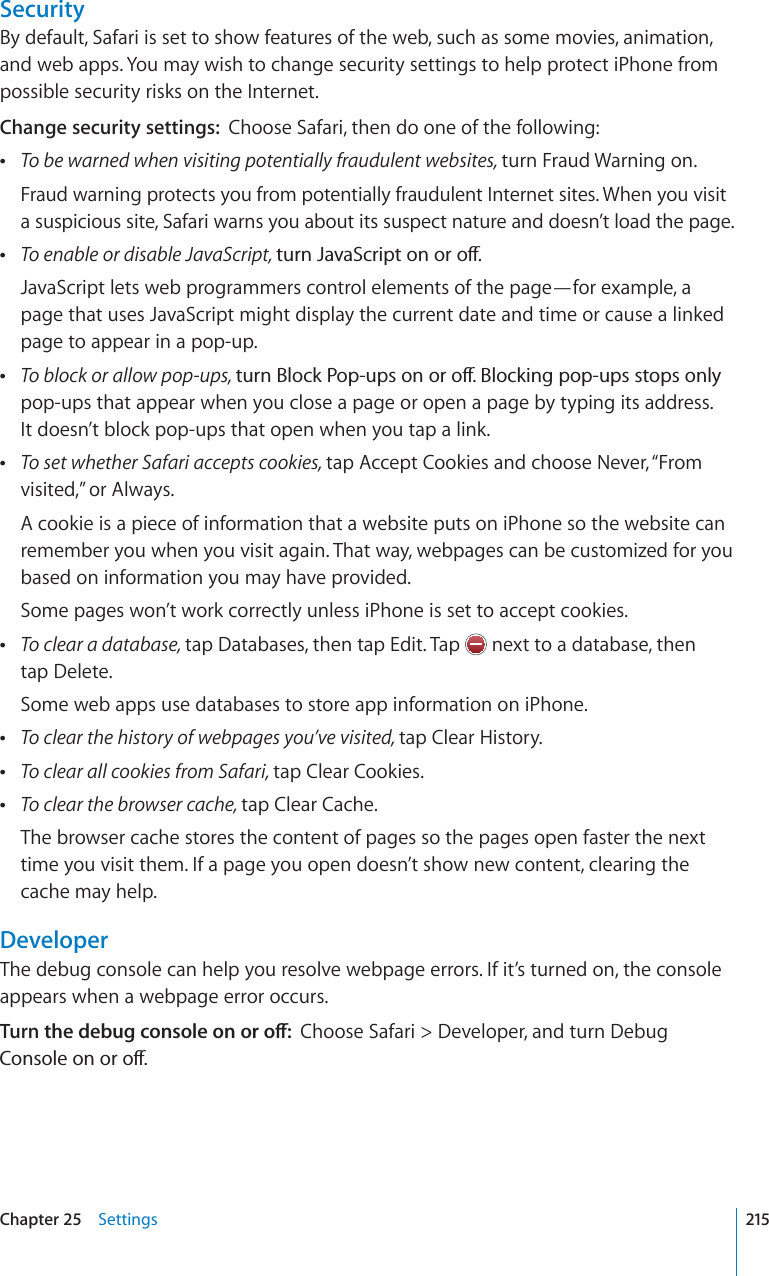
Apple E2422A Smart Cellular Phone User Manual iPhone 4 CDMA Unser Guide
Apple Inc. Smart Cellular Phone iPhone 4 CDMA Unser Guide
Apple >
Contents
- 1. Draft Regulatory Section of User Guide
- 2. Draft User Guide
- 3. Draft Regulatory section of user guide
- 4. Revised HAC Statement per section 20 19 f1 requirement
- 5. Revised with correct date HAC Disclosure Statement per section 20.19 f1
- 6. Revised User Guide
- 7. Final User Guide
- 8. Final version of User Manual
- 9. Final version of Product Info Guide
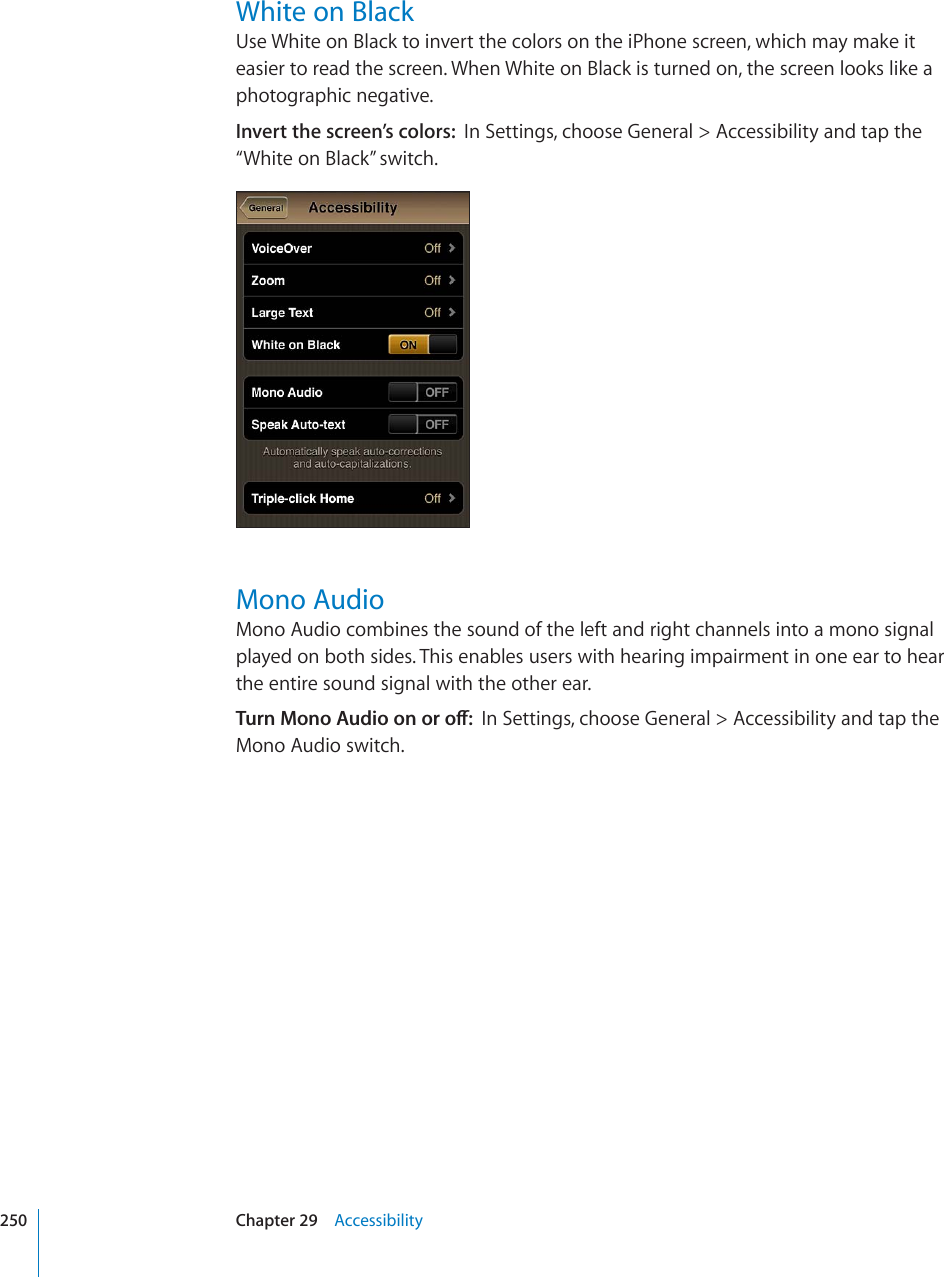
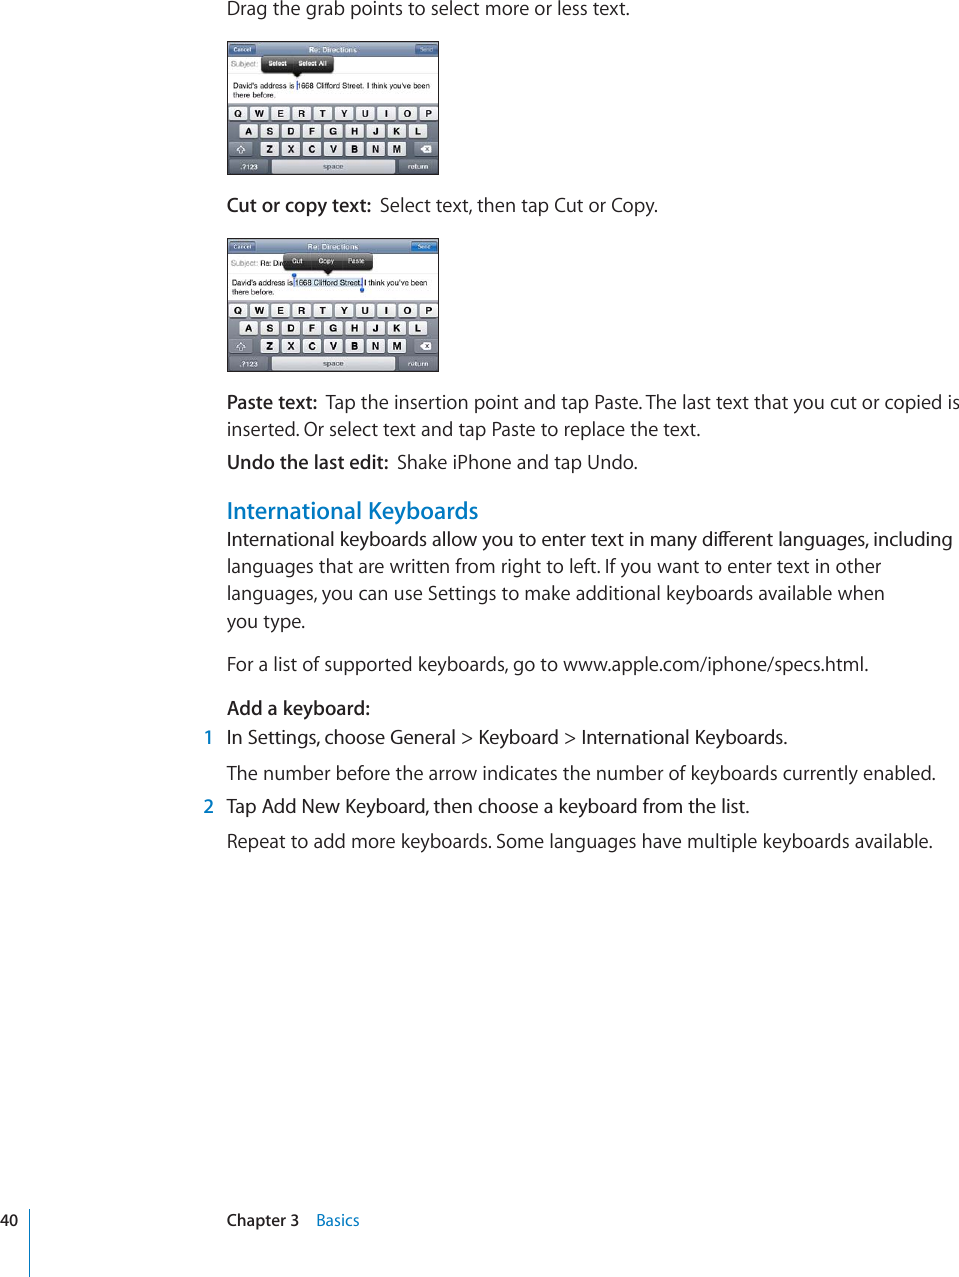
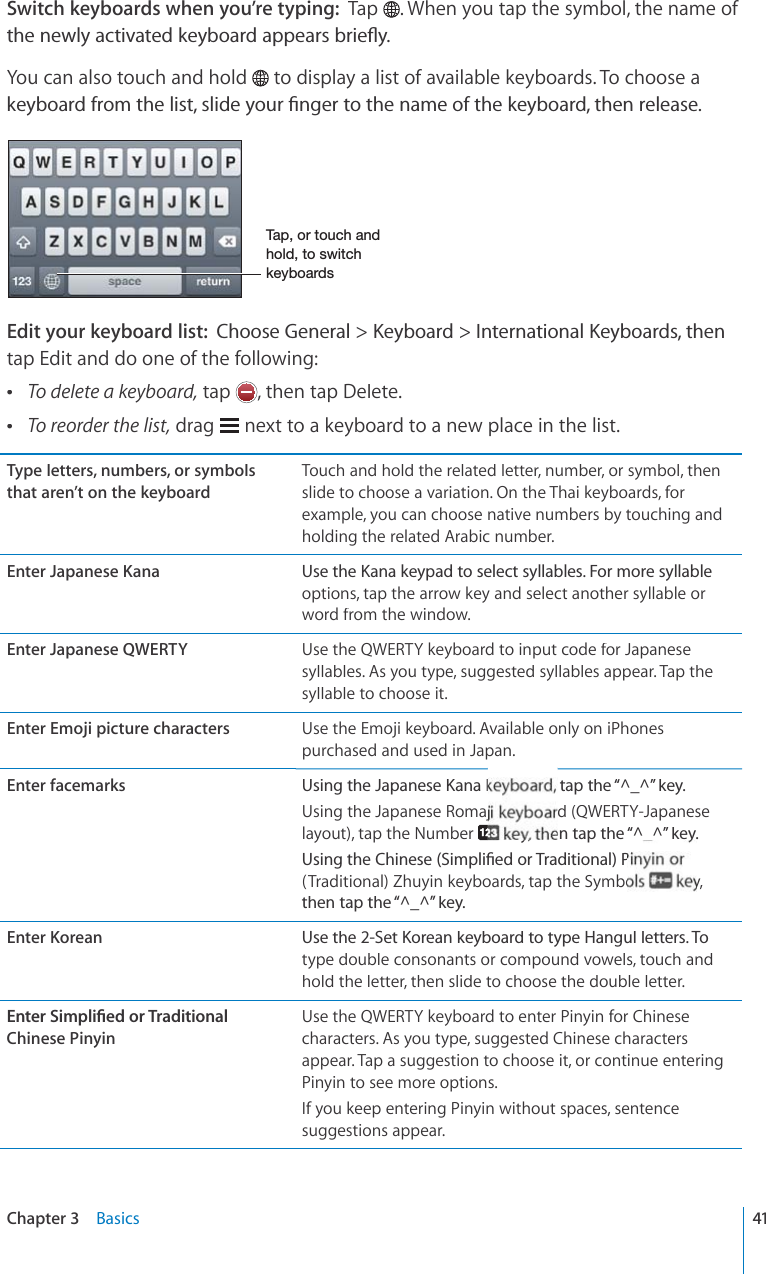
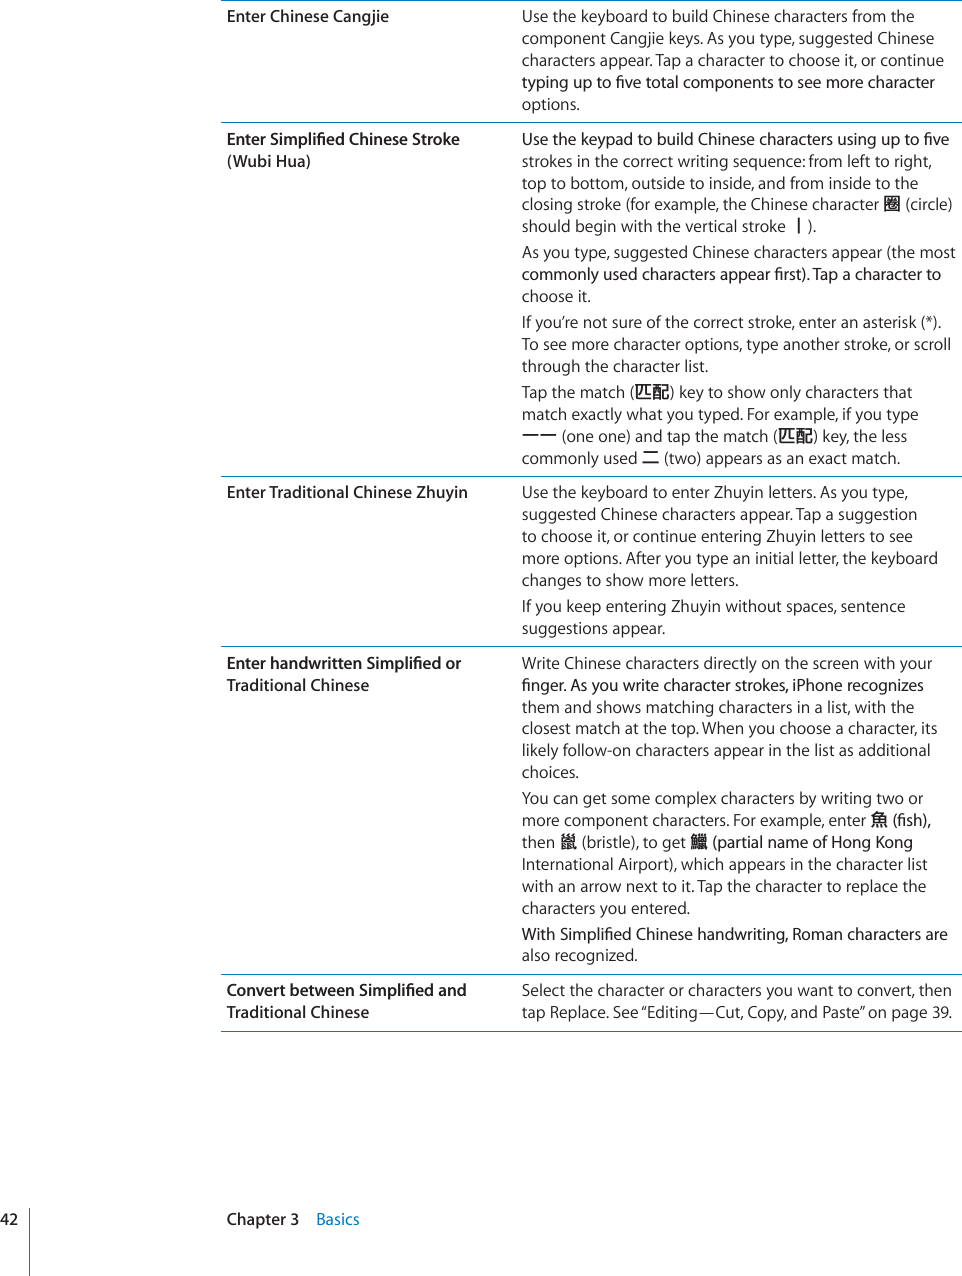
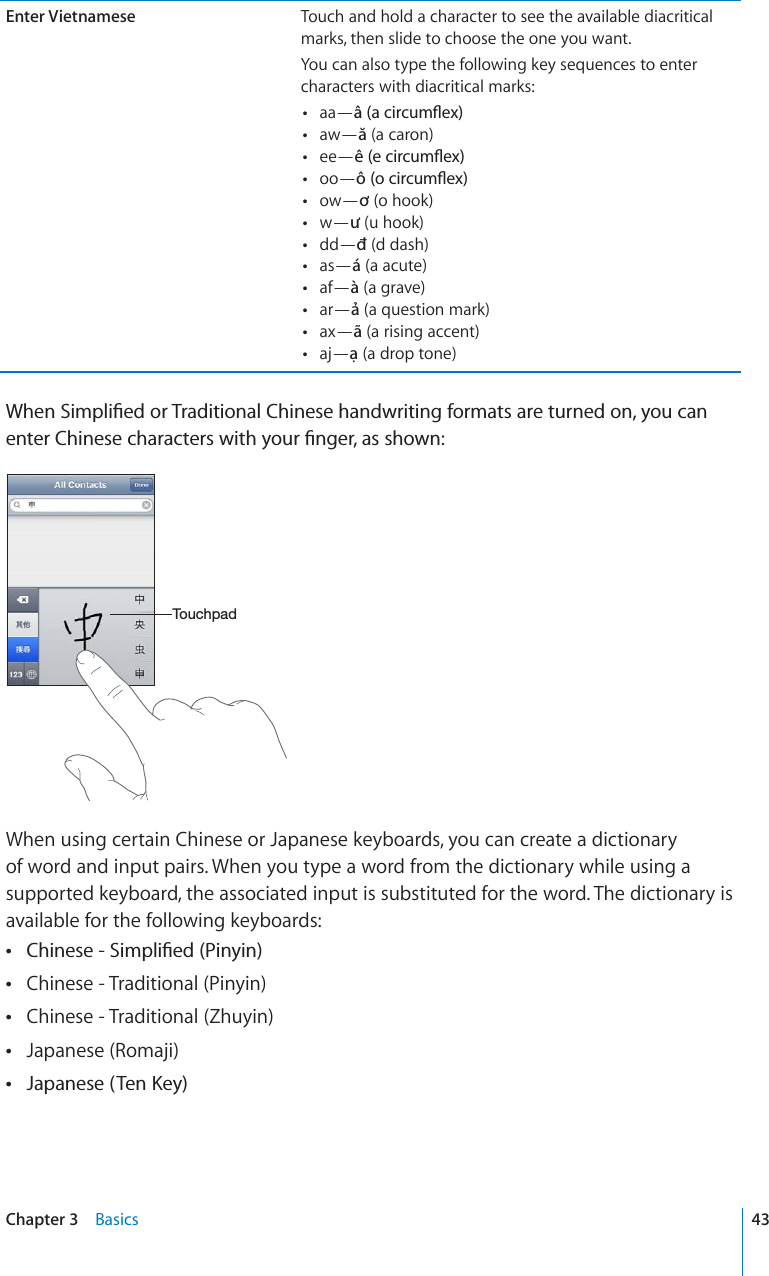
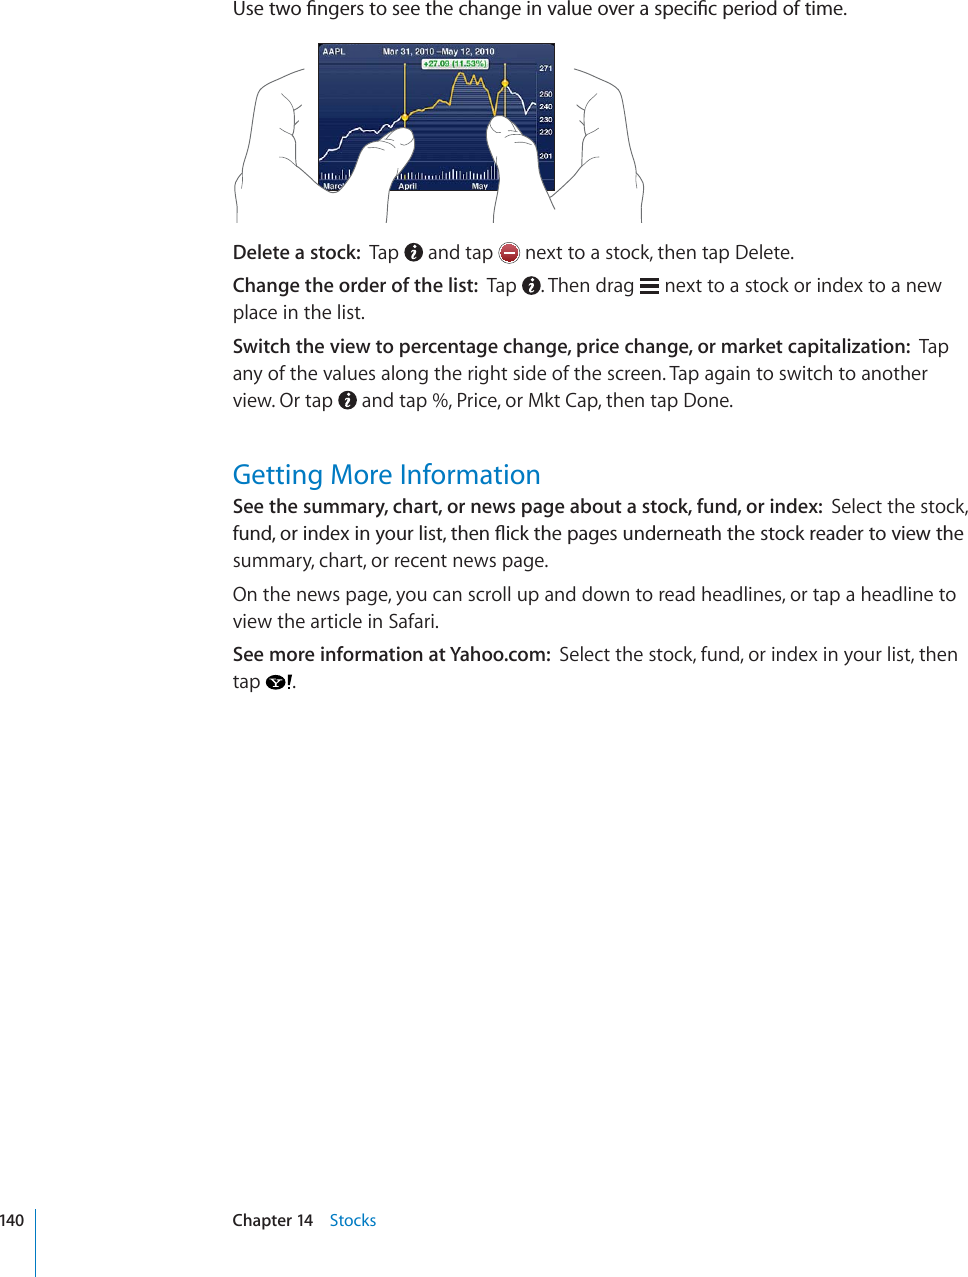
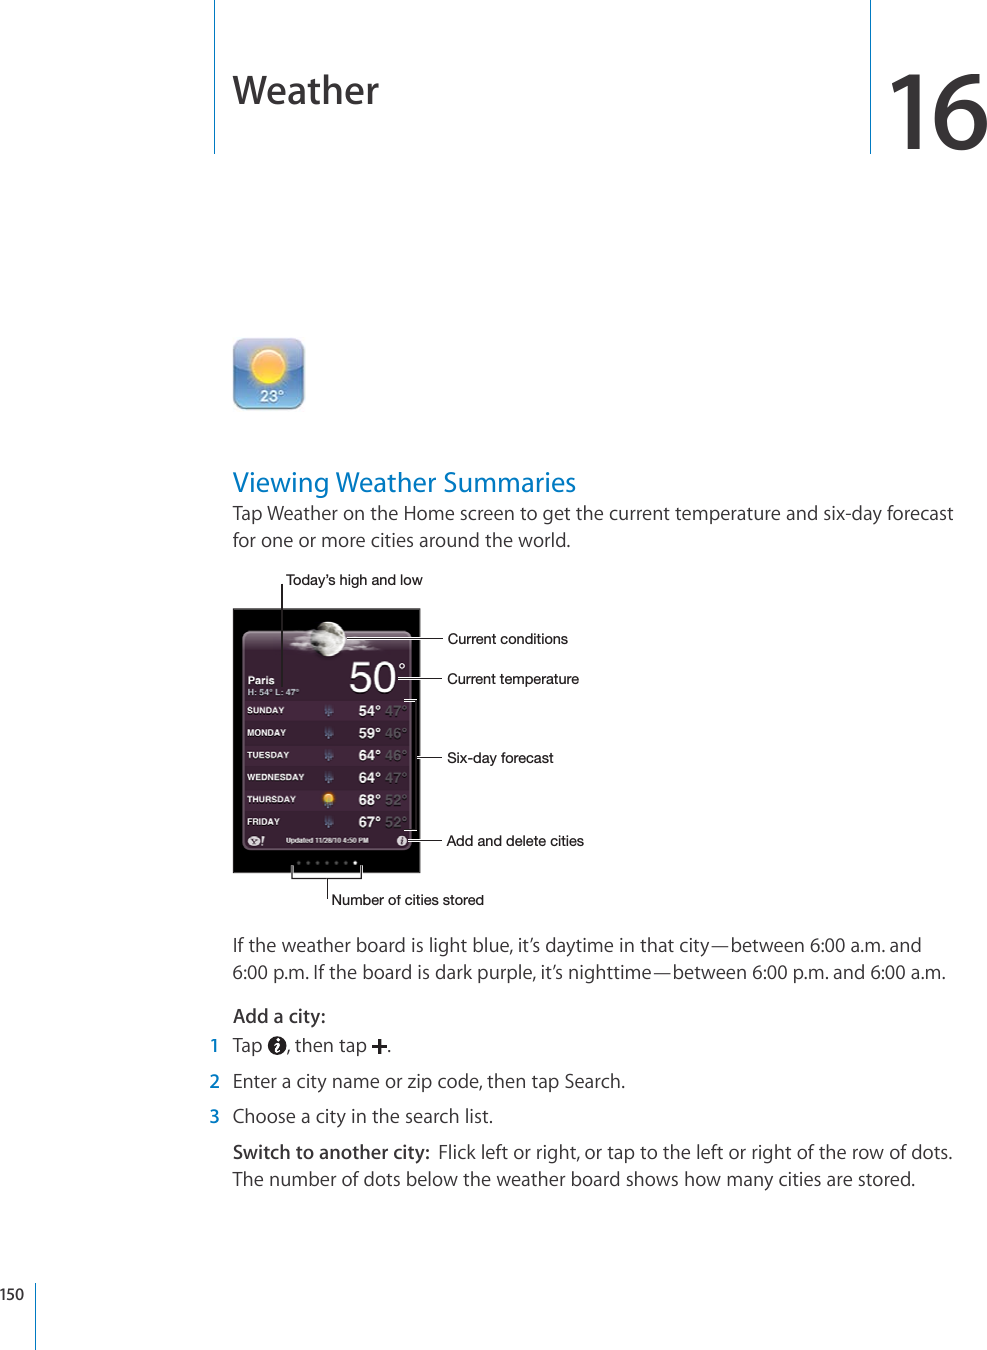
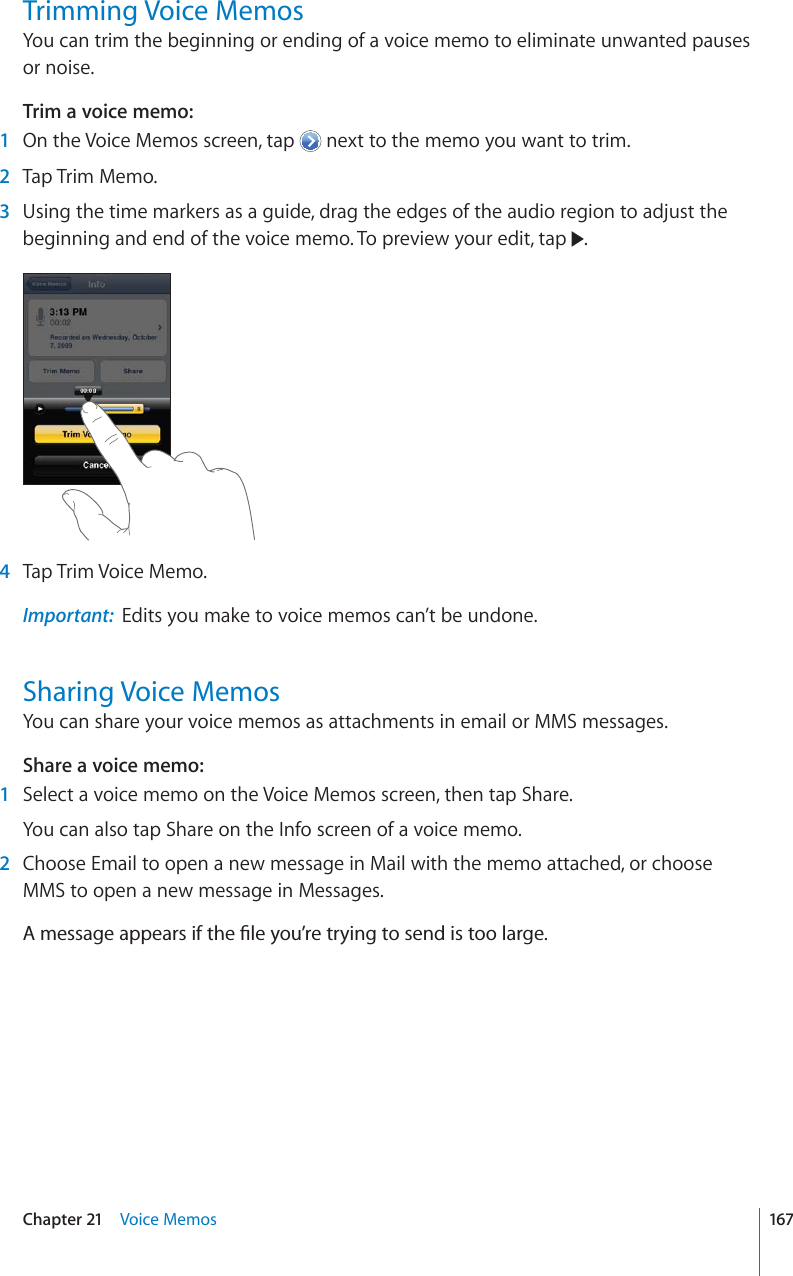
Final version of User Manual
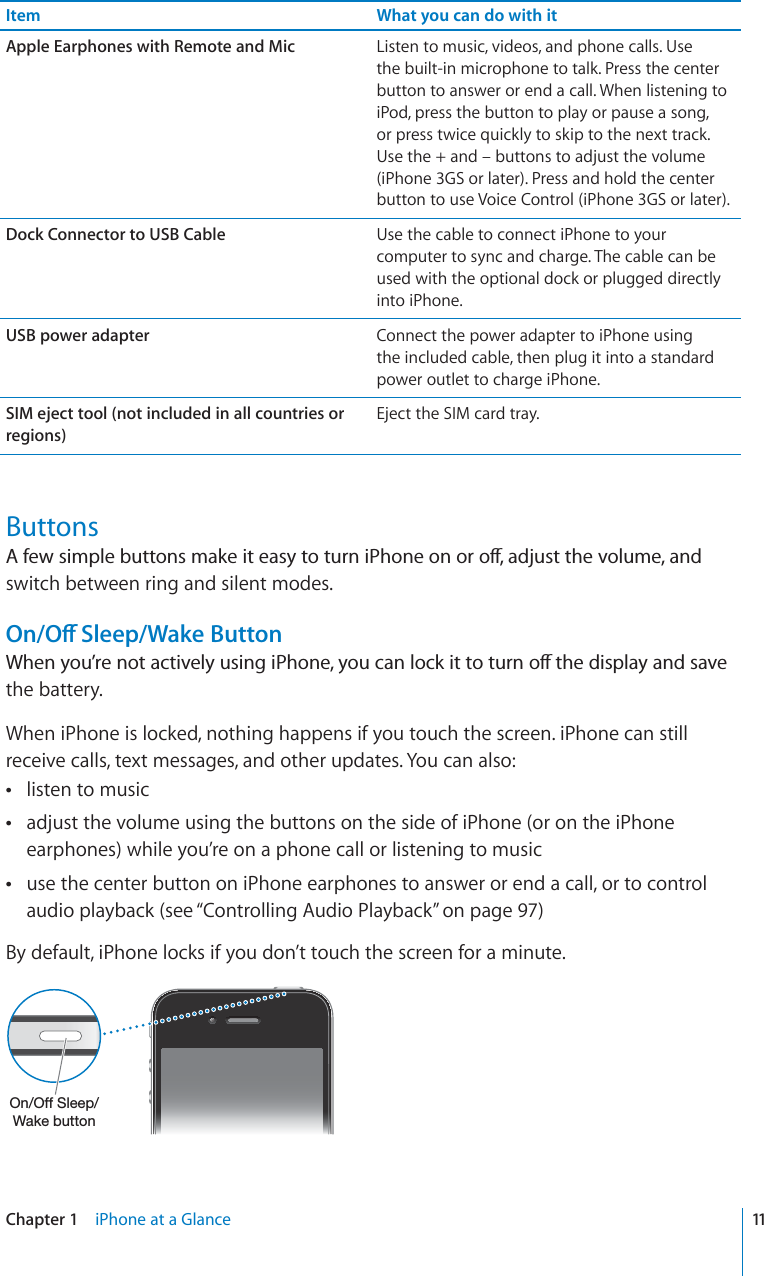
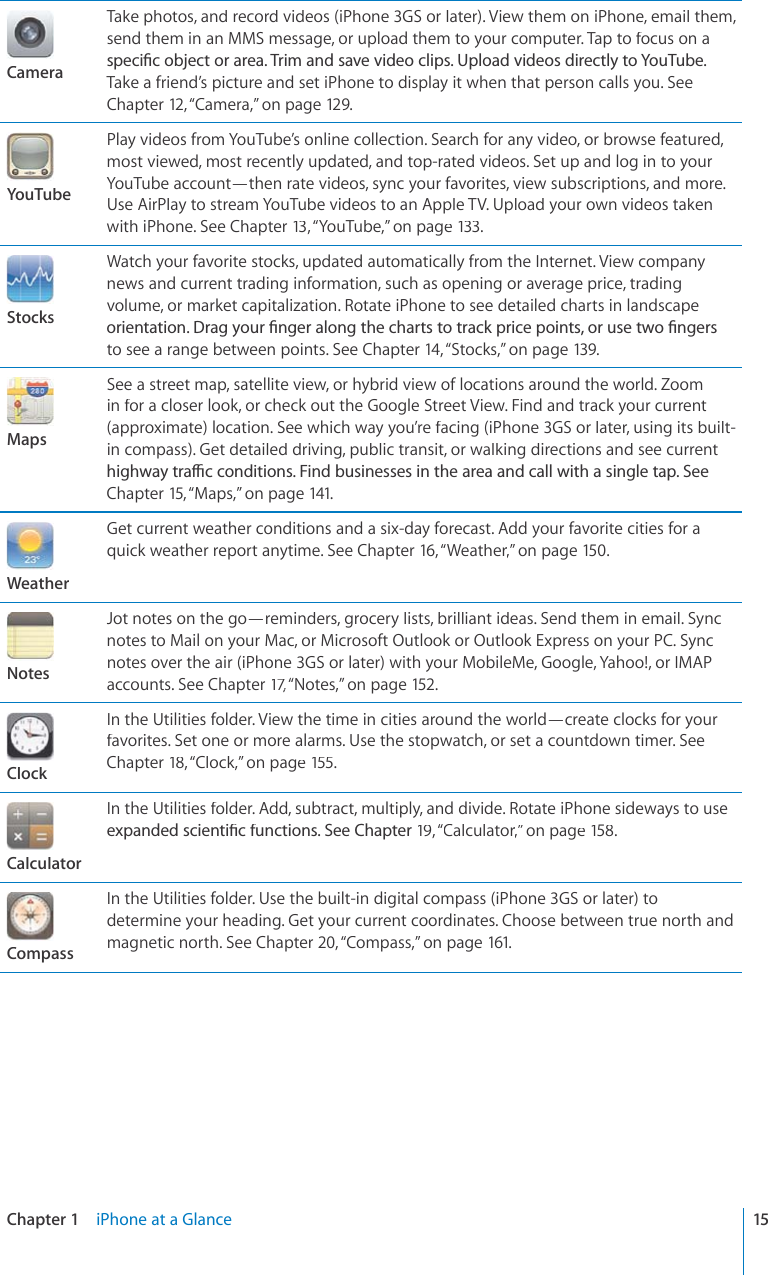
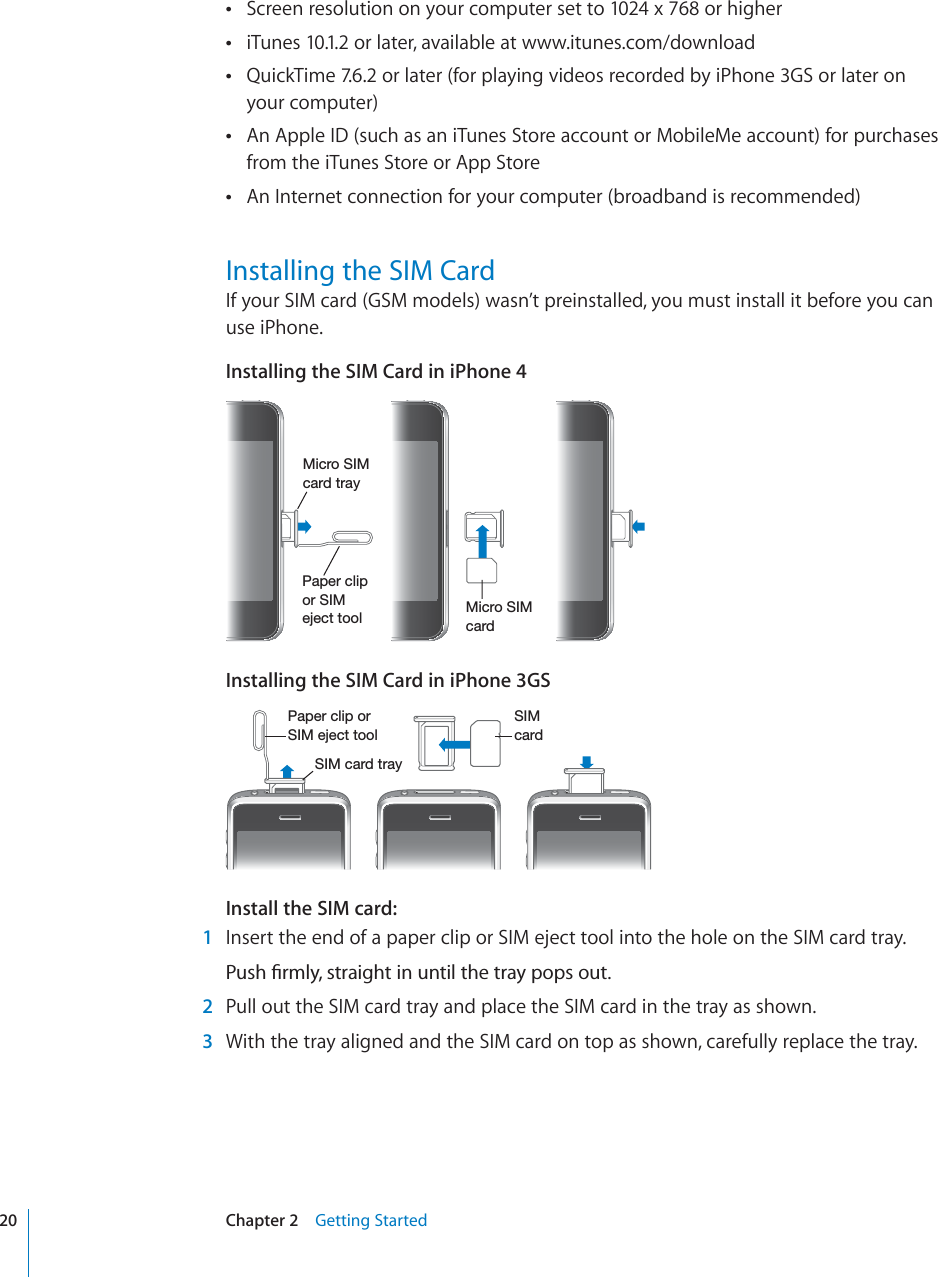
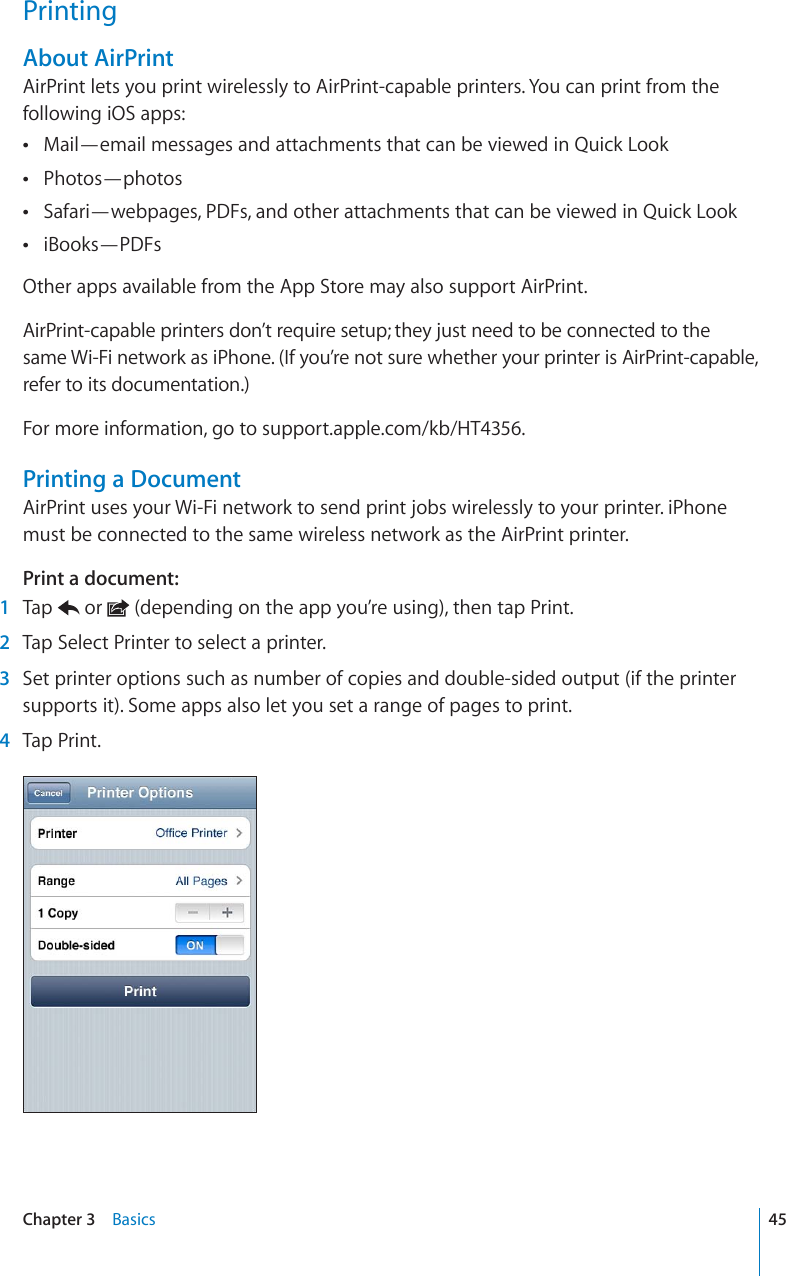
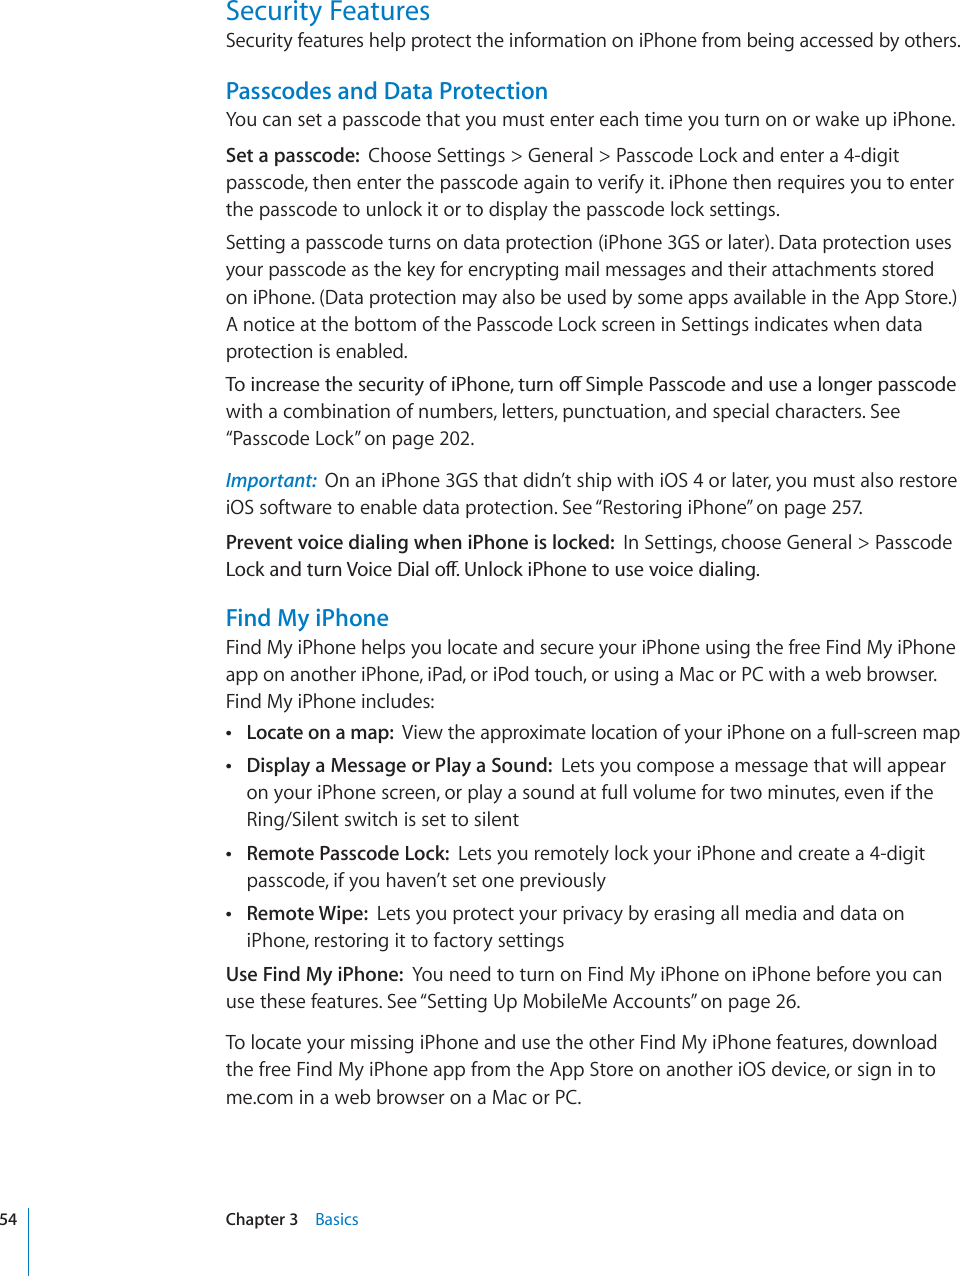
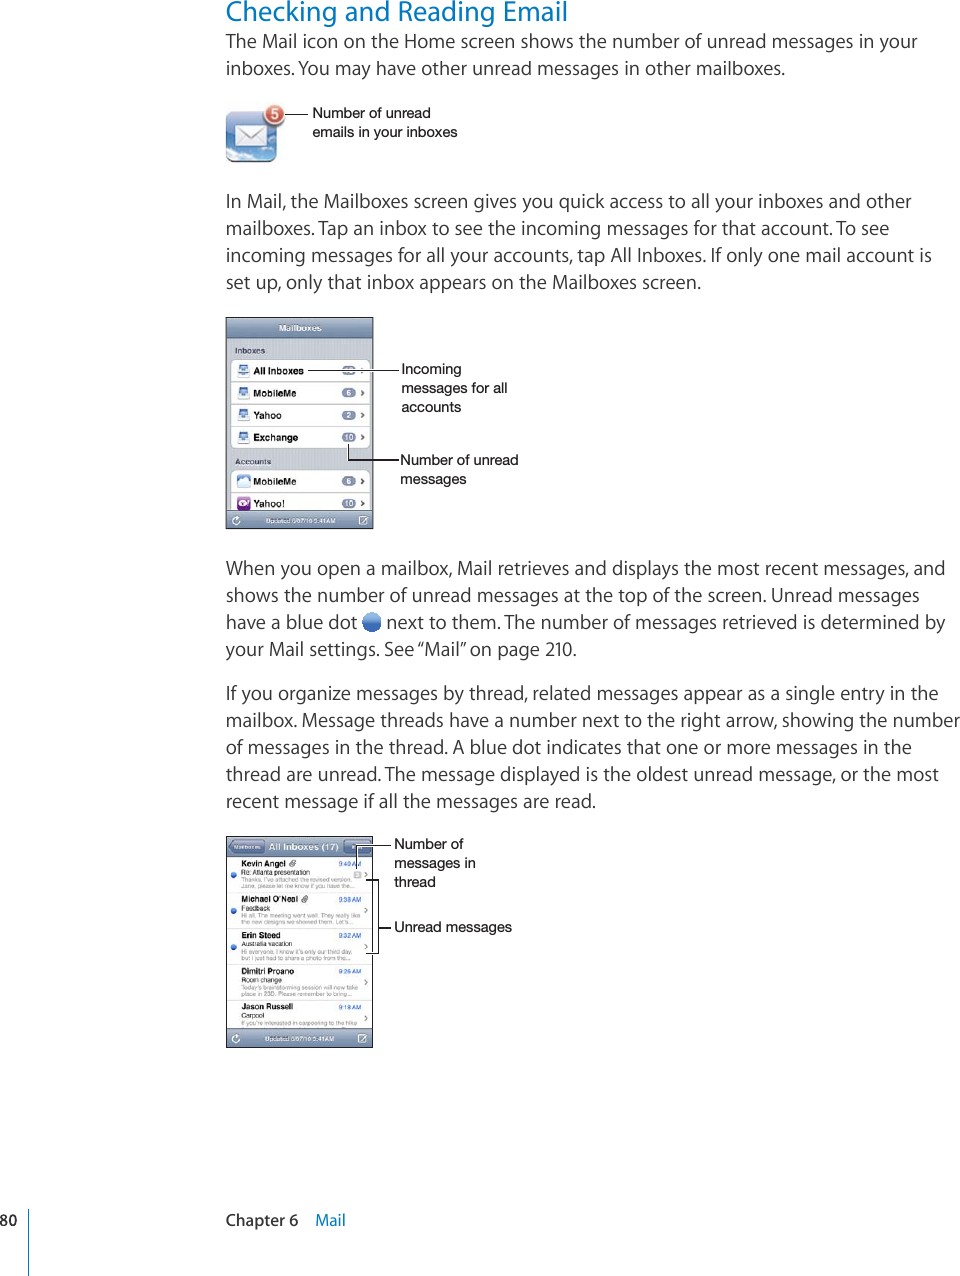
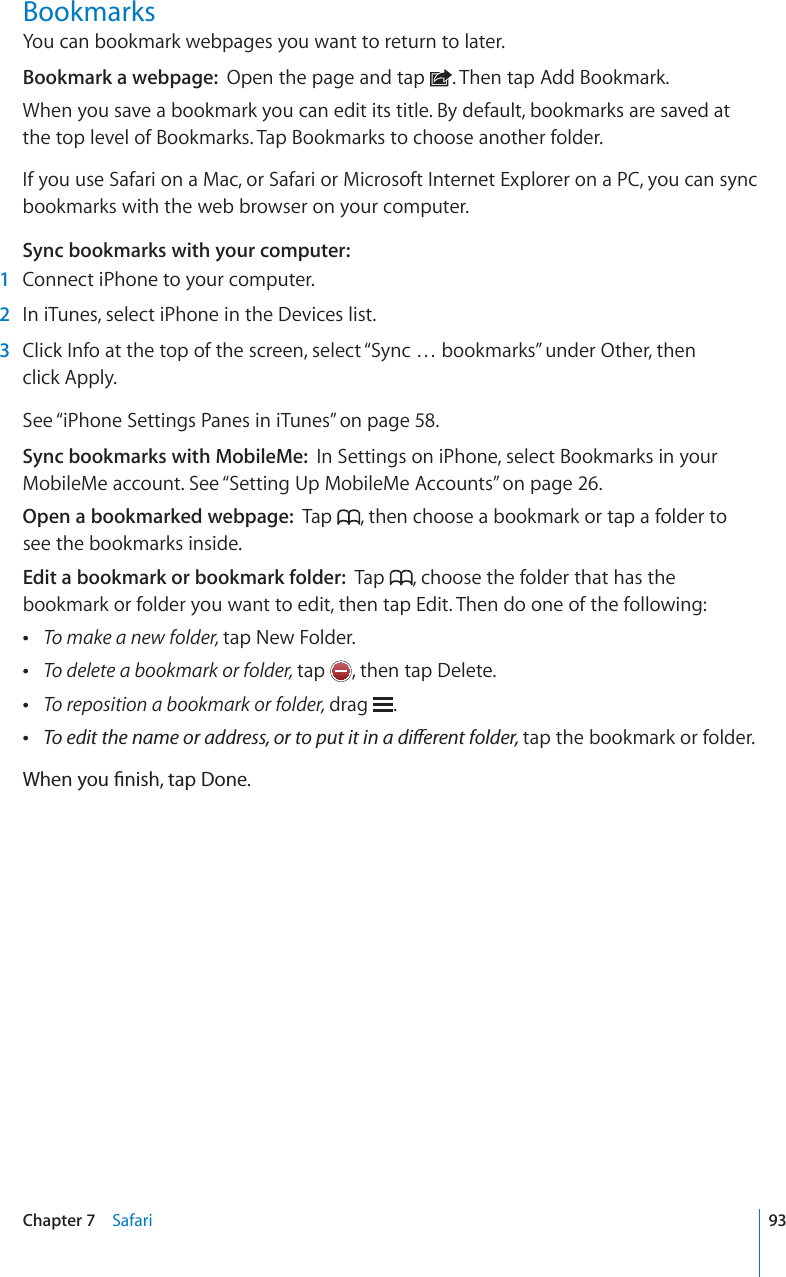
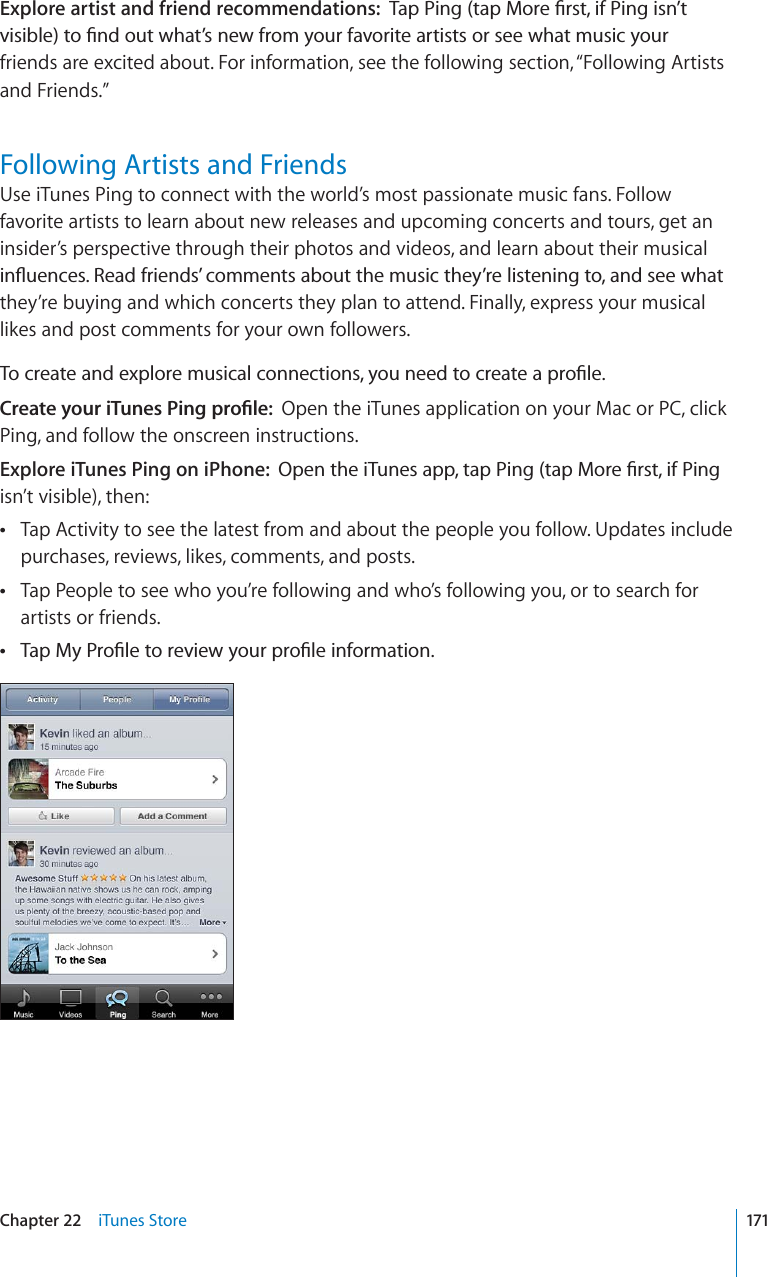
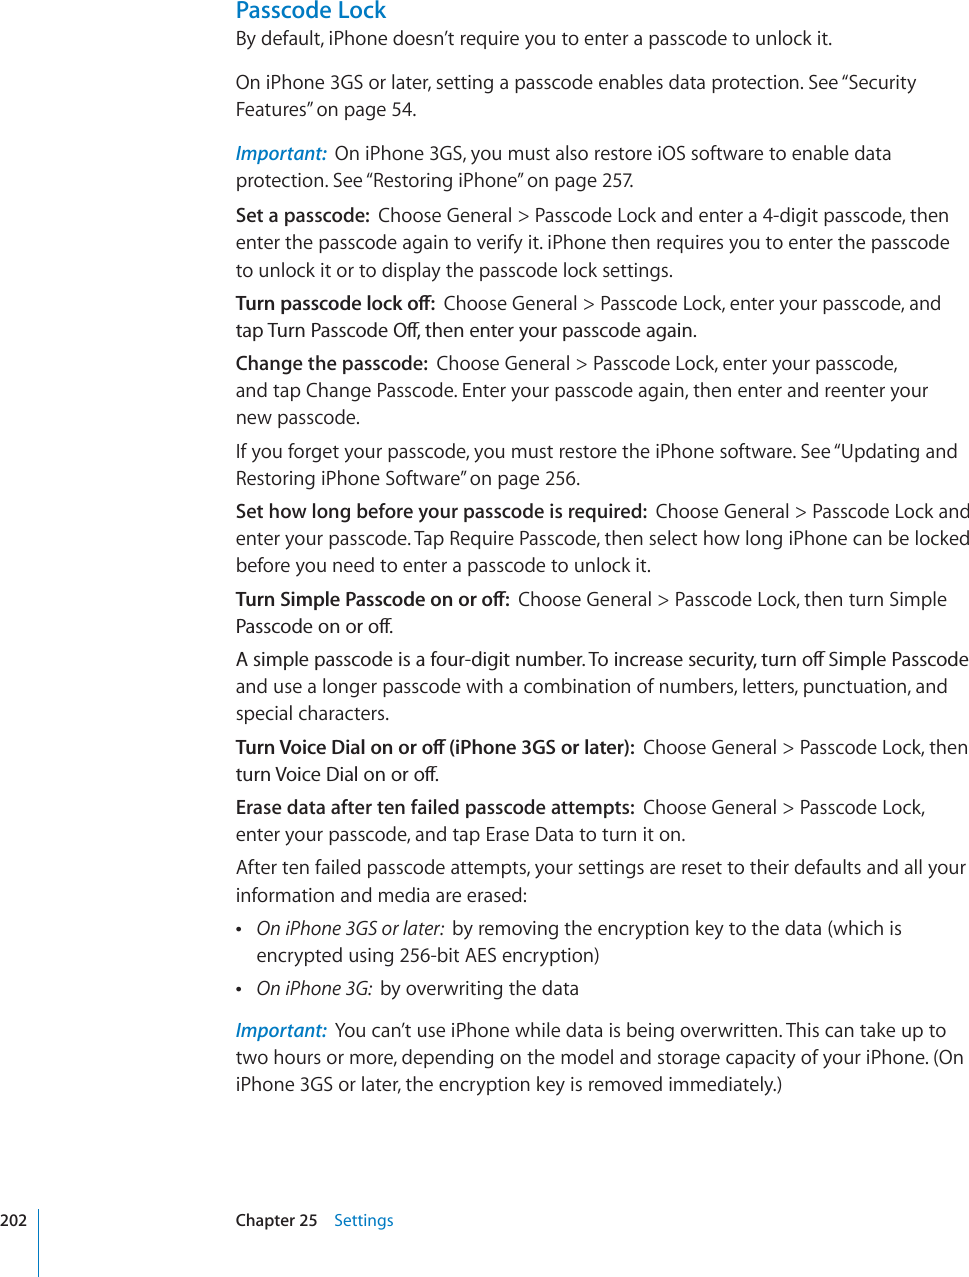
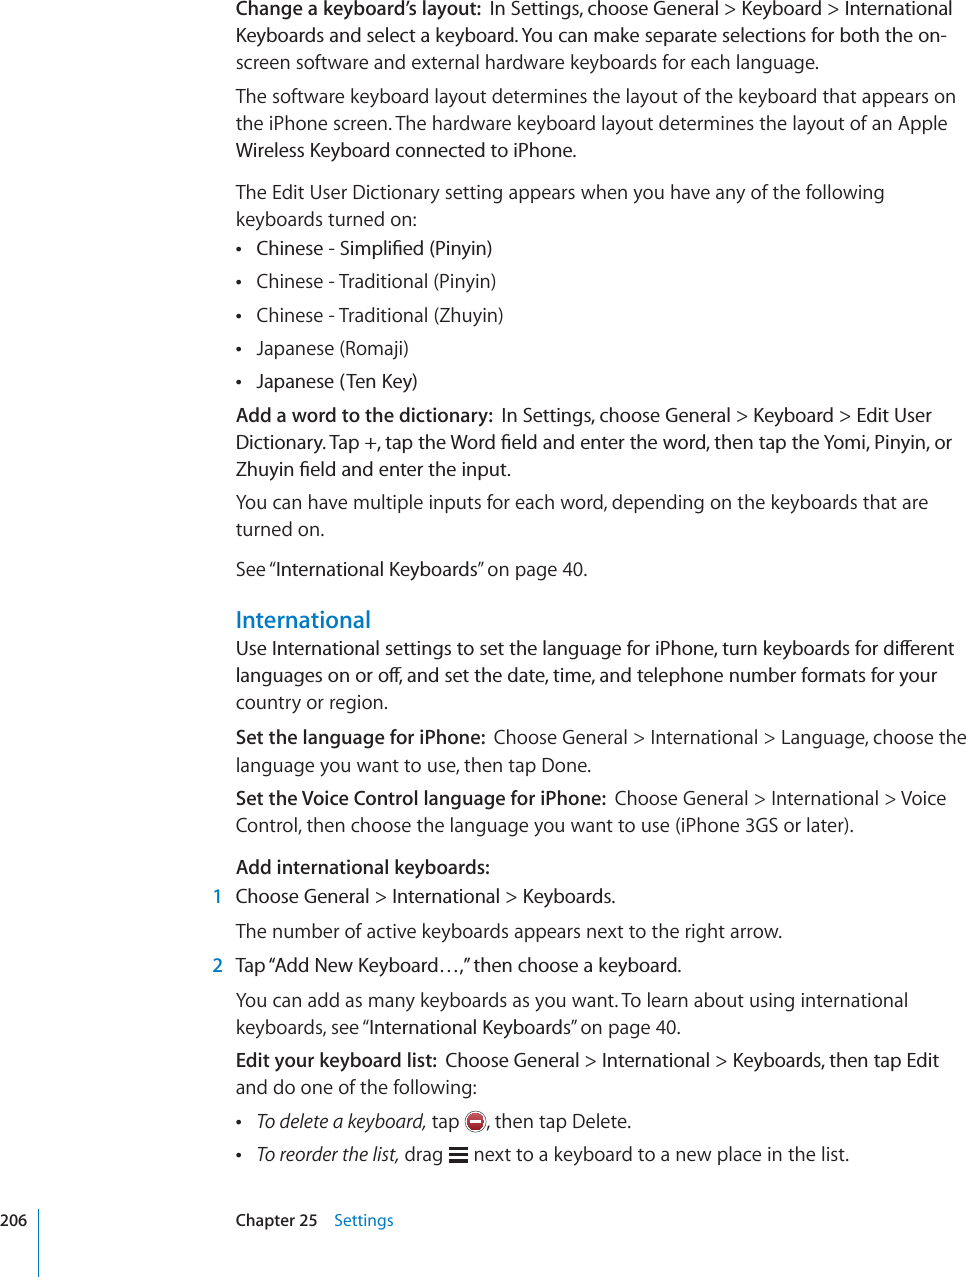
![iPhone at a Glance 1iPhone OverviewiPhone 4/LHKZL[°QHJR9LJLP]LY9PUN:PSLU[Z^P[JO;VWTPJYVWOVUL=VS\TLI\[[VUZ(WWSL9L[PUHKPZWSH`:WLHRLY/VTL°I\[[VU-YVU[JHTLYH4HPUJHTLYH3,+MSHZO:04°JHYK°[YH`.:4TVKLS+VJRJVUULJ[VY6U6MM:SLLW>HRL)V[[VTTPJYVWOVUL(WWPJVUZ:[H[\Z°IHYL3KRQH9](https://usermanual.wiki/Apple/E2422A.Final-version-of-User-Manual/User-Guide-1413266-Page-9.png)
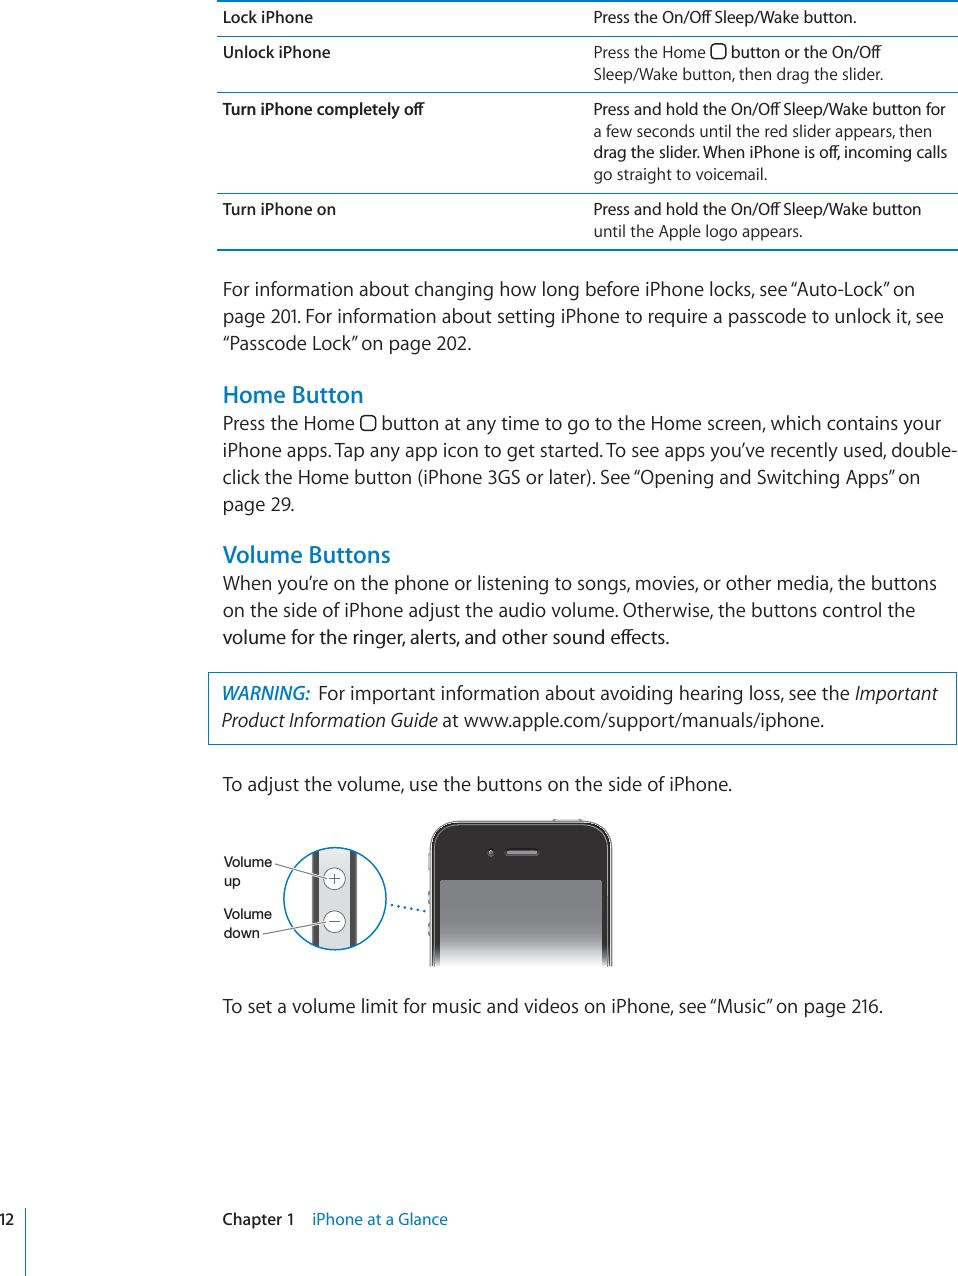
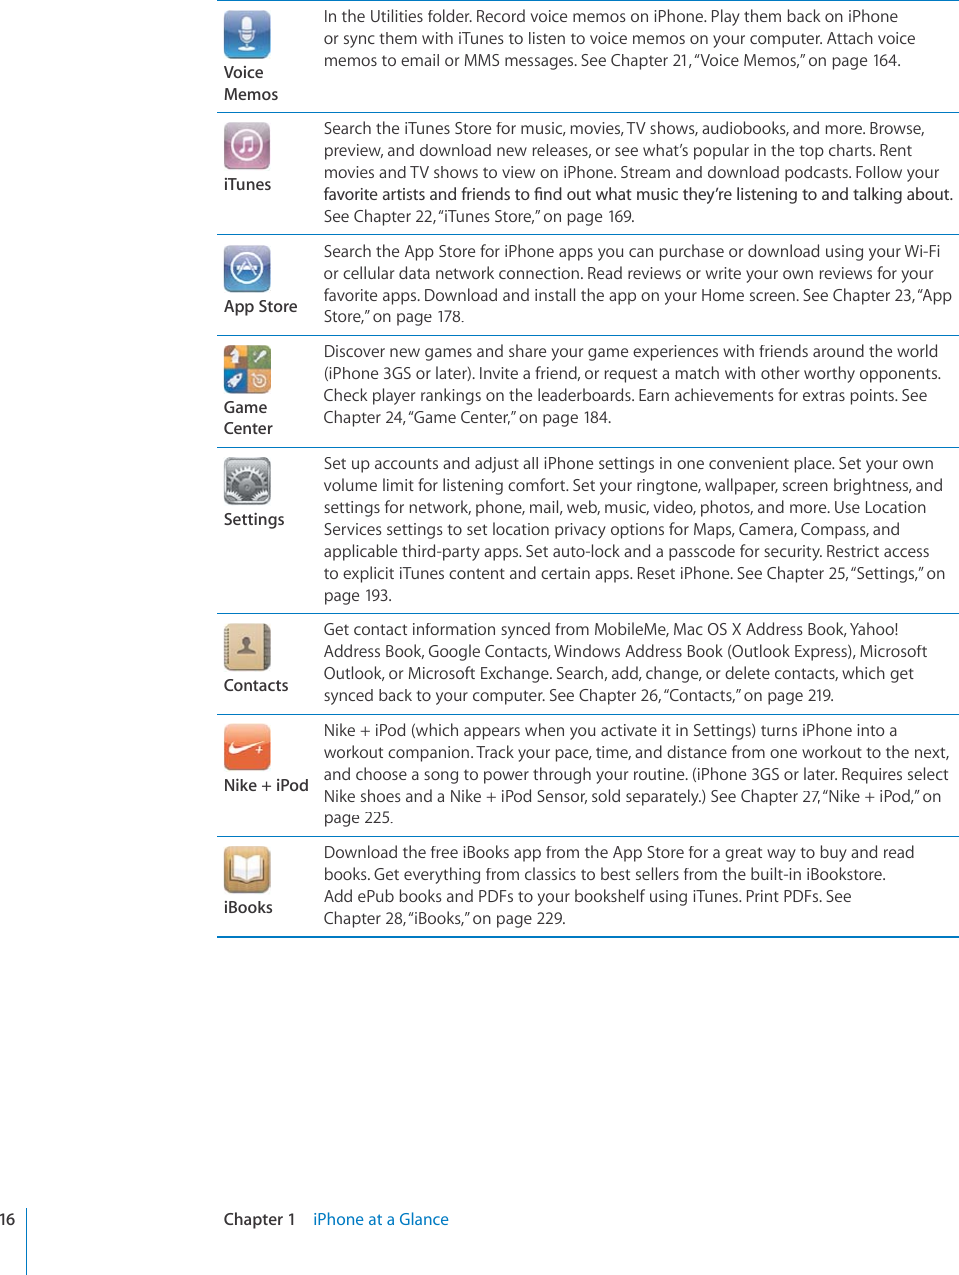
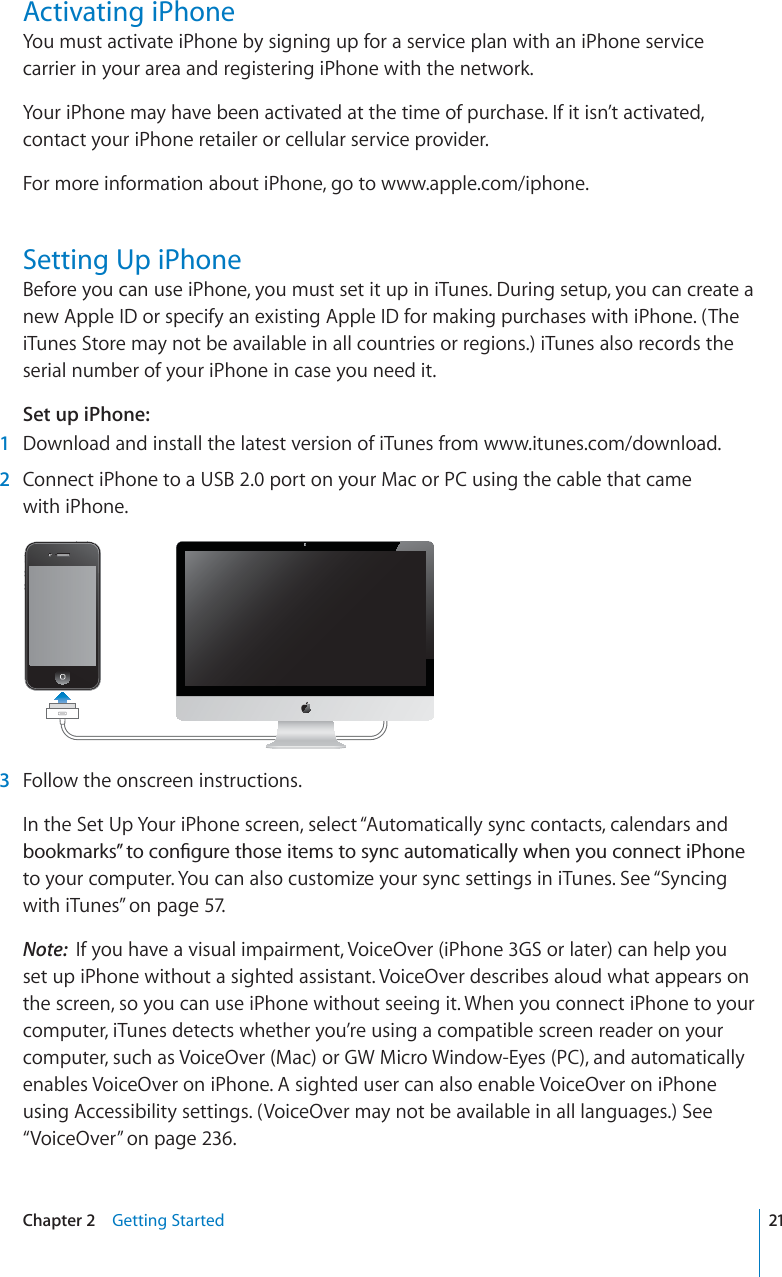
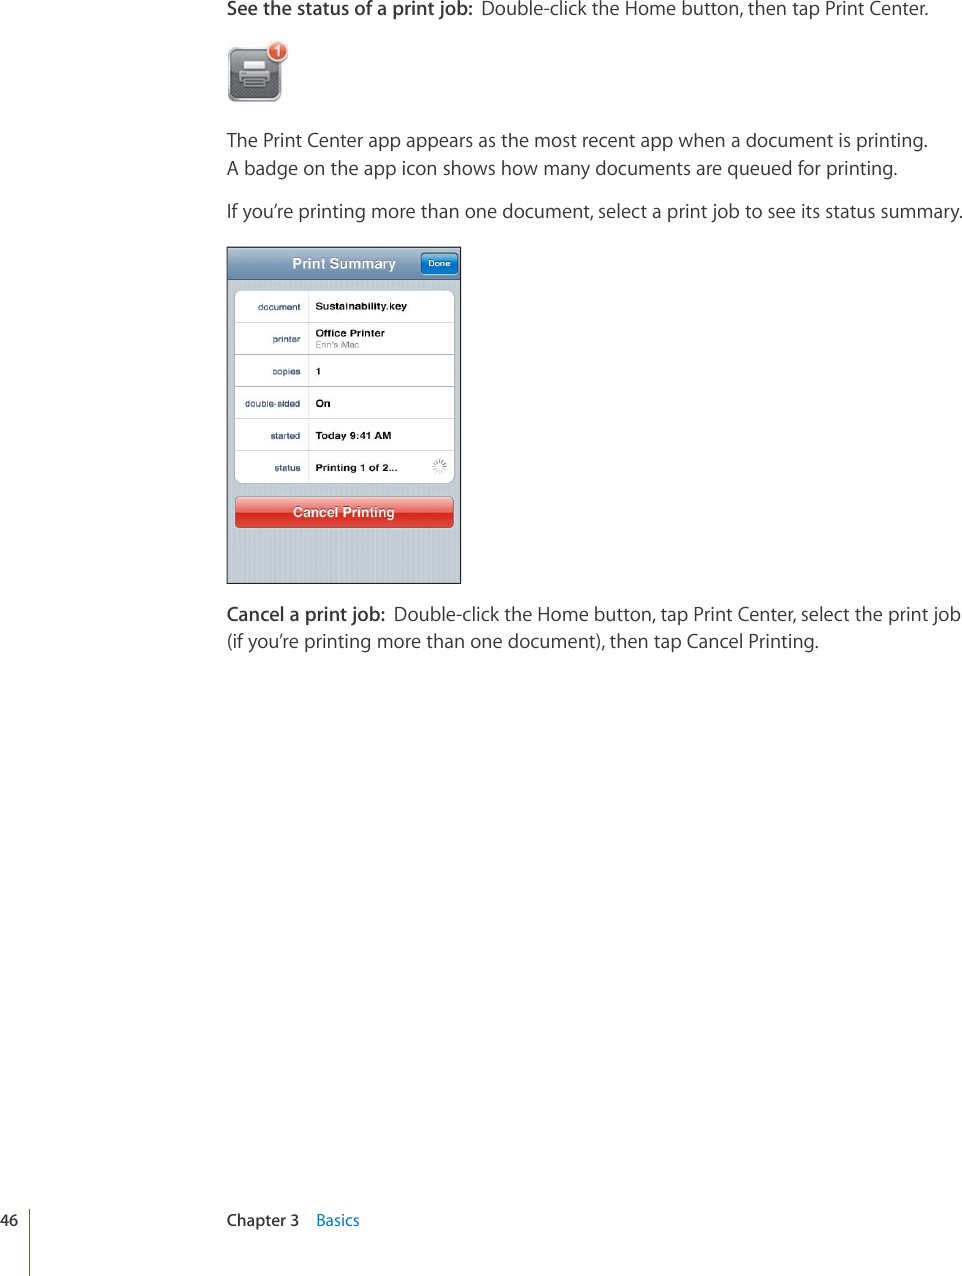
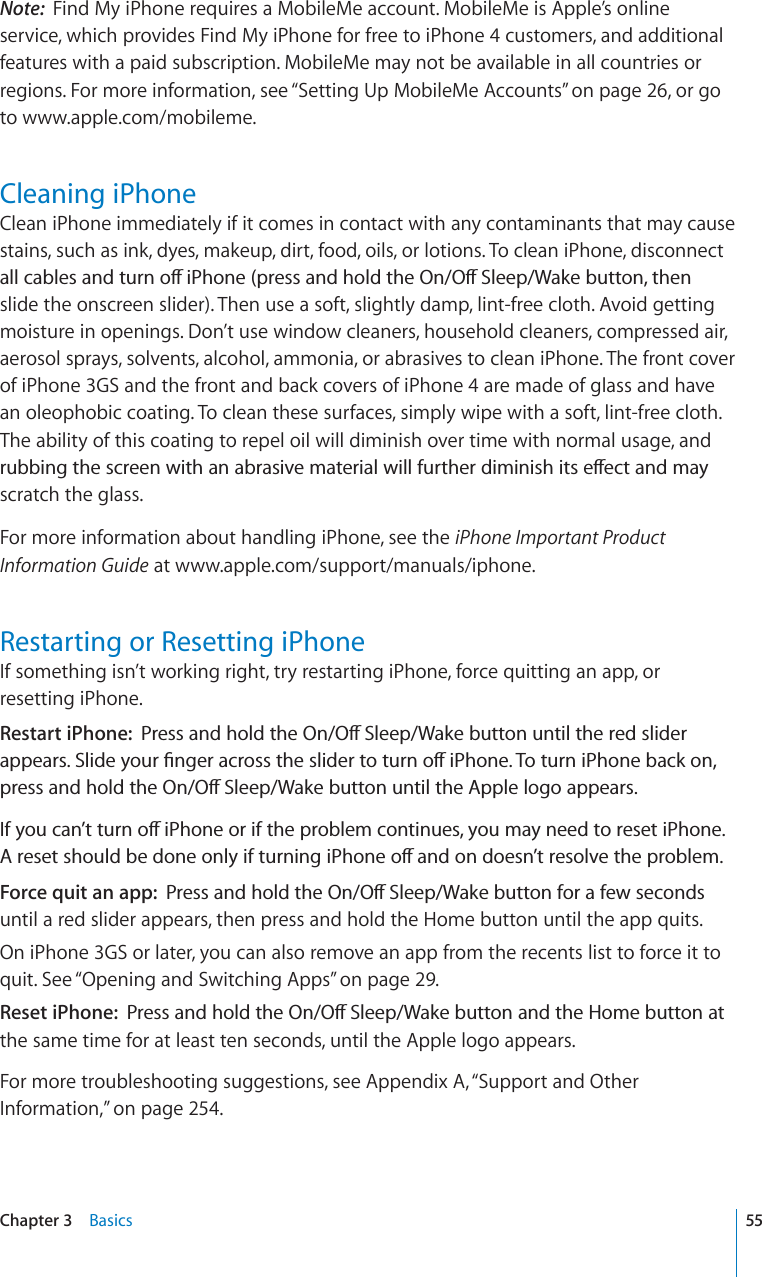
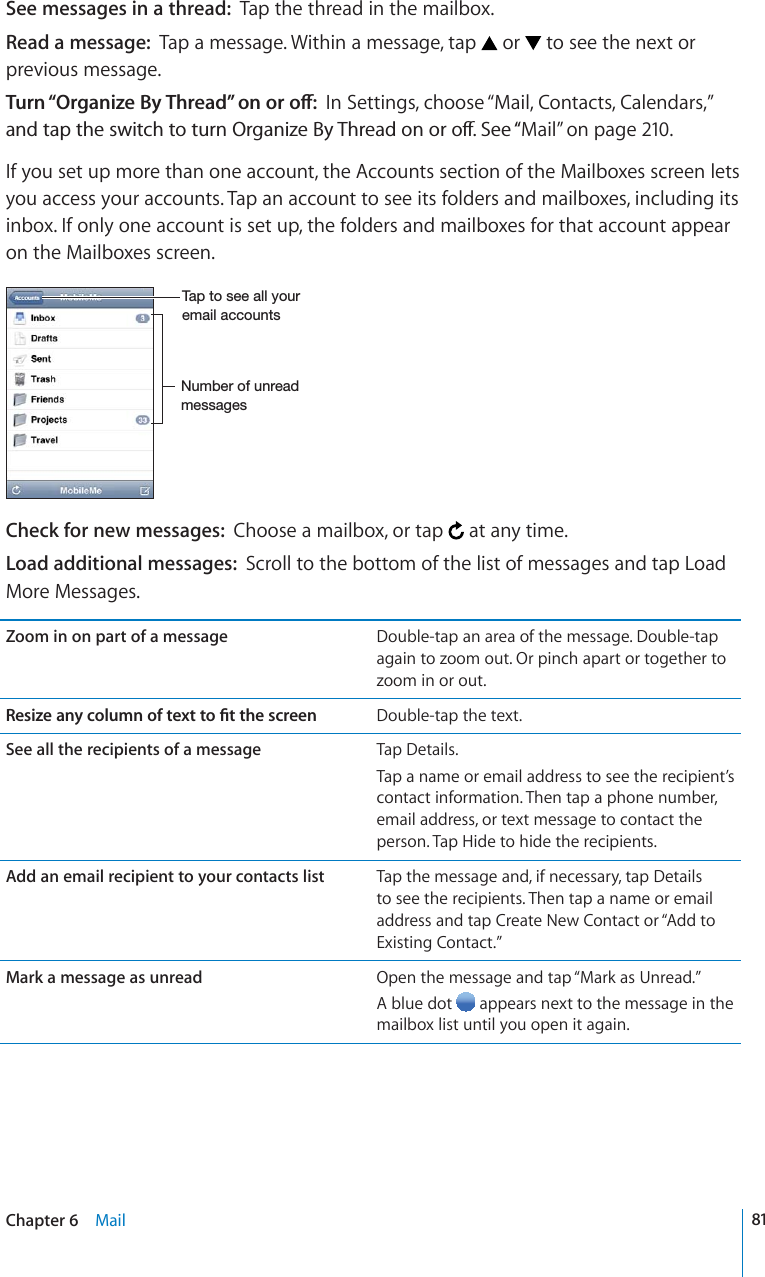
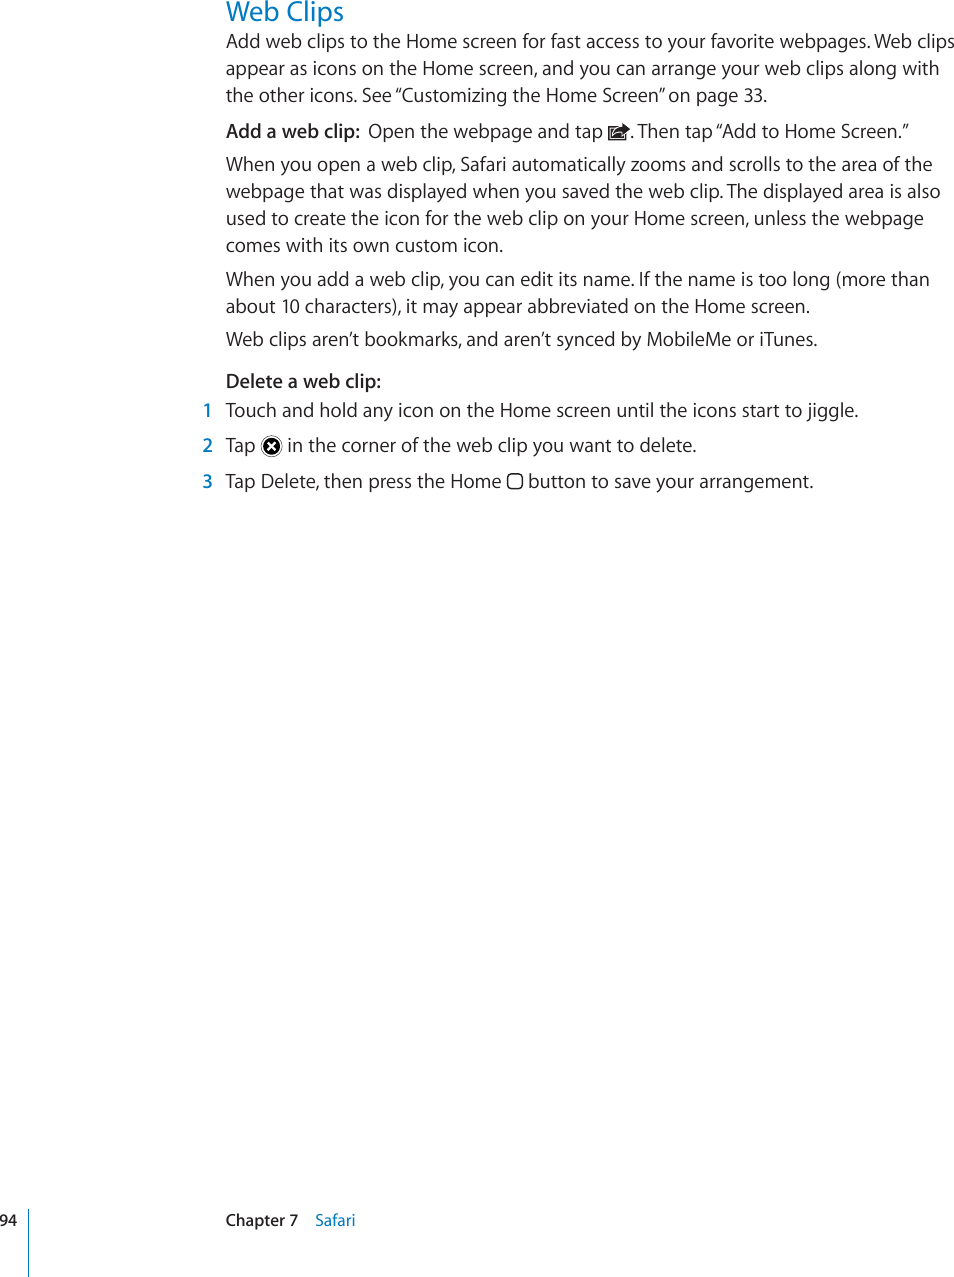
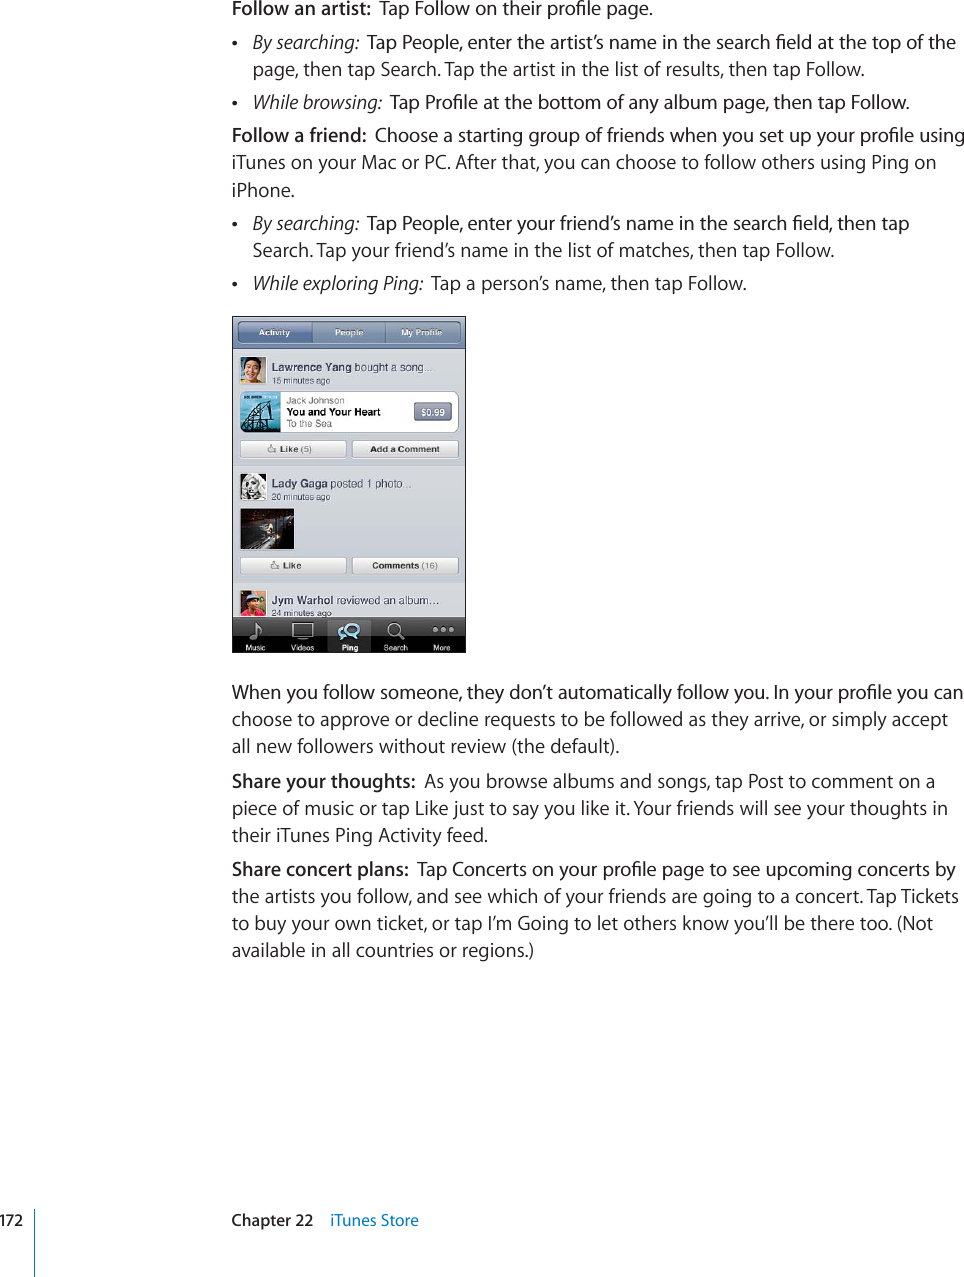
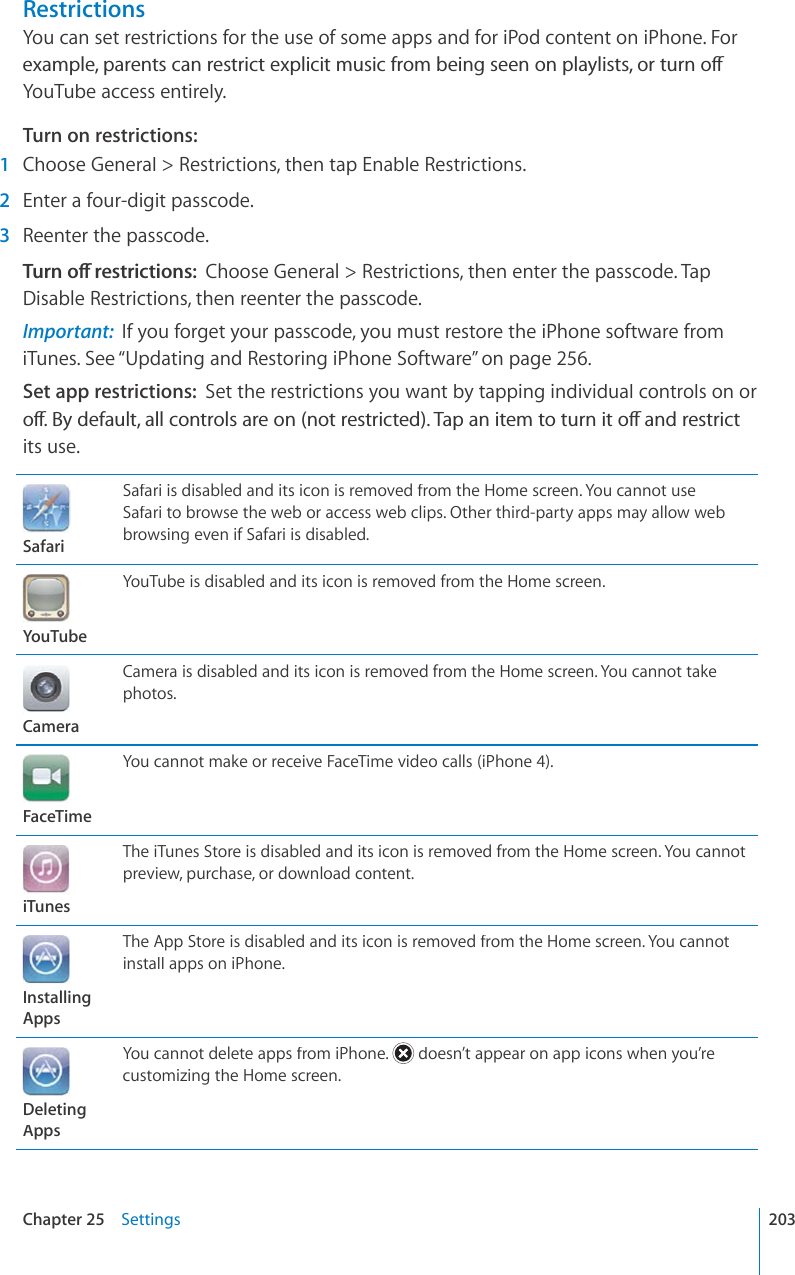
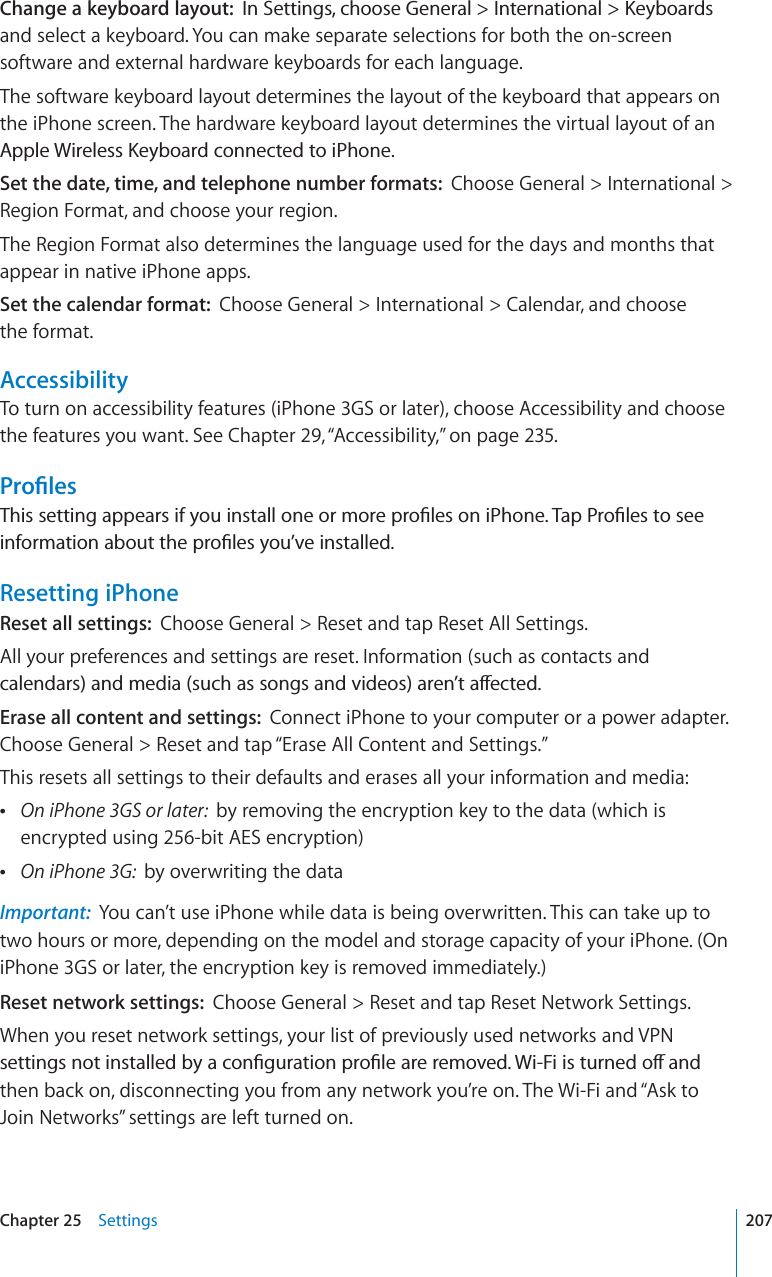
![iPhone 3GSL3KRQH/LHKZL[QHJR9LJLP]LY9PUN:PSLU[Z^P[JO *HTLYH:04JHYK[YH`=VS\TLI\[[VUZ;V\JOZJYLLU:WLHRLY+VJRJVUULJ[VY/VTLI\[[VU6U6MM:SLLW>HRL4PJYVWOVUL(WWPJVUZ:[H[\ZIHY;QWT*QOGUETGGPOC[NQQMFKÒGTGPVFGRGPFKPIQPVJGOQFGNQHK2JQPG[QWJCXGand whether you’ve rearranged its icons.AccessoriesThe following accessories are included with iPhone:+VJR*VUULJ[VY[V<:)*HISL(WWSL,HYWOVULZ^P[O9LTV[LHUK4PJ:04LQLJ[[VVS<:)WV^LYHKHW[LYNote: The SIM eject tool is not included in all countries or regions.10 Chapter 1 iPhone at a Glance](https://usermanual.wiki/Apple/E2422A.Final-version-of-User-Manual/User-Guide-1413266-Page-10.png)
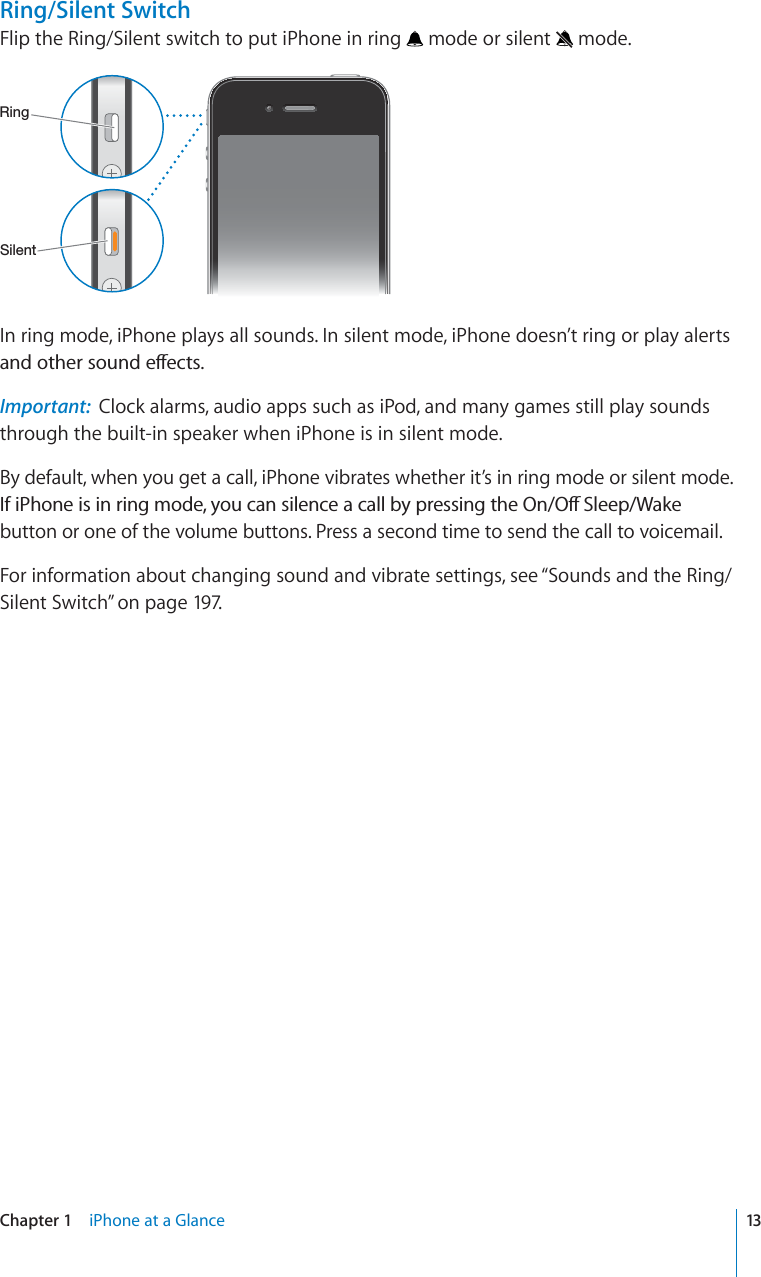

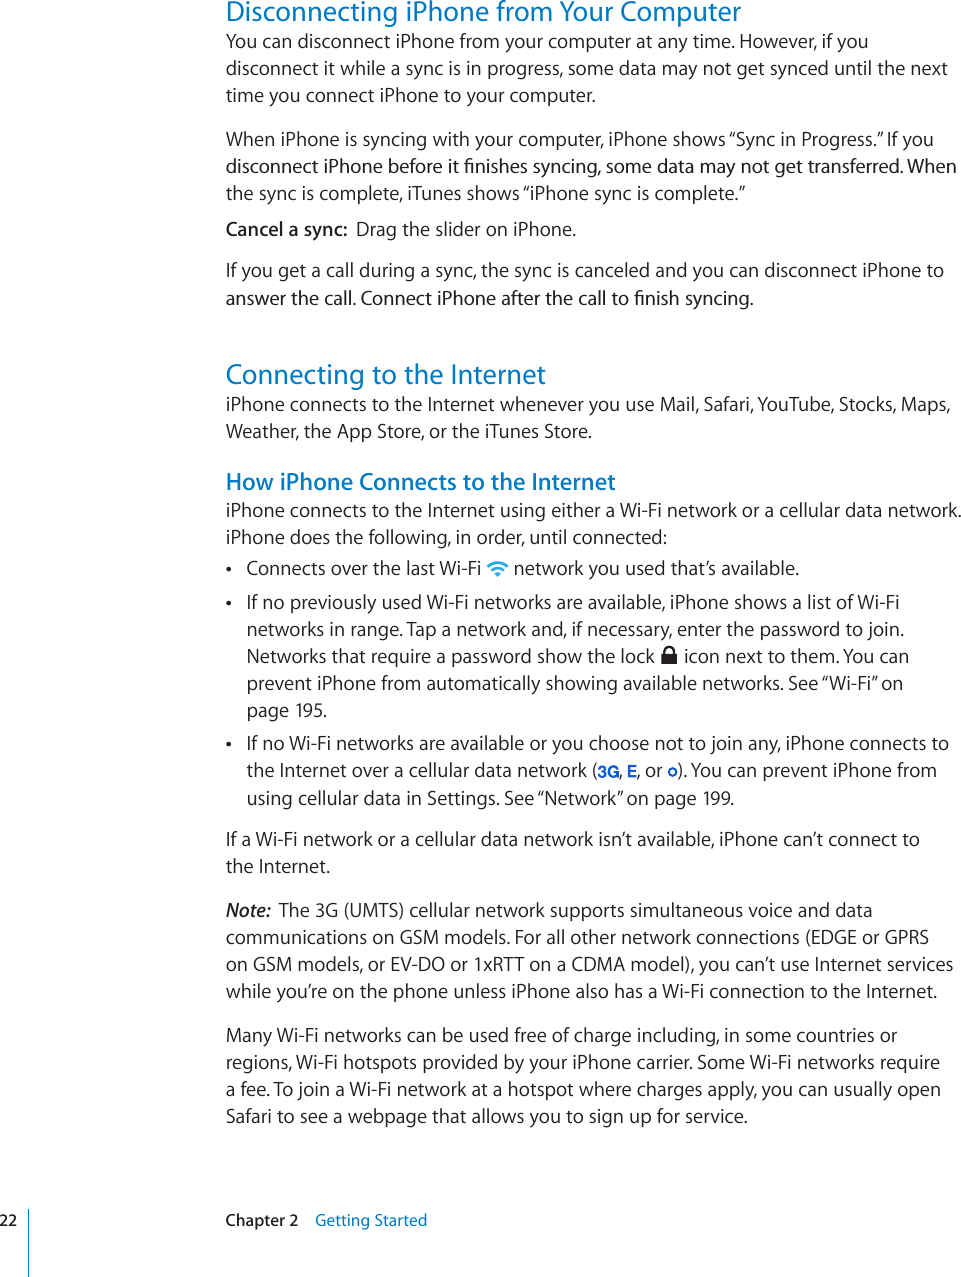

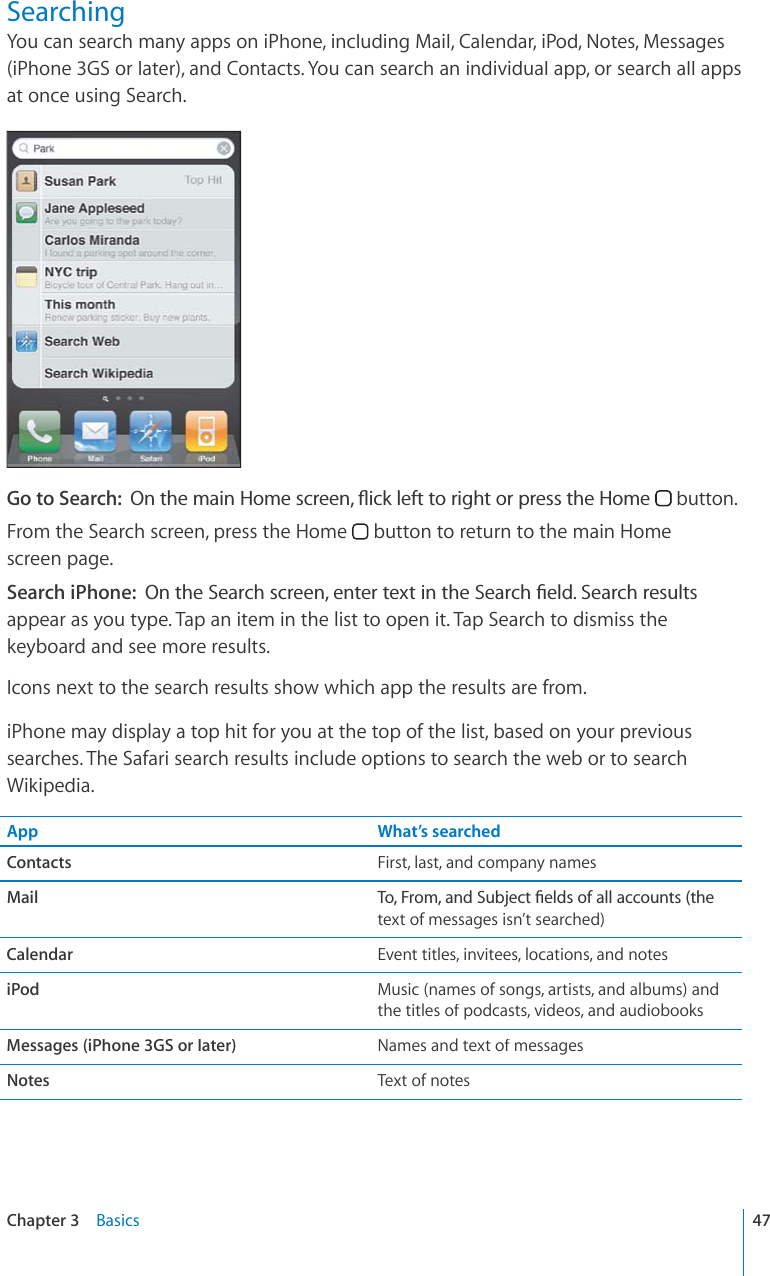
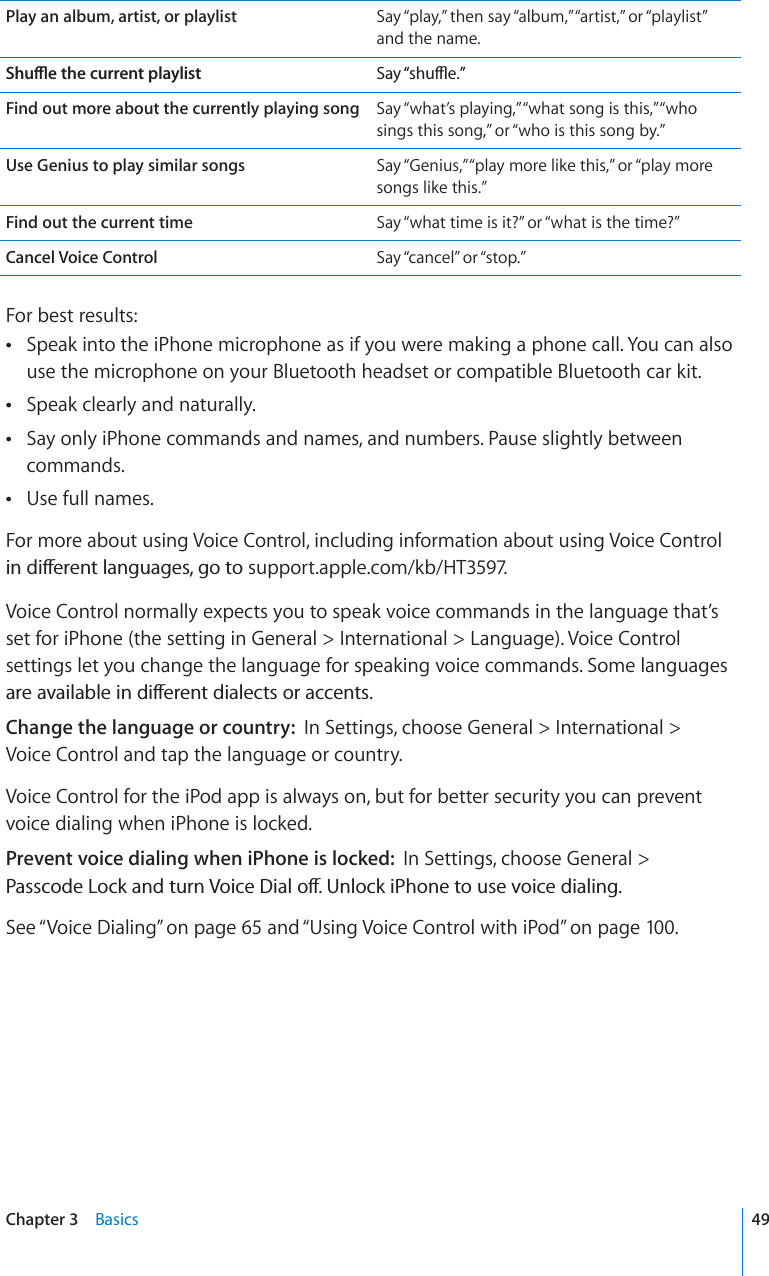

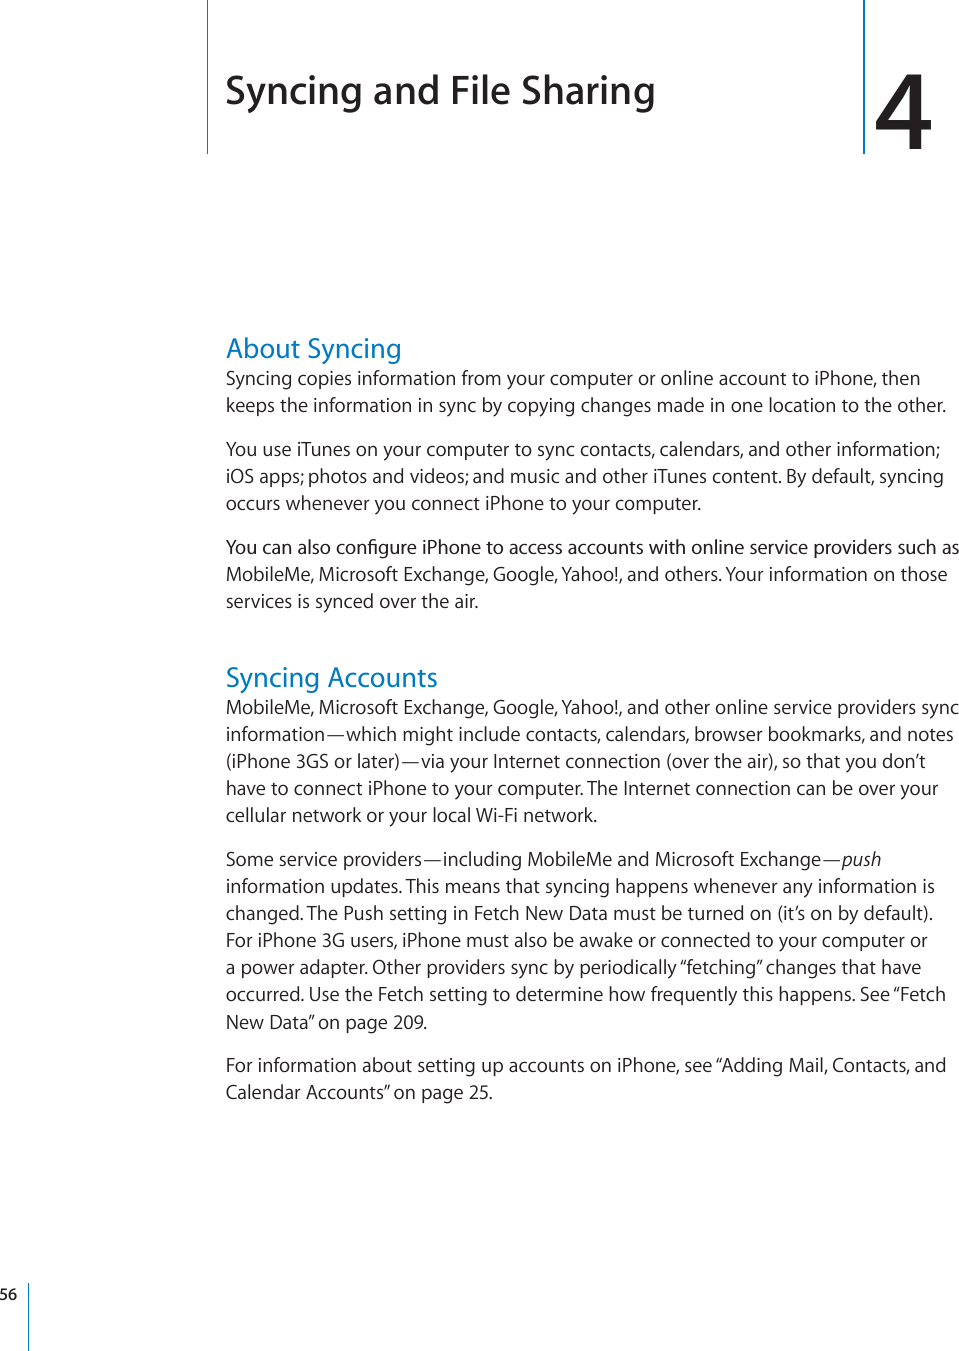
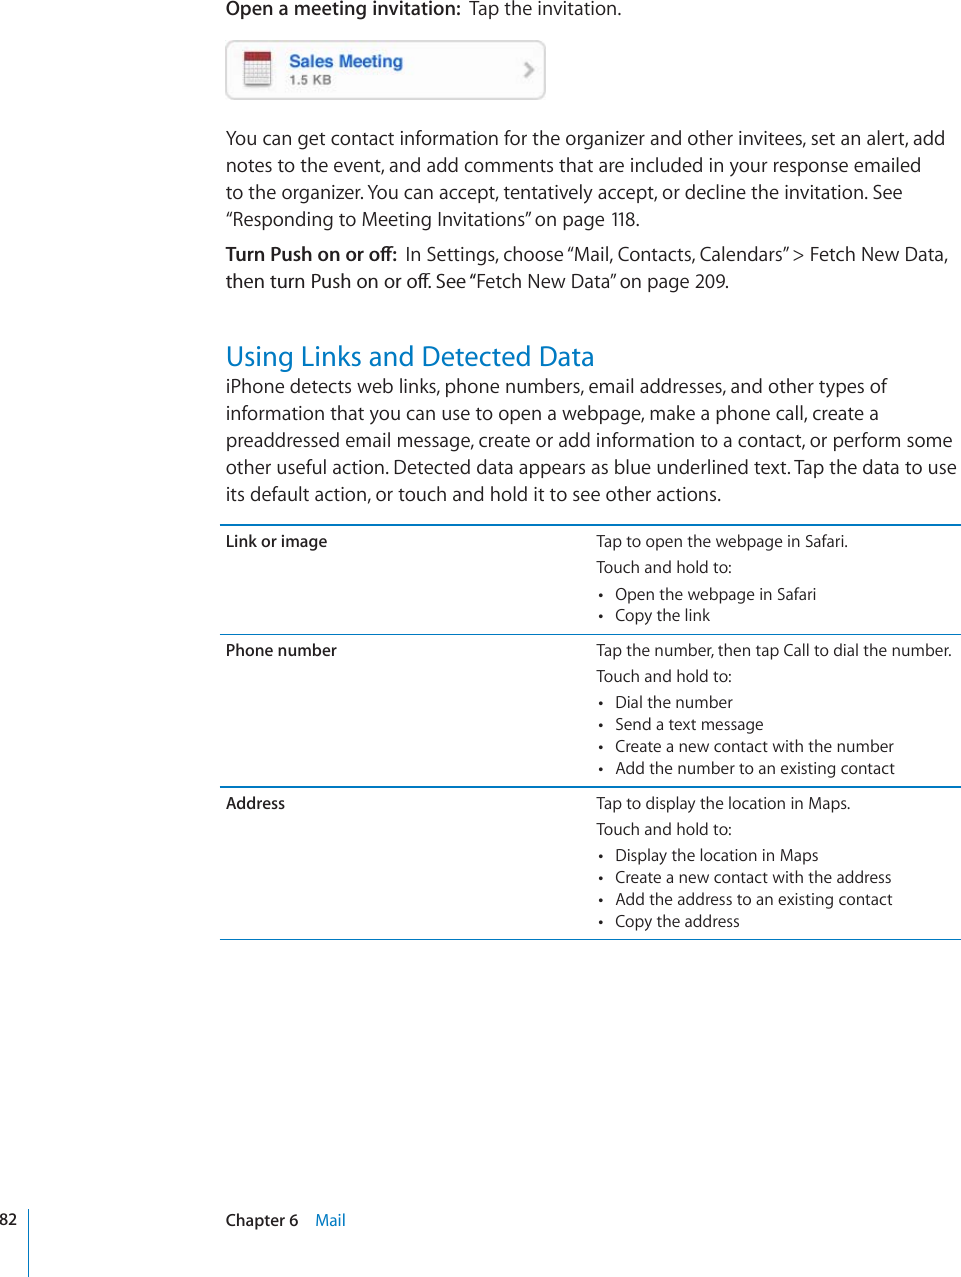
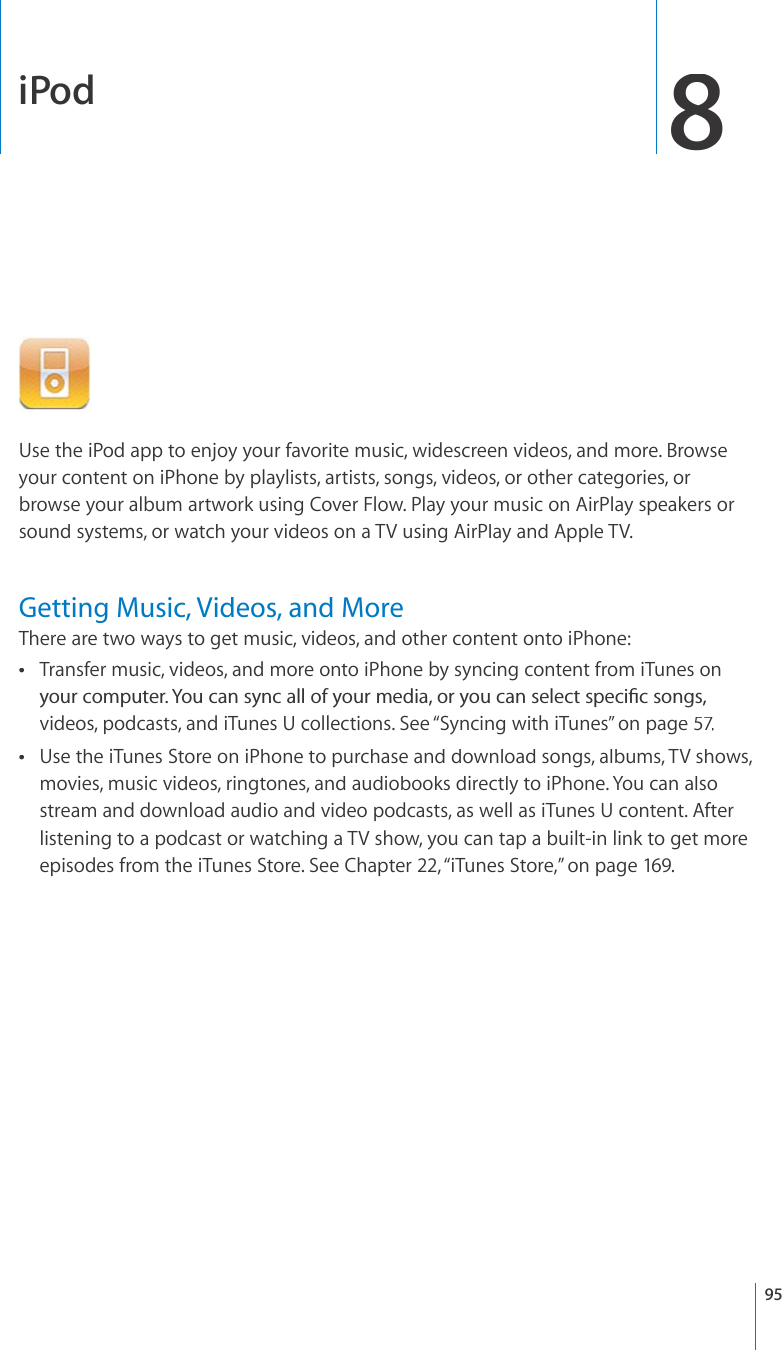
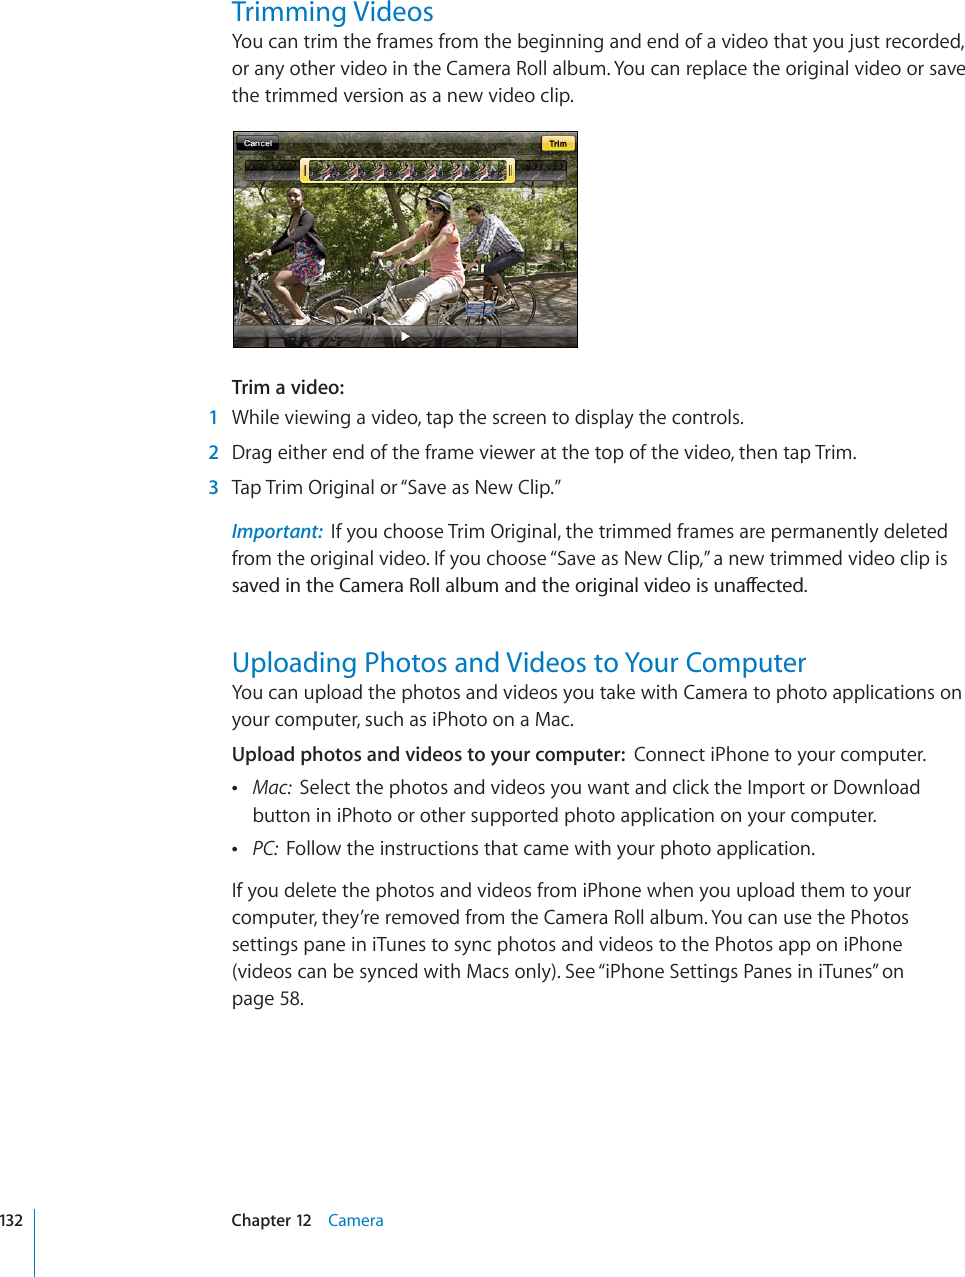
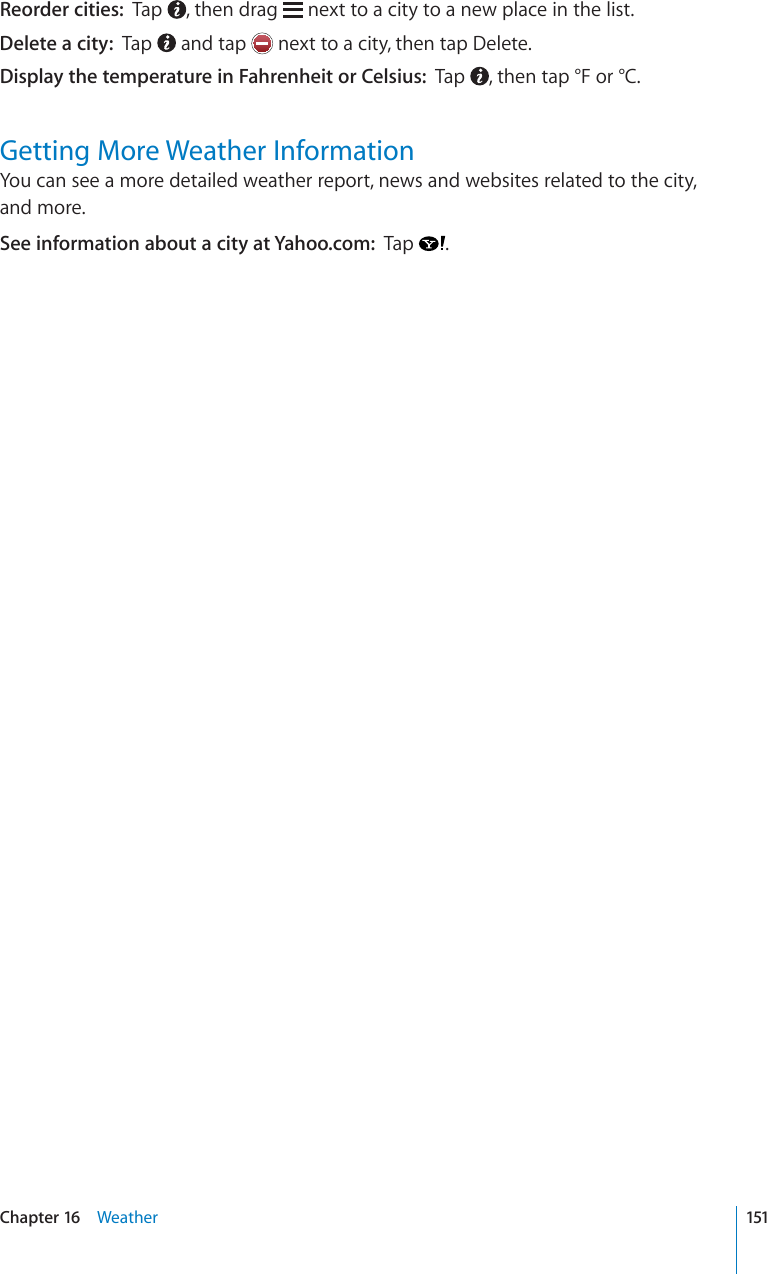
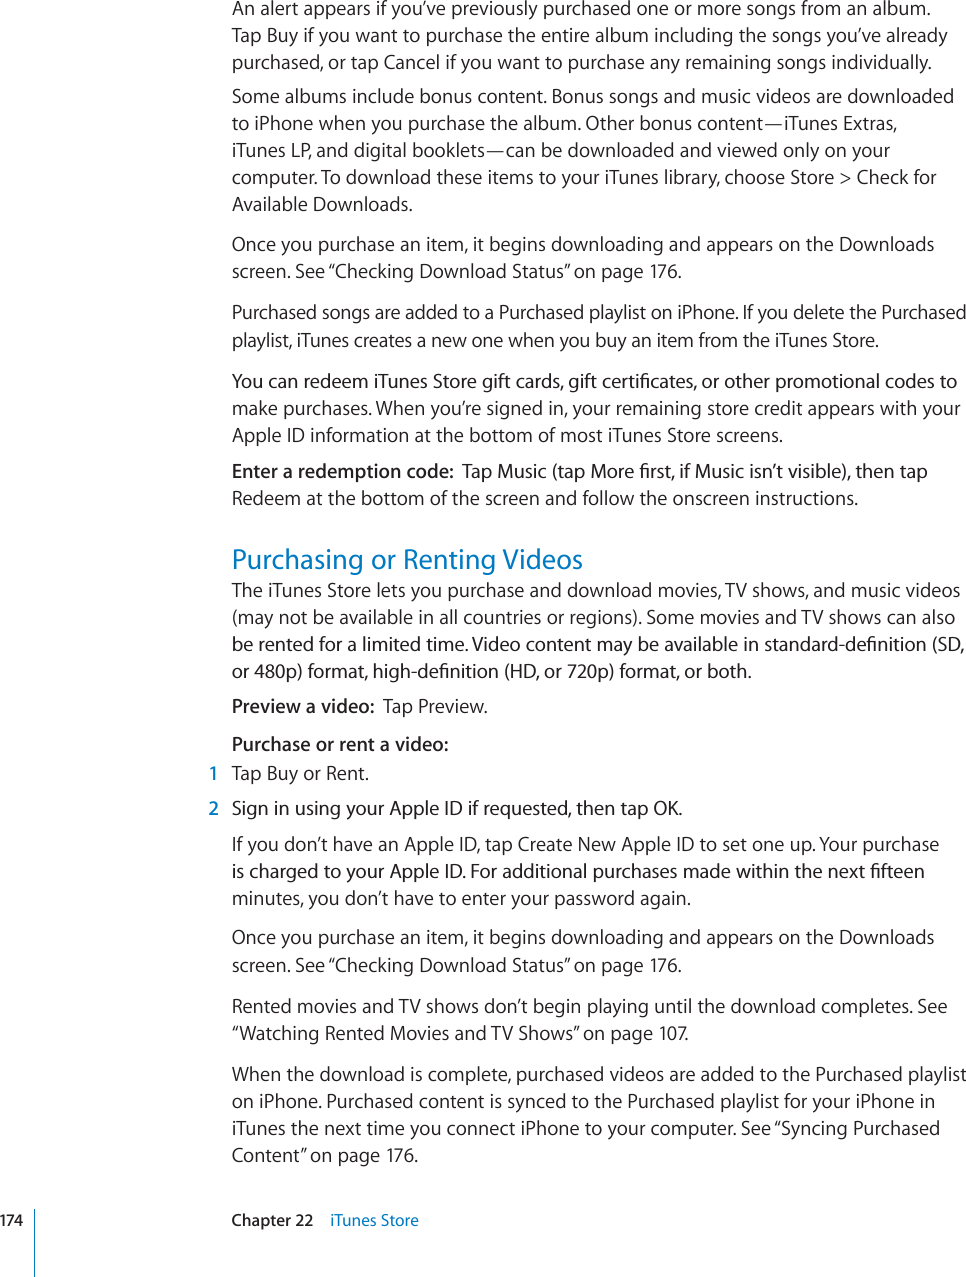
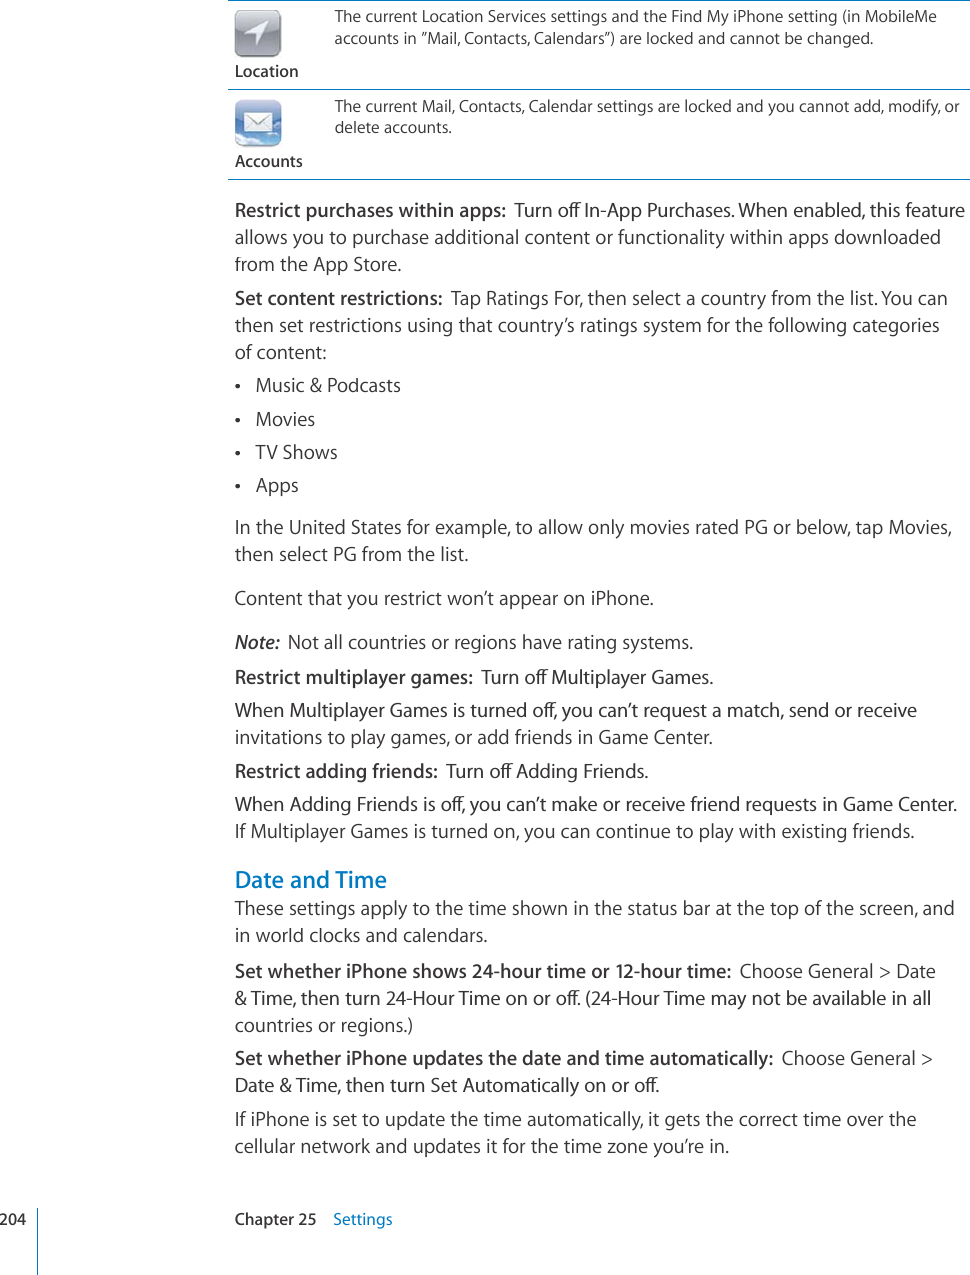
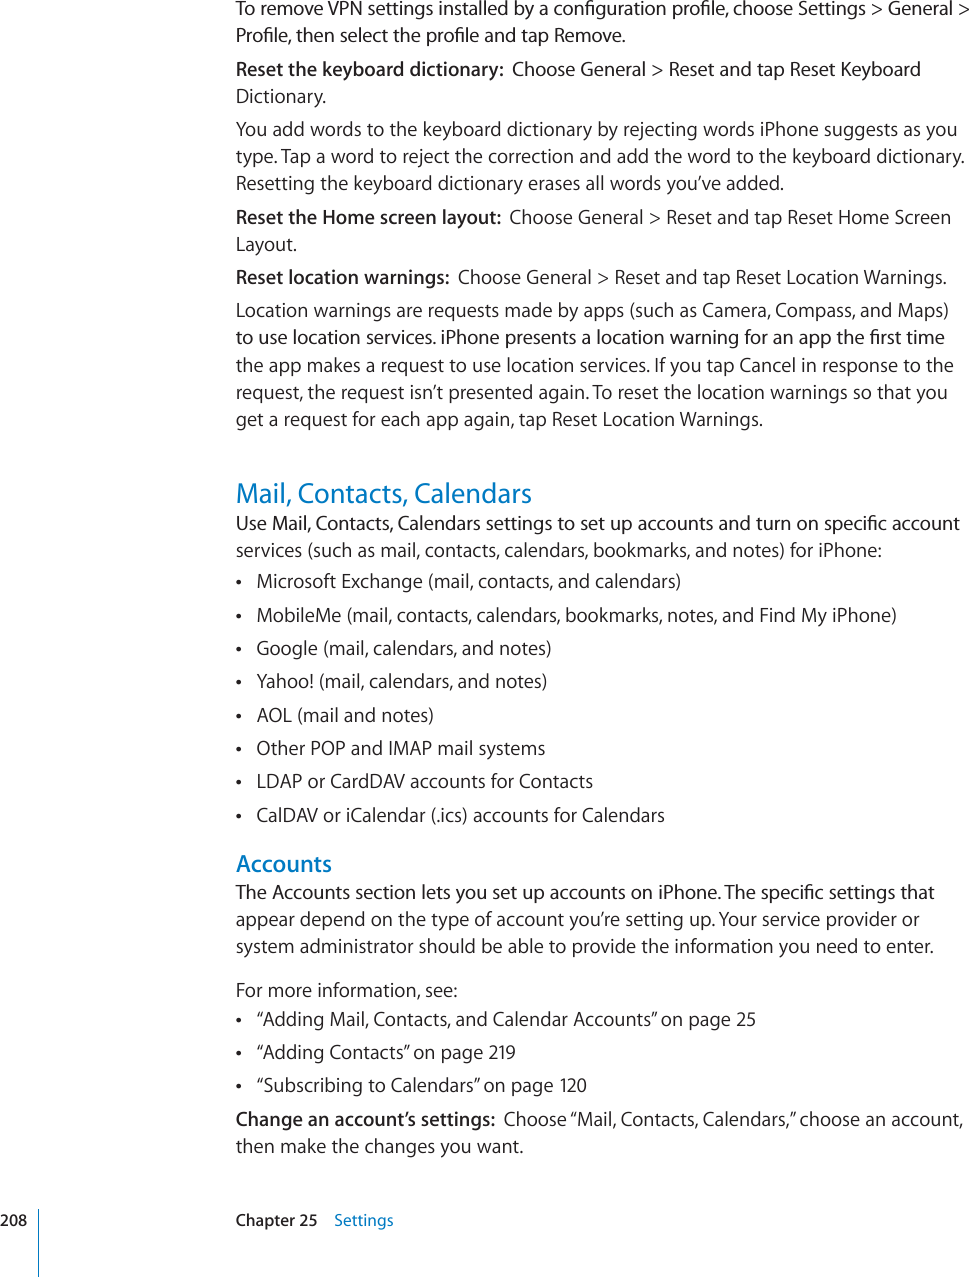
![Phone5Phone CallsMaking a call on iPhone is as simple as tapping a name and number in your contacts, tapping one of your favorites, or tapping a recent call to return it.Making CallsButtons at the bottom of the Phone screen give you quick access to your favorites, recent calls, your contacts, and a numeric keypad for dialing manually.WARNING:For important information about driving safely, see the Important Product Information Guideatwww.apple.com/support/manuals/iphone.5\TILYVMTPZZLKJHSSZ5\TILYVM\UOLHYK]VPJLTHPSTLZZHNLZUse Contacts to call someoneTap Contacts, choose a contact, then tap a phonenumber.Call a favoriteTap Favorites, then choose a contact.Return a recent callTap Recents, then tap a name or number in thelist. If the call was a FaceTime video call (indicatedby), tap the item to make a newvideo call.Dial a number6CR-G[RCFGPVGTVJGPWODGTVJGPVCR%CNN64](https://usermanual.wiki/Apple/E2422A.Final-version-of-User-Manual/User-Guide-1413266-Page-64.png)

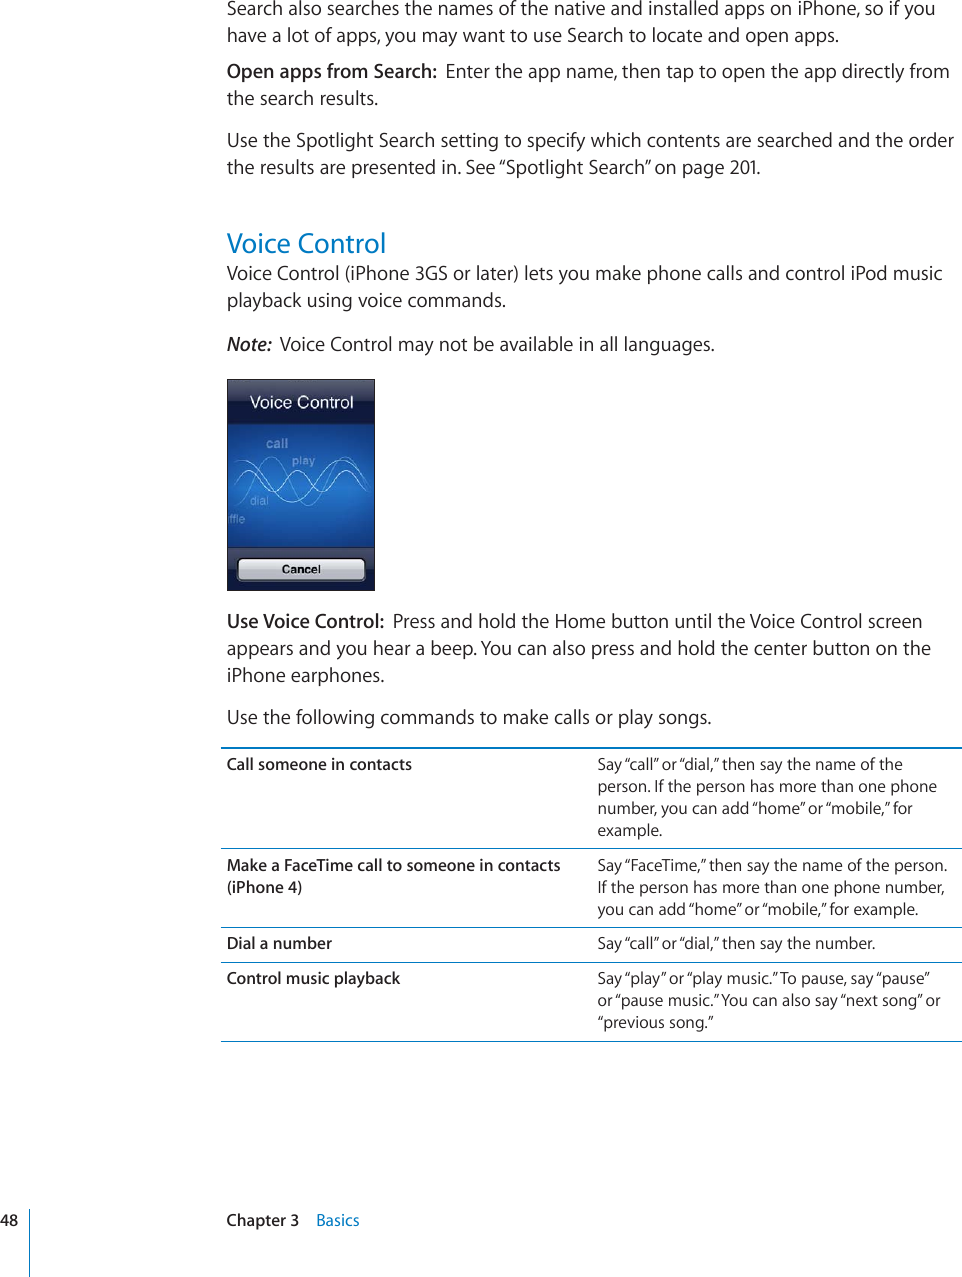
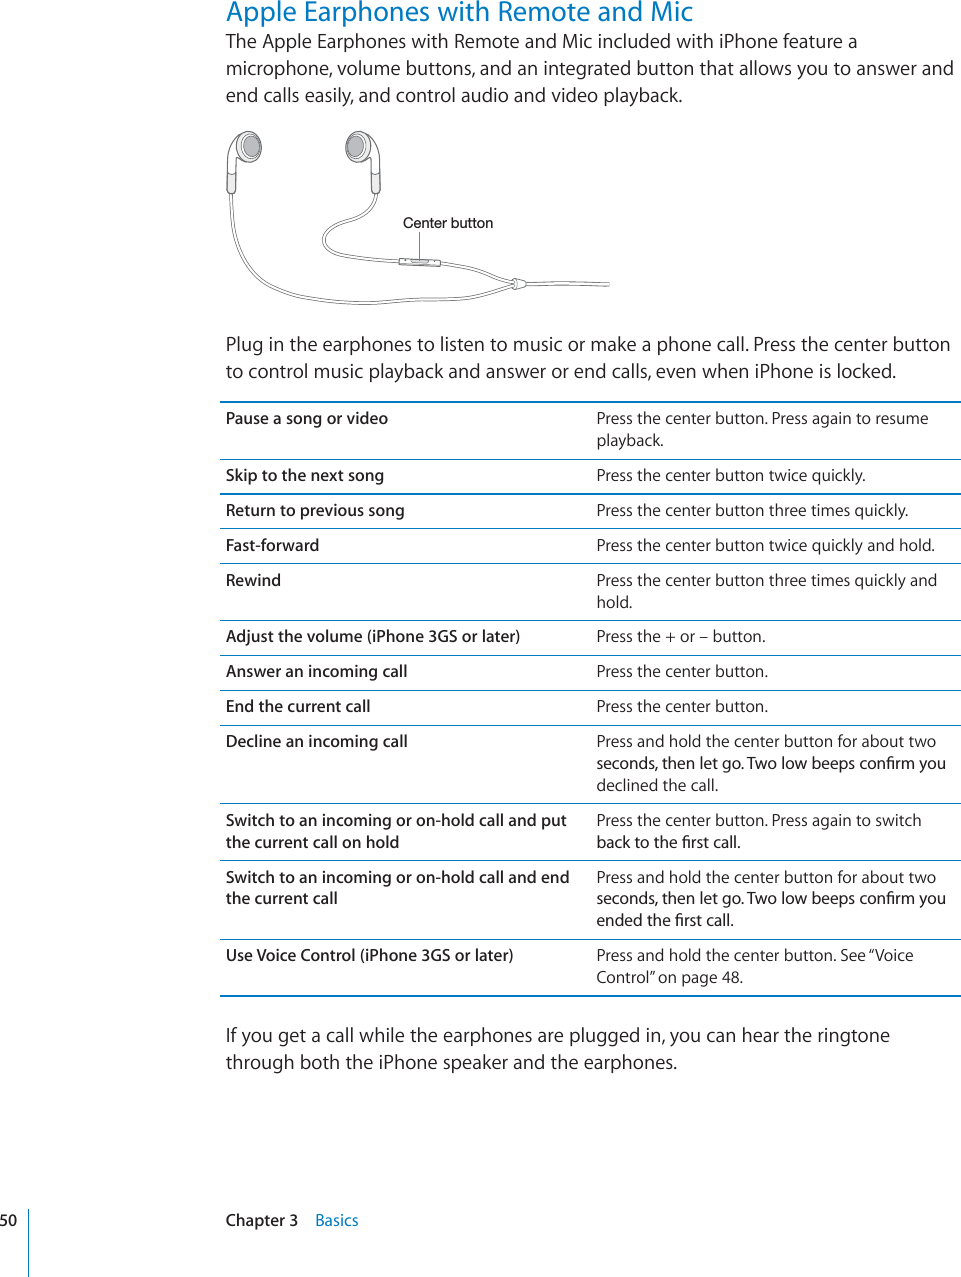
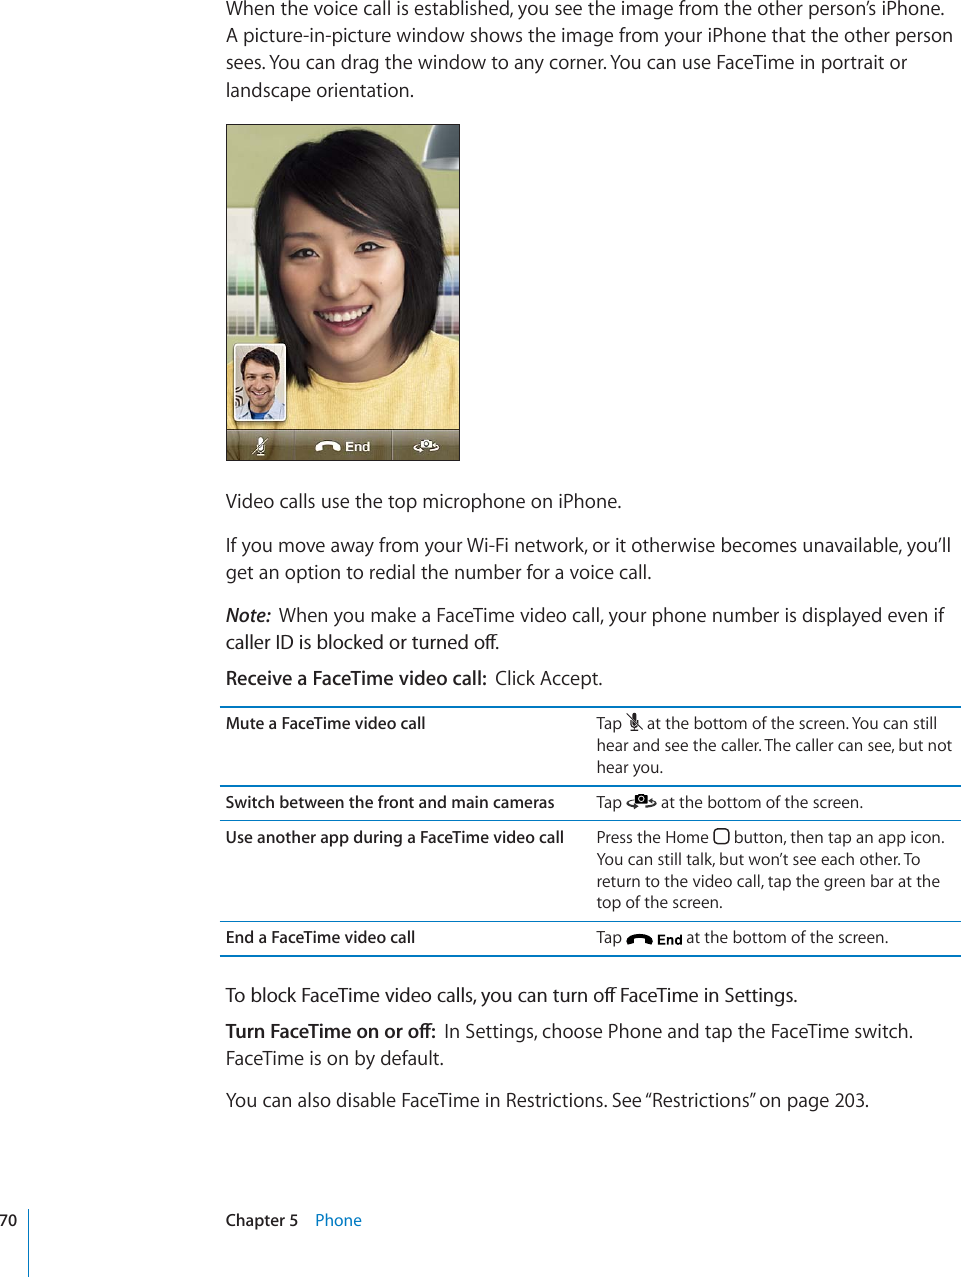
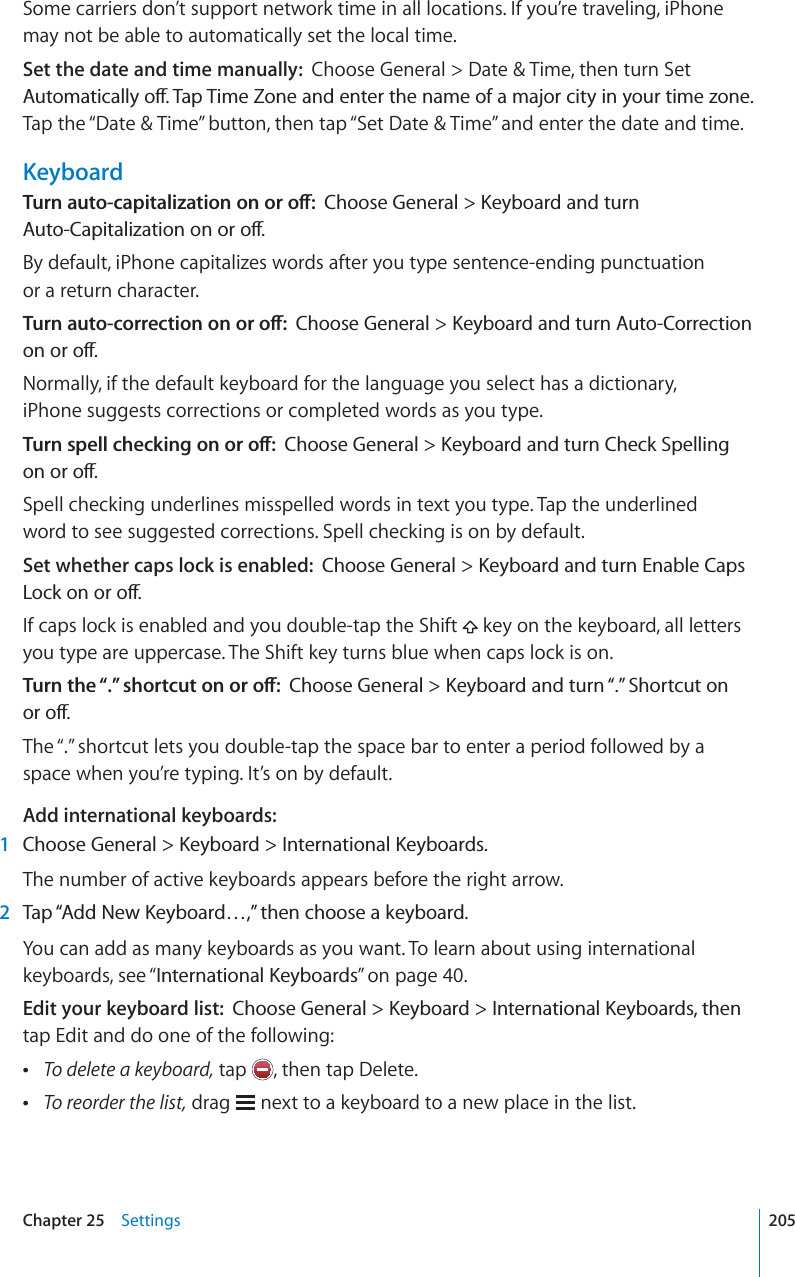
![FaceTimeFaceTime video calls let you see as well as hear the person you’re talking to. You canmake a video call to someone with another iPhone 4, an iPod touch (4th generation), or a Mac with FaceTime. No setup is needed, but you must have a Wi-Fi connection tothe Internet. FaceTime uses the front camera so the person you call can see your face, but you can switch to the main camera to share what you see around you.Note:FaceTime may not be available in all countries or regions.Make a FaceTime call:To an iPhone 4: Call the person’s phone number, then tap FaceTime. Or, in Contacts, tap FaceTime.To an iPod touch (4th generation) or a Mac: In Contacts, tap FaceTime.The contact information must include the email address that the person you’re callinguses to sign in to FaceTime. appears on the FaceTime button in Contacts if you’ve previously had a FaceTimecall with that person.4HRLH-HJL;PTL]PKLVJHSSMake a FaceTime call using Voice Control:Press and hold the Home button until theVoice Control screen appears and you hear a beep. Then say “FaceTime,” followed bythe name of the person to call.If you had a previous FaceTime video call with someone, you can make another videocall to that person by tapping the entry for that call in Recents. Previous FaceTimevideo calls are indicated by.69Chapter 5 Phone](https://usermanual.wiki/Apple/E2422A.Final-version-of-User-Manual/User-Guide-1413266-Page-69.png)
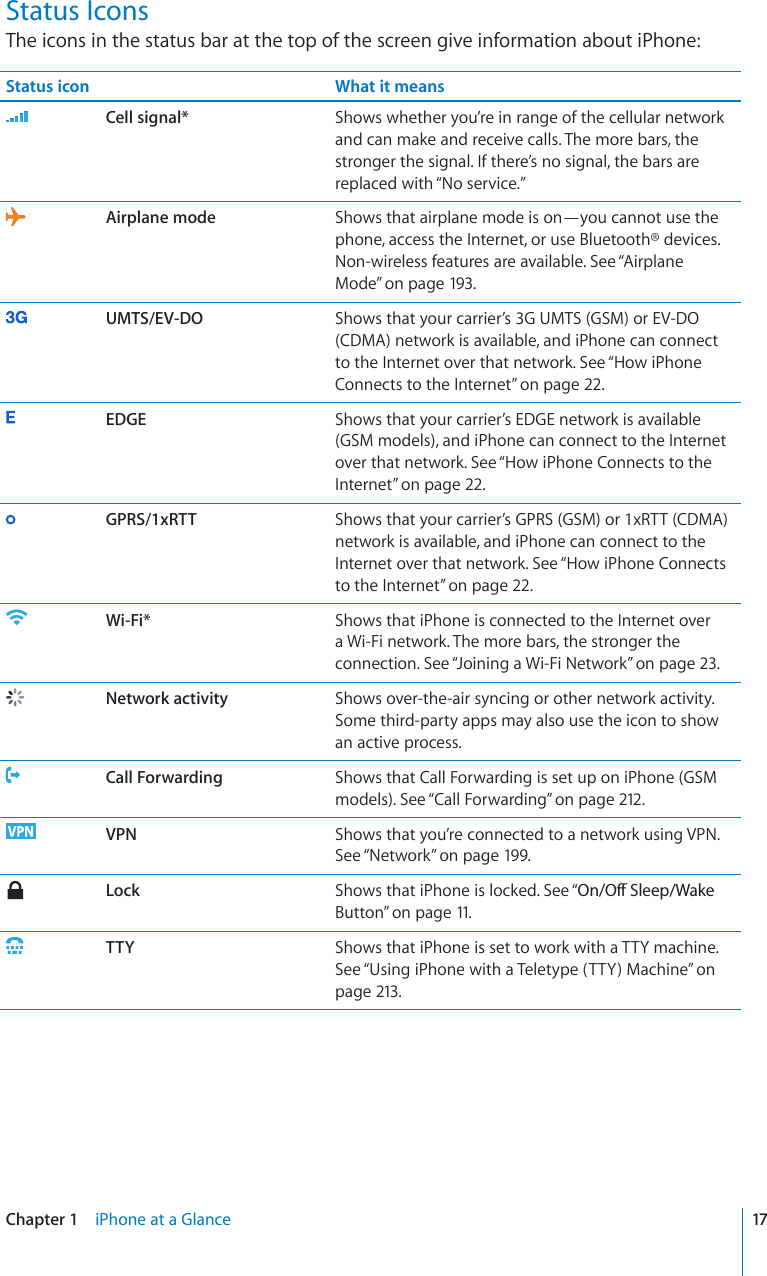
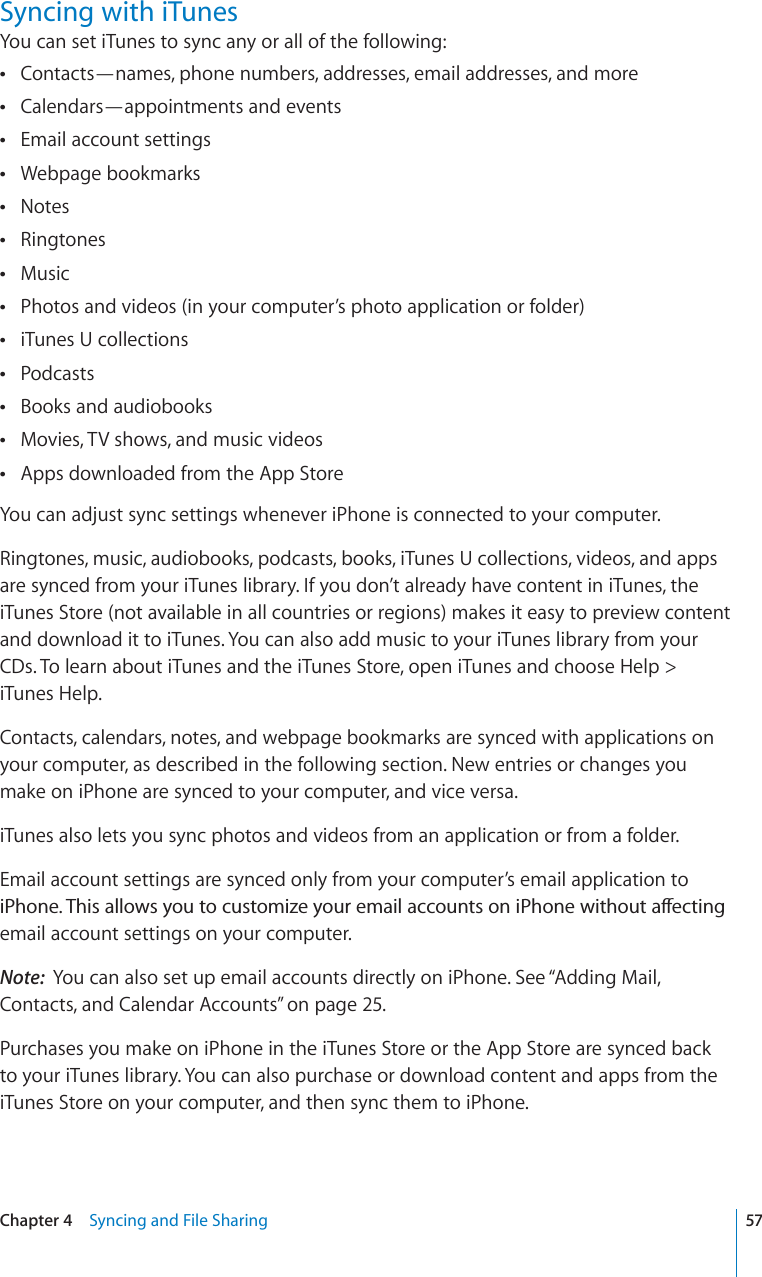
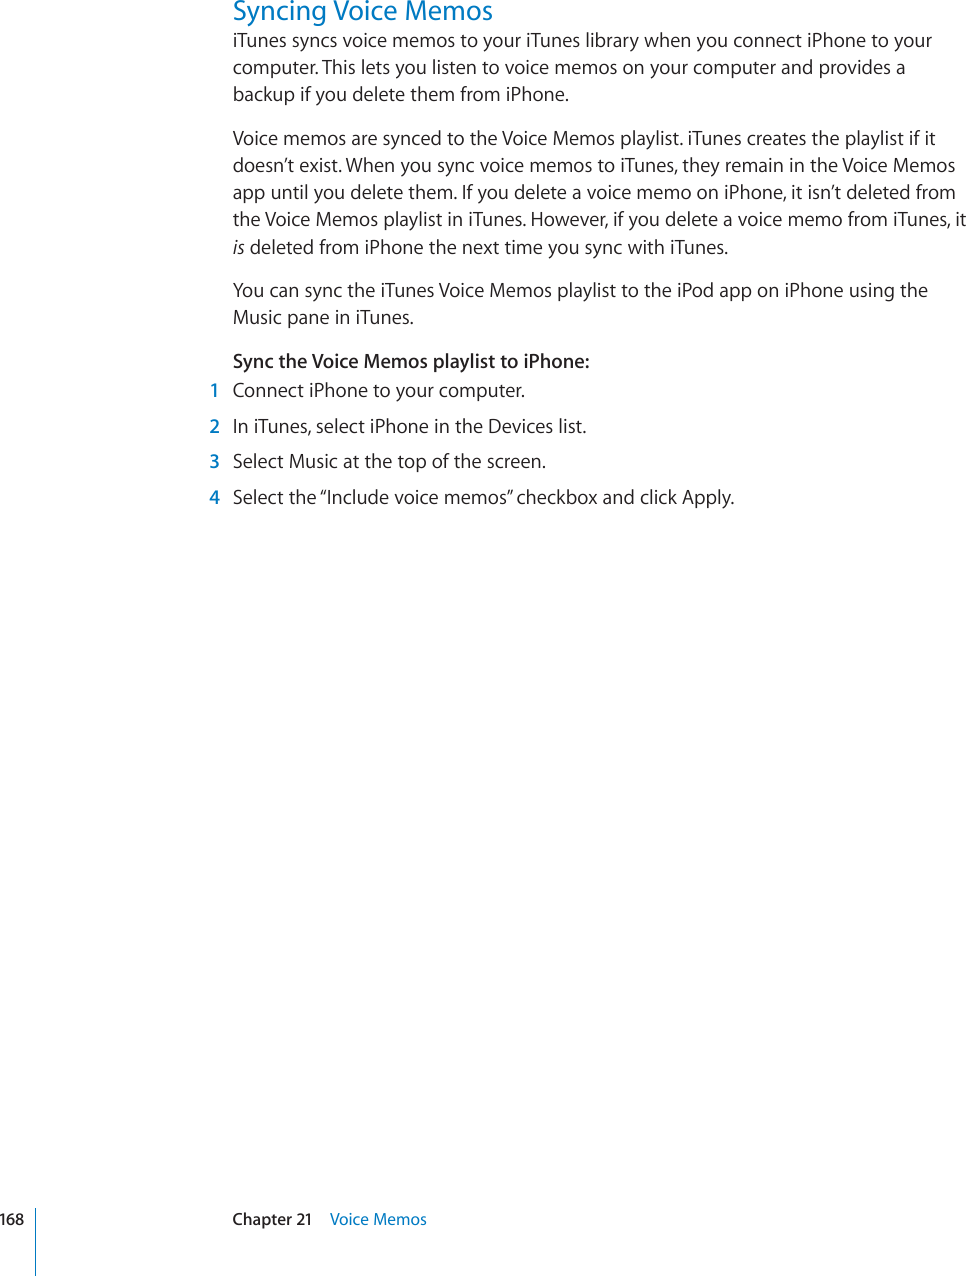
![Visual VoicemailOn iPhone, visual voicemail lets you see a list of your messages and choose which onesto listen to or delete, without having to listen to instructions or prior messages.Note:Visual voicemail may not be available in all countries or regions, or may be anoptional service. Contact your carrier for more information. If visual voicemail isn’tavailable, tap Voicemail and follow the voice prompts to retrieve your messages.5\TILYVMTPZZLKJHSSZHUK\UOLHYK]VPJLTHPSTLZZHNLZHWWLHYZVU[OL/VTLZJYLLU7OVULPJVUSetting Up Voicemail6JG°TUVVKOG[QWVCR8QKEGOCKNK2JQPGRTQORVU[QWVQETGCVGCXQKEGOCKNRCUUYQTFand record your voicemail greeting.Change your greeting:1Tap Voicemail, tap Greeting, then tap Custom.2Tap Record when you’re ready to start.39JGP[QW°PKUJVCR5VQR6QTGXKGYVCR2NC[To rerecord, repeat steps 2 and 3.4Tap Save.Use your carrier’s default greeting Tap Voicemail, tap Greeting, then tap Default.Set an alert sound for new voicemailIn Settings, choose Sounds and turn NewVoicemail on. The alert sounds once for each newXQKEGOCKN+HVJG4KPI5KNGPVUYKVEJKUQÒK2JQPGwon’t sound alerts.Change the voicemail passwordIn Settings, choose Phone > Change VoicemailPassword.Checking VoicemailWhen you tap Phone, iPhone shows the number of missed calls and unheardvoicemail messages.5\TILYVMTPZZLKJHSSZ5\TILYVM\UOLHYK]VPJLTHPSTLZZHNLZ72Chapter 5 Phone](https://usermanual.wiki/Apple/E2422A.Final-version-of-User-Manual/User-Guide-1413266-Page-72.png)
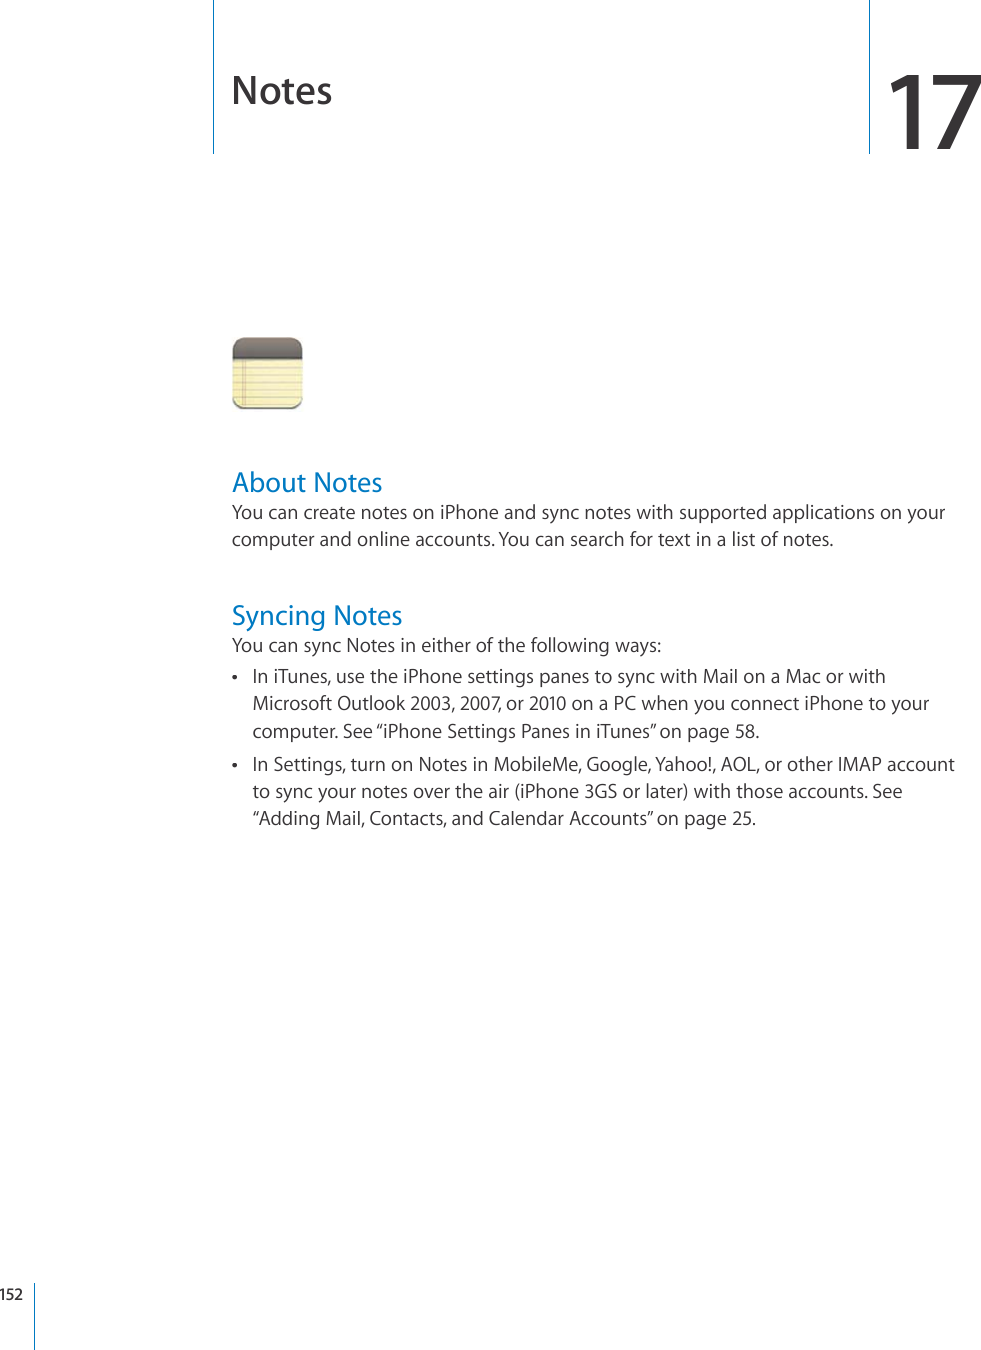
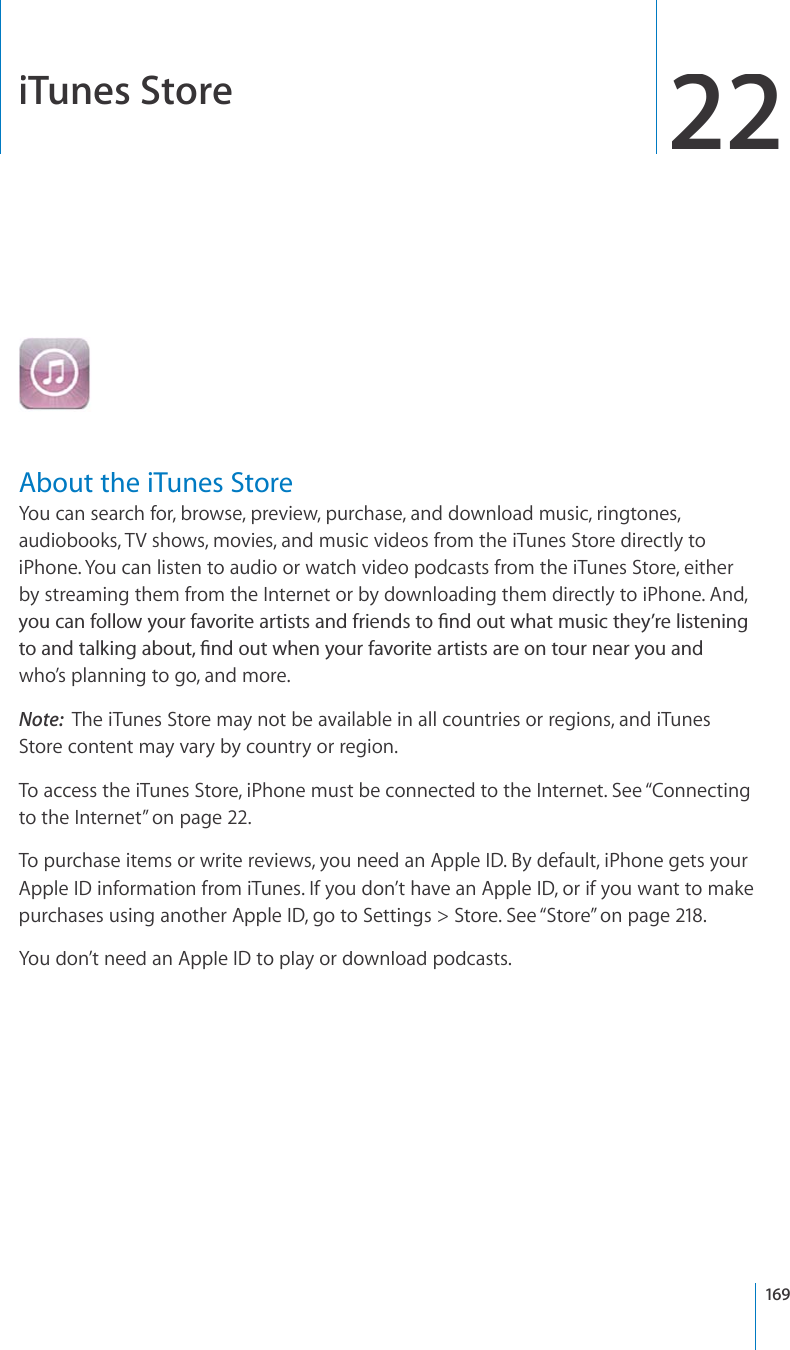
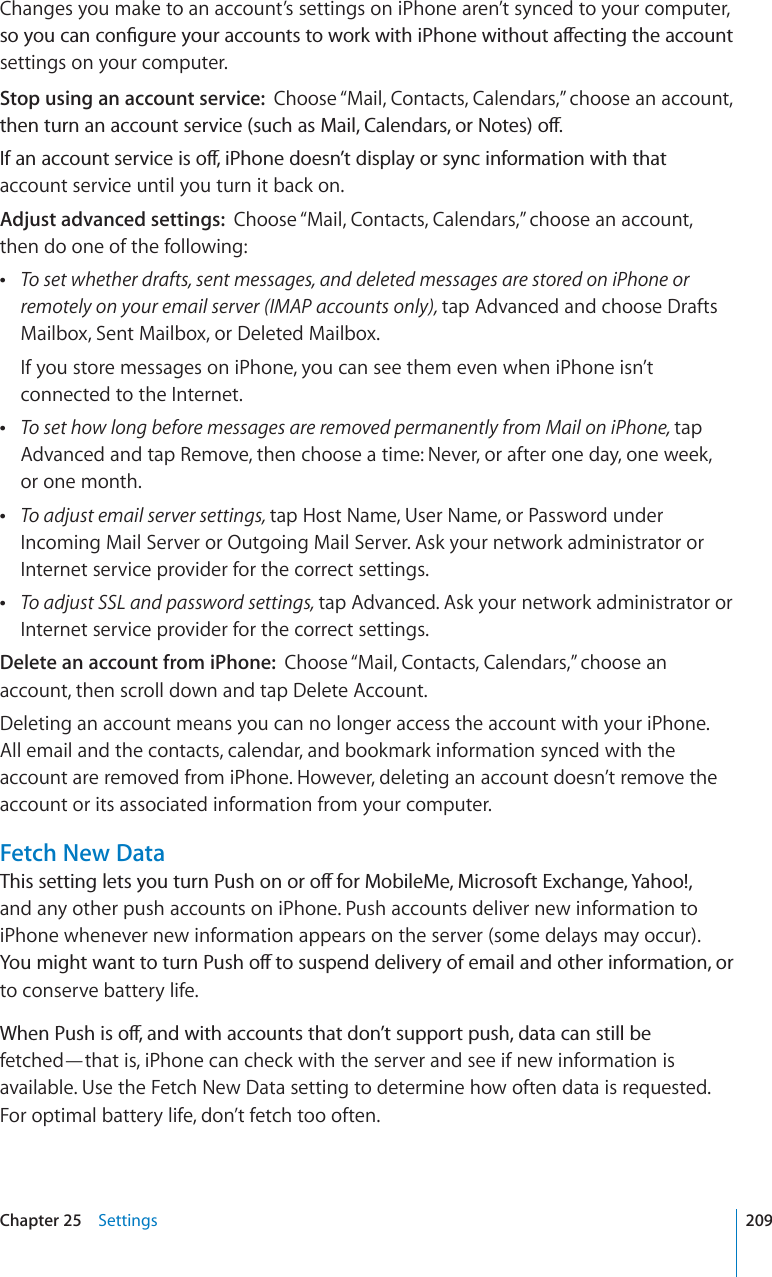
![Tap Voicemail to see a list of your messages.:RPW[VHU`WVPU[PUHTLZZHNL!+YHN[OLWSH`OLHK<UOLHYKTLZZHNLZ 7SH`7H\ZL*VU[HJ[PUMV:JY\IILYIHY:WLHRLYWOVUL(\KPV^OLUH)S\L[VV[OKL]PJLPZJVUULJ[LK;HW[VJOVVZLH\KPVV\[W\[9L[\YU[OLJHSSListen to a message: Tap the message. (If you’ve already heard the message, tap the message again to replay it.) Use and to pause and resume playback.Once you listen to a message, it’s saved until your carrier erases it.Check voicemail from another phone: Dial your own number or your carrier’s remote access number.Deleting MessagesSelect a message, then tap Delete.Listen to a deleted message Tap Deleted Messages (at the end of the list), then tap the message.Undelete a message Tap Deleted Messages (at the end of the list), then tap the message and tap Undelete.Delete messages permanently Tap Deleted Messages (at the end of the list), then tap Clear All.Note: In some countries or regions, deleted visual voicemail messages may be permanently erased by your carrier.Getting Contact InformationVisual voicemail saves the date and time of the call, the length of the message, and any available contact information.See a caller’s contact information: Tap next to a message.You can use the information to email or text the caller, or update contact info.73Chapter 5 Phone](https://usermanual.wiki/Apple/E2422A.Final-version-of-User-Manual/User-Guide-1413266-Page-73.png)

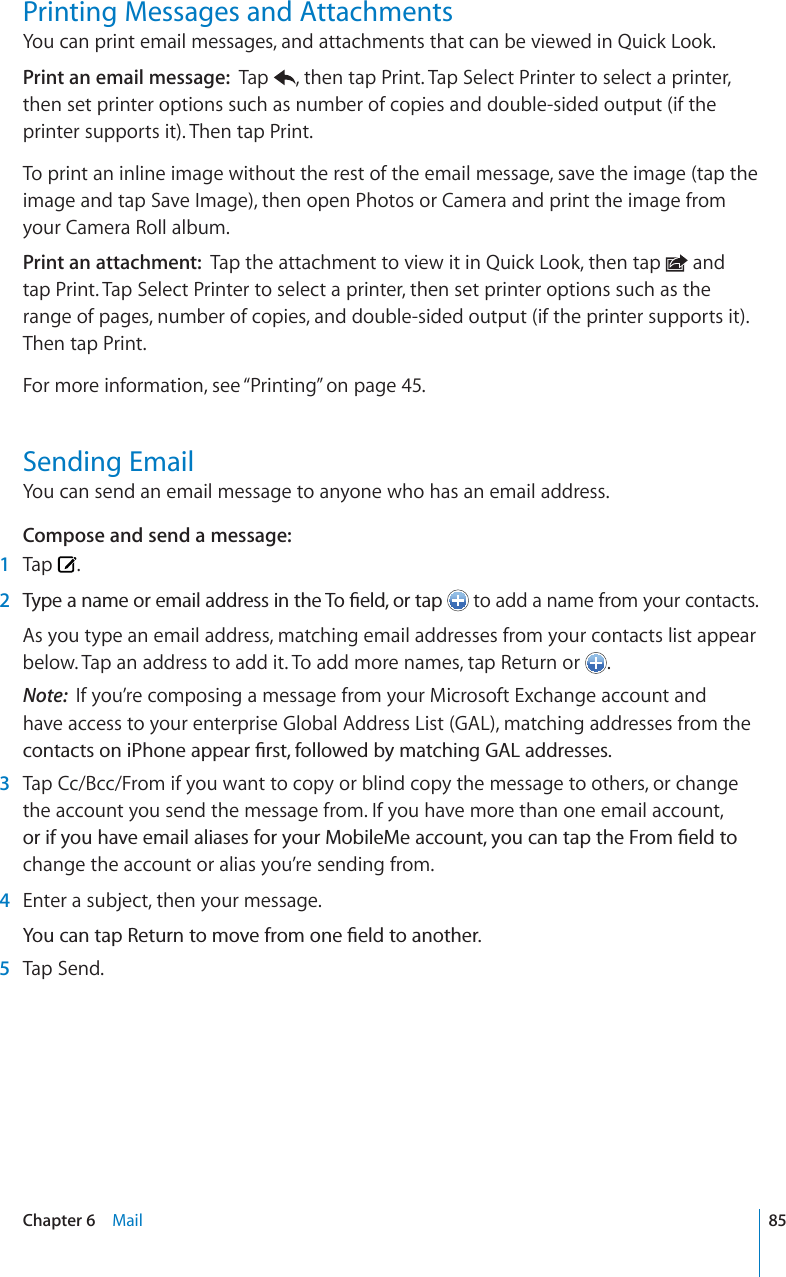
![Organizing EmailYou can organize messages in any mailbox, folder, or search results window. You can delete messages one at a time, or select a group to delete all at once. You can also move messages from one mailbox or folder to another in the same account or DGVYGGPFKÒGTGPVCEEQWPVUDelete a message: Open the message and tap .You can also delete a message directly from the mailbox message list by swiping left or right over the message title, then tapping Delete.;VZOV^[OL+LSL[LI\[[VUZ^PWLSLM[VYYPNO[V]LY[OLTLZZHNLNote: For Google accounts, tap Archive. Messages aren’t deleted, but are moved to your account archive.Delete multiple messages: When viewing a list of messages, tap Edit, select the messages you want to delete, then tap Delete.Move a message to another mailbox or folder: When viewing a message, tap , then choose a mailbox or folder.Tap Accounts to choose a mailbox or folder for another account.Move multiple messages: When viewing a list of messages, tap Edit, select the messages you want to move, then tap Move and choose a mailbox or folder.87Chapter 6 Mail](https://usermanual.wiki/Apple/E2422A.Final-version-of-User-Manual/User-Guide-1413266-Page-87.png)
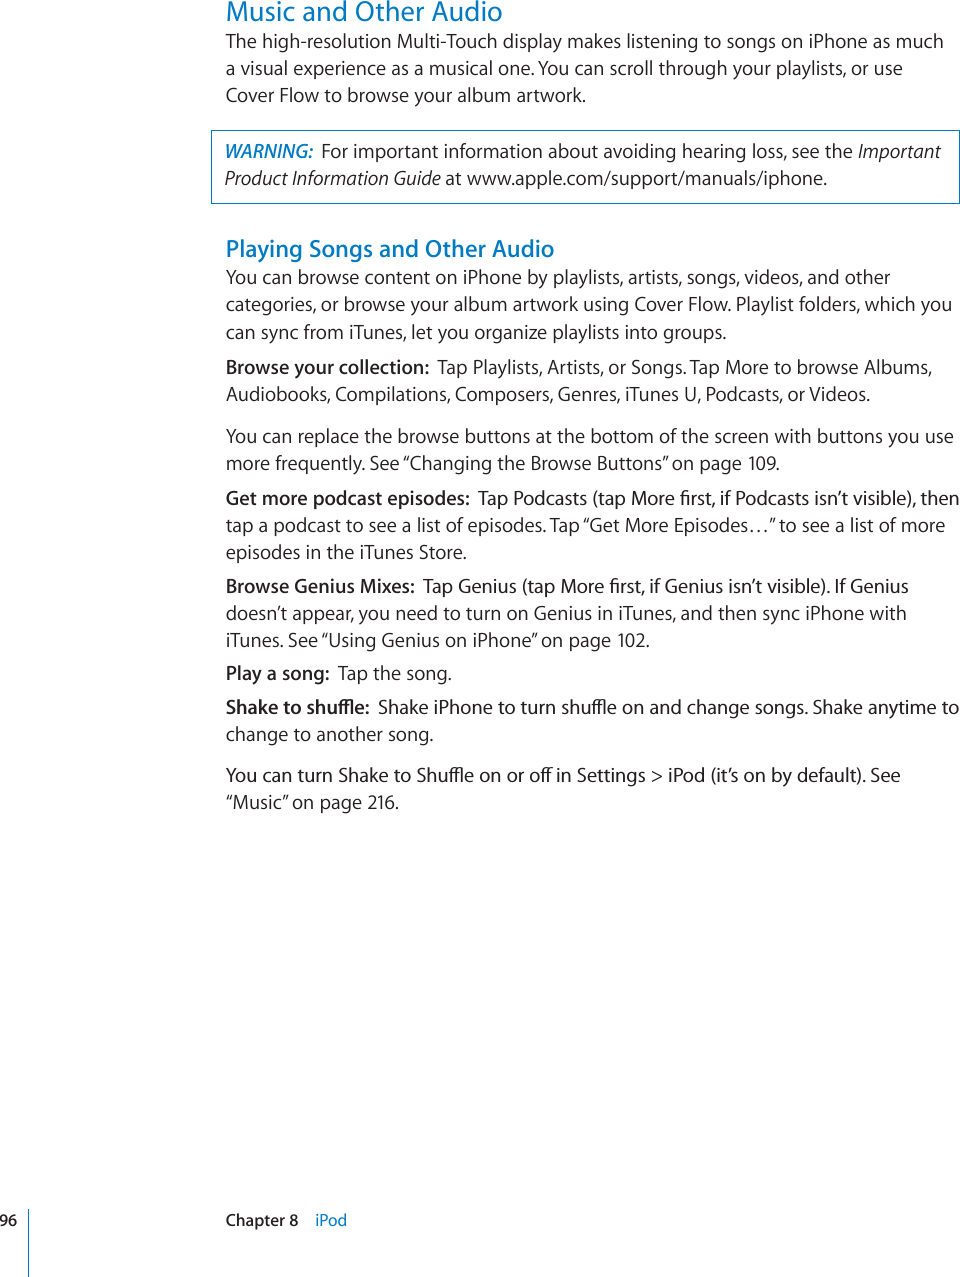
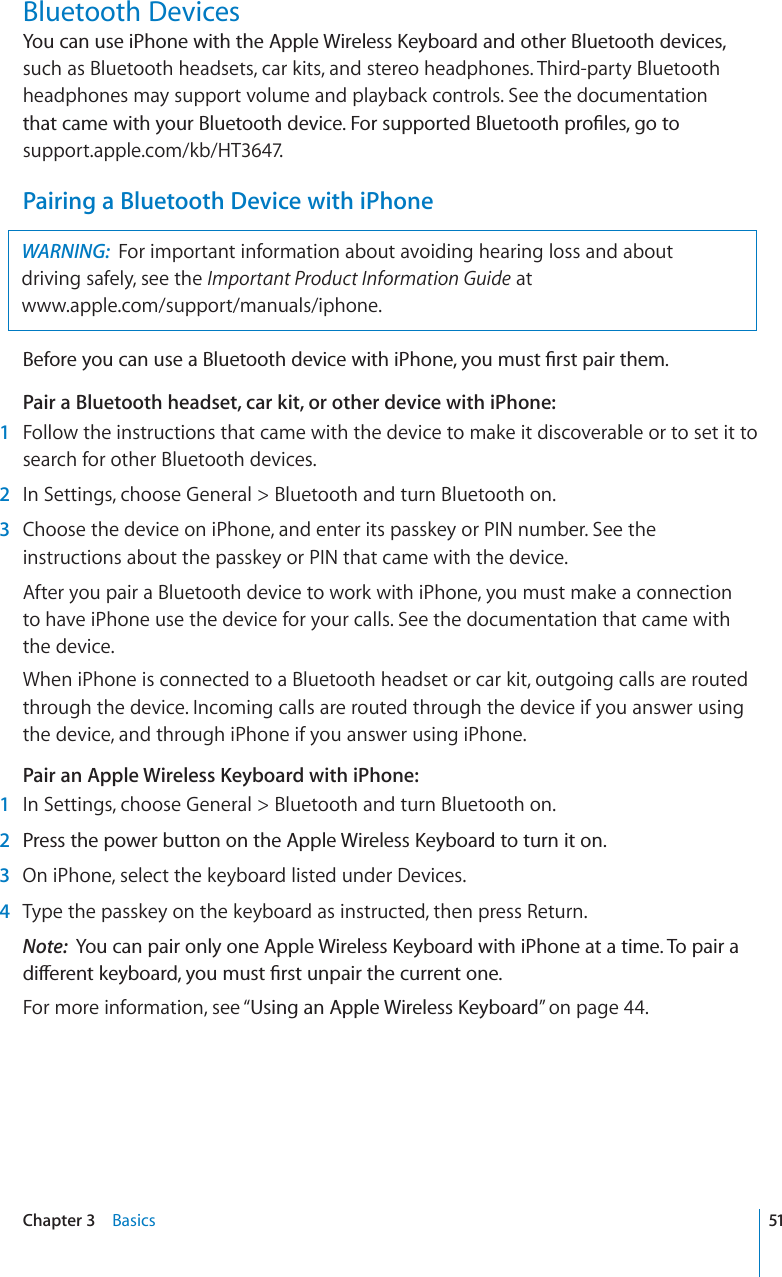
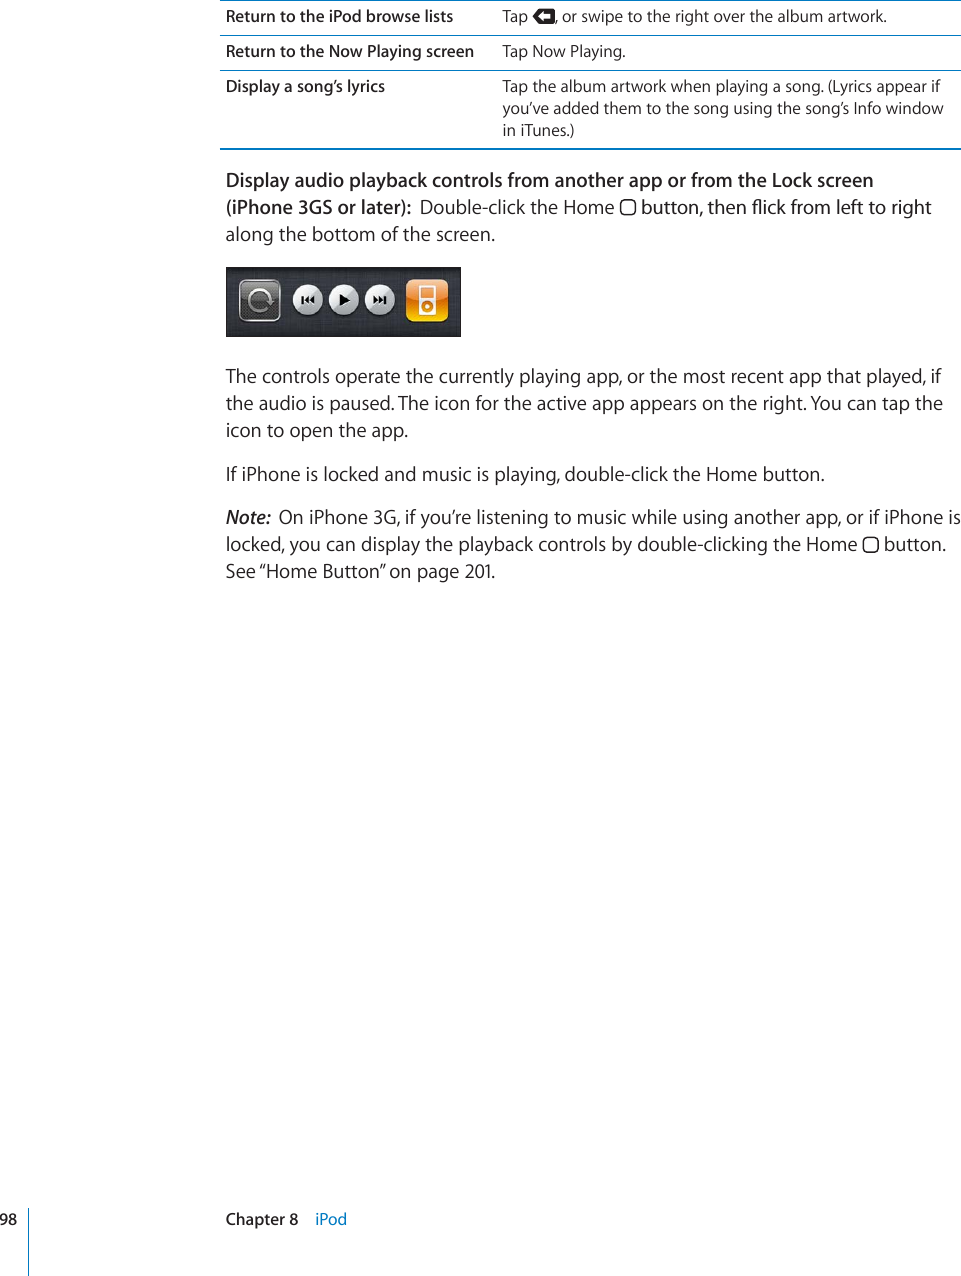
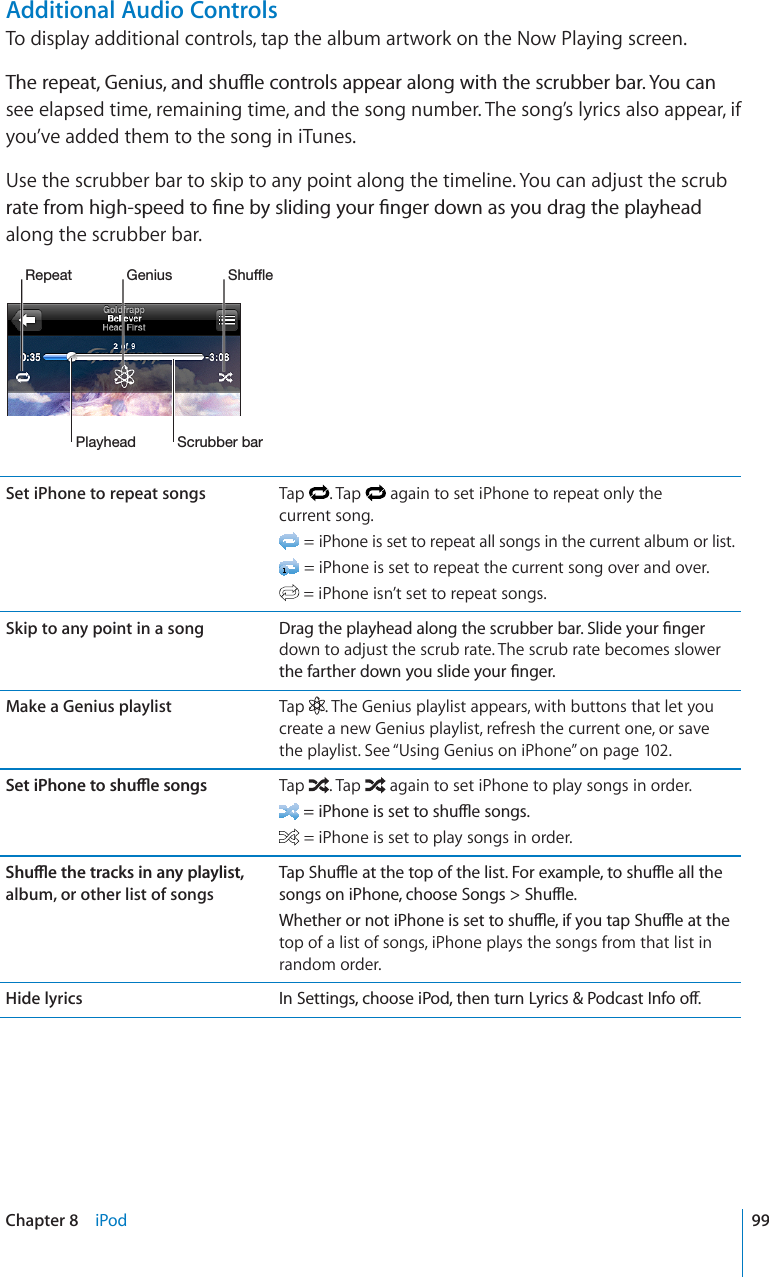
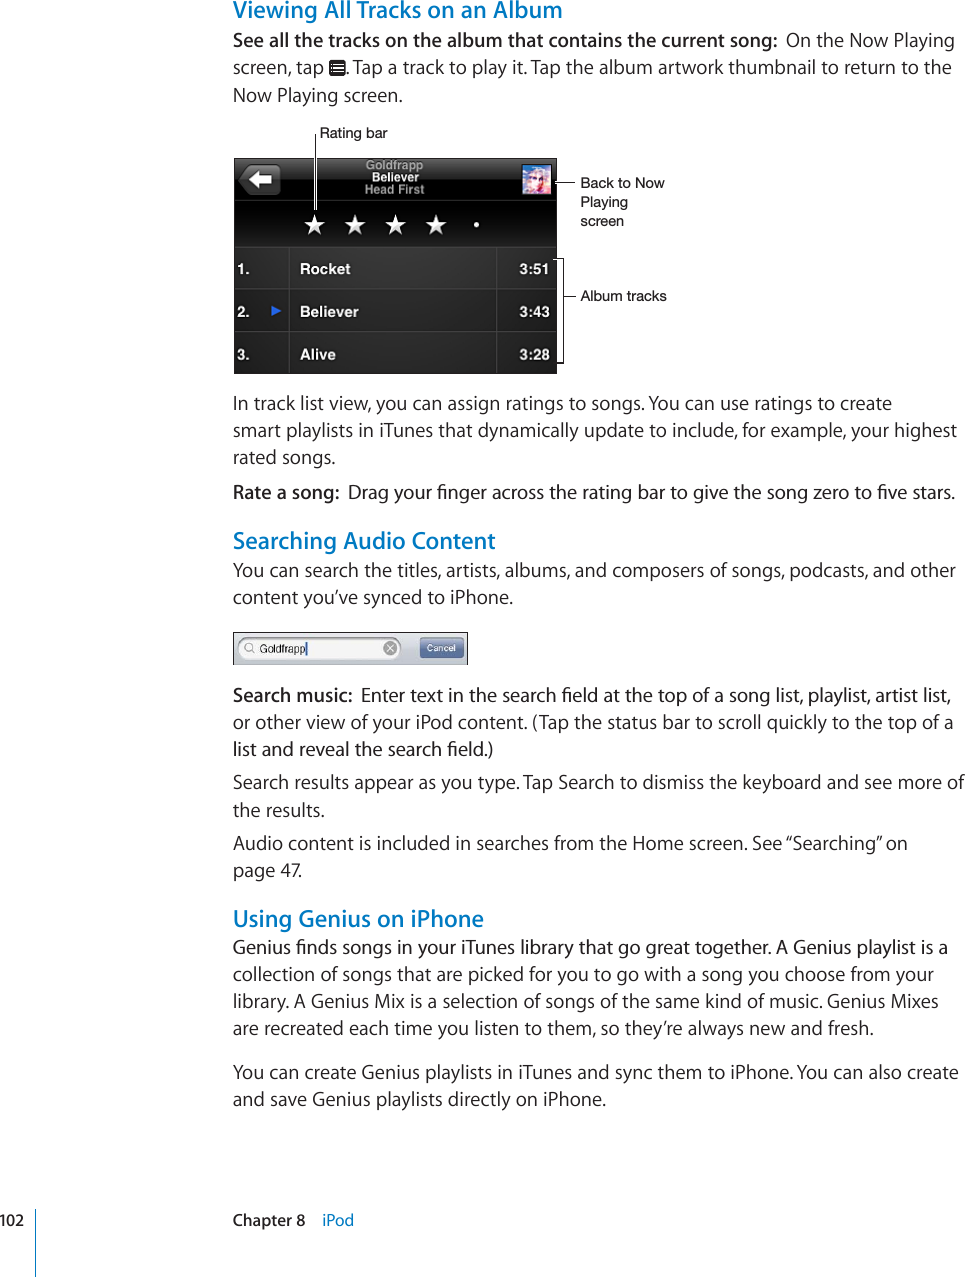
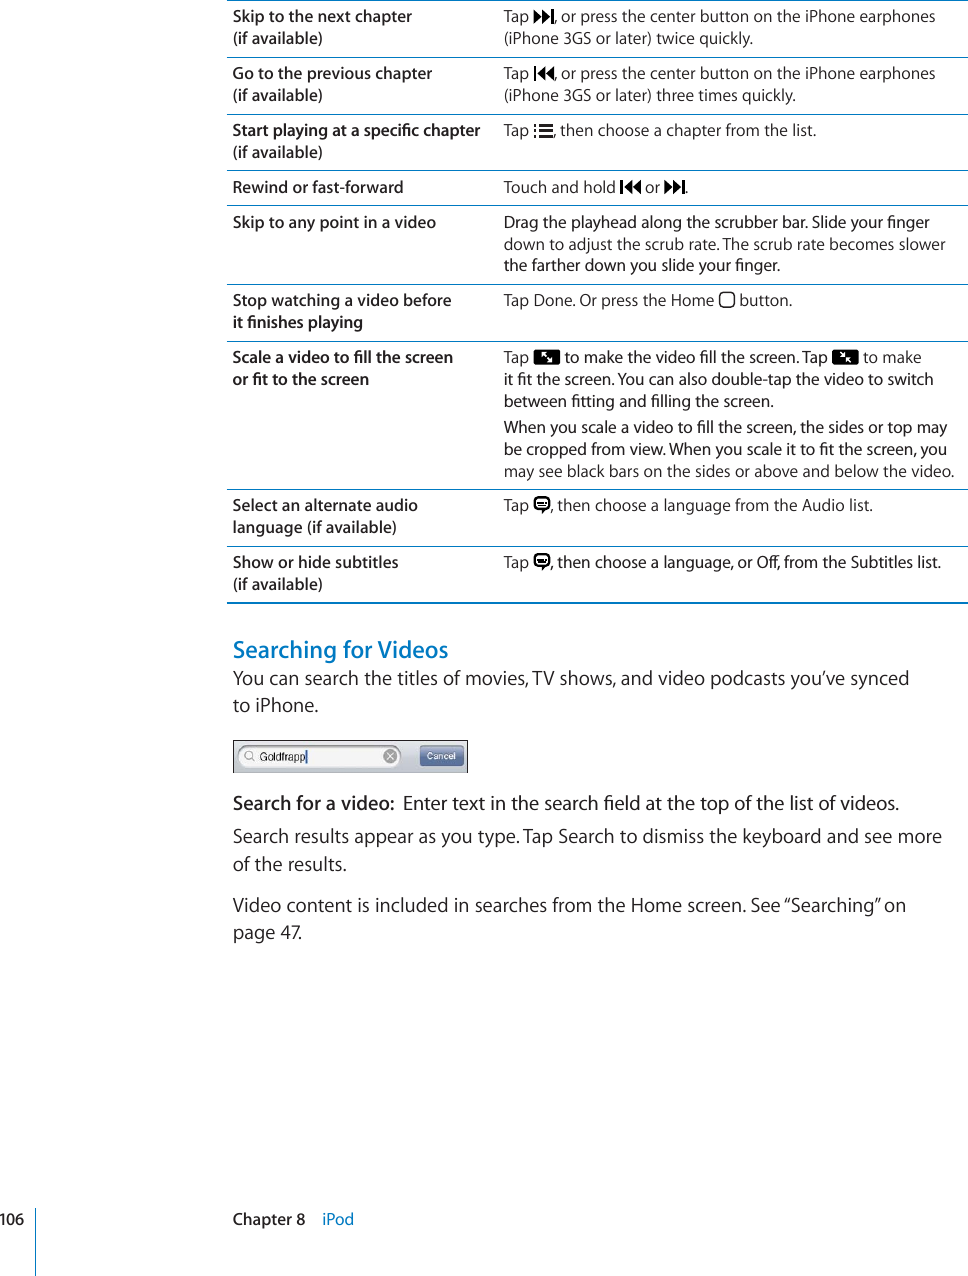
![Controlling Audio PlaybackWhen you play a song, the Now Playing screen appears.5L_[-HZ[MVY^HYK7SH`7H\ZL;YHJR3PZ[)HJR=VS\TL7YL]PV\Z9L^PUK(PY7SH`Pause a songTap, or press the center button on the iPhone earphones.Resume playbackTap, or press the center button on the iPhone earphones.Raise or lower the volumeDrag the volume slider or use the buttons on the side of iPhone. You can also use the volume buttons on the iPhoneearphones (iPhone3GS or later).Play music on an AirPlay soundsystem or Apple TVTap and choose a sound system. If doesn’t appear or if you don’t see the AirPlay system you’re looking for, make sureiPhone is on the same wireless network.Switch from AirPlay back to iPhoneTap and choose iPhone from the list.Restart a song or a chapter in anaudiobook or podcastTap.Skip to the next song or chapter inan audiobook or podcastTap, or press the center button on the iPhone earphonestwice quickly.Go to the previous song or chapterin an audiobook or podcastTap twice, or press the center button on the iPhoneearphones three times quickly.Rewind or fast-forward Touch and hold or. The longer you hold the control, the faster the song rewinds or fast-forwards. On the iPhoneearphones, press the center button twice quickly and hold tofast forward, or three times quickly and hold to rewind.97Chapter 8iPod](https://usermanual.wiki/Apple/E2422A.Final-version-of-User-Manual/User-Guide-1413266-Page-97.png)

![Save a photo or video attachment to your Camera Roll album: Tap the photo or video in the conversation, tap , then tap Save Image or Save Video.Copy a photo or video: Touch and hold the attachment, then tap Copy. You can paste the photo or video to an Mail message or another MMS message.Sending Voice MemosYou can send voice memos in a message to another MMS-capable device.Send a voice memo: In Voice Memos, tap , tap the voice memo you want to send, then tap Share and tap MMS. Address the message and tap Send.Editing ConversationsIf you want to keep just part of a conversation, you can delete the parts you don’t want. You can also delete entire conversations from the Messages list.Edit a conversation: Tap Edit. Tap the circles along the left side to select the parts of VJGEQPXGTUCVKQP[QWYCPVVQFGNGVGVJGPVCR&GNGVG9JGP[QW¨TG°PKUJGFVCR&QPG%NGCTCNNVGZVCPF°NGUYKVJQWVFGNGVKPIVJGEQPXGTUCVKQPTap Edit, then tap Clear All. 6CR%NGCT%QPXGTUCVKQPVQEQP°TOForward a conversation: Select a conversation, then tap Edit. Tap the circles on the left side of the screen to select the parts of the conversation you want to include, then tap Forward, enter one or more recipients, and tap Send.Delete a conversation: Tap Edit, then tap next to the conversation and tap Delete. You can also swipe left or right over the conversation and tap Delete.;VZOV^[OL+LSL[LI\[[VUZ^PWLSLM[VYYPNO[V]LY[OLTLZZHNL113Chapter 9 Messages](https://usermanual.wiki/Apple/E2422A.Final-version-of-User-Manual/User-Guide-1413266-Page-113.png)
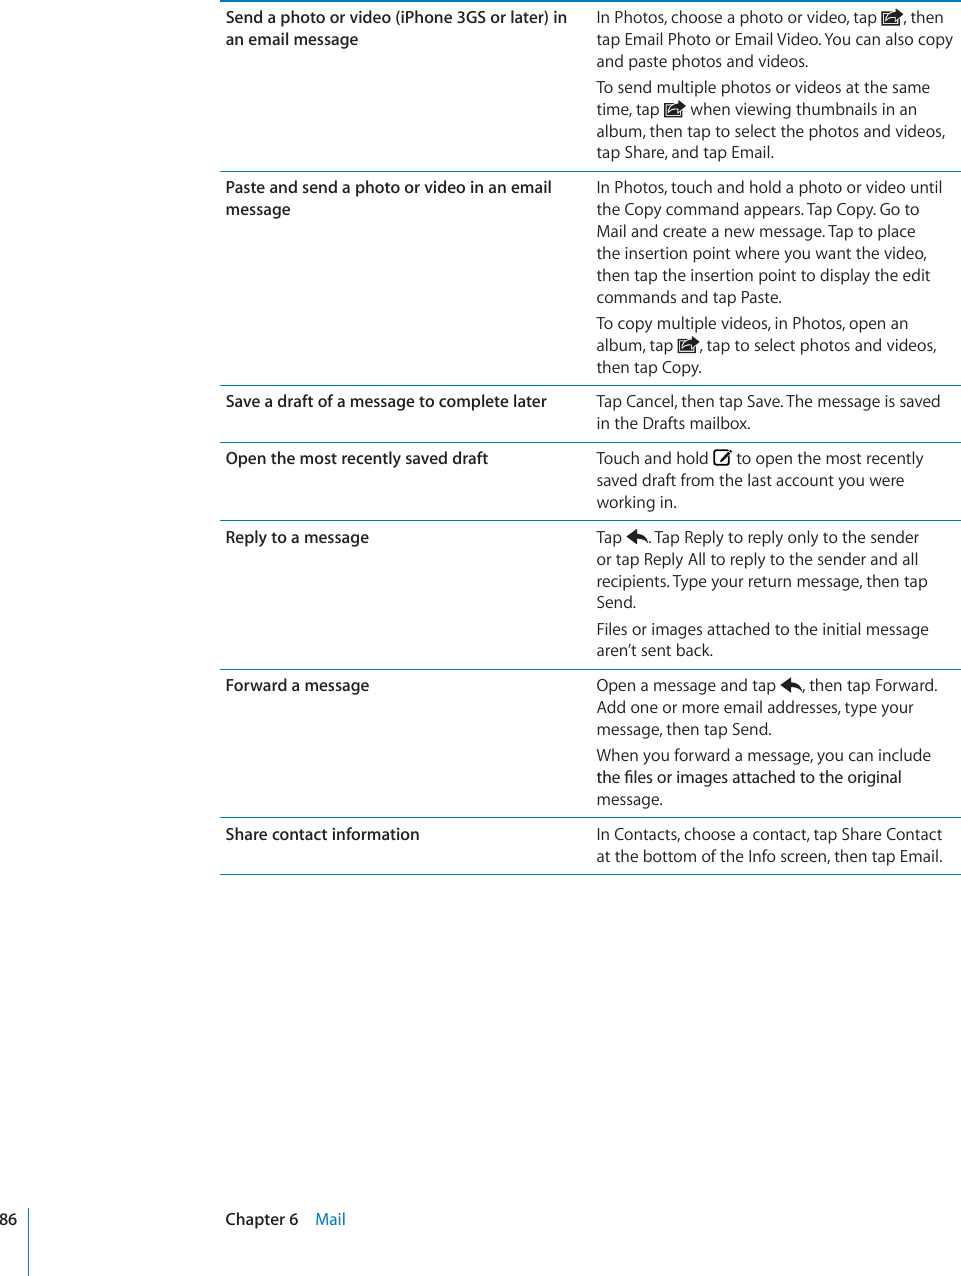
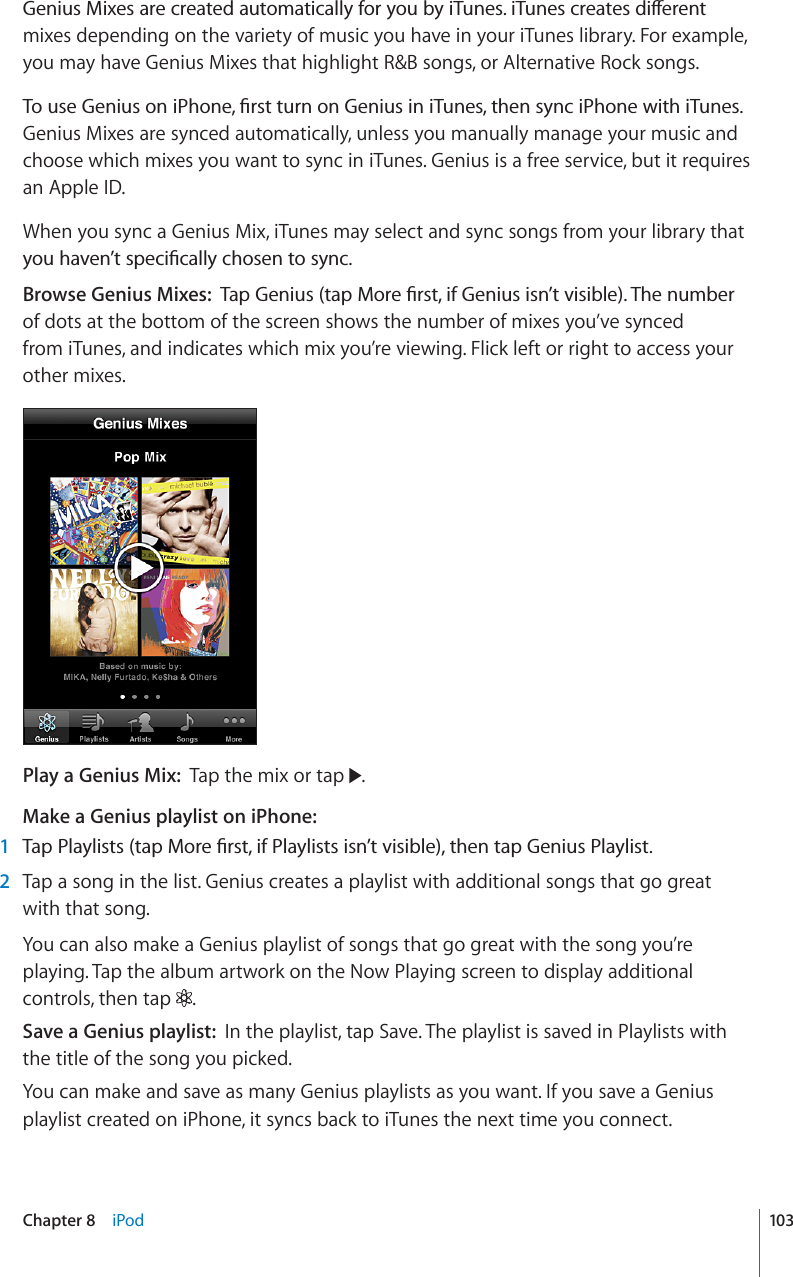
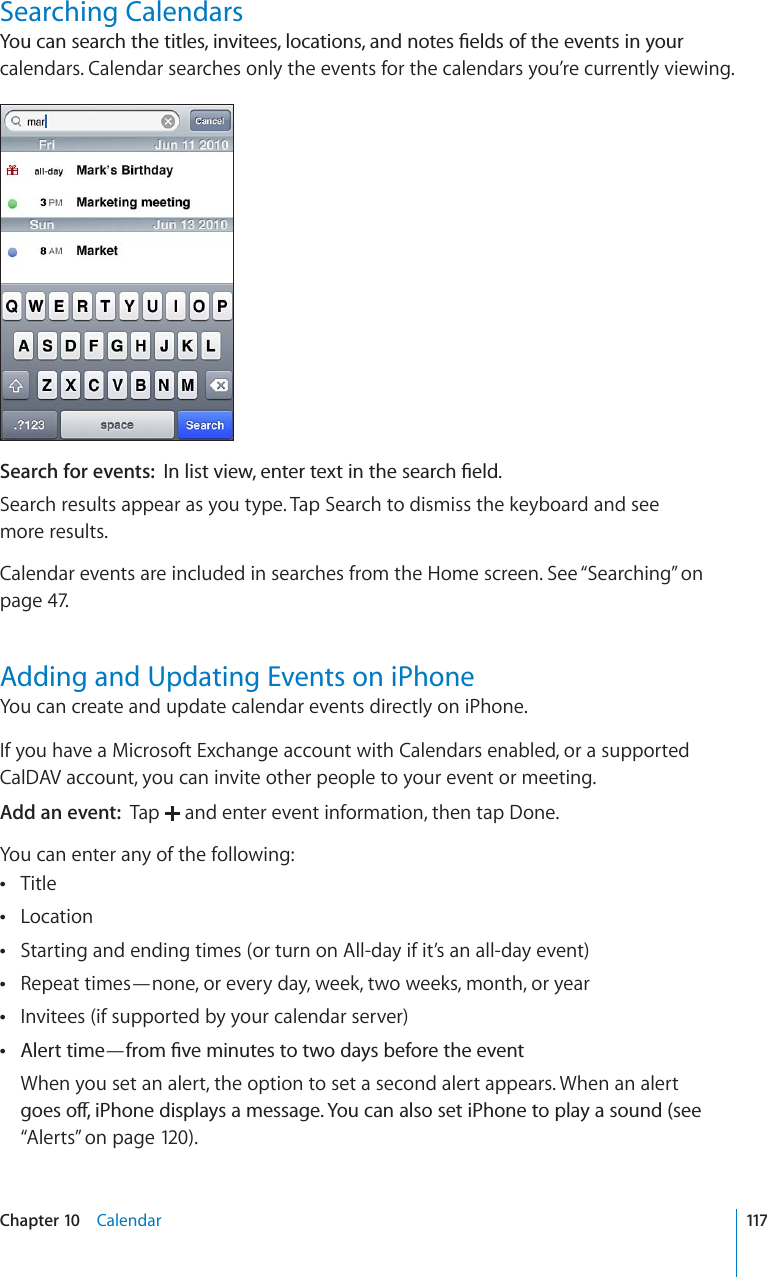
![Viewing Your CalendarsYou can view a single calendar, selected calendars, or all calendars at once.Select calendars to view: Tap Calendars, then tap to select the calendars you want to view. To quickly select or deselect all calendars, tap Show All Calendars or Hide All Calendars. To view your contacts’ birthdays, tap Birthdays at the bottom of the screen. Tap Done to view the selected calendars.The events for all selected calendars appear in a single calendar on iPhone. You can view your calendar events in a list, by day, or by month. Switch views: Tap List, Day, or Month.List view: All your appointments and events appear in a scrollable list.Day view: Scroll up or down to see the events in a day. Tap or to see the previous or next day’s events.Month view: Tap a day to see its events. Tap or to see the previous or next month.(KKHUL]LU[+H`Z^P[OKV[ZOH]LZJOLK\SLKL]LU[Z.V[V[VKH` :^P[JO]PL^Z9LZWVUK[VJHSLUKHYPU]P[H[PVU,]LU[ZMVYZLSLJ[LKKH`See the details of an event: Tap the event.Set iPhone to adjust event times for a selected time zone:1In Settings, choose “Mail, Contacts, Calendars.”2Under Calendars, tap Time Zone Support, then turn Time Zone Support on.3Tap Time Zone, then search for a major city in the time zone you want.When Time Zone Support is on, Calendar displays event dates and times in the time \QPGQHVJGEKV[[QWUGNGEVGF9JGP6KOG<QPG5WRRQTVKUQÒ%CNGPFCTFKURNC[UGXGPVUin the time zone of your current location as determined by the network time.116 Chapter 10 Calendar](https://usermanual.wiki/Apple/E2422A.Final-version-of-User-Manual/User-Guide-1413266-Page-116.png)
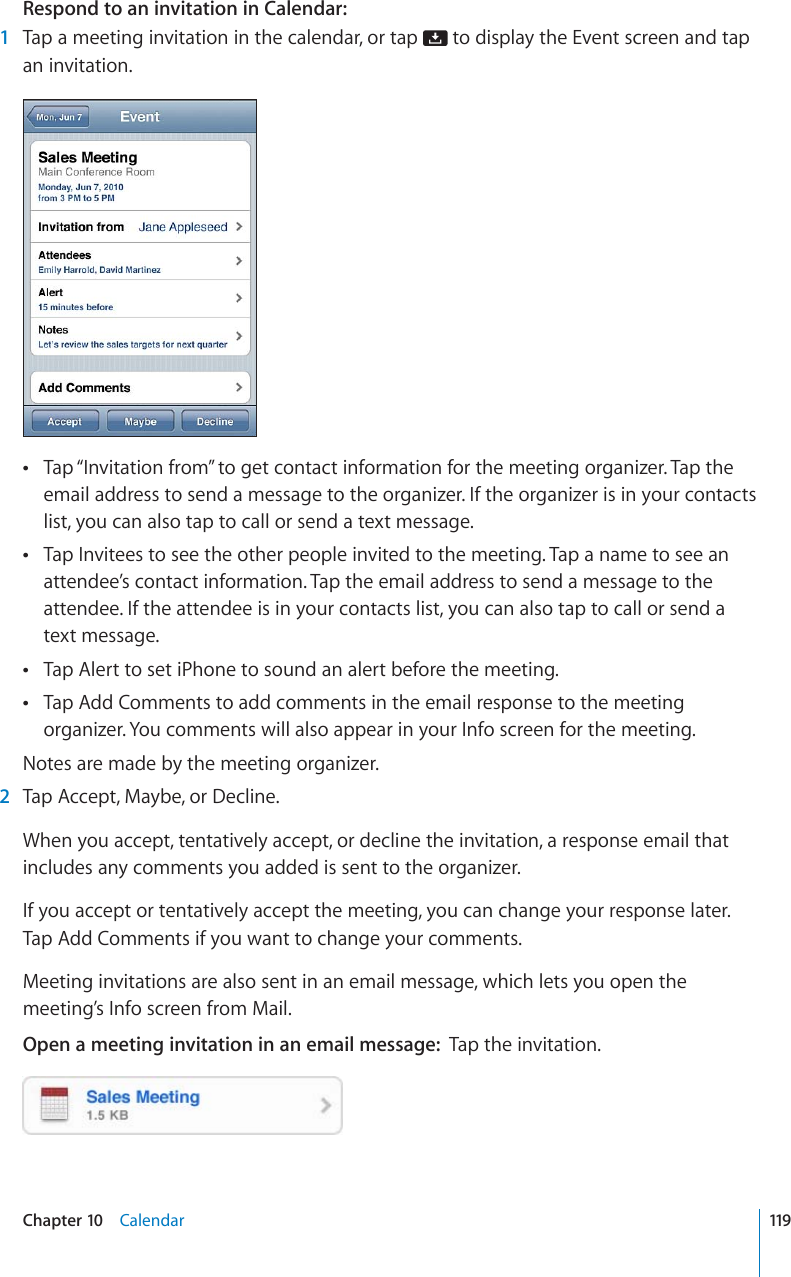
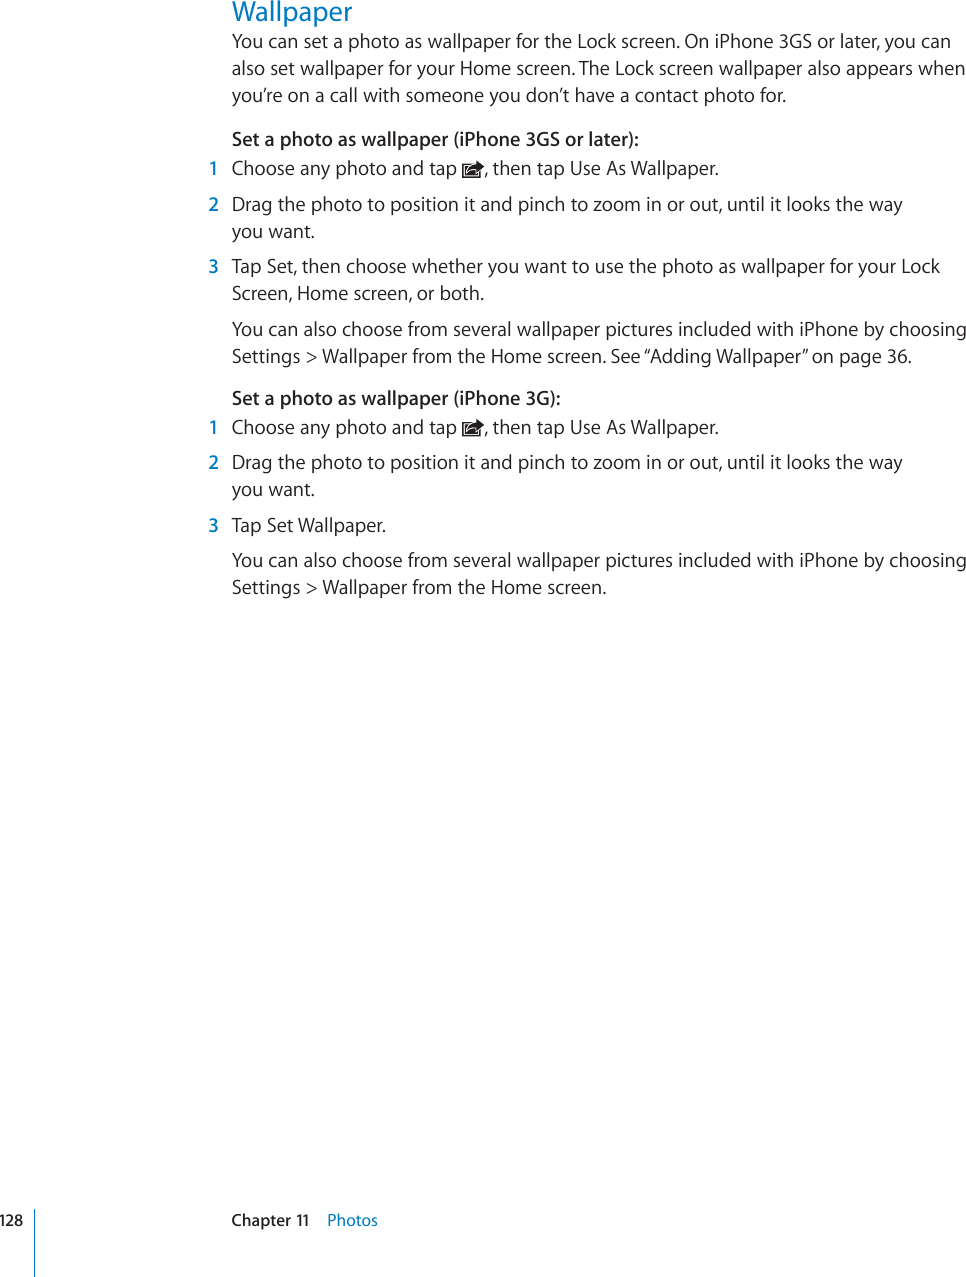
![Important: Some carriers don’t support network time in all locations. If you’re traveling, iPhone may not alert you at the correct local time. To manually set the correct time, see “Date and Time” on page 204.CalendarYou can change the default calendar using the Default Calendar setting. See “Calendars”on page 211.NotesYou can’t assign an event to a read-only calendar.Events can also be created by tapping a day, date, or time in a Mail message. See “Using Links and Detected Data”on page 82.Update an event: Tap Edit and change event information. Tap Done when [QW¨TG°PKUJGFDelete an event: Tap the event, tap Edit, then scroll down and tap Delete Event.Responding to Meeting InvitationsIf you have a Microsoft Exchange or MobileMe account with Calendars enabled, or a supported CalDAV account, you can receive and respond to meeting invitations from people in your organization. When you receive an invitation, the meeting appears in your calendar with a dotted line around it. appears in the lower-right corner of the screen with a badge that shows the total number of new invitations you have. The number of new invitations also appears on the Calendar icon on the Home screen.5\TILYVMTLL[PUNPU]P[H[PVUZ118 Chapter 10 Calendar](https://usermanual.wiki/Apple/E2422A.Final-version-of-User-Manual/User-Guide-1413266-Page-118.png)

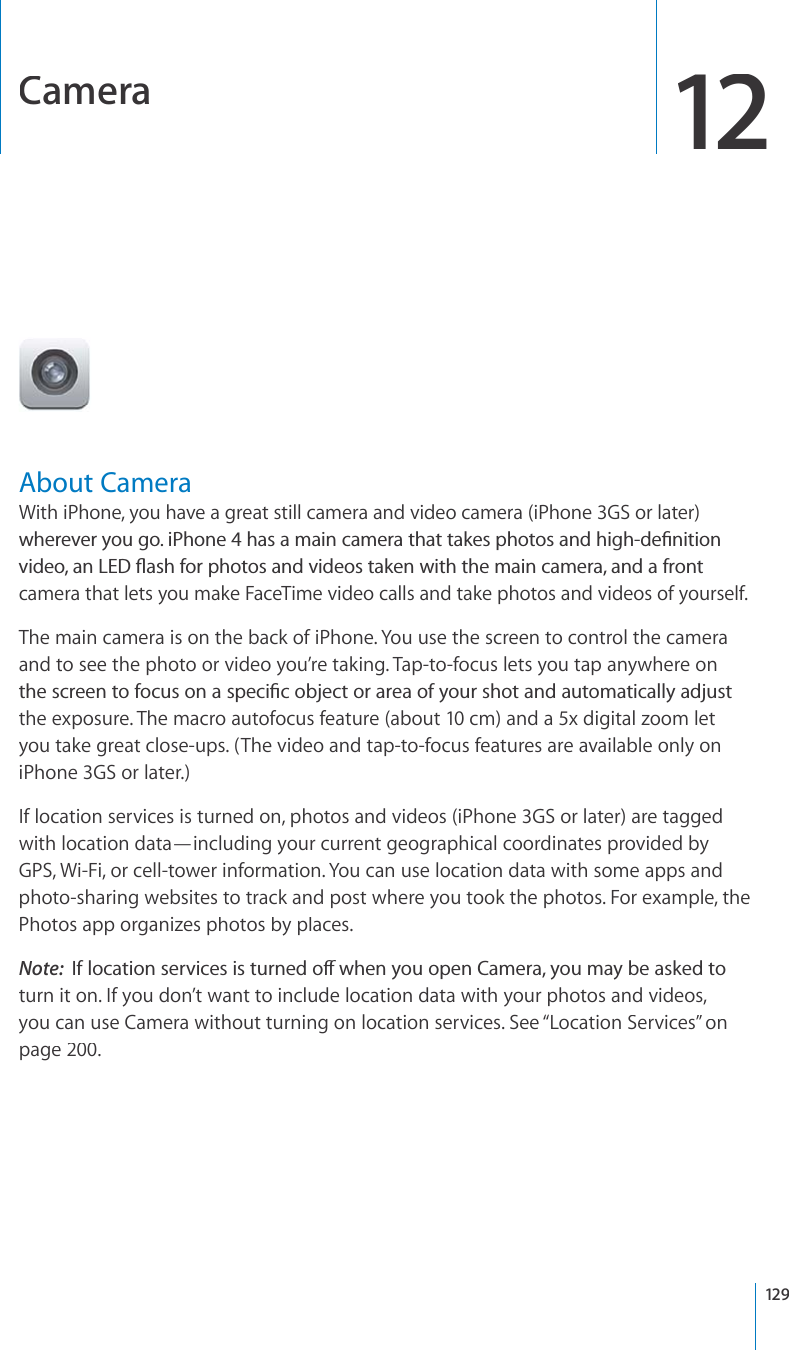
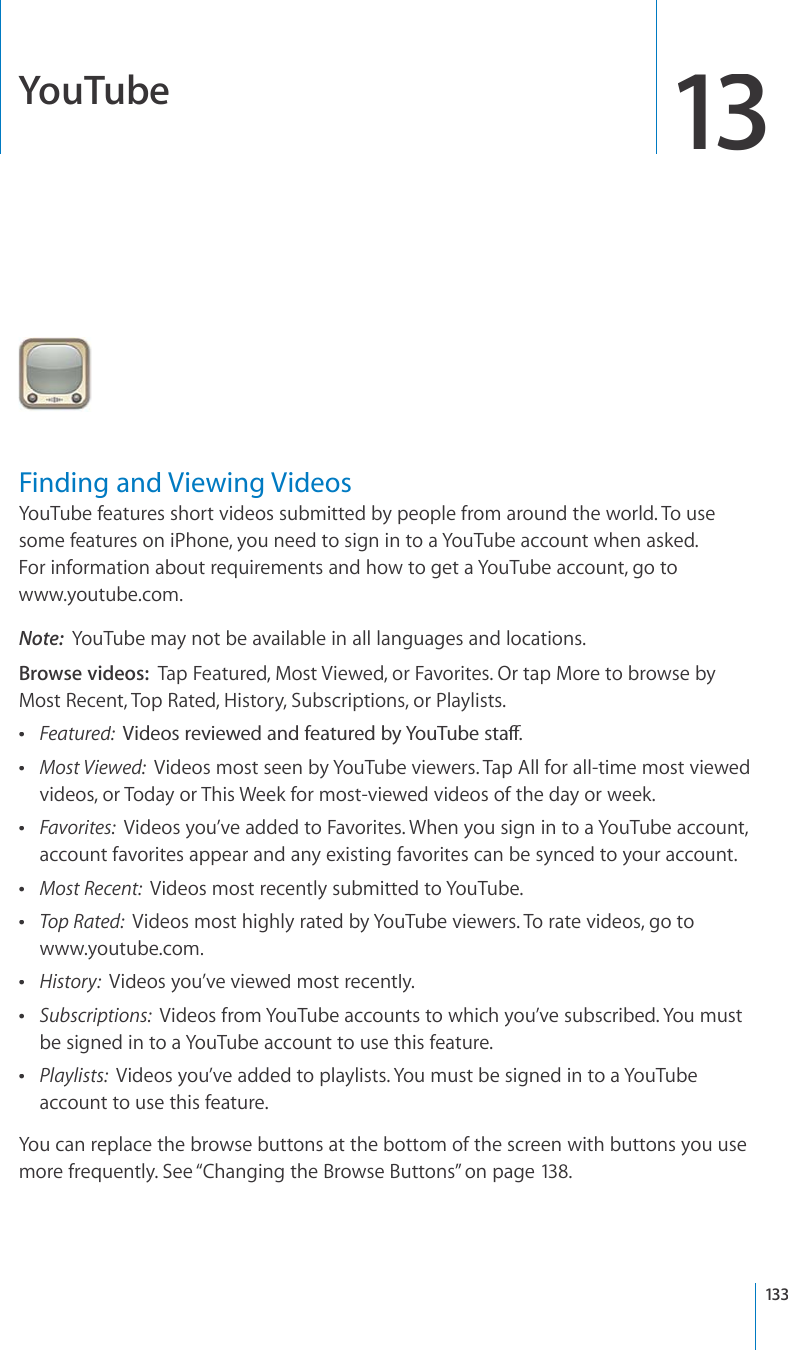
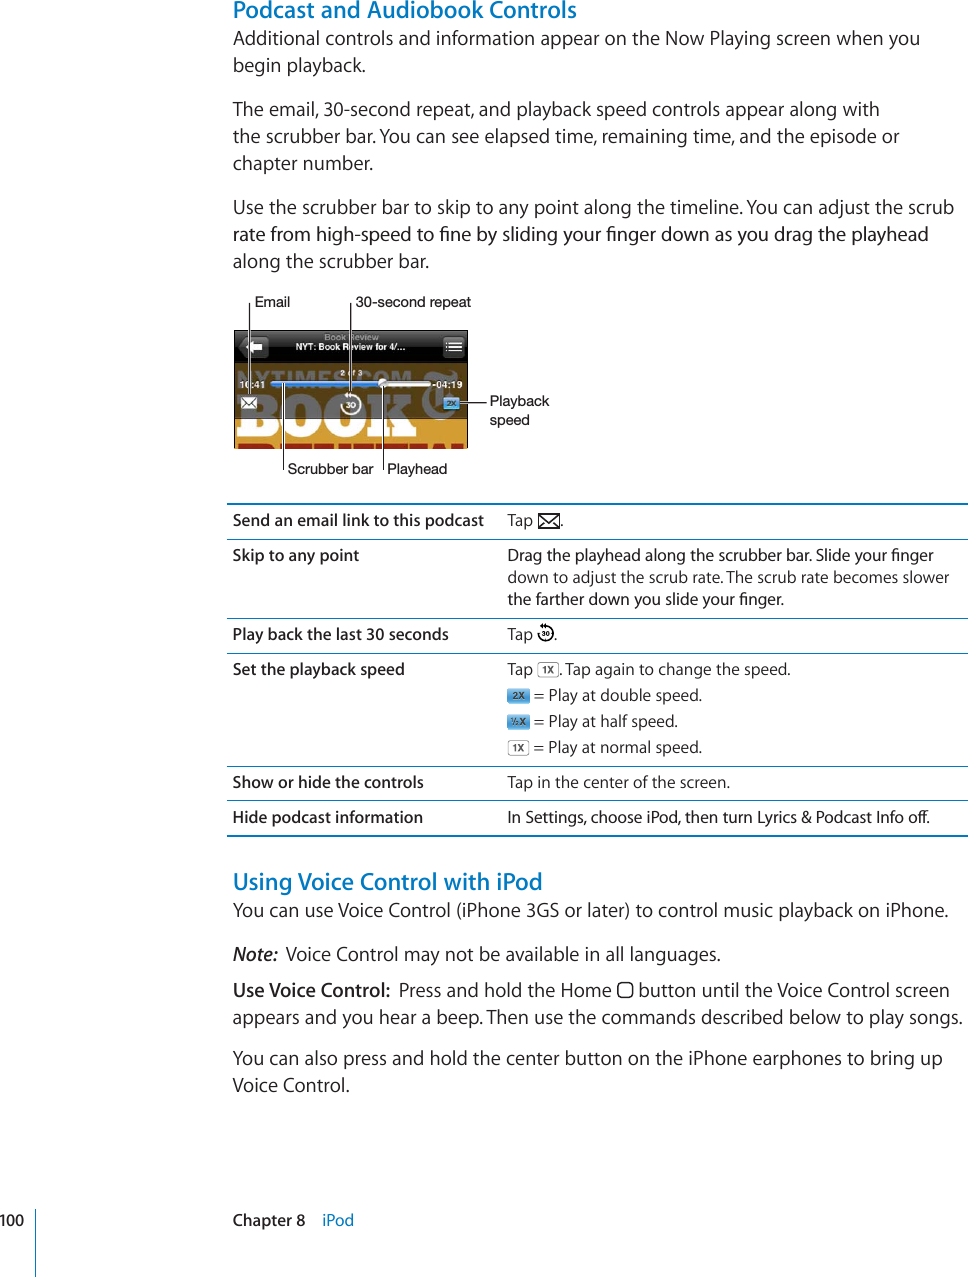
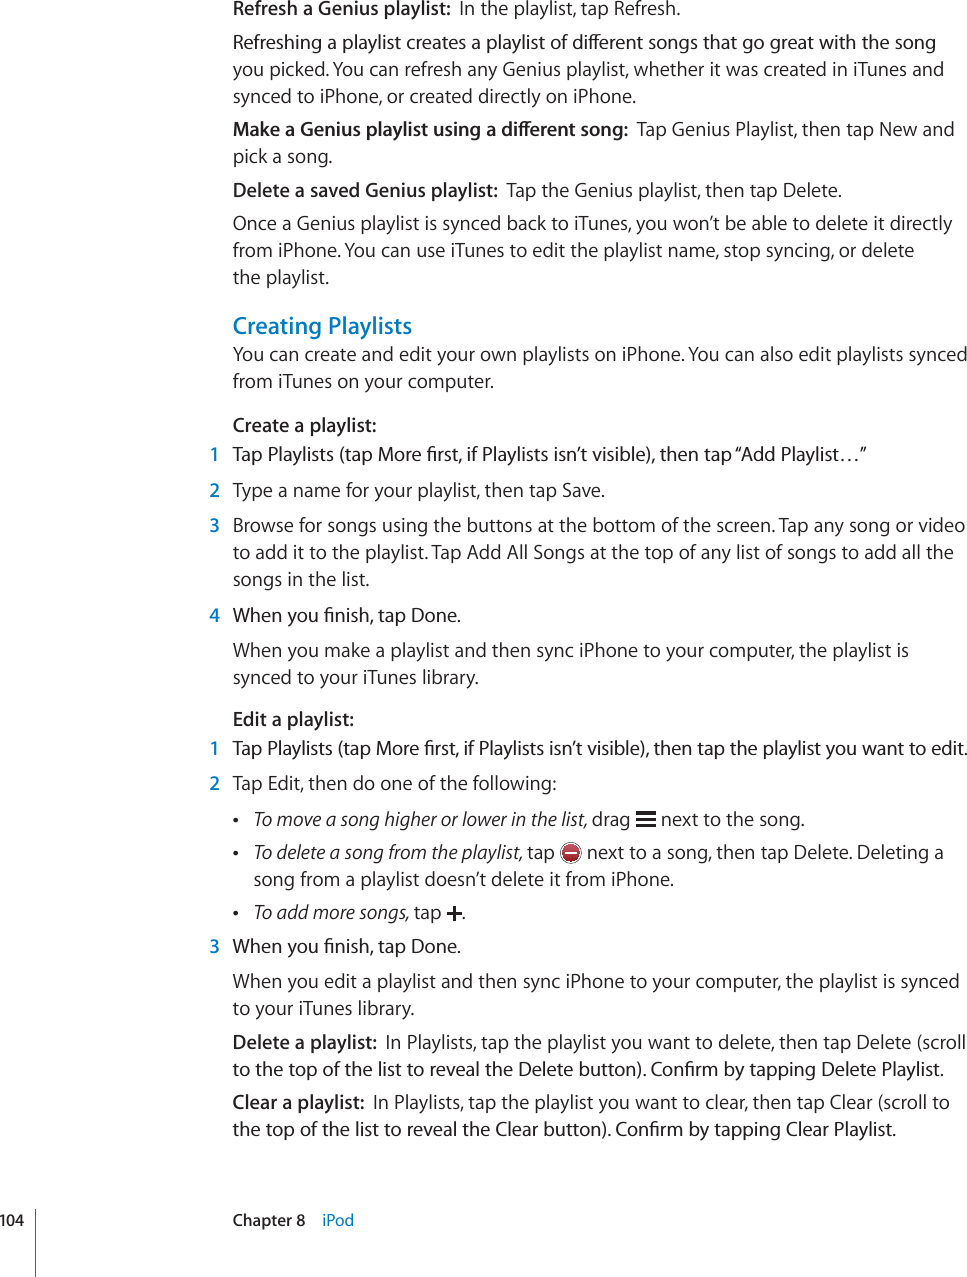
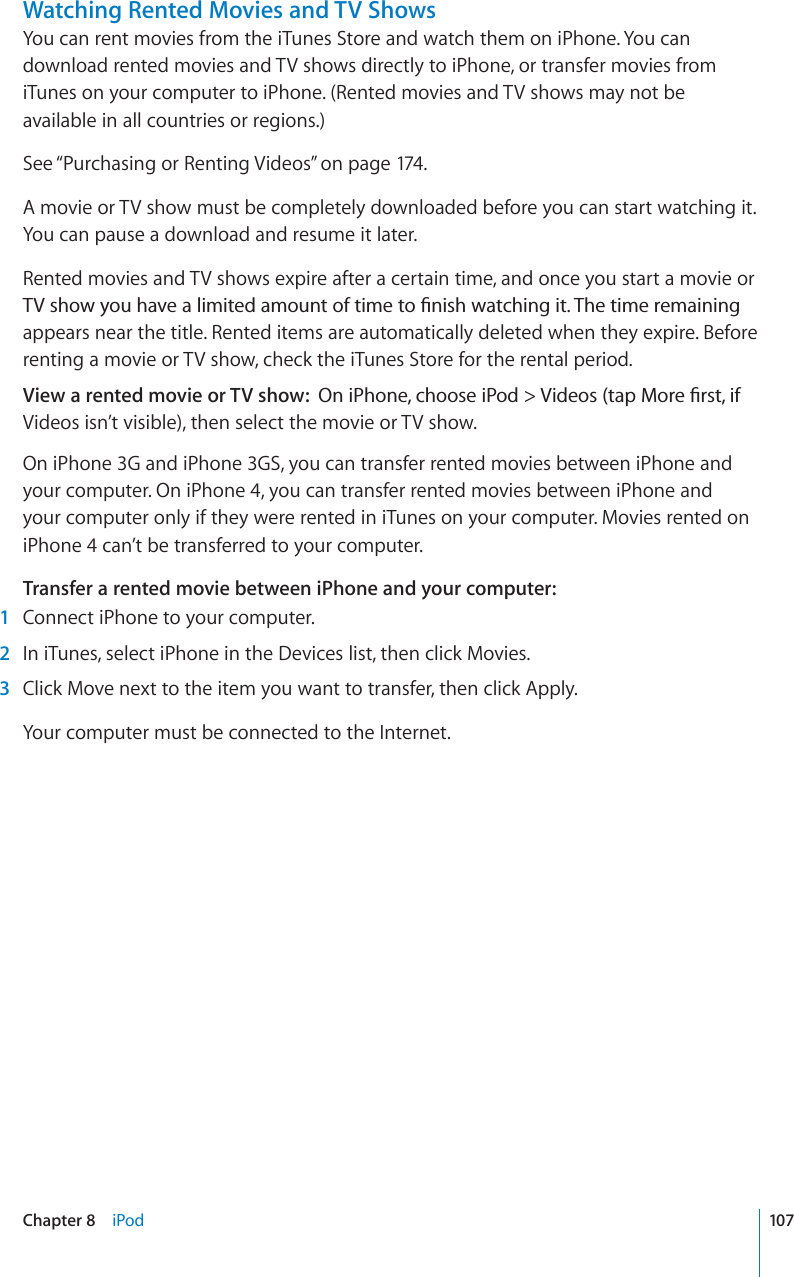
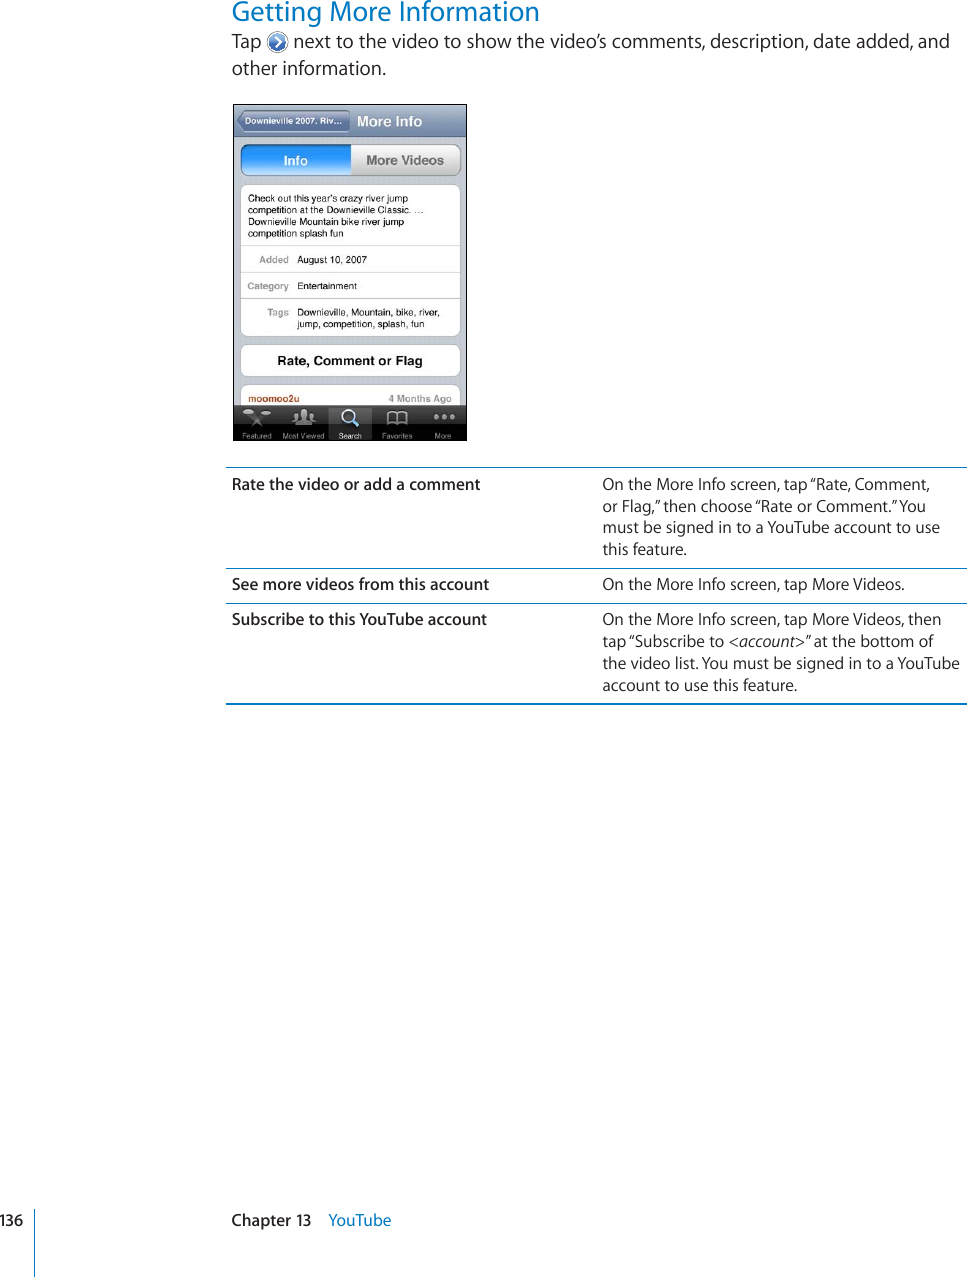
![Search for a video:1 6CR5GCTEJVCR/QTG°TUVKH5GCTEJKUP¨VXKUKDNGVJGPVCRVJG;QW6WDGUGCTEJ°GNF2Type a word or phrase that describes what you’re looking for, then tap Search.YouTube shows results based on video titles, descriptions, tags, and user names. Listed videos show title, rating, number of views, length, and the account name that posted the video.Play a video: Tap the video.The video begins to download to iPhone and a progress bar appears. When enough of the video has downloaded, it begins to play. You can also tap to start the video.Controlling Video PlaybackWhen a video starts playing, the controls disappear so they don’t obscure the video.Show or hide the video controls: Tap the screen.5L_[-HZ[MVY^HYK7SH`7H\ZL,THPS:JHSL+V^USVHKWYVNYLZZ=VS\TL7SH`OLHK :JY\IILYIHY)VVRTHYR 7YL]PV\ZYL^PUK(PY7SH`Play or pause a video Tap or . You can also press the center button on the iPhone earphones (iPhone 3GS or later).Adjust the volume Drag the volume slider, or use the volume buttons on the side of iPhone. You can also use the volume buttons on the iPhone earphones (iPhone 3GS or later).Play a video on Apple TV using AirPlay Tap and choose an Apple TV. If doesn’t appear or if you don’t see the Apple TV you’re looking for, make sure it’s on the same wireless network as iPhone.Switch from AirPlay back to iPhone Tap and choose iPhone from the list.Restart a video Tap .Skip to the next or previous video in a list Tap twice to skip to the previous video. Tap to skip to the next video.Rewind or fast-forward Touch and hold or .134 Chapter 13 YouTube](https://usermanual.wiki/Apple/E2422A.Final-version-of-User-Manual/User-Guide-1413266-Page-134.png)
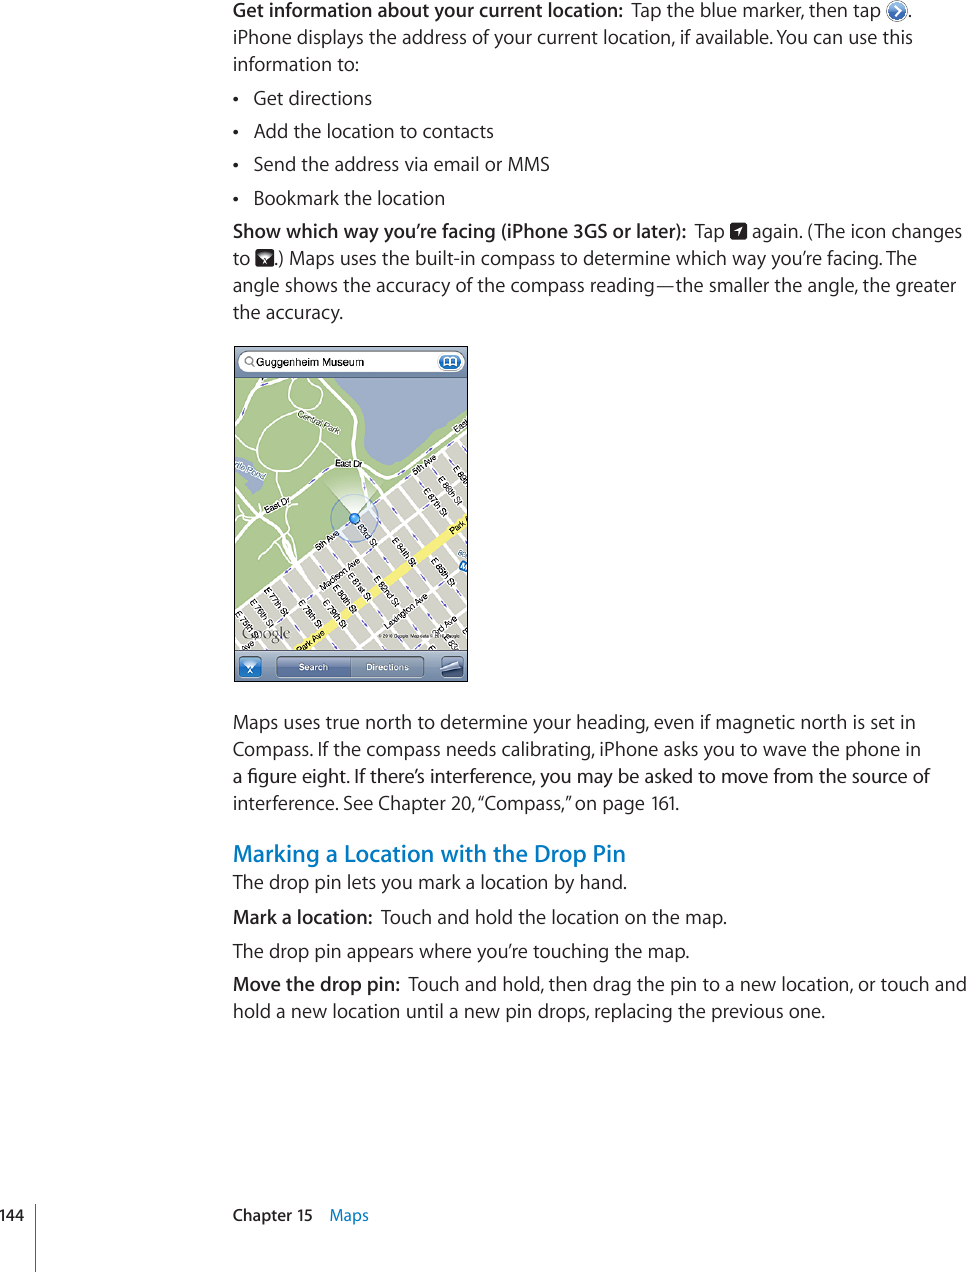
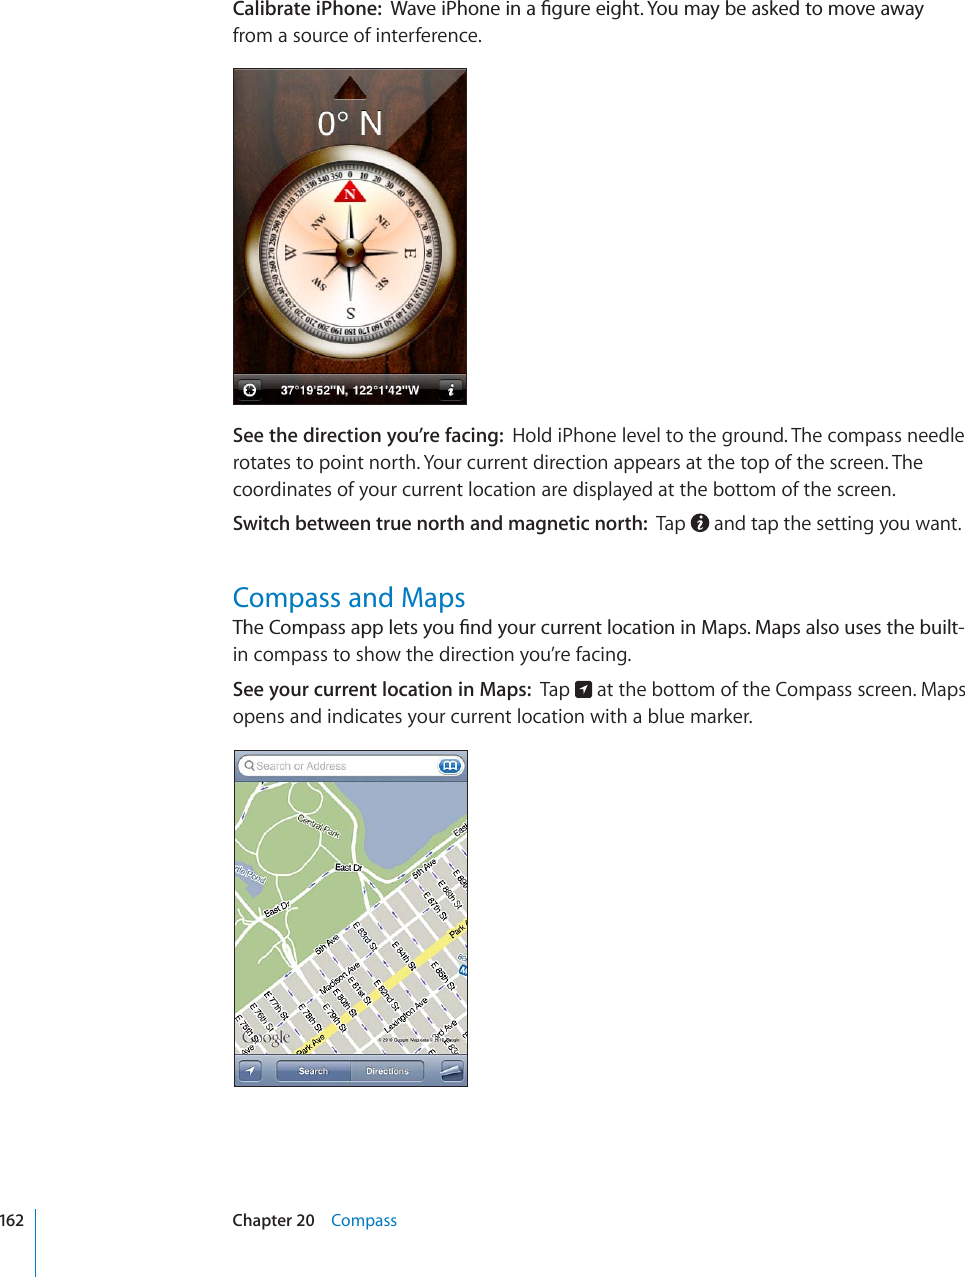
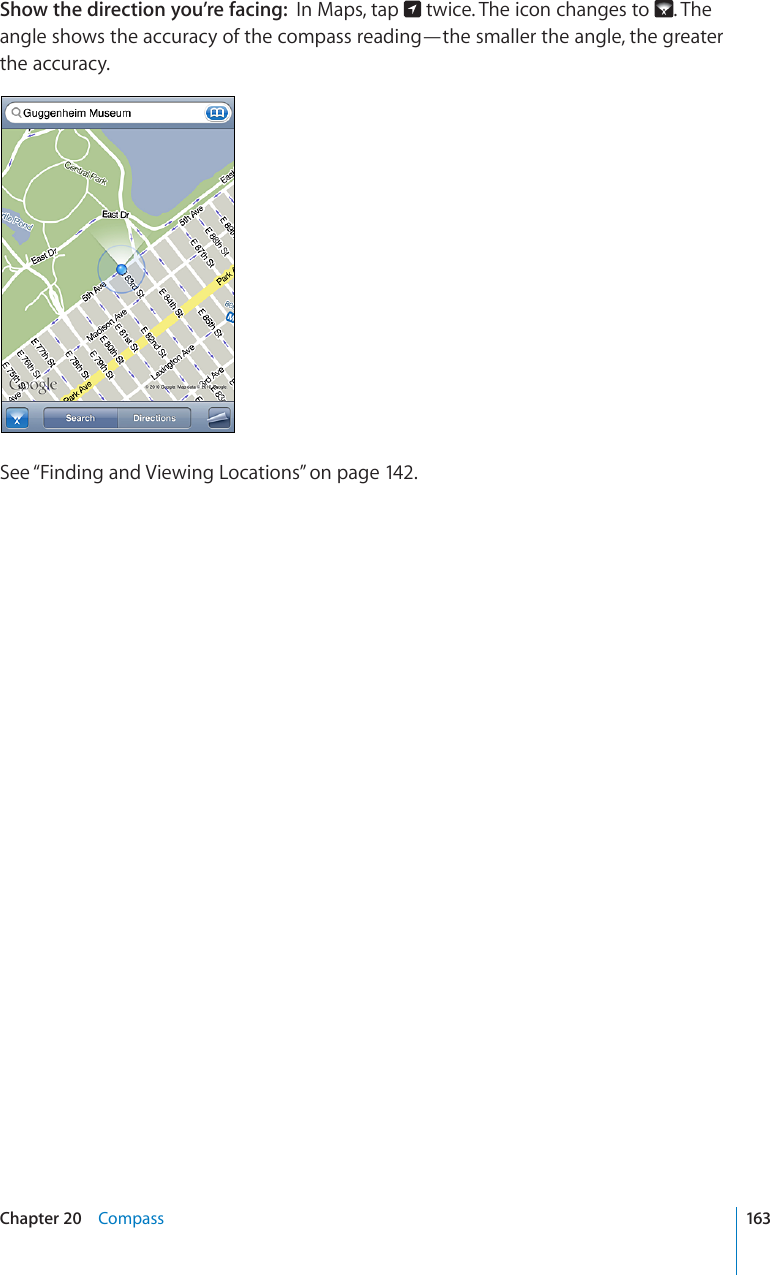
![See the Google Street View of a location:Tap. Flick left or right to pan through the360° panoramic view. (The inset shows your current view.) Tap an arrow to move downthe street. To return to map view, tap the map inset in the lower-right corner.;HW[VYL[\YU[VTHW]PL^Street View may not be available in all areas.Getting DirectionsYou can get step-by-step directions for driving, taking public transit, or walking toa destination.Get directions:1Tap Directions.2'PVGTUVCTVKPICPFGPFKPINQECVKQPUKPVJG5VCTVCPF'PF°GNFU$[FGHCWNVK2JQPGUVCTVUwith your current approximate location (if available). Tap KPGKVJGT°GNFVQEJQQUGa location in Bookmarks (including your current location and the dropped pin, if available), Recents, or Contacts. If KUP¨VUJQYKPIFGNGVGVJGEQPVGPVUQHVJG°GNFFor example, if a friend’s address is in your contacts list, you can tap Contacts and tapyour friend’s name instead of having to type the address.To reverse the directions, tap.3Tap Route (if you entered locations manually), then select directions by car (), directions by public transit (), or directions by walking ().The travel options available depend on the route. 4Do one of the following:146Chapter 15Maps](https://usermanual.wiki/Apple/E2422A.Final-version-of-User-Manual/User-Guide-1413266-Page-146.png)
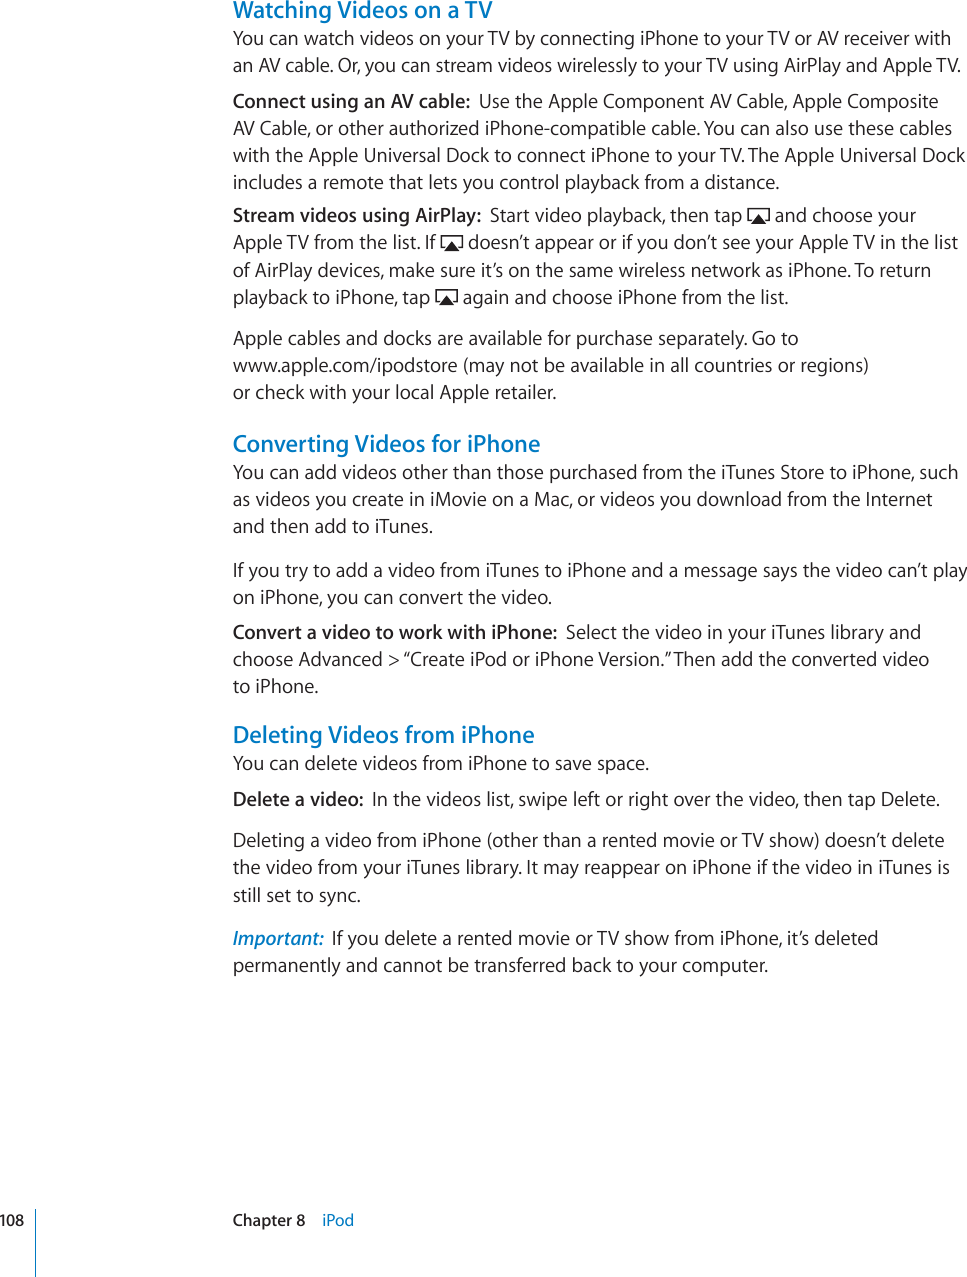
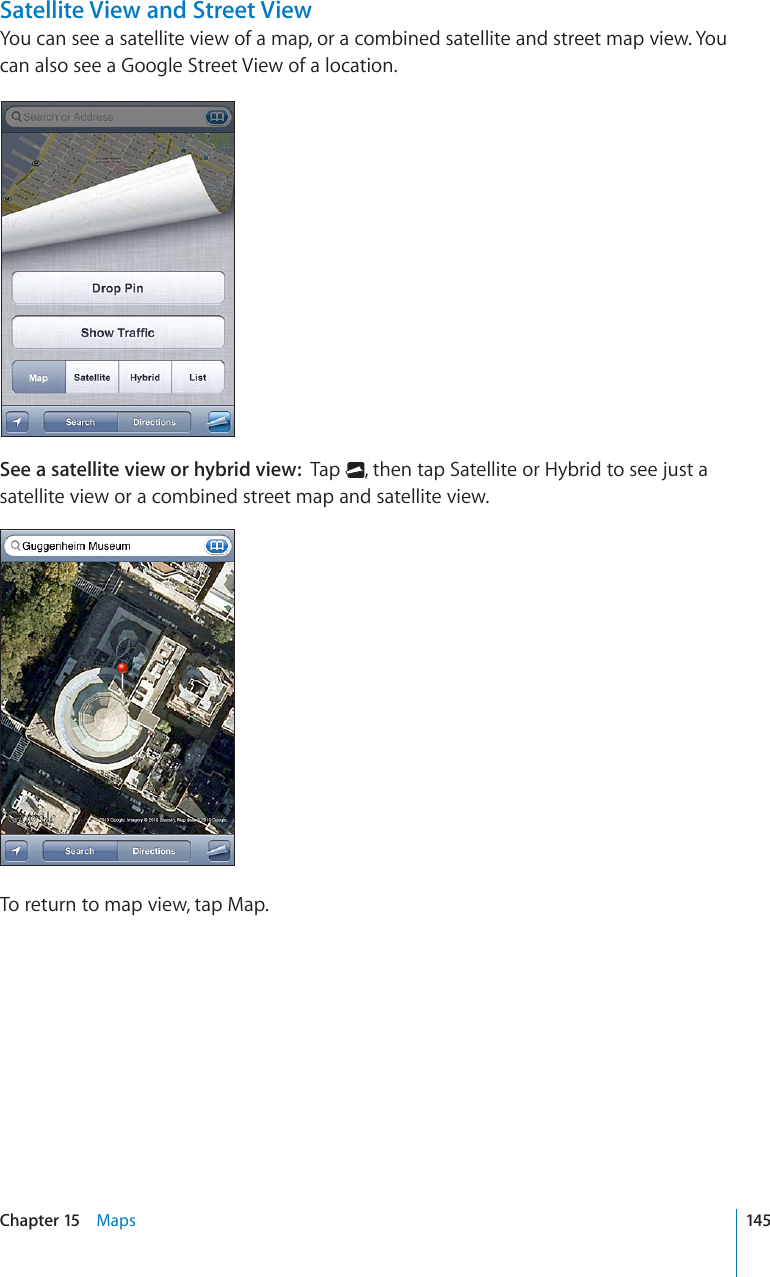
![5JQYKPI6TCÓE%QPFKVKQPU9JGPCXCKNCDNG[QWECPUJQYVTCÓEEQPFKVKQPUHQTOCLQTUVTGGVUCPFJKIJYC[UQPthe map. 5JQYQTJKFGVTCÓEEQPFKVKQPUTap VJGPVCR5JQY6TCÓEQT*KFG6TCÓE5VTGGVUCPFJKIJYC[UCTGEQNQTEQFGFVQKPFKECVGVJG±QYQHVTCÓE.YLLU$WVZ[LKZWLLKSPTP[@LSSV^$ZSV^LY[OHU[OLWVZ[LKZWLLKSPTP[.YH`$UVKH[HJ\YYLU[S`H]HPSHISL9LK$Z[VWHUKNV+H[QWFQP¨VUGGVTCÓE[QWOC[PGGFVQ\QQOQWVVQCNGXGNYJGTG[QWECPUGGOCLQTTQCFU6TCÓEEQPFKVKQPUCTGPQVCXCKNCDNGKPCNNCTGCUFinding and Contacting BusinessesFind businesses in an area:1Find a location—for example, a city and state or country, or a street address—or scroll to a location on a map.2 6[RGVJGMKPFQHDWUKPGUUKPVJGVGZV°GNFCPFVCR5GCTEJPins appear for matching locations in the area. For example, if you locate your city and then type “movies” and tap Search, pins mark movie theaters in your city.Tap the pin that marks a business to see its name or description.(KPFDWUKPGUUGUYKVJQWV°PFKPIVJGNQECVKQP°TUVType things like:restaurants san francisco caapple inc new yorkContact a business or get directions: Tap the pin that marks a business, then tap next to the name.From there, you can do the following:Tap a phone number to call, an email address to send email to, or a web address to visit.For directions, tap Directions To Here or Directions From Here.148 Chapter 15 Maps](https://usermanual.wiki/Apple/E2422A.Final-version-of-User-Manual/User-Guide-1413266-Page-148.png)
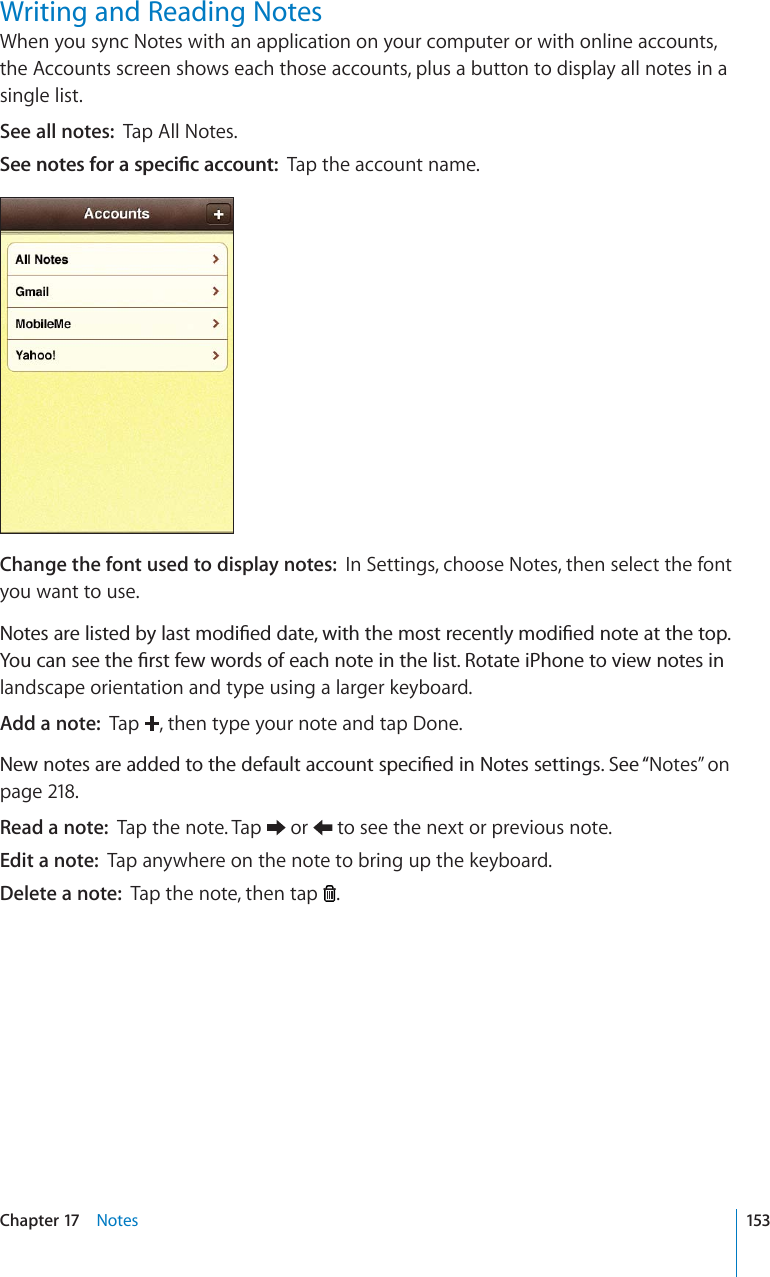
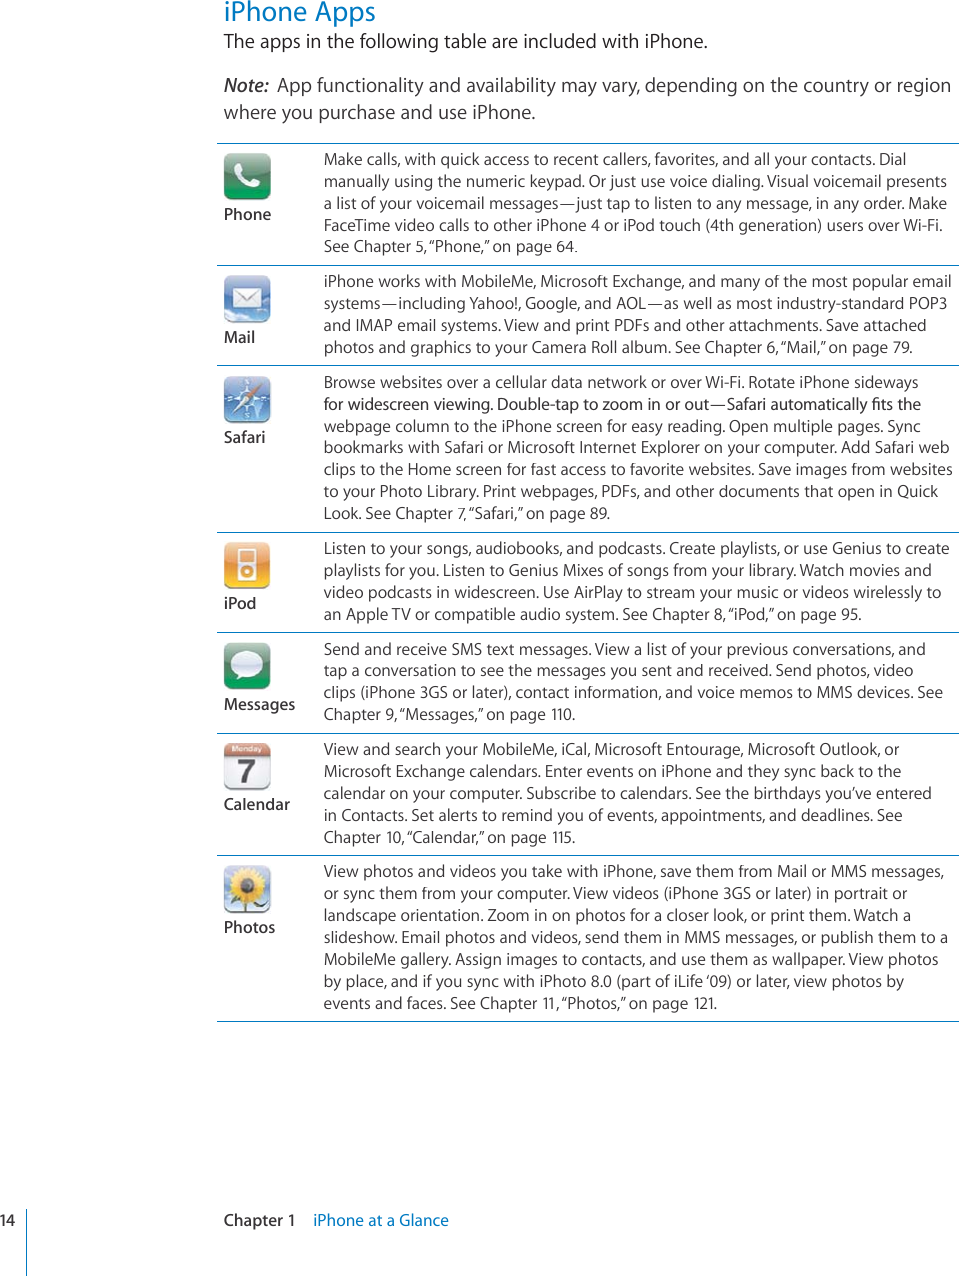
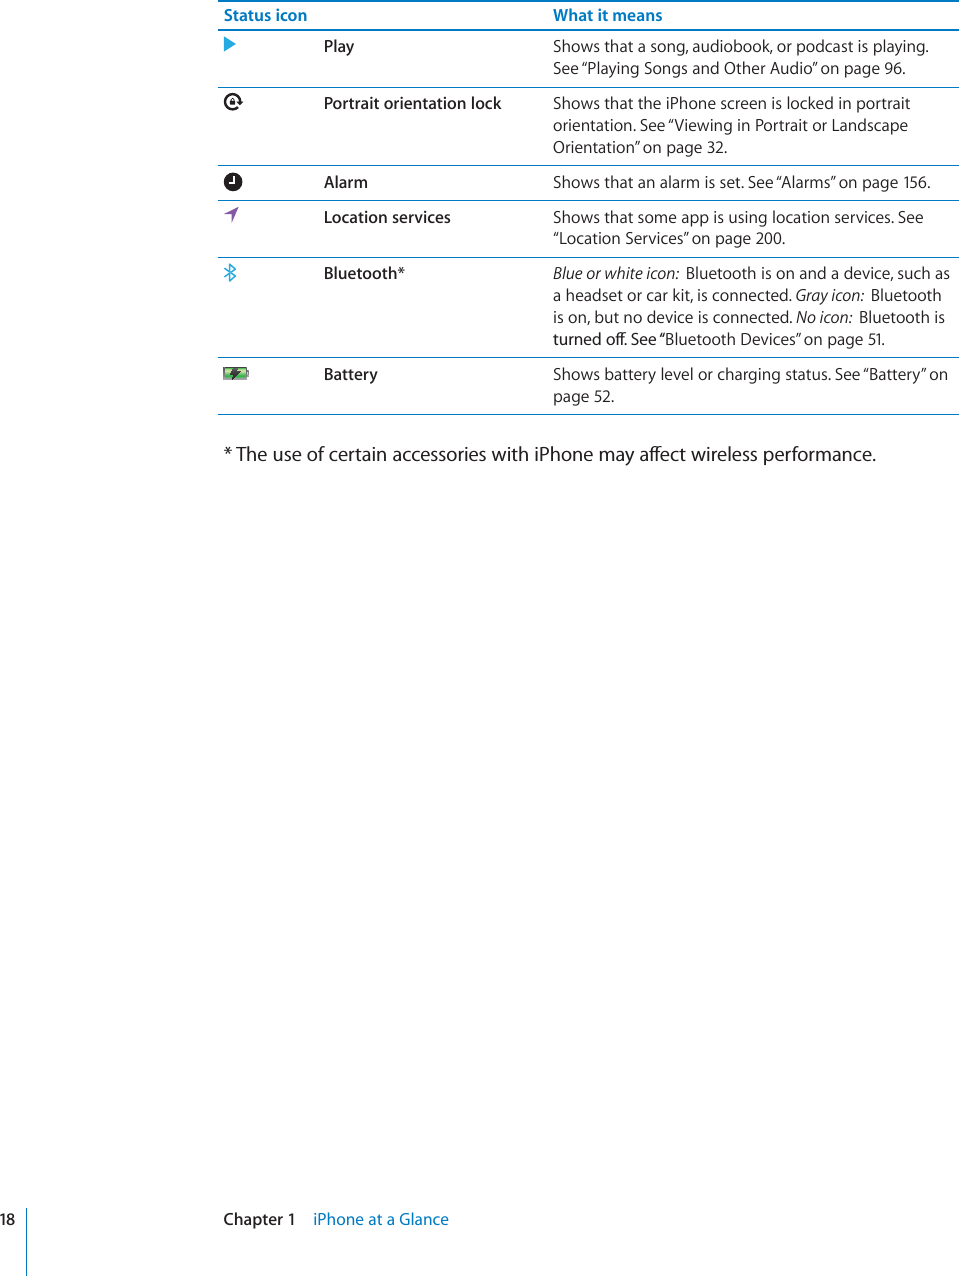
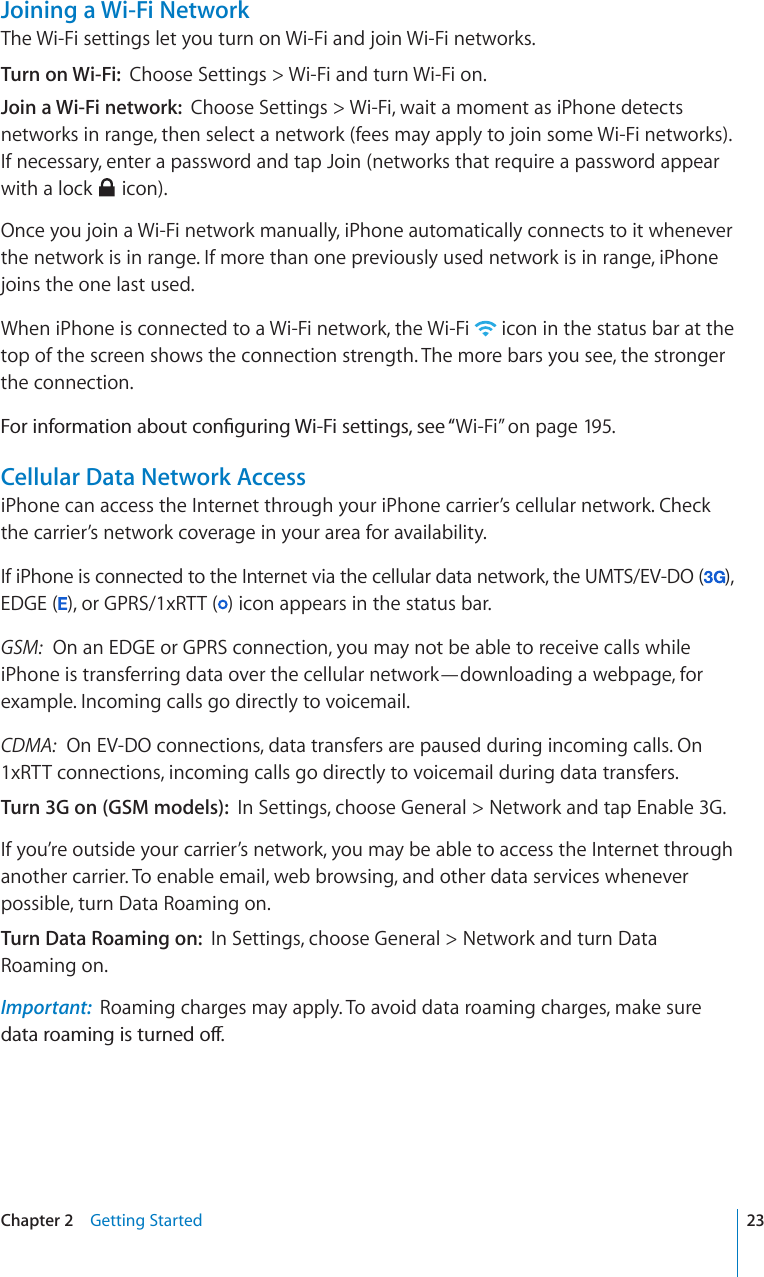
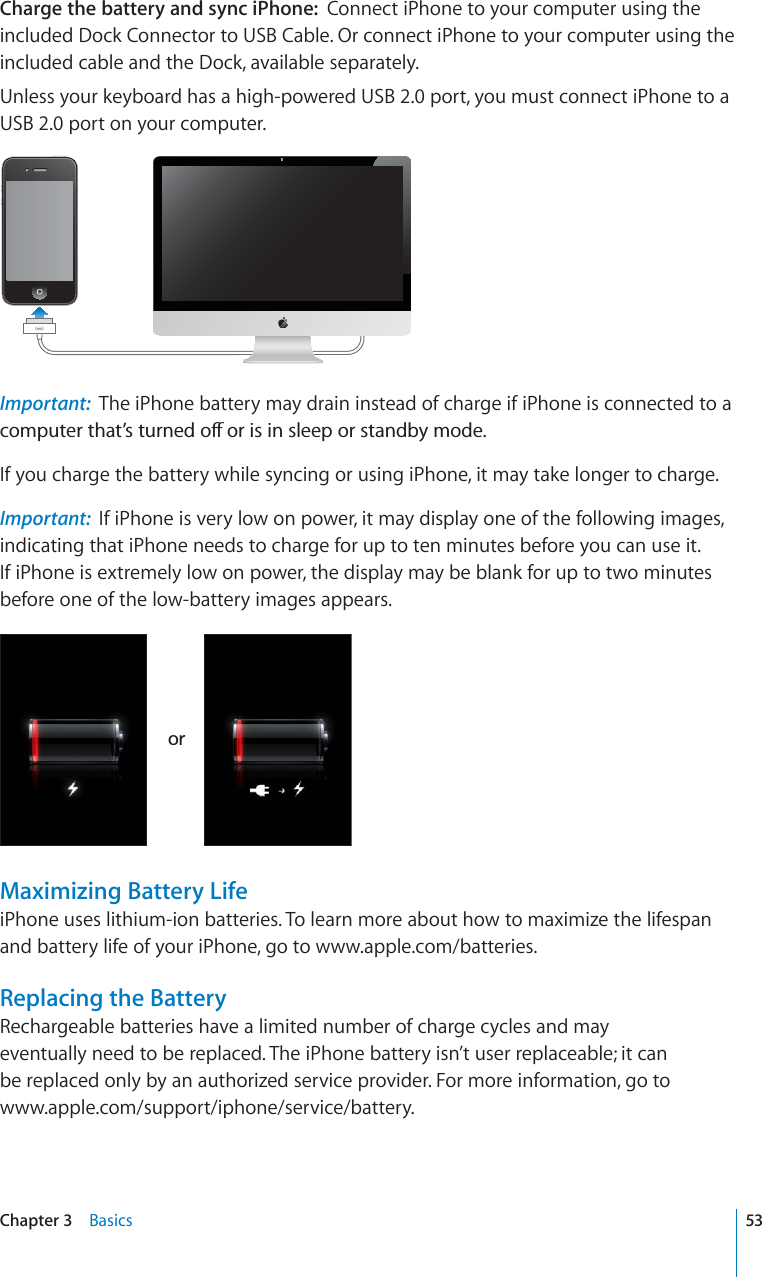
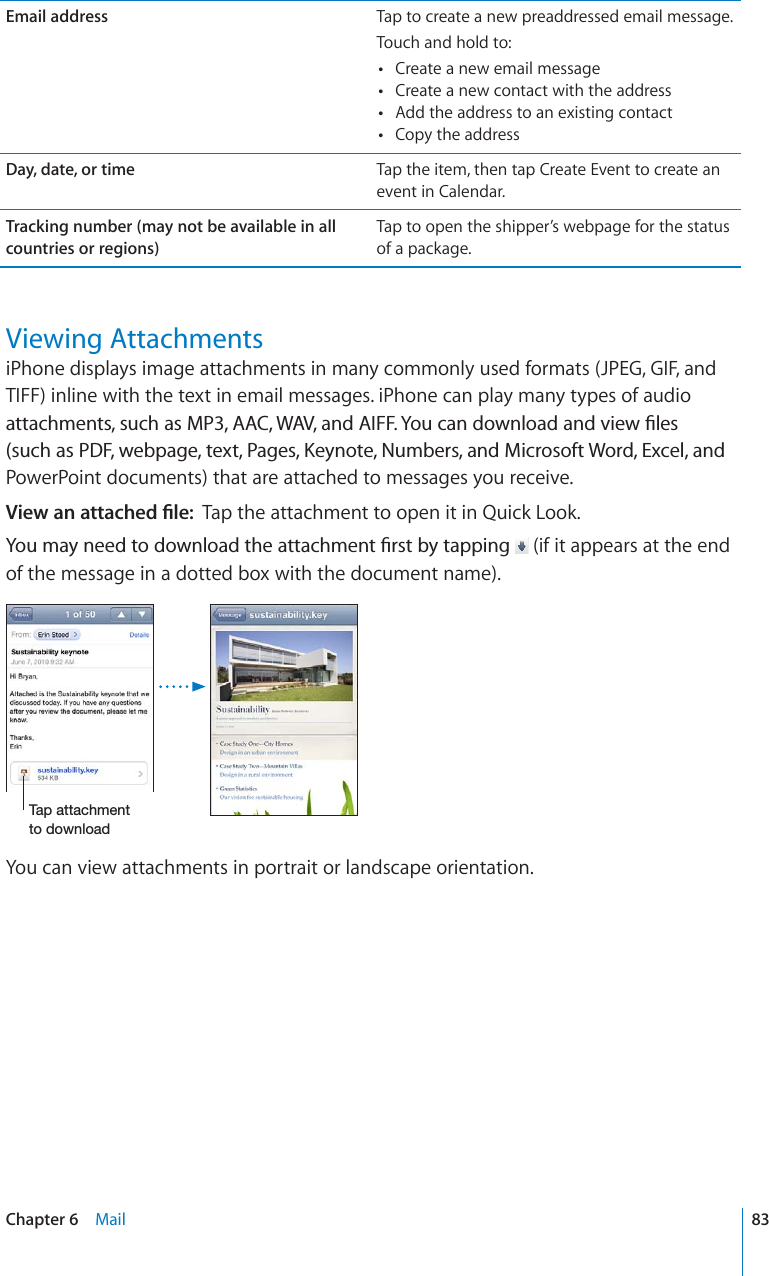
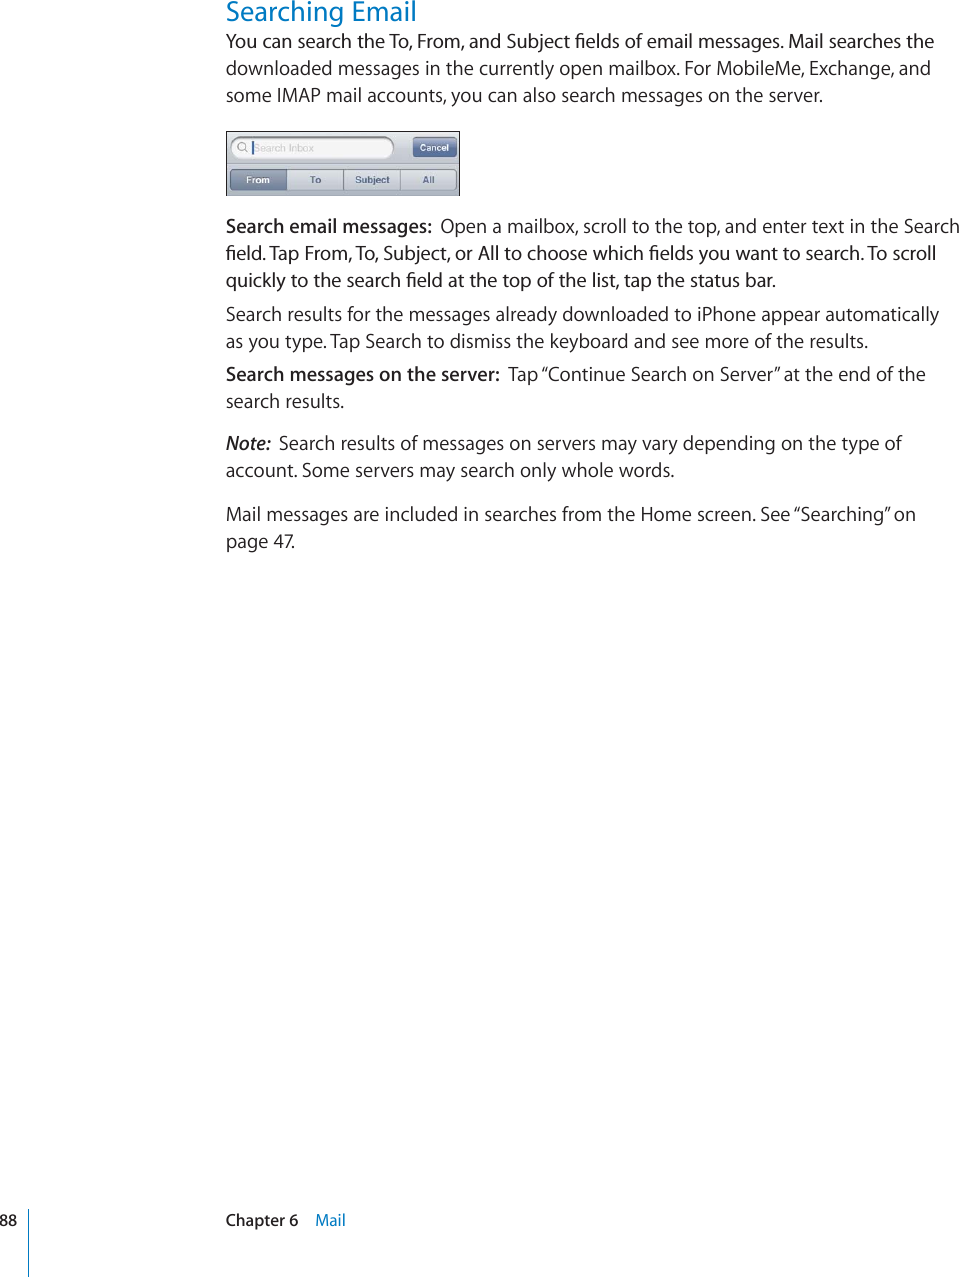
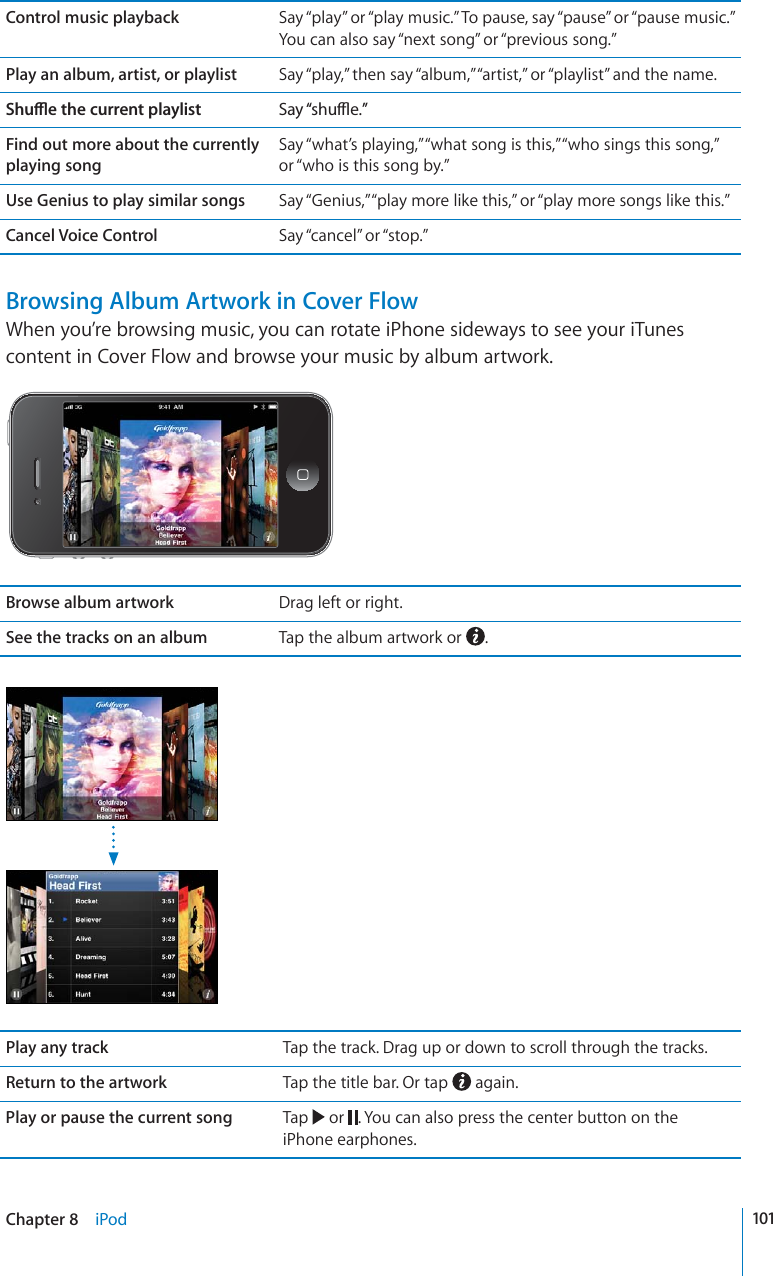
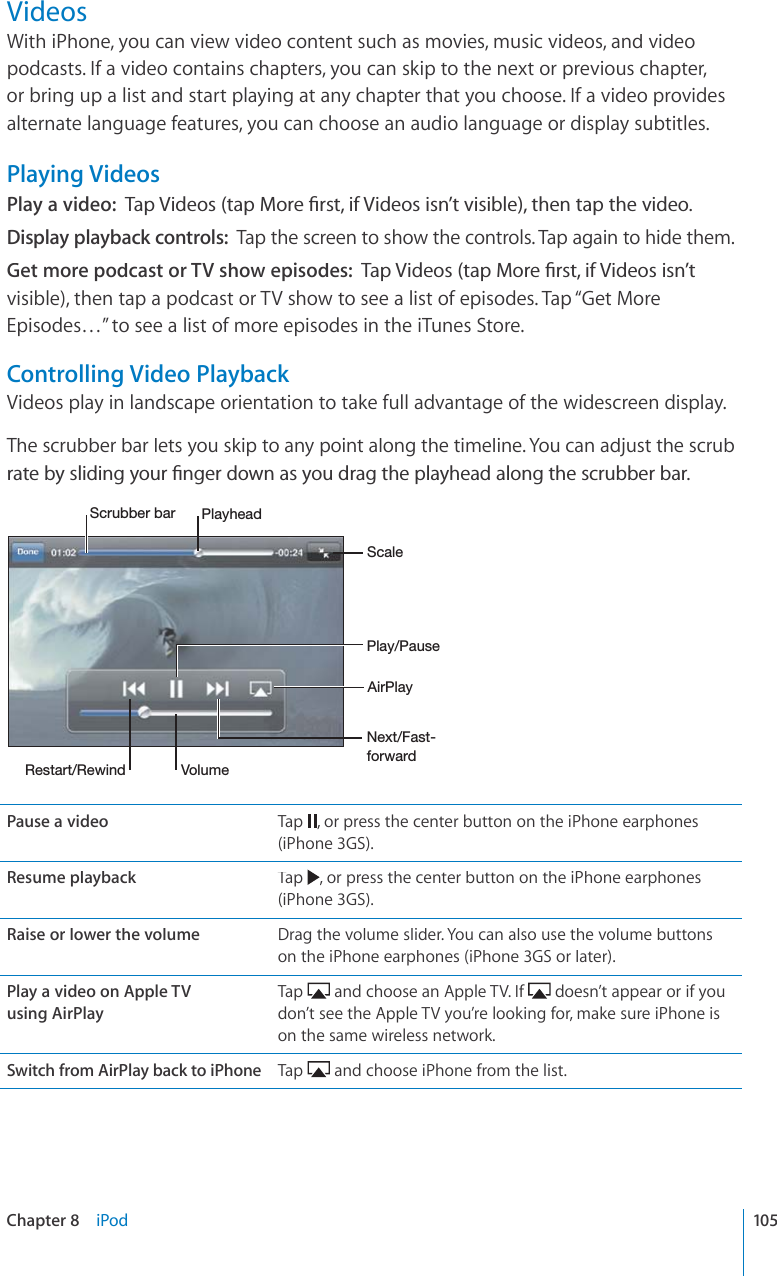
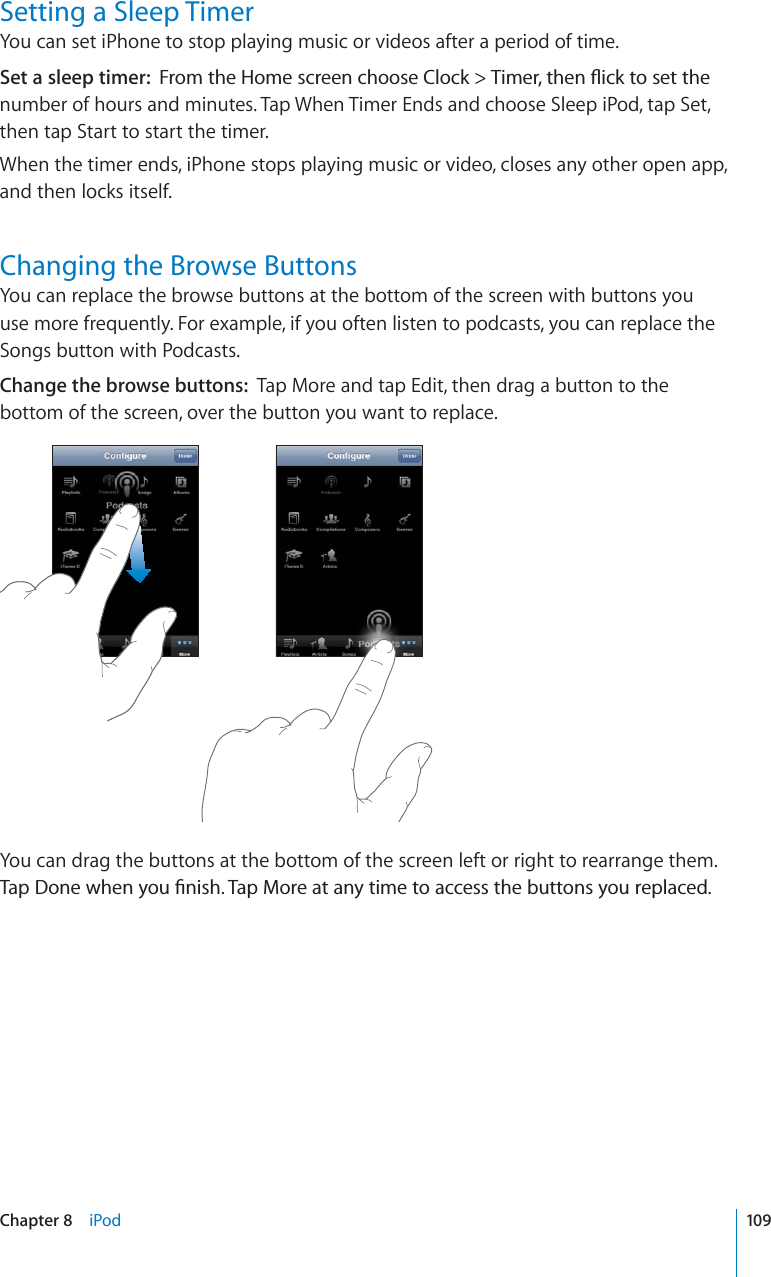
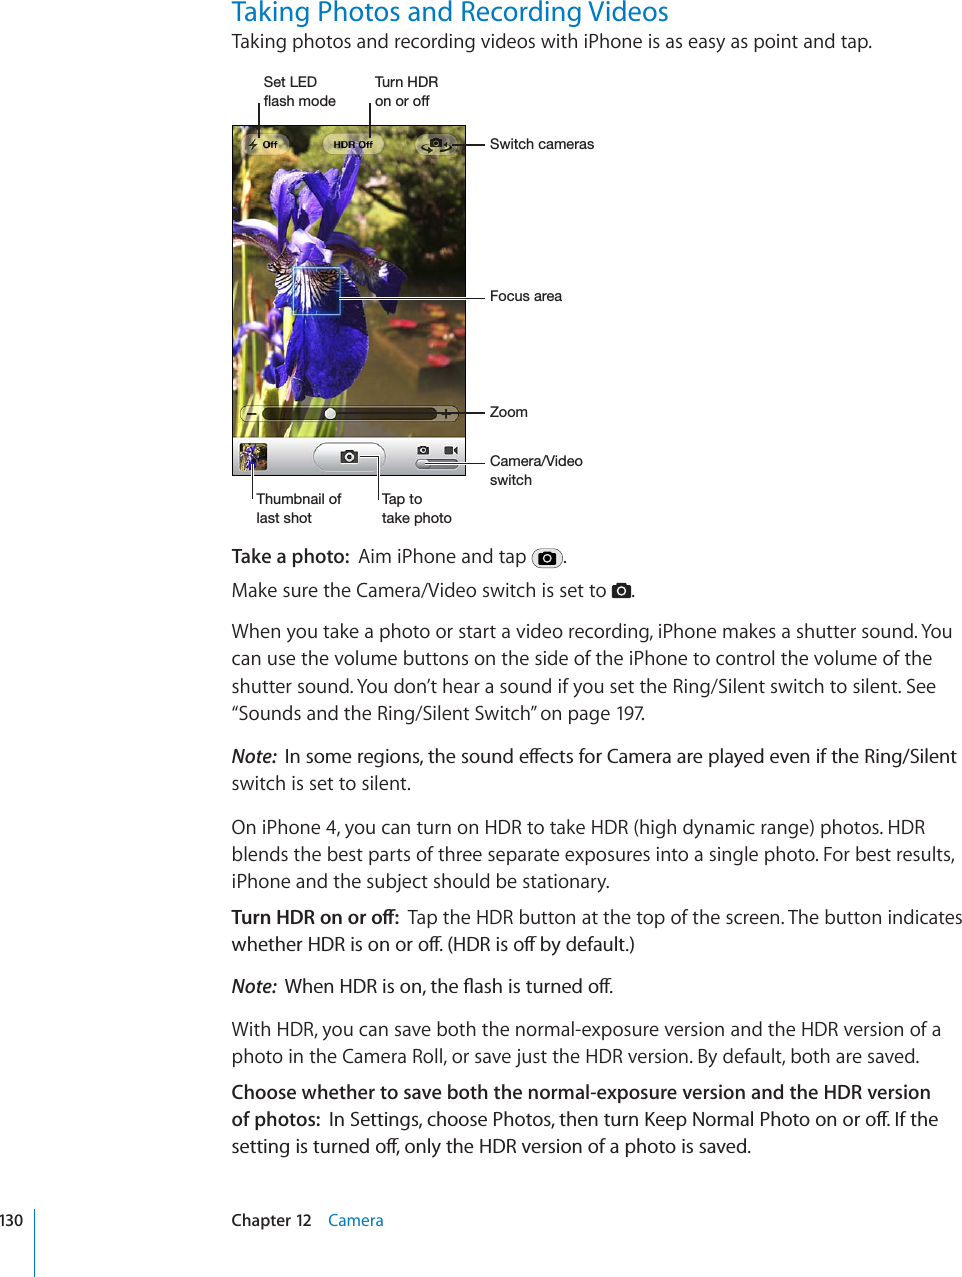
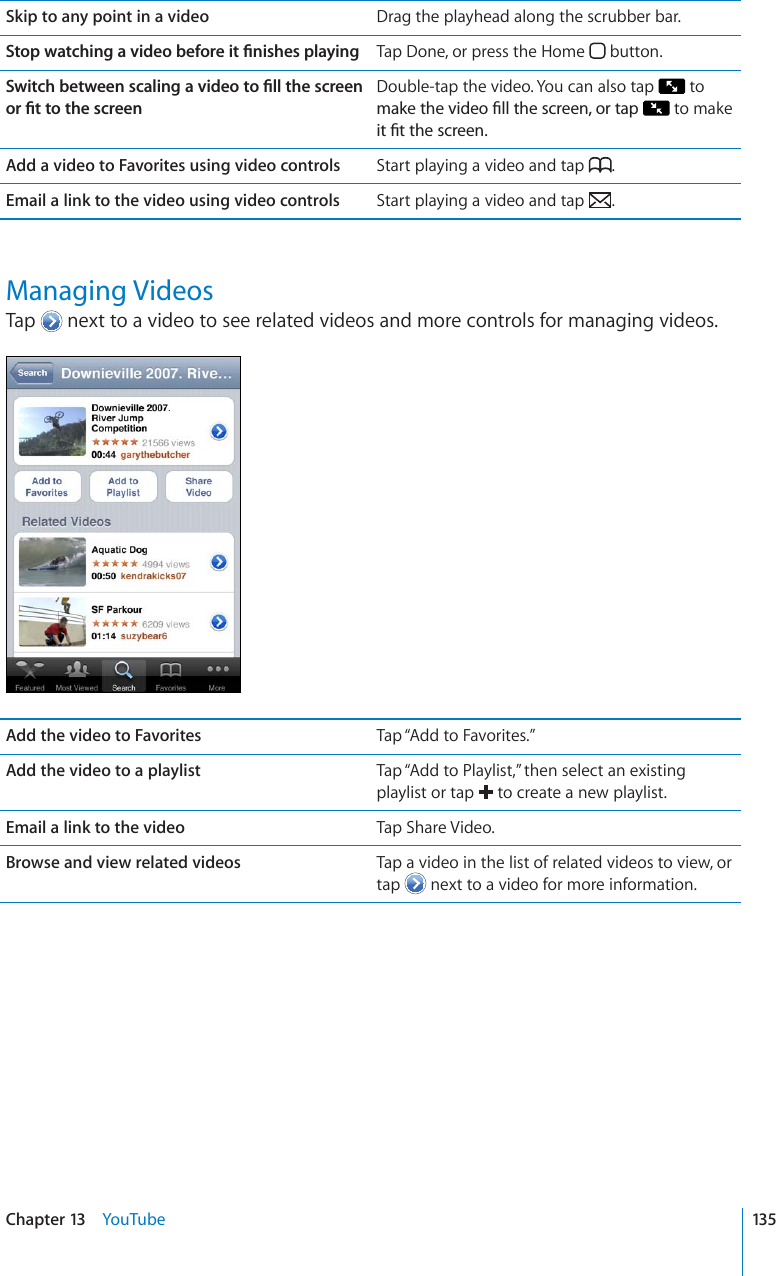
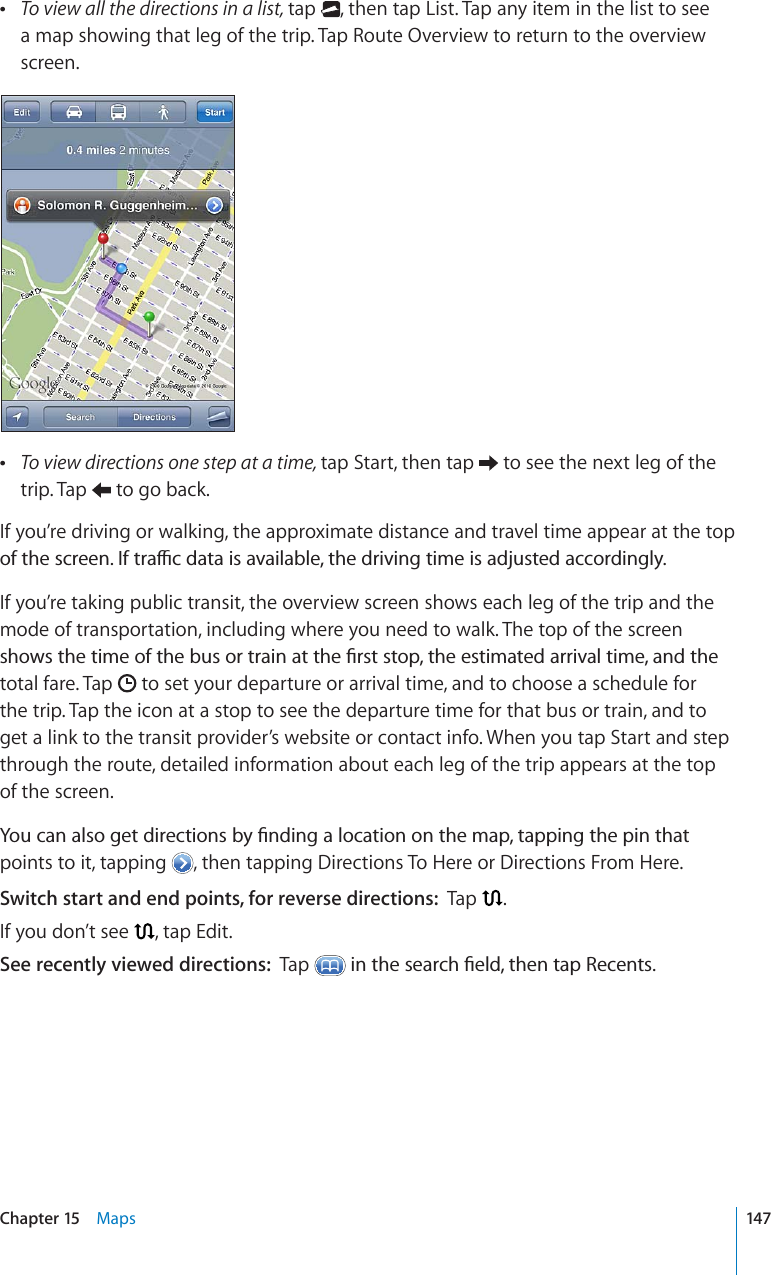
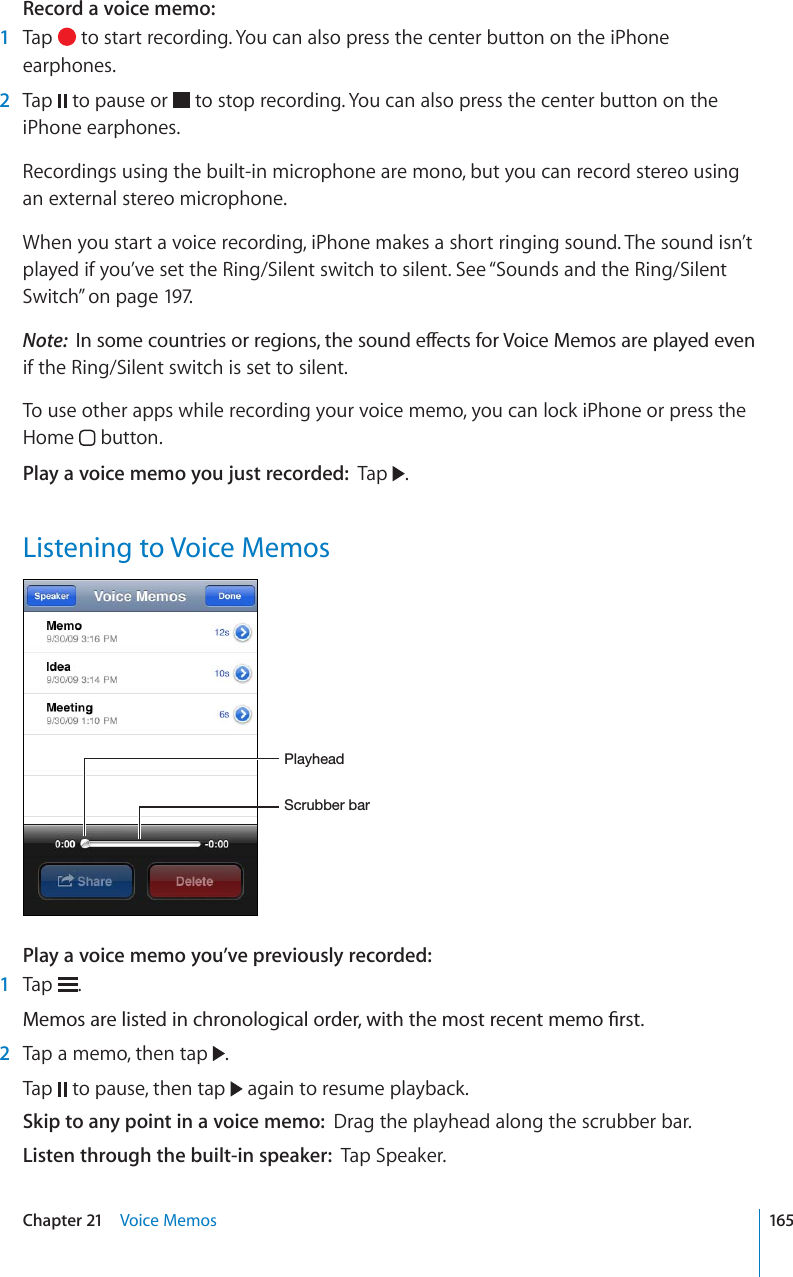
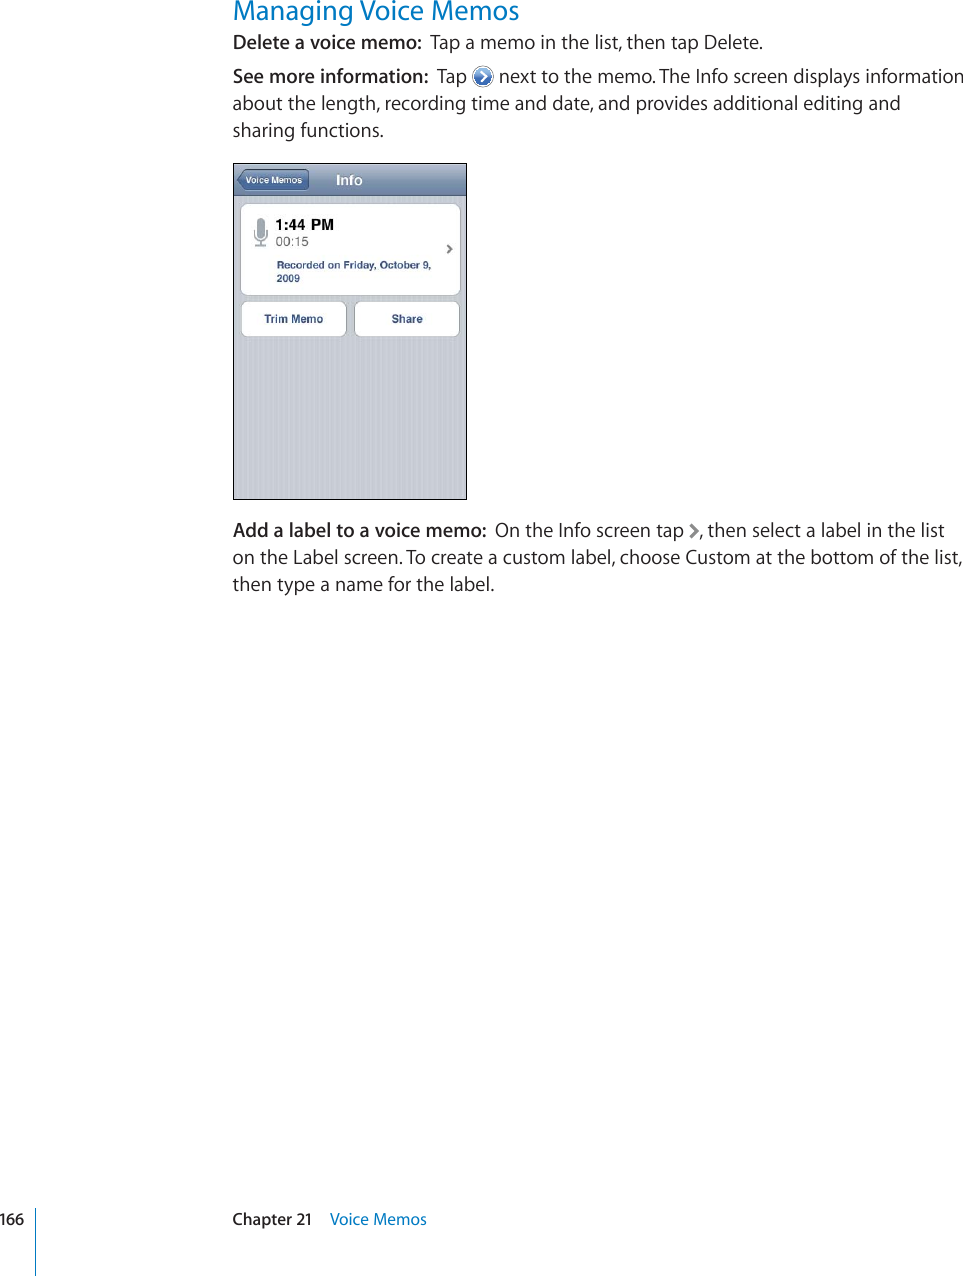
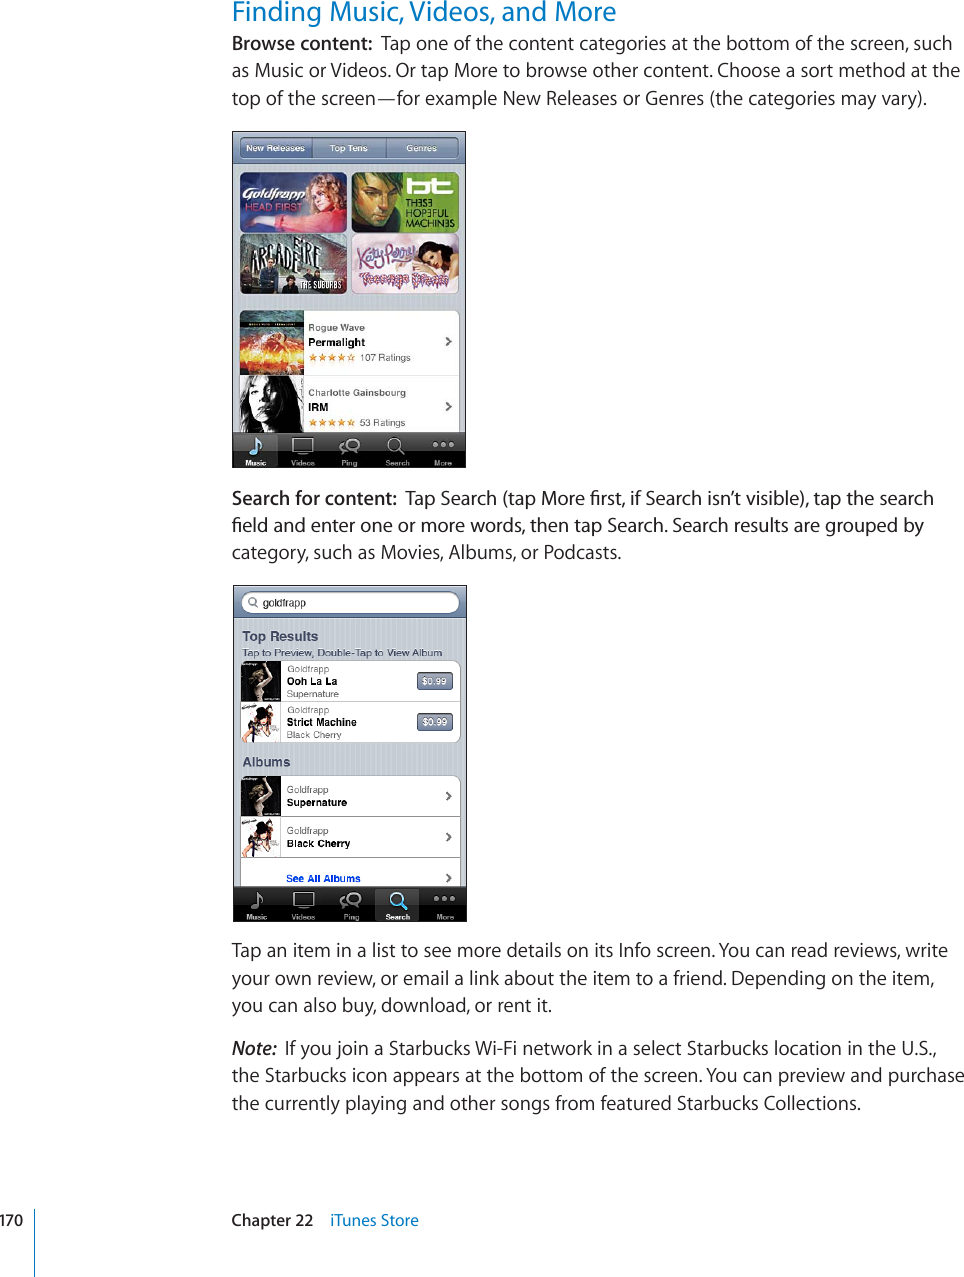
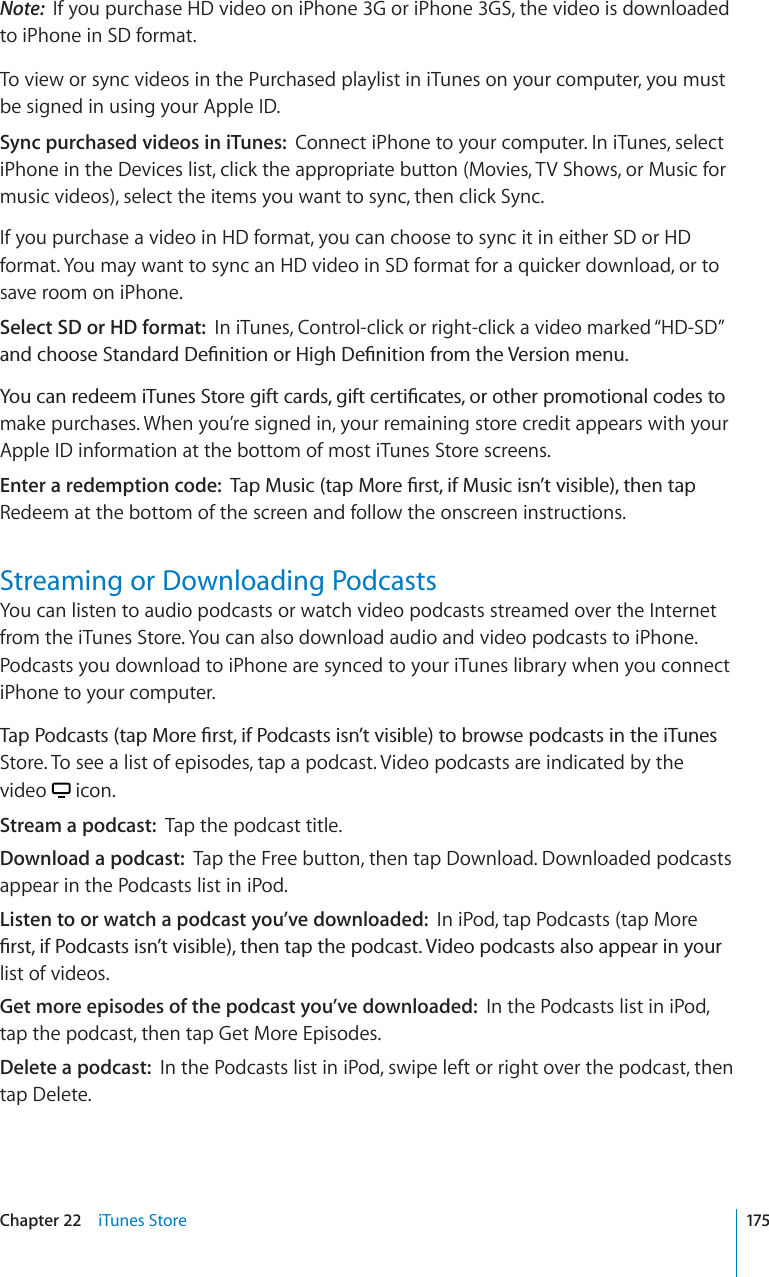
![Voice Memos21Recording Voice MemosVoice Memos lets you use iPhone as a portable recording device using the built-inmicrophone, iPhone or Bluetooth headset mic, or supported external microphone.Note:External microphones must be designed to work with the iPhone headset jack or Dock Connector. These include Apple-branded earbuds and authorized third-partyaccessories marked with the Apple “Made for iPhone” or “Works with iPhone” logo.You can adjust the recording level by moving the microphone closer to or furtheraway from what you’re recording. For better recording quality, the loudest level on thelevel meter should be between –3dB and 0 dB.9LJVYKI\[[VU(\KPVSL]LSTL[LY.V[V]VPJLTLTVZ](https://usermanual.wiki/Apple/E2422A.Final-version-of-User-Manual/User-Guide-1413266-Page-164.png)


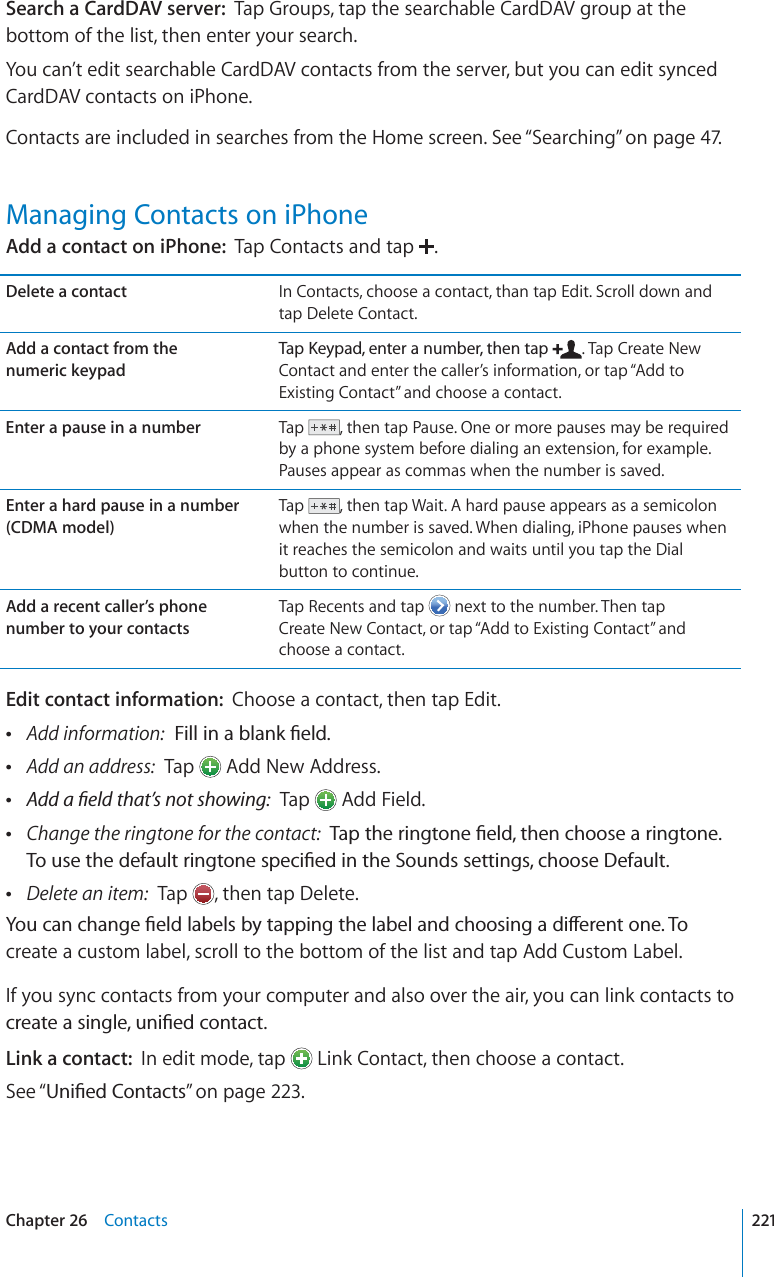
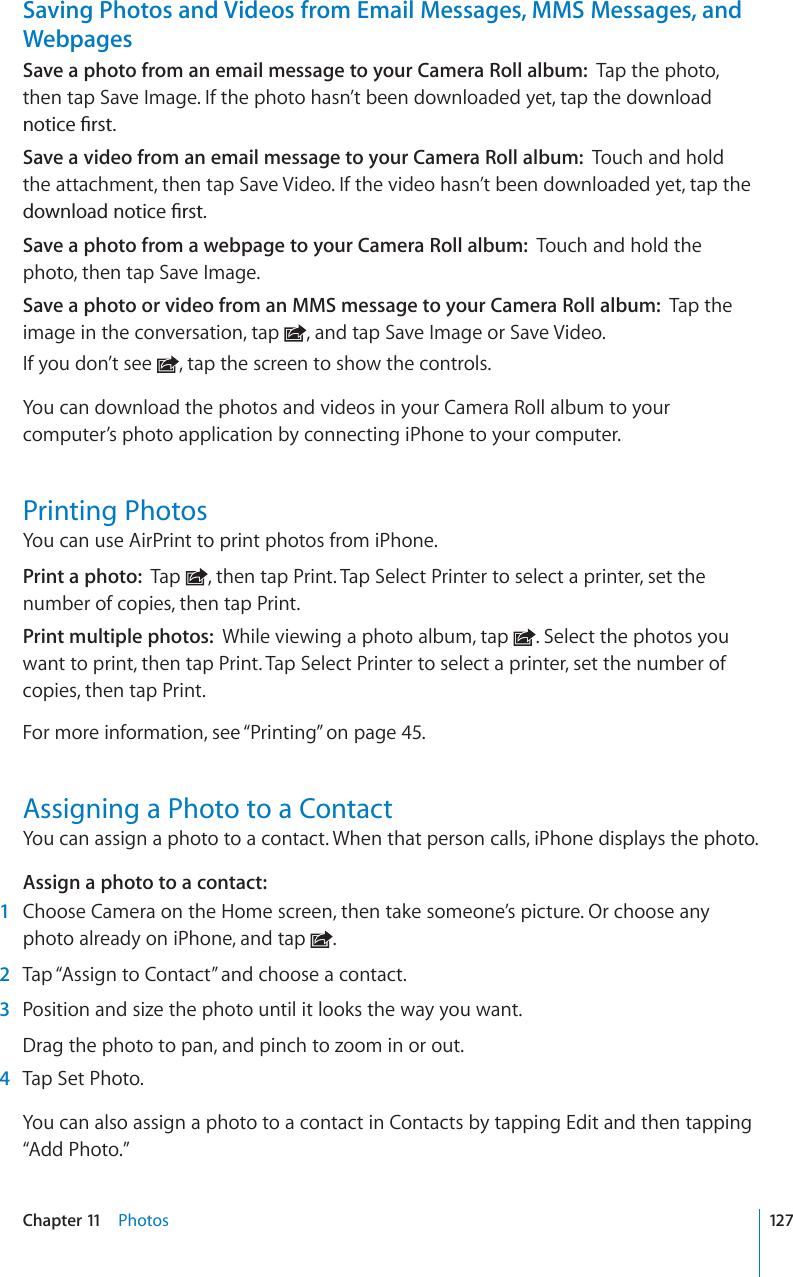
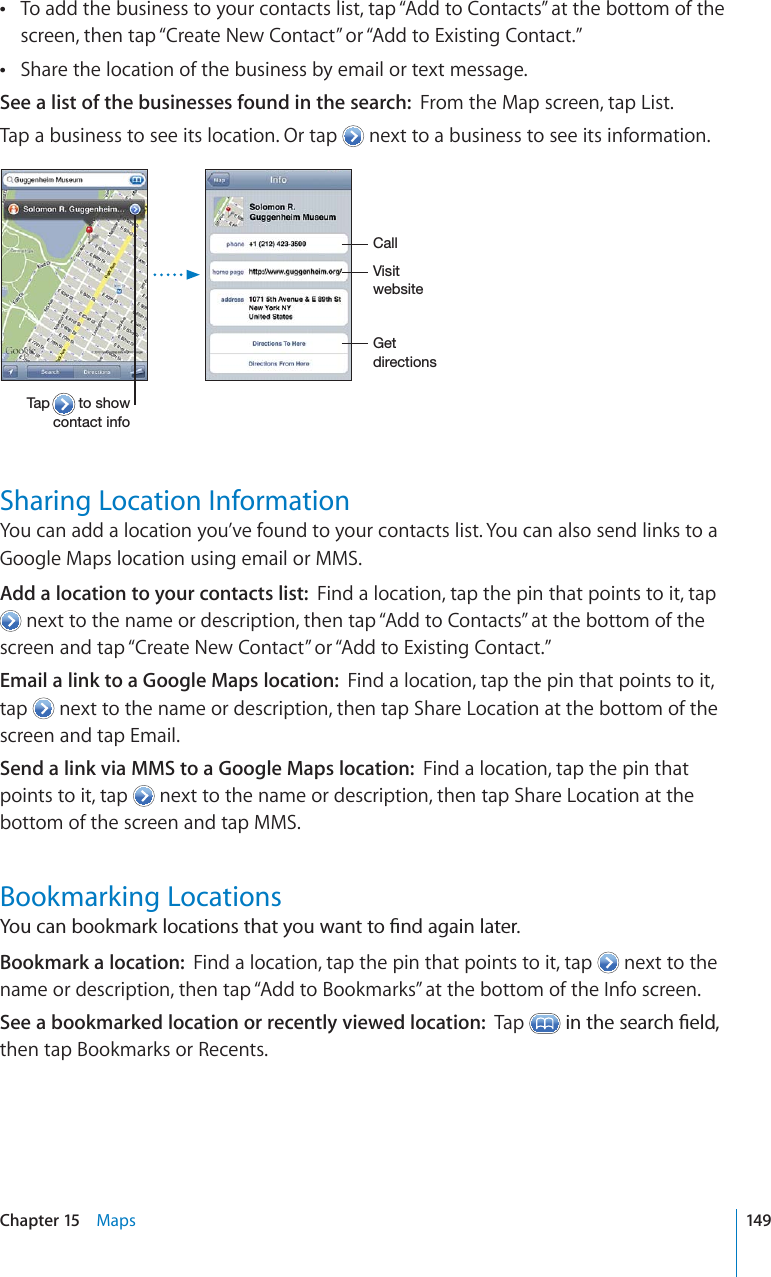
![Assign a photo to a contact:1Tap Contacts, then choose a contact.2Tap Edit and tap Add Photo, or tap the existing photo.3Tap Take Photo and take a photo with the camera. Or tap Choose Existing Photo and choose a photo.4Drag and scale the photo as desired.5Tap Use Photo (new photo) or Choose (existing photo).Using Contact InformationYou can use the information on a contact’s Info screen to:Call the contactCreate an email message in Mail, addressed to the contactOpen the contact’s home page in SafariFind the location of the contact’s address in Maps, and get directionsSend a text message to the contactShare the contact information with othersAdd a phone number for the contact to your favorites listMake a FaceTime video callUse a contact’s info screen: Tap Contacts and choose a contact. Then tap an item.=PZP[[OL^LIZP[L*HSS:LUKHULTHPS:LUKH[L_[TLZZHNL(KKHWOVULU\TILY[V`V\YMH]VYP[LZSPZ[:LLHTHWHUKNL[KPYLJ[PVUZ4HRLH-HJL;PTL]PKLVJHSSA star next to a phone number means the number is in your favorites list. appears on the FaceTime button if you’ve ever had a FaceTime call with the contact.See your own phone number: Tap Contacts and scroll to the top of the list. (Not available in all countries or regions.)222 Chapter 26 Contacts](https://usermanual.wiki/Apple/E2422A.Final-version-of-User-Manual/User-Guide-1413266-Page-222.png)
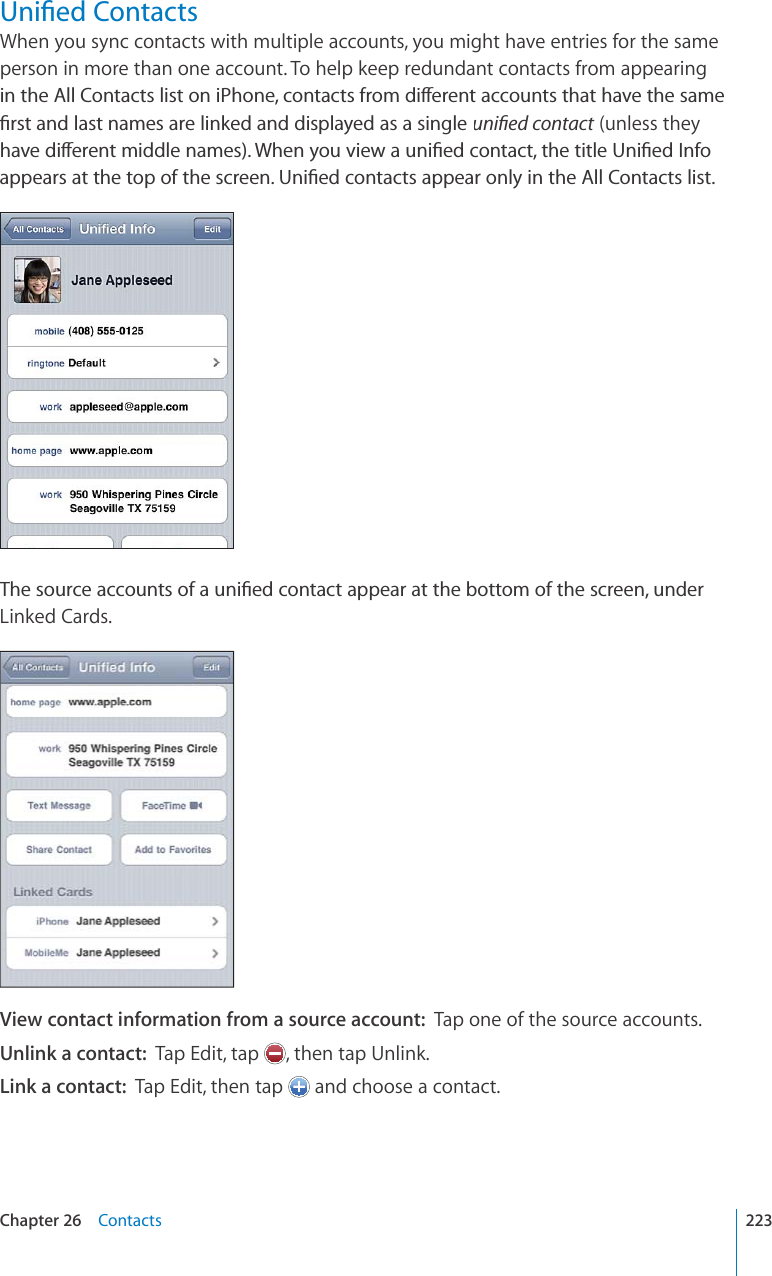

![iBooks28About iBooksiBooks is a great way to read and buy books. Download the free iBooks app fromthe App Store, and then get everything from classics to best sellers from the built-iniBookstore. Once you download a book, it’s displayed on your bookshelf. Add ePub books and PDFs to your bookshelf using iTunes. Then tap a book or PDF tostart reading. iBooks remembers your location, so you can easily return to where youNGHVQÒ#YKFGTCPIGQHFKURNC[QRVKQPUOCMGUVJGDQQMUGCU[VQTGCFNote:The iBooks app and the iBookstore may not be available in all languagesor locations.(]HPSHISLVU[OLP)VVRZ[VYL;P[SLH]HPSHIPSP[`PZZ\IQLJ[[VJOHUNLTo download the iBooks app and use the iBookstore, you need an Internet connectionand an Apple account. If you don’t have an Apple account, or if you want to makepurchases from another Apple account, go to Settings > Store. See “Store”on page218.229](https://usermanual.wiki/Apple/E2422A.Final-version-of-User-Manual/User-Guide-1413266-Page-229.png)