Apple E2816A Cellular Phone with Bluetooth and WLAN Radios User Manual iPhone User Guide iOS8 Draft 2014 07 26 Rd Sz v1 0 Part4

Apple Inc. Cellular Phone with Bluetooth and WLAN Radios iPhone User Guide iOS8 Draft 2014 07 26 Rd Sz v1 0 Part4

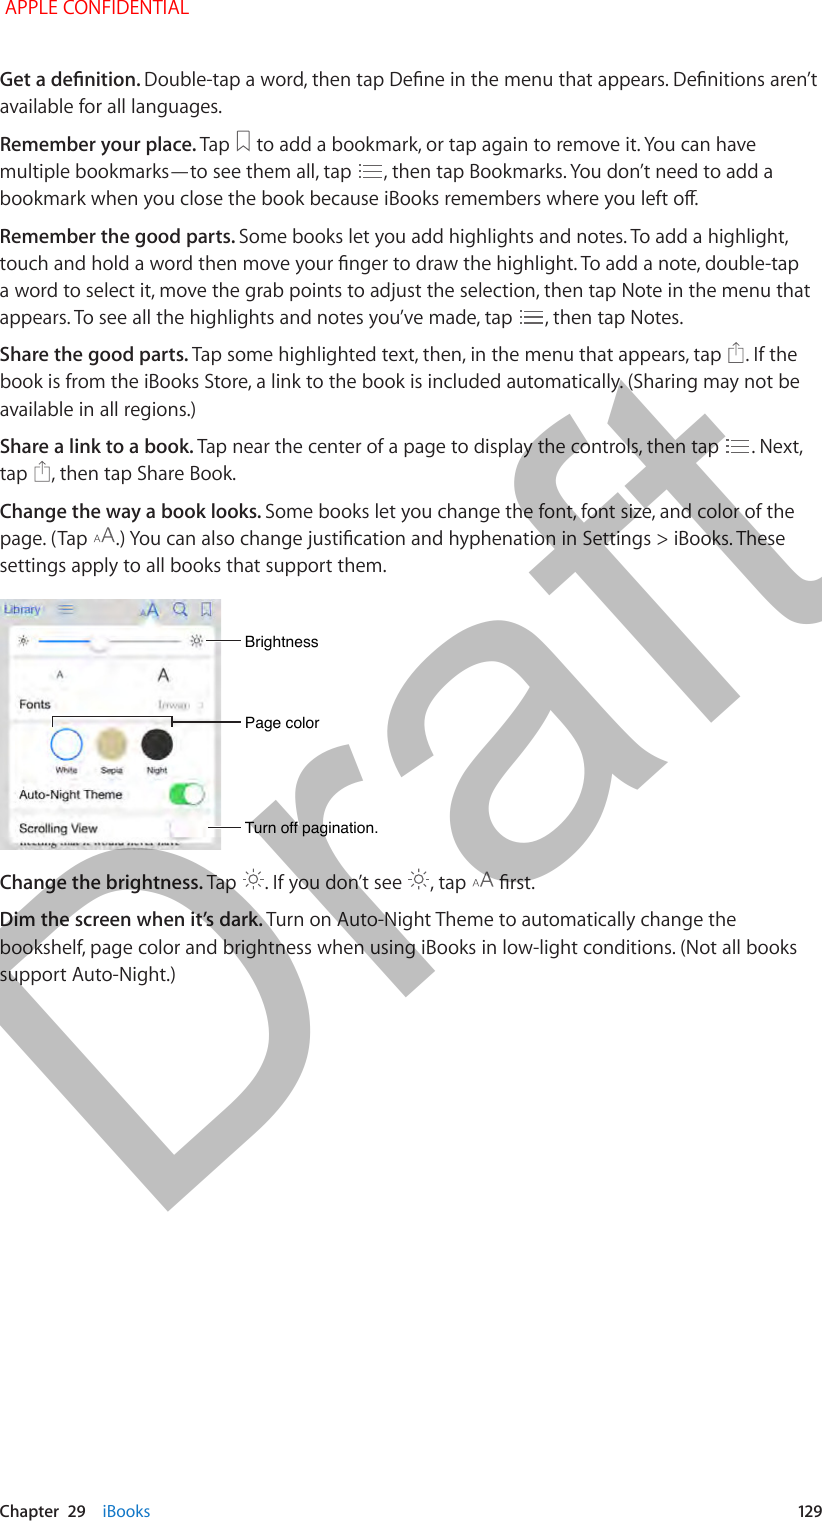
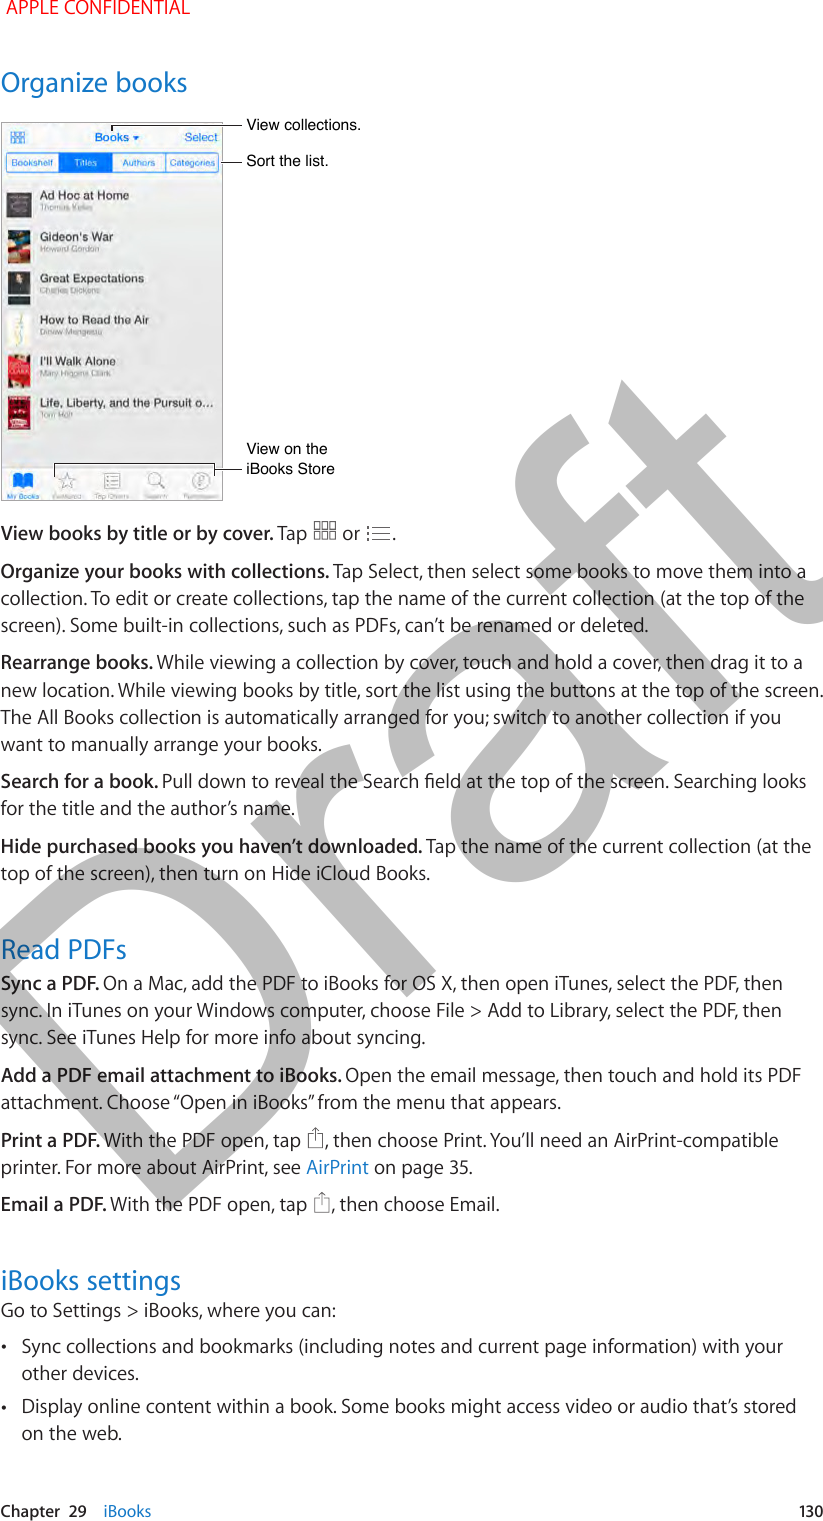
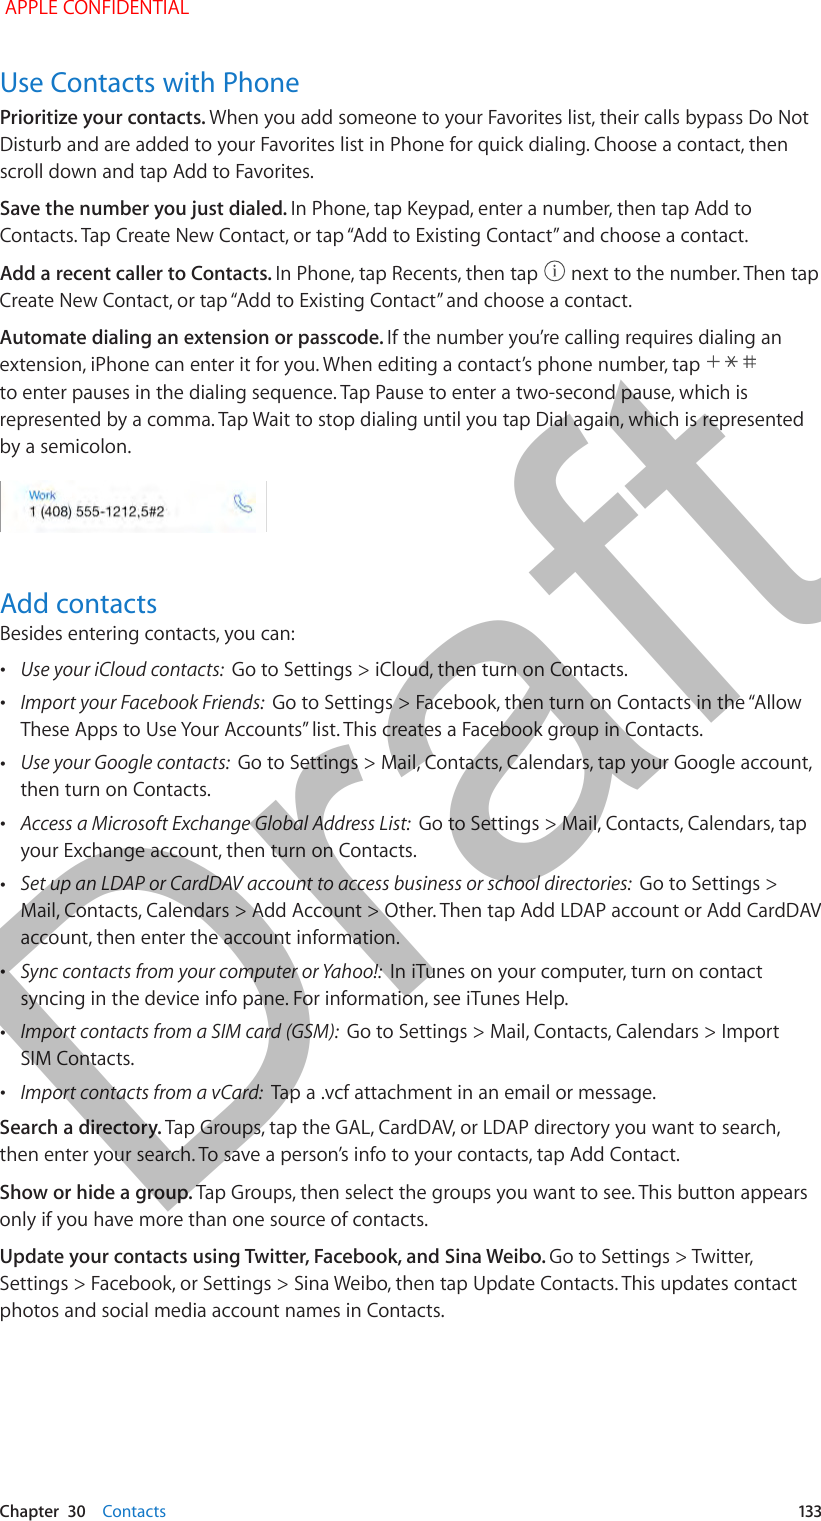
iPhone_User_Guide_iOS8_Draft_2014-07-26_Rd-Sz_v1.0_Part4

21   108Passbook at a glanceUse Passbook to keep your boarding passes, movie tickets, coupons, loyalty cards, and more, all in one place. Scan a pass on iPhone to check in for a ight, get in to a movie, or redeem a coupon. Passes can include useful information, such as the balance on your coee card, a coupon’s expiration date, or your seat number for a concert.With N56/N61, you can add your credit and debit cards to Passbook and use them to pay in stores accepting contactless payments and in supported apps. See Stockholm on page 109.Passbook on the goFind apps that support Passbook. Tap Apps for Passbook on the Welcome pass. Or, on your computer, see www.itunes.com/passbookapps. You can add a pass from an app, an email or Messages message, or a website when you make a purchase or receive a coupon or gift. Usually, you tap or click the pass or the link to a pass to add it to Passbook. You can also scan codes from merchants’ ads or receipts, which are downloaded to Passbook.Scan a code. Pull down your pass stack, tap  , then tap Scan Code. Point your iPhone at the code and frame it to add the pass.Use a pass. If an alert for a pass appears on the Lock screen, slide the alert to display the pass. Or open Passbook, select the pass, then present the barcode on the pass to the scanner.Share a pass. You can share a pass using Mail, Messages, or AirDrop (iPhone 5 or later). See Share from apps on page 31. Display a pass based on location. A pass can appear on the Lock screen when you wake iPhone at the right time or place—for example, when you reach the airport for a ight you’re taking. Location Services must be turned on in Settings > Privacy > Location Services.Rearrange passes. Drag a pass in the stack to move it to a new location. The pass order is updated on all your iOS 7 or later devices. Refresh a pass. Passes are usually updated automatically. To refresh a pass manually, tap the pass, tap  , then pull the pass downward. Use iTunes Pass. You can use the iTunes Pass in Passbook to make purchases in iTunes Store, App Store, and iBooks Store. To add the iTunes Pass, use your Apple ID account settings page, which you get to from Settings > iTunes & App Store (tap your Apple ID, then tap View Apple ID). You can add money to your iTunes Pass at Apple Retail Stores in most countries.Note:  iTunes Pass is not available in all areas.Passbook APPLE CONFIDENTIALDraft
  Chapter  21    Passbook  109Done with a pass? Tap the pass, tap  , then tap Delete.StockholmWith N56/N61 iPhone signed into iCloud, you can use the Stockholm payment feature. Keep up to eight credit and debit cards available for making purchases in stores using contactless payments, and in apps that support Stockholm (apps that sell physical goods and services such as apparel, electronics, health and beauty products, tickets, reservations and more). You can add a payment card to Passbook when you set up your N56/N61 iPhone, or you can do it later in Passbook. Cards you add on one iOS device can be added to your other supported devices just by entering the card’s security code. Credit cards and debit cards appear at the top of your Passbook stack, with passes beneath. The front of a card displays the last four digits of the credit or debit card number, and the back shows the last four digits of the Device Account Number—the number transmitted to stores and apps for the purchase. You can view recent Stockholm activity on the back of your card in Passbook, as well as on your credit and debit card statements.Add a credit card or debit card. Pull down your pass stack, tap  , then tap Set Up Stockholm (or Add Another Card, after you’ve added the rst one). If you have a credit or debit card on le in iTunes, you’re prompted to add it to Passbook. Or you can add a dierent card and follow the prompts to add the necessary information (name on card, card number, expiration date, and security code). The issuing bank will determine if your card is eligible to be added, and you might be asked to provide additional information to complete the verication process.Note:  Most U.S. credit and debit cards are able to be added to Passbook, with frequent updates. Check <link to kbase article> for the latest list of supported banks.Tap to add payment information (N56/N61).Tap to add payment information (N56/N61).Tap to scan a code.Tap to scan a code.Open the App Store to download supported apps.Open the App Store to download supported apps.Set your default card. The card at the top of your stack is the default card that can be used when you pay at a reader. When you add a new card, it's added to the bottom of the stack. Just drag your cards to a new position in the stack to reorder them.  APPLE CONFIDENTIALDraft
  Chapter  21    Passbook  110Pay at a contactless card reader. To pay with your default card, hold iPhone with your nger on the Touch ID sensor and move it close to the reader until iPhone vibrates. You see the card onscreen with a Done checkmark when the card information has been transmitted to the merchant. Or you can start by holding iPhone near a reader until the screen prompts you to use your Touch ID, then move the device near the reader again to pay.Image     "le:///svn/apd-projectles/Sweet/iPhone_iPod_touch/content/branches/Okemo/iPhone/en.lproj//Art/PASS_reader.ai" not found.Use another card. Tap the card in the stack before presenting N56/61 iPhone to the reader.Pay in an app. When you make a purchase in an app, look for the Stockholm payment option. Tap Stockholm, then review the information that appears (for example, the card you’re using for the purchase, email, and shipping method), and make any changes before purchasing.View your recent activity. Tap a card. Your most recent activity appears on the front. Tap   to view a list of your recent activity on the back of the card.Inactive card. If your card appears gray or inactive in the stack, contact the bank by calling the number on the back of your credit or debit card.Remove a card. Tap the card, tap  , then tap Delete.If you lose your iPhone. Find My iPhone can help you locate and secure your iPhone if it is lost or stolen. See Find My iPhone on page 40.Passbook settingsKeep passes from appearing on the Lock screen. Go to Settings > Touch ID & Passcode (iPhone models with Touch ID) or Settings > Passcode (other models), then tap Turn Passcode On. Then, under Allow Access When Locked, turn o Passbook. For passes with notications, to keep a specic pass from appearing on the Lock screen, tap the pass, tap  , then turn o Show On Lock Screen.Set notication options. Go to Settings > Notication Center > Passbook.Include passes and cards (for Stockholm) on your other iOS devices. Go to Settings > iCloud and turn on Passbook. APPLE CONFIDENTIALDraft
22   111iTunes Store at a glanceUse the iTunes Store to add music, movies, and TV shows to iPhone.See downloads, purchases, tones, audiobooks,and more.See downloads, purchases, tones, audiobooks,and more.View your recent history. View your recent history. BrowseBrowseNote:  You need an Internet connection and an Apple ID to use the iTunes Store. The iTunes Store is not available in all areas.Browse or searchBrowse by genre. Tap one of the categories (Music, Movies, or TV Shows). Tap Genres to rene the list.Tap a genre to see more about it.Tap a genre to see more about it.iTunes Store APPLE CONFIDENTIALDraft
  Chapter  22    iTunes Store  112If you know what you’re looking for, tap Search. Enter info in the search eld, then tap Search again.Access family members’ purchases. With Family Sharing turned on, you can view and download songs, TV shows, and movies purchased by other family members. Tap Purchased, tap your name or My Purchases in the upper left corner, then select a family member from the menu.Find it with Siri. Siri can search for items and make purchases in the iTunes Store. For example, you can say “Get a new ring tone” or “Purchase song name by band name.” You can ask Siri to download a podcast or redeem a gift card. For best results, say “purchase” instead of “buy” at the beginning of a Siri command.Ask Siri to tag it. When you hear music playing around you, ask Siri “What song is playing?” Siri tells you what the song is and gives you an easy way to purchase it. It also saves it to the Siri tab in the iTunes Store so you can buy it later. Tap Music, tap  , then tap Siri to see a list of tagged songs available for preview or purchase.Tap to see your Wish List and recommendations.Tap to see your Wish List and recommendations.Discover great new music on iTunes Radio. When you listen to iTunes Radio, songs you play appear on the Radio tab in iTunes Store so you can preview or purchase them. Tap Music, tap  , then tap Radio to see your favorite songs available to preview or purchase.Preview a song or video. Tap it.Add to your Wish List. When you hear something you hope to buy from iTunes Store, tap  , then tap Add to Wish List. To view your Wish List in iTunes Store, tap Music, Movies, or TV Shows, tap  , then tap Wish List.Tired of tapping More? To rearrange the buttons, tap More, then tap Edit. To replace an icon, drag another icon over the one you want to replace. Then tap Done. APPLE CONFIDENTIALDraft
  Chapter  22    iTunes Store  113Purchase, rent, or redeemTap an item’s price (or tap Free), then tap again to buy it. If you see   instead of a price, you’ve already purchased the item and you can download it again without a charge.Approve purchases with Family Sharing. With Family Sharing set up, the family organizer can review and approve purchases made by family members under the age of 18. For example, if Parent/Guardian > Ask to Buy is set for specic minor family members, when those members try to make a purchase, a message is sent to the family organizer for approval. For more information about setting up Family Sharing, see Family Sharing on page 32.Hide individual purchases. Using iTunes on a computer, the family organizer can hide purchases so other family members can’t view or download them. For more information, see Family Sharing on page 32.Use a gift card or code. Tap a category (like Music), scroll to the bottom, then tap Redeem. Or tell Siri “Redeem an iTunes Store gift card.” Send a gift. View the item you want to give, tap  , then tap Gift. Or tap one of the categories (Music, Movies, or TV Shows), scroll to the bottom, then tap Send Gift to send an iTunes gift certicate to someone.Use iTunes Pass. You can use the iTunes Pass in Passbook to make purchases in iTunes Store, App Store, and iBooks Store. To add the iTunes Pass, use your Apple ID account settings page, which you get to from Settings > iTunes & App Store (tap your Apple ID, then tap View Apple ID). You can add money to your iTunes Pass at Apple Retail Stores in most countries.Note:  iTunes Pass is not available in all areas.See the progress of a download. Tap More, then tap Downloads. Bought something on another device? Go to Settings > iTunes & App Store to set up automatic downloads on your iPhone. You can always view your purchased music, movies, and TV shows in iTunes Store (tap More, then tap Purchased).Watch your time with rentals. In some areas, you can rent movies. You have 30 days to begin watching a rented movie. After you start watching it, you can play it as many times as you want in the allotted time (24 hours in the U.S. iTunes Store; 48 hours in other countries). Once your time’s up, the movie is deleted. Rentals can’t be transferred to another device; however, you can use AirPlay and Apple TV to view a rental on your television.iTunes Store settingsTo set options for iTunes Store, go to Settings > iTunes & App Store. You can:View or edit your account. Tap your Apple ID, then tap View Apple ID. To change your password, tap the Apple ID eld.Sign in with a dierent Apple ID. Tap your account name, then tap Sign Out. You can then enter a dierent Apple ID.Subscribe to or turn on iTunes Match. You can subscribe to iTunes Match, a service that stores your music and more in iCloud. See iCloud and iTunes Match on page 67. If you’re a subscriber, tap iTunes Match so you can access your music on iPhone anywhere. Tap “Learn more” for more information about iTunes Match.Turn on automatic downloads. Tap Music, Books, or Updates. Content updates automatically over Wi-Fi, unless you turn o the option in Automatic Downloads. APPLE CONFIDENTIALDraft
  Chapter  22    iTunes Store  114Download purchases over the cellular network. Turn on Use Cellular Data. Downloading purchases and using iTunes Match over the cellular network may incur carrier charges. APPLE CONFIDENTIALDraft
23   115App Store at a glanceUse the App Store to browse, purchase, and download apps to iPhone.View purchases and updates.View purchases and updates.BrowseBrowseFind apps being used nearby.Find apps being used nearby.See your Wish List and other suggestionsfor you.See your Wish List and other suggestionsfor you.Note:  You need an Internet connection and an Apple ID to use the App Store. The App Store is not available in all areas.Find appsIf you know what you’re looking for, tap Search. Or tap Categories to browse by type of app.Ask Siri to nd it. Siri can search for items and make purchases in the App Store. For example, “Find apps by Apple” or “Install app name.” For best results, use “purchase” instead of “buy” at the beginning of a Siri command.Access family members’ apps. With Family Sharing turned on, you can view and download apps purchased by other family members. Tap Purchased, tap your name or My Purchases in the upper left corner, then select a family member from the menu.Want to tell a friend about an app? Find the app, tap  , then choose the method. See AirDrop on page 32.Use Wish List. To track an app you might want to purchase later, tap   on the app page, then tap Add to Wish List.App Store APPLE CONFIDENTIALDraft
  Chapter  23    App Store  116What apps are being used nearby? Tap Explore to nd out the most popular apps others around you are using. (Location Services must be on in Settings > Privacy > Location Services.) Try this at a museum, sporting event, or when you’re traveling, to dig deeper into your experience. Tap to download or purchase.Tap to download or purchase.Search apps by category. Tap Explore, scroll to Categories, then tap a category to focus on the apps you want, for example, Education, Medical, or Sports.Purchase, redeem, and downloadTap the app’s price, then tap Buy to purchase it. If it’s free, tap Free, then tap Install.If you see   instead of a price, you’ve already purchased the app and you can download it again without charge. While the app is downloading or updating, its icon appears on the Home screen with a progress indicator.Approve purchases with Family Sharing. With Family Sharing set up, the family organizer can review and approve purchases made by other family members under the age of 18. For example, if Parent/Guardian > Ask to Buy is set for specic minor family members, when those members try to make a purchase, a message is sent to the family organizer for approval. For more information about setting up Family Sharing, see Family Sharing on page 32.Find out more about the requested app.Find out more about the requested app.Hide individual purchases. Using iTunes on a computer, the family organizer can hide purchases so other family members can’t view or download them. For more information, see Family Sharing.Use a gift card or code. Tap Featured, scroll to the bottom, then tap Redeem. Or tell Siri “Redeem an iTunes Store gift card.” APPLE CONFIDENTIALDraft
  Chapter  23    App Store  117Send a gift. View the item you want to give, tap  , then tap Gift. Or tap Featured, scroll to the bottom, then tap Send Gift to send an iTunes gift certicate to someone.Use iTunes Pass. You can use the iTunes Pass in Passbook to make purchases in iTunes Store, App Store, and iBooks Store. To add the iTunes Pass, use your Apple ID account settings page, which you get to from Settings > iTunes & App Store (tap your Apple ID, then tap View Apple ID). You can add money to your iTunes Pass at Apple Retail Stores in most countries.Note:  iTunes Pass is not available in all areas.Restrict in-app purchases. Many apps provide extra content or enhancements for a fee. To limit purchases that can be made from within an app, go to Settings > General > Restrictions (make sure Restrictions is enabled), and set options (for example, restrict by age rating or require a password immediately or every 15 minutes). You can turn o In-App Purchases to prevent all purchases. See Restrictions on page 37.Delete an app. Touch and hold the app icon on the Home screen until the icon jiggles, then tap  . When you nish, press the Home button. You can’t delete built-in apps. Deleting an app also deletes its data. You can download any app you’ve purchased on the App Store again, free of charge.For information about erasing all of your apps, data, and settings, see Restart or reset iPhone on page 173.App Store settingsTo set options for App Store, go to Settings > iTunes & App Store. You can:View or edit your account. Tap your Apple ID, then tap View Apple ID. To change your password, tap the Apple ID eld.Sign in using a dierent Apple ID. Tap your account name, then tap Sign Out. Then enter the other Apple ID.Turn o automatic downloads. Tap Apps in Automatic Downloads. Apps update automatically over Wi-Fi, unless you turn o the option.Download apps using the cellular network. Turn on Use Cellular Data. Downloading apps over the cellular network may incur carrier charges. Newsstand apps update only over Wi-Fi. APPLE CONFIDENTIALDraft
24   118Voice Memos at a glanceVoice Memos lets you use iPhone as a portable recording device. Use it with the built-in microphone, an iPhone or Bluetooth headset mic, or a supported external microphone.Drag recording level to position play/record head.Drag recording level to position play/record head.Record, pause, or resume.Record, pause, or resume.Trim the recording.Trim the recording.Switch playback between receiver and speaker.Switch playback between receiver and speaker.Save the recording.Save the recording.Your recordingsYour recordingsListen before saving.Listen before saving.RecordRecord sound. Tap   or press the center button on your headset. Tap again to pause or resume.Recordings using the built-in microphone are mono, but you can record stereo using an external stereo microphone that works with the iPhone headset jack, or with the Lightning connector (iPhone 5 or later) or 30-pin dock connector (iPhone 4s). Look for accessories marked with the Apple “Made for iPhone” or “Works with iPhone” logo.Adjust the recording level. Move the microphone closer to what you’re recording. For better recording quality, the loudest level should be between –3 dB and 0 dB.Preview before saving. Tap   to the left of the Record button. To position the play head, drag the recording level display left or right.Record over a section. Drag the recording level display to position the record/play head, then tap  .Voice Memos APPLE CONFIDENTIALDraft
  Chapter  24    Voice Memos  119Trim the excess. Tap  , then drag the red trim handles. Tap   to check your edit. Adjust the trim handles if necessary, then tap Trim when you’re nished.Save the recording. Tap Done.Mute the start and stop tones. Use the iPhone volume buttons to turn the volume all the way down.Multitask. To use another app while you’re recording, press the Home button and open the other app. To return to Voice Memos, tap the red bar at the top of the screen.Play it backTrim or rename the recording.Trim or rename the recording.Listen to the recording.Listen to the recording.Tap a recording to play or edit it.Tap a recording to play or edit it.Drag to skip ahead or rewind.Drag to skip ahead or rewind.Rename a recording. Tap the name of the recording.Move recordings to your computerYou can sync voice memos with the iTunes library on your computer, then listen to them on your computer or sync them with another iPhone or iPod touch.When you delete a synced voice memo from iTunes, it stays on the device where it was recorded, but is deleted from any other iPhone or iPod touch you synced. If you delete a synced voice memo on iPhone, it’s copied back to iPhone the next time you sync with iTunes, but you can’t sync that copy back to iTunes a second time.Sync voice memos with iTunes. Connect iPhone to your computer, then in iTunes select iPhone. Select Music at the top of the screen (between Apps and Movies), select Sync Music, select “Include voice memos,” and click Apply.Voice memos synced from iPhone to your computer appear in the Music list and in the Voice Memos playlist in iTunes. Voice memos synced from your computer appear in the Voice Memos app on iPhone, but not in the Music app. APPLE CONFIDENTIALDraft
25   12 0FaceTime at a glanceUse FaceTime to make video or audio calls to other iOS devices or computers that support FaceTime. The FaceTime camera lets you talk face-to-face; switch to the rear iSight camera (not available on all models) to share what you see around you.Note:  FaceTime may not be available in all areas.Mute your mic (the caller can see but not hear you).Mute your mic (the caller can see but not hear you).Switch to the rear camera (available on some models).Switch to the rear camera (available on some models).Drag your imageto any corner.Drag your imageto any corner.With a Wi-Fi connection and an Apple ID, you can make and receive FaceTime calls (rst sign in using your Apple ID, or create a new account). On iPhone 4s or later, you can also make FaceTime calls over a cellular data connection, which may incur additional charges. To turn o this feature, go to Settings > Cellular. For more information about cellular usage and settings, see Cellular settings on page 176.Make and answer callsMake a FaceTime call. Make sure FaceTime is turned on in Settings > FaceTime. Tap FaceTime, then type the name or number you want to call in the entry eld at the top. Tap   to make a video call, or tap   to make an audio call. Or tap   to open Contacts and start your call from there.Tap an icon to start a FaceTime call.Tap an icon to start a FaceTime call.FaceTime APPLE CONFIDENTIALDraft
  Chapter  25    FaceTime  121Use your voice to start the call. Press and hold the Home button, then say “FaceTime,” followed by the name of the person to call.Want to call again? Tap FaceTime to see your call history on the screen. Tap Audio or Video to rene your search, then tap a name or number to call again. Tap   to open the name or number in Contacts. Swipe to the left, then tap Delete to delete the name or number from your call history.Can’t take a call right now? When a FaceTime call comes in, you can answer, decline, or choose another option. Set up a reminder to return the call later.Set up a reminder to return the call later.Send the caller a text message.Send the caller a text message.See the whole gang. Rotate iPhone to use FaceTime in landscape orientation. To avoid unwanted orientation changes, lock iPhone in portrait orientation. See Change the screen orientation on page 22.Manage callsMultitask during a call. Press the Home button, then tap an app icon. You can still talk with your friend, but you can’t see each other. To return to the video, tap the green bar at the top of the screen.Juggle calls. FaceTime calls aren’t forwarded. If another call comes in while you’re on a FaceTime call, you can either end the rst call and answer the incoming call, decline the incoming call, or reply with a text message. You can use call waiting with FaceTime audio calls only.Use call waiting for audio calls. If you’re on a FaceTime audio call and another call comes in—either a phone call or another FaceTime audio call—you can decline the call, end the rst call and accept the new one, or put the rst call on hold and respond to the new call.Add multiple callers. While on a FaceTime audio call or a phone call, you can add another person to the conversation. Put the rst call on hold, then tap   to add another FaceTime audio or phone call. Block unwanted callers. Go to Settings > FaceTime > Blocked > Add New. You won’t receive voice calls, FaceTime calls, or text messages from blocked callers. For more information about blocking calls, see support.apple.com/kb/HT5845.Other options in Settings let you turn FaceTime on or o, specify a phone number, Apple ID, or email address to use with FaceTime, and set your caller ID. APPLE CONFIDENTIALDraft
26   122Newsstand at a glanceNewsstand organizes your magazine and newspaper apps, and automatically updates them when iPhone is connected to Wi-Fi.Touch and hold a publication to rearrange.Touch and hold a publication to rearrange.Find Newsstand apps.Find Newsstand apps.Find Newsstand apps. Tap Newsstand to reveal the shelf, then tap Store. When you purchase a Newsstand app, it’s added to the shelf. After the app is downloaded, open it to view its issues and subscription options. Subscriptions are In-App purchases, billed to your store account.Turn o automatic updates. Apps update automatically over Wi-Fi, unless you turn o the option in Settings > iTunes & App Store > Automatic Downloads.Newsstand APPLE CONFIDENTIALDraft
27   123Podcasts at a glanceOpen the Podcasts app, then browse, subscribe to, and play your favorite audio or video podcasts on iPhone.See your subscriptionsand downloaded podcasts.See your subscriptionsand downloaded podcasts.Delete or rearrange podcasts. Delete or rearrange podcasts. Tap a podcast to view and play episodes.Tap a podcast to view and play episodes.Organize and automatically update your favorites.Organize and automatically update your favorites.Browse for podcasts.Browse for podcasts.New episodesNew episodesGet podcasts and episodesDiscover more podcasts. Tap Featured or Top Charts at the bottom of the screen.Search for new podcasts. Tap Search at the bottom of the screen.Search your library. Tap My Podcasts, then swipe down in the center of the screen to reveal the Search eld.Podcasts APPLE CONFIDENTIALDraft
  Chapter  27    Podcasts  124Preview or stream an episode. Tap the podcast, then tap an episode.Pull down to see Edit, Settings, and Share options.Pull down to see Edit, Settings, and Share options.View unplayed episodes.View unplayed episodes.View available episodes.View available episodes.Get more info. Tap   to get episode details. Tap any link in podcast or episode descriptions to open them in Safari.Find new episodes. Tap Unplayed to nd episodes you haven’t yet heard.Browse episodes. Tap Feed to see episodes available to download or stream.Download an episode to iPhone. Tap   next to the episode.Get new episodes as they’re released. Subscribe to the podcast. If you’re browsing Featured podcasts or Top Charts, tap the podcast, then tap Subscribe. If you’ve already downloaded episodes, tap My Podcasts, tap the podcast, tap Settings at the top of the episode list, then turn on Subscription.Save episodes. Tap   next to an episode, then tap Save Episode. Tap Delete Episode to delete a saved episode.Control playbackSee a list of episodes.See a list of episodes.Tap to see more info.Tap to see more info.Drag to skip forward or back.Drag to skip forward or back.Skip to the next episode.Skip to the next episode.Tap to speed up or slow down.Tap to speed up or slow down.Tap to start over, or double-tap to go to the previous episode.Tap to start over, or double-tap to go to the previous episode. APPLE CONFIDENTIALDraft
  Chapter  27    Podcasts  125See podcast info while you listen. Tap the podcast image on the Now Playing screen.Use your voice. Tell Siri to play available podcast episodes, or specic podcasts or stations. For example, say “Play podcasts” or “Play Freakonomics Radio.”Organize your favorites into stationsOrganize selected podcasts and episodes into stations.Organize selected podcasts and episodes into stations.Tap a station to choose episodes or change settings.Tap a station to choose episodes or change settings.Tap to play the latest episode.Tap to play the latest episode.Delete or rearrange stations.Delete or rearrange stations.Organize your favorite podcasts into custom stations, and update episodes automatically across all your devices.Pull together episodes from dierent podcasts. To add episodes to your On-The-Go station, tap My Stations, tap On-The-Go, then tap Add. Or tap   next to any episode in your library. You can also touch and hold any episode, then tap Add to On-The-Go.Create a station. Tap My Stations, then tap  .Change the order of the station list or the podcasts in a station. Tap My Stations, tap Edit above the station list or the episode list, then drag   up or down.Change the playback order for episodes in a station. Tap the station, then tap Settings.Rearrange your podcast library. Tap My Podcasts, tap list view in the upper right, tap Edit, then drag   up or down.List oldest episodes rst. Tap My Podcasts, tap a podcast, then tap Settings.Play podcasts from the station list. Tap   next to the station name.Podcasts settingsGo to Settings > Podcasts, where you can: •Choose to keep your podcast subscriptions up to date on all of your devices. •Choose how frequently Podcasts checks your subscriptions for new episodes. •Have episodes downloaded automatically. •Choose whether to keep episodes after you nish them. APPLE CONFIDENTIALDraft
28   126Your health at a glanceUse the Health app to keep track of your health and tness information. Enter data for key parameters, or let the Health app collect data from other apps and devices that monitor your health and activity. You can even share specic data with selected apps, and through apps with some health care providers. And, Health can display important contact and medical information on the iPhone Lock screen for someone attending to you in an emergency.Tap any item to see details.Tap any item to see details.Make emergency medical info viewable on your Lock screen.Make emergency medical info viewable on your Lock screen.See all available data, control data sharing, or add to the Dashboard.See all available data, control data sharing, or add to the Dashboard.Connect devices that update your exercise or medical status.Connect devices that update your exercise or medical status.View selected health and fitness data.View selected health and fitness data.Collect health and tness dataEnter your own data. If the parameter is in your Dashboard, just tap it there, then tap Add Data Point. Otherwise, tap Health Data at the bottom of the screen, tap the parameter you want to update, then tap Add Data Point.Health APPLE CONFIDENTIALDraft
  Chapter  28    Health  127Collect data from a device. Follow the instructions that can come with the device to set it up. If it’s a Bluetooth device, you’ll need to pair it with iPhone—see Bluetooth devices on page 36.Collect data from an app. Follow the instructions that can come with the app to set it up, then watch for a sharing request where you control whether data is shared with the Health app.Stop app data collection. Tap Sources at the bottom of the Health screen, then select the app in the Apps list. Or tap the associated parameter in your Dashboard or in the Health Data list, tap Share Data, then choose the app under Data Providers.Share health and tness dataEnter your own data. If the parameter is in your Dashboard, just tap it there, then tap Add Data Point. Otherwise, tap Health Data at the bottom of the screen, tap the parameter you want to update, then tap Add Data Point.Share data. Follow the instructions that can come with the app or the device to set it up, then watch for a sharing request where you control whether data is shared by the Health app. For example, your health care provider might provide an app that sends blood pressure updates to your doctor. You need only install the app, then allow the Health app to share blood pressure data when prompted.Stop sharing data. Tap Sources at the bottom of the Health screen, then select the app in the Apps list. Or tap the associated parameter in your Dashboard or in the Health Data list, tap Share Data, then choose the app under Share Data With.Create an emergency medical IDYour iPhone can display important contact and medical information on the Lock screen, where it’s available for someone attending to you in an emergency.Note:  Anyone with physical access to your iPhone can read the information you include in your emergency medical ID.Set up your medical ID. In the Health app, tap Medical ID in the bottom right of the screen. View your ID. When you wake iPhone, slide to the passcode screen, then tap Emergency.Prevent viewing. Tap Medical ID, tap Edit, then turn o Show Medical ID. APPLE CONFIDENTIALDraft
29   12 8Get booksGet books from the iBooks Store. In iBooks, use the buttons at the bottom of the screen to access the iBooks Store. Tap Featured to browse the latest releases, or Top Charts to view the most popular. To nd a specic book, tap Search.Read a bookGo to a page.Go to a page.Bookmark this page.Bookmark this page.Contents, bookmarks, and notesContents, bookmarks, and notesSearch in this book.Search in this book.Open a book. Tap the book you want to read. If you don’t see it on the bookshelf, swipe left or right to see other collections.Show the controls. Tap near the center of a page. Not all books have the same controls, but some of the things you can do include searching, viewing the table of contents, and sharing what you’re reading.Close a book. Tap Library, or pinch the page.Enlarge an image. Double-tap the image. In some books, touch and hold to display a magnifying glass you can use to view an image.Go to a specic page. Use the page navigation controls at the bottom of the screen. Or, tap   and enter a page number, then tap the page number in the search results.iBooks APPLE CONFIDENTIALDraft
  Chapter  29    iBooks  12 9Get a denition. Double-tap a word, then tap Dene in the menu that appears. Denitions aren’t available for all languages.Remember your place. Tap   to add a bookmark, or tap again to remove it. You can have multiple bookmarks—to see them all, tap  , then tap Bookmarks. You don’t need to add a bookmark when you close the book because iBooks remembers where you left o.Remember the good parts. Some books let you add highlights and notes. To add a highlight, touch and hold a word then move your nger to draw the highlight. To add a note, double-tap a word to select it, move the grab points to adjust the selection, then tap Note in the menu that appears. To see all the highlights and notes you’ve made, tap  , then tap Notes.Share the good parts. Tap some highlighted text, then, in the menu that appears, tap  . If the book is from the iBooks Store, a link to the book is included automatically. (Sharing may not be available in all regions.)Share a link to a book. Tap near the center of a page to display the controls, then tap  . Next, tap  , then tap Share Book.Change the way a book looks. Some books let you change the font, font size, and color of the page. (Tap  .) You can also change justication and hyphenation in Settings > iBooks. These settings apply to all books that support them.Page colorPage colorBrightnessBrightnessTurn off pagination.Turn off pagination.Change the brightness. Tap  . If you don’t see  , tap   rst.Dim the screen when it’s dark. Turn on Auto-Night Theme to automatically change the bookshelf, page color and brightness when using iBooks in low-light conditions. (Not all books support Auto-Night.) APPLE CONFIDENTIALDraft
  Chapter  29    iBooks  13 0Organize booksSort the list.Sort the list.View collections.View collections.View on the iBooks StoreView on the iBooks StoreView books by title or by cover. Tap   or  .Organize your books with collections. Tap Select, then select some books to move them into a collection. To edit or create collections, tap the name of the current collection (at the top of the screen). Some built-in collections, such as PDFs, can’t be renamed or deleted.Rearrange books. While viewing a collection by cover, touch and hold a cover, then drag it to a new location. While viewing books by title, sort the list using the buttons at the top of the screen. The All Books collection is automatically arranged for you; switch to another collection if you want to manually arrange your books.Search for a book. Pull down to reveal the Search eld at the top of the screen. Searching looks for the title and the author’s name. Hide purchased books you haven’t downloaded. Tap the name of the current collection (at the top of the screen), then turn on Hide iCloud Books.Read PDFsSync a PDF. On a Mac, add the PDF to iBooks for OS X, then open iTunes, select the PDF, then sync. In iTunes on your Windows computer, choose File > Add to Library, select the PDF, then sync. See iTunes Help for more info about syncing.Add a PDF email attachment to iBooks. Open the email message, then touch and hold its PDF attachment. Choose “Open in iBooks” from the menu that appears.Print a PDF. With the PDF open, tap  , then choose Print. You’ll need an AirPrint-compatible printer. For more about AirPrint, see AirPrint on page 35.Email a PDF. With the PDF open, tap  , then choose Email.iBooks settingsGo to Settings > iBooks, where you can: •Sync collections and bookmarks (including notes and current page information) with your other devices. •Display online content within a book. Some books might access video or audio that’s stored on the web. APPLE CONFIDENTIALDraft
  Chapter  29    iBooks  131 •Change the direction pages turn when you tap in the left margin. APPLE CONFIDENTIALDraft
30   132Contacts at a glanceOpen in Mail.Open in Mail.Dial a number.Dial a number.Open in Messages.Open in Messages.Tap to view photo.Tap to view photo.Set your My Info card for Safari, Siri, and other apps. Go to Settings > Mail, Contacts, Calendars, then tap My Info and select the contact card with your name and information.Let Siri know who’s who. On your contact card, use the related names elds to dene relationships you want Siri to know about, so you can say things like “send a message to my sister.”Find a contact. Tap the search eld at the top of the contacts list and enter your search. You can also search your contacts with Spotlight Search (see Search on page 28).Share a contact. Tap a contact, then tap Share Contact. See Share from apps on page 31.Change a label. If a eld has the wrong label, such as Home instead of Work, tap Edit. Then tap the label and choose one from the list, or tap Add Custom Label to create one of your own.Add your friends’ social proles. While viewing a contact, tap Edit, then tap “add social prole.” You can add Twitter, Facebook, LinkedIn, Flickr, Myspace, and Sina Weibo accounts, or create a custom entry.Delete a contact. Go to the contact’s card, then tap Edit. Scroll down, then tap Delete Contact.Contacts APPLE CONFIDENTIALDraft
  Chapter  30    Contacts  133Use Contacts with PhonePrioritize your contacts. When you add someone to your Favorites list, their calls bypass Do Not Disturb and are added to your Favorites list in Phone for quick dialing. Choose a contact, then scroll down and tap Add to Favorites.Save the number you just dialed. In Phone, tap Keypad, enter a number, then tap Add to Contacts. Tap Create New Contact, or tap “Add to Existing Contact” and choose a contact.Add a recent caller to Contacts. In Phone, tap Recents, then tap   next to the number. Then tap Create New Contact, or tap “Add to Existing Contact” and choose a contact.Automate dialing an extension or passcode. If the number you’re calling requires dialing an extension, iPhone can enter it for you. When editing a contact’s phone number, tap   to enter pauses in the dialing sequence. Tap Pause to enter a two-second pause, which is represented by a comma. Tap Wait to stop dialing until you tap Dial again, which is represented by a semicolon.Add contactsBesides entering contacts, you can: •Use your iCloud contacts:  Go to Settings > iCloud, then turn on Contacts. •Import your Facebook Friends:  Go to Settings > Facebook, then turn on Contacts in the “Allow These Apps to Use Your Accounts” list. This creates a Facebook group in Contacts.  •Use your Google contacts:  Go to Settings > Mail, Contacts, Calendars, tap your Google account, then turn on Contacts. •Access a Microsoft Exchange Global Address List:  Go to Settings > Mail, Contacts, Calendars, tap your Exchange account, then turn on Contacts. •Set up an LDAP or CardDAV account to access business or school directories:  Go to Settings > Mail, Contacts, Calendars > Add Account > Other. Then tap Add LDAP account or Add CardDAV account, then enter the account information. •Sync contacts from your computer or Yahoo!:  In iTunes on your computer, turn on contact syncing in the device info pane. For information, see iTunes Help. •Import contacts from a SIM card (GSM):  Go to Settings > Mail, Contacts, Calendars > Import SIM Contacts. •Import contacts from a vCard:  Tap a .vcf attachment in an email or message.Search a directory. Tap Groups, tap the GAL, CardDAV, or LDAP directory you want to search, then enter your search. To save a person’s info to your contacts, tap Add Contact.Show or hide a group. Tap Groups, then select the groups you want to see. This button appears only if you have more than one source of contacts.Update your contacts using Twitter, Facebook, and Sina Weibo. Go to Settings > Twitter, Settings > Facebook, or Settings > Sina Weibo, then tap Update Contacts. This updates contact photos and social media account names in Contacts. APPLE CONFIDENTIALDraft
  Chapter  30    Contacts  134Unify contactsWhen you have contacts from multiple sources, you might have multiple entries for the same person. To keep redundant contacts from appearing in your All Contacts list, contacts from dierent sources that have the same name are linked and displayed as a single unied contact. When you view a unied contact, the title Unied Info appears. Link contacts. If two entries for the same person aren’t linked automatically, you can unify them manually. Edit one of the contacts, tap Edit, then tap Link Contact and choose the other contact entry to link to.Linked contacts aren’t merged. If you change or add information in a unied contact, the changes are copied to each source account where that information already exists.If you link contacts with dierent rst or last names, the names on the individual cards won’t change, but only one name appears on the unied card. To choose which name appears when you view the unied card, tap Edit, tap the linked card with the name you prefer, then tap Use This Name For Unied Card.Contacts settingsGo to Settings > Mail, Contacts, Calendars, where you can: •Change how contacts are sorted •Display contacts by rst or last name •Change how long names are shortened in lists •Choose to show recent and favorite contacts in the multitasking screen •Set a default account for new contacts •Set your My Info card APPLE CONFIDENTIALDraft
31   135Tap numbers and functions in Calculator, just as you would with a standard calculator.Get to Calculator quickly! Swipe up from the bottom edge of the screen to open Control Center.Clear the display.Clear the display.To use the scientic calculator, rotate iPhone to landscape orientation.Calculator APPLE CONFIDENTIALDraft
32   136Compass at a glanceFind a direction, see your latitude and longitude, nd level, or match a slope.Swipe left to use the level.Swipe left to use the level.Current locationCurrent locationAlign the crosshairs to level for accuracy.Align the crosshairs to level for accuracy.Tap anywhere to lock the heading.Tap anywhere to lock the heading.Deviation from the locked headingDeviation from the locked headingThe direction iPhone is pointingThe direction iPhone is pointingSee your location. To see your current location, go to Settings > Privacy > Location Services and turn on Location Services and Compass. For more about Location Services, see Privacy on page 37.Stay on course. Tap the screen to lock in the current heading, then watch for a red band to see if you’re o course.Important:  The accuracy of the compass can be aected by magnetic or environmental interference; even the magnets in the iPhone earbuds can cause a deviation. Use the digital compass only for basic navigation assistance. Don’t rely on it to determine precise location, proximity, distance, or direction.Compass APPLE CONFIDENTIALDraft
  Chapter  32    Compass  137On the levelOn an edge ...On an edge ...... or lying flat... or lying flatDeviationfrom levelDeviationfrom levelLevel!Level!Deviation from chosen slopeDeviation from chosen slopeShow the level. Swipe left on the Compass screen.Hang it straight. Hold iPhone against a picture frame or other object, then rotate them until you see green. For true level, the deviation is displayed on a black background. If the background is red (indicating relative slope), tap the screen to change it to black.Level the table. Lay iPhone at on the table.Match that slope. Hold iPhone against the surface you want to match, then tap the screen to capture the slope. The slope you seek is shown in black, with deviation shown in red. Tap again to return to standard level. APPLE CONFIDENTIALDraft
33   138At a glanceWith a Nike + iPod Sensor (sold separately), the Nike + iPod app, available for iPhone 5s, iPhone 5c, and earlier, provides audible feedback on your speed, distance, time elapsed, and calories burned during a run or walk.The Nike + iPod app doesn’t appear on the Home screen until you turn it on.Turn on Nike + iPod. Go to Settings > Nike + iPod.Choose a standard workout.Choose a standard workout.Review your workout history.Review your workout history.Choose or create acustom workout.Choose or create acustom workout.Calibrate based on your last workout.Calibrate based on your last workout.Choose a workout type.Choose a workout type.Link and calibrate your sensorNike + iPod collects workout data from a wireless sensor (sold separately) that you attach to your shoe. Before you use it the rst time, you need to link your sensor to iPhone.Shoe, meet iPhone. To link the sensor to iPhone, attach the sensor to your shoe, then go to Settings > Nike + iPod > Sensor.Nike + iPod APPLE CONFIDENTIALDraft
  Chapter  33    Nike + iPod  139Be accurate. To calibrate Nike + iPod, record a workout over a known distance of at least a quarter mile (400 meters). Then, after you tap End Workout, tap Calibrate on the workout summary screen and enter the actual distance you covered.Try again. To reset to the default calibration, go to Settings > Nike + iPod.Work outGo! To start a workout, tap Workouts, and choose a workout.Take a break. If you need to stop for a moment, take iPhone and tap   on the Lock screen. Tap  when you’re ready to continue.Finish. To end the workout, wake iPhone, tap  , then tap End Workout.Post it. Send your workout data to nikeplus.com. Open Nike + iPod, tap History, then tap “Send to Nike+.” (You need to be connected to the Internet.)Progress! Review your progress on nikeplus.com. Open Safari, log in to your account on nikeplus.com, then follow the onscreen instructions.Nike + iPod SettingsGo to Settings > Nike + iPod, where you can adjust settings for: •Your power song •The voice used for spoken feedback •Units for distance •Your weight •Lock screen orientation APPLE CONFIDENTIALDraft
A   140Accessibility featuresiPhone oers these accessibility features: Vision •VoiceOver •Support for braille displays •Zoom •Invert Colors and Grayscale •Speak Selection •Speak Screen •Speak Auto-text •Large, bold, and high-contrast text •Button Shapes •Reduce screen motion •On/o switch labels •Assignable ringtones and vibrations •Video DescriptionsHearing •Hearing aids •Call audio routing •Phone noise cancelation •LED Flash for Alerts •Subtitles and closed captions •Mono audio and balanceInteraction •Siri •Widescreen keyboards •Guided Access •Switch Control •AssistiveTouchTurn on accessibility features. Go to Settings > General > Accessibility, or use the Accessibility Shortcut. See Accessibility Shortcut below.Use iTunes to congure accessibility. You can choose some accessibility options in iTunes on your computer. Connect iPhone to your computer, then select iPhone in the iTunes device list. Click Summary, then click Congure Accessibility at the bottom of the Summary screen.Accessibility APPLE CONFIDENTIALAppendixDraft
  Appendix A    Accessibility  141For more information about iPhone accessibility features, see www.apple.com/accessibility.Accessibility ShortcutUse the Accessibility Shortcut. Press the Home button quickly three times to turn any of these features on or o: •VoiceOver •Invert Colors •Grayscale •Zoom •Switch Control •AssistiveTouch •Guided Access (The shortcut starts Guided Access if it’s already turned on. See Guided Access on page 158.) •Hearing Aid Control (if you have paired Made for iPhone hearing aids)Choose the features you want to control. Go to Settings > General > Accessibility > Accessibility Shortcut, then select the accessibility features you use.Not so fast. To slow down the triple-click speed, go to Settings > General > Accessibility > Home-click Speed. (This also slows down double-clicks.)VoiceOverVoiceOver describes aloud what appears onscreen, so you can use iPhone without seeing it.VoiceOver tells you about each item on the screen as you select it. The VoiceOver cursor (a rectangle) encloses the item and VoiceOver speaks its name or describes it.Touch the screen or drag your nger over it to hear the items on the screen. When you select text, VoiceOver reads the text. If you turn on Speak Hints, VoiceOver may tell you the name of the item and provide instructions—for example, “double-tap to open.” To interact with items, such as buttons and links, use the gestures described in Learn VoiceOver gestures on page 144.When you go to a new screen, VoiceOver plays a sound, then selects and speaks the rst item on the screen (typically in the upper-left corner). VoiceOver also lets you know when the display changes to landscape or portrait orientation, and when the screen becomes locked or unlocked.Note:  VoiceOver speaks in the language specied in International settings, which may be inuenced by the Region Format setting in Settings > General > International. VoiceOver is available in many languages, but not all.VoiceOver basicsImportant:  VoiceOver changes the gestures you use to control iPhone. When VoiceOver is on, you must use VoiceOver gestures to operate iPhone—even to turn VoiceOver o.Turn VoiceOver on or o. Go to Settings > General > Accessibility > VoiceOver, or use the Accessibility Shortcut. See Accessibility Shortcut on page 141.Explore. Drag your nger over the screen. VoiceOver speaks each item you touch. Lift your nger to leave an item selected. •Select an item:  Tap it, or lift your nger while dragging over it. APPLE CONFIDENTIALDraft
  Appendix A    Accessibility  142 •Select the next or previous item:  Swipe right or left with one nger. Item order is left-to-right, top-to-bottom. •Select the item above or below:  Set the rotor to Vertical Navigation, then swipe up or down with one nger. If you don’t nd Vertical Navigation in the rotor, you can add it; see Use the VoiceOver rotor on page 145. •Select the rst or last item on the screen:  Tap with four ngers at the top or bottom of the screen. •Select an item by name:  Triple-tap with two ngers anywhere on the screen to open the Item Chooser. Then type a name in the search eld, or swipe right or left to move through the list alphabetically, or tap the table index to the right of the list and swipe up or down to move quickly through the list of items. Or use handwriting to select an item by writing its name; see Write with your nger on page 147. To dismiss the Item Chooser without making a selection, do a two-nger scrub (move two ngers back and forth three times quickly, making a “z”). •Change an item’s name so it’s easier to nd:  Select the item, then double-tap and hold with two ngers anywhere on the screen. •Speak the text of the selected item:  Set the rotor to characters or words, then swipe down or up with one nger. •Turn spoken hints on or o:  Go to Settings > General > Accessibility > VoiceOver > Speak Hints. •Use phonetic spelling:  Go to Settings > General > Accessibility > VoiceOver > Phonetic Feedback. •Speak the entire screen, from the top:  Swipe up with two ngers. •Speak from the current item to the bottom of the screen:  Swipe down with two ngers. •Pause speaking:  Tap once with two ngers. Tap again with two ngers to resume, or select another item. •Mute VoiceOver:  Double-tap with three ngers. Repeat to unmute. If you’re using an external keyboard, press the Control key. •Silence sound eects:  Turn o Settings > General > Accessibility > VoiceOver > Use Sound Eects.Use a larger VoiceOver cursor. Turn on Settings > General > Accessibility > VoiceOver > Large Cursor.Adjust the speaking voice. You can adjust the VoiceOver speaking voice: •Change the volume:  Use the volume buttons on iPhone, or add volume to the rotor, then swipe up and down to adjust; see Use the VoiceOver rotor on page 145. •Change the speech rate:  Go to Settings > General > Accessibility > VoiceOver, then drag the Speaking Rate slider. You can also set the rotor to Speech Rate, then swipe up or down to adjust. •Use pitch change:  VoiceOver uses a higher pitch when speaking the rst item of a group (such as a list or table) and a lower pitch when speaking the last item of a group. Go to Settings > General > Accessibility > VoiceOver > Use Pitch Change. •Speak punctuation:  Set the rotor to Punctuation, then swipe up or down to select how much you want to hear. •Control audio ducking:  To choose whether audio that’s playing is turned down while VoiceOver speaks, set the rotor to Audio Ducking, then swipe up or down. •Change the language for iPhone:  Go to Settings > General > Language & Region. VoiceOver pronunciation of some languages is aected by the Region Format you choose there. APPLE CONFIDENTIALDraft
  Appendix A    Accessibility  143 •Change pronunciation:  Set the rotor to Language, then swipe up or down. Language is available in the rotor only if you select more than one pronunciation in Settings > General > Accessibility > VoiceOver > Speech > Rotor Languages. •Choose which dialects are available in the rotor:  Go to Settings > General > Accessibility > VoiceOver > Speech > Rotor Languages. To adjust voice quality or speaking rate, tap   next to the language. To remove languages from the rotor or change their order, tap Edit, tap the delete button or drag the reorder button   up or down, then tap Done. •Set the default dialect for the current iPhone language:  Go to Settings > General > Accessibility > VoiceOver > Speech. •Download an enhanced quality reading voice:  Go to Settings > General > Accessibility > VoiceOver > Speech, tap a language, then tap Enhanced Quality. If you’re using English, you can choose to download Alex, the same high-quality U.S. English voice used for VoiceOver on Mac computers.Use iPhone with VoiceOverUnlock iPhone. Press either the Home button or the Sleep/Wake button, swipe to select the Unlock slide, then double-tap the screen.Enter your passcode silently. To avoid having your passcode spoken as you enter it, use handwriting; see Write with your nger on page 147.Open an app, toggle a switch, or tap an item. Select the item, then double-tap the screen.Double-tap the selected item. Triple-tap the screen.Adjust a slider. Select the slider, then swipe up or down with one nger.Use a standard gesture. Double-tap and hold your nger on the screen until you hear three rising tones, then make the gesture. When you lift your nger, VoiceOver gestures resume. For example, to drag a volume slider with your nger instead of swiping up and down, select the slider, double-tap and hold, wait for the three tones, then slide left or right.Scroll a list or area of the screen. Swipe up or down with three ngers. •Scroll continuously through a list:  Double-tap and hold until you hear three rising tones, then drag up or down. •Use the list index:  Some lists have an alphabetical table index along the right side. Select the index, then swipe up or down to move through the index. You can also double-tap, hold, then slide your nger up or down. •Reorder a list:  You can change the order of items in some lists, such as the Rotor items in Accessibility settings. Select   to the right of an item, double-tap and hold until you hear three rising tones, then drag up or down.Open Notication Center. Select any item in the status bar, then swipe down with three ngers. To dismiss Notication Center, do a two-nger scrub (move two ngers back and forth three times quickly, making a “z”).Open Control Center. Select any item in the status bar, then swipe up with three ngers. To dismiss Control Center, do a two-nger scrub.Switch apps. Press the Home button twice to see what’s running. Swipe left or right with one nger to select an app, then tap to open. Or, set the rotor to Actions while viewing open apps and swipe up or down. APPLE CONFIDENTIALDraft
  Appendix A    Accessibility  144Rearrange your Home screen. Select an icon on the Home screen, double-tap and hold, then drag. Lift your nger when the icon is in its new location. Drag an icon to the edge of the screen to move it to another Home screen. You can continue to select and move items until you press the Home button.Speak iPhone status information. Tap the status bar at the top of the screen, then swipe left or right to hear information about the time, battery life, Wi-Fi signal strength, and more.Speak notications. Go to Settings > General > Accessibility > VoiceOver and turn on Always Speak Notications. Notications, including the text of incoming text messages, are spoken as they occur, even if iPhone is locked. Unacknowledged notications are repeated when you unlock iPhone.Turn the screen curtain on or o. Triple-tap with three ngers. When the screen curtain is on, the screen contents are active even though the display is turned o.Learn VoiceOver gesturesWhen VoiceOver is on, standard touchscreen gestures have dierent eects, and additional gestures let you move around the screen and control individual items. VoiceOver gestures include two-, three-, and four-nger taps and swipes. For best results using multi-nger gestures, relax and let your ngers touch the screen with some space between them.You can use dierent techniques to perform VoiceOver gestures. For example, you can perform a two-nger tap using two ngers of one hand, or one nger from each hand. You can even use your thumbs. Some people use a split-tap gesture: instead of selecting an item and double-tapping, touch and hold an item with one nger, then tap the screen with another nger.Try dierent techniques to discover what works best for you. If a gesture doesn’t work, try a quicker movement, especially for a double-tap or swipe gesture. To swipe, try brushing the screen quickly with your nger or ngers.In VoiceOver settings, you can enter a special area where you can practice VoiceOver gestures without aecting iPhone or its settings.Practice VoiceOver gestures. Go to Settings > General > Accessibility > VoiceOver, then tap VoiceOver Practice. When you nish practicing, tap Done. If you don’t see the VoiceOver Practice button, make sure VoiceOver is turned on.Here are some key VoiceOver gestures:Navigate and read •Tap:  Select and speak the item. •Swipe right or left:  Select the next or previous item. •Swipe up or down:  Depends on the rotor setting. See Use the VoiceOver rotor on page 145. •Two-nger swipe up:  Read all from the top of the screen. •Two-nger swipe down:  Read all from the current position. •Two-nger tap:  Stop or resume speaking. •Two-nger scrub:  Move two ngers back and forth three times quickly (making a “z”) to dismiss an alert or go back to the previous screen. •Three-nger swipe up or down:  Scroll one page at a time. •Three-nger swipe right or left:  Go to the next or previous page (on the Home screen or in Stocks, for example). APPLE CONFIDENTIALDraft
  Appendix A    Accessibility  145 •Three-nger tap:  Speak additional information, such as position within a list or whether text is selected. •Four-nger tap at top of screen:  Select the rst item on the page. •Four-nger tap at bottom of screen:  Select the last item on the page.Activate •Double-tap:  Activate the selected item. •Triple-tap:  Double-tap an item. •Split-tap:  As an alternative to selecting an item and double-tapping to activate it, touch an item with one nger, and then tap the screen with another. •Double-tap and hold (1 second) + standard gesture:  Use a standard gesture. The double-tap and hold gesture tells iPhone to interpret the next gesture as standard. For example, you can double-tap and hold, and then without lifting your nger, drag your nger to slide a switch. •Two-nger double-tap:  Answer or end a call. Play or pause in Music, Videos, Voice Memos, or Photos. Take a photo in Camera. Start or pause recording in Camera or Voice Memos. Start or stop the stopwatch. •Two-nger double-tap and hold:  Change an item’s label to make it easier to nd. •Two-nger triple-tap:  Open the Item Chooser. •Three-nger double-tap:  Mute or unmute VoiceOver. •Three-nger triple-tap:  Turn the screen curtain on or o.Use the VoiceOver rotorUse the rotor to choose what happens when you swipe up or down with VoiceOver turned on, or to select special input methods such as Braille Screen Input or Handwriting.Operate the rotor. Rotate two ngers on the screen around a point between them.Choose rotor options. Go to Settings > General > Accessibility > VoiceOver > Rotor, then select the options you want to include in the rotor.The available rotor options and their eects depend on what you’re doing. For example, if you’re reading an email, you can use the rotor to switch between speaking text word-by-word or character-by-character when you swipe up or down. If you’re browsing a webpage, you can set the rotor to speak all text (word-by-word or character-by-character), or to jump to the next item of a certain type, such as a header or link.When you use an Apple Wireless Keyboard to control VoiceOver, you can use the rotor to adjust settings such as volume, speech rate, use of pitch or phonetics, typing echo, and reading of punctuation. See Use VoiceOver with an Apple Wireless Keyboard on page 148.Use the onscreen keyboardWhen you activate an editable text eld, the onscreen keyboard appears (unless you have an Apple Wireless Keyboard attached).Activate a text eld. Select the text eld, then double-tap. The insertion point and the onscreen keyboard appear. APPLE CONFIDENTIALDraft
  Appendix A    Accessibility  146Enter text. Type characters using the onscreen keyboard: •Standard typing:  Select a key on the keyboard by swiping left or right, then double-tap to enter the character. Or move your nger around the keyboard to select a key and, while continuing to touch the key with one nger, tap the screen with another nger. VoiceOver speaks the key when it’s selected, and again when the character is entered. •Touch typing:  Touch a key on the keyboard to select it, then lift your nger to enter the character. If you touch the wrong key, slide your nger to the key you want. VoiceOver speaks the character for each key as you touch it, but doesn’t enter a character until you lift your nger. •Direct Touch typing:  VoiceOver is disabled for the keyboard only, so you can type just as you do when VoiceOver is o. •Choose typing style:  Go to Settings > General > Accessibility > VoiceOver > Typing Style. Or, set the rotor to Typing Mode and swipe up or down.Move the insertion point. Swipe up or down to move the insertion point forward or backward in the text. Use the rotor to choose whether you want to move the insertion point by character, by word, or by line. To jump to the beginning or end, double-tap the text.VoiceOver makes a sound when the insertion point moves, and speaks the character, word, or line that the insertion point moves across. When moving forward by words, the insertion point is placed at the end of each word, before the space or punctuation that follows. When moving backward, the insertion point is placed at the end of the preceding word, before the space or punctuation that follows it.Move the insertion point past the punctuation at the end of a word or sentence. Use the rotor to switch back to character mode.When moving the insertion point by line, VoiceOver speaks each line as you move across it. When moving forward, the insertion point is placed at the beginning of the next line (except when you reach the last line of a paragraph, when the insertion point is moved to the end of the line just spoken). When moving backward, the insertion point is placed at the beginning of the line that’s spoken.Change typing feedback. Go to Settings > General > Accessibility > VoiceOver > Typing Feedback.Use phonetics in typing feedback. Go to Settings > General > Accessibility > VoiceOver > Use Phonetics. Text is read character by character. VoiceOver rst speaks the character, then its phonetic equivalent—for example, “f” and then “foxtrot.”Delete a character. Use   with any of the VoiceOver typing styles. VoiceOver speaks each character as it’s deleted. If Use Pitch Change is turned on, VoiceOver speaks deleted characters in a lower pitch.Select text. Set the rotor to Edit, swipe up or down to choose Select or Select All, then double-tap. If you chose Select, the word closest to the insertion point is selected when you double-tap. To increase or decrease the selection, do a two-nger scrub to dismiss the pop-up menu, then pinch.Cut, copy, or paste. Set the rotor to Edit, select the text, swipe up or down to choose Cut, Copy, or Paste, then double-tap.Undo. Shake iPhone, swipe left or right to choose the action to undo, then double-tap. APPLE CONFIDENTIALDraft
  Appendix A    Accessibility  147Enter an accented character. In standard typing style, select the plain character, then double-tap and hold until you hear a sound indicating alternate characters have appeared. Drag left or right to select and hear the choices. Release your nger to enter the current selection. In touch typing style, touch and hold a character until the alternate characters appear.Change the keyboard language. Set the rotor to Language, then swipe up or down. Choose “default language” to use the language specied in International settings. The Language rotor item appears only if you select more than one language in Settings > General > Accessibility > VoiceOver > Speech.Write with your ngerHandwriting mode lets you enter text by writing characters on the screen with your nger. In addition to normal text entry, use handwriting mode to enter your iPhone passcode silently or open apps from the Home screen.Enter handwriting mode. Use the rotor to select Handwriting. If Handwriting isn’t in the rotor, go to Settings > General > Accessibility > VoiceOver > Rotor and add it.Choose a character type. Swipe up or down with three ngers to choose lowercase, numbers, uppercase, or punctuation.Hear the currently selected character type. Tap with three ngers.Enter a character. Trace the character on the screen with your nger.Enter a space. Swipe right with two ngers.Go to a new line. Swipe right with three ngers.Delete the character before the insertion point. Swipe left with two ngers.Select an item on the Home screen. Start writing the name of the item. If there are multiple matches, continue to spell the name until it is unique, or swipe up or down with two ngers to choose from the current matches.Enter your passcode silently. Set the rotor to Handwriting on the passcode screen, then write the characters of your passcode.Skip to a letter in a table index. Select the index to the right of the table, then write the letter.Set the rotor to a web browsing element type. Write the rst letter of a page element type. For example, write “l” to have up or down swipes skip to links, or “h” to skip to headings.Exit handwriting mode. Turn the rotor to a dierent selection.Type onscreen brailleWith Braille Screen Input enabled, you can use your ngers to enter six-dot or contracted braille codes directly on the iPhone screen. Tap codes with iPhone laying at in front of you (tabletop mode), or hold iPhone with the screen facing away so your ngers curl back to tap the screen (screen away mode).Turn on Braille Screen Input. Use the rotor to select Braille Screen Input. If you don’t nd it in the rotor, go to Settings > General > Accessibility > VoiceOver > Rotor and add it.Enter braille codes. Place iPhone at in front of you or hold it with the screen facing away, then tap the screen with one or several ngers at the same time.Adjust entry dot positions. To move the entry dots to match your natural nger positions, tap and lift your right three ngers all at once to position dots 4, 5, and 6, followed immediately by your left three ngers for dots 1, 2, and 3. APPLE CONFIDENTIALDraft
  Appendix A    Accessibility  148Switch between 6-dot and contracted braille. Swipe to the right with three ngers. To set the default, go to Settings > General > Accessibility > VoiceOver > Braille > Braille Screen Input.Enter a space. Swipe right with one nger. (In screen away mode, swipe to your right.)Delete the previous character. Swipe left with one nger.Cycle through spelling suggestions. Swipe up or down with one nger.Select an item on the Home screen. Start entering the name of the item. If there are multiple matches, continue to spell the name until it is unique, or swipe up or down with one nger to select a partial match.Open the selected app. Swipe right with two ngers.Turn braille contractions on or o. Swipe to the right with three ngers.Translate immediately (when contractions are enabled). Swipe down with two ngers.Stop entering braille. Do a two-nger scrub, or set the rotor to another setting.Use VoiceOver with an Apple Wireless KeyboardYou can control VoiceOver using an Apple Wireless Keyboard paired with iPhone. See Use an Apple Wireless Keyboard on page 26.Use VoiceOver keyboard commands to navigate the screen, select items, read screen contents, adjust the rotor, and perform other VoiceOver actions. Most commands use the Control-Option key combination, abbreviated in the table that follow as “VO.” You can use VoiceOver Help to learn the keyboard layout and the actions associated with various key combinations. VoiceOver Help speaks keys and keyboard commands as you type them, without performing the associated action.VoiceOver keyboard commandsVO = Control-Option •Turn on VoiceOver help:  VO–K •Turn o VoiceOver help:  Escape •Select the next or previous item:  VO–Right Arrow or VO–Left Arrow •Double-tap to activate the selected item:  VO–Space bar •Press the Home button:  VO–H •Touch and hold the selected item:  VO–Shift–M •Move to the status bar:  VO–M •Read from the current position:  VO–A •Read from the top:  VO–B •Pause or resume reading:  Control •Copy the last spoken text to the clipboard:  VO–Shift–C •Search for text:  VO–F •Mute or unmute VoiceOver:  VO–S •Open Notication Center:  Fn–VO–Up Arrow •Open Control Center:  Fn–VO–Down Arrow •Open the Item Chooser:  VO–I •Change the label of the selected item:  VO–/ APPLE CONFIDENTIALDraft
  Appendix A    Accessibility  149 •Double-tap with two ngers:  VO–”-” •Adjust the rotor:  Use Quick Nav (see below) •Swipe up or down:  VO–Up Arrow or VO–Down Arrow •Adjust the speech rotor:  VO–Command–Left Arrow or VO–Command–Right Arrow •Adjust the setting specied by the speech rotor:  VO–Command–Up Arrow or VO–Command–Down Arrow •Turn the screen curtain on or o:  VO–Shift–S •Return to the previous screen:  EscapeQuick NavTurn on Quick Nav to control VoiceOver using the arrow keys. •Turn Quick Nav on or o:  Left Arrow–Right Arrow •Select the next or previous item:  Right Arrow or Left Arrow •Select the next or previous item specied by the rotor:  Up Arrow or Down Arrow •Select the rst or last item:  Control–Up Arrow or Control–Down Arrow •Double-tap to activate the selected item:  Up Arrow–Down Arrow •Scroll up, down, left, or right:  Option–Up Arrow, Option–Down Arrow, Option–Left Arrow, or Option–Right Arrow •Adjust the rotor:  Up Arrow–Left Arrow or Up Arrow–Right ArrowYou can also use the number keys on an Apple Wireless Keyboard to dial a phone number in Phone or enter numbers in Calculator.Single-key Quick Nav for web browsingWhen you view a webpage with Quick Nav on, you can use the following keys on the keyboard to navigate the page quickly. Typing the key moves to the next item of the indicated type. To move to the previous item, hold the Shift key as you type the letter. •Heading:  H •Link:  L •Text eld:  R •Button:  B •Form control:  C •Image:  I •Table:  T •Static text:  S •ARIA landmark:  W •List:  X •Item of the same type:  M •Level 1 heading:  1 •Level 2 heading:  2 •Level 3 heading:  3 •Level 4 heading:  4 •Level 5 heading:  5 •Level 6 heading:  6 APPLE CONFIDENTIALDraft
  Appendix A    Accessibility  150Text editingUse these commands (with Quick Nav turned o) to work with text. VoiceOver reads the text as you move the insertion point. •Go forward or back one character:  Right Arrow or Left Arrow •Go forward or back one word:  Option–Right Arrow or Option–Left Arrow •Go up or down one line:  Up Arrow or Down Arrow •Go to the beginning or end of the line:  Command–Left Arrow or Command–Down Arrow •Go to the beginning or end of the paragraph:  Option–Up Arrow or Option–Down Arrow •Go to the previous or next paragraph:  Option–Up Arrow or Option–Down Arrow •Go to the top or bottom of the text eld:  Command–Up Arrow or Command–Down Arrow •Select text as you move:  Shift + any of the insertion point movement commands above •Select all text:  Command–A •Copy, cut, or paste the selected text:  Command–C, Command–X, or Command–V •Undo or redo last change:  Command–Z or Shift–Command–ZSupport for braille displaysYou can use a Bluetooth braille display to read VoiceOver output, and you can use a braille display with input keys and other controls to control iPhone when VoiceOver is turned on. For a list of supported braille displays, see www.apple.com/accessibility/ios/braille-display.html.Connect a braille display. Turn on the display, then go to Settings > Bluetooth and turn on Bluetooth. Then, go to Settings > General > Accessibility > VoiceOver > Braille and choose the display.Adjust Braille settings. Go to Settings > General > Accessibility > VoiceOver > Braille, where you can: •Choose contracted, uncontracted eight-dot, or uncontracted six-dot braille input or output •Turn on the status cell and choose its location •Turn on Nemeth code for equations •Display the onscreen keyboard •Choose to have the page turned automatically when panning •Turn o automatic braille translation •Change the braille translation from Unied EnglishFor information about common braille commands for VoiceOver navigation, and for information specic to certain displays, see support.apple.com/kb/HT4400.The braille display uses the language that’s set for Voice Control. This is normally the language set for iPhone in Settings > International > Language. You can use the VoiceOver language setting to set a dierent language for VoiceOver and braille displays.Set the language for VoiceOver. Go to Settings > General > Language & Region.If you change the language for iPhone, you may need to reset the language for VoiceOver and your braille display.You can set the leftmost or rightmost cell of your braille display to provide system status and other information. For example: •Announcement History contains an unread message APPLE CONFIDENTIALDraft
  Appendix A    Accessibility  151 •The current Announcement History message hasn’t been read •VoiceOver speech is muted •The iPhone battery is low (less than 20% charge) •iPhone is in landscape orientation •The screen display is turned o •The current line contains additional text to the left •The current line contains additional text to the rightSet the leftmost or rightmost cell to display status information. Go to Settings > General > Accessibility > VoiceOver > Braille > Status Cell and tap Left or Right. See an expanded description of the status cell. On your braille display, press the status cell’s router button.Make phone calls with VoiceOverAnswer or end a call. Double-tap the screen with two ngers.When a phone call is established with VoiceOver on, the screen displays the numeric keypad by default, instead of showing call options.Display call options. Select the Hide Keypad button in the lower-right corner and double-tap.Display the numeric keypad again. Select the Keypad button near the center of the screen and double-tap.Read math equationsVoiceOver can read aloud math equations encoded using: •MathML on the web •MathML or LaTeX in iBooks AuthorHear an equation. Have VoiceOver read the text as usual. VoiceOver says “math” before it starts reading an equation.Explore the equation. Double tap the selected equation to display it full screen and move through it one element at a time. Swipe left or right to read elements of the equation. Use the rotor to select Symbols, Small Expressions, Medium Expressions, or Large Expressions, then swipe up or down to hear the next element of that size. You can continue to double-tap the selected element to “drill down” into the equation to focus on the selected element, then swipe left or right, up or down to read one part at a time.Equations read by VoiceOver can also be output to a braille device using Nemeth code, as well as the codes used by Unied English Braille, British English, French, and Greek. See Support for braille displays on page 150.Use VoiceOver with SafariSearch the web. Select the search eld, enter your search, then swipe right or left to move down or up the list of suggested search phrases. Then double-tap the screen to search the web using the selected phrase.Skip to the next page element of a particular type. Set the rotor to the element type, then swipe up or down.Set the rotor options for web browsing. Go to Settings > General > Accessibility > VoiceOver > Rotor. Tap to select or deselect options, or drag   up or down to reposition an item. APPLE CONFIDENTIALDraft
  Appendix A    Accessibility  152Skip images while navigating. Go to Settings > General > Accessibility > VoiceOver > Navigate Images. You can choose to skip all images or only those without descriptions.Reduce page clutter for easier reading and navigation. Select the Reader item in the Safari address eld (not available for all pages).If you pair an Apple Wireless Keyboard with iPhone, you can use single-key Quick Nav commands to navigate webpages. See Use VoiceOver with an Apple Wireless Keyboard on page 148.Use VoiceOver with MapsYou can use VoiceOver to explore a region, browse points of interest, follow roads, zoom in or out, select a pin, or get information about a location.Explore the map. Drag your nger around the screen, or swipe left or right to move to another item.Zoom in or out. Select the map, set the rotor to Zoom, then swipe down or up with one nger.Pan the map. Swipe with three ngers.Browse visible points of interest. Set the rotor to Points of Interest, then swipe up or down with one nger.Follow a road. Hold your nger down on the road, wait until you hear “pause to follow,” then move your nger along the road while listening to the guide tone. The pitch increases when you stray from the road.Select a pin. Touch a pin, or swipe left or right to select the pin. Get information about a location. With a pin selected, double-tap to display the information ag. Swipe left or right to select the More Info button, then double-tap to display the information page.Hear location cues as you move about. Turn on Tracking with heading to hear street names and points of interest as you approach them.Edit videos and voice memos with VoiceOverYou can use VoiceOver gestures to trim Camera videos and Voice Memo recordings.Trim a video. While viewing a video in Photos, double-tap the screen to display the video controls, then select the beginning or end of the trim tool. Then swipe up to drag to the right, or swipe down to drag to the left. VoiceOver announces the amount of time the current position will trim from the recording. To complete the trim, select Trim and double-tap.Trim a voice memo. Select the memo in Voice Memos, tap Edit, then tap Start Trimming. Select the beginning or end of the selection, double-tap and hold, then drag to adjust. VoiceOver announces the amount of time the current position will trim from the recording. Tap Play to preview the trimmed recording. When you’ve got it the way you want it, tap Trim.ZoomMany apps let you zoom in or out on specic items. For example, you can double-tap or pinch to look closer in Photos or expand webpage columns in Safari. But, there’s also a general Zoom feature that lets you magnify the screen no matter what you’re doing. You can zoom the entire screen (Full Screen Zoom) or zoom part of the screen in a resizable window and leave the rest of the screen unmagnied (Window Zoom). And, you can use Zoom together with VoiceOver.Turn Zoom on or o. Go to Settings > General > Accessibility > Zoom. Or, use the Accessibility Shortcut. See Accessibility Shortcut on page 141. APPLE CONFIDENTIALDraft
  Appendix A    Accessibility  153Zoom in or out. With Zoom turned on, double-tap the screen with three ngers.Vary the magnication. Double-tap with three ngers, then drag up or down. The tap-and-drag gesture is similar to a double-tap, except you don’t lift your ngers on the second tap—instead, drag your ngers on the screen. Once you start dragging, you can drag with a single nger. iPhone returns to the adjusted magnication when you zoom in again using the three-nger double-tap.Pan to see more. Drag the screen with three ngers. Or, hold your nger near the edge of the screen to pan to that side. Move your nger closer to the edge to pan more quickly.Switch between Full Screen Zoom and Window Zoom. Tap once with three ngers, then tap Window Zoom or Full Screen Zoom in the zoom controls that appear. To choose the mode that’s used when you turn on Zoom, go to Settings > General > Accessibility > Zoom > Zoom Region.Resize the zoom window (Window Zoom). Tap once with three ngers, tap Resize Lens, then drag any of the round handles that appear.Move the zoom window (Window Zoom). Drag the handle at the bottom of the zoom window.Show the zoom controller. Turn on Settings > General > Accessibility > Zoom > Show Controller, or tap once with three ngers then choose Show Controller. Then you can double-tap the oating Zoom Controls button to zoom in or out, single-tap the button to display the zoom controls, or drag it to pan. To move the Zoom Controls button, tap and hold the button, then drag it to a new location. To adjust the transparency of the zoom controller, go to Settings > General > Accessibility > Zoom > Idle Visibility.Have Zoom track your selections or the text insertion point. Turn on Settings > Accessibility > Zoom > Follow Focus. Then, for example, if you use VoiceOver, turning on this option causes the zoom window to magnify each element on the screen as you select it using a swipe in VoiceOver.Zoom in on your typing without magnifying the keyboard. Go to Settings > General > Accessibility > Zoom, turn on Follow Focus, then turn o Zoom Keyboard. When you zoom in while typing (in Messages or Notes, for example), the text you type is magnied while all of the keyboard remains visible.Display the magnied part of the screen in grayscale or inverted color. Tap once with three ngers, then tap Choose Filter in the zoom controls that appear. Tap again to turn o the eect.While using Zoom with an Apple Wireless Keyboard (see Use an Apple Wireless Keyboard on page 26), the screen image follows the insertion point, keeping it in the center of the display.Invert Colors and GrayscaleSometimes, inverting the colors or changing to grayscale on the iPhone screen makes it easier to read.Invert the screen colors. Go to Settings > General > Accessibility > Invert Colors.See the screen in grayscale. Turn on Settings > General > Accessibility > Grayscale.Turn on both eects to see inverted grayscale. You can also apply these eects to just the contents of the zoom window—see Zoom on page 152. APPLE CONFIDENTIALDraft
  Appendix A    Accessibility  154Speak SelectionEven with VoiceOver turned o, you can have iPhone read aloud any text you select. iPhone analyzes the text to determine the language, then reads it to you using the appropriate pronunciation.Turn on Speak Selection. Go to Settings > General > Accessibility > Speak Selection. There you can also: •Choose a language, dialect, and voice quality •Adjust the speaking rate •Choose to have individual words highlighted as they’re readHave text read to you. Select the text, then tap Speak.You can also have iPhone read the entire screen to you—see Speak Screen on page 154.Speak ScreeniPhone can read the contents of the screen to you, even if you don’t use VoiceOver.Turn on Speak Screen. Turn on Settings > General > Accessibility > Speech > Speak Screen.Have iPhone speak the screen. Swipe down from the top of the screen with two ngers, or ask Siri to “speak screen.” Use the controls that appear to pause speaking or adjust the rate.Highlight what’s being spoken. Turn on Highlight Content, below the Speak Screen switch when it’s turned on.You can also have iPhone read just text you select—see Speak Selection on page 154.Speak Auto-textSpeak Auto-text speaks the text corrections and suggestions iPhone makes when you type.Turn Speak Auto-text on or o. Go to Settings > General > Accessibility > Speak Auto-text.Speak Auto-text also works with VoiceOver and Zoom.Large, bold, and high-contrast textDisplay larger text in apps such as Settings, Calendar, Contacts, Mail, Messages, and Notes. Go to Settings > General > Text Size, then adjust the slider. For even larger text, go to Settings > General > Accessibility > Larger Text, then turn on Larger Accessibility Sizes.Display bolder text on iPhone. Go to Settings > General > Accessibility, then turn on Bold Text.Increase text contrast where possible. Go to Settings > General > Accessibility, then turn on Increase Contrast.Button ShapesiPhone can add a colored background shape or an underline to buttons so they’re easier to see.Emphasize buttons. Turn on Settings > General > Accessibility > Button Shapes. APPLE CONFIDENTIALDraft
  Appendix A    Accessibility  155Reduce screen motionYou can stop the movement of some screen elements, for example, the parallax eect of icons and alerts against the wallpaper, or motion transitions.Reduce motion. Go to Settings > General > Accessibility and turn on Reduce Motion.On/o switch labelsTo make it easier to see whether a setting is on or o, you can have iPhone show an additional label on on/o switches.Add switch setting labels. Go to Settings > General > Accessibility and turn on On/O Labels.Assignable ringtones and vibrationsYou can assign distinctive ringtones to people in your contacts list for audible caller ID. You can also assign vibration patterns for notications from specic apps, for phone calls, for FaceTime calls or messages from special contacts, and to alert you of a variety of other events, including new voicemail, new mail, sent mail, Tweet, Facebook Post, and reminders. Choose from existing patterns, or create new ones. See Sounds and silence on page 31. You can purchase ringtones from the iTunes Store on iPhone. See Chapter 22, iTunes Store, on page 111.Video DescriptionsVideo descriptions provide an audible description of video scenes. If you have a video that includes video descriptions, iPhone can play them for you.Turn on Video Descriptions. Go to Settings > General > Accessibility > Video Descriptions.Hearing aidsMade for iPhone hearing aidsIf you have a Made for iPhone hearing aid (available for iPhone 4s or later), you can use iPhone to adjust its settings to suit your listening needs, stream audio, or use iPhone as a remote mic.Pair with iPhone. If your hearing aids aren’t listed at Settings > General > Accessibility > Hearing Aids, you need to pair them with iPhone. To start, open the battery door on each hearing aid. Next, go to Settings > Bluetooth on iPhone and make sure Bluetooth is turned on. Then go to Settings > General > Accessibility > Hearing Aids. Close the battery doors on your hearing aids and wait until they appear in the list of devices (this could take a minute). When the hearing aid appears, tap it and respond to the pairing request.When pairing is nished, you hear a series of beeps and a tone, and a checkmark appears next to the hearing aid in the Devices list. Pairing can take as long as 60 seconds—don’t try to stream audio or otherwise use the hearing aid until pairing is nished.You should only need to pair once (and your audiologist might do it for you). After that, each time you turn your hearing aids back on, they reconnect to iPhone.Adjust hearing aid settings and view status. Go to Settings > General > Accessibility > Hearing Aids, or choose Hearing Aids from the Accessibility Shortcut. See Accessibility Shortcut on page 141. Hearing aid settings appear only after you pair your hearing aids with iPhone. APPLE CONFIDENTIALDraft
  Appendix A    Accessibility  156For shortcut access from the Lock screen, turn on Settings > Accessibility > Hearing Aids > Control on Lock Screen. Use the settings to: •Check hearing aid battery status. •Adjust ambient microphone volume and equalization. •Choose which hearing aids (left, right, or both) receive streaming audio. •Control Live Listen.Stream audio to your hearing aids. Stream audio from Phone, Siri, Music, Videos, and more, by choosing your hearing aids from the AirPlay menu  .Use iPhone as a remote microphone. You can use Live Listen to stream sound from the microphone in iPhone to your hearing aids. This can help you hear better in some situations by positioning the iPhone nearer the sound source. Triple-click the Home button, choose Hearing Aids, then tap Start Live Listen.Use your hearing aids with more than one iOS device. If you have more than one iOS device (both iPhone and iPad, for example), your hearing aid connection automatically switches from one to the other when you do something that generates audio on the other device, or when you receive a phone call on iPhone. Changes you make to hearing aid settings on one device are automatically sent to your other iOS devices. To take advantage of this, all of the devices must be on the same Wi-Fi network and logged in to the same iCloud account.Hearing Aid ModeiPhone has a Hearing Aid Mode that, when activated, may reduce interference with some hearing aid models. Hearing Aid Mode reduces the transmission power of the cellular radio in the GSM 1900 MHz band and may result in decreased 2G cellular coverage.Activate Hearing Aid Mode. Go to Settings > General > Accessibility > Hearing Aids.Hearing aid compatibilityThe FCC has adopted hearing aid compatibility (HAC) rules for digital wireless phones. These rules require certain phones to be tested and rated under the American National Standard Institute (ANSI) C63.19-2007 or C63.19-2011 hearing aid compatibility standards. The ANSI standard for hearing aid compatibility contains two types of ratings: •An “M” rating for reduced radio frequency interference to enable acoustic coupling with hearing aids that are not operating in telecoil mode •A “T” rating for inductive coupling with hearing aids operating in telecoil modeThese ratings are given on a scale from one to four, where four is the most compatible. A phone is considered hearing aid compatible under FCC rules if it is rated M3 or M4 for acoustic coupling and T3 or T4 for inductive coupling.For iPhone hearing aid compatibility ratings, see www.apple.com/support/hac.Hearing aid compatibility ratings don’t guarantee that a particular hearing aid works with a particular phone. Some hearing aids may work well with phones that don’t meet particular ratings. To ensure interoperability between a hearing aid and a phone, try using them together before purchase. APPLE CONFIDENTIALDraft
  Appendix A    Accessibility  157This phone has been tested and rated for use with hearing aids for some of the wireless technologies it uses. However, there may be some newer wireless technologies used in this phone that have not been tested yet for use with hearing aids. It is important to try the dierent features of this phone thoroughly and in dierent locations, using your hearing aid or cochlear implant, to determine if you hear any interfering noise. Consult your service provider or Apple for information on hearing aid compatibility. If you have questions about return or exchange policies, consult your service provider or phone retailer.Mono audio and balanceMono Audio combines the left and right stereo channels into a mono signal played on both channels. You can adjust the balance of the mono signal for greater volume on the right or left channel.Turn Mono Audio on or o. Go to Settings > General > Accessibility > Mono Audio.Adjust the balance. Go to Settings > General > Accessibility and drag the Left Right Stereo Balance slider.Subtitles and closed captionsThe Videos app includes an Alternate Track button  , which you can tap to choose subtitles and captions oered by the video you’re watching. Standard subtitles and captions are usually listed, but if you prefer special accessible captions, such as subtitles for the deaf and hard of hearing (SDH), you can set iPhone to list them instead when they’re available.Prefer accessible subtitles and closed captions for the hard of hearing in the list of available subtitles and captions. Turn on Settings > General > Accessibility > Subtitles & Captioning > Closed Captions + SDH. This also turns on subtitles and captions in the Videos app.Choose from available subtitles and captions. Tap   while watching a video in Videos.Customize your subtitles and captions. Go to Settings > General > Accessibility > Subtitles & Captioning > Style, where you can choose an existing caption style or create a new style based on your choice of: •Font, size, and color •Background color and opacity •Text opacity, edge style, and highlightNot all videos include closed captions.SiriWith Siri, you can do things like opening apps just by asking, and VoiceOver can read Siri responses to you. See Chapter 4, Siri, on page 43.Widescreen keyboardsMany apps, including Mail, Safari, Messages, Notes, and Contacts, let you rotate iPhone when you’re typing, so you can use a larger keyboard. APPLE CONFIDENTIALDraft
  Appendix A    Accessibility  158Large phone keypadMake phone calls simply by tapping entries in your contacts and favorites lists. When you need to dial a number, iPhone’s large numeric keypad makes it easy. See Make a call on page 46.LED Flash for AlertsIf you can’t hear the sounds that announce incoming calls and other alerts, you can have iPhone ash its LED (next to the camera lens on the back of the iPhone). This works only when iPhone is locked or asleep.Turn on LED Flash for Alerts. Go to Settings > General > Accessibility > LED Flash for Alerts.Call audio routingYou can have the audio of incoming or outgoing calls automatically routed through a headset or speaker phone instead of iPhone.Reroute audio for calls. Go to Settings > General > Accessibility > Call Audio Routing, then choose how you want to hear and speak your calls.You can also have audio from calls routed to your hearing aids; see Hearing aids on page 155.Phone noise cancelationiPhone uses ambient noise cancelation to reduce background noise. Turn noise cancelation on or o. Go to Settings > General > Accessibility > Phone Noise Cancelation.Guided AccessGuided Access helps an iPhone user stay focused on a task. Guided Access dedicates iPhone to a single app, and lets you control app features. Use Guided Access to: •Temporarily restrict iPhone to a particular app •Disable areas of the screen that aren’t relevant to a task, or areas where an accidental gesture might cause a distraction •Limit how long someone can use an app •Disable the iPhone Sleep/Wake or volume buttonsTurn on Guided Access. Go to Settings > General > Accessibility > Guided Access, where you can: •Turn Guided Access on or o •Set a passcode that controls the use of Guided Access and prevents someone from leaving a session •Set whether other accessibility shortcuts are available during a sessionStart a Guided Access session. After turning on Guided Access, open the app you want to run, then triple-click the Home button. Adjust settings for the session, then click Start. •Disable app controls and areas of the app screen:  Draw a circle or rectangle around any part of the screen you want to disable. Drag the mask into position or use the handles to adjust it’s size. •Enable the Sleep/Wake or Volume buttons:  Tap Options below Hardware Buttons. APPLE CONFIDENTIALDraft
  Appendix A    Accessibility  159 •Keep iPhone from switching from portrait to landscape or from responding to other motions:  Tap Options, then turn o Motion. •Prevent typing:  Tap Options, then turn o Keyboards. •Ignore all screen touches:  Turn o Touch at the bottom of the screen. •Set a session time limit:  Tap Time Limit Options at the bottom of the screen.End the session. Triple-click the Home button and enter the Guided Access passcode, or use TouchID.Switch ControlSwitch Control lets you control iPhone using a single switch or multiple switches. Use any of several methods to perform actions such as selecting, tapping, dragging, typing, and even free-hand drawing. The basic technique is to use a switch to select an item or location on the screen, and then use the same (or dierent) switch to choose an action to perform on that item or location. Three basic methods are: •Item scanning (default), which highlights dierent items on the screen until you select one. •Point scanning, which lets you use scanning crosshairs to pick a screen location. •Manual selection, which lets you move from item to item on demand (requires multiple switches).Whichever method you use, when you select an individual item (rather than a group), a menu appears so you can choose how to act on the selected item (tap, drag, or pinch, for example).If you use multiple switches, you can set up each switch to perform a specic action and customize your item selection method. For example, instead of automatically scanning screen items, you can set up switches to move to the next or previous item on demand.You can adjust the behavior of Switch Control in a variety of ways, to suit your specic needs and style.Add a switch and turn on Switch ControlYou can use any of these as a switch: •An external adaptive switch. Choose from a variety of popular USB or Bluetooth switches. •The iPhone screen. Tap the screen to trigger the switch. •The iPhone FaceTime camera. Move your head to trigger the switch. You can use the camera as two switches; one when you move your head to the left, and the other when you move your head to the right.Add a switch and choose its action. Go to Settings > General > Accessibility > Switch Control > Switches. If you use only one switch, it is your Select Item switch by default.If you’re adding an external switch, you need to connect it to iPhone before it will appear in the list of available switches. Follow the instructions that came with the switch. If it connects using Bluetooth, you need to pair it with iPhone—turn on the switch, then go to Settings > Bluetooth, tap the switch, and follow the onscreen instructions. For more information, see Bluetooth devices on page 36.Turn on Switch Control. Go to Settings > General > Accessibility > Switch Control, or use the Accessibility Shortcut—see Accessibility Shortcut on page 141.Turn o Switch Control. Use any scanning method to select Settings > General > Accessibility > Switch Control. Or, triple-click the Home button. APPLE CONFIDENTIALDraft
  Appendix A    Accessibility  160Basic techniquesWhether you use item scanning or point scanning, the Switch Control basics are the same.Select an item. While the item is highlighted, trigger the switch you’ve set up as your Select Item switch. If you are using a single switch, it is your Select Item switch by default.Perform an action on the selected item. Select a command from the control menu that appears when you select the item. The layout of the menu depends on whether you use Auto Tap.With Auto Tap o: The control menu includes only the Tap button and the More button (two dots at bottom). If you’re in a scrollable area of the screen, a Scroll button also appears. To tap the highlighted item, trigger your Select Item button when Tap is highlighted. To see additional action buttons, select More at the bottom of the menu. If you have multiple switches, you can set one up specically for tapping.With Auto Tap on: To tap the item, do nothing—the item is automatically tapped when the Auto Tap interval expires (0.75 seconds if you haven’t changed it). To see the control menu, trigger your Select Item button before the Auto Tap interval expires. The control menu skips the Tap button and goes right to the full set of action buttons.Turn on Auto Tap. Go to Settings > General > Accessibility > Switch Control > Auto Tap. To tap an item with Auto Tap on, just wait for the Auto Tap interval to expire.Dismiss the control menu without choosing an action. Tap while the original item is highlighted and all the icons in the control menu are dimmed. Or, choose Escape from the control menu. The menu goes away after cycling the number of times you specify at Settings > General > Accessibility > Switch Control > Loops.Perform screen gestures. Choose Gestures from the control menu.Scroll the screen. Select an item in a scrollable part of the screen, then:With Auto Tap o: Select the Scroll Down button (next to the Tap button) in the control menu. Or, for more scrolling options, select More, then select Scroll.With Auto Tap on: Select Scroll from the control menu. If many actions are available, you might have to select More rst.Tap the home button. Select Home in the control menu.Perform other hardware actions. Select any item, then select Device from the menu that appears. Use the menu to mimic these actions: •Click the Home button •Double-click the Home button for multitasking •Open Notication Center or Control Center •Press the Sleep/Wake button to lock iPhone •Rotate iPhone •Flip the Mute switch •Press the volume buttons •Hold down the Home button to open Siri •Triple-click the Home button •Shake iPhone •Press Home and Sleep/Wake buttons simultaneously to take a screenshot •Swipe down from the top with two ngers to speak the screen (if you have Speak Screen turned on) APPLE CONFIDENTIALDraft
  Appendix A    Accessibility  161Item scanningItem scanning alternately highlights each item or group of items on the entire screen until you trigger your Select Item switch. If there are many items, Switch Control highlights them in groups. When you select a group, highlighting continues with the items in the group. When you select a unique item, scanning stops and the control menu appears. Item scanning is the default when you rst turn on Switch Control.Select an item or enter a group. Watch (or listen) as items are highlighted. When the item you want to control (or the group containing the item) is highlighted, trigger your Select Item switch. Work your way down in the hierarchy of items until you select the individual item you want to control.Back out of a group. Trigger your Select Item switch when the dashed highlight around the group or item appears.Dismiss the control menu without performing an action. Trigger your Select Item switch when the item itself is highlighted. Or, choose Escape from the control menu.Hear the names of items as they are highlighted. Turn on Settings > General > Accessibility > Switch Control > Speech. Or, select Settings from the control menu, then select Speech On.Slow down the scanning. Go to Settings > General > Accessibility > Switch Control > Auto Scanning Time.Point scanningPoint scanning lets you select an item on the screen by pinpointing it with scanning crosshairs.Switch to point scanning. Use item scanning to select Point Mode from the control menu. The vertical crosshair appears when you close the menu.Select an item. Trigger your Select Item switch when the item you want is within the broad, horizontal scanning band, then trigger again when the ne scanning line is on the item. Repeat for vertical scanning.Rene your selection point. Select Rene Selection from the control menu.Return to item scanning. Select Item Mode from the control menu.Manual selectionYou can select a screen item directly using dedicated switches instead of having iPhone alternately highlight every item.Stop scanning and highlight items yourself. Add switches in addition to your Select Item switch to perform the Move To Next Item and Move To Previous Item actions. (You can use the iPhone FaceTime camera with head-left and head-right movements for these switches.) When you’ve added the switches, turn o Settings > General > Accessibility > Switch Control > Auto Scanning.Important:  Don’t turn o Auto Scanning if you use only one switch. You need at least two: one to move to an item and a second to select the item.Settings and adjustmentsAdjust basic settings. Go to Settings > General > Accessibility > Switch Control, where you can: •Add switches and specify their function •Turn o auto scanning (only if you’ve added a “Move to Next Item” switch) •Adjust how rapidly items are scanned •Set scanning to pause on the rst item in a group APPLE CONFIDENTIALDraft
  Appendix A    Accessibility  162 •Choose how many times to cycle through the screen before hiding Switch Control •Turn Auto Tap on or o and set the interval for performing a second switch action to show the control menu •Set whether a movement action is repeated when you hold down a switch, and how long to wait before repeating •Set whether and how long you need to hold a switch down before it is accepted as a switch action •Have Switch Control ignore accidental repeated switch triggers •Adjust point scanning speed •Turn on sound eects or have items read aloud as they are scanned •Choose what to include in the Switch Control menu •Set whether items should be grouped while item scanning •Make the selection cursor larger or a dierent color •Save custom gestures to the control menu (in Gestures > Saved)Fine-tune Switch Control. Choose Settings from the control menu to: •Adjust scanning speed •Change the location of the control menu •Switch between item scan mode and point scan mode •Choose whether point scan mode displays crosshairs or a grid •Reverse the scanning direction •Turn on or o sound or speech accompaniment •Turn o groups to scan items one at a timeAssistiveTouchAssistiveTouch helps you use iPhone if you have diculty touching the screen or pressing the buttons. You can use AssistiveTouch without any accessory, to perform gestures that are dicult for you. You can also use an adaptive accessory (such as a joystick) with AssistiveTouch to control iPhone.The AssistiveTouch menu lets you perform actions such as these by just tapping (or the equivalent on your accessory): •press the Home button •summon Siri •perform multi-nger gestures •access Control Center or Notication Center •adjust iPad volume •shake iPhone •capture a screenshotTurn on AssistiveTouch. Go to Settings > General > Accessibility > AssistiveTouch, or use the Accessibility Shortcut. See Accessibility Shortcut on page 141. When Assistive Touch is on, the oating menu button appears on the screen.Show or hide the menu. Tap the oating menu button, or click the secondary button on your accessory. APPLE CONFIDENTIALDraft
  Appendix A    Accessibility  163Simulate pressing the Home button. Tap the menu button, then tap Home.Lock or rotate the screen, adjust iPhone volume, or simulate shaking iPhone. Tap the menu button, then tap Device.Perform a swipe or drag that uses 2, 3, 4, or 5 ngers. Tap the menu button, tap Device > More > Gestures, then tap the number of digits needed for the gesture. When the corresponding circles appear on the screen, swipe or drag in the direction required by the gesture. When you nish, tap the menu button.Perform a pinch gesture. Tap the menu button, tap Favorites, and then tap Pinch. When the pinch circles appear, touch anywhere on the screen to move the pinch circles, then drag the pinch circles in or out to perform a pinch gesture. When you nish, tap the menu button.Create your own gesture. You can add your own favorite gestures to the control menu (for example, tap and hold or two-nger rotation). Tap the menu button, tap Favorites, then tap an empty gesture placeholder. Or go to Settings > General > Accessibility > AssistiveTouch > Create New Gesture.Example 1:  To create the rotation gesture, go to Settings > Accessibility > AssistiveTouch > Create New Gesture. On the gesture recording screen that prompts you to touch to create a gesture, rotate two ngers on the iPhone screen around a point between them. (You can do this with a single nger or stylus—just create each arc separately, one after the other.) If it doesn’t turn out quite right, tap Cancel and try again. When it looks right, tap Save and give the gesture a name—maybe “Rotate 90.” Then, to rotate the view in Maps, for example, open Maps, tap the AssistiveTouch menu button, and choose Rotate 90 from Favorites. When the blue circles representing the starting nger positions appear, drag them to point around which you want to rotate the map, then release. You might want to create several gestures with dierent degrees of rotation.Example 2:  Let’s create the touch and hold gesture that you use to start rearranging icons on your Home screen. This time, on the gesture recording screen, hold down your nger in one spot until the recording progress bar reaches halfway, then lift your nger. Be careful not to move your nger while recording, or the gesture will be recorded as a drag. Tap Save and name the gesture. To use the gesture, tap the AssistiveTouch menu button and choose your gesture from Favorites. When the blue circle representing your touch appears, drag it over a Home screen icon and release.If you record a sequence of taps or drags, they’re all played back at the same time. For example, using one nger or stylus to record four separate, sequential taps at four locations on the screen creates a simultaneous four-nger tap.Exit a menu without performing a gesture. Tap anywhere outside the menu. To return to the previous menu, tap the arrow in the middle of the menu.Move the menu button. Drag it anywhere along the edge of the screen.Adjust your accessory tracking speed. Go to Settings > General > Accessibility > AssistiveTouch > Touch speed.Hide the menu button (with an accessory attached). Go to Settings > General > Accessibility > AssistiveTouch > Always Show Menu. APPLE CONFIDENTIALDraft
  Appendix A    Accessibility  164TTY supportYou can use the iPhone TTY Adapter cable (sold separately in many areas) to connect iPhone to a TTY machine. Go to www.apple.com/store (may not be available in all areas) or check with your local Apple retailer.Connect iPhone to a TTY machine. Go to Settings > Phone and turn TTY on, and then connect iPhone to your TTY machine using the iPhone TTY Adapter.When TTY on iPhone is turned on, the TTY icon   appears in the status bar at the top of the screen. For information about using a particular TTY machine, see the documentation that came with the machine.Visual voicemailThe play and pause controls in visual voicemail let you control the playback of messages. Drag the playhead on the scrubber bar to repeat a portion of the message that’s hard to understand. See Visual voicemail on page 49.Voice ControlVoice Control lets you make phone calls and control Music playback using voice commands. See Make a call on page 46, and Siri and Voice Control on page 69.Accessibility in OS XTake advantage of the accessibility features in OS X when you use iTunes to sync with iPhone. In the Finder, choose Help > Help Center, then search for “accessibility.”For more information about iPhone and OS X accessibility features, see www.apple.com/accessibility. APPLE CONFIDENTIALDraft

Navigation menu