Apple E2944A Cellular Phone with Bluetooth and WLAN Radios User Manual 2 of 8
Apple Inc. Cellular Phone with Bluetooth and WLAN Radios 2 of 8
Apple >
Contents
User manual 2 of 8

iPhone
User Guide
For iOS 9.0 Software
Apple Confidential
Draft
Contents
9 Chapter 1: iPhone at a glance
9 iPhone overview
10 Accessories
11 Multi-Touch screen
11 Force Touch
12 Buttons
14 SIM card
15 Status icons
17 Chapter 2: Get started
17 What’s new
17 Apps and app enhancements
17 Assistence, when and where you need it
17 Under-the-hood improvements
18 Set up iPhone
18 Connect to Wi-Fi
19 Connect to the Internet
19 Apple ID
19 iCloud
21 Set up other mail, contacts, and calendar accounts
21 Manage content on your iOS devices
22 Connect iPhone to your computer
22 Sync with iTunes
23 Date and time
23 Apple Watch
23 International settings
24 Your iPhone name
24 View this user guide on iPhone
24 Tips for using iOS 9
25 Chapter 3: Basics
25 Use apps
28 Proactive assistant
28 Continuity
29 Customize iPhone
31 Type text
34 Dictate
35 Voice Control
35 Search
36 Control Center
37 Alerts and Notication Center
38 Sounds and silence
2
Apple Confidential
Draft
38 Do Not Disturb
38 Sharing
41 iCloud Drive
41 Transfer les
42 Personal Hotspot
42 AirPlay
43 AirPrint
43 Use an Apple headset
44 Bluetooth devices
44 Restrictions
44 Privacy
45 Security
48 Find My Friends
48 Charge and monitor the battery
49 Low Power Mode
49 Travel with iPhone
50 Chapter 4: Siri
50 Make requests
51 Siri and apps
51 Tell Siri about yourself
51 Make corrections
51 Siri Eyes Free
52 Siri settings
53 Chapter 5: Phone
53 Phone calls
57 Visual voicemail
58 Contacts
58 Call forwarding, call waiting, and caller ID
58 Ringtones and vibrations
58 International calls
59 Phone settings
61 Chapter 6: Mail
61 Write messages
62 Get a sneak peek
62 Finish a message later
63 See important messages
63 Attachments
64 Work with multiple messages
64 See and save addresses
64 Print messages
64 Mail settings
65 Chapter 7: Safari
65 Safari at a glance
66 Search the web
66 Browse the web
67 Keep bookmarks
68 Save a reading list for later
Contents 3
Apple Confidential
Draft
68 Shared links and subscriptions
68 Fill in forms
69 Avoid clutter with Reader
69 Privacy and security
70 Safari settings
71 Chapter 8: Music
71 Music at a glance
71 Access music
72 Apple Music
72 Get personalized recommendations
72 For You
73 Search for and add music
73 Play music
74 New
75 Radio
75 Connect
76 Playlists
77 iTunes Match
77 My Music
77 Siri and Voice Control
78 Music settings
80 Chapter 9: Messages
80 SMS, MMS, and iMessage
81 Send and receive messages
82 Manage conversations
83 Share photos, videos, your location, and more
83 Messages settings
85 Chapter 10: Calendar
85 Calendar at a glance
86 Invitations
86 Use multiple calendars
87 Share iCloud calendars
87 Calendar settings
89 Chapter 11: Photos
89 View photos and videos
90 Organize photos and videos
91 iCloud Photo Library
92 My Photo Stream
92 iCloud Photo Sharing
94 Other ways to share photos and videos
94 Edit photos and trim videos
95 Print photos
95 Photos settings
96 Chapter 12: Camera
96 Camera at a glance
97 Take photos and videos
Contents 4
Apple Confidential
Draft
99 HDR
99 View, share, and print
99 Camera settings
101 Chapter 13: Weather
103 Chapter 14: Clock
103 Clock at a glance
104 Alarms and timers
105 Chapter 15: Maps
105 Find places
106 Get more info
106 Get directions
107 3D and Flyover
108 Maps settings
109 Chapter 16: Videos
109 Videos at a glance
110 Add videos to your library
110 Control playback
111 Videos settings
112 Chapter 17: Notes
112 Notes at a glance
112 Format and edit notes
113 Create a sketch
114 Organize and share notes
114 Use notes in multiple accounts
115 Chapter 18: Reminders
115 Reminders at a glance
116 Scheduled reminders
116 Location reminders
117 Reminders settings
118 Chapter 19: Stocks
120 Chapter 20: Game Center
120 Game Center at a glance
121 Play games with friends
121 Game Center settings
122 Chapter 21: News
122 News at a glance
122 Get started with News
122 Browse and read News For You
123 Favorites
123 Search
124 Saving stories
Contents 5
Apple Confidential
Draft
125 Chapter 22: iTunes Store
125 iTunes Store at a glance
125 Browse or search
126 Purchase, rent, or redeem
127 iTunes Store settings
128 Chapter 23: App Store
128 App Store at a glance
128 Find apps
129 Purchase, redeem, and download
129 App Store settings
131 Chapter 24: iBooks
131 Get books
131 Read a book
132 Interact with multimedia
132 Study notes and glossary terms
133 Listen to an audiobook
134 Organize books
134 Read PDFs
135 iBooks settings
136 Chapter 25: Health
136 Your health at a glance
137 Collect health and tness data
137 Share health and tness data
137 Create an emergency medical ID
138 Chapter 26: Wallet
138 Wallet at a glance
138 Wallet on the go
139 Apple Pay
142 Wallet & Apple Pay settings
143 Chapter 27: FaceTime
143 FaceTime at a glance
143 Make and answer calls
144 Manage calls
144 Settings
145 Chapter 28: Calculator
146 Chapter 29: Podcasts
146 Podcasts at a glance
146 Get podcasts and episodes
148 Control playback
149 Organize your favorites into stations
149 Podcasts settings
150 Chapter 30: Compass
150 Compass at a glance
151 On the level
Contents 6
Apple Confidential
Draft
152 Chapter 31: Voice Memos
152 Voice Memos at a glance
152 Record
153 Play it back
153 Move recordings to your computer
154 Chapter 32: Contacts
154 Contacts at a glance
155 Use Contacts with Phone
155 Add contacts
156 Unify contacts
156 Contacts settings
157 Appendix A: Accessibility
157 Accessibility features
158 Accessibility Shortcut
158 VoiceOver
170 Zoom
171 Invert Colors and Grayscale
171 Speak Selection
171 Speak Screen
171 Speak Auto-text
172 Large, bold, and high-contrast text
172 Button Shapes
172 Reduce screen motion
172 On/o switch labels
172 Assignable ringtones and vibrations
172 Audio Descriptions
172 Hearing aids
174 Mono audio and balance
174 Subtitles and closed captions
175 Siri
175 Widescreen keyboards
175 Large phone keypad
175 LED Flash for Alerts
175 Call audio routing
175 Phone noise cancelation
175 Guided Access
176 Switch Control
180 AssistiveTouch
181 Touch Accommodations
182 Software and hardware keyboards
182 TTY support
182 Visual voicemail
182 Voice Control
182 Accessibility in OS X
183 Appendix B: iPhone in business
183 Mail, Contacts, and Calendar
183 Network access
183 Apps
Contents 7
Apple Confidential
Draft
185 Appendix C: International keyboards
185 Use international keyboards
186 Special input methods
188 Appendix D: CarPlay
188 About CarPlay
188 Get started
189 Maps
189 Phone
189 Messages
190 Music
190 Podcasts
190 Other apps
191 Appendix E: HomeKit
191 HomeKit basics
193 Appendix F: Safety, handling, and support
193 Important safety information
195 Important handling information
196 iPhone Support site
196 Restart or reset iPhone
197 Reset iPhone settings
197 Get information about your iPhone
197 Usage information
198 Disabled iPhone
198 Back up iPhone
199 Update and restore iPhone software
199 Cellular settings
200 Sell or give away iPhone
201 Learn more, service, and support
201 FCC compliance statement
202 Canadian regulatory statement
202 Disposal and recycling information
204 Apple and the environment
Contents 8
Apple Confidential
Draft
1
9
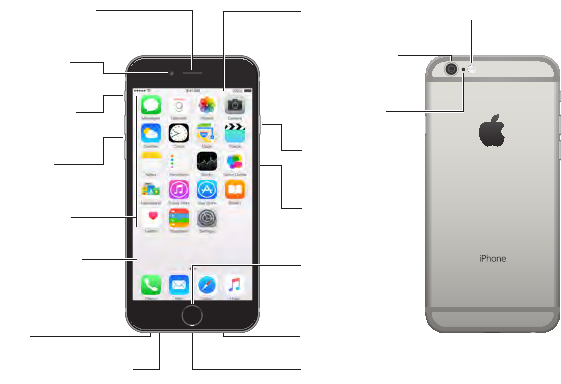
iPhone overview
This guide describes iOS 9.0 for:
•N71
•N66
•iPhone 6
•iPhone 6 Plus
•iPhone 5s
•iPhone 5c
•iPhone 5
•iPhone 4s
N71
Bottom microphone
Bottom microphone
Ring/Silent
switch
Ring/Silent
switch
Receiver/front
microphone
Receiver/front
microphone
FaceTime
camera
FaceTime
camera
Volume
buttons
Volume
buttons
Multi-Touch
display
Multi-Touch
display
Homebutton/
Touch ID
sensor
Homebutton/
Touch ID
sensor
Headset
jack
Headset
jack
Sleep/Wake
button
Sleep/Wake
button
iSight camera
iSight camera
SIM card
tray
SIM card
tray
True Tone Flash
True Tone Flash
Rear
microphone
Rear
microphone
App icons
App icons
Statusbar
Statusbar
Lightning connector
Lightning connector
Speaker
Speaker
iPhone at a glance
Apple Confidential
Draft
Chapter 1 iPhone at a glance 10
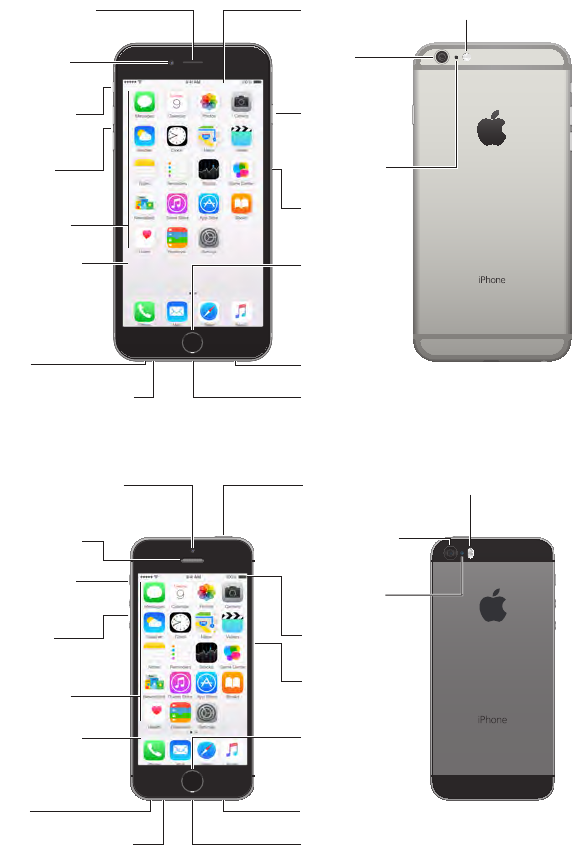
N66
FaceTime
camera
FaceTime
camera
Ring/Silent
switch
Ring/Silent
switch
Receiver/front
microphone
Receiver/front
microphone
Volume
buttons
Volume
buttons
Multi-Touch
display
Multi-Touch
display
Homebutton/
Touch ID
sensor
Homebutton/
Touch ID
sensor
Sleep/Wake
button
Sleep/Wake
button
iSight
camera
iSight
camera
SIM card
tray
SIM card
tray
True Tone Flash
True Tone Flash
Rear
microphone
Rear
microphone
App icons
App icons
Statusbar
Statusbar
Bottom microphone
Bottom microphone
Headset
jack
Headset
jack
Lightning connector
Lightning connector
Speaker
Speaker
iPhone 5s
Receiver/front
microphone
Receiver/front
microphone
Bottom microphone
Bottom microphone
Ring/Silent
switch
Ring/Silent
switch
FaceTime camera
FaceTime camera
Volume
buttons
Volume
buttons
Multi-Touch
display
Multi-Touch
display
Homebutton/
Touch ID
sensor
Homebutton/
Touch ID
sensor
Headset
jack
Headset
jack
Sleep/Wake
button
Sleep/Wake
button
Rear
microphone
Rear
microphone
SIM card
tray
SIM card
tray
True Tone Flash
True Tone Flash
iSight camera
iSight camera
App icons
App icons
Statusbar
Statusbar
Lightning connector
Lightning connector
Speaker
Speaker
Your iPhone features and apps may vary depending on the model of iPhone you have, and on
your location, language, and carrier. To nd out which features are supported in your area, see
www.apple.com/ios/feature-availability/.
Note: Apps and services that send or receive data over a cellular network may incur additional
fees. Contact your carrier for information about your iPhone service plan and fees.
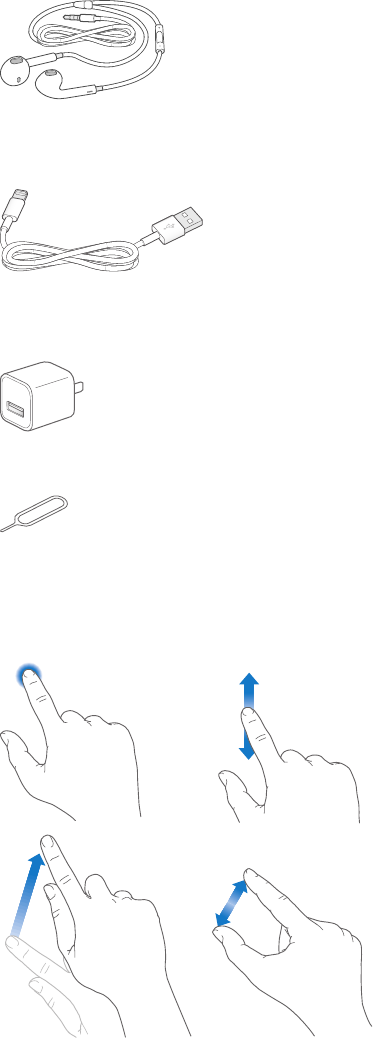
Accessories
The following accessories are included with iPhone:
Apple Confidential
Draft
Chapter 1 iPhone at a glance 11
Apple headset. Use the Apple EarPods with Remote and Mic (iPhone 5 or later) or the Apple
Earphones with Remote and Mic (iPhone 4s) to listen to music and videos, and make phone calls.
See Use an Apple headset on page 43.
Connecting cable. Use the Lightning to USB Cable (iPhone 5 or later) or the 30-pin to USB Cable
(iPhone 4s) to connect iPhone to your computer to sync and charge.
Apple USB power adapter. Use with the Lightning to USB Cable or the 30-pin to USB Cable to
charge the iPhone battery.
SIM eject tool. Use to eject the SIM card tray. (Not included in all areas.)
Multi-Touch screen
A few simple gestures—tap, drag, swipe, and pinch—are all you need to use iPhone and its apps.
Force Touch
Use Force Touch (some models) for added functionality and features in many apps. You use Force
Touch by pressing the iPhone screen. This leads to a preview or additional information. When you
press rmly and apply more pressure, you sometimes trigger even more functionality.
Apple Confidential
Draft
Chapter 1 iPhone at a glance 12
<<Illustration below shows a hand applying Force Touch in two stages—pressing and then
pressing rmly.>>
Some examples of Force Touch:
•In Photos: Press a thumbnail to get a one-up preview of a photo, then press rmly to go to
one-up view.
•In Calendar: Press a date in month view for a preview of week view, then press rmly to go to
week view.
•In Maps: Press a pin and a menu appears with Directions, Call, Open Homepage, and
Share Locations.
•On Home screen: Press the Clock app icon to Set Alarm.
Turn Force Touch on or o. Go to Settings > General > Accessibility > Force Touch and then turn
Force Touch on or o.
Buttons
Most of the buttons you use with iPhone are virtual ones on the touchscreen. A few physical
buttons control basic functions, such as turning iPhone on or adjusting the volume.
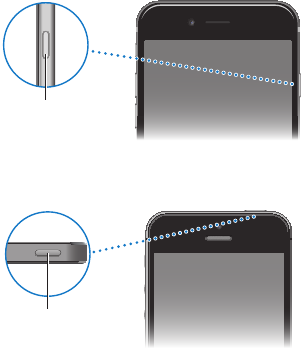
Sleep/Wake button
When you’re not using iPhone, press the Sleep/Wake button to lock iPhone. Locking iPhone puts
the display to sleep, saves the battery, and prevents anything from happening if you touch the
screen. You can still get phone calls, FaceTime calls, text messages, alarms, and notications. You
can also listen to music and adjust the volume.
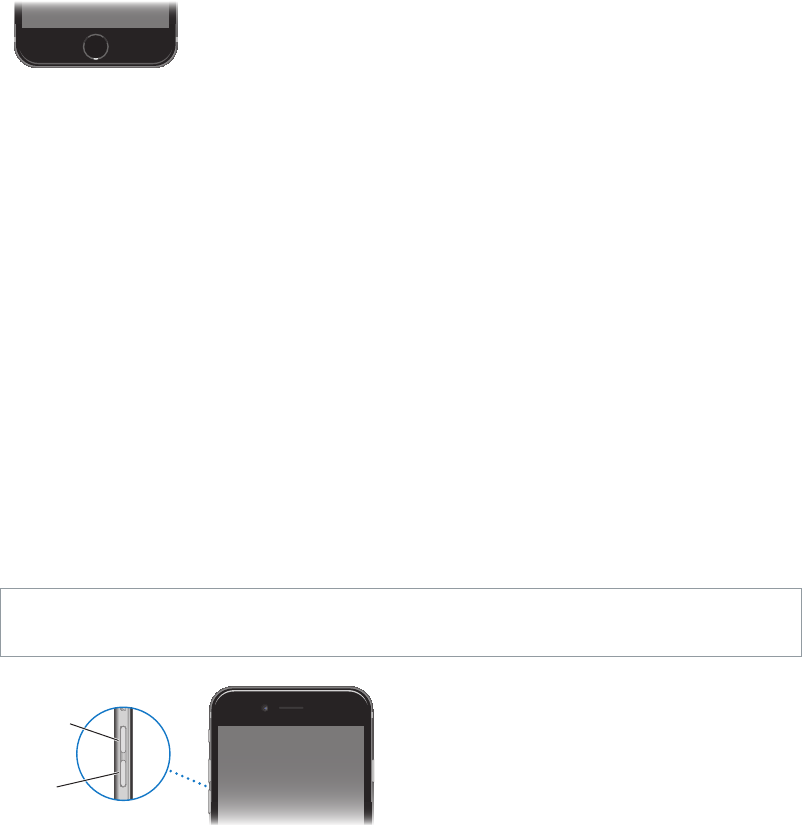
On iPhone 6 and iPhone 6 Plus, the Sleep/Wake button is on the right side:
Sleep/Wake
button
Sleep/Wake
button
On earlier iPhone models, the Sleep/Wake button is on the top edge:
Sleep/Wake
button
Sleep/Wake
button
iPhone locks automatically if you don’t touch the screen for a minute or so. To adjust the timing,
go to Settings > General > Auto-Lock.
Turn iPhone on. Press and hold the Sleep/Wake button until the Apple logo appears.
Unlock iPhone. Press either the Sleep/Wake or Home button, then drag the slider.
Apple Confidential
Draft
Chapter 1 iPhone at a glance 13
Turn iPhone o. Press and hold the Sleep/Wake button until the slider appears, then drag the
slider.
For additional security, you can require a passcode to unlock iPhone. Go to Settings > Touch ID
& Passcode (iPhone models with Touch ID) or Settings > Passcode (other models). See Use a
passcode with data protection on page 45.
Home button
The Home button takes you to the Home screen and provides other convenient shortcuts. On
the Home screen, tap any app to open it.
See apps you’ve opened. Double-click the Home button when iPhone is unlocked. See Start at
home on page 25.
Use Siri or Voice Control. Press and hold the Home button. See Chapter 4, Siri, on page 50 and
Voice Control on page 35.
On iPhone models with Touch ID, you can use the sensor in the Home button to read your
ngerprint, instead of using your passcode or Apple ID password to unlock iPhone or make
purchases in the iTunes Store, App Store, and iBooks Store. See Touch ID on page 46. If you have
iPhone 6 or iPhone 6 Plus, you can also use the Touch ID sensor for authentication when using
Apple Pay to make a purchase in a store or from within an app. See Touch ID on page 46 and
Apple Pay on page 139.
You can also use the Home button to turn accessibility features on or o. See Accessibility
Shortcut on page 158.
Volume controls
When you’re on the phone or listening to songs, movies, or other media, the buttons on the side
of iPhone adjust the audio volume. Otherwise, the buttons control the volume for the ringer,
alerts, and other sound eects.
WARNING: For important information about avoiding hearing loss, see Important safety
information on page 193.
Volume
up
Volume
up
Volume
down
Volume
down
Lock the ringer and alert volumes. Go to Settings > Sounds, then turn o Change with Buttons.
To limit the volume for music and videos, go to Settings > Music > Volume Limit.
Note: In some European Union (EU) countries, iPhone may warn that you’re setting the volume
above the EU recommended level for hearing safety. To increase the volume beyond this level,
you may need to briey release the volume control. To limit the maximum headset volume
to this level, go to Settings > Music > Volume Limit, then turn on EU Volume Limit. To prevent
changes to the volume limit, go to Settings > General > Restrictions.
Apple Confidential
Draft
Chapter 1 iPhone at a glance 14
Use Control Center to adjust the volume. When iPhone is locked or when you’re using another
app, swipe up from the bottom edge of the screen to open Control Center.
You can also use either volume button to take a picture or record a video. See Take photos and
videos on page 97.
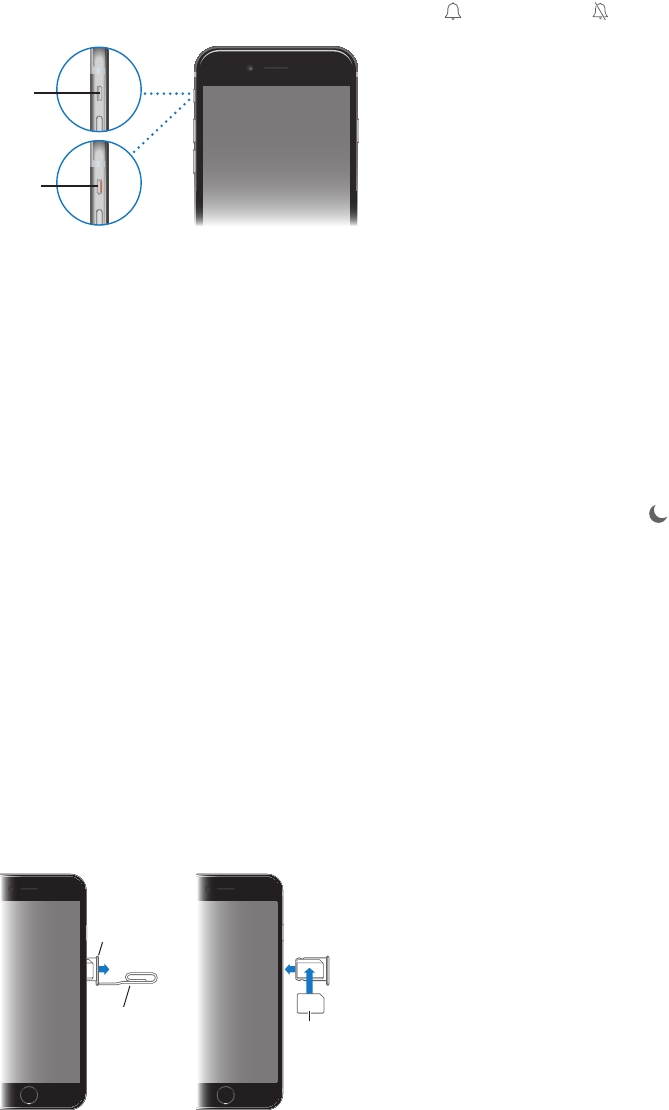
Ring/Silent switch
Flip the Ring/Silent switch to put iPhone in ring mode or silent mode .
Ring
Ring
Silent
Silent
In ring mode, iPhone plays all sounds. In silent mode, iPhone doesn’t ring or play alerts and other
sound eects (but iPhone may still vibrate).
Important: Clock alarms, audio apps such as Music, and many games play sounds through the
built-in speaker, even when iPhone is in silent mode. In some areas, the sound eects for Camera
and Voice Memos are played, even if the Ring/Silent switch is set to silent.
For information about changing sound and vibration settings, see Sounds and silence on
page 38.
Use Do Not Disturb. You can also silence calls, alerts, and notications using Do Not Disturb.
Swipe up from the bottom edge of the screen to open Control Center, then tap . See Do Not
Disturb on page 38.
SIM card
If you were given a SIM card to install, install it before setting up iPhone.
Important: A Micro-SIM card (iPhone 4s) or a Nano-SIM card (iPhone 5 or later) is required to
use cellular services when connecting to GSM networks and some CDMA networks. iPhone
that’s been activated on a CDMA wireless network may also use a SIM card for connecting to a
GSM network, primarily for international roaming. Your iPhone is subject to your wireless service
provider’s policies, which may include restrictions on switching service providers and roaming,
even after conclusion of any required minimum service contract. Contact your wireless service
provider for more details. Availability of cellular capabilities depends on the wireless network.
SIM card
SIM card
SIM card
tray
SIM card
tray
Paper clip
or SIM
eject tool
Paper clip
or SIM
eject tool
Apple Confidential
Draft
Chapter 1 iPhone at a glance 15
Status icons
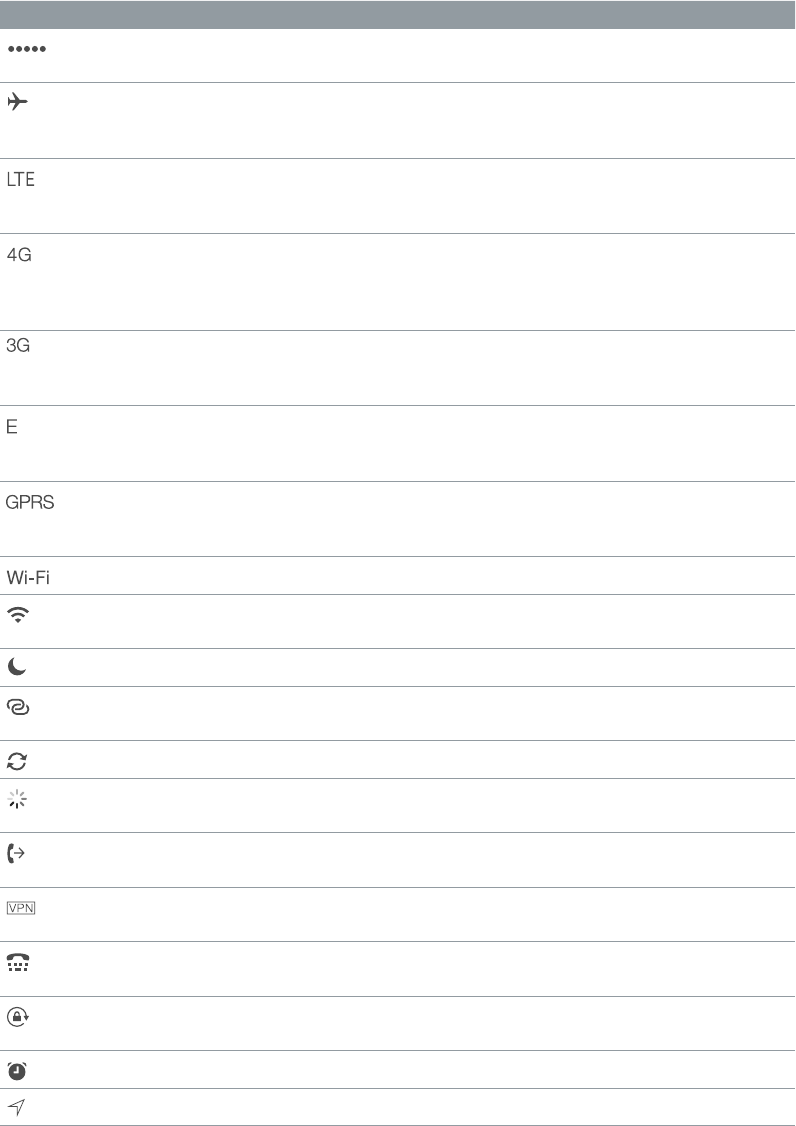
The icons in the status bar at the top of the screen give information about iPhone:
Status icon What it means
Cell signal You’re in range of the cellular network and can make and receive
calls. If there’s no signal, “No service” appears.
Airplane mode Airplane mode is on—you can’t make phone calls, and other
wireless functions may be disabled. See Travel with iPhone on
page 49.
LTE Your carrier’s LTE network is available, and iPhone can connect to
the Internet over that network. (iPhone 5 or later. Not available in all
areas.) See Cellular settings on page 199.
UMTS Your carrier’s 4G UMTS (GSM) or LTE network (depending on
carrier) is available, and iPhone can connect to the Internet over
that network. (Not available in all areas.) See Cellular settings on
page 199.
UMTS/EV-DO Your carrier’s 3G UMTS (GSM) or EV-DO (CDMA) network is available,
and iPhone can connect to the Internet over that network. See
Cellular settings on page 199.
EDGE Your carrier’s EDGE (GSM) network is available, and iPhone can
connect to the Internet over that network. See Cellular settings on
page 199.
GPRS/1xRTT Your carrier’s GPRS (GSM) or 1xRTT (CDMA) network is available, and
iPhone can connect to the Internet over that network. See Cellular
settings on page 199.
Wi-Fi call iPhone is making a call over Wi-Fi. See Make a call on page 53.
Wi-Fi iPhone is connected to the Internet over a Wi-Fi network. See
Connect to Wi-Fi on page 18.
Do Not Disturb “Do Not Disturb” is turned on. See Do Not Disturb on page 38.
Personal Hotspot iPhone is providing a Personal Hotspot for another device. See
Personal Hotspot on page 42.
Syncing iPhone is syncing with iTunes. See Sync with iTunes on page 22.
Network activity Shows that there’s network activity. Some third-party apps may also
use it to show an active process.
Call Forwarding Call Forwarding is set up. See Call forwarding, call waiting, and caller
ID on page 58.
VPN You’re connected to a network using VPN. See Network access on
page 183.
TTY iPhone is set to work with a TTY machine. See TTY support on
page 182.
Portrait orientation
lock
The iPhone screen is locked in portrait orientation. See Change the
screen orientation on page 27.
Alarm An alarm is set. See Alarms and timers on page 104.
Location Services An item is using Location Services. See Privacy on page 44.
Apple Confidential
Draft

Chapter 1 iPhone at a glance 16
Status icon What it means
Bluetooth® Blue or white icon: Bluetooth is on and paired with a device.
Gray icon: Bluetooth is on. If iPhone is paired with a device, the
device may be out of range or turned o.
No icon: Bluetooth is turned o.
See Bluetooth devices on page 44.
Bluetooth battery Shows the battery level of a paired Bluetooth device.
Battery Shows the iPhone battery level or charging status. See Charge and
monitor the battery on page 48.
Apple Confidential
Draft
2
17
What’s new
Apps and app enhancements
Get the News. Tell the News app what you’re interested in and receive your favorite stories in an
easy-to-read form. See News at a glance.
Richer Notes. Create drawings, make checklists, take and import pictures, add les and links to
your notes, and share them with others. See Notes at a glance.
More ways to get around in Maps. In select cities, Maps now provides public transportation
information and multi-modal routing, which details your entire journey, from walking to the bus
stop to hopping o at your destination. See Find places.
Additional payment options. Apple Pay now supports Discover and store credit cards. And in
addition to your credit and debit cards, you can add loyalty and reward cards to Wallet. See
Apple Pay.
Wireless CarPlay. In cars that support it, connect iPhone over Wi-Fi and use CarPlay without
plugging in. See About CarPlay.
Find your friends (and a misplaced iPhone). Find My Friends and Find My iPhone are now
included with every iPhone. See Find My Friends and Find My iPhone.
Assistence, when and where you need it
A more understanding Siri. While looking at a web page, tell Siri, “Remind me about this when I
get home.” Or “play more songs like this” when you listen to music. See Make requests.
Smarter Search. Type “weather” and get up-to-date forecasts. Enter your favorite team to see
sports scores and schedules. Search can even suggest contacts, apps, nearby places, and more
that you might nd useful, with no typing required. See Search.
Answers before you ask for them. Based on the apps you commonly use and the time of day
you use them, the proactive assistant suggests things you might want to do next, before you ask.
For example, opening the News app rst thing in the morning or playing your “Chill Out” playlist
before you go to bed. See Proactive assistant.
Under-the-hood improvements
Get your home under control. Set up your HomeKit accessories, and control them even when
you’re away from home. See HomeKit basics.
Better battery life. Enable Low Power Mode and iPhone reduces or disables non-essential
features, helping your battery charge last longer. See Low Power Mode.
Greater security. Make iPhone more secure by enabling two-factor authentication. See Security.
Get started
Apple Confidential
Draft

Chapter 2 Get started 18
Set up iPhone
·WARNING: To avoid injury, read Important safety information on page 193 before using iPhone.
You can set up iPhone over a Wi-Fi network, or over your carrier’s cellular network (not available
in all areas). Or connect iPhone to your computer and use iTunes to set up iPhone (see Connect
iPhone to your computer on page 22).
Set up iPhone. Turn on iPhone, then follow the Setup Assistant.
The Setup Assistant steps you through the process, including:
•Connecting to a Wi-Fi network
•Signing in with or creating a free Apple ID (needed for many features, including iCloud,
FaceTime, the iTunes Store, Apple Music, the App Store, and more)
•Entering a passcode
•Setting up iCloud and iCloud Keychain
•Turning on recommended features such as Location Services
•Adding a credit, debit, loyalty, or reward card to Wallet to use with Apple Pay (some models)
•Setting up Touch ID (some models)
•Training Siri
•Activating iPhone with your carrier
You can also restore iPhone from an iCloud or iTunes backup during setup. See Back up
iPhone on page 198.
Note: Find My iPhone is turned on when you sign in to iCloud. Activation Lock is engaged to
help prevent anyone else from activating your iPhone, even if it is completely restored. Before
you sell or give away your iPhone, you should reset it to erase your personal content and turn o
Activation Lock. See Sell or give away iPhone on page 200.
Some carriers let you unlock iPhone for use with their network. To see if your carrier oers this
option, see support.apple.com/kb/HT1937. Contact your carrier for authorization and setup
information. You need to connect iPhone to iTunes to complete the process. Additional fees may
apply. For more information, see support.apple.com/kb/HT5014.
Connect to Wi-Fi
If appears at the top of the screen, you’re connected to a Wi-Fi network. iPhone reconnects
anytime you return to the same location.
Congure Wi-Fi. Go to Settings > Wi-Fi, then turn Wi-Fi on or o. (You can also turn Wi-Fi on
or o in Control Center.)
•Choose a network: Tap one of the listed networks, then enter the password, if asked.
•Ask to join networks: Turn on Ask to Join Networks to be prompted when a Wi-Fi network
is available. Otherwise, you must manually join a network when a previously used network
isn’t available.
•Join a closed Wi-Fi network: Tap Other, then enter the name of the closed network. You need to
know the network name, security type, and password.
•Adjust the settings for a Wi-Fi network: Tap next to a network. You can set an HTTP proxy,
dene static network settings, turn on BootP, or renew the settings provided by a DHCP server.
Apple Confidential
Draft

Chapter 2 Get started 19
•Forget a network: Tap next to a network you’ve joined before, then tap Forget this Network.
Set up your own Wi-Fi network. If you have an uncongured AirPort base station turned on
and within range, you can use iPhone to set it up. Go to Settings > Wi-Fi and look for Set up an
AirPort base station. Tap your base station and Setup Assistant will do the rest.
Manage an AirPort network. If iPhone is connected to an AirPort base station, go to Settings >
Wi-Fi, tap next to the network name, then tap Manage This Network. If you haven’t yet
downloaded AirPort Utility, tap OK to open the App Store, then download it.
Connect to the Internet
iPhone connects to the Internet whenever necessary, using a Wi-Fi connection (if available) or
your carrier’s cellular network. For information about connecting to a Wi-Fi network, see Connect
to Wi-Fi, above.
When an app needs to use the Internet, iPhone does the following, in order:
•Connects over the most recently used available Wi-Fi network
•Shows a list of Wi-Fi networks in range, and connects using the one you choose
•Connects over the cellular data network, if available
Note: If a Wi-Fi connection to the Internet isn’t available, apps and services may transfer data
over your carrier’s cellular network, which may result in additional fees. Contact your carrier
for information about your cellular data plan rates. To manage cellular data usage, see Cellular
settings on page 199.
Apple ID
Your Apple ID is the account you use for just about everything you do with Apple, including
storing your content in iCloud, downloading apps from the App Store, streaming Apple Music
content, and buying music, movies, and TV shows from the iTunes Store.
If you already have an Apple ID, use it when you rst set up iPhone, and whenever you need
to sign in to use an Apple service. If you don’t already have an Apple ID, you can create one
whenever you’re asked to sign in. You only need one Apple ID for everything you do with Apple.
For more information, see appleid.apple.com.
iCloud
iCloud oers free mail, contacts, calendar, and other features that you can set up simply by
signing in to iCloud with your Apple ID, then making sure that the features you want to use are
turned on.
Set up iCloud. Go to Settings > iCloud. Create an Apple ID if needed, or use your existing one.
iCloud stores your photos and videos, documents, music, calendars, contacts, news, and more.
Content stored in iCloud is pushed wirelessly to your other iOS devices and computers signed in
to iCloud with the same Apple ID.
iCloud is available on devices with iOS 5 or later, on Mac computers with OS X Lion v10.7.5 or
later, and on PCs with iCloud for Windows 4.0 (Windows 7 or Windows 8 is required). You can
also sign in to iCloud.com from any Mac or PC to access your iCloud information and features like
Photos, Find My iPhone, Mail, Calendar, Contacts, iWork for iCloud, and more.
Apple Confidential
Draft
Chapter 2 Get started 20
Note: iCloud may not be available in all areas, and iCloud features may vary by area. For more
information, see www.apple.com/icloud/.
iCloud features include:
•Music, Movies, TV Shows, Apps, and Books: Automatically get iTunes purchases on all your
devices set up with iCloud, or download previous iTunes music and TV show purchases for
free, anytime. With an iTunes Match subscription, all your music, including music you’ve
imported from CDs or purchased somewhere other than the iTunes Store, can also be stored
in iCloud and played on demand. With an Apple Music membership, any music you’ve added
to Apple Music will be accessible from iPhone. See Apple Music on page 72. Download
previous App Store and iBooks Store purchases to iPhone for free, anytime.
•Photos: Use iCloud Photo Library to store all your photos and videos in iCloud, and access
them from any iOS 8.1 or later device, Mac with OS X Yosemite v10.10.3 or later, and on
iCloud.com using the same Apple ID. Use iCloud Photo Sharing to share photos and videos
with just the people you choose, and let them add photos, videos, and comments. See iCloud
Photo Library on page 91. See iCloud Photo Sharing on page 92.
•Family Sharing: Up to six family members can share their purchases from the iTunes Store,
App Store, and iBooks Store. With an optional Apple Music family membership, all six members
of the family can use Apple Music. Pay for family purchases with the same credit card and
approve kids’ spending right from a parent’s device. Plus, share photos, a family calendar, and
more. See Family Sharing on page 39.
•iCloud Drive: Safely store your presentations, spreadsheets, PDFs, images, and other documents
in iCloud, and access them from your iPhone, iPad, iPod touch, Mac, or PC. iCloud Drive is
available on any iOS 8 or later device and on any Mac with OS X Yosemite v10.10.0 or later. If
you’re using an earlier version of iOS, see Set up iCloud Drive on page 41.
•Mail, Contacts, Calendars: Keep your mail, contacts, calendars, notes, and reminders up to date
across all your devices.
•Safari Tabs: See the tabs you have open on your other iOS devices and OS X computers. See
Browse the web on page 66.
•News: Save stories on iPhone, iPod touch, or iPad and access them on any iOS 9 or later device.
See Get started with News on page 122.
•Backup: Back up iPhone to iCloud automatically when connected to power and Wi-Fi. iCloud
data and backups sent over the Internet are encrypted. See Back up iPhone on page 198.
•Find My iPhone: Locate your iPhone on a map; display a message; play a sound; lock the screen;
temporarily suspend or permanently remove your credit, debit, loyalty, and reward cards
in Wallet used for Apple Pay; or remotely wipe your iPhone data. Find My iPhone includes
Activation Lock, which requires your Apple ID and password in order to turn o Find My
iPhone or erase your device. Your Apple ID and password are also required before anyone can
reactivate your iPhone. See Find My iPhone on page 47.
•Find My Friends: Share your location with people who are important to you. See Find My
Friends on page 48.
•iCloud Keychain: Keep your passwords and credit card information up to date across all your
designated devices. See iCloud Keychain on page 46.
You must have an iCloud account and be signed in to iCloud to use Apple Pay. See Apple Pay on
page 139.
Apple Confidential
Draft
Chapter 2 Get started 21
With iCloud, you get a free email account and 5 GB of storage for your mail, documents, photos,
and backups. Your purchased music, apps, TV shows, and books, as well as your photo streams,
don’t count against your available space.
Upgrade your iCloud storage. Go to Settings > iCloud > Storage, then tap Change Storage Plan.
For information about upgrading your iCloud storage, see help.apple.com/icloud/.
View and download previous purchases, or get purchases shared by your family.
•iTunes Store purchases: You can access your purchased songs and videos in the Music and
Videos apps. Or, in the iTunes Store, tap More, then tap Purchased.
•App Store purchases: Go to the App Store, tap Updates, then tap Purchased.
•iBooks Store purchases: Go to iBooks, then tap Purchased.
Turn on Automatic Downloads for music, apps, or books. Go to Settings > iTunes & App Store.
For more information about iCloud, see www.apple.com/icloud/. For support information, see
www.apple.com/support/icloud/.
Set up other mail, contacts, and calendar accounts
iPhone works with Microsoft Exchange, and many of the most popular Internet-based mail,
contacts, and calendar services.
Set up an account. Go to Settings > Mail, Contacts, Calendars > Add Account.
You can add contacts using an LDAP or CardDAV account, if your company or organization
supports it. See Add contacts on page 155.
You can add calendars using a CalDAV calendar account, and you can subscribe to iCalendar (.ics)
calendars or import them from Mail. See Use multiple calendars on page 86.
For information about setting up a Microsoft Exchange account in a corporate environment, see
Mail, Contacts, and Calendar on page 183.
Manage content on your iOS devices
You can transfer information and les between your iOS devices and computers, using iCloud
or iTunes.
•iCloud stores your photos and videos, documents, music, calendars, contacts, and more. It all
gets pushed wirelessly to your other iOS devices and computers, keeping everything up to
date. See iCloud on page 19.
•iTunes syncs music, videos, photos, and more between your computer and iPhone. Changes
you make on one device are copied to the other when you sync. You can also use iTunes to
sync les and documents. See Sync with iTunes on page 22.
You can use iCloud or iTunes, or both, depending on your needs. For example, you can use
iCloud to automatically keep your contacts and calendars up to date on all your devices, and use
iTunes to sync music from your computer to iPhone.
Important: To avoid duplicates, keep contacts, calendars, and notes in sync using iCloud or
iTunes, but not both.
Apple Confidential
Draft
Chapter 2 Get started 22
You can also manually manage content from iTunes, in the device’s Summary pane. This lets you
add songs and videos, by choosing a song, video, or playlist from your iTunes library and then
dragging it to your iPhone in iTunes. This is useful if your iTunes library contains more items than
can t on your device.
Note: If you use iTunes Match or have turned on iCloud Music Library, you can manually manage
only video.
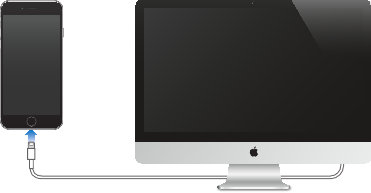
Connect iPhone to your computer
Connecting iPhone to your computer lets you sync content from your computer using iTunes.
See Sync with iTunes on page 22.
To use iPhone with your computer, you need:
•An Internet connection for your computer (broadband is recommended)
•A Mac or a PC with a USB 2.0 or 3.0 port, and one of the following operating systems:
•OS X version 10.6.8 or later
•Windows 8, Windows 7, Windows Vista, or Windows XP Home or Professional with Service
Pack 3 or later
Connect iPhone to your computer. Use the included Lightning to USB Cable or the 30-pin to
USB Cable.
Sync with iTunes
Syncing with iTunes copies information from your computer to iPhone, and vice versa. You can
sync by connecting iPhone to your computer, or you can set up iTunes to sync wirelessly with
Wi-Fi. You can set iTunes to sync music, videos, apps, photos, and more. For help syncing iPhone,
open iTunes on your computer, choose Help > iTunes Help, then select Add items to iPod, iPhone,
or iPad. iTunes is available at www.itunes.com/download/.
Set up wireless syncing. Connect iPhone to your computer. In iTunes on your computer, select
your iPhone, click Summary, then select Sync with this iPhone over Wi-Fi.
If Wi-Fi syncing is turned on, iPhone syncs when it’s connected to a power source, both iPhone
and your computer are on and connected to the same wireless network, and iTunes is open on
your computer.
Tips for syncing with iTunes on your computer
Connect iPhone to your computer, select it in iTunes, then set options in the dierent panes.
•If iPhone doesn’t appear in iTunes, make sure you’re using the latest version of iTunes, check
that the included cable is correctly connected, then try restarting your computer.
Apple Confidential
Draft

Chapter 2 Get started 23
•In the Summary pane, you can set iTunes to automatically sync iPhone when it’s attached
to your computer. To temporarily prevent syncing when you attach the device, hold down
Command and Option (Mac) or Shift and Control (PC) until you see iPhone appear in the
iTunes window.
•In the Summary pane, select “Encrypt iPhone backup” if you want to encrypt the information
stored on your computer when iTunes makes a backup. Encrypted backups are indicated by
a lock icon , and a password is required to restore the backup. If you don’t select this option,
other passwords (such as those for mail accounts) aren’t included in the backup and you’ll
have to reenter them if you use the backup to restore iPhone.
•In the Music pane, you can sync music using your playlists.
Note: If you turn on iCloud Music Library, you can’t use iTunes to sync music to iPhone.
•In the Photos pane, you can sync photos and videos from a supported app or folder on
your computer.
•If you use iCloud to store your contacts, calendars, and bookmarks, don’t also sync them to
iPhone using iTunes.
•If you turn on iCloud Photo Library, you can’t use iTunes to sync photos and videos to iPhone.
Date and time
The date and time are usually set for you based on your location—take a look at the Lock screen
to see if they’re correct.
Set whether iPhone updates the date and time automatically. Go to Settings > General >
Date & Time, then turn Set Automatically on or o. If you set iPhone to update the time
automatically, it gets the correct time over the cellular network and updates it for the time zone
you’re in. Some carriers don’t support network time, so in some areas iPhone may not be able to
automatically determine the local time.
Set the date and time manually. Go to Settings > General > Date & Time, then turn o Set
Automatically.
Set whether iPhone shows 24-hour time or 12-hour time. Go to Settings > General > Date &
Time, then turn 24-Hour Time on or o. (24-Hour Time may not be available in all areas.)
Apple Watch
Use the Apple Watch app (not available in all areas) to learn more about Apple Watch,
and to pair your Apple Watch with iPhone. Just tap the Apple Watch app, and follow the
onscreen instructions.
International settings
Go to Settings > General > Language & Region to set:
•The language for iPhone
•The preferred language order for apps and websites
•The region format
•The calendar format
•Advanced settings for dates, times, and numbers
Apple Confidential
Draft

Chapter 2 Get started 24
To add a keyboard for another language, go to Settings > General > Keyboard > Keyboards. For
more information, see Use international keyboards on page 185.
Your iPhone name
The name of your iPhone is used by both iTunes and iCloud.
Change the name of your iPhone. Go to Settings > General > About > Name.
View this user guide on iPhone
You can view the iPhone User Guide on iPhone in Safari, and in the iBooks app.
View the user guide in Safari. Tap , then tap the iPhone User Guide bookmark. (If you don’t
see a bookmark, go to help.apple.com/iphone/.)
•Add an icon for the user guide to the Home screen: Tap , then tap Add to Home Screen.
•View the user guide in a dierent language: Tap Change Language at the bottom of the
home page.
View the user guide in iBooks. Open iBooks, then search for “iPhone user” in the iBooks Store.
For more information about iBooks, see Chapter 24, iBooks, on page 131.
Tips for using iOS 9
The Tips app helps you get the most from iPhone.
Get Tips. Open the Tips app (found inside the Extras folder). New tips are added weekly.
Get notied when new tips arrive. Go to Settings > Notications > Tips.
Apple Confidential
Draft
3
25
Use apps
All the apps that come with iPhone—as well as the apps you download from the App Store—are
on the Home screen.
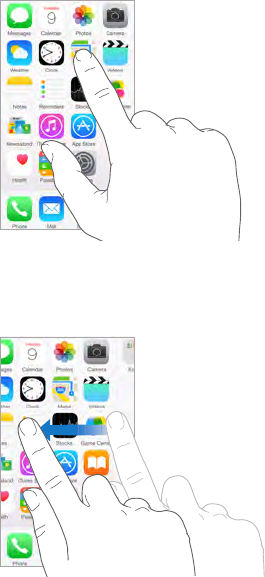
Start at home
Tap an app to open it.
Press the Home button anytime to return to the Home screen. Swipe left or right to see
other screens.
Switch between apps
You can easily switch between the apps you’re using.
Basics
Apple Confidential
Draft

Chapter 3 Basics 26
View open apps. Double-click the Home button to reveal your open apps. Swipe left or right to
see more. To switch to another app, tap it.
Close an app. If an app isn’t working properly, you can force it to quit. Drag the app up from the
app switcher display. Then try opening the app again.
If you have lots of apps, you can use Search to nd and open them. Drag right from the Home
screen to see the Search screen, or drag down the center of the Home screen to see the Search
eld. See Search on page 35.
Look around
Drag a list up or down to see more. Swipe to scroll quickly; touch the screen to stop it. Some lists
have an index—tap a letter to jump ahead.
Drag a photo, map, or webpage in any direction to see more.
To quickly jump to the top of a page, tap the status bar at the top of the screen.
Get a closer look
Pinch open on a photo, webpage, or map for a close-up—then pinch closed to zoom back out. In
Photos, keep pinching to see the collection or album the photo’s in.
Or double-tap a photo or webpage to zoom in, and double-tap again to zoom out. In Maps,
double-tap to zoom in and tap once with two ngers to zoom out.
Apple Confidential
Draft
Chapter 3 Basics 27
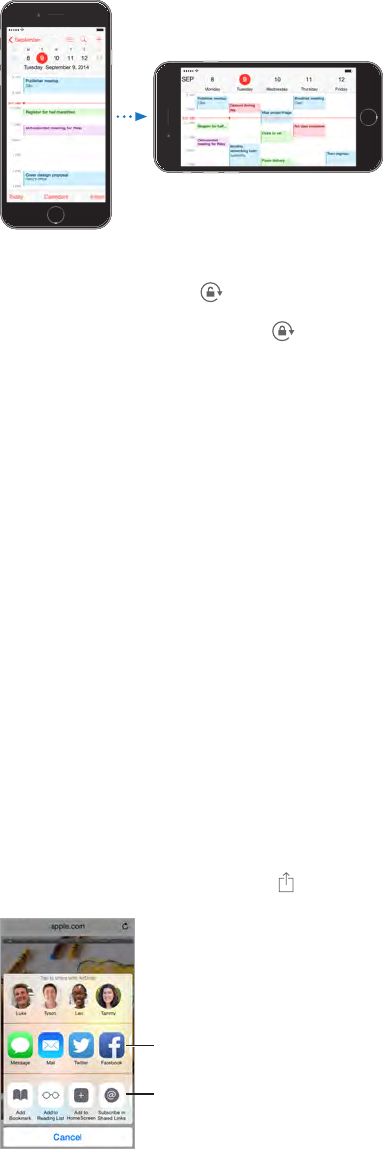
Change the screen orientation
Many apps give you a dierent view when you rotate iPhone.
9:41 AM
100%
9:41 AM
100%
To lock the screen in portrait orientation, swipe up from the bottom edge of the screen to open
Control Center, then tap .
The Portrait orientation lock icon appears in the status bar when the screen orientation
is locked.
When you use iPhone 6 Plus (or later) in landscape orientation, some apps have special layouts.
These apps include:
•Mail
•Calendar
•Settings
Note: These special layouts are not available when Display Zoom is enabled.
Reachability
If you have iPhone 6 (or later), or iPhone 6 Plus (or later), and are using it in portrait orientation,
lightly tap twice on the Home button to slide the screen down (bringing the top half closer to
your thumb).
Disable Reachability. Tap Settings > General > Accessibility, then turn o Reachability.
App extensions
Some apps let you extend the functionality of your apps on iPhone. An app extension may
appear as a sharing option, action option, a widget in Notication Center, a le provider, or a
custom keyboard. For example, if you download Pinterest to iPhone, Pinterest becomes another
option for sharing when you click .
Sharing options
Sharing options
Action options
Action options
App extensions can also help you edit a photo or video in your Photos app. For example, you can
download a photo-related app that lets you apply lters to photos from your Photos app.
Apple Confidential
Draft

Chapter 3 Basics 28
Install app extensions. Download the app from the App Store, then open the app and follow the
onscreen instructions.
Turn sharing or action options on or o. Tap , then tap More (drag options to the left if
necessary). Turn o third-party sharing or action options (they are on by default).
Organize sharing and action options. Tap , then tap More (drag options to the left if
necessary). Touch and drag to rearrange your options.
For more information about Notication Center widgets, see Notication Center on page 37. For
more information about Sharing options, see Share from apps on page 38.
Proactive assistant
Based on how you use your iPhone, proactive assistant gives you suggestions for what you might
want to do next. Some of the activities where proactive assistant might help you are:
•When listening to music: Plug in your headphones and it recognizes that you might want to
play an album you started earlier. Your music is ready to play from the lock screen—or swipe
the Music icon up from the lower left and it takes you to the Music app after you unlock.
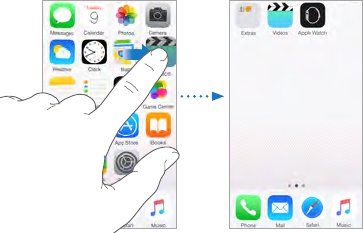
<<Illustration below of hand swiping up from lower left of lock screen (with Music icon)>>
•When creating email and events: When you start adding people to an email or calendar, it
suggests the people you usually include.
•When receiving calls: If an incoming call comes from an unknown number, it lets you know
who might be calling—based on phone numbers included in your emails and text messages.
•While looking at a web page: Ask Siri, “Remind me about this when I get home.”
Continuity
About Continuity features
Continuity features connect iPhone with your iPad, iPod touch, and Mac so they can work
together as one. You can start an email or document on iPhone, for example, then pick up where
you left o on your iPad. Or let your iPad or Mac use iPhone to make phone calls or send SMS or
MMS text messages.
Continuity features require iOS 8 or later, or OS X Yosemite or later, and work with iPhone 5 or
later, iPod touch (5th generation) or later, iPad (4th generation) or later, and supported Mac
computers. For more information, see support.apple.com/kb/HT6337.
Hando
Pick up on one device where you left o on another. You can use Hando with Mail, Safari, Pages,
Numbers, Keynote, Maps, Messages, Reminders, Calendar, Contacts, and even some third-party
apps. For Hando to work, your devices must be signed in to iCloud using the same Apple ID,
and they must be within Bluetooth range of one another (about 33 feet or 10 meters).
Switch devices. Swipe up from the bottom-left edge of the Lock screen (where you see the app’s
activity icon), or go to the multitasking screen, then tap the app. On your Mac, open the app you
were using on your iOS device.
Apple Confidential
Draft
Chapter 3 Basics 29
Disable Hando on your devices. Go to Settings > General > Hando & Suggested Apps.
Disable Hando on your Mac. Go to System Preferences > General, then turn o Allow Hando
between this Mac and your iCloud devices.
Phone calls
Make and receive phone calls on your iPad, iPod touch, or Mac. With iOS 8 or OS X Yosemite your
iPhone needs to be on the same Wi-Fi network. With iOS 9 or OS X El Capitan, it doesn't need
to be on the same Wi-Fi network (services may vary according to your carrier). In any case your
iPhone must be signed in to iCloud and FaceTime with the same Apple ID. (If available on your
iPhone, Allow Wi-Fi Calls must be o. Go to Settings > Phone > Wi-Fi Calls.) See Make and receive
calls on your iPad, iPod touch, or Mac on page 55.
Make a phone call on your iPad, iPod touch, or Mac. Tap or click a phone number in Contacts,
Calendar, or Safari.
Messages
Switch between your iOS devices (iOS 8 or later) and Mac computers (OS X Yosemite or later)
as you send and receive SMS and MMS text messages. Just sign in to iMessage with the same
Apple ID as your iPhone. For more information, see SMS, MMS, and iMessage on page 80.
Instant Hotspot
You can use Instant Hotspot on iPhone to provide Internet access to your other iOS devices
(iOS 8 or later) and Mac computers (OS X Yosemite or later) that are signed in to iCloud using the
same Apple ID. Instant Hotspot uses your iPhone Personal Hotspot, without you having to enter a
password or even turn on Personal Hotspot.
Use Instant Hotspot. Go to Settings > Wi-Fi on your other iOS device, then simply choose your
iPhone network under Personal Hotspots. On your Mac, choose your iPhone network from your
Wi-Fi settings.
When you’re not using using the hotspot, your devices disconnect to save battery life. For more
information see Personal Hotspot on page 42.
Note: This feature may not be available with all carriers. Additional fees may apply. Contact your
carrier for more information.
Customize iPhone
Arrange your apps
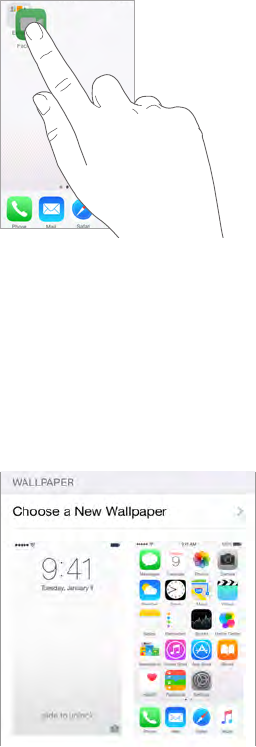
Arrange apps. Touch and hold any app on the Home screen until it jiggles, then drag apps
around. Drag an app to the edge of the screen to move it to a dierent Home screen, or to the
Dock at the bottom of the screen. Press the Home button to save your arrangement.
Apple Confidential
Draft
Chapter 3 Basics 30
Create a new Home screen. While arranging apps, drag an app to the right edge of the last
Home screen. The dots above the Dock show how many Home screens you have, and which one
you’re viewing.
You can also customize the Home screen using iTunes, when iPhone is connected to your
computer. In iTunes, select iPhone, then click Apps.
Start over. Go to Settings > General > Reset, then tap Reset Home Screen Layout to return the
Home screen and apps to their original layout. Folders are removed and the original wallpaper
is restored.
Organize with folders
Create a folder. While arranging apps, drag one app onto another. Tap the name of the folder to
rename it. Drag apps to add or remove them. Press the Home button when you nish.
You can have multiple pages of apps in a folder.
Delete a folder. Drag out all the apps—the folder is deleted automatically.
Change the wallpaper
Wallpaper settings let you set an image or photo as wallpaper for the Lock screen or Home
screen. You can choose from dynamic and still images.
Change the wallpaper. Go to Settings > Wallpaper > Choose a New Wallpaper.
When choosing an image for new wallpaper, the Perspective Zoom button determines whether
your selected wallpaper is zoomed. For wallpaper you already set, go to the Wallpaper setting,
then tap the image of the Lock screen or Home screen to see the Perspective Zoom button.
Note: The Perspective Zoom button doesn’t appear if Reduce Motion (in Accessibility settings) is
turned on. See Reduce screen motion on page 172.
Apple Confidential
Draft
Chapter 3 Basics 31
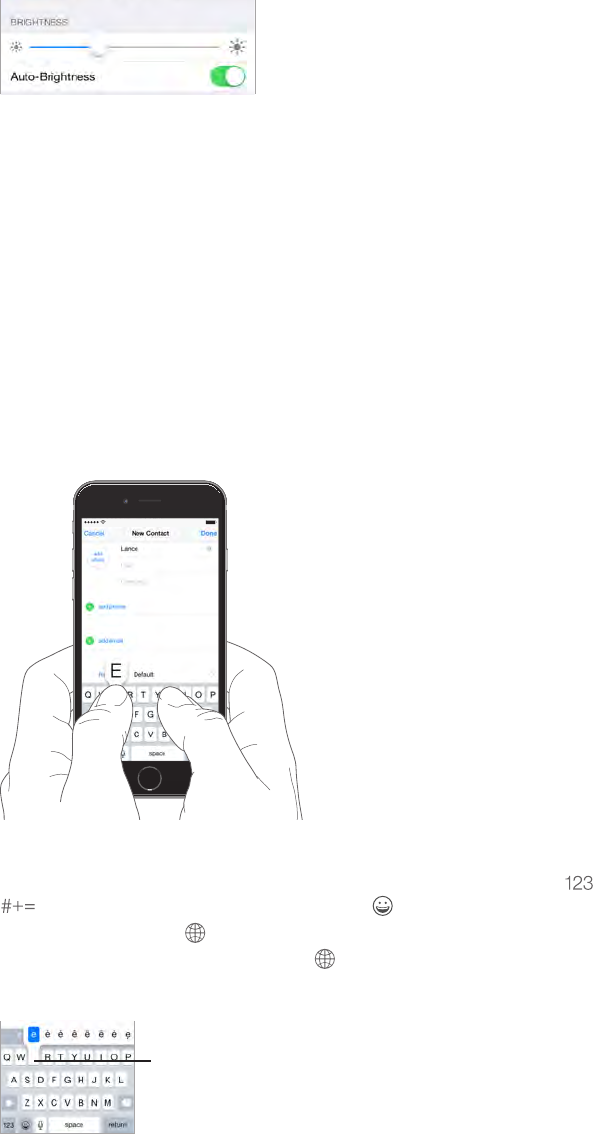
Adjust the screen brightness
Dim the screen to extend battery life, or use Auto-Brightness.
Adjust the screen brightness. Go to Settings > Display & Brightness, then drag the slider. If
Auto-Brightness is on, iPhone adjusts the screen brightness for current light conditions using the
built-in ambient light sensor. You can also adjust the brightness in Control Center.
Display Zoom
With iPhone 6 or iPhone 6 Plus you can magnify the screen display. Go to Settings > Display &
Brightness. Tap View (below Display Zoom), choose Zoomed, then tap Set. For additional zoom
features, see Zoom on page 170.
Type text
The onscreen keyboard lets you enter text when needed.
Enter text
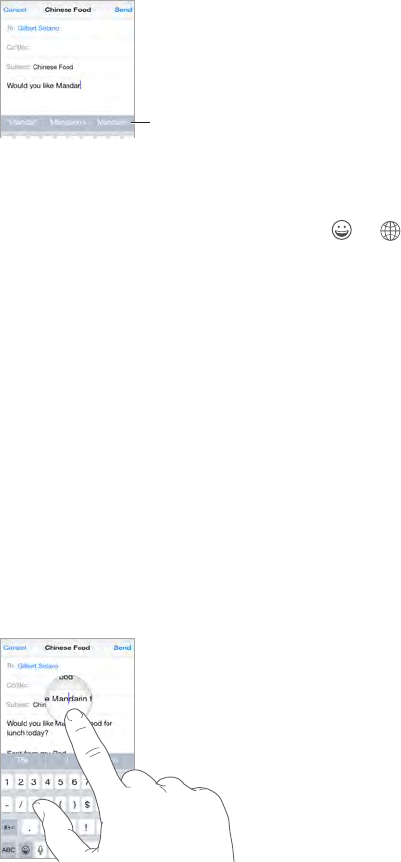
Tap a text eld to see the onscreen keyboard, then tap letters to type. If you touch the wrong
key, you can slide your nger to the correct key. The letter isn’t entered until you release your
nger from the key.
9:41 AM
100%
Tap Shift to type uppercase, or touch the Shift key and slide to a letter. Double-tap Shift for caps
lock. To enter numbers, punctuation, or symbols, tap the Number key or the Symbol key
. If you haven’t added any keyboards, tap to switch to the emoji keyboard. If you have
several keyboards, tap to switch to the last one you used. Continue tapping to access other
enabled keyboards, or touch and hold , then slide to choose a dierent keyboard. To quickly
end a sentence with a period and a space, just double-tap the space bar.
To type an alternate character,
touch and hold a key, then slide
to choose one of the options.
To type an alternate character,
touch and hold a key, then slide
to choose one of the options.
Apple Confidential
Draft
Chapter 3 Basics 32
If you see a word underlined in red, tap it to see suggested corrections. If the word you want
doesn’t appear, type the correction.
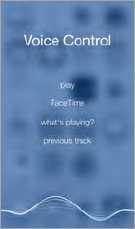
As you write, the keyboard predicts your next word (not available in all languages). Tap a word
to choose it, or accept a highlighted prediction by entering a space or punctuation. When you
tap a suggested word, a space appears after the word. If you enter a comma, period, or other
punctuation, the space is deleted. Reject a suggestion by tapping your original word (shown as
the predictive text option with quotation marks).
Predictive text
Predictive text
Hide predictive text. Pull down the suggested words. Drag the bar up when you want to see the
suggestions again.
Turn o predictive text. Touch and hold or , then slide to Predictive.
If you turn o predictive text, iPhone may still try to suggest corrections for misspelled words.
Accept a correction by entering a space or punctuation, or by tapping return. To reject a
correction, tap the “x.” If you reject the same suggestion a few times, iPhone stops suggesting it.
Set options for typing or add keyboards. Go to Settings > General > Keyboard.
The onscreen keyboard for iPhone 6 and iPhone 6 Plus includes additional keys you may nd
useful. You can see these keys when you hold iPhone in landscape orientation.
You can also use an Apple Wireless Keyboard to enter text. See Use an Apple Wireless
Keyboard on page 33. To dictate instead of typing, see Dictate on page 34.
Edit text
Revise text. Touch and hold the text to show the magnifying glass, then drag to position the
insertion point.
Apple Confidential
Draft

Chapter 3 Basics 33
Select text. Tap the insertion point to display the selection options. Or double-tap a word
to select it. Drag the grab points to select more or less text. In read-only documents, such as
webpages, touch and hold to select a word.
Grab points
Grab points
You can cut, copy, or paste over selected text. With some apps, you can also get bold, italic, or
underlined text (tap B/I/U); get the denition of a word; or have iPhone suggest an alternative.
Tap to see all the options.
Undo the last edit. Shake iPhone, then tap Undo.
Save keystrokes
A shortcut lets you enter a word or phrase by typing just a few characters. For example, type
“omw” to enter “On my way!” That one’s already set up for you, but you can also add your own.
Create a shortcut. Go to Settings > General > Keyboard, then tap Shortcuts.
Have a word or phrase you use and don’t want it corrected? Create a shortcut, but leave the
Shortcut eld blank.
Use iCloud to keep your personal dictionary up to date on your other devices. Go to Settings >
iCloud, then turn on iCloud Drive or Documents & Data.
Use an Apple Wireless Keyboard
You can use an Apple Wireless Keyboard (available separately) to enter text on iPhone. The
keyboard connects via Bluetooth, so you must rst pair it with iPhone.
Note: The Apple Wireless Keyboard may not support keyboard features that are on your device.
For example, it does not anticipate your next word or automatically correct misspelled words.
Pair an Apple Wireless Keyboard with iPhone. Turn on the keyboard, go to Settings > Bluetooth
and turn on Bluetooth, then tap the keyboard when it appears in the Devices list.
Once it’s paired, the keyboard reconnects to iPhone whenever it’s in range—up to about 33 feet
(10 meters). When it’s connected, the onscreen keyboard doesn’t appear.
Save your batteries. Turn o Bluetooth and the wireless keyboard when not in use. You can turn
o Bluetooth in Control Center. To turn o the keyboard, hold down the On/o switch until the
green light goes o.
Unpair a wireless keyboard. Go to Settings > Bluetooth, tap next to the keyboard name, then
tap Forget this Device.
See Bluetooth devices on page 44.
Add or change keyboards
You can turn typing features, such as spell checking, on or o; add keyboards for writing in
dierent languages; and change the layout of your onscreen keyboard or Apple Wireless
Keyboard.
Apple Confidential
Draft

Chapter 3 Basics 34
Set typing features. Go to Settings > General > Keyboard.
Add a keyboard for another language. Go to Settings > General > Keyboard > Keyboards > Add
New Keyboard.
Switch keyboards. If you haven’t added any keyboards, tap to switch to the emoji keyboard.
If you have several keyboards, tap to switch to the last one you used. Continue tapping to
access other enabled keyboards, or touch and hold , then slide to choose a dierent keyboard.
For information about international keyboards, see Use international keyboards on page 185.
Change the keyboard layout. Go to Settings > General > Keyboard > Keyboards, select a
keyboard, then choose a layout.
Dictate
If you like, you can dictate instead of typing. Make sure Enable Dictation is turned on (in
Settings > General > Keyboard) and iPhone is connected to the Internet.
Note: Dictation may not be available in all languages or in all areas, and features may vary.
Cellular data charges may apply. See Cellular settings on page 199.
Dictate text. Tap on the onscreen keyboard, then speak. Tap Done when you nish.
Tap to begin dictation.
Tap to begin dictation.
Add text. Tap again and continue dictating. To insert text, tap to place the insertion point rst.
You can also replace selected text by dictating.
Add punctuation or format text. Say the punctuation or format. For example, “Dear Mary
comma the check is in the mail exclamation mark” becomes “Dear Mary, the check is in the mail!”
Punctuation and formatting commands include:
•quote … end quote
•new paragraph
•new line
•cap—to capitalize the next word
•caps on … caps o—to capitalize the rst character of each word
•all caps—to make the next word all uppercase
•all caps on … all caps o—to make the enclosed words all uppercase
•no caps on … no caps o—to make the enclosed words all lowercase
•no space on … no space o—to run a series of words together
•smiley—to insert :-)
•frowny—to insert :-(
•winky—to insert ;-)
Apple Confidential
Draft
Chapter 3 Basics 35
Voice Control
Voice Control lets you make phone calls and FaceTime calls, and control music playback,
if you have Siri turned o. (For information about using Siri to control iPhone by voice, see
Chapter 4, Siri, on page 50.)
Note: Voice Control and Voice Control settings aren’t available when Siri is turned on.
Use Voice Control. Turn Siri o in Settings > General > Siri, then press and hold the Home button
until the Voice Control screen appears and you hear a beep, or press and hold the center button
on your headset. See Use an Apple headset on page 43.
For best results:
•Speak clearly and naturally.
•Say only Voice Control commands, names, and numbers. Pause slightly between commands.
•Use full names.
Change the language for Voice Control. By default, Voice Control expects you to speak voice
commands in the language that’s set for iPhone (in Settings > General > Language & Region).
To use Voice Control in another language or dialect, go to Settings > General > International >
Voice Control.
Voice Control for the Music app is always on, but you can keep Voice Control from dialing
when iPhone is locked. Go to Settings > Touch ID & Passcode (iPhone models with Touch ID) or
Settings > Passcode (other models), then turn o Voice Dial.
For specic commands, see Make a call on page 53 and Siri and Voice Control on page 77. For
more about using Voice Control, including information about using Voice Control in dierent
languages, see support.apple.com/kb/HT3597.
Search
You can search iPhone and apps for useful information, including:
•Sports scores and schedules
•Weather forecasts
•Stock prices
•Quick conversions
•Calculations
•iCloud documents
Siri provides more information even before you start to type. Siri suggests:
•Relevant people
Apple Confidential
Draft

Chapter 3 Basics 36
•Suggested apps
•Places nearby
•Items in the news
Search with iPhone. Drag right from the Home screen to show Search. Tap on an item to get
more information or tap the search eld to search with iPhone. Results occur as you type; to hide
the keyboard and see more results on the screen, tap Search. Tap an item in the list to open it.
Choose which apps and content are searched. Go to Settings > General > Spotlight Search,
then tap to deselect apps or content. To change the search order, touch and drag to a
new position.
Turn o Siri Suggestions. Go to Settings > General > Spotlight Search, then tap Siri Suggestions
to deselect it.
Turn o Location Services for Spotlight Suggestions. Go to Settings > Privacy > Location
Services. Tap System Services, then turn o Safari & Spotlight Suggestions.
Search in apps
Many apps include a search eld where you can type to nd something within the app. For
example, in the Maps app, you can search for a specic location.
Control Center
Control Center gives you instant access to the camera, calculator, AirPlay, control and playback
of currently playing audio, and other handy features. You can also adjust the brightness, lock
the screen in portrait orientation, turn wireless services on or o, and turn on AirDrop. See
AirDrop on page 39.
Open Control Center. Swipe up from the bottom edge of any screen (even the Lock screen).
Open the currently playing audio app. Tap the song title.
Close Control Center. Swipe down, tap the top of the screen, or press the Home button.
Apple Confidential
Draft
Chapter 3 Basics 37
Turn o access to Control Center in apps or on the Lock screen. Go to Settings > Control Center.
Alerts and Notication Center
Alerts
Alerts let you know about important events. They can appear briey at the top of the screen, or
remain in the center of the screen until you acknowledge them.
Some apps may include a badge on their Home screen icon, to let you know how many new
items await—for example, the number of new email messages. If there’s a problem—such as a
message that couldn’t be sent—an exclamation mark appears on the badge. On a folder, a
numbered badge indicates the total number of notications for all the apps inside.
Alerts can also appear on the Lock screen.
Respond to an alert without leaving your current app. Pull down on the alert when it appears
at the top of your screen.
Note: This feature works with text and email messages, calendar invitations, and more.
Respond to an alert when iPhone is locked. Swipe the alert from right to left.
Silence your alerts. Go to Settings > Do Not Disturb. You can also use Siri to turn Do Not Disturb
on or o. Say “Turn on Do Not Disturb” or “Turn o Do Not Disturb.”
Set sounds and vibrations. Go to Settings > Sounds.
Notication Center
Notication Center collects your notications in one place, so you can review them whenever
you’re ready. View details about your day—such as the weather forecast, appointments,
birthdays, stock quotes, and even a quick summary of what’s coming up tomorrow. Tap the
Notications tab to review all your alerts.
Open Notication Center. Drag down from the top edge of the screen.
Set Today options. To choose what information appears, tap the Edit key at the end of your
information on the Today tab. Tap + or — to add or remove information. To arrange the order of
your information, touch , then drag it to a new position.
Set notication options. Go to Settings > Notications. Tap an app to set its notication options.
For example, choose to view a notication from the Lock screen. You can also tap Edit to arrange
the order of app notications. Touch , then drag it to a new position.
Apple Confidential
Draft

Chapter 3 Basics 38
Note: To include trac conditions for your commute in the Today tab, make sure Frequent
Locations is turned on in Settings > Privacy > Location Services > System Services >
Frequent Locations.
Get government alerts. In some areas, you can turn on alerts in the Government Alerts list. Go to
Settings > Notications.
For example, in the United States, iPhone can receive presidential alerts, and you can turn AMBER
and Emergency Alerts (which includes both Severe and Extreme Imminent Threat alerts) on or
o (they’re on by default). In Japan, iPhone can receive Emergency Earthquake Alerts from the
Japan Meteorological Agency. Government alerts vary by carrier and iPhone model, and may not
work under all conditions.
Choose whether to show Today and Notications View on a locked screen. Go to Settings >
Touch ID & Passcode (iPhone models with Touch ID) or Settings > Passcode (other models), then
choose whether to allow access when locked.
Close Notication Center. Swipe up, or press the Home button.
Sounds and silence
You can change or turn o the sounds iPhone plays when you get a call, text, voicemail, email,
tweet, Facebook post, reminder, or other event.
Set sound options. Go to Settings > Sounds for options such as ringtones and alert tones,
vibration settings and patterns, and ringer and alert volumes.
Set vibration patterns. Go to Settings > Sounds, then choose an item from the Sounds and
Vibration Patterns list. Tap Vibration to select a pattern or create your own.
If you want to temporarily silence incoming calls, alerts, and sound eects, see the following
section and Ring/Silent switch on page 14.
Do Not Disturb
Do Not Disturb is an easy way to silence iPhone, whether you’re going to dinner or to sleep. It
keeps calls and alerts from making any sounds or lighting up the screen.
Turn on Do Not Disturb. Swipe up from the bottom edge of the screen to open Control Center,
then tap . When Do Not Disturb is on, appears in the status bar.
Note: Alarms still sound, even when Do Not Disturb is on. To make sure iPhone stays silent, turn
it o.
Congure Do Not Disturb. Go to Settings > Do Not Disturb.
You can schedule quiet hours, allow calls from your Favorites or groups of contacts, and allow
repeated calls to ring through for those emergency situations. You can also set whether Do Not
Disturb silences iPhone only when it’s locked, or even when it’s unlocked.
Sharing
Share from apps
In many apps, you can tap Share or to choose how to share your information. The choices vary
depending on the app you’re using. Additional options may appear if you’ve downloaded apps
with sharing options. For more information, see App extensions on page 27.
Apple Confidential
Draft