Apple E2944A Cellular Phone with Bluetooth and WLAN Radios User Manual 4 of 8
Apple Inc. Cellular Phone with Bluetooth and WLAN Radios 4 of 8
Apple >
Contents
User manual 4 of 8
Chapter 8 Music 73
Reorder a For You playlist. Play the playlist, tap the Miniplayer to show the Now Playing screen,
then tap . Drag to rearrange the song order.
Add For You playlists. Tap , then tap Add to My Music. The playlist remains in your library and
updates automatically if the playlist changes. (Go to Settings > Music, then turn on iCloud Music
Library to enable this feature.)
Do more with your music. When viewing an album’s contents tap to add music to the Up
Next queue, create a station based on the currently selected music, or share music with a friend.
Search for and add music
Find your music. Tap , tap My Music, then enter a song, album, playlist, artist, compilation, or
genre. Results include music on iPhone as well as music in your iCloud Music Library. Tap a result
to play it.
Search Apple Music. Tap , tap Apple Music, then select a trending search or enter a song,
album, playlist, artist, curator, music video, activity, radio station, or genre. Tap a result to play it.
Add Apple Music. To add music, tap next to any result, then tap Add to My Music. To stream
an added song to iPhone, tap it within My Music. To save music to iPhone so that you can play it
when you don’t have a Wi-Fi or cellular connection, tap Make Available Oine.
To see the progress of tracks being saved to iPhone, and to access options for pausing tracks or
removing them from the Downloads sheet, tap the Downloads bar.
Note: Settings > Music > iCloud Music Library must be turned on to add and save Apple Music
to your library.
Play music
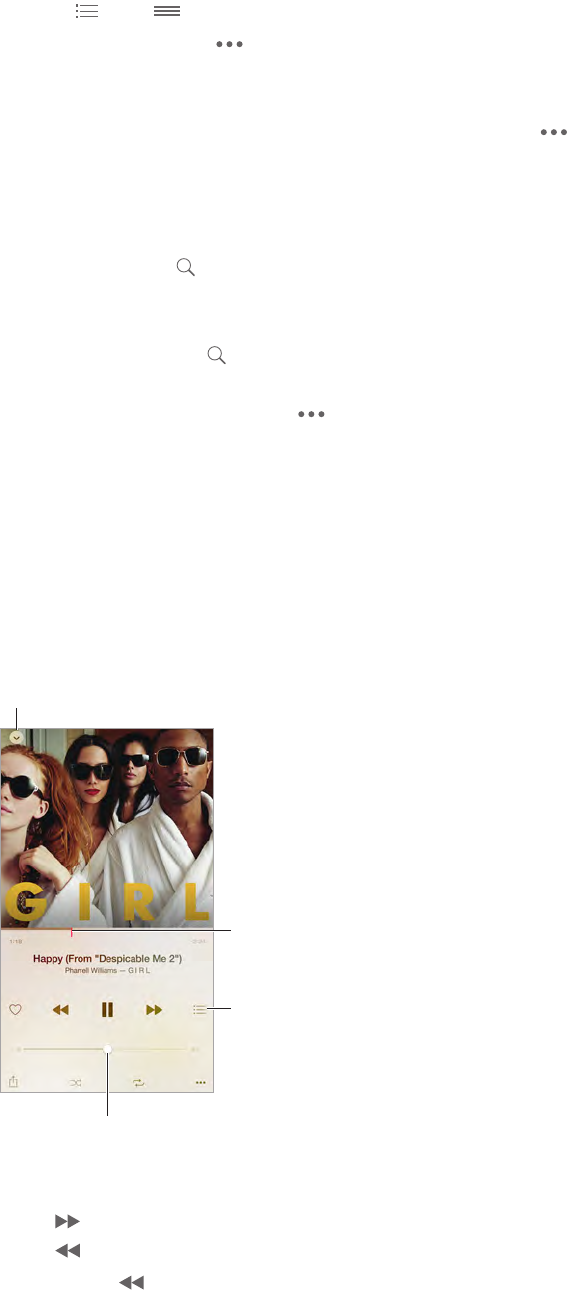
Up Next
Up Next
Tap to hide Now Playing.
Tap to hide Now Playing.
Volume
Volume
Playhead
Playhead
Control playback. Tap a song to play it and show the Miniplayer. Tap the Miniplayer to show the
Now Playing screen, where you can do the following:
•Tap to skip to the next song.
•Tap to return to the song’s beginning.
•Double-tap to play an album or playlist’s previous song.
Apple Confidential
Draft
Chapter 8 Music 74
Skip to any point in a song. Drag the playhead. Decrease the scrubbing speed by sliding your
nger down the screen.
Share music. Tap , then choose a sharing option.
Shue. Tap to play your songs in random order.
Repeat. Tap to repeat an album or playlist. Double-tap to repeat a single song.
More. Tap for additional options.
See what’s up next. Tap . Tap a song to play it and the songs that follow. Drag to reorder
the list.
Stream music to an AirPlay-enabled device. Tap in Now Playing, then choose a device. See
AirPlay on page 42.
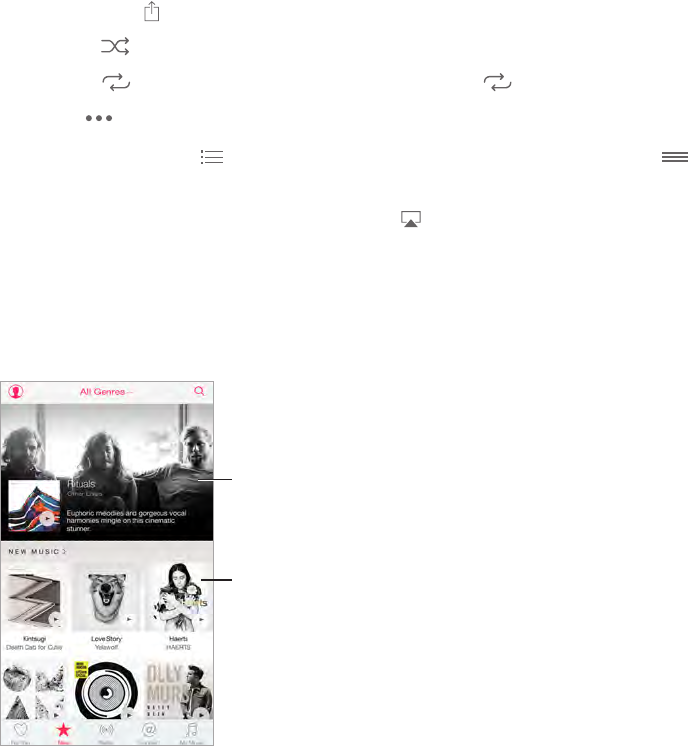
New
Music experts pick today’s best music. Tap New to browse their recommendations.
Play featured music.
Play featured music.
Play other songs and
albums recommended
by Apple’s experts.
Play other songs and
albums recommended
by Apple’s experts.
Browse expert recommendations. Tap New, then tap a featured album, song, artist, or playlist.
Browse your favorite genres. Tap All Genres, choose a genre, then tap a featured album, song,
artist, or playlist to hear music handpicked by music experts.
Fit the music to the mood. Tap Activities to play music that ts with what you’re doing (or how
you’re feeling).
Get expert advice. Tap Apple Editors or Curators to discover music recommended by music
experts. Tap Follow to keep up with your favorite experts.
See what’s hot. Tap Top Charts to view top songs, top albums, and other popular content.
Apple Confidential
Draft
Chapter 8 Music 75
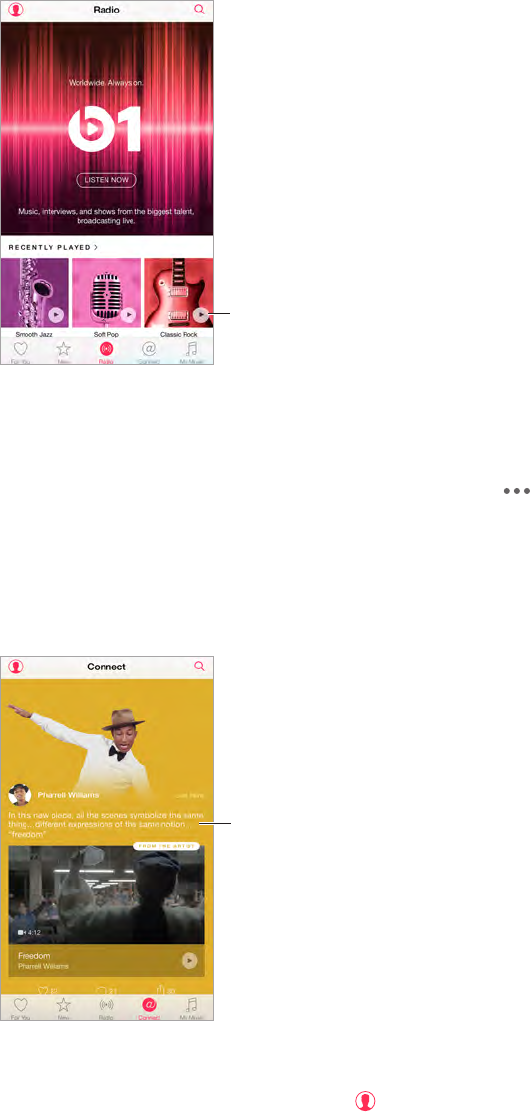
Radio
Radio oers the always-on Beats 1, featuring top DJs playing today’s best music. The featured
stations created by experts provide a great way to explore and enjoy new music in a variety of
genres. You can also create your own custom stations, based on your pick of artist, song, or genre.
Tap to play
the station.
Tap to play
the station.
Listen to live radio. Tap Listen Now to tune in to Beats 1.
Listen to your favorite music genre. Tap a station or, if you already listened to a station, tap a
recently played station.
Create a station. When browsing an artist, song, or genre, tap , then tap Start Station.
Connect
Even if you’re not an Apple Music member you can follow your favorite artists, learn more about
them, read their recent posts, and comment on what you nd.
View posts from
your favorite artists.
View posts from
your favorite artists.
Follow an artist. Music automatically follows the artists found in your music library. To follow
other artists, navigate to an artist’s page, then tap Follow. To stop following an artist, go to
the artist’s page, then tap Following. Or tap , tap Following, then tap Unfollow next to the
artist’s name.
Apple Confidential
Draft
Chapter 8 Music 76
View an artist’s content. Tap Connect to view the content shared by artists you follow. You can
also navigate to any artist’s page to see what that artist is sharing.
Make a comment. Type in the comment eld, then tap Post to make a comment. Create a
nickname the rst time you make a comment.
Share an artist post. Tap , then choose a sharing option.
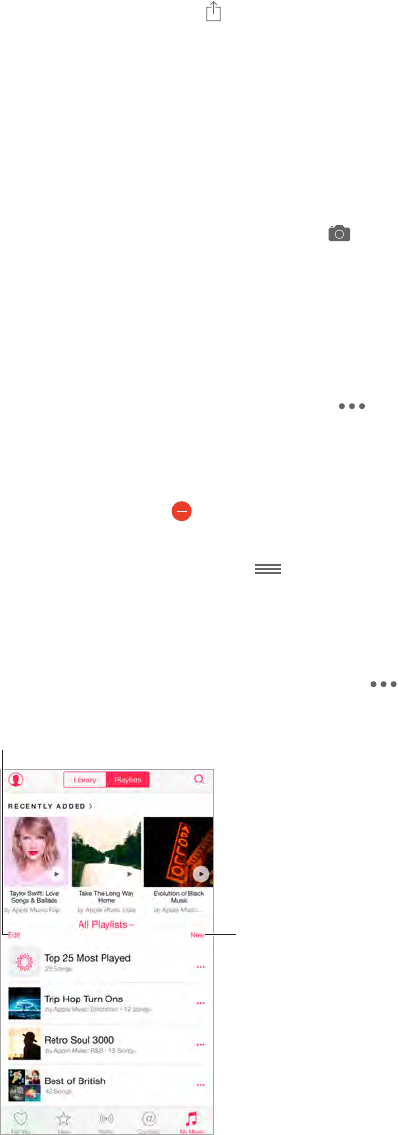
Playlists
Create playlists to organize your music. If you’re an Apple Music member, tap My Music, tap
Playlists, then tap New. Enter a title, then tap Add Songs. Select songs and albums to add to
the playlist. (If you chose to hide the Apple Music features, you can tap Playlists to create a new
playlist.)
To customize your playlist’s artwork, tap and take a photo or choose an image from your
photo library.
View particular playlists. In addition to playlists you create, Playlists includes playlists you added
from Apple Music, as well as those shared with you. To view just the playlists you created, tap All
Playlists, then tap My Playlists. You can also choose to see just Apple Music Playlists or only the
playlists saved on iPhone.
Create a Genius playlist. In My Music tap next to a song, then tap Create Genius Playlist.
Edit a playlist you created on iPhone. Select the playlist, then tap Edit.
•Add more songs: Tap Add Songs.
•Delete a song: Tap , then tap Delete. Deleting a song from a playlist doesn’t delete it
from iPhone.
•Change the song order: Drag .
New and changed playlists are added to iCloud Music Library and appear on all your devices if
you’re an Apple Music member or iTunes Match subscriber. If you’re not a member or subscriber,
they’re copied to your music library the next time you sync iPhone with your computer.
Delete a playlist you created on iPhone. Tap next to the playlist, then tap Delete.
Create a new playlist.
Create a new playlist.
Tap to reorder or
delete playlists.
Tap to reorder or
delete playlists.
Apple Confidential
Draft
Chapter 8 Music 77
iTunes Match
If you have an iTunes Match subscription and an Apple Music membership, your iTunes Match
library will be accessible in iCloud Music Library.
Subscribe to iTunes Match. Go to Settings > Music > Subscribe to iTunes Match.
Turn on iTunes Match. Go to Settings > iTunes & App Store. Sign in if you haven’t already.
My Music
My Music includes any Apple Music content you added, music and music videos synced to
iPhone, iTunes purchases, and the music you make available through iTunes Match.
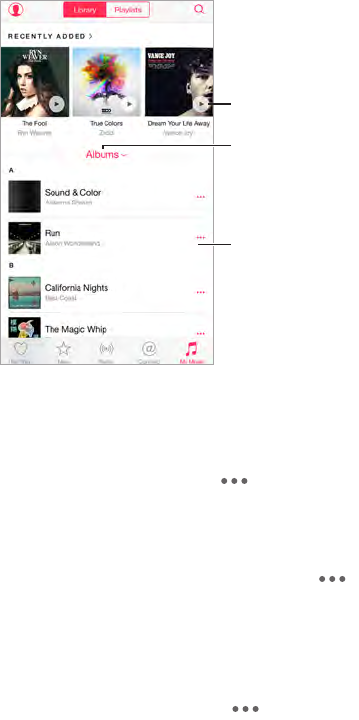
Tap to play a
recently added
album or song.
Tap to play a
recently added
album or song.
Choose a
sorting method.
Choose a
sorting method.
Tap to view an
album’s contents.
Tap to view an
album’s contents.
Browse and play your music. Tap the sorting menu to display your music by Artists, Albums,
Songs, and more. Tap the album art to play a song or album. Tap the Miniplayer to display the
Now Playing screen.
Save music to iPhone. Tap next to an album or track, then tap Make Available Oine.
View only music stored on iPhone. Tap My Music, tap the sorting menu, then turn on Music
Available Oine.
Remove a song stored on iPhone. Tap next to the song, then tap Remove Download. The
song is deleted from iPhone, but not from iCloud Music Library.
To manage music storage on iPhone, go to Settings > General > Usage > Manage Storage >
Music.
Add music to a playlist. Tap next to an album or track, tap Add to a Playlist, then choose
a playlist.
Get audio controls from the Lock screen or when using another app. Swipe up from the
bottom edge of the screen to open Control Center. See Control Center on page 36.
Siri and Voice Control
You can use Siri or Voice Control to control music playback. See Make requests on page 50 and
Voice Control on page 35.
Siri can also help you nd music in the iTunes Store. See “Find it with Siri” in Browse or search on
page 125.
Apple Confidential
Draft
Chapter 8 Music 78
Use Voice Control. Press and hold the Home button. Voice Control only works when Siri
is disabled.
•Play or pause music: Say “play music.” To pause, say “pause,” “pause music,” or “stop.” You can
also say “next song” or “previous song.”
•Play an album, artist, or playlist: Say “play album,” “play artist,” or “play playlist” followed by the
name of the artist, album, or playlist you wish to play.
•Find out more about the current song: Say “what’s playing,” “who sings this song,” or “who is this
song by.”
Ask Siri. Press and hold the Home button. In addition to the commands available through Voice
Control, Siri supports the following commands:
•Play an album, artist, song, playlist, or Radio station: Say “play” followed by the name of the
artist, album, song, playlist, or station that you want to play. If Siri doesn’t nd what you
asked for, be more specic. For example, say “play the radio station ‘Pure Pop’” rather than
saying “play ‘Pure Pop.’”
•Play music in random order: Say “shue play” followed by the name of the artist or album you’d
like to play in random order.
•Play similar music: While music is playing, say “play more songs like this one” or “create a radio
station based on this song.”
•Browse Apple Music: You can play any Apple Music track by title (“play ‘Happy’ by Pharrell
Williams”), by artist (“play Echosmith”), by movie (“play that song from Into the Woods”), by
chart (“play the top song from March 1981”), and then change versions (“play the live version
of it”).
•Add music from Apple Music to your collection (Apple Music membership required): Say, for
example, “add ‘Lifted Up’ by Passion Pit to My Music” or, while playing something, say “add this
to my collection.”
Music settings
Go to Settings > Music to set options for Music. The options you see depend on your
membership status.
•Apple Music: If you’re not currently an Apple Music member you can choose to show
Apple Music features as well as become a member.
•Connect: Show or hide Connect and show artist posts and shares in Now Playing and on the
Lock screen.
•Sort Albums: You can choose to sort by artist or title.
•iCloud Music Library: With this option o, all Apple Music content is removed from iPhone.
Music you purchased or synced, and music identied by iTunes Match that you added for
oine play remains.
•Equalization (EQ): EQ settings generally apply only to music played from the Music
app, but they aect all sound output, including the headset jack, AirPlay, and Bluetooth
audio connections.
Note: The Late Night setting compresses the dynamic range of the audio output, reducing the
volume of loud passages and increasing the volume of quiet passages. You might want to use
this setting when listening to music on an airplane or in some other noisy environment. (The
Late Night setting applies to all audio output—video as well as music.)
Apple Confidential
Draft
Chapter 8 Music 79
•Volume Limit: In some European Union (EU) countries, iPhone may indicate when you’re
setting the volume above the EU-recommended level for hearing safety. To increase the
volume beyond this level, you may need to briey release the volume control. To limit the
maximum headset volume to this level, go to Settings > Music > Volume Limit, then turn on
EU Volume Limit.
Note: To prevent changes to the volume limit, go to Settings > General > Restrictions > Volume
Limit, then tap Don’t Allow Changes.
•Sound Check: Sound Check normalizes the volume level of your audio content.
Apple Confidential
Draft

9
80
SMS, MMS, and iMessage
Messages lets you exchange text messages with other SMS and MMS devices using your cellular
connection, and with other iOS devices and Mac computers using iMessage.
iMessage is an Apple feature that lets you send messages over Wi-Fi (or cellular connections) to
others using iOS 5 or later, or OS X Mountain Lion or later. Messages you send using iMessage
don’t count against your text messaging plan with your carrier. Messages can include photos,
videos, and other info. You can see when other people are typing, and let them know when
you’ve read their messages. If you’re signed in to iMessage using the same Apple ID on other
iOS devices or a Mac (OS X Mavericks or later), you can start a conversation on one device and
continue it on another. For security, messages you send with iMessage are encrypted before
they’re sent.
With Continuity, you can also send and receive SMS and MMS messages in the Messages app on
other iOS devices (with iOS 8) or a Mac (with OS X Yosemite), if they are signed in to iMessage
with the same Apple ID as your iPhone. See About Continuity features on page 28.
Sign in to iMessage on an iOS device. Go to Settings > Messages, then turn on iMessage.
Sign in to iMessage on a Mac. On your Mac, open Messages, choose Messages > Preferences,
click Accounts, then select iMessage in the Accounts list. Enter your Apple ID and password, then
click Sign In.
WARNING: For important information about avoiding distractions while driving, see Important
safety information on page 193.
Messages
Apple Confidential
Draft
Chapter 9 Messages 81
Send and receive messages
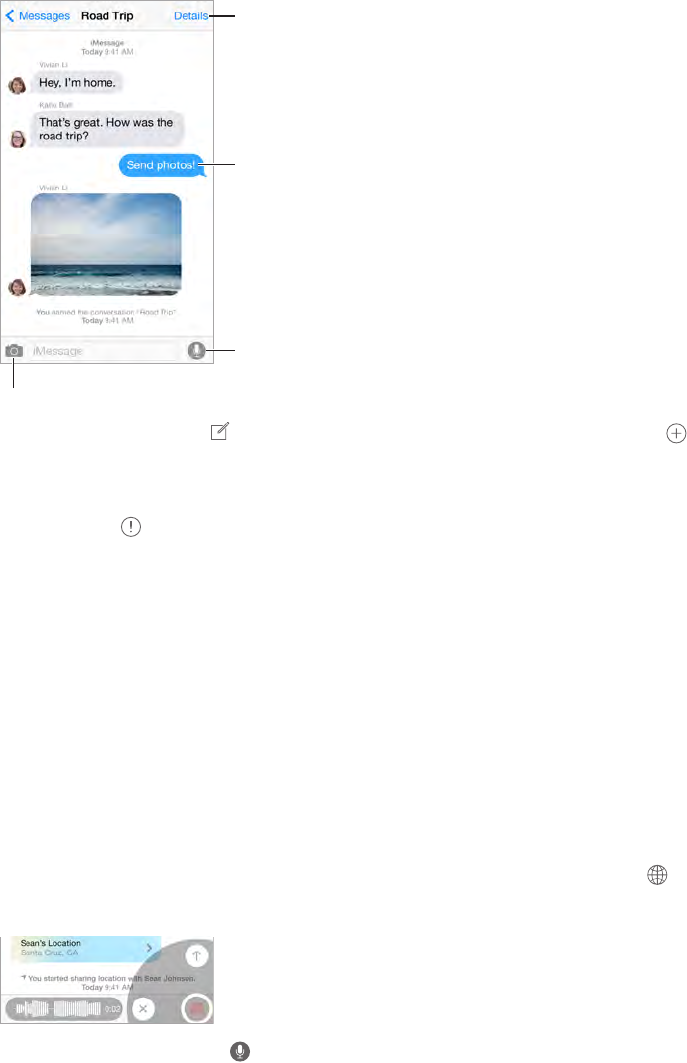
Send a photo or video.
Send a photo or video.
Add your voice to
the conversation.
Add your voice to
the conversation.
Get info, make a
voice or FaceTime
call, share your
location, or mute
notifications.
Get info, make a
voice or FaceTime
call, share your
location, or mute
notifications.
Blue indicates
an iMessage
conversation.
Blue indicates
an iMessage
conversation.
Start a conversation. Tap , then enter a phone number or email address, or tap , then
choose a contact. You can also start a conversation by tapping a phone number in Contacts,
Calendar, or Safari, or from a recent or favorite contact in the multitasking screen.
Note: An alert appears if a message can’t be sent. Tap the alert in a conversation to try
sending the message again.
Use Siri. Say something like:
•“Send a message to Emily saying how about tomorrow”
•“Read my messages”
•“Read my last message from Bob”
•“Reply that’s great news”
Preview a conversation. With iPhones that support Orb (TK), press a conversation in the
Messages list to preview it. Press rmly to open the conversation.
Resume a conversation. Tap the conversation in the Messages list.
Use picture characters. Go to Settings > General > Keyboard > Keyboards > Add New Keyboard,
then tap Emoji to make that keyboard available. When you type a message, tap to change to
the Emoji keyboard. See Special input methods on page 186.
Tap to Talk. Touch and hold to record a message, then swipe up to send it. Tap [play icon] to
listen before you send it. To delete it, swipe left.
To save space, Tap to Talk audio messages that you receive are deleted automatically two
minutes after you listen to them, unless you tap Keep. To keep them automatically, go to
Settings > Messages > Expire (under Audio Messages), then tap Never.
Apple Confidential
Draft
Chapter 9 Messages 82
Raise iPhone to listen or reply to an audio message. Raise iPhone to your ear, as if you were
talking on the phone, to play incoming audio messages automatically. Raise iPhone to your ear
again to reply to an audio message. Turn this feature on or o at Settings > Messages, under
Audio Messages.
See what time a message was sent or received. Drag any bubble to the left.
See a person’s contact info. In a conversation, tap Details, then tap . Tap the info items to
perform actions, such as making a voice or FaceTime call.
Send messages to a group (iMessage and MMS). Tap , then enter multiple recipients. With
MMS, group messaging must also be turned on in Settings > Messages, and replies are sent only
to you—they aren’t copied to the other people in the group.
Give a group a name. While viewing the conversation, tap Details, drag down, then enter the
name in the Subject line.
Add someone to a group. Tap the To eld, then tap Add Contact.
Leave a group. Tap Details, then tap Leave this Conversation.
Keep it quiet. Tap Details, then turn on Do Not Disturb to mute notications for the conversation.
Block unwanted messages. On a contact card, tap Block this Caller. You can see someone’s
contact card while viewing a message by tapping Details, then tapping . You can also
block callers in Settings > Messages > Blocked. You will not receive voice calls, FaceTime
calls, or text messages from blocked callers. For more information about blocking calls, see
support.apple.com/kb/HT5845.
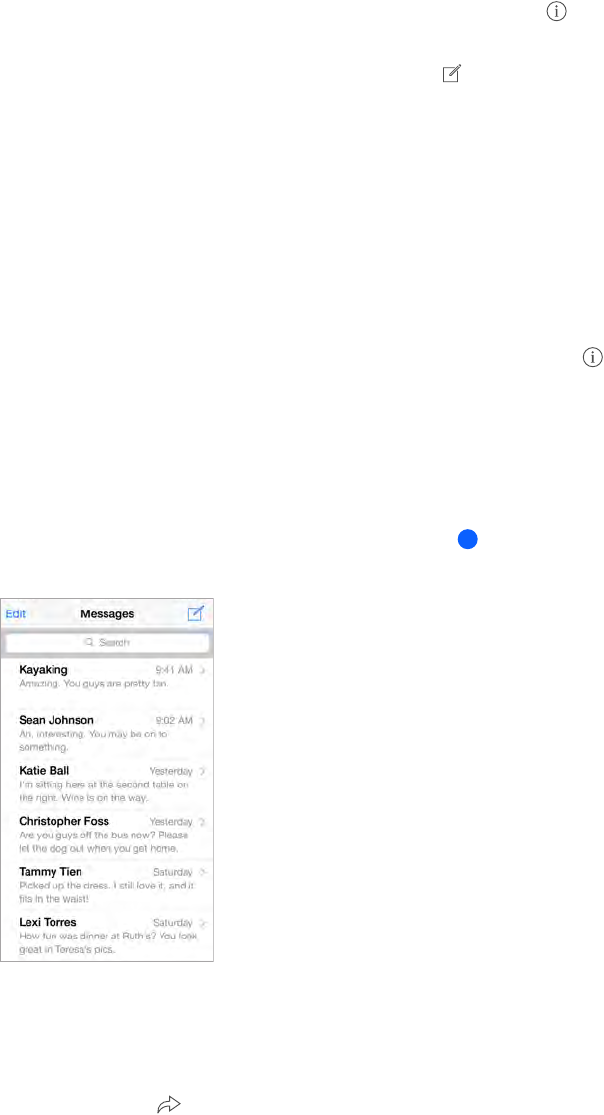
Manage conversations
Conversations are saved in the Messages list. A blue dot indicates unread messages. Tap a
conversation to view or continue it.
View the Messages list. From a conversation, tap Messages or swipe to the right. With
iPhone 6 Plus, you can also rotate iPhone to landscape orientation to see both the Messages list
and the selected conversation.
Forward a message. Touch and hold a message or attachment, tap More, select additional items
if desired, then tap .
Apple Confidential
Draft
Chapter 9 Messages 83
Delete a message or attachment. Touch and hold a message or attachment, tap More, select
additional items if desired, then tap .
Delete a conversation. In the Messages list, swipe the conversation to the left, then tap Delete.
Search conversations. In the Messages list, tap the top of the screen to display the search eld,
then enter the text you’re looking for. You can also search conversations from the Home
screen.
Share photos, videos, your location, and more
With iMessage or MMS, you can send and receive photos and videos, and send locations, contact
info, and voice memos. The size limit of attachments is determined by your service provider—
iPhone may compress photo and video attachments when necessary.
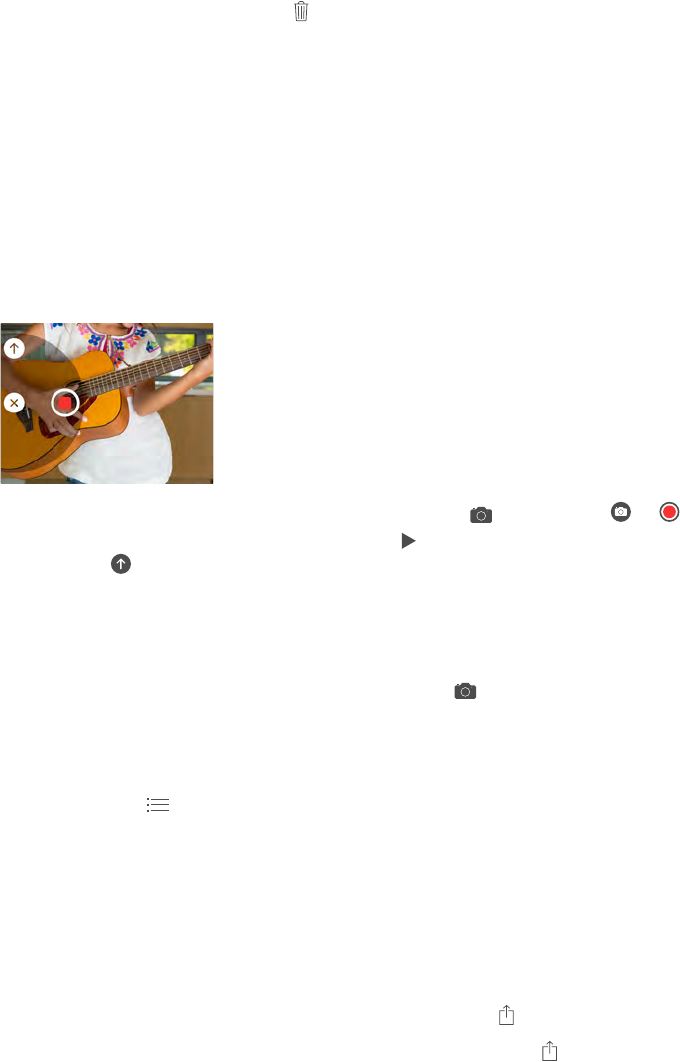
Quickly take and send a photo or video. Touch and hold . Then slide to or to take a
photo or video. Photos are sent immediately. Tap to preview your video. To send your Video
Message, tap .
To save space, Video Messages that you receive are deleted automatically two minutes after you
view them, unless you tap Keep. To keep them automatically, go to Settings > Messages > Expire
(under Video Messages), then tap Never.
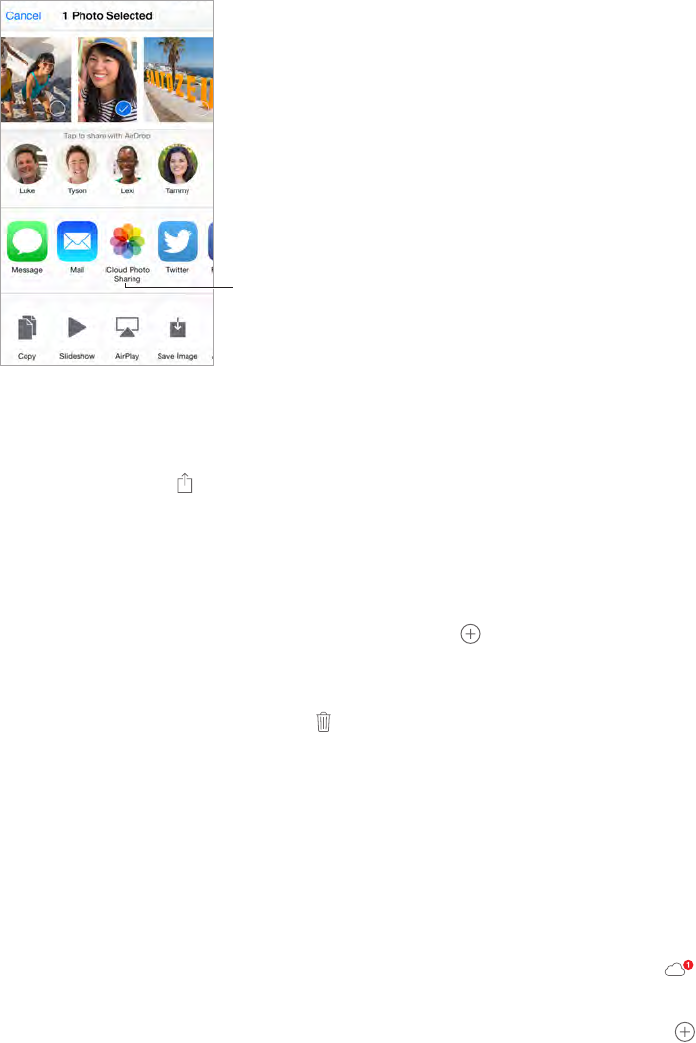
Send photos and videos from your Photos library. Tap . Recent shots are right there; tap
Photo Library for older ones. Select the items you want to send.
View attachments. While viewing a conversation, tap Details. Attachments are shown in reverse
chronological order at the bottom of the screen. Tap an attachment to see it in full screen. In full-
screen mode, tap to view the attachments as a list.
Send your current location. Tap Details, then tap Send My Current Location to send a map that
shows where you are.
Share your location. Tap Details, then tap Share My Location and specify the length of time. The
person you’re texting can see your location by tapping Details. To turn Share My Location on
or o, or to select the device that determines your location, go to Settings > iCloud > Share My
Location (under Advanced).
Send items from another app. In the other app, tap Share or , then tap Message.
Share, save, or print an attachment. Tap the attachment, then tap .
Copy a photo or video. Touch and hold the attachment, then tap Copy.
Messages settings
Go to Settings > Messages, where you can:
•Turn iMessage on or o
•Notify others when you’ve read their messages
Apple Confidential
Draft
Chapter 9 Messages 84
•Specify phone numbers, Apple IDs, and email addresses to use with Messages
•Set SMS and MMS options
•Show the Subject eld
•Block unwanted messages
•Set how long to keep messages
•Filter unknown senders
•Manage the expiration of audio messages and video messages created within Messages
(audio or video attachments created outside of Messages are kept until you delete them
manually)
Manage notications for messages. See Do Not Disturb on page 38.
Set the alert sound for incoming text messages. See Sounds and silence on page 38.
Apple Confidential
Draft
10
85
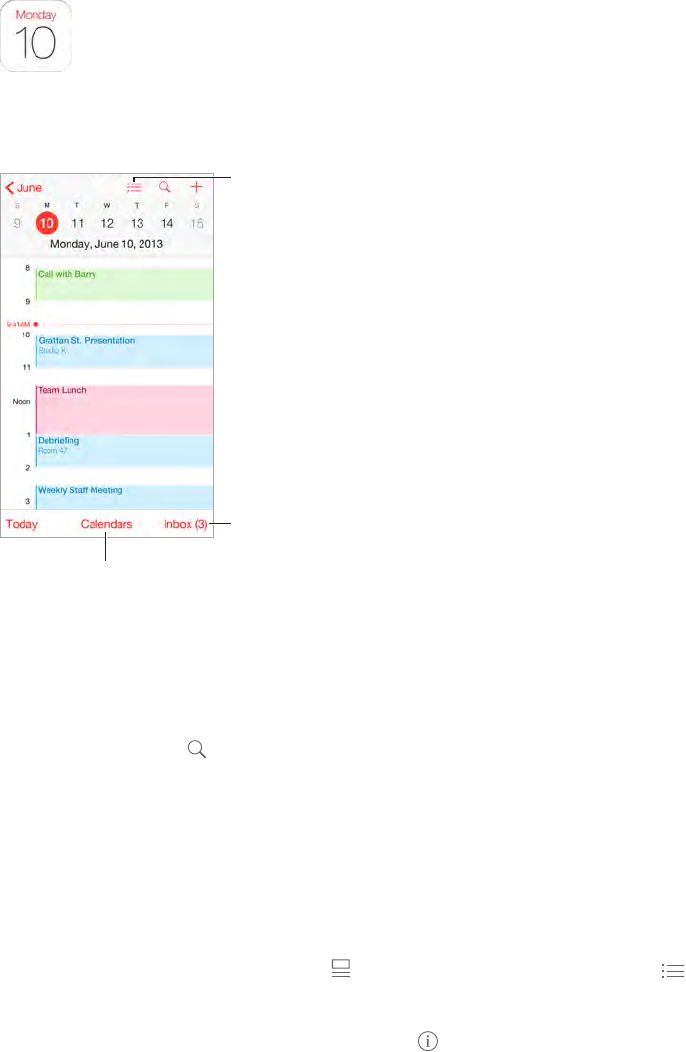
Calendar at a glance
Change calendars
or accounts.
Change calendars
or accounts.
View invitations.
View invitations.
View list of events.
View list of events.
Add an event. In day view, touch and hold on a time until a new event appears, then ll in the
event details. If you add a location for the event, you’ll be reminded in time to leave from your
current location, based on trac conditions.
Use Siri. Say, for example, “Set up a meeting with Barry at 9.”
Search for events. Tap , then enter text in the search eld. The titles, invitees, locations, and
notes for the calendars you’re viewing are searched.
View a weekly calendar. Rotate iPhone sideways.
Change your view. Tap a year, month, or day to zoom in or out on your calendar. In week or day
view, pinch to zoom in or out.
Peek at a day’s events. With iPhones that support Orb (TK), in the monthly calendar, press a date
to see that day’s schedule. Press rmly to open the schedule.
View a list of events. In month view, tap to see a day’s events. In day view, tap .
Use Siri. Say, for example, “What’s on my calendar for Friday?”
Change the color of a calendar. Tap Calendars, tap next to the calendar, then choose a color
from the list. For some calendar accounts, such as Google, the color is set by the server.
Calendar
Apple Confidential
Draft
Chapter 10 Calendar 86
Adjust an event. Touch and hold the event, then drag it to a new time, or adjust the grab points.
Use Siri. Say, for example, “Reschedule my appointment with Barry to next Monday at 9 a.m.”
Invitations
iCloud, Microsoft Exchange, and some CalDAV servers let you send and receive
meeting invitations.
Invite others to an event. Tap an event, tap Edit, then tap Invitees. Type names, or tap to pick
people from Contacts. If you don’t want to be notied when someone declines a meeting, go to
Settings > Mail, Contacts, Calendar > Show Invitee Declines.
RSVP. Tap an event you’ve been invited to, or tap Inbox and tap an invitation. If you add
comments (which may not be available for all calendars), your comments can be seen by the
organizer but not by other attendees. To see events you declined, tap Calendars, then turn on
Show Declined Events.
Schedule a meeting without blocking your schedule. Tap the event, tap Availability, then tap
“free.” Or if it’s an event you created, tap “Show As,” then tap “free.” The event stays on your
calendar, but it doesn’t appear as busy to others who send you invitations.
Quickly send an email to attendees. Tap the event, tap Invitees, then tap .
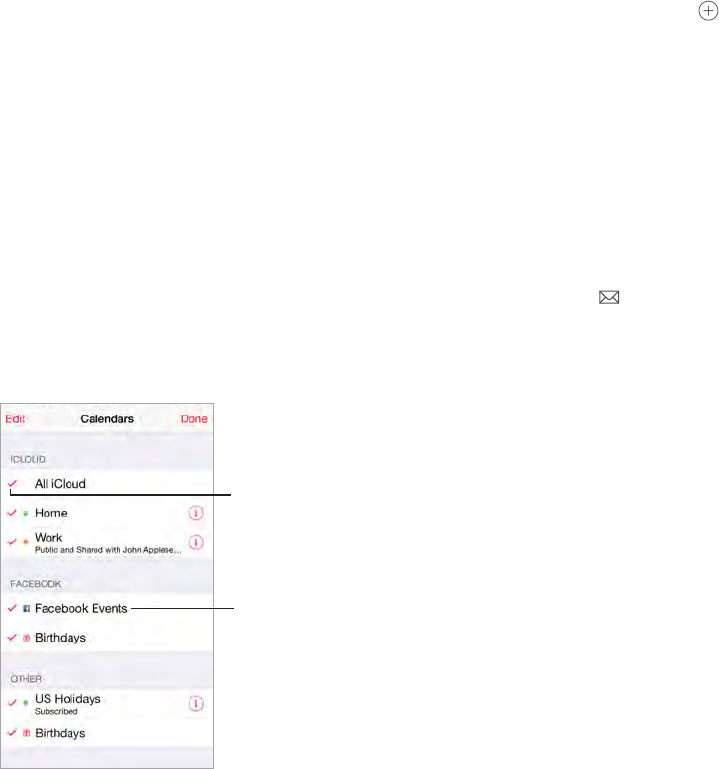
Use multiple calendars
Turn on Facebook
Events in Settings >
Facebook.
Turn on Facebook
Events in Settings >
Facebook.
Select which
calendars to view.
Select which
calendars to view.
Turn on iCloud, Google, Exchange, or Yahoo! calendars. Go to Settings > Mail, Contacts,
Calendars, tap an account, then turn on Calendar.
Subscribe to a calendar. Go to Settings > Mail, Contacts, Calendars, then tap Add Account.
Tap Other, then tap Add Subscribed Calendar. Enter the server and lename of the .ics le to
subscribe to. You can also subscribe to an iCalendar (.ics) calendar published on the web, by
tapping a link to the calendar.
Add a CalDAV account. Go to Settings > Mail, Contacts, Calendars, tap Add Account, then tap
Other. Under Calendars, tap Add CalDAV Account.
Add an OS X Server account. Go to Settings > Mail, Contacts, Calendars, tap Add Account, then
tap Other. Under Servers, tap Add OS X Server Account.
Apple Confidential
Draft
Chapter 10 Calendar 87
View the Birthdays calendar. Tap Calendars, then tap Birthdays to include birthdays from
Contacts with your events. If you set up a Facebook account, you can also include your Facebook
friends’ birthdays.
View the Holidays calendar. Tap Calendars, then tap Holidays to include national holidays with
your events.
View events sent to you in Mail messages. Tap Calendars, then tap Events Found In Mail. To
turn o notications for these events, go to Settings > Notications > Calendar > Events Found
in Mail.
See multiple calendars at once. Tap Calendars, then select the calendars you want to view.
Move an event to another calendar. Tap the event, tap Edit, tap Calendars, then select a calendar
to move it to.
Share iCloud calendars
With Family Sharing, a calendar shared with all the members of your family is created
automatically. See Family Sharing on page 39. You can also share an iCloud calendar with other
iCloud users. When you share a calendar, others can see it, and you can let them add or change
events. You can also share a read-only version that anyone can view.
Create an iCloud calendar. Tap Calendars, tap Edit, then tap Add Calendar in the iCloud section.
Share an iCloud calendar. Tap Calendars, tap Edit, then tap the iCloud calendar you want to
share. Tap Add Person, then enter a name, or tap to browse your Contacts. Those you invite
receive an email invitation to join the calendar, but they need an iCloud account to accept.
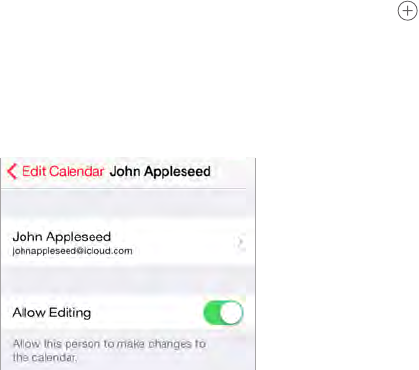
Change a person’s access to a shared calendar. Tap Calendars, tap Edit, tap the shared calendar,
then tap the person. You can turn o his or her ability to edit the calendar, resend the invitation
to join the calendar, or stop sharing the calendar with that person.
Turn o notications for shared calendars. When someone modies a shared calendar,
you’re notied of the change. To turn o notications for shared calendars, go to Settings >
Notications > Calendar > Shared Calendar Changes.
Share a read-only calendar with anyone. Tap Calendars, tap Edit, then tap the iCloud calendar
you want to share. Turn on Public Calendar, then tap Share Link to copy or send the URL for your
calendar. Anyone can use the URL to subscribe to the calendar using a compatible app, such as
Calendar for OS X.
Calendar settings
Several settings in Settings > Mail, Contacts, Calendars aect Calendar and your calendar
accounts. These include:
•Syncing of past events (future events are always synced)
Apple Confidential
Draft
Chapter 10 Calendar 88
•Display of events found in Mail messages
•Default calendar for new events
•Default time for alerts
•Time zone override, to show dates and times using a dierent time zone
•Which day starts the week
•Display week numbers in the monthly calendar
•Display of Chinese, Hebrew, or Islamic dates
Apple Confidential
Draft
11
89
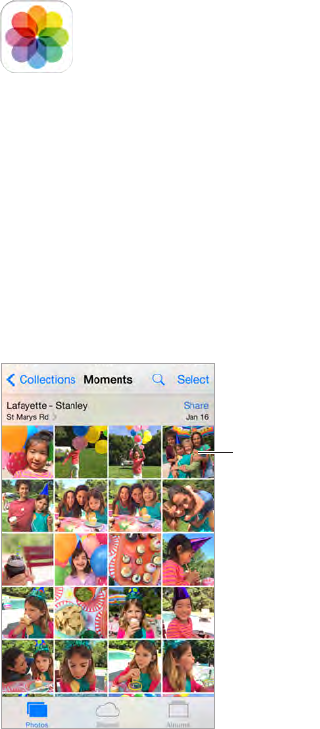
View photos and videos
The Photos app lets you view the photos and videos:
•Taken with Camera on iPhone
•Stored in iCloud (see iCloud Photo Library on page 91)
•Shared from others (see iCloud Photo Sharing on page 92)
•Synced from your computer (see Sync with iTunes on page 22)
•Saved from an email, text message, webpage, or screenshot
Tap to view
full screen.
Tap to view
full screen.
The Photos app includes tabs for Photos, Shared, and Albums.
•Tap Photos to see all your photos and videos, organized by Years, Collections, and Moments. To
quickly browse the photos in a collection or year, touch and hold for a moment, then drag.
•Tap Shared to see photos and videos you shared with others or that others shared with you.
See iCloud Photo Sharing on page 92.
•Tap Albums to see how photos and videos are organized into albums on your iPhone. See
Organize photos and videos, next.
View all your photos and videos. By default, Photos displays a representative subset of your
photos when you view by year or by collection. To see all your photos and videos, go to
Settings > Photos & Camera, then turn o Summarize Photos.
Photos
Apple Confidential
Draft
Chapter 11 Photos 90
Browse through your photos and videos. While viewing a photo, swipe the scrubber to
browse through your other photos. Tap a thumbnail to view it. Drag the photo down to go to
thumbnail view.
Image
Press to preview photos (some models). Press a thumbnail to get a one-up preview of a photo,
then press rmly to go to one-up view.
View by location. While viewing by year or by collection, tap . Photos and videos that include
location information appear on a map, showing where they were taken.
While viewing a photo or video, tap to show and hide the controls. Swipe left or right to go
forward or backward.
Search photos. From Albums or Photos, tap to search by date (month and year), or place (city
and state). Search also keeps your Recent Searches on hand and gives you a list of suggested
searches.
Zoom in or out. Double-tap, or pinch a photo. When you zoom in, you can drag to see other
parts of the photo.
Play a video. Tap . To toggle between full screen and t-to-screen, double-tap the screen.
Play a slideshow. While viewing a photo, tap , then tap Slideshow. Select options, then tap
Start Slideshow. To stop the slideshow, tap the screen. To set other slideshow options, go to
Settings > Photos & Camera.
To stream a slideshow or video to a TV, see AirPlay on page 42.
Organize photos and videos
The Album tab includes albums you create yourself and some albums that are created for you,
depending on how you use Photos. For example, videos are automatically added to the Videos
album and you see a My Photo Stream album if you use that feature (see My Photo Stream, next).
All your photos in iCloud are in the All Photos album if you use iCloud Photo Library (see iCloud
Photo Library on page 91). If you don’t use iCloud Photo Library, you see the Camera Roll album
instead, which includes photos and videos you took with iPhone and from other sources.
Note: If you use iCloud Photo Library, albums are stored in iCloud and are up to date and
accessible on any iOS 8.1 or later device, Mac with OS X Yosemite v10.10.3 or later, and on
iCloud.com using the same Apple ID. See iCloud Photo Library on page 91.
Create a new album. Tap Albums, tap , enter a name, then tap Save. Select photos and videos
to add to the album, then tap Done.
Add items to an existing album. While viewing thumbnails, tap Select, select items, tap Add To,
then select the album.
Manage albums. While viewing your album list, tap Edit.
•Rename an album: Select the album, then enter a new name.
•Rearrange albums: Drag .
•Delete an album: Tap .
Apple Confidential
Draft

Chapter 11 Photos 91
With iCloud Photo Library, you can manage all your albums from any iOS 8.1 or later device set
up with iCloud Photo Library.
Mark your favorites. While viewing a photo or video, tap to automatically add it to the
Favorites album. A photo or video can be part of another album as well as Favorites.
Hide photos you want to keep but not show. Touch and hold a photo, then choose Hide. The
photo is moved to the Hidden album. Touch and hold a hidden photo to Unhide it.
Remove a photo or video from an album. Tap the photo or video, tap , then tap Delete Photo.
The photo or video is removed from the album and from the Photos tab.
Delete a photo or video from Photos. Tap the Photos tab, tap the photo or video, tap , then
tap Delete Photo or Delete Video. Deleted photos and videos are kept in the Recently Deleted
album on iPhone, with a badge showing the remaining days until the item is permanently
removed from iPhone. To delete the photo or video permanently before the days expire, tap the
item, tap Delete, then tap Delete Photo or Delete Video. If you use iCloud Photo Library, deleted
photos and videos are permanently removed from all your devices using iCloud Photo Library
with the same Apple ID.
Recover a deleted photo or video. In the Recently Deleted album, tap the photo or video, tap
Recover, then tap Recover Photo or Recover Video to move the item to the Camera Roll or, if you
use iCloud Photo Library, the All Photos album.
iCloud Photo Library
iCloud Photo Library gives you access to your photos and videos on any iOS 8.1 or later device,
Mac with OS X Yosemite v10.10.3 or later, and on iCloud.com using the same Apple ID. You can
make changes to photos and videos in the Photos app, preserve both the original and edited
versions, and see the changes updated across your devices (see Edit photos and trim videos on
page 94). Store as many photos and videos as your iCloud storage plan allows.
Note: If you turn on iCloud Photo Library, you can’t use iTunes to sync photos and videos
to iPhone.
Turn on iCloud Photo Library. Go to Settings > iCloud > Photos. Or go to Settings > Photos &
Camera.
View photos and videos in iCloud Photo Library. In addition to viewing your photos and videos
in the Photos tab, organized by Years, Collections, and Moments, you can also view them as a
continuous stream, organized by date added, in the All Photos album.
Choose to optimize your storage or keep all your photos and videos in full-resolution on
iPhone. If your iCloud storage plan is over 5 GB, Optimize iPhone Storage is on by default. It
manages your device storage by automatically keeping full-resolution photos and videos in
iCloud and lightweight versions on your iPhone, as space is needed. Tap Download and Keep
Originals to keep your full-resolution originals on your iPhone. Your originals are always stored
in iCloud.
Download a full-resolution photo or video. If you’re not storing original versions on iPhone,
simply pinch to zoom in to 100%, or tap Edit.
Note: To upload photos and videos to iCloud Photo Library, iPhone must be connected to Wi-Fi.
Using a cellular connection, you can download up to 100 MB at a time.
Apple Confidential
Draft

Chapter 11 Photos 92
If your uploaded photos and videos exceed your storage plan, you can upgrade your
iCloud storage. Go to Settings > iCloud > Storage > Change Storage Plan to learn about the
available options.
My Photo Stream
My Photo Stream, turned on by default, automatically uploads new photos and videos to your
other devices that use My Photo Stream.
Turn My Photo Stream on or o. Go to Settings > Photos & Camera, or Settings > iCloud >
Photos.
Note: Photos stored in iCloud count against your total iCloud storage, but photos uploaded to
My Photo Stream don’t count additionally against your iCloud storage.
Use My Photo Stream without iCloud Photo Library. Photos and videos you take with iPhone
are added to the My Photo Stream album when you leave the Camera app and iPhone is
connected to Wi-Fi. Any photos you add—including screenshots and photos saved from email,
for example—also appear in your My Photo Stream album.
Photos and videos added to My Photo Stream on your other devices appear in your My Photo
Stream album on iPhone. iOS devices can keep up to 1000 of your most recent photos in iCloud
for 30 days; you can choose to automatically import these photos to your computer, if you want
to keep them permanently.
Manage My Photo Stream contents. In the My Photo Stream album, tap Select.
•Save your best shots on iPhone: Select the photos, then tap Add To.
•Share, print, or copy: Select the photos, then tap .
•Delete photos: Select the photos, then tap .
Note: Although deleted photos are removed from My Photo Stream on all your devices,
the original photos remain in Photos on the device on which they were originally taken.
Photos that you save to another album on a device or computer are also not deleted. See
support.apple.com/kb/HT4486.
Use My Photo Stream with iCloud Photo Library. If you use iCloud Photo Library on iPhone, you
can use My Photo Stream to upload recent photos and videos and view them on other devices
that do not have iCloud Photo Library enabled.
iCloud Photo Sharing
With iCloud Photo Sharing, you can create albums of photos and videos to share, and subscribe
to other people’s shared albums. You can invite others using iCloud Photo Sharing (iOS 6 or later
or OS X Mountain Lion or later) to view your albums, and they can leave comments if they wish.
If they’re using iOS 7 or OS X Mavericks or later, they can add their own photos and videos. You
can also publish your album to a website for anyone to view. iCloud Photo Sharing works with or
without iCloud Photo Library and My Photo Stream.
Apple Confidential
Draft
Chapter 11 Photos 93
Note: To use iCloud Photo Sharing, iPhone must be connected to the Internet. iCloud Photo
Sharing works over both Wi-Fi and cellular networks. Cellular data charges may apply. See Usage
information on page 197.
Create new
shared albums
or add photos to
existing ones.
Create new
shared albums
or add photos to
existing ones.
Turn on iCloud Photo Sharing. Go to Settings > iCloud > Photos. Or go to Settings > Photos &
Camera.
Share photos and videos. While viewing a photo or video, or when you’ve selected multiple
photos or videos, tap , tap iCloud Photo Sharing, add comments, then share to an existing
shared album or create a new one. You can invite people to view your shared album using their
email address or the mobile phone number they use for Messages.
Enable a public website. Select the shared album, tap People, then turn on Public Website. Tap
Share Link if you want to announce the site.
Add items to a shared album. View a shared album, tap , select items, then tap Done. You can
add a comment, then tap Post.
Delete photos from a shared album. Select the shared album, tap Select, select the photos
or videos you want to delete, then tap . You must be the owner of the shared album, or the
owner of the photo.
Delete comments from a shared album. Select the photo or video that contains the comment.
Touch and hold the comment, then tap Delete. You must be the owner of the shared album, or
the owner of the comment.
Rename a shared album. Tap Shared, tap Edit, then tap the name and enter a new one.
Add or remove subscribers, or turn Notications on or o. Select the shared album, then
tap People.
Subscribe to a shared album. When you receive an invitation, tap the Shared tab , then tap
Accept. You can also accept an invitation in an email.
Add items to a shared album you subscribed to. View the shared album, then tap . Select
items, then tap Done. You can add a comment, then tap Post.
See your Family album. When Family Sharing is set up, a shared album called “Family” is
automatically created in Photos on all family members’ devices. Everyone in the family can
contribute photos, videos, and comments to the album, and be notied whenever something
new is added. For more information about setting up Family Sharing, see Family Sharing on
page 39.
Apple Confidential
Draft

Chapter 11 Photos 94
Other ways to share photos and videos
You can share photos and videos in Mail or Messages, or through other apps you install.
Share or copy a photo or video. View a photo or video, then tap . If you don’t see , tap the
screen to show the controls.
Tap More in Sharing to turn on the apps you want to use for sharing.
The size limit of attachments is determined by your service provider. iPhone may compress
photo and video attachments, if necessary.
You can also copy a photo or video, then paste it into an email or text message (MMS or
iMessage).
Share or copy multiple photos and videos. While viewing by moment, tap Share.
Save or share a photo or video you receive.
•Email: Tap to download it if necessary, then touch and hold the item to see sharing and
other options.
•Text message: Tap the item in the conversation, then tap .
Photos and videos that you receive in messages or save from a webpage are saved to your
Photos tab. They can also be viewed in the Camera Roll or, if you’re using iCloud Photo Library,
the All Photos album.
Edit photos and trim videos
You can edit photos right on iPhone. If your photos are stored in iCloud, your edits are updated
across all your devices set up with iCloud, and both your original and edited versions are saved.
If you delete a photo, it’s deleted from all your devices and iCloud. Photo app extensions can
provide special editing options. See App extensions on page 27.
Edit a photo. View the photo full screen, tap Edit, then tap one of the tools. To edit a photo not
taken with iPhone, tap the photo, tap Edit, then tap Duplicate and Edit.
•Auto-enhance improves a photo’s exposure, contrast, saturation, and other qualities.
•With the Remove Red-eye tool , tap each eye that needs correcting.
•Tap , and Photos suggests an optimal crop, but you can drag the corners of the grid tool to
set your own crop. Move the wheel to tilt or straighten the photo. Tap Auto to align the photo
with the horizon, and tap Reset to undo alignment changes. Tap to rotate the photo 90
degrees. Tap to choose a standard crop ratio, such as 2:3 or Square.
Rotate photo.
Rotate photo.
Move the wheel to
tilt or straighten.
Move the wheel to
tilt or straighten.
Choose a standard
photo format.
Choose a standard
photo format.
Apple Confidential
Draft
Chapter 11 Photos 95
•Photo lters let you apply dierent color eects, such as Mono or Chrome.
•Tap Adjustments to set Light, Color, and B&W (black & white) options. Tap the down arrow,
then tap next to Light, Color, or B&W to choose the element you want to adjust. Move the
slider to the desired eect.
Compare the edited version to the original. Touch and hold the photo to view the original.
Release to see your edits.
Don’t like the results? Tap Cancel, then tap Discard Changes. Tap Done to save changes.
Revert to original. After you edit a photo and save your edits, you can revert to the original
image. Tap the image, tap Edit, then tap Revert.
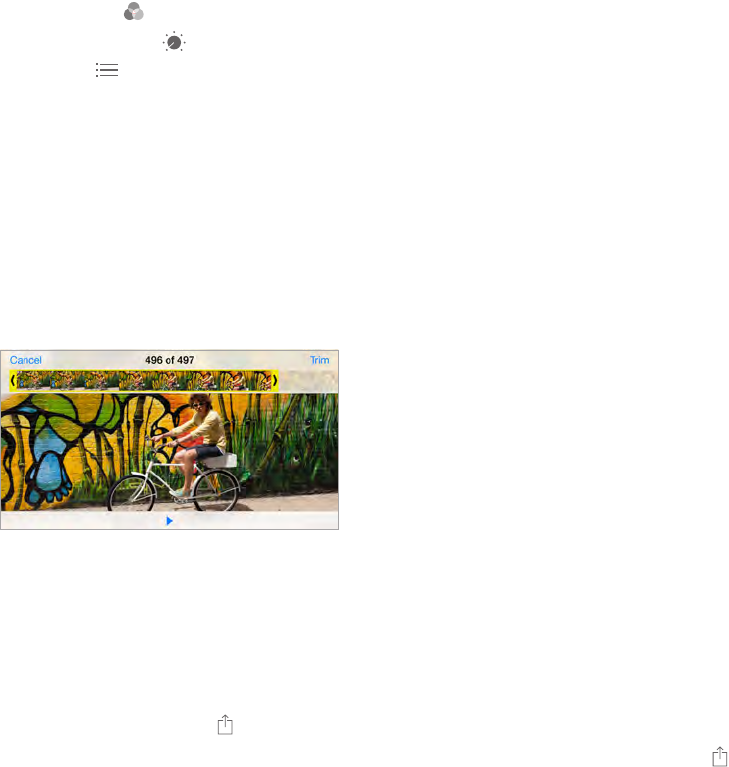
Trim a video. Tap Edit to display the controls, drag either end of the frame viewer, then tap Done.
Tap Save as New Clip to save a new trimmed video clip in your Videos album.
Set the Slo-Mo section of a video. (iPhone 5s or later) Use the vertical bars beneath the frame
viewer to set the section of the video you want to play in slow motion.
Print photos
Print to an AirPrint-enabled printer.
•Print a single photo: Tap , then tap Print.
•Print multiple photos: While viewing a photo album, tap Select, select the photos, tap , then
tap Print.
See AirPrint on page 43.
Photos settings
Settings for Photos are in Settings > Photos & Camera. These include:
•iCloud Photo Library, My Photo Stream, iCloud Photo Sharing, and Upload Burst Photos
•Photos Tab
•Slideshow
•Camera Grid
•HDR (High Dynamic Range)
Apple Confidential
Draft