Apple MacPro(Early2008) Mac Pro (Early 2008) Memory (FB DIMM) DIY Replacement Instructions User Manual Pro(Early2008)Memory(FB DIMM)DIYReplacement Early2008 DIMM
User Manual: Apple MacPro(Early2008) MacPro(Early2008)Memory(FB-DIMM)DIYReplacementInstructions
Open the PDF directly: View PDF ![]() .
.
Page Count: 6
073-1179 Rev. B 1
© 2008 Apple Inc. All rights reserved.
Mac Pro
Memory (FB-DIMM)
Replacement Instructions
Follow the instructions in this document carefully. Failure to follow these instructions could
damage your equipment and void its warranty.
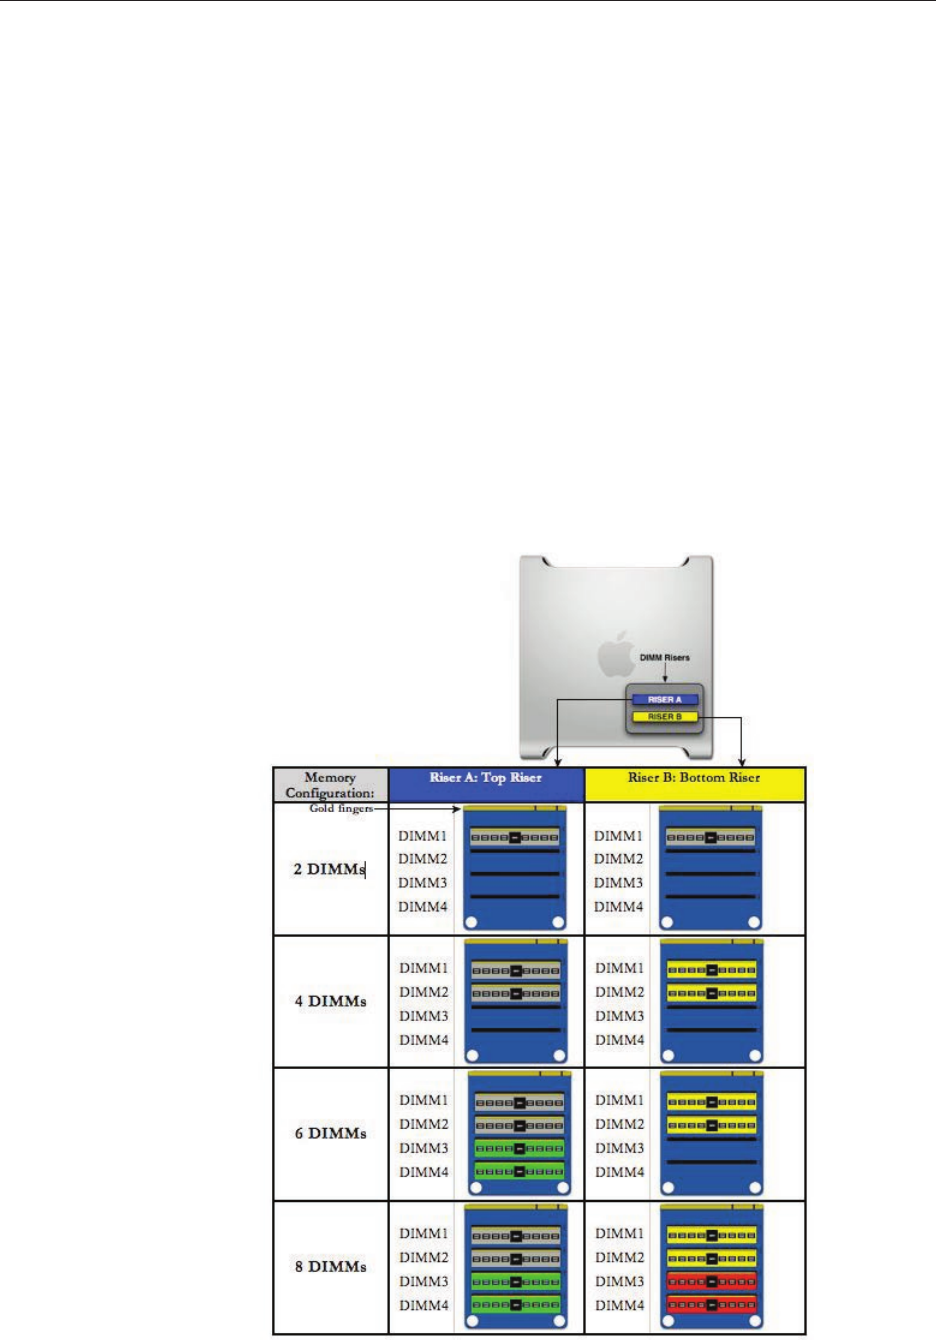
The Mac Pro (Early 2008) computer has two memory riser cards with a total of 8 memory slots.
On each card, the slots are arranged as two banks of two slots each. The computer comes with
a minimum of 2 GB of memory, installed as a pair of 1 GB fully buered, dual inline memory
modules (FB-DIMMs) in two of the DIMM slots. Additional pairs of 1 GB, 2 GB, or 4 GB FB-DIMMs
can be installed in the open DIMM slots, as illustrated below. Maximum memory is 32 GB.
DIMMs must be installed as pairs of identical size and type, from the same vendor. In the
illustration below, like-colored DIMMs must match.

073-1179 Rev. B 2
© 2008 Apple Inc. All rights reserved.
DIMMs for Mac Pro (Early 2008) must t these specications:
800 MHz, DDR2, FB-DIMMs•
72-bit wide, 240-pin modules•
36 memory ICs maximum per DIMM•
Error-correcting code (ECC)•
Memory from older Macintosh computers is not compatible with Mac Pro (Early 2008).
Important: For proper operation of Mac Pro (Early 2008) computers, Apple recommends using
only Apple-approved Mac Pro (Early 2008) FB-DIMMs.
Tools Required
No tools are required for this procedure.
Opening the Computer
Shut down the computer. 1.
Warning: Always shut down the computer before opening it to avoid damaging its
internal components or the components you are installing. Do not open the computer
or attempt to install items inside it while it is on.
Wait 5 to 10 minutes to allow the computer’s internal components to cool. 2.
Warning: After you shut down the system, the internal components can be very hot. You
must let the computer cool down before continuing.
Unplug all external cables from the computer except the power cord.3.
Touch the metal PCI access covers on the back of the computer to discharge any static 4.
electricity from your body.
Important: Always discharge static before you touch any parts or install any
components inside the computer. To avoid generating static electricity, do not walk
around the room until you have nished working and closed the computer.
073-1179 Rev. B 3
© 2008 Apple Inc. All rights reserved.
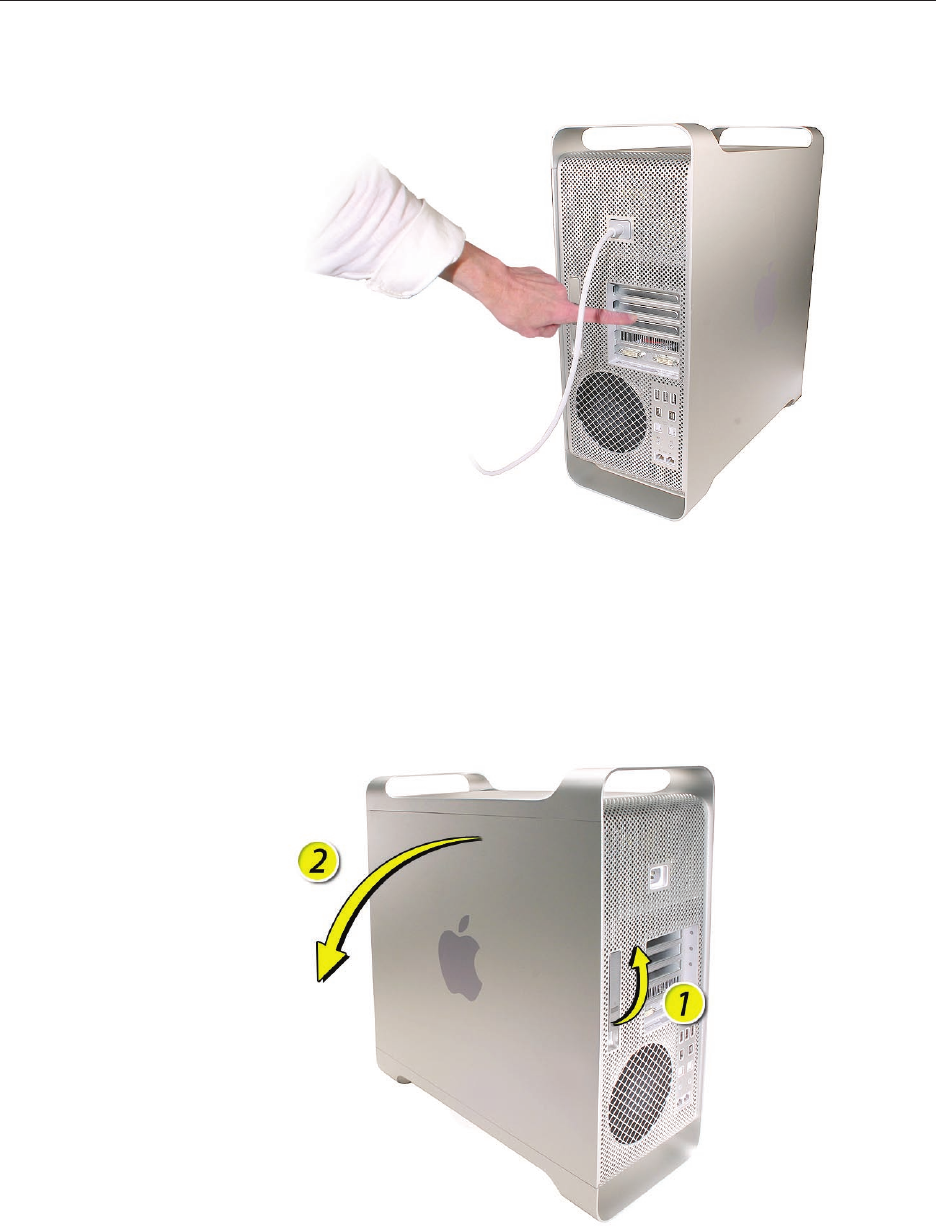
Unplug the power cord.5.
Hold the side access panel and lift the latch on the back of the computer. 6.
Warning: The edges of the access panel and the enclosure can be sharp. Be very careful
when handling them.
Remove the access panel and place it on a at surface covered by a soft, clean cloth.7.
073-1179 Rev. B 4
© 2008 Apple Inc. All rights reserved.
Removing the Installed FB-DIMM
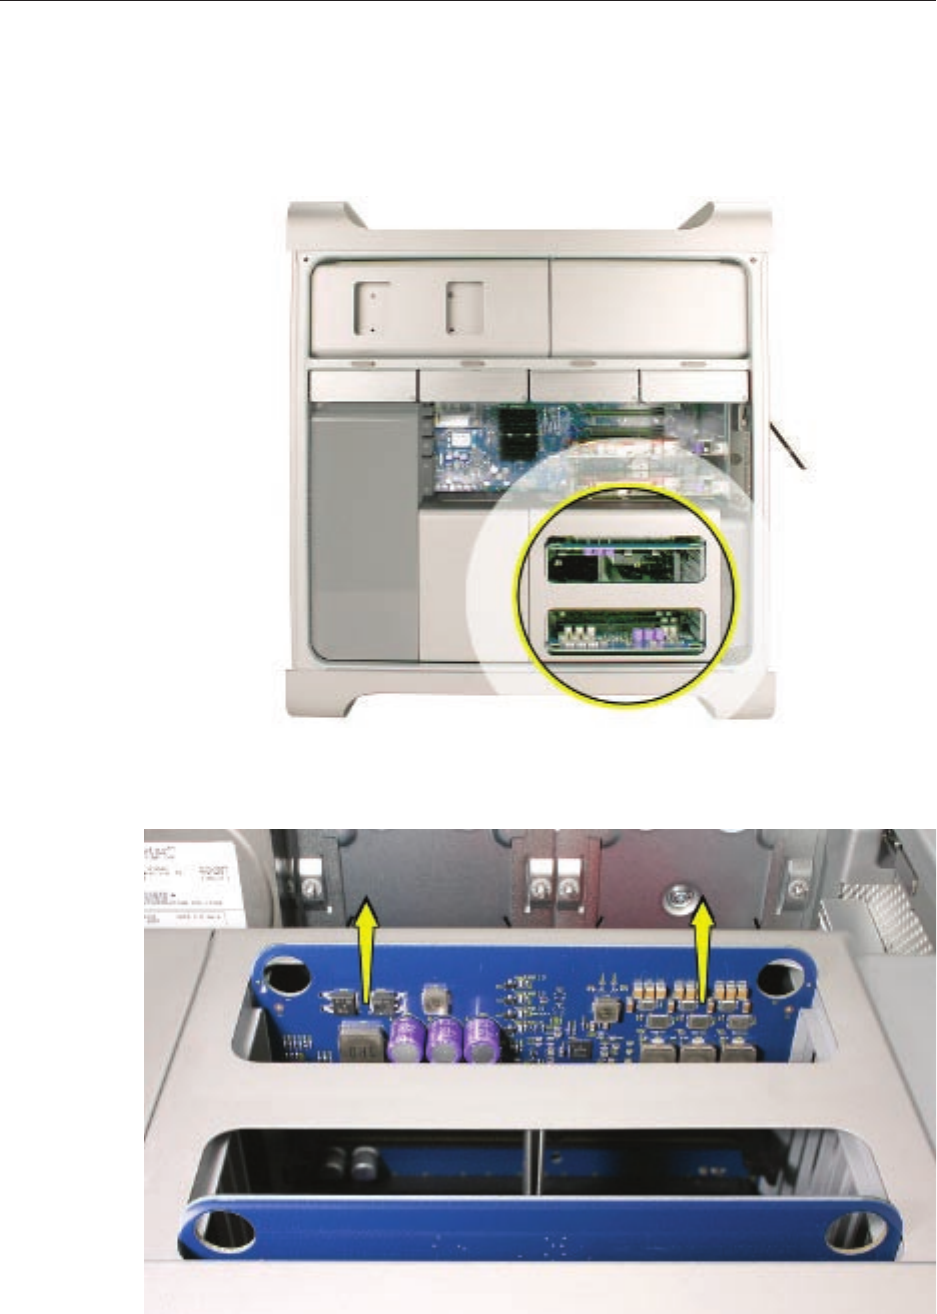
Carefully lay the computer on its side so that the open side faces up. 1.
Locate the FB-DIMMs.2.
Holding the memory riser card by the two nger holes, pull it out of the memory cage and 3.
place the card DIMM-side-up on a soft, clean cloth.
073-1179 Rev. B 5
© 2008 Apple Inc. All rights reserved.
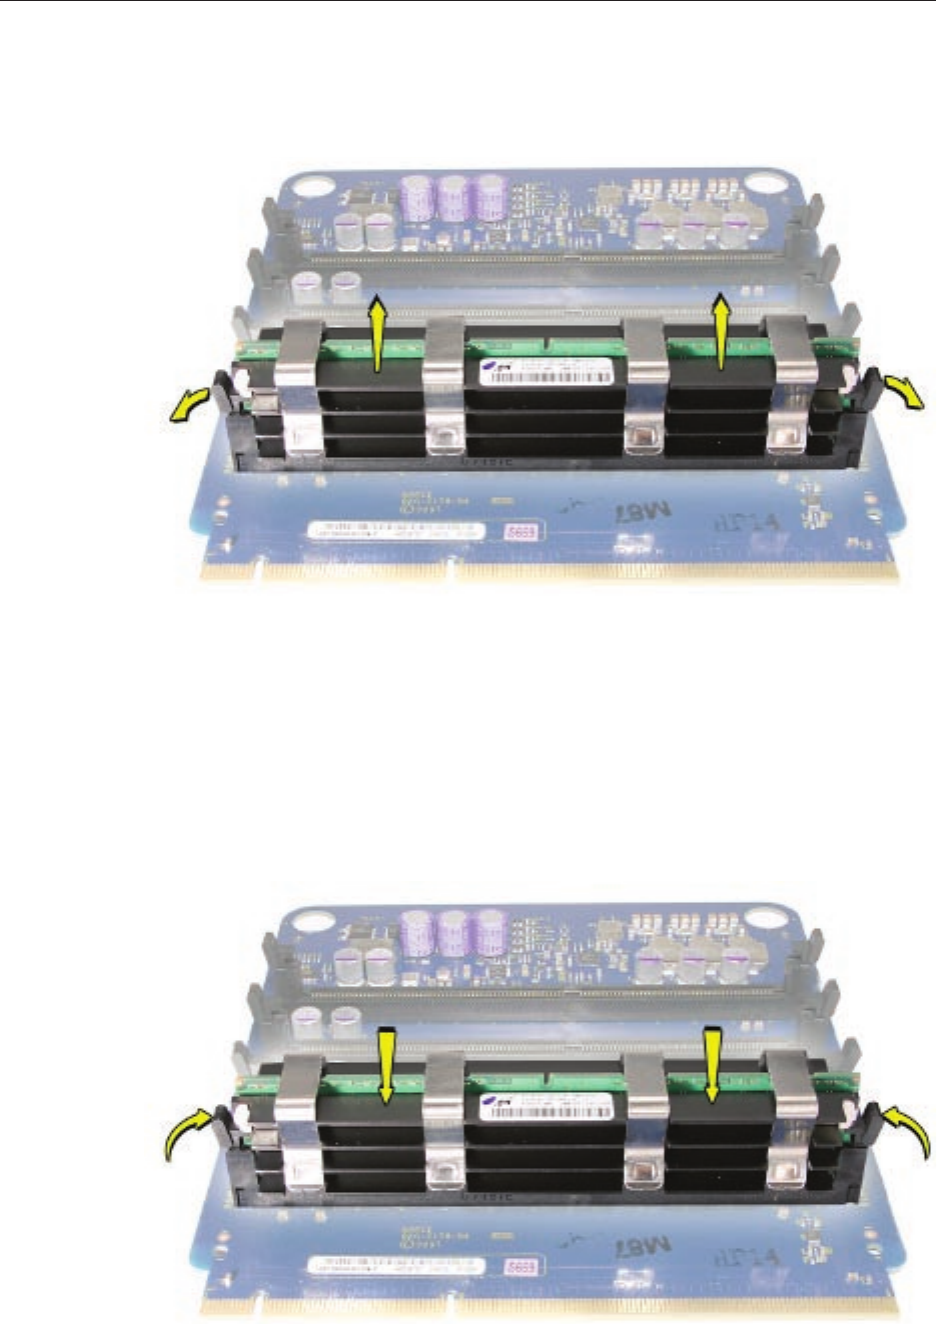
Open the ejectors on the DIMM slot by pushing them out to the sides, and remove the 4.
DIMM from the riser card.
Installing the Replacement FB-DIMM
Warning: FB-DIMMs carry heatsinks on either side of the DIMM. Never attempt to remove
the heatsinks from the DIMMs. Doing so could damage the DIMM.
Align the DIMM in the slot on the riser card and push both ends of the DIMM down until the 1.
ejectors snap back up into place.

073-1179 Rev. B 6
© 2008 Apple Inc. All rights reserved.
Insert the replacement riser card into position in the memory cage, pushing slightly until the 2.
card is seated in its logic board memory slot.
Closing the Computer
Replace the access panel. 1.
Note: Make sure the latch is in the up position before replacing the access panel. If the latch
is down, the access panel will not seat correctly in the enclosure.
Push the latch down to close and secure the access panel. 2.
Warning: Never turn on the computer unless all of its internal and external parts are
in place and it is closed. Operating the computer when it is open or missing parts can
damage it or cause injury.
Apple Inc.
© 2008 Apple Inc. All rights reserved.
This document is protected under U.S. Copyright Law and International Treaties, and no part of
this document may be reproduced in any form without written permission from Apple.
Apple is not responsible for typographical, printing, or inadvertent errors.
Apple Inc.
1 Innite Loop
Cupertino, CA 95014-2084
USA
+ 1 408 996 1010
www.apple.com
Apple, the Apple logo, and Mac are trademarks of Apple Inc., registered in the U.S. and other
countries.
