Apple MacPro(Mid2010) Mac Pro User Manual Pro(Mid2010) Guide Mid2010 Ug
Apple-Apple-Mac-Pro-Mc560Ll-A-Workstation-Mc560Ll-A-Users-Manual-418359 apple-apple-mac-pro-mc560ll-a-workstation-mc560ll-a-users-manual-418359
Apple-Mac-Pro-Mid-2010-Owner-S-Manual apple-mac-pro-mid-2010-owner-s-manual
MD772LLA to the manual 595f861d-b437-4019-9d67-35c167f9916e
User Manual: Apple MacPro(Mid2010) MacPro(Mid2010)-UserGuide
Open the PDF directly: View PDF ![]() .
.
Page Count: 136 [warning: Documents this large are best viewed by clicking the View PDF Link!]
- Contents
- Ready, Set Up, Go
- Life with Your Mac Pro
- Making a Good Thing Better
- Problem, Meet Solution
- An Ounce of Prevention
- Problems with Your Mac Pro
- Problems with Software
- Repairing, Restoring, or Reinstalling Mac OS X Software
- Checking for a Hardware Problem
- Keeping Your Software Up to Date
- Problems with Wi-Fi Communication
- Problems with Your Display
- Problems with Your Internet Connection
- Replacing the Apple Magic Mouse Batteries
- Maximizing Ethernet Performance
- Learning More, Service, and Support
- Locating Your Serial Number
- What’s Under the Hood
- Last, but Not Least
- Looking for Something?
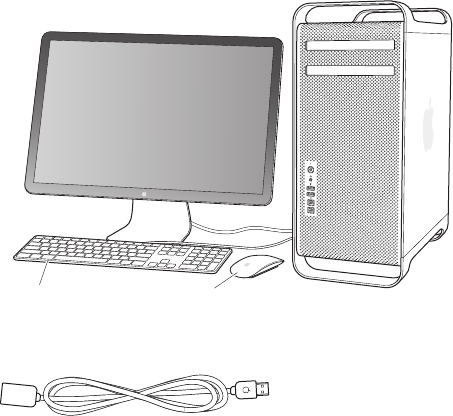
Congratulations, you and your Mac Pro
were made for each other.
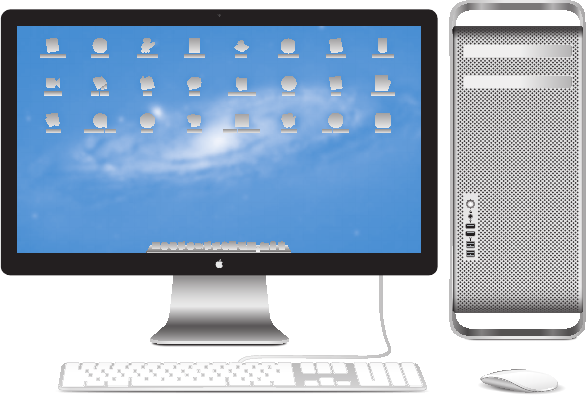
Mac Pro shown with LED Cinema Display, Apple Keyboard with Numeric Keypad, and Magic Mouse.
Welcome to your Mac Pro.
www.apple.com/macpro
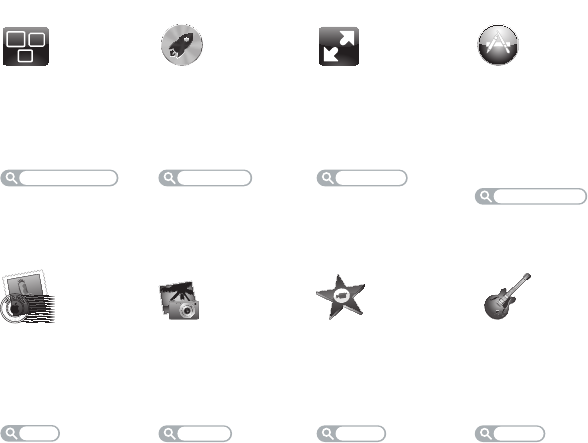
Mission Control
A bird’s-eye view
of what’s running
on your Mac.
Help Center
mission control
OS X Lion
www.apple.com/macosx
Full screen
Make apps
full screen
with a click.
Help Center
full screen
Mac App Store
The best way
to discover
and download
Mac apps.
Help Center
mac app store
launchpad
Launchpad
Instant access
to all your apps
in one place.
Help Center
iPhoto
Organize, edit,
and share
your photos.
iPhoto Help
photos
iMovie
Turn home
videos into home
blockbusters.
iMovie Help
movie
GarageBand
Create great-
sounding songs
with ease.
GarageBand Help
record
Mail
Group your
messages by
conversations.
Help Center
mail
H
E
L
L
O
F
R
O
M
C
U
P
E
R
T
I
N
O
,
C
A
5Contents
Chapter 1: Ready, Set Up, Go
11 SettingUpYourMacPro
21 PuttingYourMacProtoSleeporShuttingItDown
Chapter 2: Life with Your Mac Pro
24 BasicFeaturesontheFrontofYourMacPro
26 FeaturesofYourAppleKeyboard
28 PortsandConnectorsontheBackofYourMacPro
30 MorePortsandConnectorsontheBack
32 InternalExpansionOptions
34 GettingAnswers
Chapter 3: Making a Good Thing Better
39 OpeningYourMacPro
43 InstallingMemory
61 InstallingInternalStorageDevices
74 AddingPCIExpressCards
79 ReplacingtheInternalBackupBattery
Contents
6Contents
Chapter 4: Problem, Meet Solution
82 AnOunceofPrevention
83 ProblemswithYourMacPro
85 ProblemswithSoftware
86 Repairing,Restoring,orReinstallingMacOSXSoftware
91 CheckingforaHardwareProblem
92 KeepingYourSoftwareUptoDate
92 ProblemswithWi-FiCommunication
93 ProblemswithYourDisplay
95 ProblemswithYourInternetConnection
98 ReplacingtheAppleMagicMouseBatteries
99 MaximizingEthernetPerformance
99 LearningMore,Service,andSupport
102 LocatingYourSerialNumber
Chapter 5: What’s Under the Hood
104 Specications

Help Center Migration Assistant
www.apple.com/macpro
Ready, Set Up, Go
1

10 Chapter 1 Ready, Set Up, Go
YourMacProfeaturesthelatestcomputertechnology,includingadvancedmulticore
processortechnology,high-speedmemory,PCIExpressgraphicsandexpansionslots,
andinternalstorage,allinananodizedaluminumchassiswitheasyaccesstointernal
components.
WARNING: Toavoidinjury,readalltheinstallationinstructions(andthesafety
informationstartingonpage116)carefullybeforeyourstuseyourMacPro.
MakesureyoulookovertheinformationinChapter2,“LifewithYourMacPro,”tond
outaboutthenewfeaturesofthisMacPro.
ManyanswerstoquestionscanbefoundonyourMacProinHelpCenter.For
informationaboutHelpCenter,see“GettingAnswers”onpage34.
11Chapter 1 Ready, Set Up, Go
Setting Up Your Mac Pro
YourMacProisdesignedsothatyoucansetitupquicklyandstartusingitrightaway.
Followthestepsonthenextfewpagestogetstarted.
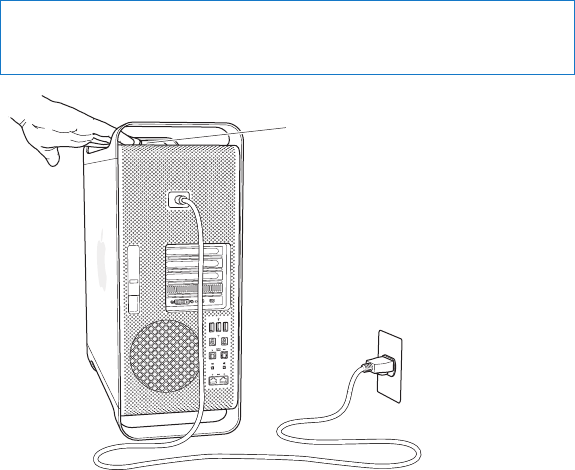
Step 1: Position your Mac Pro and display.
PickupyourMacProbybothofitshandlesusingcorrectliftingtechniques.Usecorrect
liftingtechniqueswhenpositioningyourdisplayaswell.PositionyourMacProand
displaysothat:
ÂTheyareeachonasturdy,atsurface
ÂThepowercableconnectorsdon’tpressagainstawallorotherobject
ÂTheairowinfrontof,behind,andbelowyourMacProandthedisplayis
notobstructed
ÂThecomputer’sopticaldrivetrayshavespacetoopeninfront
TheonlywaytoshutopowercompletelytoyourMacProanddisplayistodisconnect
theirpowerplugsfromthepowersource.MakesurethepowercordsforyourMacPro
anddisplayarewithineasyreachsothatyoucanunplugthem.
12 Chapter 1 Ready, Set Up, Go
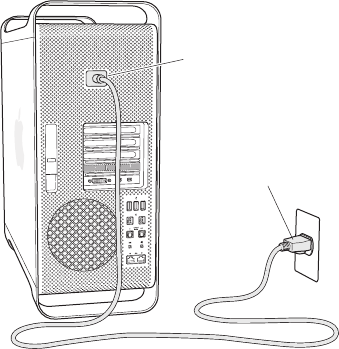
Step 2: Plug in the power cord.
Plugthepowercordcompletelyintotherecessedpowercordsocketonthebackof
yourMacProandplugtheotherendintoagroundedpoweroutlet.
Power cord socket
Power cord plug
13Chapter 1 Ready, Set Up, Go
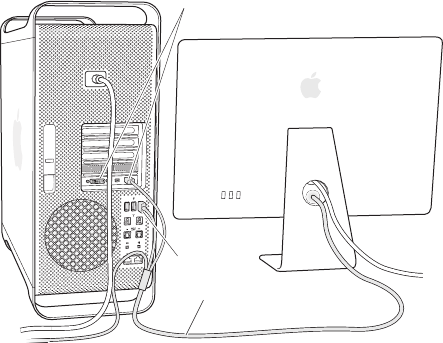
Step 3: Connect the display.
Connectyourdisplayasshownbelow.Dependingonthedisplay,youmayhaveone
ormorecablestoconnect.Checktheinstructionsthatcamewiththedisplayfor
additionalsetupinformation.
Display cable
Display ports
USB port

14 Chapter 1 Ready, Set Up, Go
YoucanconnectuptothreedisplayswithMiniDisplayPortorDigitalVisualInterface
(DVI)connectorstothedisplayportsonthebackofyourMacPro.TheDVIdisplayport
isadual-linkport,soyoucanconnecta30-inchAppleCinemaHDDisplay.
DVI display port Mini DisplayPort (2)
YoucanalsoconnectdisplaysthathaveanAppleDisplayConnector(ADC)oravideo
graphicsarray(VGA)connectorusingoneofthefollowingadapters:
ÂToconnectaVGAdisplaytotheDVIdisplayportoraMiniDisplayPort,usetheApple
DVItoVGADisplayAdapterortheAppleMiniDisplayPorttoVGAAdapter(both
availableseparately).
ÂToconnectanADCdisplaytotheDVIdisplayport,useanAppleDVItoADCDisplay
Adapter(availableseparately).
TheMiniDisplayPortoutputsprovidebothvideoandaudiooutput.Forexample,
usingaMiniDisplayPorttoHDMIadapterandanHDMIcable,youcanconnectyour
computertoanHDTVorAVreceiverthathasanHDMIconnectorandplaybothaudio
andvideo.YoumustusetheSoundpaneinSystemPreferencestoselecttheconnected
deviceforaudiooutput.FormoreinformationaboutconnectinganHDMIdevice,
searchfor“HDMI”ontheMacProSupportpageatwww.apple.com/support/macpro.
DisplayadaptersandotheraccessoriesforyourMacProaresoldseparatelyat
www.apple.com/store.
15Chapter 1 Ready, Set Up, Go
Step 4: Connect an Ethernet cable or join a Wi-Fi network.
ToaccesstheInternetoranetworkusinganEthernetcable,connectoneendofan
EthernetcabletoeitheroftheGigabitEthernetportsonthebackofyourMacPro.
Connecttheotherendtoacablemodem,DSLmodem,orEthernetnetwork.
Gigabit Ethernet ports
16 Chapter 1 Ready, Set Up, Go
Step 5: Connect the USB cable from your keyboard.
ConnectthekeyboardcabletooneoftheUSBports(d)onyourMacProoron
thedisplay.
MouseKeyboard
Ifthekeyboardcableisn’tlongenough,usethekeyboardextensioncablethatcame
withyourMacPro.
Apple keyboard extension cable
17Chapter 1 Ready, Set Up, Go
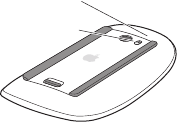
Step 6: Turn on your Apple Magic Mouse.
SlidetheswitchonthebottomofyourAppleMagicMousetoturniton.
YourwirelessmousecomeswithAAbatteriesinstalled,andisalreadypairedwithyour
MacPro.PairingallowsittocommunicatewirelesslywithyourMacPro.
Indicator light
On/off switch
Whenyourstturnonyourmouse,theindicatorlightglowssteadilyfor5seconds,
indicatingthebatteriesaregood.Ifyourmousedoesn’tturnon,makesurethe
batteriesareinstalledproperlyandcharged(seepage98).
TheindicatorlightblinksuntilyouturnonyourMacProandaconnectionisestablished.
IfyoupurchasedanAppleWirelessKeyboardorMagicTrackpad,followtheinstructions
thatcamewiththekeyboardtosetitup.
18 Chapter 1 Ready, Set Up, Go
Step 7: Turn on your Mac Pro.
Pressthepowerbutton(®)onthefrontofyourMacPrototurniton.Ifyourdisplay
mustbeturnedonseparately,turnitonbypressingitspowerbutton.Clickyourmouse
toestablishaconnectionwithyourMacPro.
Note: Ifyourmouseisn’tpaired,followtheonscreeninstructionstopairitwithyour
MacPro.
Step 8: Congure your Mac Pro with Setup Assistant.
ThersttimeyouturnonyourMacPro,SetupAssistantstarts.SetupAssistanthelps
youenteryourInternetinformationandsetupauseraccountonyourMacPro.
YoucantransferinformationfromanotherMacorPCduringsetup.Youcanalsouse
SetupAssistanttotransferinformationfromaTimeMachinebackuporotherdisk.
YoumayhavetoupdatesoftwareiftheotherMacdoesn’thaveMacOSXversion10.5.3
orlaterinstalled.TomigratefromaPC,youneedtodownloadMigrationAssistantfor
Windowsfromwww.apple.com/migrate-to-mac.
AfteryoustartSetupAssistantonyourMacPro,youcanleaveitmidprocesswithout
quitting,movetotheothercomputerifyouneedtoupdateitssoftware,andthen
returntoyourMacProtocompletethesetup.
Ifyoudon’tuseSetupAssistanttotransferinformationwhenyourststartupyour
MacPro,youcandoitlaterusingMigrationAssistant.OpenMigrationAssistantinthe
UtilitiesfolderinLaunchpad.ForhelpusingMigrationAssistant,openHelpCenterand
searchfor“MigrationAssistant.”
19Chapter 1 Ready, Set Up, Go
To set up your Mac Pro:
1 InSetupAssistant,followtheonscreeninstructionsuntilyougettothe“Transfer
InformationtoThisMac”screen.
2 Doabasicsetup,asetupwithmigration,ortransferinformationfromaTimeMachine
backuporotherdisc:
ÂTo do a basic setup,select“Don’ttransfernow”andclickContinue.Followthe
remainingpromptstoselectyourwirelessnetwork,setupanaccount,andexit
SetupAssistant.
ÂTo do a setup with migration,select“FromanotherMacorPC”andclickContinue.
FollowtheonscreeninstructionstoselecttheMacorPCyouwanttomigrate
informationfrom.YourMacorPCmustbeonthesamewiredorwirelessnetwork.
YoucanalsoconnectanotherMacbyusingaFireWirecableandthenrestarting
itintargetdiskmode.TorestartaMacintargetdiskmode,restartthecomputer
whileholdingdowntheTkey.AfterselectingyourMacorPC,followtheonscreen
directionsformigratinginformation.
ÂTo transfer information from a Time Machine backup or another disk,select“Froma
TimeMachinebackuporotherdisk”andclickContinue.Selectthebackuporthe
otherdiskthatyouwanttomigrateinformationfrom,andclickContinue.Followthe
onscreendirectionsfortransferringtheinformation.
Ifyoudon’tintendtokeeporuseyourothercomputer,it’sbesttodeauthorizeitfrom
playingmusic,videos,oraudiobooksthatyou’vepurchasedfromtheiTunesStore.
Deauthorizingacomputerpreventsanysongs,videos,oraudiobooksyou’vepurchased
frombeingplayedbysomeoneelse,andfreesupanotherauthorizationforuse.For
informationaboutdeauthorizing,chooseiTunesHelpfromtheHelpmenuiniTunes.
20 Chapter 1 Ready, Set Up, Go
Afteryou’vesetupyourMacPro,checkforupdatedsoftware.ChooseApple()>
SoftwareUpdatefromthemenubarandfollowtheonscreeninstructions.
Step 9: Customize Your Desktop and Set Your Preferences.
YoucaneasilymakeyourdesktoplookthewayyouwantusingSystemPreferences.
ChooseApple()>SystemPreferencesfromthemenubarorclicktheSystem
PreferencesiconintheDock.SystemPreferencesisyourcommandcenterformost
settingsonyourMacPro.Formoreinformation,chooseHelp>HelpCenterandsearch
for“SystemPreferences”orforthespecicpreferenceyouwanttochange.
Important: YoucansetanoptioninUsers&Groupspreferencestohelpyoureset
yourloginpasswordifyouforgetit.Youshouldsetyourpasswordpreferencessoon
aftersetup.
Need Help Setting Up?
Ifyoudon’tseeanythingonyourscreenoryouthinkyourMacProdidn’tstartup
properly,checkthefollowing:
ÂIsyourMacPropluggedintoapoweroutlet?Ifit’spluggedintoapowerstrip,isthe
powerstripturnedon?
ÂIsthepowercordsecurelypluggedintothebackofyourMacPro?
ÂArethekeyboardanddisplaycablesconnectedcorrectly?
ÂArethebrightnessandcontrastofthedisplayadjustedcorrectly?Ifthedisplayhas
brightnesscontrols,adjustthem.Ifthedisplayhasapowerbutton,makesurethe
displayisturnedon.
21Chapter 1 Ready, Set Up, Go
ÂIfyoustilldon’tseeanythingonyourscreen,restartyourMacPro.Pressandhold
thepowerbutton(®)onyourMacProfor5or6seconds,untilitturnso.Pressthe
powerbutton(®)againtorestart.
ÂIfyouseeablinkingquestionmarkonthescreenoraseriesofashesfromthestatus
light,seeChapter4,“Problem,MeetSolution”onpage81.
Putting Your Mac Pro to Sleep or Shutting It Down
Whenyounishworking,youcanputyourMacProtosleeporshutitdown.
Putting Your Mac Pro to Sleep
Ifyou’llbeawayfromyourMacProforonlyashorttime,putittosleep.Whenyour
MacProisinsleep,thedisplay’sscreenisdark.YoucanquicklywakeyourMacProfrom
sleepandbypassthestartupprocess.
To put your Mac Pro to sleep quickly, do one of the following:
ÂChooseApple()>Sleepfromthemenubar.
ÂPressthepowerbutton(®)onthefrontofyourMacPro.
ÂPresstheControlandEjectkeys,andthenclickSleepinthedialogthatappears.
ÂChooseApple()>SystemPreferences,clickEnergySaver,andsetasleeptimer.

22 Chapter 1 Ready, Set Up, Go
To wake your Mac Pro from sleep, do one of the following:
ÂPressanykeyonthekeyboard.
ÂClickthemouse.
ÂPressthepowerbutton(®)onthefrontofyourMacPro.
WhenyourMacProwakesfromsleep,yourapplications,documents,andcomputer
settingsareexactlyasyouleftthem.
Shutting Down Your Mac Pro
Ifyouwon’tbeusingyourMacProforanextendedperiod,shutitdown.
To turn o your Mac Pro, do one of the following:
ÂChooseApple()>ShutDown.
ÂPresstheControlandEjectkeys,andthenclickShutDowninthedialogthatappears.
NOTICE: DonotturnoyourMacProbyturningotheswitchonapowerstripor
byunpluggingyourMacPro’spowerplug(unlessyoucan’tturnoyourMacProany
otherway).YourlesorsystemsoftwarecouldbedamagedifyourMacProisnot
shutdownproperly.
NOTICE: ShutdownyourMacProbeforemovingit.Movingyourcomputerwhilethe
harddiskisspinningcandamagetheharddisk,causinglossofdataortheinabilityto
startupfromtheharddisk.

Help Center ports
www.apple.com/macpro
Life with Your Mac Pro
2
24 Chapter 2 Life with Your Mac Pro
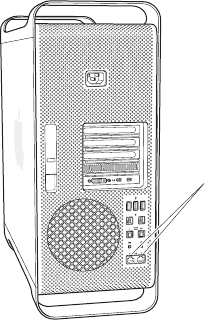
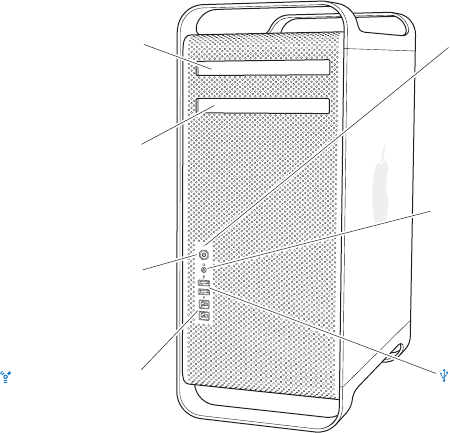
Basic Features on the Front of Your Mac Pro
Optical drive
Headphone jack
Status light
f
®Power button
FireWire 800 ports (2)
Second optical drive
(optional)
USB 2.0 ports (2)

25Chapter 2 Life with Your Mac Pro
Optical drive
YourMacProhasaDVD±RDL/DVD±RW/CD-RWSuperDrive,whichcanreadCD-ROM,
photoCD,audio,andDVDdiscs.Itcanwritemusic,documents,andotherlestoCD-R,
CD-RW,DVD±R,DVD±RW,andDVD±RDoubleLayer(DL)discs.Toopenthedrive,press
theMediaEjectkey(C)onyourAppleKeyboard.IfyourMacProhasasecondoptical
drive,presstheOptionkeyandMediaEjectkey(C)toopenit.
®Power button
PressthisbuttontoturnonyourMacPro,putittosleep,orwakeitfromsleep.Torestart,
pressandholdthisbuttonfor5or6secondsuntilyourMacProturnso,andthenpress
itagaintoturniton.
HTwo FireWire 800 ports
Connecthigh-speedexternaldevices,suchasFireWiredigitalvideo(DV)cameras,
scanners,andexternalharddiskdrives.YoucanconnectanddisconnectFireWiredevices
withoutrestarting.Eachportsupportsdataratesupto800Mbit/s.
dTwo USB 2.0 ports
ConnectaniPod,iPhone,iPad,mouse,keyboard,printer,diskdrive,digitalcamera,
joystick,externalUSBmodem,andmore.YoucanalsoconnectUSB1.1devices.Your
displaymayalsohaveUSBports.
fHeadphone jack
Connectheadphonesorearphoneswithastandard3.5mmconnector.
Status light
AwhitelightindicatesyourMacProison;apulsinglightindicatesit’sinsleep.For
informationaboutaashingstatuslight,see“Ifthecomputerdoesn’trespondorthe
pointerdoesn’tmove”onpage83.
26 Chapter 2 Life with Your Mac Pro
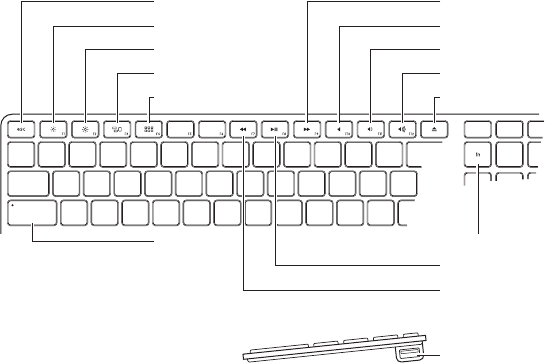
Features of Your Apple Keyboard
Escape
Decrease brightness
Increase brightness
Mission Control
Launchpad
Caps Lock
Fast Forward
Mute
Volume Down
Volume Up
Media Eject
Function
Play/Pause
Rewind
USB port
(both sides)

27Chapter 2 Life with Your Mac Pro
Escape key (esc)
PresstheEscapekey(esc)tocloseamenuwithoutchoosinganitemorcancela
procedure.
Brightness keys (F1, F2)
Increase( )ordecrease( )thebrightnessofyourAppledisplay.
Mission Control key (F3)
OpenMissionControltogetacomprehensiveviewofwhat’srunningonyourMacPro,
includingDashboard,allyourspaces,andallopenwindows.
Launchpad key (F4)
OpenLaunchpadandclickanapplicationtoopenanyapplicationonyourMacPro.
—Mute key (F10)
Mutethesoundcomingfromthebuilt-inspeaker,headphonejack,oraudioports.
-Volume keys (F11, F12)
Increase(-)ordecrease(–)thevolumeofsoundcomingfromthebuilt-inspeaker,
headphonejack,oraudioports.
CMedia Eject key
PressandholdtheMediaEjectkey(C)toremoveadisc.
Function (fn) key
Holddowntoactivatecustomizedactionsassignedtothefunctionkeys(F1toF19).To
learnaboutcustomizingfunctionkeys,chooseHelp>HelpCenterfromthemenubar
andsearchfor“functionkeys.”
’Media keys (F7, F8, F9)
Rewind( ),playorpause(’),orfast-forward( )asong,movie,orslideshow.
Caps Lock key
Presstoengagecapslocksoyoucantypecapitalletters.
dTwo USB 2.0 ports
ConnectamouseandsyncyouriPhone,iPod,iPad,ordigitalcamera.
28 Chapter 2 Life with Your Mac Pro
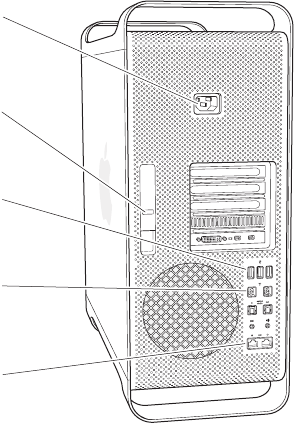
Ports and Connectors on the Back of Your Mac Pro
Power socket
Locking latch
USB 2.0 ports (3)
FireWire 800 ports (2)
G
d
¥
H
Gigabit Ethernet
ports (2)

29Chapter 2 Life with Your Mac Pro
Power socket
ConnectthepowercordthatcamewithyourMacPro.Don’tuseanordinarypowercord
orextensioncord.
¥Locking latch
LiftthelatchtoopenthesidepanelandaccesstheinternalcomponentsinyourMacPro.
Ifyou’reworkinginsideyourMacProandthelatchisdown,thedrivesarelockedin
place.Youcanattachasecuritylock(availableseparately)tothelatchtopreventaccess
andsecuretheinternalcomponents.Youcanalsoattachasecuritycabletothelatchor
throughthehandlesandfeettoprotectyourMacPro.
dThree USB 2.0 ports
ConnectaniPod,iPhone,iPad,mouse,keyboard,printer,diskdrive,digitalcamera,
joystick,externalUSBmodem,andmore.YoucanalsoconnectUSB1.1devices.Your
displaymayalsohaveUSBports.
HTwo FireWire 800 ports
Connecthigh-speedexternaldevices,suchasFireWiredigitalvideo(DV)cameras,
scanners,andexternalharddiskdrives.YoucanconnectanddisconnectFireWiredevices
withoutrestarting.Eachportsupportsdataratesupto800Mbit/s.
GTwo Gigabit Ethernet ports with jumbo frame support
Connecttoahigh-speedEthernetnetwork,aDSLorcablemodem,oranothercomputer.
TheEthernetportautomaticallydetectsEthernetdevicesanddoesn’trequireanEthernet
crossovercable.YoucanaccesstheInternetornetworkresourcessuchasprintersand
servers,andshareinformationoverthenetworkusingaCAT5ecable.
30 Chapter 2 Life with Your Mac Pro
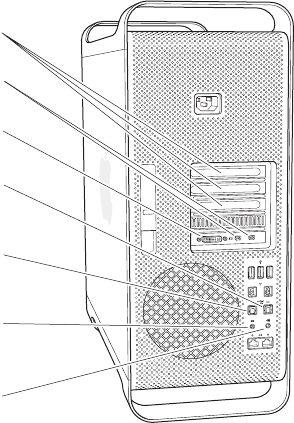
More Ports and Connectors on the Back
PCI Express
expansion slots
Mini DisplayPort (2)
-
,
Optical digital
audio out port
Analog audio
line-in port
Analog audio
line-out port
Optical digital
audio in port
DVI display port
£
£

31Chapter 2 Life with Your Mac Pro
PCI Express expansion slots (3)
ExpandyourMacProbyinstallinguptothreePeripheralComponentInterconnect(PCI)
Expresscardsinthecoveredslotslabeled2,3,and4.
£Mini DisplayPort outputs
ConnectoneortwodisplaysthatuseaMiniDisplayPortconnector,suchastheApple
LEDCinemaDisplay.TheMiniDisplayPortoutputssupportbothvideoandaudiooutput.
YoucanuseadapterstoconnectyourcomputerviatheMiniDisplayPortoutputsto
devicessuchasHDTVsandAVreceiversforbothsoundandaudiooutput.Displayadapters
foryourMacProareavailablefromtheonlineAppleStoreatwww.apple.com/store.
£DVI display port (dual-link)
ConnectadisplaythatusesaDigitalVisualInterface(DVI)connector,suchastheApple
LEDCinemaDisplay,totheDVIdisplayport.DisplayadaptersforyourMacProareavailable
fromtheonlineAppleStoreatwww.apple.com/store.
Optical digital audio in and audio out ports
Connecttodecks,receivers,digitalinstruments,andsurround-soundspeakersystems
usingstandardTOSLINKcablesorber-opticcableswitha3.5mmplasticornylon
opticalplug.YoucantransferstereoorencodedaudiousingtheS/PDIF(Sony/Philips
DigitalInterface)protocolandTOSLINKcables.
,Analog audio line-in port
Connectself-poweredmicrophones,MP3andCDplayers,andotherdeviceswith
analogcapability.
-Analog audio line-out port
Connectself-poweredspeakersandotherdeviceswithanalogcapability.
32 Chapter 2 Life with Your Mac Pro
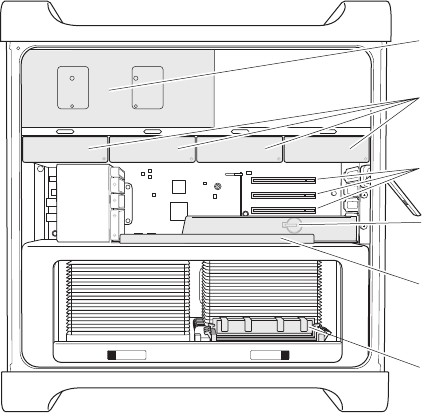
Internal Expansion Options
Drive carriers (4)
Optical drive carrier
Slot 1: Double-wide
PCI Express graphics
(graphics card installed)
Memory slots
(4 or 8 slots depending
on model)
Slots 2–4: PCI Express
Battery
(behind graphics card)

33Chapter 2 Life with Your Mac Pro
Optical drives
YourMacProcomeswithoneortwoDVD±RDL/DVD±RW/CD-RWSuperDrives.To
replaceanopticaldrive,see“ReplacinganOpticalDrive”onpage68.
Hard disk drives or solid state drives
YourMacProcomeswithuptofourdrivesinstalled.Toinstallorreplacedrives,see
“InstallingInternalStorageDevices”onpage61.
PCI Express slots
YourMacProhasthreePCIExpressexpansionslots.ToinstallPCIcardsinslots2through
4,see“AddingPCIExpressCards”onpage74.
Battery
YourMacProusesaninternalbackupbattery.IfyourMacProhastroublestartingup,or
ifthesystemdateandtimearefrequentlyincorrect,youmayneedtoreplacethebattery.
See“ReplacingtheInternalBackupBattery”onpage79.
Double-wide PCI Express graphics slot
ConnectuptotwodisplaystothegraphicscardinthePCIExpressgraphicsslot(slot1).
YoucanreplacethecardinthisslotandinstalladditionalgraphicscardsinPCIslots2
through4.See“AddingPCIExpressCards”onpage74.
Memory slots
YourMacProhasfouroreightmemoryexpansionslots,dependingonthemodel.Toadd
morememory,installPC3-10600E,1333MHz,DDR3ECCSDRAMUDIMMsinthememory
slots.ForinformationaboutthetypeofmemoryusedinyourMacPro,see“Installing
Memory”onpage43.

34 Chapter 2 Life with Your Mac Pro
Getting Answers
MuchmoreinformationaboutusingyourMacProisavailableinHelpCenterandon
theInternetatwww.apple.com/support/macpro.
To open Help Center:
1 ClicktheFindericonintheDock(thebaroficonsalongtheedgeofthescreen).
2 ClicktheHelpmenuinthemenubaranddooneofthefollowing:
ÂTypeaquestionortermintheSearcheld,andchooseatopicfromthelistofresults
orchooseShowAllResultstoseealltopics.
ÂChooseHelpCentertoopentheHelpCenterwindow,whereyoucanbrowseor
searchtopics.
More Information
FormoreinformationaboutusingyourMacPro,seethefollowing:
To learn about See
Installingdrives,memory,
expansioncards,orabattery
Chapter3,“MakingaGoodThingBetter”onpage37.
TroubleshootingyourMacPro
ifyouhaveaproblem
Chapter4,“Problem,MeetSolution”onpage81.
Findingserviceandsupport
foryourMacPro
“LearningMore,Service,andSupport”onpage99.Orseethe
MacProSupportwebsiteatwww.apple.com/support/macpro.
UsingMacOSX TheMacOSXwebsiteatwww.apple.com/macosx.Orsearchfor
“MacOSX”inHelpCenter.
MovingfromaPCtoaMac “Whyyou’llloveaMac”atwww.apple.com/getamac/whymac.

35Chapter 2 Life with Your Mac Pro
To learn about See
UsingiLifeapplications TheiLifewebsiteatwww.apple.com/ilife.OropenaniLife
application,openHelp,andthentypeaquestionorterminthe
searcheld.
ChangingSystemPreferences SystemPreferencesbychoosingApple(K)>SystemPreferences.
Orsearchfor“systempreferences”inHelpCenter.
Usingyourmouseorkeyboard SystemPreferencesandchooseKeyboard&Mouse.Oropen
HelpCenterandsearchfor“mouse”or“keyboard.”
UsingAirPortExtremewireless
technology
TheAirPortSupportpageatwww.apple.com/support/airport.
OropenHelpCenterandsearchfor“AirPort.”
UsingBluetooth®wireless
technology
TheBluetoothSupportpageatwww.apple.com/support/bluetooth.
OropenHelpCenterandsearchfor“Bluetooth.”
Connectingaprinter HelpCenterandsearchfor“printing.”
FireWireandUSBconnections HelpCenterandsearchfor“FireWire”or“USB.”
ConnectingtotheInternet HelpCenterandsearchfor“Internet.”
Usingadisplay HelpCenterandsearchfor“displayport.”
BurningaCDorDVD HelpCenterandsearchfor“burndisc.”
MacProspecications Chapter5,“What’sUndertheHood”onpage103.OrseetheMacPro
specicationspageatwww.apple.com/macpro/specs.html.Or
openSystemInformation(intheUtilitiesfolderinLaunchpad),
andthenclickMoreInfo.
Applenews,freedownloads,
andonlinecatalogs
TheApplewebsiteatwww.apple.com.
Instructions,technicalsupport,
andproductmanuals
TheAppleSupportwebsiteatwww.apple.com/support.

Help Center RAM
www.apple.com/store
Making a Good Thing Better
3

38 Chapter 3 Making a Good Thing Better
UsetheinformationinthischaptertocustomizeandexpandyourMacPrototyour
needs.Youcanndinformationaboutimportantproceduresinthefollowingsections:
“OpeningYourMacPro”onpage39
“InstallingMemory”onpage43
“InstallingInternalStorageDevices”onpage61
“AddingPCIExpressCards”onpage74
“ReplacingtheInternalBackupBattery”onpage79
WARNING: ApplerecommendsthatyouhaveanApple-certiedtechnicianinstall
memory,PCIExpresscards,andinternalstoragedevices.TocontactanApple
AuthorizedServiceProviderorAppleforservice,see“LearningMore,Service,and
Support”onpage99.Ifyouinstalltheseitemsyourself,youriskdamagingyour
equipment,andsuchdamageisnotcoveredbythelimitedwarrantyonyour
computer.SeeanAppleAuthorizedResellerorAppleAuthorizedServiceProviderfor
additionalinformationaboutthisoranyotherwarrantyquestion.

39Chapter 3 Making a Good Thing Better
Opening Your Mac Pro
1 BeforeyouopenyourMacPro,shutitdownbychoosingApple()>ShutDown.
NOTICE: AlwaysshutdownyourMacProbeforeopeningittoavoiddamaging
itsinternalcomponentsorthecomponentsyouwanttoinstall.Donotopenyour
MacProorattempttoinstallitemsinsideitwhileitison.
2 Wait5to10minutestoallowtheinternalcomponentsofyourMacProtocool.
WARNING: LetyourMacProcooldownbeforeyoutouchtheinternalcomponents,
whichmaybeveryhot.
40 Chapter 3 Making a Good Thing Better
3 TouchthemetalontheoutsideofyourMacProtodischargeanystaticelectricity.
NOTICE: Alwaysdischargestaticbeforeyoutouchpartsorinstallcomponentsinside
yourMacPro.Toavoidgeneratingstatic,don’twalkaroundtheroomuntilyounish
installingthecards,memory,orinternalstoragedeviceandreplacethesidepanel.
Touch the metal
case to discharge
static.
41Chapter 3 Making a Good Thing Better
4 UnplugallthecablesandthepowercordfromyourMacPro.
WARNING: Toavoiddamaginginternalcomponentsorthecomponentsyouwant
toinstall,alwaysunplugyourMacPro.Don’tattempttoinstallitemswhileit’s
pluggedin.
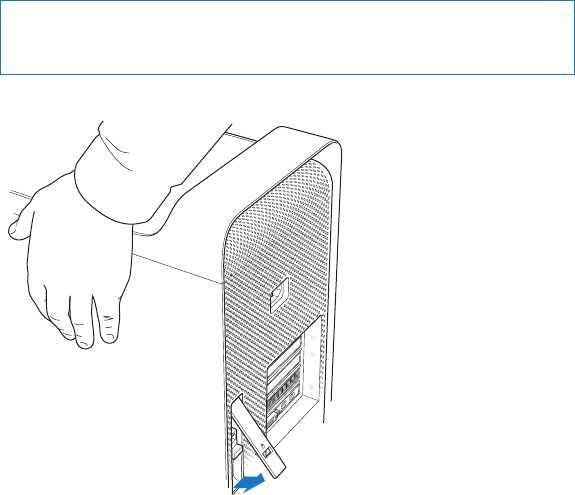
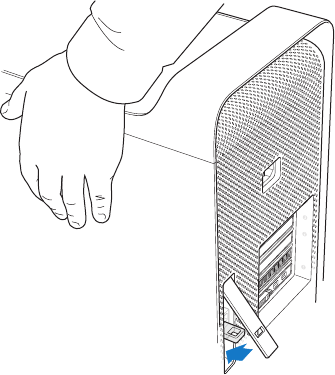
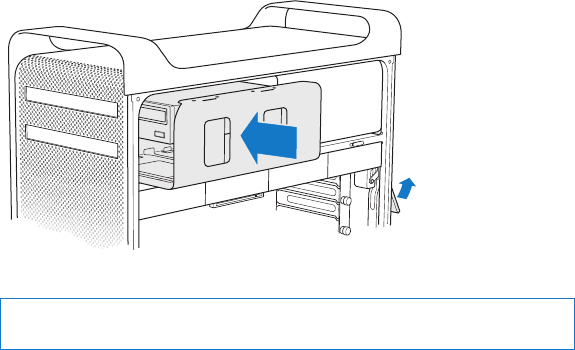
5 Holdthesidepanelandliftthelatchontheback.
42 Chapter 3 Making a Good Thing Better
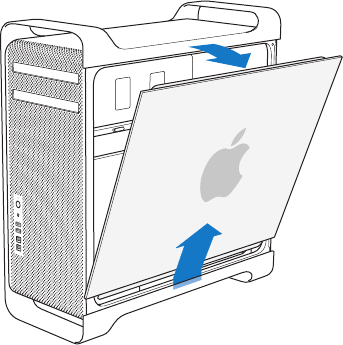
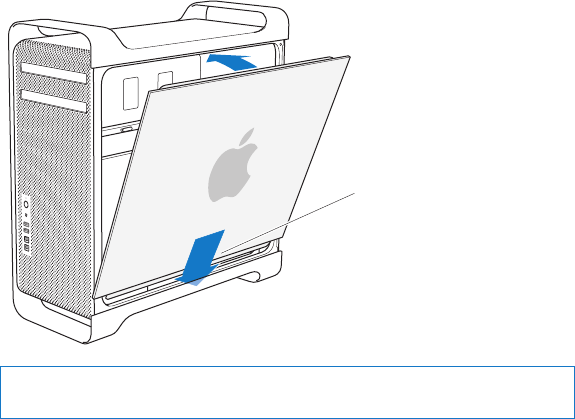
6 RemovethesidepanelbypullingthetopawayfromyourMacProandliftingup.
Important: Whenyouremovethesidepanel,holditsecurely.

43Chapter 3 Making a Good Thing Better
Installing Memory
YourMacProcomeswithaminimumof3GBofmemoryinthesingle-processor
model,oraminimumof6GBofmemoryinthedual-processormodel,installedas
1GBunbueredECCdualinlinememorymodules(UDIMMs).
AllinstalledUDIMMsmustmeetthesespecications:
ÂPC3-10600E,1333MHz,DDR3SDRAMUDIMMs
ÂError-correctingcode(ECC)
Â72-bitwide,240-pinECCmodules
Â36ICsmaximumperECCUDIMM
NOTICE: ApplerecommendsthatyouuseApple-approvedDIMMs.DIMMsfromolder
MaccomputerscannotbeusedinyourMacPro.YoucanpurchaseApple-branded
memoryonlinefromtheAppleStoreatwww.apple.com/store.
WhenpurchasingDIMMsforuseinMaccomputers,makesurethatthememoryvendor
conformstotheJointElectronDeviceEngineeringCouncil(JEDEC)specication.Check
withyourmemoryvendortoensurethattheDIMMssupportthecorrecttimingmodes
andthattheSerialPresenceDetect(SPD)featurehasbeenprogrammedproperly,as
describedintheJEDECspecication.
Note: AlthoughthememoryspeedoftheUDIMMSis1333MHz,theywilloperateat
1066MHzor1333MHzdependingontheprocessorinthecomputer.
44 Chapter 3 Making a Good Thing Better
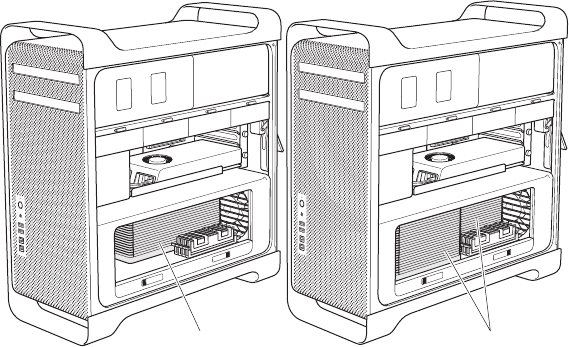
Beforeyouinstallmemory,determinewhetheryouhaveasingle-ordual-processor
MacPro.Removethesidepanel,followingtheinstructionsin“OpeningYourMacPro”
onpage39,andlookinside:
ÂAquad-coreor6-coreMacProhasoneprocessorandfourmemoryslots.Youcan
installatotalofupto16GBofmemory.See“InstallingMemoryinaQuad-Coreor
6-CoreMacPro”onpage45.
ÂAn8-coreor12-coreMacProhastwoprocessorsandeightmemoryslots.Youcan
installatotalofupto32GBofmemory.See“InstallingMemoryinan8-Coreor
12-CoreMacPro”onpage54.
One processor Two processors

45Chapter 3 Making a Good Thing Better
YoucanalsodeterminewhichMacProyouhavebychoosingApple()>AboutThis
Macfromthemenubar.ClickMoreInfo,chooseHardwarefromtheContentslist,and
thenndNumberOfProcessorsinHardwareOverview.Thequad-coreand6-core
MacProhaveoneprocessorandthe8-coreand12-coreMacProhavetwoprocessors.
Installing Memory in a Quad-Core or 6-Core Mac Pro
Thequad-coreand6-coreMacProhavefourmemoryslots,andcomewithatleast
three1GBDIMMsinstalled.Youcanreplaceorinstalladditional1GB,2GBor4GB
DIMMsforatotalofupto16GBofmemory.
It’simportantthatallDIMMsinstalledinyourMacProareofthecorrectspecications.
UsetheinstructionsthatfollowtoinstallDIMMsinaquad-coreor6-coreMacPro.
To install memory:
1 ShutdownyourMacPro,openit,andremovethesidepanel,followingtheinstructions
in“OpeningYourMacPro”onpage39.
WARNING: LetyourMacProcooldownfor5to10minutesbeforeyouremovethe
processortrayortouchtheinternalcomponents.Theprocessortrayandcomponents
maybeveryhot.
46 Chapter 3 Making a Good Thing Better
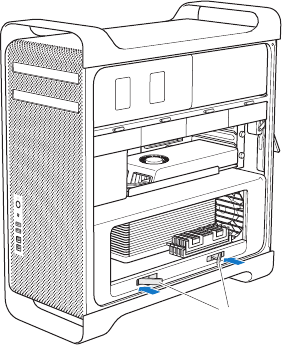
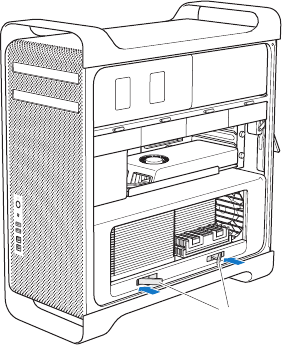
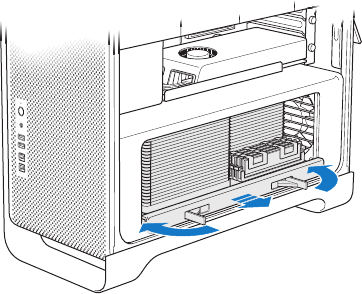
2 Pushthelatchesontheprocessortrayuntiltheypartiallyopen.
Latches
47Chapter 3 Making a Good Thing Better
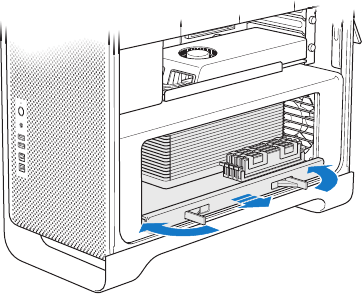
3 Pullthelatchesuntiltheyopenallthewayandreleasetheprocessortray.
48 Chapter 3 Making a Good Thing Better
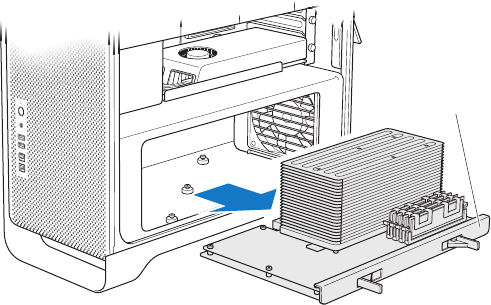
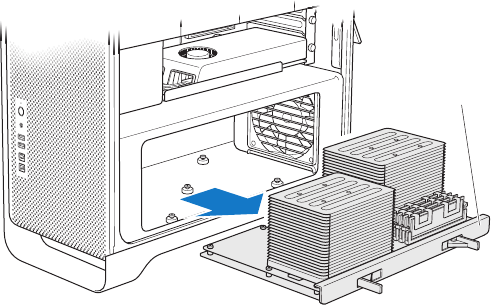
4 Removetheprocessortrayandlayitonasoft,cleanclothonthedeskorworksurface,
toprotectthetrayandavoidscratchingtheworksurface.
Processor tray
49Chapter 3 Making a Good Thing Better
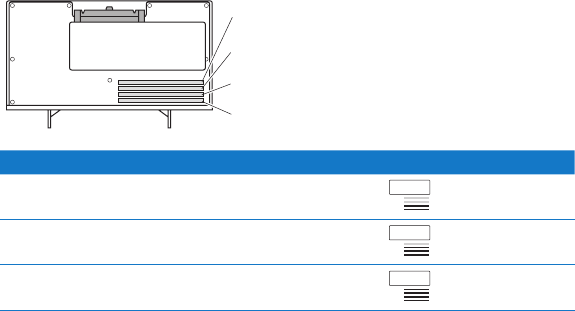
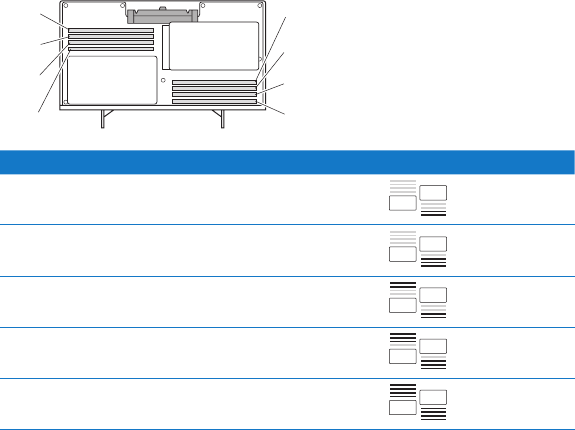
Ifyouinstallequal-sizeDIMMs(forexample,all1GBDIMMSorall2GBDIMMS)inyour
quad-coreor6-coreMacPro,Applerecommendsthatyoulltheslotsintheorder
listedinthetable.
Slot 4
Slot 3
Slot 2
Slot 1
If you have Fill these slots
TwoDIMMs 1and2
ThreeDIMMs 1,2,and3
FourDIMMs 1,2,3,and4(all)
Note: Ifyouinstalldierent-sizeDIMMsinyourMacPro,followtheorderinthetable.
IftheDIMMcongurationyouinstalldoesn’tprovideoptimizedperformance,the
MemorySlotUtilityappearsonscreenandrecommendsanimprovedconguration.
Tousetheutilityagain,goto/System/Library/CoreServices/MemorySlotUtility.

50 Chapter 3 Making a Good Thing Better
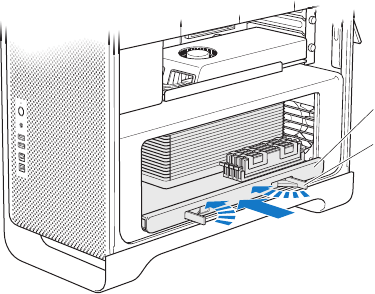
5 OpentheejectorsonDIMMslots1,2,and3andpushthemouttothesides.Then
removetheDIMMsfromtheslots.
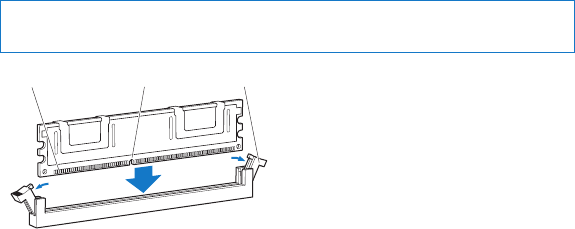
6 InstalltheDIMMsbyaligningthemintheDIMMslotsandpushingbothendsofthe
DIMMdownuntilthetabsareverticalandtheejectorssnapintoplace.
NOTICE: ToavoiddamagingtheDIMM,holditbythecornersanddon’ttouchthe
goldconnectorsorothercomponents.
EjectorsNotchConnectors
51Chapter 3 Making a Good Thing Better
7 Reinstalltheprocessortray,pushingitinuntilthelatchesareata90-degreeangle.
Processor tray
Latch
8 Pushthelatchesallthewayintoclosethemandseattheprocessortray.
52 Chapter 3 Making a Good Thing Better
9 Replacethesidepanel.
Whenyoureplacethesidepanel,makesurethelatchisup.Holdthesidepanel
securelysoitstaysinplaceasyoupushthelatchdown.
Place the side panel
in the slot and then
push to close.
NOTICE: Alwaysreplacethesidepanelafterinstallingcomponents.YourMacPro
doesn’toperateproperlywithoutthesidepanelinplace.
53Chapter 3 Making a Good Thing Better
10 HoldthesidepanelagainstyourMacProandpushthelatchdowntosecurethe
sidepanel.
Youcanattachalockorcablethroughametalloop(underthelatch)tosecureyour
MacPro.Flipthemetalloopdownbeforeyouclosethelatch,thenclosethelatchand
attachyourlockorcablethroughtheextendedloop.

54 Chapter 3 Making a Good Thing Better
Installing Memory in an 8-Core or 12-Core Mac Pro
The8-coreand12-coreMacProhaveeightmemoryslots,and,inmostcongurations,
comewithatleastsix1GBDIMMsinstalled.Youcaninstallatotalofupto32GB
ofmemory.
It’simportantthatalltheDIMMsinstalledinyourMacProhavethecorrectspecications.
UsetheinstructionsthatfollowtoinstallDIMMsinan8-coreor12-coreMacPro.
To install memory in a dual-processor Mac Pro:
1 ShutdownyourMacPro,openit,andremovethesidepanel,followingtheinstructions
in“OpeningYourMacPro”onpage39.
WARNING: LetyourMacProcooldownfor5to10minutesbeforeyouremovethe
processortrayortouchtheinternalcomponents.Theprocessortrayandcomponents
maybeveryhot.
55Chapter 3 Making a Good Thing Better
2 Pushthelatchesontheprocessortrayuntiltheyopenslightly.
Latches
56 Chapter 3 Making a Good Thing Better
3 Pullthelatchesuntiltheyopenallthewayandreleasetheprocessortray.
57Chapter 3 Making a Good Thing Better
4 Removetheprocessortrayandlayitonasoft,cleanclothonthedeskorworksurface,
toprotectthetrayandavoidscratchingtheworksurface.
Processor tray
58 Chapter 3 Making a Good Thing Better
Ifyouinstallequal-sizeDIMMs(forexample,all1GBDIMMSorall2GBDIMMS)inyour
8-coreor12-coreMacPro,Applerecommendsthatyoulltheslotsintheorderlisted
inthetable.
Slot 4
Slot 3
Slot 2
Slot 1
Slot 5
Slot 6
Slot 7
Slot 8
If you have Fill these slots
TwoDIMMs 1and2
ThreeDIMMs 1,2,and3
FourDIMMs 1,2,and5,6
SixDIMMs 1,2,3,and5,6,7
EightDIMMs 1,2,3,4,and5,6,7,8(all)
59Chapter 3 Making a Good Thing Better
Note: Ifyouinstalldierent-sizeDIMMsinyourMacPro,followtheorderinthetable.
IftheDIMMcongurationyouinstalldoesn’tprovideoptimizedperformance,the
MemorySlotUtilityappearsonscreenandrecommendsabetterconguration.
Tousetheutilityagain,goto/System/Library/CoreServices/MemorySlotUtility.
5 InstalltheDIMMsbyaligningthemintheDIMMslotsandpushingbothendsofthe
DIMMdownuntilthetabsareverticalandtheejectorssnapintoplace.
NOTICE: ToavoiddamagingtheDIMM,holditbythecornersanddon’ttouchthe
goldconnectorsorothercomponents.
EjectorsNotchConnectors

60 Chapter 3 Making a Good Thing Better
6 Reinstalltheprocessortray,pushingitinuntilthelatchesareata90-degreeangle.
7 Pushthelatchesallthewayintoclosethemandseattheprocessortray.
Processor tray
Latch
8 Replacethesidepanel,followingtheinstructionsstartingonpage52.
NOTICE: Alwaysreplacethesidepanelafterinstallingcomponents.YourMacPro
doesn’toperateproperlywithoutthesidepanelinplace.
61Chapter 3 Making a Good Thing Better
Installing Internal Storage Devices
YourMacProhasroomforsixinternaldrives:twoopticaldrives,andfourharddiskor
solidstatedrives.Inmostcongurations,asingledriveoccupiestherstdrivebayand
anopticaldriveislocatedintheupperopticaldrivebay.
Youcanadduptothree3.5-inchcable-freeSerialATA(SATA)harddiskdrivestothe
emptydrivebays.Thedrivesmustmeetthesespecications:
ÂType:SATA3Gb/s
ÂWidth:3.9inches(102mm)
ÂDepth:5.7inches(147mm)
ÂHeight:1.0inch(25.4mm)
Youcanadduptothree2.5-inchsolidstatediskdrives(SSDs)totheemptydrivebays.
Thedrivesmustmeetthesespecications:
ÂType:SATA3Gb/s
ÂWidth:2.5inches(63.5mm)
Thesolidstatedrives(SSD)comewithadaptersthattthe3.5-inchdrivebays.
Formoreinformationaboutrequirementsorsupporteddevices,visitanApple
AuthorizedReseller,theAppleStoreatwww.apple.com/store,ortheMacProSupport
websiteatwww.apple.com/support/macpro.

62 Chapter 3 Making a Good Thing Better
Installing Serial ATA Hard Disk Drives
YourMacProcanaccommodateuptofourinternal1-inch-highSATAharddiskdrives
inthedrivebays.IfyourMacProcomeswithasingledriveinstalled,it’sintherstdrive
bay.Youcaninstalldrivesinthesecond,third,andfourthdrivebays.
To install a hard disk drive:
1 OpenyourMacProandremovethesidepanelfollowingtheinstructionsin“Opening
YourMacPro”onpage39.
2 Liftthelatchtounlockthedrivecarriers.
Note: Whenthelatchisdown,thecarriersarelockedinthedrivebaysandcan’t
beremoved.
3 Pullthecarrieroutofthedrivebay.
Drive carrier
63Chapter 3 Making a Good Thing Better
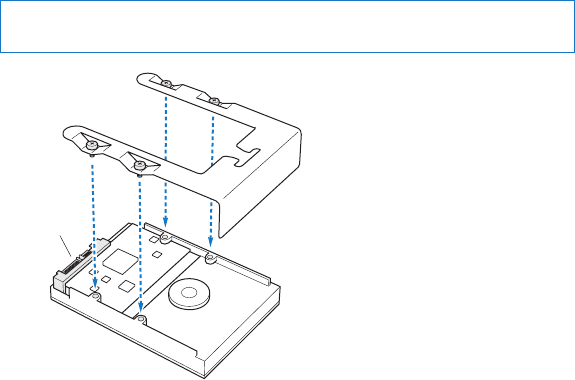
4 Positionthecarrierovertheharddiskdrivewiththeconnectorsattheback.
5 Usethefourscrewsonthecarriertoattachtheharddiskdrivetothecarrier.
NOTICE: Holdthedrivebyitssides.Toavoiddamagingthedrive,don’ttouchthe
printedcircuitboard.
Connectors
64 Chapter 3 Making a Good Thing Better
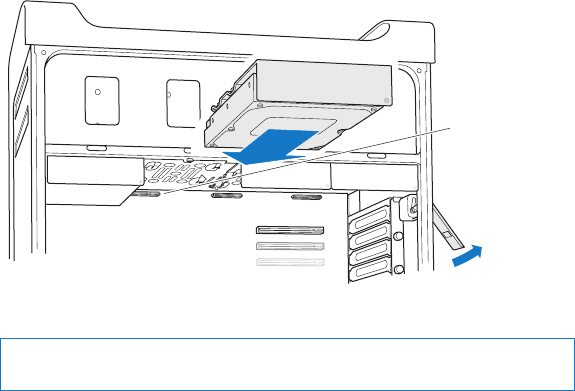
6 Liftthelatchandslidethecarrierovertheguidesandintothedrivebayuntilit’s
touchingthedriveconnectorsandisseatedinthebay.
Drive
connectors
7 Replacethesidepanel,followingtheinstructionsstartingonpage52.
NOTICE: Alwaysreplacethesidepanelafterinstallingcomponents.YourMacPro
doesn’toperateproperlywithoutthesidepanelinplace.

65Chapter 3 Making a Good Thing Better
Installing a Solid State Drive
YourMacProcanaccommodateuptofourinternal2.5-inchsolidstatedrivesinthe
drivebays.IfyourMacProcomeswithasingledriveinstalled,it’sintherstbay.You
caninstalldrivesinthesecond,third,andfourthdrivebays.
To install a solid state drive:
1 OpenyourMacProandremovethesidepanel,followingtheinstructionsin“Opening
YourMacPro”onpage39.
2 Liftthelatchtounlockthedrivecarriers.
Note: Whenthelatchisdown,thecarriersarelockedinthedrivebaysandcan’t
beremoved.
3 Pullthecarrieroutofthedrivebay.
Drive carrier
66 Chapter 3 Making a Good Thing Better
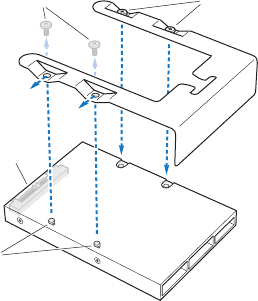
4 Removethetwoscrewsfromthedrivecarrierasshown.You’llattachtheSSDadapter
tothecarrierusingthetworemainingscrews.Putthetwoscrewsthatyouremoved
awayforsafekeeping.
Connectors
Hooks
ScrewsUnused screws (2)
5 PositionthedrivecarrierovertheSSDadapterwiththedriveconnectorsatthebackas
shown.Insertthetwohooksonthetopoftheadapterintothecarrier’sholes.Fasten
thetwoscrewsontopofthecarriertoattachtheSSDenclosuretothecarrier.
67Chapter 3 Making a Good Thing Better
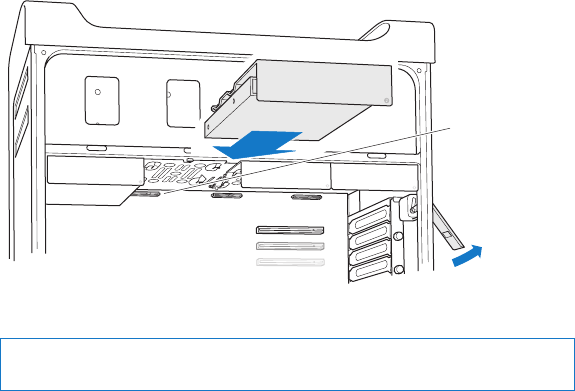
6 Liftthelatchandslidethecarrierovertheguidesandintothedrivebayuntilittouches
thedriveconnectorsandisseatedinthebay.
Drive
connectors
7 Replacethesidepanel,followingtheinstructionsstartingonpage52.
NOTICE: Alwaysreplacethesidepanelafterinstallingcomponents.YourMacPro
doesn’toperateproperlywithoutthesidepanelinplace.
68 Chapter 3 Making a Good Thing Better
Replacing an Optical Drive
YourMacProcomeswithoneortwoSuperDrivesinstalledintheopticaldrivebays.
Followtheseinstructionstoreplaceanopticaldrive.
Note: Contactyourdrivemanufacturerorconsultthemanufacturer’swebsiteto
determineifyourdriveissettocableselectmode.Beforeyouinstalladrive,setthe
drivetocableselectmodeifthemanufacturerhasn’talreadydoneso.
To replace the optical drive:
1 OpenyourMacProandremovethesidepanel,followingtheinstructionsin“Opening
YourMacPro”onpage39.
2 Liftthelatchtounlocktheopticaldrivecarriers.
Whenthelatchisdown,thedrivesandcarriersarelockedintheopticaldrivebaysand
can’tberemoved.
69Chapter 3 Making a Good Thing Better
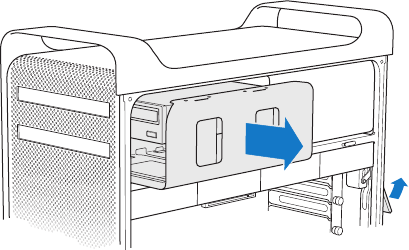
3 Pullthecarrierhalfwayoutoftheopticaldrivebay.
70 Chapter 3 Making a Good Thing Better
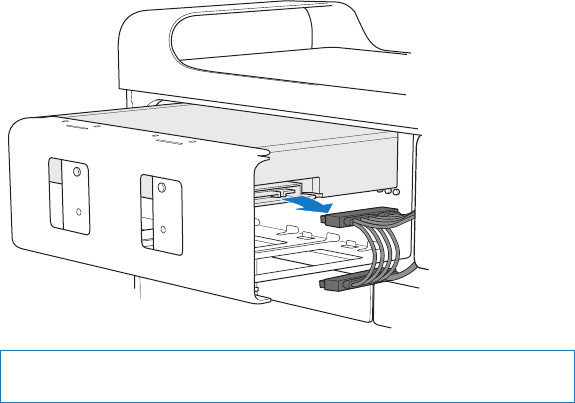
4 Disconnectthecablefromtheopticaldriveandremovethecarrierfromtheoptical
drivebay.
NOTICE: Whenyouinstallorreplaceopticaldrives,usetheoriginalApplecablesthat
camewithyourMacPro.
71Chapter 3 Making a Good Thing Better
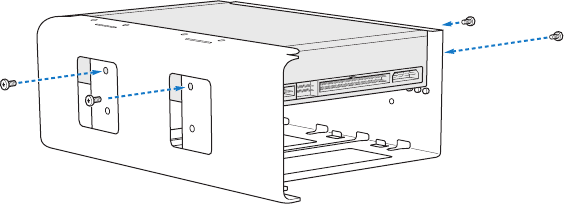
5 Removetheopticaldrivefromthecarrierbyunscrewingthefourattachmentscrews.
6 Usethefourscrewsfromtheoriginalopticaldrivetoattachthereplacementdriveto
thecarrier.
72 Chapter 3 Making a Good Thing Better
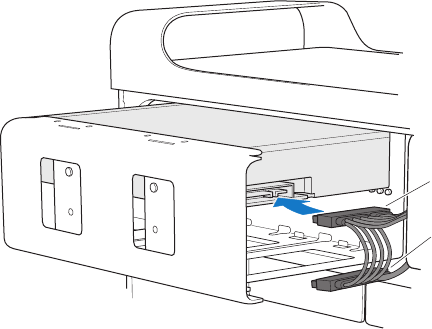
7 Slidetheopticaldriveandcarrierovertheguideshalfwayintotheopticaldrivebay.
8 Attachthecabletothebackoftheopticaldrive.
Cable middle
connector
Cable end
connector
73Chapter 3 Making a Good Thing Better
9 Liftthelatchandthenslidethecarrierintotheopticaldrivebay,pushingitintoplace.
10 Replacethesidepanel,followingtheinstructionsstartingonpage52.
NOTICE: Alwaysreplacethesidepanelafterinstallingcomponents.YourMacPro
doesn’toperateproperlywithoutthesidepanelinplace.

74 Chapter 3 Making a Good Thing Better
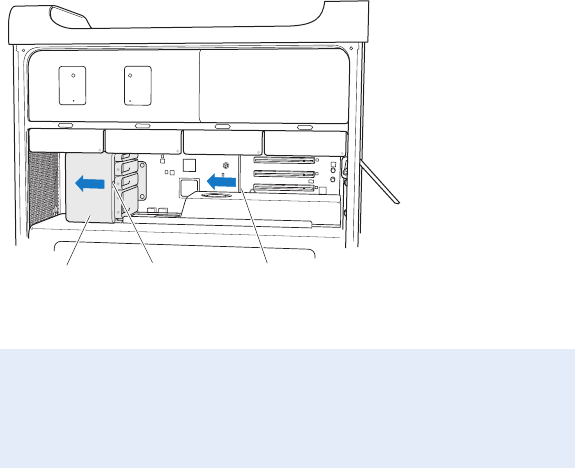
Adding PCI Express Cards
YoucanexpandthecapabilitiesofyourMacProbyinstallingcardsinthePeripheral
ComponentInterconnect(PCI)Expressslots.YourMacProhasonedouble-widePCI
ExpressgraphicsslotandthreePCIExpressexpansionslots,foratotaloffourslots.
TheseslotsaccommodatePCIExpressgraphicscardsandexpansioncards.
About PCI Express Cards
YourMacProcomeswithahigh-performancePCIExpressgraphicscard,which
containsthegraphicsprocessingunit(GPU)andprovidesthecomputer’sdisplayports.
Thegraphicscardisinstalledinslot1.
YoucaninstalladditionalPCIExpressgraphicsandexpansioncards.Beforeinstallinga
card,checkitsspecicationstomakesureitcanoperateinyourMacPro:
ÂSlots1and2arex16,PCIExpress2.0slots
ÂSlots3and4arex4,PCIExpress2.0slots
Allfourslotssupport16-lanecards.
NOTICE: CombinedmaximumpowerconsumptionforallfourPCIExpressslotsmust
notexceed300watts(W).

75Chapter 3 Making a Good Thing Better
To install a PCI Express card:
1 OpenyourMacProandremovethesidepanel,followingtheinstructionsin“Opening
YourMacPro”onpage39.
WARNING: Toavoiddamaginginternalcomponentsorthecomponentsyouwantto
install,alwaysturnoandthenunplugyourMacPro.Donotattempttoinstallitems
whileitispluggedin.LetyourMacProcooldownfor5to10minutesbeforeyou
touchtheinternalcomponents,whichmaybeveryhot.
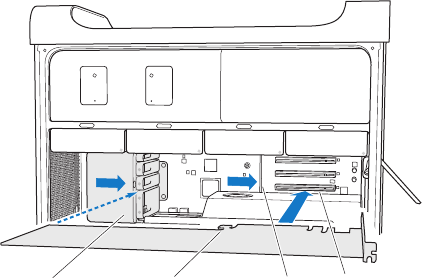
2 UnscrewthecaptivescrewsinthePCIbracketandremovethebracket.
Port access cover
PCI bracket
3 Removetheportaccesscoverfromtheslotinwhichyouplantoinstallthecard.
76 Chapter 3 Making a Good Thing Better
4 PressthebuttononthePCIsliderandmovetheslidertotheleft,whichmovesthe
retentionbar.
Button Retention barPCI slider
5 Removeyournewcardfromitsstatic-proofbagandholditbyitscorners.Don’ttouch
thegoldconnectororthecomponentsonthecard.
If You’re Installing a Full-Length PCI Card
ItmaybeeasiertoinstallaPCIcardifyouremovetheharddiskdrivesandcarriers
(seepage62),andremoveadjacentcards.Makesuretheendofthecardgoesinthe
appropriatecardguidebeforealigningthecardwiththePCIslotandcompleting
theinstallation.
77Chapter 3 Making a Good Thing Better
6 Alignthecard’sconnectorwiththeexpansionslotandpressthecardintotheslot.
Hook on card Retention bar PCI Express slotPCI slider
7 Pressthecardgentlybutrmlyuntiltheconnectorisfullyinserted.Pressonlyonthe
bareareasofthecardtoavoiddamagingthecomponents.Don’trockthecardfrom
sidetosideorforceit.Ifyoumeetresistance,checktheconnectorandslotfordamage
orobstructions,andthentryinsertingthecardagain.
8 Pullthecardgentlytomakesureit’sproperlyconnected.Ifitstaysinplaceanditsgold
connectorsarebarelyvisible,thecardisconnected.
9 MovethePCIslidertotherighttosecurethecard.
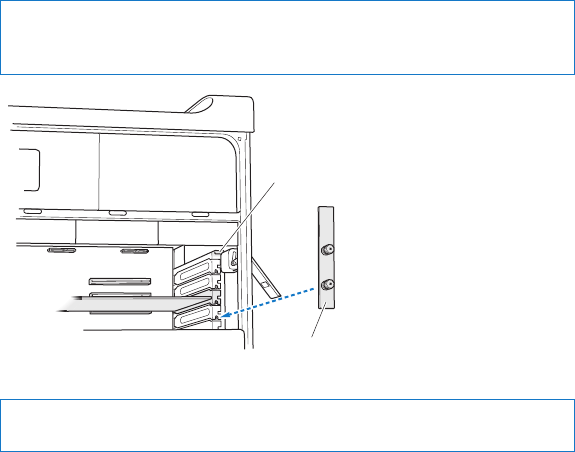
78 Chapter 3 Making a Good Thing Better
10 ReplacethePCIbracketunderthebraceandtightenthescrewstosecurethecard.
NOTICE: Ifyouremoveacardanddon’tinstallareplacement,placeaportaccess
coverovertheemptyslottokeepforeignobjectsoutoftheenclosure.Anuncovered
slotaectstheairowthatcoolstheinternalcomponentsandmaycausedamage.
Brace
PCI bracket
11 Replacethesidepanel,followingtheinstructionsstartingonpage52.
NOTICE: Alwaysreplacethesidepanelafterinstallingcomponents.YourMacPro
doesn’toperateproperlywithoutthesidepanelinplace.

79Chapter 3 Making a Good Thing Better
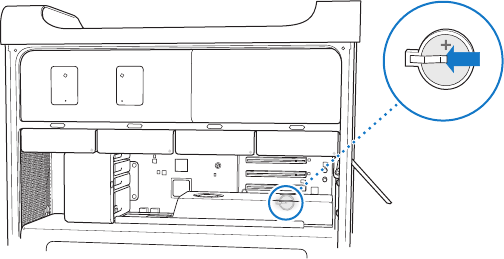
Replacing the Internal Backup Battery
YourMacProusesaBR2032lithiumcoincellbatterythatpreservessettings,suchas
thedateandtime,whenyourMacProiso.Ifyounoticeintermittentproblemswhen
yourMacProstartsup,orchangesinthedateandtimesettings,replacethebattery.
Important: Disposeoftheoldbatteryaccordingtoyourlocalenvironmentallaws.
Toreplacethebattery:
1 OpenyourMacProandremovethesidepanel,followingtheinstructionsin“Opening
YourMacPro”onpage39.
2 RemoveanyPCIExpresscardsthatblockaccesstothebattery.See“AddingPCIExpress
Cards”onpage74forinstructions.
3 Removetheoldbatteryfromtheholder.
WARNING: Installingthebatteryincorrectlymaycauseanexplosion.Useonlythesame
typeofbatteryoranequivalentrecommendedbythemanufactureroftheoriginal.

Help Center help
www.apple.com/support
Problem, Meet Solution
4
82 Chapter 4 Problem, Meet Solution
OccasionallyyoumayhaveproblemswhileworkingwithyourMacPro.Readon
fortroubleshootingtipstotrywhenyouhaveaproblem.Youcanalsondmore
troubleshootinginformationinHelpCenterorontheMacProSupportwebsiteat
www.apple.com/support/macpro.
WhenyouhaveaproblemwithyourMacPro,there’susuallyasimpleandquicksolution.
Thinkabouttheconditionsthatleduptotheproblem.Makinganoteofthingsyoudid
beforetheproblemoccurredwillhelpyounarrowdownpossiblecausesandndthe
answersyouneed.Thingstonoteinclude:
ÂTheapplicationsyouwereusingwhentheproblemoccurred.Problemsthatoccur
onlywithaspecicapplicationmayindicatethattheapplicationisnotcompatible
withtheMacOSversioninstalledonyourcomputer.
ÂAnysoftwarethatyourecentlyinstalled.
ÂAnynewhardware(suchasmemory,graphicsorPCIExpresscards,harddiskdrives)
thatyouinstalledorperipheralsthatyouconnected.
An Ounce of Prevention
Ifyouhaveaproblemwithyourcomputerorsoftware,havingkeptup-to-date
TimeMachinebackupsensuresthatyourdatawon’tbelost.Ifyoumakeregular
TimeMachinebackups,youcanrestoreyoursoftwareandallyourdatatoexactly
thewayitwasatthetimeofthebackup.Evenseriousissuesareoflessconcern
whenyousafeguardyourinformationwithTimeMachine.
83Chapter 4 Problem, Meet Solution
Problems with Your Mac Pro
IfyourMacProdoesn’trespondorturnon,ifyouhavetroubleejectingadisk,orifthe
statuslightisashing,trythestepsinthissection.
If the computer doesn’t respond or the pointer doesn’t move
First,makesurethekeyboardisconnectedbyunpluggingandthenplugginginthe
connector,andmakesureitisrmlyseated.MakesureyourAppleMagicMouseis
turnedonandthebatteriesarecharged.(See“ReplacingtheAppleMagicMouse
Batteries”onpage98.)Thentrytocancelwhatthecomputerisdoing.
ÂPresstheCommandkey(x)andQkeyatthesametimetotrytoquitthe
currentapplication.
ÂPresstheCommandkey(x)andperiodkeyatthesametime.Ifadialogappears,
clickCancel.
ÂChooseApple()>ForceQuitandselecttheapplicationyouwanttoquit.Youcan
alsoforcequitbypressingtheEsc,Option,andCommand(x)keysatthesametime.
RestartyourMacProbychoosingApple()>Restarttobesuretheproblemis
entirelyclearedup.Youcanalsorestartbypressingthepowerbutton(®)forabout
5or6secondsuntilyourMacProshutsdown.Pressthepowerbutton(®)againto
startupyourMacPro.
ÂIf the problem occurs only when you use a particular program,checkwiththeprogram’s
manufacturertoseeifitiscompatiblewithyourcomputer.
ÂIf the problem occurs frequently,youmayneedtoreinstallyoursystemsoftware
(see“Repairing,Restoring,orReinstallingMacOSXSoftware”onpage86).
84 Chapter 4 Problem, Meet Solution
If the computer doesn’t turn on or start up
ÂMakesurethepowercordisconnectedtoaworkingpowersource.Theplugon
thepowercordmustbecompletelyinsertedintothecomputer’spowersocketand
rmlyseated.
ÂRestartyourcomputerwhileholdingdowntheCommandkey(x)andRkey,until
thecomputerrestarts.WhentheMacOSXUtilitiesapplicationappears,selectan
optiontorepairyourdisk,restoreyoursoftware,orreinstallMacOSXandApple
applicationsfromtheMacOSXUtilitiespane.Formoreinformation,see“Repairing,
Restoring,orReinstallingMacOSXSoftware”onpage86.
ÂIfyourcomputerstilldoesnotstartup,tryresettingtheparameterrandomaccess
memory(PRAM).TurnonthecomputerandimmediatelyholddowntheCommand(x),
Option,P,andRkeysuntilyouhearthestartupsoundasecondtime.Releasethekeys.
ThePRAMisresettothedefaultvaluesandyourclocksettingsmayneedtobereset.
• IfyourcomputerdoesnotstartupafterresettingthePRAM,restartyourcomputer
whileholdingdowntheOptionkeytoselectyourstartupdisk.
• Ifthisdoesn’twork,restartyourcomputerwhileholdingdowntheShiftkey.
If you’re unable to eject a disc
Aleonthediscmaybeinuse.Quitapplicationsthatareopen,andthentryagain.
Ifthatdoesn’twork,chooseApple()>Restartandholddowneitherthemouse
buttonortheMediaEjectkey(C)onyourAppleKeyboard.
Ifthatdoesn’twork:
1 Shutdownthecomputerandremovethesidepanel(seetheinstructionsonpage39).
2 Pulltheopticaldrivecarrieroutoftheopticaldrivebay(see“ReplacinganOptical
Drive”onpage68).
85Chapter 4 Problem, Meet Solution
3 Carefullyinserttheendofastraightenedpaperclipintothesmallholeonthefrontof
theopticaldrive.
4 Pushrmlyuntilthetrayopens,removethedisc,andpushthetraytocloseit.
5 Puttheopticaldrivecarrierandthesidepanelbackinplace(see“ReplacinganOptical
Drive”onpage68).
If the status light ashes and the computer doesn’t start up
ÂIfyourecentlyinstalledmemory,aPCIexpansioncard,oranotherinternal
component,makesurethatitiscorrectlyinstalledandthatitiscompatiblewithyour
computer.Seeifremovingitallowsthecomputertostartup.
ÂIfthestatuslightstillashes,determinethenumberofashestoidentifytheproblem:
• One short ash followed by a longer o period: Novalidmemory.
• Three short ashes followed by a longer o period:Failedmemory.
Problems with Software
Whenanapplicationfreezesordoesn’trespond,MacOSXprovidesawaytoquitthe
applicationwithoutrestartingyourcomputer.Quittingafrozenapplicationmayallow
youtosaveyourworkinotheropenapplications.
To force an application to quit:
1 PressCommand(x)-Option-EscorchooseApple()>ForceQuitfromthemenubar.
2 SelectthenameoftheapplicationyouwanttoquitintheForceQuitApplicationsdialog.
3 ClickForceQuit.
Theapplicationquits,leavingallotherapplicationsopen.
86 Chapter 4 Problem, Meet Solution
If you have a problem with a software program
ÂUseSoftwareUpdatetoensurethatyouhavethelatestdrivers,bugxes,and
otherupdates.
ÂForproblemswithsoftwarefromamanufacturerotherthanApple,contactthe
manufacturer.
If you have a problem using your computer or working with Mac OS X
ÂLookinHelpCenter(intheHelpmenu)forinstructionsandtroubleshooting
information.
ÂForthelatesttroubleshootinginformationandsoftwareupdates,gototheApple
Supportwebsiteatwww.apple.com/support.
Repairing, Restoring, or Reinstalling Mac OS X Software
IfyouhaveaproblemwithyourMacsoftwareorhardware,MacOSXprovidesrepair
andrestoreutilitiesthatmayeliminateproblemsandcanevenrestoreyoursoftware
toitsoriginalfactorysettings.YoucanaccesstheseutilitiesfromtheMacOSXUtilities
application,evenifyourcomputerisn’tstartingupcorrectly.
87Chapter 4 Problem, Meet Solution
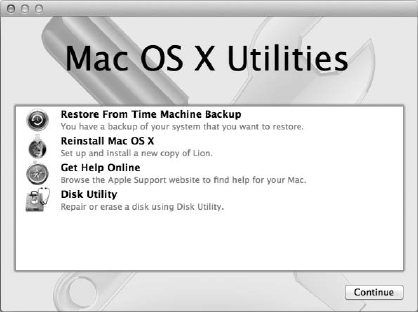
UsetheMacOSXUtilitiesapplicationto:
ÂRepairyourcomputer’sdiskusingDiskUtility.
ÂRestoreyoursoftwareanddatafromaTimeMachinebackup.
ÂReinstallMacOSXLionandAppleapplications.
ÂRestoreyourcomputertoitsfactorysettingsbyerasingitsdiskandreinstalling
MacOSXLionandyourAppleapplications.
Ifyourcomputerdetectsaproblem,itopenstheMacOSXUtilitiesapplication
automatically.Youcanalsoopenitmanuallybyrestartingyourcomputer.
88 Chapter 4 Problem, Meet Solution
To open the Mac OS X Utilities application:
mRestartyourcomputerwhileholdingdowntheCommandkey(x)andRkey.
SomeutilitiesintheMacOSXUtilitiespanerequireaccesstotheInternetandthe
MacAppStore.Youmayneedtomakesureyourcomputerisconnectedtothe
InternetviayourEthernetorWi-Finetwork.
To connect via a Wi-Fi network:
1 ChooseanetworkfromtheWi-Fistatusmenuintheupper-rightcornerofthescreen.
2 Ifnecessary,typethenetworkpassword.
Tojoinaclosednetwork,chooseJoinOtherNetwork.Enterthenetwork’sname
andpassword.
Repairing a Disk with Disk Utility
Ifyouhaveaproblemwithyourcomputer,orifyoustartyourcomputerandseethe
MacOSXUtilitiespane,youmayneedtorepairyourcomputer’sdisk.
1 SelectDiskUtilityintheMacOSXUtilitiespaneandclickContinue.
2 Selectthediskorpartitioninthelistontheleft,andthenclicktheFirstAidtab.
3 ClickRepairDisk.
IfDiskUtilitycan’trepairthedisk,backupasmuchofyourinformationaspossible,
andthenfollowtheinstructionsin“ReinstallingMacOSXandAppleApplications”on
page89.
ForinformationaboutDiskUtilityanditsoptions,seeHelpCenter,oropenDiskUtility
(intheUtilitiesfolderinLaunchpad)andchooseHelp>DiskUtilityHelp.
89Chapter 4 Problem, Meet Solution
Restoring Information Using a Time Machine Backup
IfyoupreviouslycreatedaTimeMachinebackup,usetheRestoreutilitytorestore
everythingonyourcomputertoitspreviousstate.
UseyourTimeMachinebackuponlytorestoreinformationtothecomputerthatwas
thesourceofthebackup.Ifyouwanttotransferinformationtoanewcomputer,use
MigrationAssistant.
1 IfyourbackupisonaTimeCapsule,makesureyourMacProisconnectedtothesame
EthernetorWi-Finetwork.(ToconnecttoaWi-Finetwork,followtheinstructionson
page88.)
2 IntheMacOSXUtilitiespane,selectRestoreFromTimeMachineBackupandclick
Continue.
3 SelectthediskthatcontainstheTimeMachinebackup,andthenfollowtheonscreen
instructions.
Reinstalling Mac OS X and Apple Applications
Undersomecircumstances,youmayneedtoreinstallMacOSXandAppleapplications.
Youcanreinstallwhilekeepingyourlesandusersettingsintact.
Important: TheMacOSXUtilitiesapplicationalsoreinstallsandrestoresMacOSXLion
Serversoftware,ifyouhaveitinstalledonyourMacPro.
1 MakesureMacProisconnectedtotheInternetviaanEthernetorWi-Finetwork.
(ToconnecttoaWi-Finetwork,followtheinstructionsonpage88.)
2 IntheMacOSXUtilitiespane,selectReinstallMacOSXandclickContinue.
3 Whenyouareaskedtoselectadisk,selectyourcurrentMacOSXdisk(inmostcases,
it’stheonlyoneavailable).
90 Chapter 4 Problem, Meet Solution
4 Toinstalloptionalsoftware,clickCustomize.
5 ClickInstall.
YoucaninstallMacOSXwithouterasingthedisk,whichsavesyourexistingles
andsettings,oryoucanerasethediskrst,whicherasesallyourdataandleavesthe
computerreadyforyoutoreinstallMacOSXandAppleapplications.
AfterreinstallingMacOSX,youcanthengototheMacAppStoreandre-download
theapplicationsthatcamewithyourMacandotherappsthatyoupurchasedfromthe
MacAppStore.
Important: Applerecommendsthatyoubackupthedataonthediskbeforerestoring
software.Appleisnotresponsibleforanylostdata.
Restoring Your Computer to Its Factory Settings
Whenyourestoreyourcomputertoitsfactorysettings,everythingonyourcomputer
(youruseraccounts,networksettings,andallofyourlesandfolders)isdeleted.Before
yourestore,backupanylesyouwanttokeepbycopyingthemtoanotherdisk.
WritedownyournetworksettingsfromNetworkpreferencestomakeiteasiertoget
connectedagainafterreinstallingMacOSX.
1 MakesureyourMacProisconnectedtotheInternetviaanEthernetorWi-Finetwork.
(ToconnecttoaWi-Finetwork,followtheinstructionsonpage88).
2 IntheMacOSXUtilitiespane,selectDiskUtilityandclickContinue.
3 Selectthediskinthelistontheleft,andthenclicktheErasetab.
4 ChooseMacOSExtended(Journaled)fromtheFormatpop-upmenu,typeanamefor
thedisk,andthenclickErase.
5 Afterthediskiserased,chooseDiskUtility>QuitDiskUtility.
91Chapter 4 Problem, Meet Solution
6 IntheMacOSXUtilitiespane,selectReinstallMacOSXandclickContinue.
7 ToreinstallMacOSXandAppleapplications,followtheinstructionsinthe
MacOSXInstaller.
AfterrestoringMacOSXandAppleapplications,youcanselectivelyrestoreyourother
dataandapplicationsfromaTimeMachinebackup.
Checking for a Hardware Problem
Ifyoususpectahardwareproblem,usetheAppleHardwareTestapplicationtohelp
determineifthere’saproblemwithoneoftheMacProcomponents.
To use Apple Hardware Test:
1 DisconnectallexternaldevicesfromyourMacPro,exceptthedisplay,keyboard,
andmouse.
IfyouhaveanEthernetcableconnected,disconnectit.
2 RestartyourMacProwhileholdingdowntheDkey.
3 WhentheAppleHardwareTestchooserscreenappears,selectthelanguageyou
wanttouse.
4 PresstheReturnkeyorclicktherightarrowbutton.
5 WhentheAppleHardwareTestmainscreenappears(afterabout45seconds),follow
theonscreeninstructions.
6 IfAppleHardwareTestdetectsaproblem,itdisplaysanerrorcode.Makeanoteofthe
errorcodebeforepursuingsupportoptions.IfAppleHardwareTestdoesn’tdetecta
hardwarefailure,theproblemmaybesoftwarerelated.
92 Chapter 4 Problem, Meet Solution
Keeping Your Software Up to Date
YoucanconnecttotheInternetandautomaticallydownloadandinstallthelatestfree
softwareversions,drivers,andotherenhancementsfromApple.
WhenyouareconnectedtotheInternet,SoftwareUpdatecheckstoseeifanyupdates
areavailableforyourcomputer.YoucansetyourMacProtocheckforupdates
periodically,andthenyoucandownloadandinstallupdatedsoftware.
To check for updated software:
1 ChooseApple()>SoftwareUpdate.
2 Followtheonscreeninstructions.
ÂFormoreinformation,searchfor“SoftwareUpdate”inHelpCenter.
ÂForthelatestinformationaboutMacOSX,gototheMacOSXwebsiteat
www.apple.com/macosx.
Problems with Wi-Fi Communication
IfyouhaveaproblemusingWi-Ficommunication:
ÂMakesureyouhaveproperlyconguredthesoftwareaccordingtotheinstructions
thatcamewithyourbasestation.
ÂMakesurethecomputerornetworkyouaretryingtoconnecttoisrunningandhasa
wirelessaccesspoint.
ÂMakesureyourMacProiswithinantennarangeoftheothercomputerorthe
networkaccesspoint.Nearbyelectronicdevicesormetalstructurescaninterfere
withwirelesscommunicationandreducethisrange.Repositioningorrotatingthe
computermayimprovereception.

93Chapter 4 Problem, Meet Solution
ÂMakesurethesidepanelisclosed(followtheinstructionsstartingonpage52)and
thePCIportaccesscoversareinplace(see“AddingPCIExpressCards”onpage74).
AntennareceptionisreducedwhenyourMacProisnotclosedproperly.
ÂChecktheWi-Fisignallevel.YoumayhaveuptofourbarsintheWi-Fistatusicon(Z)
inthemenubar.
ÂFormoreinformationaboutWi-Fi,chooseHelp>HelpCenterandsearchfor“Wi-Fi.”
Alsoseetheinstructionsthatcamewiththewirelessdeviceformoreinformation.
Problems with Your Display
NOTICE: IfyouhaveaproblemwithyourAppledisplayandnothinginthismanual
solvesit,contactanAppleAuthorizedServiceProviderorAppleforassistance.Ifyou
attempttorepairthedisplayyourself,anydamageyoumaycausetothedisplaywill
notbecoveredbythelimitedwarrantyonyourdisplay.ContactanAppleAuthorized
ResellerorAppleAuthorizedServiceProviderforadditionalinformationaboutthisor
anyotherwarrantyquestion.
If no image appears on the screen
ÂMakesurethecomputeristurnedon,andifthedisplayhasapowerbutton,make
sureit’sturnedon.
ÂMakesurethecablesareconnectedproperlytoyourcomputerandthedisplay.
ÂIfyourgraphicscardhasaninternalpowercable,makesureit’sconnectedtothe
cardandthelogicboard.
ÂMakesureyourcomputerisnotinsleep.Pressthepowerbuttonoranykeytoseeif
thecomputerwakes.
94 Chapter 4 Problem, Meet Solution
ÂMakesurethedisplaybrightnessandcontrastaresetproperly.Usethebrightness
keysontheAppleKeyboard.Somedisplayshavebrightnessandcontrastcontrolson
orundertheirfrontedgeorontheside.
ÂResetthePRAMbyrestartingthecomputerwhileholdingdowntheCommand(x),
Option,P,andRkeysuntilyouhearthestartupsoundasecondtime.
If the screen image appears dim or ickers
ÂAdjustthedisplaybrightnessandcontrastsettings.Usethebrightnesskeysonthe
AppleKeyboard.Somedisplaysalsohavebrightnessandcontrastcontrolsonor
undertheirfrontedge.Oryoumaybeabletoadjustbrightnessorcontrastusingthe
DisplayspaneofSystemPreferences.
ÂCalibratethedisplaybychoosingApple()>SystemPreferences.ClickDisplays,
selectColor,andclickCalibrate.Formoreinformationaboutcolorandyourdisplay,
seeHelpCenter.
ÂTheickeringmaybecausedbyinterferencefromanearbypowerline,auorescent
light,oranelectricaldevice—forexample,aradio,amicrowaveoven,oranother
computer.Tryrelocatingnearbyelectricaldevicesormovingyourcomputer
anddisplay.
If no colors appear on the screen or the colors don’t look right
ÂMakesurethedisplayisconnectedrmlytothecomputer.
ÂCalibratethedisplay,asdescribedin“Ifthescreenimageappearsdimorickers”on
page94.
If desktop icons move when you change the screen resolution
Changingthescreenresolutionaectsthedisplayofinformationonyourscreen.
Theoperatingsystemmayrepositioniconswhenyouchangethescreenresolution.
95Chapter 4 Problem, Meet Solution
If the screen freezes
ÂForcethefrozenapplicationtoquit.HolddowntheCommand(x)andOptionkeys
andpressEsc.ThenselecttheapplicationinthelistandclickForceQuit.
ÂIfthatdoesn’twork,forcethecomputertorestartbyholdingdownthepowerbutton
(®)for5or6secondsuntilyourMacProshutsdown.Pressthepowerbutton(®)
againtostartupyourMacPro.
If your display has a light on the front and it’s ashing
OnsomeAppleatpaneldisplays,thepowerlightdisplaysaseriesofshortashes
whenanerrorisdetected.
ÂIf you see a repeating sequence of three short ashes,thedisplayisdetectinginputin
thewrongvideoformat.Makesureyourdisplayiscompatiblewithyourgraphics
cardandthatyou’veinstalledthecorrectdisplaysoftware,ifyourdisplaycamewith
installationsoftware.
ÂIf you see a sequence of two short ashes and a long ash,thedisplayisdetectinga
problemwithabacklightinglamp.ContactanAppleAuthorizedResellerorApple
AuthorizedServiceProvider.
Problems with Your Internet Connection
IfyouhavetroublewithyourInternetconnection,youcantrythestepsinthissection
startingwithNetworkDiagnostics.
To use Network Diagnostics:
1 ChooseApple()>SystemPreferences.
2 ClickNetworkandthenclick“Assistme”atthebottomofthepage.
96 Chapter 4 Problem, Meet Solution
3 ClickDiagnosticstoopenNetworkDiagnostics.
4 Followtheonscreeninstructions.
IfNetworkDiagnosticscan’tresolvetheproblem,theremaybeaproblemwiththe
Internetserviceprovider(ISP)youaretryingtoconnectto,withanexternaldeviceyou
areusingtoconnecttoyourISP,orwiththeserveryouaretryingtoaccess.Youcan
alsotrythestepsinthefollowingsection.
Cable Modem, DSL, and LAN Internet Connections
Makesureallmodemcablesarefullypluggedin,includingthemodempowercord,
thecablefromthemodemtothecomputer,andthecablefromthemodemtothewall
jack.CheckthecablesandpowersuppliesforEthernethubsandrouters.
TurnoyourDSLorcablemodemforafewminutes,andthenturnitbackon.Some
ISPsrecommendthatyouunplugthemodem’spowercord.Ifyourmodemhasareset
button,youcanpressiteitherbeforeorafteryouturnthepoweroandon.
PPPoE Connections
IfyouareunabletoconnecttoyourInternetserviceproviderusingPPPoE,makesure
youhaveenteredthecorrectinformationinNetworkpreferences.
To enter PPPoE settings:
1 ChooseApple()>SystemPreferences.
2 ClickNetwork.
3 ClickAdd(+)atthebottomofthenetworkconnectionserviceslist,andchoosePPPoE
fromtheInterfacepop-upmenu.
4 ChooseaninterfaceforthePPPoEservicefromtheEthernetpop-upmenu.
97Chapter 4 Problem, Meet Solution
ChooseEthernetifyouareconnectingtoawirednetwork,orWi-Fiifyouare
connectingtoawirelessnetwork.
5 ClickCreate.
6 Entertheinformationyoureceivedfromyourserviceprovider,suchastheaccount
name,password,andPPPoEservicename(ifyourserviceproviderrequiresit).
7 ClickApplytomakethesettingsactive.
Network Connections
MakesuretheEthernetcableispluggedintoyourcomputerandintothenetwork.
CheckthecablesandpowersuppliestoyourEthernethubsandrouters.
IfyouhavetwoormorecomputerssharinganInternetconnection,makesureyour
networkissetupproperly.YouneedtoknowifyourISPprovidesonlyoneIPaddress
orifitprovidesmultipleIPaddresses,oneforeachcomputer.
IfonlyoneIPaddressisused,thenyoumusthavearoutercapableofsharingthe
connection,alsoknownasnetworkaddresstranslation(NAT)or“IPmasquerading.”
Forsetupinformation,checkthedocumentationprovidedwithyourrouteroraskthe
personwhosetupyournetwork.YoucanuseanAirPortbasestationtoshareoneIP
addressamongmultiplecomputers.
ForinformationaboutusinganAirPortbasestation,searchfor“AirPort”inHelpCenter
orvisittheAirPortsupportwebsiteatwww.apple.com/support/airport.
Ifyoucannotresolvetheissueusingthesesteps,contactyourISPornetwork
administrator.
98 Chapter 4 Problem, Meet Solution
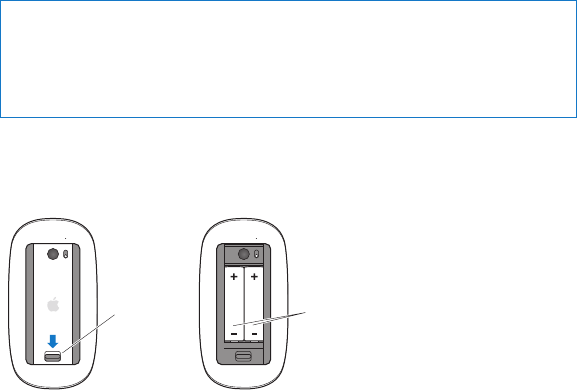
Replacing the Apple Magic Mouse Batteries
YourAppleMagicMousecomeswithtwoAAbatteriesinstalled.Youcanreplacethem
withalkaline,lithium,orrechargeableAAbatteries.
Keepthebatterycompartmentcoverandbatteriesoutofthereachofsmallchildren.
WARNING: Whenyoureplacethebatteries,replacethemallatthesametime.Don’t
mixoldbatterieswithnewbatteriesormixbatterytypes(forexample,don’tmix
alkalineandlithiumbatteries).Don’topenorpuncturethebatteries,installthem
backwards,orexposethemtore,hightemperatures,orwater.Keepbatteriesoutof
thereachofchildren.
To replace the batteries in the Apple Magic Mouse:
1 Slidetheon/oswitchonthebottomofyourmousetoturnito.
2 Slidethelatchdownandremovethebatterycover.
BatteriesLatch
3 Insertthebatterieswiththepositiveends(+)facingup,asshownabove.
4 Replacethecoverandturnonyourmouse.
99Chapter 4 Problem, Meet Solution
YoumayhavetoclickyourAppleMagicMouseoncetoreconnectittoyourMacPro.
Tocheckthebatterystatus,slidetheon/oswitchtoturnonthemouse.Ifthe
indicatorlightdoesn’tglow,youmayneedtochangethebatteries.Youcancheckthe
batterylevelinMousePreferences.ChooseApple()>SystemPreferencesandclick
Mouse.Thebatterylevelisshowninthelower-leftcorner.
Maximizing Ethernet Performance
YourcomputerperformsbestwhentheEthernetporttowhichitisconnectedissetto
autonegotiate.Askyournetworkadministratortoverifythissetting.
Note: Ifyouexperienceconnectionproblemsonyournetwork,makesureyournetwork
switchissettoautonegotiate,ifpossible.Ifaswitch’sportisnotautonegotiating,your
computerdetectstheappropriatespeedbutdefaultstohalf-duplexmode.Ifthe
switch’sportattheotherendofthelinkisconguredforfull-duplexmode,alarge
numberoflateeventscanoccuronthelink.Ifitisn’tpossibletosettheswitchto
autonegotiate,thensettheswitch’sporttohalf-duplex.Formoreinformation,seethe
documentationthatcamewiththeEthernetswitch.
Learning More, Service, and Support
IfyourMacProneedsservice,takeittoanAppleAuthorizedServiceProvider(AASP)or
contactAppleforservice.YoucanndmoreinformationaboutyourMacProthrough
onlineresources,onscreenhelp,SystemInformation,orAppleHardwareTest.
100 Chapter 4 Problem, Meet Solution
Online Resources
Foronlineserviceandsupportinformation,gotowww.apple.com/support.Choose
yourcountryfromthepop-upmenu.YoucansearchtheAppleCareKnowledgeBase,
checkforsoftwareupdates,orgethelpfromApple’sdiscussionboards.
Onscreen Help
Youcanoftenndanswerstoyourquestions,aswellasinstructionsand
troubleshootinginformation,inHelpCenter.IntheFinder,chooseHelp>HelpCenter.
System Information
Togetinformationaboutyourcomputer,useSystemInformation.SystemInformation
showsyouwhichhardwareandsoftwareisinstalled,theserialnumberandoperating
systemversion,howmuchmemoryisinstalled,andmore.ToopenSystemInformation,
chooseApple()>AboutThisMacfromthemenubar,andthenclickMoreInfo.
Apple Hardware Test
YoucanuseAppleHardwareTesttodiagnosehardwareproblemsonyourMacPro.
Formoreinformation,see“CheckingforaHardwareProblem”onpage91.
AppleCare Service and Support
YourMacProcomeswith90daysoftechnicalsupportandoneyearofhardwarerepair
warrantycoverageatanAppleStoreoranApple-authorizedrepaircenter,suchasan
AppleAuthorizedServiceProvider.Youcanextendyourcoveragebypurchasingthe
AppleCareProtectionPlan.Forinformation,visitwww.apple.com/support/productsor
visitthewebsiteaddressforyourcountrylistedinthetable.

101Chapter 4 Problem, Meet Solution
Ifyouneedassistance,AppleCaretelephonesupportrepresentativescanhelpyouwith
installingandopeningapplications,andbasictroubleshooting.Callthesupportcenter
numbernearestyou(therst90daysarecomplimentary).Havethepurchasedateand
yourMacProserialnumberreadywhenyoucall.
Note: Your90daysofcomplimentarytelephonesupportbeginsonthedateof
purchase.Telephonefeesmayapply.
Country Phone Website
UnitedStates 1-800-275-2273 www.apple.com/support
Australia (61)1-300-321-456 www.apple.com/au/support
Canada(English)
(French)
1-800-263-3394 www.apple.com/ca/support
www.apple.com/ca/fr/support
Ireland (353)1850946191 www.apple.com/ie/support
NewZealand 00800-7666-7666 www.apple.com/nz/support
UnitedKingdom (44)08442090611 www.apple.com/uk/support
Telephonenumbersaresubjecttochange,andlocalandnationaltelephoneratesmay
apply.Acompletelistisavailableontheweb:
www.apple.com/support/contact/phone_contacts.html
102 Chapter 4 Problem, Meet Solution
Locating Your Serial Number
UseanyofthesemethodstondyourMacProserialnumber:
ÂChooseApple()fromthemenubarandthenchooseAboutThisMac.Clickthe
versionnumberbeneaththewords“MacOSX”tocyclethroughtheMacOSXversion
number,thebuildversion,andtheserialnumber.
ÂOpenSystemInformationintheUtilitiesfolderinLaunchpadandclickHardware.
ÂLookonthecongurationlabel,whichislocatedonthebackofyourMacPronear
thevideoports.

Help Center System Information
www.apple.com/macpro
What’s Under the Hood
5
104 Chapter 5 What’s Under the Hood
ThetechnicalspecicationsofyourMacProareincludedinthissection.
Specications
UseSystemInformationtonddetailedinformationaboutyourMacPro,including
theamountofinstalledmemory,harddisksize,connecteddevices,andproductserial
number.ToopenSystemInformation,chooseApple()>AboutThisMacfromthe
menubar,andthenclickMoreInfo.
Processor and Memory Specications
Quad-core Mac Pro
ÂOneQuad-CoreIntelXeonseriesprocessor
Â8MBofsharedL3cacheperprocessor
Â1066MHzDDR3ECCSDRAM
6-core Mac Pro
ÂOne6-CoreIntelXeonseriesprocessor
Â12MBofsharedL3cacheperprocessor
Â1333MHzDDR3ECCSDRAM
8-core Mac Pro
ÂTwoQuad-CoreIntelXeonseriesprocessors
Â12MBofsharedL3cacheperprocessor
Â1066MHzDDR3ECCSDRAM
105Chapter 5 What’s Under the Hood
12-core Mac Pro
ÂTwo6-CoreIntelXeonseriesprocessors
Â12MBofsharedL3cacheperprocessor
Â1333MHzDDR3ECCSDRAM
Random-access memory (RAM)
ÂUnbuereddualinlinememorymodules(UDIMMs)
ÂPC3-10600E,1333MHz,DDR3SDRAMUDIMMs(memoryoperatesat1066MHzor
1333MHz,dependingontheprocessor)
ÂDIMMslots
• Fourslotsavailableinasingle-processorMacPro
• Eightslotsavailableinandual-processorMacPro
ÂError-correctingcode(ECC)
Â72-bitwide,240-pinECCmodules
Â36ICsmaximumperECCUDIMM
ÂMustconformtoJEDECspecication(see“InstallingMemory”onpage43)
ÂNonparity
Graphics Card
PCIExpress2.0graphicscardwithadual-linkDigitalVisualInterface(DVI)connector
andtwoMiniDisplayPortconnectors.
MiniDisplayPortaudiooutput:
ÂUpto8-channel(7.1),24-bitaudioatamaximumsamplerateof192.0kHz
106 Chapter 5 What’s Under the Hood
Video Display Modes
Fortechnicalspecicationsforyourdisplay:
ÂApple displays: Gotowww.apple.com/displays
Storage
Â4independent3Gb/sSerialATA(SATA),cable-free,direct-attach3.5-inchhard
drivebays
• Type: SATA3Gb/s
• Bay Width: 3.9inches(102mm)
• Bay Depth: 5.7inches(147mm)
• Bay Height: 1.0inch(25.4mm)
ÂFourinternaldrivecarriers(optional2.5-inchsolidstatedrives(SSDs)comewith
driveadaptersdesignedtomountinthe3.5-inchdrivecarriers)
PCI Express Expansion
ÂFourfull-lengthPCIExpressexpansionslots(slot1containsthegraphicscard)
• Slots1and2arex16,PCIExpress2.0slots
• Slots3and4arex4,PCIExpress2.0slots
ÂAllfourslotssupport16-lanecards
Â300WcombinedmaximumforallPCIExpressslots
107Chapter 5 What’s Under the Hood
SuperDrive (DVD±R DL/DVD±RW/CD-RW) Specications
ÂDisc diameters supported: 12cmand8cm
ÂData formats:
• CD-ROM
• CD-Audio
• CD-R
• CD-RW
• CD-I
• CD-IBridge
• CDExtended
• CDMixedMode
• PhotoCD
• VideoCD
• EnhancedCD
• DVD-Video
• DVD±R
• DVD±RW
• DVD±RDL
108 Chapter 5 What’s Under the Hood
USB Specications
ÂSupportforUniversalSerialBus(USB)2.0and1.1
ÂSevenexternalUSBTypeAports
• TwoUSB2.0portsonthefront
• ThreeUSB2.0portsontheback
• TwoUSB2.0portsontheAppleKeyboard
ÂEachUSBport(frontandback)isonaseparate480megabit-per-second(Mbit/s)
USBchannel
Â500milliamperes(mA)availableforatotalof1.5Aonthebackand1.0Aonthefront
FireWire Specications
ÂFour external FireWire ports: TwoFireWire800ports(9-pin)onthefrontandtwoon
theback
ÂData transfer speed: 100,200,400,and800Mbit/s
Power
ÂOutput voltage: Approximately12V
ÂOutput power: Uptoamaximumof28Wforall4portsor12Wforanyoneport
Ethernet Specications
ÂIEEE802.3compliant
ÂMaximum cable length: 328feet(100meters)
ÂConnector: RJ-45for10Base-T,100Base-TX,and1000Base-T
ÂMedia, 10Base-T: Category(CAT)3orhigherUTPon2pairsupto100m
ÂMedia, 100Base-TX: CAT5eUTPon2pairsupto100m
109Chapter 5 What’s Under the Hood
ÂMedia, 1000Base-T: CAT5eUTPon4pairsupto100m
ÂChannel speeds: IEEEAutonegotiationof10Base-T,100Base-TX,and1000Base-T
Bluetooth 2.1+EDR Specications
ÂWireless data rate: Upto3Mbit/s
ÂRange: Upto33feetor10meters(dataratesmayvary,dependingon
environmentalconditions)
ÂFrequency band: 2.4gigahertz(GHz)
AirPort Extreme Specications
ÂFrequency band: 2.4and5gigahertz(GHz)
ÂRadio output power: 20dBm(nominal)
Compatibility
Â802.11a,b,g,andn
Optical Digital Audio Specications
ÂData format: Sony/PhillipsDigitalInterface(S/PDIF)protocol(IEC60958-3)
ÂConnector type: TOSLINKoptical(IEC60874-17)
ÂBits per sample: 16-bit,20-bit,or24-bit
Optical digital audio out
Basedonatypicalsituationwithplaybackofa1kHz,0dBFS24-bitsinewave,44.1kHz
outputsamplerate,unlessotherwisespeciedbelow.
ÂOutput sample rate: 44.1kHz,48kHz,or96kHz
ÂSignal-to-noise ratio: Greaterthan130dB
ÂTotal harmonic distortion + noise: Lessthan-130dB(0.00003percent)
110 Chapter 5 What’s Under the Hood
Optical digital audio in
Basedonatypicalsituationwithplaybackofa1kHz,0dBFS24-bitsinewave,unless
otherwisespeciedbelow.
ÂInput sample rate: 44.1kHz,48kHz,or96kHz
ÂSignal-to-noise ratio: Greaterthan130dB
ÂTotal harmonic distortion + noise: Lessthan-130dB(0.00003percent)
Analog Audio Specications
ÂSample rate: 44.1kHz,48kHz,or96kHz
ÂJack type: 1/8”mini
ÂBits per sample: 16-bit,20-bit,or24-bit
ÂFrequency response: 20Hzto20kHz,+0.5dB/-3dB
Analog audio out using the headphone jack (typical values)
Basedonatypicalsituationwithplaybackofa1kHz,-3dBFS24-bitsinewave,44.1kHz
outputsamplerateinto150ohms,unlessotherwisespeciedbelow.
ÂOutput voltage: 1.3volts(rootmeansquare)(Vrms)(+4.5dBu)
ÂOutput impedance: 55ohms
ÂOutput power: 53milliwatts(mW)into32ohms
ÂSignal-to-noise ratio: Greaterthan90dB
ÂTotal harmonic distortion + noise: Lessthan-70dB(.03percent)
ÂChannel separation: Greaterthan50dB
111Chapter 5 What’s Under the Hood
Analog audio line in (typical values)
Basedonatypicalsituationwithplaybackofa1kHz,-3dBFS24-bitsinewave,44.1kHz
outputsamplerate,unlessotherwisespeciedbelow.
ÂMaximum input voltage: 2Vrms(+8.2dBu)
ÂInput impedance: Greaterthan17kilohms
ÂSignal-to-noise ratio: Greaterthan90dB
ÂTotal harmonic distortion + noise: Lessthan-85dB(.006percent)
ÂChannel separation: Greaterthan85dB
Analog audio line out (typical values)
Basedonatypicalsituationwithplaybackofa1kHz,-3dBFS24-bitsinewave,44.1kHz
outputsamplerateinto100kilohms,unlessotherwisespeciedbelow.
ÂOutput voltage: 2Vrms(+8.2dBu)
ÂOutput impedance: 33ohms
ÂSignal-to-noise ratio: Greaterthan90dB
ÂTotal harmonic distortion + noise: Lessthan-85dB(.006percent)
ÂChannel separation: Greaterthan85dB
External microphone input using the headphone jack (typical values)
Basedonatypicalsituationwithplaybackofa1kHz,28mVrmssinewave,44.1kHzinput
samplerate,24-bitsampling,unlessotherwisespeciedbelow.
ÂMaximum input voltage: 39mVrms(-26dBu)
ÂInput impedance: Greaterthan1kilohm
ÂSignal-to-noise ratio: Greaterthan60dB
112 Chapter 5 What’s Under the Hood
ÂTotal harmonic distortion + noise: Lessthan-60dB(0.1percent)
ÂFrequency response: 100Hzto8.2kHz,+0.5dB/-3dB
Power Supply
AC line input
ÂVoltage ranges: 100–240Valternatingcurrent(AC)
ÂCurrent: Maximumof12A(lowvoltagerange)or5A(highvoltagerange)
ÂFrequency: 50–60Hzsinglephase
Power Requirements for Expansion Cards and Peripherals
Expansion cards
CombinedmaximumpowerconsumptionforallfourPCIExpressslotsshouldnot
exceed300watts(W).
USB devices
Eachofthecomputer’sbuilt-inUSBportsisallotted500mA.
FireWire devices
Thecomputercanprovideupto28WtotaltotheFireWireports.
System Clock and Battery
YourcomputerhasCMOScustomcircuitrywithalong-lifebattery.
Battery
Usea3-volt,BR2032lithiumcoincellreplacementbattery(see“ReplacingtheInternal
BackupBattery”onpage79).
113Chapter 5 What’s Under the Hood
Dimensions and Operating Environment
Dimensions
ÂWeight: 39.9lbs.(18.1kg)
Theweightdependsontheconguration.Theweightaboveisforabasic
congurationandmaybegreaterifoptionaldevicesareinstalled.
ÂHeight: 20.1inches(51.1cm)
ÂWidth: 8.1inches(20.6cm)
ÂDepth: 18.7inches(47.5cm)
Operating environment
ÂOperating temperature: 50°to95°F(10°to35°C)
ÂStorage temperature: –40°to116°F(–40°to47°C)
ÂRelative humidity: 5%to95%(noncondensing)
ÂMaximum altitude: 10,000feet(3048meters)


116 Chapter 6 Last, but Not Least
Thischapterprovidesimportantinformationaboutsafetyprocedures,routine
maintenance,andergonomicconsiderationsforusingyourMacProanddisplay.
Foryoursafetyandthatofyourequipment,followtheserulesforhandlingand
cleaningyourMacProandforworkingmorecomfortably.Keeptheseinstructions
handyforreferencebyyouandothers.
NOTICE: Incorrectstorageoruseofyourcomputermayvoidthemanufacturer’s
warranty.
Important Safety Information
WARNING: Failuretofollowthesesafetyinstructionscouldresultinre,electric
shock,orotherinjuryordamage.
TheonlywaytodisconnectpowercompletelyfromyourMacProistounplugthe
powercordfromthemainpowersupply.Todisconnectyourdisplaycompletely,you
mustalsounplugitspowercablefromthecomputerorpoweroutlet.Makesurethat
atleastoneendofthedevice’spowercordiswithineasyreachsothatyoucanunplug
thecomputerordisplaywhennecessary.
Always take the following precautions.
Disconnectthepowerplug(bypullingtheplug,notthecord),fromyourcomputeror
displayanddisconnectthephonecordifanyofthefollowingconditionsexist:
ÂThepowercordorplugbecomesfrayedorotherwisedamaged
ÂYouspillsomethingintothecase

117Chapter 6 Last, but Not Least
ÂYourcomputerordisplayisexposedtorainoranyotherexcessmoisture
ÂYourcomputerordisplayhasbeendroppedorthecasehasbeenotherwisedamaged
ÂYoususpectthatyourcomputerordisplayneedsserviceorrepair
ÂYouwanttocleanthecomputerorthecaseorscreenofthedisplay
Ifyouplantostoreyourcomputerforanextendedperiodoftime,removethebattery.
Forserviceorquestionsaboutyourwarranty,contactanAppleAuthorizedService
ProviderorApple.See“LearningMore,Service,andSupport”onpage99.
General Maintenance
Ifyouneedtocleanthecomputerordisplaybydoingmorethanwipingitdownwith
acleancloth,followtheseinstructions:
1 Turnoyourcomputeranddisplay.
2 Disconnectthecomputerpowercablefromtheelectricaloutletorpowerstrip.Ifyour
displayisconnectedtoanoutlet,disconnectitaswell.
3 Disconnectthedisplay’scablesfromthecomputer.
4 Cleanthedisplayscreenwithsoft,lint-freepaperorclothdampenedwithmildsoap
andwater.
WARNING: Donotsprayliquiddirectlyontothedisplayscreen.Liquidcoulddrip
insidethedisplayandcauseelectricalshock.

118 Chapter 6 Last, but Not Least
5 Wipethecomputerordisplaycasesurfaceslightlywithaclean,softclothdampened
withwater.
NOTICE: Don’tusealcohol,aerosolsprays,solvents,orabrasivesthatmightdamage
thenishonthecase.
Protecting Your Optical Drive
To keep your optical drive working properly:
ÂPositionyourcomputersothatthedrivetraydoesn’tbumpintoanythingwhen
itopens.
ÂClosethedrivewhenyou’renotusingit.
ÂDonotputanythingonthedrivetraywhenitisopen.
ÂDonottouchtheopticaldrivelenswithyourngers.Donotwipethelenswitha
papertowelorotherabrasivesurface.Ifyouneedtocleanthelens,seeanApple
AuthorizedServiceProviderforalenscleaner.
ÂKeepyourcomputerawayfromanysourceofmoisture.
Laser Information for Optical Disc Drive
Foryoursafety,havetheopticaldriveservicedonlybyanAppleAuthorized
ServiceProvider.
WARNING: Makingadjustmentsorperformingproceduresotherthanthosespecied
inyourequipment’smanualmayresultinhazardousradiationexposure.Theoptical
discdriveinyourcomputercontainsalaserthatissafeinnormalusebutthatmaybe
harmfultoyoureyesifdisassembled.

119Chapter 6 Last, but Not Least
Apple Magic Mouse Class 1 Laser Information
TheAppleMagicMouseisaClass1laserproductinaccordancewithIEC60825-1A1
A2and21CFR1040.10and1040.11exceptfordeviationspursuanttoLaserNoticeNo.
50,datedJuly26,2001.
WARNING: Modicationofthisdevicemayresultinhazardousradiationexposure.
Foryoursafety,havethisequipmentservicedonlybyanAppleAuthorizedService
Provider.
AClass1laserissafeunderreasonableforeseeableconditionspertherequirementsin
IEC60825-1and21CFR1040.However,itisrecommendedthatyoudonotdirectthe
laserbeamatanyone’seyes.
Maintaining Your Display
To maintain your display and ensure its long life:
ÂDonotpressonthesurfaceofthedisplayscreen.
ÂDonotwriteonthescreenortouchthescreenwithasharpobject.
ÂIfyouwillnotbeusingyourcomputerforadayormore,turnothecomputerand,if
thedisplayhasapowerbutton,turnothedisplay.YoucanalsouseEnergySaver.
120 Chapter 6 Last, but Not Least
Understanding Ergonomics
Herearesometipsforsettingupahealthyworkenvironment.
Keyboard
Whenyouusethekeyboard,yourshouldersshouldberelaxed.Yourupperarmand
forearmshouldformanapproximaterightangle,withyourwristandhandinroughly
astraightline.
Changehandpositionsoftentoavoidfatigue.Somecomputerusersmightdevelop
discomfortintheirhands,wrists,orarmsafterintensiveworkwithoutbreaks.Ifyou
begintodevelopchronicpainordiscomfortinyourhands,wrists,orarms,consulta
qualiedhealthspecialist.
Mouse
Positionthemouseatthesameheightasthekeyboardandwithinacomfortablereach.
Chair
Anadjustablechairthatprovidesrm,comfortablesupportisbest.Adjusttheheight
ofthechairsoyourthighsarehorizontalandyourfeetareatontheoor.Thebackof
thechairshouldsupportyourlowerback(lumbarregion).Followthemanufacturer’s
instructionsforadjustingthebackresttotyourbodyproperly.
Youmighthavetoraiseyourchairsothatyourforearmsandhandsareattheproper
angletothekeyboard.Ifthismakesitimpossibletorestyourfeetatontheoor,use
afootrestwithadjustableheightandtilttomakeupforanygapbetweentheoorand
yourfeet.Oryoucanlowerthedesktoptoeliminatetheneedforafootrest.Another
optionistouseadeskwithakeyboardtraythat’slowerthantheregularworksurface.
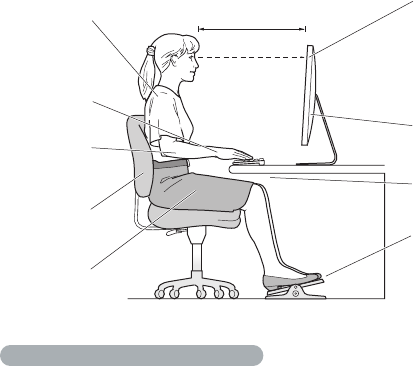
121Chapter 6 Last, but Not Least
Display
Arrangethedisplaysothatthetopofthescreenisslightlybeloweyelevelwhenyou’re
sittingatthekeyboard.Thebestdistancefromyoureyestothescreenisuptoyou,
althoughmostpeopleseemtoprefer18to28inches(45to70cm).
Positionthedisplaytominimizeglareandreectionsonthescreenfromoverhead
lightsandnearbywindows.Ifpossible,useatiltabledisplaystand.Thestandletsyou
setthedisplayatthebestangleforviewing,helpingtoreduceoreliminateglarefrom
lightingsourcesyoucan’tmove.
Thighs tilted
slightly
Shoulders
relaxed
Screen positioned to
avoid reflected glare
Forearms and
hands in a
straight line
Forearms level
or tilted slightly
Lower back
supported Feet flat on the floor
or on a footrest
Top of the screen at or
slightly below eye level
(You may need to adjust
the height of your display
by raising or lowering
your work surface)
Clearance under
work surface
18–28 in. (45–70 cm)
Moreinformationaboutergonomicsisavailableontheweb:
www.apple.com/about/ergonomics

122 Chapter 6 Last, but Not Least
Avoid Hearing Damage
WARNING: Permanenthearinglossmayoccurifearbudsorheadphonesareusedat
highvolume.Youcanadaptovertimetoahighervolumeofsoundthatmaysound
normalbutcanbedamagingtoyourhearing.Ifyouexperienceringinginyourears
ormuedspeech,thenstoplisteningandhaveyourhearingchecked.Thelouderthe
volume,thelesstimerequiredbeforeyourhearingcanbeaected.Hearingexperts
suggestthattoprotectyourhearing:
ÂLimittheamountoftimeyouuseearbudsorheadphonesathighvolume
ÂAvoidturningupthevolumetoblockoutnoisysurroundings
ÂTurnthevolumedownifyoucan’thearpeoplespeakingtoyou
Apple and the Environment
AppleInc.recognizesitsresponsibilitytominimizetheenvironmentalimpactsofits
operationsandproducts.
Moreinformationisavailableontheweb:
www.apple.com/environment

123
Regulatory Compliance Information
FCC Compliance Statement
Thisdevicecomplieswithpart15oftheFCCrules.Operation
issubjecttothefollowingtwoconditions:(1)Thisdevicemay
notcauseharmfulinterference,and(2)thisdevicemustaccept
anyinterferencereceived,includinginterferencethatmaycause
undesiredoperation.Seeinstructionsifinterferencetoradioor
televisionreceptionissuspected.
Radio and Television Interference
Thiscomputerequipmentgenerates,uses,andcanradiateradio-
frequencyenergy.Ifitisnotinstalledandusedproperly—that
is,instrictaccordancewithApple’sinstructions—itmaycause
interferencewithradioandtelevisionreception.
Thisequipmenthasbeentestedandfoundtocomplywith
thelimitsforaClassBdigitaldeviceinaccordancewiththe
specicationsinPart15ofFCCrules.Thesespecications
aredesignedtoprovidereasonableprotectionagainstsuch
interferenceinaresidentialinstallation.However,thereis
noguaranteethatinterferencewillnotoccurinaparticular
installation.
Youcandeterminewhetheryourcomputersystemiscausing
interferencebyturningito.Iftheinterferencestops,itwas
probablycausedbythecomputeroroneoftheperipheraldevices.
Ifyourcomputersystemdoescauseinterferencetoradioor
televisionreception,trytocorrecttheinterferencebyusingoneor
moreofthefollowingmeasures:
• Turnthetelevisionorradioantennauntiltheinterferencestops.
• Movethecomputertoonesideortheotherofthetelevision
orradio.
• Movethecomputerfartherawayfromthetelevisionorradio.
• Plugthecomputerintoanoutletthatisonadierentcircuit
fromthetelevisionorradio.(Thatis,makecertainthecomputer
andthetelevisionorradioareoncircuitscontrolledbydierent
circuitbreakersorfuses.)
Ifnecessary,consultanAppleAuthorizedServiceProvideror
Apple.Seetheserviceandsupportinformationthatcamewith
yourAppleproduct.Or,consultanexperiencedradio/television
technicianforadditionalsuggestions.
Important: Changesormodicationstothisproductnot
authorizedbyAppleInc.couldvoidtheEMCcomplianceand
negateyourauthoritytooperatetheproduct.
ThisproducthasdemonstratedEMCcomplianceunderconditions
thatincludedtheuseofcompliantperipheraldevicesandshielded
cablesbetweensystemcomponents.Itisimportantthatyou
usecompliantperipheraldevicesandshieldedcables(including
Ethernetnetworkcables)betweensystemcomponentstoreduce
thepossibilityofcausinginterferencetoradios,televisionsets,and
otherelectronicdevices.
Responsible party (contact for FCC matters only):
AppleInc.CorporateCompliance
1InniteLoop,MS26-A
Cupertino,CA95014
Wireless Radio Use
Thisdeviceisrestrictedtoindoorusewhenoperatingthe5.15to
5.25GHzfrequencyband.
Cetappareildoitêtreutiliséàl’intérieur.
Exposure to Radio Frequency Energy
TheradiatedoutputpoweroftheAirPortCardinthisdevice
isbelowtheFCCandEUradiofrequencyexposurelimitsfor
uncontrolledequipment.Thisdeviceshouldbeoperatedwitha
minimumdistanceofatleast20cmbetweentheAirPortCard
antennasandaperson’sbodyandmustnotbecolocatedor
operatedwithanyotherantennaortransmittesubjecttothe
conditionsoftheFCCgrantr.
FCC Bluetooth Wireless Compliance
Theantennausedwiththistransmittermustnotbecolocatedor
operatedinconjunctionwithanyotherantennaortransmitter
subjecttotheconditionsoftheFCCGrant.

124
Canadian Compliance Statement
ThisdevicecomplieswithIndustryCanadalicense-exemptRSS
standard(s).Operationissubjecttothefollowingtwoconditions:
(1)thisdevicemaynotcauseinterference,and(2)thisdevicemust
acceptanyinterference,includinginterferencethatmaycause
undesiredoperationofthedevice.
CetappareilestconformeauxnormesCNRexemptesdelicence
d’IndustrieCanada.Lefonctionnementestsoumisauxdeux
conditionssuivantes:(1)cetappareilnedoitpasprovoquer
d’interférenceset(2)cetappareildoitacceptertouteinterférence,
ycompriscellessusceptiblesdeprovoquerunfonctionnement
nonsouhaitédel’appareil.
Bluetooth Industry Canada Statement
ThisClassBdevicemeetsallrequirementsoftheCanadian
interference-causingequipmentregulations.
CetappareilnumériquedelaClassBrespectetouteslesexigences
duRèglementsurlematérielbrouilleurduCanada.
Industry Canada Statement
ComplieswiththeCanadianICES-003ClassBspecications.
CetappareilnumériquedelaclasseBestconformeàlanorme
NMB-003duCanada.ThisdevicecomplieswithRSS210ofIndustry
Canada.
Bluetooth Europe—EU Declaration of Conformity
ThiswirelessdevicecomplieswiththeR&TTEDirective.
Europe—EU Declaration of Conformity
Seewww.apple.com/euro/compliance.
Български Apple Inc. декларира, че това Mac Pro е в
съответствие със съществените изисквания и другите
приложими правила на Директива 1999/5/ЕС.
Česky Společnost Apple Inc. tímto prohlašuje, že tento Mac
Pro je ve shodě se základními požadavky a dalšími příslušnými
ustanoveními směrnice 1999/5/ES.
Dansk Undertegnede Apple Inc. erklærer herved, at følgende
udstyr Mac Pro overholder de væsentlige krav og øvrige
relevante krav i direktiv 1999/5/EF.
Deutsch Hiermit erklärt Apple Inc., dass sich das Mac Pro in
Übereinstimmung mit den grundlegenden Anforderungen und
den übrigen einschlägigen Bestimmungen der Richtlinie
1999/5/EG benden.
Eesti Käesolevaga kinnitab Apple Inc., et see Mac Pro vastab
direktiivi 1999/5/EÜ põhinõuetele ja nimetatud direktiivist
tulenevatele teistele asjakohastele sätetele.
English Hereby, Apple Inc. declares that this Mac Pro is in
compliance with the essential requirements and other relevant
provisions of Directive 1999/5/EC.
Español Por medio de la presente Apple Inc. declara que este
Mac Pro cumple con los requisitos esenciales y cualesquiera otras
disposiciones aplicables o exigibles de la Directiva 1999/5/CE.
Ελληνικά Mε την παρούσα, η Apple Inc. δηλώνει ότι αυτή η
συσκευή Mac Pro συμμορφώνεται προς τις βασικές απαιτήσεις
και τις λοιπές σχετικές διατάξεις της Οδηγίας 1999/5/ΕΚ.
Français Par la présente Apple Inc. déclare que l’appareil Mac
Pro est conforme aux exigences essentielles et aux autres
dispositions pertinentes de la directive 1999/5/CE.
Islenska Apple Inc. lýsir því hér með yr að þetta tæki Mac
Pro fullnægir lágmarkskröfum og öðrum viðeigandi ákvæðum
Evróputilskipunar 1999/5/EC.
Italiano Con la presente Apple Inc. dichiara che questo
dispositivo Mac Pro è conforme ai requisiti essenziali ed alle altre
disposizioni pertinenti stabilite dalla direttiva 1999/5/CE.
Latviski Ar šo Apple Inc. deklarē, ka Mac Pro ierīce atbilst
Direktīvas 1999/5/EK būtiskajām prasībām un citiem ar to
saistītajiem noteikumiem.
Lietuvių Šiuo „Apple Inc.“ deklaruoja, kad šis Mac Pro atitinka
esminius reikalavimus ir kitas 1999/5/EB Direktyvos nuostatas.
Magyar Alulírott, Apple Inc. nyilatkozom, hogy a Mac Pro
megfelel a vonatkozó alapvetõ követelményeknek és az
1999/5/EC irányelv egyéb elõírásainak.
Malti Hawnhekk, Apple Inc., jiddikjara li dan Mac Pro jikkonforma
mal-ħtiġijiet essenzjali u ma provvedimenti oħrajn relevanti li
hemm d-Dirrettiva 1999/5/EC.
125
Nederlands Hierbij verklaart Apple Inc. dat het toestel Mac Pro
in overeenstemming is met de essentiële eisen en de andere
bepalingen van richtlijn 1999/5/EG.
Norsk Apple Inc. erklærer herved at dette Mac Pro-apparatet er
i samsvar med de grunnleggende kravene og øvrige relevante
krav i EU-direktivet 1999/5/EF.
Polski Niniejszym Apple Inc. oświadcza, że ten Mac Pro są
zgodne z zasadniczymi wymogami oraz pozostałymi stosownymi
postanowieniami Dyrektywy 1999/5/EC.
Português Apple Inc. declara que este dispositivo Mac Pro
está em conformidade com os requisitos essenciais e outras
disposições da Directiva 1999/5/CE.
Română Prin prezenta, Apple Inc. declară că acest aparat Mac
Pro este în conformitate cu cerinţele esenţiale şi cu celelalte
prevederi relevante ale Directivei 1999/5/CE.
Slovensko Apple Inc. izjavlja, da je ta Mac Pro skladne z
bistvenimi zahtevami in ostalimi ustreznimi določili direktive
1999/5/ES.
Slovensky Apple Inc. týmto vyhlasuje, že toto Mac Pro spĺňa
základné požiadavky a všetky príslušné ustanovenia Smernice
1999/5/ES.
Suomi Apple Inc. vakuuttaa täten, että tämä Mac Pro tyyppinen
laite on direktiivin 1999/5/EY oleellisten vaatimusten ja sitä
koskevien direktiivin muiden ehtojen mukainen.
Svenska Härmed intygar Apple Inc. att denna Mac Pro står i
överensstämmelse med de väsentliga egenskapskrav och övriga
relevanta bestämmelser som framgår av direktiv 1999/5/EG.
AcopyoftheEUDeclarationofConformityisavailableat:
www.apple.com/euro/compliance
Thisequipmentcanbeusedinthefollowingcountries:
Korea Warning Statements
B
ૺૺ(ਜ਼ႜဧ෮ቛཅૺၴႁ)
ၦૺૺ௴ਜ਼ႜဧ(
B
) ႖ၴኒ႕ጁૺૺചച
ਜ਼ႜຫဧዻ௴ઇၕඛ႕ၒചዻඑ, ක౷ხ
ຫဧዾ༘ၰཀఁఋ.
෮ቛ၁ધགྷಋ൏ધხຫጃ
ጄఙඳ໓໕๗௴ဪဧთ႖ኒጯཅਜ਼ໜၦၰၗ
ၦૺૺ௴ၨྦ႖શഏౘ๗༺ຫဧዾ༘࿖ཀఁఋ
ఝዽූ૬ႜෟა༘
Singapore Wireless Certication
Taiwan Wireless Statements
Taiwan Class B Statement
警告
本電池如果更換不正確會有爆炸的危險
請依製造商說明書處理用過之電池
126
Japan VCCI Class B Statement
Russia
External USB Modem Information
WhenconnectingyourMacProtothephonelineusingan
externalUSBmodem,refertothetelecommunicationsagency
informationinthedocumentationthatcamewithyourmodem.
ENERGY STAR® Compliance
AsanENERGYSTAR®partner,Applehasdeterminedthatstandard
congurationsofthisproductmeettheENERGYSTAR®guidelines
forenergyeciency.TheENERGYSTAR®programisapartnership
withelectronicequipmentmanufacturerstopromoteenergy-
ecientproducts.Reducingenergyconsumptionofproducts
savesmoneyandhelpsconservevaluableresources.
Thiscomputerisshippedwithpowermanagementenabled
withthecomputersettosleepafter10minutesofuserinactivity.
Towakeyourcomputer,clickthemouseorpressanykeyon
thekeyboard.
FormoreinformationaboutENERGYSTAR®,visit:
www.energystar.gov
Disposal and Recycling Information
Thissymbolindicatesthatyourproductmustbedisposedof
properlyaccordingtolocallawsandregulations.Whenyour
productreachesitsendoflife,contactAppleoryourlocal
authoritiestolearnaboutrecyclingoptions.
ForinformationaboutApple’srecyclingprogram,goto
www.apple.com/recycling.
European Union: Disposal Information
Thesymbolabovemeansthataccordingtolocallawsand
regulationsyourproductshouldbedisposedofseparatelyfrom
householdwaste.Whenthisproductreachesitsendoflife,take
ittoacollectionpointdesignatedbylocalauthorities.Some
collectionpointsacceptproductsforfree.Theseparatecollection
andrecyclingofyourproductatthetimeofdisposalwillhelp
conservenaturalresourcesandensurethatitisrecycledina
mannerthatprotectshumanhealthandtheenvironment.
Türkiye
EEE yönetmeliğine (Elektrikli ve Elektronik Eşyalarda Bazı Zararlı
Maddelerin Kullanımının Sınırlandırılmasına Dair Yönetmelik)
uygundur.
Brasil: Informações sobre descarte e reciclagem
Osímboloacimaindicaqueesteprodutoe/ousuabateria
nãodevemserdescartadasnolixodoméstico.Quandodecidir
descartaresteprodutoe/ousuabateria,faça-odeacordocom
asleisediretrizesambientaislocais.Parainformaçõessobreo
programadereciclagemdaApple,pontosdecoletaetelefonede
informações,visitewww.apple.com/br/environment.
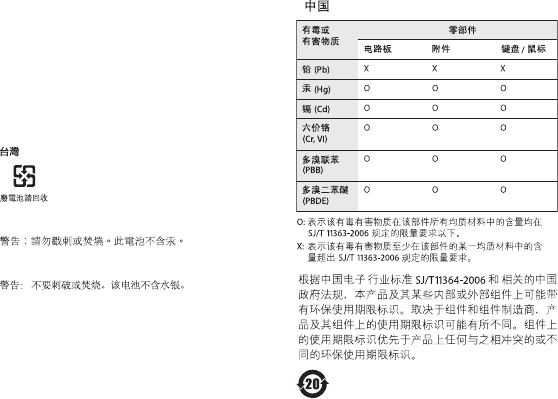
127
Battery Disposal Information
Disposeofbatteriesaccordingtoyourlocalenvironmentallaws
andguidelines.
Deutschland: DiesesGerätenthältBatterien.Bittenichtinden
Hausmüllwerfen.EntsorgenSiediesesGerätamEndeseines
Lebenszyklusentsprechenddermaßgeblichengesetzlichen
Regelungen.
Nederlands: Gebruiktebatterijenkunnenwordeningeleverdbijde
chemokarofineenspecialebatterijcontainervoorkleinchemisch
afval(kca)wordengedeponeerd.
Taiwan Battery Statement
Chinese Battery Statement

Looking for Something?
130 Looking for Something?
A
adapter
AppleMiniDisplayPortto
VGAAdapter 14
DVItoADC 14
DVItoVGA 14
AirPortExtreme
about 35
specications 109
analogaudio
linein 31
lineout 31
specications 110
AppleCareServiceand
Support 100
AppleHardwareTest 91,100
AppleKeyboard 26
AppleMagicMouse 17,98
applications
forcequit 83,85
freezing 85
MacOSXUtilities 86
MigrationAssistant 18
problems 85
audiospecications 110
B
batteries,wirelessmouse 98
battery 33
internalbackupbattery 33
replacing 79
specications 112
blinkingquestionmark 21
Bluetooth
about 35
specications 109
brightnesskeys 27
burningaCDorDVD 35
C
CapsLockkey 27
CD-RW 107
chair 120
changing
SystemPreferences 20,35
thedesktop 20
cleaning 117
computer 117
display 117
computerdisposal 126
computerdoesn’tturnon 84
connecting
display 13
Ethernetcable 15
keyboardcable 16
controls
brightness 27
mediaeject 27
mute 27
volume 27
D
desktop,customizing 20
dimensions 113
DIMMs
installing 43
location 33,58
specications 104,105
dischargingstatic 40
disconnectingthepower 116
DiskUtility 88
display
modes 106
ports 30
precautions 116
disposalof
batteries 127
computer 126
Dock 34
double-widePCIExpress
graphicsslot 33
Index
131Looking for Something?
downloadingsoftware 92
DVD 107
DVIdisplayport 31
E
environmentalimpact 122
ergonomics 120
Escapekey 27
Ethernet
maximizingperformance 99
ports 29
specications 108
expansioncards 112
externalUSBmodem 25,29
F
F1toF19functionkeys 27
Finder 34
FireWire
connections 35
devices 112
ports 29
specications 112
ForceQuit 85,95
frozenapplication 95
functionkeys 27
G
generalmaintenance 117
graphicscard 105
H
handposition 120
harddiskdrive 33
headphonejack 24,25
specications 111
HelpCenter 34
I
iLifeapplications 35
installing
backupbattery 79
DIMMs 43
equal-sizeDIMMs 49
full-lengthPCIcards 76
harddiskdrives 62
internaldrives 61
memory 45
PCIExpressCards 74
Internetconnection 95
internetproblems 95
iTunesStore 19
J
JEDECspecication 43
K
keyboard
connecting 16
ergonomics 120
extensioncable 16
features 26
functionkeys 27
wireless 17
keys
brightness 27
CapsLock 27
Escapekey 27
function 27
media 27
MediaEject 27
Mute 27
Volume 27
L
latch 29
lockinglatch 29
M
MacOSX
informationabout 34
keepinguptodate 92
MacOSXUtilities
application 86
MacOSXUtilitiespane 87
MagicMouse 17,98
maintenance 117
maximizingEthernet
performance 99
MediaEjectkey 27
mediakeys 27
memory
installing 43
location 33
specications 104
132 Looking for Something?
memoryslots 33
MemorySlotUtility 49,59
MigrationAssistant 18
MiniDisplayPort 31
modem
cable 29
DSL 29
externalUSB 25,29
mouse
connecting 25
ergonomics 120
replacingbatteries 98
settingup 17
Mutekey 27
N
network
connections 97
diagnostics 96
noimageonscreen 93
O
onlineresources 100
openingyourMacPro 39
operatingenvironment 113
opticaldigitalaudio
ports 31
specications 109
opticaldrive
about 25
installing 68
specications 107
P
PCIExpresscards 31,33
installing 74
specications 106
PCIExpressExpansion
specications 106
peripheral
connections 108
ports
analogaudioin 31
analogaudioout 31
display 31
DVIdisplay 31
Ethernet 29
FireWire 25,29
MiniDisplayPort 31
opticaldigitalaudioin 31
opticaldigitalaudioout 31
USB 25,27,29
power
button 18
powercord 12
powerrequirements
cards 112
USBdevices 112
powersocket 29
powersupply
specications 112
problems.Seetroubleshooting
processorspecication 104
Q
questionmark,blinking 21
R
RAM
installing 43
location 33
specications 105
reinstallingMacOSX 89
reinstallingsoftware 83
repairingadisk 88
replacingbatteries 97,98
resetthePRAM 84
restoringinformation 89
restoringyourcomputer 90
S
safetyinformation 116
SATAharddisk 61,106
screen
freezes 95
settingbrightness 27
SerialATAharddiskdrives
installing 61
specications 106
serialnumberlocation 102
serviceandsupport
information 100
settingup 11
SetupAssistant 18
shuttingopower 11,25,41
sleep 21,25
133Looking for Something?
software
updating 92
SoftwareUpdate 92
solidstatedrive(SSD) 65
specications
AirPortExtreme 109
analogaudio 110
battery 112
Bluetooth 109
dimensions 113
Ethernet 108
externalmicrophone 111
nding 104
FireWire 108
graphicscard 105
headphonejack 110
memory 104
operatingenvironment 113
opticaldigitalaudio 109
opticaldrive 107
PCIExpress 106
powerrequirements 112
powersupply 112
processor 104
RAM 105
storage 106
SuperDrive 107
USB 108
videodisplay 106
static,discharging 40
statuslight 25
ashes 85
stoppinganapplication 85
SuperDrive
about 25,33
replacing 68
specications 107
systemclock 112
SystemInformation 35,102
SystemPreferences 35
customizingthedesktop 20
T
telephonesupport 101
troubleshooting
AppleCare 100
AppleHardwareTest 91
applications 85
connectingtothe
Internet 95
DSLmodem 96
ForceQuit 83
internetconnection 95
networkconnection 97
PPPoEconnection 96
serviceandsupport
information 99
statuslightashes 85
unabletoejectadisc 84
typingposition 120
U
UDIMMs 43
unabletoejectadisc 84
updatingsoftware 92
USB
connections 27
devices 108
keyboardandmouse
connecting 16
USB2.0ports 27,29
V
Volumekeys 27
W
wireless
AirPorttechnology 35
Bluetoothtechnology 35
keyboard 17
mouse 17
K AppleInc.
©2011AppleInc.Allrightsreserved.
Underthecopyrightlaws,thismanualmaynotbecopied,inwhole
orinpart,withoutthewrittenconsentofApple.
Everyeorthasbeenmadetoensurethattheinformationin
thismanualisaccurate.Appleisnotresponsibleforprintingor
clericalerrors.
TheApplelogoisatrademarkofAppleInc.,registeredintheU.S.
andothercountries.Useofthe“keyboard”Applelogo(Option-
Shift-K)forcommercialpurposeswithoutthepriorwrittenconsent
ofApplemayconstitutetrademarkinfringementandunfair
competitioninviolationoffederalandstatelaws.
Apple
1InniteLoop
Cupertino,CA95014
408-996-1010
www.apple.com
Apple,theApplelogo,AirPort,AirPortExtreme,AppleCinema
Display,Finder,FireWire,GarageBand,Life,iMovie,iPhone,iPhoto,
iPod,iTunes,Keynote,Mac,MacOS,Safari,Spaces,SuperDrive,
TimeCapsule,andTimeMachinearetrademarksofAppleInc.,
registeredintheU.S.andothercountries.
TheFireWirelogoandiPadaretrademarksofAppleInc.
AppleCare,AppleStore,andiTunesStoreareservicemarksof
AppleInc.,registeredintheU.S.andothercountries.
AppStoreisaservicemarkofAppleInc.
Intel,IntelCore,andXeonaretrademarksofIntelCorp.intheU.S.
andothercountries.
TheBluetoothwordmarkandlogosareregisteredtrademarks
ownedbyBluetoothSIG,Inc.andanyuseofsuchmarksby
AppleInc.isunderlicense.
ThisproductincludessoftwaredevelopedbytheUniversityof
California,Berkeley,FreeBSD,Inc.,TheNetBSDFoundation,Inc.,
andtheirrespectivecontributors.
ENERGYSTAR®isaU.S.registeredtrademark.
Othercompanyandproductnamesmentionedhereinare
trademarksoftheirrespectivecompanies.Mentionofthird-party
productsisforinformationalpurposesonlyandconstitutes
neitheranendorsementnorarecommendation.Appleassumes
noresponsibilitywithregardtotheperformanceoruseofthese
products.
ManufacturedunderlicensefromDolbyLaboratories.“Dolby,”
“ProLogic,”andthedouble-DsymbolaretrademarksofDolby
Laboratories.CondentialUnpublishedWorks,©1992–1997Dolby
Laboratories,Inc.Allrightsreserved.
SimultaneouslypublishedintheUnitedStatesandCanada.
