Applied Wireless Identifications Group HH6600 RFID Handheld Terminal User Manual
Applied Wireless Identifications Group Inc. RFID Handheld Terminal
UserManual.wiki
>
Applied Wireless Identifications Group
>
HH6600 User Manual
User manual
Navigation menu
Upload a User Manual
Namespaces
Wiki Guide
HTML
PDF
Info
Views
User Manual
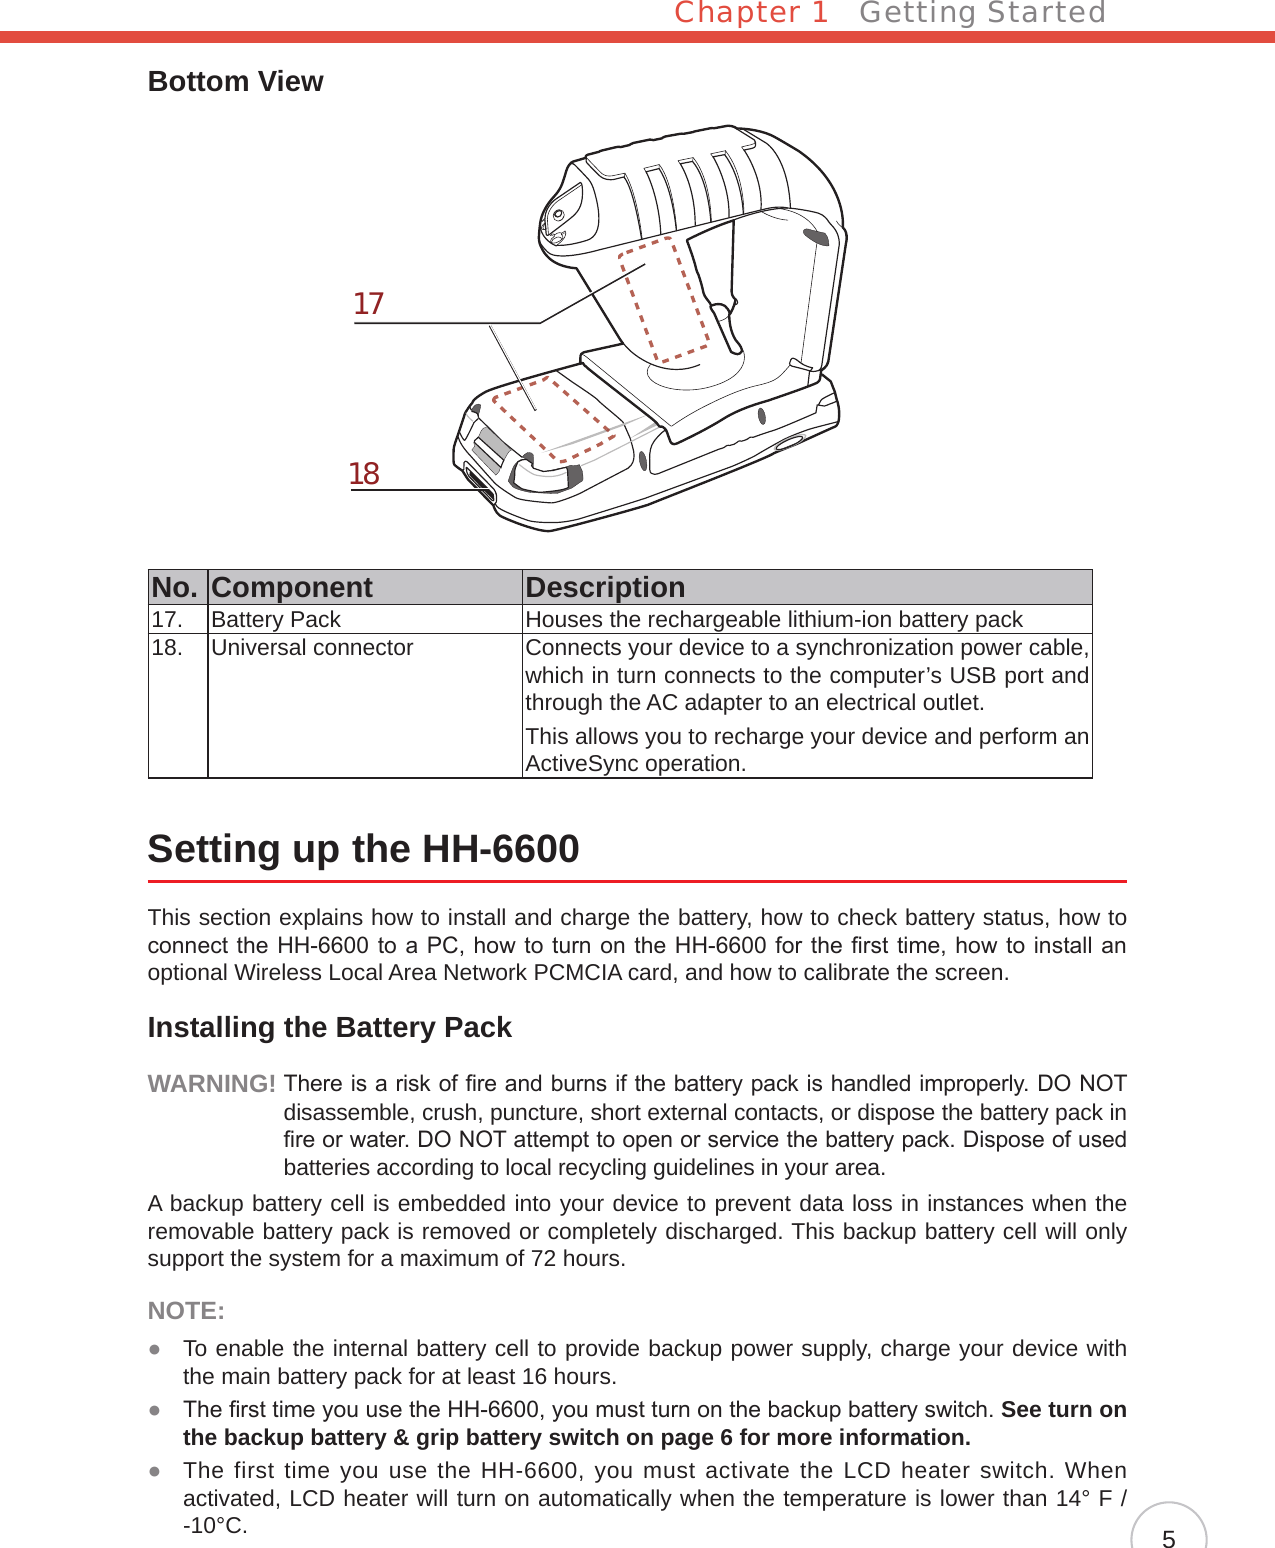
Discussion / Help
Navigation


![Chapter 1 Getting Started11Calibrating the HH-6600 ScreenThe calibrate screen automatically appears when the unit is powered-on for the rst time or after the system is reset.This screen will automatically appear when the unit is powered-on for the first time or after the system is reset. This screen can also be accessed at any time by pressing the hot key [FUNC] and the [ESC] key.The HH-6600 prompts you to calibrate the unit by tapping a sequence of screen locations. Tap gently but rmly.When you have completed the series of taps, press the [ENT] key to confirm calibration or press the [ESC] key to cancel it. After confirming calibration, the Date/Time Properties screen appears prompting you to set the date and time.Esc alpha Func Enter12369(/*-+[[Del,<=“870@%.54abcedinstojxyupkfglqvzwBksprmhFunction KayESC key](https://usermanual.wiki/Applied-Wireless-Identifications-Group/HH6600/User-Guide-1080759-Page-19.png)
![12Copyright 2009 Applied Wireless Identications Group, Inc. All rights reserved.Setting the Time and DateIn the Date/Time Properties window, use the stylus to select the current date and time, time zone, and daylight saving time option.Adjusting the Screen BrightnessAdjust the screen brightness by pressing the Function button [FUNC] to enable the soft keys and pressing the left (decrease brightness) or right (increase brightness) cursor buttons.Esc alpha Func Enter12369(/*-+[[Del,<=“870@%.54abcedinstojxyupkfglqvzwBksprmhFunction ButtonIncrease BrightnessDecrease Brightness](https://usermanual.wiki/Applied-Wireless-Identifications-Group/HH6600/User-Guide-1080759-Page-20.png)
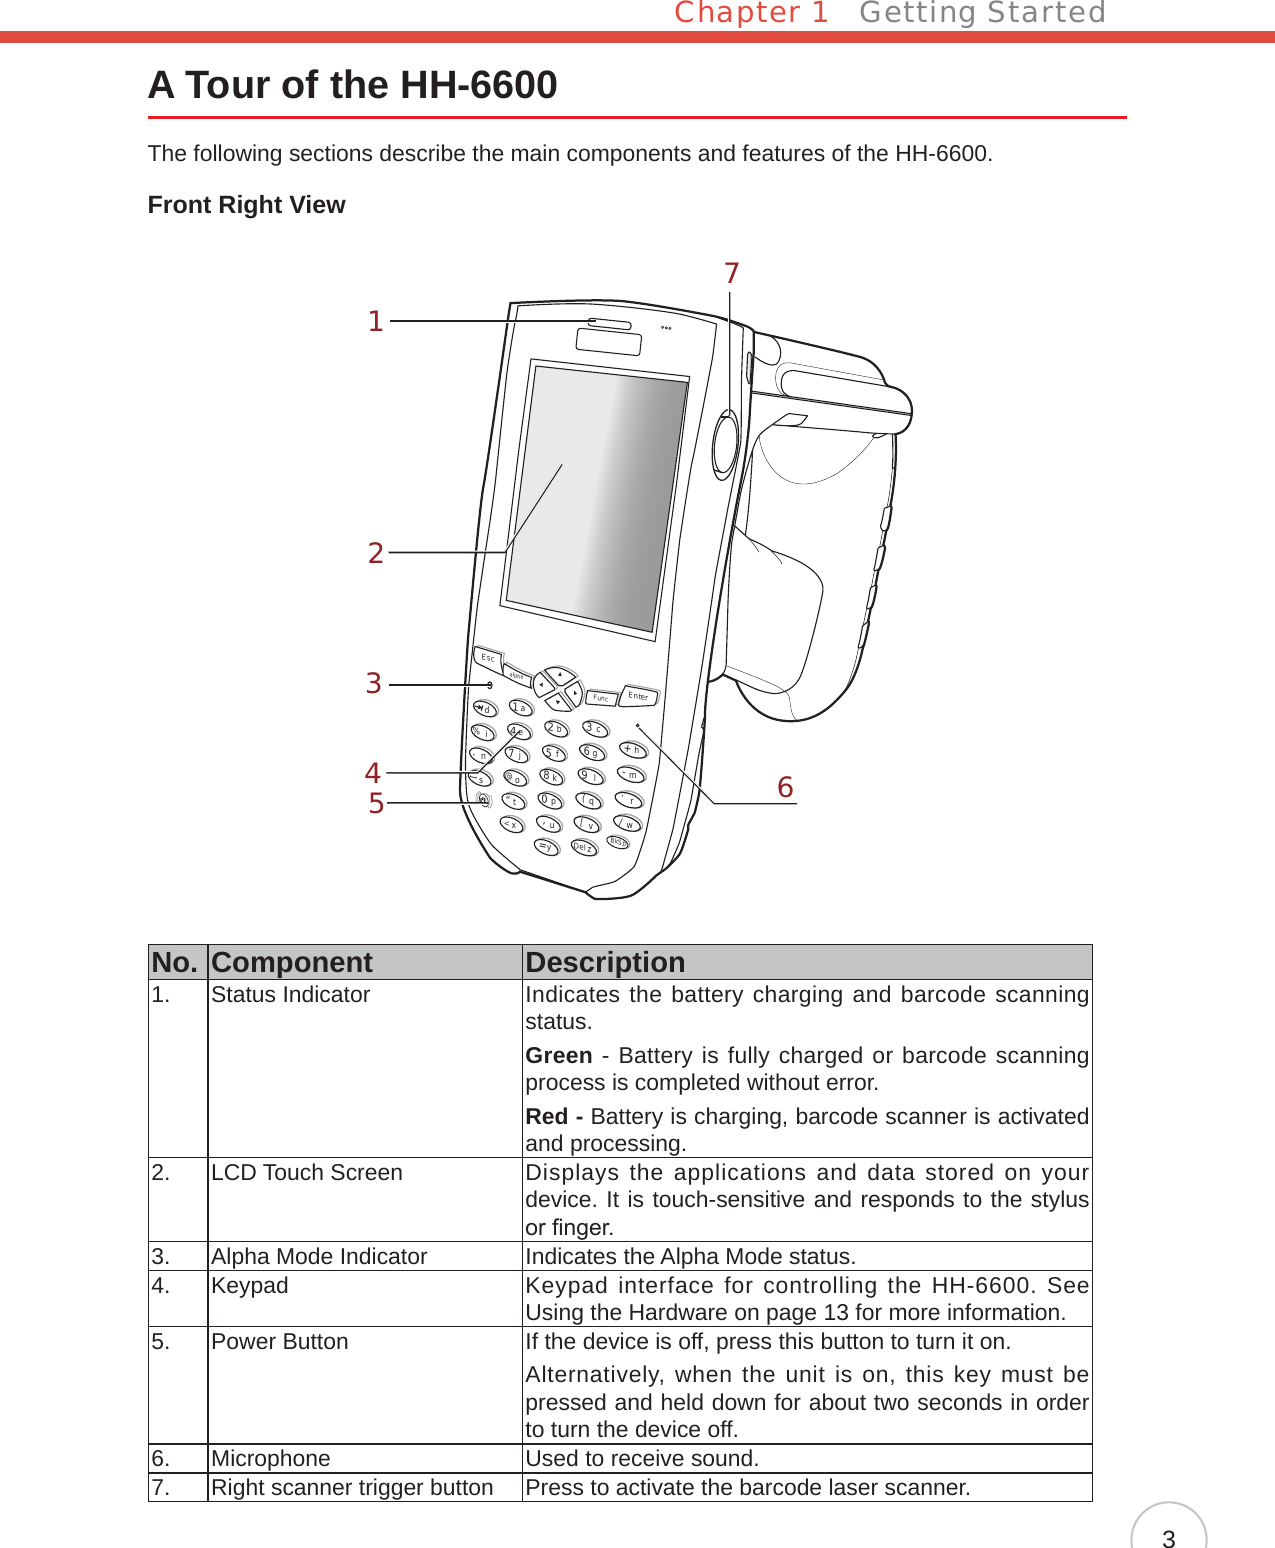
![Chapter 2The following table describes the main keypad keys.Key Main FunctionPress this button to turn the HH-6600 on. Press and hold this button for two seconds to turn the HH-6600 off.Pressing this button corresponds to tapping the cancel or X button on the screen.Press the backspace key to erase characters.Press the function key to perform alternative key functions. This key is also used to toggle between upper and lower case alphabetic characters. Refer to Using Hotkeys on page 13.dUse the tab key to toggle between elds or to tab forward in word processing applications.Press the enter key to conrm an action or entry by the user.Use the cursor keys to navigate in applications. Press and hold the Function key and then press the right and left arrows to raise and lower the screen brightness.Press the alpha key to toggle between numeric and alphabetic entry modes. 0p~1aPress these keys to enter numbers or characters depending on whether the Alpha key has been pressed. Press the 0 key to enter a space..nPress this key to add punctuation.Using Function keysThe HH-6600 provides many combination hot keys to activate specied screen setting functions or programs. These hotkeys are useful for calibrating the touch screen, toggling the backlight, and adjusting screen contrast when the menu-driven operation is disabled. Below is the list of hotkeys. To use them, Press and hold the [FUNC] key in combination with the corresponding second key.Key Function[FUNC]+ Toggle Display Backlight[FUNC]+ Toggle Keypad LED Backlight[FUNC]+ Increase screen brightness[FUNC]+ Decrease screen brightnessUsing the Hardware13](https://usermanual.wiki/Applied-Wireless-Identifications-Group/HH6600/User-Guide-1080759-Page-21.png)
![14Copyright 2009 Applied Wireless Identications Group, Inc. All rights reserved.Toggle to Alpha Mode and CAPSWhen the HH-6600 boots, the default condition is Numeric Mode on. When you toggle to Alpha Mode, the default condition is CAPS mode off. Please use the alpha Key and Function key to toggle to CAPS.Key Alpha OFF Alpha ONFUNC UP FUNC DOWN FUNC UP FUNC DOWNESC ESC ESC ESC ESCBackspace Backspace Backspace Backspace BackspaceEnter Enter Enter Enter Enter1/F1/a 1 F1 a A2/F2/b 2 F2 b B3/F3/c 3 F3 c CTAB/d TAB ` d D4/F4/e 4 F4 e E5/F5/f 5 F5 f F6/F6/g 6 F6 g G+/^/h + ^ h H%/BL/i % Backlight i I7/F7/j 7 F7 j J8/F8/k 8 F8 k K9/F9/l 9 F9 l L-/_/m - _ m M./;/n . ; n N@/!/o @ ! o O0/$/p 0 $ p P(/)/q ( ) q Q*/#/r * # r RSPACE/s SPACE SPACE s S“/’/t “ ‘ t T,/?/u , ? u U[/]/v [ ] v V//\/w / \ w W</>/x < > x X=/&/y = & y YDEL/z DEL ~ z Z](https://usermanual.wiki/Applied-Wireless-Identifications-Group/HH6600/User-Guide-1080759-Page-22.png)
![Chapter 2 Using the Hardware17Using the StylusCAUTION! Never use anything other than the HH-6600 stylus on the screen. Otherwise this could cause a permanent damage.1. Remove the stylus from its holder.2. Hold the stylus as you would a pencil.3. To make a choice from a menu, lightly tap the tip of the stylus on that choice.4. To write data into a field on a form, use the stylus to print the letters or numbers. Use very light pressure.Using the Laser ScannerThe HH-6600 has an integrated laser scanner which reads all major bar code labels with excellent performance.NOTE: Reading software must be enabled in order to operate the scanner. This can be a userloaded application or a pre-loaded utility such as Scanner Setting.Activate the laser scanner by pressing either one of the trigger keys located on the left and right side of the unit.The HH-6600 has a built-in Scanner Setting utility that allows you to test the device’s barcode scan function.1. To launch Scanner Settings, press [FUNC] + [7].NOTE: Alternatively, tap Start → Settings → System →Scanner Settings.EscalphaFuncEnterabcdefghmrqijnokpDeltxyzBkSpuvwls1234567890@%“<,/..-+=([[Scan button](https://usermanual.wiki/Applied-Wireless-Identifications-Group/HH6600/User-Guide-1080759-Page-25.png)
![18Copyright 2009 Applied Wireless Identications Group, Inc. All rights reserved.2. The Scanner Control Panel opens. From here you can configure barcode scanner parameters such as enabling or disabling barcode symbologies, setting data transmission options, configuring magnetic and proximity reading options, and setting power management options.3. To test the barcode scanner, tap the Test tab and press one of the scanner buttons on a barcode. The screen will display the results of the scan.Scanner SettingsWhen it is necessary for the user to change the default barcode symbology for a different application, the Scanner Control Panel provides the ability to change default symbology, place delimiter characters behind scanned data, and save the settings.Press [FUNC] + 7 to display the Scanner Control Panel.NOTE: Alternatively, tap Start → Settings → System → Scanner Settings to display the Scanner Control Panel.](https://usermanual.wiki/Applied-Wireless-Identifications-Group/HH6600/User-Guide-1080759-Page-26.png)
![Chapter 2 Using the Hardware19Scan2KeyThe Scan2Key application routes input from a scanner port to a keypad buffer, making all input from the scanner emulate input from the keypad. Using Scan2Key, scanned data can be directly input into a scanner port aware application such as MS Mobile Word.Press [FUNC] + [7] to display the Scanner Control Panel, then tap To Kpd to access Scan2Key settings.Using the RFIDThe HH-6600 RFID sample application is provided for reading RFID tags. The RFID demo program is pre-loaded in the Flash Storage.Launching UHF RFID Demo ProgramTo launch the AWID HHT Demo program,1. Double-tap My Device, then double-tap Flash Storge.2. Double-tap the HHT Demo AP icon, then tap the Connect Reader/Disconnect button to connect/disconnect reader.](https://usermanual.wiki/Applied-Wireless-Identifications-Group/HH6600/User-Guide-1080759-Page-27.png)