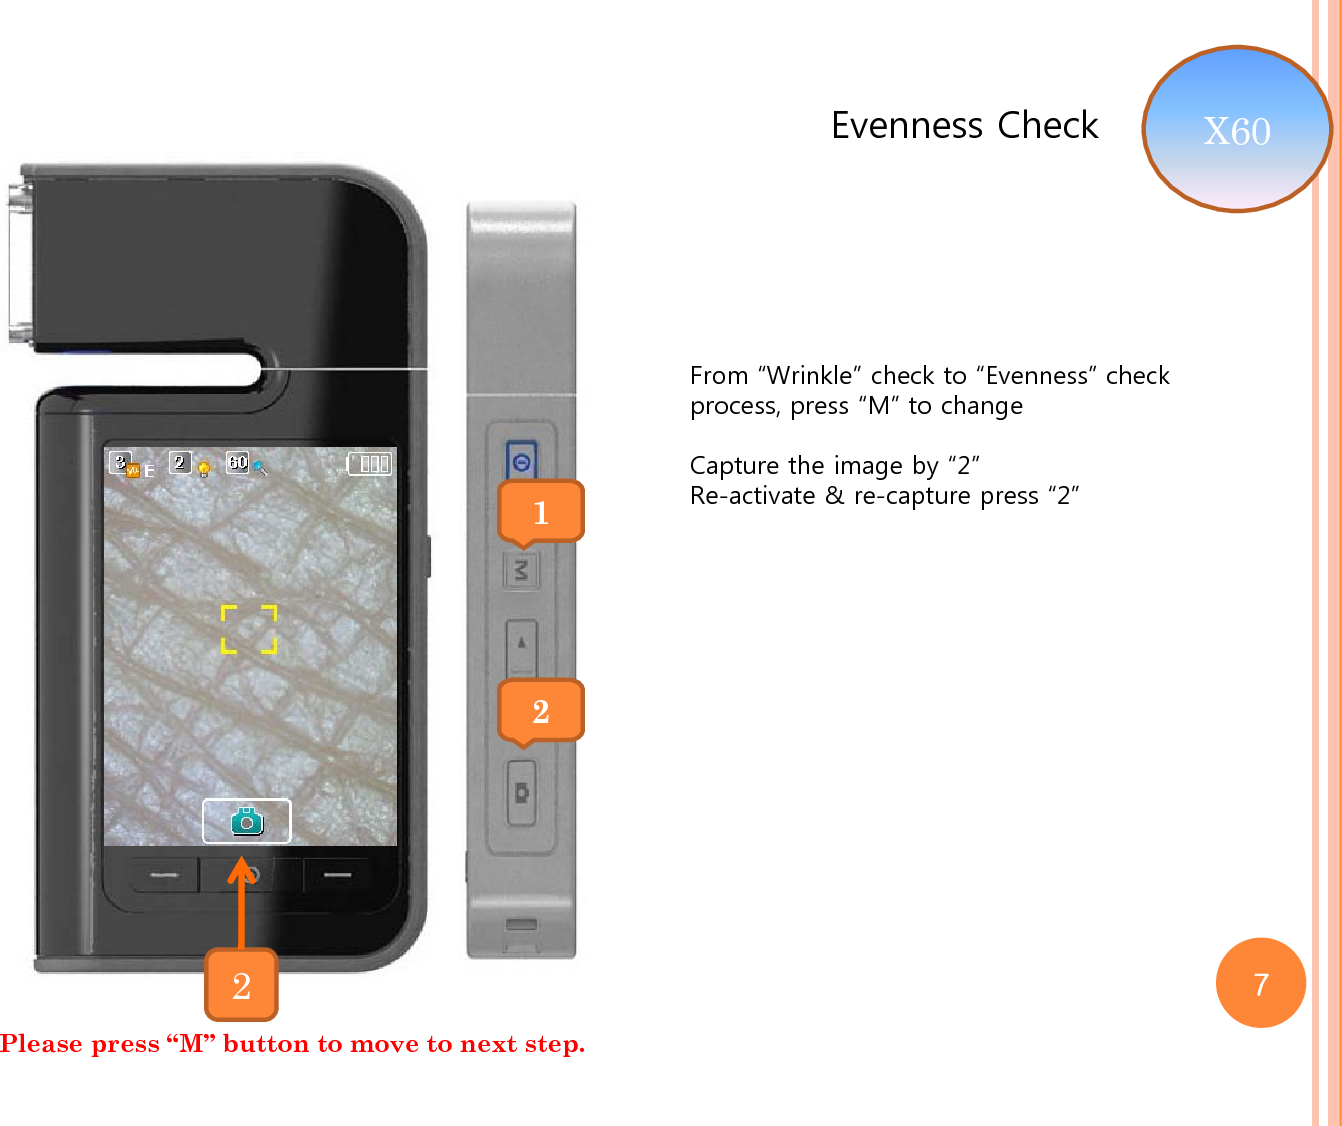
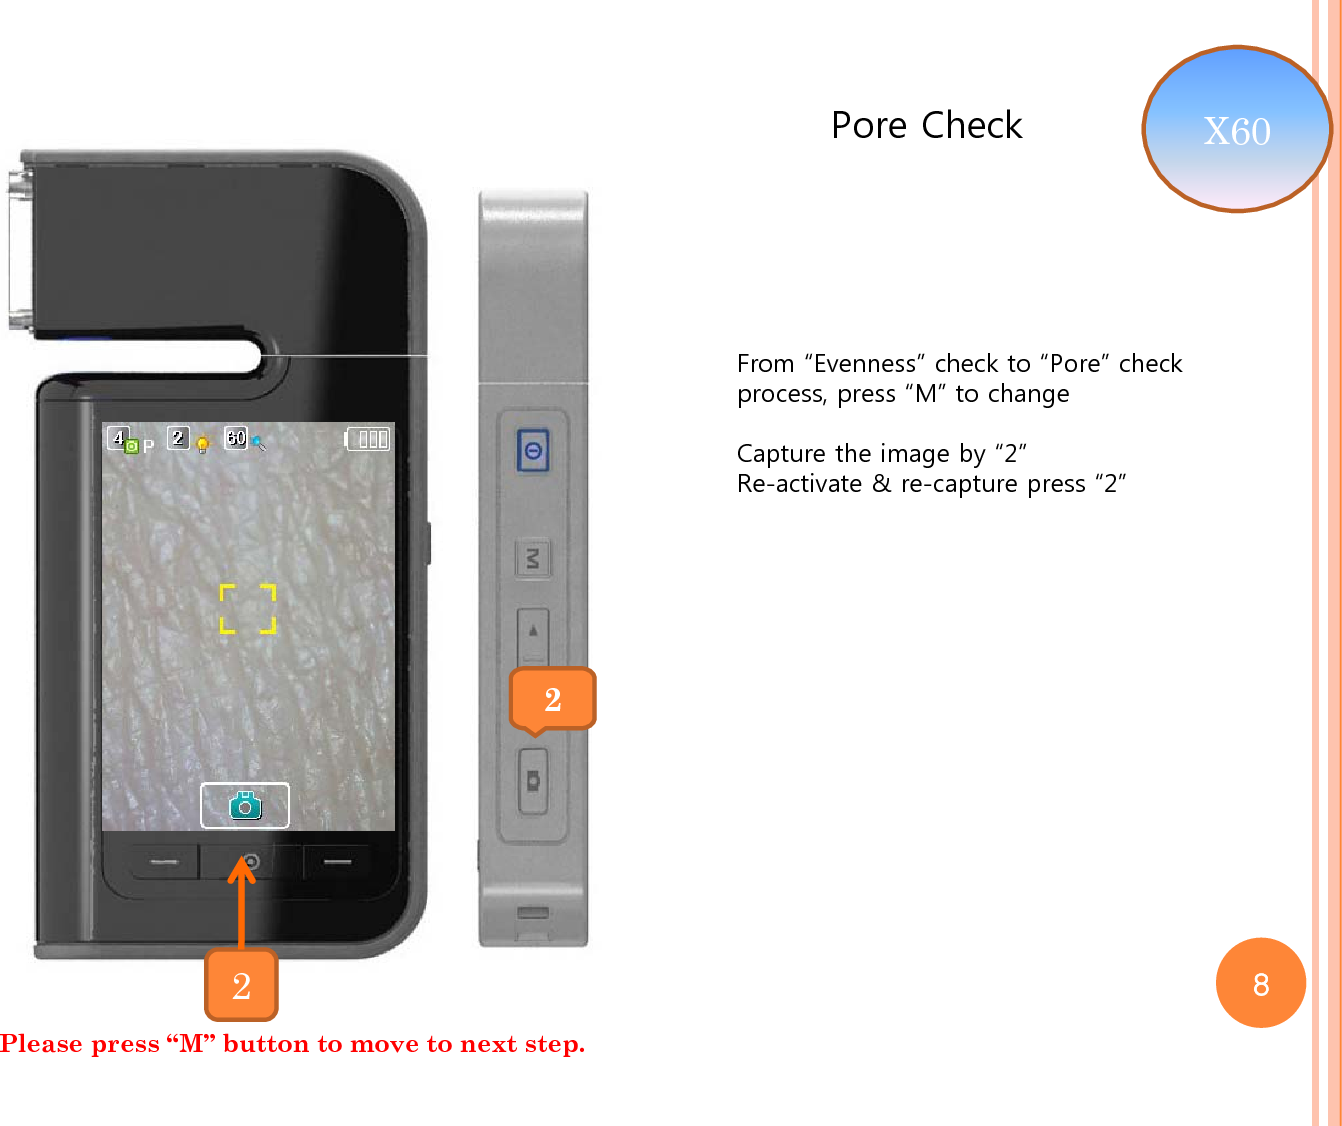
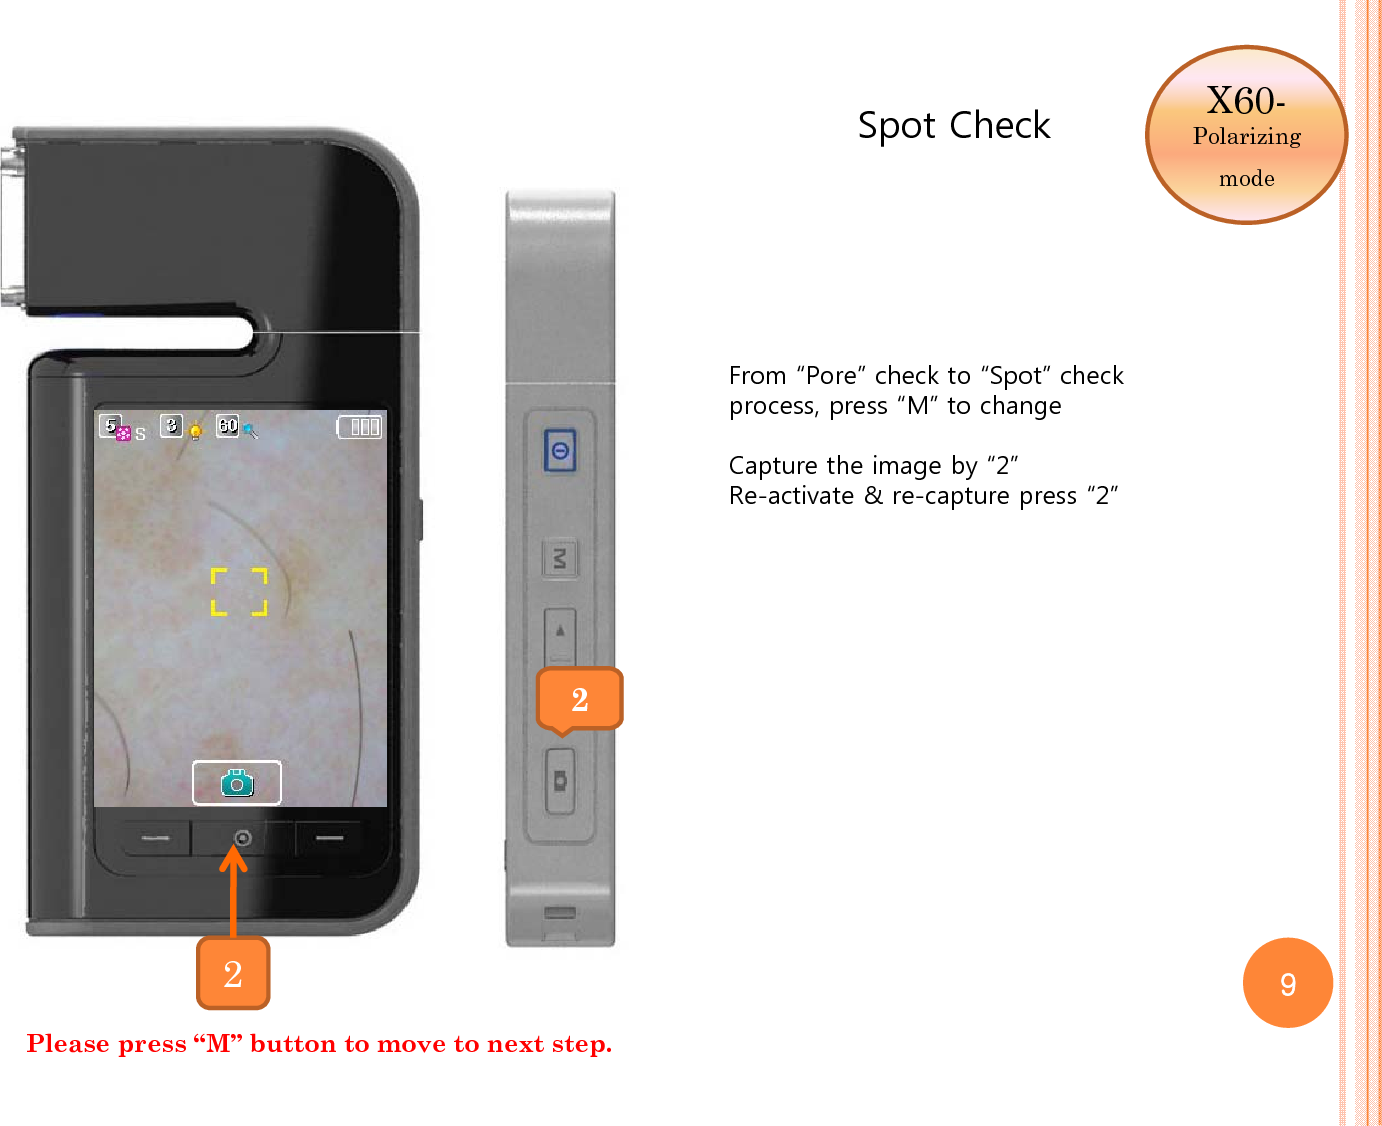
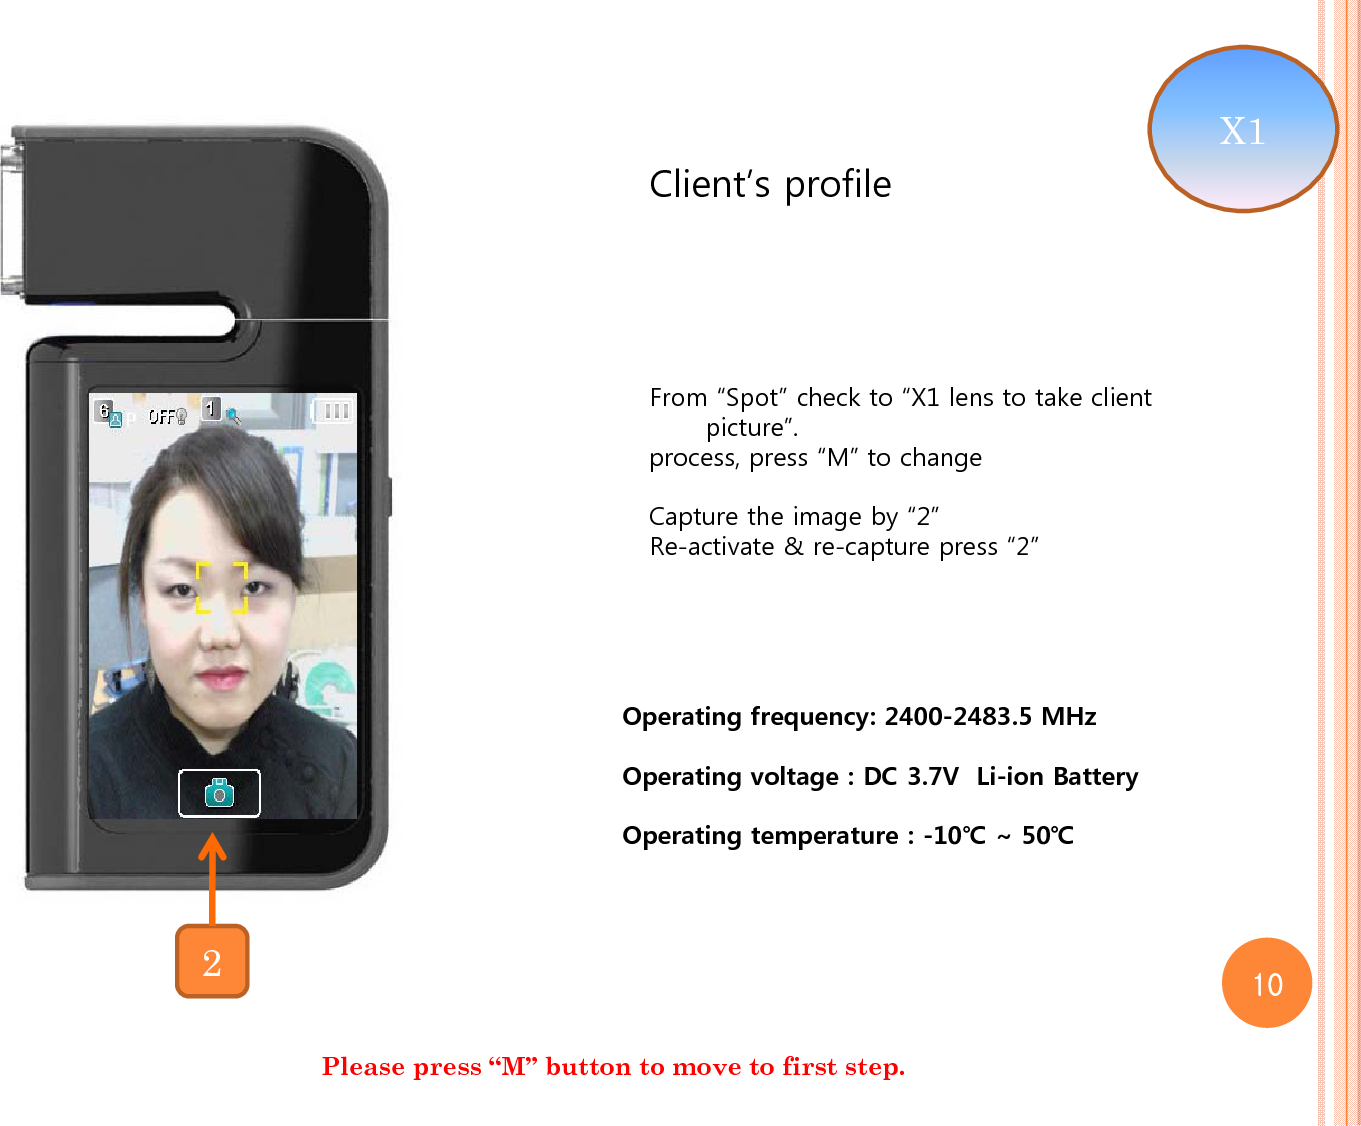
Aram Huvis ARAMO-SMART PORTABLE SKIN DIAGNOSIS SYSTEM User Manual Microsoft PowerPoint Smart manual Eng

Aram Huvis Co., Ltd. PORTABLE SKIN DIAGNOSIS SYSTEM Microsoft PowerPoint Smart manual Eng

USERS MANUAL

255431Key function1. Power buttonPress it to “ON”Press & hold it for 5sec to “OFF”2. Mode change buttonTo change diagnosis processMoisture -> Wrinkle (30X) -> Evenness (60X) -> Pore (60X) -> Pigmentation (60X PL) -> 1X lens3. LED light mode change buttonOnly used in 1X lens mode In the album, it is move key to select anotherimage4.  Go to Album buttonWhen camera is activated, press this and the captured image will be shown as a albumIn the album, it is move key to select anotherimage5. Capture buttonClick to capture and re-activate the cameraWhen it is searching for Blue tooth device.6. Bluetooth sending buttonIt is used in Album to send selected image to external device7. Delete buttonIt is used in Album to delete selected image6 7Auto-focus function- press “5”.Capture – press “5” for 2 sec. 2
Moisture CheckTo check moisture,Simply place moisture sensor area to skinAnd press button 3.There are four round shaped metal in the lens part, above two metals “1” aremoisture sensorThe test result will be displaced as shown as “2”21moisture sensor 3Please press “M” button to move to next step. 3
Wrinkle CheckCapture the image by “1”Re-activate & re-capture press “1”Diagnosis process will be done in1) PDA ( which has Blue tooth )2) PC ( Blue tooth )Or captured image will be saved in external memory such as SD or Mini SD card then it can be inserted into PC to perform the analysis Diagnosis software can be provided –depends on project.  11Please press “M” button to move to next step. X30 Auto-focus function- press “1”.Capture – press “1” for 2 sec. 4
Album ( 4 images view )Captured image is saved in AlbumGo to Album, press “3” when the camera is activating When album is shown, “4” images will shownPress “1” selected image will be shown in “Full Screen”In 4 images view, press “2” or “3” to selectother imagesIn 4 images view & one image view, press “4” to transfer the image to external device and press “5” to delete selected image23415 5
Album ( 1 images view )Captured image is saved in AlbumGo to Album, press “3” when the camera is activating When album is shown, “4” images will shownPress “1” selected image will be shown in “Full Screen”In 4 images view, press “2” or “3” to selectother imagesIn 4 images view & one image view, press “4” to transfer the image to external device and press “5” to delete selected image234156
Evenness CheckFrom “Wrinkle” check to “Evenness” check process, press “M” to changeCapture the image by “2”Re-activate & re-capture press “2”122Please press “M” button to move to next step. X60 7
Pore CheckFrom “Evenness” check to “Pore” check process, press “M” to changeCapture the image by “2”Re-activate & re-capture press “2”22Please press “M” button to move to next step. X60 8
Spot CheckFrom “Pore” check to “Spot” check process, press “M” to changeCapture the image by “2”Re-activate & re-capture press “2”22Please press “M” button to move to next step. X60-Polarizing mode9
Client’s profile From “Spot” check to “X1 lens to take client picture”.process, press “M” to changeCapture the image by “2”Re-activate & re-capture press “2”Please press “M” button to move to first step. 2X1 10Operating frequency: 2400-2483.5 MHzOperating voltage : DC 3.7V  Li-ion BatteryOperating temperature : -10℃ ~ 50℃
Federal Communication Commission Interference Statement  This equipment has been tested and found to comply with the limits for a Class B digital device, pursuant to Part 15 of the FCC Rules. These limits are designed to provide reasonable protection against harmful interference in a residential installation. This equipment generates, uses and can radiate radio frequency energy and, if not installed and used in accordance with the instructions, may cause harmful interference to radio communications. However, there is no guarantee that interference will not occur in a particular installation. If this equipment does cause harmful interference to radio or television reception, which can be determined by turning the equipment off and on, the user is encouraged to try to correct the interference by one of the following measures: • Reorient or relocate the receiving antenna. • Increase the separation between the equipment and receiver. • Connect the equipment into an outlet on a circuit different from that to which the receiver is con-nected. • Consult the dealer or an experienced radio/TV technician for help.  FCC Caution: To assure continued compliance, (example - use only shielded interface cables when connecting to computer or peripheral devices). Any changes or modifications not expressly approved by the party responsible for compliance could void the user’s authority to operate this equipment.This device complies with Part 15 of the FCC Rules. Operation is subject to the following two conditions: (1) This device may not cause harmful interference, and (2) this device must accept any interference received, including interference that may cause undesired operation including interference that may cause undesired operation IMPORTANT NOTE: FCC RF Radiation Exposure Statement: This equipment complies with FCC RF radiation exposure limits set forth for an uncontrolled environment. This equipment should be installed and operated with a minimum distance of 20 centimeters between the radiator and your body.This transmitter must not be co-located or operating in conjunction with any other antenna or transmitter.  NOTE: THE MANUFACTURER IS NOT RESPONSIBLE FOR ANY RADIO OR TV INTERFERENCE CAUSED BY UNAUTHORIZED MODIFICATIONS TO THIS EQUIPMENT.   SUCH MODIFICATIONS COULD VOIDTHE USER�S AUTHORITY TO OPERATE THE EQUIPMENT.
  IMPORTANT Safety Instruction:   1) Read these instructions. 2) Keep these instructions. 3) Heed all warnings. 4) Follow all instructions.   5) Do not use this equipment near water. 6) Do not using near any heat sources such as radiators, heat resisters, stove, or other equipment that produce heat.

Navigation menu