Ardi Technology SB20 Keyring Locator/Kid Tracker/Remote Controller User Manual iReminder SB20 20130517 ai
Ardi Technology Corp. Keyring Locator/Kid Tracker/Remote Controller iReminder SB20 20130517 ai
UserManual.wiki
>
Ardi Technology
>
SB20 User Manual
Users Manual
Navigation menu
Upload a User Manual
Namespaces
Wiki Guide
HTML
PDF
Info
Views
User Manual
Discussion / Help
Navigation
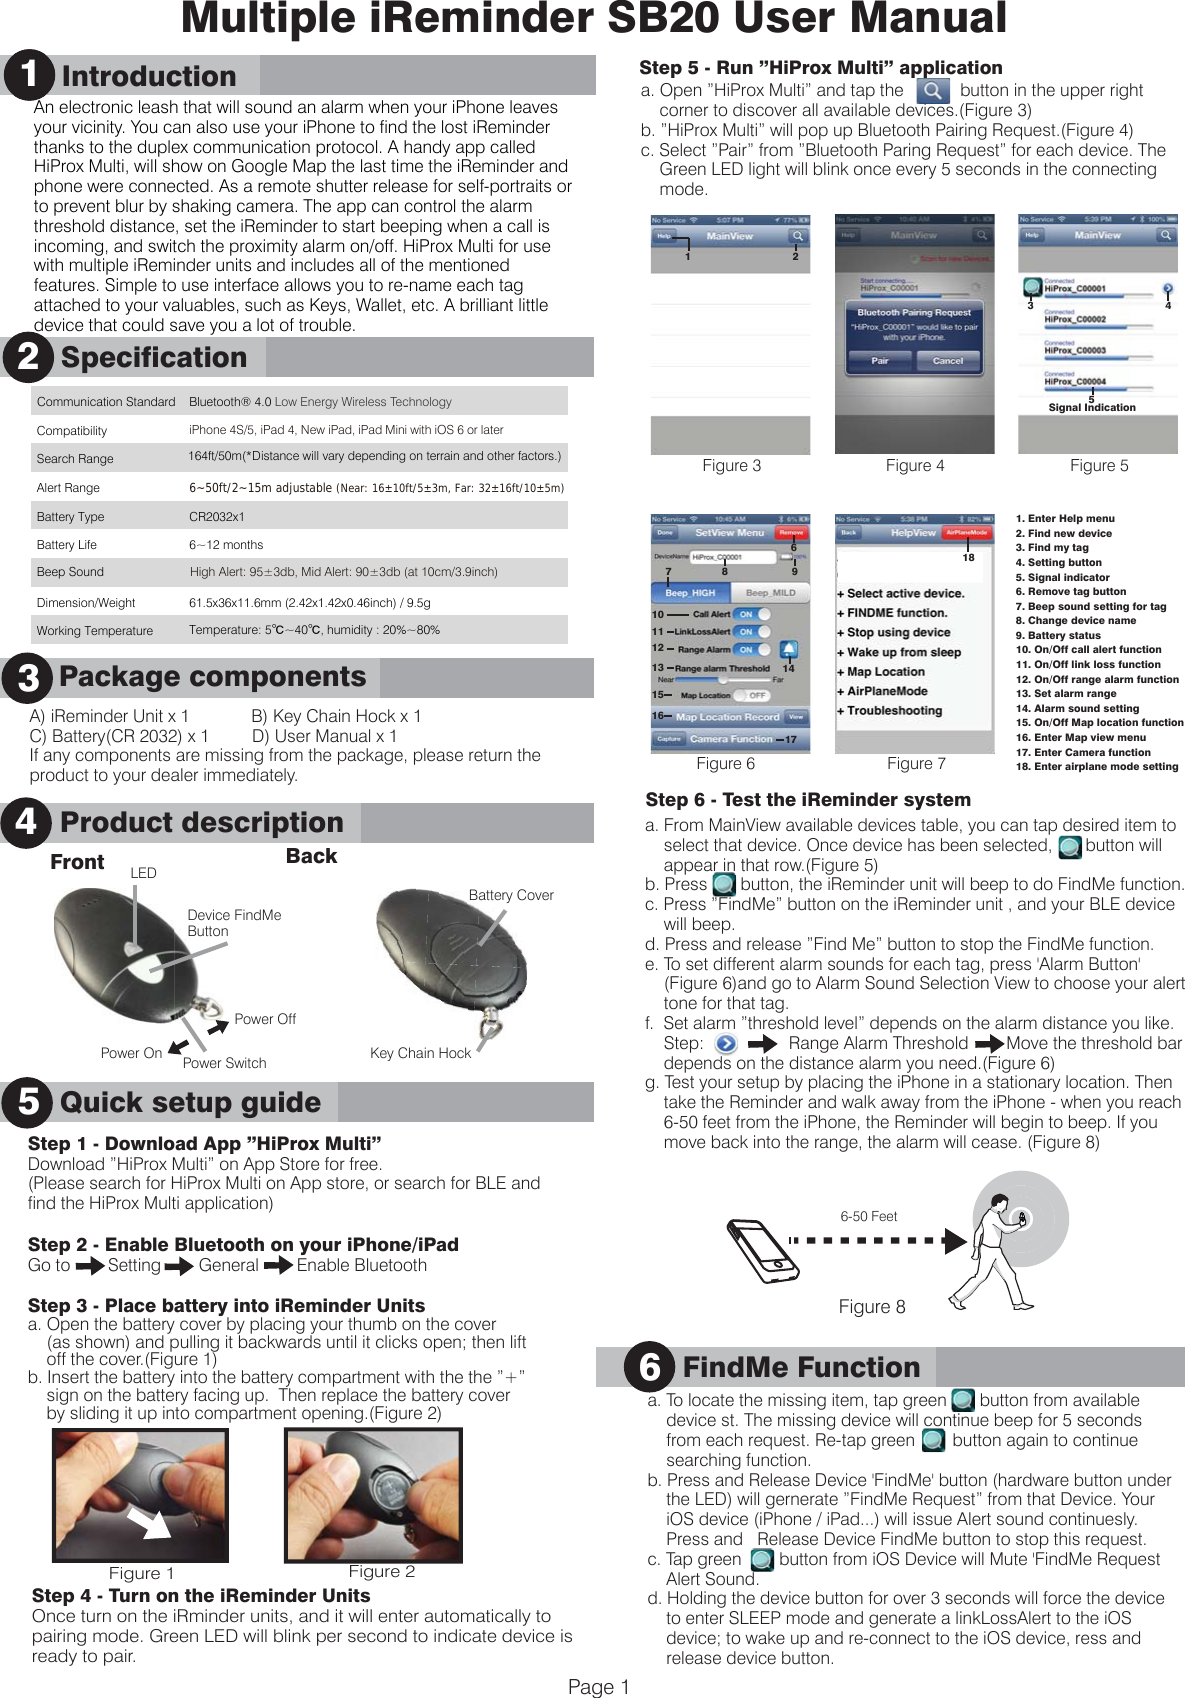
![Notification of incoming callsMap Locate9 Warning13Do not disassemble, repair, modify or replace the iReminder Unit or any of its components.Please comply with the national and international flight safety regulations when using device during your flight trip.When storing rechargeable batteries for collection, keep in a vented, non-metal container.Operating for this product is between 40˚F~103˚F (5˚C~40˚C). Storage for this product is between -4F˚~185˚F(-20˚C~85˚C).Do NOT dispose of the battery in public trash; it is unlawful under state and federal environmental laws and regulations. Please dispose of the battery at local battery recycling center.a. To set map Location function manually, go to SetView Menu page and tap the button to go to MapView.(Figure 9)b. To manually select a Location mark, tap the button and choose [YES] ,you will see a red mark pin on the current blue location mark.(Figure 10)c. Auto set map location function: go to MapView Menu and tap the button and remove the current mark pin , then enable the Map Location function. When your iOS Device detects linkLossAlert , the iOS Device will automark the Location pin on MapView.(Figure 11)Please notice map location is at the base of the iOS Device GPS function if outdoors. If indoor, Please enable Wi-Fi to get Location accurately.Please go to SetView Menu to enable the call alert function.Step: Call Alert EnableWhen you get a phone call, the iReminder will start beeping and flashing to remind you. Troubleshooting12If you try to discover a device, but cannot find it, this usually indicates that there is existing bond information. Locate and remove(Figure 12) existing bond information from your iOS device and from Bluetooth Setting to "Forget device". (Figure 14) May be you need to shut down iOS device to clean holding information completely.Removing bond information from iOSBond information can be removed from the Settings menu, by going to General and then Bluetooth. There you should see the name of the device you want to remove, tap it, and choose "Forget this device". (Figure 14)Step : Removing bond information from deviceTo remove device permanently:a.) Disconnection device first and go to SetView page to ”Remove” (Figure 12) and ”Delete” (Figure 13) Device. Follow “Removing bond information from the iOS” setps to completely remove device from the iOS. Step : YES OK b.) Remove battery from device and re-install to re-start pairing process.What can cause a false Out-of-Range alarm?a.) Low battery power. b.) The human body is also a source of interference; when carrying both iPhone & iReminder, carry them on the same side of your body. c.) Interference/block by metal objects or high power signals used by 2.4 GHz band devices (i.e. Wi-Fi networks or Microwave ovens…).Please change batteries if audible alarm becomes weak. 7 Mode option and tap 'Reconnect' to connect all devices. If all devices are in sleep mode, please press and release device button to wakeup each device. In this case, you have to exit App and Run again to reconnect all device (this may take up to 20 seconds for device in SLEEP mode).c. Press and release device button, Device will wake up from sleep mode and send connection request to iOS DEVICE. iOS DEVICE Will automatically connect to this device with "Connected" message. d. To temporarily stop using one or more devices, enter sleep mode for each device. Hold device button for over 3 seconds until you hear the first beep or the status LED light blinks Red. If you are still in connect mode, a link lost alert will register to iOS DEVICE and iOS will issue Alert Sound with 'LinkLoss/sleep' message. Tap that row to stop Alert Sound. You can wakeup that device by press and release device button once. iOS Device will detect wakeup signal and enable connection automatically.e. Device LED will stop blinking when it is in sleep mode. f. You can remove device permanently by tapping the red Remove button(Figure 12) in the upper right corner of the SetView page. To delete this device(Figure 13) ,Please GO TO your iOS Device Settings menu, select General/Bluetooth . You should see the name of the device you want to remove, tap it and choose "Forget this device".9Page 2Figure 9 Figure 10 Figure 11Figure 12 Figure 13 Figure 14 HiProx_CXXXXXForget deviceRemove deviceOption A: After Airplane Mode has been turned 'ON'.Press and release device button once for each device to disable alert sound. Please go to Help/AirPlaneMode option: tap the button by select [YES] to disconnect all Devices and exit App now (please follow instructions from App)To reconnect to all devices: tap the button and choose [RECONNECT] and exit App now (please follow instructions from APP). If you can not connect all devices at once, please repeat AirPlaneMode disconnect / reconnect steps to RECONNECT all devices.Option B: Enable sleep mode for all devices: Press and release device button over 3 seconds for each device, you should hear beep once to confirm sleep mode. Your iOS DEVICE will register 'LinkLoss/Sleep detected' message and go to Help/AirPlane Mode to disconnect all devices (please follow instruction from App) and exit App now. You can go to setting and turn 'ON' the Airplane Mode. To reconnect the all devices: you have to wakeup each device by press/release device button once. Tap the button and choose [RECONNECT] and exit App now (please follow instructions from APP). If you can not connect all devices at once, please repeat AirPlaneMode disconnect / reconnect steps to RECONNECT all devices. AirPlane Mode10 Stop using device11a. To DISCONNECT all active device, please go to Help/ AirPlane Mode option and tap 'YES' to disconnect all devices. Device will enter standby mode after 30 seconds. Green LED will blink every 10 seconds to indicate standby mode.b. To RECONNECT all active device: please go to Help/AirPlane Remote control for Photo CaptureTo use the 'Photo' remote control function, go to the SetView page and tap the Capture button to go to Capture View. The Smart Tag remote key can control your smartphone camera function for photo capture with one second per 'capture count number' or one minute per 'capture time'.For the Photo Capture function: You can use '+' or '-' to increase or decrease the 'Capture count number' up to 100 images. Press the smart tag remote button to start photo image capture one image per second for the specified capture count period (you only press the remote button once and you can pan your camera around your target area).8 Delete device](https://usermanual.wiki/Ardi-Technology/SB20/User-Guide-2035795-Page-2.png)