Argox Information Co PI-1X60 Data Collector User Manual PI 1060 UserMan 20181005
Argox Information Co Ltd Data Collector PI 1060 UserMan 20181005
PI-1060- UserMan-20181005

PI‐1000Series
Portabledataterminal
User’sManual
PI‐1010/PI‐1030/PI‐1060/PI‐1230
http://www.argox.com
service@argox.com V1.205‐06‐2018

i
RegulatoryCompliance
FEDERALCOMMUNICATIONSCOMMISSIONINTERFERENCE
STATEMENT
This equipment has been tested and found to comply with the
limits for a Class B digital device, pursuant to part 15 of theFCC
Rules.Theselimitsaredesignedtoprovidereasonableprotection
against harmful interference in a residential installation. This
equipmentgenerates,usesandcanradiateradiofrequencyenergy
and,ifnotinstalledandusedinaccordancewiththeinstructions,
may cause harmful interference to radio communications.
However,thereisnoguaranteethatinterferencewillnotoccurin
a particular installation. If this equipment does cause harmful
interference to radio or television reception, which can be
determined by turning the equipment off and on, the user is
encouragedtotrytocorrecttheinterferencebyoneormoreof
thefollowingmeasures:
‐Reorientorrelocatethereceivingantenna.
‐Increasetheseparationbetweentheequipmentandreceiver.
‐Connecttheequipmentintoanoutletonacircuitdifferentfrom
thattowhichthereceiverisconnected.
‐Consultthedealeroranexperiencedradio/TVtechnicianfor
help.

ii
CAUTION:
Anychangesormodificationsnotexpresslyapprovedbythe
granteeofthisdevicecouldvoidtheuser'sauthoritytooperate
theequipment.
PI-1010 EN 300 328 BT RF Power EIRP 1.92 dbm
PI-1060 EN 300 328 BT RF Power EIRP 1.92 dbm
PI-1060 EN 300 200 SUB-1G RF Power EIRP 5.17 dbm
PI-1030 EN 300 328 BT RF Power EIRP 1.92 dbm
PI-1030 EN 300 328 WIFI RF Power EIRP 19.04 dbm
PI-1230 EN 300 328 BT RF Power EIRP 1.92 dbm
PI-1230 EN 300 328 WIFI RF Power EIRP 19.04 dbm
RFexposurewarning
TheequipmentcomplieswithFCCRFexposurelimitsset
forthforanuncontrolledenvironment.
Theequipmentmustnotbeco‐locatedoroperatingin
conjunctionwithanyotherantennaortransmitter.

iii
RadioTransmitters(Part15)
ThisdevicecomplieswithPart15oftheFCCRules.Operationis
subjecttothefollowingtwoconditions:(1)thisdevicemaynot
causeharmfulinterference,and(2)thisdevicemustacceptany
interferencereceivedincludinginterferencethatmaycause
undesiredoperation.
FCCID:NBF‐PI‐1X30ForPI‐1010&PI‐1030&PI‐1230
FCCID:NBF‐PI‐1X60ForPI‐1060
Note:PI‐1060OnlyBT&Sub‐1GRFFunction
CAUTION:EXPLOSIONHAZARD
Do not disassemble, short circuit, heat the battery or dispose of in fire. Store battery
packinaproperplace.Donotexposetotemperatureabove60℃/140℉.Usespecified
chargeronly.Pleasedisposeoftheusedbatteriesfollowingtherulesorlawsissuedbythe
localgovernment.

iv
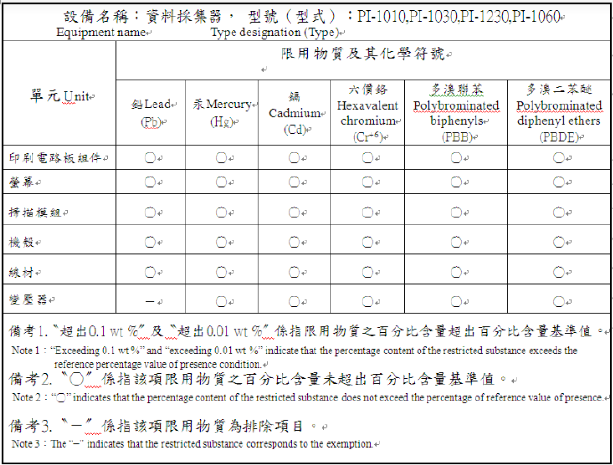
警告:電池若未妥善處理,可能會導致爆炸。
請勿拆卸電池,或用火銷毀電池。請將電池放置於兒童拿不到的地方。
請使用專用充電器充電,並請依照當地政府或法律規定妥善處理廢棄
電池。
低功率電波無線輻射電機管理辦法
第十二條:經型式認證合格之低功率射頻電機, 非經許可,公司, 商
號或使用者均不得擅自變更頻率,加大功率或變更原設計之特性
及功能。
第十四條:低功率射頻電機之使用不得影響飛航影響安全及干擾
合法通信, 經發現有干擾現象時,應立即停用,並改善至無干擾時方
得繼續使用。
前項合法通信,指一電信法規定作業之無線電通信低功率射頻電
機需忍受合法通信或工業,科學及醫療用電波輻射性電機設備之
干擾
本產品支援 WIFI/Bluetooth/Sub-1G(依不同型號有所不同)
製造商:立象科技股份有限公司
地址:新北市新店區寶橋路 235 巷126 號7樓
電話:02‐8912‐1121(代表號)
v

ReleaseNote
i
Release Note
Version Date Note
V1.0 02/22 2017 Initial release
V1.1 07/12 2017 Add Appendix A for reference
V1.1 02/13 2018 Add Appendix B for reference
V1.2 06/05 2018 Add PI-1060, Tag-60 information
ii
Content
1 Introduction..........................................................................1
1.1 Unpacking.................................................................2
1.2 Understandyourterminal........................................4
1.2.1 Terminal........................................................4
1.2.2 Holder(Option)..............................................5
1.3 Indicators..................................................................6
1.3.1 LED................................................................6
1.3.2 Buzzer............................................................8
1.3.3 Vibration.......................................................8
1.4 Keypad......................................................................9
1.5 Powersource..........................................................15
1.6 Tag‐60introduction(PI‐1060only).........................16
2 Getstarted..........................................................................17
2.1 Setupyourterminal...............................................21
2.2 Userinterface.........................................................23
2.3 Connection.............................................................25
2.3.1 Remotelinkconnection..............................26
2.4 Attachthehandstrap.............................................30
2.5 Tag‐60(PI‐1060)......................................................32
3 Controlsandsettings..........................................................35
3.1 UserMenu..............................................................35
3.1.1 RunProgram...............................................36
3.1.2 RemoteLink................................................36
3.1.3 Scanner(HID)...............................................37
iii
3.1.4 Information.................................................38
3.2 SystemMenu..........................................................39
3.2.1 RemoteLink................................................39
3.2.2 Diskinfo......................................................39
3.2.3 Timersetting...............................................40
3.2.4 Environment...............................................41
3.2.5 Test..............................................................42
3.2.6 Systeminfo..................................................44
3.3 SupervisorMenu....................................................45
3.3.1 RemoteLink................................................46
3.3.2 Formatdisk.................................................49
3.3.3 Setting.........................................................50
3.3.4 Information.................................................55
4 Applications........................................................................56
5 Troubleshooting..................................................................57
5.1 Hardwareissues......................................................57
5.2 Communicationissues............................................58
5.3 Barcodescanningissues.........................................59
6 Specifications......................................................................60
AppendixA..............................................................................66
AppendixB..............................................................................83
1Introduction Unpacking
1
1 Introduction
PIseriesisalightweight,portabledataterminal(PDT)
fordatacaptureandcollection.Thismanualwillhelp
youtogettoknowPIseriesandutilizeitwell.
Features
■ Scratch‐resistantkeypadCoatedwithPC
(polycarbonate),thelettersandnumbersonthekeys
won’twearoffbetweenuses.
■ Batterycoveropendetection Whentheswitchof
thebatterycoverisup,thesystemautomatically
savesyourfilesandshutdown.
■ Largeflashmemory PIseriesoffersmoreflash
memorythantherivalsonthesamelevel.The
standardis20MB,andtheoptionalis60MB.
■ Backupbattery Thebackupbatterygivesyou
additional15minutestofinishyourjobiftheprimary
batterieswearout.
■ Wi‐Ficonnectivity Youcanexchangedataovera
Wi‐Finetwork.(PI‐1030)
■ Tag‐60

1Introduction Unpacking
2
1.1 Unpacking
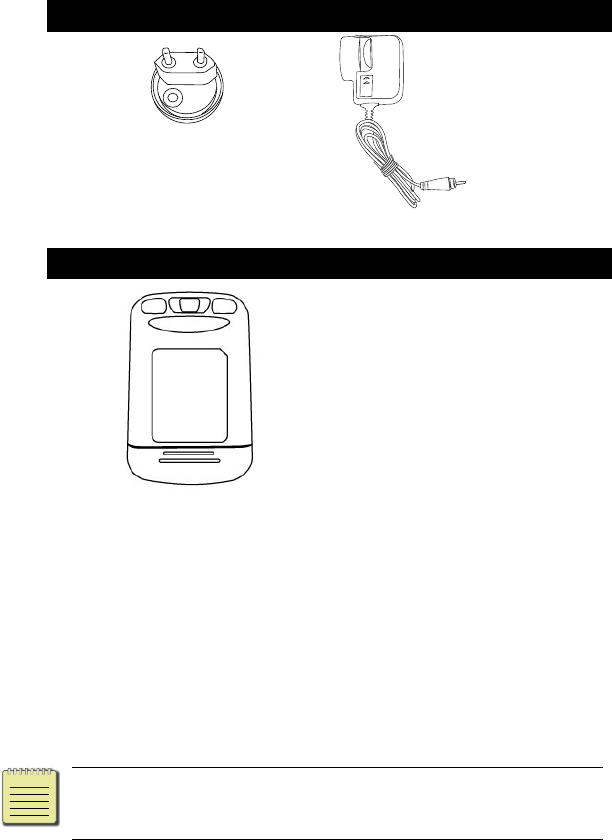
Makesureallofthefollowingitemsareincludedinyour
package.
PIseries QuickStartGuide
USBCable or RS‐232CablewithUSB
powercord
Holder HandStrap
1Introduction Unpacking
3
PlugandPowerSupply(Option)
Tag‐60(PI‐1060)
Whenyoureceiveyourterminal,openthepackage
immediatelyandinspectforshippingdamage.Ifyoudiscover
anydamage,contacttheshippingcompanyandfileaclaim.
Argoxisnotresponsibleforanydamageincurredduring
shipping.Saveallpackagematerialsfortheshippingcompany
toinspect.
Note Ifanyitemismissing,pleasecontactyour
localdealer.
1Introduction Understandyourterminal
4
1.2 Understandyourterminal
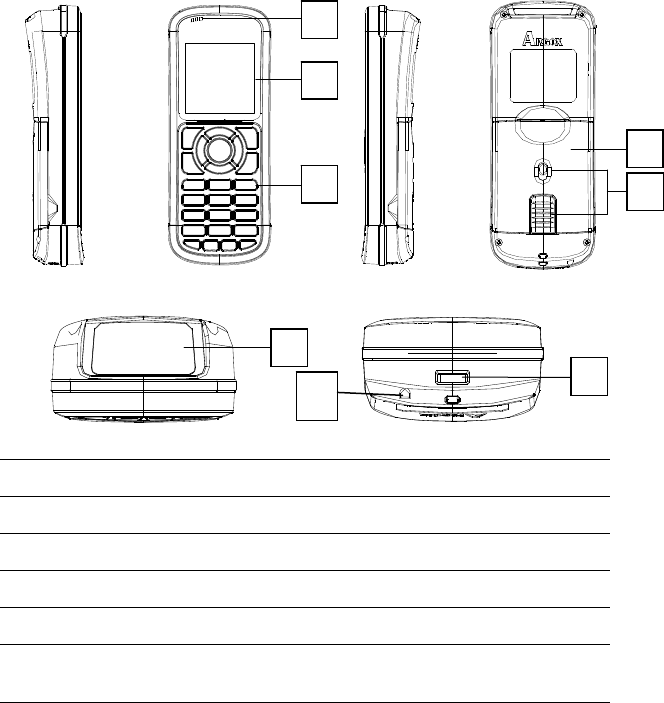
1.2.1 Terminal
Left Front Right Back
Top Bottom
1 LED ThreeLEDs.
2 LCDDisplay AmonoLCD.
3 Keypad A25‐keykeypad.
4 BatteryCover Thebatterycover.
5 BatteryCoverSwitch Openandclosethebatterycover.
6 ReadingWindow Thebarcodereadingbeamisemitted
throughthiswindow.
7 Speaker Buzzersound
1
2
3
6
8
5
4
7
1Introduction Understandyourterminal
5
8 Connector Aporttoconnectcomputer
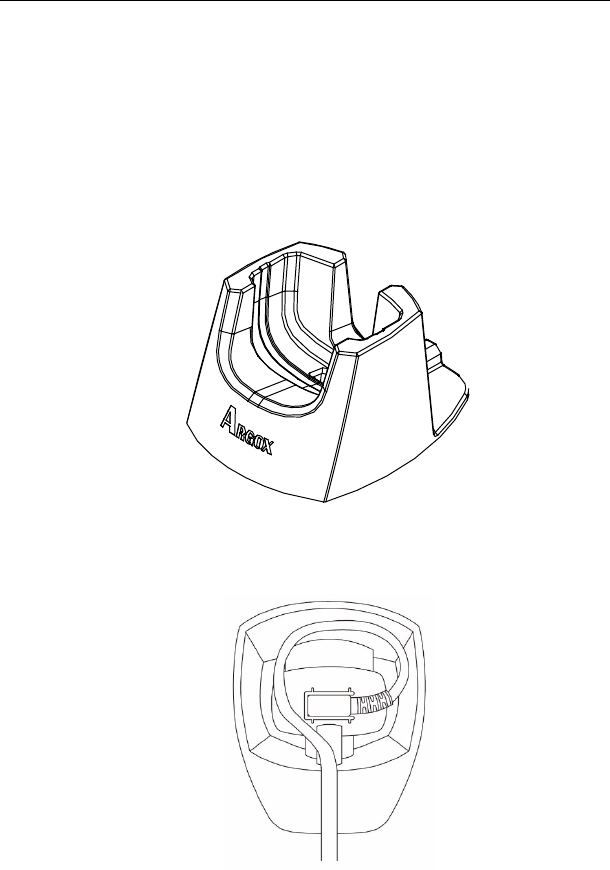
1.2.2 Holder
Theholderisusedtoholdyourterminalinitsstanding
position.
Inthebottomofholder,makesurecablewireis
installedasbelow.
1Introduction Indicators
6
1.3 Indicators
PIserieshasthreeLEDsandabuzzertoindicateitscurrent
status.
1.3.1 LED
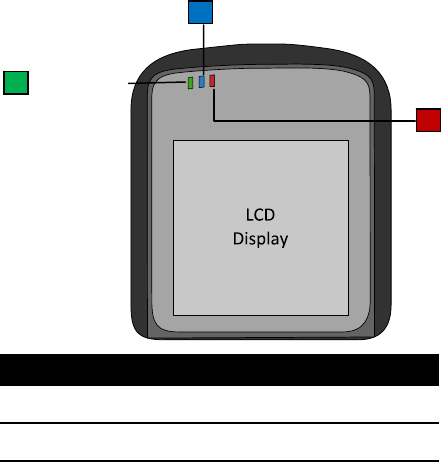
YourterminalhasthreeLEDsontheupper‐leftcorner.
Theyhavedifferentbehavior.Thetablebelowgives
informationaboutthestatustheyindicate.
LED Color
ScanLED Green,RedandOrange
BTorWi‐FiLED Blue
ChargerLED Red
BTorWi‐FiLED
ChargerLED
ScanLED

1Introduction Indicators
7
LED Behavior Status Note
Scan
LED
Solidgreen Userdefined UseSDK.
Solidred Userdefined. UseSDK.
Solidorange Userdefined. UseSDK.
Flashing
green
Transmittingdataor
userdefined.
UseSDK.
Flashingred Userdefined. UseSDK.
Flashing
orange
Userdefined. UseSDK.
Off Nodatatransmission
oruserdefined.
UseSDK.
BT&
Wi‐Fi
LED
Solidblue Yourterminalis
connectedthrough
BluetoothorWi‐Fi.
Flashing
blue
Yourterminalisready
tobeconnected
throughBluetoothor
Wi‐Fi.
Off BluetoothorWi‐Fiis
turnedoff.
Default
Charger
LED
Solidred Yourterminalisfully
chargedorconnected
toapowersource.
Controlled
by
hardware.
Flashingred Charging. Controlled
by

1Introduction Indicators
8
LED Behavior Status Note
hardware.
Off Yourterminalisnot
connectedtoany
powersource.
Controlled
by
hardware.
1.3.2 Buzzer
Youcandefinethestatusthevibrationindicatesusing
theSDK.
Sound Status
1ShortBeep Akeyispressed.
Agoodscan.
Anerroroccurred.
2ShortBeep Thebatteryislow.
4ShortBeep Batteryistoolowtoturnoff
terminal.
1.3.3 Vibration
Youcandefinethestatusthevibrationindicatesusing
theSDK.
Vibration Status
Vibrate Agoodscan.
1Introduction Keypad
9
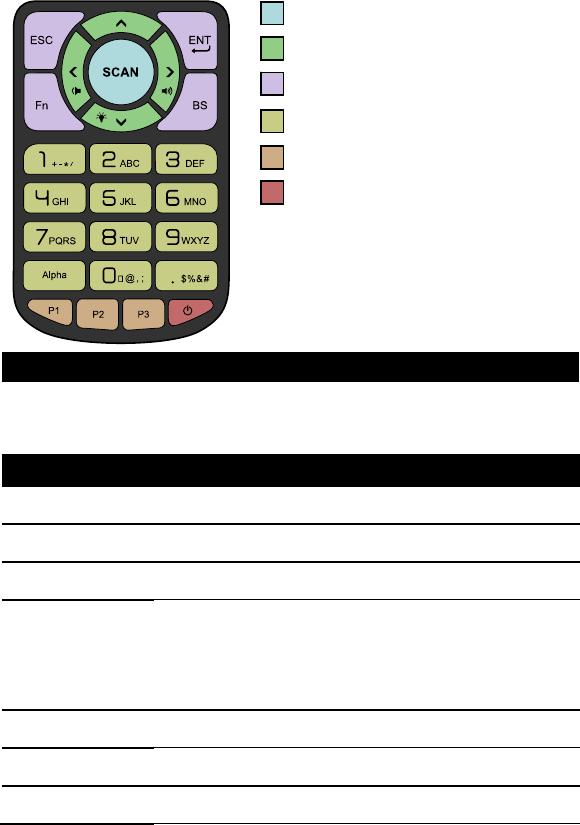
1.4 Keypad
Scankey
Cursorkeys
Controlkeys
Numerickeys
User‐definedkeys
Powerkey
Scankey
Scanabarcode.
Cursorkeys
Up Movethehighlightbarup.
Fn+Up OpenMessageMenu.
Down Movethehighlightbardown.
Fn+Down Adjustthebacklightbrightness.The
brightnessrepeatsthesequence
0123.
Left Movethehighlightbartothetop.
Fn+Left Reducethevolume.
Right Movethehighlightbartothebottom

1Introduction Keypad
10
Cursorkeys
Fn+Right Increasethevolume.
Controlkeys
ESC TheEscape
key.
1. Gouponelevelinamenu.
2. Giveupchangingasetting.
3. Exitaprogram.
Fn TheFunction
key.
Usewithotherkeys.Ex:
“Fn+DownArrow”istoadjust
thebacklightbrightness.The
functionofF0‐F9(Fn+0‐9)
canbedefinedusinganSDK.
ENT TheEnterkey. 1. Enteramenu.
2. Selectanoption.
BS TheBackspace
key.
1. Deleteacharactertothe
leftofthecursor.
Numerickeys
YoucanusethekeypadtoenternumbersorEnglish
characters,dependingonthemodeyou’reusing.
1 1. Enterthenumberone.
2. Enterthesesigns:plus(+),minus(‐),star
(*)andslash(/).
2 1. Enterthenumbertwo.
2. EnterthelettersA,B,C.

1Introduction Keypad
11
Numerickeys
3 1. Enterthenumberthree.
2. EnterthelettersD,E,F.
4 1. Enterthenumberfour.
2. EnterthelettersG,H,I.
5 1. Enterthenumberfive.
2. EnterthelettersJ,K,L.
6 1. Enterthenumbersix.
2. EnterthelettersM,N,O.
7 1. Enterthenumberseven.
2. EnterthelettersP,Q,R,S.
8 1. Enterthenumbereight.
2. EnterthelettersT,U,V.
9 1. Enterthenumbernine.
2. EnterthelettersW,X,Y,Z.
0 1. Enterthenumberzero.
2. Enterthesecharacters:space(),at(@),
comma(,)andsemicolon(;).
Alpha Switchtheinputmethodbetweennumbers,
uppercaseandlowercasecharacters.
. 1. Enteraperiod(.).
2. Enterthesesymbols:dollarsign($),
percentsign(%),ampersand(&)and
numbersign(#).

1Introduction Keypad
12
User‐definedkeys
P1 User‐definedkey.
P2 User‐definedkey.
P3 User‐definedkey.
Powerkey
Turnonorturnoffyourterminal.
Powercombinationkey
Youcanusethekeycombinationstoenterdifferent
menusormodes.Pressandholdthecombinationof
keys,untilyourterminalresponds.
3+9+Power SystemMenu.
1+3+0+Power SupervisorMenu.
1+3+Power Forcemode.
P1+P2+P3+Power BIOSreset.
SCAN+Power Warmreset.
SCAN+Power(5sec) Coldreset.Youneedtopress
thekeysfor5seconds.
1Introduction Keypad
13
■ SystemMenuEnterSystemMenu.
■ SupervisorMenu EnterSupervisorMenu.
■ Forcemode Itupdatesallfirmwarefilesand
restoresallsystemparameterstofactorysettings.
ThismodeneedstobeusedwithanSDKorcomputer
software.Youcanusethismodewhenyouencounter
theproblemthatcan’tberesolvedinanyotherway.
■ BIOSreset itisthesameasBIOSdefault(see
SupervisorMenu).Itresetsallyourterminalsettings,
includingthepasswordofSupervisorMenu.
■ Warmreset Itrestartsyourterminalwithout
changinganysettings.Youcanuseitwhenyour
programstopsresponding.
■ Coldreset Itforcesyourterminaltorestart.The
datastoredintheDRAMmayberemoved.Youcan
useitwhenyourterminalcrashes,orwhenyoucan’t
turnonyourterminalbypressingthePowerkey.
1Introduction Keypad
14

1Introduction Powersource
15
1.5 Powersource
TherearethreewaystosupplypowertoPIseries:
1. TwoAAbatteries.Recommendedalkaline
rechargeabletype.
2. UsetheUSBcablewithcomputer.
3. UsethepowersupplywiththeUSBorRS‐232
cable.
CableType Charge
your
batteries
Supplypower
without
batteries
Needtouse
withapower
supply
USB Yes Yes No
RS‐232 No No Yes
Note It’snotnecessarytouseaUSBcablewiththe
powersupply,butthebatterychargingtimeis
shorterwithit.

1Introduction Tag‐60introduction(PI‐1060only)
16
1.6 Tag‐60introduction
(PI‐1060only)
YoucandefineindicatorfunctionbyusingSDKorSkywalker.
LEDColor Status
Blue Tag‐60iscalled.
Red Tag‐60batterylowwarning
Sound Status
Beep BeepisdefinedbyPI‐1060
application.
RedLED
Latch
Buzzer
Battery
TAG‐60IDNo.
BlueLED
Topstraphole

2Getstarted Tag‐60introduction(PI‐1060only)
17
2 Getstarted
Thischapterprovidesinformationabouthowtowork
withyourterminalandmakeconnectiontocomputer.
Inserting or replacing battery
Whenyouseethebatteryiconshowslow.Youneedto
changenewbatteryorchargeitimmediately.Ifthereis
nopower,thebackupbatterycanholdthedataabout
15minutes.Therefore,alwaysuploadyourimportant
dataafterworkorkeeptwoAAbatteriesincase.
Caution Donotmixoldbatteriesandnewbatteriesor
standard(carbon‐zinc)withalkalinebatteries.Remove
batteriesifproductisnottobeusedwithforalongtime.Risk
ofexplosionifbatteryisreplacedbyanincorrecttype.
Disposeofusedbatteriesaccordingtotheinstructions.
DONOTRECHARGEDIFFERENTTYPESOFBATTERIES.
2Getstarted Tag‐60introduction(PI‐1060only)
18
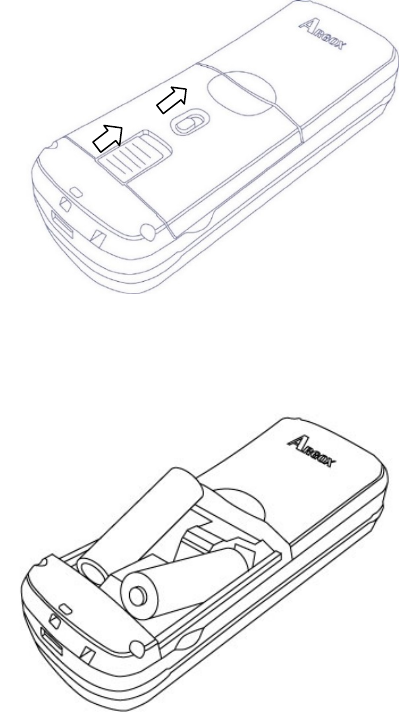
1. Pressandslidetworeleaselatchesatthesametime
toopenthebatterycover.
2. Insertingtwobatteriesasindicatedinsidebattery
compartment.
+
‐‐
+
2Getstarted Tag‐60introduction(PI‐1060only)
19
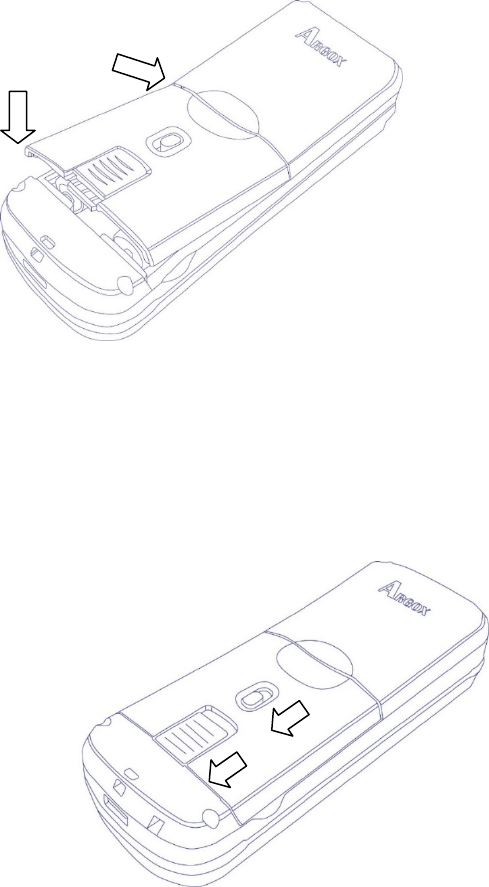
3. Closethebatterycoverasfollow.
4. Makesurecoverisclosedandslidetwolatches
back.
①
②

2Getstarted Tag‐60introduction(PI‐1060only)
20
Charge the battery
Ifyou’reusingrechargeablebatteriestosupplypower
toyourterminal,youcanchargethemby
(1) connectingtheUSBcabletoyourterminaland
computer.
(2) Usingabatterychargertochargebatteriesin
advance.
(3) ConnectingtheUSBcabletoyourterminalanduse
apowersupply.
Whenyourbatteriesarefullycharged,theChargerLED
turnstosolidred.
Important Toprotectpowersource,PIseries
cannotbepoweredonunlessbatterycover
backareclosedcorrectly.
Chargingby FullChargeTime
PowerSupply 5‐6hours
USBCable 7‐8hours
Important BeforeusingPIseries,we
recommendtochargePI‐1000series1dayto
makesurebackupbatteryisfullycharged.
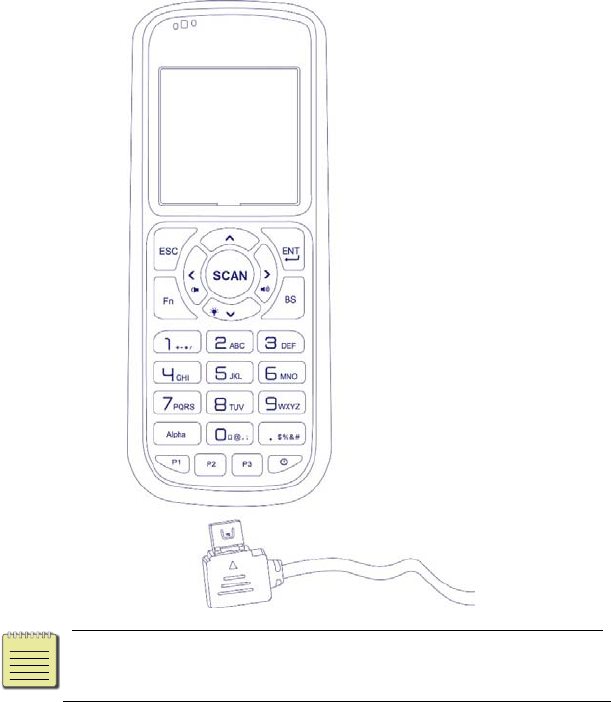
2Getstarted Setupyourterminal
21
2.1 Setupyourterminal
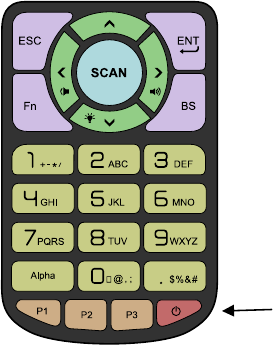
1. Chooseonetopoweronyourterminal
OpenthebatterycoverandInstalltwoAA
NoteThetrianglemarkshouldbefaceupwhen
youwanttoconnecttoPIseries.
2Getstarted Setupyourterminal
22
batteries.
Connectyourterminaltoyourcomputerusing
USBorRS‐232cable.
2. PressthePowerkeytoturnonyourterminal.
Powerkey
2Getstarted Userinterface
23
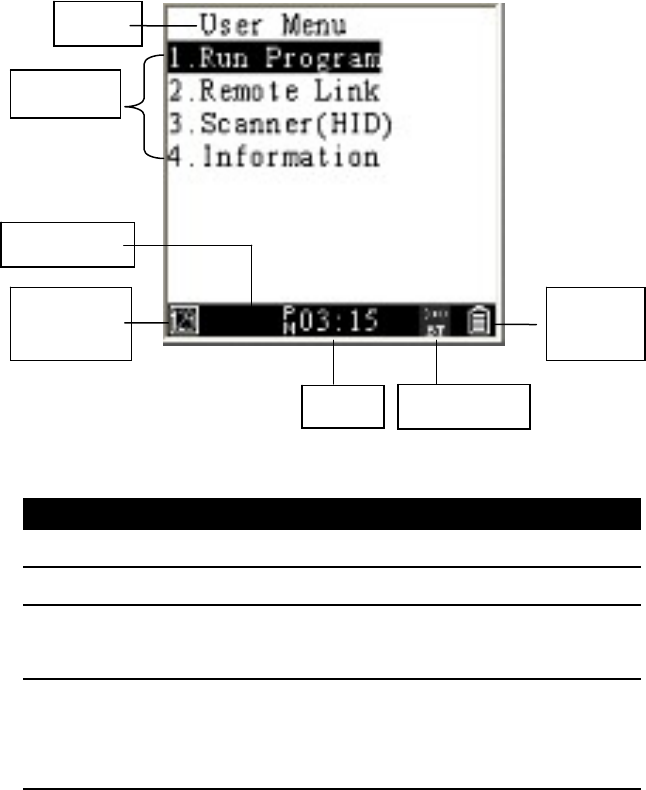
2.2 Userinterface
Item Description
Menu Currentmenutitle
Options Itemsinthemenu.
Statusbar Itdisplaystheinformationaboutyour
terminal.
Inputmethod Thewayyouenterdata.Youcanenter
numbers,lowercaseoruppercase
characters.
Time Thecurrenttime.
Menu
Options
Input
method
Time
Power
source
Wireless
Statusbar

2Getstarted Userinterface
24
Item Description
Wireless
communication
WhenyouopenBluetoothorWi‐Fi
function,itdisplaysaniconwithout
waves.Ifconnectionissuccessful,the
iconwillshowwaves.
Powersource Ifyourterminalisconnectedtoadirect
powersupply(USBorRS‐232),itdisplays
aplugicon;ifitisrunningonbatteries,it
displaysabatteryicon.

2Getstarted Connection
25
2.3 Connection
PIserieshavefourinterfacestoconnect:USB,RS232,
BluetoothandWI‐FI.Eachonecanchoosetwowaysas
below.
Remotelink:ItisauniqueprotocolfromArgox
development.VisitArgoxwebsitebelowtodownload
application.
http://www.argox.com/content2011.php?sno=0000033
Linkingport:Developercansetupdifferent
interfacesUSB/WIFI/COM/BTaccordingtotheir
application.
Important RemotelinkhastouseArgox
application,suchasPhoenixVolerorEverlink
fromArgox.
2Getstarted Connection
26
2.3.1 Remotelinkconnection
ThissectionwillshowhowtolinkPIseriestoPCwith
“Remotelink”andenter“Messagemenu”tosend
messagewhentheconnectionsuccessful.
UseRemotelinktoconnectPCwithUSB
Step1. AfterlinkUSBcablebetweenPIseriesandPC,
press“Power”keytopoweronPIseries.
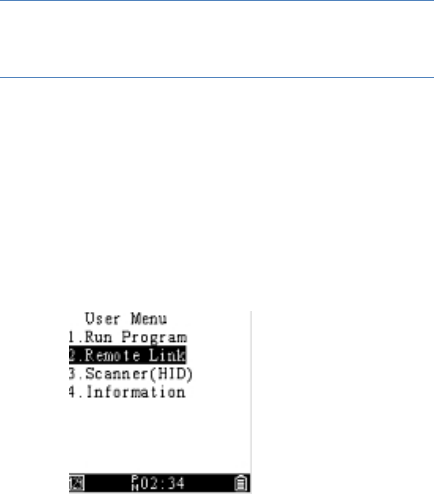
Step2. Movecurseto“RemoteLink”andpress“ENT”
key.

2Getstarted Connection
27
Step3. Enter“RemoteI/FSelect”andChoose“USB”.
Itwillgetreturnlastpagewhenpress”Enter”
Step4. Choose“Connect”.
Step5. InPhoenixVolerorEverlink,ClickCommsetup
willshowthemodelnumber.Successfully
connectedtoPC.
2Getstarted Connection
28
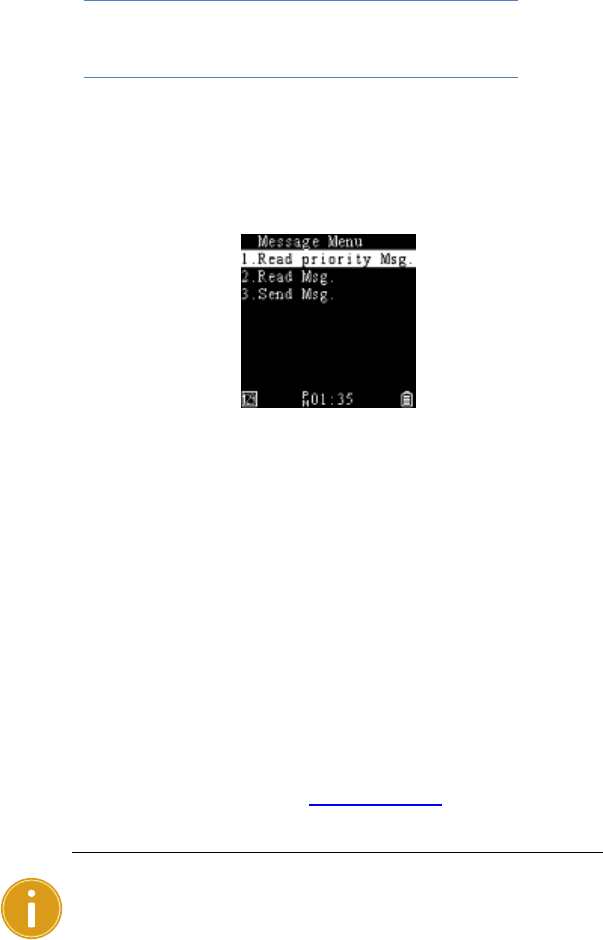
MessageMenu
Everlink,ControlCenterandPIseriescansend
messagetoPIseries.Press“Fn”+”^”keytoenter
MessageMenu.
ReadpriorityMsg.:Itshowsthepriority
messageyoureceive.
ReadMsg.:Itshowsthemessageyousent.
SendMsg.:
ToEverlink:“Sendto”is9000
ToControlCenter:“Sendto”is9001
TootherPIseriesdevice:“Sendto”default
dependsonSNlastfourdigits.Tochange
ID,referto“EquipmentID”inSystem
menu.
Important SendingmessagerelyonEverlink.PI

2Getstarted Connection
29
seriesmustconnecttoEverlinkthenthemessagewill
starttosendandreceive.
2Getstarted Attachthehandstrap
30
2.4 Attachthehandstrap
Sometimesyoumayneedtodosomethingandcan’t
holdyourterminalonyourhand.Or,youmight
accidentallydropyourterminalbetweenuses.Attach
thehandstrapisausefulwaytoresolvetheseissues.
Youcanwrapthestraparoundyourhandtosecureitto
yourhand,orhangitonyourhandtohavebothhands
freetodootherthings.
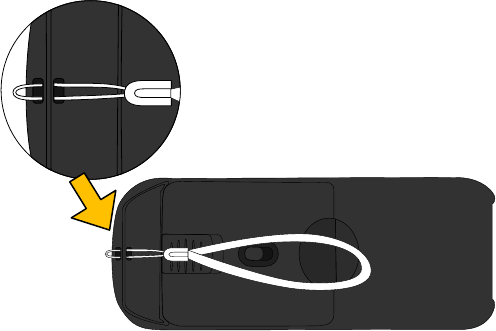
Toattachthehandstrap,dothis:
1. Pinchthesmallloopandthreaditintothetwo
squareholesunderthebatterycover.
2Getstarted Attachthehandstrap
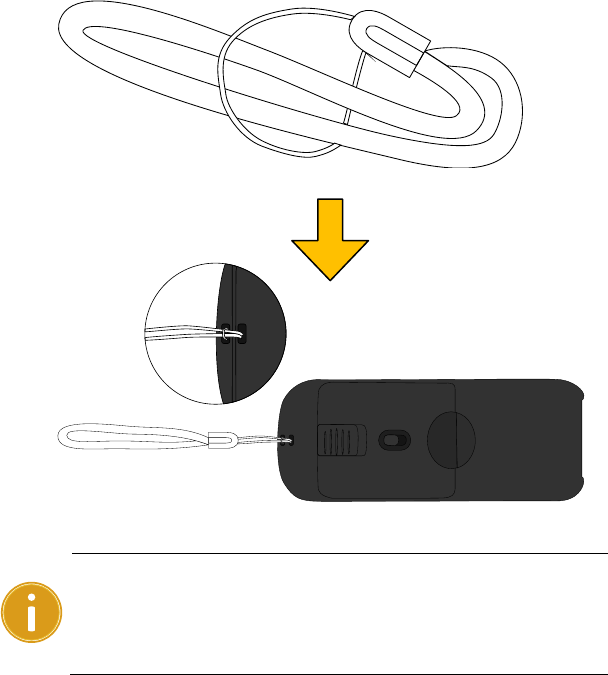
31
2. Threadthebigloopintothesmallloop,andpullthe
biglooptotieaknot.
Important Usehandstrapwhenyoucollect
barcodeincasedropaccident.PIseriesmightshut
downtoprotectdataafterdrop.

2Getstarted Tag‐60(PI‐1060)
32
2.5 Tag‐60(PI‐1060)
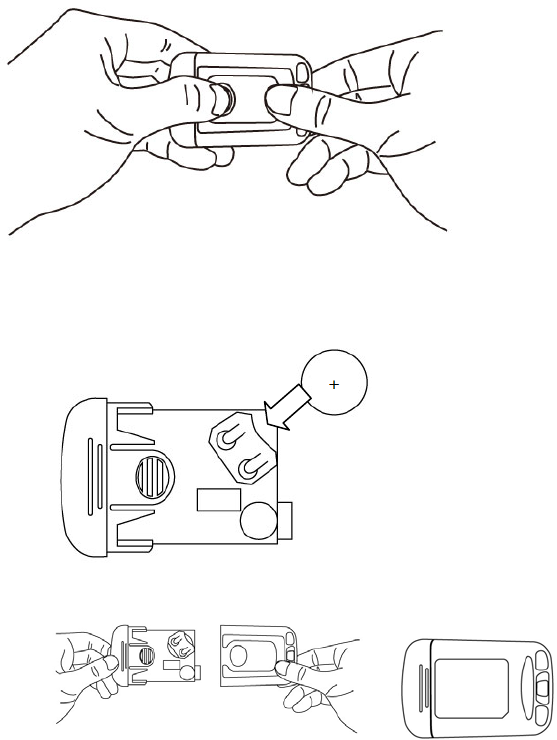
StartTag‐60up
1. HoldTag‐60bottom,presslatchtoremovecover.
2. RemovebatteryinsulationtostartTag‐60up.
3. Makesurebatteryisintheslotandclosecoverback.
2Getstarted Tag‐60(PI‐1060)
33
InsertorreplacingBattery
1. HoldTag‐60bottomcover,presslatchtoremovecover.
2. ReplaceCR‐2032coinbattery.Makesurepositive
electrodeisup.
3. Makesurebatteryisintheslotandclosecoverback.
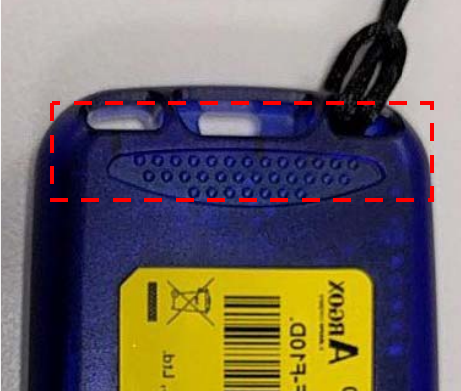
TopStraphole
2Getstarted Tag‐60(PI‐1060)
34
Topcaseisdesigned3holesforplacingTag‐60easily.Attacha
straponTag‐60canhangingiteverywhereandalsoprevent
dropdamage.
3Controlsandsettings UserMenu
35
3 Controlsandsettings
PIseriesoffersthreedifferentlayermenus.UserMenu
isforgeneralusers,SystemMenuisforsupervisorsor
managers,andSupervisorMenuisforsystem
administratorsorengineers.Besides,pressFn+^can
enterMessageMenuThischapterprovidesinformation
aboutthesemenus.
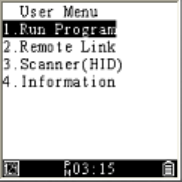
3.1 UserMenu
UserMenuincludesthreefrequentlyusedsettings.You
canusethemtorunyourprogram,connectyour
terminaltoacomputerorotherdevice,ordisplayyour
terminal’sinformation(viaEverlink).
3Controlsandsettings UserMenu
36
3.1.1 RunProgram
Itshowstheprogramyoudownloadfromyour
computer.Torunaprogram,justselectitandpressENT.
Ifthere’snoprogram,itwilltellyou“Noprogramfile.”
Formoreinformationabouthowtoconnecttoa
computeranddownloadprogramsfromit,see
PhoenixVolerorEverlinkUserguide.
Note DefaultsettingbetweenPISeriesandProgram
isindividual
3.1.2 RemoteLink
ItisforyoutoconnectyourterminalwithEverlinkor
3Controlsandsettings UserMenu
37
PhoenixVolertocomputer.
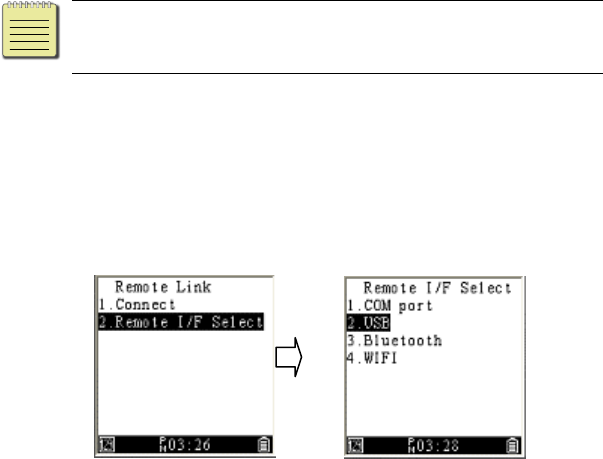
■ Connect Itconnectsyourterminaltocomputer
afteryouselectaninterface.
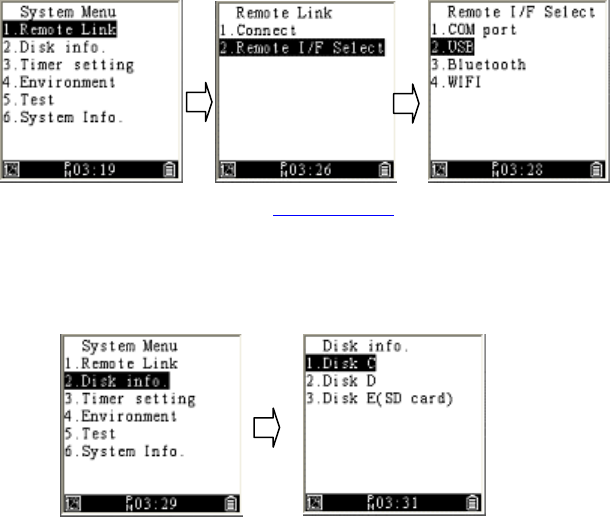
■ RemoteI/FSelect Itprovidesinterfaces,including
COMport,USB,BluetoothandWI‐FI.
Toconnectyourterminal,dothis:
1. SelectRemoteLink>RemoteI/FSelect>COM
port/USB/Bluetooth/WI‐FI.
2. GouponelevelinthemenuandselectConnect.
Note IfyouwanttoconnectviaBluetoothorWI‐FI,
youneedtoenterSupervisorMenuandsetup
BluetoothconnectionorWI‐FIconnectionfirst.After
completingthesetting,youcanconnectyour
terminalfromUserMenuConnect.
3.1.3 Scanner(HID)
3Controlsandsettings UserMenu
38
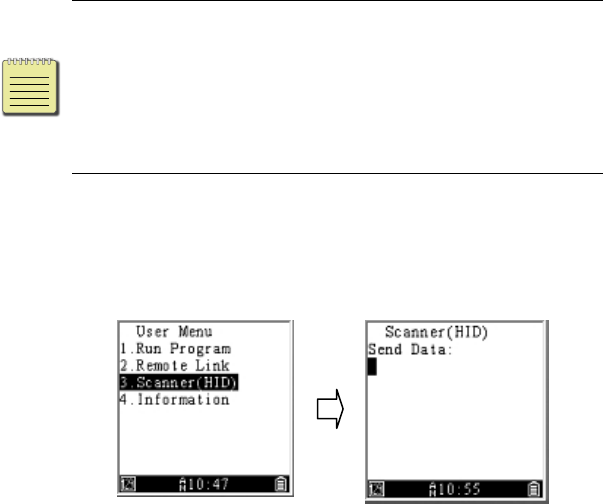
Itisforyoutoreadanduploadbarcodedataeasily.
Onceyouhaveconnectiontocomputer.Press“SCAN”
keytoreadbarcodeanditwilluploaddata.GotoCH4
Application.seemoreinEverlinkuserguide.
Note Makesureyouturnonthedecode
function(barcodedefault).
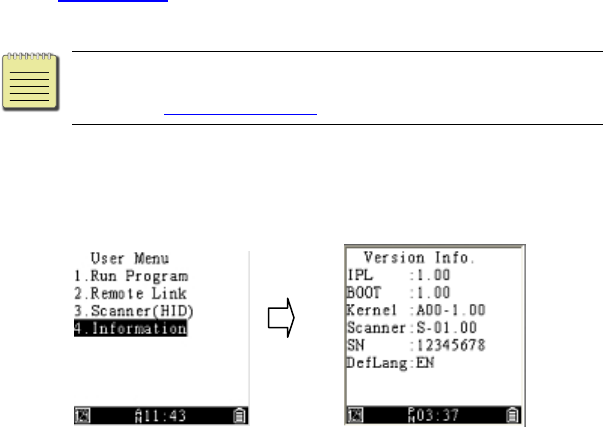
3.1.4 Information
Itdisplaysyourterminal’sinformation.
IPL TheIPLversion.
BOOT Thebootversion.
Kernal Thekernelversion.
Scanner Thescanner’sfirmwareversion.
SN Theserialnumber.
DefLang Thedisplaylanguage.
3Controlsandsettings SystemMenu
39
3.2 SystemMenu
UnderSystemMenu,youcanchangesystemsettingsto
meetyourneedandrunsometeststoseeifyour
terminalisworkingproperly.Presskey3+9+Powerto
entersystemmenu.
3.2.1 RemoteLink
SeethedescriptioninRemoteLinkinUserMenu.
3.2.2 Diskinfo
3Controlsandsettings SystemMenu
40
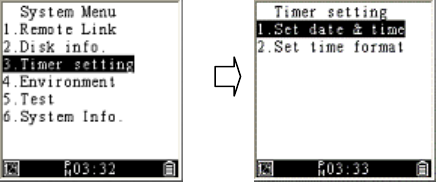
Itprovidesthediskinformation,includingthefree,
usedandtotaldiskspace.Bydefault,yourterminalhas
twodisks:CandD.
3.2.3 Timersetting
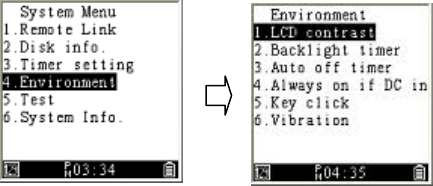
■ Setdate&time Youcansetdateandtimehere.
■ Settimeformat Youcansetthetimeformathere.It
providesthe12‐houror24‐hourclockandonly
displayinStatusBar.
C RAM Fordatamemory
D Flash Forsystemanduser’sapplication
3Controlsandsettings SystemMenu
41
3.2.4 Environment
Itprovidessettingsforyoutoadjustdifferent
workplaceormatchyourpreference.
■ LCDcontrast Itdeterminesthecontrastratio.The
biggerthenumber,thelowerthecontrast(thedarker
thescreen).1~10
■ Backlighttimer Itdetermineshowlongthe
backlightstaysonafteryoupressakey.1~65535.Set0
willalwayson.
■ Autoofftimer Itturnsoffyourterminalaftera
certainamountoftimeelapsed.Theunitoftimeis
thesecond.Ifyousetit0,yourterminalisalways
turnedon.30~65535
■ AlwaysonifDCin Itwillalwaysonwhenyouplug
DCpower.Defaultisdisable.
3Controlsandsettings SystemMenu
42
■ Keyclick Youcanturnonorturnoffthesoundof
keypad.
■ Vibration Itdetermineshowlongyourterminal
vibrates.Theunitis0.1second,rangeis1~255.Set0
willturnitoff.
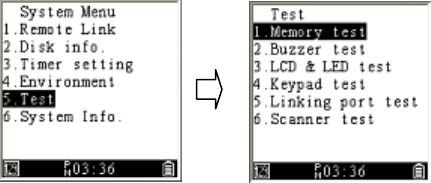
3.2.5 Test
Itprovidesvarioustestsforyoutocheckyourterminal
system.
■ Memorytest Itchecksifthememorycanbewritten
andreadproperly.Notethatthistestremovesalldata
storedinthememory,soremembertosaveyourfiles
inadvance.
■ Buzzertest Itchecksifthebuzzercanmakesound
properly.You’llhearthesoundrepeatedlyplaysfrom

3Controlsandsettings SystemMenu
43
hightolowandfromlowtohigh.Ifthesoundis
playedsmoothly,itmeansthebuzzerworksproperly,
otherwisethebuzzermayhavesomeissues.
■ LCD&LEDtest ItchecksiftheLCDdisplayhasbad
pixels.
■ Keypadtest Itchecksifthekeypadworksproperly
whenyoupressit.
■ Linkingporttest Itchecksiftheportworksproperly.
Youneedtosetaporttorunthistest.Formore
informationabouttheportsetting,seethe
descriptioninSettinginSupervisorMenu.
Afteryousetaport,dothis:
1. Selecttheportyouwanttotest,andpressENT.
2. Yourterminalwillshowifthetestissuccessfulor
failedafterthetestiscomplete.
■ Scannertest Itchecksifyourterminalcanreadbar
codeswhenyoupressSCANtoscanbarcodes.Ifthe
scanissuccessful,yourterminalwillvibrateand
displaythebarcodedata.
Note Whenyoudoscannertesttobarcode,
turnonthefunctioninBarcodeconfig
(SupervisorMenu).

3Controlsandsettings SystemMenu
44
3.2.6 Systeminfo
SeethedescriptioninInformationinUserMenu.
3Controlsandsettings SupervisorMenu
45
3.3 SupervisorMenu
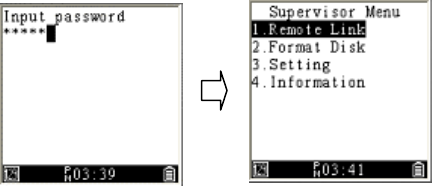
(1+3+0+PWR)SupervisorMenuprovidesadvanced
settingsforyoutoconfigure.Toprotectthesettings
frombeingchangedeasily,youneedtoentera
passwordtoaccessthemenu.Bydefault,thepassword
isfivezeros(00000).
3Controlsandsettings SupervisorMenu
46
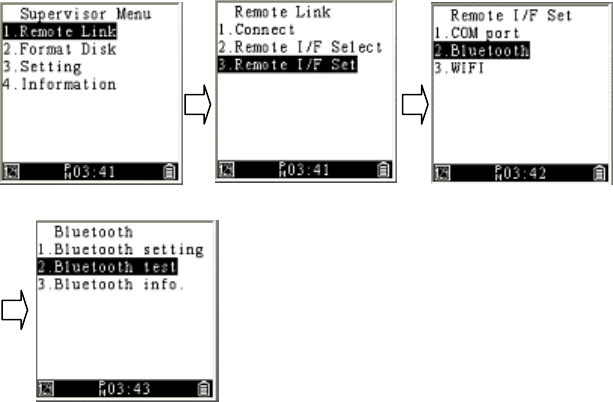
3.3.1 RemoteLink
ItisforyoutoconnectyourterminalwithEverlinkor
PhoenixVolertocomputer.
■ Connect Itconnectsyourterminaltocomputer
afteryouselectaninterface.
■ RemoteI/FSelect Itprovidesinterfaces,including
COMport,BluetoothandWI‐FI.
■ RemoteI/FSet Ithasthreeoptions:
∙ COMport Youcanselectabaudhere.
3Controlsandsettings SupervisorMenu
47
∙ Bluetooth Ithasthreeoptions:
1. Bluetoothsetting:
(1) Devicename:Yourterminal’sname.By
default,thenameistheserialnumber.
(2) PINcode:ThepasskeyforaBluetooth
connection.Bydefault,thecodeisfour
zeros(0000).
(3) Securitymode:Ithastwooptions.
a. Security:Yourterminalwillaskother
devicestoenteraPINcodewhenthey
trytoconnecttoyourterminal.
b. Encryption:Itencryptstheconnectionto
preventdatatheft.
(4) Inquirytimeout:Itdetermineshowlong
yourterminalstopssearchingotherdevices
afteracertainamountoftimeelapses.
(5) Maxresponse:Itdeterminesthemaximum
numberofconnectabledevicesyour
terminallists.
(6) Setpeerdevice:Ithastwooptions.
a. Setbysearch:Searchotherdevicesinthe
neighborhood.
b. Setbykeyin:Searchanotherdeviceby
3Controlsandsettings SupervisorMenu
48
enteringitsBluetoothMACaddress.
2. Bluetoothtest:Youcanusethisoptiontotest
theBluetoothconnectionafteryourterminal
connectstoadevice.
3. Bluetoothinfo:ItdisplaysBluetooth
information,includingthelocaladdress,device
nameandlinkaddress.
∙ WI‐FIIthasthreeoptions
1. Setting
(1) WI‐FISSID:
a. Setbysearch:SearchWI‐FIsignalinthe
neighborhood.
b. Setbykeyin:TypeNewSSIDtoconnect
theWI‐FIyouprefer.
(2) Network:Itisthesameascomputer
network.TheDefaultis“Enable”DHCPto
autogetIPAddress,SubnetMaskand
Gateway.Oryoucan“Disable”DHCPtoset
yourWI‐FIdata.
(3) Connectsetting:Type“NewIP”and“New
Port”togetconnection.
(4) SystemScale:Thereare3Leveltochoose.
Thedefaultis“High”

3Controlsandsettings SupervisorMenu
49
(5) PowerSaving:IfDisable,WI‐FImodulewill
alwaysawaketotransmitdata.Otherwise,
WI‐FIwillautomaticallyturnoff.
2. TCPTest:TestWI‐FIconnection,theprocess
needtowaitabout3~15seconds.PIserieswill
showtheconnectsuccessoffailonthescreen.
3. Information:ItdisplaysWI‐FIinformation.
(1) Remoteport:showthepageisunder
remoteport.
(2) MAC:ShowMACaddressafteryouconnect.
(3) DHCP:ThestatusisEnableorDisable.
(4) rIP:CurrentremoteIPAddress.
(5) rPort:CurrentremotePort.
3.3.2 Formatdisk

3Controlsandsettings SupervisorMenu
50
Itformatsadiskinyourterminal.Thesystemwillask
youtoconfirmifyouwanttoformat,becauseitwill
removealldatastoredinthedisk.
■ FormatC FormattheCdisk.
■ FormatD FormattheDdisk.
3.3.3 Setting
Itoffersavarietyofsettingsthatyoucanchangeto
meetyourneed.
■ EquipmentID Yourterminal’sID.ThedefaultIDis
fourzeros(0000).YoucanreplaceitwithanewID.
TheIDneedstobea4‐digitnumber.
■ BIOSPassword ItisthepasswordofSupervisor
Menu.Thepasswordneedstobea5‐digitnumber.
■ BIOSdefault Itresetsallyourterminalsettings,
includingthepasswordofSupervisorMenu.

3Controlsandsettings SupervisorMenu
51
■ Environment Itprovidessettingsforyoutoadjustto
adapttodifferentworkplacesormatchyour
preference.Forthefirstfiveoptions,seethe
descriptioninEnvironmentinSystemMenu.
∙ Poweron Itdeterminesthescreendisplayed
inUserMenuafteryouturnonyourterminal.
1. Resume:Thesystemdisplaysthelastscreenyou
visitedinUserMenueverytimeyouturnon
yourterminal.
2. Reset:Thesystemdisplaysthedefaultscreenin
UserMenueverytimeyouturnonyour
terminal.
∙ Statusbar Youcanchooseifyouwantto
displaythestatusbar.
■ Scanner Itprovidesseveralsettingsforthescanning
functionality.
∙ Readingtest SeethedescriptioninTestin
SystemMenu.
∙ Indication Ithastwooptions:
1. LED:YoucanturnonorturnofftheLED.
2. Beep:Youcanturnonorturnoffbeeps.
∙ CodeID CodeIDisanidentifierforabarcode.
Ithastwooptions:

3Controlsandsettings SupervisorMenu
52
1. Transmission:Ithastwomodes:Proprietary
IDorAIMID.Youcanchooseeitherofthem.
ProprietaryIDisdefinedbyArgox.AIMIDis
definedbytheAIMorganization.
2. Position:YoucaninsertthecodeIDbefore
orafterthebarcodedata.
∙ InvertImage Whenyouturnonthisfeature,you
canscanbothregularandinvertedbarcodes.
∙ Preamble Addacharacterorcharactersbeforea
barcode.
∙ Postamble Addacharacterorcharactersafterabar
code.
∙ Barcodeconfig Itprovidesseveralsettingsforeach
barcodetype.Changethemtomeetyourneed.
Thelistbelowshowsthebarcodetypessystem
defaultsetting.
BarCodeTypeONOFF
1.Code‐11○
2.Code‐39○
3.Code‐93○
4.Code‐128○
5.EAN‐8○
6.EAN‐13○
7.UPC‐A○

3Controlsandsettings SupervisorMenu
53
8.UPC‐E○
9.Industrial25○
10.Interleaved25○
11.Standard25○
12.MSI‐Plessey○
13.UK‐Plessey○
14.RSS14○
15.RSSLimited○
16.RSSExpanded○
17.CODABAR○
18.Telepen○
19.Matrix2of5○
20.ChinaPost○
21.Pharmacode○
■ Language Youcanchangethelanguageforthe
systemtodisplayitemsintheuserinterface.Ithas
twooptions:English,TC(TraditionalChinese)and
SC(SimpleChinese).
■ Linkingport Youcandecidewhichportyouwantto
useandconfigureitssettings.Tosetaport,dothis:
1. InPortIFselect,selectaportanditsinterface.
2. InPortIFsetup,selecttheportyouchooseinthe
previousstep,andconfigurethesettingsofits

3Controlsandsettings SupervisorMenu
54
interface.
∙ PortIFselect Ithasfourports.Selectoneof
themandchooseitsinterface.Youcanchoose
COM,USB,BluetoothandWI‐FI.Ifyoudon’t
wanttouseinterface,chooseNone.
∙ PortIFsetup ItprovidesthesettingsofCOM,
BluetoothandWI‐FI.Formoreinformation
aboutthesettings,seeRemoteLinkin
SupervisorMenu.
∙ Portinfo Itdisplaystheportinformation.
PressUpArrowandDownArrowtocheck
differentports.
■ Freq.set(PI‐1060Only)ChangePI‐1060Frequency
settingtotriggerTag‐60
∙ 868 SetPI‐1060toRF868MHzfrequency
whichisforEuropecommunication.
∙ 920 SetPI‐1060toRF920MHzfrequency
whichisfornonEuropecommunication.
ImportantLinkingportisfordevelopment
usageandtransmitrawdata.Seemore
information,gotoCH2.3Connection
3Controlsandsettings SupervisorMenu
55
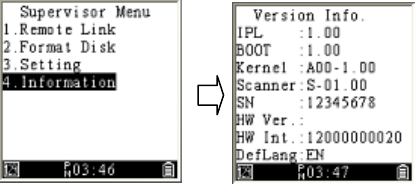
3.3.4 Information
Itdisplaysyourterminal’sinformation.
IPL TheIPLversion.
BOOT Thebootversion.
Kernal Thekernelversion.
Scanner Thescanner’sfirmwareversion.
SN Theserialnumber.
HW Ver. ThePCBA(PrintedCircuitBoard
Assembly)version.
HW Int. Thehardwareversion.
DefLang Thedisplaylanguage.

4Applications SupervisorMenu
56
4 Applications
Argoxprovidesmultipleapplicationsforcommunicationand
developmentsasbelow:
Communication
PhoenixVoler UploadandDownloadfirmwareor
applicationeasily.Recommenddeveloper.
Everlink ManagemultiplePIserieswithfiles
transmission,messagesendingandhistory
datafunction.
Controlcenter Remote‐endofmanageprogramcanlink
multipleEverlinkandprovideCloud
operation.
Developmentapplication
Skywalker Userfriendlysoftwaredevelopmentkit
GotoArgoxwebsitetogetmoreapplicationsanduser
guide
http://www.argox.com/content2011.php?sno=0000033
NotePISeriesaccept“.bas”and“.bin”filefrom
BasicandCcompiler.

5Troubleshooting Hardwareissues
57
5 Troubleshooting
5.1 Hardwareissues
Speakerisnotworkingorvolumeistoolow.
■ Makesurethespeakerholeisnotblocked.
■ Testisinthesystemmenu,useTesttocheckspeaker.
Keypaddoesnotresponse.
■ Testisinthesystemmenu,useTesttocheckkeypad.
■ Thesystemmightbecrush.UseScan+Powerkeyto
warmresetorcoldreset(hold5seconds).
Myterminalkeepsturningitselfofforcannotopen.
■ Ifyou’reusingbatteries,checkthemandseeifthey
needtobecharged.
■ IfyourterminalisconnectedusingUSBorRS‐232
cable,makesurethecableistightlyplugged.
■ ThedurationofAutooffTimeristooshort.Setita
longerdurationfromAutoofftimerinEnvironment

5Troubleshooting Communicationissues
58
5.2 Communicationissues
ReceiveortransmitproblemonUSB
■ CheckUSBconnectorispluggedcorrectly.
■ CheckRemoteLinksetisUSBandselecttherightPI
seriesnameoncomputer.
■ RestartPIseriesandunplugtheUSBandtryagain.
ReceiveortransmitproblemonRS‐232
■ CheckRS‐232connectorispluggedcorrectly.
■ CheckRemoteLinksetisCOMportandselectthe
sameportoncomputer.
■ RestartPIseriesandunplugtheRS‐232andtryagain.
ReceiveortransmitproblemonBluetooth
■ CheckRemoteLinksetisBluetoothportand
Bluetoothsettingiscorrect.
■ BesurePIseriesisintheBluetoothrange

5Troubleshooting Barcodescanningissues
59
5.3 Barcodescanningissues
Barcodecannotberead
■ Changetheanglebetweenthebarcodeandthe
terminal.
■ Changethedistancebetweenthebarcodeandthe
terminal.
■ Cleanthescanningwindowslightlyofthe
terminal(makesurewithoutscratch).
■ Enabledthebarcodesymbologyinsupervisormenu>
3.Setting>5.Scanner>7.Barcodeconfig.

Specifications
60
6 Specifications
GeneralCharacteristics
OS ArgoxProprietary
CPU ARM926EJ‐S
RAM 16/32MBDRAM
ROM 20/60MBFlash
Display WhitegraymonoSTNLCD160*160
Indicator LEDBlue,GreenandRed;Beeper;
VibrationMotor
Keypad 25Alpha‐Numerickeys(Including10
functionkeys,3programmablehot
keys)
Accessory Holder(Standard),PowerSupply
Dimensions 145.0mm(L)x55.0mm(W)x26.0mm
(H)
Weight 230gwithbattery

Specifications
61
Model PI‐1010 PI‐1030 PI‐1060 PI‐1230
WPAN BluetoothClass2,BT2.1+EDR
WLAN N/A Wi‐Fi
802.11b/g
/n
N/A Wi‐Fi
802.11b/g
/n
RF N/A N/A +15dbmmax.
(Maxoutput
power)
N/A
I/O
Interface
USB2.0/RS‐232

Specifications
62
Scanner
Model PI‐1010/PI‐1030/PI‐1060 PI‐1230
Scanner
system
CCD 2DAreaimager
Resolution 3milatPCS90% 1D(5mils):Code39
2D(6.7miks):
PDF417
Depthof
field
Code39
3mil 40‐90
mm Code39 5mil
5mil 45‐140
mm EAN13 13mil
20mi
l
65‐570
mm Datamatrix 15mil
EAN13 13m
il
55‐435
mm
Scanning
rate
200scan/sec
Decode
capability
Code‐11、Code‐39、
Code‐93、Code‐128、
EAN‐8、EAN‐13、UPC‐A、
UPC‐E、Industrial25、
Interleaved25、Standard
25、MSI‐Plessey、
UK‐Plessey、RSS14、RSS
Limited、RSSExpanded、
Autodiscriminates
allstandard
one‐dimension
barcodes;including
GS1databar
PDF417,MicroPDF,
Composite
Codes(CC‐A,CC‐B,

Specifications
63
CODABAR、Telepen、
Matrix2of5、China
Post、Pharmacode
CC‐C)
OCR‐A,
OCR‐B,OCR‐C,Aztec
(Standard,Inverse),
MaxiCode,
DataMatrix/ECC200
(Standard,Inverse),
QRCode,MicroQR
Expansion
Storage MicroSD(upto16GB)(factoryoption)
DevelopingTools
Software SoftwareDevelopmentKit(SDK),
Skywalker(Proprietaryapplication
softwaregenerator)
Programming
Language
Clanguage,BASIClanguage
Power
Battery AAsizeNIMHBattery*2(chargedbyUSB
oroptionalpoweradapter)orAAsize
Alkaline*2
(RecommendAAsizeNIMHBatteryfor
dailywork)

Specifications
64
Power
Rating 5Vdc2A
PhysicalandEnvironment
Operating
Temperature
‐10℃~60℃ /14F~140F
Storage
Temperature
‐20℃~70℃ /‐4F~158F
Humidity 1)Operating:Non‐condensed10~90%
2)Storage:Non‐condensed5~95%
Impact
Resistance
1)Terminal1.2M/4ft
2)IP54
Electrostatic
Discharge
1)+/‐15KVairdischarge2)+/‐8KV
directdischarge
EMC
Regulation
FCC,CE,BIS,BSMI

Specifications
65
Model TAG‐60
Light
indication
BlueLED
Soundalert Buzzer>80dbA@10cm,programmable
soundpattern
Beeping
pattern
Programmablebeepingpattern
RFSensitivity ‐110dbmtyp.
Frequency
bands(TBD)
410~475,820~950MHz
Power CR‐2032coinbattery,1yearsstandby
minimum
Drop 1.5M
Dimensions 76.0mm(L)x50.0mm(W)x17.0mm(H)

AppendixA
66
AppendixA
ScanModule(CCD)ConfigurationTable
Default(*)
Command1 Command2 Option/Limitation
Indication
LED indication Disable
Enable *
Buzzer indication Disable
Enable *
Transmission
Preamble transmission Disable *
Enable
Postamble
transmission
Disable *
Enable
Code ID position Before code data *
After code data
Code ID transmission Disable *
Proprietary ID
AIM ID
Code length
transmission
Disable *
Enable
Code name
transmission
Disable *
Enable
Disable *

AppendixA
67
Case conversion Upper case
Lower case
Scan
Double confirm
0 ~ 9
0 *
Global min. code
length
0 ~ 99
4 *
Global max. code
length
0 ~ 99
63 *
Inverted image scan
Disable *
Enable
String setting
Prefix characters
setting
0 *
0x00 ~ 0xff ASCII code
12 characters.
Suffix characters
setting
0 *
0x00 ~ 0xff ASCII code
12 characters.
Preamble characters
settings
0 *
0x00 ~ 0xff ASCII code
12 characters.
Postamble characters
settings
0 *
0x00 ~ 0xff ASCII code
12 characters.
Code 11
Read
Disable *
Enable

AppendixA
68
Check-sum transmit
/verify
Disable/Disable
Disable/One digit *
Disable/Two digits
Enable/One digit
Enable/Two digits
Max. code length
0 ~ 64
0 *
Min. code length
0 ~ 64
0 *
Truncate leading
0 ~ 15
0 *
Truncate ending
0 ~ 15
0 *
Code ID setting
<O>
0x00 ~ 0xff ASCII
code(1 or 2 bytes)
Code 39 Read Disable
Enable *
Check-sum transmit
/verify
Disable/Disable *
Disable/Enable
Enable /Enable
Max. code length 0 ~ 64
0 *
Min. code length 0 ~ 64

AppendixA
69
1 *
Truncate leading 0 ~ 20
0 *
Truncate ending 0 ~ 15
0 *
Code ID setting
<*>
0x00 ~ 0xff ASCII
code(1 or 2 bytes)
Format
Standard *
Full ASCII
Start/stop transmission
Disable *
Enable
Code 93
Read
Disable *
Enable
Check-sum transmit
/verify
Disable/Disable
Disable/Enable *
Enable /Enable
Max. code length
0 ~ 64
0 *
Min. code length
0 ~ 64
0 *
Truncate leading
0 ~ 15
0 *
Truncate ending
0 ~ 15
0 *

AppendixA
70
Code ID setting
<&>
0x00 ~ 0xff ASCII
code(1 or 2 bytes)
Code 128
Read
Disable
Enable *
Check-sum transmit
/verify
Disable/Disable
Disable/Enable *
Enable /Enable
Max. code length
0 ~ 64
0 *
Min. code length
0 ~ 64
1 *
Truncate leading
0 ~ 15
0 *
Truncate ending
0 ~ 15
0 *
Code ID setting
<#>
0x00 ~ 0xff ASCII
code(1 or 2 bytes)
Format
Standard *
UCC.EAN 128
UCC/EAN 128 ID
setting
<#>
0x00 ~ 0xff ASCII
code(1 bytes)
0x1D *

AppendixA
71
Concatenation code 0x00 ~ 0xff ASCII
code(1 bytes)
Codabar
Read
Disable *
Enable
Check-sum transmit
/verify
Disable/Disable *
Disable/Enable
Enable /Enable
Max. code length
0 ~ 64
0 *
Min. code length
0 ~ 64
0 *
Truncate leading
0 ~ 15
0 *
Truncate ending
0 ~ 15
0 *
Code ID setting
<%>
0x00 ~ 0xff ASCII
code(1 or 2 bytes)
Start/stop type
ABCD/ABCD *
abcd/abcd
ABCD/TN*E
abcd/tn*e
Start/stop transmission
Disable *
Enable
Disable

AppendixA
72
EAN 8 Read Enable *
Check-sum
transmission
Disable
Enable *
Truncate leading
0 ~ 15
0 *
Truncate ending
0 ~ 15
0 *
Code ID setting
<FF>
0x00 ~ 0xff ASCII
code(1 or 2 bytes)
Supplement digits
None *
2 digits
5 digits
2, 5 digits
UCC/EAN 128
2, UCC/EAN 128
5, UCC/EAN 128
All
Truncation/expansion
None *
Truncate leading zero
Expand to EAN 13
Expansion
Disable *
Enable
EAN 13
Read
Disable
Enable *

AppendixA
73
Check-sum
transmission
Disable
Enable *
Truncate leading
0 ~ 15
0 *
Truncate ending
0 ~ 15
0 *
Code ID setting
<F>
0x00 ~ 0xff ASCII
code(1 or 2 bytes)
Supplement digits
None *
2 digits
5 digits
2, 5 digits
UCC/EAN 128
2, UCC/EAN 128
5, UCC/EAN 128
All
ISBN/ISSN conversion
Disable *
Enable
Industrial 2 of
5
Read
Disable *
Enable
Max. code length
0 ~ 64
0 *
Min. code length
0 ~ 64
0 *

AppendixA
74
Truncate leading
0 ~ 15
0 *
Truncate ending
0 ~ 15
0 *
Code ID setting
<i>
0x00 ~ 0xff ASCII
code(1 or 2 bytes)
Interleaved 2
of 5
Read Disable
Enable *
Check-sum transmit
/verify
Disable/Disable *
Disable/Enable
Enable /Enable
Max. code length
0 ~ 64
0 *
Min. code length
0 ~ 64
0 *
Truncate leading
0 ~ 15
0 *
Truncate ending
0 ~ 15
0 *
Code ID setting
<i>
0x00 ~ 0xff ASCII
code(1 or 2 bytes)
Standard 2 of 5
Read
Disable *
Enable

AppendixA
75
Check-sum transmit
/verify
Disable/Disable *
Disable/Enable
Enable /Enable
Max. code length
0 ~ 64
0 *
Min. code length
0 ~ 64
0 *
Truncate leading
0 ~ 15
0 *
Truncate ending
0 ~ 15
0 *
Code ID setting
<i>
0x00 ~ 0xff ASCII
code(1 or 2 bytes)
MSI Plessey
Read
Disable *
Enable
Check-sum transmit
/verify
N/disable *
N/MOD 10
N/Mod 10,10
N/mod 11,10
Y/ Mod10
Y/ Mod 10,10
Y/ Mod 11/10

AppendixA
76
Max. code length
0 ~ 64
0 *
Min. code length
0 ~ 64
0 *
Truncate leading
0 ~ 15
0 *
Truncate ending
0 ~ 15
0 *
Code ID setting
<@>
0x00 ~ 0xff ASCII
code(1 or 2 bytes)
UK Plessey
Read
Disable *
Enable
Check-sum transmit
/verify
Disable/Disable
Disable/Enable *
Enable /Enable
Max. code length
0 ~ 64
0 *
Min. code length
0 ~ 64
0 *
Truncate leading
0 ~ 15
0 *
Truncate ending
0 ~ 15
0 *
<@>

AppendixA
77
Code ID setting 0x00 ~ 0xff ASCII
code(1 or 2 bytes)
Telepen
Read
Disable *
Enable
Check-sum transmit
/verify
Disable/Disable *
Disable/Enable
Enable /Enable
Max. code length
0 ~ 64
0 *
Min. code length
0 ~ 64
0 *
Truncate leading
0 ~ 15
0 *
Truncate ending
0 ~ 15
0 *
Code ID setting
<S>
0x00 ~ 0xff ASCII
code(1 or 2 bytes)
Format
Numeric *
Full ASCII
UPCA
Read
Disable
Enable *
Check-sum
transmission
Disable
Enable *

AppendixA
78
Truncate leading
0 ~ 15
0 *
Truncate ending
0 ~ 15
0 *
Code ID setting
<A>
0x00 ~ 0xff ASCII
code(1 or 2 bytes)
Supplement digits
None *
2 digits
5 digtis
2, 5 digits
UCC/EAN 128
2, UCC/EAN 128
5, UCC/EAN 128
All
Truncate/expansion
None
Truncate leading zero *
Expand to EAN 13
UPCE
Read
Disable
Enable *
Check-sum
transmission
Disable
Enable *
Truncate ending
0 ~ 15
0 *
<E>

AppendixA
79
Code ID setting 0x00 ~ 0xff ASCII
code(1 or 2 bytes)
Supplement digits
None *
2 digits
5 digits
2, 5 digits
UCC/EAN 128
2, UCC/EAN 128
5, UCC/EAN 128
All
Truncate/expansion
None *
Truncate leading zero
Expand to EAN 13
Expand to UPCA
Expansion
Disable *
Enable
UPCE-1
Disable *
Enable
Matrix 25
Read
Disable *
Enable
Check-sum transmit
/verify
Disable/Disable *
Disable/Enable
Enable /Enable
Max. code length
0 ~ 64
0 *

AppendixA
80
Min. code length
0 ~ 64
0 *
Truncate leading
0 ~ 15
0 *
Truncate ending
0 ~ 15
0 *
Code ID setting
<B>
0x00 ~ 0xff ASCII
code(1 or 2 bytes)
China post
Read
Disable *
Enable
Max. code length
0 ~ 64
11 *
Min. code length
0 ~ 64
11 *
Truncate leading
0 ~ 15
0 *
Truncate ending
0 ~ 15
0 *
Code ID setting
<t>
0x00 ~ 0xff ASCII
code(1 or 2 bytes)
RSS 14
Read
Disable *
Enable
Truncate leading
0 ~ 15
0 *

AppendixA
81
Truncate ending
0 ~ 15
0 *
Code ID setting
<R4>
0x00 ~ 0xff ASCII
code(1 or 2 bytes)
UCC/EAN 128
emulation
Disable *
Enable
RSS Limited
Read
Disable *
Enable
Truncate leading
0 ~ 15
0 *
Truncate ending
0 ~ 15
0 *
Code ID setting
<RL>
0x00 ~ 0xff ASCII
code(1 or 2 bytes)
UCC/EAN 128
emulation
Disable *
Enable
RSS
Expanded
Read
Disable *
Enable
Max. code length
0 ~ 99
99 *
Min. code length
0 ~ 99
1 *

AppendixA
82
Truncate leading
0 ~ 15
0 *
Truncate ending
0 ~ 15
0 *
Code ID setting
<RX>
0x00 ~ 0xff ASCII
code(1 or 2 bytes)
UCC/EAN 128
emulation
Disable *
Enable
Italian
Pharmacode
39
Read
Disable *
Enable
Max. code length
0 ~ 64
12 *
Min. code length
0 ~ 64
9 *
Truncate leading
0 ~ 15
0 *
Truncate ending
0 ~ 15
0 *
Code ID setting
<p>
0x00 ~ 0xff ASCII
code(1 or 2 bytes)
Leading “A”
Disable *
Enable

AppendixB
83
AppendixB
ScanModule(2D)ConfigurationTable
Default(*)
Command1 Command2 Value
5
Indication
2
LED indication
0: Disable
1: Enable *
3
Buzzer indication
0: Disable
1: Enable *
4
Vibrator
0: Disable
1: Enable *
6
Transmission
8
Transmit Code ID
0: None(*)
1: AIM Code ID
2: Symbol Code ID
7
Scan
17
Timeout
5~99(0.1 sec.)
Default: 99(9.9 sec)
20
Trigger Mode
0:Trigger(*)
7: Hand-Free Mode
9:Auto
21
Picklist Mode
0: Disable(*)
2: Enable
22
Same Barcode Timeout
5~99(0.1 sec.)
Default: 6 (0.6 sec)
23
Mobile Phone/Display
Mode
0: Disable(*)
3: Enable

AppendixB
84
27
Illumination Power Level
1~10 (default: 10)
28
Decoding Illumination
0: Disable
1: Enable(*)
29
Decode Aiming Pattern
0: Disable
2: Enable(*)
32
Inverse 1D
0: Regular(*)
1: Inverse
2: Inverse Autodetect
10
Code 11
1
Read
0: Disable(*)
1: Enable
2
Check Digit Verification
0: Disable(*)
1: 1 Check Digit
2: 2 Check Digits
3
Transmit Check Digit(s)
0: Disable(*)
1: Enable
4
Length 1※1
0 ~ 55 (default: 4)
5
Length 2※1
0 ~ 55 (default: 55)
11
Code 39
1
Read
0: Disable
1: Enable(*)
2
Check Digit Verification
0: Disable(*)
1: Enable
3
Transmit Check Digit
0: Disable(*)
1: Enable
4
Length 1※1
0 ~ 55 (default: 2)

AppendixB
85
5
Length 2※1
0 ~ 55 (default: 55)
10
Full ASCII Conversion
0: Disable(*)
1: Enable
19
Code 32 Prefix
0: Disable(*)
1: Enable
20
Trioptic Code 39
0: Disable(*)
1: Enable
21
Convert Code 39 to
Code 32
0: Disable(*)
1: Enable
12
Code 93
1
Read
0: Disable(*)
1: Enable
4
Length 1※1
0 ~ 55 (default: 4)
5
Length 2※1
0 ~ 55 (default: 55)
13
Code 128
1
Read
0: Disable
1: Enable(*)
4
Length 1※1
0 ~ 55 (default: 0)
5
Length 2※1
0 ~ 55 (default: 0)
14
ISBT 128
0: Disable
1: Enable(*)
15
GS1-128
0: Disable
1: Enable(*)
19
ISBT Concatenation
0: Disable(*)
1: Enable

AppendixB
86
2: Auto
20
Check ISBT Table
0: Disable
1: Enable(*)
21
ISBT Concatenation
Redundancy
2 ~ 20 (default: 10)
14
Codabar
1
Read
0: Disable(*)
1: Enable
4
Length 1※1
0 ~ 55 (default: 5)
5
Length 2※1
0 ~ 55 (default: 55)
14
CLSI Editing
0: Disable(*)
1: Enable
15
NOTIS Editing
0: Disable(*)
1: Enable
15
EAN 8/JAN 8
1
Read
0: Disable
1: Enable(*)
20
Zero Extend
0: Disable(*)
1: Enable
16
EAN 13/JAN 13
1
Read
0: Disable
1: Enable(*)
18
Interleaved 2 of
5
1
Read
0: Disable
1: Enable(*)
2
Check Digit Verification
0: Disable(*)
1: USS Check Digit
2: OPCC Check Digits
3
Transmit Check Digit
0: Disable(*)
1: Enable

AppendixB
87
4
Length 1※1
0 ~ 55 (default: 14)
5
Length 2※1
0 ~ 55 (default: 0)
9
Convert to EAN 13
0: Disable(*)
1: Enable
20
MSI Plessey
1
Read
0: Disable(*)
1: Enable
2
Check Digits
0: One Check Digit(*)
1: Two Check Digits
3
Transmit Check Digit
0: Disable(*)
1: Enable
4
Length 1※1
0 ~ 55 (default: 4)
5
Length 2※1
0 ~ 55 (default: 55)
9
Check Digit Algorithm
0: MOD 10/MOD 11
1: MOD 10/MOD 10(*)
23
UPCA
1
Read
0: Disable
1: Enable(*)
3
Transmit Check Digit
0: Disable
1: Enable(*)
20
UPC-A Preamble
0: Disable
1: System Character
Only(*)
2. System Character and
Country Code
24
UPCE
1
Read
0: Disable
1: Enable(*)

AppendixB
88
3
Transmit Check Digit
0: Disable
1: Enable(*)
13
UPC-E1
0: Disable(*)
1: Enable
14
Convert UPC-E to
UPC-A
0: Disable(*)
1: Enable
20
Transmit UPC-E1 Check
Digit
0: Disable
1: Enable(*)
21
Convert UPC-E1 to
UPC-A
0: Disable(*)
1: Enable
22
UPC-E Preamble
0: Disable
1: System Character
Only(*)
2. System Character and
Country Code
23
UPC-E1 Preamble
0: Disable
1: System Character
Only(*)
2. System Character and
Country Code
25
Matrix 2 of 5
1
Read
0: Disable(*)
1: Enable
2
Check Digit
0: Disable(*)
1: Enable
3
Transmit Check Digit
0: Disable(*)
1: Enable
4
Length 1※1
0 ~ 55 (default: 14)
5
Length 2※1
0 ~ 55 (default: 0)

AppendixB
89
26
PDF-417
1
Read
0: Disable
1: Enable(*)
33
MicroPDF
1
Read
0: Disable(*)
1: Enable
11
Code 128 Emulation
0: Disable(*)
1: Enable
35
UPC/EAN
1
Bookland EAN
0: Disable(*)
1: Enable
2
Bookland ISBN Format
0: Bookland ISBN-10(*)
1: Bookland ISBN-13
3
UCC Coupon Extended
Code
0: Disable(*)
1: Enable
5
Supplemental
0: Ignore supplemental (*)
1: Decode with
Supplemental only
2: Auto discriminate
Supplemental
3: Smart Supplemental
Mode
※ Applies to EAN-13
starting with any
prefix listed
previously
4: Enable 378/379
Supplemental
5: Enable 978/979
Supplemental
※ If you select 978
Supplemental Mode
and are scanning
Bookland EAN bar
codes, you should
enable Bookland
EAN, and select a
format using

AppendixB
90
Bookland ISBN
Format.
6: Enable
414/419/434/439
Supplemental
7: Enable 977
Supplemental
8: Enable 491
Supplemental
9: Supplemental
User-Programmable Type
1
※ Applies to EAN-13
bar codes starting
with a 3-digit
user-defined prefix.
Set this 3-digit prefix
using
User-Programmable
Supplemental.
10: Supplemental
User-Programmable Type
1 and 2
※ Applies to EAN-13
bar codes starting
with either of two
3-digit user-defined
prefixes. Set the
3-digit prefixes
using
User-Programmable
Supplemental.
11: Smart Supplemental
Plus
User-Programmable 1
※ Applies to EAN-13
bar codes starting
with any prefix listed
previously or the
user-defined prefix
set using

AppendixB
91
User-Programmable
Supplemental.
12: Smart Supplemental
Plus User-Programmable
1 and 2
※ Applies to EAN-13
bar codes starting
with any prefix listed
previously or one of
the two user-defined
prefixes set using
User-Programmable
Supplemental.
6
Supplemental
Redundancy
2 ~ 30 (default: 10)
7
User-Programmable
Supplemental 1
-1 ~ 999(default:-1)
8
User-Programmable
Supplemental 2
-1 ~ 999(default:-1)
9
UPC/EAN/JAN
Supplemental AIM ID
Format
0: Separate
1: Combined(*)
2: Separate Transmission
10
Coupon Report
0: Old Coupon Symbols
1: New Coupon
Symbols(*)
2: Both Coupon Formats
11
ISSN EAN
0: Disable(*)
1: Enable
45
Australia Post
1
Read
0: Disable
1: Enable(*)
2 0: Auto(*)

AppendixB
92
Format 1: Raw Format
2: Alphanumeric Encoding
3: Numeric Encoding
48
Japan Postal
1
Read
0: Disable
1: Enable(*)
49
KIX Code
1
Read
0: Disable
1: Enable(*)
51
USPS
1
Read
0: Disable(*)
1: Enable
52
UPU
1
Read
0: Disable(*)
1: Enable
53
Aztec
1
Read
0: Disable
1: Enable(*)
10
Inverse
0: Regular(*)
1: Inverse
2: Auto
54
Data Matrix
1
Read
0: Disable
1: Enable(*)
6
Inverse
0: Regular(*)
1: Inverse
2: Auto
55
Maxicode
1
Read
0: Disable
1: Enable(*)
58
OCR
1
Read
0: OCR off (*)
1: OCR-A
2: OCR-B
3. US Currency
4. MICR E13B

AppendixB
93
2
OCR-A Variant ※2
0: OCR-A Full ASCII(*)
1: OCR-A Reserved 1
2: OCR-A Reserved 2
3: OCR-A Banking
3
OCR-B Variant ※3
0: OCR-B Full ASCII(*)
1: OCR-B Banking
2: OCR-B Limited
3: OCR-B Travel
Document Version 1
(TD1) 3 Line ID Cards
4: OCR-B Passport
6: OCR-B ISBN 10-Digit
Book Numbers
7: OCR-B ISBN 10 or
13-Digit Book Numbers
8: OCR-B Travel
Document Version 2
(TD2)2-Line ID Cards
9: OCR-B Visa Type A
10: OCR-B Visa Type B
14:Travel Document 2 or
3-Line ID Cards
Auto-Detect
4
OCR Orientation
0: OCR Orientation 0(*)
1: OCR Orientation 270
Clockwise
2: OCR Orientation 180
Clockwise
3: OCR Orientation 90
Clockwise
4: OCR Orientation
Omnidirectional
5
OCR Lines
1: OCR 1 Line(*)
2: OCR 2 Line

AppendixB
94
3: OCR 3 Line
6
OCR Minimum
Characters
3(*)
Range:3~100
7
OCR Maximum
Characters
100(*)
Range:3~100
8
OCR Quiet Zone
50(*)
Range:20~99
9
Inverse OCR
0: Regular Only(*)
1: Inverse Only
2: Autodiscriminate
59
Discrete 2 of 5
1
Read
0: Disable(*)
1: Enable
4
Length 1※1
0 ~ 55 (default: 12)
5
Length 2※1
0 ~ 55 (default: 0)
60
Chinese 2 of 5
1
Read
0: Disable(*)
1: Enable
61
GS1 Data Bar
1
GS1 DataBar-14
0: Disable
1: Enable(*)
2
GS1 DataBar Limited
0: Disable(*)
1: Enable
3
GS1 DataBar Expanded
0: Disable(*)
1: Enable
4
Convert to UPC/EAN
0: Disable(*)
1: Enable
5
GS1 DataBar Limited
Security Level
1: Level 1
2: Level 2
3: Level 3(*)

AppendixB
95
4: Level 4
62
Korean 3 of 5
1
Read
0: Disable(*)
1: Enable
63
Postal codes
1
US Postnet
0: Disable
1: Enable(*)
2
US Planet
0: Disable
1: Enable(*)
3
Transmit US Postal
Check Digit
0: Disable
1: Enable(*)
4
UK Postal
0: Disable
1: Enable(*)
5
Transmit UK Postal
Check Digit
0: Disable
1: Enable(*)
64
Composite
1
Composite CC-C
0: Disable(*)
1: Enable
2
Composite CC-A/B
0: Disable(*)
1: Enable
3
Composite TLC-39
0: Disable(*)
1: Enable
4
UPC Composite Mode
0: UPC Never Linked(*)
1: UPC Always Linked
2: Auto
5
GS1-128 Emulation
Mode for UCC/EAN
Composite Codes
0: Disable(*)
1: Enable
65
QR Code
1
Read
0: Disable
1: Enable(*)
2 0: Regular(*)

AppendixB
96
Inverse 1: Inverse
2: Auto
66
Micro QR
1
Read
0: Disable
1: Enable(*)
68
Symbology
Specific Security
Levels
1
Redundancy Level
1: Level 1(*)
2: Level 2
3: Level 3
4: Level 4
2
Security Level
0: Level 0
1: Level 1(*)
2: Level 2
3: Level 3
3
Intercharacter Gap Size
6:Normal(*)
10:Large