Ascalade Technologies DT19R42H 1.9 GHZ DECT CORDLESS PHONE-HANDSET User Manual DECT200QUG10
Ascalade Technologies, Inc. 1.9 GHZ DECT CORDLESS PHONE-HANDSET DECT200QUG10
Contents
- 1. USERS MANUAL
- 2. USERS MANUAL 2
- 3. USERS MANUAL 1
USERS MANUAL 1
Quick Start
Guide
DECT200
DRAFT
1.9GHz DECT Telephone
Caller ID
Table of Contents
1 -
Hands-free

- 2 -
BEFORE USING YOUR TELEPHONE EQUIPMENT, BASIC SAFETY PRECAUTIONS SHOUD
ALWAYS BE FOLLOWED TO REDUCE THE RISK OF FIRE, ELECTRIC SHOCK AND
INJURY, INCLUDING THE FOLLOWING.
• Read and follow all warnings and instructions marked on the product.
• Do not use this product near water, laundry tub, in a wet basement, or near a swimming pool.
• Do not place this product on an unstable table. The product may fall and be damaged.
• This product should never be placed near or over a radiator or heat register.
• This product should be operated only from the type of power source indicated on the label.
• Do not allow anything to rest on the power cord. Do not locate this product where the cord will be
abused by persons walking on it.
• Do not overload wall outlets and extension cords as this can result in the risk of fire or electric
shock.
• Avoid using a telephone during an electrical storm. There may be a remote risk of electric shock
from lightning.
• Do not use this product to report a gas leak in the vicinity of the leak.
• Do not use this product near intensive care medical equipment or by persons with pacemakers.
• Due to the radio signals between base station and handset, wearers of hearing aids may experience
interference in the form of a humming noise.
• Do not allow the handset to come into contact with liquids or moisture.
• Do not open the handset, base unit or charger. This could expose you to high voltages.
• Do not allow the charging contacts or the battery to come into contact with conductive materials.
• There is a slight chance that your product could be damaged by an electrical storm. We recommend
that you unplug the product from the power supply and telephone socket during a storm.
• Do not use the handset in an explosive hazard area such as where there is gas leaking.
• It is recommended that this product is not used near intensive care medical equipments or by
persons with pacemakers.
• This product can interfere with electrical equipment such as answering machine, television, radio,
and computers if placed too close. We recommend that you position the base unit at least one
meter from such appliances.
• This product is not designed for making emergency telephone calls when the power fails. Alternative
arrangements should be made for access to emergency services.
BATTERIES
• Use only the battery type listed in the instruction manual. Do not use lithium batteries.
• Do not dispose of the battery in a fire, as they can explode.
• Do not open or mutilate the battery. Released electrolyte is corrosive and can cause damage to the
eyes or skin. It can be toxic if swallowed.
• Avoid contact with metal objects when handling the battery. These objects could short out the
batteries or cause the conductor to overheat resulting in burns.
• Do not attempt to recharge the battery cell by heating it. Sudden release of battery electrolyte can
cause burns or irritation to the eyes or skin.
• Observe the proper polarity, or direction, of any battery. Reverse insertion of the battery cell can
result in leakage or explosion.
• Remove the battery cells if you do not plan to use the product for several months at a time.
• Discard any “dead” batteries because they are likely to leak into the product.
• Do not store this product or the battery in a high temperature area. Battery stored in a freezer or
refrigerator should be protected from condensation during storage and defrosting. Battery should
be stabilized at room temperature before using.
• Your battery is rechargeable and can be recycled once it outlives its usefulness. Depending upon
your local and state law, it might be illegal to dispose of this battery into a municipal waste system.
Check with your local solid waste company for more information on your recycling options for the
battery cells.
SAVE THESE INSTRUCTIONS
Im
p
ortant Safet
y
Instructions
Environment and Safety
- 3 -
- 4 -
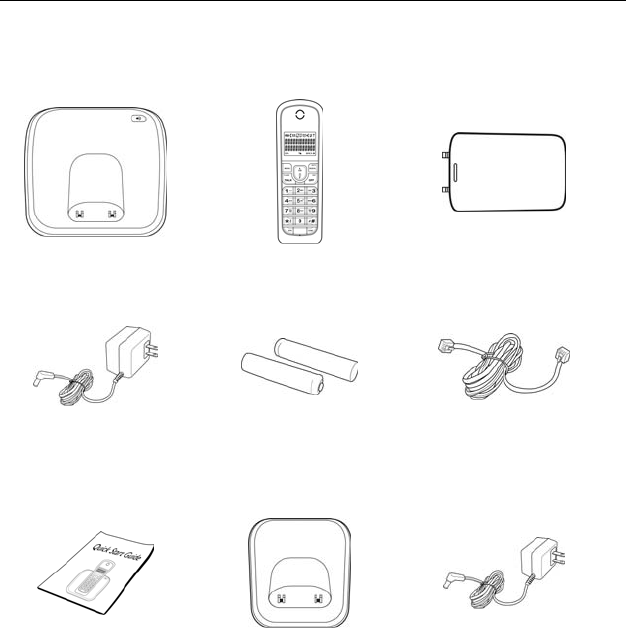
What’s in the Box?
Make sure you have all these items in the box. For missing item(s), contact
your dealer.
Base Unit Handset Handset Battery Cover
Base Power Adapter NiMH AAA
Rechargeable Battery
x 2
Telephone Line Cord
Quick Start Guide Charger
* For multiple pack model
Charger Power
Adapter
* For multiple pack model
- 5 -
About your phone
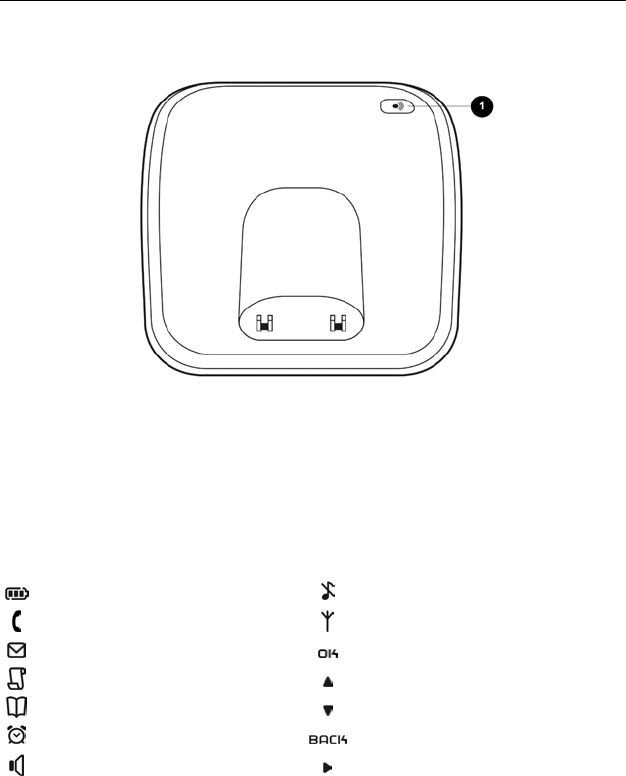
THE BASE
1 Page key
Use to locate handsets.
Use for registration.
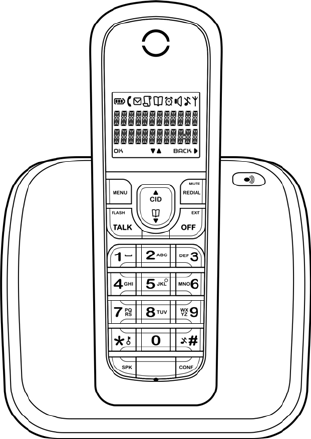
THE ICONS
Each icon gives you a visual message of what is happening on your handset.
Battery level Ringer off
Call in progress Signal strength
Voicemail indicator Press to confirm
Caller ID indicator Menu options upward
Phonebook Menu options downward
Alarm clock on Press to cancel/delete
Speaker on More digits on the right
- 6 -
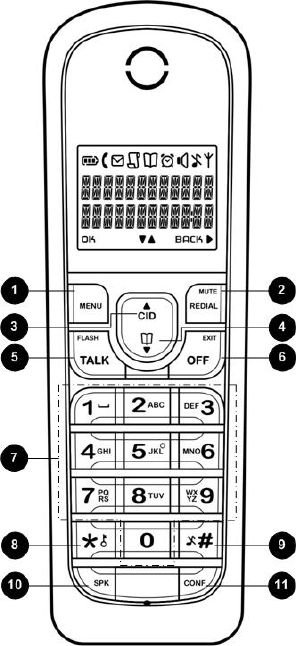
THE HANDSET
1 M e n u & O K k e y
Use to enter the menus.
Use to select menu.
Use to confirm selection.
2 Redia l , Mu t e & B a c k k e y
Use to enter the redial log.
Use to dial the last dialed
number.
Use to erase text and numbers.
Use to mute/unmute microphone.
Use to switch between screens.
3 Up Navigation & Call Log key
Use to enter the call log.
Use to scroll up menu items.
Use to increase the ringer and
receiver volume.
4 Down Navigation & Phonebook
key
Use to enter the phonebook.
Use to scroll down menu items.
Use to reduce the ringer and
receiver volume.
5 Talk & Recall key
Use to make and receive calls.
Use to send flash signal.
6 End & On/Off key
Use to end a call.
Use to exit menus.
7 D i g i t k e y s
Use to dial digits.
Use to enter text and numbers.
8 S t a r & R i n g e r O f f k e y
Use to dial *.
Use to lock the keypad.
9 Pound, Keylock, & Pause key
Use to dial #.
Use to enter a pause.
Use to turn the ringer on/off.
1
0
Speaker key
Use to turn the speaker on/off.
1
1
Intercom & Conference key
Use to make an intercom call.
Use to start a conference call.
- 7 -
Getting Started
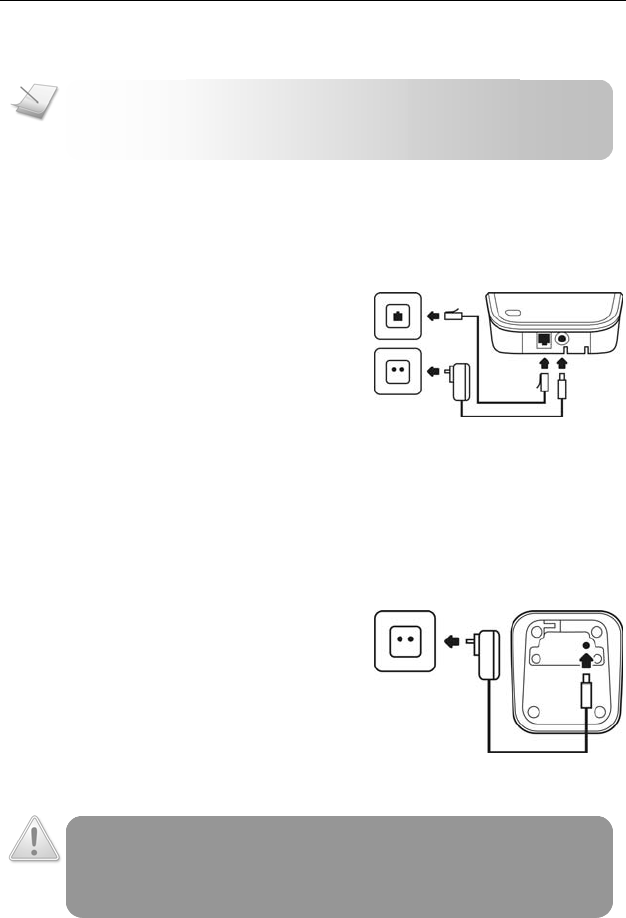
CONNECTING YOUR PHONE
1. Connect the output plug of
the mains adapter to the
bottom of the base unit.
2. Connect the mains adapter to
a standard wall outlet.
3. Connect the telephone line
cord to the phone sockets at
the bottom of the base unit
and the wall phone socket.
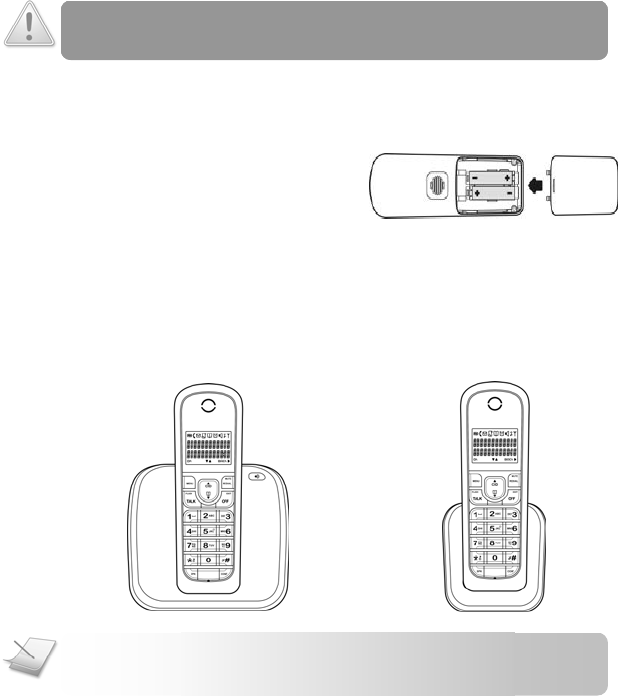
CONNECTING YOUR CHARGER
* For multiple pack model
1. Connect the output plug of
the mains adapter to the
bottom of the charger unit.
2. Connect the mains adapter to
a standard wall outlet.
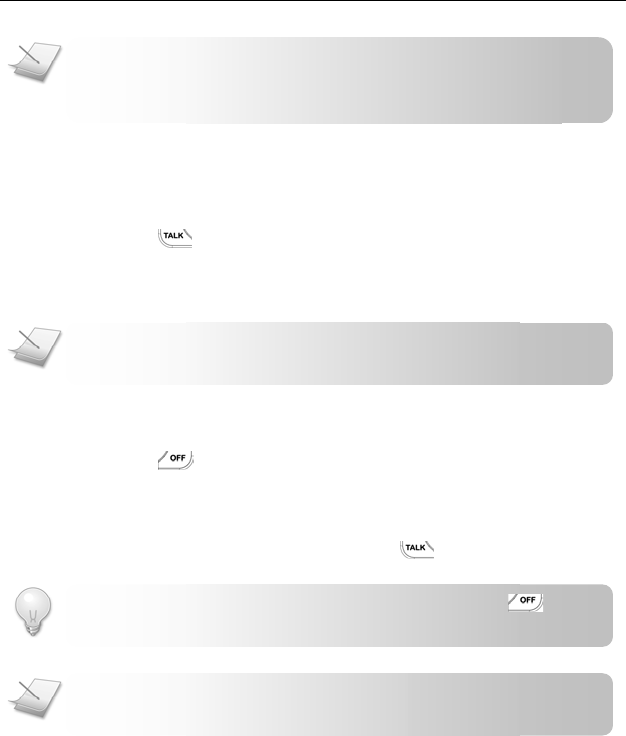
CHARGING YOUR HANDSET
WARNING: RISK OF EXPLOSION IF BATTERY IS REPLACED BY AN INCORRECT TYPE.
Never use non-rechargeable batteries. Use recommended type supplied with
this product. NiMH batteries must be disposed of in accordance with the
applicable waste disposal regulations.
NOTE: The power adapters (for the phone and charger) are
intended to be correctly orientated in a vertical or floor
mount position.
- 8 -
1. Place the 2 rechargeable
batteries (included) into the
battery compartment.
2. Slide the battery door firmly
into place.
3. Place the handset on the base unit or charger for charging.
Charge for 14 hours before initial use.
* The charger is only applicable to multiple pack model.
NOTE: Handset may get warm during initial charge. This is
normal. The handset may take a few seconds to power up.
CAUTION: Check the batteries polarity when inserting the batteries. Incorrect
polarity may damage the product.
- 9 -
Call
MAKING A CALL
This section describes the different ways to make a call.
1. Press .
2. Dial the phone number. The number displays on the screen
and is dialed out.
ENDING A CALL
1. Press or place the handset on the base unit or charger.
ANSWERING A CALL
When you receive a call, your phone rings. Press to answer the call.
TIP: Silent Ringer. When the phone is ringing, press to
turn off the ringer for the incoming call.
NOTE: Caller ID Service. Consult and subscribe from your
service provider.
NOTE: Emergency Call. This telephone is not designed for
making emergency telephone calls when the power fails.
Alternate arrangements should be made for access to
NOTE: Call Timer. During a call, the call timer displays the
talk time of your current call.
- 10 -
Registering Your Handset
Registration allows communication between your base unit and handset(s).
If your handset cannot communicate with its base, you will not be able to
make any call or use some of the functions and features on the phone.
If your handset displays UNREGISTERED, follow the steps below to register
your handset.
1. Press on the base for 4 seconds.
2. Press on the handset.
3. Press
OK
to select REGISTRATION.
4. Enter the system PIN (Pre-set: 0000). Press
BACK
to make
corrections.
5. Press
OK
.
6. Select the base number you want. A blinking digit indicates
that the base number is already being used. Your handset
starts searching for the base.
If registration is successful, the signal icon displays steadily along with
the handset name. The base assigns a handset number to your handset. It is
the digit displayed on the right margin of the screen.
If registration failed, repeat the above procedure.
NOTE: Your base can register up to 4 handsets.
NOTE: Your handset is already registered unless you have
bought an extra handset individually or you have de-registered

- 11 -
Troubleshooting
Problem(s) Tip(s)
No dialing tone • Check your phone connections.
• The handset may be out of range. Move closer.
• The battery capacity may be low. Charge
battery.
Signal icon flashing • The handset may be out of range. Move closer.
• If the handset displays Unregistered, register the
handset. See page 9.
No parking tone • The handset may not be placed properly. Try
again.
• Charging contacts may be dirty. Clean contacts
with a damp cloth.
Handset on the
charger does not
charge
• The battery may be defective. Purchase new
battery from your dealer.
• Check that the battery is inserted correctly.
• Make sure the handset is placed properly on the
base unit or charger. The battery icon is
animated while charging.
No display • Check that the battery is charged.
• Check the connections.
Bad audio (crackles,
echo, etc.)
• The handset may be nearly out of range. Move
closer.
• The phone may be interfered by nearby
electrical appliance. Move the base unit to a
different location.
• The phone may be at a location with thick walls.
Move the base unit to a different location.
Handset does not ring • Check that the handset ringer is turned on.
Caller ID does not
display
• Caller ID service may not be activated. Check
with your service provider.
• The caller’s information may be withheld or is
unavailable.
Cannot make/answer
a 2nd call
• 2nd call service may not be activated. Check
with your service provider.
• Check that the recall selection is correct.