Ascalade Technologies DT19R51 1.9GHz cordless phone User Manual B255OMR00 002
Ascalade Technologies, Inc. 1.9GHz cordless phone B255OMR00 002
UserManual.wiki
>
Ascalade Technologies
>
DT19R51 User Manual
>
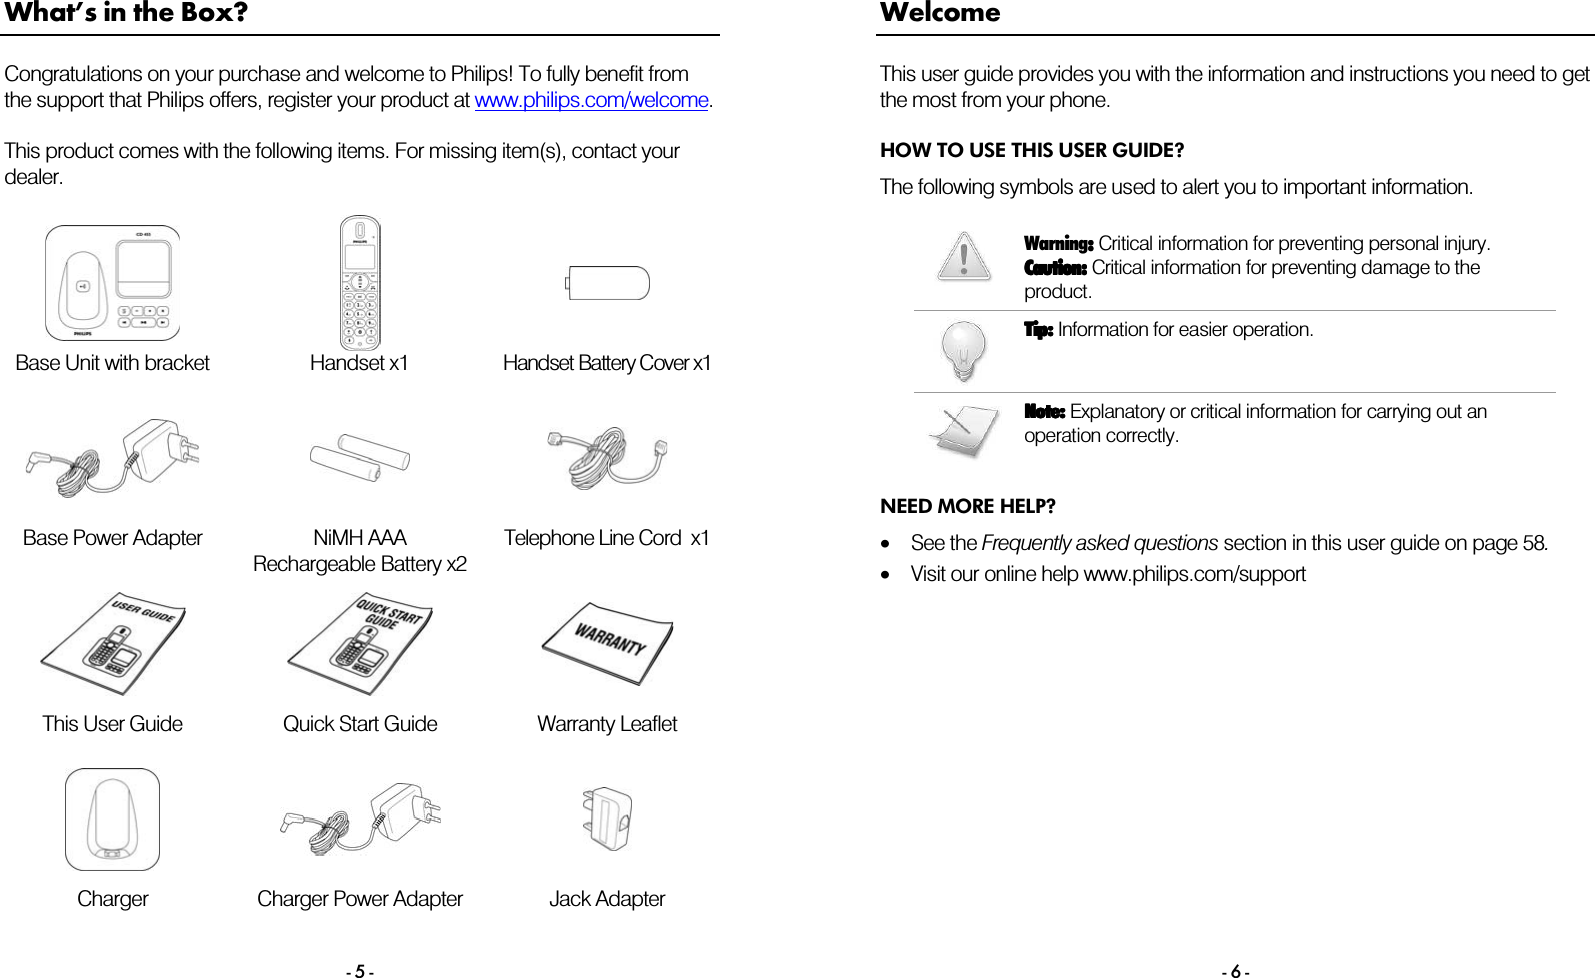
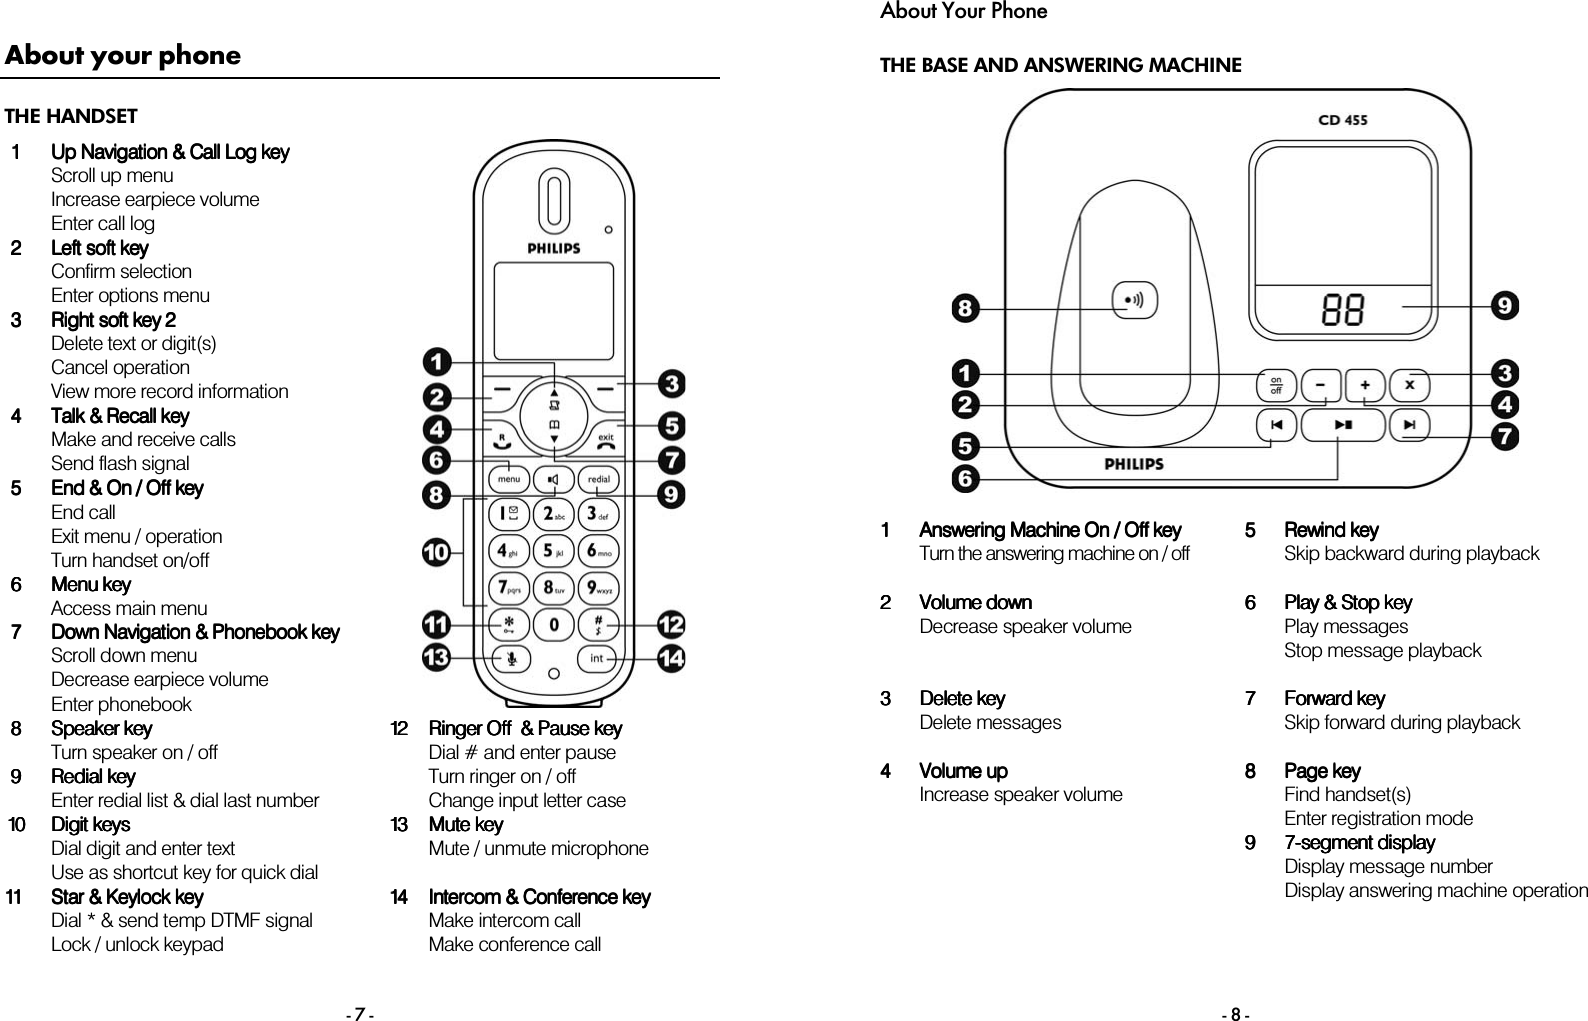
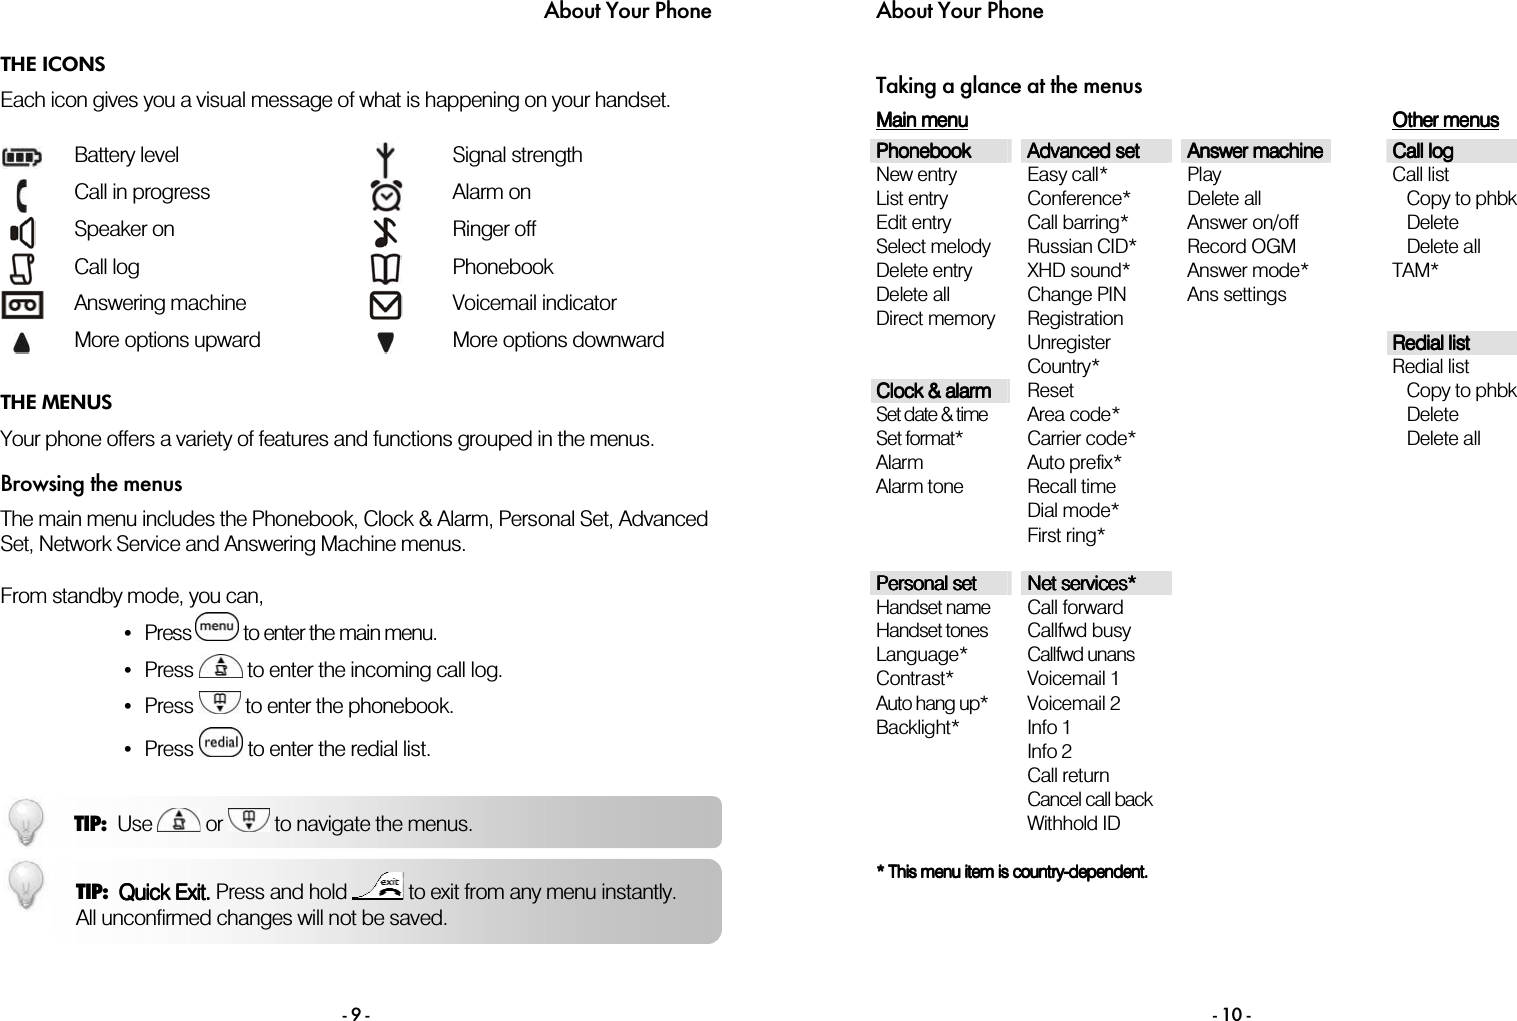
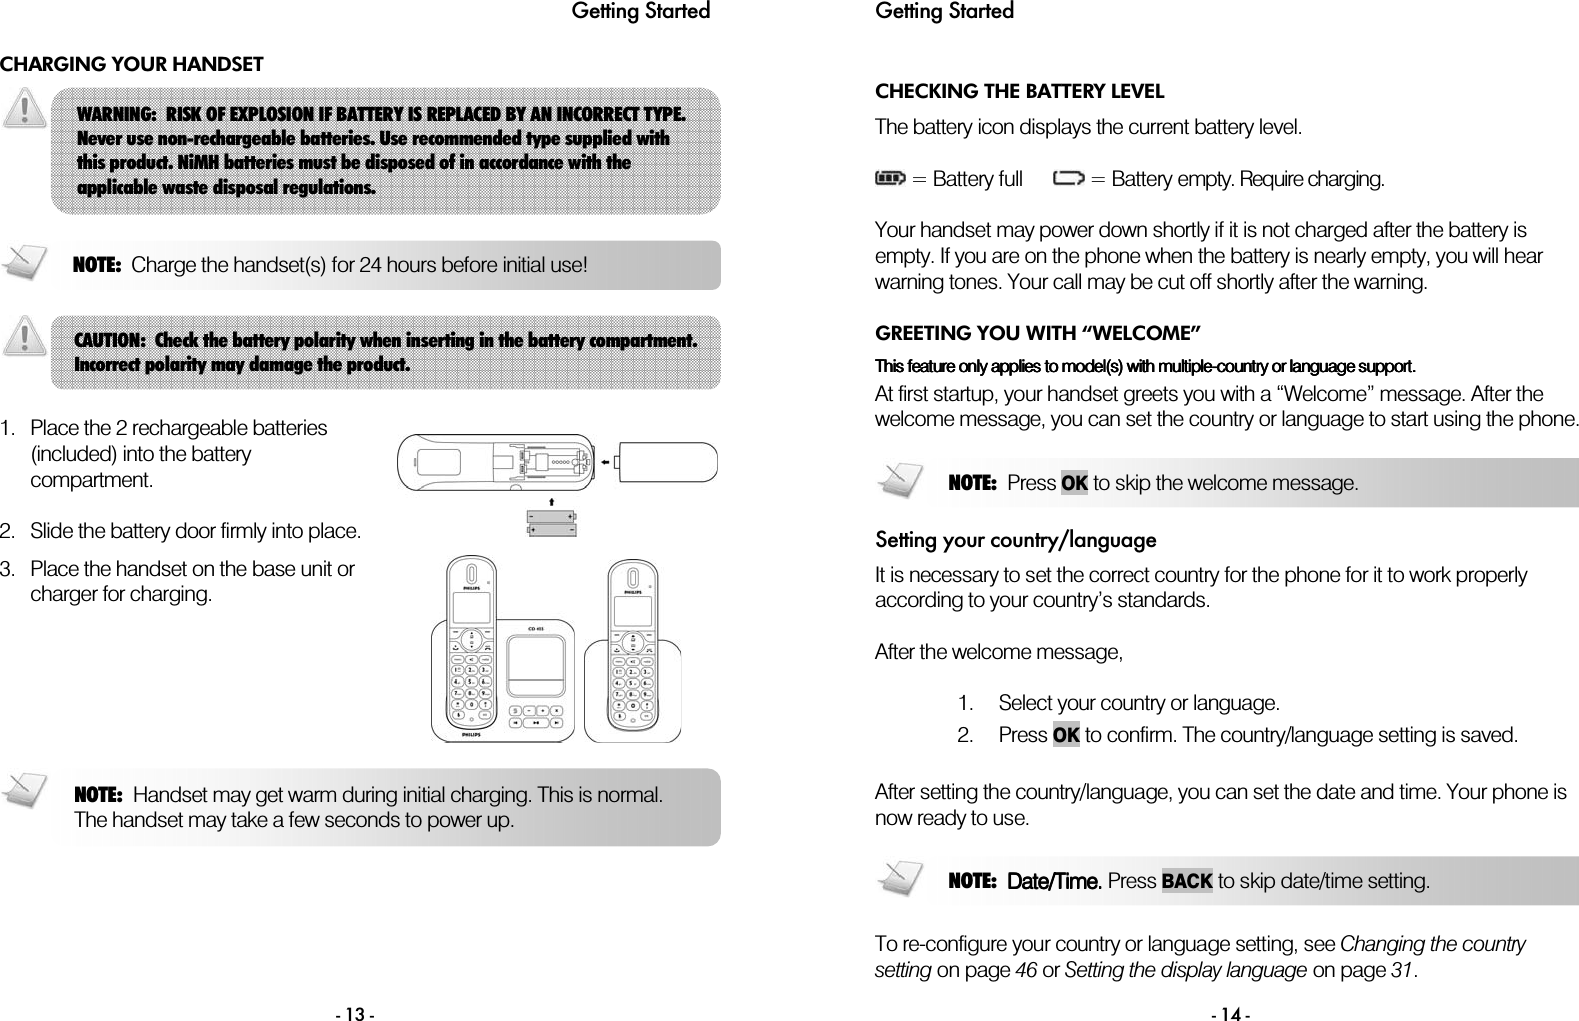
USERS MANUAL 1
Contents
1.
USERS MANUAL 1
2.
USERS MANUAL 2
USERS MANUAL 1
Navigation menu
Upload a User Manual
Namespaces
Wiki Guide
HTML
PDF
Info
Views
User Manual
Discussion / Help
Navigation
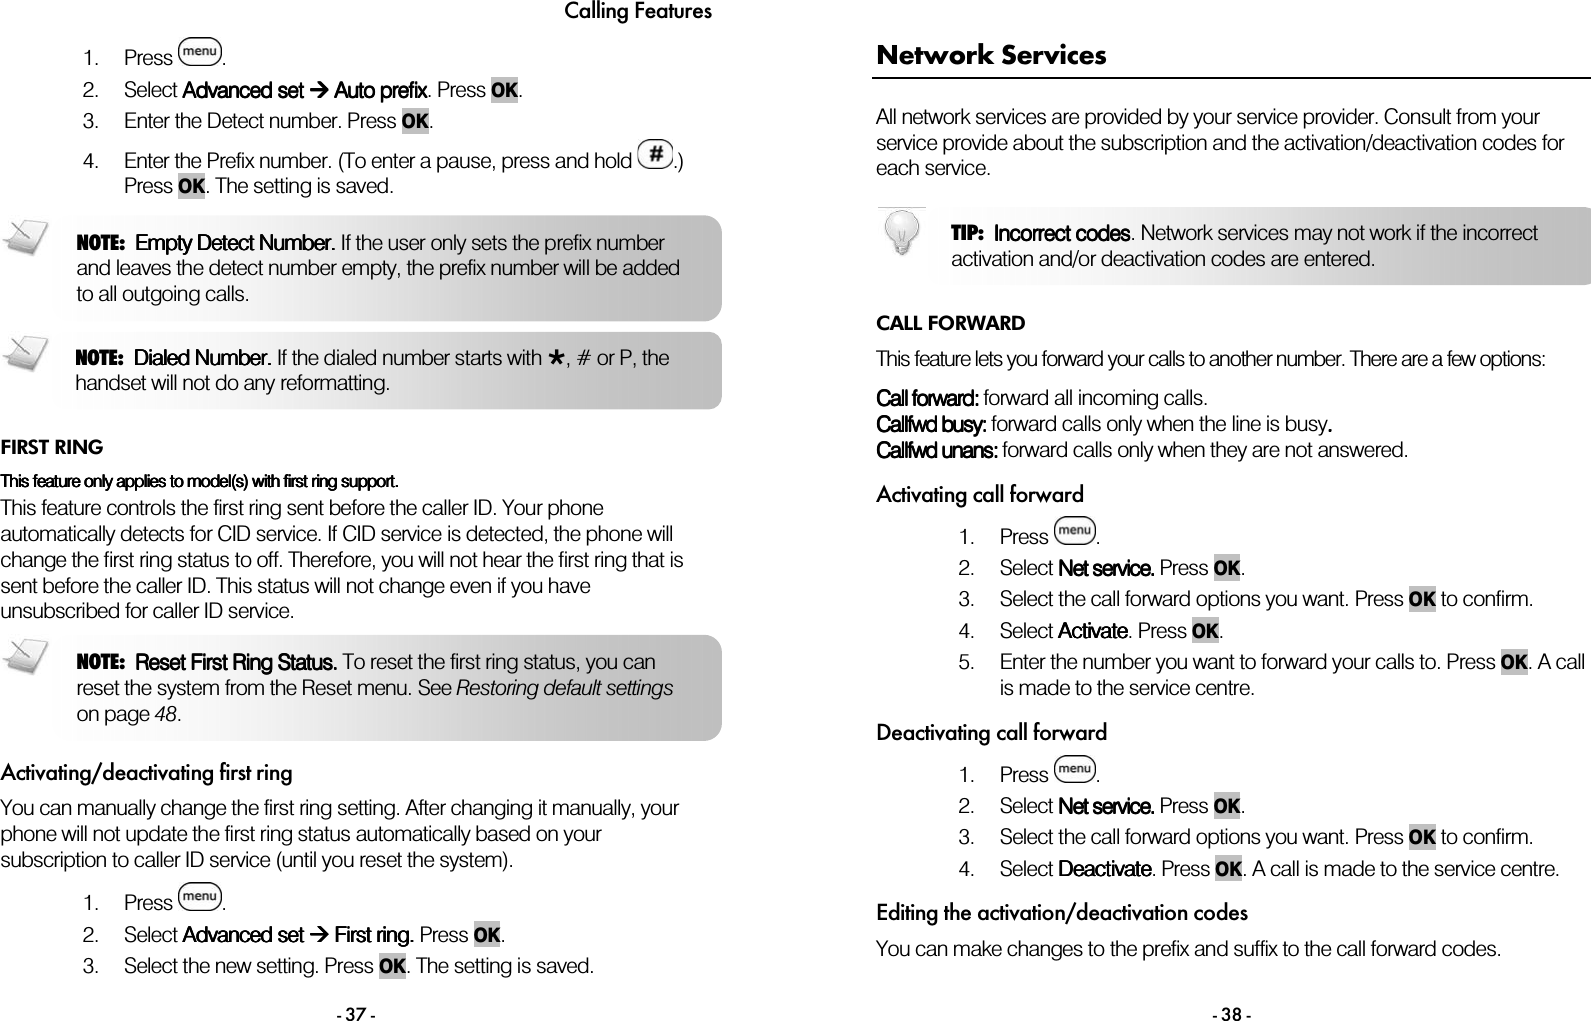
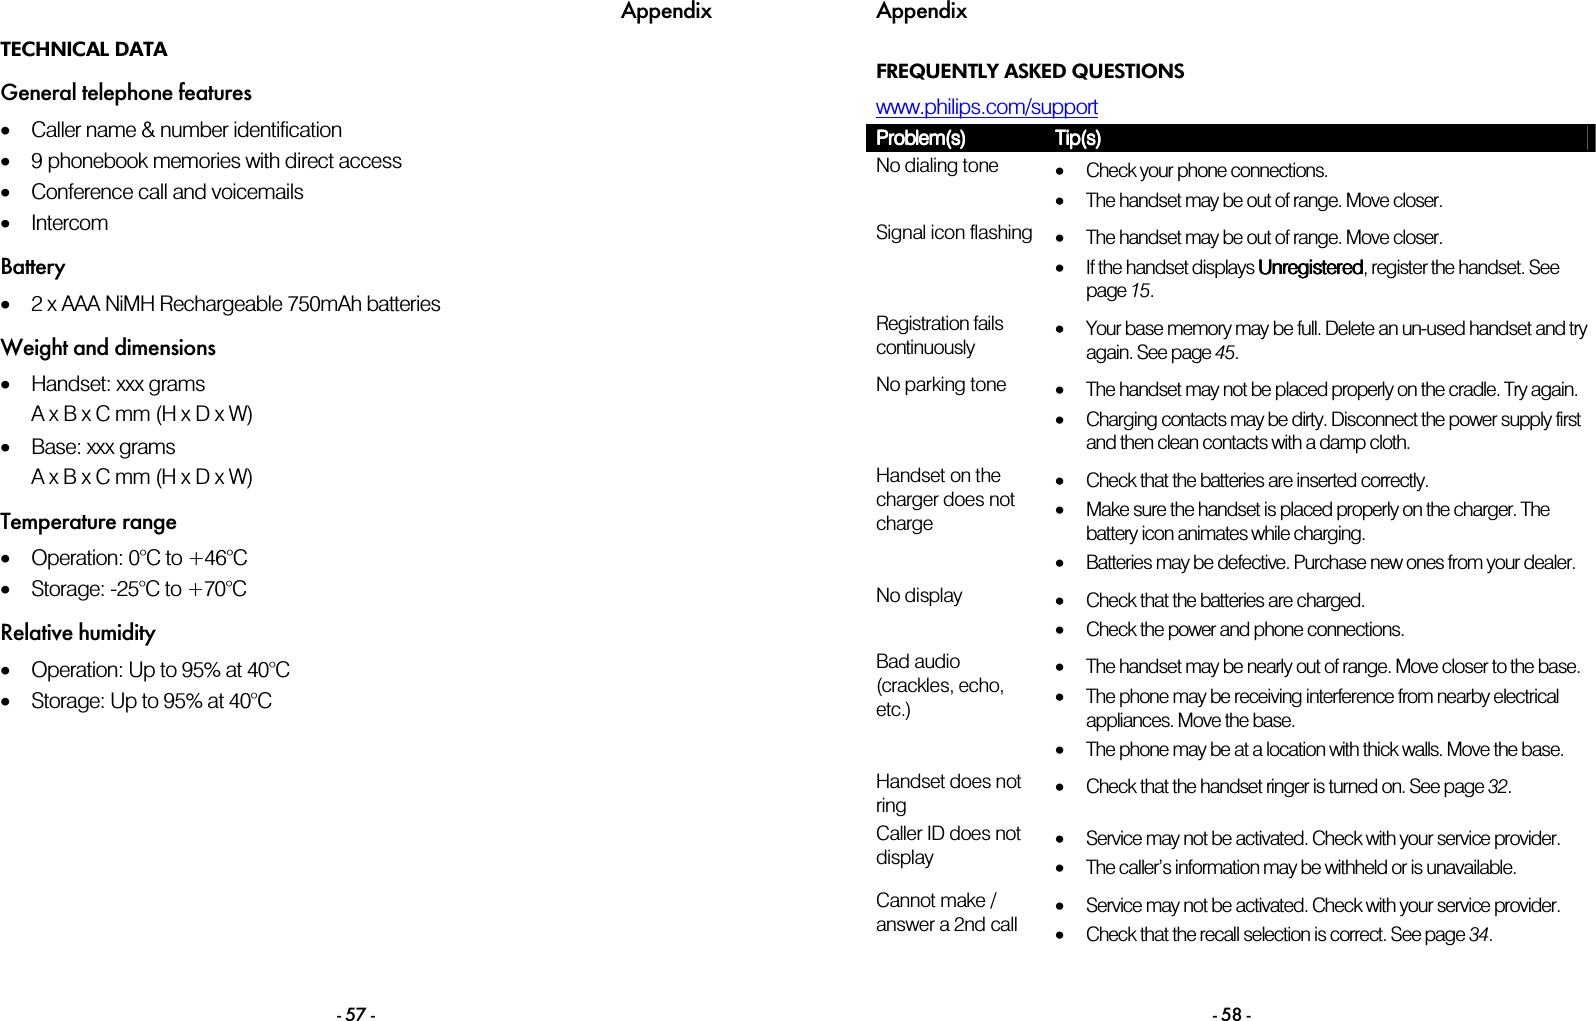
![- 11 - Getting Started CONNECTING YOUR PHONE 1. Connect the output plug of the mains adapter to the bottom of the base unit. 2. Connect the mains adapter to a standard wall outlet. 3. Connect the telephone line cord to the phone socket at the bottom of the base unit and the wall phone socket. CONNECTING YOUR CHARGER * For multi* For multi* For multi* For multi----pack pack pack pack models models models models onlyonlyonlyonly 1. Connect the output plug of the mains adapter to the bottom of the charger. 2. Connect the mains adapter to a standard wall outlet. Getting Started - 12 - WALL MOUNTING THE BASE The charger is designed to support wall mounting. If you prefer to wall mount the charger, follow the instructions below. 1. Remove the bracket from the back of the base unit by pressing down the two latches on the top of the bracket. 2. Turn the bracket upside down and then re-insert the bracket to the back of the base unit. [Image to be added][Image to be added][Image to be added][Image to be added] 3. Insert screws (not included) into the wall. The recommended mounting screws are Philips Pan Head Self-Tapping Screws with diameter 4mm and length 20mm. [Image to be added][Image to be added][Image to be added][Image to be added] 4. Align the mounting holes on the back of the base with the screws on the wall. 5. Slide the base down into place. CAUTION: Other wall mounting methods are not recommended and may damage the product.](https://usermanual.wiki/Ascalade-Technologies/DT19R51.USERS-MANUAL-1/User-Guide-895678-Page-9.png)
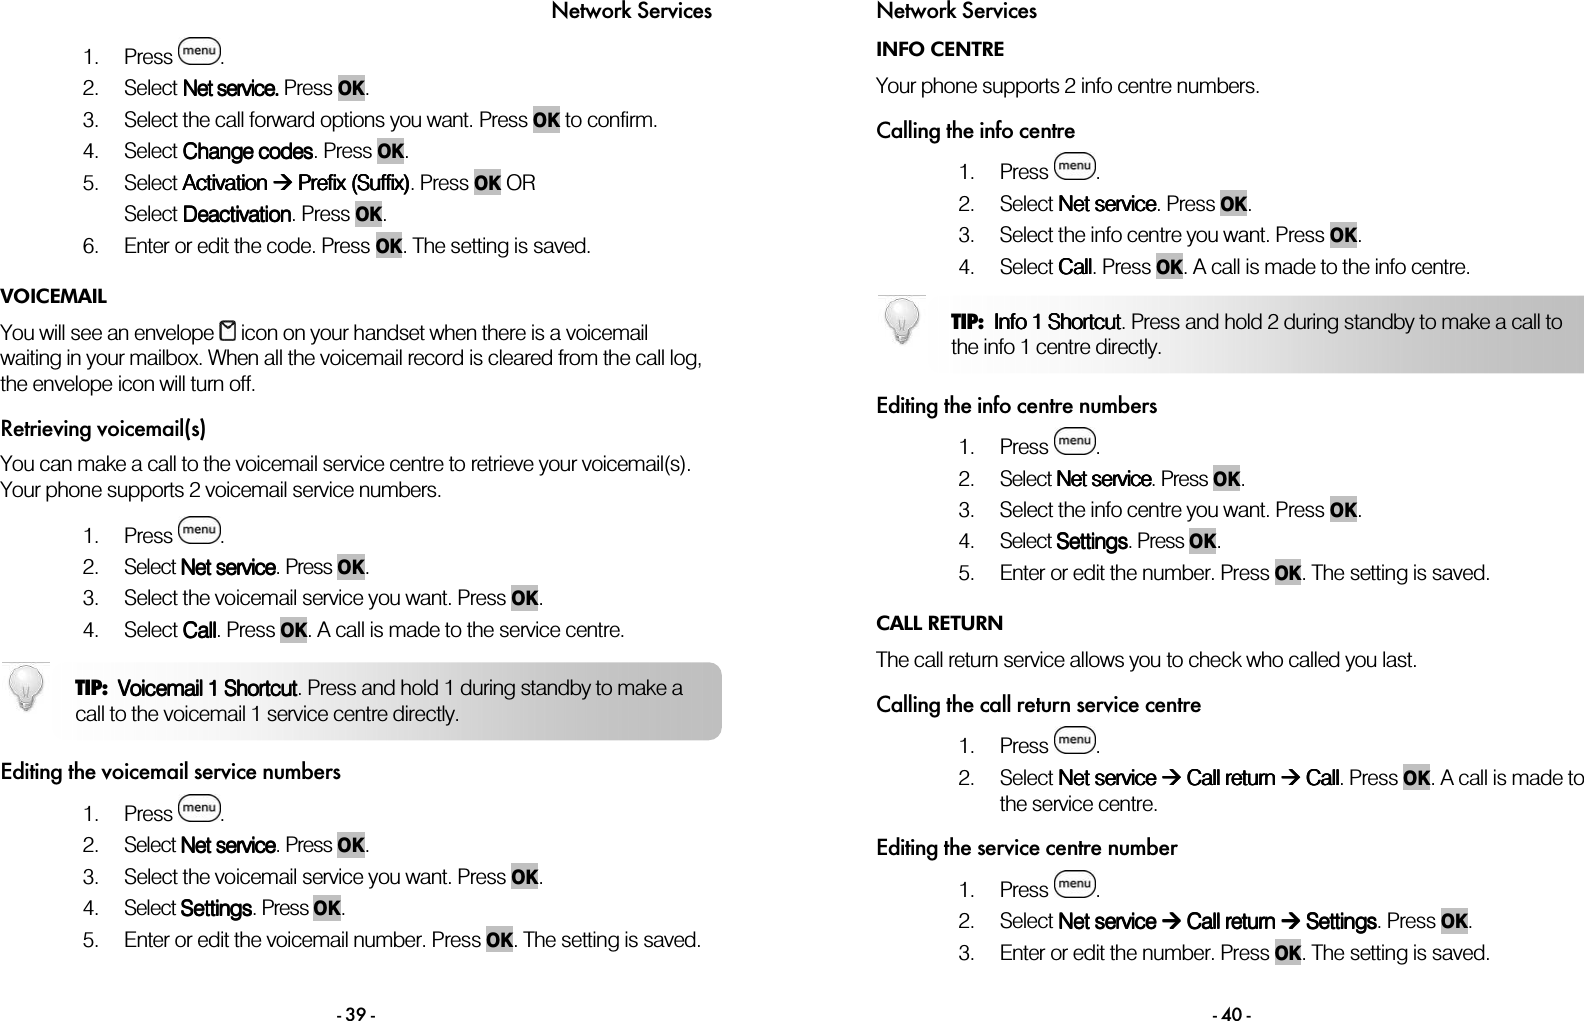
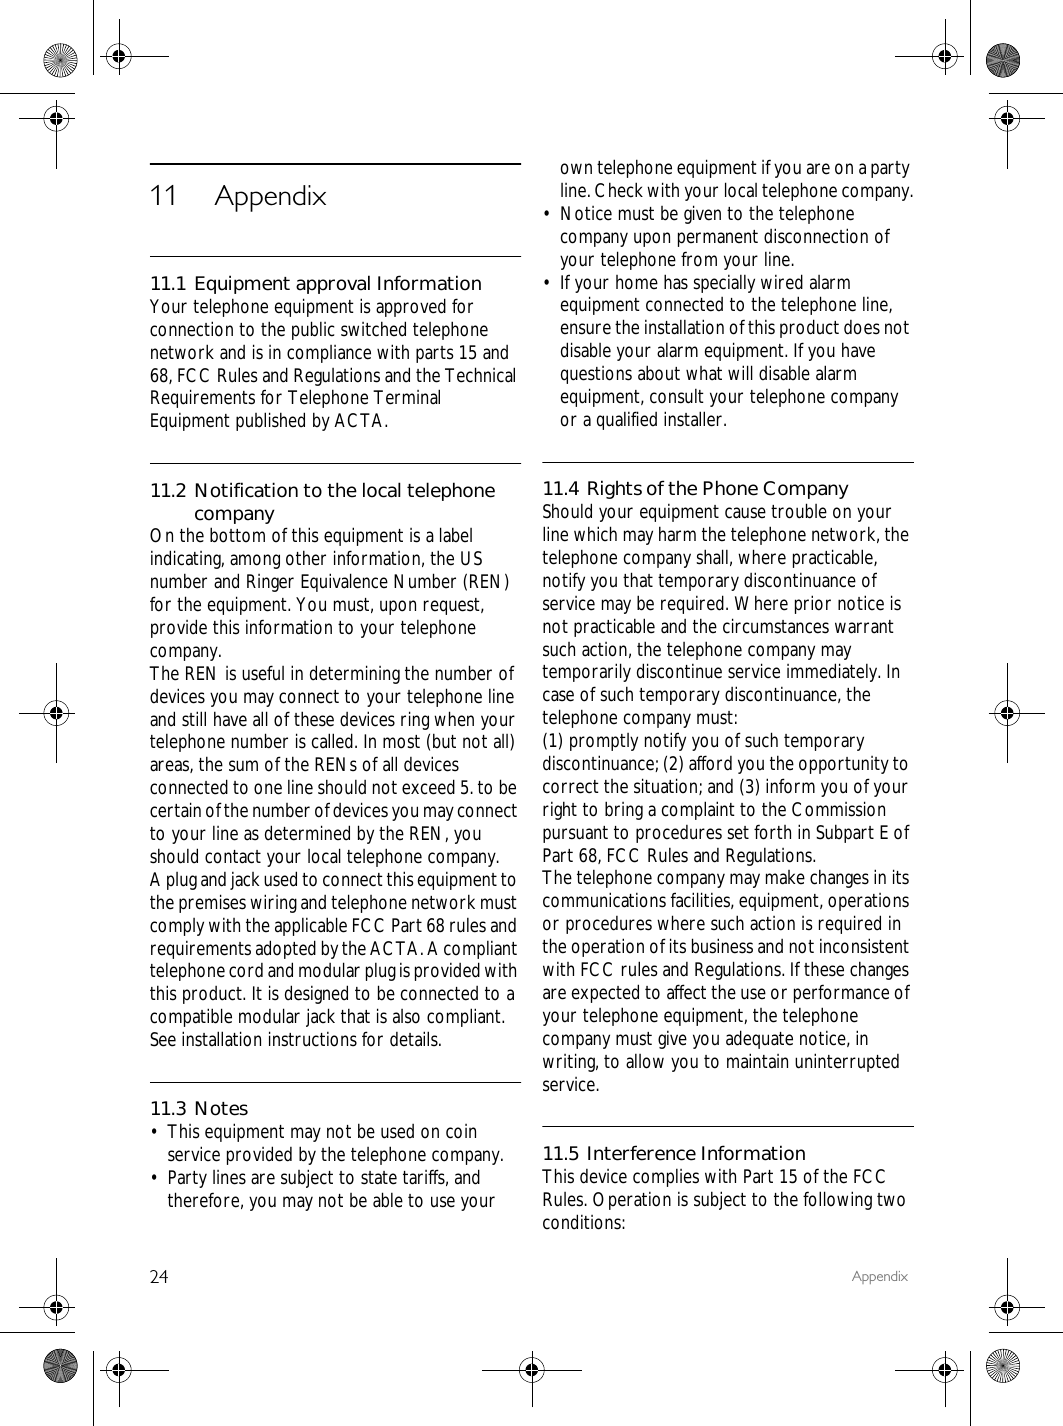
![Call - 23 - MAKING A CONFERENCE CALL A 3-way conference call is a call between you, outside caller(s), and another handset user in your house. You are talking on the phone with an outside caller and you want to involve another handset user in the conversation. During your call with the outside caller, 1. Press . The external caller is automatically being placed on hold. 2. Select or press the target handset number. Wait for the other party to answer your call. 3. Press and hold . You are now on a 3-way conference call. 4. Press to end the conference call. TIP: Auto ConferenceAuto ConferenceAuto ConferenceAuto Conference. You can join an ongoing external call with another handset by pressing . See Activating/Deactivating auto conference on page 33. NOTE:A 3-way conference call requires 2 handsets that share the same base unit. - 24 - Text and Numbers You can enter text and numbers for handset name, phonebook records, and others menu items. ENTERING TEXT AND NUMBERS 1. Find the key with the character you want. 2. Press it as many times as needed for the character you want. I I I Input nput nput nput tabletabletabletable KeyKeyKeyKey Characters (Upper case)Characters (Upper case)Characters (Upper case)Characters (Upper case) KeyKeyKeyKey Characters (Lower case)Characters (Lower case)Characters (Lower case)Characters (Lower case) 0 . 0 , / : ; “ ; ! ¡ ? ¿ * + - % \ ^ ~ | 0 . 0 , / : ; “ ; ! ¡ ? ¿ * + - % \ ^ ~ | 1 [Sp] 1 @ _ # = < > ( ) & ¤ £ $ ¥ [ ] { } ° § … 1 [Sp] 1 @ _ # = < > ( ) & ¤ £ $ ¥ [ ] { } ° § …2 A B C 2 À Â Æ Á Ã Ă Ä Å Ą Ç ĆČ 2 a b c 2 à â Æ á ã ă ä å ą ç ćč3 D E F 3 ĎĐĖĚ È É Ê Ë Ę∆Φ 3 d e f 3 ďđėě è é ê ë ę∆Φ4 G H I 4 Ğ Í Ì Î Ï İΓ 4 g h i 4 ğ í ì î ï I Γ5 J K L 5 Λ Ł ĹĽ 5 j k l 5 Λ ł ĺľ6 M N O 6 Ñ ŇŃ Ó Ô Õ Ö Ő 6 m n o 6 ñ ňń ó ô õ ö ő7 P Q R S 7 ŘŞ Š ŚβΠΘΣ 7 p q r s 7 řş š śβΠΘΣ8 T U V 8 ŢŤ Ù Ú Û Ü ŮǙŰ 8 t u v 8 ţť ù ú û ü ůǚűµ9 W X Y Z 9 Ý Ž ŹŻſ Ø ΩΞΨ 9 w x y z 9 ý ž źż ƒ ø ΩΞΨ TIP: Change CaseChange CaseChange CaseChange Case. Press during editing, and the next letter you enter will be in the alternate case. TIP: EditingEditingEditingEditing. Use BACK to delete and or to move the cursor.](https://usermanual.wiki/Ascalade-Technologies/DT19R51.USERS-MANUAL-1/User-Guide-895678-Page-15.png)