User Manual
0309ver1 1
ATOMIC
Quick
Set-Up Guide
AWD205
2.4GHz
Digital Headphones
0309ver1 2
Congratulations on the purchase of (AWD205) 2.4GHz Digital Stereo RF Wireless
Headphones to enjoy the revolutionary technology! Please check the supplied component
against the following list:
1 x Transmitter
1 x Headphones
1 x Power Supply (AC/DC 5V400mA Adaptor for Transmitter)
1 x 3.5mm audio cord (built in)
1 x Charging Cord
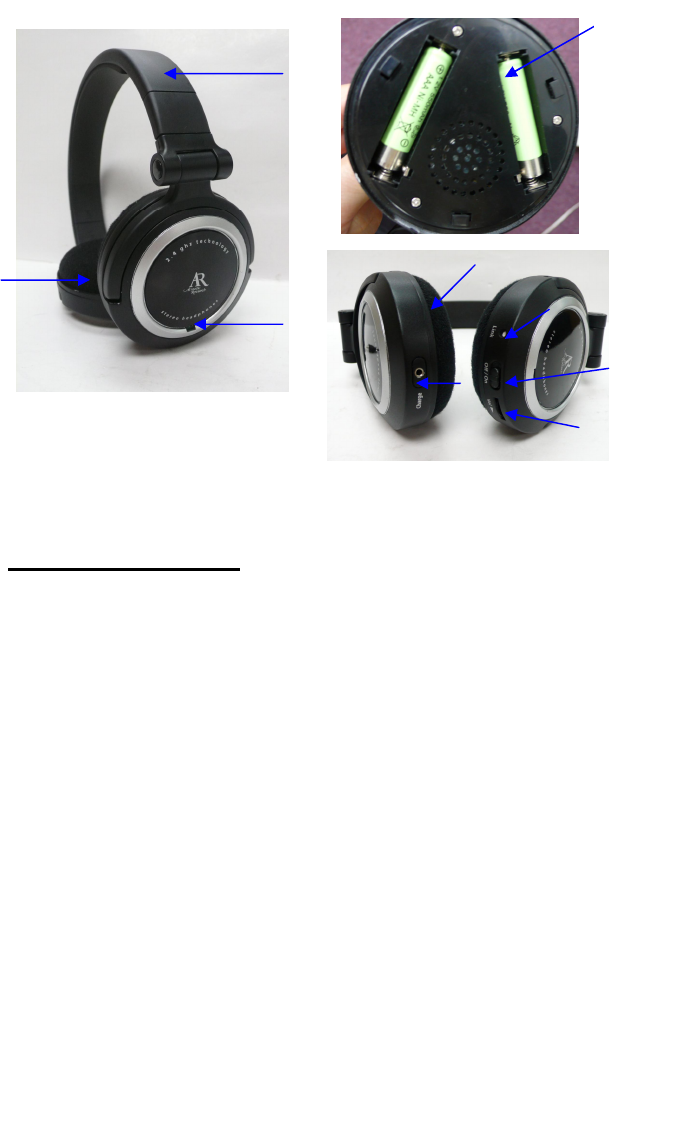
FUNCTION KEYS
HEADPHONES
(1) Headbelt
(2) Ear Cushion
(3) Color LED Indicator
(4) Power ON/OFF Switch
(5) Volume Control Knob
(6) Charging Socket
(7) Battery Compartment
(8) Battery cover
(9) Link
2
3
1
9
4
6
5
8
7
0309ver1 3
TRANSMITTER:
Transmitter Front:
(10) Charging LED Indicator
(11) Power LED Indicator
Transmitter Rear Side:
(12) Charging Cord
(13) Audio IN Cord
(14) Switch (source) Analog or USB
(15) USB /Power IN Socket
(16) Link
ACCESSORIES:
(17) Charging Cord
(18) AC/DC Adaptor
10
11 1213
14
15
16
18

0309ver1 4
INSTALLATION
Please follow this quick set-up guide to ensure trouble free installation of your
headphones.
Step 1:
Connect the Stereo Audio Cord (13) to the audio output socket (i.e. PHONE/
HEADPHONE 3.5mm socket) of your audio source, e.g. TV, HiFi, CD, DVD player etc.
*** If your audio source has 2 RCA output sockets (red and white in colour), use the
90mm Y-connection Cord ) (not included) for connection, if necessary.
Step2:
Connect one end of the AC/DC Adaptor (18) to the DC IN Socket (15) at the rear side of
the transmitter, and the other end to the main electric wall outlet.
Or
Connect the USB cord (not included)to computer of your audio source and the other end
to the DC IN Socket (15) at the rear side of the transmitter.
Suggestion: When listening music from computer,
1)please try to use USB cord for power and music source at the same time.
2)Please advoid to put USB cord on computer and using analog 3.5mm cord at the same
computer to get music sources, the quality will be affected.
Pls use either one method!
Step3:
The transmitter will be automatically ON (Green) when there is audio signal IN from the
audio source (please make sure that the transmitter is powered on by the AC/DC adaptor
in Step 2). Then the Power LED Indicator (11) will glow Green (flashing) to confirm that
the transmitter is ready for operation. Place the transmitter on a dry, cool place preferably
above head level.
*** The transmitter has auto-cut-off function. When there is no audio signal for over
10
minutes, the transmitter will goes into deep sleep mode. TX can wake up immediately
after it detects audio input again..
Step 4:
Open the Battery Cover (8). Insert 2 pcs AAA size batteries into the Battery
Compartment (7) at the Left hand side of the headphones observing the correct polarity.
Then close the Battery Cover (8), and switch the headphones ON (4).
Step 5:
Switch on your music device (TV. HiFi, CD, DVD etc.) and start your media playing.
Then headphone’s LED will be Green and music comes out.
Step 6:

0309ver1 5
Then you can hear a good quality sound. Adjust the Volume Control Knob (5) to a
comfortable sound level.
Remark:
Pairing button is needed when more than 1 receiver towards 1 transmitter. If only 1set (1
transmitter with 1 receiver), do not need to press the pairing button.
** Press the button pairing (Link) on Transmitter longer than 3 seconds, LED will grow
Green flashing , then press Receiver (Link) longer than 3 seconds, the ID learning
process will be enable. Please finish the pairing process within 20 seconds. Then it will
pair automatically, the LED will grow Green on Transmitter and Receiver. Music will
come out.
CHARGING THE HEADPHONES
Battery type: Rechargeable batteries AAA
No. of cells: 2pcs
Rated capacity: 550 mAH / 10 – 12 hrs
Step 1:
Insert 2 pcs AAA size rechargeable batteries into the Battery Compartment (7) at the Left
hand side of the headphones.
Step 2:
Switch OFF (4) the headphones.
Step 3:
Connect the transmitter to a conveniently located electric wall outlet with the supplied
AC/DC Adaptor (18).
Step 4:
Insert one end of the Charging Cord (17) to the Charging Socket (12) of headphones.
The batteries should be charged for a full 8 hours. During charging process, the Charging
LED Indicator (10) will glow RED the headphone is being charged. After full charged
LED will be off.
*** Regular (non-rechargeable type) batteries can also be used to operate this
headphone. However, you must never attempt to charge non-rechargeable batteries in
this appliance as this could prove dangerous. Only the supplied special battery can be
charged.
Step 5:
When the batteries have been charged, remember to remove the Charging Cord from the
headphones.
*** Charging procedure should never exceed 48 hours.
Caution! To avoid risk of fire or injury, do not attempt to recharge non-rechargeable
batteries.

0309ver1 6
Replace only with the same or equivalent type recommended by the manufacturer.
Please dispose of old, defective batteries in an environmentally friendly manner in
accordance with the relevant legislation
Use only the supplied adaptor. Use of other adaptor may cause damage to the unit
When not using the unit for a long period of time, remove all batteries from unit to avoid
damage or battery leakage.
Disconnect the adaptor from the wall outlet when the unit is not to be operated’
Symbol indicating separate collection for electrical and electronic equipment.
TROUBLE SHOOTING GUIDE
If you encounter any trouble in setting up the Headphones, please check the following
points:
(1) Distorted sound quality or unclear sound:
~ Check if the sound of your audio source is distorted and whether the volume control
is tuned to the suitable level.
~ Check if the batteries in the headphones have insufficient power. Replace fresh ones if
necessary.
~ Check if the distance between the headphones and transmitter are within the effective
range. (The effective range of the device is approx. 50M in open area.) Place the
headphones closer to the transmitter.
(2) No Sound from the headphones:
~ Make sure that your audio equipment, the transmitter and headphones are properly
connected, powered and switched ON.
~ Check if the batteries are inserted properly into the battery compartment.
~ Check if the transmitter is powered on with the AC/DC adaptor: the Power LED
Indicator (11) will keep Green showing the transmitter is powered (only when there is
audio signal from the audio source).
~ Check if all the connection cords are properly connected.
If you still have problem after checking the above points, please contact your customer
service. Do not try to loosen the screws of the products to fix the problem.
All the above are subject to our final change without further notice.
Copyright by Atom Industrial Ltd.2008
0309ver1 7

0309ver1 8
SPECIFICATION
Model AWD205
Description 2.4GHz ISM band
Wireless Headphones System
(Rechargeable)
Transmitter
No. of Channels RF frequency hopping in 15 channels
Carrier Frequency 2406 ~2472 MHz
Effective Range 50 meters open area
Power Supply AC/DC Adaptor
Headphones
Frequency Responses 20 - 20,000 Hz
Signal to Noise Ratio >80 dB
Distortion <1%
Channel Separation 55dB
Power Supply 2 x 1.2V AAA size rechargeable batteries OR
2 x 1.5V AAA size normal batteries (Optional)
System Included: 1 x Transmitter (3.5mm built in audio cord)
1 x Headphones
1 x AC/DC 5V 400 mA adaptor for transmitter
2 x AAA batteries (Rechargeable) optional
1 x Charging Cord
www.araccessories.com