Atoms Labs AWFB17R Li-On Battery Operated Wireless Network Camera User Manual JSW QSG SAPP ES V1 1 OMGuard HD

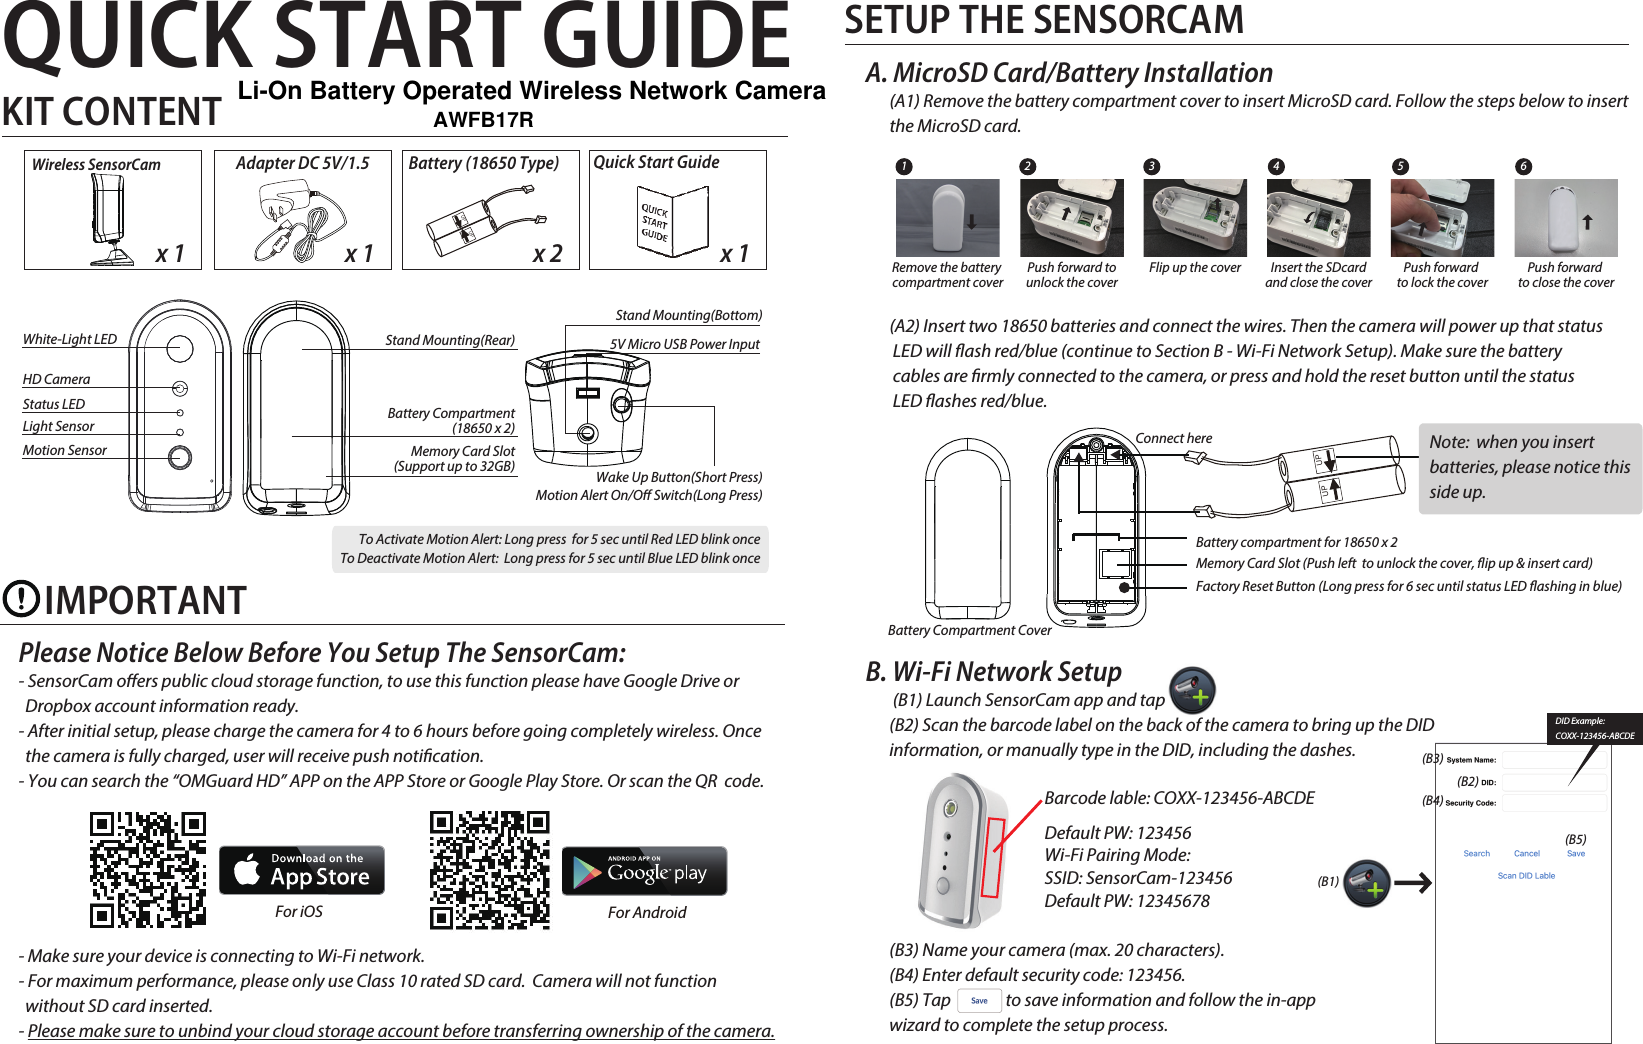
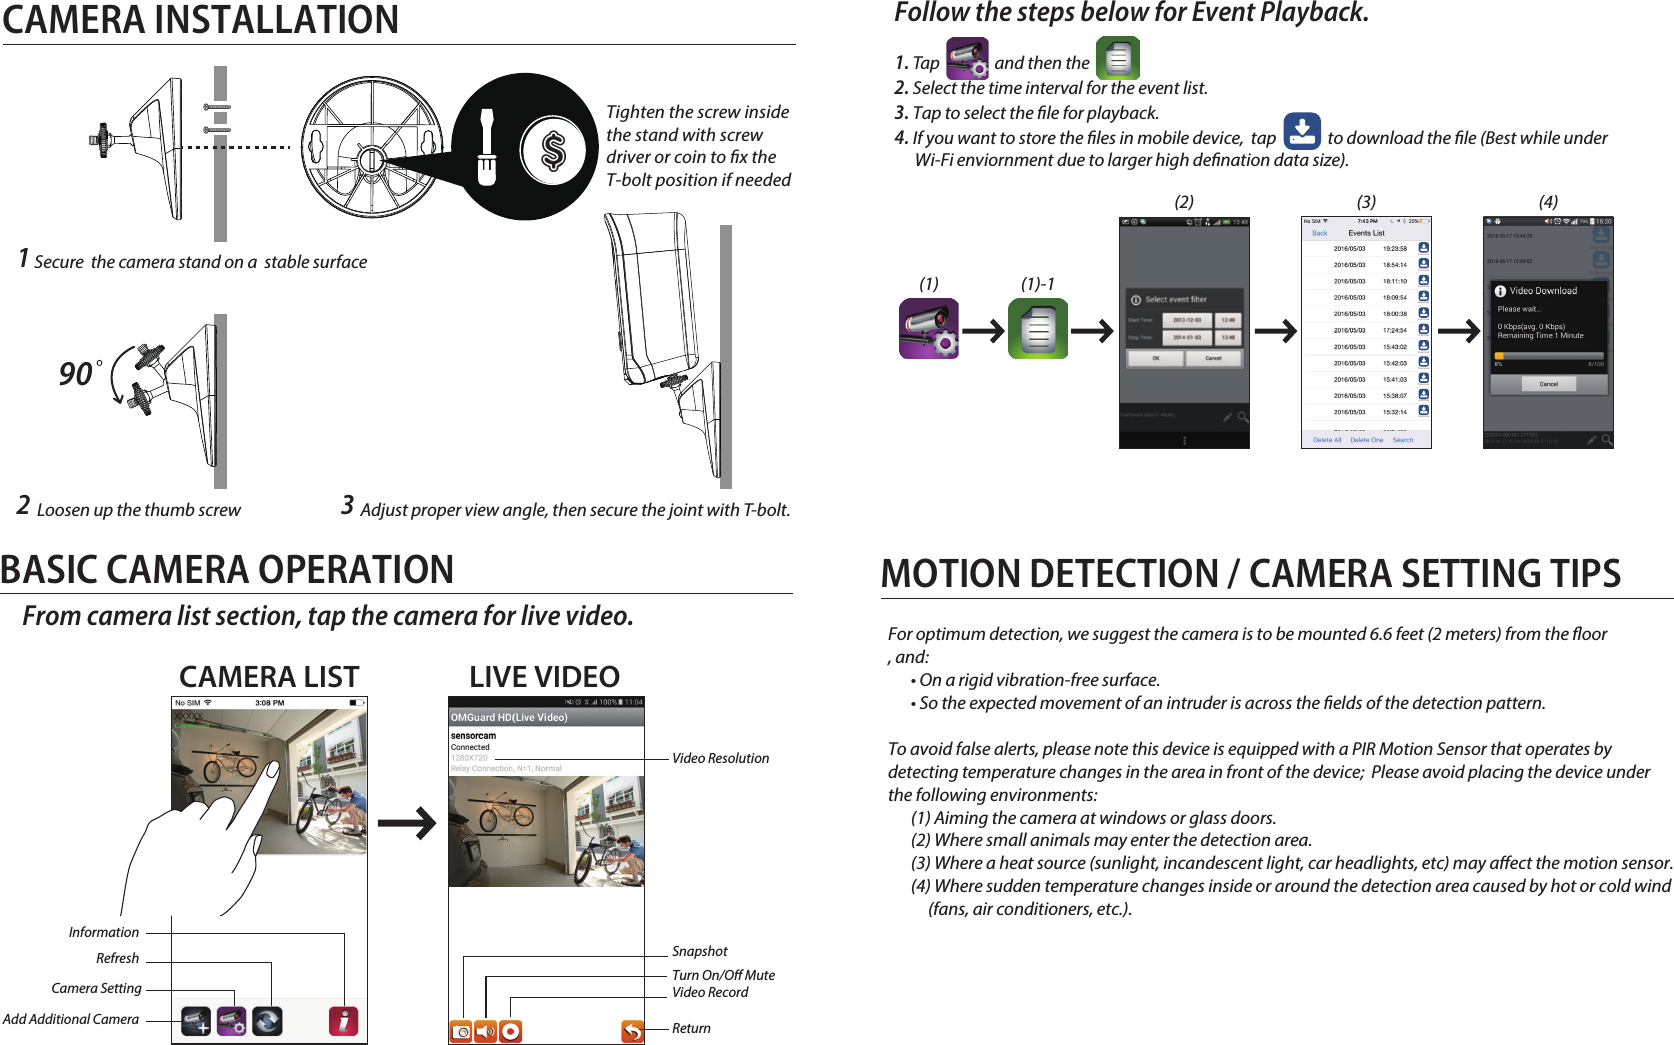
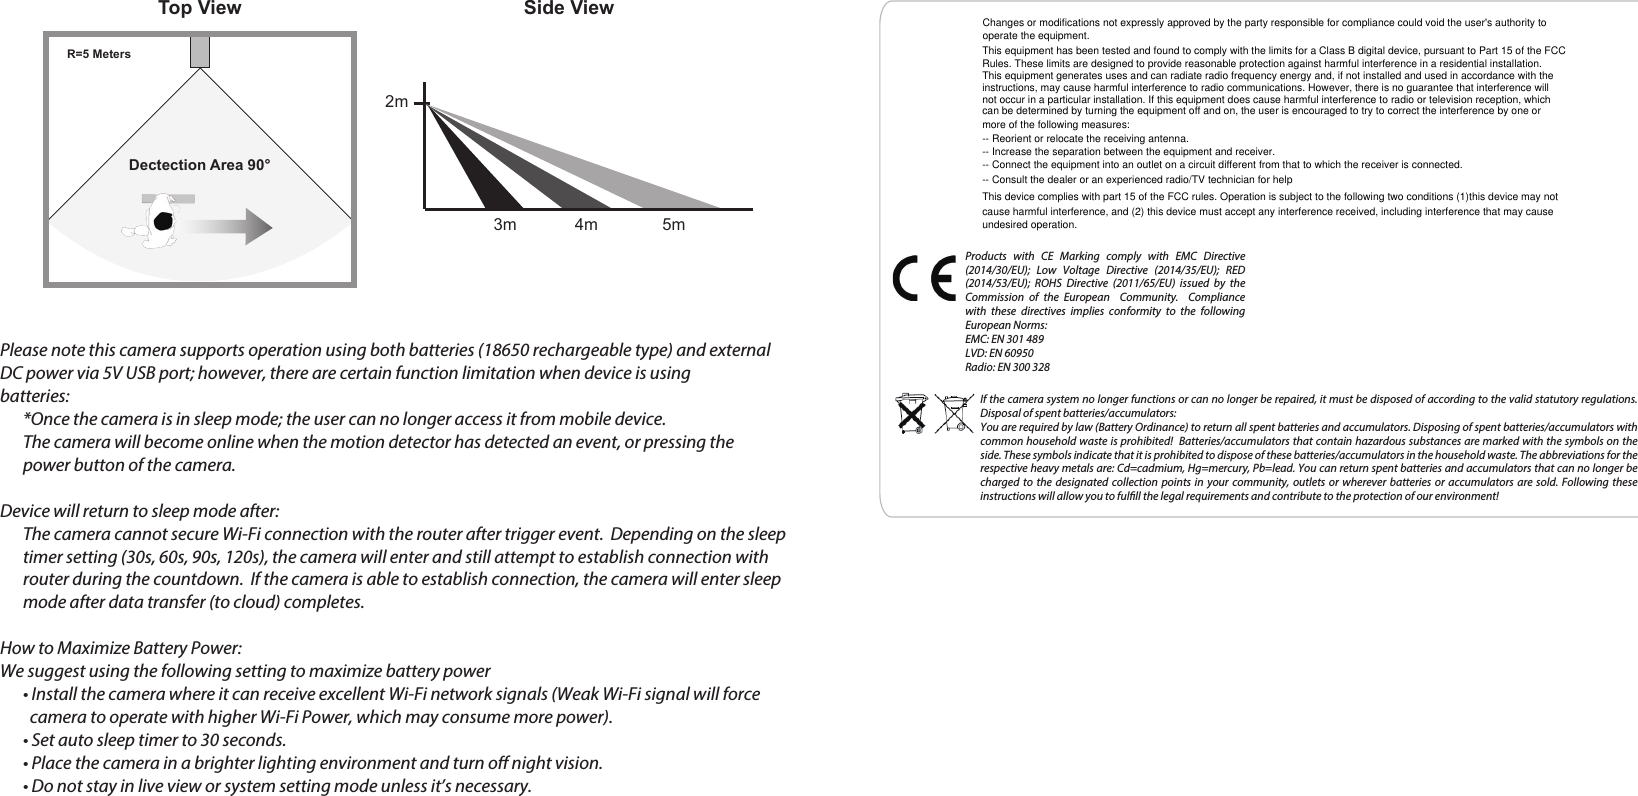
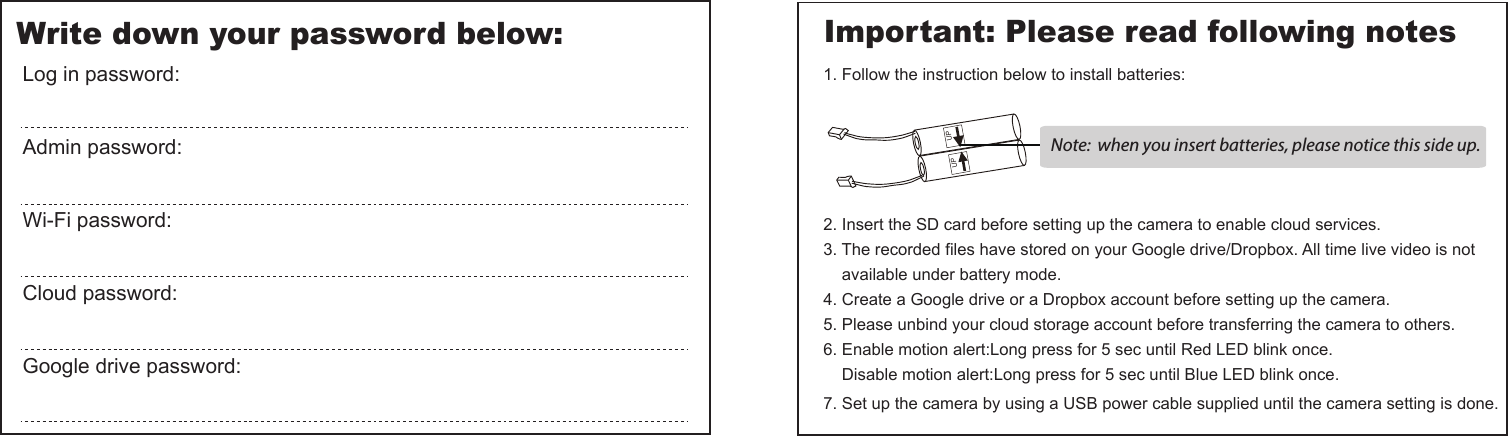
Atoms Labs LLC Li-On Battery Operated Wireless Network Camera JSW QSG SAPP ES V1 1 OMGuard HD

Users Manual

B. Wi-Fi Network Setup         (B1) Launch SensorCam app and tap        (B2) Scan the barcode label on the back of the camera to bring up the DID        information, or manually type in the DID, including the dashes.              (B3) Name your camera (max. 20 characters).       (B4) Enter default security code: 123456.       (B5) Tap                to save information and follow the in-app            wizard to complete the setup process.QUICK START GUIDEKIT CONTENTWireless SensorCam x 1Adapter DC 5V/1.5x 1Quick Start Guidex 1x 2Battery (18650 Type)IMPORTANTPlease Notice Below Before You Setup The SensorCam:- SensorCam oers public cloud storage function, to use this function please have Google Drive or    Dropbox account information ready.- After initial setup, please charge the camera for 4 to 6 hours before going completely wireless. Once   the camera is fully charged, user will receive push notication.- You can search the “OMGuard HD” APP on the APP Store or Google Play Store. Or scan the QR  code. - Make sure your device is connecting to Wi-Fi network.- For maximum performance, please only use Class 10 rated SD card.  Camera will not function   without SD card inserted.- Please make sure to unbind your cloud storage account before transferring ownership of the camera.SETUP THE SENSORCAMA. MicroSD Card/Battery Installation       (A1) Remove the battery compartment cover to insert MicroSD card. Follow the steps below to insert        the MicroSD card.                     (A2) Insert two 18650 batteries and connect the wires. Then the camera will power up that status              LED will ash red/blue (continue to Section B - Wi-Fi Network Setup). Make sure the battery                         cables are rmly connected to the camera, or press and hold the reset button until the status         LED ashes red/blue.(B1)(B2)(B3)(B4)(B5)Battery compartment for 18650 x 2Memory Card Slot (Push left  to unlock the cover, ip up & insert card)  Factory Reset Button (Long press for 6 sec until status LED ashing in blue)Default PW: 123456Wi-Fi Pairing Mode:SSID: SensorCam-123456Default PW: 12345678Barcode lable: COXX-123456-ABCDEDID Example:COXX-123456-ABCDEStatus LEDLight SensorMotion SensorWhite-Light LEDHD Camera5V Micro USB Power Input Wake Up Button(Short Press)Motion Alert On/O Switch(Long Press)Stand Mounting(Bottom)Stand Mounting(Rear)Battery Compartment(18650 x 2)Memory Card Slot(Support up to 32GB)To Activate Motion Alert: Long press  for 5 sec until Red LED blink onceTo Deactivate Motion Alert:  Long press for 5 sec until Blue LED blink once Connect here Battery Compartment CoverNote:  when you insert batteries, please notice this side up.  For iOS  For Android UP UPUP UPPush forward tounlock the cover2Flip up the cover3Insert the SDcardand close the cover4Push forward to lock the cover5Remove the battery compartment cover1Push forward to close the cover6Li-On Battery Operated Wireless Network Camera          AWFB17R
BASIC CAMERA OPERATIONCAMERA INSTALLATIONCAMERA LIST LIVE VIDEOLoosen up the thumb screw Adjust proper view angle, then secure the joint with T-bolt.Secure  the camera stand on a  stable surface Tighten the screw insidethe stand with screw driver or coin to x the T-bolt position if needed 12 390For optimum detection, we suggest the camera is to be mounted 6.6 feet (2 meters) from the oor, and:• On a rigid vibration-free surface.• So the expected movement of an intruder is across the elds of the detection pattern. To avoid false alerts, please note this device is equipped with a PIR Motion Sensor that operates by detecting temperature changes in the area in front of the device;  Please avoid placing the device under the following environments:(1) Aiming the camera at windows or glass doors.(2) Where small animals may enter the detection area. (3) Where a heat source (sunlight, incandescent light, car headlights, etc) may aect the motion sensor. (4) Where sudden temperature changes inside or around the detection area caused by hot or cold wind      (fans, air conditioners, etc.).  MOTION DETECTION / CAMERA SETTING TIPSFollow the steps below for Event Playback.$Information Refresh Camera SettingAdd Additional Camera From camera list section, tap the camera for live video.(1) (1)-1(2) (3) (4)DownloadDownloadDownloadDownloadDownloadDownloadDownloadDownloadDownloadDownloadDownload1. Tap                and then the                 2. Select the time interval for the event list.3. Tap to select the le for playback. 4. If you want to store the les in mobile device,  tap               to download the le (Best while under       Wi-Fi enviornment due to larger high denation data size).SnapshotVideo RecordTurn On/O MuteReturnVideo Resolution
Products with CE Marking comply with EMC Directive (2014/30/EU); Low Voltage Directive (2014/35/EU); RED (2014/53/EU); ROHS Directive (2011/65/EU) issued by the Commission of the European  Community.  Compliance with these directives implies conformity to the following European Norms:EMC: EN 301 489LVD: EN 60950Radio: EN 300 328If the camera system no longer functions or can no longer be repaired, it must be disposed of according to the valid statutory regulations. Disposal of spent batteries/accumulators:You are required by law (Battery Ordinance) to return all spent batteries and accumulators. Disposing of spent batteries/accumulators with common household waste is prohibited!  Batteries/accumulators that contain hazardous substances are marked with the symbols on the side. These symbols indicate that it is prohibited to dispose of these batteries/accumulators in the household waste. The abbreviations for the respective heavy metals are: Cd=cadmium, Hg=mercury, Pb=lead. You can return spent batteries and accumulators that can no longer be charged to the designated collection points in your community, outlets or wherever batteries or accumulators are sold. Following these instructions will allow you to fulll the legal requirements and contribute to the protection of our environment!Please note this camera supports operation using both batteries (18650 rechargeable type) and external DC power via 5V USB port; however, there are certain function limitation when device is using batteries:*Once the camera is in sleep mode; the user can no longer access it from mobile device. The camera will become online when the motion detector has detected an event, or pressing the power button of the camera. Device will return to sleep mode after:  The camera cannot secure Wi-Fi connection with the router after trigger event.  Depending on the sleep timer setting (30s, 60s, 90s, 120s), the camera will enter and still attempt to establish connection with router during the countdown.  If the camera is able to establish connection, the camera will enter sleepmode after data transfer (to cloud) completes. How to Maximize Battery Power:We suggest using the following setting to maximize battery power• Install the camera where it can receive excellent Wi-Fi network signals (Weak Wi-Fi signal will force   camera to operate with higher Wi-Fi Power, which may consume more power).• Set auto sleep timer to 30 seconds.• Place the camera in a brighter lighting environment and turn off night vision.• Do not stay in live view or system setting mode unless it’s necessary.Top View Side ViewDectection Area 90°R=5 Meters2m3m 4m 5mChanges or modifications not expressly approved by the party responsible for compliance could void the user's authority to operate the equipment.This equipment has been tested and found to comply with the limits for a Class B digital device, pursuant to Part 15 of the FCC Rules. These limits are designed to provide reasonable protection against harmful interference in a residential installation. This equipment generates uses and can radiate radio frequency energy and, if not installed and used in accordance with theinstructions, may cause harmful interference to radio communications. However, there is no guarantee that interference will not occur in a particular installation. If this equipment does cause harmful interference to radio or television reception, which can be determined by turning the equipment off and on, the user is encouraged to try to correct the interference by one or more of the following measures:-- Reorient or relocate the receiving antenna.-- Increase the separation between the equipment and receiver.-- Connect the equipment into an outlet on a circuit different from that to which the receiver is connected.-- Consult the dealer or an experienced radio/TV technician for helpThis device complies with part 15 of the FCC rules. Operation is subject to the following two conditions (1)this device may not cause harmful interference, and (2) this device must accept any interference received, including interference that may cause undesired operation.
Log in password:Admin password:Wi-Fi password:Cloud password:Google drive password:1. Follow the instruction below to install batteries:2. Insert the SD card before setting up the camera to enable cloud services.3. The recorded files have stored on your Google drive/Dropbox. All time live video is not        available under battery mode.4. Create a Google drive or a Dropbox account before setting up the camera.5. Please unbind your cloud storage account before transferring the camera to others.6. Enable motion alert:Long press for 5 sec until Red LED blink once.     Disable motion alert:Long press for 5 sec until Blue LED blink once. 7. Set up the camera by using a USB power cable supplied until the camera setting is done.UP UPNote:  when you insert batteries, please notice this side up. Important: Please read following notesWrite down your password below:

Navigation menu