Attenti IDEU-830 Intelligent Data Extension Unit - IDEU-830 User Manual IDEU 830 Installation Guide
3M Electronic Monitoring, Inc. Intelligent Data Extension Unit - IDEU-830 IDEU 830 Installation Guide
Attenti >
User Manual

IDEU
IDEUIDEU
IDEU-
--
-830
830830
830
Home Unit
Home UnitHome Unit
Home Unit
I
II
Installation
nstallationnstallation
nstallation
and
andand
and O
O O
Operation
perationperation
peration G
G G
Guide
uideuide
uide

Information in this documentation is subject to change without
notice and does not represent a commitment on part of
Elmo-Tech Ltd. The software described in this document is
subject to the license agreement that is included with the
product, which specifies the permitted and prohibited uses of
the product. Any unauthorized duplication or use of this
documentation, in whole or in part, in print, or in any other
storage or retrieval system is prohibited.
No part of this publication may be reproduced, transmitted,
transcribed, stored in a retrieval system, or translated into any
language in any form by any means for any purpose other than
the purchaser’s personal use without the permission of
Elmo-Tech Ltd.
© 2002-10 Elmo-Tech Ltd. All rights reserved.
Unless otherwise noted, all names of companies, products,
street addresses, and persons contained herein are part of a
completely fictitious scenario and are designed solely to
document the use of an Elmo-Tech product.
Contact Us
Corporate Headquarters
Elmo-Tech Ltd.
2 Ha-Barzel St.,
P.O. Box 13236,
61132 Tel Aviv, Israel
Tel: 972-3-7671800
Fax: 972-3-7671801
U.S.A Customers, call 1-800-313-1483
E-mail: contact@elmotech.com
Visit us at: www.elmotech.com

i
Table of Contents
Table of ContentsTable of Contents
Table of Contents
1
Getting Started................................................................ 3
About This Manual.............................................................. 3
2
Installation & Activation Instructions ............................. 5
Locating the Home Unit....................................................... 6
Activating the Home Unit..................................................... 6
3
Maintaining & Packing the Monitoring Equipment ........... 9
Cleaning the Home Unit ...................................................... 9
4
FCC Information ............................................................ 10

STaR
STaRSTaR
STaR
U
UU
Unit
nitnit
nit & T
& T & T
& Transmitter Installati
ransmitter Installatiransmitter Installati
ransmitter Installation and Operation
on and Operationon and Operation
on and Operation G
G G
Guide
uideuide
uide
ii
List of Figures
List of FiguresList of Figures
List of Figures
Figure 1 Home Unit .................................................................... 5
Figure 2 Locating the Home Unit .................................................. 6

3
1
1 1
1
Getting Started
Getting StartedGetting Started
Getting Started
About This Manual
About This ManualAbout This Manual
About This Manual
The Home Unit Installation and Operation Guide have been
created for the installation expert and are meant as a guide
through the installation and operational procedures. This manual
assumes that you have at least some experience with electronic
monitoring systems.
This manual does not contain information regarding system
settings, configuration or any other software produced by
Elmo-Tech Ltd., unless directly related to this produce.
Please refer to the appropriate manuals for information with
respect to the E3-MWS Monitor Operator and System
Administration manuals.
All related hardware and software must be installed and
repaired by a qualified Elmo-Tech customer service
representative or an experienced system administrator.
Elmo-Tech Ltd is committed to innovation and continued
improvement. Upgrades may be announced that consist of
software improvements and updated manuals will generally
accompany those system changes.

5
2
2 2
2
Installation & Activation Instructions
Installation & Activation InstructionsInstallation & Activation Instructions
Installation & Activation Instructions
Figure 1 Home Unit
1Track Home
1Track Home1Track Home
1Track Home
U
UU
Unit Installation and Operation
nit Installation and Operationnit Installation and Operation
nit Installation and Operation G
G G
Guide
uideuide
uide
6
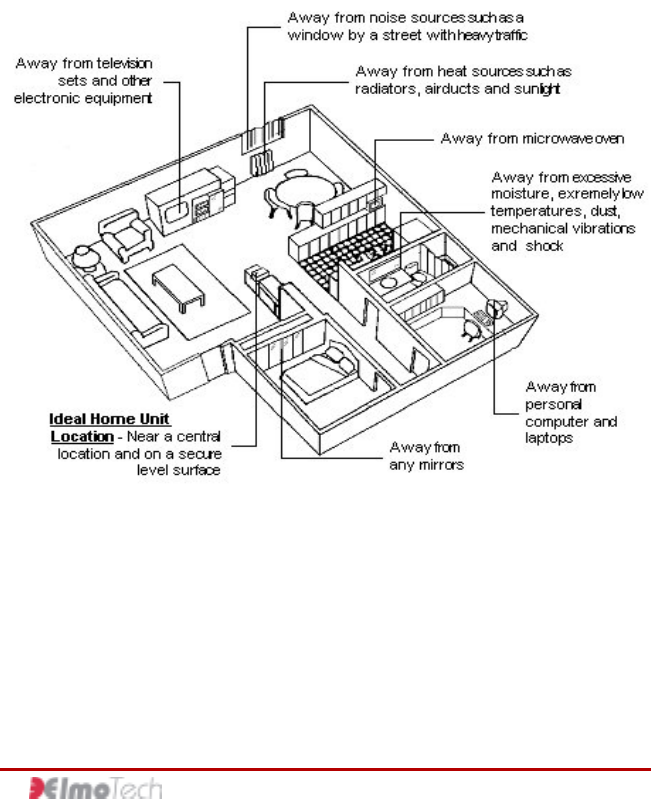
Locating the Home Unit
Locating the Home UnitLocating the Home Unit
Locating the Home Unit
Place the Home Unit as close to the center of the curfew location
as possible, 3 ft (1 m) off the ground and at least 1 foot (30 cm)
away from the wall.
Figure 2 Locating the Home Unit
Activating the Home Unit
Activating the Home UnitActivating the Home Unit
Activating the Home Unit
To activate the Home Unit:
Connect the adapter end of the external power cable to the
power outlet. The Home Unit makes three audible beeping
sounds. The Charge LED on the front panel flashes when the
Home Unit is first activated.

1Track Home
1Track Home1Track Home
1Track Home
U
UU
Unit Installation and Operation
nit Installation and Operationnit Installation and Operation
nit Installation and Operation G
G G
Guide
uideuide
uide
7
The Charge and Power LED’s light up only after the backup
battery is fully charged. The Home Unit is now in monitoring
mode.
To deactivate the Home Unit:
1. Using a screwdriver, unscrew and remove the Unit holding
screw located on the underside of the mounting bracket.
2. Disconnect the Home Unit from the mounting bracket by
pulling the Unit upwards slightly.
3. Remove the Home Unit from the mounting bracket and turn
the Unit over. The deactivation button is located on the
backside of the Unit.
4. Using a pointed instrument (but not sharp), push down on
the reset button. The Home Unit deactivates itself and all
stored information is deleted.
9
3
3 3
3
Maintaining & Packing the Monito
Maintaining & Packing the MonitoMaintaining & Packing the Monito
Maintaining & Packing the Monitoring
ring ring
ring
Equipment
EquipmentEquipment
Equipment
Regular cleaning of your Elmo-Tech equipment is recommended,
using Elmo-Tech approved products.
After cleaning, Elmo-Tech recommends that you perform a
visual inspection of all Units to check for cracks or any other
damage, before redeploying into the field
Cleaning the Home Unit
Cleaning the Home UnitCleaning the Home Unit
Cleaning the Home Unit
To clean the Home Unit:
1. Remove the Unit from its carrying case.
2. Spray the surface of the Unit with an alcohol based cleaner
(optional).
Note Elmo-Tech recommends Citrus Base cleaner by 3M™
(http://solutions.3m.com/).
3. Using a damp cloth, wipe the outside of the Unit.
Caution: Do not, under any circumstances, submerge or
place the Unit under running water.
4. Using a dry cloth, or paper towel, dry the outside of the
Unit.
5. Once the Unit is dry, return it to its carrying case.

10
4
4 4
4
FCC Information
FCC InformationFCC Information
FCC Information
FCC ID: LSQ-IDEU-830
FEDERAL COMMUNICATIONS COMMISSION (FCC)
Part 15 STATEMENT
The equipment complies with Part 15 of the FCC Rules.
Operation is subject to the following two conditions:
(1) This device may not cause harmful interference, and (2) This device must
accept any interference received, including interference that may cause
undesired operation.
This equipment has been tested and found to comply with the limits for a Class
B digital device, pursuant to part 15 of the FCC Rules. These limits are
designed to provide reasonable protection against harmful interference in a
residential installation. This equipment generates, uses and can radiate radio
frequency energy and, if not installed and used in accordance with the
instructions, may cause harmful interference to radio communications.
However, there is no guarantee that interference will not occur in a particular
installation. If this equipment does cause harmful interference to radio or
television reception, which can be determined by turning the equipment off and
on, the user is encouraged to try to correct the interference by one or more of
the following measures:
1. Reorient or relocate the receiving antenna, 2. Increase the separation
between the equipment and the receiver, 3. Connect the equipment into an
outlet on a circuit different from that to which the receiver is connected, 4.
Consult the dealer or an experienced radio/TV technician for help.
CAUTION: Any changes or modifications not expressly approved by the
grantee of this device could void the user’s authority to operate the equipment.