Attenti TD4I-433 433 MHz Tracking Device User Manual Users guide
3M Electronic Monitoring, Inc. 433 MHz Tracking Device Users guide
Attenti >
Users guide

3M™ One-Piece GPS (TD4i)
Offender Tracking
System and Curfew Unit
Installation & Operation
April 2017
Installation Guide 3M Electronic Monitoring

Installation Guide: 3M™ One-Piece GPS (TD4i) Offender Tracking System and Curfew Unit
2
Information in this documentation is subject to change without notice and does not represent a commitment on part of 3M™
Electronic Monitoring. The software described in this document is subject to the license agreement that is included with the
product, which specifies the permitted and prohibited uses of the product.
Any unauthorized duplication or use of this documentation, in whole or in part, in print, or in any other storage or retrieval system
is prohibited. No part of this publication may be reproduced, transmitted, transcribed, stored in a retrieval system, or translated
into any language in any form by any means for any purpose other than the purchaser’s personal use without the permission of
3M™ Electronic Monitoring.
© 1995-2017 3M™ Electronic Monitoring. All rights reserved.
Unless otherwise noted, all names of companies, products, street addresses, and persons contained herein are part of a
completely fictitious scenario and are designed solely to document the use of a 3M™ Electronic Monitoring product.
Contact Us
Corporate Headquarters
3M™ Electronic Monitoring
2 Ha-Barzel St.,
P.O. Box 13236,
61132 Tel Aviv, Israel
Tel: 972-3-7671800
Fax: 972-3-7671801
U.S.A Customers, call 1-800-313-1483
Visit us at: www.3m.com/electronicmonitoring

3M Electronic Monitoring
3
Versions and Changes Table
Version
Status/Changes
Author
Date
1.0
Initial release version
Steve Graniewitz
03-APR-2017

Installation Guide: 3M™ One-Piece GPS (TD4i) Offender Tracking System and Curfew Unit
4
Safety Information
Please read, understand, and follow all safety information contained in these instructions prior to the use of this 3M
Electronic Monitoring device. Retain these instructions for future reference.
Intended Use
This 3M Electronic Monitoring device is part of an electronic monitoring system, which performs data transfer using
cellular network to a monitoring platform. This device has not been tested for and is not intended for use on
airplanes, in hazardous environments, in healthcare facilities, or where cellular phones or other intentional
transmitters are restricted.
The operating temperature of the One-Piece GPS Tracking Unit (TD4i) is -20°C to +55°C. The operating
temperature of the Curfew Unit is -25°C to +55°C. The storage temperature of the One-Piece GPS Tracking Unit
(TD4i) is -40°C to +60°C. The storage temperature of the Curfew Unit is -25°C to +55°C.
Explanation of Signal Word Consequences
WARNING
Indicates a hazardous situation which, if not avoided, could result in serious injury or
death.
CAUTION
Indicates a hazardous situation which, if not avoided, could result in minor or moderate
injury and/or property damage.
NOTICE:
Indicates a situation which, if not avoided, could result in property damage.
Safety information for:
Rechargeable hand-held/wearable devices
Non-rechargeable hand-held/wearable devices
Cradles/receivers/base units
WARNING
Avoid placing a device next to an implanted electronic device (e.g., don’t carry the device in a shirt or
jacket pocket directly near an implanted device).
To reduce the risks associated with fire or explosion:
Do not intentionally open or damage the device.
Do not attempt to access or replace battery. Battery is not user-replaceable. The device shall be
opened by 3M authorized service only.
Ensure storage temperature of device is within the range as specified in device manual.
Do not use device outside of the operation temperature range specified in device manual. Contact
the agency representative from which you are monitored to get operation temperature range.

3M Electronic Monitoring
5
WARNING
To reduce the risks associated with hazardous voltage:
Do not modify, decorate, or attempt to service the device. Return to 3M authorized personnel or
location for repair or service. There are no user serviceable parts.
If the device or power cord becomes damaged, contact the agency representative from which
you are monitored.
NOTICE
Only authorized personnel can turn off or remove the device.
Safety information for:
Rechargeable hand-held/wearable devices
Cradles/receivers/base units
WARNING
To reduce the risks associated with hazardous voltage:
Do not modify AC/DC power adapter plug.
Do not force the power plug into an outlet where it does not fit.
Use only a 3M provided AC/DC power adapter to recharge or power the device.
Do not unplug AC/DC adapter by power cord. Handle the adapter by the body only.
Do not attempt to charge the device using an outdoor outlet. Only use the AC/DC adapter
indoors.
Do not expose power adapter to rain, steam or wet conditions.
Do not submerge the device, or hold the device under running water, while it is charging.
CAUTION
To reduce the risks associated with hot surfaces:
Do not touch thermal pads on device or charger if charging is interrupted.

Installation Guide: 3M™ One-Piece GPS (TD4i) Offender Tracking System and Curfew Unit
6
Safety information only for:
Rechargeable Hand-held/wearable Devices
Non Rechargeable Hand-held/wearable Devices
WARNING
To reduce the risks associated with fire or explosion:
Do not enter areas with potentially explosive atmosphere. Potentially explosive areas are often,
but not always, clearly marked.
CAUTION
To reduce the risks associated with sharp points:
Use caution when handling pin trays.
CAUTION
Avoid installing the electronic monitoring device in the presence of ulcers, open wounds, blisters,
swelling or skin infection over the expected area of contact with the electronic monitoring device.
If the user reports pain, numbness or other symptom over the expected area of contact with the
electronic monitoring device, a medical opinion is recommended prior to installation.
If the user reports concerns about an underlying medical condition that could be exacerbated by
use of the electronic monitoring device, a medical opinion is recommended prior to installation of
device.
If, during use, the user experiences skin changes or symptoms in the area in contact with the
electronic monitoring device, the user should immediately contact their agency representative.
Cancer Patients that have been treated with Radiotherapy:
Avoid installing the electronic monitoring device in the presence of radiation-induced skin
changes (such as ulcers, open wounds, blisters, desquamation, erythema, hyperpigmentation)
over the expected area of contact with the electronic monitoring device. Otherwise, there is no
currently available evidence the use of the electronic monitoring device is contraindicated in
cancer patients that have been treated with Radiotherapy.
Pregnant women:
Avoid installing the electronic monitoring device in the presence of ulcers, open wounds, blisters,
swelling or skin infection over the expected area of contact with the electronic monitoring device.
Otherwise, there is no currently available evidence the use of the electronic monitoring device is
contraindicated in pregnant women.
Safety information only for:
Cradles/receivers/base Units
WARNING
To reduce the risks associated with hazardous voltage:
Do not submerge the device, or hold the device under running water.

3M Electronic Monitoring
7
FCC
FCC ID: LSQ-TD4i-433
FCC ID: LSQ-IDEU-830-2
FEDERAL COMMUNICATIONS COMMISSION (FCC)
Part 15 STATEMENT
The equipment complies with Part 15 of the FCC Rules.
Operation is subject to the following two conditions:
(1) This device may not cause harmful interference, and (2) This device must accept any interference received,
including interference that may cause undesired operation.
This device complies with FCC/ISED radiation exposure limits set forth for an uncontrolled environment and meets
the FCC radio frequency (RF) Exposure Guidelines and RSS‐102 of the ISED radio frequency (RF) Exposure rules.
This transmitter must not be co-located or operating in conjunction with any other antenna or transmitter.
This equipment has been tested and found to comply with the limits for a Class B digital device, pursuant to part 15
of the FCC Rules. These limits are designed to provide reasonable protection against harmful interference in a
residential installation. This equipment generates, uses and can radiate radio frequency energy and, if not installed
and used in accordance with the instructions, may cause harmful interference to radio communications. However,
there is no guarantee that interference will not occur in a particular installation. If this equipment does cause harmful
interference to radio or television reception, which can be determined by turning the equipment off and on, the user
is encouraged to try to correct the interference by one or more of the following measures:
1. Reorient or relocate the receiving antenna, 2. Increase the separation between the equipment and the receiver, 3.
Connect the equipment into an outlet on a circuit different from that to which the receiver is connected, 4. Consult
the dealer or an experienced radio/TV technician for help.
3M Electronic Monitoring has not approved any changes or modifications to this device by the user. Any changes or
modifications could void the user’s authority to operate the equipment.
WEEE
This symbol according to the European Directive indicates that the Waste of Electrical and Electronic
Equipment (WEEE) must not be disposed of as unsorted municipal waste and must be collected separately.
Please contact an authorized representative of the manufacturer or an authorized waste management
company for information concerning the decommissioning of your equipment.

Installation Guide: 3M™ One-Piece GPS (TD4i) Offender Tracking System and Curfew Unit
8
Table of Contents
1 Introduction .......................................................................................................................................... 9
2 Main Components .............................................................................................................................. 10
2.1 LED Indicators................................................................................................................................10
2.1.1 PWR LED ............................................................................................................................... 11
2.1.2 GPS LED ............................................................................................................................... 11
2.1.3 Zone LED ............................................................................................................................. 12
2.1.4 LED Indication During Activation Sequence ................................................................. 12
2.1.5 LED Indication of Vibrate Now Feature ......................................................................... 13
3 Charging the Unit ................................................................................................................................ 14
3.1 Cord Charger Attachment ........................................................................................................... 14
3.2 Cordless Charger .......................................................................................................................... 14
4 Installing the One-Piece GPS Unit .................................................................................................... 16
4.1 Before Installation ......................................................................................................................... 16
4.1.1 Installation Equipment ....................................................................................................... 16
4.1.2 Installation Tools ............................................................................................................... 16
4.1.3 Offender Information in the 3M™ Offender Management Software ....................... 17
4.2 Setting Up the 3M™ Curfew Unit............................................................................................... 17
4.2.1 Curfew Unit LED Indication ............................................................................................. 18
4.3 Checking the One-Piece GPS Unit’s Battery Status ............................................................... 19
4.4 Attaching the Tamper Plugs ........................................................................................................ 19
4.5 Preparing the Strap ...................................................................................................................... 20
4.6 Attaching the One-Piece GPS Unit to the Offender’s Ankle ................................................ 22
4.7 Activating the One-Piece GPS Unit .......................................................................................... 23
5 Status Alerts ....................................................................................................................................... 24
5.1 Low Battery ................................................................................................................................... 24
5.2 Motion No GPS ............................................................................................................................. 24
5.3 Strap Tamper ................................................................................................................................ 24
5.4 Case Tamper ................................................................................................................................. 24
5.5 Geographic Zone Alerts .............................................................................................................. 24
5.6 Curfew Zone Alert ....................................................................................................................... 25
5.7 Curfew Unit Tamper .................................................................................................................... 25
6 Dismantling the One-Piece GPS Unit .............................................................................................. 26
6.1 Before Dismantling ....................................................................................................................... 26
6.2 Performing an End of Service .................................................................................................... 26
6.3 Removing the One-Piece GPS Unit ........................................................................................... 26
6.4 Removing the Curfew Unit ......................................................................................................... 28

3M Electronic Monitoring
9
1 Introduction
The 3M™ One-Piece GPS Offender Tracking Unit is a wearable device designed specifically for offender
monitoring applications. With security redundancies and anti-tamper mechanisms built-in across the
platform, the One-Piece unit provides a trustworthy and reliable tracking system.
The system integrates tracking, communication, and mapping technologies that enable operators to
efficiently track offenders at varying levels of intensity.
Each monitored offender is assigned a tracking unit which continuously tracks their location in real-time.
The One-Piece unit stores and processes the tracking data and communicates with the monitoring center
or assigned officers to report the offender’s location or alert in the event of a violation. Alerts are
configured according to the offender’s individual schedule and zone restrictions.
The One-Piece unit operates on the 3M Electronic Monitoring software platform and is a result of over a
decade of field experience.
Installation Guide: 3M™ One-Piece GPS (TD4i) Offender Tracking System and Curfew Unit
10
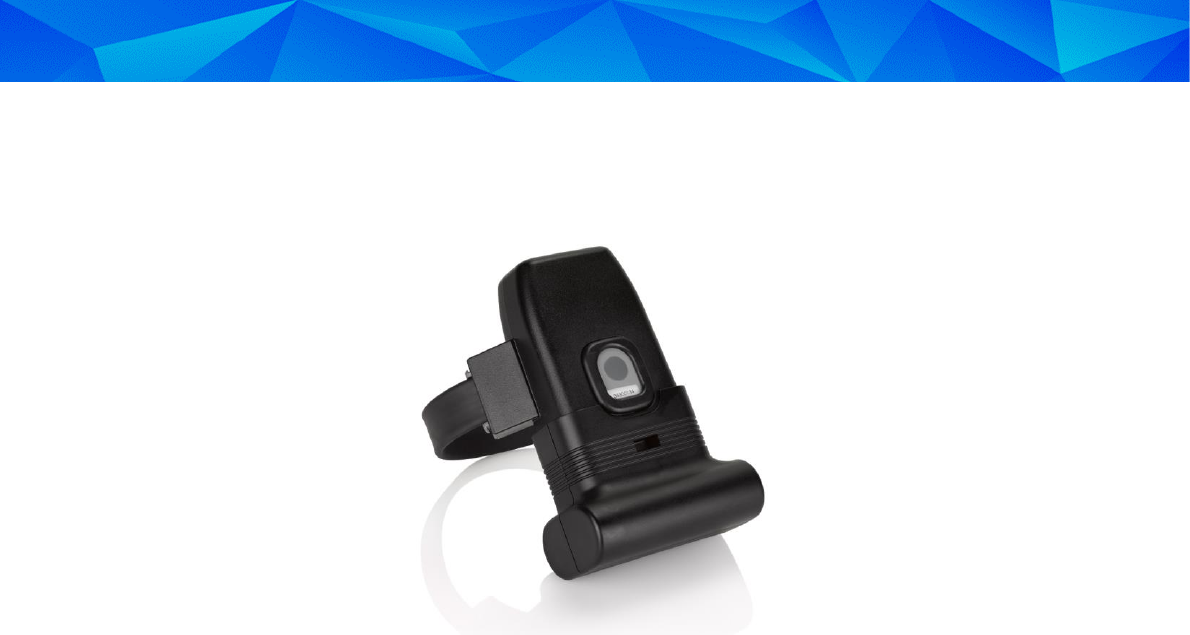
2 Main Components
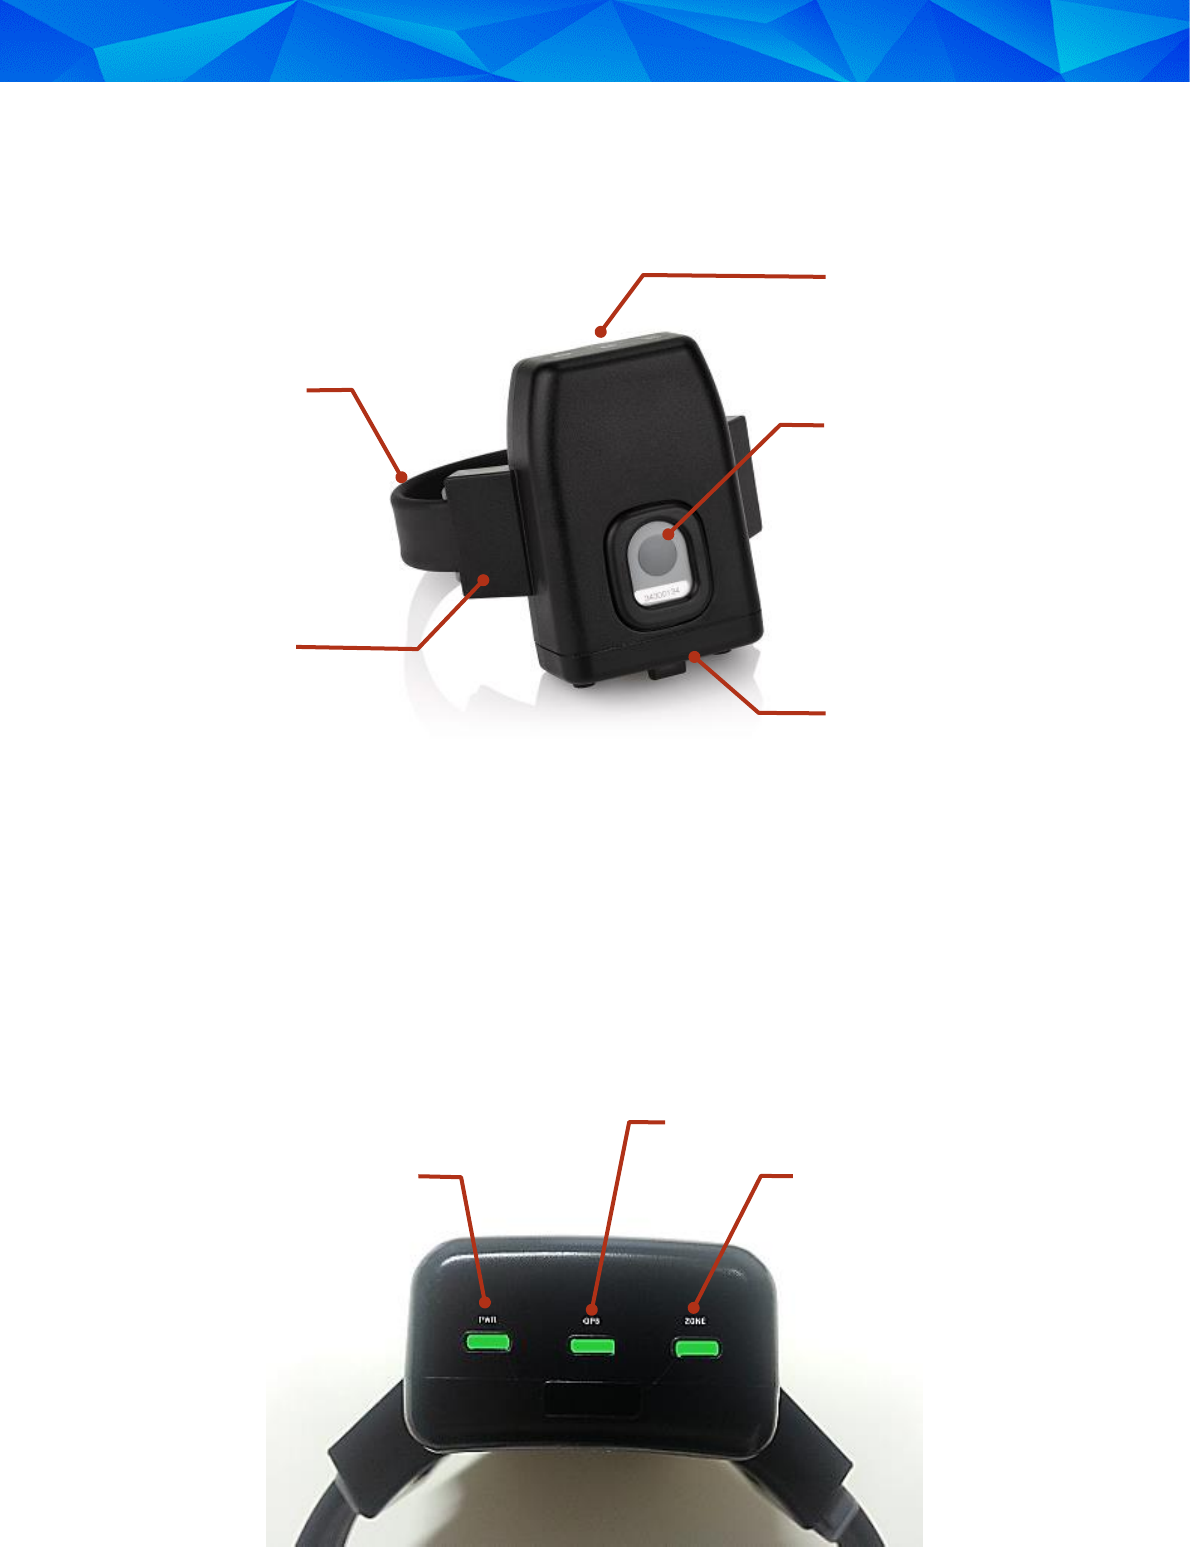
The One-Piece unit features the following main components:
Figure 1: One-Piece GPS Unit Main Components
2.1 LED Indicators
The One-Piece unit features three LED indicators that inform the offender of the unit’s status. If vibration
notification is enabled, the One-Piece unit vibrates in order to prompt the offender to check the status of
the LEDs.
The three LED indicators are labeled as follows:
PWR
GPS
Zone
Activation Button
LED Indicators
Charging Port
Pin-Tray Bracket
Fiber Optic Strap
Zone
PWR
GPS

3M Electronic Monitoring
11
Figure 2: One-Piece GPS Unit LED Indicators
The following three sections explain the One-Piece unit’s LED indication during regular operation.
Additional status conditions indicated by a combination of LEDs are explained in section 2.1.4 LED
Indication During Activation Sequence and section 2.1.5 LED Indication of Vibrate Now Feature.
2.1.1 PWR LED
The PWR LED indicates the status of the One-Piece unit’s battery as explained in the following table.
LED Indication
LED Pattern
Status Description
Flashing green
(once per second)
The One-Piece unit is activated or is in the process of being
activated, and the battery does not need to be charged.
Flashing red
(once per second)
The One-Piece unit is activated and the battery needs to be
charged.
Solid green
The One-Piece unit is connected to the charger and the battery
has been completely recharged. You may remove the One-Piece
GPS unit from the charger.
Solid red
The One-Piece unit is connected to the charger and is not yet
fully charged.
LED off
The One-Piece unit is not active or has shut down due to low
battery.
2.1.2 GPS LED
The GPS LED indicates the conditions listed in the following table.
LED Indication
LED Pattern
Status Description
LED off
During regular operation, the GPS LED is off. There is no
indication to the offender if the device has a GPS fix or not.
Flashing red
(once per second)
The One-Piece unit has accumulated 10 minutes of offender
motion in a 60-minute period without receiving a signal from the
GPS satellites.
Installation Guide: 3M™ One-Piece GPS (TD4i) Offender Tracking System and Curfew Unit
12
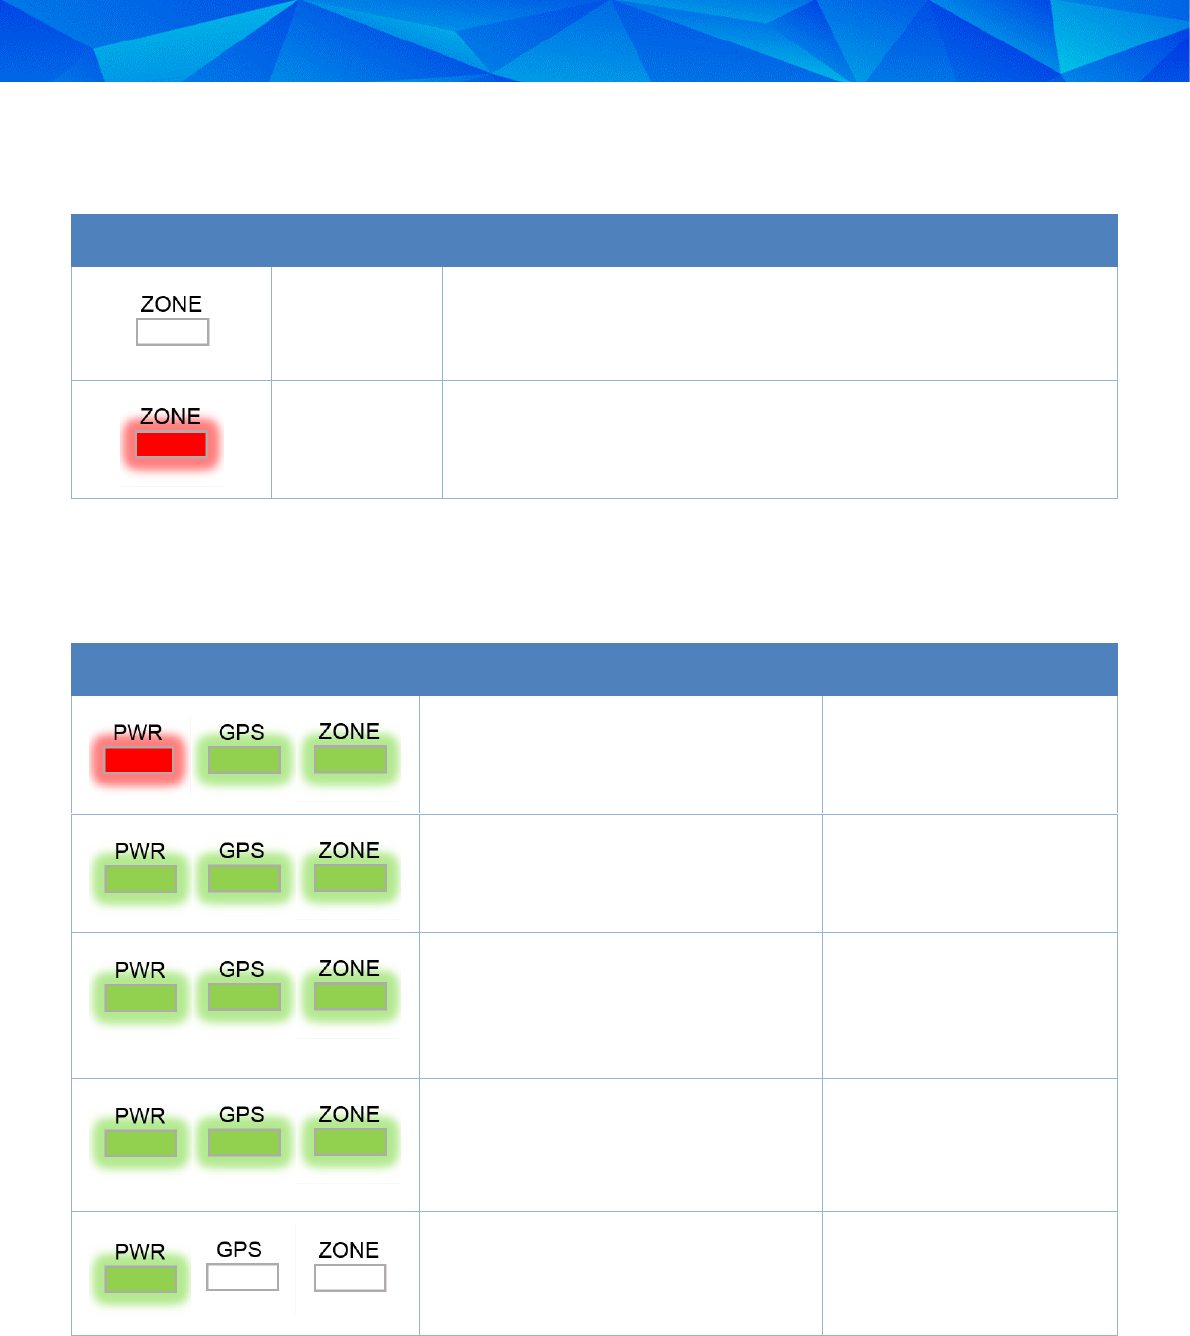
2.1.3 Zone LED
The Zone LED indicates geographic zone violation status.
LED Indication
LED Pattern
Status Description
LED off
The Offender is not violating any zone restrictions.
Flashing red
(once per second)
The Offender has violated one or more zone restrictions – see 5.5
Geographic Zone Alerts
2.1.4 LED Indication During Activation Sequence
The One-Piece unit uses all three LEDs in combination to indicate each stage of the activation sequence.
These indications are explained in the following table.
LED Indication
LED Pattern
Status Description
PWR LED flashes
red not in sequence
with the other LEDs
flashing green
The activation sequence
has begun.
All three LEDS flash
green once per
second
The data transfer sequence
has begun
All three LEDS flash
green. GPS and
Zone flash twice
per second. PWR
LED is not in
sequence.
The One-Piece unit has
completed the data
transfer sequence and is
searching for a GPS signal.
All three LEDS flash
green three times
per second
GPS signal has been
received, the One-Piece
unit is searching for its
Curfew Unit.
The PWR LED
flashes green once
per second and the
other two LEDs
stop flashing
The One-Piece unit has
been activated
successfully.
3M Electronic Monitoring
13
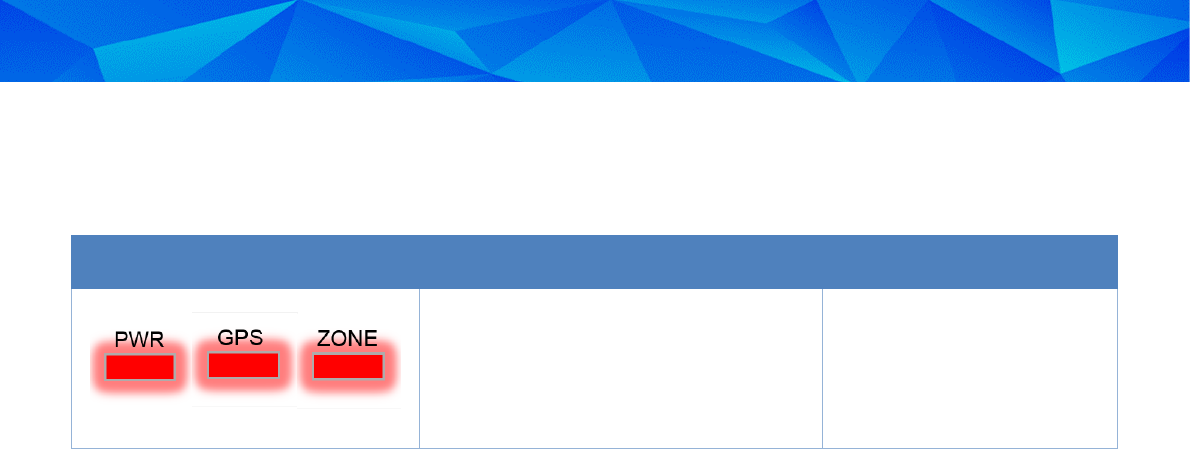
2.1.5 LED Indication of Vibrate Now Feature
The Vibrate Now feature enables the monitoring center to send a command to the One-Piece unit that
causes the unit to vibrate and flash all three LED so that the offender will call the monitoring center.
LED Indication
LED Pattern
Status Description
All three LEDs flash
red once per
second
The One-Piece has
received a Vibrate Now
command. Press the
Activation button to
acknowledge.
Installation Guide: 3M™ One-Piece GPS (TD4i) Offender Tracking System and Curfew Unit
14
3 Charging the Unit
The One-Piece unit can be charged in two different ways; the Cord Charger attachment and the Cordless
Charger. Both charging options can fully charge a depleted battery in 2.5 to 3 hours.
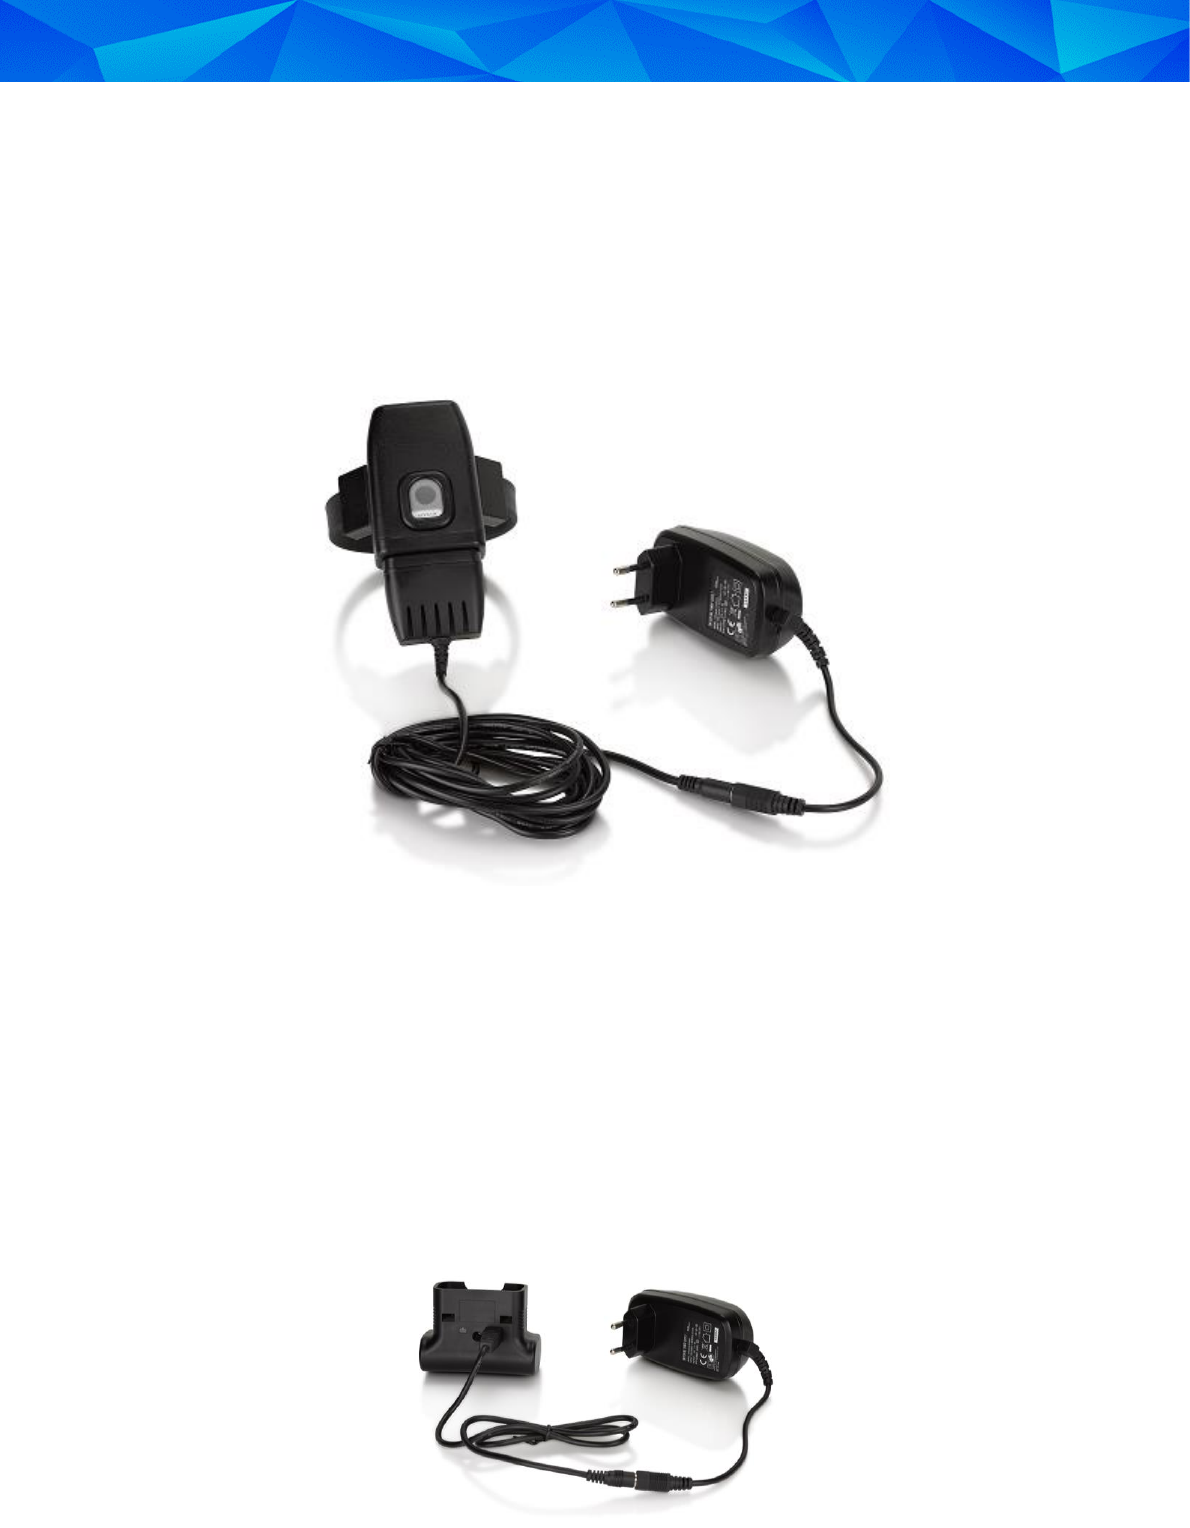
3.1 Cord Charger Attachment
The first method of charging is via the regular cord charger attachment that is supplied in the product kit.
Figure 3: One-Piece GPS Unit with Wall Mount Power Supply and Cord Charger Attachment
The Cord Charger attachment is connected to a wall mount power supply at one end and to the One-
Piece unit’s charging port at the other.
The Cord Charger is attached to the One-Piece unit using two magnets allowing quick and easy
attachment and removal. This method helps to prevent any damage to the device or the wearer in the
event of unintended pulling.
3.2 Cordless Charger
The Cordless Charger is a dedicated attachment including a rechargeable battery that fits to the bottom
of the One-Piece unit. The Cordless Charger connects to a wall mount power supply that recharges its
battery when not in use.
Figure 4: Cordless Charger with Wall Mount Power Supply
3M Electronic Monitoring
15
When attached to the One-Piece unit, the cordless charger charges the device while allowing the
offender to go about their daily routine unhindered.
Figure 5: One-Piece GPS Unit with Cordless Charger Attached

Installation Guide: 3M™ One-Piece GPS (TD4i) Offender Tracking System and Curfew Unit
16
4 Installing the One-Piece GPS Unit
Installing the One-Piece GPS Unit involves:
Assembling the appropriate equipment
Verifying that the Offender is registered in the 3M™ Offender Management Software
Activating the unit
4.1 Before Installation
Before leaving the monitoring center, check that you have the correct installation kit and the appropriate
installation tools. In addition, verify that the Offender is correctly registered in the 3M™ Offender
Management Software application.
4.1.1 Installation Equipment
The kit of installation equipment should include the following items:
One-Piece GPS unit
Power adapter
Curfew Unit
1 strap
2 tamper plugs
2 pin trays
4.1.2 Installation Tools
You will also need the following installation tools:
Strap installation tool – for measuring and cutting the strap
Flat head screwdriver – for removing tamper plugs
The One-Piece GPS unit’s battery must be fully charged.
Press and hold the Activation button for one second to check the battery’s status – see Figure 1:
One-Piece GPS Unit Main Components.
If the PWR LED flashes green, the battery is fully charged.
If the PWR LED flashes red, the battery is not fully charged and must be charged for at
least 60 minutes.
3M Electronic Monitoring
17
4.1.3 Offender Information in the 3M™ Offender Management Software
Verify the following Offender details in the 3M™ Offender Management Software application:
Offender’s name and address
Offender’s program type – 1 Piece
Equipment serial numbers –these must match the serial numbers on the equipment you are
planning to install
SIM card details
For more information about working with the 3M™ Offender Management Software, refer to the One-
Piece GPS Offender Tracking Operational Guide.
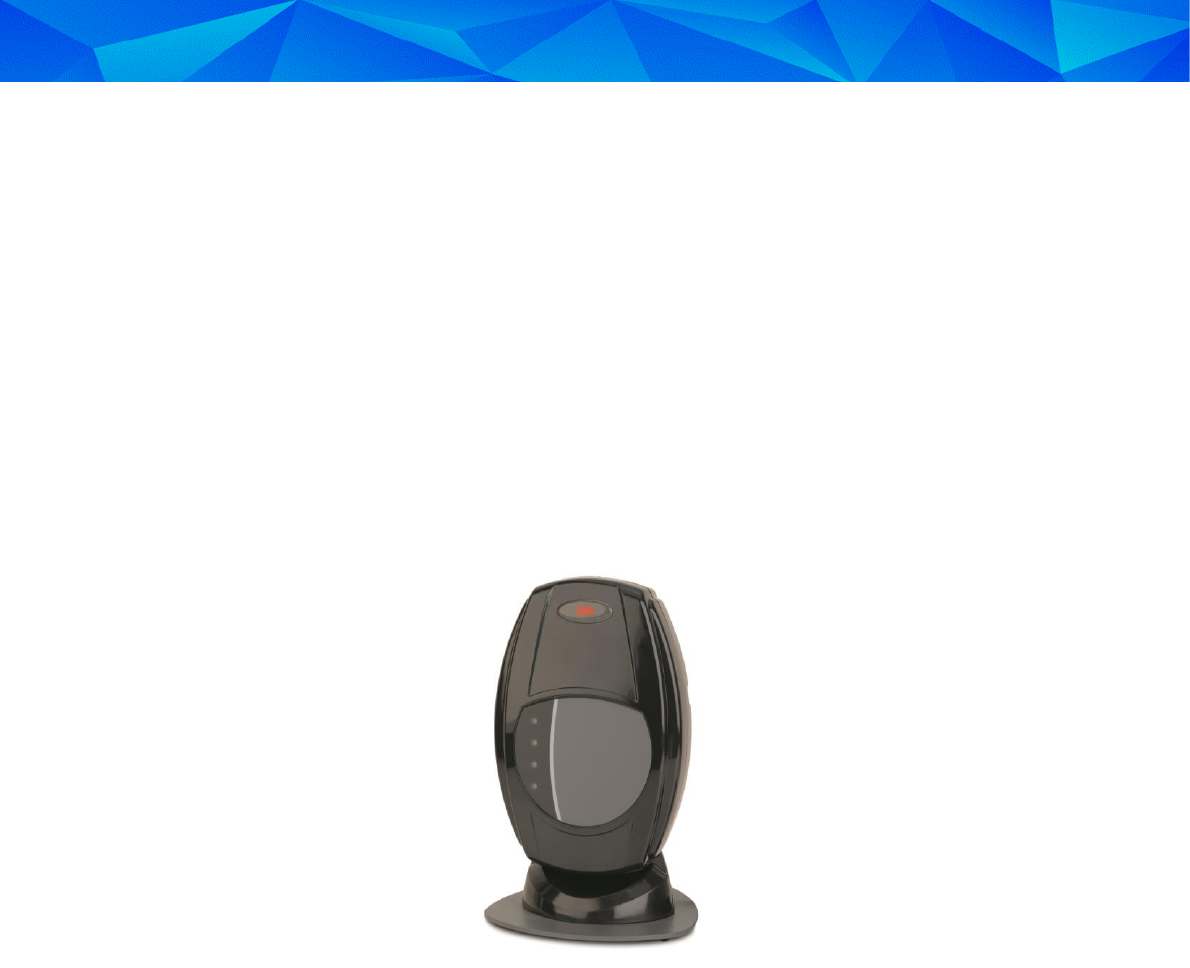
4.2 Setting Up the 3M™ Curfew Unit
The Curfew Unit is an RF device that monitors the offender’s presence in a fixed curfew area.
Figure 6: 3M™ Curfew Unit
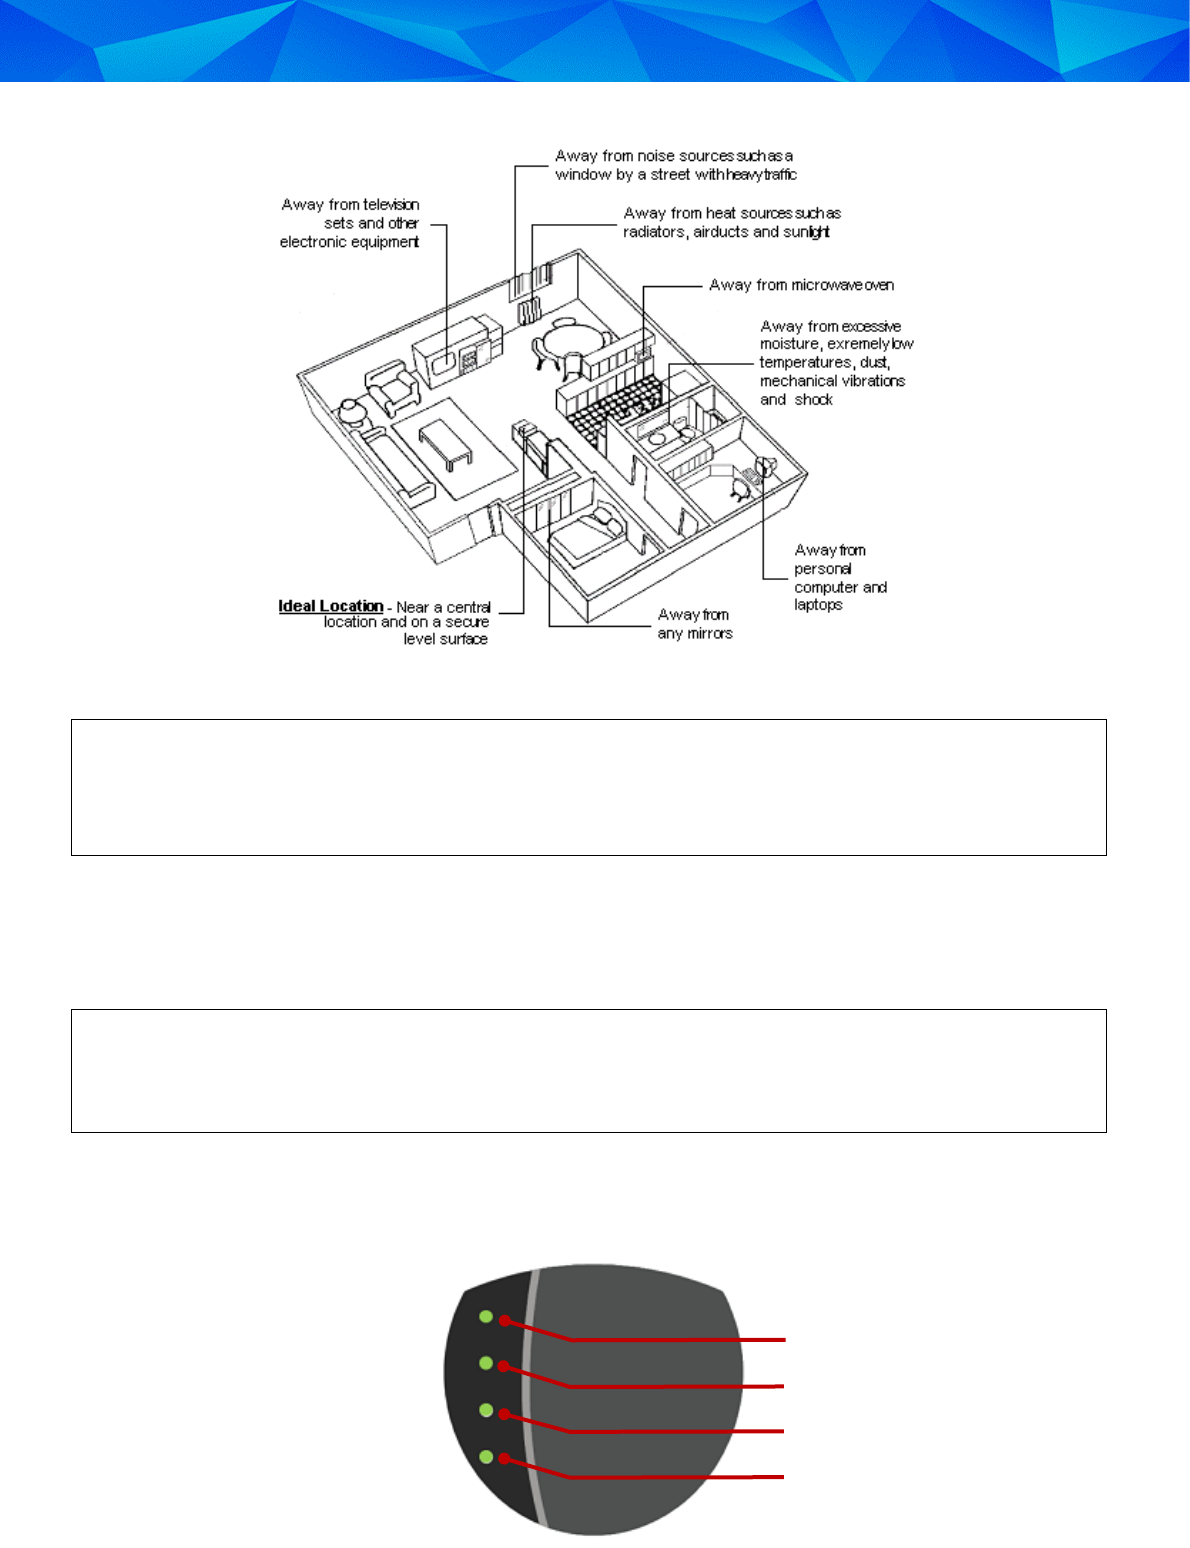
The ideal location for the Curfew Unit is:
As close as possible to the center of the curfew site
On a flat and secure surface
1m above the ground and at least 30cm away from the wall
Not close to the ceiling
Make sure the Curfew Unit is located far away from:
Television sets or other electrical appliances
Microwave ovens
Personal computers or laptops
Heat sources such as a radiator, air duct, or direct sunlight
Excessive moisture or extremely low temperatures
Mirrors or reflective materials
Installation Guide: 3M™ One-Piece GPS (TD4i) Offender Tracking System and Curfew Unit
18
Figure 7: Positioning the Curfew Unit
If the house has two floors, it is recommended that you install the Curfew Unit on the first floor.
If the house has three floors, it is recommended that you install the Curfew Unit on the middle
floor.
To install the Curfew Unit:
1. Place the Curfew unit in position according to the recommendations above.
2. Connect the Curfew unit to power.
The Curfew Unit includes a rechargeable battery that enables the unit to continue functioning in
the event of a power outage. This battery is recharged automatically and recharging is not
controlled by the user.
4.2.1 Curfew Unit LED Indication
The Curfew Unit has four LEDs that provide status indication
Receive
Transmit
Power
Battery
3M Electronic Monitoring
19
Figure 8: Curfew Unit LED Indication
The following table explains the role of each of the Curfew Units LED indicators.
LED
Description
Receive
Flickers when a transmission is received by the Curfew Unit.
Transmit
Flickers when a transmission is sent by the Curfew Unit.
Battery
Lit (solid LED) when the backup battery is fully charged.
Flashes when the backup battery is charging.
Power
Lit (solid LED) when external power is connected.
Off when external power is disconnected.
4.3 Checking the One-Piece GPS Unit’s Battery Status
To check the One-Piece GPS Unit’s Battery Status:
Press and hold the Activation button on the front of the One-Piece unit for one second.
The PWR LED flashes green once.
If the PWR LED flashes red, or not at all, the One-Piece unit needs to be charged.
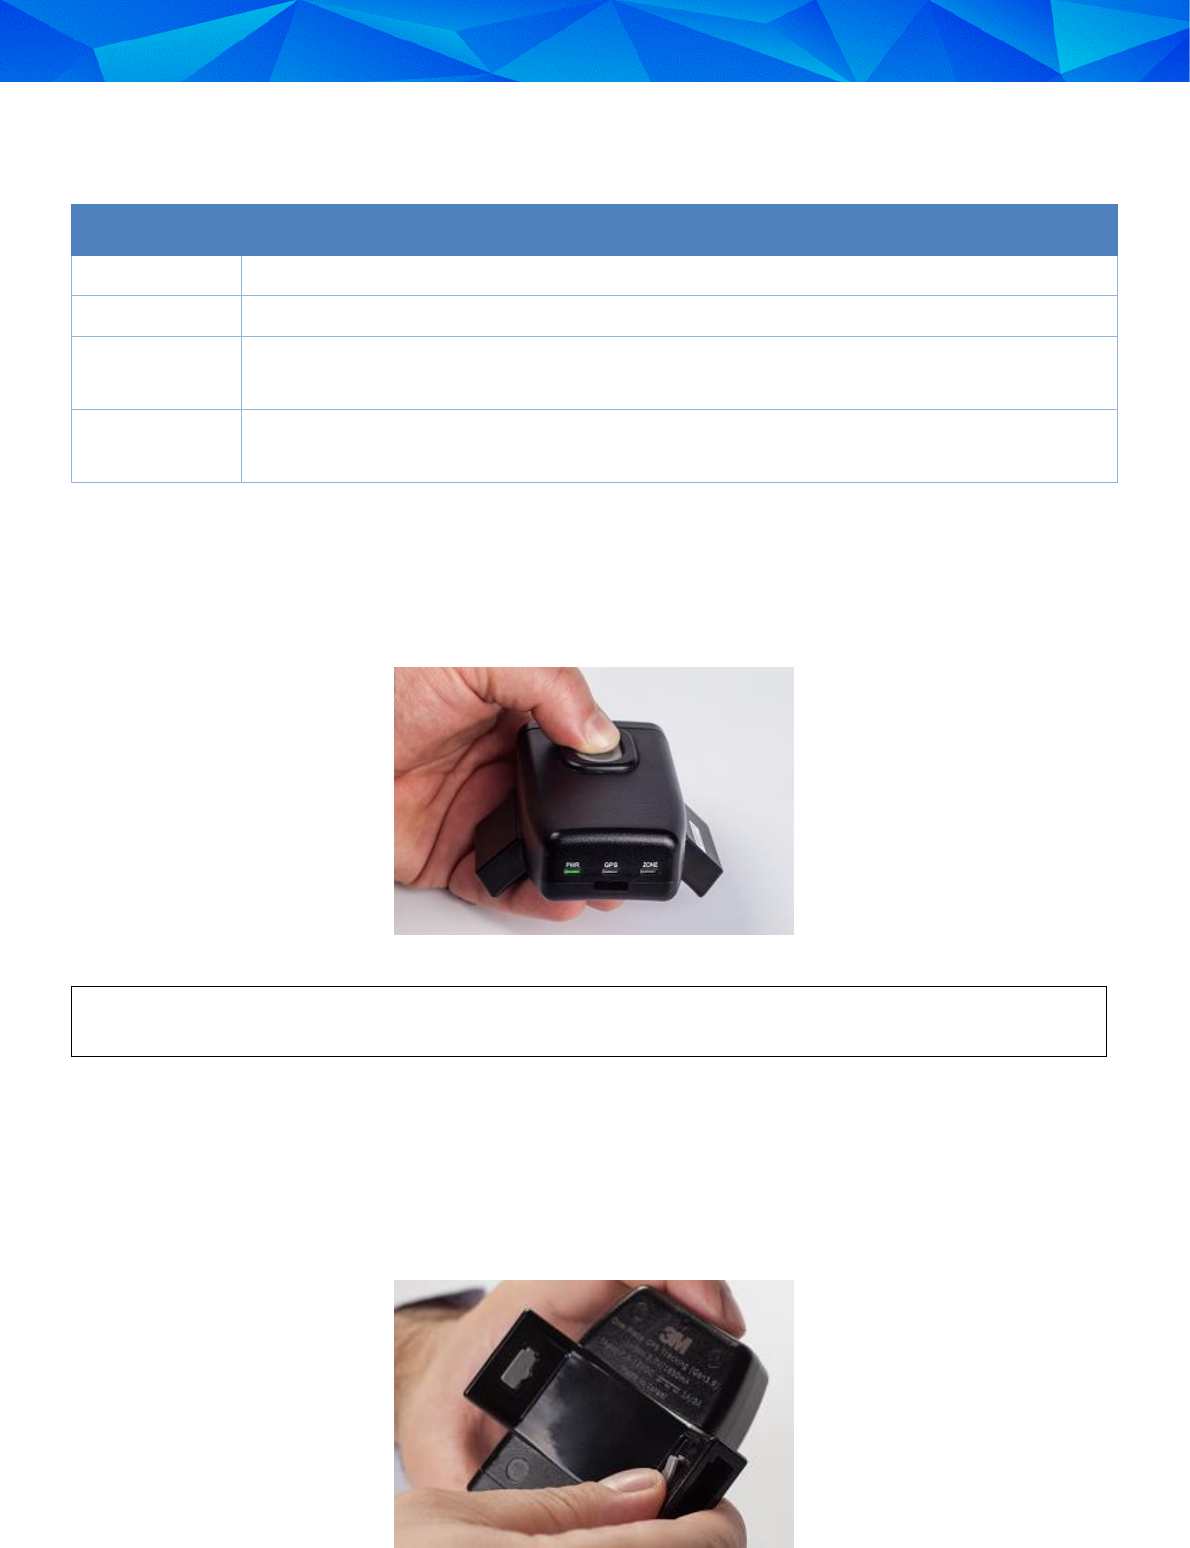
4.4 Attaching the Tamper Plugs
On the rear of the brackets on the One-Piece unit, attach tamper plugs.
To attach the tamper plugs
1. Into each bracket on the back of the One-Piece unit, insert a tamper plug.
2. Loosely place the tamper plug into the slot in the bracket.
Installation Guide: 3M™ One-Piece GPS (TD4i) Offender Tracking System and Curfew Unit
20
3. Push the tamper plug into the slot making sure to enter the right side first.
4. Secure the tamper plug by pushing the left side of the tamper plug into the slot.
4.5 Preparing the Strap
Before attaching the One-Piece unit to the offender’s ankle, you need to prepare the strap. Preparing the
strap involves the following actions:
Measuring and cutting the strap to fit the size of the offender’s ankle.
Installing the pin-trays.
To prepare the strap:
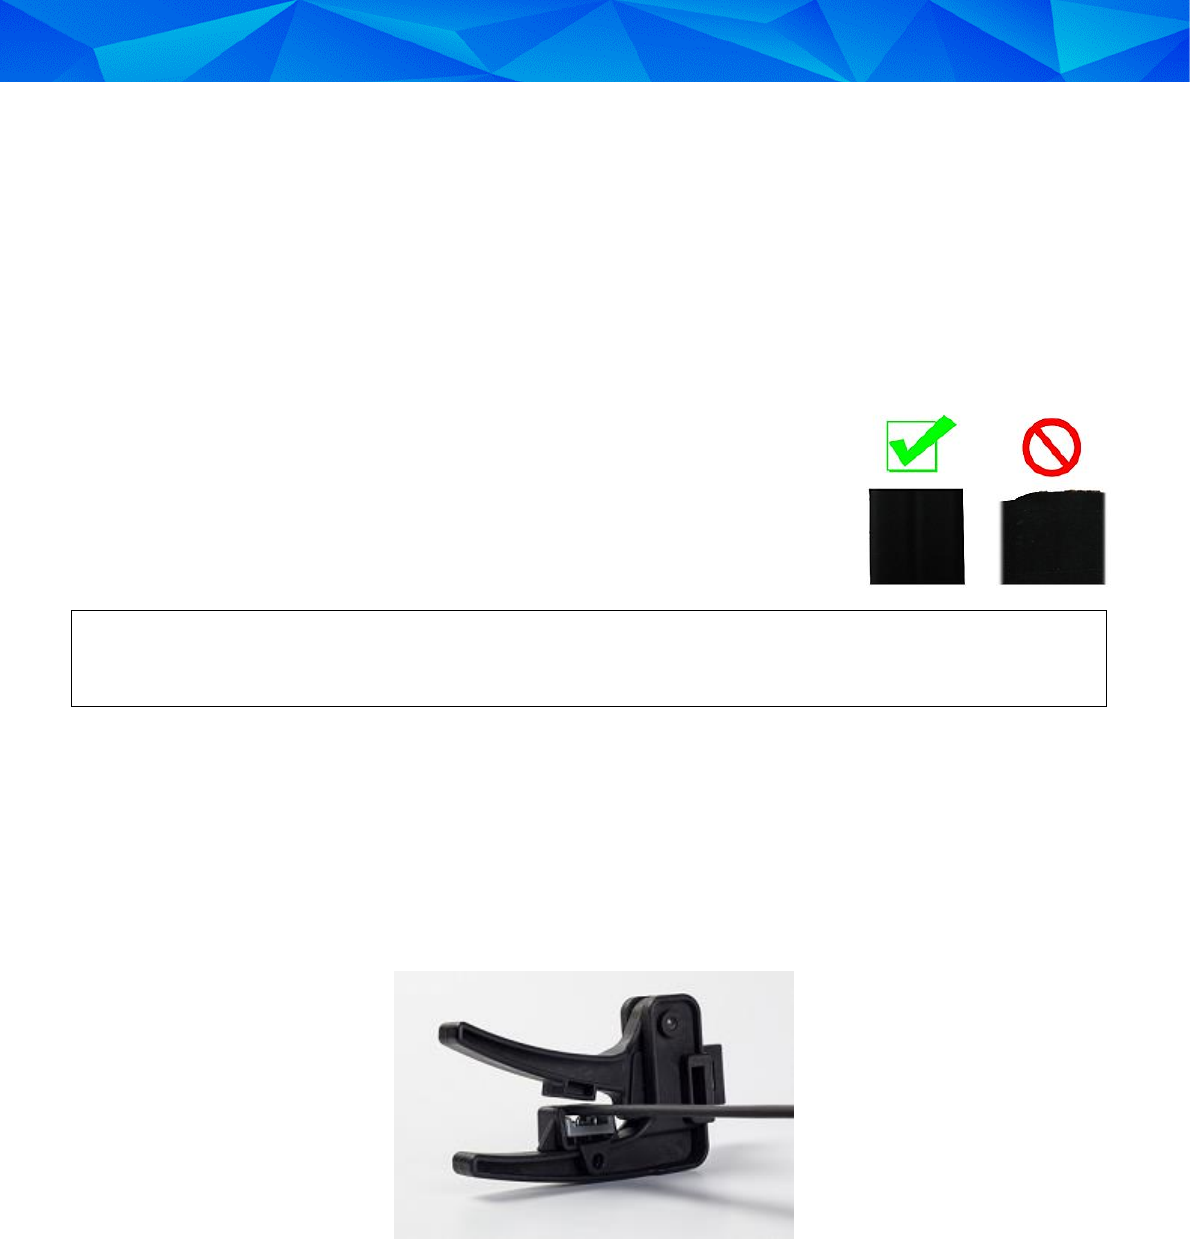
1. Examine both ends of the strap and check that the strap has been cut
evenly. If the strap has been cut at an angle or the fiber optic cable is
protruding, proceed with step 2. If both ends are cut evenly move to
step 3.
If using a reinforced strap, make sure that the copper wire is cut evenly and is not protruding
from the strap.
2. Spread the handles of the strap installation tool and insert the uneven end of the strap into the
measuring slot. Push the strap in until the edge of the strap is at the edge of the slot. Squeeze the
handles together to cut the end of the strap. Keeping the handles together, tilt the strap
installation tool, and tap out the cut piece of strap.
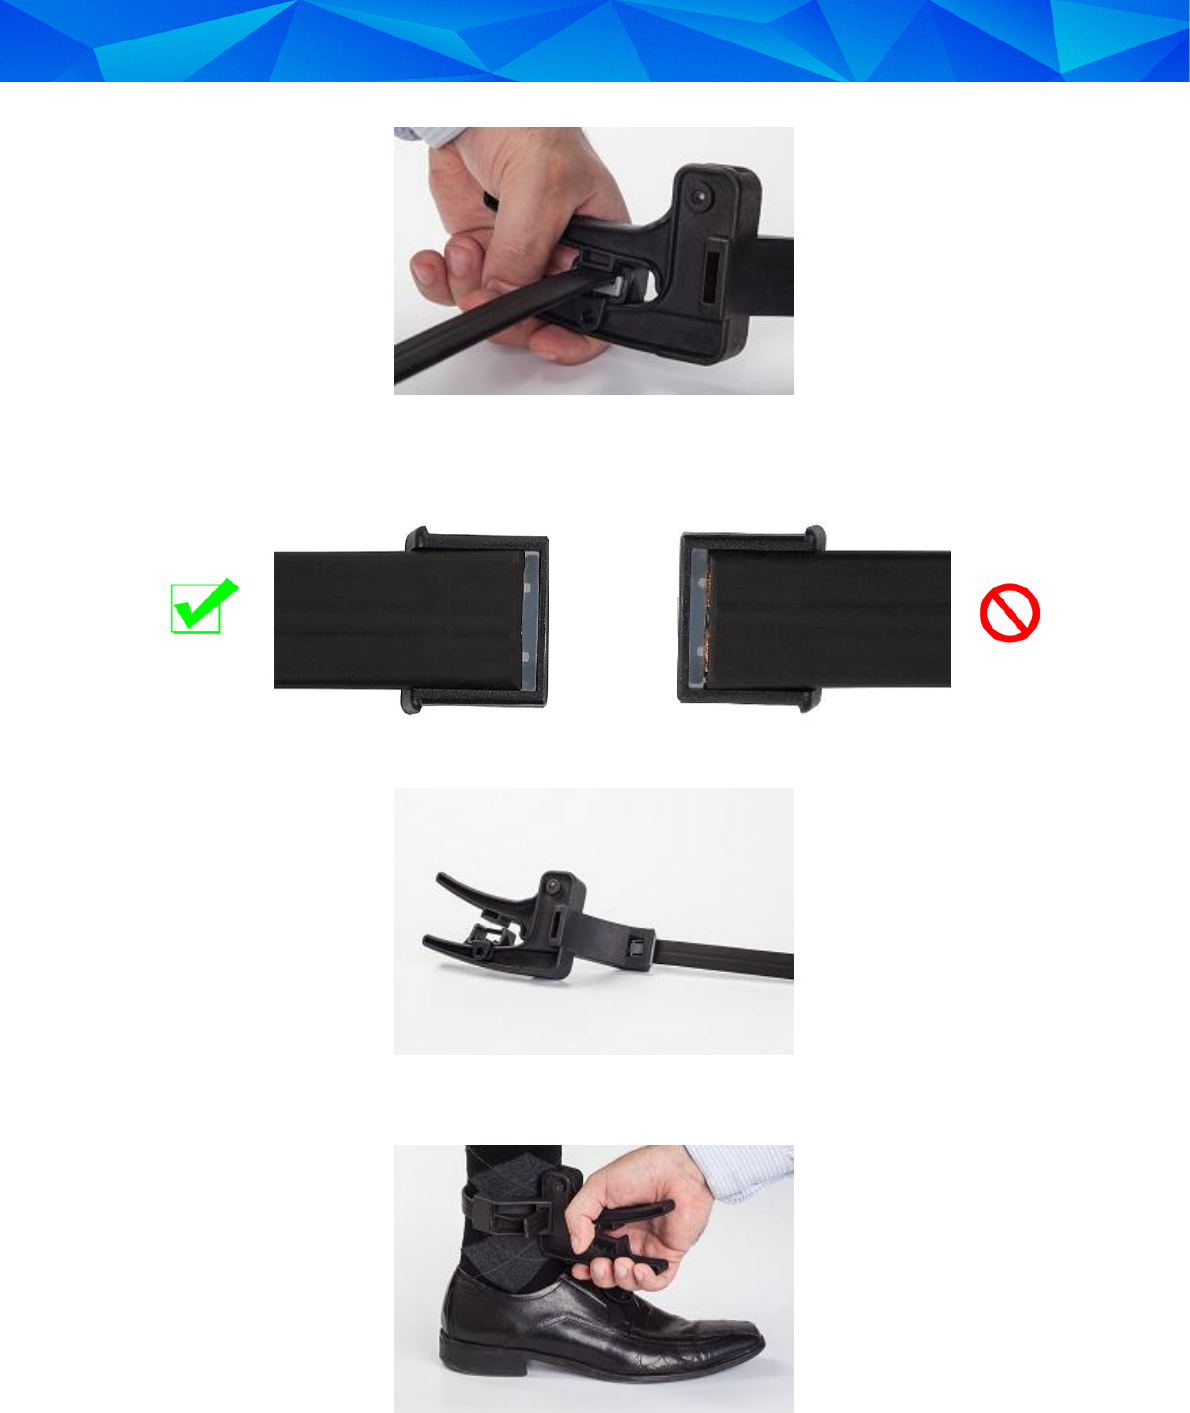
3. Spread the handles of the strap installation tool and insert the pin tray into the slot located on the
handle. Push the pin tray in until it stops.
Note that the metal pins should be facing upwards and the silicone plug should be under the lip of
the slot.
4. Lay the strap installation tool in the palm of your hand. Place the strap over the pin tray and ensure
that the end of the strap is touching the lip of the pin tray slot.
5. Squeeze the handles together until the strap is firmly attached to the pin tray.
3M Electronic Monitoring
21
6. Examine the end of the strap to ensure that the edge is even with the silicone plug and that no
gaps are visible
7. Insert the strap with the attached pin tray into the bracket of the strap installation tool.
8. Place the strap installation tool with the strap around the offender’s ankle.
9. Insert the free end of the strap into the cutter slot and push it through to the other side.
10. Tighten the strap to the desired length. It should fit tightly around the offender’s ankle allowing
room for one finger between the offender’s leg and the strap.
Installation Guide: 3M™ One-Piece GPS (TD4i) Offender Tracking System and Curfew Unit
22
11. Squeeze the two handles of the strap installation tool to cut the extra strap.
12. Attach the second pin tray to the other side of the strap as explained in steps 3, 4, 5 and 6.
4.6 Attaching the One-Piece GPS Unit to the Offender’s Ankle
Once the strap is cut to size with a pin tray attached to both ends, you are ready to attach the One-Piece
unit to the offender’s ankle.
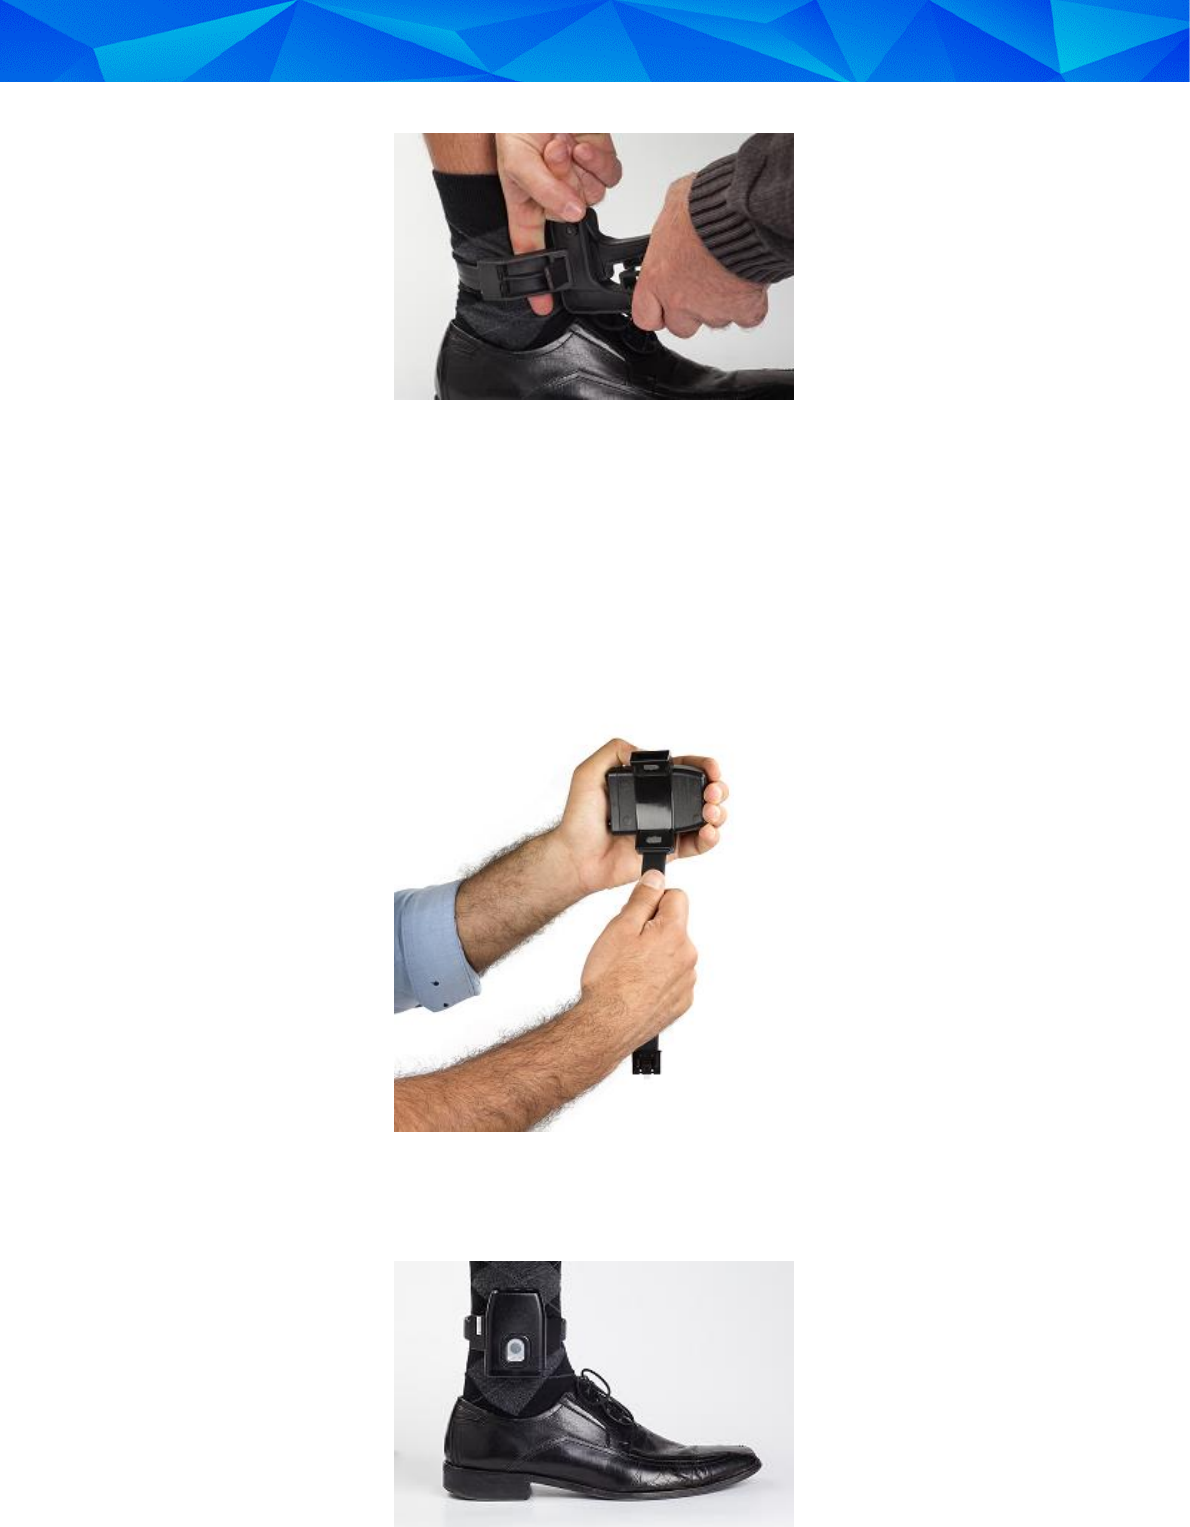
To attach the One-Piece unit to the offender’s ankle:
1. Insert the strap with the attached pin tray into one of the pin tray brackets until it snaps into place.
2. Place the One-Piece unit on the offender’s leg just above the ankle.
3. Insert the other end of the strap into the second pin tray bracket until it snaps into place.
4. Make sure that both pin trays have snapped into place and are locked.
3M Electronic Monitoring
23
4.7 Activating the One-Piece GPS Unit
After the One-Piece unit is firmly secured to the offender’s ankle, you are ready to activate.
For a detailed description of the LED indications displayed during the activation sequence,
see 2.1.4 LED Indication During Activation Sequence.
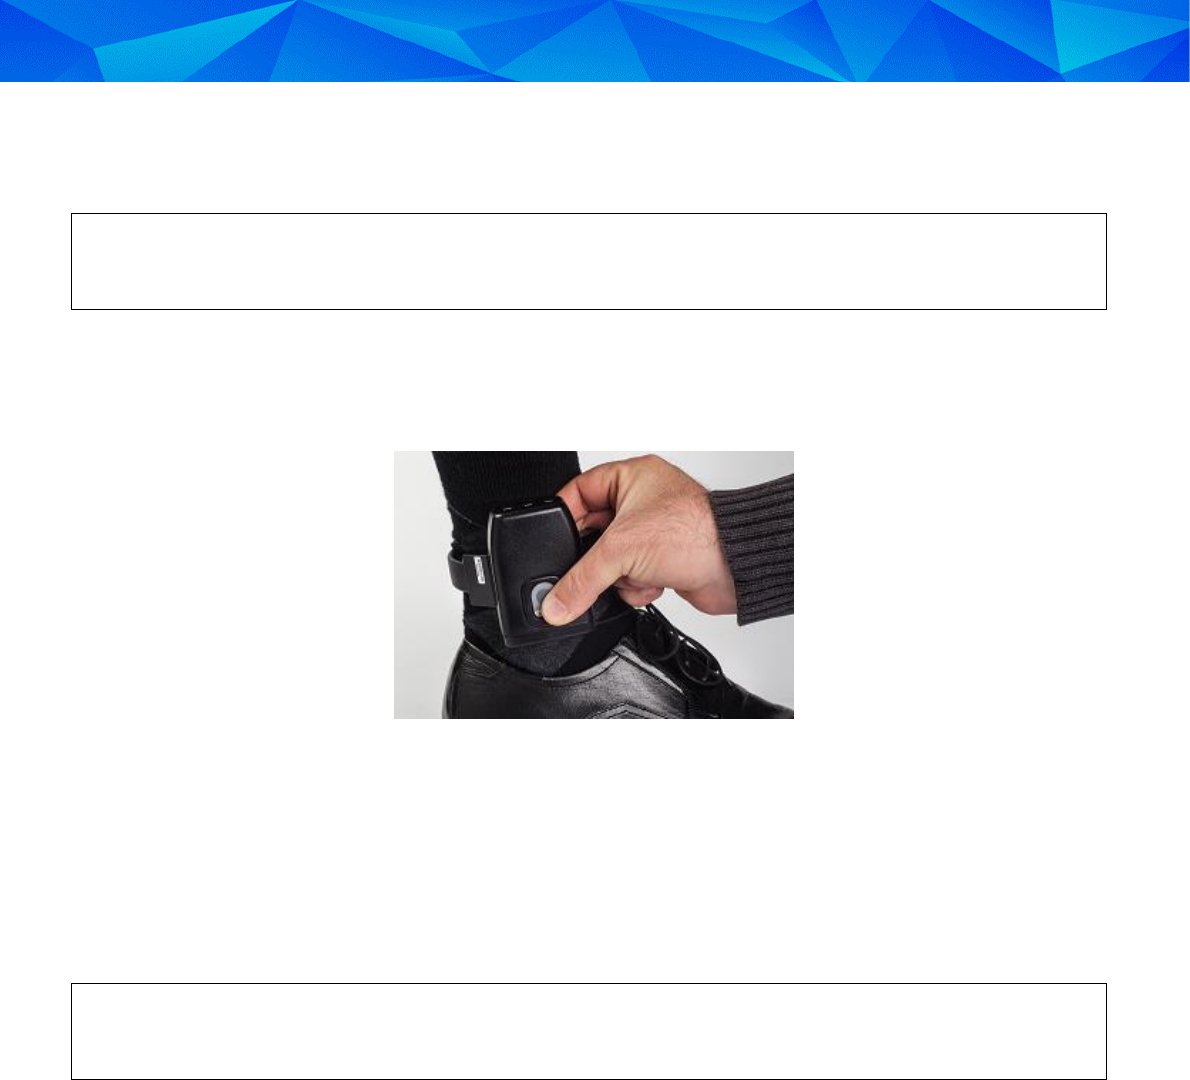
To activate the One-Piece unit:
1. Press and hold the Activation button on the front of the One-Piece unit until the unit vibrates once.
The PWR LED begins to flash red and the GPS and Zone LEDs flash green.
2. Call the monitoring center and request that they download the offender’s program to the unit.
When the data transfer sequence begins PWR, GPS, and Zone LEDs will begin to flash green once
per second.
3. After the data transfer is complete, the GPS and Zone LEDs begin to flash green twice per second
indicating that the One-Piece unit is searching for a GPS signal. Take the offender outside to
acquire a GPS signal.
4. After the GPS signal is received, the Zone and GPS LEDs begin flashing three times per second,
indicating that the One-Piece unit is searching for its Curfew Unit.
Optionally, you can skip the Curfew Unit search and conclude the activation process by pressing
the activation button on the One-Piece unit at this stage.
When the One-Piece unit detects the Curfew Unit, the One-Piece unit vibrates three times and the
GPS and Zone LEDs stop flashing. The PWR LED continues to flash green, indicating that the unit
is on.
The One-Piece unit is activated successfully.

Installation Guide: 3M™ One-Piece GPS (TD4i) Offender Tracking System and Curfew Unit
24
5 Status Alerts
The following sections provide a reference to the various status alerts and indications that can be
generated by the One-Piece unit.
5.1 Low Battery
A Low Battery alert shows that the One-Piece unit’s battery is running low and needs to be recharged.
This status is indicated by the following:
The device initially vibrates three times.
The PWR LED flashes red once every second until the device is connected to the charger.
The device vibrates once every ten minutes until the device is connected to the charger.
The One-Piece GPS unit must be charged for a minimum of two hours daily. The hours do not
have to be consecutive.
5.2 Motion No GPS
The Motion No GPS alert means that the One-Piece unit has detected 10 minutes of accumulated motion
by the offender within a 60-minute period without receiving a GPS signal.
This status is indicated by the following:
The device initially vibrates once.
The GPS LED flashes red once every second.
The device vibrates once every ten minutes until the violation has cleared by acquiring GPS.
5.3 Strap Tamper
A Strap Tamper alert occurs if the strap has been damaged or cut. By default, the One-Piece unit does
not indicate this condition. If vibration notification is enabled, the unit vibrates to indicate this status.
5.4 Case Tamper
A Case Tamper condition indicates that the unit has been damaged or opened. By default, the One-Piece
unit does not indicate this condition. If vibration notification is enabled, the unit vibrates to indicate this
status.
5.5 Geographic Zone Alerts
Geographic Zone alerts are triggered when the offender has violated one or more zone restrictions.
Inclusion Zone – Geographic areas like home or work in which the offender is required to be during
prescheduled intervals. If the offender is outside the Inclusion zone, a violation condition is
triggered.
Exclusion Zone – Geographic areas that the offender is forbidden to enter. These can be off-limits
at all times or during pre-scheduled intervals. When the offender enters an Exclusion zone, a
violation condition is triggered.

3M Electronic Monitoring
25
Geographic Zone alerts are indicated as follows:
If vibration notification is enabled, the device initially vibrates three times.
The Zone LED flashes red once every second until the zone violation is resolved.
If vibration notification is enabled, the device vibrates once every ten minutes until the zone
violation is resolved.
5.6 Curfew Zone Alert
A Curfew Zone alert indicates that the offender has violated a curfew restriction:
Curfew Zone – The location where the Curfew Unit has been installed and in which the offender is
required to be present during pre-scheduled intervals. If the offender is not within range of the
Curfew Unit according to the defined schedule, a violation condition is triggered.
Curfew Zone alerts are indicated as follows:
If vibration notification is enabled, the device initially vibrates three times.
The Zone LED flashes red once every second until the zone violation is resolved.
If vibration notification is enabled, the device vibrates once every ten minutes until the zone
violation is resolved.
5.7 Curfew Unit Tamper
Curfew Unit Tamper alerts indicate that Curfew Unit has been moved and/or disconnected from external
power.
By default, the One-Piece unit does not indicate that this status has occurred. If vibration notification is
enabled, the unit vibrates to indicate this status.
Installation Guide: 3M™ One-Piece GPS (TD4i) Offender Tracking System and Curfew Unit
26
6 Dismantling the One-Piece GPS Unit
Dismantling the One-Piece unit involves:
Performing an End of Service (when applicable).
Removing and packing the One-Piece GPS Unit.
Removing and packing the Curfew Unit.
6.1 Before Dismantling
Before leaving the monitoring center, check that you have the following dismantling tools:
Strap installation tool – for measuring and cutting the strap
0.2” (5mm) flathead screwdriver – for removing tamper plugs
In addition, make sure to bring the original carrying case for the One-Piece GPS Unit and the Curfew Unit.
6.2 Performing an End of Service
In some cases, it is required to remove the One-Piece unit before full period of the offender’s monitoring
program is completed. In this case, you must perform a manual End of Service procedure removing the
One-Piece unit from the offender’s ankle.
To perform End of Service:
1. Call the monitoring center and ask the monitoring personnel to perform End of Service.
2. The monitoring center personnel will call back to confirm a successful End of Service. You can
now remove the One-Piece GPS Unit and Curfew Unit.
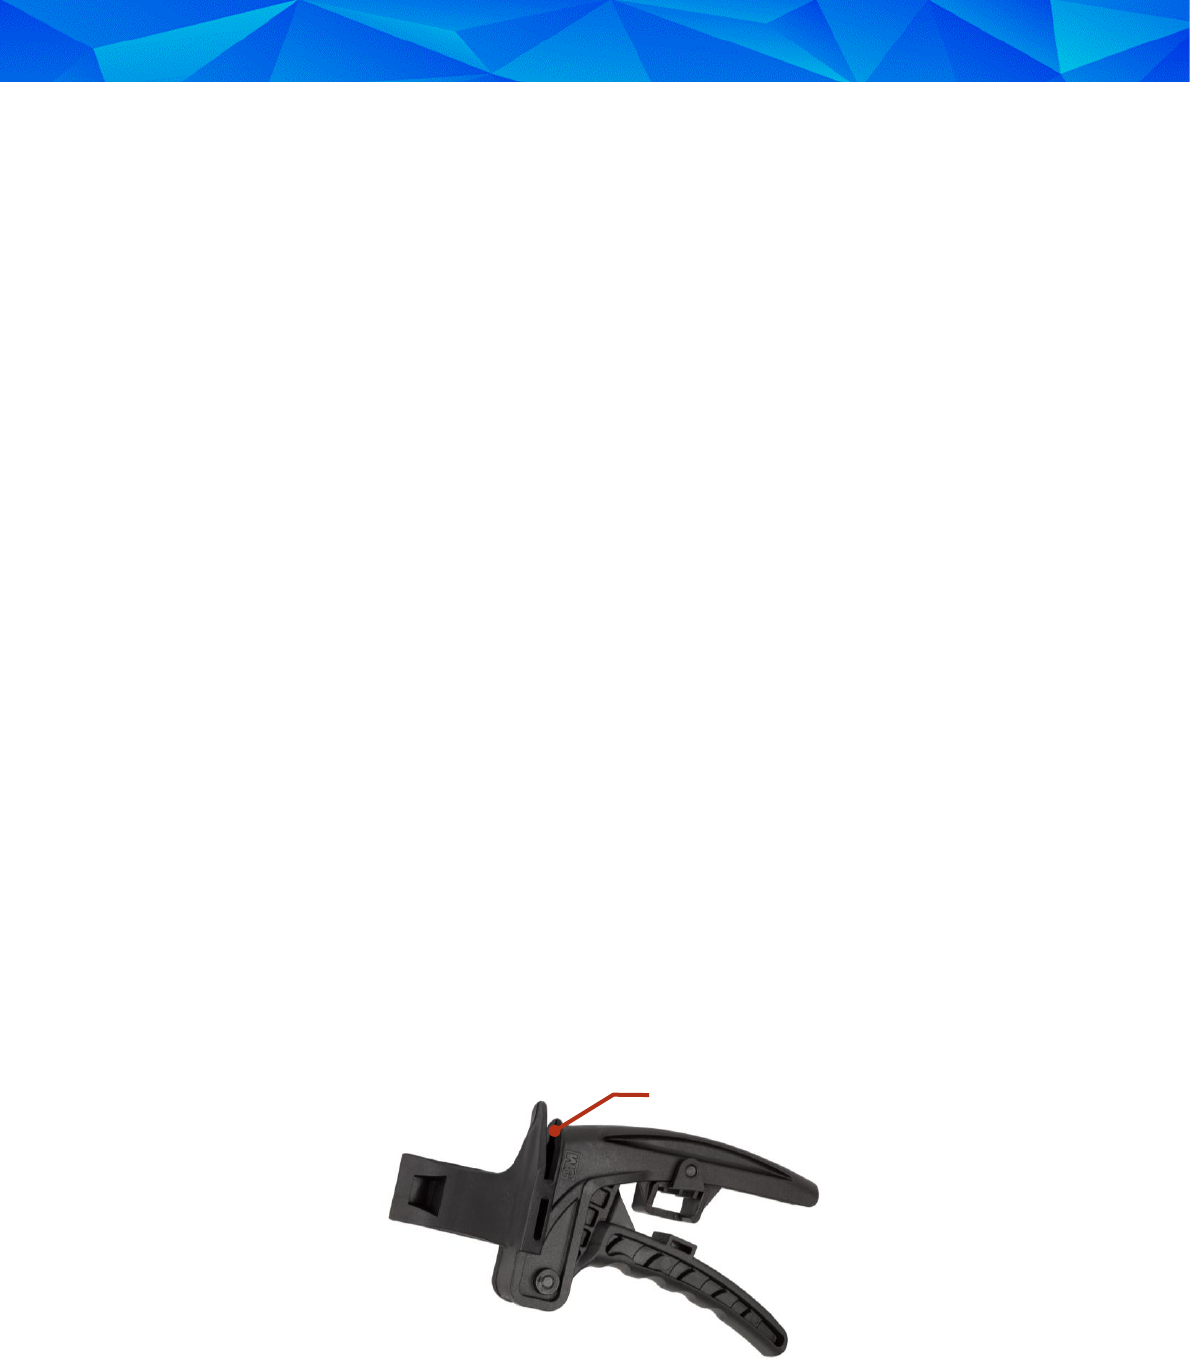
6.3 Removing the One-Piece GPS Unit
The strap installation tool includes a feature that enables you to cut the fiber optic strap in order to
remove the One-Piece unit from the offender’s ankle.
Figure 9: Position of Strap Cutting Slot on 3M™ Strap Installation Tool
Strap Cutting Slot
3M Electronic Monitoring
27
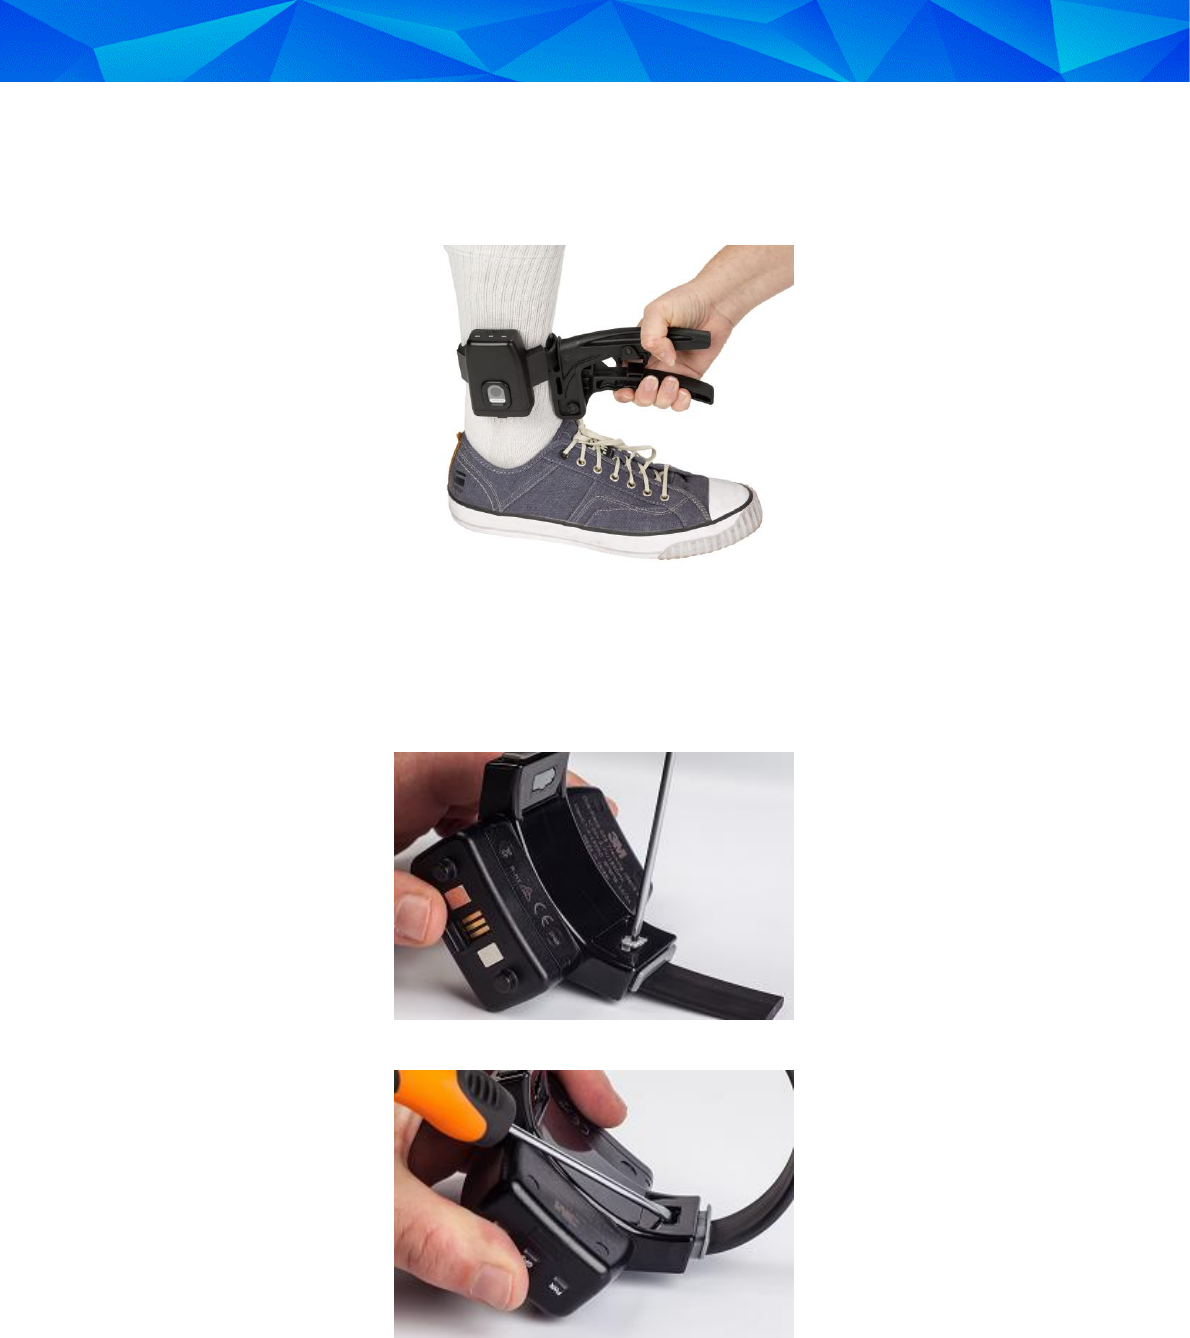
To remove the One-Piece unit from the offender’s ankle:
1. Spread the handles of the strap installation tool.
2. Insert the One-Piece unit’s strap in the strap cutting slot.
3. Squeeze the handles together to cut the strap and remove the One-Piece unit from the offender’s
leg.
4. Using a flathead screwdriver, apply pressure on the tamper plugs to break them.
5. Use the screwdriver to remove the tamper plugs from the brackets.
6. At one end of the strap, use the screwdriver to depress the latch on the pin tray.
7. While keeping the latch depressed, pull the strap out of the bracket.
8. Repeat steps 6 and 7 for the other end of the strap that is still attached.
9. Collect the tamper plugs, pin trays and pieces of strap that you have disassembled. Do not leave
any disposable items on site.
10. Pack the One-Piece GPS Unit, its power adapter and charging attachments into their original
carrying case.

Installation Guide: 3M™ One-Piece GPS (TD4i) Offender Tracking System and Curfew Unit
28
6.4 Removing the Curfew Unit
To remove the Curfew Unit:
1. Disconnect the Curfew Unit from the external power source. The Curfew Unit turns off.
2. Pack the Curfew Unit into its original carrying case.