Audio HXIR Hand Held Radio Microphone User Manual User Guide
Audio Limited Hand Held Radio Microphone User Guide
Audio >
User Guide

1
Operating Instructions
HXiR Hand Held Radio Microphone Transmitter
The HXiR is the latest innovative microprocessor controlled hand held transmitter from
Audio Limited. The transmitter utilises inter-changeable, high quality condenser capsules
from the Schoeps ™ Colette range, Thereby allowing a variety of applications where
broadcast quality audio is required.
The transmitter incorporates a microphone suspension specially designed by Rycote ™,
for Audio Limited, to minimize the handling noise.
The HxiR can have up to 32 switchable frequencies over a 24MHz bandwidth.
The transmitter antenna has been integrated into the design of the battery compartment to
enhance the elegant appearance. The TX is powered from a single “AA” type 1.5 V
battery, allowing the transmitter to be used for up to two and a half hours continuously
from a good quality alkaline battery. A lithium “AA” type battery is available allowing
seven hours continuous use.
As with all previous products from Audio Limited, the transmitter has been designed for
ease of use, with all user settable functions being controlled by the unique SwitchiR.

2
Microphone Windshield
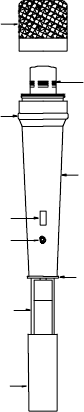
3
Microphone Capsule
+
Transmitter Body
ON / Overload Indicator
Microphone Windshield
Identifier
Infra-red Port
ON Button
Battery Compartment Cover
AA
Battery Compartment

4
Microphone Capsule
Identification Ring
Transmitter Body
Infra red Port
On Button
On/Overload Indicator
Battery Compartment
Battery Cover

5
1) Battery Access
The HXiR uses a single AA 1.5V (LR6, MN1500) type alkaline battery
which is universally available.
Grip the battery compartment cover and slide it away from the body of the
HXiR to expose the battery compartment. Fit the AA battery with the
Positive terminal uppermost and the negative terminal at the sprung end.
Close the battery cover.
Do not twist the cover.
2) Switching the transmitter ON
Press and hold the grey “ON” button found below the infra red port, for one
second. A red LED will illuminate the translucent ring above the battery
compartment.
There is no “OFF” switch on the transmitter preventing the transmitter from being
turned off accidentally. The transmitter can only be turned off via the SwitchiR, or
by disconnecting the battery.
To turn the transmitter off via the SwitchiR [Subsequent or continuous pressing
of the “ON” switch will not have any effect on the transmitter function]:
Press MENU followed by down arrow. Align the front of the SwitchiR with the
iR port on the transmitter and press OK OFF
TX
3) Selecting the operating frequency
The SwitchiR enables the user to check, and change the frequency setting
of the transmitter being addressed.
To check frequency
Step 1. Press MENU - display shows FREQUENCY
Fr
MHZ
Align front of SwitchiR with infra red port of TX
Step 2. Press OK - displays the set frequency of TX / RX
e.g. 857.950 MHZ
( Pressing the OK button downloads the
32 frequencies from the unit into SwitchiR)

6
To Change Frequency
i ) Follow Steps 1 & 2.
ii ) Press OK - display will alternatively flash between
frequency and channel number
e.g. ''''857.95'''' ''''21''''
MHZ CHANNEL
iii ) Press up/ to scroll through any of the 32 frequencies
down arrows pre-programmed into the receiver or
transmitter until desired frequency is displayed
iv ) Point the SwitchiR - directly at the infra red port of the transmitter.
v ) Press OK - to change the frequency. Display will show the new frequency
of the transmitter.
4) Setting the Gain
To Check gain setting:
AF LEVEL
i ) Press MENU followed - display will indicate: AF
by the up arrow once TX
Align front of SwitchiR with infra red port of TX
ii) Press OK - to view gain setting AF LEVEL
on transmitter, e.g.: 8
TX
To Change gain setting:
i ) Follow the above steps 1 & 2
ii ) Press OK - the display will flash the ''''AF LEVEL'''' icon
iii) Press up / down arrows - to select any one of ten gain settings
once the desired gain setting is selected,
Align front of SwitchiR with infra red port of TX
iv) Press OK - to set the new gain setting.
Note: Steps between gain settings are approximately 3 to 4 dB.
The “ON” indicator has a dual function.
The translucent ring above the battery compartment is normally illuminated while the
transmitter is switched on. This red light will turn off indicating an overload if the
microphone experiences a loud signal.

7
The gain control should be adjusted to suit the application. Set the gain position such that
the overload indicator remains illuminated during normal speech.
The HxiR transmitter uses the same ultra low distortion, fast attack, fast decay
overload compressor as found in the TX2020 pocket transmitter. In normal use,
the gain should be set so that this compressor does not operate. Should an overload
occur then the red LED will flash momentarily and the gain switch should be set
lower. In the event that overloads occur, however, the only result will be
compression rather than distortion. This means that if an interview is disturbed by
unexpected aircraft or vehicles passing for example, an otherwise useless recording
is rendered useable. The fast recovery of the compressor means that one does not
have the problems of feedback associated with automatic gain controls in hand held
radio microphone transmitters which are constantly varying their own gain.
With the wide dynamic range of the system, however, it is always possible to
set the gain control so that the compressor never operates. It is present only for the
unexpected.
5) Setting the Low Frequency Cut Filter
The LF cut filter gives approximately 10dB cut at 50Hz to reduce handling and wind n To
Check status of low frequency filter:
i ) Press MENU
ii ) Press Up arrow twice - display will indicate LF Cut
TX
Align front of SwitchiR with infra red port of TX
iv) Press OK - to view the present status of the LF cut filter e.g.: On
To Change the filter setting:
i ) Follow the above steps
ii ) Press OK - the display will flash ''''On''''
iii ) Press Up/down
arrows - to toggle between the On / Off settings.
Once desired setting is reached.
Align front of SwitchiR with infra red port of TX
iv ) Press OK - to set the new LF Cut status.
6) Battery Status
The battery status of the transmitter is checked via the SwitchiR
8
Battery Level Transmitter
To Check status of battery in transmitter:
i ) Press MENU
ii ) Press Up arrow three times - display will indicate BAtt
TX RX
Align front of SwitchiR with infra red port of TX
iii )Press OK - display will show the battery status volts
The transmitter battery status is also conveyed to the receiver. When checking
The battery status via the receiver, the SwitchiR display will alternate between the
Receiver voltage and the received transmitter battery status.
The display will indicate:-
HH – High / Good battery
TX
LL – Low battery
TX
FF – Fail / Replace battery
TX
Battery life - 2.5 hours typical with a good alkaline battery / - 7 hours lithium battery.
7) Infra red Disable
For live performances or situations requiring a higher degree of protection from an
accidental change of settings, the infra red port on the transmitter can be disabled.
This action will prevent all communication to the transmitter
The only way to re-activate the infra red port is by disconnection of the battery, thereby
performing a hard reset.
To disable the infra red port:
i) Press MENU
ii) Press Down arrow twice display will indicate ‘diSABLE “ Ir ? ‘

9
8) Antenna
The transmitter antenna is integrated into the battery compartment and therefore no
external antenna is required.
9) Microphone Capsule
The HXiR transmitter utilises the high quality inter-changeable condenser capsules from
the Schoeps ™ Colette range. The HxiR is compatible with the full range of capsules
and accessories in the range.
10) Fitting capsule
Unscrew the metal windscreen (1) from the top of the transmitter. Fit the appropriate
capsule taking care not to over tighten the capsule (2). Replace the windscreen.
Setting up the HXiR
∙Fit the battery
∙Press “on” switch till indicator illuminates
∙Check transmitter frequency corresponds to that of the receiver.
∙Set gain
∙Set LF Cut if required
∙Check that the receiver’s ‘No signal’ indicator is not illuminated.
Holding the HXiR
The HXiR should be held above the illuminated ‘on’ indicator ring (6). This will
Enable the maximum power radiation from the integrated antenna in the transmitter
compartment (7). Holding of the HXiR over the battery compartment (7) will impair the
range of the transmitter, and should be avoided.
Note: The HXiR transmitter will retain the last settings of frequency, gain, LF status even if
the battery is removed from the transmitter. The information is stored in the non-volatile
Memory of the HXiR
The capsule mounting has been specially designed by Rycote™, to minimize the
handling noise.
The transmitter is supplied with six coloured identifying rings to aid recognition in
multi-channel use.
The ring also prevents the transmitter from rolling when placed on a table or other such
surface, due to the specially designed flat areas on the ring.
Infra red Disable
For live performances or situations requiring a high degree of protection from an
10
Accidental change of settings, the infra red port on the transmitter can be disabled.
The only way to re-activate the infra red port is by disconnection of the battery thereby
performing a hard reset.