Authinx VT42A Remote Music Player User Manual Exhibit D Users Manual per 2 1033 b3
Authinx Inc. Remote Music Player Exhibit D Users Manual per 2 1033 b3
Authinx >
Exhibit D Users Manual per 2 1033 b3
VT42A
VR38A
UR89A
OWNER’S MANUAL
RR
RR
REMOTEEMOTE
EMOTEEMOTE
EMOTE M M
M M
MUSICUSIC
USICUSIC
USIC
PP
PP
PLALA
LALA
LAYERYER
YERYER
YER
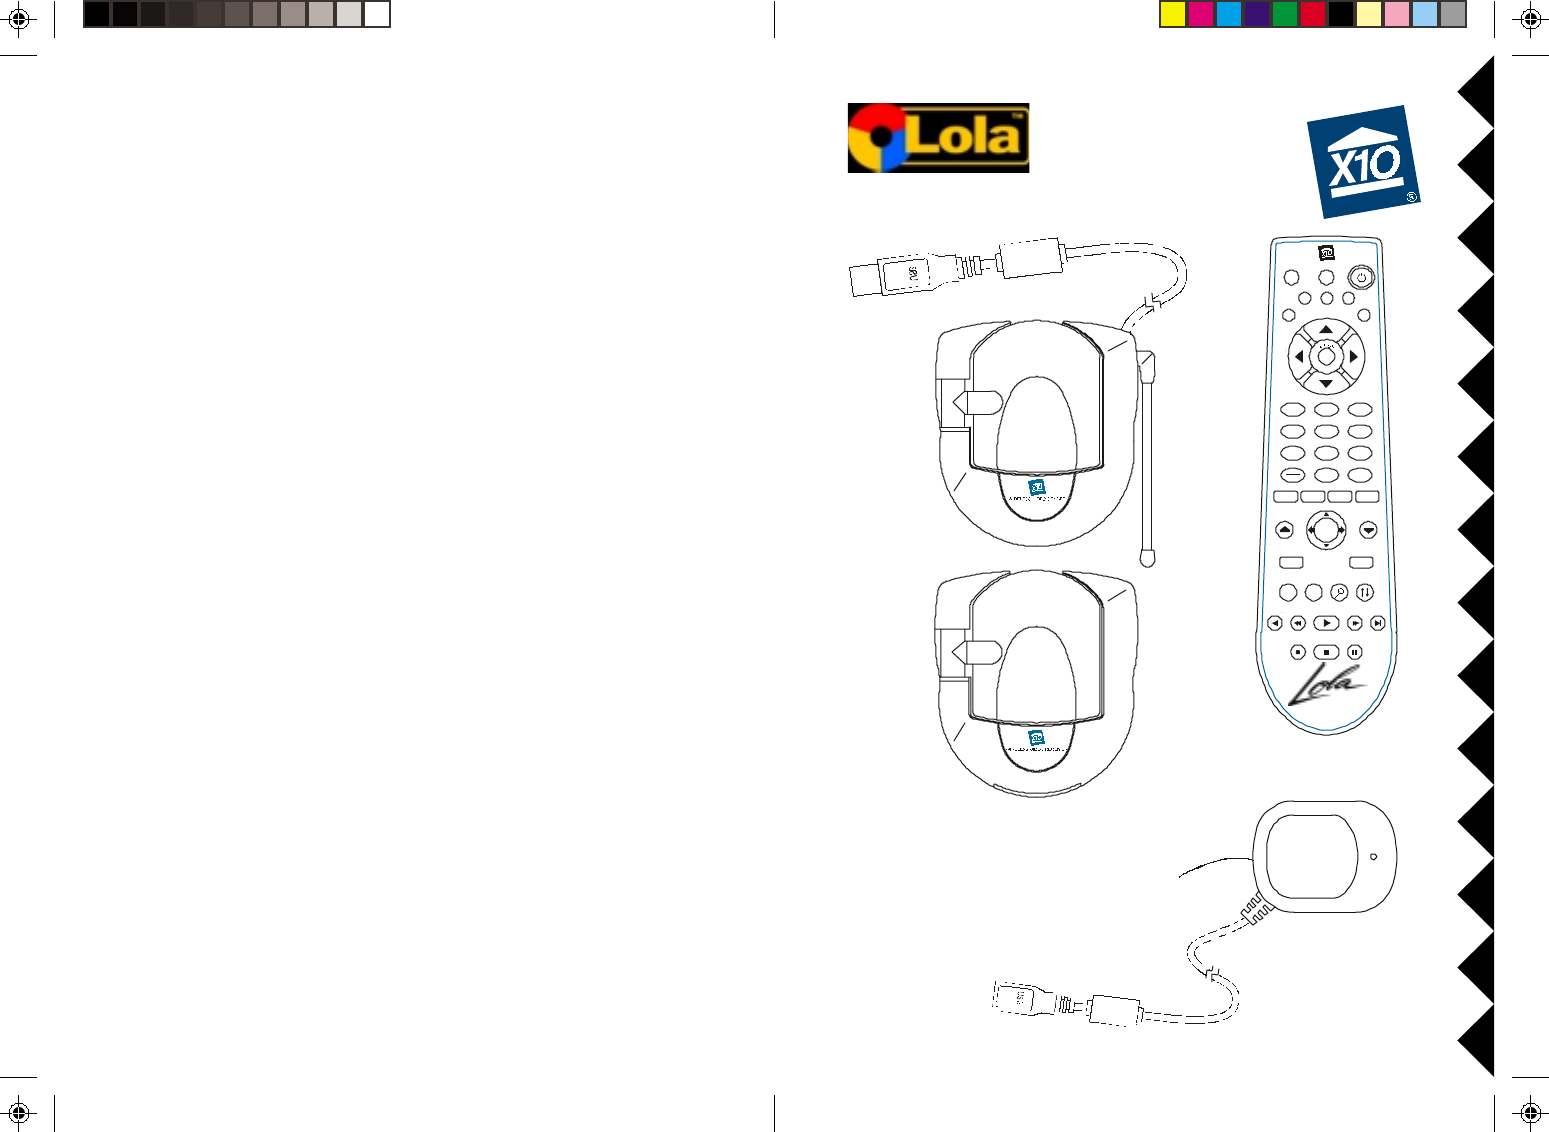
CM19A
Basic Model, MK10A
(UR89A + CM19A)
Deluxe Model, MK11A
(UR89A + VT42A + VR38A)
AUDIO PC
LEARNSETUP
CH+
TOP FI NDEND
SCAN SCAN+F. FPLAYREW
PAUSESTOPREC
CH
VOL
P LAY LI ST P LAY IN G
ALBUM
VOL +
M
A/B
Add
Delete
ENTER
G ENR E T RAC KARTI ST
TV X10
All Lts on
on
off
brt
dim
PAGE
UP
PAGE
DOWN
12
5
8
0
ABC
JKL
TUV
3
6
9
DEF
MNO
WXYZ
4
GHI
PQRS
7
SELECT
TE
CBL
32
CONTENTS
Introduction ................................................................................................... 3
Basic System ................................................................................................ 4
Deluxe System .............................................................................................. 5
Installing the Software .................................................................................. 6
Basic System ........................................................................................... 6
Deluxe System ......................................................................................... 7
Operation ...................................................................................................... 8
Media Manager ....................................................................................... 8
Using Lola ..............................................................................................10
Using the Remote ....................................................................................... 12
Installing the batteries ............................................................................ 12
Button Descriptions ............................................................................... 13
Connecting up the Audio/Video Sender (Deluxe System only) .................. 14
Connecting up the Audio/Video Receiver (Deluxe System only) ............... 15
Advanced Options ...................................................................................... 17
Using the Remote to Control Your TV/Audio system ........................... 17
Code Search .......................................................................................... 17
Code Identification ................................................................................. 18
Learning Codes...................................................................................... 18
Code List ............................................................................................... 19
Home Control ............................................................................................. 22
Controlling X10 Modules ....................................................................... 23
Changing the Remote’s Housecode ....................................................... 24
Changing the Remote’s Master Code. .................................................. 24
Fine Tuning Your System ............................................................................ 25
Troubleshooting ........................................................................................... 26
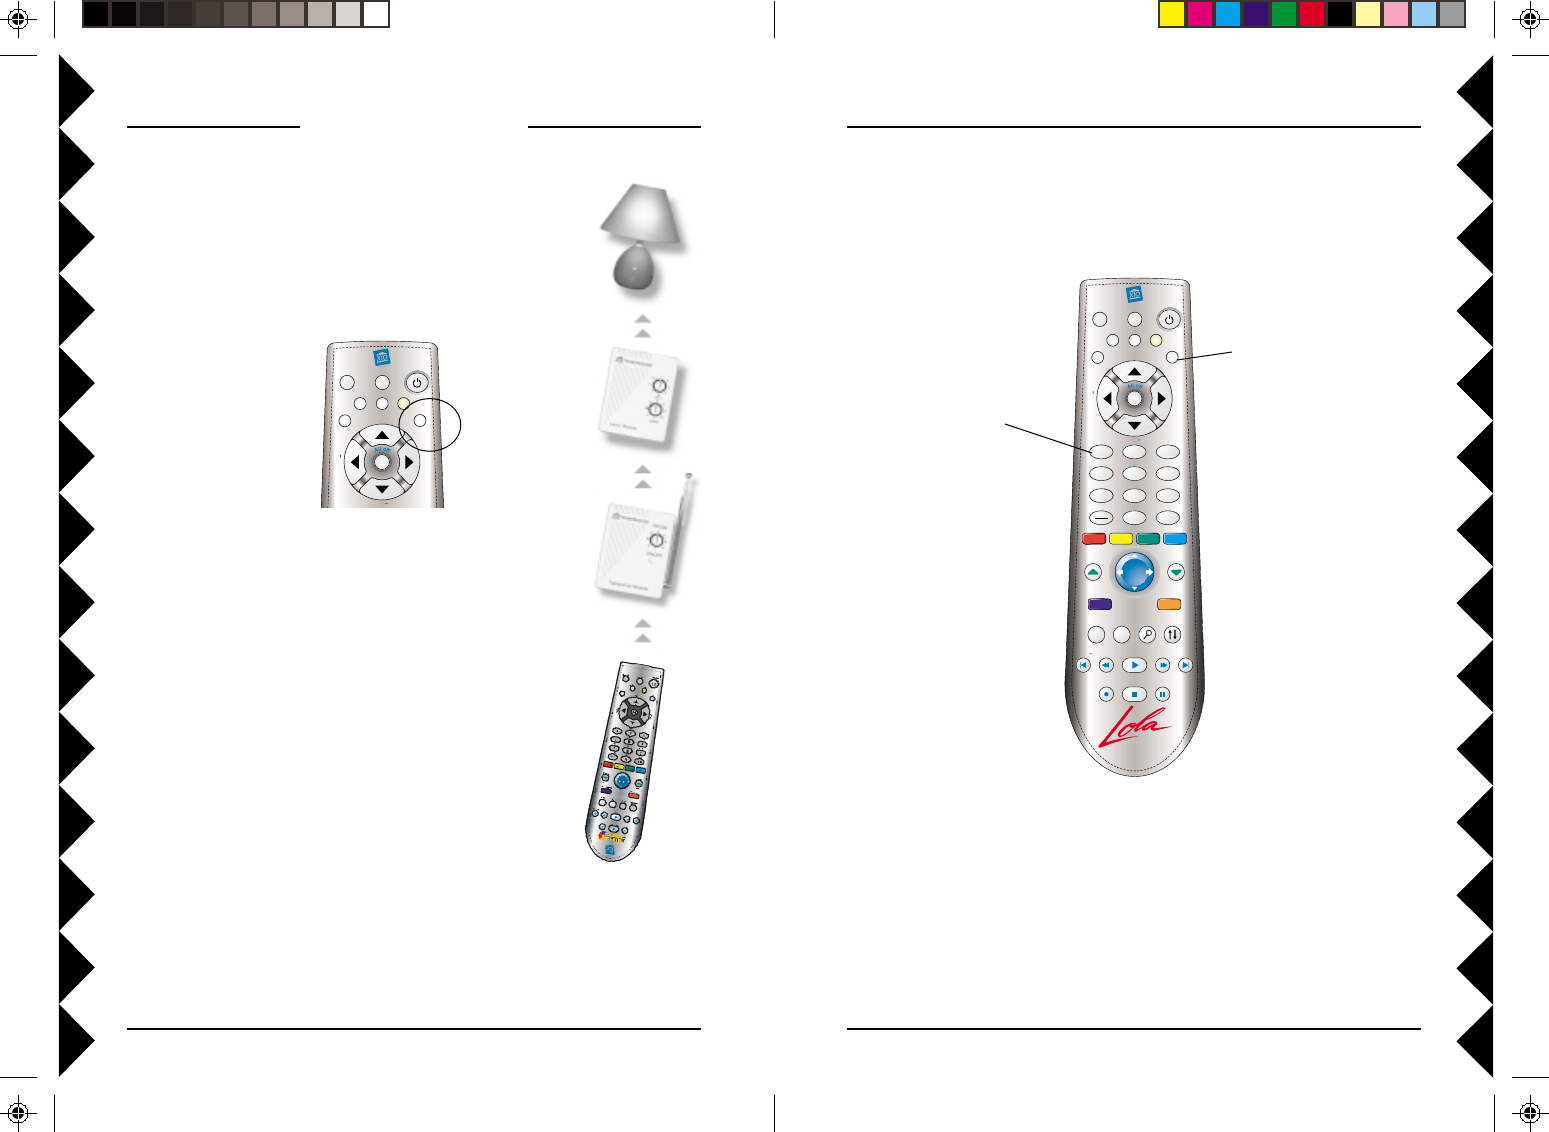
INTRODUCTION
Your Lola™ Wireless Audio/Video Sender kit consists of a Sender which
connects to the video and audio output jacks on your PC, and a Receiver
which you connect to your TV and/or audio system. It includes the Lola
software program that you install from X10’s Web Site. You control the
Audio/Video Sender and software using a remote control (included). The
Sender converts the audio and video signals from your PC into wireless
Radio Frequency (RF) signals and transmits them (even through walls) to
the Receiver. The Receiver converts the signals back to their original form
and passes them to your TV and/or audio system. The Lola software
application lets you listen to audio files stored on your computer’s hard
drive, in a variety or formats (MP3, wma, rm, wav, etc.), on any TV or
audio system in your home, and you can control everything using the remote
control while sitting in front of your TV.
54
Sound Card
Video Card
USB Port
VGA Out
TV
To video in on VT42A
To audio in on VT42A
VT42A
A/V Sender
VR38A
A/V Receiver
UR89A
Wireless
Remote
100 ft.
100 ft.
The remote controls the Lola application in your PC via the receiver built
into the VT42A. The VT42A connects to your PC’s USB port.
The VT42A sends the sound and picture from your PC to the VR38A that
you connect to a TV anywhere in your home. This lets you view the Lola
application on your TV, hear the music files stored in your PC on your TV’s
speakers, and control the Lola application while sitting in front of your TV
with the remote.
Or you can connect the VR38A receiver to your audio system, view Lola
on your PC’s monitor and listen to the music files stored in your PC on the
speakers connected to your audio system.
The Deluxe System includes the UR89A remote control, a VT42A
Wireless Audio/Video Sender with built in USB PC Receiver, a Wireless
Audio/Video Receiver, and the Lola software, and all connecting cables.
Sound Card
USB Port
VGA Out
The Basic System includes the UR89A remote control, a CM19A USB
PC Receiver, the Lola software, and all connecting cables.
To your PC’s monitor.
To your PC’s speakers.
CM19A
Receiver
UR89A
Wireless
Remote
100 ft.
The remote controls the Lola application in your PC via the CM19A
receiver. The CM19A connects to your PC’s USB port.
This lets you view the Lola application on your PC, and listen to audio files
through your PC’s speakers. You can also directly connect the video and
sound outputs from your PC to a TV using the RCA, S-Video, and Audio,
jacks and cables. All connecting cables are included.
AUDIOPC
LEARNSETUP
CH +
TOPFIND
END
SCAN
SC
AN
+F.F
PLAY
REW
PAUSESTOPREC
CH
VOL
PLAYLI
S
T
PLAYING
ALBUM
VO L+
M
A
/
B
A
dd
Dele te
ENTER
G
ENRE TRA
C
KARTI
S
T
TV X10
All L
ts
o
n
on
off
brt
dim
PA
G
E
UP
PA
G
E
D
O
WN
12
5
8
0
ABC
JKL
TUV
3
6
9
DEF
MNO
WXYZ
4GHI
P
Q
R
S
7
SELECT
TE
C
BL
AUDIOPC
LEARNSETUP
CH +
TOP
FIND
END
SCAN
SC
AN
+F.F
PLAY
REW
PAUSESTOPREC
CH
VOL
PLAYLI
S
T
PLAYING
ALBUM
VO L+
M
A/ B
A
dd
Dele te
ENTER
GENRE
TRACK
ARTIST
TV X10
All L
ts
o
n
on
off
brt
dim
PA
G
E
UP
PA
G
E
D
O
WN
12
5
8
0
ABC
JKL
TUV
3
6
9
DEF
MNO
WXYZ
4GHI
P
Q
R
S
7
SELECT
TE
C
BL
76
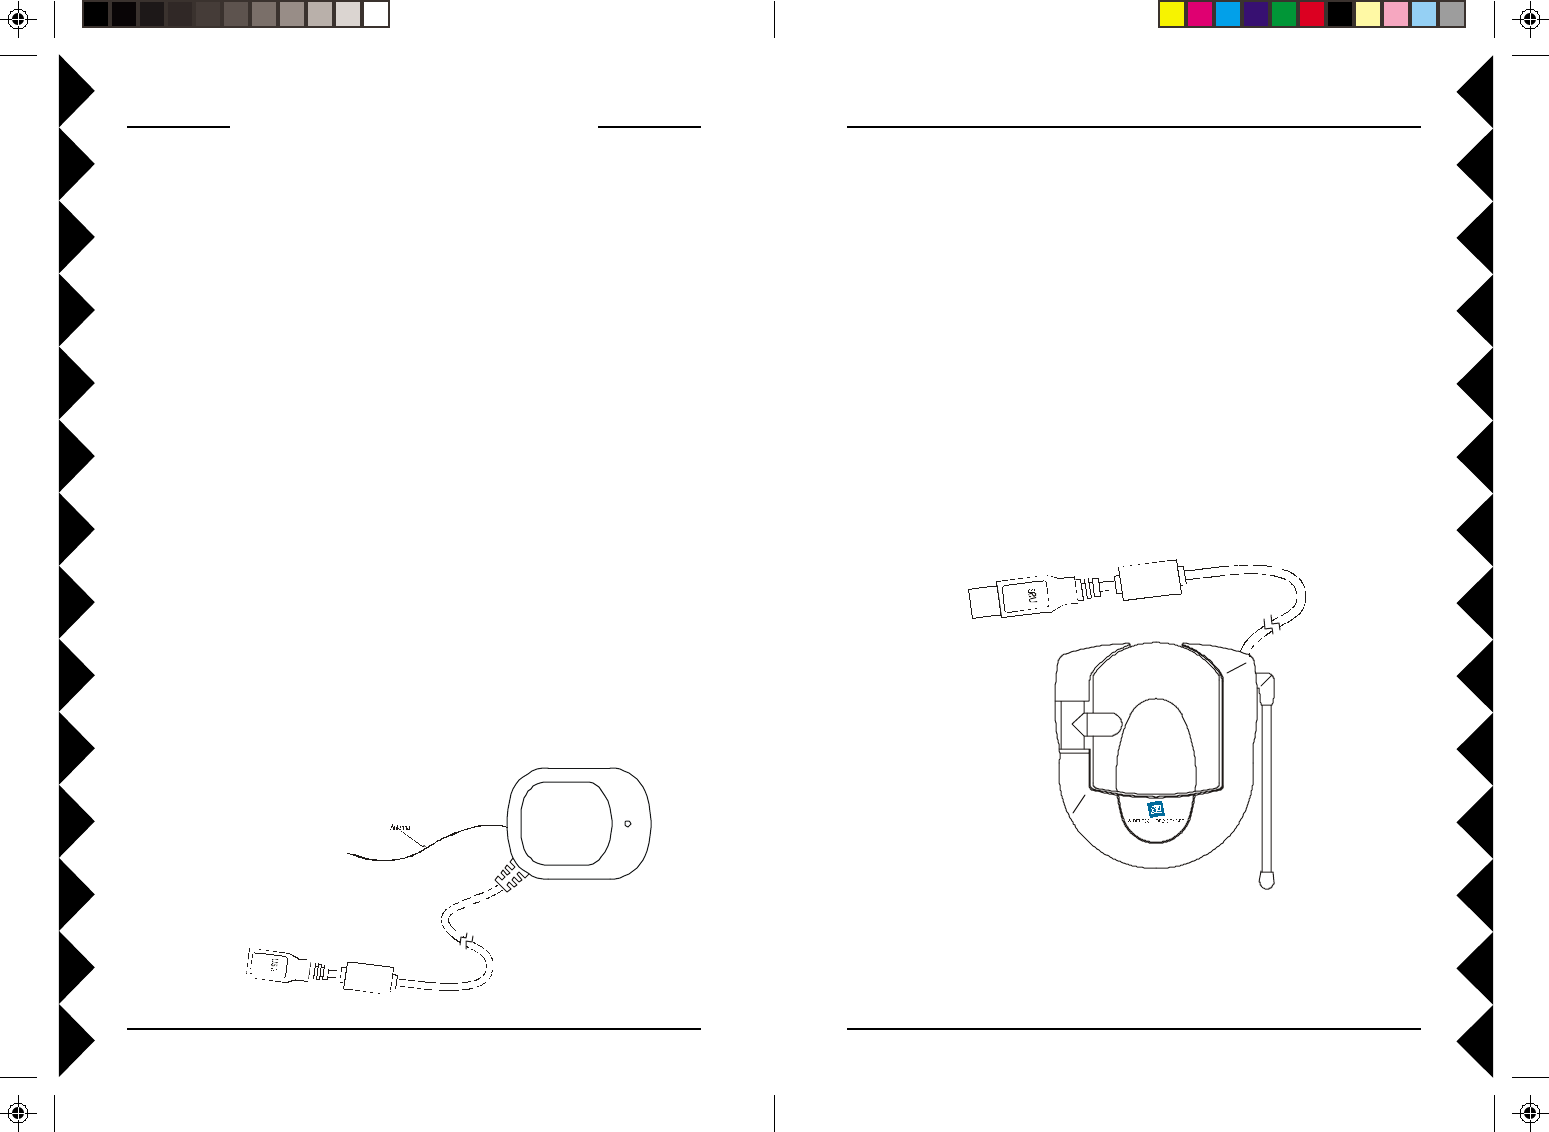
SOFTWARE INSTALLATION FOR DELUXE SYSTEM (VT42A)
Before you install the software, unpack the hardware components and have
the Sender (Model VT42A) near your PC ready to connect it up when the
Lola software installation program instructs you to do so.
IMPORTANT: Do NOT connect the USB connector before you
install the software.
Log on to the Internet and go to the web address in the e-mail you received
when your order was confirmed (or visit www.x10.com/software). There
you will be able to install the software (you need to be connected to the
Internet while you install the software). Follow the instructions to install it.
At the appropriate point in the installation you will be instructed to plug the
Sender’s USB connector into your PC’s USB port. When you do this,
Windows® will tell you it has found new hardware and will automatically
install the X10 USB driver for the Sender. Follow the instructions to
complete the software installation.
USB connector
Do not connect to
your PC until you
install the Lola
software. Model
VT42A
Windows® is a registered trademark of Microsoft Corporation.
After the software installation is complete, connect the VT42A’s power
supply to the jack on the back of the unit and plug the power supply into an
AC outlet. Make sure the switch on the side of the unit is ON.
Model CM19A
INSTALLING THE SOFTWARE
Basic vs Deluxe Systems
The Basic System includes the UR89A remote control, a CM19A USB
PC Receiver, the Lola software, and all connecting cables.
The Deluxe System includes the UR89A remote control, a VT42A
Wireless Audio/Video Sender with built in USB PC Receiver, a Wireless
Audio/Video Receiver, the Lola software, and all connecting cables.
Go to page 12 if you purchased the Deluxe System.
SOFTWARE INSTALLATION FOR BASIC SYSTEM (CM19A)
Before you install the software, unpack the hardware components and have
the USB Receiver (Model CM19A) near your PC ready to connect it up
when the Lola software installation program instructs you to do so.
IMPORTANT: Do NOT connect the USB connector before you
install the software.
Log on to the Internet and go to the web address in the e-mail you received
when your order was confirmed (or visit www.x10.com/software). There
you will be able to install the software (you need to be connected to the
Internet while you install the software). Follow the instructions to install it.
At the appropriate point in the installation you will be instructed to plug the
Receiver’s USB connector into your PC’s USB port. When you do this,
Windows® will tell you it has found new hardware and will automatically
install the X10 USB driver for the CM19A. Follow the instructions to
complete the software installation.
USB connector
Do not connect to
your PC until you
install the Lola
software.
98
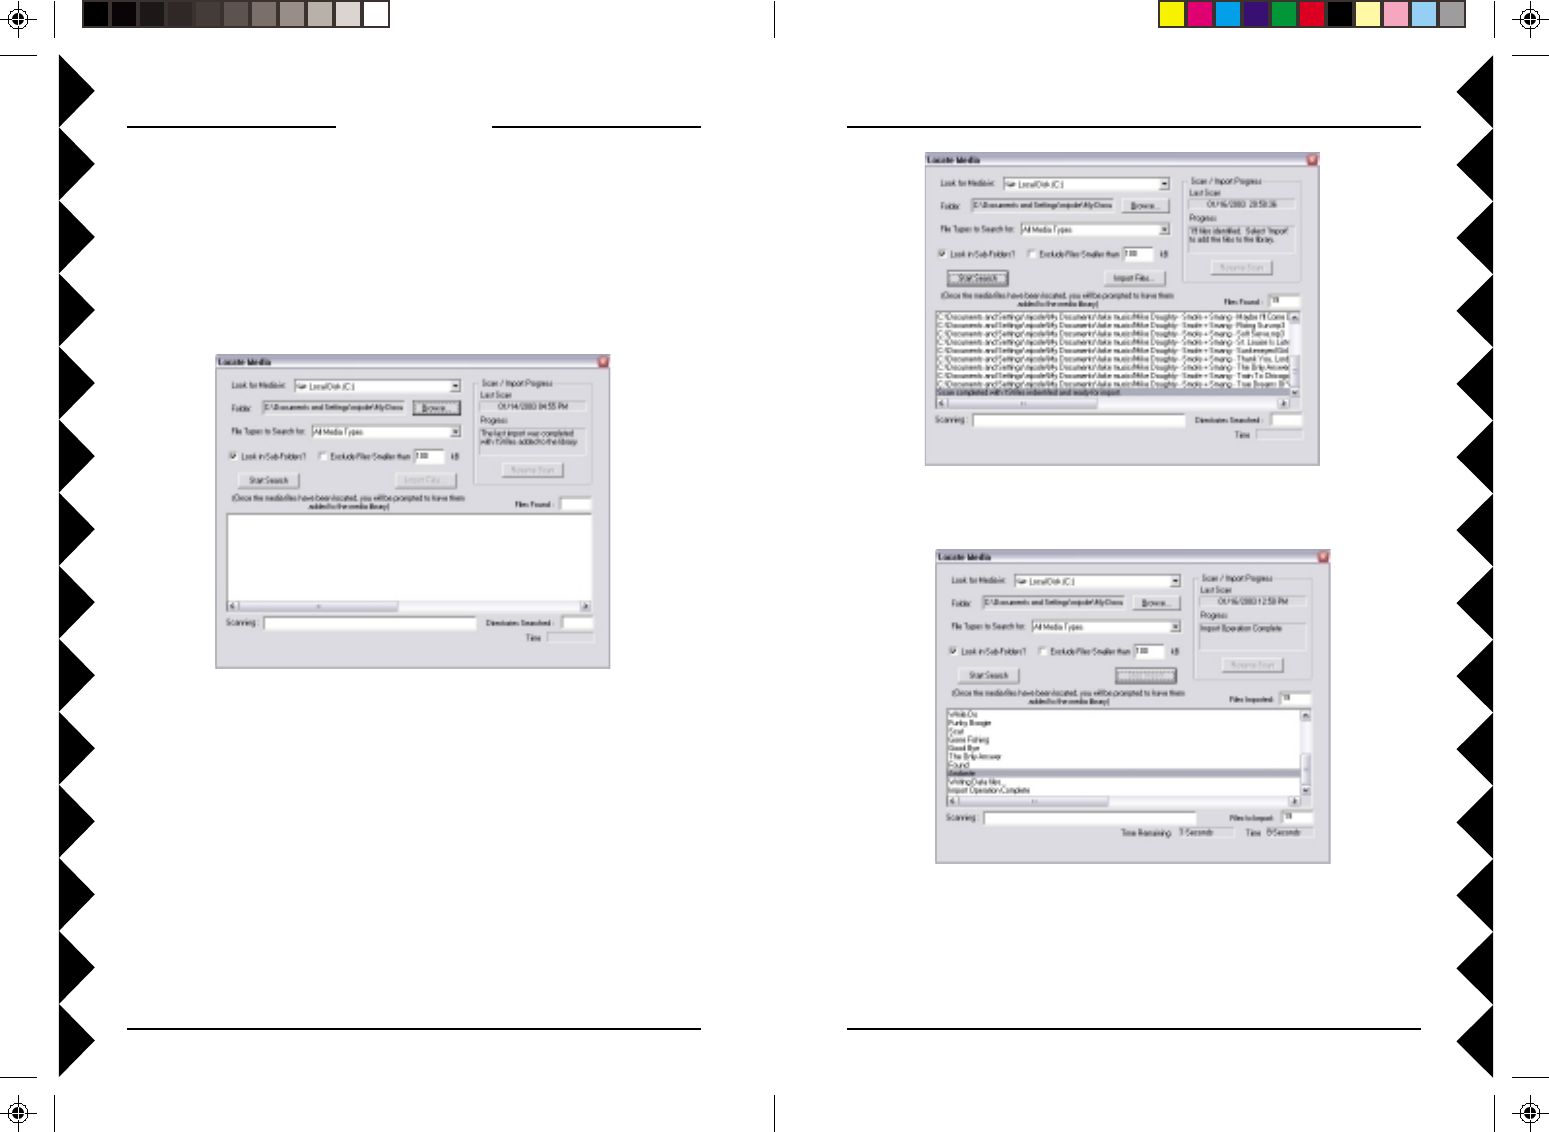
MEDIA MANAGER
Before using Lola you will need to use Media Manager to scan your
computer for music files and import them into Lola. Lola then uses that
information to display your music in an easy to use format that can be
accessed by remote control from anywhere in your home. Select Run
Media Manager from the Lola folder under your Windows Start button.
Select Scan Computer for Media from the Tools menu. A screen like the
one below appears.
OPERATION
Click on the Browse button to find the location that you store your music
files (if desired), then click on Start Search. Or scan your entire computer
by clicking on Start Search.
Media Manager searches your computer for music files and lists them as
they are found.
After Media Manager files all your music files, click on Import Files.
After you’ve imported all your music files into Lola, exit the Media
Manager and run Lola.
Note you can also right-click on the screen while Lola is running and select
Run Media Manager.
1110
LEARN
SETUP All Lts on
CH+
TOP FINDEND
SCAN SCAN+
F.FPLAYREW
PAUSESTOPREC
CH
VOL
PLAYING
ALBUM
SELECT
VOL+
M
1 2
5
8
0
ABC
JKL
TUV
3
6
9
A/B
DEF
MNO
WXYZ
4
GHI
Add
Delete
GENRE TRACK
ARTIST
AUDIO
TV
PC
X10
on
off
brt
dim
PAG E
DOWN
PQRS
7
TE
ENTER
PLAYLIST
PAG E
UP
CBL
Select your favorite tracks from any album, play them in order, or out of
sequence. Create your own albums and Play Lists.
You can use Media Manager included with Lola to search the Internet for
the album covers for the albums you import into Lola and displays them on
screen.
When used with X10’s 2.4 GHz Audio/Video Sender, you can display the
above on any TV in your home. This lets you sit in front of your TV and
select and play all the music stored in your PC using the remote control.
You can hear your music through your TV’s speakers, through a surround-
sound system connected to your TV, or you can send the music to your
stereo system - with no wires!
See Lola’s Help for more information.
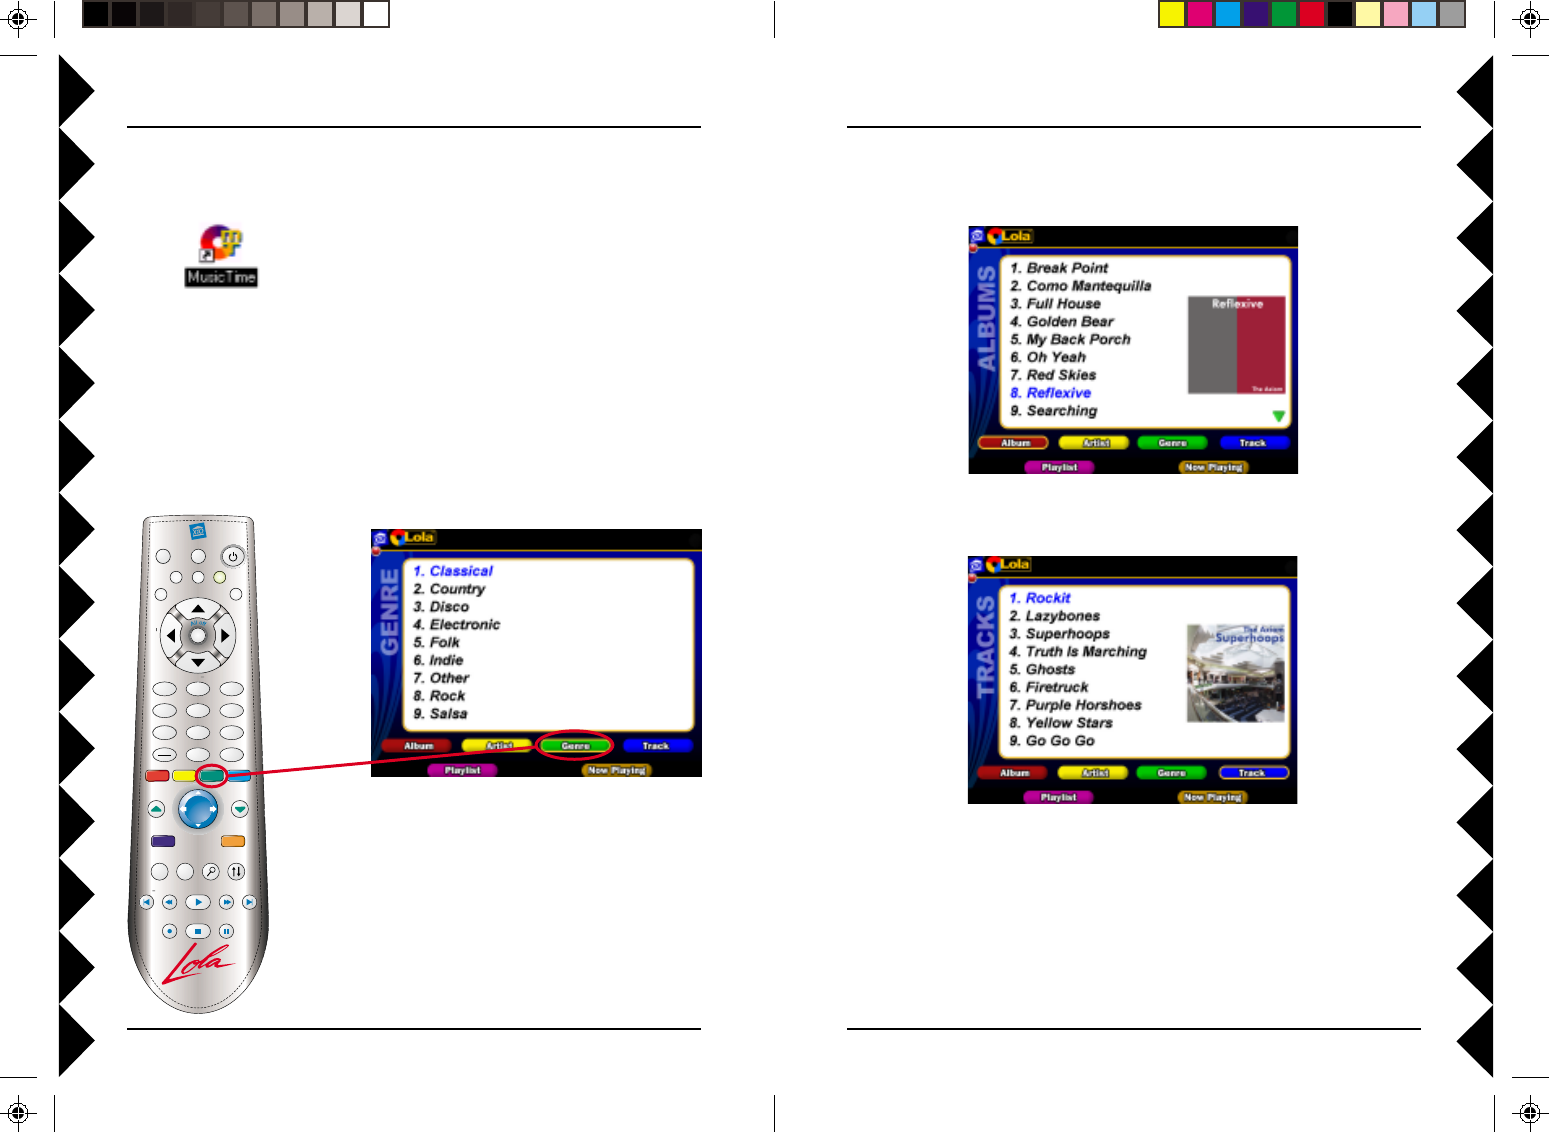
Press the Genre button on the remote. A screen similar to the one below
appears on your PC’s screen.
The software displayed on your PC lets you select
music by Album, by Artist, by Genre (Rock, Jazz,
Country, etc.) or you can list all your tracks in
sequence. You can also create and display your
own Play Lists. The buttons on the remote match
the categories shown on your PC screen.
USING LOLA
After you’ve installed the Lola software, connected up the hardware, and
turned on your PC, the Lola shortcut icon shown below appears on your
desktop.
Double-click on the Lola shortcut icon on your desktop to launch Lola. If
you don’t see the icon, run Lola from the Windows Start button.
If during installation you chose to have the Lola Controller run at startup,
you can simply press the Power button on the remote to launch Lola.

1312
BUTTON DESCRIPTIONS
Setup Used to setup the remote to control your TV or audio system (see page xx):
Learn Learns TV/Audio codes not in the remote’s library (see page xx):
Power Hides/Reopens Lola. Also operates your TV/Stereo.
PC, TV, Audio Changes the remote’s control from Lola, to TV, to audio system,
respectively.
X10 Used for Home Control functions.
0-9 Selects track numbers directly.
Add/Delete Marks a track to be added to a playlist, or excluded from play.
A/B Selects input mode on your TV.
Album, Artist, Genre, Track Selects how you want to display/select your music
files.
Up, Down, Left, Right Arrows Moves around the current list displayed. Works like
a joystick.
Enter Opens the current selection. (Like pressing joystick button).
Page Up and Down Moves up and down through screens.
Playlist Displays your play lists.
Playing Displays info on the track that’s playing.
Top, End, Find, Order Used to move around within, and organize your music files.
Top and end go to the top and end of a list. Find lets you find albums/artists/tracks
by name using the ABC, DEF, etc., on the numeric buttons (like you enter names on
a cell phone). Order lets you rearrange the order of albums/artists/tracks.
Play, Stop, Pause, FF, REW, Scan+/- Used like you would use on your CD player.
Play Plays the currently highlighted selection. Also, with Add/Delete, used to
exclude a track from play.
Record Saves the track exclusion for every time Lola is run.
See the help in the Lola software for more information. To access the help, right-
click your mouse button while at your PC.
INSTALL THE BATTERIES IN THE REMOTE.
Push the tab and lift
off the battery cover.
Insert four AAA alkaline
batteries, taking care to
match the + and - marks in
the battery compartment.
USING THE REMOTE
The Lola Remote works with the CM19A Receiver (Basic system) or
VT42A Receiver/Transmitter (Deluxe system). The remote sends
commands to the Receiver which is connected to your PC. This lets you
access all the features of the Lola application from the comfort of your
easy chair.
Press the corresponding button on the remote (color matched to the buttons
on the screen) to view your music files by Album, by Artist, by Genre
(Rock, Jazz, Country, etc.) or to list them all by track.
Press the Playlist button to view playlists that you previously set up in Media
Manager.
Press Now Playing to view details on the track you’re currently playing.
Use the up and down cursor keys on the remote to navigate around each
screen and then use Play, Stop, Pause, etc. when you select the Album,
Artist list, Genre, or playlist that you want to play.
LEARN
SETUP All Lts on
CH+
TOP FINDEND
SCAN SCAN+
F.FPLAYREW
PAUSESTOPREC
CH
VOL
PLAYING
ALBUM
SELECT
VOL+
M
1 2
5
8
0
ABC
JKL
TUV
3
6
9
A/B
DEF
MNO
WXYZ
4
GHI
Add
Delete
GENRE TRACK
ARTIST
AUDIO
TV
PC
X10
on
off
brt
dim
PAG E
DOWN
PQRS
7
TE
ENTER
PLAYLIST
PAG E
UP
CBL
1514
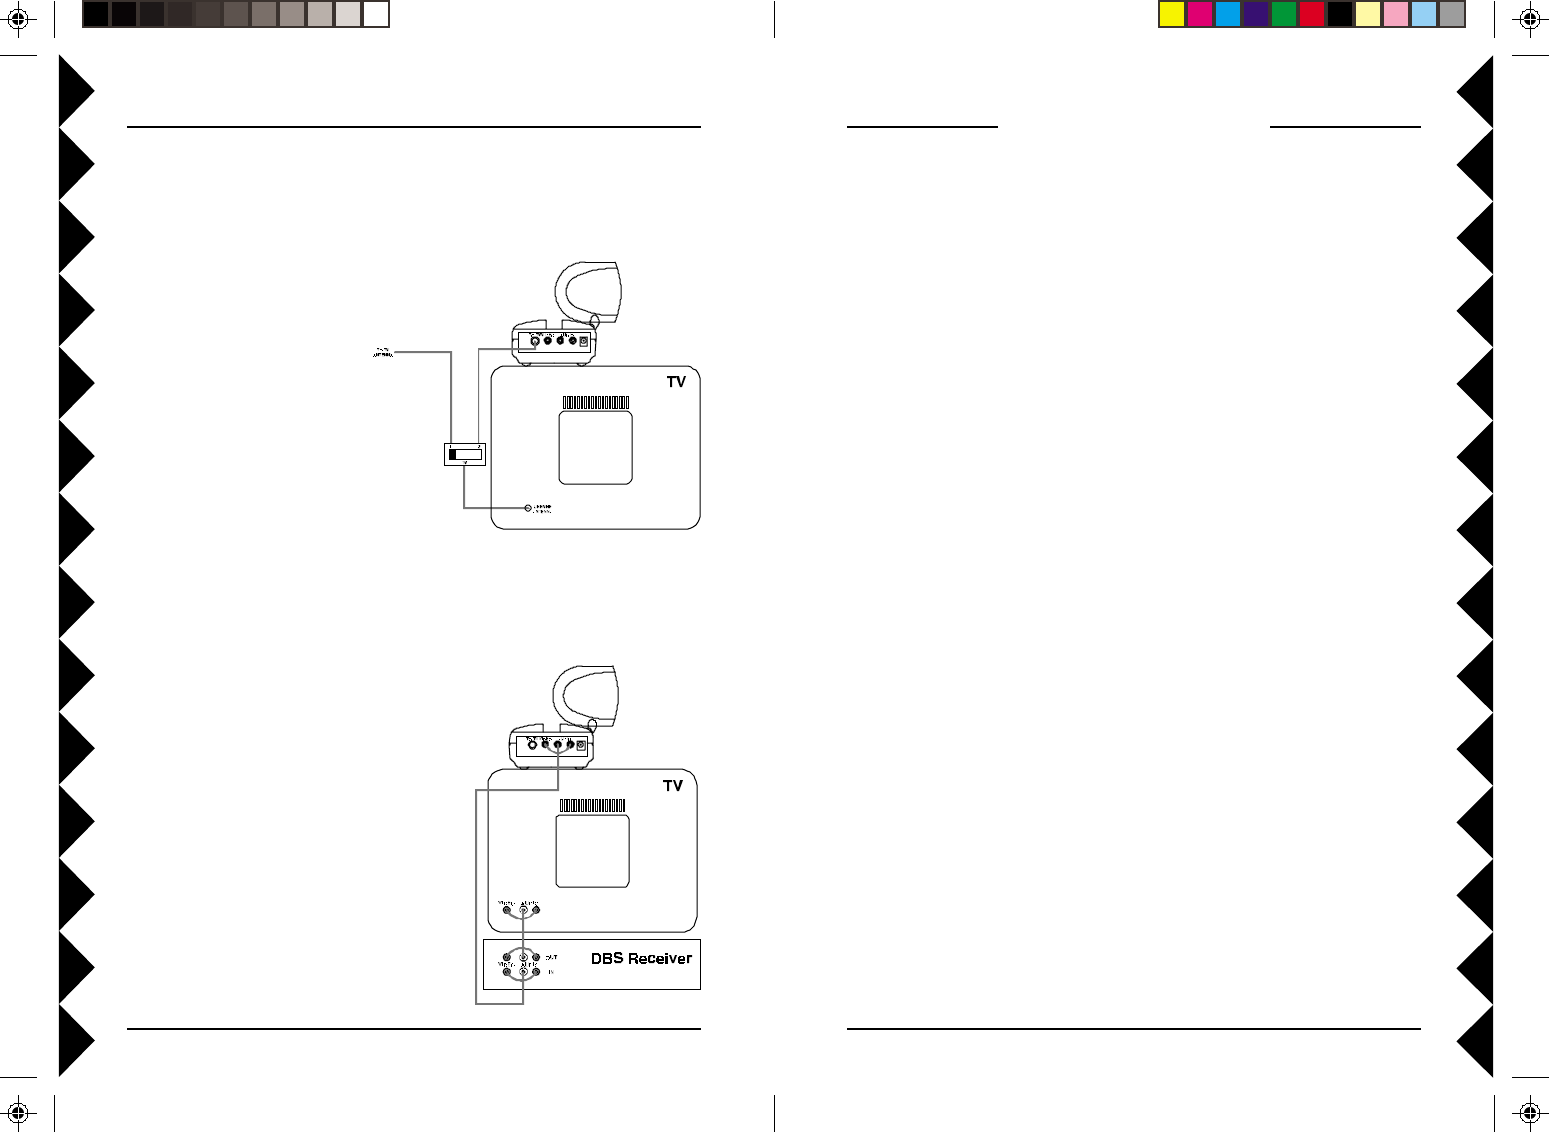
1. Connect a set of Audio/Video cables to the A/V OUT jacks on the A/V
Receiver. Connect the other end to your TV.
2. Plug the Audio/Video Receiver’s Power
Supply into a 120 volt wall outlet and
plug its jack into the Audio/Video
Receiver.
3. Turn power switch on (on side of unit).
4. Position the Audio/Video Receiver in a
convenient location such as on top of the
TV and orient the antenna so that the
flat side points in the direction of the
room where you set up the Audio/Video
Sender.
CONNECTING UP THE RECEIVER
Connecting the receiver to your TV lets you see the picture displayed on
your PC’s monitor on a TV located up to 100 ft. away from your PC.
2.4 GHz Video Antenna
TV Output
Connector
Power Supply Jack
2.4 GHz Channel Switch
(on bottom)
TV Channel Switch
(on bottom)
ON-OFF
Switch
A/V Output Jacks
(SKIP PAGES 14 THRU 16 IF YOU HAVE THE BASIC SYSTEM)
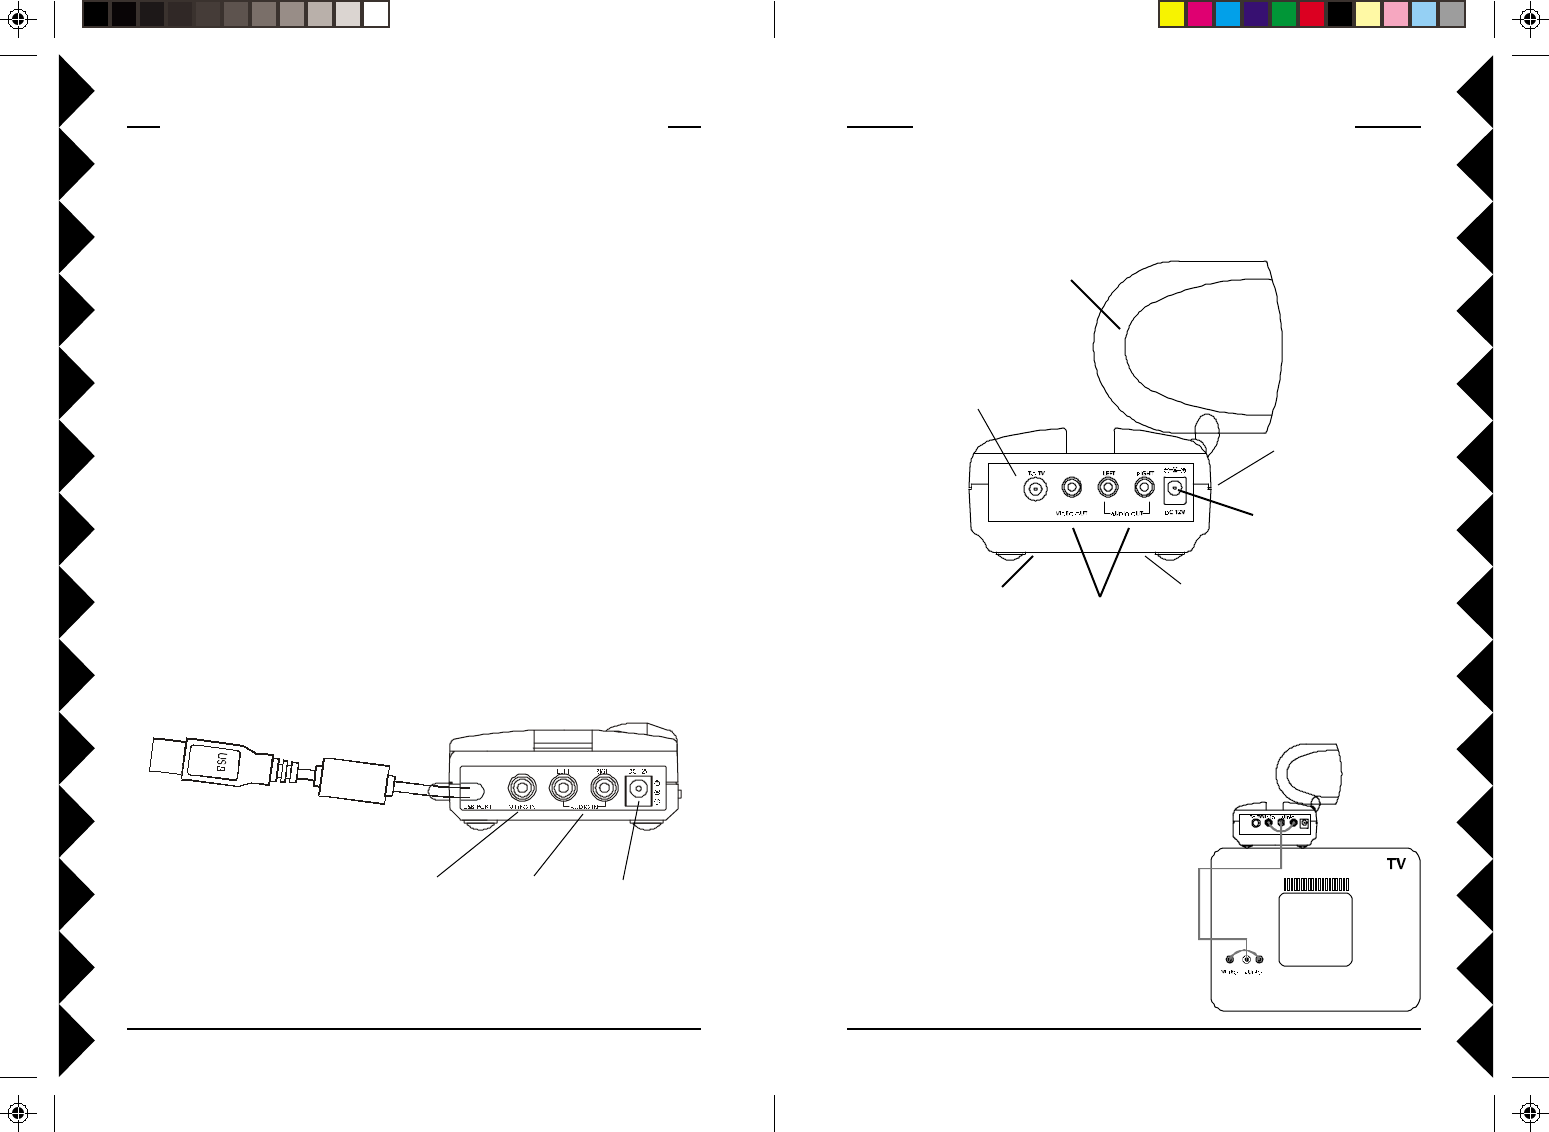
1. Connect the jack on the audio cable (supplied) to the speaker/headphone
jack, or line out jack on your PC’s sound card. Use adapter if needed.
2. Connect the red RCA plug to the jack labelled AUDIO RIGHT and the
white RCA plug to the jack labeled AUDIO LEFT on the A/V Sender.
3. Connect the yellow RCA plug on the supplied video cable to the Video
out jack from your PC. If your PC has an S-Video Out jack you can use
the supplied adapter.
4. Plug the other end of the video cable (yellow plug) to the video IN jack
on the A/V Sender.
5. Set the channel switch (on the TOP of the unit) to channel A (to the
RIGHT).
6. Plug the A/V Sender’s Power Supply into a convenient 120 volt wall
outlet and plug its jack into the Audio Sender.
7. Turn the power switch (on the side of unit) on.
8. Position the A/V Sender in a convenient location and orient the antenna
so that the flat side points in the direction of the room where you will be
installing the Receiver.
CONNECTING UP THE AUDIO SENDER
STOP!
IMPORTANT: Do
not connect USB
connector to your
PC until you install
the software (see
page 7).
To Video out
on your PC.
To Audio out
on your PC.
To plug-in
power supply.
1716
ADVANCED OPTIONS
Using the remote to control your TV or Cable Box or
Audio System
The remote can be set up to control the volume, channel etc. on your TV or
audio system as follows.
1. Turn on the device you want to control (TV, Cable Box or Audio
system).
2. Press and release mode button for the device you want to control (TV,
Cable, or Audio).
3. Press and hold SETUP until the green LED indicator under the button
you pressed in step 2 lights steadily. Release SETUP.
4. Enter the 3 digit Code from the Library Code Table on page 17. The
LED turns off after the last digit entered.
5. Point the remote at the device and press the POWER button. Your
device should turn off.
Code Search.
If you can’t find the code for your device in the Code List you can search
for it:
1. Turn on the device you want to control (TV, Cable, or Audio system).
2. Press and release mode button for the device you want to control (TV,
Cable, or Audio).
3. Press and hold SETUP until the green LED indicator under the button
you pressed in step 2 lights steadily. Release SETUP.
4. Press the CH+ (or Power) button on the remote repeatedly until your
TV changes channel (or your Audio device turns off). If you overshoot
you can press Ch -.
5. When you device responds, press Mute to install the code.
II
II
IFF
FF
F
YY
YY
YOUROUR
OUROUR
OUR TV TV
TV TV
TV ISIS
ISIS
IS
ALREADALREAD
ALREADALREAD
ALREADYY
YY
Y
HOOKEDHOOKED
HOOKEDHOOKED
HOOKED
UPUP
UPUP
UP
TT
TT
TOO
OO
O
AA
AA
A S S
S S
SAA
AA
ATELLITETELLITE
TELLITETELLITE
TELLITE R R
R R
RECEIVERECEIVER
ECEIVERECEIVER
ECEIVER
OROR
OROR
OR
OO
OO
OTHERTHER
THERTHER
THER
A/V A/V
A/V A/V
A/V DEVICEDEVICE
DEVICEDEVICE
DEVICE
If a Satellite Receiver or other A/V
component is connected to your TV using
Audio/Video cables, you can connect the
Audio/Video Receiver to the free LINE IN
jacks on the component. If there are no
LINE IN jacks, you will need to use a TV
antenna splitter as described above.
CONNECTING UP THE RECEIVER, CONT.
II
II
IFF
FF
F
YY
YY
YOUROUR
OUROUR
OUR TV TV
TV TV
TV DOESDOES
DOESDOES
DOES
NONO
NONO
NOTT
TT
T
HAHA
HAHA
HAVEVE
VEVE
VE A/V A/V
A/V A/V
A/V CONNECTCONNECT
CONNECTCONNECT
CONNECTORSORS
ORSORS
ORS
You can use the supplied
coaxial cable to connect the
TV OUT socket on the Audio/
Video Receiver to the Antenna
input on your TV. If you
already have an antenna
connected to your TV, you will
need to use a TV antenna
splitter.
Set your TV and the TV
Channel switch on the Audio/
Video Receiver (on bottom) to the same channel (3 or 4).

1918
Code List
TV
ABEX.......................................................... 185
ACME .................................................003 031
ADA ............................................................ 009
ADC .................................................... 009 002
ADMIRAL .........................................001 173
ADVENTURA ...........................................174
AIKO ..........................................................058
AIWA .................................................. 195 196
ALLERON .................................................046
AMARK...................................................... 020
AMTRON................................................... 053
AKAI ..........................................................002
AMSTRAD .................................................189
ANAM NATIONAL . 003 025 042 053 193
AOC .... 004 005 007 009 014 132 156 175
ARCHER ....................................................020
AUDIOVOX ...............................................053
BANG & OLUFSEN..................................190
BELCOR .....................................................004
BELL & HOWELL ................... 000 001 049
BRADFORD ...............................................053
BROKSONIC...................................... 136 147
BROKWOOD............................................. 004
CANDLE ............................ 004 008 009 174
CAPEHART ...............................................175
CELEBRITY.............................................. 002
CENTURION............................................. 009
CETRONIC ................................................042
CHANGHONG ...........................................214
CITIZEN .................... 001 004 008 009 042
..................................... 053 058 105 109 177
CLAIRTONE .............................................014
CLASSIC ............................................. 042 214
COLORTYME ...........................004 009 010
CONCERTO ....................................... 004 009
CONCIERGE..............................................121
CONTEC/CONY ....... 012 013 014 042 053
CRAIG .................................................042 053
CROWN.............................................. 042 053
CURTIS MATHES ..... 000 001 004 009 015
..................................... 031 049 105 109 130
CXC .....................................................042 053
DAEWOO .. 004 005 009 017 018 019 042
......058 082 085 097 100 126 127 130 138
DAYTRON.........................................004 009
DIMENSIA ......................................... 000 031
DUMONT ..........................................004 121
DYNASTY .................................................042
ELEKTRA .................................................001
ELECTROBAND ..............................002 014
ELECTROHOME .... 003 004 009 022 133
EMERSON ......... 004 009 014 023 024 025
......026 027 030 032 033 034 035 036 037
......038 039 040 041 042 043 045 046 049
......053 116 135 147 155 177 179 189 198
ENVISION ..........................................004 009
FISHER ....................... 013 049 050 180 209
FUJITSU ............................................. 046 197
FUNAI ................ 042 053 046 155 189 198
FUTURETEC ....................................042 053
GE........ 000 003 004 009 022 031 044 052
......054 055 087 092 103 107 125 164 181
GIBRALTER ...................................... 004 121
GOLDSTAR........................ 004 005 009 056
..................................... 057 133 155 156 172
GRUNDY ............................................046 053
HALLMARK .....................................004 009
HARVARD ..................................................053
HITACHI............ 001 004 009 013 059 060
..................... 061 088 091 137 139 140 141
..................... 142 143 144 145 146 179 210
IMA ............................................................. 053
INFINITY ..................................................062
INTEQ........................................................121
JANEIL....................................................... 174
JBL ..............................................................062
JCB .............................................................. 002
JC PENNY ................. 000 004 005 008 009
............................. 022 031 052 054 055 063
............................. 087 105 107 109 172 181
JENSEN ..............................................004 009
JVC .............. 013 054 055 060 065 067 089
KAWASHO ................................. 002 004 009
KAYPANI ................................................... 175
KEC .............................................................042
KENWOOD ............................... 004 009 133
KLOSS NOVABEAM ............... 068 069 174
KONKA .............. 016 047 066 157 158 176
KTV ............ 014 021 042 053 070 116 177
LODGENET ...................................... 000 001
LOEWE ..............................................062 211
LOGIK ................................................000 001
LUXMAN........................................... 004 009
LXI ...................................... 000 004 009 031
..................................... 049 062 107 109 181
MAGNAVOX ..... 004 008 009 062 068 069
............. 074 075 076 077 089 133 163 165
MAJESTIC .........................................000 001
MARANTZ ................................ 004 009 062
MEGATRON.............................. 004 009 059
MEI ............................................................. 014
MEMOREX........................ 000 001 004 009
............................................. 046 049 051 135
MGA............ 004 005 009 022 046 133 180
MIDLAND ......... 054 055 107 121 172 181
MINUTZ ....................................................052
Code Identification.
To identify what code is stored in the remote:
1. Press and release mode button for the device you want to control (TV,
Cable, or Audio).
2. Press and hold SETUP until the green LED indicator under the button
you pressed in step 2 lights steadily. Release SETUP.
3. Press SETUP again.
4. Press each digit number in turn. When the indicator blinks off, the button
you pressed when it blinked is the first digit of the code set in the
remote.
5. Repeat step 4 twice to find the second and third digits.
Learning Codes.
If you can’t find the code for your TV, Cable or audio system in the code
library, you can learn the commands you need from your existing remote:
1. Point your existing remote at the UR89A Remote with a distance of
about 1 inch between remotes.
2. Press the mode button that matches the equipment you want to learn
(TV or Audio). The LED blinks once.
3. Press and hold SETUP until the green LED indicator under the button
you pressed in step 2 lights steadily. Release SETUP.
4. Press and release the LEARN button. The LED blinks once.
5. Press and release the button on the UR89A Remote that you want to
teach. (e.g. POWER) The LED blinks once.
6. Press the matching button on your existing remote that you want to
learn. Hold the button until the LED on the UR89A Remote blinks off.
7. Repeat steps 5 and 6 for each button you want to learn.
8. When you’ve finished learning all the keys, press SETUP.
Note you can only learn codes under Power, Vol +/-, Ch+/-, and Mute.

2120
CABLETENNA......................................... 468
CABLEVIEW............................................. 468
CENTURY .................................................471
CITIZEN ....................................................471
COLOUR VOICE............................... 472 473
COMTRONICS ..................................474 475
CONTEC/CONY .......................................476
EASTERN ..................................................477
GARRARD .................................................471
GC ELECTRONICS ..................................469
GEMINI ...................................... 478 479 536
GE ................................................................549
GENERAL INSTRUMENT ............. 463 509
............. 511 513 514 518 528 529 530 531
HAMLIN ....................................480 481 482
HITACHI.................................................... 463
HYTEK ...................................................... 462
JASCO .........................................................471
JERROLD ........... 461 463 464 465 467 478
..................... 484 509 510 511 526 528 529
MAGNAVOX .............................................485
MEMOREX................................................ 486
MOVIE TIME ................................... 462 487
NSC ..................................................... 462 487
OAK ............................................ 462 476 489
PACE .......................................................... 532
PANASONIC...................................... 460 508
PARAGON ................................................. 486
PHILIPS ............................. 471 472 473 479
............................................. 485 490 491 492
PHILIPS/MAGNAVOX ....................505 534
PIONEER ................................... 493 494 498
PULSAR .....................................................486
RADIO SHACK ......................... 505 525 534
RCA .....................................................460 507
REALISTIC................................................ 469
REGAL .......................................................482
REGENCY ..................................................477
REMBRANDT ...........................................463
RUNCO.......................................................486
SAMSUNG ..........................................474 494
SCIENTIFIC ATLANTA ......... 466 496 497
............................................. 498 535 596 607
SIGNAL .............................................. 474 478
SIGNATURE .............................................. 463
SL MARX ...................................................474
SPRUCER ...................................................460
STANDARD COMPONENTS ................. 499
STARCOM ................................. 461 467 478
STARGATE ........................................ 474 478
STAR SIGHT..............................................520
STAR SIGHT CABLE SERVICE ..............507
STARQUEST ............................................. 478
STAR TRAK .............................................. 516
TANDY ...................................................... 500
TELEVIEW ...............................................474
MITSUBISHI ............. 004 005 009 022 046
..................................... 081 089 132 133 180
MONTGOMERY WARD ................. 000 001
MOTOROLA .....................................003 173
MTC .................... 004 005 009 014 105 109
MULTITECH ............................................053
MULTIVISION .......................................... 084
NAD .................................... 004 009 109 185
NEC ..... 003 004 005 009 010 085 089 095
NIKEI .........................................................042
NIKKO ....................................... 004 009 058
NTC ............................................................ 058
ONKING ..................................................... 042
ONWA ................................................ 042 053
OPTIMUS ..........................................170 185
OPTONICA .......................................095 173
ORION ........................................ 035 121 135
PANASONIC...................... 003 054 055 062
............................................. 070 148 170 171
PHILCO.............. 003 004 005 008 009 062
............................. 068 069 074 075 077 133
PHILIPS ..... 003 004 006 008 062 068 069
............. 074 075 076 086 087 089 133 163
............. 183 184 205 206 207 208 212 213
PHILIPS/MAGNAVOX ....................183 184
..................................................... 204 208 213
PILOT ........................................................004
PIONEER ................... 004 009 090 179 185
PORTLAND ...................... 004 005 009 058
PRECISION................................................166
PRICE CLUB ............................................. 105
PRISM .........................................................055
PROSCAN .......................... 000 031 107 181
PROTON ............ 004 009 093 175 186 192
PULSAR .....................................................121
PULSER...................................................... 004
QUASAR ............................ 003 054 055 062
............................................. 070 148 170 171
RADIO SHACK . 000 004 009 031 041 042
......048 049 053 095 133 155 170 172 194
RCA ............. 000 003 004 005 007 009 011
..................... 048 078 082 092 094 096 098
............. 099 101 102 103 107 113 125 129
............. 133 167 179 181 187 188 191 194
REALISTIC........ 000 004 009 031 041 042
............ 048 049 053 095 133 155 170 172
RHAPSODY ...............................................014
RUNCO.......................................................121
SAMPO............................... 004 009 172 175
SAMSUNG .................. 004 005 009 015 104
..................................... 105 106 109 133 172
SAMSUX ....................................................009
SANSUI............................................... 135 136
SANYO ....... 004 013 049 108 110 180 209
SCOTCH ............................................. 004 009
SCOTT ....... 004 009 024 035 042 046 053
SEARS ......... 000 004 009 013 031 046 049
............. 105 107 109 110 133 180 181 189
SHARP ........................ 004 009 079 095 111
............................. 112 114 122 123 124 173
SHOGUN ....................................................004
SIGNATURE .............................. 000 001 023
SIMPSON ................................................... 008
SONIC .........................................................014
SONY .................................. 002 006 071 128
SOUNDESIGN ... 004 008 009 042 053 046
SPECTRAVISION ..................................... 203
SQUAREVIEW ..........................................189
SSS ............................................... 004 042 053
STARLITE .................................................053
SUPREMACY ............................................174
SUPREME ..................................................002
SYLVANIA ................. 004 008 009 062 068
..................................... 069 074 075 076 077
............................. 133 155 161 163 189 198
SYMPHONIC............. 033 053 155 189 198
TANDY ......................................................173
TATUNG .................................................... 003
TECHNICS .........................................054 055
TECHWOOD..................... 004 009 054 055
TEKNIKA .. 000 001 004 005 008 009 013
......042 046 053 058 076 105 109 170 174
TELECAPTION .......................................117
TELERENT.......................................000 001
TERA.................................................. 004 186
TMK ...................................................004 009
TOSHIBA ................... 013 049 089 105 109
..................................... 117 118 120 159 178
UNIVERSAL ...................................... 052 087
VICTOR......................................................060
VIDTECH................................... 004 005 009
VIKING.......................................................174
WARDS............... 000 001 004 005 009 024
..................... 031 033 046 052 062 068 069
..................... 074 075 076 087 095 119 133
WHITE WESTINGHOUSE ............. 097 100
............................................................. 130 155
YAMAHA........................... 004 005 009 133
ZENITH ..................... 000 001 004 023 038
..................... 058 059 064 121 135 136 153
Cable
ABC ............. 461 462 463 464 465 466 467
ADELPHIA................................................ 596
ALLEGRO ..........................................524 525
AMERICAST .............................................527
ANTRONIX .......................................468 469
ARCHER ............................ 468 469 470 471
AT&T .........................................................511
TELEWEST ..............................................532
TEXSCAN ..................................................499
TOCOM...................................... 464 501 513
TOSHIBA ...................................................486
TUSA ..........................................................478
TV86...........................................................487
UNIKA ....................................... 468 469 471
UNITED ARTISTS ................................... 462
UNITED CABLE ......................................461
UNIVERSAL .............. 468 469 470 471 502
VIDEOWAY ............................................... 504
VIEWSTAR ........................ 475 485 487 500
VIDEO TECH ............................................550
ZENITH ............. 486 488 503 517 519 520
..................... 521 522 523 524 525 527 533
Audio
AIWA .................................. 839 842 851 860
CARVER .....................................................825
CITIZEN ....................................................826
DENON ..............................................803 817
FISHER ............................................... 814 821
GOLDSTAR................................................766
HARMAN KARDON ........................ 804 818
JVC .............................................. 790 813 819
KENWOOD ....... 683 808 816 828 832 869
MAGNAVOX .....................................796 814
MARANTZ ........................................ 688 824
MITSUBISHI .............................................877
NAD ............................................ 721 739 743
ONKYO ...................................... 805 811 812
OPTIMUS .......................... 667 747 748 749
............................................. 751 752 754 793
PANASONIC ...................................... 810 815
PHILIPS ............................. 814 823 824 825
PIONEER ........................... 837 866 867 878
RADIOSHACK .......... 706 754 793 806 865
............................. 866 867 868 875 878 879
RCA ..................... 717 772 781 795 827 866
..................... 867 870 871 872 875 878 879
REALISTIC................................................ 822
SANYO .......................................................705
SCOTT .......................................................768
SHARP ........................................ 671 684 809
SHERWOOD ...................... 706 806 858 859
SONY .......................... 778 785 797 798 799
..................................... 833 834 835 836 843
TEAC.......................... 710 807 855 856 857
TECHNICS ......... 791 810 815 823 863 864
VENTURER ...............................................745
YAMAHA........................... 801 802 838 840
..................................... 841 846 847 848 849
ZENITH ............................. 676 730 749 759
..................................... 765 766 784 814 850
2322
LEARN
SETUP All Lts on
CH+
CH
VOL
VOL+
M
AUDIO
TV
PC
X10
on
off
brt
dim
CBL
LEARN
SETUP All Lts on
CH+
TOP FINDEND
SCAN SCAN+
F.FPLAYREW
PAUSESTOPREC
CH
VOL
PLAYING
ALBUM
SELECT
VOL+
M
1 2
5
8
0
ABC
JKL
TUV
3
6
9
A/B
DEF
MNO
WXYZ
4
GHI
Add
Delete
GENRE TRACK
ARTIST
AUDIO
TV
PC
X10
on
off
brt
dim
PAG E
DOWN
PQRS
7
TE
ENTER
PLAYLIST
PAG E
UP
CBL
CONTROLLING X10 MODULES
Here’s how to control X10 modules with your Lola Remote Control. The
remote is set to House Code A by default. See next page to change it.
1. Press and release
the X10 button.
2. Use the number
buttons to select the
Unit Code number of
the chosen module.
(You can press 1, then
6 for Unit Code 16).
3. Press the appropriate
button (labeled in
blue) for the function
you require (On, Off,
Bright, Dim, All
Lights On, All Units
Off).
HOME CONTROL
The X10 button on the Lola remote control is your gateway to a
world of useful control and automation solutions built by X10.
Why enter a dark room when there is a simple and
affordable solution that can keep you safe and secure? From
a simple remote control that can turn on a lamp, to a full-blown
automation system, X10 provides you with all the products you
need.
With the correct components in your X10 system, you
can have all of these powerful options at your control:
· Give your home a secure appearance by scheduling
when lights and other electronics turn on and off
· Distribute audio and video to stereos and televisions
using wireless technology
· Turn on house lights while sitting in your car
· Schedule sprinkler systems
· Control your lights and electronic devices using your
personal computer
X10’s control and automation products are easy to install
and extremely affordable. Visit X10.com today for more
information and the latest products to build and enhance
your X10 system.
2524
LEARN
SETUP All Lts on
CH+
TOP FINDEND
SCAN SCAN+
F.FPLAYREW
PAUSESTOPREC
CH
VOL
PLAYING
ALBUM
SELECT
VOL+
M
1 2
5
8
0
ABC
JKL
TUV
3
6
9
A/B
DEF
MNO
WXYZ
4
GHI
Add
Delete
GENRE TRACK
ARTIST
AUDIO
TV
PC
X10
on
off
brt
dim
PAG E
DOWN
PQRS
7
TE
ENTER
PLAYLIST
PAG E
UP
CBL
FINE TUNING YOUR SYSTEM
The Lola Wireless Audio/Video Sender usually works best with the flat
faces of the antennas on the Sender and Receiver units facing each other
(see diagram below). Sometimes, however, reflections and other effects in
your home may affect the signal so that some adjustment of either the
Sender or Receiver antenna might be necessary to get the best signal.
IF YOU ARE NOT GETTING ANY SIGNAL AT ALL:
Check that the CHANNEL slide switch (labeled A, B, C, D) on both units
is set to the same letter.
IF THE SIGNAL IS POOR, OR IF THERE IS INTERFERENCE:
Try changing the channel on both units. Do this by adjusting the CHANNEL
slide switch on each unit to any position from A to D. Make sure both units
are set to the same channel.
RECEIVER
TRANSMITTER
Point antennas at each other
Changing the House Code for the Remote
The Remote comes set to House Code A by default. To change the House
Code on the remote follow steps 1 through 4 below:
1. Press and release the
X10 button (indicator
flashes).
2. Press and hold Setup
until the indicator
lights steadily.
Release the Setup
button.
3. Use the number
buttons to enter the
number equivalent to
the chosen
Housecode (1=A,
2=B....16=P). Press 1
then 6 for 16, etc.
4. Press the Mute
button to confirm the
Housecode. The
indicator blinks then
goes off.
Changing the Master Code for the Remote
You can use up to 16 remotes within 100 ft. of each other without
interfering with each other by setting each remote to a different Master
Code. To do this, press and release PC. Then press and hold Setup until the
indicator starts to blink. Release Setup (the indicator blinks a number
corresponding to its Master Code 1-16 and then stays on). While the
indicator is on, enter a new number for this remote (1-16) and then press
setup. The indicator blinks back the new setting and then stays off. Repeat
this process for each remote, setting a unique number (1-16) for each
remote.

2726
If there is no sound:
• Check the connections between your PC’s sound card and the audio-in
jacks on the VT42A Audio/Video Sender (steps 1 and 2 on page 14).
If you are not getting any audio or video:
• There is a power light on the front of the Sender and Receiver. Check
that both the Sender’s and Receiver’s power supplies are plugged in.
Check that the ON/OFF switch on the Sender and Receiver are ON.
• Verify that your connections to the TV are correct. If you are using the
RCA jacks, make sure you are using the appropriate input mode for your
TV, try pressing the A-B button or the Video button on your TV’s
remote control to change the input mode (consult your TV’s owner’s
manual, if necessary). If you are using the COAX cable, verify that the
Receiver and the TV are on the same channel (3 or 4).
If the sound or video is poor, or there is interference:
• Try locating the VT42A Sender away from the PC and/or its monitor.
• Try changing the channel on both units. Do this by adjusting the
CHANNEL slide switch on each unit to any position (A, B, C, or D).
• Try different positions for the antennas on the Sender and Receiver.
Normally the flat faces on each antenna should point at each other.
Sometimes, due to reflections, you might get a better picture with the
Receiver’s antenna pointing to the ceiling.
• Take a look at what the audio and video signal is passing through or near
to get to the Receiver. Metal objects and electromagnetic fields can
distort the signal. Try to keep the Receiver as far away from other
devices as the RCA or Coax cables allow. In most cases, relocating the
Sender or Receiver a few feet is enough to avoid the source of
interference.
• Try unplugging/turning off any electromagnetic interference producing
devices, such as a microwave oven, baby monitor, computer, wireless
LAN, wireless speakers, cordless phone, cell phone, etc.
For more help please visit www.x10.com/support
TROUBLESHOOTING
Basic Version:
If the remote control doesn’t control Lola:
• Check the USB cable on the CM19A is connected to your PC.
• Make sure you have installed the software from:
www.x10.com/software
• Make sure the tray icon is present in the Windows task bar. If it isn’t run
Lola from the Windows Start button, or desktop shortcut.
• Press the Power button on the remote to launch Lola.
• Replace the Remote’s batteries.
If the range for the remote control is poor:
• Try locating the CM19A Receiver away from the PC and/or its monitor.
If there is no sound:
• Check the connections between your PC’s sound card and your PC’s
speakers.
Deluxe Version:
If the remote control doesn’t control Lola:
• Make sure the VT42A Audio/Video Sender is turned on.
• Check the USB cable on the VT42A is connected to your PC.
• Make sure you have installed the software from:
www.x10.com/software
• Make sure the tray icon is present in the Windows task bar. If it isn’t run
Lola from the Windows Start button, or desktop shortcut.
• Press the Power button on the remote to launch Lola.
• Replace the Remote’s batteries.
If the range for the remote control is poor:
• Try locating the VT42A Audio/Video Sender away from the PC and/or
its monitor.

MTMT
MTMT
MT--
--
-OM-2/03OM-2/03
OM-2/03OM-2/03
OM-2/03
FCC Caution
THIS DEVICE COMPLIES WITH PART 15 OF THE FCC RULES.
OPERATION IS SUBJECT TO THE FOLLOWING TWO CONDITIONS:
(1) THIS DEVICE MAY NOT CAUSE HARMFUL INTERFERENCE, AND
(2) THIS DEVICE MUST ACCEPT ANY INTERFERENCE RECEIVED, INCLUDING
INTERFERENCE THAT MAY CAUSE UNDESIRED OPERATION.
This equipment generates and uses radio frequency energy, and if not installed and
used properly, that is, in strict accordance with the manufacturers instructions, it may
cause interference to radio and television reception. It has been type tested and found
to comply with the limits for remote control devices in accordance with the
specifications in Sub-Parts B and C of Part 15 of FCC Rules, which are designed to
provide reasonable protection against such interference in a residential installation.
However, there is no guarantee that interference will not occur in a particular installation.
If this equipment does cause interference to radio or television reception, which can
be determined by unplugging the equipment, try to correct the interference by one or
more of the following measures.
• Reorient the antenna of the radio/TV experiencing the interference.
• Relocate the equipment with respect to the radio/TV.
• Move the equipment away from the radio/TV.
• Plug the equipment into an outlet on a different electrical circuit from the radio/TV
experiencing the interference.
• If necessary, consult your local dealer for additional suggestions.
NOTE: Modifications to this product will void the user’s authority to operate this
equipment.
X10 Wireless Technology, Inc. Limited One Year Warranty
X10.com, a division of X10 Wireless Technology, Inc. (X10) warrants X10 products to
be free from defective material and workmanship for a period of one (1) year from the
original date of purchase at retail. X10 agrees to repair or replace, at its sole discretion,
a defective X10 product if returned to X10 within the warranty period and with proof
of purchase. If service is required under this warranty:
Call 1-800-442-5065, visit www.x10.com, or e-mail support@x10.com.
For help or more information on setup, please visit:
http://www.x10.com/support
X10.com, a division of X10 Wireless Technology, Inc.
3824 North 5th St., Suite C,
North Las Vegas, NV 89032