Authinx XC22A 2.4 GHz Wireless Camera User Manual
Authinx Inc. 2.4 GHz Wireless Camera Users Manual
Authinx >
Users Manual
Trim
to
crop
marks
Trim
to
crop
marks
Trim
to
crop
marks
Trim to crop marks Trim to crop marks
OWNER’S MANUAL
PLEASE KEEP FOR FUTURE REFERENCE
XCAM2™ AND WIDEEYE™
INDOOR/OUTDOOR WIRELESS
CAMERA SYSTEM
Congratulations! You have purchased X10’s most
popular wireless camera system. Your XCam2 or Wide
Eye is a powerful and versatile video solution.
Your camera uses X10’s 2.4 Gigahertz wireless
technology to transmit live video through walls to a
television up to 100 feet away. It’s also designed so
that you can combine multiple cameras to provide
comprehensive coverage of your home or business.
This owner’s manual will take you through setting up
and using the camera. The world of wireless video is
waiting for you!
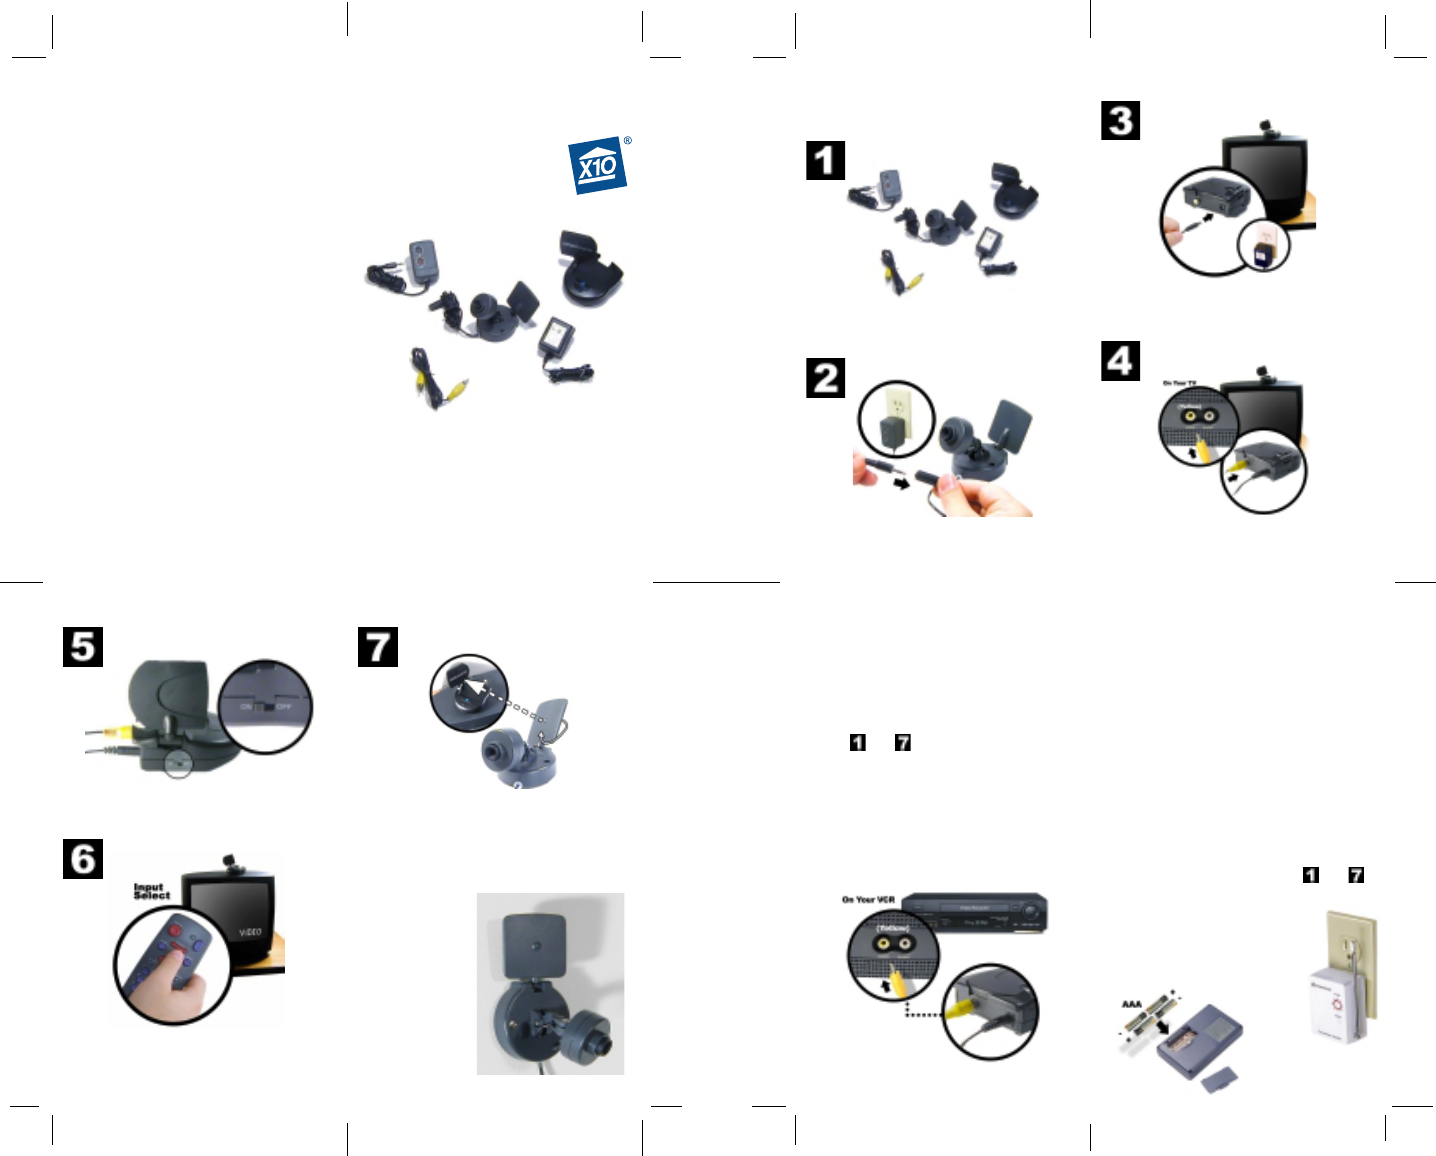
Your camera is ready to go out of the box! Follow these
steps for a quick setup of your new Camera system.
You should have: a camera and its power supply; a
wireless video receiver and its power supply; and a
video cable.
Unpack these items.
Basic Camera Setup
Connect the camera to power.
Plug the camera’s power supply into a standard wall
outlet. Plug the other end into the camera. Remove
the protective cover from the camera’s lens.
Connect the wireless video receiver to power.
Put your video receiver in a convenient place near or
on your TV. Plug its power supply into a standard wall
outlet and the other end into the video receiver.
Basic Camera Setup, cont.
Connect the video receiver to your TV.
Connect the video cable into the video-out jack
on the video receiver and into the video-in jack on
your TV.
Turn on the video receiver.
Make sure the power switch on the video receiver is set
to “ON.”
Turn on your TV.
Turn on your TV and select its video input. Use the
Video or Select buttons on your TV remote control,
or try channel 0 and then Channel Down. The
camera’s picture should appear.
Once the camera and receiver are in place, adjust their
antennas so that they face each other. The side of the
camera’s antenna with the dot on it should face the side
of the receiver’s antenna marked with four squares.
Adjust the positions to improve the picture on your TV.
Fine tune the antennas.
Options
Mounting the
Camera
You can attach your
camera to a wall using
the supplied screws.
Recording with a VCR
You can configure your XCam2 camera so that you can
record its video signal on your VCR. It’s easy:
1. Make sure your VCR is connected to play back on
your TV.
2. Set up your camera according to the instructions in
steps 1 thru 7.
3. Connect the video cable from the video receiver into
the Video In jack on your VCR.
With the camera connected to the VCR, you will be able
record surveillance video while watching on your TV.
Check your VCR owner’s manual if you aren’t sure how
to select the camera as the video source.
Options, cont. Multi-Camera Systems
How does it work?
XCam2 cameras are designed so that you can use more
than one camera together with one wireless video
receiver. You select different cameras using a remote
control. The cameras should be set in groups of four,
i.e., A1, A2, A3, and A4, or A5, A6, A7, and A8. You
change the setting by turning the dials on the camera’s
power supply. Ensure all of your cameras are set to the
same Housecode, e.g. A.
Setting Up Multiple Cameras
1. Get together the parts of your multi-camera system:
the cameras and power supplies, video receiver and
power supply, video cable, transceiver module, and
camera remote control.
2. Set up your first camera and your video receiver
according to the instructions in steps 1 thru 7.
3. Plug in the transceiver module and extend the
antenna.
X10 Wireless Technology, Inc.
Limited One Year Warranty
X10.com, a division of X10 Wireless Technology, Inc.
(X10) warrants X10 products to be free from defective
material and workmanship for a period of one (1) year
from the original date of purchase at retail. X10 agrees
to repair or replace, at its sole discretion, a defective
X10 product if returned to X10 within the warranty
period and with proof of purchase. If service is required
under this warranty:
Call 1-800-442-5065, visit www.x10.com, or e-mail
support@x10.com.
For help or more information on setup, please visit:
http://www.x10.com/support
X10.com, a division of X10 Wireless Technology, Inc.
3824 North 5th St., Suite C,
North Las Vegas, NV 89032.
Basic Camera Setup, cont. Basic Camera Setup, cont.
4. Remove the battery cover and
put four AAA batteries into the
remote. Make sure to match the
batteries to the + and – marks
inside the battery case.
34
56 78
XCam2-3/03
Trim to crop marks
Trim
to
crop
marks
Trim
to
crop
marks
Trim
to
crop
marks
Trim
to
crop
marks
Trim to crop marks
Fold Fold
FoldFold
Fold
Fold
Fold
Fold
Trim
to
crop
marks
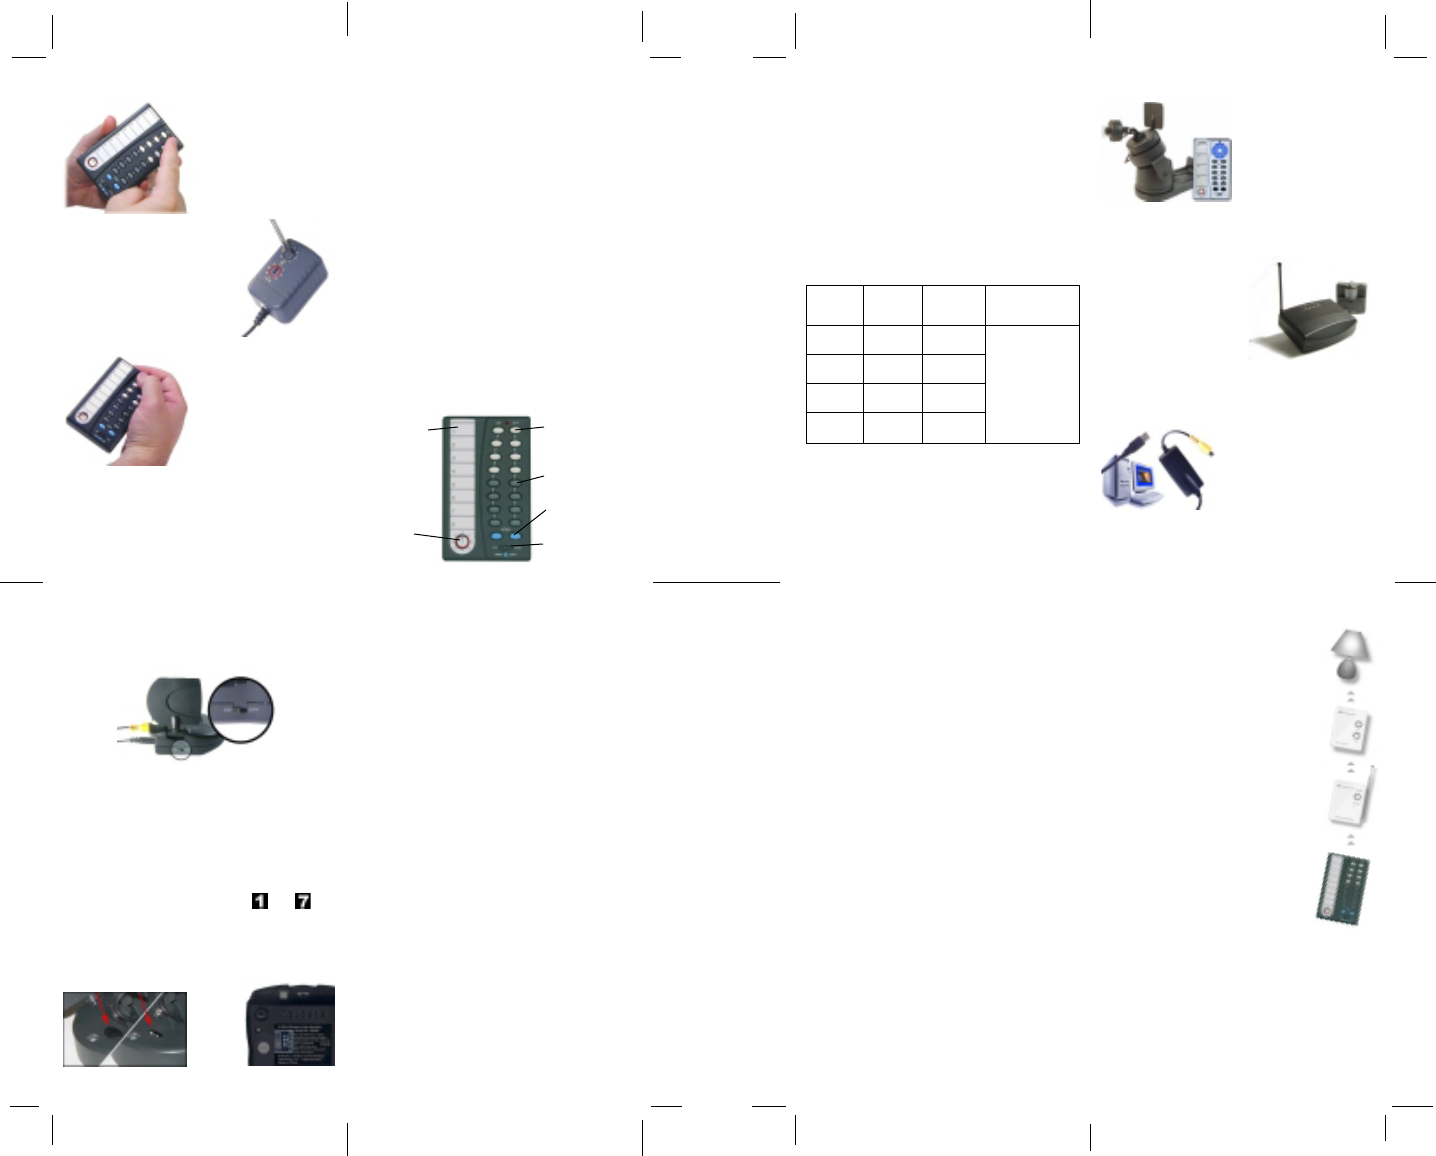
To set Put the Then press And then:
to group: switch to: and hold:
1-4 1-8 1 On Flip the switch
back and forth
5-8 1-8 5 On once, and release
the button.
9-12 9-16 9 On
13-16 9-16 13 On
5. Press 1 Off on the remote
control to turn the first
camera off.
6. Set the dials on the second
camera’s power supply to A
and 2.
7. Connect the second camera to
power. A picture will appear on
your TV.
8. Press 1 On to switch to
camera 1 and then 2 On to
switch back to camera 2.
Multi-Camera Systems, cont.
Repeat steps 6 through 8 for each additional camera,
changing the Unit Code as appropriate. For each extra
camera, set the Unit Code (number) dial to the next
number. For example, your third camera will be set to
‘3,’ your fourth camera set to ‘4’ and so on. Set all
cameras to A.
Cameras 1-4 on
and off.
Next/Previous
camera.
Write camera
names here.
Set House
Code the same
as cameras.
Switching Cameras with the Remote
To switch from one camera to another with the remote
control, simply press the On button for that camera. For
example, press 2 On to switch from the current camera
to camera 2. When you do that, the current camera
switches off and camera 2 switches on, displaying its
picture. Note: If you have 8 cameras set up, before
turning on a camera in group 1-4, turn off any cameras
in group 5-8, and vice versa.
Scanning Between Cameras with the Remote
If you select a camera with the remote, you can then
use the scan buttons to cycle through cameras 1
through 4. First select a camera using its On button.
Then use the blue arrow buttons at the bottom of the
remote to go to the next or previous cameras. Each
press of the button switches to the next or previous
camera in order.
Unit Switch
Cameras 5-8 on
and off.
Using Different Unit Codes
If you need to set your cameras to unit codes other
than 1 through 4, make sure that you use Unit Codes
within one of the three other camera groups: 5-8, 9-12,
and 13-16. The camera switching system is designed to
work within these groups.
When you change the Unit Codes on your cameras,
you will also need to change the Unit Code grouping
on your remote control.
Flip the label on the remote over if you are using
cameras 9 thru 12 or 13 thru 16.
Troubleshooting
If there’s no camera picture on your TV:
1. Make sure your Wireless Video Receiver is
connected to power and turned on.
Top of camera
Set the
ABCD
channel
switch
Bottom of receiver
2. Select the appropriate video input on your TV.
Usually you can select the input mode by pressing
the VIDEO or INPUT button on the remote control.
Or, you might have to change the TV to Channel 0 or
2, and then use Channel Down to change video
inputs. See your TV’s owner’s manual if you still
aren’t sure how to change the video source.
3. Make sure your camera is connected to power and
turned on.
5. Follow the setup steps again (steps 1 thru 7 ),
and check that you have done each step correctly.
6. Make sure that the ABCD switches on the top of the
camera and the bottom of the wireless video receiver
are set to the same letter. On the camera, the bottom
switch position is A and the top position is D.
If the picture on your TV isn’t clear:
First, adjust the antennas on the video receiver and
camera so they point towards each other. The side of
the camera’s antenna with the dot on it should face the
side of the receiver’s antenna marked with four squares.
You can also try moving the video receiver itself to
another location near the TV. Sometimes moving it just
a foot can make a big difference.
If the camera picture still doesn’t improve after
adjusting the antennas and receiver position, try
changing the channels on the camera and video
receiver. The channel switch is on the top of the camera
(under the rubber plug) and the bottom of the wireless
video receiver. Change the setting on both the camera
and video receiver, making sure they are set to the same
letter (A, B, C, or D). Try different letter settings to see
if the picture improves.
If the picture is out of focus:
The camera is shipped with the focus preset for optimal
use. You can adjust the focus by turning the lens. Try
turning it counterclockwise first. If you turn it
clockwise do not force or overtighten it.
If you can’t switch cameras:
If you have a multi-camera setup and are having trouble
switching, start by unplugging all the cameras but one.
Use your remote control to turn the remaining camera
on and off. If you find that you can’t control it, plug it
into a different power outlet and try again. You may
have to try several outlets. If you still can’t control
a camera, try the following (page 15):
Troubleshooting, cont.
Accessories
Visit x10.com for more details.
Ninja Pan ‘n Tilt
Increase the viewable area
of your camera by 400%.
The standard XCam2
records everything within a
60° x 60° field of view. But
with the Ninja Robotic
Mount, you get sweeping
240° x 130° views.
VCR Commander
Record only when there’s
movement in your camera’s
field of view. The VCR
Commander issues “STOP”
and “START” commands to
your VCR anytime there’s
movement within 30 feet of
your camera.
XRay Vision
Monitor your home from any
city in the world! With XRay
Vision Software you can
monitor your home from any
computer with an Internet
connection. E-mail video
snapshots to your personal
account or view them on your
own secure Web Site.
Home Control
X10 remote controls are your gateway to a
world of useful control and automation
solutions built by X10. Why enter a dark room
when there is a simple and affordable solution
that can keep you safe and secure? From a
simple remote control that can turn on a lamp,
to a full-blown automation system, X10
provides you with all the products you need.
With the right components in your X10
system, you can have all of these powerful
options at your control:
• Enhance the color, brightness and detail
of your camera’s subject by adding more
light automatically.
• Give your home a secure appearance by
scheduling when lights and other
electronics turn on and off.
• Distribute audio and video to stereos
and televisions using wireless
technology.
• Turn on house lights while sitting in your car.
• Schedule sprinkler systems.
• Control your lights and electronic devices using
your personal computer.
X10’s control and automation products are easy to
install and extremely affordable. Visit X10.com today for
more information on the latest products to build and
enhance and your X10 system.
FCC Caution
THIS DEVICE COMPLIES WITH PART 15 OF THE FCC
RULES. OPERATION IS SUBJECT TO THE
FOLLOWING TWO CONDITIONS:
(1)THIS DEVICE MAY NOT CAUSE HARMFUL
INTERFERENCE, AND
(2)THIS DEVICE MUST ACCEPT ANY
INTERFERENCE RECEIVED, INCLUDING
INTERFERENCE THAT MAY CAUSE UNDESIRED
OPERATION.
NOTE: Modifications to this product will void the
user’s authority to operate this equipment.
Multi-Camera Systems, cont.
1. Check that you have a transceiver module (model
TM751) plugged in.
2. Make sure that all camera power supplies are set to
the same House (letter) Code as the transceiver and
remote control you are using.
3. Check that the cameras are set to different,
sequential Unit (number) Codes. E.G. 1, 2, 3, and 4.
4. Once it works, unplug it and try another camera in
the same outlet. Test each camera in this way. Then
try each camera in its desired outlet.
For more help with setup please visit
http://www.x10.com/support
Multi-Camera Systems, cont.
Troubleshooting, cont.
910 1112
13 14 15 16
Trim
to
crop
marks
Trim
to
crop
marks
Trim
to
crop
marks
Trim
to
crop
marks
Trim to crop marks Trim to crop marks
Trim to crop marks Trim to crop marks
Trim
to
crop
marks
Trim
to
crop
marks
Trim
to
crop
marks
Trim
to
crop
marks
Fold Fold
FoldFold
Fold
Fold
Fold
Fold