Automatic Technology TRX02403 NTR-1V1 NETWORK TRANSCEIVER User Manual
Automatic Technology (Australia) Pty. Ltd. NTR-1V1 NETWORK TRANSCEIVER Users Manual
Users Manual
Transceiver Installation Instructions
Smart Phone Control Kit
TRANSCEIVER KIT NTR-1V1 - ORDER NO. 14825
ITEM DESCRIPTION QTY
1NETWORK TRANSCEIVER NTR-1V1 AY 1
2 TIMING HARNESS 400MM VR12 AY 1
3 TAPTITE SCREW “P” M4 X 12 2
4 VELCRO 20 X 50 1
Garage Door Openers
Important Safety Instructions
WARNING! • DO NOT attempt to disassemble, repair or modify the product. This will invalidate
the warranty.
• Do not allow children to play with the Base Station or your smart phone if the
B&D phone app has been installed.
ELECTROCUTION! • Keep the device away from water and other liquids. In the event that water or
other liquids enter the device, power off he product immediately and clean the
device.
• To reduce the risk of fire or electric shock, do not expose this device to rain or
moisture. The device should not be exposed to dripping or splashing.
• DO NOT remove the cover as there are no user-serviceable parts inside.
CAUTION:
Fall from ladder • Ensure ladder is the correct type for job.
• Ensure ladder is on flat ground.
• Ensure user has 3 points of contact while on ladder.
Doc # 160064_02
Part # N/A
Released 21/07/16
This device allows for unattended operation of the door when not in line-of-sight of the
door opener.
The door may operate unexpectedly, therefore do not allow anything to stay in or near the path of the
door. When the door is not operating automatically, watch the door when it is moving and keep people
away until the door is completely opened or closed. Contact with the moving door can cause serious
personal injury or damage to property.
Your opener must be fitted with SAFETY BEAMS. Safety Beams detect any obstructions in
the door’s path and override automatic operation if one presents. These must be installed as
in accordance with UL 325 and CSA C222.2 No 247.
This is in addition to regular professional servicing, and monthly obstruction tests as detailed in your
opener’s Home Owners Manual.
CLASS B DEVICE CAN ICES-3 (B)/NMB-3 (B)
This equiment has been tested and found to comply with the limits
for a Class B digital device, pursuant to Part 15 of the FCC Rules.
These limits are designed to provide reasonable protection against
harmful interference in a residential installation. This equipment
generates, uses and can radiate radio frequency energy and, if not
installed and used in accordance with the instructions, may cause
harmful interference to radio communications. However, there is no
guarantee that interference will not occur in a particular installation. If
this equipment does cause harmful interference to radio or television
reception, which can be determined by turning the equipment off and
on, the user is encourage to try to correct the interference by one or
more of the following measures:
•Reorient or relocate the receiving antenna
•Increase the separation between the equipment and receiver
•Connect the equipment into an outlet on a circuit different from
that to which the receiver is connected.
•Consult the dealer or experienced radio/TV technician for help.
Any changes or modifications not
expressively approved by Automatic
Technology could void the user’s
authority to operate this equipment.
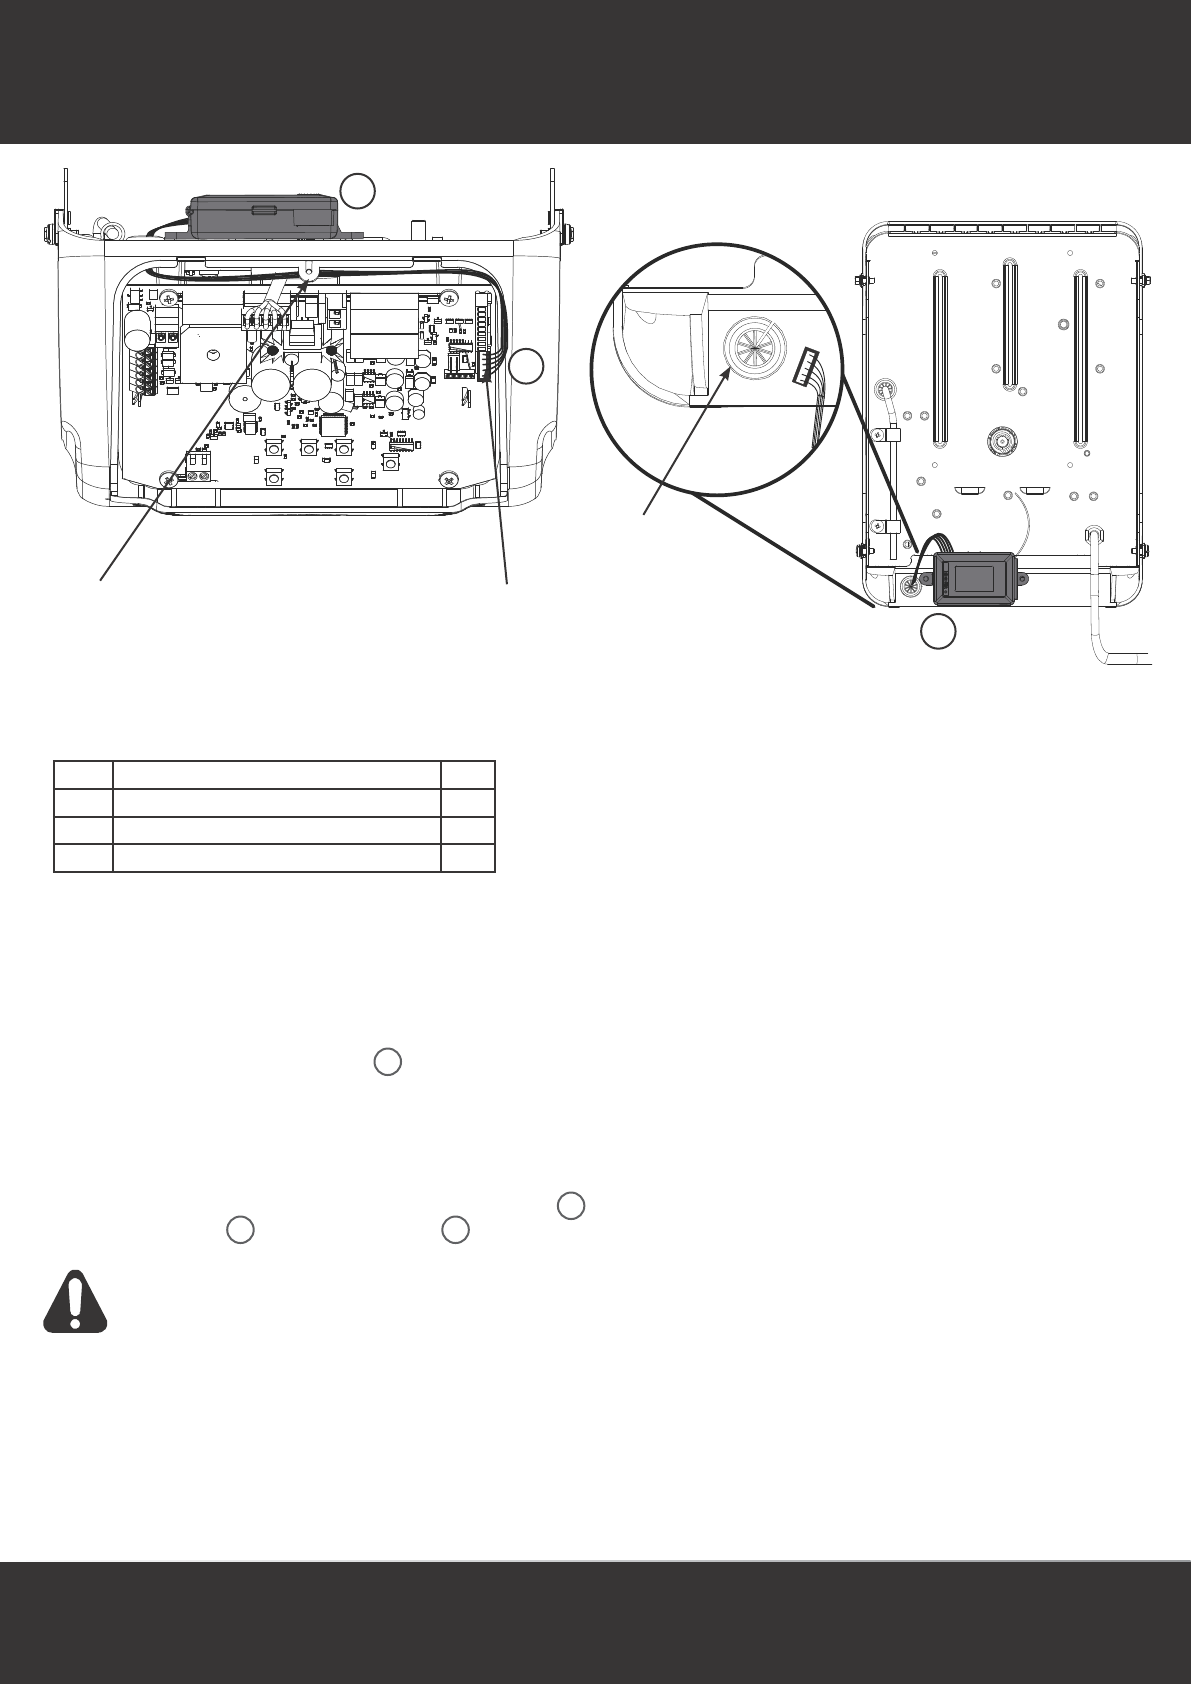
AM-808 Installation Instructions
Preparation of Opener
a. Disconnect the power supply to the opener.
b. Remove the cover or back cover via screw at top.
c. Remove the grommet out of the chassis.
d. Cut (1) one side of the grommet with a knife or scissors.
e. Slide the network timing harness 2 into the cut in the grommet.
f. Refit grommet to chassis by sliding the harness through hole before fitting grommet.
g. Connect the harness to the network / programmer pin on the control board.
h. Refit the cover.
Mount and connect Transceiver
a. Plug the other end of the harness into the transceiver 1.
b. Using the velcro 4 stick the transceiver 1 on the top of the opener as shown.
WARNING: DO NOT drill into the chassis or covers. No screws are
required to secure the transceiver.
Re-setup and Test the Opener
a. Reconnect power and remove the button cover.
b. Setting Limits:
i. If limits have not been set, follow the openers installation sheet to set limits.
ii. If limits were set previously, clear limits and follow openers installation sheet to set
limits.
c. Refer to the Smart Phone Control Kit User Guide to set up network capabilities.
Back cover screw Network /
Programmer Pin
Grommet
ITEM DESCRIPTION QTY
1NETWORK TRANSCEIVER NTR-1V1 AY 1
2 TIMING HARNESS 400MM VR12 AY 1
4 VELCRO 20 X 50 1
AM-808 Door Openers
1
2
1
1
2
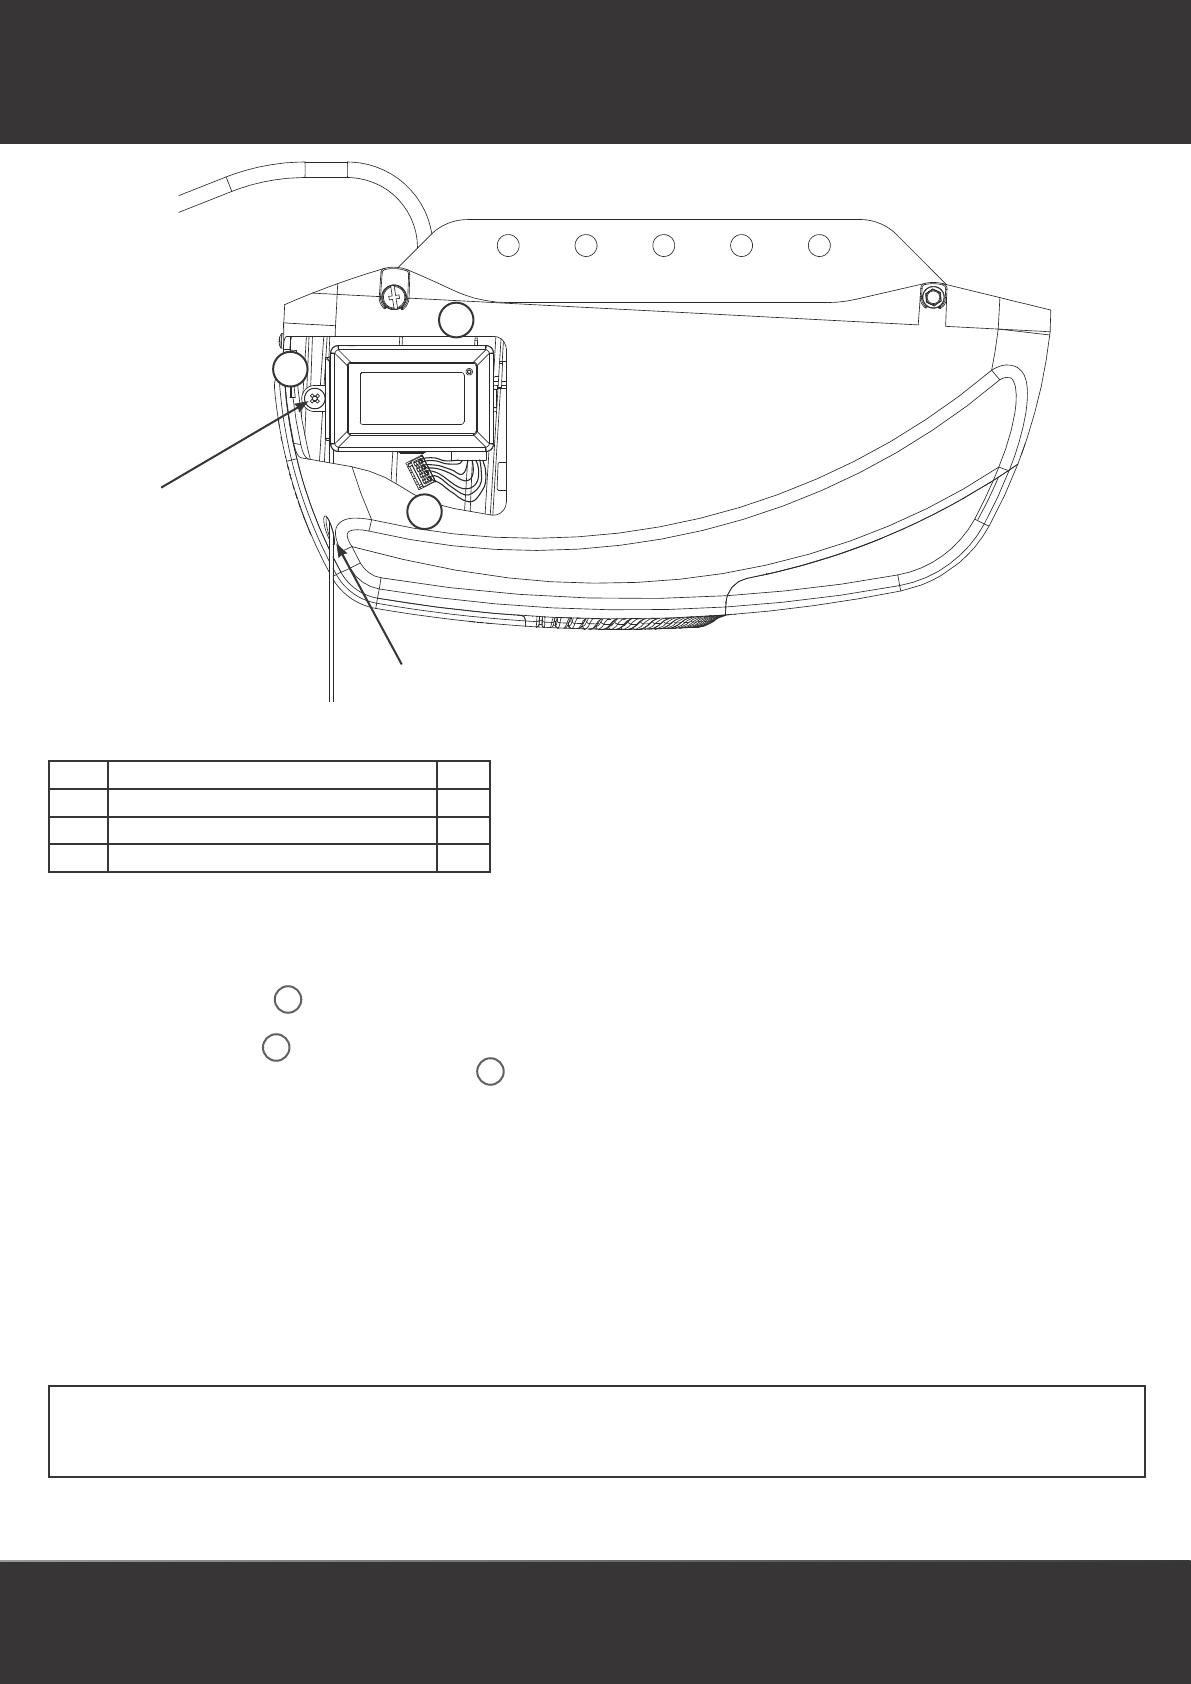
Aerial slot
Affix with screw here
3
Preparation of Opener
a. Disconnect the power supply to the opener.
b. Open the side cover on the right hand side (looking from back of unit).
c. Connect the harness 2 to the network / programmer pin on the control
board.
d. Place the transceiver 1 inside the cover, threading the aerial through the slot
provided and affix with one (1) Taptite Screw 3.
e. Refit the cover.
Re-setup and Test the Opener
a. Reconnect power and remove the button cover.
b. Setting Limits:
i. If limits have not been set, follow the openers installation sheet to set limits.
ii. If limits were set previously, clear limits and follow openers installation sheet
to set limits.
c. Refer to the Smart Phone Control Kit User Guide to set up network capabilities.
AM-888 Installation Instructions
ITEM DESCRIPTION QTY
1NETWORK TRANSCEIVER NTR-1V1 AY 1
2 TIMING HARNESS 400MM VR12 AY 1
3 TAPTITE SCREW “P” M4 X 12 2
AM-888 Door Openers
AM-808 Installation Instructions
To comply with FCC/IC RF exposure limits for general population / uncontrolled exposure, the antenna(s) used for this transmitter must be
installed to provide a separation distance of at least 20cm from all persons and must not be co-located or operating in conjunction with
any other antenna or transmitter.

6 - 8 Fiveways Boulevard, Keysborough, VIC, Australia 3173
P: 1300 133 944 E: sales@automatictechnology.com.au
W: www.automatictechnology.com.au
© April 2015 Automatic Technology (Australia) Pty Ltd. All rights reserved. No part of this document may be reproduced without prior permission. In an ongoing
commitment to product quality we reserve the right to change specification without notice. E&OE.