Avante Technology VT-EVC308 Vote-trakker(TM) Electronic Voting Machine User Manual 289575
Avante International Technology, Inc. Vote-trakker(TM) Electronic Voting Machine 289575
Contents
- 1. Poll Workers Manual part A
- 2. Poll Workers Manual part B
- 3. Poll Workers Manual part C
- 4. Voters Manual
Poll Workers Manual part B

Avante International Technology, Inc.
VOTE-TRAKKER™ Election Official Manual
Part B
Sections 4 - 5
Version 4.4.3
Date: June 7, 2002
© 2001-2002 Avante International Technology, Inc.

Avante International Technology, Inc.
Version 4.4.3 ii
Table of Contents
1. INTRODUCTION ............................................ ERROR! BOOKMARK NOT DEFINED.
1.1 ABOUT THIS MANUAL ......................................................... ERROR! BOOKMARK NOT DEFINED.
1.1.1 Basic Operational Functions ................................................Error! Bookmark not defined.
1.1.2 Voter Operating Functions and Modes.................................Error! Bookmark not defined.
1.2 SAFETY INFORMATION......................................................... ERROR! BOOKMARK NOT DEFINED.
2. OPERATIONAL ENVIRONMENT............... ERROR! BOOKMARK NOT DEFINED.
2.1 MEANS OF INTERFACE BY THE VOTER:................................ ERROR! BOOKMARK NOT DEFINED.
2.2 POLL WORKER FUNCTIONS: ................................................ ERROR! BOOKMARK NOT DEFINED.
3. OPERATIONAL FEATURES ........................ ERROR! BOOKMARK NOT DEFINED.
3.1 BEFORE VOTING AND VID#: ............................................ ERROR! BOOKMARK NOT DEFINED.
3.2 HOW TO START VOTING?................................................... ERROR! BOOKMARK NOT DEFINED.
3.3 THE VOTING PROCESS – HOW THE VOTER VOTES ............. ERROR! BOOKMARK NOT DEFINED.
3.3.1 Enter the VID# to initiate voting.......................................Error! Bookmark not defined.
3.3.2 Verify the ballot.................................................................Error! Bookmark not defined.
3.3.3 Straight Party Line Option (When available) ...................Error! Bookmark not defined.
3.3.4 Make the selections if “Straight-Party-Line” voting is not allowed..... Error! Bookmark
not defined.
3.3.5 How to perform a “Write-In” on VOTE-TRAKKER™.....Error! Bookmark not defined.
3.3.6 Checking choices and making changes before pressing “Cast Vote” Error! Bookmark
not defined.
3.3.7 Voting on Public Questions, Initiatives, and Propositions .............Error! Bookmark not
defined.
3.3.8 Casting vote before all contests were selected..................Error! Bookmark not defined.
3.3.9 Cast vote and end voting when all contests have been selected .........Error! Bookmark not
defined.
3.3.10 Cast vote - collect your voter receipt ................................Error! Bookmark not defined.
3.3.11 How to vote a provisional ballot.........................................Error! Bookmark not defined.
3.3.12 CUMULATIVE VOTING ................................................... ERROR! BOOKMARK NOT DEFINED.
Avante International Technology, Inc.
Version 4.4.3 iii
3.3.13 RANKING VOTING................................. ERROR! BOOKMARK NOT DEFINED.
3.3.14 PRIMARY ELECTIONS.......................... ERROR! BOOKMARK NOT DEFINED.
4. ELECTION OFFICIAL OPERATING PROCEDURES.............................................. 1
4.1 HOW TO PREPARE A VOTE-TRAKKER™ FOR AN ELECTION .................................................. 1
4.1.1 Load Ballot.......................................................................................................................... 1
4.1.2 Prepare hardware components............................................................................................ 8
4.1.3 Test the VOTE-TRAKKER™................................................................................................ 9
4.2 OPEN POLL ON ELECTION DAY.................................................................................................. 20
4.2.1 Activate the VOTE-TRAKKER™ ....................................................................................... 25
4.2.2 Ballot and Logic Test ......................................................................................................... 29
4.2.3 Tally Accuracy Test (Optional).......................................................................................... 31
4.3 CHOICE OF INSTRUCTION LANGUAGE ...................................................................................... 33
FIGURE 4.3A ................................................................................................................................... 33
4.4 HOW TO HANDLE A “FLEEING VOTER” .................................................................................... 34
4.5 HOW TO ACTIVATE THE ADA FUNCTION FOR THE VISUALLY IMPAIRED VOTERS..................... 35
4.6 OPENING AND CLOSING TIMES .................................................................................................. 41
4.7 CLOSE VOTING .......................................................................................................................... 42
4.8 COUNT PROVISIONAL BALLOTS................................................................................................. 49
5. OPERATION SUPPORT ............................................................................................... 51
5.1 SYSTEM WARRANTY .................................................................................................................. 51
5.2 SYSTEM CORRECTIONS UNDER WARRANTY................................................................................ 51
5.3 ERROR MESSAGES ..................................................................................................................... 51
5.3.1 Missing/Not Available Errors ............................................................................................ 52
5.3.2 Incorrect / Incomplete Errors ............................................................................................ 52
5.3.3 Computer Errors................................................................................................................ 53
6. APPENDICES................................................... ERROR! BOOKMARK NOT DEFINED.
6.1 GLOSSARY ........................................................................ ERROR! BOOKMARK NOT DEFINED.
6.2 REFERENCES ..................................................................... ERROR! BOOKMARK NOT DEFINED.
6.2.1 Miscellaneous Error Screens ............................................Error! Bookmark not defined.
Avante International Technology, Inc.
Version 4.4.3 iv
6.2.2 Manufacturer’s Recommended Security Procedures.......Error! Bookmark not defined.
6.2.3 Machine Setting & Testing Functions...................................Error! Bookmark not defined.
6.3 CALIBRATION OF TOUCH SCREEN........................................ ERROR! BOOKMARK NOT DEFINED.
7. PRINTER INFORMATION............................ ERROR! BOOKMARK NOT DEFINED.
1. GENERAL DESCRIPTION............................ ERROR! BOOKMARK NOT DEFINED.
2. CONSTRUCTION............................................ ERROR! BOOKMARK NOT DEFINED.
2.1 CONFIGURATION.................................................................. ERROR! BOOKMARK NOT DEFINED.
2.2 PRINCIPLE OF OPERATION.................................................... ERROR! BOOKMARK NOT DEFINED.
2.2.1 Drive and paper feed.............................................................Error! Bookmark not defined.
2.2.2 Printer ...................................................................................Error! Bookmark not defined.
2.2.3 Presenter ...............................................................................Error! Bookmark not defined.
3. GENERAL SPECIFICATIONS...................... ERROR! BOOKMARK NOT DEFINED.
4. PAPER ROLL SPECIFICATIONS................ ERROR! BOOKMARK NOT DEFINED.
5. DISPLAYS AND FUNCTIONS ...................... ERROR! BOOKMARK NOT DEFINED.
5.1 LEDS................................................................................... ERROR! BOOKMARK NOT DEFINED.
5.2 RESUME BUTTON.............................................................. ERROR! BOOKMARK NOT DEFINED.
5.3 POWER SWITCH AND BUTTON COMBINATIONS.................... ERROR! BOOKMARK NOT DEFINED.
5.4 SENSOR ADJUSTING MODE .................................................. ERROR! BOOKMARK NOT DEFINED.
5.6 ERROR MESSAGES ............................................................... ERROR! BOOKMARK NOT DEFINED.
5.7 NEAR-END SENSOR POSITION.............................................. ERROR! BOOKMARK NOT DEFINED.
6. CUTTER............................................................ ERROR! BOOKMARK NOT DEFINED.
7. PRESENTER .................................................... ERROR! BOOKMARK NOT DEFINED.
8. RELIABILITY.................................................. ERROR! BOOKMARK NOT DEFINED.
8.1 DURING OPERATION............................................................. ERROR! BOOKMARK NOT DEFINED.
8.2 DURING STORAGE ................................................................ ERROR! BOOKMARK NOT DEFINED.
8.3 LIFE TEST ............................................................................ ERROR! BOOKMARK NOT DEFINED.
Avante International Technology, Inc.
Version 4.4.3 v
9. INSTALLING THE PAPER ROLL ............... ERROR! BOOKMARK NOT DEFINED.
10. MAINTENANCE............................................ ERROR! BOOKMARK NOT DEFINED.
Avante International Technology, Inc.
Version 4.4.3 1
4.1 How to prepare a VOTE-TRAKKER™ for an election
VOTE-TRAKKER™ is designed to be working alone and independent of any computer network
or communication network. The first step to prepare a VOTE-TRAKKER™ for an election is to
load the ballot onto the voting unit.
4.1.1 Load Ballot
VOTE-TRAKKER™ is designed to receive ballot information via a ballot CD disc generated by
a Ballot Generation Computer (For information on how to generate a ballot CD, refer to the
Ballot Generation Module and Manage Ballot Data Module in the Election Administrator’s
Manual). You should have a ballot CD, floppy disk and flash memory card ready.
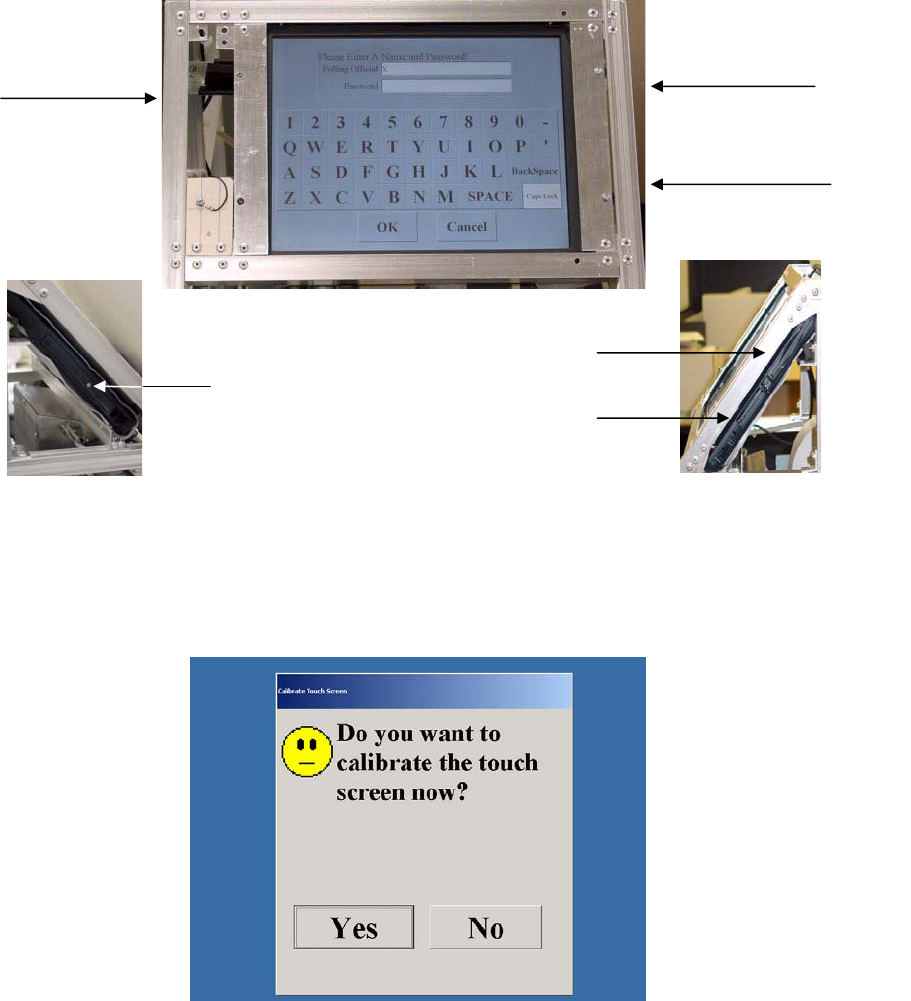
Remove the top cover of the VOTE-TRAKKER™ so that you can gain access to the CD-RW
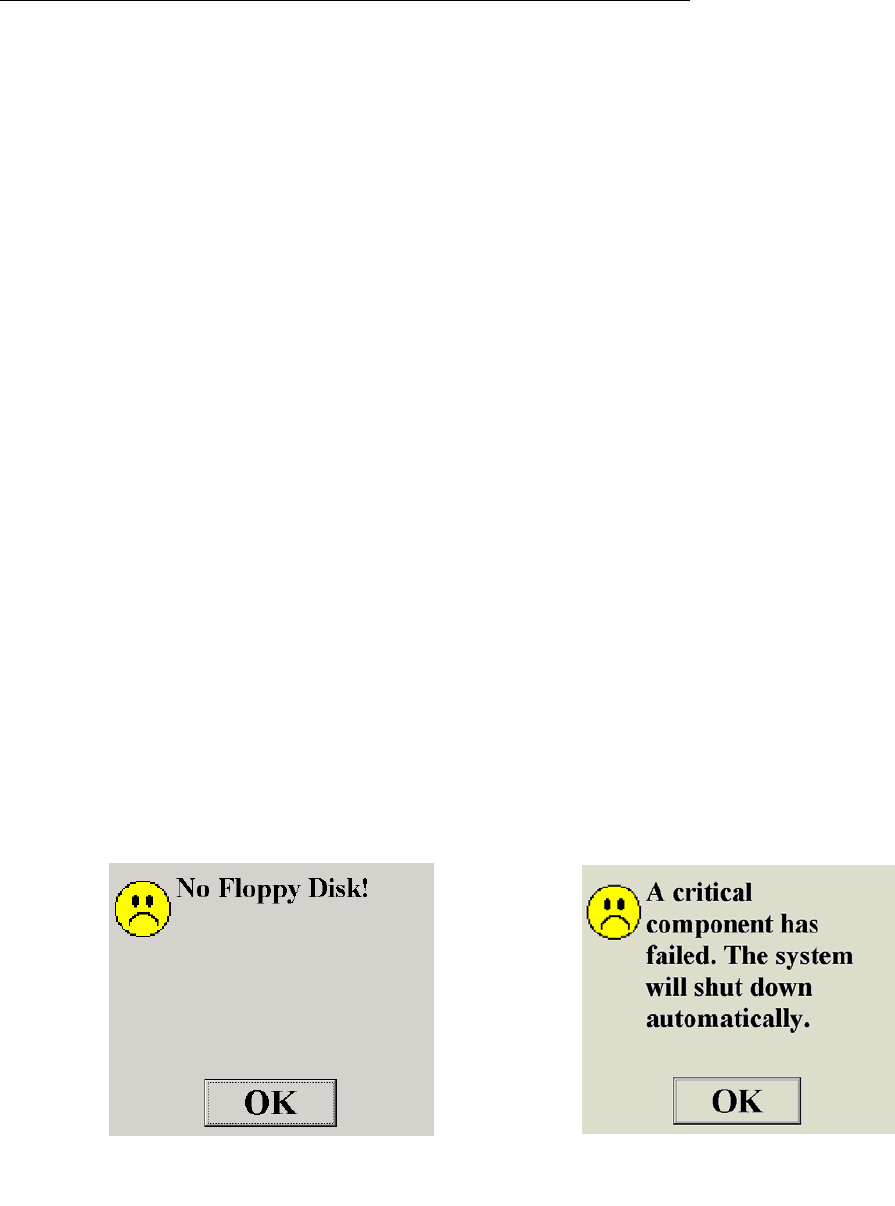
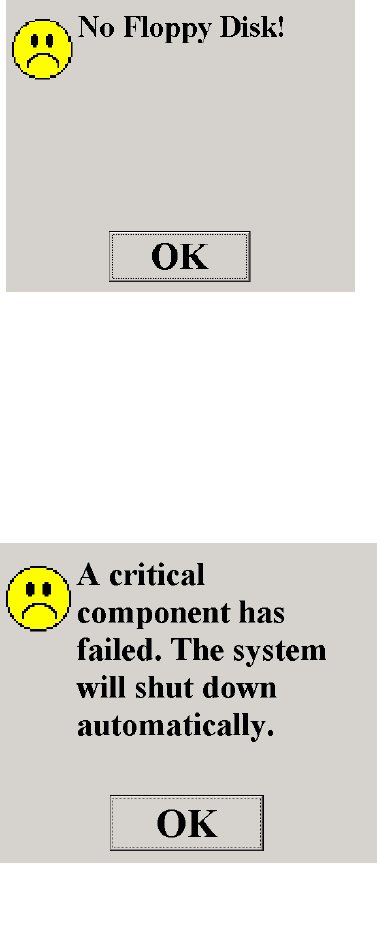
drive, floppy drive and PCMCIA slot for flash memory. Insert the floppy disk and flash memory
card into their correct locations prior to turning on the power. If the system is turned on without
the floppy and/or flash memory in place you will get a message telling you what is missing.
When you press “OK” the next screen will tell you a critical component has failed. You must
press “OK” and the system will shut down. See figures 4.1.1A and 4.1.1B.
4. Election Official Operating Procedures
Figure 4.1.1B
Fi
g
ure 4.1.1A
Avante International Technology, Inc.
Version 4.4.3 2
Plug the VOTE-TRAKKER™ into the power outlet via UPS. Press the Power On/Off switch
button at the rear bottom of the VOTE-TRAKKER™ to turn on the system. This will turn on the
computer and other hardware components. Once the computer is turned on, press the CD-RW
door open-button, place the ballot CD into the CD-RW drive and close the door.
Wait until the system boots up and you see the following screen, Figure 4.1.1C.
Figure 4.1.1C
CD-RW Drive Floppy Drive
Flash Memory
(PCMCIA Slot)
CD-RW Door open button
Floppy Drive
Flash Memory
(PCMCIA Slot)
Avante International Technology, Inc.
Version 4.4.3 3
Check around the perimeter of this window to make sure the touch screen is working. If the
touch screen is functioning properly, then press the “No” button to move to the next screen. If
the touch screen is off calibration (meaning the pointer is not exactly where your finger touch is),
then use your finger to adjust the position to get the arrow to point to the “Yes” button. When
the arrow is over the “Yes” button, press the screen to activate the calibration program. Details
of the calibration program are described in section 6.3. If the touch screen is completely non-
functional, contact Avante International Technology, Inc. for assistance.
Upon completion of calibrating the touch-screen or aborting the touch-screen calibration process,
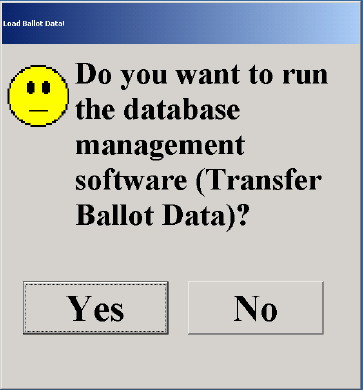
Figure 4.1.1D will confirm that the computer has detected a ballot CD in the CD-RW drive:
Press the “Yes” button to continue loading new ballot. If you press “No”, the system will start to
load the most recent voting database. If you press “No” by mistake you can return to this screen
by removing the CD-RW and then replacing it.
Figure 4.1.1D
Avante International Technology, Inc.
Version 4.4.3 4
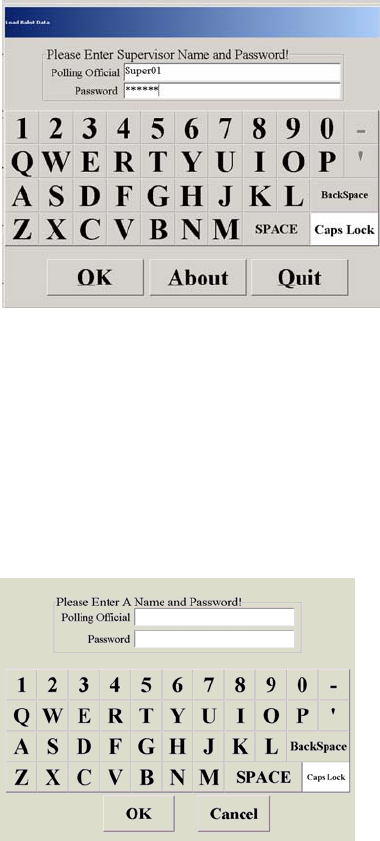
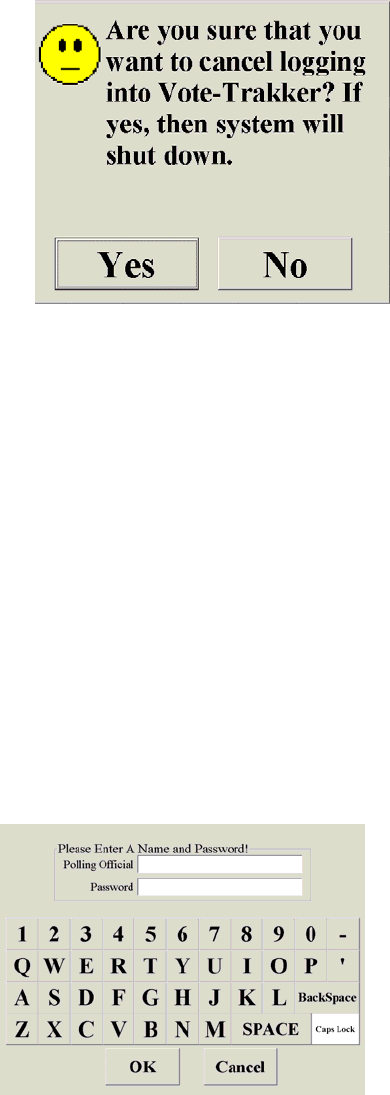
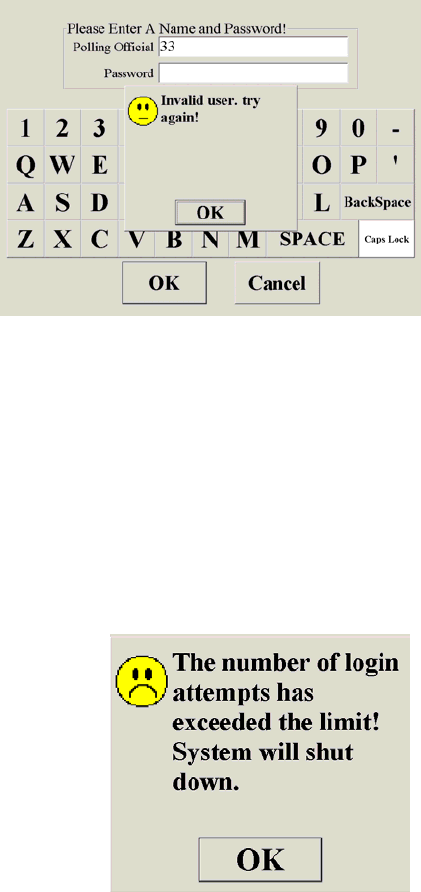
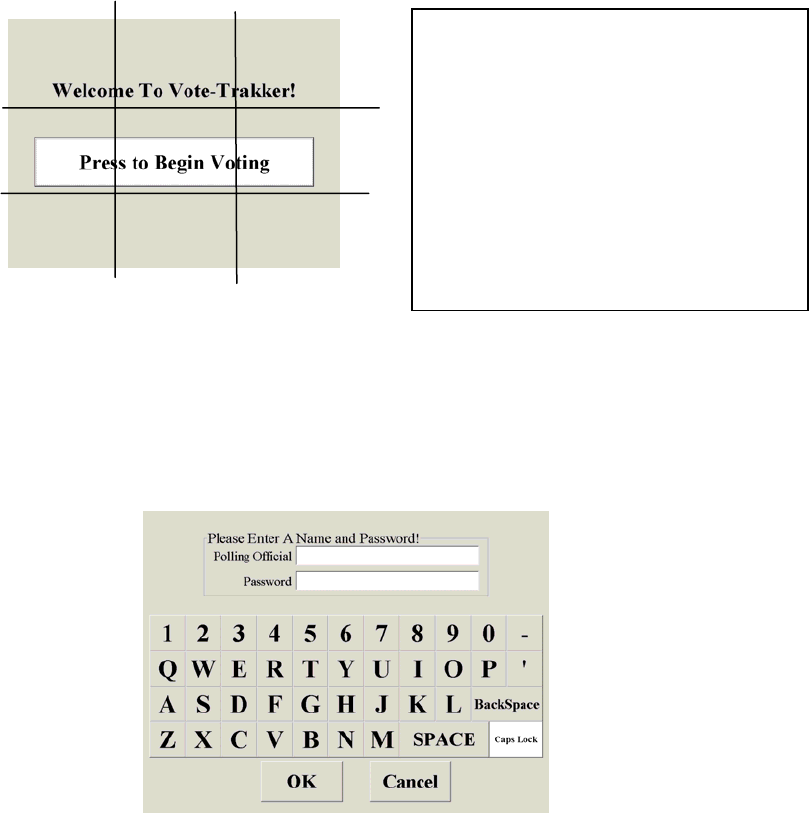
The next screen, Figure 4.1.1E asks for the Polling Official username and password for loading
ballot. Use exactly the same username and password as in the Manage Ballot Data Module. Both
the username and the password are case-sensitive. After you enter the Polling Official, press on
the “Password” space to enter the correct password. The default Polling Official is Super01 and
the Password is Vote01. Press “OK” to continue.
If you choose “Quit” the system will return to the voting module log-in screen Figure 4.1.1F
and load the last ballot used after the Polling Official username and Password are entered. The
system default settings require two sets of polling officials’ names and passwords: Enter 11 in
the polling official’s field and leave the password field blank, press “OK”. Enter 22 in the
polling official’s field, and leave the password field blank, press “OK”.
Fi
g
ure 4.1.1E
Figure 4.1.1F
Avante International Technology, Inc.
Version 4.4.3 5
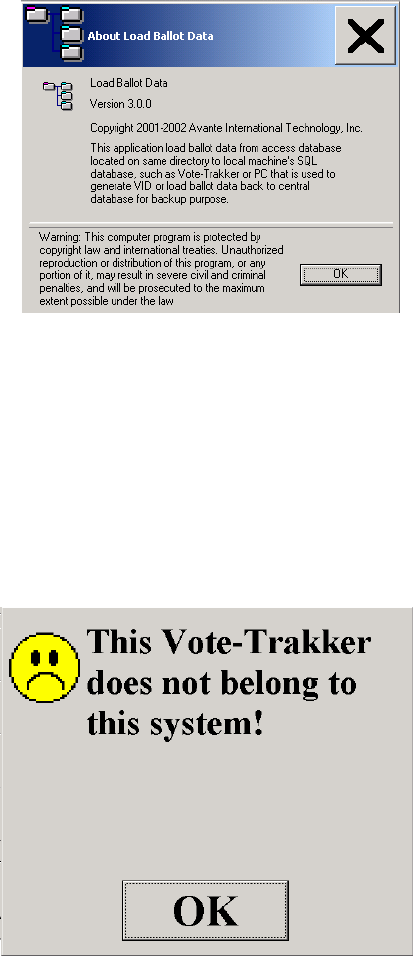
You can press the “About” button to see the version number of the “Load Ballot Data” software
Figure 4.1.1G.
After the correct username and password are entered, Figure 4.1.1E the computer will verify that
the VOTE-TRAKKER™’s serial number is included in the ballot CD. If the computer cannot
find a matching number in the CD, the following screen, Figure 4.1.1H will appear to notify the
election official:
Figure 4.1.1H
If this happens, check with the county election office to add this voting machine’s serial number
into the ballot program and generate another CD disc to try loading again. The serial number is
located on the outside back of the unit.
Figure 4.1.1G
Avante International Technology, Inc.
Version 4.4.3 6
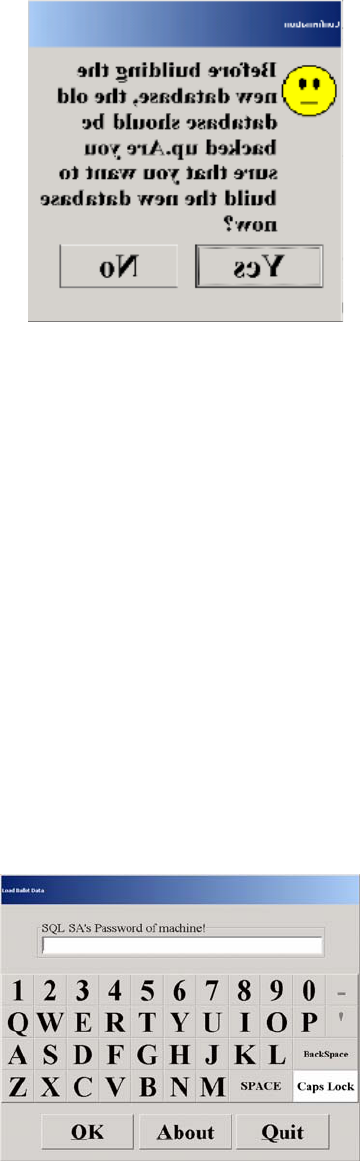
If a matching number in the CD is found, then the screen in Figure 4.1.1I appears.
Press on the “Yes” button to continue. The above screen is a reminder to back up the old
database. The actual back up procedure should have been done at the Ballot Generation
Computer by writing the old database into a ballot CD. If you choose “No” the system will return
to the voting module login screen Figure 4.1.1D and load the last ballot used.
Figure 4.1.1J is the SA (System Administrator) password screen. The default password is null
(meaning no password required). Press the “OK” button to continue. The “About” button will
show you the version. “Quit” returns to the voting module login screen Figure 4.1.1F and loads
the last ballot used.
NOTE: If the local jurisdiction election office has changed the SA password, you must enter the
correct password to continue.
Figure 4.1.1I
Figure 4.1.1J
Avante International Technology, Inc.
Version 4.4.3 7
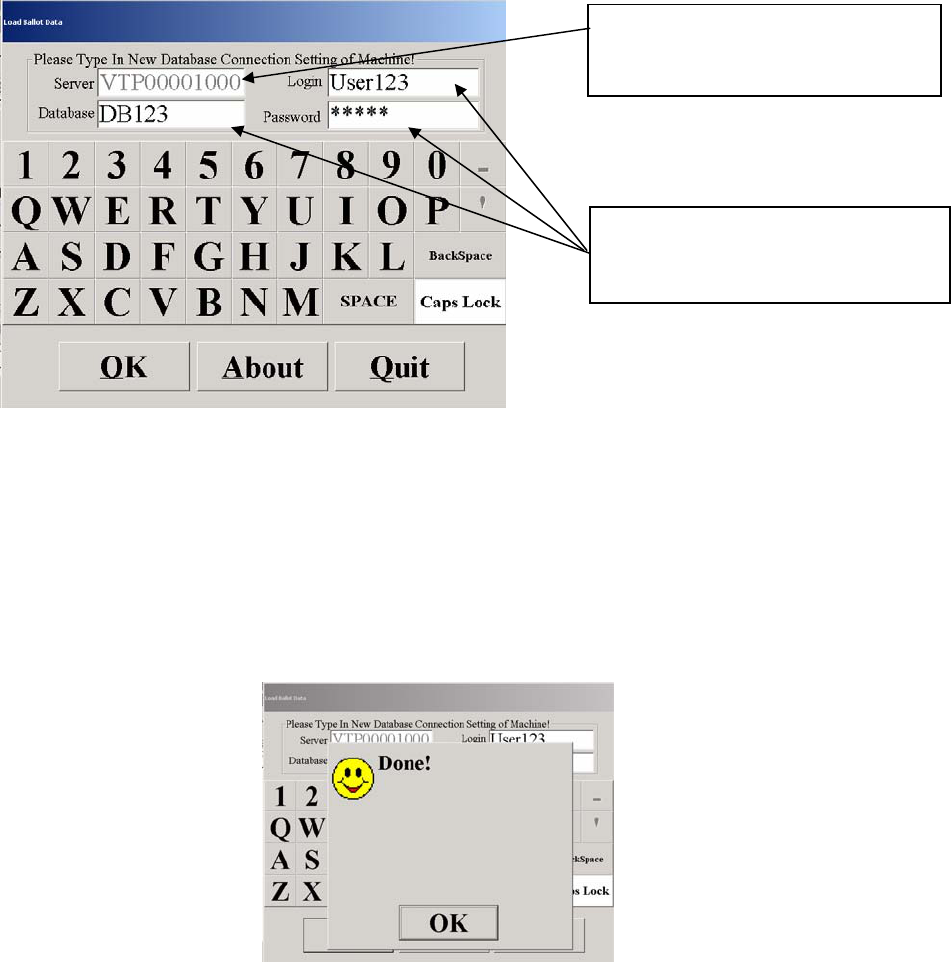
The next screen allows you to set up the Database name, Login user name and Password for the
new database, Figure 4.1.1 K. If you do not supply a password a warning screen appears but it
will allow you to continue without a password. This is not recommended. Always keep a record
of the database name, login user name and password for future reference and audit purpose.
Press “OK” to continue. If you choose “Quit” the system will return to the voting module login
screen Figure 4.1.1F and load the last ballot used.
The computer will begin to set up the new database. A horizontal status bar will appear on the
screen to show the progress. Wait until you see the next screen, Figure 4.1.1L.
This confirms that the ballot information has been successfully transferred onto this voting
machine. A new database has been set up for the upcoming election. Press “OK” to continue.
Vote-Trakker serial number
You cannot change it.
You can change the Database name,
Login user name and Password.
Figure 4.1.1K
Figure 4.1.1 L

Avante International Technology, Inc.
Version 4.4.3 8
4.1.2 Prepare hardware components
After the ballot has been loaded the computer will automatically start to run the voting program
based on the new database. Before entering the passwords in Figure 4.1.2A the election official
should also know the answer to the following:
• Will raw data be recorded onto a CD-R disc (refer to Generate Ballot Data Module
ÎDatabase SettingsÎRaw Data Storage) ?
If the answer is yes, press the CD-RW door open-button and take the ballot CD disc out from
the CD-RW drive. Put a new, formatted CD-R disc into the CD-RW and close the door. If
the answer is no, just take out the ballot CD disc.
• Raw data will be recorded onto a flash memory card
Make sure a flash memory card has been inserted into the PCMCIA slot.
• Will the internal thermal printer print a receipt after each ballot cast?
If yes, make sure the printer has enough paper left. Replace paper if necessary.
After the election official is sure that all necessary hardware components are present, press the
“Cancel” button, Figure 4.1.2A to quit the process. The purpose of doing this is to shut down the
system. When the “Cancel” button is pressed, Figure 4.1.2B will ask you to confirm that you
want to shut down the system. If you enter the Polling Official’s usernames and passwords the
system will go directly to Figure 4.1.3D to begin testing.
Figure 4.1.2A
Avante International Technology, Inc.
Version 4.4.3 9
Figure 4.1.2B
Press “Yes” to continue shut down. When you see the message “It is now safe to turn off the
computer” on the screen, press the VOTE-TRAKKER™’s power on/off switch located at the
rear of the machine to shut down. VOTE-TRAKKER™ is now ready for the election. Press “No”
to return to Figure 4.1.3A.
4.1.3 Test the VOTE-TRAKKER™
Press the power on/off button to start VOTE-TRAKKER™ . Wait until you see the “Calibrate
Touch-Screen?” screen again. Press “No” to skip it. The following screen Figure 4.1.3A will
appear.
Figure 4.1.3A
Avante International Technology, Inc.
Version 4.4.3 10
Enter the required number of polling officials’ names and passwords. The system default settings
require two sets of polling officials’ names and passwords: Enter 11 in the polling official’s field
and leave the password field blank, press “OK”. Enter 22 in the polling official’s field, and leave
the password field blank, press “OK”. (The local jurisdiction election office should change this
in the Generate Ballot Data Module.)
Figure 4.1.3B will appear if there is any incorrect entry:
Figure 4.1.3B
Warning: Three consecutive failed attempts to enter the correct username and password
will lead the system to shut down. If you see the following screen, Figure 4.1.3C, you must
press “OK” which shuts down the system. You will need to turn the machine on again, confirm
the correct username and password and retry.
Figure 4.1.3C
Avante International Technology, Inc.
Version 4.4.3 11
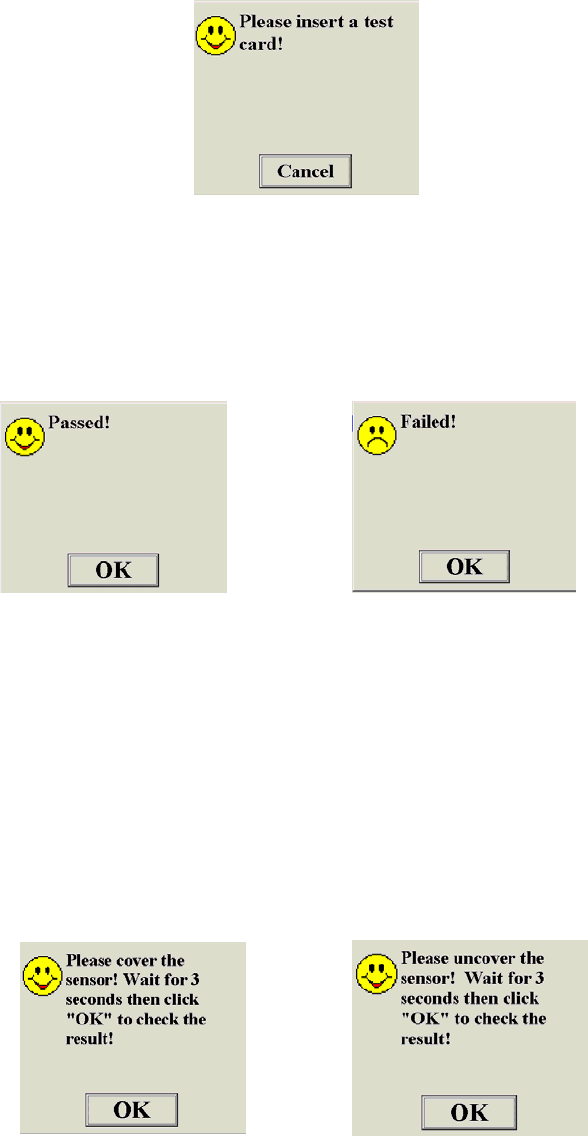
Once the required usernames and passwords are accepted, the following screen appears:
Insert the Smart Card Reader test card. This card tests the functionality of the smart card reader.
If the reader is performing properly, it will accept the card, read it, push it back out and Figure
4.1.3E appears.
Figure 4.1.3E or Figure 4.1.3F
Press “OK” if Passed. If you see Figure 4.1.3F, the card reader failed Try again with another
card. If it still does not work, then notify a supervisor for repair. If the reader fails press “OK”
to continue. For voting the VID # must be entered manually.
The next start-up test is the presence sensor. First it asks you to cover the sensor for three
seconds, Figure 4.1.3G. Press “OK”. It then asks you to uncover the sensor, Figure 4.1.3H. Press
“OK”. Make sure there is nothing in front of the sensor for five feet.
Figure 4.1.3G Figure 4.1.3H
Figure 4.1.3D
Avante International Technology, Inc.
Version 4.4.3 12
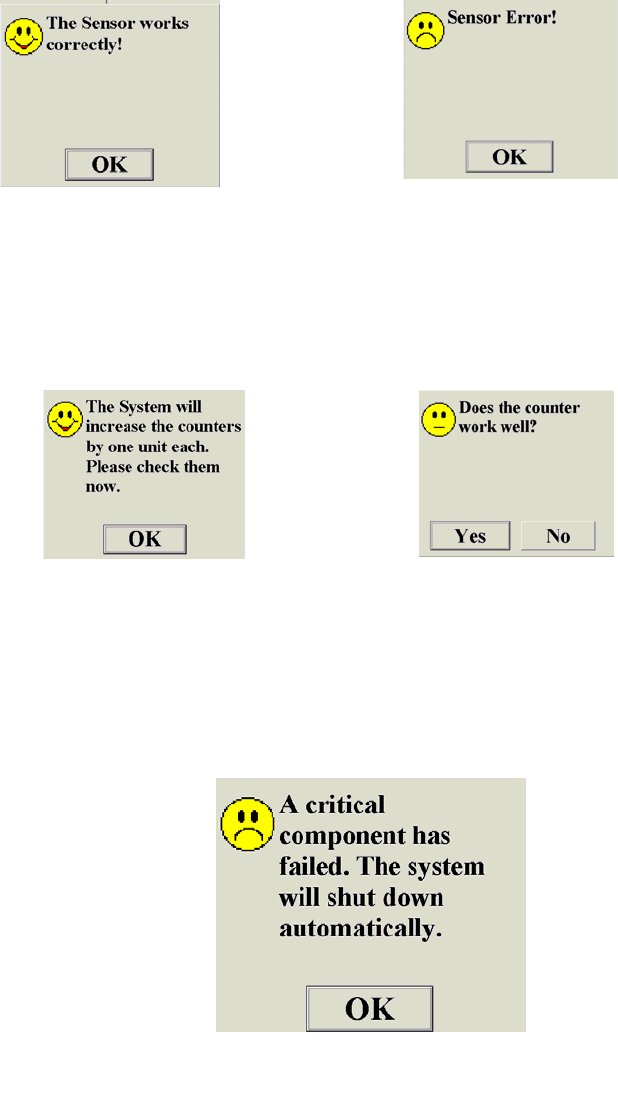
If everything is functioning, the Figure 4.1.3I message will appear, otherwise the Figure 4.1.3J
message will appear. Again report any problems to the supervisor for repair. A sensor error will
not stop the voting process. Press “OK” to continue.
Figure 4.1.3I Figure 4.1.3J.
The final test is for the counters. The counters are increased by one increment. Note the counts
on both counters and press “OK”, Figure 4.1.3K. A visual check is made to see if both moved up
one count.
Enter “Yes” or “No” depending on the counter function test. If the answer to the counter function
test is “No”, the voting program will be terminated and the system will shut down, Figure
4.1.3N. This voting unit is not suitable for conducting an election until the counter is repaired.
Figure 4.1.3K Figure 4.1.3L
Figure 4.1.3N
Avante International Technology, Inc.
Version 4.4.3 13
If the two counters are functioning properly, the VOTE-TRAKKER™ performs other internal
tests for all other critical components. The test will include the hard drive, floppy disk, flash
memory cards (if selected), CD-R disc (if selected) and printer. If any of the critical components
are missing or nonfunctional, a screen similar to Figure 4.1.3M will appear to notify the election
official as to what component/s have been found to be non-functional.
Figure 4.1.3M
Once the “OK” button is pressed, Figure 4.1.3N appears. Press the “OK” button to shut down the
system. Report the failure to the supervisor for necessary repair.
Figure 4.1.3N

Avante International Technology, Inc.
Version 4.4.3 14
When the VOTE-TRAKKER™ confirms that all the critical components are functional, it will
print out a report detailing all the tests performed (see Figure 4.1.3O).
Description of Test Report:
- Election Type: Based on description assigned
during ballot generation.
- Test Time: Time the report was printed.
- Vote-Trakker: The network identification of
the computer in the Vote-Trakker™.
- Software Version: The version of the Voting
module.
- Hardware Version: The version number of
the Vote-Trakker™ hardware.
- Machine ID: Assigned during ballot
generation. A unique number.
- Machine Code: Used for the voter receipt.
- Allocated Name: The name assigned in ballot
generation for this particular Vote-Trakker™.
- Machine Status: Either closed or open for
voting.
- Raw Data File: Checks raw data file(s) for
availability and to make sure they are the same.
- Times are listed for opening, closing, first
and last cast of votes.
- Each major device is checked for operational
status.
- Each storage media is checked for available
memory size. If empty (e.g. no floppy in drive)
the Test will read EMPTY!
- Spaces are provided to write down the
counter information and appropriate signatures.
Spaces are provided for signatures and
countersignatures for all parties to
agree that the machine is ready for
voting.
Election Type: General Election
Test Time: 2002-3-25 15:01:41
Vote-Trakker: VTP000010001007
Software Version 4.3
Hardware Version 1.3.0
Machine ID: 2
Machine Code: 02
Allocated Name: VTP000010001007
Machine Status: Close
Raw Data File is OK!
03-20-2002 06:45:58
Open Poll by Polling Official 11,22
03-20-2002 06:46:09
First Ballot Cast
03-20-2002 15:24:25
Last Ballot Cast
03-20-2002 16:00:03
Close Poll by Polling Official 11,22
Device Test Status
Battery: PASSED! 100.00%
Counter: PASSED!
Printer: PASSED!
Sensor: PASSED!
Smart Card: PASSED!
Sound: PASSED!
Store Media Size(Available) Test
A:\Floppy 1344.2K AVAILABLE
C:\Hard Drive 16499342.5K AVAILABLE
D:\CD-ROM 681080 K AVAILABLE
E:\Flash Mem 31202 K AVAILABLE
Beginning Public Counter Number
Ending Public Counter Number
Beginning Protective Counter Number
Ending Protective Counter Number
Polling Officials Signature
X______________________________________________
X______________________________________________
Observers: X___________________________________
Figure 4.1.3O
Avante International Technology, Inc.
Version 4.4.3 15
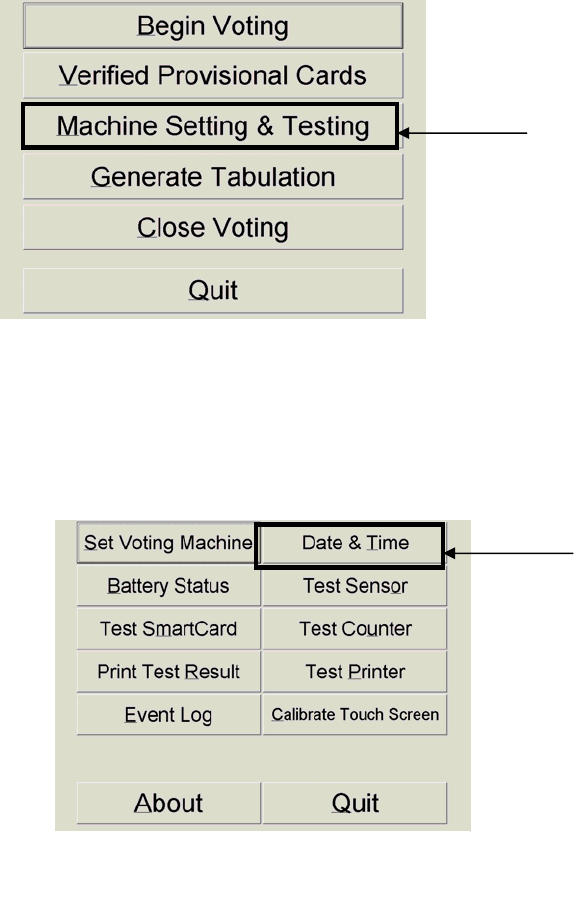
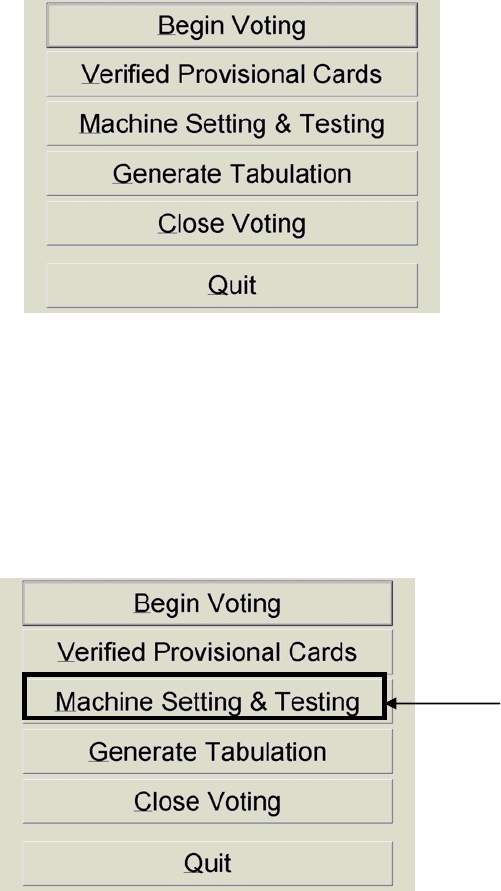
After printing out the report. Figure 4.1.3P will appear. Press the “Machine Setting & Testing”
button.
Press the “Date & Time” on the next screen, Figure 4.1.3Q.
Figure 4.1.3Q
Press
Figure 4.1.3P
Press
Avante International Technology, Inc.
Version 4.4.3 16
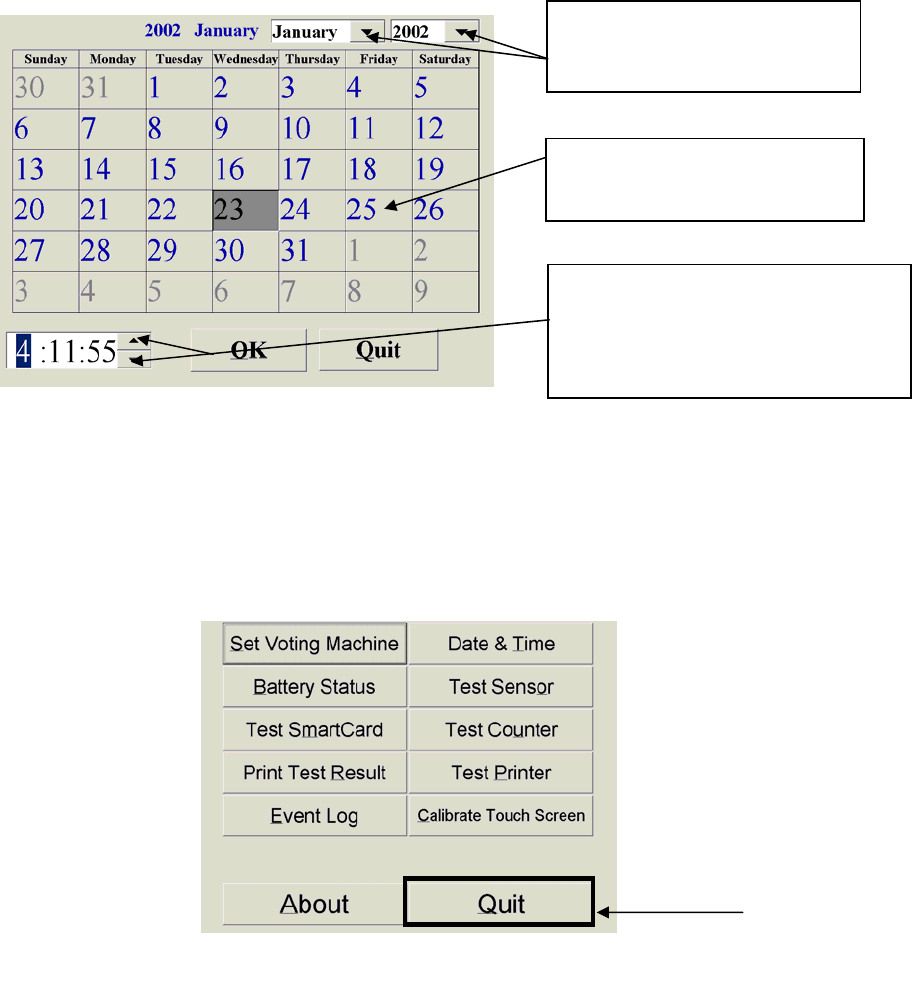
Check that the system’s date and time are correct. If not, adjust the date and time, Figure 4.1.3R.
Figure 4.1.3 R
Press “OK” when the date and time are correct.
Press “Quit” to return to Figure 4.1.3Q.
Since the other functions have been completed, press the “Quit” button in Figure 4.1.3 Q.
Adjust “Month” and “Year”
from the drop-down list.
Adjust “Date” by touching
the correct date
(
25th
)
.
Highlight the “hour” and use the
up or down arrow to adjust. Do
the same to adjust “Minute”.
Figure 4.1.3Q
Press
Avante International Technology, Inc.
Version 4.4.3 17
The screen, Figure 4.1.3 P will return. Press the “Begin Voting” button.
The following screen Figure 4.1.3S will appear.
Figure 4.1.3 S
This screen means that the current database has not been activated for voting. The polling official
on Election Day should activate this. The voting machine is now ready to ship to its polling
location. Press the “OK” button to return to screen 4.1.3P.
Figure 4.1.3P
Press
Avante International Technology, Inc.
Version 4.4.3 18
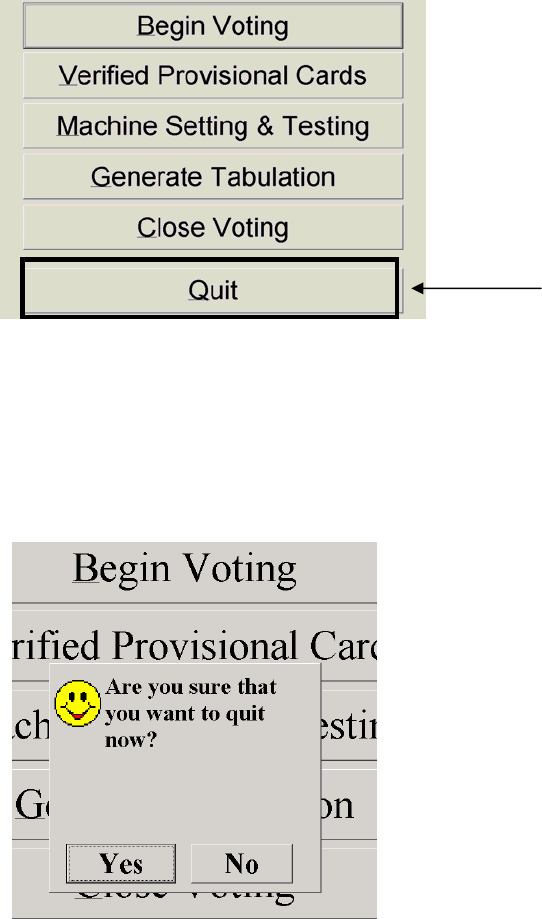
Press the “Quit” button.
The system will ask you to confirm your “Quit” command, Figure 4.1.3Q. Choose “Yes” to
confirm. Press on the “No” button to return to Figure 4.1.3P.
Figure 4.1.3Q
Figure 4.1.3P
Press
Avante International Technology, Inc.
Version 4.4.3 19
When you press “Yes” the machine will automatically begin to shut down. When the message “It
is now safe to turn off your computer” shows up on the screen, press the VOTE-TRAKKER™’s
power ON/Off button at the rear of the machine to shut down the whole system. Put the top
cover back to the voting machine and close all the three latches so that the top cover is locked to
the bottom cover. Seal the machine with tags on left and right hand side of the VOTE-
TRAKKER™. Unplug the power cord and move the VOTE-TRAKKER™ into the shipping
box. Put the power cord into the shipping box.
If this VOTE-TRAKKER™ is planned to serve ADA voters, ship a set of Avante ADA voting
keyboard and earphone with the VOTE-TRAKKER™ so that the local election judge can plug
them in at the polling place. Ship a UPS back up system for each VOTE-TRAKKER™ if
necessary.
When the machine arrives at the polling place, polling official will perform the same testing
procedure outlined in the Section 4.1.3 to ensure that the machine is functional. Plug in the ADA
voting keyboard and the earphones.
NOTE: Once ballots have been stored within VOTE-TRAKKER™, the machine should be
locked and tagged with tamper-obvious labels and ties. Any subsequent opening of the
machine should be documented and signed by polling workers and countersigned by
supervisor or overseeing body.
Avante International Technology, Inc.
Version 4.4.3 20
4.2 Open Poll on Election Day
Make sure the VOTE-TRAKKER™ is connected to a UPS backup system and plugged into a
working electrical outlet before turning on the voting machine. Press the Power On/Off
switch button at the rear bottom of the VOTE-TRAKKER™ to turn on the system. This will
turn on the computer and other hardware components. Wait until the system boots up and
you see the following screen, Figure 4.2A.
Check at the corners of this window to make sure the touch screen is working. The touch screen
calibration should have been tested prior to delivery. If the touch screen is functioning properly,
then press the “No” button to move to the next screen, Figure 4.2B will appear. If the touch
screen is off calibration (meaning the pointer is not exactly where your finger touch is), then use
your finger to adjust the position to get the arrow to point to the “Yes” button. When the arrow
is over the “Yes” button, press the screen to activate the calibration program. Details of the
calibration program are described in section 6.3.
Figure 4.2A
Figure 4.2B
Avante International Technology, Inc.
Version 4.4.3 21
Enter the required number of polling officials’ names and passwords. The system default settings
require two sets of polling officials’ names and passwords: Enter 11 in the polling official’s field
and leave the password field blank, press “OK”. Enter 22 in the polling official’s field, and leave
the password field blank, press “OK”. (The local jurisdiction election office should change this
in the Generate Ballot Data Module.)
The following screen will appear if there is any incorrect entry:
Warning: Three consecutive failed attempts to enter the correct username and password
will lead the system to shut down. If you see the following screen, Figure 4.2D, you must press
“OK” which shuts down the system. You will need to turn the machine on again, confirm the
correct username and password and retry.
Figure 4.2D
Figure 4.2C
Avante International Technology, Inc.
Version 4.4.3 22
Once the required usernames and passwords are accepted, the following screen, Figure 4.2E
appears.
Insert the Smart Card Reader test card. This card tests the functionality of the smart card reader.
If the reader is performing properly, it will accept the card, read it, push it back out and Figure
4.2F appears.
Press “OK” if Passed. If you see Figure 4.2G the card reader failed Try again with another card.
If it still does not work, then notify a supervisor for repair. If the reader fails press “OK” to
continue. For voting VID # must be entered manually.
The next start-up test is the presence sensor. First it asks you to cover the sensor for three
seconds, Figure 4.2H. Press “OK”. It then asks you to uncover the sensor, Figure 4.2I. Press
“OK”. Make sure there is nothing in front of the sensor for five feet.
Figure 4.2E
Figure 4.2F Figure 4.2G
Fi
g
ure 4.2H Figure 4.2I
Avante International Technology, Inc.
Version 4.4.3 23
The final test is for the counters. The counters are increased by one increment. Note the counts
on both counters and press “OK”, Figure 4.2J. A visual check is made to see if both moved up
one count. Record the initial reading of every counter before conducting counter testing.
Enter “Yes” or “No” depending on the counter function test Figure 4.2K. If the answer to the
counter function test is “No”, the voting program will be terminated and the system will shut
down, press “OK”, Figure 4.2L. This voting unit is not suitable for conducting an election until
the counter is repaired. When you press “Yes” the system will print out Figure 4.2M.
Figure 4.2J Figure 4.2K
Figure 4.2L

Avante International Technology, Inc.
Version 4.4.3 24
When the VOTE-TRAKKER™ confirms that all the critical components are functional, it will
print out a report detailing all the tests performed (see Figure 4.2M).
Description of Test Report:
- Election Type: Based on description assigned
during ballot generation.
- Test Time: Time the report was printed.
- Vote-Trakker: The network identification of
the computer in the Vote-Trakker™.
- Software Version: The version of the Voting
module.
- Hardware Version: The version number of
the Vote-Trakker™ hardware.
- Machine ID: Assigned during ballot
generation. A unique number.
- Machine Code: Used for the voter receipt.
- Allocated Name: The name assigned in ballot
generation for this particular Vote-Trakker™.
- Machine Status: Either closed or open for
voting.
- Raw Data File: Checks raw data file(s) for
availability and to make sure they are the same.
- Times are listed for opening, closing, first
and last cast of votes.
- Each major device is checked for operational
status.
- Each storage media is checked for available
memory size. If empty (e.g. no floppy in drive)
the Test will read EMPTY!
- Spaces are provided to write down the
counter information and appropriate signatures.
Spaces are provided for signatures and
countersignatures for all parties to
agree that the machine is ready for
voting.
Election Type: General Election
Test Time: 2002-3-25 15:01:41
Vote-Trakker: VTP000010001007
Software Version 4.3
Hardware Version 1.3.0
Machine ID: 2
Machine Code: 02
Allocated Name: VTP000010001007
Machine Status: Close
Raw Data File is OK!
03-20-2002 06:45:58
Open Poll by Polling Official 11,22
03-20-2002 06:46:09
First Ballot Cast
03-20-2002 15:24:25
Last Ballot Cast
03-20-2002 16:00:03
Close Poll by Polling Official 11,22
Device Test Status
Battery: PASSED! 100.00%
Counter: PASSED!
Printer: PASSED!
Sensor: PASSED!
Smart Card: PASSED!
Sound: PASSED!
Store Media Size(Available) Test
A:\Floppy 1344.2K AVAILABLE
C:\Hard Drive 16499342.5K AVAILABLE
D:\CD-ROM 681080 K AVAILABLE
E:\Flash Mem 31202 K AVAILABLE
Beginning Public Counter Number
Ending Public Counter Number
Beginning Protective Counter Number
Ending Protective Counter Number
Polling Officials Signature
X______________________________________________
X______________________________________________
Observers: X___________________________________
Figure 4.2M
Avante International Technology, Inc.
Version 4.4.3 25
Once the diagnostic test is completed, Figure 4.2N will appear. VOTE-TRAKKER™ is now
ready to be activated for voting as described in Section 4.2.1.
4.2.1 Activate the VOTE-TRAKKER™
Before voting can begin, the machine must be opened for polling. The “Opening” procedure is
required only once after a new ballot is loaded on to the voting unit. To open the machine for
voting, select the “Machine Setting & Testing” button from Figure 4.2N.
Press
Figure 4.2N
Figure 4.2N
Avante International Technology, Inc.
Version 4.4.3 26
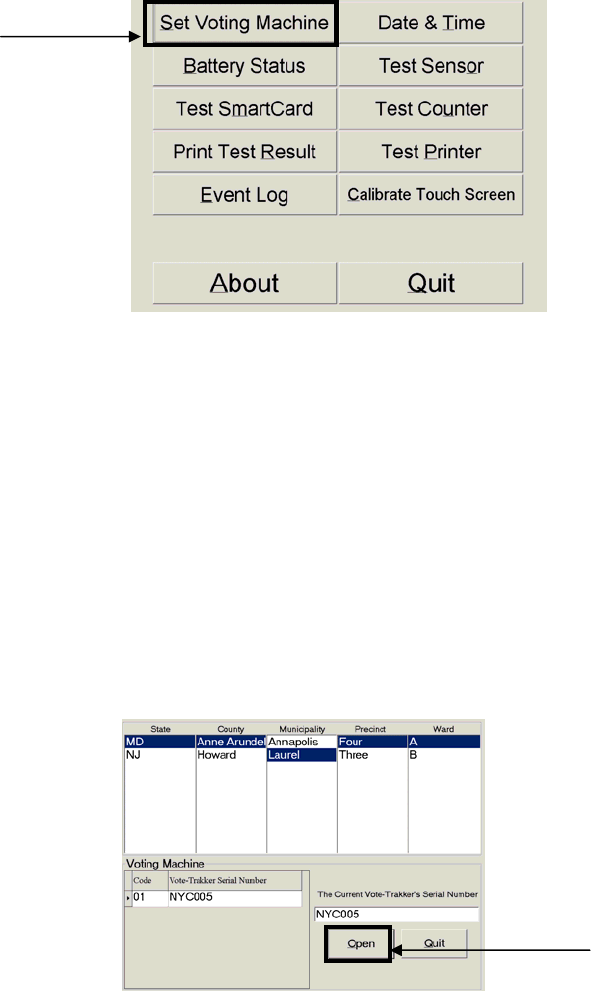
This brings Figure 4.2.1A. To activate the machine, select the “Set Voting Machine” button.
The computer will automatically find the ward, Figure 4.2.1B, where this VOTE-TRAKKER™
is supposed to be stationed. If the Ward designation is wrong the machine has been shipped to
the wrong location. Contact an Election Official immediately.
Press the “Open” button, Figure 4.2.1B [ NOTE: If the OPEN button is pressed before the preset
open poll time you will get a warning message for opening the poll early. If you insist on
opening, a record will be written into the Event Log. ]
Figure 4.2.1A
Press
Figure 4.2.1B
Press
Avante International Technology, Inc.
Version 4.4.3 27
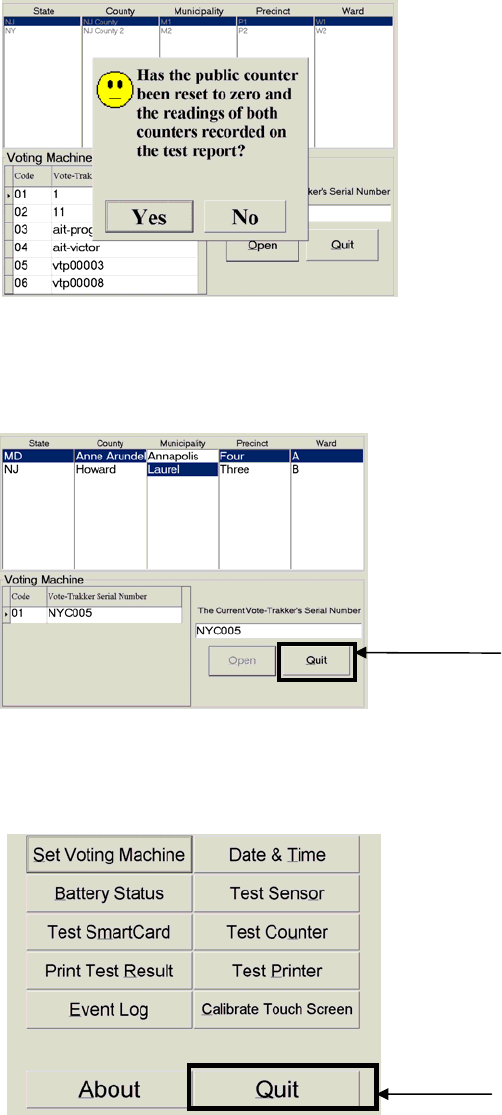
You will be reminded to reset the counter and record the current readings before continuing,
Figure 4.2.1C. The counter is reset to “0” by using the key provided. Press “Yes” to continue.
The system will print out zero tally reports. If you press “No” it returns to Figure 4.2.1B.
Press “Quit” in Figure 4.2.1D to set the machine.
This brings you back to the Figure 4.2.1A screen. Press “Quit” to go back to Figure 4.2.1E.
Figure 4.2.1A
Press
Figure 4.2.1D
Press
Figure 4.2.1C
Avante International Technology, Inc.
Version 4.4.3 28
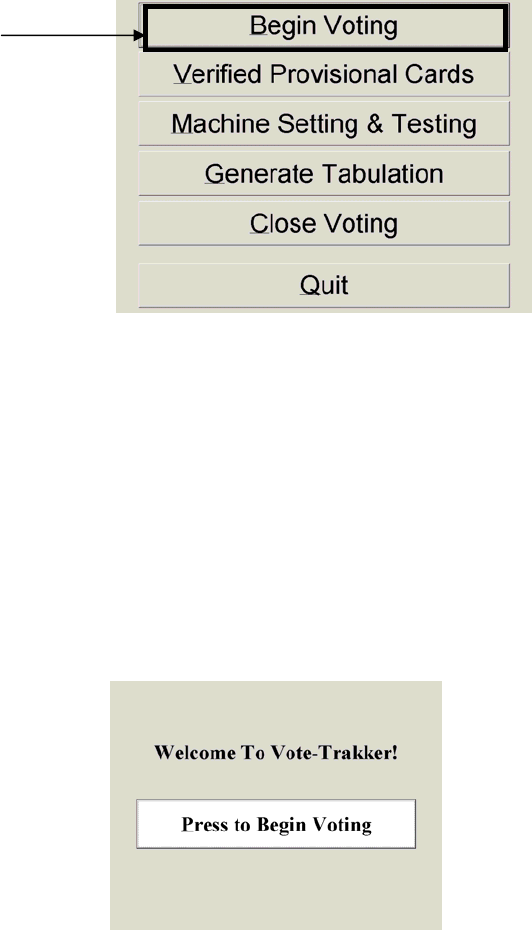
Press the “Begin Voting” button.
The “Welcome to VOTE-TRAKKER™” screen Figure 4.2.1F will appear, meaning that the
machine is ready for voting. Once a machine is ready for voting, both of the two counters will
increase their readings only by ballot cast. The “Check Counter” button in the “Machine Setting
and Testing” screen will be grayed out, and if the machine is turned off and then powered on
again, the counter will not be checked until the voting is closed.
Figure 4.2.1F
Press
Figure 4.2.1E
Avante International Technology, Inc.
Version 4.4.3 29
4.2.2 Ballot and Logic Test
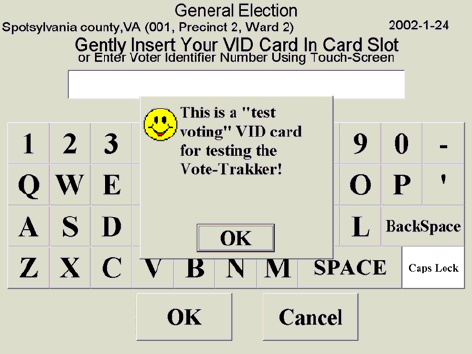
Polling officials can use a Test Voting Card to verify the ballot content is correct. For
information on how to generate Test Voting Card, refer to the Generate VID Module in the
Election Administrator’s Manual. If the election is General Election, a Test Voting Card issued
for a specific ward will bring up the ballot for that ward. If the election is Closed Primary
Election, a Test Voting Card will allow you to see what a political party’s ballot looks like in this
ward. In other words, the card is party-specific.
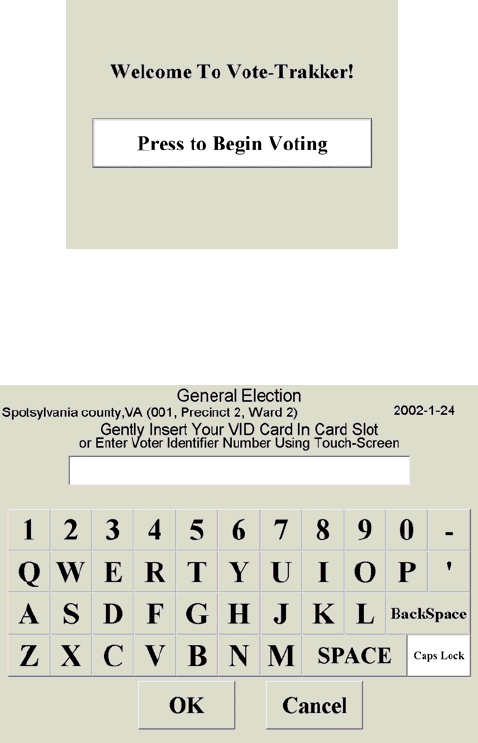
Press the “Press to Begin Voting” button, Figure 4.2.2A.
Insert the Test Card, Figure 4.2.2B and Figure 4.2.2C screen appears.
Figure 4.2.2A
Figure 4.2.2B
Avante International Technology, Inc.
Version 4.4.3 30
After pressing the “OK” button, the polling official can vote as a normal voter. Report
immediately if any inaccuracies are found in the ballot. Upon casting vote, the test voting result
will be stored in a Test Voting Tally, which will not influence the tally for other voting result.
The VOTE-TRAKKER™ will return the Test Voting Card to the polling official and the card
can be used as long as the corresponding database is active in the VOTE-TRAKKER™.
Figure 4.2.2C

Avante International Technology, Inc.
Version 4.4.3 31
4.2.3 Tally Accuracy Test (Optional)
To verify that the voting machine tabulates the vote cast correctly, you can get a tally of all the
test votes you cast in the last section. To get the tally, enter the correct screen touch-code as
explained in Figure 4.2.3A (For information on how to set screen touch-code, refer the Ballot
Generation ModuleÎ Database Settings)
When the correct touch-code is entered, the following screen, Figure 4.2.3B will ask for polling
officials’ username and password. The default user names are 11 and 22. There are no
passwords. Enter 11 and press “OK’ then enter 22 and press “OK”.
Figure 4.2.3B
The screen is divided into nine areas.
The screen touch-code is a specific
combination of 6 touches of any of
these nine areas. A touch on the first
of the six preset areas starts the
count; any subsequent incorrect touch
will set the count back to zero. Only
when the six preset areas are touched
in the correct sequence will the next
screen appear for entering password.
Figure 4.2.3A
Avante International Technology, Inc.
Version 4.4.3 32
After the correct usernames and passwords are entered, the administrative screen, Figure 4.2.3C
will appear.
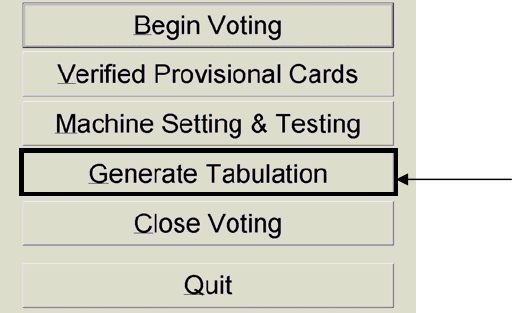
Press on the “Generate Tabulation” button. The VOTE-TRAKKER™’s printer will print out the
paper tally for test-voting only if the voting session has not been closed. Verify that the test-
voting tally conform to the totals of all the test votes cast by polling officials prior to the
tabulation. If required, sign on this verification and other test report. Press the “Begin Voting”
Figure 4.2.3C. The machine is ready for public voting.
Figure 4.2.3C
Press
Avante International Technology, Inc.
Version 4.4.3 33
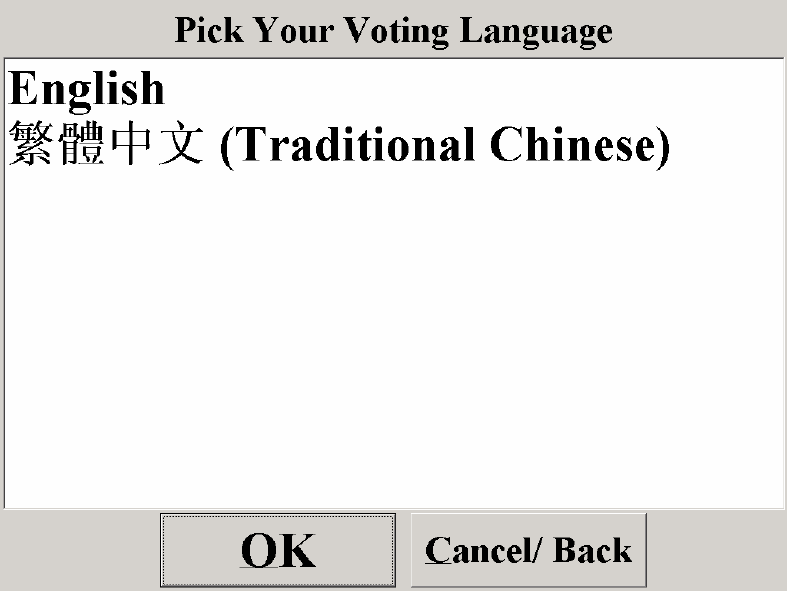
4.3 Choice of instruction language
There are some states that require multiple instruction languages for voting. In some cases, they
may even require the translation of the candidate names for citizens that may have English
language problems.
Typical foreign languages include Spanish, Chinese, Japanese, Korean, Vietnamese, etc. VOTE-
TRAKKER™ is equipped for various election languages. Depending on the jurisdiction, the
choice of languages may be the first screen that appeared after the entering of the VID#.
To select a language, press on the language to highlight it, and press “OK”.
Figure 4.3A
Avante International Technology, Inc.
Version 4.4.3 34
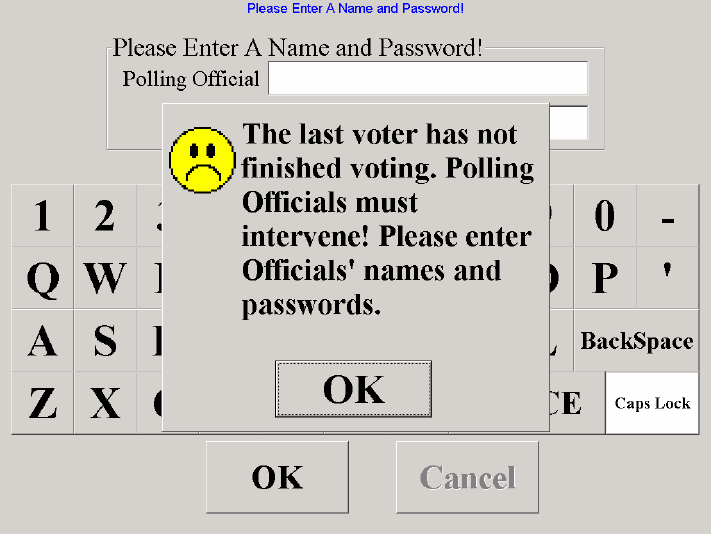
4.4 How to handle a “fleeing voter”
A “Fleeing voter” is defined as voters that leave the voting booth without casting their ballot.
VOTE-TRAKKER™ is programmed to “lock-up” the screen after a fixed amount of time after
the voter is absent. This lock-up occurs when the sensor cannot detect the voter’s presence after
a fixed amount of time passed while the voter has not taken additional voting actions. The time is
preset in the Generate Ballot Data module. VOTE-TRAKKER™ will freeze and the following
screen will appeared (Figure 4.4A). No one will be able to view the choices that were selected by
the fleeing voter. After the poll workers enter their passwords, the machine will cast the ballot
for the voter by casting “No Vote” for the rest of the contests that the voter has not voted. No
receipt will be issued.
No additional voting selection will be allowed in such cases. This helps to eliminate possible
tampering of the “fleeing” voter’s choices that have been expressed so far.
Figure 4.4A
Avante International Technology, Inc.
Version 4.4.3 35
4.5 How to activate the ADA function for visually impaired voters
ADA Voice-Assisted Voting using VOTE-TRAKKER™ may be activated with the help of the
poll worker by pressing the“F9” key on the special ADA voting keyboard.
Warning: Do not use a normal computer keyboard to conduct ADA voting. Doing so may
interrupt the normal process of the voice-assisted voting program.
The program is designed to allow voters that are visually impaired to be able to vote in private.
The voter will not require any assistance to complete the voting process.
1. A keyboard is used to assist the “Write-In” voting. Using specific keys on the keyboard
performs the rest of the voting. Only certain keys will be activated. The “-, MINUS” key on
the right hand upper corner, the “ENTER” key on the lower right hand corner, the “Escape”
key on the upper left corner, and the “CONTROL” key on the lower left hand corner. For
advanced users, the arrow keys are also available for faster scrolling through the ballot.
2. Only alphanumeric keys will be activated. All other key functions will be eliminated to avoid
possible errors.
3. The voting is activated by the polling worker/official pressing the “F9” to initiate this voice-
assisted voting. The poll worker then hands the keyboard to the voter and steps back to allow
the voter to vote in privacy.
4. The following protocol will be used once voice-assisted voting is activated:
The introduction and instructional portion starts with the following message:
“Welcome to voice-assisted voting. Please familiarize yourself with the four basic keys
that you will be using for this election. Each of the four keys is located at one of the four
corners of the keyboard unit.”
The keys are then taught to the voter with the following script:
“The first key is the enter key, located at the extreme lower right hand corner of the
keyboard unit. Please press on it now.”
The VOTE-TRAKKER™ will wait till a key is entered. If the key is incorrect, the
VOTE-TRAKKER™ will say “Please try again.” If it is correct, the script continues-
“You have found the enter key, this enter key is used when you select the candidate of
your choice in each contest. The second key is the minus key, located at the extreme
Avante International Technology, Inc.
Version 4.4.3 36
upper right hand corner of the keyboard unit. Please press on it now.”
The VOTE-TRAKKER™ will wait till a key is entered. If the key is incorrect, the
VOTE-TRAKKER™ will say “Please try again.” If it is correct, the script continues-
“You have found the minus key. This minus key is used to ask the machine to repeat
reading the current contest from the beginning. The third key is the control key, located at
the lower left-hand corner of the keyboard. Please press on it now.”
The VOTE-TRAKKER™ will wait till a key is entered. If the key is incorrect, the
VOTE-TRAKKER™ will say “Please try again.” If it is correct, the script continues-
“You have found the control key, this key is used only when you want to cast your vote
and finish your voting. The fourth key is the escape key, located at the upper left-hand
corner of the keyboard. Please press on it now.”
The VOTE-TRAKKER™ will wait until a key is entered. If the key is incorrect, the
VOTE-TRAKKER™ will say “Please try again.” If it is correct, the script continues-
“You have found the escape key, this key works as a fast forward key to let you skip an
instruction or a candidate. Please remember, if you selected a wrong candidate; do not
panic because you can correct it later before you press the control key to finish your
voting. If you are familiar with the arrow keys on the keyboard, you have an option to use
the down arrow key to skip to the next candidate or press on the up arrow key to go back
to the previous candidate.”
The voice type and speed are then selected with a series of interactive questions. The
flow of the script is shown in Figure 4.5A
Avante International Technology, Inc.
Version 4.4.3 37
Next, you can adjust computer voice. You can
choose the voice of gender, do you like male's
voice? If you do, press the enter key or press the
escape key to choose the system's default gender
voice.
You can choose the voice of gender, do you like
female's voice? If you do, press the enter key. Or press
the escape key to choose the system's default gender
voice
No Entry
- toggles
between
question
s
You have chosen
male voice.
You have
chosen system's
default setting
You have chosen
female voice.
After a voice gender is selected, a speed is selected...
Next, you can choose the speed of the voice. How
about this speed of the voice? You can press the
enter key to accept it.
You have chosen the
speed of the voice.
The arrow keys are used to adjust the speed faster and slower.
After a speed is selected, a pitch is selected...
Next, you can choose the pitch of the voice. How
about this pitch of the voice? You can press the
enter key to accept it.
You have chosen the
pitch of the voice.
The arrow keys are used to adjust the pitch higher and lower.
A voice gender is selected...
Fi
g
ure 4.5A

Avante International Technology, Inc.
Version 4.4.3 38
Once all the voice settings are selected, the ballot begins to be read. “Welcome to
“general election, 2000”. The same wording as that appears on the header of the specific
election.
If the election allows party line voting, the following instructions are read:
“This election allows straight party line voting, which means if you select a party, you
choose to fill in each contest with a candidate from that party and abstain from any
contest that does not have a candidate from the same party. To select a party, please press
on the enter key within (the time limit that was preset) seconds after the party is read.
You may press on the escape key to scroll through each party, or press on the minus key
to repeat reading at anytime. "
When the enter key is pressed, the choice is read back to them. If no selection is made,
the VOTE-TRAKKER™ will select the “Not Voting Party Line” selection.
When the first screen appears for the first contest, the machine will announce: “The first
contest is for “ Presidential Electors for” you are to vote for one or the number required
for the contests. The following are the candidates for this contest. Please press on the
ENTER key on the right hand lower corner within (the time limit that was preset)
seconds after the candidates names are read. You may press on the right top corner key to
initiate repeat reading at anytime.” The machine will start reading the candidates and
wait for (the time limit that was preset) seconds.
If the voter presses the lower right hand key within (the time limit that was preset)
seconds of the candidate’s names being read, the machine will accept it as a selection. It
will further confirm with “ You have just selected “name” for “Presidential Electors for”
for that contest.
If the voter press the “-” key, the machine will repeat the reading of contests from the
beginning.
The machine will automatically repeat from the very beginning of the contest if the voter
does not make his choice when all candidates’ names, “Write-In” option, and “No Vote
(abstain)” options have been all read. It will inform the voter that he/she has x minutes to
make his choices on each contests with, “Every voter has “x” minutes (or whatever
period of time required by the jurisdiction) to complete his/her vote. Please make your
selections or choose ‘No Vote (Abstain)’ if you have no preference or choice”.
Avante International Technology, Inc.
Version 4.4.3 39
If the voter still does not make his/her selection after the second reading, the machine will
automatically enter “No Vote (Abstain)” and read the following to the voter, “We have
assumed you are abstaining in this contest and entered “No Vote” for you. You may
change this vote when we review you selections after all of the contests.”
If the voter selected “Write-In” option, the machine will start by acknowledging his
choice for write-in by saying, “Now you have selected to write-in your own candidate. If
you do not know how to type on a keyboard, please press on the escape key at any time to
cancel this write in.”
After the entry is made, the machine will read back the entry by saying, “The first name
is “John”. If you want to make change please press on ENTER key on the lower right
hand corner within next XX seconds.”
If a change is to be made, the machine will ask the voter to enter the name again by
saying, “Please enter the first name (or last name or middle initial) of your candidate by
using the keyboard provided. And press on the ENTER key on the lower right hand
corner when you finished.”
If no change is initiated, the machine will ask the voter to enter the next name by saying,
“Please enter the last name (or last name or middle initial) of your candidate by using the
keyboard provided. And press on the ENTER key on the lower left hand corner when you
finished”
“The last name is “Jones”. If you want to make change please press on ENTER key on the
lower right hand corner within next XX seconds.”
When the voter finished his write-in choice, the machine will move onto the next contest as
normal.
When the next contest is shown on the screen, the machine will make the following
announcement: “The next contest is for the position of “US Senator”, you are to vote for one,
(or the number required for the contest) the following are the candidates for this contest.
Please press on the ENTER key on the right hand lower corner within XX seconds when the
candidates names are read. You may press on the right top corner key to initiate repeat
reading at anytime.”
Avante International Technology, Inc.
Version 4.4.3 40
The process repeats itself until all contests, proposals or propositions are done. The machine
will read the selections made by the voter on the left hand screen back to the voter and
inform him/her the following:
“You have just completed your selections of all of the contests and questions for this
election. The followings are your selections. You may press the ENTER key, within xx
seconds after the name for the specific position is read to make another selection on that
position. If no changes are needed. Please press the CONTROL key, on the lower left-hand
corner of the keyboard to cast your vote.”
If the voter presses for any change, the machine will start as if the new contest is being
announced. It any changes have been made, the machine will remind the voter to cast his
vote by saying,
“Please press on the “CONTROL” key on the lower left hand corner of your keyboard to cast
your vote.”
The machine will repeat itself after the voter presses on the lower left hand key to cast his/her
vote with the same reminder as the visual reminder:
“Please confirm your vote by pressing on the “CONTROL” key on the lower left hand corner
of your keyboard to cast your vote again.”
After the casting of vote is confirmed, the machine will print the receipt and remind the voter
to take the receipt with,
“Thank you for voting. Please take your voter receipt coming out from printer output port
located approximately 8 inches up from the lower left hand portion of the voting machine.”
Avante International Technology, Inc.
Version 4.4.3 41
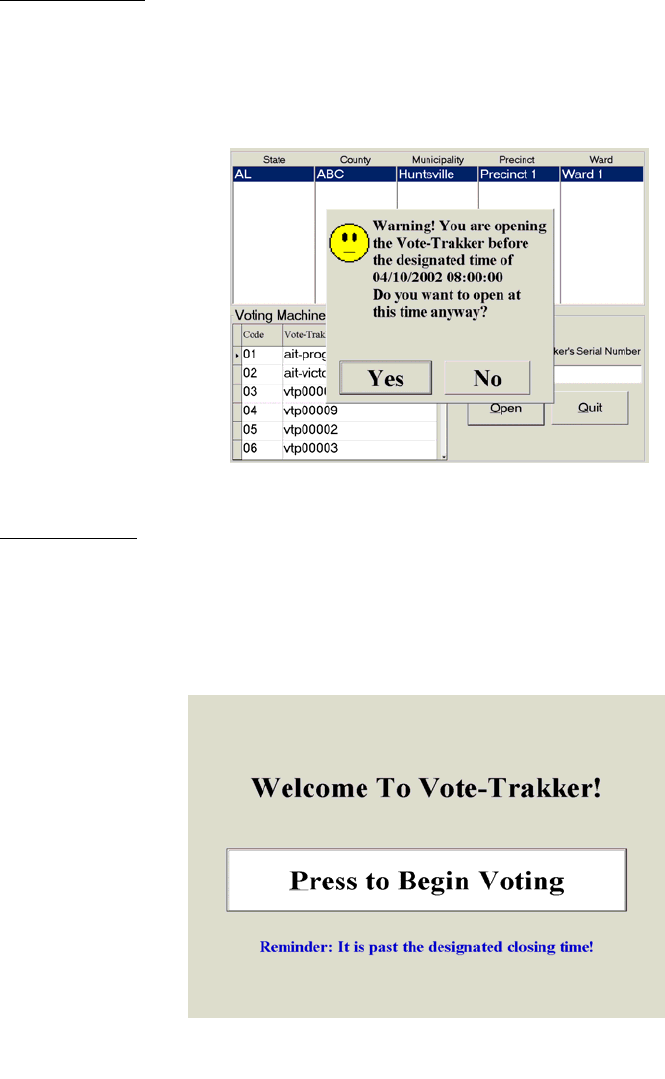
4.6 Opening and Closing Times
The opening and closing times can be preset in the ballot generation stage of setting up the
voting machines. The date and times that are entered are used for reminder purposes. Opening
times and closing times are completely independent functions so one can be used without the
other.
Opening Time:
This time is set for the earliest that the machine can be opened. When a poll worker selects the
“Open” function prior to the set time, a warning will be displayed. To continue, the poll worker
cancels the warning and the event log records that this function was bypassed.
Closing Time:
Never will the voting machine lock out because it is past time for voting. Most states allow
those that arrived to the polling place prior to the closing time have the opportunity to vote.
What will appear on the “Welcome” screen is the reminder that it is past the designated closing
time, Figure 4.6B.
Figure 4.6B
Figure 4.6A
Avante International Technology, Inc.
Version 4.4.3 42
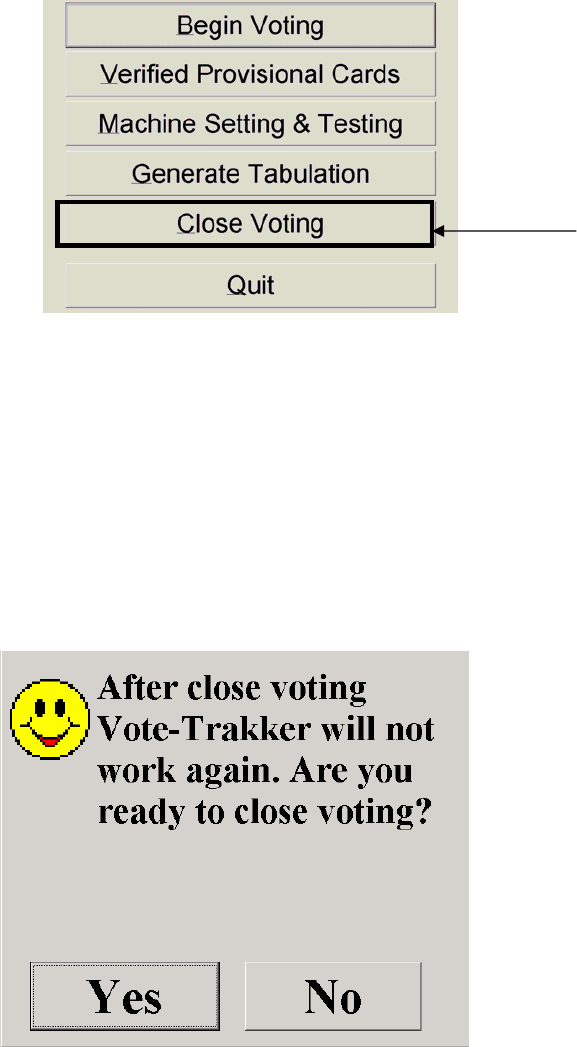
4.7 Close Voting
When it is the time to close voting, the polling official should press the following screen with the
screen touch-code. (For information on how to set screen touch-code, refer the Ballot Generation
ModuleÎ Database Settings)
Figure 4.7 A
When the correct touch-code is entered, the following screen will ask for polling officials’
username and password. The default user names are 11 and 22. There are no passwords. Enter 11
and press “OK’ then enter 22 and press “OK”.
Figure 4.7B
After the correct usernames and passwords are entered, press” OK” to go to Figure 4.7C.
The screen is divided into nine areas.
The screen touch-code is a
combination of 6 touches of any of
these nine areas. A touch on the first
of the six preset areas starts the
count; any subsequent incorrect touch
will set the count back to zero. Only
when the six preset areas are touched
in the correct sequence will the next
screen appear for entering password.
Avante International Technology, Inc.
Version 4.4.3 43
Press the “Close Voting” button. The following screen, Figure 4.7D will ask you to make sure
that you want to close voting. A Vote-Trakker will not accept any further voting after it is closed
until a new ballot is loaded.
Figure 4.7D
Press the “Yes” button to continue.
Press
Figure 4.7C
Avante International Technology, Inc.
Version 4.4.3 44
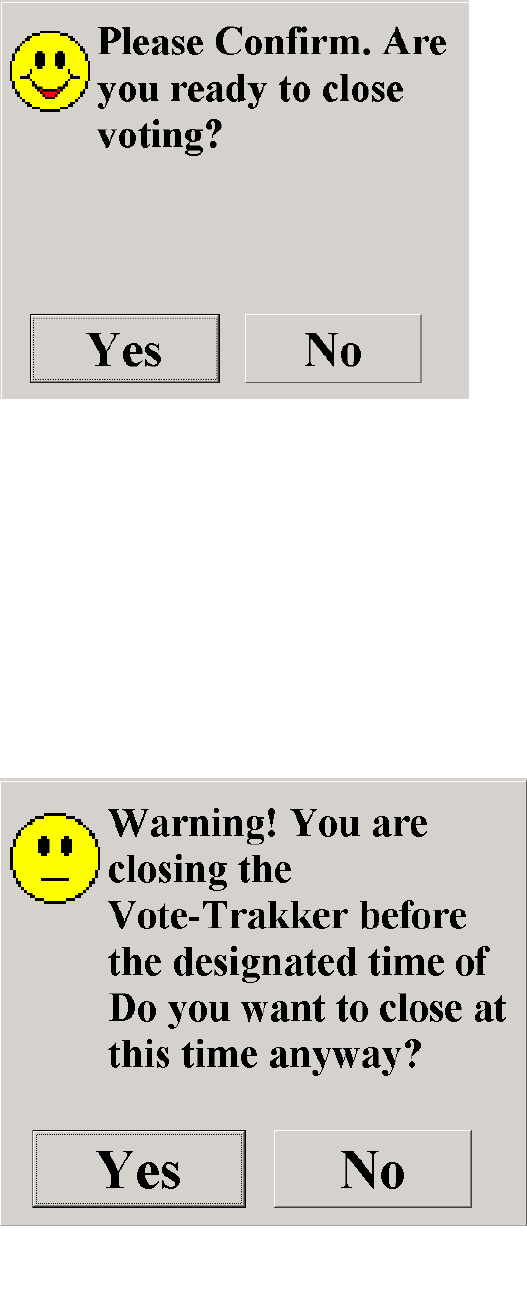
You need to press “Yes” in Figure 4.7E to confirm your intention to close voting. Pressing “No”
will return you to Figure 4.7C.
If a designated closing time is established during the ballot generation process and the Vote-
Trakker™ is closed before this time, a message as shown in Figure 4.7F appears.
Figure 4.7E
Figure 4.7F
Avante International Technology, Inc.
Version 4.4.3 45
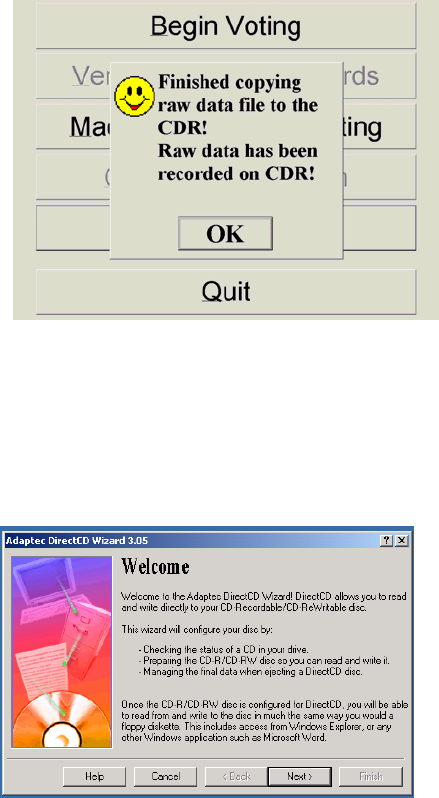
After the “Yes” button is pressed, the computer will begin to print out the paper tally for normal
(registered voters) voting. Pressing “No” will return you to Figure 4.7C. The system will
automatically begin copying the raw data onto the CDR. When finished copying Figure 4.7H
appears.
Press the “OK” button to continue. Figure 4.7I will appear to guide you through the CDR
organization process.
Press “Next”. Figure 4.7 J will appear.
Figure 4.7H
Figure 4.7I
Avante International Technology, Inc.
Version 4.4.3 46
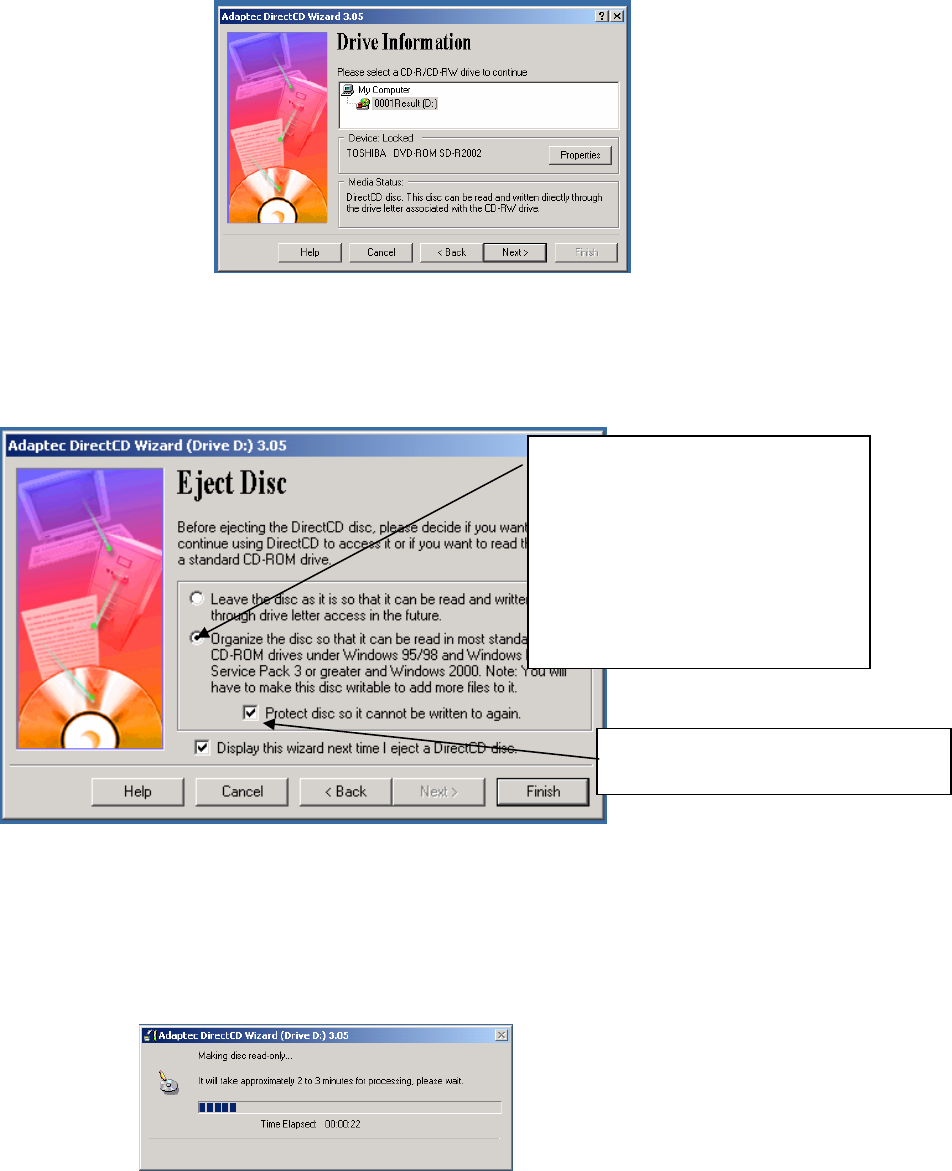
Press “Next”. and you will see Figure 4.7K.
Press “Finish”. The organizer time bar will appear, Figure 4.7L. When it is done Figure 4.7M
will appear.
Figure 4.7J
Figure 4.7K
Choose to organize the disc and
then press the “Finish” button.
Do not select the first choice
“To leave the disc as it is…”
Make sure this box is checked.
Figure 4.7L
Avante International Technology, Inc.
Version 4.4.3 47
Press “OK”. The printer will begin printing the tally for provisional voting. Once the paper
provisional tally is received, you can break the seal for the flap on the top right of the lid that
allows access to the floppy disk. Remove the floppy disk that contains tally information and
should be treated securely by an election judge. You can remove the CDR and close the CD
drive.
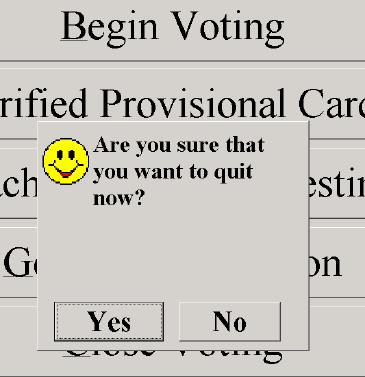
Press the “Quit” key on Figure 4.7C.
Figure 4.7M
Press
Figure 4.7C
Avante International Technology, Inc.
Version 4.4.3 48
Figure 4.7J
Press “Yes” if you want to quit. “No” returns you to Figure 4.7C.
When you press “Yes” the machine will automatically begin to shut down. The message “It is
now safe to turn off your computer” will appear. Turn off the machine by pressing the button on
the rear off the machine and pack the machine and ship it back to the county office if necessary.
The close voting process is completed.
If you press the “Generate Tabulation” button after a Vote-Trakker is closed, the printer will
print out the tally for test-voting, provisional voting and normal voting. You can print out such
tally as long as no new ballot is loaded onto the machine.
Avante International Technology, Inc.
Version 4.4.3 49
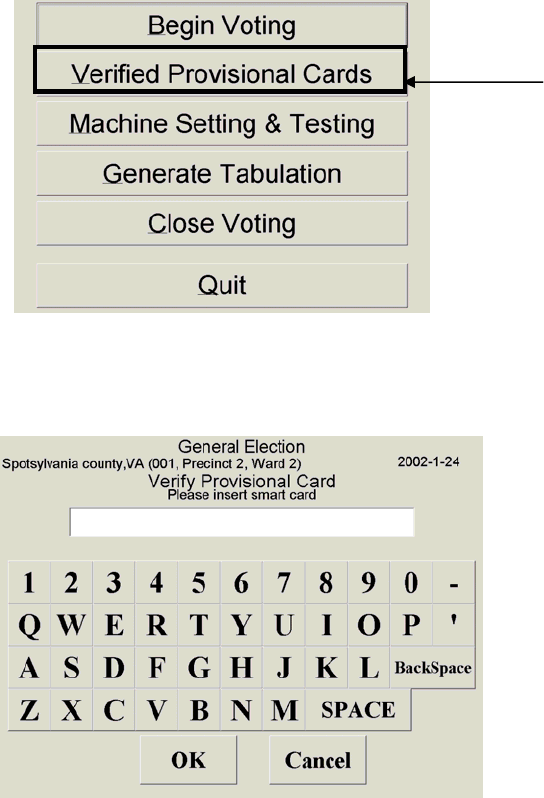
4.8 Count Provisional Ballots
After a provisional voter’s eligibility has been verified, the voter’s provisional vote is counted. A
local jurisdiction election office uses one or more VOTE-TRAKKERS to tally all the verified
provisional votes. To tally provisional votes, press on the “Verified Provisional Cards” (Figure
4.8A).
Figure 4.8A
This brings up the next screen (Figure 4.8B).
Figure 4.8B
WARNING: A Vote-Trakker is not responsible for verifying the eligibility of the voter.
Please make sure that only provisional voting cards from eligible voters be inserted into the
card reader to be counted.
Figure 4.8A
Press
Avante International Technology, Inc.
Version 4.4.3 50
Once a provisional ballot card is inserted into the card reader, the following screen, Figure 4.8C
appears:
Figure 4.8C
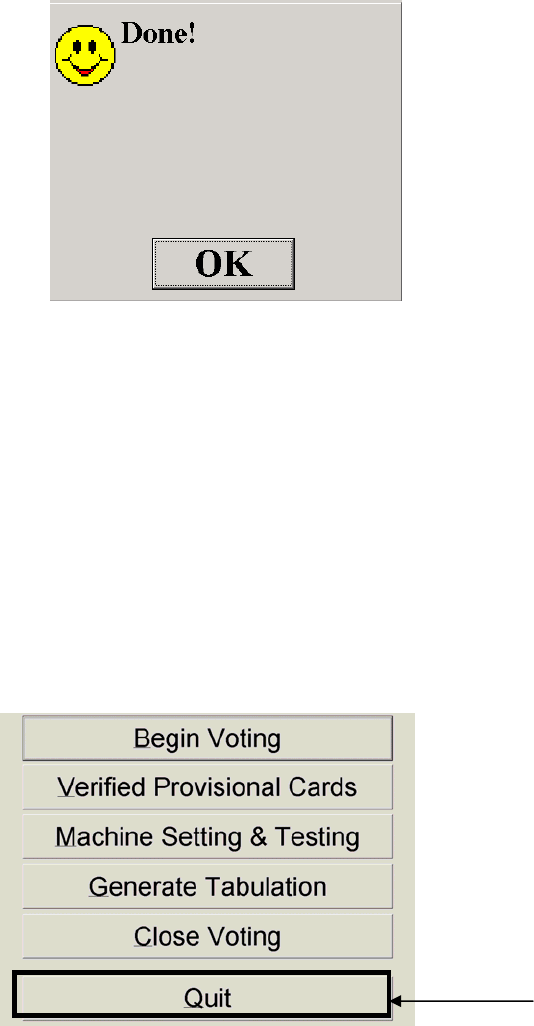
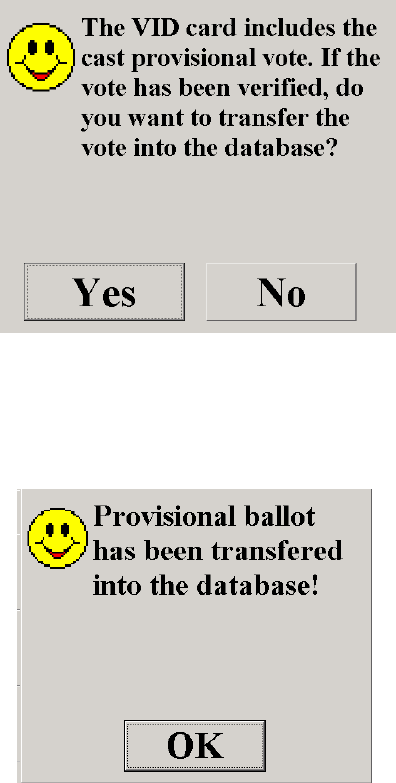
Press “Yes” to count the vote. The computer will transfer the voting result from the smart card to
the election result database. Once this process is completed, the voting result on the smart card
will be erased. The next screen, Figure 4.8D will appear:
Figure 4.8D
Press the “OK” button. The smart card will be ejected from the card reader. The screen returns to
Figure 4.8B with the voting machine ready to count another provisional vote.
Put all the verified provisional voting cards one by one into the Vote-Trakker to count the votes.
After all votes have been counted, close the voting as you would on Election Day. (Refer to
section 4.7).

Avante International Technology, Inc.
Version 4.4.3 51
Avante International Technology, Inc. provides full service support for all VOTE-
TRAKKER™ systems with several levels of supports.
• Full service support: For a defined fee, Avante will provide on-site support before and during
an election for each county. This may include the assistance in ballot generation, transporting
and installing of machines for the election, and election tabulation and assistance.
• Contract support as needed: Each county that purchases the system may ask for a fixed fee
for each service rendered.
5.1 System warranty
• Avante provides a one-year on site warranty for parts and labor.
• An extended 5-year warranty after the first year is available.
• On-site maintenance can be arranged.
5.2 System corrections under warranty
The factory provides all of the warranty and services. The system comes with complete
transporting case for ease of transport.
Special on-site services can be arranged if required.
5.3 Error Messages
If during any operation of Vote-Trakker™, you experience an error that is not resolved, please
copy the message down and list what actions you were taking which caused the error. Also, if
possible, try to replicate the error procedures on another machine.
There are three types of errors:
1. Something is missing / not available – The Vote-Trakker™ sensed that a component
is not available.
2. You performed a function incorrectly – Either by entering in the wrong information
or by not being complete in your entry.
5. Operation Support
Avante International Technology, Inc.
Version 4.4.3 52
3. A computer error has occurred – This is rare and likely a more serious problem.
There is a program imbedded in the Vote-Trakker™ that anticipates system
errors. See below for an example screen (Figure 5.3A).
5.3.1 Missing/Not Available Errors
These types of errors occur when a component is missing. A physical component that could be
missing is the floppy disk, CD-RW disc, flash memory cartridge, or paper for the printer.
Depending on how the memory storage is managed, if one of these devices is missing, the Vote-
Trakker™ will shut down automatically. The Vote-Trakker™ will make this decision of
shutting down the machine. It cannot be overridden.
5.3.2 Incorrect / Incomplete Errors
The entry of any information by either a voter or poll worker may not be complete or it is not the
correct entry for that particular function. These types of errors occur during entry of usernames
and passwords for the poll worker. The voter will have incorrect or incomplete errors in
completing a write-in or by not having the correct VID card. When these types of errors occur,
the screen prompts the user to correct or complete the entry. These are rarely fatal errors that
would cause the Vote-Trakker™ to shut down. The only instance would be if the incorrect
password/username were entered more than three times. The Vote-Trakker™ will shut down.
This is done as a security measure.
Figure 5.3A
Avante International Technology, Inc.
Version 4.4.3 53
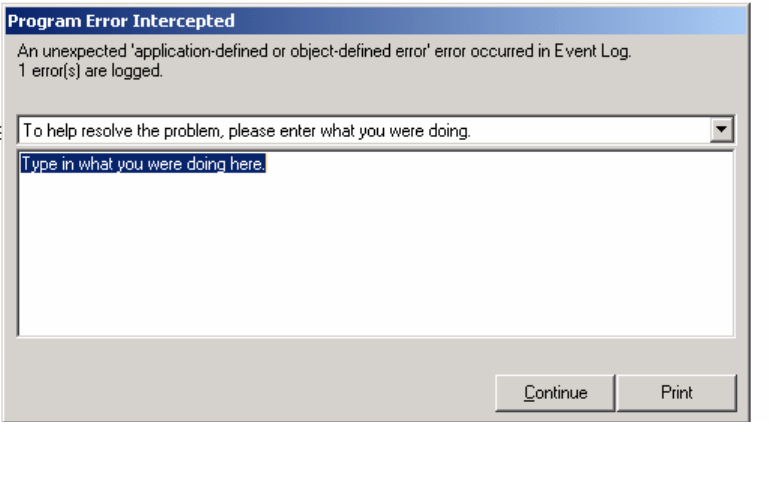
5.3.3 Computer Errors
In the event that a computer error occurs that is not correctable, the Vote-Trakker™ should be
quarantined and examined by an experienced service technician. If the error type is one that has
not been anticipated by Avante, a screen will appear (see Figure 5.3.3A). If a keyboard is
available, the scenario that caused the error can be typed into the text box. Also, one could write
down on paper what steps were performed prior to the error occurring. Include the time, day,
and the error message when describing the events on paper.