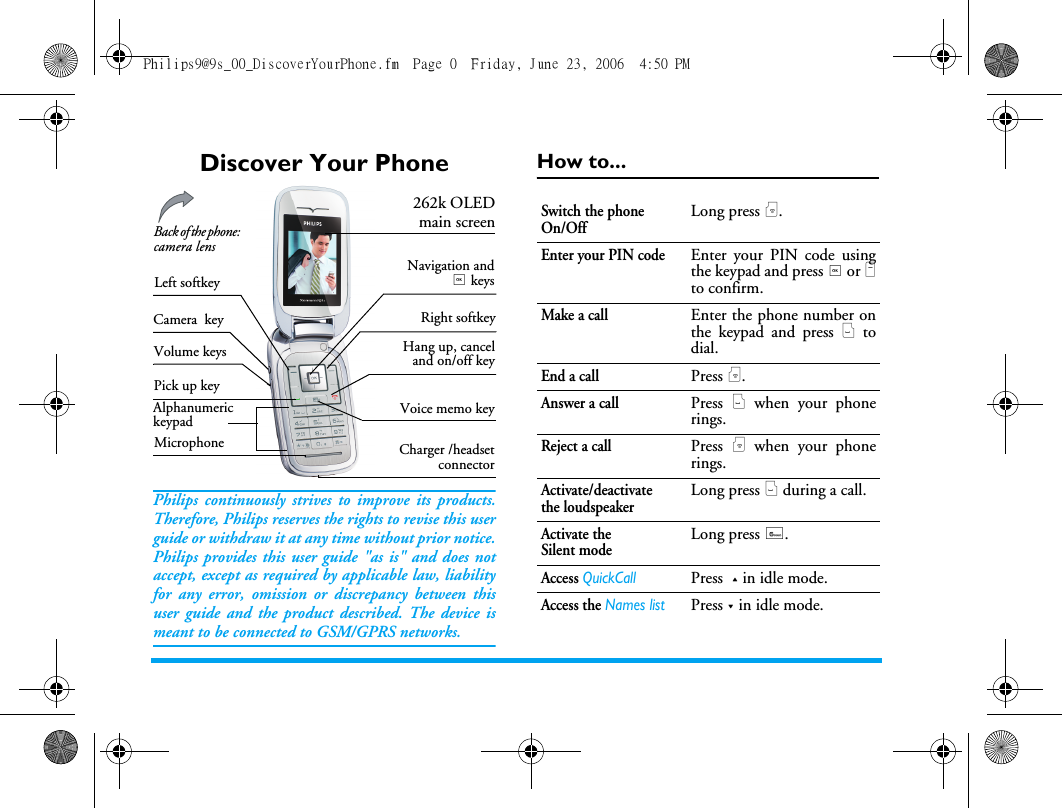
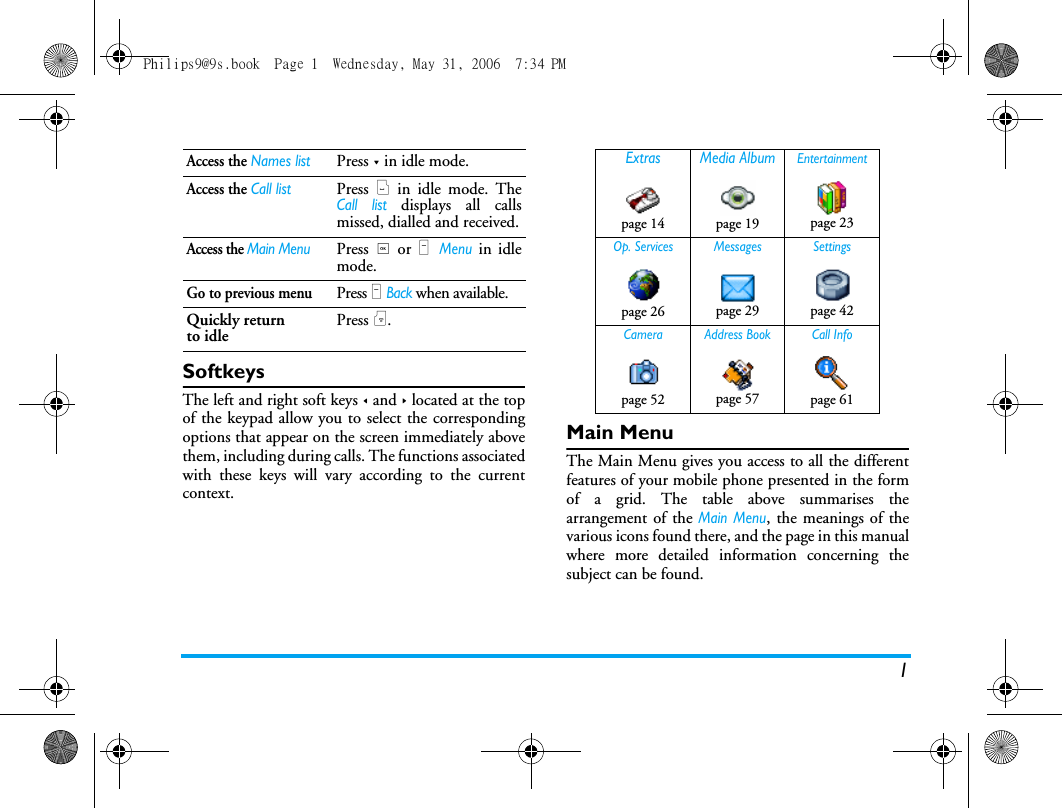
Avantech Mobile CT6628 GSM 900/1800/1900 Mobile Phone User Manual Philips9 9s

Avantech Mobile GSM 900/1800/1900 Mobile Phone Philips9 9s

User Manual

Discover Your PhonePhilips continuously strives to improve its products.Therefore, Philips reserves the rights to revise this userguide or withdraw it at any time without prior notice.Philips provides this user guide "as is" and does notaccept, except as required by applicable law, liabilityfor any error, omission or discrepancy between thisuser guide and the product described. The device ismeant to be connected to GSM/GPRS networks.How to...Alphanumeric keypadMicrophone262k OLEDmain screenPick up keyHang up, canceland on/off keyBack of the phone: camera lens Charger /headsetconnectorLeft softkeyRight softkeyNavigation and, keysVolume keysVoice memo keyCamera keySwitch the phone On/OffLong press ).Enter your PIN codeEnter your PIN code usingthe keypad and press , or Lto confirm.Make a callEnter the phone number onthe keypad and press ( todial.End a callPress ).Answer a callPress ( when your phonerings.Reject a callPress ) when your phonerings.Activate/deactivate the loudspeakerLong press ( during a call.Activate the Silent modeLong press 6.Access QuickCallPress + in idle mode.Access the Names listPress - in idle mode.Philips9@9s_00_DiscoverYourPhone.fm  Page 0  Friday, June 23, 2006  4:50 PM
1SoftkeysThe left and right soft keys < and > located at the topof the keypad allow you to select the correspondingoptions that appear on the screen immediately abovethem, including during calls. The functions associatedwith these keys will vary according to the currentcontext.Main MenuThe Main Menu gives you access to all the differentfeatures of your mobile phone presented in the formof a grid. The table above summarises thearrangement of the Main Menu, the meanings of thevarious icons found there, and the page in this manualwhere more detailed information concerning thesubject can be found.Access the Names listPress - in idle mode.Access the Call listPress ( in idle mode. TheCall list displays all callsmissed, dialled and received.Access the Main MenuPress , or L Menu in idlemode.Go to previous menuPress R Back when available.Quickly returnto idle Press ).Extras Media AlbumEntertainmentpage 14 page 19 page 23Op. Services Messages Settingspage 26 page 29 page 42Camera Address Book Call Infopage 52 page 57 page 61Philips9@9s.book  Page 1  Wednesday, May 31, 2006  7:34 PM
2Press , to access the Main Menu when in idle mode,then use the central navigation key which directionsare represented in the present guide with the +, -, < or> signs to browse the icons and lists. When navigatingin a list, a scroll bar located on the right hand side ofthe screen shows your current position in the list.Within lists, press , to access the options related tothe selected item, press select R Back to go back onelevel.How to use this manualThe current manual is structured as follows:Discover your phoneThe current section presents anoverview of your mobile phone andinformation on the most commonlyused features.Chapter 1: Getting startedInformation on how to set up yourmobile phone for the first time:installation of the SIM card, battery,etc.Chapter 2: CallingInformation on how to make andreceive calls.Chapter 3: Text entryInformation on how to enter textusing the numeric keypad.Chapters 4 to 12These chapters treat each element ofthe Main Menu one at a time.Other sectionsAfter Chapter 12 appear the sectionsfor Icons & Symbols, Precautions, By-packed accessories, SAR information(if available at publication, otherwiseincluded as a separate document), andfinally the Limited Warranty.Philips9@9s.book  Page 2  Wednesday, May 31, 2006  7:34 PM
3Table of contents1. Getting Started ............................................5Inserting the SIM card ......................................5Switching on the phone ...................................6Charging the battery  ........................................7Setting Hotkeys  .................................................72. Calling ................................................................8Make a call  ..........................................................8Answer and end a call ......................................8Adjust the earpiece volume ............................8Call handsfree  ....................................................8Options during a call ........................................9Quick call ......................................................... 10Handling multiple calls  .................................. 103. Text Entry ................................................... 12T9® text input ................................................ 12Basic text input ............................................... 134. Extras .............................................................. 14Calculator ........................................................ 14Money converter  ........................................... 14Organiser ......................................................... 14World clock  .................................................... 15Sound recording ............................................. 16Alarm clock ..................................................... 17Infrared ............................................................. 17Auto Switch On / Off  ................................... 185. Media Album ............................................. 19Memory status ................................................ 19Sound album  ................................................... 19Picture album .................................................. 20TV slideshow  .................................................. 216. Entertainment ........................................... 23Countdown ..................................................... 23Brick game ....................................................... 23Java .................................................................... 23Dictionary ........................................................ 25Stopwatch ........................................................ 257. Op. Services ............................................... 26Op. Services + ................................................ 26WAP ................................................................. 268. Messages ....................................................... 29Settings ............................................................. 29Create message .............................................. 33Inbox ................................................................. 36Outbox ............................................................. 40Philips9@9s.book  Page 3  Wednesday, May 31, 2006  7:34 PM
49. Settings .......................................................... 42Time and date ................................................. 42Autonomy ........................................................ 42Security ............................................................. 43Profiles .............................................................. 45Sounds .............................................................. 46Display .............................................................. 47Network .......................................................... 48Shortcuts .......................................................... 49Language ........................................................... 5110. Camera ....................................................... 52How to...  .......................................................... 52Camera menu  ................................................. 54Help ................................................................... 5611. Address Book ......................................... 57Copy to phone  ............................................... 57Select contacts ................................................ 57Delete all .......................................................... 57Quick call  ......................................................... 57Address book .................................................. 57Adding a contact  ............................................ 59Service Numbers ............................................ 60Status ................................................................ 6012. Call Info ...................................................... 61Call times ......................................................... 61Settings ............................................................. 62Call list .............................................................. 63Icons & symbols ............................................ 64Precautions ....................................................... 65Troubleshooting ........................................... 69By-packed Accessories ............................. 71Trademark Declaration ............................ 72Limited warranty .......................................... 73Philips9@9s.book  Page 4  Wednesday, May 31, 2006  7:34 PM
Getting Started 51. Getting StartedPlease read the safety instructions in the "Precautions"section before use.To use your phone, you must insert a valid SIM cardsupplied by a GSM operator or retailer. The SIM cardcontains your subscription information, your mobiletelephone number, and a memory in which you canstore phone numbers and messages. (see “AddressBook” on page 57) Inserting the SIM cardRemove the back coverTo insert the SIM card, you must first remove theback cover. Press down the latch and slide the coverdownwards as shown below.Remove the batteryTo remove the battery, pull the battery up from thebottom left corner.You may lose all your personal settings if you removethe battery when the phone is switched on.Insert the SIM cardUnlock the SIM card holder and then lift it up on itshinge (1). Place it in the space provided (2). Makesure that the clipped corner of the card is in the correctcorner and that the gold contacts are facing down.Then close the cardholder into the locked position.Philips9@9s.book  Page 5  Wednesday, May 31, 2006  7:34 PM
6 Getting StartedSlide the battery into its slot, metallic connectorsfacing downwards, until it stops. Then lock it bypushing it downwards.Replace the back cover by sliding it down into itsslots, until it stops.Remove the protective film covering the screen andthe camera lens before using the phone.Switching on the phoneTo switch on the phone, long-press the ) key. Enterthe PIN code if required. A PIN code is a 4- to 8-digitsecret code for your SIM card. It is preconfigured andcommunicated to you by your operator or retailer. Formore information on PIN codes, see “Security” onpage 43.If you enter an incorrect PIN code three times, yourSIM card will be blocked. To unblock it, you mustrequest the PUK code from your operator.Philips9@9s.book  Page 6  Wednesday, May 31, 2006  7:34 PM
Getting Started 7When you switch on your mobile phone with yournew SIM for the first time, you will be asked tocustomize your phone. This function will help you toset the following parameters:Charging the batteryYour phone is powered by a rechargeable battery. Anew battery is partially charged and a sound alert willwarn you when the battery reaches low, if the batteryalert is On. (see “Sounds alerts” on page 47)Once the battery and battery cover are back in placeyou can charge the phone. Plug in the connector asshown below. Then plug the other end into a mainAC power socket.The battery symbol indicates the state of charge. Duringcharging, the charge indicators will scroll; it takes around2.5 hours to fully recharge your mobile phone. When allthe scroll bars are steady the battery is fully charged. Youcan then disconnect the charger.Depending on the network and condition of use, talk timegoes up to 8.5 hours and stand-by time up to 30 days.Keeping the charger plugged to the mobile when thebattery is fully charged will not damage the battery. The only way to turn off the charger is to unplug it,so use an easily accessible AC power socket. You canconnect the charger to an IT supply (Belgium only).Setting HotkeysYou can configure the numeric keys 2 to 9 to accessyour favourite features simply by long-pressing on thenumeric key. A number of hotkey shortcuts are pre-configured. For more information, see “Shortcuts” onpage 49Summer timeSet timeSet dateMelody for incoming callsWallpaperAddress BookPhilips9@9s.book  Page 7  Wednesday, May 31, 2006  7:34 PM
8 Calling2. CallingMake a callFrom the idle screen1. In idle mode, enter the phone number using thekeypad. To correct an error, press R <C.2. Press ( to dial.3. Press ) or R End call to hang up.For an international call, long press * to enter the"+" sign for the international prefix.Using the phonebook1. Press -in idle mode.2. Select a contact in the list. If you are using theonboard phonebook and the selected contactfeatures more than one number, the numberidentified as the default will automatically beselected. To select a different number, press < or >(see “Address Book” on page 57 for moreinformation).3. Press (: the selected number is dialled.4. Press ) or R End call to hang up.Answer and end a callWhen receiving a call, the number of the caller may bedisplayed, depending on whether or not the personcalling has chosen to display his or her ID. If thenumber is stored in the selected phonebook, then thecorresponding name is displayed instead of thenumber.•Answer the call: press (.•Reject the call: press ). If you have activated Callforward (see page 62), the call is diverted to anumber or voice mail.•Mute the ringer: press R Silent (this only switchesthe sound off without rejecting/accepting the call).•Hang up: press ).The phone will not ring if in Silent mode .If you have selected Any Key Answer, you can accept acall by pressing any key except ) (see “Call forward”on page 62).Adjust the earpiece volumeDuring a call, press the volume keys on the left side ofthe phone to increase or decrease the volume.Call handsfreeFor your own comfort and safety, ensure you move thephone away from your ear when calling handsfree,especially when increasing the volume.Philips9@9s.book  Page 8  Wednesday, May 31, 2006  7:34 PM
Calling 91. In idle mode, enter the phone number using thekeypad or select a contact in the phonebook.2. Press ( then L Handsfree.If you are already on the phone, long press ( to switchto handsfree mode and back.Options during a callDuring a call, press , or L Options to access thefollowing options.Activate h/freeThis option allows you to use your mobile phone’shandsfree option.Mute / UnmuteAllows you to mute or unmute the microphone sothat your caller cannot hear you.Record dialogueIn most countries, recording telephone conversations issubject to legislation. We advise you to notify the callerif you intend to record your conversation and only doso if they agree.To record a conversation during a call, select Recorddialogue and press ,. Press , again or L Save to endthe recording: an edit window allows you to assign aname to the recording, which is then available inMedia Album> Sound album > Recordings, and also inExtras > Sound recording.Depending on memory capacity (see “Memory status”on page 19), the number and length of recordings willvary.If you select Mute and then Record dialogue, only thecaller’s voice is recorded.NotepadAllows you to note down a number. You can thenstore it in the phonebook, call it, or send a message tothis number.Other options during a callPress L Options to be able to perform the followingtasks while a call is ongoing: you can access andconsult the Name List or Call list, hang up by selectingEnd call, change the Equalizer settings, send or read SMS,or consult and manage events of the Organizer.Philips9@9s_02_Calling.fm  Page 9  Thursday, June 1, 2006  9:32 AM
10 CallingQuick callTo access the Quick call feature, press + when in idlemode. It allows you to set your four most frequentlydialled numbers. You can then quickly call one ofthem by selecting the corresponding icon or pictureon the screen.This feature is also available from the main menu, inSettings > Shortcuts > Quick call.Setting a Quick call contact1. In idle mode, press + to access the Quick callscreen. Select a thumbnail to configure and press, or L Set.2. Select a name in the contacts list, and press ,again to access the Picture album and select apicture. Proceed the same way for eachthumbnail.Calling a Quick call contactTo make a call, press + when in idle mode, then selectthe thumbnail of your choice and press ,.To reconfigure a thumbnail, select it and press , toReplace the name and/or picture.If a picture is already associated with a contact, it isdisplayed in the Quick call screen. Changing the picturein one of the menus will also update it in the other.Handling multiple callsThe ability to handle two or more calls at one timeand to make conference calls is dependent on youroperator and/or subscription.Making a second callYou can make a second call during an active call orwith a call on hold. While on the phone, dial anumber (or select a contact in the phonebook) andpress ,. The first call is put on hold (the number isdisplayed on the bottom of the screen) and the secondnumber is dialled. You can then press , to access theoptions among which are:•Switch calls to toggle between calls (you can alsopress < or > to switch calls).•Transfer to connect the two calls. You aredisconnected when the transfer is completed.•Conference to introduce the caller into a conference call.Philips9@9s.book  Page 10  Wednesday, May 31, 2006  7:34 PM
Calling 11Answering a second callWhen you receive a second call while being already incommunication, the phone emits a beep alert and thescreen displays Call waiting. You can then:To receive a second call, you must have deactivated theCall forward for voice calls (see page 62) and activatedthe Call waiting (see page 62).Answering a third callIf you are in a call and have one call on hold, you can alsoreceive a third call. To do so, you must either end one ofthe calls or introduce the new caller to a conference.This service is limited to two current communications(one active and one on hold).Conference callSubscription dependent.A conference call is activated by making severaloutgoing calls or from a multiple call context. Itallows you to speak with up to five people at the sametime. 1. Make a first call with someone, then a secondone (see above).2. Press , or Options and select Conference. Repeatthe process until five members are connected. 3. Select Remove party to disconnect a member ofthe conference, or select Private call to have aprivate call with this member only (othermembers are put on hold).4. Press ) to disconnect all calls at once.If there is an incoming call during the conference calland there are less than five members, you can acceptthis new call and add this member to the Conferencecall (if five members are already connected, you cananswer the call, but not add it to the conference).Press ,To answer the call (the first one isput on hold).Press )To reject the call.Press , or LOptionsTo open the options list. You canselect End call to end the currentcall, then answer the incoming call.Press )To reject the call.Press , or LOptionsTo open the options list. You canselect Accept to answer theincoming call, or End call to end thecurrent call, then answer theincoming call.Philips9@9s.book  Page 11  Wednesday, May 31, 2006  7:34 PM
12 Text Entry3. Text EntryText can be entered in editing screens in two differentways: by using T9® Predictive Text Input or basic textinput. The techniques for using these two methodsare discussed below.T9® text inputT9® Predictive Text Input is anintelligent editing mode for entering texton a mobile phone. It allows you to entertext more quickly by anticipating theword you want to enter based on thekeys you have pushed. You press once on the keycorresponding to each letter needed to spell a wordand T9® suggests a word based on your keystrokes. Ifseveral words are available, the first word in the list isdisplayed and highlighted. Press +/- or L to browsethe list and press , to insert the word.How to use it?Letters and symbols represented by each key are asfollows:Example: how to enter the word "home":1. Press 4 6 6 3. The screen displays the firstword of a list: Good.2. Press + or L to scroll and select Home.3. Press , or > to confirm selection of the wordHome.DictionaryIf the word you want to enter is not in the T9®dictionary, you can add it to the database. Press L1>2>3 to scroll to the bottom of the list until youreach the entry represented by a series of highlightedunderscores (_ _ _ _ _).2 to 9To key in letters.L or+/ -To browse the list of candidate words.Tegic Euro. Pat. App. 0842463>1,Press any of the three keys to insert theselected word followed by a space.LShort press to backspace, long press toclear all text.0To shift letter case: Standard, lower orUPPERCASE letters.#To view the table of symbols andpunctuation. Then press L >> or < and> to browse the 3 available tables.*To shift mode from T9® to basic textinput to numeric.Philips9@9s.book  Page 12  Wednesday, May 31, 2006  7:34 PM
Text Entry 13Press R Spell to open a basic text editing screen. Enterthe new word without spaces using the methodsdescribed below and press L OK when done. You arethen returned to the message you were composing andthe new word is inserted.LanguageYou can switch input language while writing amessage by long-pressing the # key. The availablelanguages will depend on where you purchased yourmobile phone.Basic text inputPress * to switch from T9® to basic text input. Thismethod requires multiple key presses to reach thedesired character: the letter "h" is the second letter onthe 4 key, so you must press it twice to enter "h".Short press R Cancel to clear one entry, long press toclear all text. Example: how to enter the word "home":Press 4, 4 (GHI) 6, 6, 6 (MNO), 6 (MNO),3, 3 (DEF). Press , when the message iscompleted.Letters, numbers and symbols are located on each keyas described opposite.Short press Long press1space 1. , @ / : ; " ’ ! ¡ ? ¿ # + - *= % < > ( ) & £ $ ¥ 12a b c 2 à ä å æ ç 23d e f 3 é è ∆ Φ34g h i 4 Γ ì 45j k l 5 Λ56m n o 6 ñ ò ö  67p q r s 7 β Π Θ Σ78t u v 8 ü ù 89w x y z 9 ø Ω Ξ Ψ90To shift letter case: Standard,lower or UPPERCASE letters. 0#To open symbols andpunctuation mode. Then pressL >> or < and > to browse the3 available tables.Changes the language used for text edition*To shift mode: T9®, basic ornumeric. Also shifts modePhilips9@9s.book  Page 13  Wednesday, May 31, 2006  7:34 PM
14 Extras4. ExtrasThis menu contains features and options designed tohelp you keep you organised and informed while onthe move.CalculatorYour phone has a built-in calculator that youcan use to perform basic calculations.Numbers are entered with the keypad andoperators with the navigation keys asindicated in the table below:An icon at the top of the screen indicates whichnavigation keys to use for entering operators.Press and hold 0 to get the decimal point. The result of the calculator is indicative. Thecalculation accuracy is 2 decimal places. The result isthen truncated after the 2nd decimal digit for the nextoperation.Money converterThis menu allows you to convert a sum fromone currency into another using the exchangerate of your choice. You can convert fromLocal to Foreign or vice versa. Enter a rate in theExchange rate field and an amount in either the Local orForeign fields: the sum is calculated automatically.OrganiserThis menu allows to create, store and manageevents in your organiser. When the organiseralert is On (see “Sounds alerts” on page 47), abeep alerts you when an event is due.The organiser shares the mobile memory capacity withother features (phonebook, picture album, sound,etc.). To check the memory available in your phone,select Media Album > Memory status.Creating a new event1. In Events, select <New>, then the type of event tocreate (Holiday, Meeting, To Do).2. Enter the starting and ending date and time of theevent and name it (e.g. "Meeting with Smith").3. Set a reminder and a frequency: alerts will betriggered at the chosen time.AdditionPress > or the * key.SubtractionPress < or the * key twice.MultiplicationPress + or the * key 3 times.DivisionPress - or the * key 4 times.EqualsPress , or #.Philips9@9s.book  Page 14  Wednesday, May 31, 2006  7:34 PM
Extras 15The reminder only applies to Meeting and To Do events.It will be updated when changing time zones (see“World clock” below).Deleting old eventsThis menu allows you to delete past events. Enter thestarting date (past or future) from which all previousevents will be deleted and press , twice to delete allevents preceding this date.To delete all events set in your organiser, enter astarting date several years ahead (e.g. 31st ofDecember 2010) to make sure all events preceding thisdate are deleted at once.Managing eventsSelect an event in the list and press , or L Options toaccess the options described below.Changing a repeating event modifies all instances ofthis event.Events viewsEvents stored in your organiser can be displayed inDay view, Week view and Month view. Select a viewformat and press ,, then use < or > to display theprevious or next day, week or month.World clockThis menu allows you to set and display boththe local time and the time in the foreign timezone of your choice. Note that if you chooseto display the local and foreign time on your homescreen, the image you selected as your wallpaper willno longer be displayed there, but will be replaced withthe standard World clock wallpaper.Local settingsDeleteTo delete the selected event.ChangeTo change the selected event.Send by infraredTo transmit the selected event toanother infrared-compatible device.Change soundTo change the sound associated withthe alarm type of the selected event.Set timeAllows you to set the time bypressing the appropriate keys.Local zoneMove + or - to select the timezone corresponding to your area.Summer timeAllows you to set summer timeoption On or Off for the localtime zone.Philips9@9s.book  Page 15  Wednesday, May 31, 2006  7:34 PM
16 ExtrasWorld clockActivate this option if you want to display both thelocal time and the time of another time zone on theidle screen. Press + or - to set the option On or Off.When On, you can display the zone of your choice viathe menu Switch local / foreign. This feature is not available when the option No clockis selected in “Set date” on page 42.Switch local / foreignTo display local to foreign zone and vice-versa.Foreign settingsAlarms, reminders, programmed events are time zoneindependent! If you set an alarm or an event at9:00 AM in time zone A, it will still ring or be due at9:00 AM if you change to time zone B.Sound recordingThis menu allows you to make recordings ofup to 12 minutes in length, depending on thememory status (see “Memory status” onpage 19).Select <New> to begin the recording. When you arefinished, press L Save to stop recording. You can theneither enter a name for the new sound file or acceptthe default name proposed by pressing ,. You thenreturn to the list of Sound recordings and the newrecording is displayed in the list.When you select a sound file, it is playedautomatically in a loop. Press , to access the options.You can Play recording, Rename or Delete it, set as ringeror As SMS/MMS ringer. A flashing warning sign indicates that your recordingwill soon reach the maximum authorized length. Ifyou do not stop recording, a red envelope icon informsyou that your recording is too long to be sent via MMS.Foreign zoneMove + or - to select the time zone ofyour choice.Daylight savingAllows you to set the daylight savingoption On or Off for a foreign time zone. Philips9@9s.book  Page 16  Wednesday, May 31, 2006  7:34 PM
Extras 17Alarm clockOur mobile phone has a built-in alarm clockwith a snooze feature. You can set up to threeseparate alarms and choose whether or notthe alarm should repeat. To set an alarm, follow thesteps below:1. Select an alarm and set it On.2. Then enter the time and press ,.3. Then select the frequency: Once, daily, Onweekdays.4. Finally, select the type of alarm: the Buzzer or amelody from the sounds album and press ,.Repeat above steps to set other alarms.The alarm clock will ring even if your mobile phone isswitched off and/or the ringer volume is set to Silent.When the alarm rings, press any key to stop it (exceptif the snooze mode is on, see below).Snooze modeThis menu allows you to set the snooze mode On orOff. When the alarm rings and the snooze mode is On:• press any key (except R Stop) to stop the ringingtemporarily. The alarm will ring again around 7minutes later.• press R Stop to stop the ringing and the alarmrepetition.The snooze mode is automatically deactivated after 9alarm repetitions.The snooze mode setting applies to all the alarms youhave set.InfraredYour mobile phone allows you to connect toa variety of external devices via infrared. Thismenu provides you with more features to setup the connection with these externaldevices. InfraredYour mobile phone has an infrared port that allowsyou to send or receive data to or from other infrared-compliant devices (e.g. another mobile phone, acomputer, a PDA, etc.) through a wireless link.Files that are copyright protected cannot be sent.When connecting with a PC, make sure you haveactivated its infrared option.Position of devicesBefore transmitting data between two devices, theymust be correctly positioned in relation to oneanother. Make sure that:Philips9@9s.book  Page 17  Wednesday, May 31, 2006  7:34 PM
18 Extras• the infrared ports are facing each other,• they are at a less than 50 cm away from each other.• nothing obstructs the infrared beam.Sending dataTo send data via infrared from your mobile phone, youmust first select the item to be sent: when selecting apicture, a sound, a name or an event, a sub-menu thengives you access to the Send via infrared option.As soon as your phone finds another infraredcompliant device to communicate with, the sendingautomatically takes place. Messages are displayed onthe screen for you to follow the process.Sending is cancelled if your phone cannot find anotherdevice before the time out is reached, if the infraredlink is broken, or if you cancel the process.Receiving dataWhen you select Receive your phone is ready to receivean item via infrared and waits for the another infrareddevice to send it. As with sending data, messages aredisplayed on the screen and allow you to follow theprocess.Receiving is cancelled if your phone isn’t contacted byanother device before the time out is reached, if theinfrared link is broken, if the size of the file sent is toolarge or if you cancel the process.Saving the dataA message will appear to inform you that you havereceived a file. Press , to access the options describedbelow.Auto Switch On / OffThese two separate menus allow you to set yourmobile phone to switch itself on or off at pre-set times.This lets you extend your phone’s battery life (e.g.during the night), not be disturbed at given times andhave your phone switch back on automatically.To set Auto switch on, select the option and press ,.Select On and press ,. Enter the time at which youwant your mobile phone to switch itself on and press,. Select the desired frequency from Once, daily, or Onweekdays and press ,. A message appears to confirmactivation.SaveTo save the data, eventually rename thefile.ShowTo display the details of the data youhave received.DiscardTo ignore the data received.Philips9@9s.book  Page 18  Wednesday, May 31, 2006  7:34 PM
Media Album 195. Media AlbumMemory statusThis menu allows you to display thepercentage of memory available in yourphone. Various features share the memorycapacity: pictures, sounds, recorded memos and voicetags for voice commands, stored messages, phonebookand organiser entries, games, etc.Press , to check the memory status. The displayshows you the percentage of memory free and thephone’s total memory in Kilobytes (Kb). Press ,again to check the detailed list of memory used byeach feature.Your mobile phone is supplied with many sounds andpictures. You can only delete sounds or pictures whichare not protected, e.g. to free memory space for yourown sounds and pictures.If the List full message appears when saving a new itemyou must delete an item to be able to create or add anew one.Sound albumThis menu allows you to manage the soundfiles stored in your mobile phone. Theoptions are:Once in a list, you can then select a sound file andpress , to access the menu options listed below.View allTo access all your sound files in asingle list.Own melodiesTo access your downloaded soundfiles. Protected melodiesTo access the list of copyrightprotected sample sounds.Protected melodies cannot be sentnor deleted.RecordingsTo access the list of soundrecordings.Send by...To send the selected sound file viaE!mail (see page 31), via Infrared (seepage 17) or MMS (see page 39).Note that sound files from Recordingsfolder cannot be sent via MMS.Philips9@9s.book  Page 19  Wednesday, May 31, 2006  7:34 PM
20 Media AlbumPicture albumThis menu allows you to display and modifythe images stored in your mobile phone. Theoptions are described below.Pictures must be of the correct size and in the formatfor your mobile phone to store and display themcorrectly.  Inside the folders, images are displayed as a text list.Select an image and press > to view the image. Pressing, gives you access to the menu options listed below.As ringtoneTo set the selected sound as ringer.As SMS/MMS ringerTo set the selected sound as theMessages ringer. This option must beactivated in the menu Settings >Sounds (see page 46). RenameTo  Rename the selected sound file.Delete / Delete allTo Delete the selected sound file orall files at once.View allTo access all your image files in asingle list.My photosTo access the photos taken with thephone’s built-in camera.My imagesTo access the images you havereceived on your phone.Prot. imagesTo access the list of protected sampleimages.Protected pictures cannot be sent nordeleted.IconsTo access the list of icons you havedownloaded.Send by...To send the selected file via E!mail (seepage 31), via Infrared (see page 17) orMMS (see page 39). Note that youcannot send pictures that areprotected by copyright.Set as wallpaperTo set the selected picture aswallpaper.ModifyUse this menu to access the followingoptions:Philips9@9s.book  Page 20  Wednesday, May 31, 2006  7:34 PM
Media Album 21TV slideshowThis menu allows you to display the pictureslisted in the Picture album (automatically in aslideshow or manually one-by-one) on themain internal screen of your phone and/or on a TVscreen via the TV Link accessory.TV Link may not supplied with your product. In thiscase, you must purchase it separately. ManualThis menu allows you to display the picturesmanually. Browse the list of pictures by pressing + or-. Press > to activate the graphical full-screen displayand send it to the TV, press < to go back to the list.•Add text To add text to the selected picture.Enter your text in the editing screenand press ,. Use the navigation keysto move the text on the screen: shortpress to move the text 1 pixel at atime, long press for 5 pixels.Press R Back to go back to the texteditor, or L OK to validate and go tothe next option.•Addframeor iconTo add a frame or an icon to theselected picture.•Eraser To  Undo the last modification madeon the picture, or to Reset, i.e. cancelall changes at once. Press R Back tocancel or L OK to validate.•Send To send the selected picture viainfrared, E-mail or MMS.•Save To save the picture with all thechanges you have applied.RotateUse this option to rotate the selectedimage of -90 degrees, +90 degrees or+180 degrees.ViewTo display the selected file.PropertiesTo display its properties (size, format,resolution, etc.).RenameTo Rename the selected image.Delete / Delete allTo Delete the selected file or all files atonce.Pictures in the Protected images foldercannot be sent nor deleted.Philips9@9s.book  Page 21  Wednesday, May 31, 2006  7:34 PM
22 Media AlbumWhen a picture is selected, press , or L Select to openthe rotation options (90° or 180°).AutomaticThis menu allows you to display the picturesautomatically in a slideshow.1. Select the time value that will be appliedbetween each picture of the slideshow (10, 15 or20 seconds) and press , or L Select.2. In the list that appears, select the pictures of yourchoice by pressing < or >. Choose (Un)Check all toselect or deselect all pictures at once.3. Press , to start the slideshow and R to stop it.In both modes, the last selection made isautomatically saved and can be played several times ina row, even when you quit the TV Slideshow menu.Philips9@9s.book  Page 22  Wednesday, May 31, 2006  7:34 PM
Entertainment 236. EntertainmentWestern Horoscope, Lunar Calendar and ChineseFestival features are available only in the Chineselanguage menu (see page 23). Your phone may or maynot have the Chinese Language menu depending onwhere the phone was purchased.CountdownWhen you enter Countdown menu, the screencountdown with a start time as 00:00:0. Enterthe Countdown menu and enter thecountdown time in HH:MM:SS format.1. Press L Start to start the countdown.2. Press L Stop to stop the countdown timer andpress R Back to exit.3. At the end of the countdown, the phone willemit an alarm. When you exit the countdown,this function will be deactivated.Brick gameThe goal of this game is to destroy bricks byhitting them with a ball. Destroying all bricksgive you access to the next level.Keys used are the following:JavaYour mobile phone features a Java run-timeenvironment, which allows you to run Javaapplications, such as games downloaded onthe network.The first time you launch Java, a message appears toalert you that the installation and configuration ofJava will take several moments. This is a one-timeoccurrence.SettingsOnce Java has been installed, you may then proceedwith configuration.4 and 6To move the racket left or right.* and #To start the game by throwing theball left or right.0To pause the game up to 2 min.(after which the screen returns toidle mode and the game is lost).Philips9@9s.book  Page 23  Wednesday, May 31, 2006  7:34 PM
24 EntertainmentAuto launchAllows you to set the automatic launch of Java On orOff. When On, a Java application will be automaticallylaunched immediately following installation.Network accessNetworkThis menu gives you access to operator-specificsettings, including DNS and proxy addresses. Whenavailable, all items of this menu are pre-configured, sothat you shouldn’t have to change them.Java applications1. The first time you select this menu, press L OKfor initialization to start. This will take severalminutes.2. Back to the JAVA window, you can either:- press , to access the content of the Defaultfolder, then press L Menu and Select to play thelisted games,- or press L Menu, to access the options allowingyou to create and manage new folders.3. Select Install to install on your mobile phone theJAVA games you have downloaded: you mustalways proceed with installation first, to be ableto play a game.4. Press Exit to quit the Java application, or press LMenu to access the list of available options.Your mobile phone may display messages about"MIDlets". MIDlets are JAVA applications or games.BearerTo select the type of network used whenlaunching a connection and to configurethe corresponding settings.•GSM or GPRS: your mobile will onlyuse the GSM or the GPRS networkfor e-mail connections.•GPRS first: your mobile will first try toconnect to the GPRS network, then tothe GSM network if the GPRSnetwork isn’t available.Selecting the above option requires you to have bothGSM and GPRS settings configured. See page 48 fordetails.DNS addressAllows you to enter the DNS address ofthe external data network you want toconnect to.Network accountAllows you to select one of the dataprofiles you have defined in Settings >Network > Access settings (see page 48).Philips9@9s.book  Page 24  Wednesday, May 31, 2006  7:34 PM
Entertainment 25StopwatchWhen you enter Stopwatch menu, the screenwill display Stopwatch with a start time as00:00:0.Press L Start or , to start the Stopwatch timer. Thesoft keys will become Start/Stop and Reset.Press R Reset to reset the Stopwatch. Then R Back toexit.Philips9@9s_06_Entertainment.fm  Page 25  Thursday, June 1, 2006  6:23 PM
26 Op. Services7. Op. ServicesThis menu contains the services and features providedby your operator. Consequently, the menus describedbelow may vary or may not be available, depending onyour subscription. Contact your network operator formore details.The services provided may involve making a phonecall or sending a SMS for which you may be charged.Op. Services +This menu option is reserved for operator-specific services. Please contact your operatorfor more information about these options.WAPThis menu allows you to access servicessupplied with your network, such as news,sports, weather, etc.If your phone was pre-configured, it isn’t necessary foryou to change the settings described in this section.With some operators, settings can be set remotely.To launch a WAP session, select Operator > WAP >Homepage.Your mobile phone connects to the networkaccording to the Access settings you have defined in themenu Settings > Network (see page48). In case of aconnection error, the screen displays "Go to menu":press , or L Options to access the WAP options (seepage 28).HomepageThis is the link to the first WAP site you access whenlaunching a WAP session. In most cases, this menuitem is preconfigured and will connect to youroperator’s WAP homepage. To change this defaulthomepage see “Options” on page 28.Use + or -To browse the on-line pages.Press , or L SelectTo select a highlighted item.Press R BackTo return to the previous page.Press ) or select Options > ExitTo end the WAP session.Philips9@9s.book  Page 26  Wednesday, May 31, 2006  7:34 PM
Op. Services 27BookmarksThis menu allows you to store your favourite WAPsite addresses, rename them and access them quicklyfrom the list.Press L Options while browsing, then select Bookmarks:the name and URL fields will be automatically filledin with the information of the page you are browsing.Select Add bookmark and start entering the new namefor the edit screen to appear. Press , , then proceedthe same way to enter the URL address.The Manage bookmarks menu allows you to Delete orEdit the selected bookmark.Go to URLThis menu allows you to enter a WAP site address andto connect directly when selecting it (a quick way toaccess WAP addresses without saving them asbookmarks).All the addresses you enter in this menu and connectto at least once, will appear in a list. Select one of theitems and press , to reconnect to the correspondingpage, without having to re-enter its complete address.SettingsIn order to access WAP sites, you must first configurea WAP connection profile.Select profileTo select one of the available profiles, then define theconnection settings for each of them.All connection settings described below apply to theselected profile.Browser optionsTo activate or deactivate the downloading of imagesattached to WAP pages.Selecting Off will speed up the global downloadingtime of the pages browsed.Rename profileTo rename the currently selected profile (startentering the new name for the edit screen to appear).CacheTo empty an area of the phone’s memory where thepages browsed during a WAP session are stored.Network•Homepage: to change the homepage name andaddress (start entering the new name for the editscreen to appear).•Network access allows you to select one of the dataprofiles you have defined in Settings > Access settings(see page 48).Philips9@9s.book  Page 27  Wednesday, May 31, 2006  7:34 PM
28 Op. Services•Bearer allows you to select the type of network usedby the selected profile when launching a connection(see page 42).•Proxy address and Proxy port allow you to define agateway address and port number to be used whenlaunching a WAP connection using the selectedprofile.•Security: to display the list of installed securityCertificates (then display its details or delete it), theSession info or the Current certificate.Push inboxThis menu allows you to read and manage messagesautomatically sent to you by the network and / or byyour operator. In some cases, a red "@" sign will be displayed on thescreen to inform you that you have received a new pushmessage. Press , or L Read to read it or R Back to goback to idle. Push messages include URL links for quick access tothe corresponding WAP services: a single click on thelink will connect to the WAP site for browsing ordownloading multimedia files into your handset.If your push inbox is full, a message will advise you todelete some messages in WAP > Push Inbox.OptionsWhile browsing, press L Options to access:HomepageTo access the default homepage.BackTo go back to the previously browsedpage.ForwardTo go to the next browsed page.RefreshTo reload the currently browsed pagefrom its original server.Set as homepageTo save the currently browsed WAPpage as the default homepage.Save as...To save images embedded in thepages that are displayed in the Picturealbum.ExitTo end a WAP session.BookmarksGo to URLSettingsPush inboxSee page 27 for description of theseoptions.Philips9@9s.book  Page 28  Wednesday, May 31, 2006  7:34 PM
Messages 298. MessagesSettingsMy dictionaryThis feature allows you to enrich the T9 dictionaryused for writing messages. For detailed informationon entering with T9, please see “T9® text input” onpage 12). Select <New> to create and store a newword, or <Delete all > to erase the content of thedictionary at once.SMS Reply pathWhen On, this option allows you totransmit the number of your SMSmessage centre together with themessage. The recipient can thenreply using your own SMS centreand not theirs. This speeds up therate of transmission. This feature issubscription dependent.DeliveryreportWhen On, this option will informyou via SMS whether your own SMSwas received or not. This feature issubscription dependent.Auto save SMSWhen On, this option willautomatically save messages sent inthe Archive menu.SMS centerTo select your default SMS centre. Ifnot available on your SIM card, youmust enter your SMS centre number.SignatureWhen On, allows you to add asignature at the end of your message.You can Edit, Change or Save thesignature.Validity periodTo select the length of time yourmessages are to be stored in the SMScentre. This is useful when therecipient is not connected to thenetwork (and thus cannot receiveyour message immediately). Thisfeature is subscription dependent.Philips9@9s.book  Page 29  Wednesday, May 31, 2006  7:34 PM
30 MessagesMMSThis menu allows you to Activate, Modify or Rename oneof the available MMS profiles. Your mobile phonemay have been pre-configured. To change thesettings, choose an MMS profile in the list and selectModify to access the settings described below.Application settingsRetrieval modeAllows you to choose from:•Manual: you connect manually tothe server by selecting anotification in the Inbox, selectingRead to download, then Play.•Automatic: new MMS are directlyplaced in the Inbox. Select theMMS and press > to play it.This mode is deactivated whenroaming.Validity periodTo select how long your MMS willbe stored on the server, from 1 hour to1 week (maximum). This is usefulwhen the recipient is not connectedto the network (and thus cannotreceive your message immediately).Read reportThis option can be set On or Off andinforms you (via an SMS) when thestatus of the MMS you have sent haschanged, i.e. if it was read or deleted.Delivery reportThis option can be set On or Off andinforms you (via an SMS) of thestatus of delivery, e.g. if your MMSwas received or rejected.Auto saveThis option can be set On or Off andallows you to automatically save themessages sent in the Outbox menu.Slide durationAllows you to select the durationbetween each slide of the MMS.Hide identityTo Always hide or Never hide youridentity (i.e., your phone number) tothe recipients of your MMS.Restr. advertis.To set the option On or Off. WhenOn, you will receive lessadvertisement messages sent by thenetwork.Philips9@9s.book  Page 30  Wednesday, May 31, 2006  7:34 PM
Messages 31Network settingsE-MailThis menu allows you to Activate, Modify or Rename oneof the available email profiles. Your mobile phonemay have been pre-configured. To change thesettings, choose an Email profile in the list and selectModify to access the settings decribed below. If one of the accounts has been pre-configured, it maybe locked, in which case it cannot be renamed.Network accessBefore you can consult your e-mails, you first need toconfigure your connection to the internet.GSM SettingsWhen you use a GSM connection to connect to theinternet, your mobile phone dials a number providedby your operator and the data is sent and received overthis connection, somewhat like a dial-up internetconnection from a PC. The GSM connectionparameters are described in the table below.Network accessTo choose a connection profile fromthe ones you have set (see “Accesssettings” on page 48).BearerTo select the type of network usedwhen launching a connection: GSM,GPRS or GPRS first.MMS centerTo enter the MMS address of theserver you will connect to.Gatewayaddress Gateway portTo enter the IP and Port numbers ofthe server’s gateway.Phone No.This is the number your mobile phonedials to establish a connection. Firstchoose ISDN No. (Integrated ServiceDigital Network) or Analogue No.(depending on your network operator)and then enter the Phone numberprovided by your operator,Login & PasswordThe login and password provided byyour GSM network operator to accessthis service.Auto disconnectEnter an inactivity time-out value afterwhich the phone will automaticallyend the call (if a connection was inprogress). The value must be over 30seconds.Philips9@9s.book  Page 31  Wednesday, May 31, 2006  7:34 PM
32 MessagesGPRS settingsIf using GSM is like a dial-up internet connection, aGPRS connection would be the equivalent ofbroadband. GPRS (or Global Packet Radio Service) isa protocol for sending data rapidly using a radiosignal.To configure a GPRS connection, you may need toprovide a a user name and password, although someGPRS connections function without them. You willneed to provide the APN (or Access Point Name).BearerThis menu option allows you to choose which how toestablish an internet connection.•GSM: your mobile will only use the GSM networkfor e-mail connections.•GPRS: your mobile will only use the GPRS networkfor e-mail connections.•GPRS first: your mobile will first try to connect tothe GPRS network. If no GPRS network isavailable, then it will try with the GSM network. For these features to work, you must first have enteredthe corresponding settings.E!mail serverTo configure the settings needed to connect to your e-mail service.You must obtain the POP3 and SMTP addresses fromyour e-mail service provider.If you wish to use a GPRS connection to access your e-mail, you may need to use the SMTP server of yourmobile service provider to send e-mails.PasswordThe password to access your e-mailaccount.E-mail addressYour e-mail address.SMTP addressThe Simple Mail Transport Protocol(SMTP) address. This is the server foryour outgoing mail and is usually in aformat like smtp.yourmail.com.POP3 addressThe Post Office Protocol (POP)address. This is the server for yourincoming mail and is usually in aformat like pop3.yourmail.com.LoginThe login (or user name) to accessyour e-mail account.Philips9@9s.book  Page 32  Wednesday, May 31, 2006  7:34 PM
Messages 33AdvancedBroadcast SMSThis menu allows you to manage the reception ofSMS broadcasts regularly transmitted to allsubscribers on the network. It gives you access to thefollowing options:Create messageNew E-mailIf not included in your mobile phone contract, youwill need to subscribe to an e-mail service in order tosend and receive e-mails. In this case, all parametersare communicated to you by your operator.This menu allows you to send e-mails to one or severalrecipients at a time, including with an attachmentsuch as a JPEG picture. Once received, your messagescan be forwarded and the attachments visualised withthe appropriate software.POP3 PortThe port number on the POP3server. This is usually port 110.SMTP portThe port number on the SMTPserver. This is usually port 25.DNS addressThe IP address of your DomainName Server.SMTP authent.SMTP authentication is usually set toOff. Contact your provider for moreinformation.District CodeTo select the type of messages youwant to be permanently displayed onthe idle screen (in this case, enter thetype in both District code and Topicsmenus).ReceptionTo set the reception of cell broadcastmessages On or Off.TopicsTo define the type of messages youwant to receive. To configure a topic,select <New>, enter the code providedby the operator, and, if desired,associate a name. You can also selectan existing topic in the list, which youcan rename, change its code or delete.You can enter up to 15 differenttopics in the list. To obtain the codescorresponding to the different topics,contact your operator.Philips9@9s.book  Page 33  Wednesday, May 31, 2006  7:34 PM
34 MessagesIf you exit the Create message > New Email menu beforesending your e-mail or if you cancel the sending whileit takes place, the e-mail content is deleted withoutbeing stored.You can only attach one picture (JPEG, GIF or BMP)or one sound at a time. If you accept an incoming callwhile writing an e-mail, the menu is closed and thephone goes back to idle when you hang up.New SMSTo compose and send an SMS, follow the stepsdetailed below:1. Select Create message > New SMS then enter textthen send SMS then enter phone number orname from contact list and press L Select or ,.2. Select name from contact list then Send SMS thenenter text then press , to access the nextoptions :You can send up to two attachments of two differenttypes together with your SMS. Images and picturesare exclusive: if you first select an animation and thenAdd contactsTo select the recipient(s) of your e-mail,provided that you have entered e-mailaddresses for contacts saved in yourphone phonebook (see “Address Book”on page 57).After you have added contacts, select oneof them and press , to Change the e-mailaddress, Remove it from the list.If you select a contact from the SIMphonebook, an edit window will allowyou to enter an e-mail address.Create emailAllows you to design your message. Enter the subject and text, then press ,to access the next option:•Add sound or Add graphic to attach asound or a picture to your e-mail,•Send now to send it to the selectedrecipient(s),•Modify to redesign your e-mail.SaveTo store the current message and itsattachments in the Archive menu.Send nowTo send the current message.Add soundTo attach a melody.Add graphicTo attach an image or an animation.Input languageTo change the language for typing.Philips9@9s.book  Page 34  Wednesday, May 31, 2006  7:34 PM
Messages 35an image, only the image will be taken into accountand vice-versa.Once you have selected one of the above options press, and you could send to the contact you haveselected or add recipient. Copyright protected pictures and sounds cannot besent by SMS.New MMSWhen you select New MMS, you are first asked to enterthe contact to whom you wish to send the MMS. Youcan select one or more existing contacts, enter a newmobile phone number or a new email address.Next you will be asked to Create MMS. In the MMScreation screen, five icons allow you to add a Picture,add Text, add Sound, Send the message or access theMMS options. Use + or - to move from one option tothe next and press , or L to access the menu.1. Design your message: add a Picture, a Text and/or a Sound. Press > to create more slides.2. The last icon on the left handside lets you accessthe MMS options (see below).3. Select Send to send the MMS to the selectedrecipient(s).Pictures are chosen from the Picture album. Copyrightprotected pictures cannot be sent via MMS. Soundscan be chosen from the Sound Album melodies.The following options are available when creatingnew MMS messages: Add slideTo create a new slide and add it toyour slide show. Press < or > tobrowse slides once you have createdseveral.Edit subjectTo edit and change or enter thesubject of your message.Next slide /Previous slideTo move to the next/previous slide.Note that this option only appearsif the MMS contains more than oneslide.Delete slideTo delete the selected page (if thereis more than one in the message).Saveas draftTo save your message as a draft thatyou can edit, complete and sendlater on.Philips9@9s.book  Page 35  Wednesday, May 31, 2006  7:34 PM
36 MessagesOnce your message is completed, select Send now andpress ,. A progress bar allows you to follow thesending of your message, press L Cancel if you wish tocancel the sending. If you saved the MMS as a draft,it will be available in the Drafts menu. If you have sentthe MMS, it is available in the Outbox when you haveactivated the Auto save options (see below).InboxE-mailThis menu allows you to connect to your mailbox anddownload the e-mail headers (sender and subjectlines) from the server. You may then choose to retrievethe corresponding e-mails.1. Select Open mailbox: your phone automaticallyconnects to the e-mail server and downloads thelist of e-mail headers if any (five at a time).2. If Next (or Previous) appears at the end (orbeginning) of the list, other e-mail headers arepending: select one of the available options andpress , to retrieve them.3. Select a header, and press , to display theDetails. The following status icons may appear toeach header:4. If there is no icon next to the header, you canpress , and select Get mail to download thee-mail. Repeat this operation to download eache-mail corresponding to each selected header.If the e-mail you have received contains attachments(an image, a text file, or another e-mail), they areidentified by a specific icon:Saveas templateTo save your message as a template,that you can use as a basis for otherMMS (e.g. "Happy birthday" typeof message.Preview MMSTo preview the slide show you havecreated.Slide durationTo change the value of slideduration set in Settings > Applicationsettings, and to set a delay betweeneach slide. The e-mail size is too large (over 50 Kb), itcannot be downloaded.The e-mail is marked to be deleted (seepage 37).Contains the details of the e-mail header(date and time, sender’s e-mail address,etc.), press , to display these details.Philips9@9s.book  Page 36  Wednesday, May 31, 2006  7:34 PM
Messages 37You must download and save a picture before you canview it in the Picture album. If there isn’t enoughmemory to store the new picture, you must deleteother items (images, sounds, messages, etc.) to free upmemory to save the new picture.An image file may not be accepted by your mobilephone if it isn’t in the correct format. Images must bein JPEG, BMP or GIF format.The optimal image size is 128 x 160 pixels (thedimensions of the screen). If you are transferringimages from your home computer, you can use animage editing program to create images of the correctsize.5. Select an e-mail header and press , to access thefollowing options:The text of the e-mail itself can be viewed asan attachment, press , to read it (noadvanced options in this case).A text file (text only, ".txt" format) isattached to the e-mail, press , to read it(no advanced options in this case).The application needed to manage thisattachment isn’t available in your phone, orthe e-mail is too large to be uploaded.Another e-mail is attached to the one youreceived. Up to five e-mails can be attached,although there will be no advanced options.A picture is attached to this e-mail. Select itin the list and press , twice to store it inyour phone (you can rename it if you wish).Add to contactsTo add the sender’s e-mail addressto your phonebook, even when youhaven’t yet downloaded his e-mail.Select <New> to create a newcontact, or a name in the list to addor change the e-mail address.You must have selected the phonephonebook in this case; this menuitem will NOT appear if youselected the SIM phonebook.DeleteTo mark the e-mail to be deleted(select this option again to unmarkit). When you exit the E-mail menu,you will be asked to confirmdeletion of the selected item(s) fromthe e-mail server.Philips9@9s.book  Page 37  Wednesday, May 31, 2006  7:34 PM
38 MessagesSMS This menu allows you to read SMS messages you havereceived. The messages are displayed in a list. At theend of the list, the <Delete All> item allows you todelete all the messages at once. Deleting old messagesis useful to free memory space in order to receive newmessages.When a message is displayed, press , or L Options toaccess the menu options listed below.ReplyTo reply to the sender (whoseaddress will be automatically addedto the list). Proceed as described in“Inbox” on page 36.ForwardTo forward the downloaded e-mailto someone else. Proceed asdescribed in “Inbox” on page 36.DeleteTo delete the selected message.Edit SMSTo edit, modify and resend theSMS to someone.Reply by SMSTo reply to the sender.Move to phoneTo store messages in the phonememory. You can then consult themin Messages > SMS > Archive. Movinga message to the archive deletes itfrom the SMS Inbox list.Forward toTo forward the selected message.Note that attachments cannot beforwarded.Call handsfreeTo call the sender of the messagehandsfree.Call backTo call the sender of the message(operator-dependent).Store numberTo save the number of the sender ifit is attached to the message.Extracted No.To extract a number included in themessage itself, if this number isincluded in double quotes (severalnumbers can be included andextracted).  This menu is onlyvisible if there is a number toextract.Philips9@9s.book  Page 38  Wednesday, May 31, 2006  7:34 PM
Messages 39MMS If someone sends you an MMS, an icon and a soundalert will inform. If the sender of the message hasasked for a Read report, a prompt will ask you to sendit or not. Once the MMS is downloaded, it is availablein the Inbox.If the size of the MMS to download is bigger than thememory available in your phone, you must freememory by deleting data (picture, sounds, etc.). Your MMS inbox lists all the Read and Unread MMS,Notifications, Delivery and Read report. To read amessage, select it and press >. Press , or L Options toaccess the following options:Once you have opened an MMS, press L Options toaccess the following:Store melodyTo save the melody that was sentwith the SMS. This menu is onlyvisible if there is a melody toextract.Store graphicTo save the graphic and/oranimation that was sent togetherwith the SMS. This menu is onlyvisible if there is an image toextract.SMS Inbox SortingSMS messages that have been readare automatically moved to thephone memory and sorted by timeand date. SMS messages that have not beenread are kept on SIM memory andsorted according to the SIM order.Play messageTo switch back to automatic mode:the MMS is then played as acontinuous slide show.ForwardTo forward the selected MMS tosomeone else.MMS detailsTo display the details of theselected message (size, date, etc.).DeleteTo delete the selected MMS.Play messageTo switch back to automaticmode: the MMS is then played as acontinuous slide show.Philips9@9s.book  Page 39  Wednesday, May 31, 2006  7:34 PM
40 MessagesDo NOT delete notifications before you have retrievedthe MMS, or you will not be able to retrieve the MMS.Notifications are automatically deleted once you havereceived the full MMS.DraftsLists all messages saved as drafts, or automaticallysaved if you quit the MMS menu before saving orsending your MMS. You can Play, Edit, Send, viewDetails and Delete drafts.TemplatesLists all messages saved as templates. You can Play, Editand Delete them.MMSLists all messages saved as templates. You can Play, Editand Delete them.SMSLists all messages that are pre-configured, such as “I’mwaiting for you” or “Please call me back”. Selectingthem directly from this menu prevents you fromtyping them from scratch.OutboxMMS outboxLists the messages you have Sent or created but Not sentyet. You can Play, Delete or view the Details of all thesemessages, Send or Forward them to someone.Messages you have saved can only be sent from theDraft or Outbox folders. You can NOT recover an item(whether message, notification or report) that youhave deleted. Press R Back to cancel deletion.SMS outboxLists the messages that were saved, whether they weresent or not. You can Delete or forward any of theNext / previousslideTo move to the next or previousslide. You can also press < or > whenviewing the MMS in manualmode. Note that this option onlyappears if the MMS contains morethan one slide.Save pictureTo detach the picture of thecurrent slide and save it in thePicture album.Save soundTo detach the sound of the currentslide (if a sound is attached) andsave it in the Sound album.CloseTo close the MMS and go back tothe list of options.Philips9@9s.book  Page 40  Wednesday, May 31, 2006  7:34 PM
Messages 41messages listed in this folder, or Edit the selectedmessage to send it to someone else. At the end of thelist, the <Delete all> items you to delete all the messagesat once. Deleting old messages is useful to freememory space in order to receive new messages.Philips9@9s.book  Page 41  Wednesday, May 31, 2006  7:34 PM
42 Settings9. SettingsThis menu allows you to change the settings related toeach available option (sounds, time and date, security,etc.) and to customise your phone.Time and dateSet timeAllows you to set the time using the keypad orwith the navigation keys.You should select your Time zone and activate Daylightsaving (if appropriate) before setting the time.Set dateAllows you to set the date by pressing the appropriatenumeric keys or the navigation keys.Local zoneAllows you to select your current time zone. Whenyou enter the menu, you are presented with a map ofthe world that which you can navigate with the up anddown navigation keys. Each time zone is identifiedaccording to its position relative to Greenwich MeanTime (GMT) and by the main cities within that timezone.Summer timeAllows you to set the Summer time option On or Off(in summer time) or Off (in winter time). If daylightsaving is On and you set the time to 12:00, it willautomatically switch to 11:00 when turning theoption to Off.AutonomyThis menu gives you access to:Deactivating most of the functions in the Autonomymenu increases battery life.Light SensorThe light sensor is a feature that enables the handsetto optimize the consumption of power using ambientlight.  The following summarizes the functions of the lightsensor:• In a bright or sunny environment, the screen is setat the maximum power level and the backlight ofthe keypad is set to off.• In a dark environment, the screen is set at less thanthe maximum power level, while the backlight ofthe keypad is set to on.Philips9@9s.book  Page 42  Wednesday, May 31, 2006  7:34 PM
Settings 43When you switch on the power of the phone or openthe clamshell, the keypad backlight is on, and thescreen is powered at the maximum level.You can activate or de-activate the light sensor.BacklightAllows you to choose from different backlightdurations.External LEDThe handset has an external LED, you can activate orde-activate it.When on, by default the light will blink,it will indicate that the phone is on. It also lights upwhen one of the following event occurs :•The alarm rings.• There is a new SMS, a new MMS, a new organizerevent, a new voice mail, or a missed call.• There is an incoming call.• A SMS, MMS, organizer event, voice mail, ormissed call has not been read.• The battery is low (red light).SecurityThis menu allows you access the featuresrelating to the security of your mobile phoneand the data you store there.Change codesAllows you to change your PINand PIN 2 codes, as wellas the call Barring code. Depending on your SIMcard, some features or options may require a PIN2secret code given to you by your operator.If you enter a wrong PIN2 code 3 times, your SIMcard is blocked. To unblock it, request the PUK2 codefrom your operator or retailer. If you enter anincorrect PUK code 10 times in a row, the SIM cardwill be blocked and unusable. If this happens, contactyour operator or retailer.PIN protectionThis allows you to set the PIN protection On or Off.When On, you will be asked to enter your PIN codewhen switching your phone on.You cannot change your PIN code if this option is Off.Public namesAllows you to manage a specific names list called PublicNames list, and restrict calls to this list via the Callrestriction option.This feature is subscription dependent and requires aPIN2 code (see page 47).Philips9@9s.book  Page 43  Wednesday, May 31, 2006  7:34 PM
44 SettingsCall barringAllows you to limit the use of your phone to specificcalls. This can be applied to Incoming calls (All calls orWhen roaming) and/or to Outgoing calls (All calls,International calls and Intl. Exc. Home). In both cases,the Cancel option applies to all calls at once. TheStatus option allows you to know whether a type ofcall is barred or not.This feature is network dependent and requires aspecific call barring password supplied by your serviceprovider.Information privacyAllows you to protect, with a code of your choice,your Messages, Contacts or Call info and prevent themfrom being read by someone else using your phone.FirewallThis menu allows you reject all calls and SMS receivedfrom the people you include in the blacklist.SettingsSelect this menu item and press L Select to access theoptions described below.Public namesAllows you to consult, edit andmodify your Public Names list via aPIN2 code.Call restrictionAllows you to restrict the calls to thePublic names list when Public only isselected.This feature is subscriptiondependent and requires a PIN2code (see page 47). This optionmight also apply to WAP ande-mail connections over GPRS.NotificationTo select the way you want to benotified of a rejected call or SMS: witha Status icon displayed in idle screen oran Icon feedback. You can also chooseNo notification.ActivationAllows you to set the firewall optionOn or Off. When On, your mobilephone will reject all calls and SMSreceived from the people listed in theblacklist. Rejected calls appear in theCall list and rejected SMS in the SpamSMS Box.Philips9@9s.book  Page 44  Wednesday, May 31, 2006  7:34 PM
Settings 45BlacklistThis menu displays the list of contacts whose calls andSMS will be rejected. Select <New> to add a name andthe corresponding number to the list, then choosewhether you want to reject SMS and/or Calls comingfrom this person.Select a name in the list and press , or L Select toChange the related information or Delete it. SelectDetails to display the blacklist details.You can add a name to the blacklist directly from thephonebook, the Calls list and the SMS Inbox: select acontact, a call or a message in the relevant list, press LOptions and simply select Add to the blacklist. The relatednumber will be added to the blacklist.ProfilesA profile is a group of predefined settings thatallow you to quickly adapt your phone toyour environment. Selecting Meeting, forexample, will set your ringer volume to silent, activatethe vibrating alert and deactivate the key tones (theother items are set according to your Personal settings).When your meeting is over, selecting Personal willreactivate all your usual settings. The details of eachprofile are displayed when selecting a profile.You can also associate a hotkey with a profile (e.g.,long press key 3 to activate Outdoors). Long pressingthe same key deactivates it and returns you to yourPersonal settings. For more information, see “Hotkeys”on page 49. The information that appears in the Personal  fieldwill depend on how your mobile phone has beenconfigured.AutonomyVibra alertOffRingtoneSilentBacklightEcoKeytonesOffHeadsetVibra alertOnRingtoneMediumBacklight10 secKey tonesOffAnimationOnPhilips9@9s.book  Page 45  Wednesday, May 31, 2006  7:34 PM
46 SettingsSoundsSilentWhen this mode is On, all alerts are deactivated andthe vibra alert is active.The Silent mode also applies to key tones.Ringer volumeThis option allows you to adjust the volumeof your ringer. Press + or - to adjust thevolume of your ringer from Silent to Increasing.RingtoneAllows you to select a ringer tone. The list alsoincludes recorded sounds and melodies you saved.Scroll through the list and wait to hear the selectedmelody being played.There is a set of embedded MP3 ringers listed in thephone. • Enjoy MP3 ringtones simply by downloading yourfavourite music files using the Mobile Phone Toolssoftware (CD Rom included in the box).  • Use the USB data cable to transfer them to yourphone and personalize a ringtone of your choice.  Ifthe download is successful, the file is stored in theOwn melodies folder (file size dependent).• You can also share your files via MMS or IRDA.Car, OutdoorsVibra alertPersonal settingRingtoneHighBacklight10 secKey tonesOffMeetingVibra alertPersonal settingRingtoneOffBacklight10 secKey tonesOffSilenceVibra alertOnRingtoneOffBacklightPersonal settingKey tonesOffPhilips9@9s.book  Page 46  Wednesday, May 31, 2006  7:34 PM
Settings 47You cannot receive any MP3 ringers from otherhandsets.Messages ringerAllows you to set On or Off an alert for each time youreceive a new message. When On, you can select thealert of your choice from the ringers list.Vibra alertAllows you to set the vibra alert On or Off whenreceiving a call, when an event set in the organiser isdue, when you receive a message and when the alarmrings.The vibra alert is always Off when you connect thecharger or the Cigarette Lighter Adapter.Key tonesAllows you to switch the key tones On or Off.Auto switch on & off soundAllows you to set On or Off the sounds of your mobilephone when you switch it on or off.EqualizerThis option allows you to choose from different audiosettings. It is only available while a call is in progress.Scroll through the list and wait a few seconds to hearthe difference.Sounds alertsAllows you to set alert sounds for the following items:•Organizer: when an event programmed in yourorganiser is due,•Missed call, when you missed an incoming call,•Battery alert: when the battery is running low andrequires charging,•Minute alert for a beep alert that sounds everyminute during a call to help you manage theduration of your call (the beep cannot be heard bythe caller).Select or deselect the item(s) of your choice bypressing < or >.This menu only allows you to set the alert sounds On orOff, NOT the alerts themselves. E.g. setting theOrganiser alert Off will not prevent your phone fromdisplaying the Reminder screen (if you programmedone), but the corresponding sound will not be played.DisplayThis menu allows you to configure how themenus are displayed on screen.Philips9@9s.book  Page 47  Wednesday, May 31, 2006  7:34 PM
48 SettingsBacklightBacklight is activated when receiving incoming callsor messages, browsing menus, etc. Select one of theavailable values.NetworkContact your phone operator to have fullinformation about GPRS availability over itsnetwork and for an appropriate subscription.You might also need to configure your phone with theGPRS settings supplied by your operator, by using themenus described in this section. Then select the bearer(GSM or GPRS) in the menus of each application tobe used (e.g. WAP, MMS, e-mail, etc.).Access settingsThis menu allows you to create different data profilesthat can be used for connecting to various services: forexample, when using WAP or when sending MMS,the selected profile will be used to connect to theGSM or GPRS network.Options described below are operator and/orsubscription dependent. Error messages duringconnections are mainly due to incorrect parameters:contact your operator before first use, in order to havethe appropriate settings, which you may receive bySMS in some cases. Some pre-configured profilesmight be locked, preventing re-programming andrenaming.Select an item in the list and press , to access thefollowing options:Change nameTo rename the selected profile.ShowTo display all parameters of theselected profile.GSM SettingsTo change the GSM settings:•Login & Password,•Phone number needed to establishthe connection and provided byyour operator (ISDN or Analogue),•Inactivity time, a value of over 30seconds after which the phonedisconnects automatically (if aconnection was in progress).GPRS settingsTo change the GPRS settings:•Login, Password, Inactivity time•the APN menu allows you toenter the address of the externaldata network you want toconnect to, a text string used toestablish the connection.Philips9@9s.book  Page 48  Wednesday, May 31, 2006  7:34 PM
Settings 49GPRS connectThis menu allows you to define how your mobilephone connects to the GPRS service.Register againProvides you with a list of the networks available inthe area when the Manual mode is selected. Select thenetwork you want to register with and press , toconfirm.Preferred listAllows you to build a network list in order ofpreference. Once defined, the phone will try toregister on the network, according to yourpreferences.ShortcutsThis feature allows you to configure shortcutsto the features and options you access mostfrequently.HotkeysAllows you to set up direct access to a specific functionor a contact by linking it to a key. A long press on thekey in idle mode will then automatically activate thefunction or call the associated number.A number of Hotkeys have been preconfigured, e.g. 6for Silence, but you can reprogram them (keys from2 to 9 only). The following keys are locked:Depending on your service provider, other hotkeysmay be predefined and locked.1. In the list, select a key from 2 to 9 and press,. If the key was already programmed, selectChange.2. Browse the list to select the function you wish toassociate with this key and press , or L Select. 3. To use a hotkey, press and hold the programmedkey when in idle mode.Always onYour phone automatically connectsto the GPRS service (if available).This option allows quicker accessto GPRS features, but increasesenergy consumption.For data callsYour phone will connect to theGPRS service only when required.This option reduces energyconsumption, but increases theconnection delay.1Call voice mailbox.*Dial international call.Philips9@9s.book  Page 49  Wednesday, May 31, 2006  7:34 PM
50 SettingsVoice commandAllows you to set up a direct access to a specificfunction by linking it to a voice tag.You can associate a voice command to most functionssupported by the hotkeys.1. Select <New>, then browse the list to select afunction and press , or L Select.2. When Press , and speak appears, record yourvoice tag. Make sure you are in a quietenvironment, choose a short and simple wordand clearly pronounce it.3. The next menu gives you access to Delete, Play,function and Change sound options. Press R Back tocreate another voice tag.To use the voice command, press and hold , whenin idle mode, then say the recorded voice tag.To reprogram a voice command: select it, press L OKand select Change function. This will bring you to thelist of available functions.Voice dialAllows you to set a voice tag that will dial the defaultnumber for the corresponding contact simply bysaying the voice tag. To set up voice dial, proceed asfollows:1. Select <New>, then a contact in the list, thenpress , or L Options.When the phonebook in phone is selected, choose thenumber of your choice in the list that is displayed.2. When Add voice tag? appears, follow theinstructions displayed on the screen. To use the voice dial, press and hold , when in idlemode, then say the voice tag corresponding to thenumber you want to dial.Up to 15 voice tags can be defined and shared betweenvoice dial and voice command. Recorded voice tags areavailable in their respective menu and can be deleted,played or changed.Quick CallThis feature allows you to set your four preferred ormost frequently dialled numbers. You can thenquickly call one of them by selecting thecorresponding icon or picture on the screen, therebyremoving the need to enter and browse the Contactslist. See “Quick call” on page 10 for details.Philips9@9s.book  Page 50  Wednesday, May 31, 2006  7:34 PM
Settings 51LanguageThis menu allows you to select a language forall menu texts. Use + or -to browse the listand select a language by pressing , or LSelect.Philips9@9s.book  Page 51  Wednesday, May 31, 2006  7:34 PM
52 Camera10. CameraYour mobile phone features a built-in digital camera.You can take pictures, store them in your phone ortransfer them to your PC via Infrared, use them aswallpaper or send them to your friends via MMS orEmail. This chapter describes in detail how to use thecamera.How to...This section describes how to perform the mostcommon operations with your camera.Activate the camera To activate the camera mode, simply press R Camera:the camera application is automatically launched.After a period of inactivity, the camera automaticallyexits.When the camera is active, the preview screen isdisplayed. Note that the lens is preset and focus-free.The table below details the operations of the variouskeys in camera mode.Take a picture1. Frame your picture and press , to take thepicture.2. Once the picture is taken, a view screen isdisplayed. Press   to ignore the picture, , tosave it or press   to access the followingoptions (see “Camera menu” below for details).+ -Zoom in / out.< >Increase / decrease exposurecompensation.,Take a picture.) or  Exit Camera mode and return tohome screen.0Activate/deactivate the self-timer.*Activate/deactivate the burst mode.#Toggle through the imageresolutions.LAccess the Options menu.RReturn to previous screen.Philips9@9s.book  Page 52  Wednesday, May 31, 2006  7:34 PM
Camera 53If there is no action before the view screen time-out,the picture is automatically saved.Pictures are named with the date of the shot, e.g."0410_154157.jpg" for a picture taken on October 4,at 15: 41:57.The number of pictures you can save varies accordingto the settings: the higher the resolution, the biggerthe file size. A message will warn you if there isn’tenough memory left. In this case, you must delete databefore storing a new picture.Using the self-timer1. In Camera mode, press 0.2. Adjust your picture, and press , to start thecountdown of 10 seconds (this value cannot bechanged).Press L to stop the timer and go back to preview mode.3. A sound is played three seconds before the pictureis taken, then again when it’s actually shot.MMS Foto talkThis feature allows you to send a picture via MMSand to add a sound recording to it. The picture can beselected from the Picture album or can be a picture youhave just taken with the camera.1. Take a picture, then press Menu, or select apicture from the Picture Album, then press , or LOptions. In both cases, select Send by... > MMS.2. When the Add sound? message appears, press LYes to start recording. Then press L Save to stopand save your recording, or R Cancel.3. Select a contact in the list that appears and thengo to the MMS creation screen. Press L Send tosend your message, or modify it as you wantbefore sending it (see “New MMS” on page 35for more information.StoreTo save the picture in your personalphotos folder using the defaultnumbering (you can then rename it fromthe folder itself).Send by...To send the picture by MMS, E-mail orInfrared.Modify To save the picture and modify it (see“Picture album” on page 20).DiscardTo ignore the picture and go back topreview mode.Philips9@9s.book  Page 53  Wednesday, May 31, 2006  7:34 PM
54 CameraCamera menuThis section describes in detail the Camera menuoptions.My photosWhen you take a picture and save it, the file is storedin your My photos folder. When you open the menu,your photos are displayed as thumbnails. Use the upand down navigation keys to move through the list. To view the image full-screen, press ,. Use the upand down navigation keys to move through the list ofimages. Press L Options to access the following:Slide showSelecting this option will launch a slide show of thecontents of the My photos folder. During the slideshow, each photo will be displayed briefly on thescreen. Press any key to end the slide show and returnto the previous screen.Continuous shootActivating this menu option allows you to take a"burst" of 9 photos with one press of the button. Notethat to use this mode, the resolution must be set toWallpaper (for more information, see “Settings” onpage 55).ViewTo display the picture in full screen.Send by...Use this menu to transfer an image toanother device. The options are: MMS,Email and Infrared.Set as wallpaperTo set the selected photo as the imageto be displayed in the background ofyour screen.ModifyThis option launches the image editingprogram. See “Picture album” onpage 20 for details.PropertiesChoosing this option displays thefollowing properties of the selectedimage: Name, Size (in Kb), Resolution andFormat.RotateThis option allows you to rotate animage; The options are: - 90 degrees,+ 90 degrees, + 180 degrees. Changes areautomatically applied.RenameUse this option to rename an image file.Delete / Delete allUse this option to delete some or all thefiles in your My photos folder. Philips9@9s.book  Page 54  Wednesday, May 31, 2006  7:34 PM
Camera 55When the camera is finished processing the images,they are displayed on screen as thumbnails. You maythen press L Options to access the options describedbelow.When you save or delete an image from the group, itis removed from the thumbnail view and stored in theMy photos folder.Picture orientationThis feature allows you to choose how photos aredisplayed in your photo album so that they can beviewed correctly. The options are: Landscape & Portrait.FramesThis feature allows you to take photos with decorativeframes. The Standard frames folder contains framesthat were loaded on your mobile phone when youpurchased it.Color modeThe Colour mode feature allows you to apply a numberof different visual effects to your images. The optionsare: None, Embossed, Black & White, Negative, Sepia,Digital, Edge and Edge 2.Night modeWhen activated, this feature allows you to takepictures in low-light situations.Self-TimerThis feature allows you to take a time-delayed pictureso that you can get into the frame as well. To use theSelf-Timer, select On in this menu, return to the view-finder mode, frame your picture, and then press ,.BrightnessUse this menu option to adjust the exposurecompensation of your mobile phone’s screen.SettingsSaveTo save the selected image.Save allTo save all the images in the group.Send by...To send the selected image by MMS,Email, or Infrared.DeleteTo delete the selected image.Delete allTo delete all the images in the group.ResolutionUse this menu option to choose the sizeof the photos you take. The options are:• 1.3Mpix (1280 x 1024)• VGA (640 x 480)• Medium (320 x 240) • Wallpaper (128 x 160)Please note that the higher theresolution, the larger the file size.Philips9@9s.book  Page 55  Wednesday, May 31, 2006  7:34 PM
56 CameraHelpThis menu option provides you with on-screen helpin taking pictures with your mobile phone.Picture qualityThis menu allows you to adjust thequality of the pictures taken with yourcamera: Low, Medium, High.The lower the quality, the smaller willbe the resulting image files, therebyallowing you to store more photos onyour mobile phone.Default settingsTo reset all camera settings to theirdefault values. A warning messageappears: Do you really want to reset allparameters? Choose Yes or No.Philips9@9s.book  Page 56  Wednesday, May 31, 2006  7:34 PM
Address Book 5711. Address BookContacts are stored in one of the two availablephonebooks: in your SIM card (number of entriesdepending on capacity) or in your phone (up to 999names). When entering new names, they will only beadded to the phonebook you have selected.Copy to phoneThis option will copy the content of your SIM cardinto your phone. If you cancelled or aborted theautomatic copy of your SIM phonebook when youfirst switch on your phone, you can do it manuallywith this option.Selecting this option twice will duplicate all thenames.Select contactsThis menu allows you to select the phonebook to use,either In SIM or In phone. Press + or - to select aphonebook, then press L Select or ,. Contacts addedto the selected phonebook can then be copied into theother, via the Copy to SIM or Copy to phone options.Your mobile phone only manages one phonebook at atime and will ignore the information relative to theother one, e.g. if "Smith" is present in bothphonebooks and if you delete it in the phone, itremains unchanged in the SIM.Delete allTo delete all contacts at once. This option onlyapplies to the onboard phonebook, not to the SIMphonebook.Quick callTo access the Quickcall features, which allows you to setyour four most frequently dialled numbers. See“Quick call” on page 10.Address bookThis menu allows you to search for a name, then editand manage the related information (telephonenumbers, and e-mail addresses, etc.). It gives you toaccess to the same fields as when selecting a namefrom the home screen.Philips9@9s.book  Page 57  Wednesday, May 31, 2006  7:34 PM
58 Address BookThe number of the selected contact will appear in ahighlighted line, at the bottom of the screen. Tosearch for a given name:In the SIM phonebookChoose a contact in your SIM phonebook and press, or Options to access the following options:In the onboard phonebookChoose a contact of your phone phonebook. Whenthe selected name features several numbers or fields(see below), simply press < or > to go from a field toanother (the information of the selected field willappear, highlighted in the bottom of the screen).Press , or Options to access the following options:Select <Show> to access the list of numbers or fieldssaved for this contact. Select <New> to create a newfield or select one of the number and press , to accessa second set of the options. Change, Call, Send SMS, SendMMS and Delete are the same options as the ones listedabove. You will find in addition:1 to 9 and # Press the key for the letterthat you want to go to in thelist (e.g. press 0 twice toaccess the letter “U”).The first record starting withthis letter is selected in thelist.# or <Search...>Press this key or select thisoption, then enter the firstletters of the name you aresearching, and press , to godirectly to that name.Change Send MMS Copy to phoneDetails Voice dial DeleteCall  Add to Blacklist Send SMSChange name Select melody Send byShow Send SMS DeleteCall Send MMS Add to BlacklistSelect pictureChangeTo change the number of the selectedfield.ShowTo display the details of the selectedfield.Philips9@9s.book  Page 58  Wednesday, May 31, 2006  7:34 PM
Address Book 59Alphanumeric fields (note and e-mail) can only bechanged or deleted.Personalizing your contactsContacts stored in the phone phonebook can bepersonalised with a picture and/or a sound, so thatwhen the person calls, the picture and/or soundassociated with his name will be displayed/played.This function is only available when you select theonboard phonebook.Own numbersThe Own numbers item that appears in the contacts listallows you to store your own phone number. Weadvise that you enter your mobile number as well asany other relevant information.Although all its fields can be empty, the Own numbersitem cannot be deleted.Emergency numberThe emergency number will call the emergencyservices number in your country. In most cases, youcan call this number even if you haven’t yet inserted aSIM card or entered your PIN.In Europe the standard emergency number is 112, inthe UK it is 999.Adding a contact To the SIM phonebook1. Select Add a contact in the list, then press L Selector ,.2. Enter the name and and press ,.Copy to SIM cardTo copy a contact of your phonephonebook into the SIM phonebook(it is then always updated whenswitching phonebooks or when usinganother phone).Voice dialTo set a voice tag that will call thecontact when pronounced (seepage 50).Make defaultThe first number you enter becomesthe default number which isautomatically dialled when pressing ,.This option allows you to set anotherdefault number.Change typeTo change or to define the field type ofthe selected number.Philips9@9s.book  Page 59  Wednesday, May 31, 2006  7:34 PM
60 Address Book3. Enter the relevant number, then select the typeof number allocated to the name (Phone, Fax orData) and press , to store this name in yourphonebook.A number is limited to 40 digits, depending on yourSIM card. Entering international prefix, country andarea codes allows you to dial a number from anylocation.In the phone phonebook1. Select Add a contact in the list, then press L Selector ,.2. Enter the last, then first name (up to 20 latincharacters); one of the two fields can be empty,but not both.3. Then select the number type or field type.Numeric fields can hold up to 40 digits and one"+" sign and alphanumeric fields (e-mail andnote) feature up to 50 latin characters. Eachcontact can feature a maximum of 5 numericfields (e.g. 2 mobile numbers, 3 work numbers,an e-mail address and a text note).4. Enter the relevant number or text and press ,.5. To personalise this contact, See “Personalizingyour contacts” on page 59).Service NumbersSubscription and operator-dependent.This menu allows you to call various voice serversincluding consumer services, get some information,subscribe to mailing lists, etc. The services availablemay vary according to your subscription.StatusSelect this menu to display the total number ofcontacts you have saved in each phonebook, out of thetotal number available.Philips9@9s.book  Page 60  Wednesday, May 31, 2006  7:34 PM
Call Info 6112. Call InfoThe menus described in this section are used formanaging how your mobile phone handles calls andtheir related costs.Call timesThis menu allows you to track the cost andduration of your calls. Most optionsmentioned below are subscription dependent.Data countersThe GPRS counter allows you to monitor the amountof data received via GPRS sessions. This feature issubscription and network dependent. It gives youaccess to the following options:Call countersThis feature is used for keeping track of yourincoming and outgoing GSM calls.PC sessionThis option will display the lastconnection session or transfervolume of your PC transmission.Mobile sessionThis option will display the lastconnection session or transfervolume of your mobile phone (e.g.after a WAP connection overGPRS).The call counters managed by your mobile phonemight differ from the ones used by your operator. Youshould therefore consider the call counters displayedon the screen as informative items, but NOT as theactual charge rate basis.Last call infoTo display the duration and/or costof your last call.Total durationTo Show or Reset the time durationof Outgoing or Incoming calls.Philips9@9s.book  Page 61  Wednesday, May 31, 2006  7:34 PM
62 Call InfoSettingsThis menu allows you to set all the options related tocalling: call forwarding, call waiting, etc.Info at call endTo set On or Off the systematic display of the lengthand/or cost of each call when hanging up.Any key answerWhen On, this options allows you to accept a call bypressing any key, except ) (used to reject a call).Call waitingCaller IDTo Show or Hide your identity (i.e., your phonenumber) to your correspondent. The Status willinform you on which option is activated.Call forwardTo divert incoming calls to your mailbox or to anumber (whether in your contacts or not) and appliesto: Data calls, Voice calls and Fax calls.Total costTo display the accumulated costand to set the counter to zero (maybe protected by PIN/PIN2 codes).•Show how much has been spentbased on the Charge rate.•Reset the current total cost.•Show balance to check theremaining credit (based on theCost limit).•Cost limit off•Cost limit to enter the cost limitused in the Show balance menu.•Charge rate to set the rate per unit.First enter the currency used(3 characters maximum), thenenter the cost per unit.With GSM callApplies to All calls, Voice calls, Fax callsand Data calls. When this option isactive, you hear a beep if someone triesto call you while already on a call.Select the Status option to find outwhether the GSM call waiting is activeor not.With GPRS callAllows you to set On or Off the callwaiting for voice incoming calls whilea GPRS connection is ongoing.Philips9@9s.book  Page 62  Wednesday, May 31, 2006  7:34 PM
Call Info 63Before activating this option, you must enter yourvoice mailbox number (see next section). This featureis subscription dependent, and different from the calltransfer, which takes place when one/several calls arein progress.MailboxesTo enter your voice mailbox numbers (if not availableon your SIM card).In some cases, you might have to enter two numbers:one to listen to your mailbox, the other one to forwardcalls. Contact your operator for more information.Auto redialWhen On, if the person you are calling is busy, yourphone will automatically redial the number until asuccessful connection is made or until the maximumnumber of attempts is reached (10). The phone beepsat the beginning of each attempt and emits a specialbeep if the connection is successful. The time betweenredials increases with each attempt.Call listThis menu provides you with the list of outgoing andincoming calls, attempts at auto redialling and calldetails. The different types of calls - calls made, callsmissed and calls received - are represented by differenticons. They are displayed in chronological order with themost recent on top. If the correspondent is listed storedin your contacts, the corresponding name is displayed.ResetTo reset the whole list at once and delete all listed calls.Call listSelect a number in the list, and press ( to redial thenumber or press , or L Options to access the options:Details, Call or Call handsfree this correspondent, SendSMS, Send MMS, Delete the selected call or Store theassociated number (if not already in yourphonebook).UnconditionalWill divert all the incoming calls. Ifyou select this option, you will notreceive any calls until youdeactivate it.ConditionalAllows you to choose when youwant to divert incoming calls: If noreply, If not reachable or If busy. Eachoption can be set independently.StatusWill display the status of all callforwarding.Philips9@9s.book  Page 63  Wednesday, May 31, 2006  7:34 PM
64 Icons & symbolsIcons & symbolsIn idle mode, several symbols can be displayedsimultaneously on the main screen.If the network symbol isn’t displayed, the network isnot currently available. You may be in a bad receptionarea, moving to a different location may help.Silent - Your phone will not ring whenreceiving a call.Vibra - Your phone will vibrate when receivinga call.GPRS attach - Your phone is connected to theGPRS network.SMS message - You have received a newmessage. Voice mail - You have received a new voicemail.Battery - The bars indicate the battery level (4 bars = full, 1 bar = low).Alarm clock activated.Roaming - Displayed when your phone isregistered to a network other than your own(especially when you’re abroad).SMS full - Memory for messages is full. Deleteold messages to receive new ones.Call Forward Unconditional to number - Allyour incoming voice calls are being forwardedto a number other than voice mail.Call Forward to voice mailbox - All your callsare being forwarded to voice mail.Home zone - A zone designated by yournetwork operator. Subscription dependent,contact your service provider for details.GSM Network: your phone is connected to aGSM network.Reception quality: the more bars are shownthe better the reception is.Memory full - The phone’s memory is full.Delete items to store new ones.MMS message - You have received a newmultimedia message.Wap message - You have received a messagein the wap push inbox.Auto switch on/off - option is set to On.Philips9@9s_Icons&Symbols.fm  Page 64  Thursday, June 1, 2006  9:34 AM
65PrecautionsRadio WavesYour cellular mobile phone is a low powerradio transmitter and receiver. When it isoperating, it sends and receives radio waves.The radio waves carry your voice or datasignal to a base station that is connected to thetelephone network. The network controls the powerat which the phone transmits.• Your phone transmits/receives radio waves in theGSM frequency (900 / 1800 /1900 MHz).• The GSM network controls transmission power(0.01 to 2 watts).• Your phone complies with all relevant safetystandards.•The CE mark on your phone shows compliancywith European electromagnetic compatibility (Ref.89/336/EEC) and low voltage directives (Ref. 73/23/EEC).For body worn operation, this phone has been testedand meets FCC RF exposure guidelines when usedwith an accessory that contains no metal and thatpositions the handset a minimum of 1.5cm from thebody. Use of other accessories may not ensurecompliance with FCC RF exposure guidelines. Yourcellular mobile phone is your responsibility. To avoiddamage to yourself, to others or to the phone itself,read and follow all the safety instructions and makethem known to anyone borrowing your phone.Furthermore to prevent unauthorised use of yourphone:Keep your phone in a safe place and keep itout of small children's reach.Avoid writing down your PIN code. Try toremember it instead. Switch off the phone and remove the battery if you aregoing to leave it unused for a long time.Change your PIN code after purchasing the phoneand to activate call restriction options.The design of your phone complies with allapplicable laws and regulations. Howeveryour phone may cause interference withother electronic devices. Consequently youshould follow all local recommendations andregulations when using your cellular phone both athome and when away. Regulations on the use ofcellular phones in vehicles and aircraft areparticularly stringent.Public concern has been focused for some time on thepossible health risks for users of cellular phones. Thecurrent research on radio wave technology, includingPhilips9@9s.book  Page 65  Wednesday, May 31, 2006  7:34 PM
66the GSM technology, has been reviewed and safetystandards have been drawn up to ensure protectionfrom exposure to radio wave energy. Your cellulartelephone  complies with all applicable safetystandards  and the Radio Equipment andTelecommunications Terminal Equipment Directive1999/5/EC.Always switch off your phone...Inadequately protected or sensitive electronicequipment  may be affected by radio energy. Thisinterference can lead to accidents.Before boarding an aircraft and/or whenpacking the phone in your luggage: the useof mobile phones in an aircraft may bedangerous for the operation of the aircraft, disrupt themobile phones network and may be illegal.In  hospitals, clinics, other health carecentres and anywhere else where you may bein the close vicinity of medical equipment.In areas with a potentially explosiveatmosphere (e.g. petrol stations and alsoareas where the air contains dust particles,such as metal powders).In a vehicle transporting flammable products (even ifthe vehicle is parked) or a vehicle powered by liquefiedpetroleum gas (LPG), check first that the vehiclecomplies with the applicable safety rules.In areas where you are requested to turn off radiotransmitting devices, such as quarries or other areaswhere blasting operations are in progress.Check with the vehicle manufacturer thatelectronic equipment used in your vehiclewill not be affected by radio energy.PacemakersIf you have a pacemaker:• Always keep the phone more than 15 cm from yourpacemaker when the phone is switched on, in orderto avoid potential interference.• Do not carry the phone in a breastpocket.• Use the ear opposite to the pacemaker to minimisethe potential interference.• Switch off your phone if you suspect thatinterference is taking place.Hearing aidsIf you are a user of a hearing aid, consult yourphysician and hearing aid manufacturer to learnPhilips9@9s.book  Page 66  Wednesday, May 31, 2006  7:34 PM
67whether your particular device is susceptible tocellular phone interference.Improved performanceIn order to improve the performance of your phone,reduce radio energy emission, reduce batteryconsumption and ensure safe operation adhere to thefollowing guidelines:For the optimal and satisfactory operation ofthe phone you are recommended to use thephone in the normal operating position(when not using in hands-free mode or witha hands-free accessory).• Do not expose your phone to extremetemperatures.• Treat the phone with care. Any misuse will void theInternational Guarantee.• Do not immerse the phone in any liquid; if yourphone is damp, switch it off, remove the batteryand let them dry for 24hrs before using them again.• To clean the phone, wipe it with a soft cloth.• Placing and receiving calls consumes the sameamount of battery energy. However, the mobileconsumes less energy in idle screen when kept inthe same place. When in idle screen and while youare moving, your phone consumes energy totransmit updated location information to thenetwork. Setting the backlight for a shorter periodof time as well as avoiding unnecessary navigatingin the menus will also help to save the battery’senergy for longer phoning and stand-byperformances.Battery information• Your phone is powered by a rechargeable battery.• Use specified charger only.• Do not incinerate.• Do not deform or open the battery.• Do not allow metal objects (such as keys in yourpocket) to short circuit the battery contacts.•Avoid exposure to excessive heat (>60°C or140° F), moisture or caustic environments.You should only use Philips AuthenticAccessories, as the use of any otheraccessories may damage your phone and willmake all guarantees for your Philips phonenull and void.Make sure damaged parts are replaced immediately bya qualified technician and that they are replaced withgenuine Philips replacement parts.Philips9@9s.book  Page 67  Wednesday, May 31, 2006  7:34 PM
68Your mobile phone and your carStudies have shown that speaking on thetelephone while driving lowers yourconcentration, which can be dangerous.Adhere to the following guidelines:• Give your full attention to driving. Pull off the roadand park before using the phone.• Respect the local regulations in countries where youdrive and use your GSM phone.• If you want to use your phone in a vehicle, installthe hands-free car kit which is designed for thatpurpose.• Ensure that your phone and car kit do not block anyair bags or other security devices fitted in your car.The use of an alarm system to operate a vehicle's lightor horn to indicate incoming phone calls is prohibitedon public roads in some countries. Check localregulations.EN 60950 NormIn hot weather or after prolonged exposure to the sun(e.g., behind a window or a windscreen), the temperatureof your phone's casing might increase, especially whenfeaturing a metallic finish. Be very careful in this casewhen picking up your phone and also avoid using it withan ambient temperature over 40° C.Environmental careRemember to observe the local regulationsregarding the disposal of the packagingmaterials, exhausted batteries and old phoneand please promote their recycling.Philips has marked the battery and packaging withstandard symbols designed to promote the recyclingand appropriate disposal of your eventual waste.The battery should not be disposed ofwith general household waste.The labelled packaging material isrecyclable.A financial contribution has been madeto the associated national packagingrecovery and recycling system.The plastic material is recyclable (alsoidentifies the type of plastic).Philips9@9s.book  Page 68  Wednesday, May 31, 2006  7:34 PM
69TroubleshootingThe phone does not switch onRemove/reinstall the battery. Then charge the phoneuntil the battery icon stops scrolling. Unplug fromcharger and try to switch the mobile on.The display shows BLOCKED when you switch onSomebody tried to use your phone but didn’t knowthe PIN code nor the unblocking code (PUK).Contact your service provider.The display shows IMSI failureThis problem is related to your subscription. Contactyour operator.Your phone doesn’t return to the idle screenLong press the hangup key or switch off the phone,check that the SIM card and the battery are installedcorrectly and switch it on again.The network symbol is not displayedThe network connection is lost. Either you are in aradio shadow (in a tunnel or between tall buildings) oryou are outside the network coverage area. Try fromanother place, try to reconnect to the network(especially when abroad), check that the antenna is inplace if your mobile has an external antenna, orcontact your network operator for assistance/information.The display doesn’t respond (or the display responds slowly) to key pressesThe display responds more slowly at very lowtemperatures. This is normal and does not affect theoperation of the phone. Take the phone to a warmerplace and try again. In other cases please contact yourphone supplier.Your battery seems to over heatYou might be using a charger that was not intendedfor your phone. Make sure you always use the Philipsauthentic accessory shipped with your phone.Your phone doesn’t display the phone numbers of incoming callsThis feature is network and subscription dependent.If the network doesn’t send the caller’s number, thephone will display Call 1 or Withheld instead. Contactyour operator for detailed information on this subject.You can’t send text messagesSome networks don’t allow message exchanges withother networks. First check that you entered thenumber of your SMS centre, or contact your operatorfor detailed information on this subject.Philips9@9s.book  Page 69  Wednesday, May 31, 2006  7:34 PM
70You can’t receive and/or store picturesA picture may not be accepted by your mobile phoneif it is too large, if its name is too long, or if it doesn’thave the correct file format.You have the feeling that you miss some callsCheck your call divert options.During battery charge, the battery icon shows no bar and the outline is flashingOnly charge the battery in an environment where thetemperature does not go below 0°C (32°F) or above50°C (113°F).In other cases please contact your phone supplier.The display shows SIM failureCheck that the SIM card has been inserted in the rightposition. If the problem remains, your SIM card maybe damaged. Contact your operator.When attempting to use a feature in the menu, the mobile displays NOT ALLOWEDSome features are network dependent. They are onlyavailable, therefore, if the network or yoursubscription supports them. Contact your operatorfor detailed information on this subject.The display shows INSERT YOUR SIM CARDCheck that the SIM card has been inserted in the rightposition. If the problem remains, your SIM cardmight be damaged. Contact your operator.The autonomy of your phone seems lower that indicated in the user guideThe autonomy is linked to your settings (e.g., ringervolume, backlight duration) and the features you use.To increase the autonomy, and whenever possible,you must deactivate features you do not use.Your phone doesn’t work well in your carA car contains many metallic parts that absorbelectromagnetic waves which can affect the phone’sperformances. A car kit is available to provide youwith an external antenna and enables you to make andreceive phone calls without handling the handset.Check with local authorities if you are allowed to usethe phone whilst driving.Your phone is not chargingIf your battery is completely flat, it might take severalminutes of pre-charge (up to 5 minutes in some cases)before the charging icon is displayed on the screen.Philips9@9s.book  Page 70  Wednesday, May 31, 2006  7:34 PM
71By-packed AccessoriesSome accessories, such as a battery and a charger, areincluded as standard in the package of your mobilephone. Additional accessories may also be provided orsold separately. Package contents may therefore vary.To maximise the performance of your Philips mobilephone and not to void the warranty, always purchasePhilips Authentic Accessories that are speciallydesigned for use with your phone. Philips ConsumerElectronics cannot be held liable for any damage dueto use with non authorised accessories.ChargerCharges your battery in any AC outlet. Small enoughto carry in a briefcase/handbag.Data connect kitProvides easy data connection to your Philips mobilephone. The USB cable enables high speedcommunication between your phone and yourcomputer. The provided software allows you todownload pictures and melodies and to synchroniseyour contacts and appointments.Using the phone as a modemYou can use your mobile phone together with a PC ora PDA, e.g. to connect to the internet or to send faxes,via Infrared.To fully benefit from the services available via infrared(sending and receiving SMS, e-mails and faxes,uploading pictures and sound files to your phone,phonebook synchronisation, GPRS Wizard, etc.), youmust install the Philips Mobile Phone Tools Lightsoftware on your PC. This software is available onInternet: connect to www.club-philips.com andregister your mobile to access the avilable content,inlcuding Mobile Phone Tools.The software is not compatible with Apple Macintoshcomputers. It only supports Windows 98 SE, ME, XPand 2000 (Service Pack 3 and up mandatory in thiscase).Specific software modules for Lotus Notes, LotusOrganizer and Microsoft Outlook are designed toallow synchronisation of your Philips mobile phonewith these applications (refer to their respective userguides for detailed information).Philips9@9s.book  Page 71  Wednesday, May 31, 2006  7:34 PM
72Trademark DeclarationJAVA is a trademark of SunMicrosystems, Inc.T9® is a trademark of TegicCommunications Inc.Tegic Euro. Pat. App. 0842463Philips9@9s.book  Page 72  Wednesday, May 31, 2006  7:34 PM
73Limited warranty1.  What Does This Limited Warranty Cover?Philips warrants to the original retail purchaser(“Consumer” or “You”) that this Philips cellularproduct and all accessories originally provided byPhilips in the sales package (“Product”) are freefrom defects in materials, design andworkmanship under normal use in accordancewith the operating instructions and pursuant tothe following terms and conditions. This limitedwarranty extends only to the Consumer forProducts purchased and used in the originalcountry of purchase. The limited warranty isvalid only in Philips’ intended country of sales ofthe product.2.  How Long is The Limited Warranty Period?The limited warranty period for the Productextends for ONE (1) YEAR from the date ofpurchase of the Product, documented by validproof of purchase. The limited warranty fororiginal Philips rechargeable battery extends forsix (6) months from the date of purchase.3.  What Will Philips Do if The Product is Not FreeFrom Material Defects in Materials andWorkmanship During The Limited WarrantyPeriod?During the limited warranty period, Philips or itsauthorized service representative will, at itsoption either repair or replace, without charge forparts or labour, a materially defective Productwith new or refurbished parts or Product andreturn such repaired or replaced Product to theConsumer in working condition. Philips willretain defective parts, modules or equipment.Repaired or replaced Product will be covered bythis limited warranty for the balance of theoriginal limited warranty period or ninety (90)days from the date of repair or replacementwhichever is longer. Repair or replacement ofProduct, at Philips’ option is your exclusiveremedy.4.  What is Not Covered By This Limited Warranty?This limited warranty does not cover::a)  Product that has been subjected to misuse,accident, shipping or other physical damage,improper installation, abnormal operationhandling, neglect, inundation, fire, water orother liquid intrusion; orPhilips9@9s.book  Page 73  Wednesday, May 31, 2006  7:34 PM
74b)  Product that has been damaged due torepair, alteration, or modification by anyonenot authorized by Philips; orc)  Product that has reception or operationproblems caused by signal conditions,network reliability or cable or antennasystems; ord)  Product defects or problems caused by useswith non-Philips products or accessories; or e)  Product which warranty/quality stickers,product serial number or electronic serialnumber has been removed, altered orrendered illegible; or f)  Product purchased, used, serviced, orshipped for repair from outside the originalcountry of purchase, or used for commercialor institutional purposes (including but notlimited to Products used for rentalpurposes); or g)  Product returned without valid proof ofpurchase or which proof of purchase hasbeen altered or is illegible.h) Normal wear and tear or Force Majeure.5.  How Do You Get Warranty Service?a)  Return the Product to an authorized servicecenter of Philips. You may contact the localPhilips office for the location of the nearestauthorized service center.b) The SIM card must be removed from theProduct before it is given to Philips. Philipsassumes no liability for damaged or loss ofthe SIM card or the data contained therein.c) If the Product failure is not covered by thislimited warranty, or this limited warranty isinapplicable, void or invalid due to anyterms and conditions stated herein, theConsumer will be charged for the cost ofrepair or replacement of the Product and allother related cost incurred in repairing orreplacing the Product.d)  IMPORTANT - you are required to returnthe Product together with a valid proof ofpurchase which must identify the point ofpurchase, date of purchase, Product modeland Product serial number clearly.6.  Other Limitation: This Warranty is The EntireAgreement.EXCEPT FOR THE EXPRESSWARRANTIES SET FORTH ABOVE ANDTHOSE IMPLIED BY LAW AND WHICHCANNOT BE EXCLUDED OR MODIFIEDBY AGREEMENT, PHILIPS PROVIDES NOOTHER WARRANTY WHETHER EXPRESSOR IMPLIED (WHETHER BY STATUTE,UNDER THE OPERATION OF LAW OROTHERWISE) AND SPECIALLY DISCLAIMSPhilips9@9s.book  Page 74  Wednesday, May 31, 2006  7:34 PM
75ANY WARRANTY OF SATISFACTORYQUALITY MERCHANTABILITY ORFITNESS FOR A PARTICULAR PURPOSE.PHILIPS’ TOTAL LIABILITY FORDAMAGES RELATING TO OR ARISINGOUT OF THE PURCHASE OR USE OF THEPRODUCT, REGARDLESS OF THE TYPEOR CAUSE OF SUCH DAMAGE OR THEFORM OR CHARACTERISATION OF THECLAIM ASSERTED (E.G. CONTRACT ORTOPIT), SHALL NOT EXCEED THEORIGINAL PURCHASE PRICE PAID FORTHE PRODUCT.HOWEVER IN NO EVENT SHALL PHILIPSBE LIABLE FOR ANY PUNITIVE, SPECIAL,INCIDENTAL, INDIRECT ORCONSEQUENTIAL DAMAGES (INCLUDINGBUT NOT LIMITED TO THE LOSS OFUSE, LOSS OF TIME, INCONVENIENCE,COMMERIAL LOSS, LOST PROFITS, LOSTBUSINESS OPPORTUNITIES, COST OFSUBSTITUTION OF GOODS ORSERVICES, INVESTMENTS, DAMAGE TOGOODWILL OR REPUTATION, OR LOSSOF DATA AND CLAIMS BY THIRDPARTIES) RESULTING FROM PURCHASEOR USE OF THE PRODUCT, TO THEFULLEST EXTENT ALLOWED BY LAW,WHETHER OR NOT PHILIPS HAS BEENADVISED OF THE POSSIBILTY OF SUCHDAMAGES. THESE LIMITATIONS SHALLAPPLY NOTWITHSTANDING THEFAILURE OF THE ESSENTIAL PURPOSEOF ANY LIMITED REMEDY.This limited warranty represents the completeand exclusive agreement between the Consumerand Philips with respect to this cellular Productand it supercedes all prior agreements betweenthe parties, oral or written, and all othercommunications between the parties relating tothe subject matter of this limited warranty. Nocarrier, retailer, agent, dealer, employee, thereof,or employee of Philips is authorized to makemodifications to this limited warranty and youshould not rely on any such representation.This limited warranty does not affect theConsumer’s statutory rights under applicablenational laws in force.Philips9@9s.book  Page 75  Wednesday, May 31, 2006  7:34 PM

Navigation menu