Avantronics AS8P Sacool Pro User Manual Z PKMN AS8P 00V1
Avantronics Limited Sacool Pro Z PKMN AS8P 00V1
UserManual.wiki
>
Avantronics
>
AS8P User Manual
User manual
Navigation menu
Upload a User Manual
Namespaces
Wiki Guide
HTML
PDF
Info
Views
User Manual
Discussion / Help
Navigation
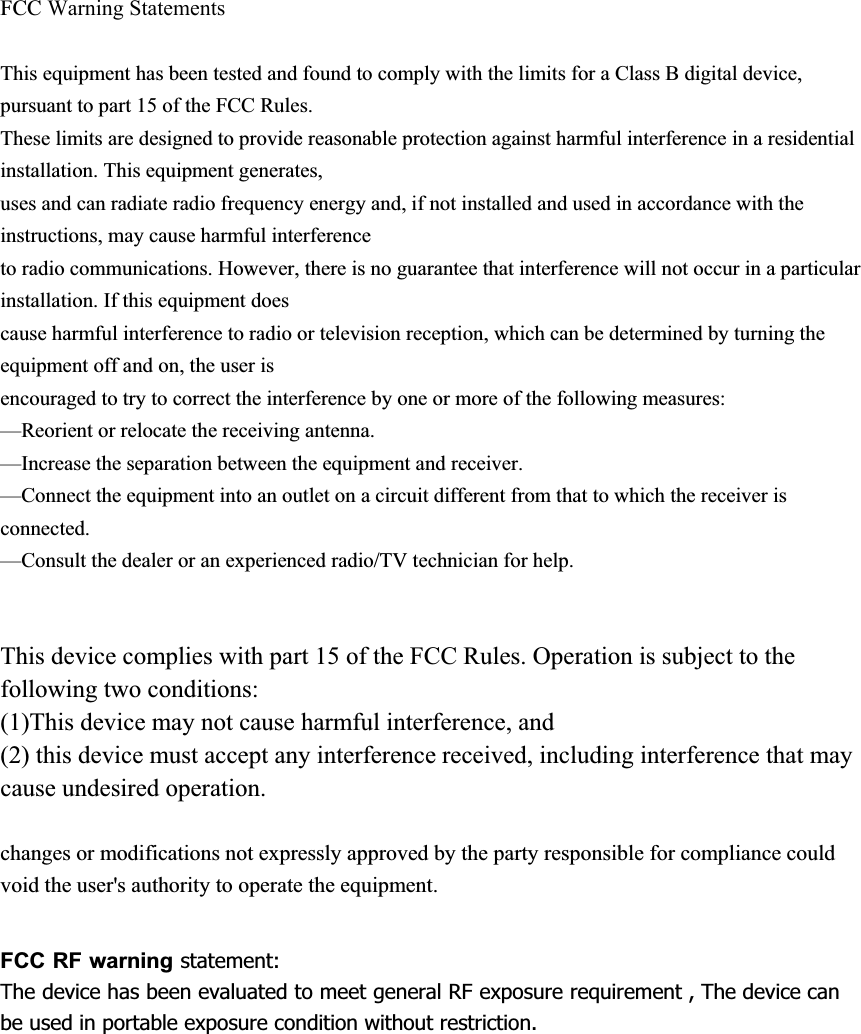
![材质:封面 封面封底128G双铜 + 单色印刷 内页臻品上质80g高白纸 2个小号骑马钉 大约12页, 尺寸W 105 x H 75mm- 1 - - 2 -- 4 - - 5 -1. Headset overview NOTE: All accessories are also available on avantree.com2. ConnectTurn on Press and hold the MFB for 4 seconds-The LED flashes blue and you will hear: “power on”.Turn off Press and hold the MFB for 4 seconds-The LED flashes red and you will hear: “power off”.Whenever you turn your Audition Pro on again, it will automatically reconnect to your phone. Otherwise, please press the MFB once to reconnect them.2.2 Connect with PC/notebookSTEP 1 Turn Sacool Pro off (press and hold MFB button for 4s).The LED indicator flashes red and you will hear “power off”.STEP 2 Press and hold MFB button for 7-10s until LED indicator flashes blue and red alternately.STEP 3 Activate Bluetooth on your PC/notebook and select “Avantree Sacool Pro”.NOTE: Make sure the PC/notebook is Bluetooth-enabled and supports the A2DP profile; otherwise you may need a separate Bluetooth dongle that supports this feature. For additional details on how to set up with a PC/notebook, please see support.avantree.com2.3 Connect with two mobile phones simultaneouslySTEP 1 Pair your Sacool Pro with the first phone using the MFB as above. STEP 2 Repeat the process to pair your Sacool Pro to the second phone. STEP 3 Turn off and turn on your Sacool Pro. Your Sacool Pro will now automatically connect with either or both of the two paired phones when in range.STEP 4 Audio priority is given to the second phone. To switch, manually connect or disconnect from the Audition Pro via Bluetooth settings on the first or second phone.3. How to wear the Sacool ProSTEP 1 Hold the headset as shown, with the button side in your left hand.- 6 - - 7 -- 8 -NOTE: Make sure your phone is in an armband / pocket / handbag on the left of your body. Otherwise, disconnection might be caused by your body blocking the Bluetooth signal.4. How to use 5. How to chargeWhen the LED blinks red, you should recharge your headphones. Remove the Micro USB port protector and charge the headphones via the supplied Micro USB cable . It normally takes about 2 hours to fully charge the battery. The LED will stay red when charging and will turn off when charging is complete.Charging requirement:You can plug our supplied Micro USB cable to your own USB chargers (wall charger/travel charger/car charger, etc) with ==5V/500mA-2A or to a PC/Mac USB port. It is OK to use most mobile phone chargers on the market.6. Product specificationsBluetooth version: 4.0 Support profiles: Headset, Handsfree, A2DP, AVRCPOperational range: Class 2, 10 metres ( 33 feet )Battery: rechargeable lithium batteryTalk time: up to 8.5 hrsMusic time: up to 8 hrsStandby time: up to 80 hrsHeadset weight: 18gHeadset size: 36.2mm(L)x21.2mm(H)X29.7mm(W)NOTE: The talk and standby times may vary when used with different mobile phones or other compatible Bluetooth devices and are also dependant on different usage styles, settings and operating environment.www.avantree.comUser Manual(R[KZUUZN9ZKXKU.KGJYKZ]OZN3OISimply ConvenientSimply ConvenientZ-PKMN-AS8P-00V1www.avantree.comsupport@avantree.comDispose of the packaging andthis product in accordance withthe latest provisions. FCC ID: WJ5-AS8PDispose of the packaging andthis product in accordance withthe latest provisions.Sacool ProRLSpeakerMulti-function button (MFB)Charging socketLED indicatorMicrophoneVolume up (Previous) Volume down (Next)LHeadbandUSB charging cable Silicone earbuds Carrying bag- 3 -2.1 Connect with mobile phoneSTEP 1 Ensure your Sacool Pro is off.STEP 2 Press and hold the MFB for about 7-10 seconds until LED indicator flashes BLUE and RED alternately and you will hear “pairing”.STEP 3 Activate Bluetooth on your phone and select “Avantree Sacool Pro”.When paired successfully, you will hear “connected”.、Reconnect Bluetooth blue and redL RButtonOver the earOn/Off Press and hold MFB 4 secondsAnswer a call Press MFB onceEnd a call Press MFB onceReject a call Double click MFBRedial last number Double click MFBVoice Dial / Command Short press “V+” and “V-”Play music Press MFB oncePause music Press MFB onceVolume up Press “V+” onceVolume down Press “V-” oncePrevious track Press and hold “V+”Next track Press and hold “V-”V +“ V+ ”and V +Charge from AC adapter Charge from PCRLWrong mobile phone area.AntennaSTEP 1 STEP 2STEP 4STEP 3STEP 2 Put the earbuds in your ears, with the cord over the ears and to back of your head.STEP 3 Adjust position of earbuds in your ears for maximum comfort.STEP 4 Adjust length of cable using the silicone piece to make the headset secure.](https://usermanual.wiki/Avantronics/AS8P/User-Guide-2608485-Page-1.png)