Awood Computer Technology X1 Notebook Computer User Manual
Shenzhen Awood Computer Technology Co.,Ltd. Notebook Computer
UserManual.wiki
>
Awood Computer Technology
>
X1 User Manual
User manual
Navigation menu
Upload a User Manual
Namespaces
Wiki Guide
HTML
PDF
Info
Views
User Manual
Discussion / Help
Navigation
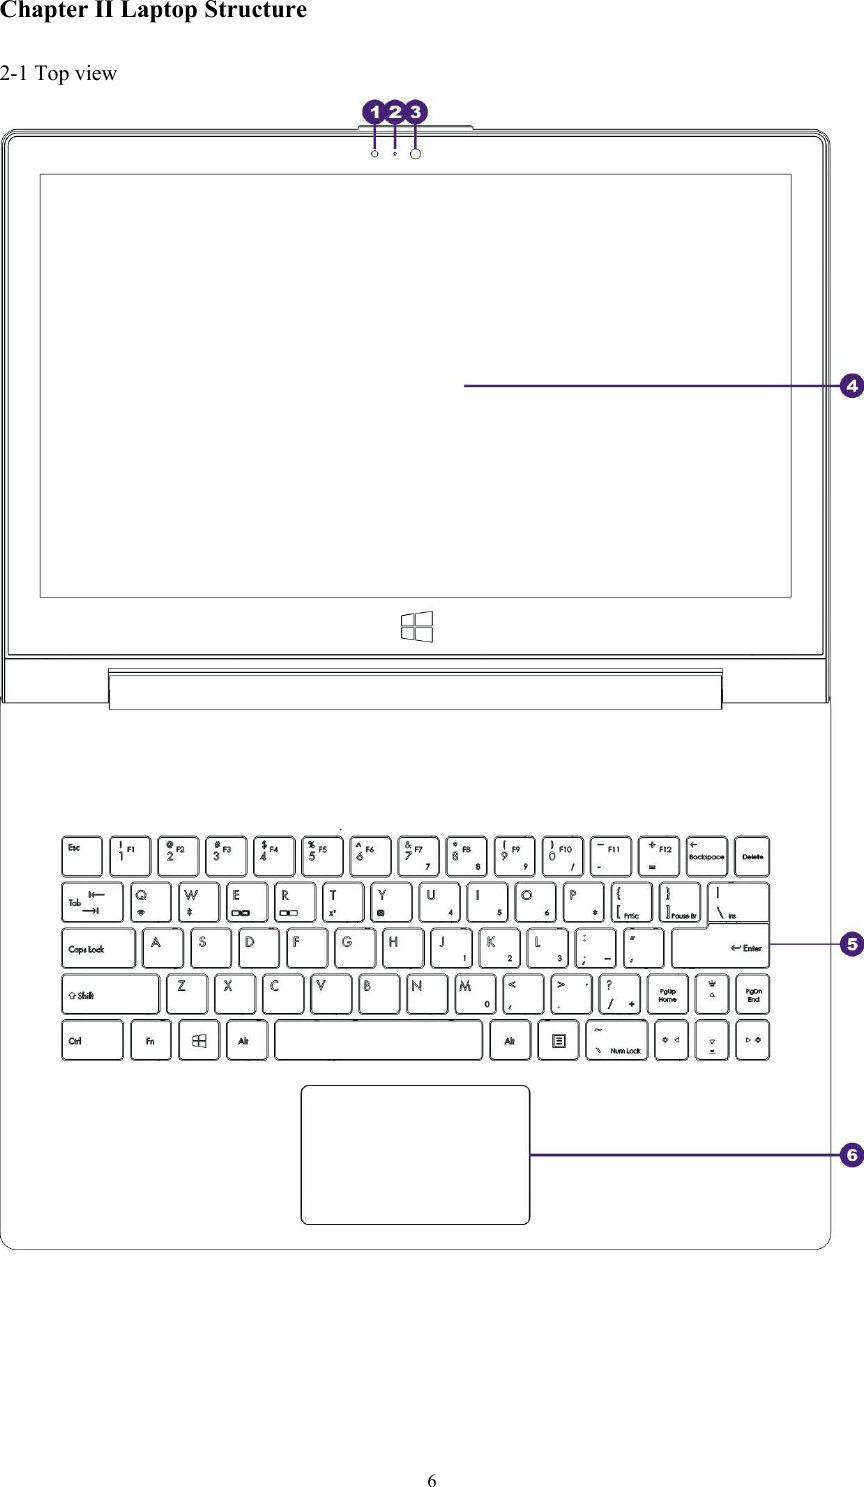
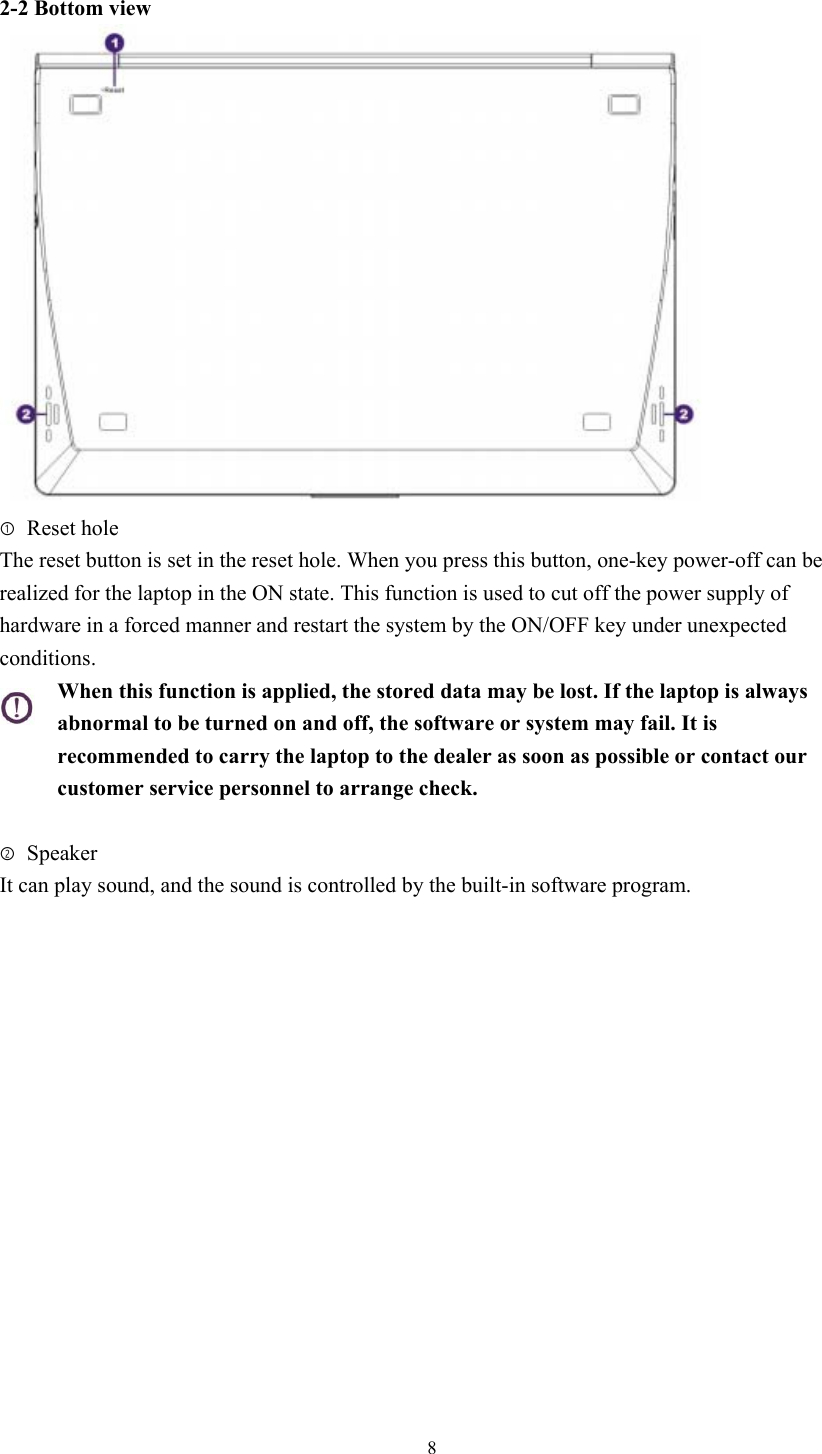
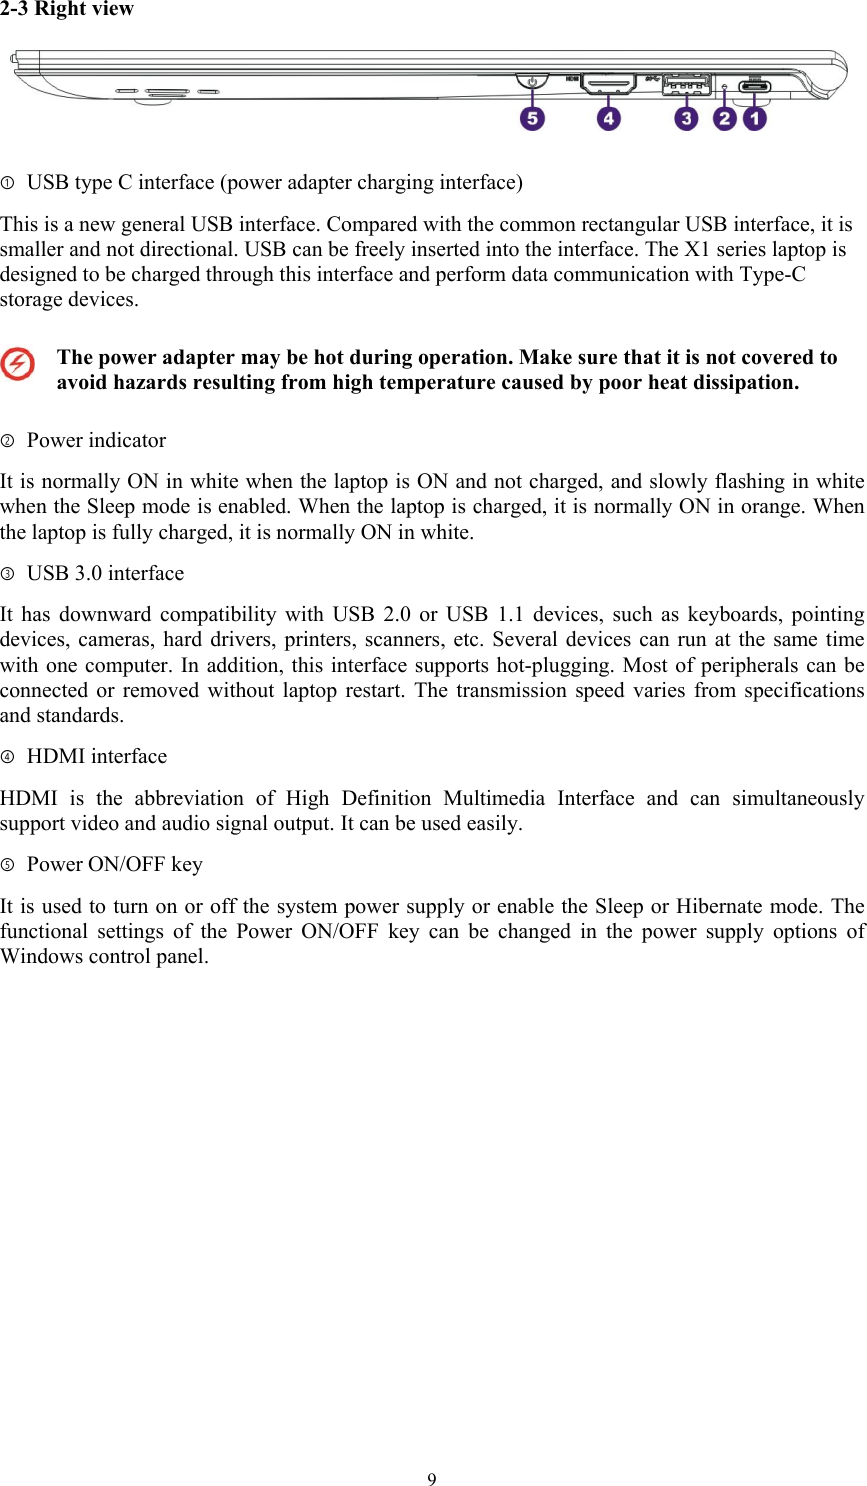

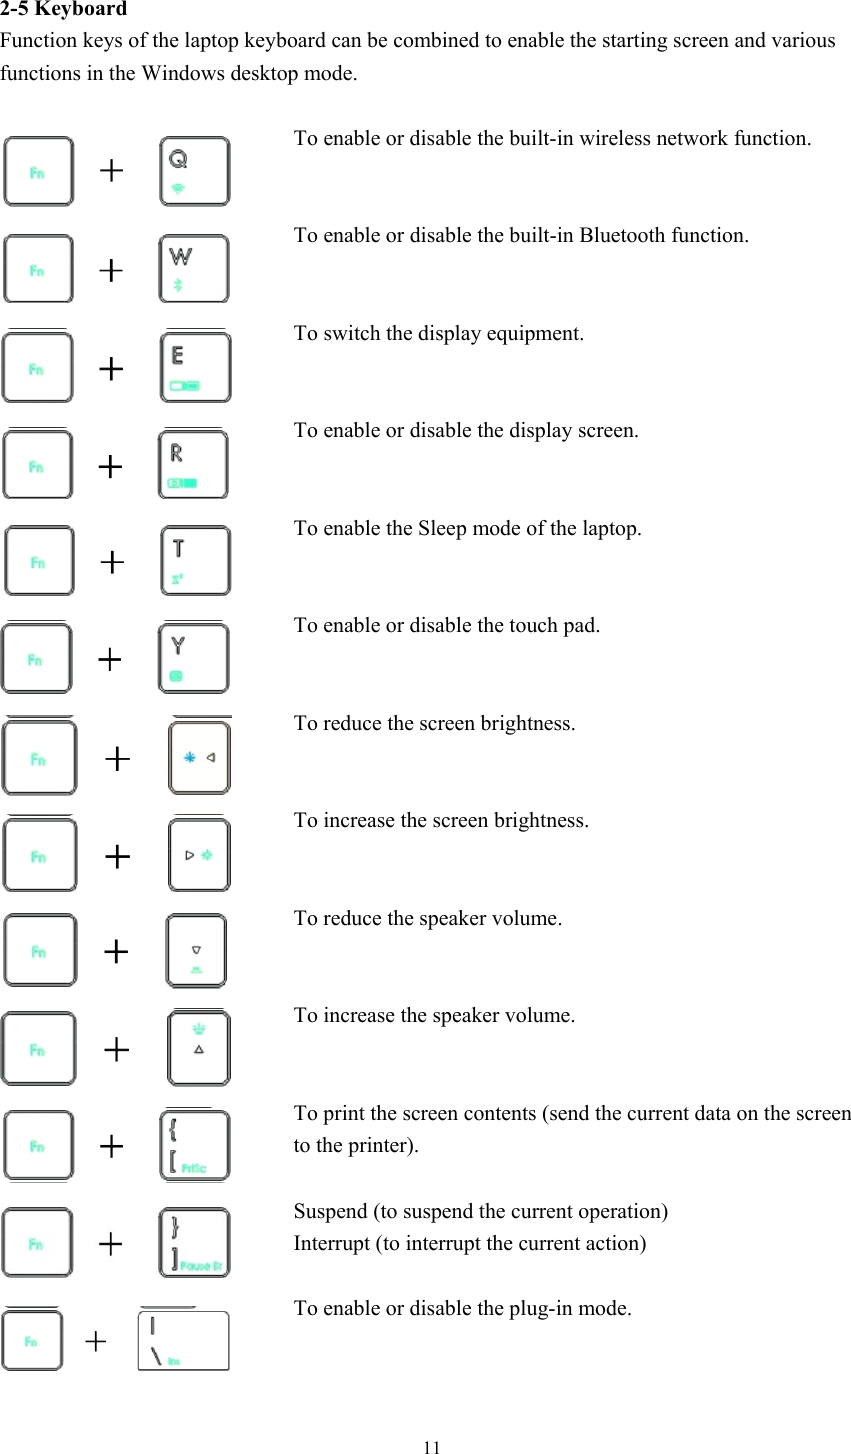
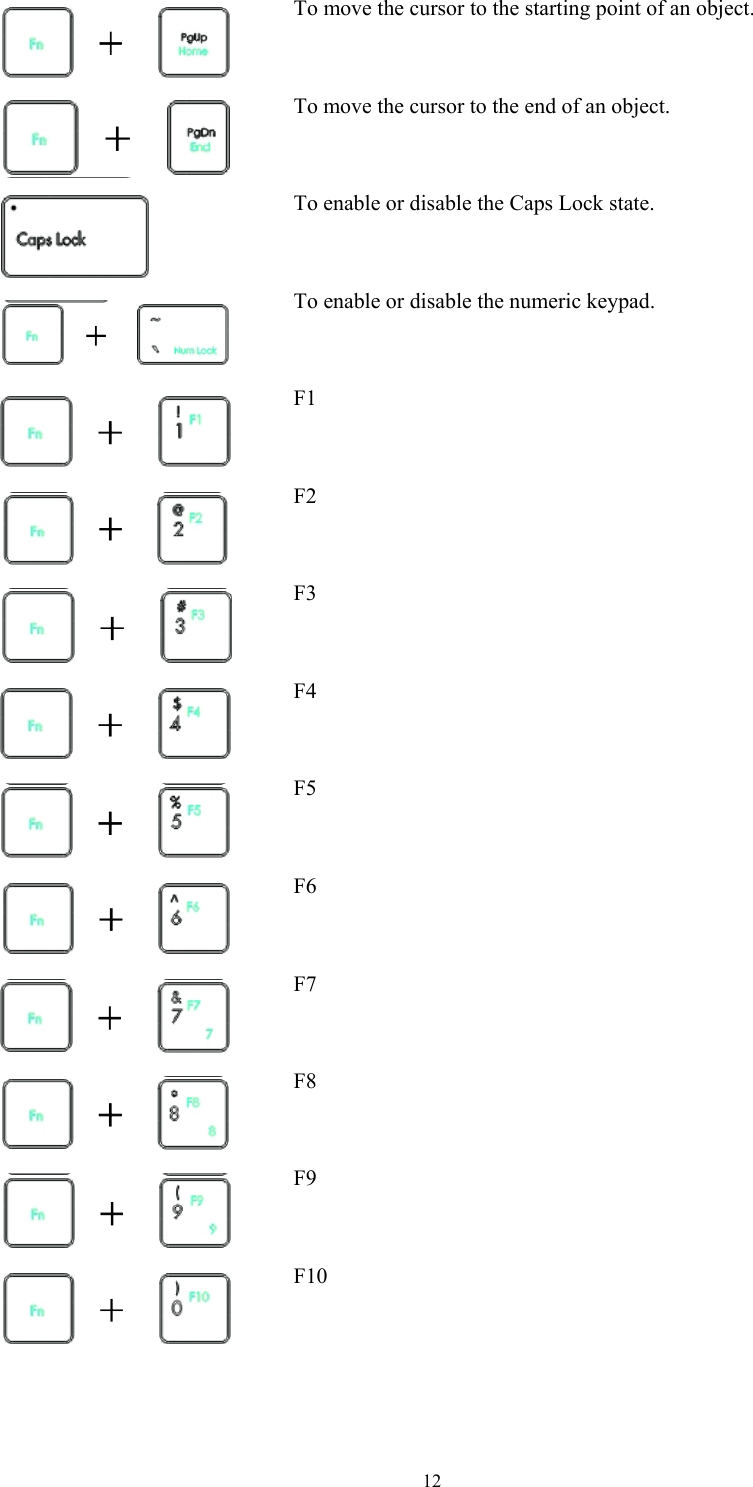
![17 3-3 BIOS test and setting When the power supply of the laptop is turned on, a series of diagnostic tests controlled by software will be performed at first on the screen, generally known as POST (power-on self-test). POST is operated at first every time the laptop is started. If no error appears in POST, the operating system will be enabled; otherwise, the error warning of BIOS setting memory loss caused by improper setting or long-time power loss will appear. You can use the function keys to read/write the BIOS setting program or operation troubleshooting options. Refer to the following instructions for more details. BIOS (basic input/output system) is used to save system hardware configuration required for laptop start-up. The default BIOS settings are applicable to most of operating conditions of the laptop and must not be changed except in the following cases: ◆ The error tip appears when the system is started, requiring you to operate the BIOS settings. ◆ You have installed a new system component requiring further BIOS setting or updating. The use of improper BIOS settings may result in system instability or start-up failure. It is strongly recommended to change BIOS settings with the help of professional personnel. How to enter the BIOS setting program: Restart the laptop and press in POST. The BIOS setting program image in this chapter is only for reference. The actual image may vary from models. 3-3-1 Menu label [Boot] The Boot menu can help you set the boot disc and priorities. Refer to the follow steps. Move right and left in the menu label and select [Boot]. Move up and down and select [Boot Option #1]. Press .](https://usermanual.wiki/Awood-Computer-Technology/X1/User-Guide-2847047-Page-17.png)
![18 The sub-options of [Boot Option #1] appear. Move up and down to select the priority boot disc and press for confirmation. 3-3-2 Menu label [Security] The [Security] can help you to set the administrator and user passwords and control the permission for use of the hard disc drive. Refer to the following steps to set the password: ① Move right and left in the menu label and select [Security]. Move up and down and select [Administrator Password] or [User Password]. Press for confirmation.](https://usermanual.wiki/Awood-Computer-Technology/X1/User-Guide-2847047-Page-18.png)
![19② The password dialog box appears. Input the password and press . ③ The password dialog box appears again. Input the password again and press . Refer to the following steps to clear the password: ① Move right and left in the menu label and select [Security]. Move up and down and select [Administrator Password] or [User Password]. Press for confirmation. ② The password dialog box appears. Input the password and press . ③ The password dialog box appears again. Keep it blank and press . ④ The confirmation dialog box appears. Select [Yes] and press . Thus, the password is cleared. ● If you have set the User Password, you will be required to input the password each time before entering the operating system. ● If you have set the Administrator Password, you will be required to input the password to enter BIOS each time before entering the BIOS setting program. 3-3-3 Save & Exit Any setting must be saved to take effect after the host is restarted.](https://usermanual.wiki/Awood-Computer-Technology/X1/User-Guide-2847047-Page-19.png)
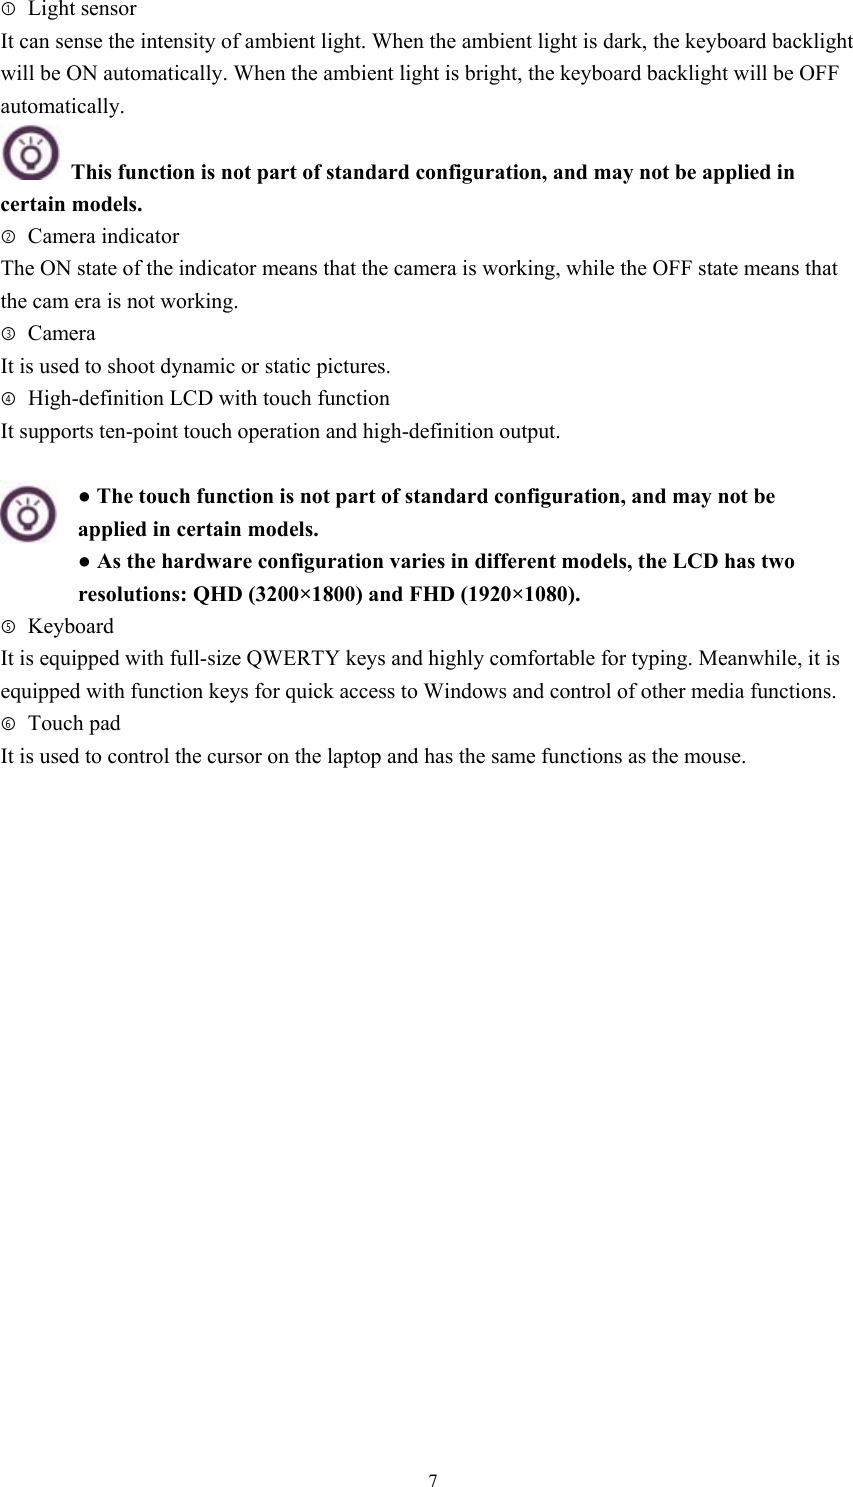
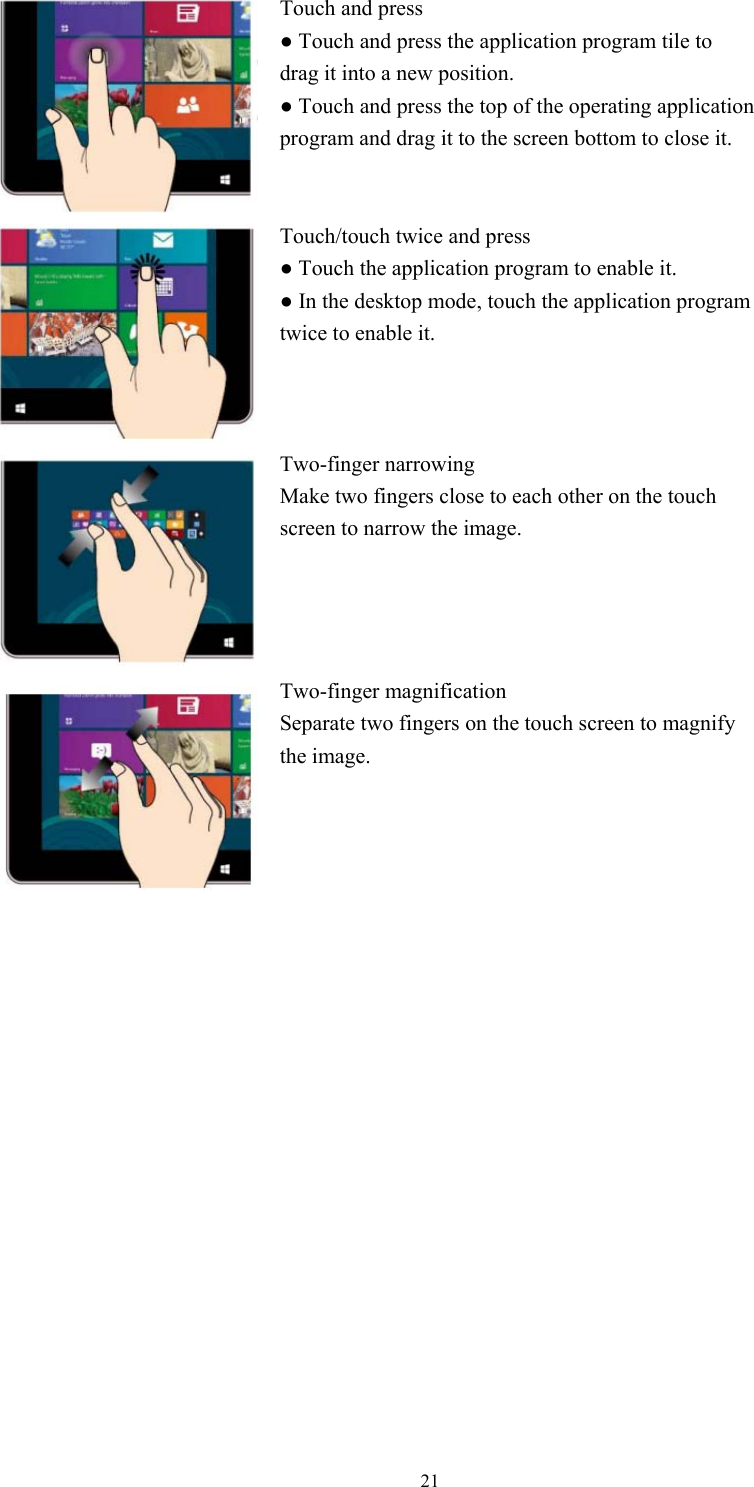
![20Move right and left in the menu label and select [Save & Exit]. Move up and down and select [Save Changes and Exit]. The confirmation dialog box appears. Select [Yes] and press . Then the settings will be saved. Exit BIOS. Restart the laptop to apply new settings. 3-4 Touch screen operations The touch screen can help you to run the program and complete laptop settings. Refer to the following graphical instructions for gestures of touch screen operations (depending on the model). Right-to-left sliding Slide from the right to left to enable the Charm Toolbar. Left-to-right sliding Slide from the left to right to open operating application programs in a cyclic manner. Top-to-bottom or bottom-to-top sliding Slide from top to bottom or from bottom to top in the starting screen to display application commands. Finger sliding Slide the finger to move the image vertically or horizontally.](https://usermanual.wiki/Awood-Computer-Technology/X1/User-Guide-2847047-Page-20.png)
![22 3-5 Touch pad operation The gestures of the touch pad are similar to those of the touch screen. However, the touch pad has the general operating characteristics of the mouse, which can help you run programs and read/write laptop settings. Refer to the following graphical instructions for the gestures of touch pad operation. 3-6-1 Cursor movement You can touch or click any part of the touch pad to enable the cursor, and slide the finger on the touch pad to move the cursor. Horizontal sliding Vertical sliding Oblique sliding 3-6-2 Single-finger gestures Touch/touch twice ● In the starting screen, touch an application program to enable it. ● In the desktop mode, touch an application program twice to enable it. Press the left key ● In the starting screen, press an application program to enable it. ● In the desktop mode, press an application program twice to enable it. Press the right key ● In the starting screen, press an application program to select and run the setting menu. You can also press this key to run the [All application programs] menu. ● In the desktop mode, press this key to enable the right-key menu. Drag and set ● Touch an icon twice to select it. Slide the same finger on the pad to drag the icon. ● Remove the finger to set the icon in a new position. Slide to the right Slide from the left to right of the touch pad to enable the operating](https://usermanual.wiki/Awood-Computer-Technology/X1/User-Guide-2847047-Page-22.png)
![23 application program. This function is the same as that of [Left-to-right sliding] of the touch screen. Slide to the left Slide from the right to left of the touch pad to enable the Charms bar. This function is the same as that of [Right-to-left sliding] of the touch screen. Top-down sliding ● In the starting screen, slide top-down to enable the [All application programs] menu. ● Slide top-down in the operating application program to view other menus. This function is the same as that of [Top-to-bottom sliding] of the touch screen. 3-6-3 Double-finger gestures Touch Touch the touch pad with two fingers to simulate the right-key functions of the mouse. Rotate Move two fingers clockwise or counterclockwise on the touch pad in a circular manner to rotate the image. This gesture only applies in Windows Photo Viewer or other application programs supporting this function. Two-finger rolling (up-and-down) Slide two fingers to roll the screen up and down. Two-finger rolling (right-and-left) Slide two fingers to roll the screen right and left.](https://usermanual.wiki/Awood-Computer-Technology/X1/User-Guide-2847047-Page-23.png)
![24 Narrow Make two fingers close to each other on the touch pad to narrow the image. This function is the same as that of [Two-finger narrowing] of the touch screen. Magnify Separate two fingers on the touch pad to magnify the image. This function is the same as that of [Two-finger magnification] of the touch screen. Drag and set Select an icon and press the left key, and slide another finger down on the touch pad to drag and set the icon in a new position. 3-6 Product registration It is recommended to register the purchased product on the official website after check. The product registration is greatly associated with warranty services and free of charge. Once the product is registered on the official website of Awood, the warranty will take effect immediately and you will immediately enjoy membership services and rights for future activities or promotions. If you do not register the product, you can only enjoy the standard “repair, replacement and return guarantees” specified in national laws and regulations, which are inferior to membership services. Registration website: Http://www.awood.com/register](https://usermanual.wiki/Awood-Computer-Technology/X1/User-Guide-2847047-Page-24.png)