Awood Computer Technology X1 Notebook Computer User Manual
Shenzhen Awood Computer Technology Co.,Ltd. Notebook Computer
User manual
1
Awood X1 Series
Laptop User Manual
Awood CHS
A-QW-070X110 A1

2
This manual applies to all X1 series models.
Tips:
● Welcome to log in Awood’s official website to obtain the latest product information and quick
and convenient support services.
● It is strongly recommended to purchase Awood products via its official website to obtain
complete warranty services.
● The default operating system is Mircosoft Windows 8.1. For other operating systems, the
operations may be different or the model may not apply.
● Contact us:
Official website: www.awood.com
Customer Service Tel: 400-
Email: service@awood.com
Official WeChat:
Official MicroBlog:

3
Icons in this manual:
Tips: tips or additional instructions to complete operations.
Important information: important instructions to be followed in operation or
use.
Warning: important instructions to be followed in particular work to maintain
the user safety and prevent the laptop data from loss or components from
damage.
Tips to use the touch pad.
Tips to use the keyboard.
Be away from fire or high-temperature environment. Risks may be caused if
the product is set in a high-temperature place or near a fire.
Avoid discarding without permission. The product may contain toxic or
harmful substances. Discarding without permission may cause environmental
pollution.
4
Contents
Chapter I Host and Part Check ............................................................................................................. 5
1-1 Packing list ................................................................................................................................. 5
1-2 Appearance check ...................................................................................................................... 5
1-3 Product serial number check ...................................................................................................... 5
Chapter II Laptop Structure ................................................................................................................. 6
2-1 Top view .................................................................................................................................... 6
2-2 Bottom view ............................................................................................................................... 8
2-3 Right view .................................................................................................................................. 9
2.4 Left view ................................................................................................................................... 10
2-5 Keyboard .................................................................................................................................. 11
Chapter III Operation .......................................................................................................................... 15
3-1 Charging before use ................................................................................................................. 15
3-2 Start-up ..................................................................................................................................... 16
3-3 BIOS test and setting ................................................................................................................ 17
3-4 Touch screen operations ........................................................................................................... 20
3-5 Touch pad operation ................................................................................................................. 22
3-6 Product registration .................................................................................................................. 24
Chapter IV Daily Basic Maintenance ................................................................................................. 25
4-1 LCD maintenance ..................................................................................................................... 25
4-2 Battery maintenance ................................................................................................................. 25
4-3 Keyboard maintenance ............................................................................................................. 26
4-4 Touch pad maintenance ............................................................................................................ 26
4-5 Heat dissipation ........................................................................................................................ 26
4-6 Maintenance of other components ........................................................................................... 26
4-7 Environmental protection requirements ................................................................................... 26
4-8 Recommended schedule of routine maintenance ..................................................................... 27
4-9 Other safety instructions ........................................................................................................... 27
Chapter V Simple Troubleshooting .................................................................................................... 28

5
Chapter I Host and Part Check
1-1 Packing list
The packing box of Awood X1 series laptop product should include the following items:
① X1 series laptop host × 1
② Dedicated power adapter with USB3.1 type C interface × 1
③ Power cord × 1
④ User Manual × 1
⑤ Warranty card ×1
1-2 Appearance check
The host appearance should have no obvious scratch or damage. The casing should not be
deformed. The power adapter and cord should not be broken or ruptured.
1-3 Product serial number check
The serial number in the product serial number label on the host back must be the same as the
registration serial number on the warranty card. Moreover, it should be clear and not altered.
In case of part missing or defect, immediately contact the seller. According to our service policy,
the purchased product will be replaced with a new one immediately.
● The power adapter with other modes or interfaces are not supported for
charging. Only use the original power adapter.
● The date of production is shown on the warranty card. If you are not registered
as a member and cannot provide the purchase certificate, the warranty service will
be started from the date of production.
● The defect or breakage of the power cord may result in electrical leakage and
even fire, or equipment failure and personal injury.
● The power adapter or power cord plug is a great potential hazard and may result
in anomaly or failure of equipment.
6
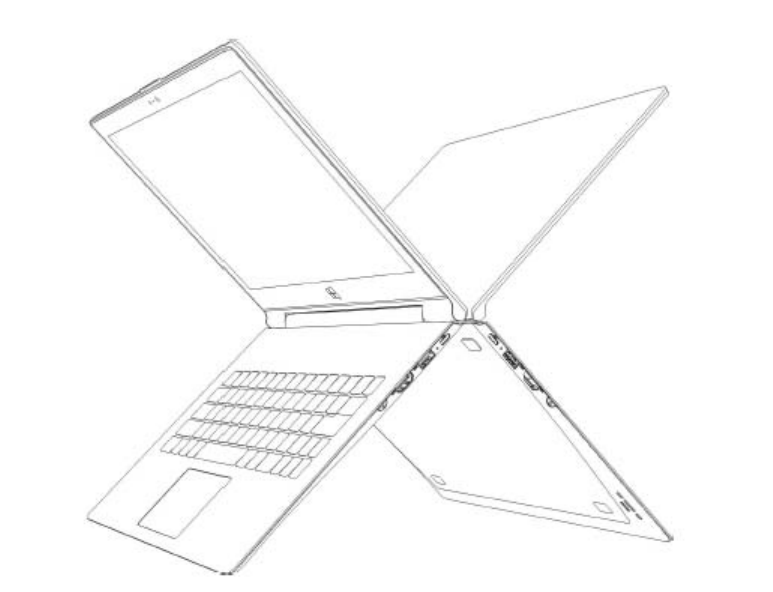
Chapter II Laptop Structure
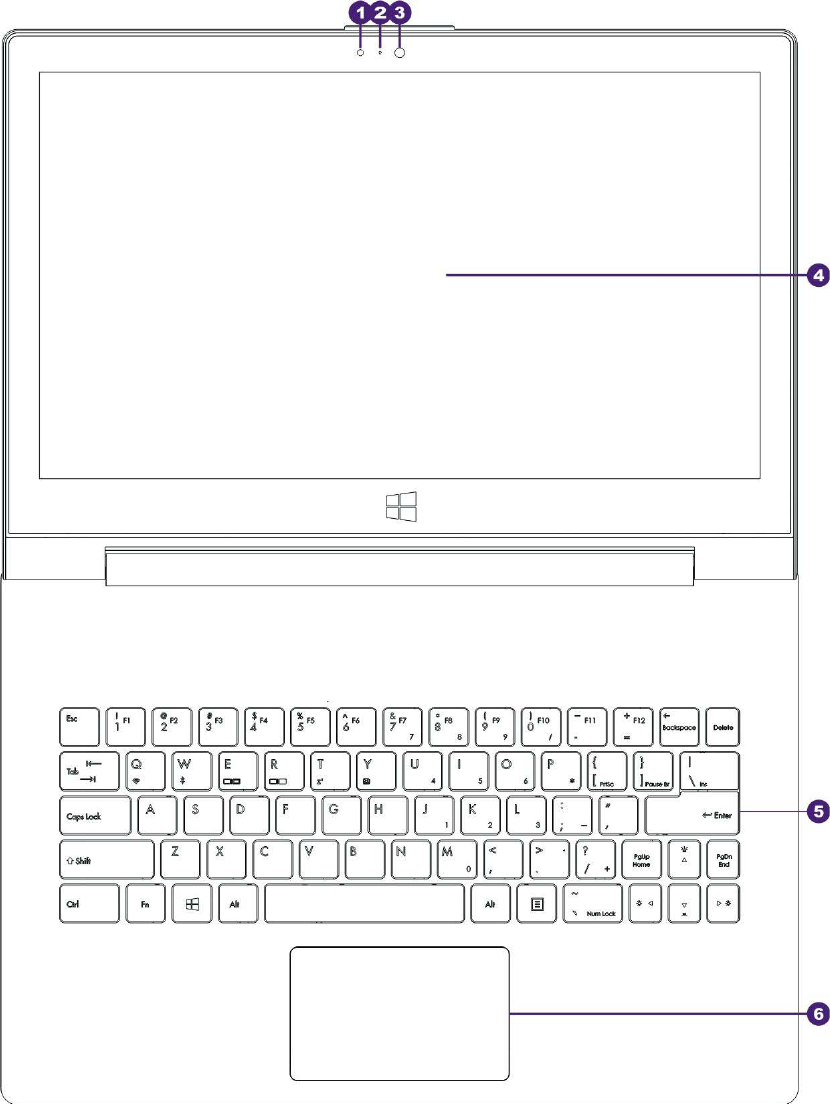
2-1 Top view

7
① Light sensor
It can sense the intensity of ambient light. When the ambient light is dark, the keyboard backlight
will be ON automatically. When the ambient light is bright, the keyboard backlight will be OFF
automatically.
This function is not part of standard configuration, and may not be applied in
certain models.
② Camera indicator
The ON state of the indicator means that the camera is working, while the OFF state means that
the cam era is not working.
③ Camera
It is used to shoot dynamic or static pictures.
④ High-definition LCD with touch function
It supports ten-point touch operation and high-definition output.
● The touch function is not part of standard configuration, and may not be
applied in certain models.
● As the hardware configuration varies in different models, the LCD has two
resolutions: QHD (3200×1800) and FHD (1920×1080).
⑤ Keyboard
It is equipped with full-size QWERTY keys and highly comfortable for typing. Meanwhile, it is
equipped with function keys for quick access to Windows and control of other media functions.
⑥ Touch pad
It is used to control the cursor on the laptop and has the same functions as the mouse.

8
2-2 Bottom view
① Reset hole
The reset button is set in the reset hole. When you press this button, one-key power-off can be
realized for the laptop in the ON state. This function is used to cut off the power supply of
hardware in a forced manner and restart the system by the ON/OFF key under unexpected
conditions.
When this function is applied, the stored data may be lost. If the laptop is always
abnormal to be turned on and off, the software or system may fail. It is
recommended to carry the laptop to the dealer as soon as possible or contact our
customer service personnel to arrange check.
② Speaker
It can play sound, and the sound is controlled by the built-in software program.
9
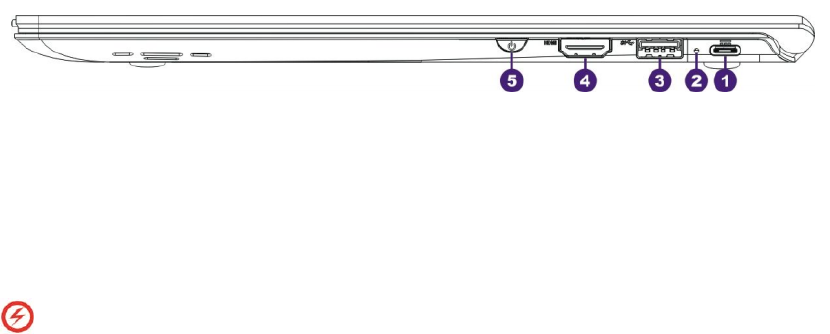
2-3 Right view
① USB type C interface (power adapter charging interface)
This is a new general USB interface. Compared with the common rectangular USB interface, it is
smaller and not directional. USB can be freely inserted into the interface. The X1 series laptop is
designed to be charged through this interface and perform data communication with Type-C
storage devices.
The power adapter may be hot during operation. Make sure that it is not covered to
avoid hazards resulting from high temperature caused by poor heat dissipation.
② Power indicator
It is normally ON in white when the laptop is ON and not charged, and slowly flashing in white
when the Sleep mode is enabled. When the laptop is charged, it is normally ON in orange. When
the laptop is fully charged, it is normally ON in white.
③ USB 3.0 interface
It has downward compatibility with USB 2.0 or USB 1.1 devices, such as keyboards, pointing
devices, cameras, hard drivers, printers, scanners, etc. Several devices can run at the same time
with one computer. In addition, this interface supports hot-plugging. Most of peripherals can be
connected or removed without laptop restart. The transmission speed varies from specifications
and standards.
④ HDMI interface
HDMI is the abbreviation of High Definition Multimedia Interface and can simultaneously
support video and audio signal output. It can be used easily.
⑤ Power ON/OFF key
It is used to turn on or off the system power supply or enable the Sleep or Hibernate mode. The
functional settings of the Power ON/OFF key can be changed in the power supply options of
Windows control panel.

10
2.4 Left view
① USB 2.0 interface
It has downward compatibility with USB 1.1 devices, such as keyboards, pointing devices,
cameras, hard drivers, printers, scanners, etc. Several devices can run at the same time with one
computer. In addition, this interface supports hot-plugging. Most of peripherals can be connected
or removed without laptop restart. The transmission speed varies from specifications and
standards.
② Audio interface
It is a dual-purpose jack for headphone output and microphone output. Audio signals of laptop can
be output to the speaker or headphone, or the interface can be connected to a microphone or used
to input signals from an audio device.
③ Microphone reception hole
The built-in high-sensitivity microphone of the host is set in the hole. It can be used with related
audio software to collect or record sound.
④ Micro SD memory card slot
A card reader is set in the slot to read Micro SD (TF) memory cards. It supports the maximum
capacity of 256G. The reading speed depends on the specifications of the memory card.

11
2-5 Keyboard
Function keys of the laptop keyboard can be combined to enable the starting screen and various
functions in the Windows desktop mode.
To enable or disable the built-in wireless network function.
To enable or disable the built-in Bluetooth function.
To switch the display equipment.
To enable or disable the display screen.
To enable the Sleep mode of the laptop.
To enable or disable the touch pad.
To reduce the screen brightness.
To increase the screen brightness.
To reduce the speaker volume.
To increase the speaker volume.
To print the screen contents (send the current data on the screen
to the printer).
Suspend (to suspend the current operation)
Interrupt (to interrupt the current action)
To enable or disable the plug-in mode.

12
To move the cursor to the starting point of an object.
To move the cursor to the end of an object.
To enable or disable the Caps Lock state.
To enable or disable the numeric keypad.
F1
F2
F3
F4
F5
F6
F7
F8
F9
F10

13
F11
F12
Enabling of the numeric keypad:
When the numeric keypad is enabled, the functions of these keys are as follows:
Number 7
Number 8
Number 9
Number 4
Number 5
Number 6
Multiply (meaning that the calculation function is “to multiply”)
Number 1

14
Number 2
Number 3
Divide (meaning that the calculation function is “to divide”)
Number 0
Deduct (meaning that the calculation function is “to deduct”)
Decimal point (meaning a separator between the integer and decimal part of a
figure)
Add (meaning that the calculation function is “to add”)
Windows 8.1 function keys
The laptop has two groups of special Windows function keys, as shown below:
Press it to return to the starting screen. In the starting screen, press it to return to the
previous application program.
Press it to simulate the right key function of the mouse.
15
Chapter III Operation
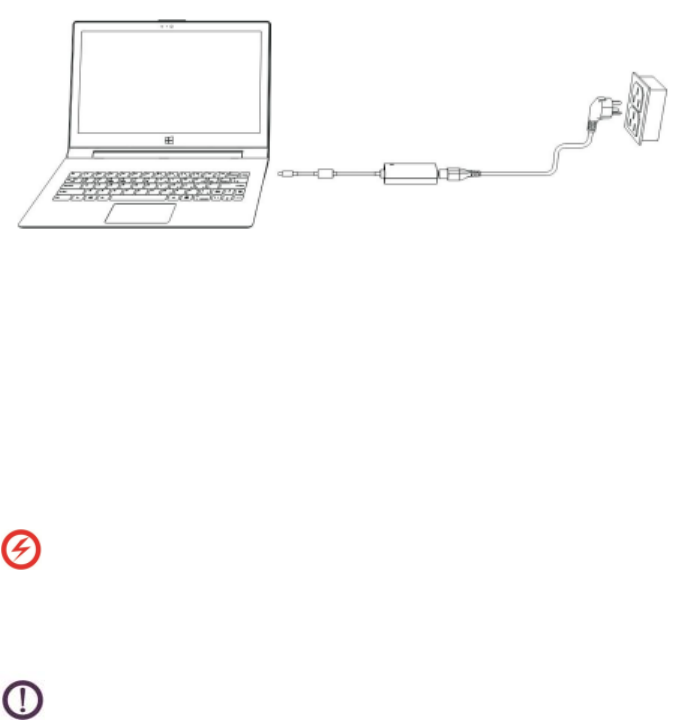
3-1 Charging before use
The built-in battery module of the host may not be fully charged. It is recommended to charge the
battery before start-up to ensure the normal operation.
Insert the three-hole plug of the power cord to the AC jack of the power adapter, the international
plug of the power cord to the 100V-240V power socket and the USB type C plug of the power
adapter into the USB type C jack of the laptop to charge the battery. Observe the power indicator
in the charging process.
● The power adapter may be hot during operation. Make sure that it is not covered
to avoid hazards resulting from high temperature caused by poor heat dissipation.
● The use of the socket beyond the specified voltage range (100V-240V) may result
in anomaly or damage of the power adapter or laptop host.
The laptop host may be hot during charging or start-up. Do not place the laptop on
an uneven or soft object, such as the bed, sofa or quilt, which may block the heat
dissipation part to affect cooling effects or result in performance decline and
failure of the product. It is strongly recommended to set the laptop host on an even
desktop or bench during charging or start-up to ensure the safety.
16
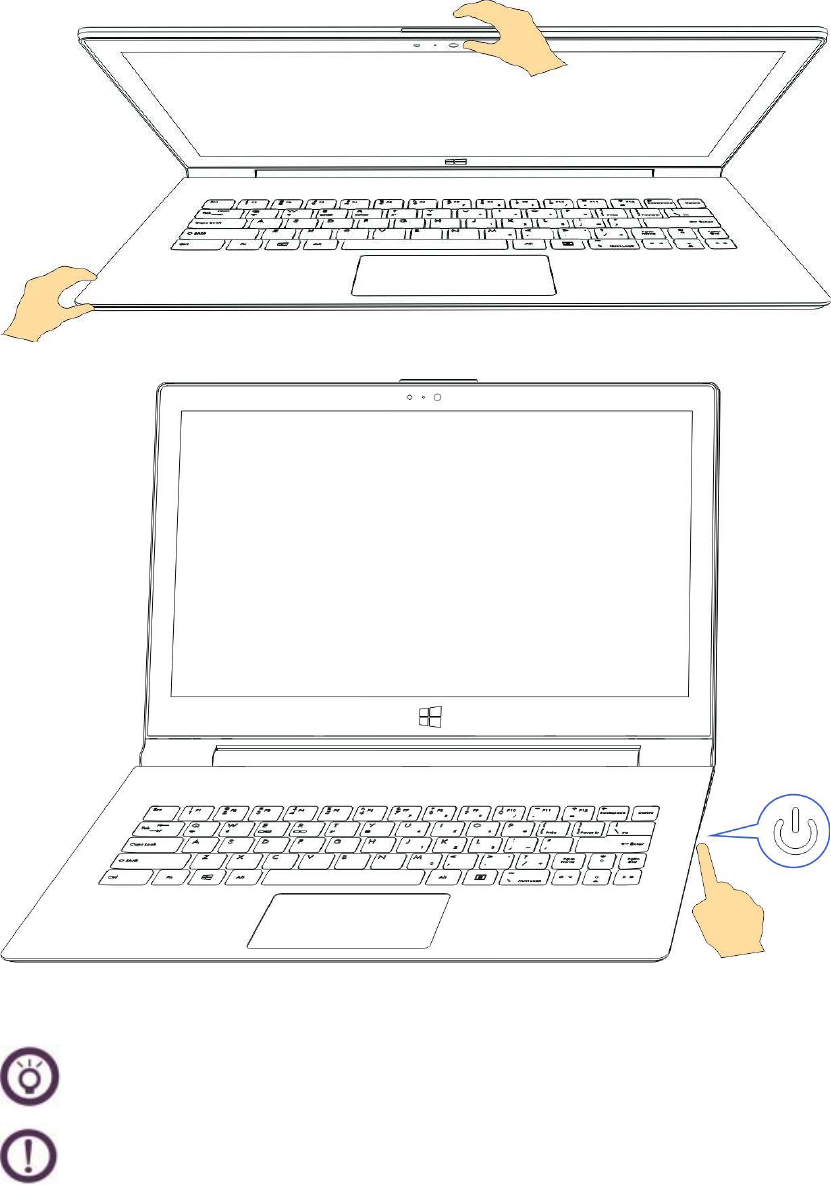
3-2 Start-up
Open the display.
Press the power ON/OFF key
The laptop may not be started normally as a result of insufficient power of the
battery module if charging is not performed before start-up.
The heat produced normally by the system may be dissipated to the surface
when the laptop is working or charged. The power adapter may be hot in
normal operation. Do not place the laptop and power adapter on the knees or
any part of the body in a long time to avoid discomfort caused by heat.
17
3-3 BIOS test and setting
When the power supply of the laptop is turned on, a series of diagnostic tests controlled by
software will be performed at first on the screen, generally known as POST (power-on self-test).
POST is operated at first every time the laptop is started. If no error appears in POST, the
operating system will be enabled; otherwise, the error warning of BIOS setting memory loss
caused by improper setting or long-time power loss will appear. You can use the function keys to
read/write the BIOS setting program or operation troubleshooting options. Refer to the following
instructions for more details.
BIOS (basic input/output system) is used to save system hardware configuration required for
laptop start-up. The default BIOS settings are applicable to most of operating conditions of the
laptop and must not be changed except in the following cases:
◆ The error tip appears when the system is started, requiring you to operate the BIOS
settings.
◆ You have installed a new system component requiring further BIOS setting or updating.
The use of improper BIOS settings may result in system instability or start-up
failure. It is strongly recommended to change BIOS settings with the help of
professional personnel.
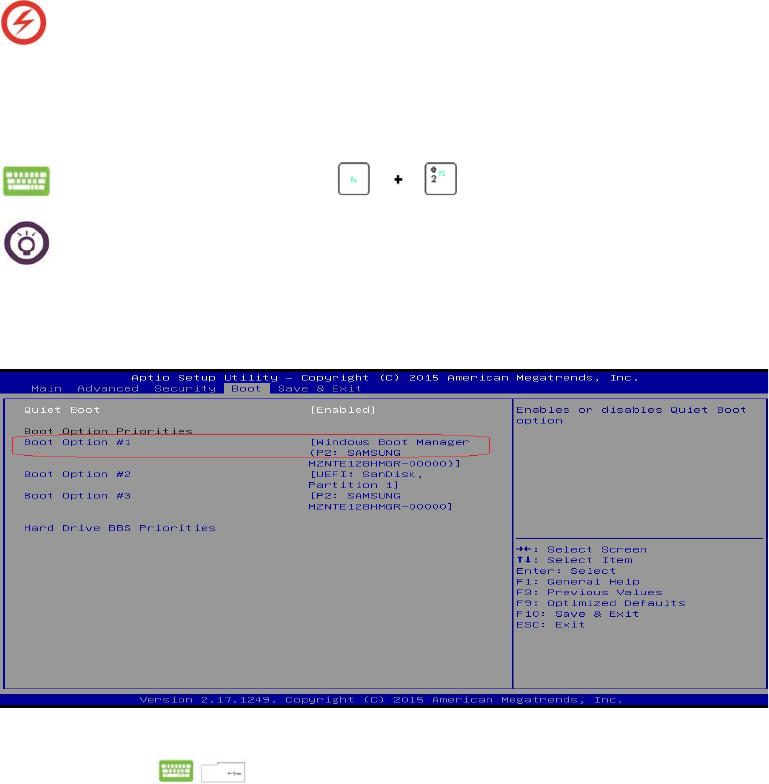
How to enter the BIOS setting program:
Restart the laptop and press in POST.
The BIOS setting program image in this chapter is only for reference. The
actual image may vary from models.
3-3-1 Menu label [Boot]
The Boot menu can help you set the boot disc and priorities. Refer to the follow steps.
Move right and left in the menu label and select [Boot]. Move up and down and select [Boot
Option #1]. Press .
18
The sub-options of [Boot Option #1] appear. Move up and down to select the priority boot disc
and press for confirmation.
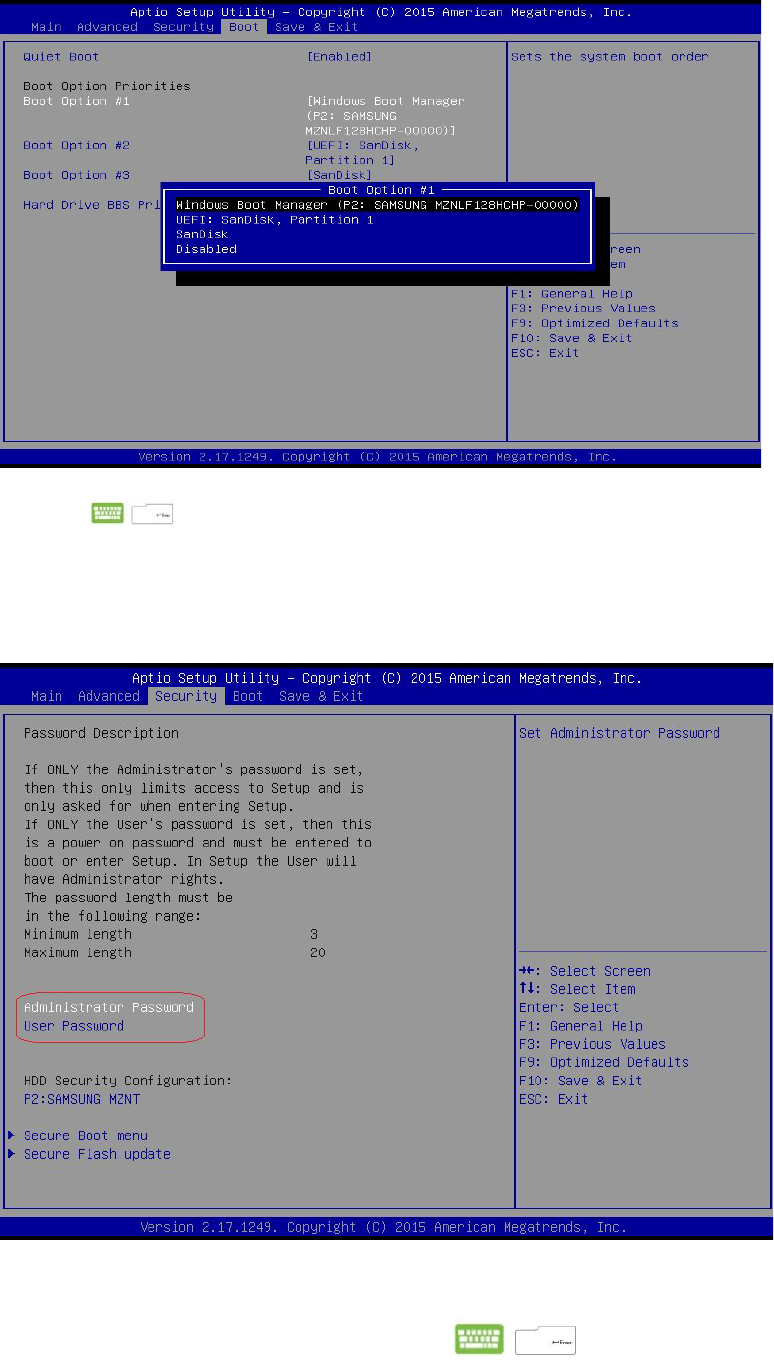
3-3-2 Menu label [Security]
The [Security] can help you to set the administrator and user passwords and control the permission
for use of the hard disc drive.
Refer to the following steps to set the password:
① Move right and left in the menu label and select [Security]. Move up and down and select
[Administrator Password] or [User Password]. Press for confirmation.
19
② The password dialog box appears. Input the password and press .
③ The password dialog box appears again. Input the password again and press .
Refer to the following steps to clear the password:
① Move right and left in the menu label and select [Security]. Move up and down and select
[Administrator Password] or [User Password]. Press for confirmation.
② The password dialog box appears. Input the password and press .
③ The password dialog box appears again. Keep it blank and press .
④ The confirmation dialog box appears. Select [Yes] and press . Thus, the password
is cleared.
● If you have set the User Password, you will be required to input the
password each time before entering the operating system.
● If you have set the Administrator Password, you will be required to input
the password to enter BIOS each time before entering the BIOS setting
program.
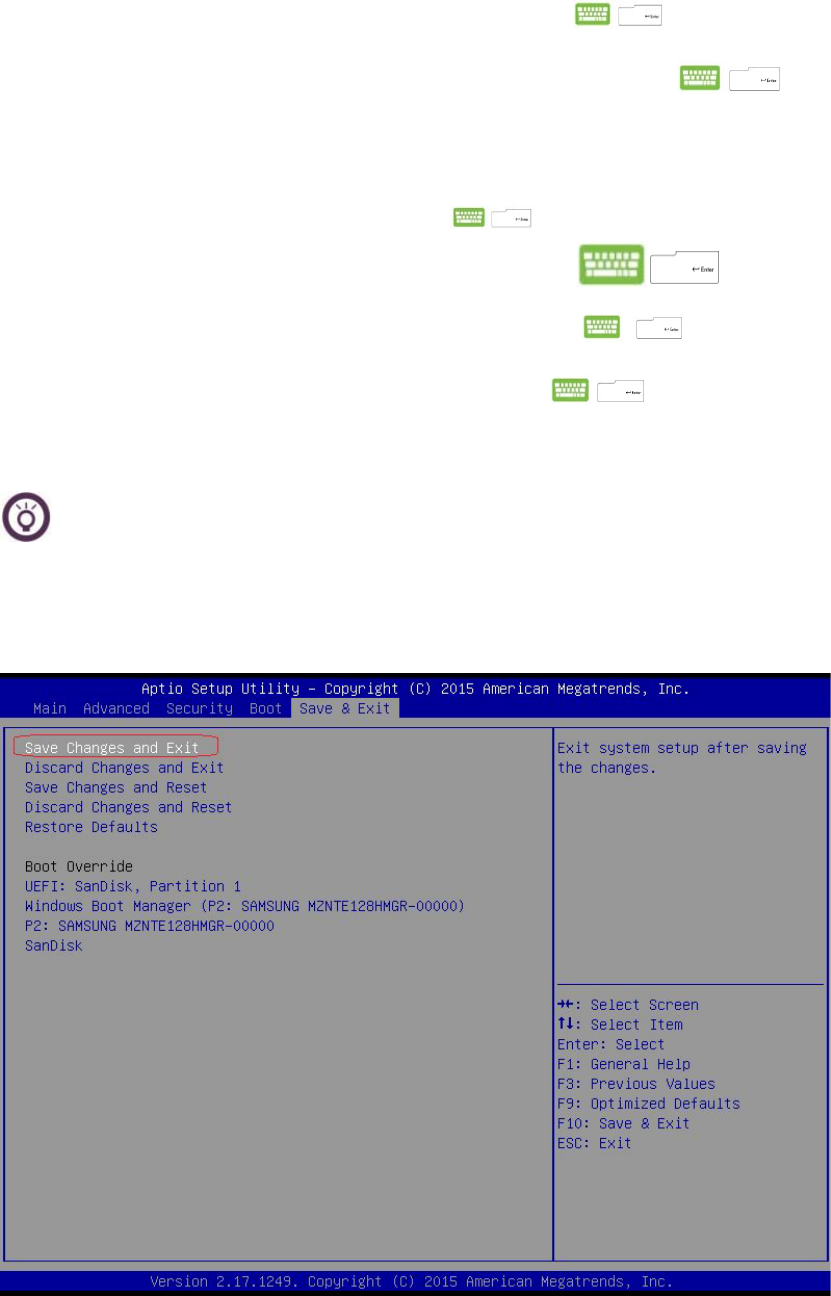
3-3-3 Save & Exit
Any setting must be saved to take effect after the host is restarted.
20
Move right and left in the menu label and select [Save & Exit]. Move up and down and select
[Save Changes and Exit]. The confirmation dialog box appears. Select [Yes] and press
. Then the settings will be saved. Exit BIOS. Restart the laptop to apply new
settings.
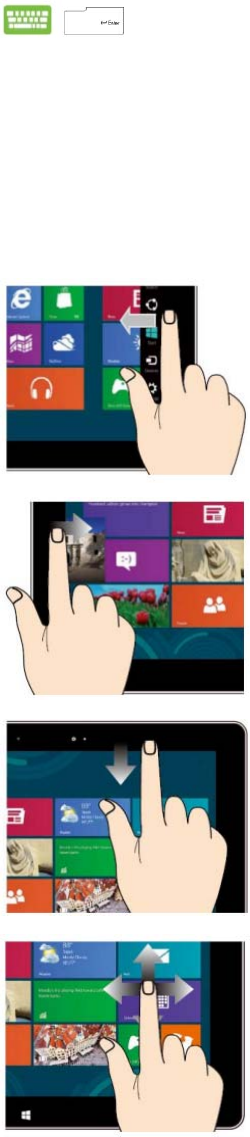
3-4 Touch screen operations
The touch screen can help you to run the program and complete laptop settings. Refer to the
following graphical instructions for gestures of touch screen operations (depending on the model).
Right-to-left sliding
Slide from the right to left to enable the Charm
Toolbar.
Left-to-right sliding
Slide from the left to right to open operating
application programs in a cyclic manner.
Top-to-bottom or bottom-to-top sliding
Slide from top to bottom or from bottom to top in the
starting screen to display application commands.
Finger sliding
Slide the finger to move the image vertically or
horizontally.

21
Touch and press
● Touch and press the application program tile to
drag it into a new position.
● Touch and press the top of the operating application
program and drag it to the screen bottom to close it.
Touch/touch twice and press
● Touch the application program to enable it.
● In the desktop mode, touch the application program
twice to enable it.
Two-finger narrowing
Make two fingers close to each other on the touch
screen to narrow the image.
Two-finger magnification
Separate two fingers on the touch screen to magnify
the image.

22
3-5 Touch pad operation
The gestures of the touch pad are similar to those of the touch screen. However, the touch pad has
the general operating characteristics of the mouse, which can help you run programs and
read/write laptop settings. Refer to the following graphical instructions for the gestures of touch
pad operation.
3-6-1 Cursor movement
You can touch or click any part of the touch pad to enable the cursor, and slide the finger on the
touch pad to move the cursor.
Horizontal sliding Vertical sliding Oblique sliding
3-6-2 Single-finger gestures
Touch/touch twice
● In the starting screen, touch an application program to enable it.
● In the desktop mode, touch an application program twice to enable
it.
Press the left key
● In the starting screen, press an application program to enable it.
● In the desktop mode, press an application program twice to enable
it.
Press the right key
● In the starting screen, press an application program to select and
run the setting menu. You can also press this key to run the [All
application programs] menu.
● In the desktop mode, press this key to enable the right-key menu.
Drag and set
● Touch an icon twice to select it. Slide the same finger on the pad
to drag the icon.
● Remove the finger to set the icon in a new position.
Slide to the right Slide from the left to right of the touch pad to enable the operating
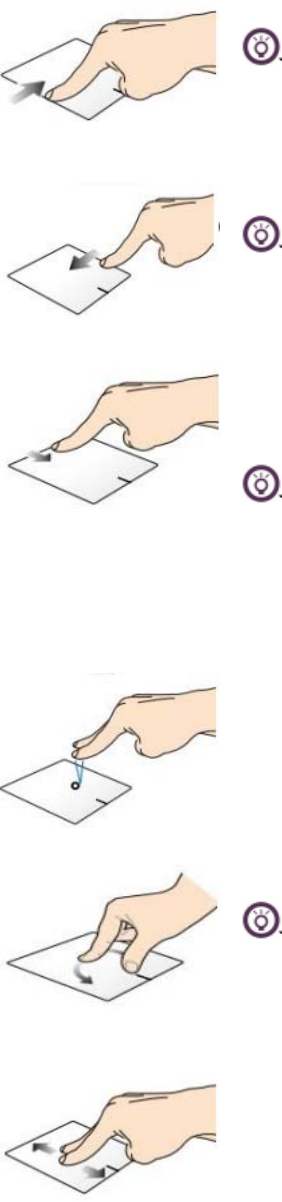
23
application program.
This function is the same as that of [Left-to-right sliding]
of the touch screen.
Slide to the left
Slide from the right to left of the touch pad to enable the Charms
bar.
This function is the same as that of [Right-to-left sliding]
of the touch screen.
Top-down sliding
● In the starting screen, slide top-down to enable the [All
application programs] menu.
● Slide top-down in the operating application program to view other
menus.
This function is the same as that of [Top-to-bottom sliding]
of the touch screen.
3-6-3 Double-finger gestures
Touch
Touch the touch pad with two fingers to simulate the right-key
functions of the mouse.
Rotate
Move two fingers clockwise or counterclockwise on the touch pad
in a circular manner to rotate the image.
This gesture only applies in Windows Photo Viewer or other
application programs supporting this function.
Two-finger rolling
(up-and-down)
Slide two fingers to roll the screen up and down.
Two-finger rolling
(right-and-left)
Slide two fingers to roll the screen right and left.
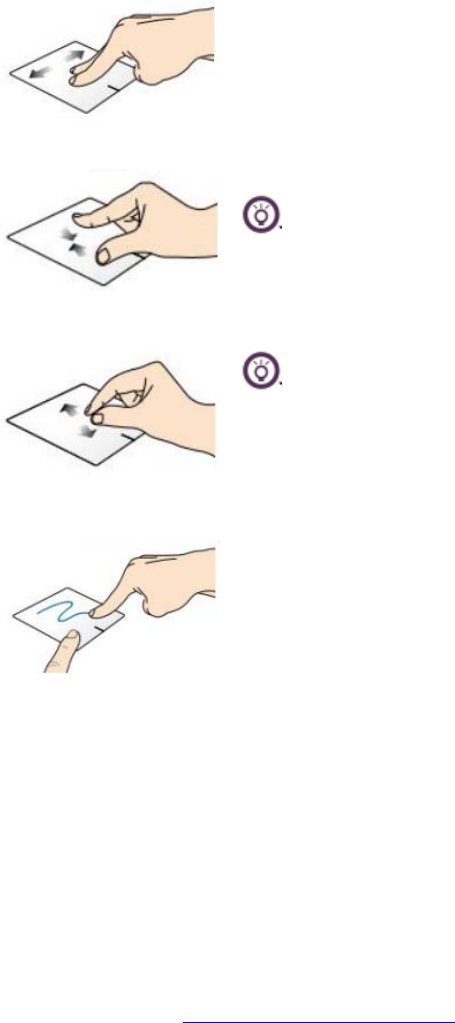
24
Narrow
Make two fingers close to each other on the touch pad to narrow the
image.
This function is the same as that of [Two-finger narrowing] of
the touch screen.
Magnify
Separate two fingers on the touch pad to magnify the image.
This function is the same as that of [Two-finger
magnification] of the touch screen.
Drag and set
Select an icon and press the left key, and slide another finger down
on the touch pad to drag and set the icon in a new position.
3-6 Product registration
It is recommended to register the purchased product on the official website after check.
The product registration is greatly associated with warranty services and free of charge. Once the
product is registered on the official website of Awood, the warranty will take effect immediately
and you will immediately enjoy membership services and rights for future activities or promotions.
If you do not register the product, you can only enjoy the standard “repair, replacement and return
guarantees” specified in national laws and regulations, which are inferior to membership services.
Registration website: Http://www.awood.com/register

25
Chapter IV Daily Basic Maintenance
4-1 LCD maintenance
● When the laptop is not used in a long time, temporarily turn off the power supply of LCD via
the function key on the keyboard. The display principle of the LCD is different from that of the
conventional display (CRT), the laptop requires no screen protection program to prevent screen
aging. On the contrary, more power is needed for screen protection.
● Open and close the LCD cover with appropriate forces. Do not place any object between the
keyboard and screen before closing the laptop, to prevent the screen from being damaged under
external pressure.
●Do not touch the surface of the touch screen with fingernails or sharp objects (such as pencils) to
avoid damage.
● Dust may be accumulated on the screen surface under electrostatic effects. Do not wipe dust
with fingers to avoid fingerprints.
● Refer to the following steps to clean the screen:
1. Turn off the power supply of the laptop at first. Then move the laptop into a bright place to
check dust and stain and better clean the screen.
2. Soak the dedicated cloth (glasses cloth or other lint-free soft cloth) with a little clean water,
squeeze it dry and clean the screen. Do not extrude the screen with excessive forces. Wipe the
screen in a certain direction.
3. After cleaning with a soft wet cloth, clean the screen again with a piece of dry lint-free soft
cloth and naturally dry moisture left on the screen in a ventilated place.
● Do not wipe the screen with chemical detergent (including alcohol).
● Do not wipe the screen with hard cloth or paper. Do not directly spray liquid
to the screen surface to avoid leakage through the frame and cause damage.
4-2 Battery maintenance
● If no external power supply is connected and external peripherals are not needed temporarily, it
is recommended to disconnect or remove such peripherals to prolong the battery life.
● The appropriate working temperature of the battery is 20-30 . The battery ℃life will be reduced
if the operating temperature is over high or low.
● For this product, when the battery is fully charged, the charging circuit will be OFF
automatically, and overcharge will not occur. However, the running-out of the battery should be
avoided. If it occurs frequently, the battery life may be reduced.
● It is preferred to store the battery in a 10-30 dry place. If the storage temperature is over low, ℃
the battery activity will decline. If the storage temperature is over high, the battery discharge
speed will be increased and the battery life will be reduced.
26
4-3 Keyboard maintenance
● It is recommended not to wear a watch or bracelet during laptop operation to prevent the
keyboard or shell from being worn during operation.
● If dust is accumulated in the keyboard, clean seams with a small brush, or blow dust out with a
high-pressure nozzle used for cleaning the camera lens, or clean dust and debris in keyboard
seams with a hand-held vacuum cleaner.
● If necessary, wipe the keyboard surface via the soft cloth with a little neutral disinfectant and in
the OFF state of the laptop.
4-4 Touch pad maintenance
● Keep both hands clean and dry in touch pad operation to avoid inaccurate positioning of the
cursor.
● If the surface of the touch pad accidentally gets dirty, carefully wipe it via soft cloth soaked with
a little water. Do not use hard cloth.
● The touch pad is an inductive precision electronic component. Do not write on its surface with
sharp objects (such as pens) or place weights on it to avoid damage.
4-5 Heat dissipation
The heat produced by the laptop is dissipated by large radiating fins. Do not place the laptop on an
uneven or soft object, such as the bed, sofa and quilt, which may block the heat dissipation part
and effect cooling effects and result in performance decline or failure of the product.
4-6 Maintenance of other components
Clean or maintain your laptop and related peripherals according to the following steps:
1. Turn off the power supply and remove the external power cord, built-in battery and all
peripheral connecting wires.
2. Remove dust in connecting joints, keyboard seams and other parts with the small vacuum
cleaner.
3. Carefully wipe the shell surface with the slightly wet cloth. Pay special attention to avoid liquid
leakage into the product and prevent short-circuiting and burning.
4. Turn on the power supply until the laptop is fully dry.
4-7 Environmental protection requirements
● The battery contains traces of harmful substances. Do not remove and repair it without
permission. The scraped battery should not be directly discarded into rubbish heaps and must be
disposed according to local environmental protection requirements.
● The screen sandwich contains liquid crystal and the backlight tube may contain a small amount
of mercury. Do not remove and repair them without permission. Improper use, impact and falling
may cause screen breakage. Do not touch leaking liquid. The scraped screen should not be directly
discarded into rubbish heaps and must be disposed according to local environmental protection
requirements.
● The other scraped components of the laptop should not be directly discarded into rubbish heaps
and must be disposed according to local environmental protection requirements.
27
4-8 Recommended schedule of routine maintenance
Shell cleaning Screen cleaning Keyboard
cleaning
Touch pad
cleaning
Weekly
maintenance
√ √ √
Monthly
maintenance
√
Wipe the shell with non-corrosive neutral detergent.
All the electronic components such as the battery and display must be disposed
properly. Do not discard them randomly or as household waste into the trashcan. It
is recommended to dispose them in a recycling manner.
4-9 Other safety instructions
1. The laptop can only be used at 5 to 35 .℃℃
2. Do not carry or pack the operating laptop in any article which may reduce air circulation.
3. Do not place the laptop in an uneven or unstable working environment.
4. The laptop can be checked in the conveyor belt type X-ray machine. However, it must be
prevented from contact with the magnetic sensor or magnet.
5. To use the laptop in a flight, first consult the related airline service and operation specifications.
6. Do not place heavy objects or books, papers and other objects on the laptop. Do not close the
laptop cover with excessive forces to avoid LCD damage.
7. Keep the laptop away from magnetic materials (such as the speaker and TV).
8. Do not use the laptop in rain or damp environments.
9. Do not use the modem for access to the Internet in lightning storms to avoid remote electric
shock.
10. Do not use the laptop in dusty places. Dust may easily result in faults.
11. Do not use the laptop in places where combustible gas such as natural gas leaks.

28
Chapter V Simple Troubleshooting
How to turn off the laptop in a forced manner in case of failure of hot start
after crash?
Continuously press the ON/OFF key for 4-6s.
What should be checked basically in case of failure of start-up?
1. If the laptop can be started after the power adapter is connected, the
power is low.
2. Check whether the LCD ON/OFF key or shift key is pressed.
What may cause failure of system recovery in the sleep (or hibernate)
mode?
Definition of the sleep (or hibernate) mode:
Sleep mode: in this mode, the running state of the system and application
program can be saved in the memory (RAM), and the laptop only needs a
little power to maintain the data storage state. You can press any key to
recover the running state.
Hibernate mode: in this mode, the running state of the system and
application program can be saved in the hard disc storage area, and the
power supply of the laptop is cut off. You can press the ON/OFF key to
recover the running state.
Possible reasons for failure of system recovery:
1. Failure of the extension memory or built-in memory of the shell: if the
data are stored in a wrong area, the correct running state will not be
recovered.
2. Incompatible peripherals: some external USB storage devices and
storage cards have special disc structures and may easily result in failure of
power cutoff or recovery in the standby (or hibernate) mode.
3. Inappropriate drive or application program: the inappropriate drive
program may cause failure of the standby or hibernate mode of
the .dll, .sys and .exe files.
How to prolong the battery life?
1. Adjust the LCD brightness to the appropriate level.
2. Adjust the volume to the appropriate level.
3. Disconnect unnecessary peripherals.
4. Set the power management configuration.
Why the charging indicators indicates that the laptop is not charged when
the displayed residual power is 95% and the power supply is connected?
This is normal. The battery of Awood laptop is designed to be charged
only when the capacity is less than 95%. This aims to prevent frequent
charging. Frequent charging may affect the battery life. The reduction of

29
charging times can help to prolong the battery life.
How to deal with the laptop subject to unexpected water leakage?
1. Do not start the laptop. Otherwise, it may be damaged more seriously.
2. Immediately remove the power cord and battery as well as external or
replaceable module parts (such as the external optional drive).
3. Thoroughly pour out water in the laptop. Carefully wipe water flowing
out with soft tissue or cloth and prevent the surface from being worn.
4. Dry the laptop and its parts with cold air blown by a fan. Immediately
send the laptop to the service center or professional engineer authorized by
Awood to minimize the damage.
How to solve the problem of failure in access of the laptop with built-in
wireless network adapter to the wireless network?
Check the wireless network settings according to the following steps (for
the positions of keys, refer to Section 2-5 of “Laptop Structure”):
1. Confirm that the switching of the wireless network short-cut keys Fn+Q
on the keyboard is ON.
2. Confirm the wireless network setting program (such as the Windows
network configuration program) and check whether the correct name of the
wireless network appears in the list of wireless networks.
3. Confirm that the wireless access point to be connected is available.
4. Check whether you use the correct security password (if any) for access
to the wireless network.
5. Enter the equipment manager and check whether there is an exclamation
mark or question mark on the wireless network adapter.
6. Update the wireless card driver (you can download it from the official
website of Awood http://www.awood.com/support).
30
Copyright
○
CShenzhen Awood Computer Technology Co., Ltd. All rights reserved.
All the information included, but not limited to, in the User Manual are protected by the copyright
law. Without permission of Shenzhen Awood Computer Technology Co., Ltd. (hereinafter
referred to as Awood”), such information must not be counterfeited, copied, extracted, translated,
released or used for other purposes.
Disclaimer
The User Manual is provided for use in the “state quo” or “current express” state. Within the law
scope, Awood provides no express or implied guarantee for the User Manual, including but not
limited to the commercial best-selling, applicability to special purposes, no infringement on the
rights of others and use or failure to use this User Manual. In addition, Awood shall not be liable
for the accuracy or reliability of results obtained by using this User Manual or information
obtained through the User Manual.
The user shall bear all risks related to use of this User Manual and clearly understand and agree
that Awood, the person authorized by Awood and the directors, management, employees, agents
and affiliated enterprises will assume no responsibility for the use of this manual and the
derivative, incidental, direct, indirect, particular, punishment or any other losses (including but not
limited to profit losses, business interruption, data loss or other monetary loss) which may be
caused by the use of this manual, or failure to use this manual or any part therein for the reasons
which cannot be attributed to Awood, no matter whether Awood is informed of the possibility of
the above losses.
As the complete exemption of the above liabilities or the restrictions of liabilities for the above
losses may not be allowed in some countries or regions, the above restrictions or exemption
requirements may not apply to you. The user should know that Awood has the right to modify this
manual at any time. Once the product specifications or drive program is changed, the User Manual
will be updated. For updating details, visit the official website of Awood or directly contact its
customer service center.
The ownership and intellectual property rights of the third-party product names or attributes
mentioned in this manual belong to the owner and are protected by the current intellectual
property laws and treaties of the state.

31
FCC Statement
This equipment has been tested and found to comply with the limits for a Class B digital device,
pursuant to Part 15 of the FCC Rules. These limits are designed to provide reasonable protection
against harmful interference in a residential installation. This equipment generates uses and can
radiate radio frequency energy and, if not installed and used in accordance with the instructions,
may cause harmful interference to radio communications. However, there is no guarantee that
interference will not occur in a particular installation. If this equipment does cause harmful
interference to radio or television reception, which can be determined by turning the equipment
off and on, the user is encouraged to try to correct the interference by one or more of the
following measures:
-- Reorient or relocate the receiving antenna.
-- Increase the separation between the equipment and receiver.
-- Connect the equipment into an outlet on a circuit different from that to which the receiver is
connected.
-- Consult the dealer or an experienced radio/TV technician for help.
This device complies with part 15 of the FCC Rules. Operation is subject to the following two
conditions:
(1) This device may not cause harmful interference, and (2) this device must accept any
interference received, including interference that may cause undesired operation.
Changes or modifications not expressly approved by the party responsible for compliance could
void the user's authority to operate the equipment.
Any change or modification of the product without authorization of Awood
may result in invalidity of EMC and radio specifications and loss of warranty
rights and interests.
Important instructions:
The whole product or its parts must not be disposed together with household
garbage. They must be disposed according to the local environmental laws and
regulations.
Keep the product away from fire or high-temperature environment during operation,
transportation and storage. Parts of the product may burst at high temperature or in
fire and endanger the personal safety.
32
33
RF Exposure Information (SAR)
This device meets the government’s requirements for exposure to radio waves. This device is designed
and manufactured not to exceed the emission limits for exposure to radio frequency (RF) energy set by the
Federal Communications Commission of the U.S. Government.
WARNING!! Read this information before using your Notebook Computer.
In August 1986 the Federal Communications Commission (FCC) of the United States with its action in
Report and Outer FCC 96-326 adopted an updated safety standard for human exposure to radio frequency
(RF) electromagnetic energy emitted by FCC regulated transmitters. Those guidelines are consistent with
the safety standard previously set by both U.S. and international standards bodies. The design of this
Notebook Computer complies with the FCC guidelines and these international standards. Use only the
supplied or an approved antenna.
This device was tested for typical close to the body operations. To comply with FCC RF exposure
requirements, a minimum separation distance of 1.0cm should be maintained between the user's body and
the Notebook Computer, including the antenna, whether extended or retracted.
For more information about RF exposure, please visit the FCC website at www.fcc.gov

33
Warranty Card
Model Product SN: (barcode sticker)
Color
Place of purchase Dealer store seal:
Dealer
Date of Sales: YY/MM/DD
Consumer name: Tel:
Email:
Member: 囗No 囗Yes, membership number:
Tips:
1. The three-year warranty services provided by the company shall strictly comply with national
requirements of repair, replacement and return guarantees.
2. The warranty period shall three years from the date of purchase.
3. If you are registered as a member of Awood official website, you will enjoy additional
preferential warranty.
4. In case of any doubt or suggestion, contact us anytime:
http://www.awood.com or services@awood.com
Nationwide Service Tel: 400-
The above commitments are not applicable to the following cases:
1. The whole product or its parts are beyond the range of free warranty.
2. The product has been dismantled or repaired without permission.
3. The product is physically damaged, such as falling, squeezing, deformation, screen breakage,
etc.
4. The product cannot be connected to the Internet or the computer software is invalid as a result
of virus of the control computer, etc.
5. The failure or damage is caused by nonconformity to the requirements of this manual or
incorrect or improper use, storage, maintenance and operation (such as data line plugging in the
live state or use of non-USB external devices).
6. The failure or damage is caused by use in the working environment which is not specified for
the product (such as over high or low temperature, over humid or dry environment,
electromagnetic interference, unstable power supply and electrostatic interference).
7. The failure or damage is caused by installation, repair, change, addition or removal by the agent
or personnel unauthorized by the company.
8. The failure or damage is caused by unexpected or artificial factors (including operational error,
liquid leakage, scratching, handling, collision, improper plugging, foreign matters, rats and
insects).
9. The failure or damage is caused by force majeure (the force majeure refers to the unforeseeable,
inevitable or insurmountable objective events, including natural disasters such as flood, fire,
explosion, lightning, earthquake and storm and social events such as the war and turmoil).
10. The failure or damage is not caused by quality problems of the computer product (including
parts) sold by the company.
Supplementary instructions:
1. The effectiveness, fulfillment, explanation and dispute settlement of the specifications shall
comply with the laws and regulations of the People’s Republic of China. In case of no conflict
against national laws and regulations, the specifications shall be followed.
2. The rights of revision and explanation of the specifications belong to the company within the
law scope.