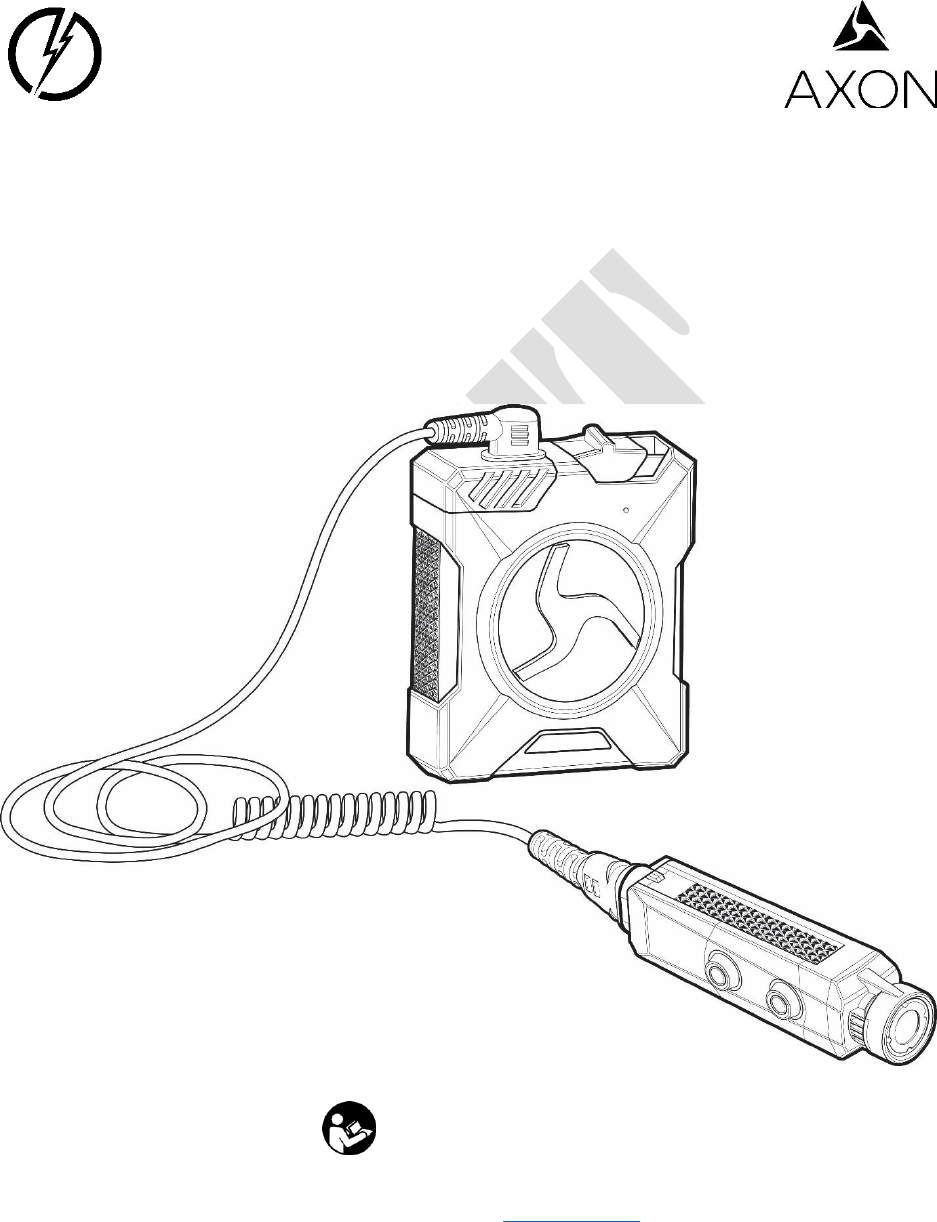
Axon Enterprise S00146 Body Worn POV Camera System User Manual
TASER International Body Worn POV Camera System Users Manual
Users Manual

i
Contents
Chapter 1: Introduction ...................................................................................................................... 1
What Is the Axon Flex 2 Camera System...................................................................................... 1
Important Safety and Health Information ................................................................................... 1
Additional Reading .......................................................................................................................... 1
Chapter 2: Getting to Know Your Axon Flex 2 Camera .................................................................. 3
Axon Flex 2 Features ....................................................................................................................... 3
Axon Flex 2 Camera ..................................................................................................................... 3
Axon Flex 2 Controller ................................................................................................................. 4
Axon Flex 2 Cables and Connectors ............................................................................................. 7
Straight-to-Right-Angle Connector ............................................................................................ 7
USB Cable ...................................................................................................................................... 7
Axon RapidLock Mount ................................................................................................................... 7
Parts ............................................................................................................................................... 8
Assembly and Use ....................................................................................................................... 8
Other Equipment Mounting Options ........................................................................................ 9
Chapter 3: Hardware Details .......................................................................................................... 10
Preparing the Axon Flex 2 Camera ............................................................................................ 10
Using the Camera Clip ................................................................................................................. 12
Attaching the Camera to the Clip ........................................................................................... 12
Removing the Camera from the Clip ..................................................................................... 13
Attaching the Clip to a Mount ................................................................................................. 14
Chapter 4: Recording with the Axon Flex 2 Camera ................................................................... 15
BUFFERING Mode (Turning on the Camera) ......................................................................... 15
EVENT Mode (Starting Recording) .......................................................................................... 16
Muting Audio Recording .............................................................................................................. 17
Adding Markers to Recorded Video ........................................................................................... 17

ii
Battery Status ................................................................................................................................ 17
Configuring Your Axon Camera .................................................................................................. 17
Adjusting the Audio Prompt Volume ..................................................................................... 17
Turning off the Camera LEDs (Stealth Mode) ....................................................................... 18
Using Axon View ....................................................................................................................... 18
Pairing Your Axon Flex 2 Camera with a Smart Device ....................................................... 18
Other Settings ........................................................................................................................... 19
Chapter 5: Notification Reference Tables ..................................................................................... 20
Audio Prompts .............................................................................................................................. 20
LED Status ...................................................................................................................................... 20
Controller Operation LED ........................................................................................................ 20
Controller Function LED ........................................................................................................... 21
Controller Battery LED ............................................................................................................. 21
Camera Upload Status LED ..................................................................................................... 21
Chapter 6: Axon Signal Operations................................................................................................ 23
Chapter 7: Care and Maintenance ................................................................................................. 24
Cleaning the Axon Flex 2 Camera .............................................................................................. 24
Charging the Battery .................................................................................................................... 24
Replacing the Battery ................................................................................................................... 25
Chapter 8: Troubleshooting ............................................................................................................ 26
Customer Service .......................................................................................................................... 26
Warranty Policy ............................................................................................................................. 26
Declaration of Conformity ........................................................................................................... 26
Radio Waves .................................................................................................................................. 26
1
Chapter 1: Introduction
What Is the Axon Flex 2 Camera System
The Axon Flex 2 is a camera system incorporating an audio and video recording device. This
camera is designed for use in tough environmental conditions encountered in law
enforcement, corrections, military, and security activities. The Axon Flex 2 camera is
designed to record events for secure storage, retrieval, and analysis via Evidence.com
services. The recorded events are transferred to your storage solution via the Axon Dock,
or by using Evidence Sync software installed on a Windows computer.
The Axon Flex 2 camera has 2 operating modes designed to accommodate the needs of
law enforcement, corrections, security, and the military. The default mode, or BUFFERING
mode, provides pre-event buffering to capture activities that occur prior to the user
activating the EVENT mode. In addition, the Axon View application enables playback of
footage on a smart device for review prior to storing the data.
Important Safety and Health Information
WARNING!
Read, understand, and follow all warnings and instructions before using this product.
The most up-to-date warnings and instructions are available at www.taser.com.
Additional Reading
This manual explains how to operate the Axon Flex 2 camera hardware. Other manuals
cover additional aspects of the Axon Flex 2 system. These documents are available at
www.taser.com.
The Axon Academy website explains how to register for the Evidence.com website,
configure settings, install Evidence Sync software, assign personnel to cameras, recharge
your camera, and transfer video from an Axon device to a computer. Visit
academy.axon.io/.
Detailed instructions for using Axon cameras and other TASER products with Evidence Sync
are available in the Evidence Sync User Manual.

2
For instructions on using Axon cameras with a smart device, see the Axon View for Android
Devices User Manual or the Axon View for iOS Devices User Manual.
If you have an Axon Dock, see the Axon Dock Quick Start Guide for how to transfer
information and recharge your camera.

3
Chapter 2: Getting to Know Your Axon Flex 2
Camera
Axon Flex 2 Features
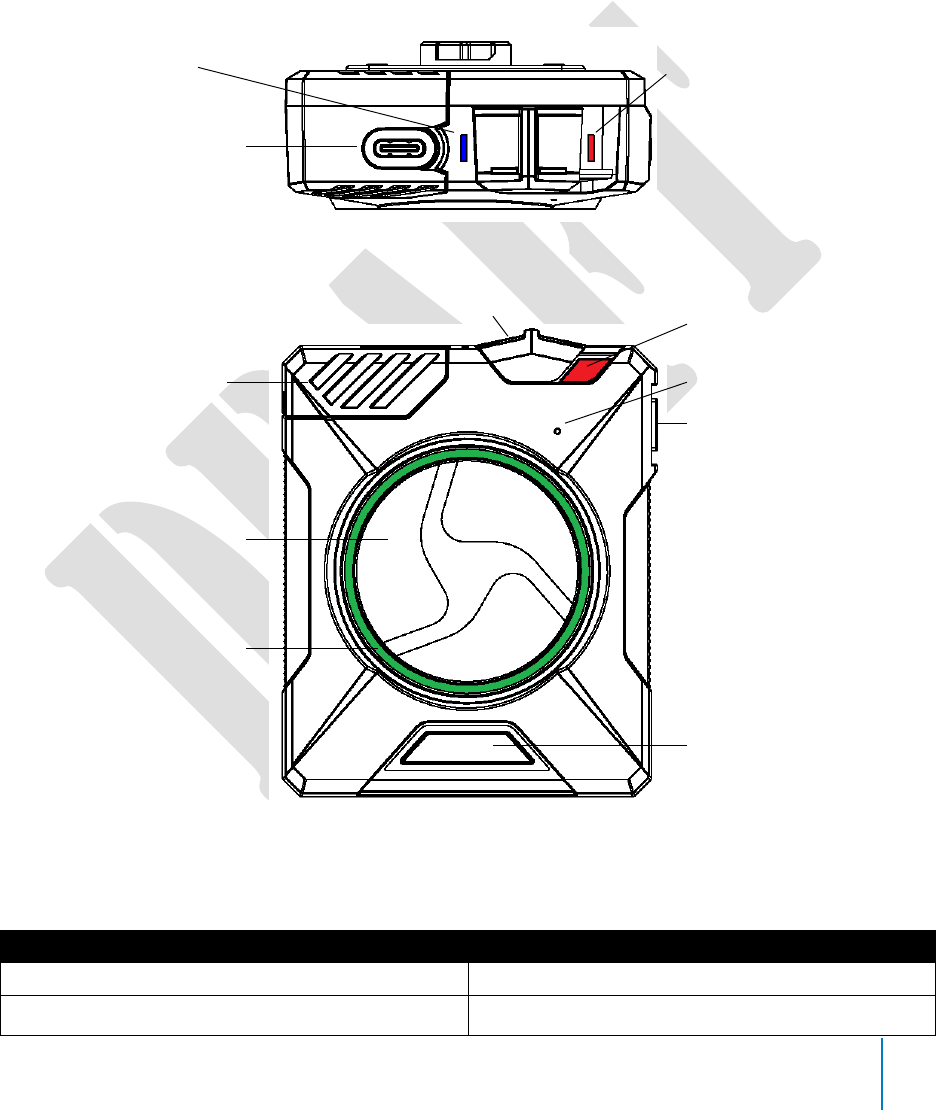
The primary Axon Flex 2 components are the camera and controller.
Axon Flex 2 Camera
The camera offers high quality video and low-light gathering capabilities. The camera is
designed to store at least 12 hours of video (and up to 70 hours based on the video
setting). If the camera is full (has reached its storage limit), the camera will not record over
previous video but instead stops recording. If notifications are turned on, the sytem will
alert with 3 beeps and 3 vibrations and the camera will not start recording when the
memory is full.
1 Imager – This is the camera lens. Avoid touching the lens. For cleaning information,
see Chapter 5 Care and Maintenance in this manual.
2 LEDs – the LEDs will illuminate when in the dock to signify status of uploads or
firmware updates.
3 USB Connector – This feature on the back of the camera connects to a cable
leading to the Axon Flex 2 controller.
4 Microphone – Records ambient sound.
5 Speaker – Issues alerts in the form of beeps.
Imager (lens)
USB connector
LED
Microphone
Speaker
4
Axon Flex 2 Controller
The Axon Flex 2 camera includes physical controls to enable video and audio capture while
providing visual, audible, and vibration notifications of the Axon Flex 2 camera’s state of
operation.
Note: You can turn off the controller LEDs, if necessary. See Turning off the Controller LEDs
(Chapter 4) for instructions.
Operation LED
Shows the camera’s current operating mode (for battery status, see the Battery LED,
described below).
Operating Mode
Operation LED
EVENT
Blinking red
BUFFERING
Blinking green
top view
Operation LED
Connection Socket
Function LED
front view
On/Off Switch
On/Off Indicator
Function Button
Speaker
EVENT button
Battery LED
Battery Status Button
Slide Lock

5
Operating Mode
Operation LED
Recovering interrupted video*
Booting up/powering down
Error state**
Solid red
* When the Function LED also is blinking red. Interrupted video is video that was stopped incorrectly
(for example a sudden power loss).
** When the Function LED also is solid red.
Controller Function LED
Shows when certain functions are enabled.
Function Enabled
Function LED
Mute
Blinking blue
Camera error*
Solid red
Bluetooth feature is booting up
Solid blue
* Use the power switch to turn the camera off and on.
Connection Socket – Enables data transfer and recharging.
Slide Lock – Holds the cable to the controller.
On/Off Switch – Turns the camera’s power on or off.
On/Off Indicator – When the camera’s power is turned on, the red portion is exposed.
When the camera power is turned off, the red portion is covered from view.
Speaker – Provides audio notifications.
Function Button – Used in device pairing, to mute the device, and to add markers to the
video as it is recorded.
EVENT Button – Used to start and stop recording. (Double-press to start; hold for 4
seconds to stop recording.)
The camera might take several additional seconds to close out of the video when it is
powered off before stopping an event.
Battery Status Button – When pressed, the Battery button lights up the Battery LED, which
momentarily indicates the remaining battery capacity only (with default settings, the
Battery LED does not indicate the operating mode).
Battery LED
When lit, momentarily indicates the remaining battery capacity (with default settings, it
does not indicate the operating mode).
When you turn the camera on, the Operation LED turns solid red until the system is ready
to use. Then the Operation LED blinks green (BUFFERING mode). The camera can be

6
configured so the Battery LED operates in sync with the Operation LED. In BUFFERING
mode both the Operation and Battery LEDs will blink green, and in EVENT mode both will
blink red. If the battery status button is pressed, the battery LED displays the battery status
for approximately 10 seconds and then resumes displaying the EVENT mode.
Battery Status
Battery LED
Battery capacity is 41–100 percent
Green
Battery capacity is 20–40 percent
Yellow
Battery capacity is less than 20 percent
Red during operation; flashing red and yellow
during charging
Battery is critically low
Blinking red and yellow
BUFFERING mode (if configured)
Blinking green
EVENT mode (if configured)
Blinking red
Dual-Channel Microphone – For audio recording.
Upload Status LED
Indicates status when the camera is uploading data to the Evidence.com website via the
Axon Dock.
System Status
Upload Status LED
Initial connection (momentary)
Solid red (for 20 seconds or fewer)
In queue awaiting upload
Solid yellow
Device ready (all videos uploaded successfully)
and fully charged
Solid green
Device not assigned, agency mismatch, camera
set in the offline mode, or device error
Blinking red
Uploading data
Blinking yellow – DO NOT remove the camera
from the Axon Dock
Firmware update, internal battery charging, ex-
tremely low battery, or memory full
Blinking red and yellow – DO NOT remove the
camera from the Axon Dock
Transfer error, device re-trying to transfer
Blinking green and yellow
Network error (no connection)
Blinking red, yellow, and then green (cycling all
colors)
Axon Dock has no communication with the
camera. Contact TASER customer service.
LED off
Lens – The camera lens.
Pressing buttons causes the Axon Flex 2 camera to emit audio alerts (beeps) to indicate
system actions. See Chapter 4: Notification Reference Tables for more information.

7
Axon Flex 2 Cables and Connectors
Straight-to-Right-Angle Connector
The Axon Flex 2 camera and controller are designed to work with a purpose-built cable,
with a straight connector at one end and a right-angle connector at the other. Insert the
straight connector into the camera and the right-angle connector into the controller.
CAUTION! POTENTIAL DATA LOSS
These cables are specifically calibrated to work with the Axon Flex 2 system. Use of unapproved
cables will degrade system performance and may cause the system to not function properly or at
all.
Ensure that your cables are inserted properly into the camera and controller. If the camera’s
battery is low, or the cable is disconnected, your recorded video will be lost.
USB Cable
A USB cable is available to connect the Axon Flex 2 camera directly to your computer. The
cable used with the Axon Flex 2 system is not the same as the cable used with the Axon
Flex system. The cables are not interchangeable.
CAUTION! ENSURE SOFTWARE IS INSTALLED
Do NOT connect your Axon Flex 2 camera to your computer before you have installed the
Evidence Sync software.
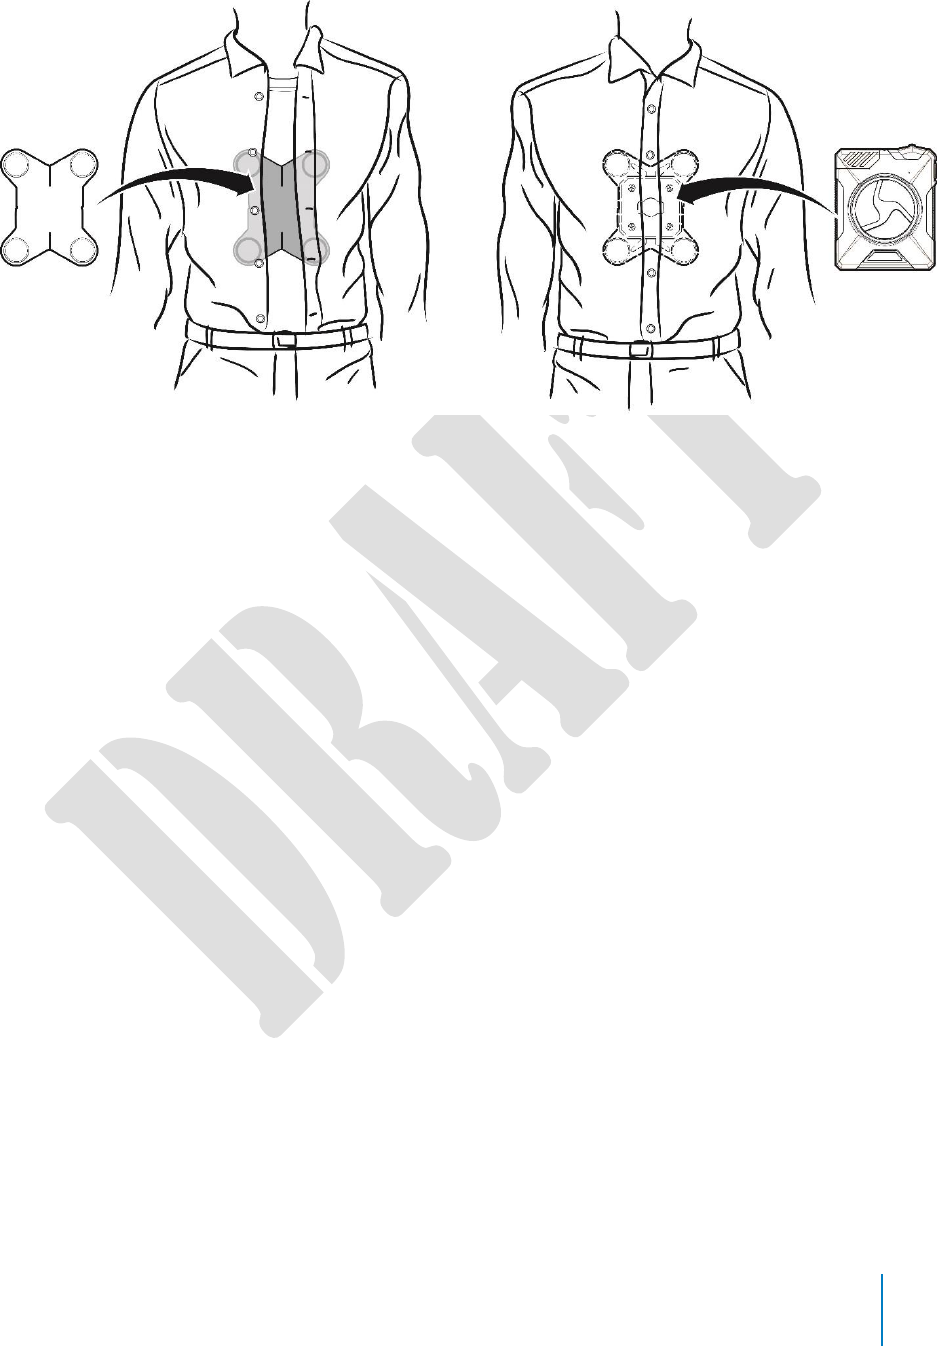
Axon RapidLock Mount
The Axon Flex 2 controller is designed to work with the Axon RapidLock mounting system. The Axon
RapidLock mounting system consists of the attachment piece (called the key) on the camera and the
various mounting options including the attachment receiver (called the lock). To engage the Axon
RapidLock, insert the key of the camera into the lock of the mount and turn it 90 degrees counter-
clockwise (when you are looking straight at the mount). To release the camera from the mount, turn
the camera 90 degrees clockwise.
The various mounts that use this system can be used with a wide variety uniforms, and holds the
camera to your shirt, patrol vest, jacket, or belt.
8
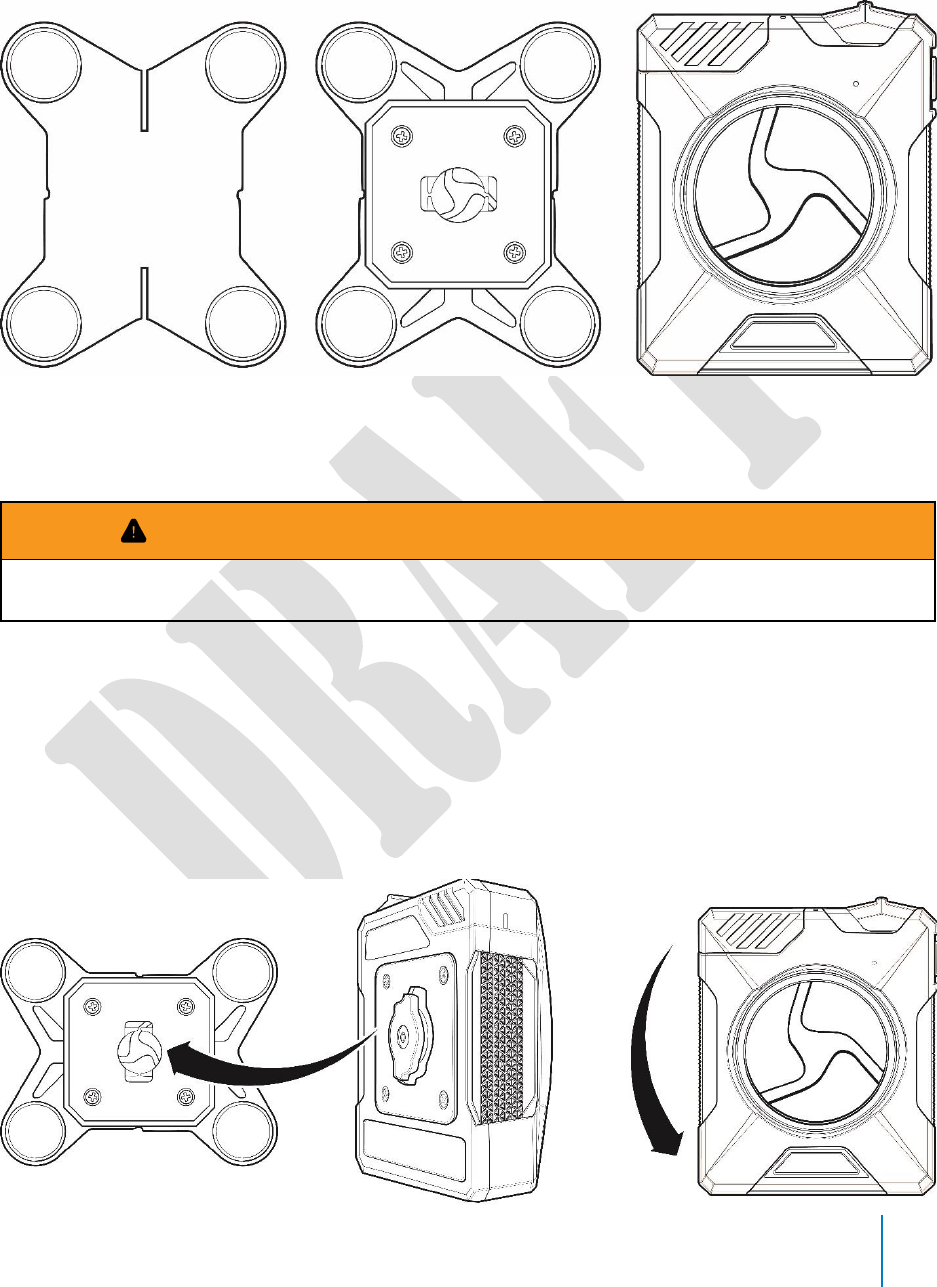
Parts
back lock controller
Assembly and Use
WARNING! IMPORTANT SAFETY AND HEALTH INFORMATION
Read Important Safety and Health Information (Chapter 1) and Chapter 9: Error! Reference
source not found. before performing these steps.
1 Insert the key on the back of the Axon Flex 2 controller into the lock.
2 Twist the RapidLock mount counterclockwise, 90 degrees.
3 Place the magnetic back underneath the shirt, patrol vest, or whatever you are
using.
4 Hold the back in place, and place the RapidLock mount over the back. Magnetic
attraction will hold the controller in place.
9
Other Equipment Mounting Options
The Axon Flex 2 system provides you with a variety of ways to wear your camera. A variety
of mounts enable the camera to be attached to your Oakley Flak Jacket eyewear, shirt collar
or epaulette, load bearing equipment, helmet, or cap.
Additional information on Axon Flex 2 mounting options is available at www.axon.io.

10
Chapter 3: Hardware Details
This chapter describes preparing and wearing the Flex 2 camera system. For additional
information on using the universal mount and other mounts, see the instructional videos
for assembling Axon Flex 2 hardware at www.axon.io.
WARNING! AXON SYSTEM USE
If the camera system causes discomfort or headaches, adjust the system for comfort. NEVER wrap
cables around the neck.
The Axon Flex 2 system uses magnets in many of its mounting systems. The Axon Flex 2 camera
and Axon Flex 2 controller both contain batteries.
Preparing the Axon Flex 2 Camera
All Axon Flex 2 cameras shipped from the factory are configured to be installed on the right
side of the body. If you wish to wear a camera on the left side, you will have to adjust your
settings through the Evidence Sync software or on the Evidence.com website to re-orient
the camera.
The side on which you wear the camera is configured through the Evidence Sync software.
Try wearing your camera on your dominant side and your non-dominant side to find what
works best for you. If you have the Axon View application, you can view live video and
determine if the camera is pointed where you want it. See the Axon View for Android Devices
or Axon View for iOS Devices manuals for more information on how to do this.
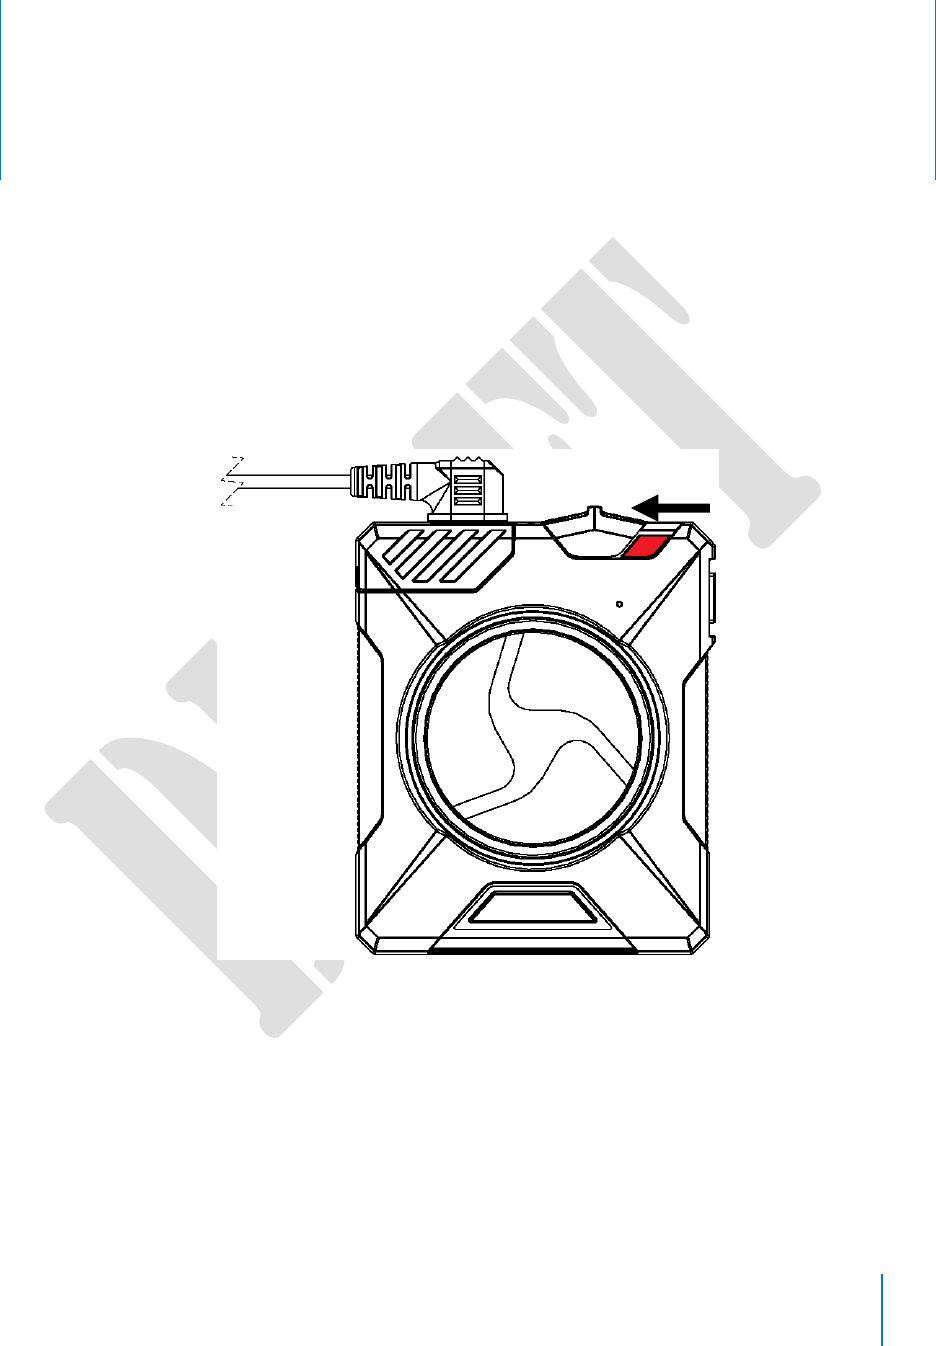
Cable connectors are inserted into the rear of the Axon Flex 2 camera. If you do not
connect the cable to the camera properly, the connection may not be secure.

11
The controller has a Slide Lock that is retracted before inserting the cable into the port.
After putting the cable in the port, release the slide. Ensure that it closes properly.
12
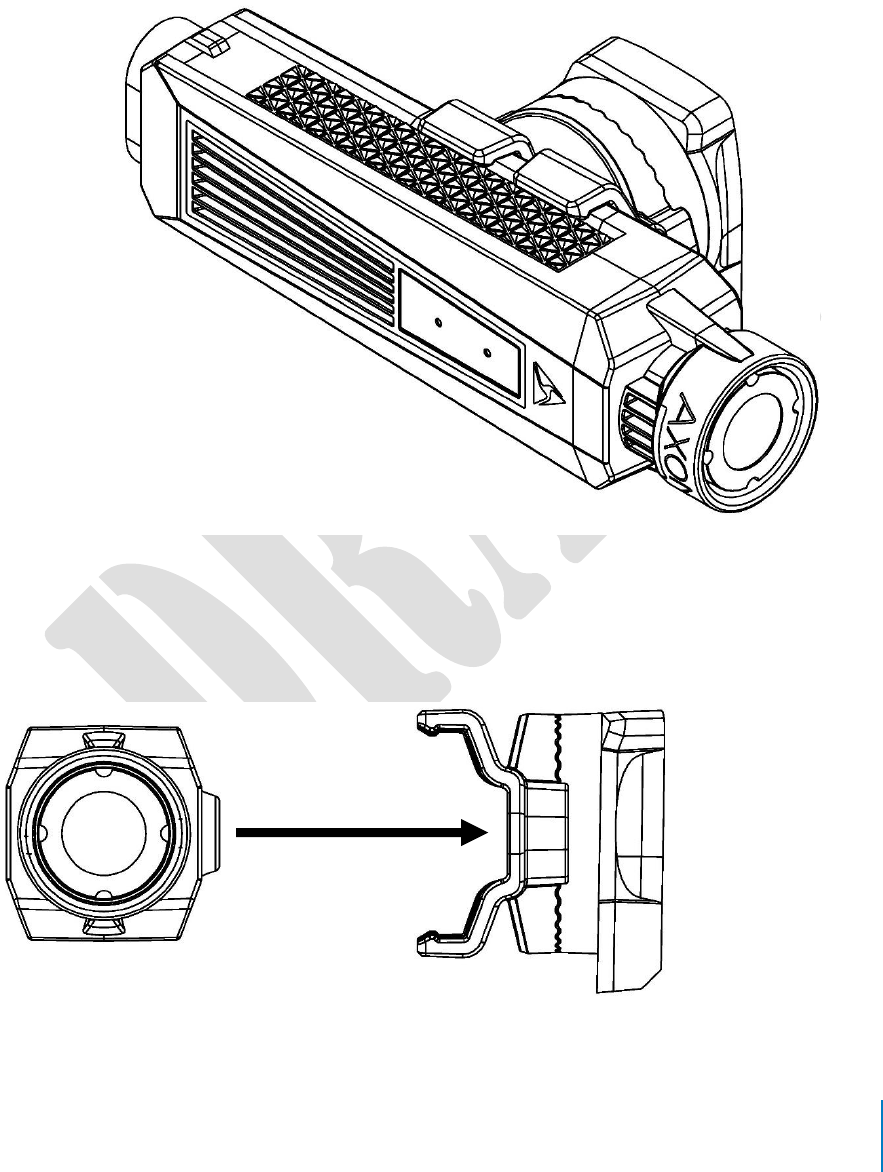
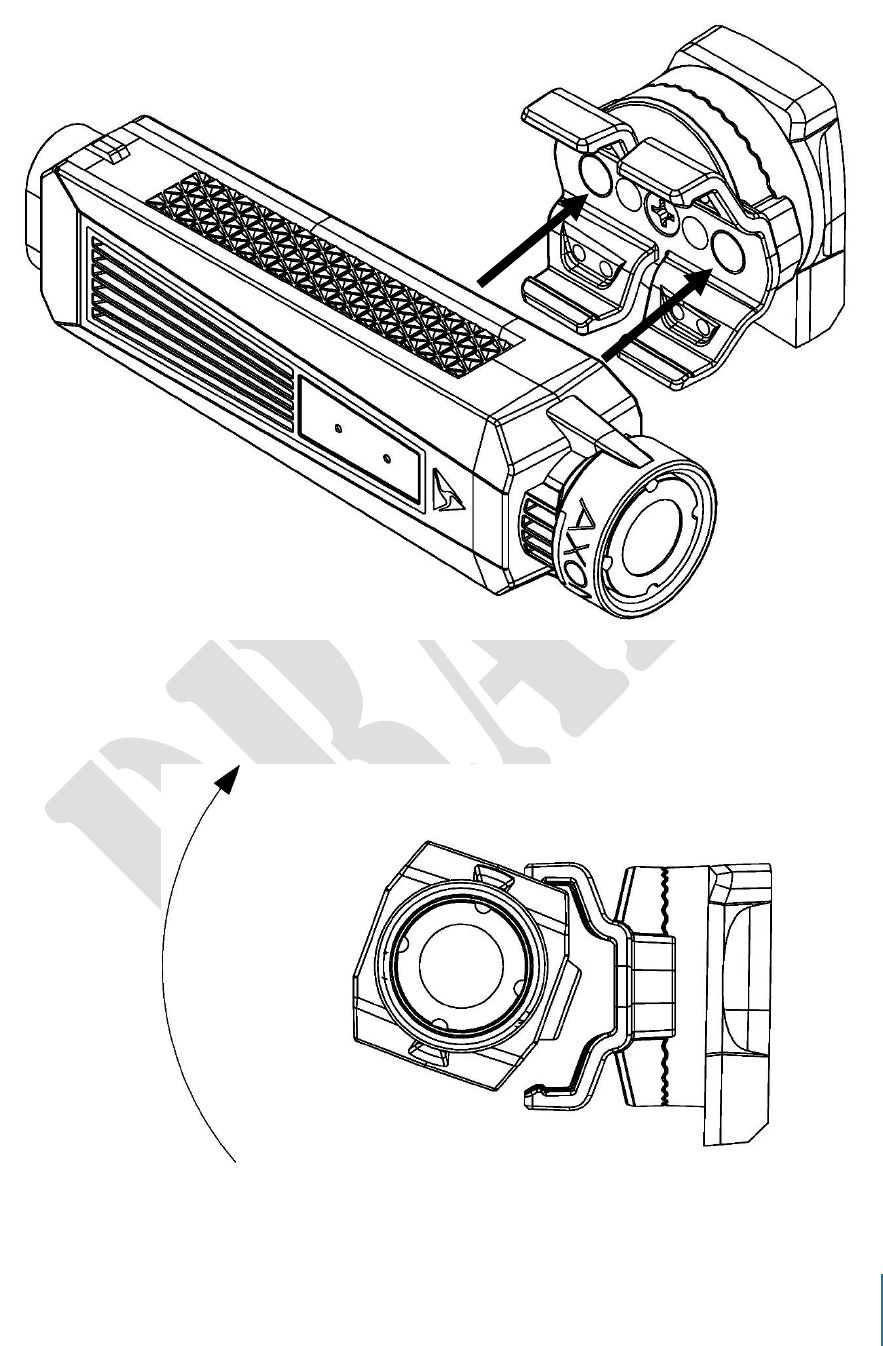
Using the Camera Clip
Several mounting systems are available for the Axon Flex 2 camera, enabling you to wear
the camera in different ways. The camera does not attach directly to a mount. Instead, the
camera is attached to a camera clip, and the clip is then fitted to the mount.
Axon Flex 2 camera attached to the clip
Attaching the Camera to the Clip
To attach the camera to the clip, push the camera straight into the clip as shown.
13
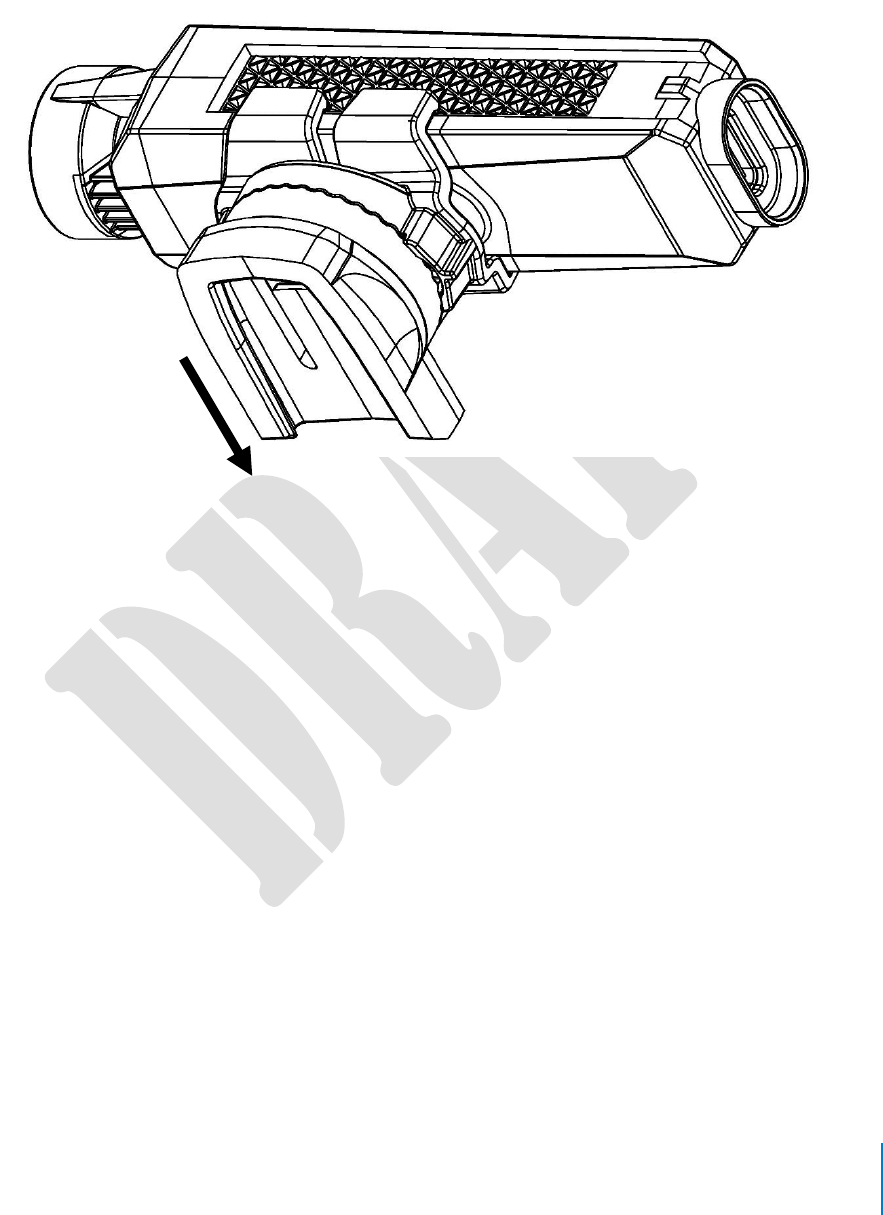
Removing the Camera from the Clip
To remove the camera from the clip, roll the camera out.
front view
14
Attaching the Clip to a Mount
With the camera attached to the clip, press the clip onto the mounting system you are
using.
15
Chapter 4: Recording with the Axon Flex 2
Camera
The Axon Flex 2 camera has 2 operating modes:
1 BUFFERING (turning on the camera and starting pre-event buffering)
2 EVENT (event recording)
BUFFERING Mode (Turning on the Camera)
1 Move the On/Off switch on the controller to the On position.
With the camera turned on, the Axon system is in the BUFFERING mode. When BUFFERING
begins:
• The Operation LED on the camera will blink green.
• The camera will be capturing video but no audio, and will not record to permanent
memory while in BUFFERING mode.
• Buffered video duration is 30 seconds by default (00:00:30).
When you activate the EVENT mode, the buffered video (not audio) captured directly before
the event, up to 30 seconds, will be saved and attached to the event in permanent

16
memory. This feature is intended to capture the video of an incident just before your
activation of EVENT mode.
CAUTION! OPERATING MODES
With default settings, the system does not capture audio in BUFFERING mode, so anything
recorded in that mode will be video-only. Buffering mode starts only after the Axon Flex 2 camera
is turned on. The system does not record when the camera is turned off.
Notes:
• An agency can turn off the BUFFERING mode. If your agency has deactivated the
BUFFERING mode, your Axon system will operate the same way as described in this
manual, but the camera will not record anything until you double-press the EVENT
button.
• An agency can extend the BUFFERING mode’s duration to 2 minutes total (00:02:00).
• An agency can configure the BUFFERING mode so it records sound as well as video.
EVENT Mode (Starting Recording)
1 When you need to record, quickly double-press the EVENT button on the camera.
The system now records audio as well as video. The “buffered” video directly
preceding the event will be saved and attached to the event recording. (Remember,
with default settings, the buffered video will not contain audio.) The moment you
double-press the EVENT button, both video and audio will be recorded from the
camera and GPS coordinates (if the system is paired to a GPS-capable smart phone)
will be recorded. This will continue throughout the duration of the recording until
you terminate the recording.
The camera provides you with indications that it is recording in EVENT mode:
• At the start of an event and every 2 minutes during an event, the system will
beep twice.
• The Operation LED on top of the camera will blink red.
2 To stop recording and return to BUFFERING mode, press and hold the EVENT
button for approximately 4 seconds. The system will beep once (with a long tone).
3 To end a recording and turn off the system, move the On/Off switch to the “off”
position. When you end a recording with the on/off switch you will not go into
BUFFERING mode; instead the system will turn off completely.
Note: An event not recorded by the camera cannot be played back or downloaded
to your computer.

17
Muting Audio Recording
If your system administrator has configured your Axon system to do so, you can use the
function button to disable audio recording during an event. This feature may be useful in
sensitive situations.
1 Press and hold the Function button for 3 seconds to mute the audio capture.
The Function LED will flash blue while the camera is muted.
2 Press and hold the Function button another 3 seconds to re-enable the audio
recording.
Adding Markers to Recorded Video
The Function button also can be used to add a marker to recorded video that will show
when the video is replayed on Evidence.com and documented in the audit trail for the
device. Markers are most useful for documenting a moment that you will want to jump to
quickly at a later time when re playing the video. If you want to add a marker to a video
while you are recording:
• Press and release the Function button within 1 second.
Battery Status
Press the Battery Status button to determine the percentage remaining in the battery. See
Chapter 2: Getting to Know Your Axon Flex 2 Camera for details on the Battery LED functions.
Configuring Your Axon Camera
Adjusting the Audio Prompt Volume
1 Connect the Axon Flex 2 camera to the Evidence Sync application.
2 Select the device settings.
3 Select the desired volume settings for the audio beeps recorded by the device.
The volume has 4 settings. At each level, the camera beeps, providing you with a
sample of the volume:
• Low
• Medium
• High

18
• Off
Turning off the Camera LEDs (Stealth Mode)
For some situations, you may wish to turn off the LED lights on your camera. You can turn
off the lights through the Axon View application, Evidence Sync software or by using the
Battery button. To turn the lights off using the Battery Status button:
• Press and hold the Battery button for 10 seconds.
To turn the lights back on:
• Press and hold the Battery Status button for 10 seconds.
To use Evidence Sync:
1 Connect the Axon Flex 2 camera to the Evidence Sync application.
2 Select the device settings.
3 Select the option to turn off the device LEDs.
• The Operation LED flashes red, yellow, and then green before shutting down
the lights.
• Pressing the Battery button will momentarily light both the Operation LED and
the Battery LED, displaying the current operating mode and battery level. For
interpreting the LED colors, see Chapter 2: Getting to Know Your Axon Flex 2
Camera.
To turn the lights back on:
• Connect the Axon Flex 2 camera to the Evidence Sync application.
• Select the device settings.
• Select the option to turn on the device LEDs.
Using Axon View
See the Axon View for Android Devices User Manual or the Axon View for iOS Devices User
Manual.
Pairing Your Axon Flex 2 Camera with a Smart Device
For instructions on using Axon cameras with a smart device, see the Axon View for Android
Devices User Manual or the Axon View for iOS Devices User Manual.

19
Other Settings
Your organization’s administrator can further configure your Axon Flex 2 system with these
features:
• Pre-event buffer of up to 2 minutes
• Axon Signal-enabled Bluetooth wireless technology
• Wi-Fi to pair your Axon Flex 2 camera to the Axon View application
• Haptic (status notification via device vibration)
• Video quality

20
Chapter 5: Notification Reference Tables
Audio Prompts
The Axon Flex 2 camera emits beeping sounds called “audio prompts” to notify you of the
system status. These audio prompts usually occur after you perform an action with the
body camera. These audio prompts are accompanied by a vibration that matches the
beeps.
Operating Mode
Audio Notification
Haptic Notification (Vibration)
Powering on or off
One beep
Once
Recording an event
Two beeps (every 2 minutes)
Twice (every 2 minutes)
Press the Battery button while
the camera is recording
Two beeps
None
The device is ending an event
and returning to BUFFERING
mode
One long beep
Once, long-duration
The battery is at 20 percent
capacity or lower
Four quick beeps (every 5
minutes)
Four times, quickly, every 5
minutes
The camera memory is full
Three beeps. The camera will
not start recording.
Three times
LED Status
Controller Operation LED
Shows the camera’s current operating mode (for battery status, see the Battery LED,
described below).
Operating Mode
Operation LED
EVENT
Blinking red
BUFFERING
Recovering interrupted video*
Blinking green

21
Operating Mode
Operation LED
Booting up/powering down
Error state**
Solid red
* When the Function LED also is blinking red.
** When the Function LED also is solid red.
Controller Function LED
Shows when certain functions are enabled.
Function Enabled
Function LED
Mute
Blinking blue
Camera error*
Solid red
Bluetooth feature is booting up
Solid blue
* Use the power switch to turn the camera off and on.
Controller Battery LED
Battery Status
Battery LED
Battery capacity is 41–100 percent
Green
Battery capacity is 20–40 percent
Yellow
Battery capacity is less than 20 percent
Red during operation; flashing red and yellow
during charging
Battery is critically low
Blinking red and yellow
BUFFERING mode (if configured)
Blinking green
EVENT mode (if configured)
Blinking red
Camera Upload Status LED
System Status
Upload Status LED
Initial connection (momentary)
Solid red (for 20 seconds or fewer)
In queue awaiting upload
Solid yellow
Device ready (all videos uploaded successfully)
and fully charged
Solid green
Device not assigned, agency mismatch, camera
set in the offline mode, or device error
Blinking red
Uploading data
Blinking yellow – DO NOT remove the camera
from the Axon Dock
Firmware update, internal battery charging, ex-
tremely low battery, or memory full
Blinking red and yellow – DO NOT remove the
camera from the Axon Dock
Transfer error, device re-trying to transfer
Blinking green and yellow

22
System Status
Upload Status LED
Network error (no connection)
Blinking red, yellow, and then green (cycling all
colors)
Axon Dock has no communication with the
camera. Contact TASER customer service.
LED off

23
Chapter 6: Axon Signal Operations
Axon Signal technology is included with the Axon Flex 2 camera. However, your agency’s
administrator must have activated the Axon Signal capability for it to work.
When it is active, Axon Signal technology takes your Axon Flex 2 camera from BUFFERING
to EVENT mode automatically.
Emergency vehicles can be equipped with an Axon Signal Unit (ASU). With light bar
activation, or other activation triggers, the ASU sends a signal to your Axon Flex 2 camera.
Upon processing this signal, your Axon camera transitions from BUFFERING to EVENT
mode. When your camera starts recording, you will hear 2 beeps.
The ASU has a range of approximately 30 feet (9.1 meters). Another vehicle’s light bar
activation may cause your Axon camera to start recording if the light bar is equipped to do
so.
The ASU can only send a signal to tell the camera to start recording. Axon Signal technology
does not end recording. If a light bar is turned off, the camera will continue to record.
The ASU cannot turn an Axon system on. If the Axon Flex 2 camera is turned off, the
camera will not record even if an ASU sends an activation signal.
The ASU is purchased separately from the Axon Flex 2 camera.

24
Chapter 7: Care and Maintenance
Cleaning the Axon Flex 2 Camera
Use a soft, damp cloth to clean the surface of the Axon Flex 2 camera. Do not use harsh
cleaners or solvents.
Do not immerse the Axon Flex 2 camera in water or cleaning solutions.
If the Axon Flex 2 camera lens becomes dirty, use a lens blower brush to clean it and then
wipe it with a soft cloth if necessary.
CAUTION! POSSIBLE EQUIPMENT DAMAGE
• Do not use alcohol or alcohol-based liquids with the Axon Flex 2 system.
• Do not use ammonia-based or similar type window cleaners on the camera lens.
• Do not place the lens under running water or apply jets of water to the camera lens.
Charging the Battery
A fully charged controller battery should provide enough power for approximately 12
hours of normal operation. Recharging a battery after a 12-hour use can take up to 6 hours
if you are recharging your Axon Flex 2 controller from a wall outlet or Axon Dock.
Recharging could take considerably longer if you are recharging from a computer.
If the battery depletes significantly during use, you will hear 4 quick tones repeating every 5
minutes. This message indicates that less than approximately 20 percent of the battery
capacity remains.
Always recharge a depleted battery as soon as reasonably possible. You can use an Axon
Dock, wall charger, or computer to charge the battery. Using a non-TASER approved wall
charger may degrade device performance and will void the warranty.
If the Axon Flex 2 controller is to be stored for a long time, the Battery LED should be
yellow when you put the controller in storage. After an Axon Flex 2 controller has been
stored 6 months, the controller should be run until the battery is depleted and then the
battery should be recharged. After an Axon Flex 2 controller has been stored more than 1
year, recharge the controller before using it.

25
Replacing the Battery
Replacement batteries are not available with the Axon Flex 2 system. However, new
controllers are sold separately.

26
Chapter 8: Troubleshooting
If you experience difficulty with your Axon Flex 2 camera, first power the device down, and
start it again.
If experiencing difficulty with the Axon View application, power down the mobile device,
turn the device back on, and re-pair your smart device with the Axon Flex 2 camera.
Customer Service
Visit www.axon.io and view the Support options, or call 1-800-978-2737.
Warranty Policy
TASER International warranty provisions are applicable on all Axon Flex 2 system products.
See TASER International’s website, www.taser.com, for detailed warranty information.
Declaration of Conformity
TASER International declares that this Axon system is in compliance with the requirements
and other relevant provisions of the RTT&E Directive 1999/5/EC regarding radio and
telecommunications equipment and the Directive 2014/30/EU regarding electromagnetic
compatibility. A copy of the original Declaration of Conformity can be found at
www.taser.com.
Radio Waves
Changes or modifications to the equipment not expressly approved by the manufacturer
could void the product warranty and the user’s authority to operate the equipment.
Your wireless device is a radio transmitter and receiver. It is designed and manufactured
not to exceed the emission limits for exposure to radio frequency (RF) energy set by the
Federal Communications Commission (FCC) of the U.S. Government. These limits are part
of comprehensive guidelines and establish permitted levels of RF energy for the general
population. The guidelines are based on standards that were developed by independent
scientific organizations through periodic and thorough evaluation of scientific studies. The
standards include a substantial safety margin designed to assure the safety of all persons,

27
regardless of age and health. Before a device model is available for sale to the public, it
must be tested and certified to the FCC that it does not exceed the limit established by the
government-adopted requirement for safe exposure. This equipment has been tested and
found to comply with the limits for a Class B digital device, pursuant to part 15 of the FCC
Rules. These limits are designed to provide reasonable protection against harmful interference in
a residential installation. This equipment generates, uses and can radiate radio frequency energy
and, if not installed and used in accordance with the instructions, may cause harmful interference to
radio communications. However, there is no guarantee that interference will not occur in a
particular installation. If this equipment does cause harmful interference to radio or television
reception, which can be determined by turning the equipment off and on, the user is encouraged to
try to correct the interference by one or more of the following measures:
• Reorient or relocate the receiving antenna.
• Increase the separation between the equipment and receiver.
• Connect the equipment into an outlet on a circuit different from that to which the
receiver is connected.
• Consult TASER International Customer Service for help.
FCC/IC NOTICE: This device meets the body worn human exposure limits found in OET
Bulletin 65, 2001, and ANSI/IEEE C95.1, 1992. Proper operation of this equipment according
to the instructions found in this guide will result in exposure substantially below the FCC’s
recommended limits. To comply with the FCC and ANSI C95.1 RF exposure limits, this
device has been tested for compliance with FCC RF Exposure limits in the typical
configuration. The radiated output power of this wireless device is far below the FCC radio
frequency exposure limits.
This device complies with part 15 of the FCC Rules. Operation is subject to the following
two conditions: (1) This device may not cause harmful interference, and (2) this device must
accept any interference received, including interference that may cause undesired
operation.
RSS 210 Warning Statement: The installer of this equipment must ensure that the antenna
is located or pointed such that it does not emit RF field in excess of Health Canada limits for
the general population; consult Safety Code 6, obtainable from Heath Canada’s Web site
www.hc‐sc.gc.ca/rpb.
This device complies with Industry Canada licence-exempt RSS standard(s). Operation is
subject to the following two conditions: (1) this device may not cause interference, and (2)
this device must accept any interference, including interference that may cause undesired
operation of the device.
Le présent appareil est conforme aux CNR d’Industrie Canada applicables aux appareils
radio exempts de licence. L’exploitation est autorisée aux deux conditions suivantes : (1)
l’appareil ne doit pas produire de brouillage, et (2) l’utilisateur de l’appareil doit accepter

28
tout brouillage radioélectrique subi, même si le brouillage est susceptible d’en
compromettre le fonctionnement.
THIS MODEL DEVICE MEETS THE GOVERNMENT’S REQUIREMENTS FOR EXPOSURE TO
RADIO WAVES.
Section 8.4 of RSS-GEN
This Device complies with Industry Canada License-exempt RSS standard(s). Operation is
subject to the following two conditions: 1) this device may not cause interference, and 2)
this device must accept any interference, including interference that may cause undesired
operation of the device.
Cet appareil est conforme aux normes d’exemption de licence RSS d’Industrie Canada. Son
utilisation est soumise aux conditions suivantes : 1) cet appareil ne doit pas causer de
brouillage, et 2) doit accepter tout brouillage, y compris le brouillage pouvant entraîner un
fonctionnement indésirable.
Section 8.3 of RSS-GEN
Under Industry Canada regulations, this radio transmitter may only operate using an
antenna of atype and maximum (or lesser) gain approved for the transmitter by Industry
Canada. To reduce potential radio interference to other users, the antenna type and its
gain should be so chosen that the equivalent isotropically radiated power (e.i.r.p.) is not
more than that necessary for successful communication.
Conformément à la réglementation d’Industrie Canada, le présent émetteur radio ne peut
fonctionner qu’au moyen d’une antenne d’un seul type et d’un gain maximal (ou inférieur)
approuvé pour l’émetteur par Industrie Canada. Dans le but de réduire les risques de
brouillage radioélectrique pour les autres utilisateurs, il faut choisir le type d’antenne et
son gain de sorte que la puissance isotrope rayonnée équivalente (p.i.r.e.) ne dépasse pas
celle requise pour établir une communication satisfaisante.
THIS MODEL DEVICE MEETS THE GOVERNMENT’S REQUIREMENTS FOR EXPOSURE TO
RADIO WAVES.
29
Product functions and specifications may change without notice and the actual product may vary from the illustrations in this
manual.
Android is a trademark of Google, Inc.; Bluetooth is a trademark of Bluetooth SIG; iPad, iPhone, iPod, and iTunes are
trademarks of Apple, Inc.; IOS is a trademark of Cisco Technology, Inc.; Wi-Fi is a trademark of the Wi-Fi Alliance; and Windows
is a trademark of Microsoft Corporation.
, AXON, Axon, Axon Flex 2, Axon Dock, Axon RapidLock, Axon Signal, Axon View, Evidence.com, Evidence Sync, TASER, and
© are trademarks of TASER International, Inc., some of which are registered in the US and other countries. For more
information, visit www.taser.com/legal. All rights reserved. © 2016 TASER International, Inc.
TASER Axon Flex, Axon Flex 2, Axon Fleet, Axon Body, Axon Body 2, Axon Dock, and
Axon Signal Unit Warnings, Instructions & Information
December 12, 2016
Page 1 of 8
This document presents important safety warnings, instructions, and information intended to minimize
hazards associated with the use of TASER International, Inc.’s (TASER) Axon camera systems. These
instructions and warnings are for your protection as well as the safety of others. Read the entire
document before using any Axon system.
These warnings and instructions are effective December 12, 2016, and supersede all prior revisions.
The most current warnings are also available online at www.taser.com.
1. Read and obey. Read, understand, and follow all current Axon system instructions, manuals,
warnings, and relevant TASER training materials before using any Axon system. Failure to do so
could increase the risk of serious injury, system malfunctions, or loss of data.
2. Obey applicable laws, regulations, and agency guidance. Use the Axon systems only in
accordance with applicable federal, state, and local laws and other regulations or legal
requirements.
This document uses a signal word panel to mark specific warnings:
WARNING
This signal word panel indicates a potentially hazardous situation which if not avoided could result in
fire, electric shock, damage, system malfunctions, death, or personal injury.
CAUTION
This signal word panel indicates a potentially hazardous situation which if not avoided or heeded
could result in minor or moderate injury.
Warnings may be followed by instructions and information to help avoid the hazard and improve safety.
WARNING! POTENTIALLY EXPLOSIVE ENVIRONMENTS
Failure to follow these safety instructions could result in fire, electric shock, damage, system
malfunctions, death, or personal injury.
Potentially explosive environments. Electric sparks in a potentially explosive area could cause an
explosion or fire, resulting in serious injury or even death. Areas with a potentially explosive
atmosphere are often, but not always, marked clearly. Potential areas may include: fueling areas
(such as gas stations); below deck on boats; fuel or chemical transfer or storage facilities; vehicles
using liquefied petroleum gas (such as propane or butane); areas where the air contains chemicals
or particles (such as grain, dust, or metal powders); and any other area where you would normally be
advised to turn off your vehicle engine. Axon Flex, Axon Flex 2, Axon Body, Axon Body 2, and Axon
Fleet cameras contain wireless transmission technology that transfers radio frequencies over the air
as a form of energy transfer. Wireless transmission has been deemed a risk factor in igniting an
explosive environment. In situations where the Axon camera operator needs to enter a potentially
explosive environment, TASER recommends that the user err on the side of caution and power off
the camera before entering the explosive environment. An Axon camera should be treated the same
as a cellular telephone would be treated in this situation.
TASER Axon Flex, Axon Flex 2, Axon Fleet, Axon Body, Axon Body 2, Axon Dock, and
Axon Signal Unit Warnings, Instructions & Information
December 12, 2016
Page 2 of 8
WARNING! NEODYMIUM RARE EARTH MAGNETS
Failure to follow these safety instructions could result in fire, electric shock, damage, system
malfunctions, death, or personal injury.
Neodymium Magnets. The Axon magnet mount contains a neodymium magnet which emits strong
magnetic fields that can affect a pacemaker, ICD (implantable defibrillator), VNS (vagal nerve
stimulator), and other implanted electrical medical devices. Many of these devices are made with a
feature that deactivates it when in contact with a strong magnetic field. Therefore, care must be
taken to avoid inadvertently deactivating such devices when in close proximity to the Axon magnet
mount. Persons with a pacemaker, ICD, VNS, or other implanted electrical medical device
should not wear the Axon magnet mount.
WARNING! AXON DOCK USE
Failure to follow these safety instructions could result in fire, electric shock, damage, system
malfunctions, death, or personal injury.
Electrical Warnings. To reduce the risk of fire, electric shock, or injury to persons when using any
Dock, follow basic precautions, including the following:
•
Plug into a grounded 3-prong outlet and do not remove the ground prong.
•
Verify the outlet is installed according to applicable local electrical codes.
•
Do not use an adapter or an extension cord.
•
Disconnect power and verify power disconnect before servicing.
•
Keep away water, other liquids, corrosive substances, and flammable materials and vapors, such
as gasoline. Keep away from sources of static electricity. Static electricity can cause damage to
the Dock or cause it to malfunction.
•
In the event of electrostatic discharge or intermittent power fluctuation, power will need to be
cycled to the unit to regain full functionality.
CAUTION! AXON DOCK USE
Maintenance. Failure to properly maintain the Dock may cause the system to malfunction or not
operate optimally.
To reduce the risk of malfunction, including failure or loss of data:
1. Anchoring and Installation. Docks should be securely placed on a flat surface; when anchoring
(for example, to the wall or other hard and stable surface) be sure to use appropriate hardware. The
following are guidelines for installation:
• Comply with your local and other applicable building and electricity regulations and codes;
• Install in an area with redundant power and redundant HVAC;
• Install in an area with an ambient temperature between 41 °F to 95 °F (5 °C to 35 °C);
• Leave adequate space around all sides of the Dock for proper ventilation and maneuvering
around it without people or items bumping it;
• Do not expose cords or wires which can be a tripping hazard; and
• If mounted to a wall, secure to wall studs or with drywall or concrete anchors, as applicable.
TASER Axon Flex, Axon Flex 2, Axon Fleet, Axon Body, Axon Body 2, Axon Dock, and
Axon Signal Unit Warnings, Instructions & Information
December 12, 2016
Page 3 of 8
2. Indoor use only. The Dock is manufactured for indoor use only. Install the Dock indoors, away
from excessive moisture, liquids, corrosive substances, or heat, dust, direct sunlight, water, or other
negative environmental factors. In-car installations may expose the Dock to excessive heat.
3. Avoid water, other liquids, and wet locations. Do not install the Dock near or around liquids,
water, or water pipes. Do not get the Dock wet.
WARNING! AXON SYSTEM USE
Failure to follow these safety instructions could result in fire, electric shock, damage, system
malfunctions, death, or personal injury.
To prevent potential injuries or system malfunctions or compromise, take the following precautions:
1. Handling the components. Ensure proper connections between the Axon components (e.g., the
Axon Body camera is correctly inserted into the Dock). Do not drop, crush, disassemble, deform,
open, incinerate, or insert foreign objects into the Axon system components.
2. Operate safely. Be careful and attentive while using an Axon system, including while operating a
vehicle, riding a bicycle, operating other conveyance, when dealing with potentially violent
individuals, or handling a hazardous or potentially hazardous situation. If you use an Axon system
while operating a conveyance, keep in mind the following guidelines:
• Do not take notes, look up information, adjust the camera, or perform any other activities that
require or distract your attention. Give full attention to driving or riding and to the road. Using a
mobile device or mobile data terminal (MDT) while driving or riding may be distracting.
• Get to know the Axon system and its features.
• Position the Axon system’s camera and activation buttons within easy reach.
3. Navigate safely. If your Axon system is paired or combined with a mobile phone or device or MDT
and has applications that provide maps, digital compass headings, directions or location-based
tracking or navigation assistance, these applications should only be used for basic navigation
assistance and should not be relied on to determine precise locations, proximity, distance, or
direction. Maps, digital compass, directions, and location-based applications provided by TASER
depend on data collected and services provided by third parties. These data services are subject to
change, may not be available in all geographic areas, or may not be accurate, resulting in maps,
digital compass headings, directions, or location-based information that may be unavailable,
inaccurate, or incomplete. Compare the information provided on the Axon system to your
surroundings and defer to posted signs to resolve any discrepancies.
4. Wire and mount safety. If the system causes bodily discomfort discontinue use or find an
alternative way to wear the equipment. Never wrap wires around your neck.
5. Avoiding hearing damage. Hearing damage, impairment, or loss may occur and may be
permanent if an Axon Flex or Axon Flex 2 camera is mounted near your head and used at high
volume. Set the volume to a safe and comfortable level. Be advised that you can adapt over time to
a higher volume of sound that may sound normal but can be damaging to your hearing.
6. Choking hazards. The Axon systems contain small parts, which may present a choking hazard.
Keep the Axon systems and their accessories away from small children.
7. Repetitive motion. When you perform repetitive activities such as typing on a mobile phone or
device, you may experience occasional discomfort, which may create injury, including permanent
injury, in your hand, wrist, arm, shoulder, neck, or other part of your body. Take frequent breaks and
if you have discomfort during or after use, stop use and see a physician.
8. Use only TASER-approved components, batteries, and accessories. Only TASER-approved
components, batteries, and accessories are to be used with the systems. Use of anything other than
TASER Axon Flex, Axon Flex 2, Axon Fleet, Axon Body, Axon Body 2, Axon Dock, and
Axon Signal Unit Warnings, Instructions & Information
December 12, 2016
Page 4 of 8
TASER-approved components, batteries, or accessories will void the warranty, may cause
malfunction, and may put the user or other person at risk of injury.
WARNING! BATTERIES
Failure to follow these safety instructions could result in fire, electric shock, damage, system
malfunctions, death, or personal injury.
Damage to or improper handling of batteries could result in fire, electric shock, damage, system
malfunctions, loss of data, or personal injury.
To prevent potential injuries, leaking, overheating or explosion of batteries, take the following
precautions:
1. Do not replace the batteries in the Axon Flex system, Axon Flex 2 system, Axon Body
camera, or Axon Fleet power unit. The batteries in the Axon Flex system, Axon Flex 2 system,
Axon Body camera, and Axon Fleet power unit are not designed to be replaced. DO NOT attempt to
replace these batteries. The Axon Body 2 camera battery is replaceable only with a TASER-
manufactured battery.
2. Avoid extreme temperatures. Do not expose the battery to excessive heat, cold, water, other
liquids, or corrosive substances. Do not use or leave the batteries for on-officer cameras near a heat
source or at a very high temperature (for example, fire, heater, in strong direct sunlight, or in a
vehicle in extremely hot weather). Otherwise, the battery may overheat, cause a fire, or its
performance will be degenerated and its service life will be shortened. The battery in the Axon Fleet
power unit is designed to be installed in the passenger compartment of a vehicle. Do not install the
Axon Fleet power unit in the engine compartment, on the exterior of a vehicle, or in any location that
will continually expose it to direct sunlight, water, other liquids, or corrosive substances.
3. Avoid static electricity. Keep the battery away from sources of static electricity. Static electricity
can cause damage to the battery, which could result in serious injury.
4. Recharging. When recharging Axon equipment, use the Dock or TASER-approved power source
specifically for that purpose. Do not reverse the positive (+) and negative (−) terminals. Do not
connect the battery to an electrical outlet without using a TASER-approved adapter. The Axon Fleet
power unit is designed to be recharged when the vehicle’s engine is running. Do not attempt to
recharge the Axon Fleet power unit by other means.
5. Handling. Ensure proper connections between the Axon equipment when charging or docking an
Axon component. To avoid risk of fire, burns, or damage to your battery pack, do not: allow a metal
object to touch the battery contacts; strike or throw the battery; directly solder the battery or pierce
the battery with a nail or other sharp object; disassemble, short circuit, or heat batteries; or put
batteries in a fire. Doing so may cause battery explosion, battery leakage, system damage, injury, or
fire.
6. Abnormal appearance. If the battery gives off an odor, generates heat, becomes discolored or
deformed, or in any way appears abnormal during use, recharging or storage, immediately place the
Axon component with the battery in a contained vessel such as a metal box.
7. Avoid battery acid contact with skin or eyes. In case the battery acid gets into the eyes due to
the leakage of battery, do not rub the eyes. Rinse the eyes with clean running water, and
immediately seek medical attention. Battery acid’s contact with the eyes or skin could cause serious
injury, including a loss of eyesight.
8. Disposal. Dispose of any battery properly; contact your local waste disposal provider regarding
local restrictions on the disposal or recycling of batteries. Do not dispose of the battery in fire or
heat; the battery may explode if placed in the fire. Do not dispose of the battery in water.
TASER Axon Flex, Axon Flex 2, Axon Fleet, Axon Body, Axon Body 2, Axon Dock, and
Axon Signal Unit Warnings, Instructions & Information
December 12, 2016
Page 5 of 8
WARNING! VEHICLE INSTALLATIONS
Failure to follow these safety instructions could result in damage, system malfunctions, death, or
personal injury.
To prevent potential injuries or system malfunctions, take the following precautions:
1. Anchoring and Installation. If the Axon system is installed in the cab of the vehicle (in a location
other than under the center console), it should be permanently mounted to avoid injury. Do not
install an Axon system anywhere that will interfere with airbag deployment.
2. Avoid extreme temperatures. Do not expose the Axon system to excessive heat, cold, water,
other liquids, or corrosive substances. Do not install the Axon system in the engine compartment,
on the exterior of a vehicle, or in any location that will continually expose it to direct sunlight, water,
other liquids, or corrosive substances.
3. Axon Dock in-Vehicle Caution. Installing an Axon Dock in a vehicle may expose the Dock to
excessive temperatures. In-vehicle temperatures may exceed the threshold for recharging an Axon
device in the Dock.
WARNING! HAZARDOUS SUBSTANCES
Failure to follow these safety instructions could result in fire, electric shock, damage, system
malfunctions, death, or personal injury.
Hazardous Substances. The Axon system has components that contain chemicals known to the
State of California, U.S.A. and others to cause cancer and birth defects or other reproductive harm.
Do not disassemble. Refer to your agency’s guidance for proper handling and disposal.
CAUTION! LOSS OF DATA
Read and obey. Always follow all current instructions, warnings, and TASER training materials to
minimize risks and the loss of data.
Properly Maintain the System. Failure to maintain or use the Axon system or Axon Dock (“Dock”)
as instructed may cause the system to malfunction or fail to function properly or optimally. Recorded
content in memory may be compromised, destroyed, or erased by operating mistakes, system or unit
malfunction, or during repair work. Back up and save important content as necessary, after each
shift, and before returning the unit for repair work.
Installation and Update of Software. Install the Evidence Sync software on the appropriate
computer before attempting to transfer files from an Axon camera to a computer or the Evidence.com
services. Ensure the most recent software and firmware are installed on the system components.
CAUTION! MAINTENANCE
Failure to properly maintain or use the Axon system may cause the system to malfunction or fail to
function properly or optimally, including failure to capture data and corruption of loss of data.
To reduce the risk of malfunction, including failure, corruption or loss of data:
TASER Axon Flex, Axon Flex 2, Axon Fleet, Axon Body, Axon Body 2, Axon Dock, and
Axon Signal Unit Warnings, Instructions & Information
December 12, 2016
Page 6 of 8
1. Charging the battery. The Axon system batteries must be charged prior to use. Only use the
approved TASER chargers, charging cables, or Dock units. Be aware that a battery can fail to
function, fail to charge, fail to maintain a charge, or deteriorate over time.
2. Regularly update firmware and software. The Axon systems have the capability for firmware and
software updating through the Evidence.com services or Evidence Sync software. It is important to
acquire, update, and maintain the latest software update. Current software may be obtained from
www.evidence.com.
3. Storage. Do not store the Axon system or its accessories in the following locations or under the
following conditions:
• Anywhere extremely hot, cold, or humid:
o Axon on-officer cameras are not intended to be operated in temperatures above 122 °F
(50 °C).
o Axon on-officer cameras should not stored in environments where the temperature is likely to
exceed 95 °F (35 °C) (such as under direct sunlight, near heaters, or in a vehicle in extremely
hot weather) or exposed to temperatures below −4 °F (−20 °C).
o Axon systems for automotive applications are rated for different temperatures. See the
appropriate specification sheet.
• With the battery completely drained.
• Near strong magnetic fields or mechanical vibrations.
4. Exposure to Magnets or Magnetic Fields. Do not use the Axon system in close proximity to
unauthorized magnets or magnetic fields, which may cause the Axon system to unintentionally turn
the camera on or off.
5. Avoid Exposure to Wet Conditions. If a system component (including a camera or controller) is
drenched or immersed in water, seawater, or other liquid, DO NOT use the component. Do not
attempt to dry the Axon component with an external heat source, such as a microwave oven or hair
dryer. An Axon component that has been damaged as a result of exposure to liquids is not
serviceable.
6. Repairing or Modifying. Never attempt to repair or modify the Axon system yourself except as
specifically outlined in the model specific operating instructions. Service should only be provided by
TASER or an authorized service provider. Disassembling the Axon system may cause damage that
is not covered under the product warranty. For service information, go to: www.taser.com.
CAUTION! RADIO WAVES
Radio Waves. Changes or modifications not expressly approved in writing by the
manufacturer could void the user’s authority to operate the equipment.
The Axon system contains a radio transmitter and receiver. It is designed and manufactured not to
exceed the emission limits for exposure to radio frequency (RF) energy set by the Federal
Communications Commission (FCC) of the U.S. Government, Industry Canada (IC), and the
recommendations of the Council of the European Union (EU).
The FCC limits are part of comprehensive guidelines and establish permitted levels of RF energy for
the general population. The FCC guidelines are based on standards that were developed by
independent scientific organizations through periodic and thorough evaluation of scientific studies. The
standards include a substantial safety margin designed to assure the safety of all persons, regardless
of age and health. Before a device model is available for sale to the public, it must be tested and

TASER Axon Flex, Axon Flex 2, Axon Fleet, Axon Body, Axon Body 2, Axon Dock, and
Axon Signal Unit Warnings, Instructions & Information
December 12, 2016
Page 7 of 8
certified to the FCC that it does not exceed the limit established by the government‐adopted
requirement for safe exposure.
The Axon systems have been tested and found to comply with the limits for a Class B digital device,
pursuant to part 15 of the FCC Rules. These limits are designed to provide reasonable protection
against harmful interference in a residential installation. This equipment generates, uses and can
radiate radio frequency energy and, if not installed and used in accordance with the instructions, may
cause harmful interference to radio communications. However, there is no guarantee that interference
will not occur in a particular installation. If this equipment does cause harmful interference to radio or
television reception, which can be determined by turning the equipment off and on, the user is
encouraged to try to correct the interference by one or more of the following measures:
• Reorient or relocate the receiving antenna.
• Increase the separation between the equipment and receiver.
• Connect the equipment into an outlet on a circuit different from that to which the receiver is
connected.
• Contact TASER’s Customer Service Department for help.
FCC/IC NOTICE: The Axon systems meet the body worn human exposure limits found in OET Bulletin
65, 2001, and ANSI/IEEE C95.1, 1992. Proper operation of this radio according to the product
instructions will result in exposure substantially below the FCC’s recommended limits. To comply with
the FCC and ANSI C95.1 RF exposure limits, these devices have been tested for compliance with FCC
RF Exposure limits in the typical configuration. The radiated output power of these wireless devices
are far below the FCC radio frequency exposure limits.
Axon systems comply with part 15 of the FCC Rules. Operation is subject to the following two
conditions: (1) the device may not cause harmful interference, and (2) the device must accept any
interference received, including interference that may cause undesired operation.
NOTE: Unauthorized modifications could void the warranty and the user’s authority to operate the
equipment.
Axon systems comply with Industry Canada licence-exempt RSS standard(s). Operation is subject to
the following two conditions: (1) the device may not cause interference, and (2) the device must accept
any interference, including interference that may cause undesired operation of the device.
Axon systémes est conforme aux CNR d'Industrie Canada applicables aux appareils radio exempts de
licence. L'exploitation est autorisée aux deux conditions suivantes : (1) l'appareil ne doit pas produire
de brouillage, et (2) l'utilisateur de l'appareil doit accepter tout brouillage radioélectrique subi, même si
le brouillage est susceptible d'en compromettre le fonctionnement.
Section 8.4 of RSS-GEN
Axon systems comply with Industry Canada License-exempt RSS standard(s). Operation is subject to
the following two conditions: 1) the device may not cause interference, and 2) the device must accept
any interference, including interference that may cause undesired operation of the device.
Axon systems est conforme aux normes d’exemption de licence RSS d’Industrie Canada. Son utilisation
est soumise aux conditions suivantes : 1) cet appareil ne doit pas causer de brouillage, et 2) doit accepter
tout brouillage, y compris le brouillage pouvant entraîner un fonctionnement indésirable.
Section 8.3 of RSS-GEN
Under Industry Canada regulations, radio transmitters may only operate using an antenna of a type and
maximum (or lesser) gain approved for the transmitter by Industry Canada. To reduce potential radio

TASER Axon Flex, Axon Flex 2, Axon Fleet, Axon Body, Axon Body 2, Axon Dock, and
Axon Signal Unit Warnings, Instructions & Information
December 12, 2016
Page 8 of 8
interference to other users, the antenna type and its gain should be so chosen that the equivalent
isotropically radiated power (e.i.r.p.) is not more than that necessary for successful communication.
Conformément à la réglementation d’Industrie Canada, émetteur radio ne peut fonctionner qu’au moyen
d’une antenne d’un seul type et d’un gain maximal (ou inférieur) approuvé pour l’émetteur par Industrie
Canada. Dans le but de réduire les risques de brouillage radioélectrique pour les autres utilisateurs, il
faut choisir le type d’antenne et son gain de sorte que la puissance isotrope rayonnée équivalente
(p.i.r.e.) ne dépasse pas celle requise pour établir une communication satisfaisante.
AXON SYSTEMS MEET THE GOVERNMENT’S REQUIREMENTS FOR EXPOSURE TO RADIO
WAVES.
, AXON, Axon, Axon Body, Axon Body 2, Axon Dock, Axon Fleet, Axon Flex, Axon Flex 2, Evidence.com, Evidence Sync, TASER, and
© are trademarks of TASER International, Inc., some of which are registered in the US and other countries. For more information, visit
www.taser.com/legal. All rights reserved. © 2016 TASER International, Inc.