Axxcelera Broand Wireless AB-ACCESS-SU01 UNII System User Manual Product Install Manual
Axxcelera Broadband Wireless, Inc. UNII System Product Install Manual
Contents
- 1. ADditional trouble shooting guide
- 2. UNII configuration guide
- 3. Additional UNII Product Install Manual information
Additional UNII Product Install Manual information

PRODUCT INSTALLATION MANUAL
for Subscriber Units, Base Stations, Access Points
and AB-Extender Units
Issue 5.4
Revision 1
July 27, 2004
Axxcelera Broadband Product Install Manual Page 2 of 71
Preface
AB-Access™ System technology enables high-speed, broadband Internet access for fast data
transmission, full streaming video, real-time video conferencing, and web surfing. Axxcelera
Broadband’s wireless point-to-multipoint and point-to-point solutions (AB-Extender) for fixed
networks enables our customers to easily leap-over existing infrastructure, making the initial
investment significantly lower than that required for wired alternatives.
Axxcelera Broadband’s, patent pending, Packet-on-Demand technology delivers up to 10 times
the effective Internet data throughput of existing network configurations. Our technology
provides a last-mile solution, when deployed between networks and business/residential Internet
users. AB-Access System’s low-cost, wireless infrastructure means that a complete network can
be installed in days or weeks, instead of the typical months or years. Since AB-Access
architecture is highly scalable, our customers’ wireless network can grow as quickly as their
business grows or as bandwidth needs evolve.
The main tasks covered in this manual are configuring and managing network elements, such as
Base Stations, Subscriber Units, Access Points, AB-Extender Units, Anchor Switches, and
Control Servers. Definitions of all the terms and abbreviations used in this manual can be found
in the Glossary at the end of this manual.
Proprietary Notice
The information contained within this manual was originated by and is the property of Axxcelera
Broadband. Axxcelera Broadband reserves all patent proprietary design, manufacturing,
reproduction use, and sales rights thereto, and to any articles disclosed therein, except to the
extent rights are expressly granted to others. The foregoing does not apply to vendor proprietary
parts. To allow for the introduction of design improvements, specifications are subject to change
without notice.
Intended Audience
This guide is aimed at qualified AB-Access System installers. Installers should have experience
in radio equipment installations and aspects of hardware and software networks. Installers for
AB-Extender should be professionally qualified to install radio equipment.
Related Documentation
For more information, refer to one or more of the following documents:
• U-NII Config & User Manual – Covers AB-Access components, architectures,
configuration, and troubleshooting
• CLI Manual – Describes configuration, operational, and diagnostic capabilities of
the radios.
• AB-Access Software Release Notes – Describes updates and changes to the
latest software and known product issues.
Axxcelera Broadband Product Install Manual Page 3 of 71
Notice
While every reasonable effort has been made to ensure the accuracy of this manual, product
improvements may result in minor differences between the manual and the product shipped to
you. If you have any questions or need an exact specification for a product, please contact
Axxcelera Broadband’s Customer Service Team at support@axxcelera.com
Axxcelera Broadband Wireless
175 Science Parkway
Rochester, New York 14620
USA
Tel: (585) 242-9600
Tel: (877) 557-4001
FAX: (585) 242-9620
Copyright 2002 Axxcelera Broadband Wireless.
Axxcelera Broadband Product Install Manual Page 4 of 71
PLEASE READ THESE SAFETY PRECAUTIONS!
RF Energy Health Hazard
Professional installation required. The radio equipment described in this guide uses radio
frequency transmitters. Although the power level is low, the concentrated energy from a
directional antenna may pose a health hazard.
Use the following chart for determining the minimum safe distance. Do not allow people to
come within the minimum safe distance of the antenna while the transmitter is operating.
Peak Gain of
Antenna Minimum
Safe Distance
18 dBi 20 cm
20 dBi 20 cm
23 dBi 25 cm
25 dBi 32 cm
30 dBi 56 cm
37.6 dBi 135 cm
Protection from Lightning
Article 810 of the US National Electric Department of Energy Handbook 1996 specifies that
radio and television lead-in cables must have adequate surge protection at or near the point of
entry to the building. The code specifies that any shielded cable from an external antenna must
have the shield directly connected to a 10 AWG wire that connects to the building ground
electrode.

Axxcelera Broadband Product Install Manual Page 5 of 71
FCC Notice, USA
The AB-Access units comply with Part 15 of the FCC rules. Operation is subject to the
following three conditions:
• This device may not cause harmful interference.
• This device must accept any interference received including interference that
may cause undesired operation.
• Units with support for an external antenna must be professionally installed.
This device is specifically designed to be used under Part 15, Subpart E of the FCC Rules
and Regulations. Any unauthorized modification or changes to this device without the express
approval of Axxcelera Broadband may void the user’s authority to operate this device.
Furthermore, this device is intended to be used only when installed in accordance with the
instructions outlined in this manual. Failure to comply with these instructions may also void the
user’s authority to operate this device and/or the manufacturer’s warranty
Conditions specific to AB-Extender:
AB-Extender complies with Part 15 of the FCC rules. The device is specifically designed to be
used under Part 15, Sub-part E of the FCC rules and regulations. Operation is subject to
following conditions:
• The device to utilize a fixed mount antenna, for use on a permanent outdoor
structure.
• The device to be installed by qualified installation/deployment personnel, and a
minimum of 25 centimeters of separation must exist between the device and
persons, when the device is operating.
• The device installers and operators should be aware of the transmitter operating
conditions, specified in the AB-Extender installation manual and other associated
user documentation, as well as the antenna co-location requirements of Part
1.1307 (b) (3), of FCC rules, pertaining to RF exposure.
• The device may not cause harmful interference.
• The device must accept interference received, including interference that may
cause undesired operation.
The device is intended to be used only when installed in accordance with instructions
outlined in this manual. Failure to comply with these instructions may void the user's authority to
operate this device and/or the manufacturer's warranty. Furthermore, any unauthorized
modification or changes to this device without the express approval of Axxcelera Broadband
may also void the user's authority to operate this device.

Axxcelera Broadband Product Install Manual Page 6 of 71
Table of Contents
Preface
....................................................................................................................................... 2
PLEASE READ THESE SAFETY PRECAUTIONS!
........................ 4
Table of Contents
......................................................................................................... 6
List of Figures
................................................................................................................. 9
List of Tables
................................................................................................................. 11
1 AB-Access Product Overview.............................................................................................. 12
1.1 AB-Access System........................................................................................................ 12
1.2 AB-Access Network ..................................................................................................... 12
1.3 System Components...................................................................................................... 12
1.3.1 AB-Access System Architecture........................................................................... 12
1.3.2 Base Station Function ........................................................................................... 13
1.3.3 Subscriber Unit Function...................................................................................... 14
1.3.4 System Configuration Selection ........................................................................... 14
2 Getting Started ...................................................................................................................... 15
2.1 Skills Required.............................................................................................................. 15
2.2 Information Needed From Your Service Provider........................................................ 15
2.3 Required Tools and Equipment .................................................................................... 16
2.4 Unpacking the Equipment............................................................................................. 16
2.5 Performing a Site Survey.............................................................................................. 17
2.5.1 What You Need..................................................................................................... 17
2.5.2 Access Point Locations......................................................................................... 18
2.5.3 Selecting an Access Point..................................................................................... 19
2.5.4 AB-Extender Locations ........................................................................................ 20
3 Base Station Installation ....................................................................................................... 22
3.1 System Overview.......................................................................................................... 22
3.2 Access Points ................................................................................................................ 22
3.3 AB-Extender Units........................................................................................................ 23
3.4 A Note On Cabling ....................................................................................................... 23
4 Access Point Installation....................................................................................................... 24
4.1 Before You Start ........................................................................................................... 24
4.2 Information Required.................................................................................................... 24
4.2.1 Equipment Required ............................................................................................. 24
4.3 Access Points ................................................................................................................ 25
4.4 Installing the Equipment............................................................................................... 26
4.4.1 Overview............................................................................................................... 26
4.4.2 Installing the Mounting Poles............................................................................... 26
4.4.3 Installing On an Antenna Mast ............................................................................. 27
4.4.4 Installing On Brick or Masonry............................................................................ 27
4.4.5 Installing On a Wall with Wood Siding................................................................ 27
4.5 Mounting the Outdoor Access Points........................................................................... 28
Axxcelera Broadband Product Install Manual Page 7 of 71
4.5.1 Installing the Access Panel ................................................................................... 30
4.5.2 Installing the Interconnect Cables......................................................................... 30
4.5.2.1 Route the Cables ............................................................................................... 30
4.5.2.2 Install the Interconnect Cables (Transceiver End)............................................ 30
4.5.2.3 Installing the Interconnect Cables to Junction Box .......................................... 32
4.5.2.4 Mark the Access Point Cables .......................................................................... 33
4.6 Grounding the System................................................................................................... 33
4.6.1 Grounding the Outdoor Access Points.................................................................. 34
4.6.2 Grounding the Indoor Junction Box ..................................................................... 35
4.6.3 Assembling and Mounting the Junction Box........................................................ 36
5 AB-Extender Installation ...................................................................................................... 37
5.1 Before You Start ........................................................................................................... 37
5.2 Information Required.................................................................................................... 37
5.2.1 Equipment Required ............................................................................................. 37
5.3 AB-Extender ................................................................................................................. 38
5.4 Installing the Equipment............................................................................................... 38
5.4.1 Overview............................................................................................................... 39
5.4.2 Installing the Mounting Poles............................................................................... 39
5.4.3 Installing On an Antenna Mast ............................................................................. 39
5.4.4 Installing On Brick or Masonry............................................................................ 39
5.4.5 Installing On a Wall with Wood Siding................................................................ 40
5.5 Mounting the Outdoor AB-Extender ............................................................................ 40
5.5.1 Installing the Interconnect Cables......................................................................... 42
5.5.1.1 Route the Cables ............................................................................................... 42
5.5.1.2 Install the Interconnect Cables (Transceiver End)............................................ 42
5.5.1.3 Installing The Interconnect Cables to Junction Box......................................... 45
5.5.1.4 Mark the AB-Extender Cables.......................................................................... 46
5.6 Grounding the System................................................................................................... 46
5.6.1 Grounding the Outdoor AB-Extender................................................................... 47
5.6.2 Grounding the Indoor Junction Box ..................................................................... 48
5.6.3 Assembling and Mounting the Junction Box........................................................ 49
6 Subscriber Unit Installation .................................................................................................. 50
6.1 Installation Overview.................................................................................................... 50
6.2 Installing Mounting Pole............................................................................................... 50
6.2.1 Installing on a Brick or Masonry Wall ................................................................. 51
6.2.2 Installing on a Wall with Wood Siding................................................................. 52
6.2.3 Installing on an Antenna Mast.............................................................................. 53
6.3 Installing the Outdoor Subscriber Unit......................................................................... 54
6.4 Preparing the Indoor Junction Box ............................................................................... 54
6.5 Installing the Interconnect Cable .................................................................................. 55
6.5.1 Routing the Interconnect Cable ............................................................................ 55
6.5.2 Preparing the Interconnect Cable.......................................................................... 56
6.5.3 Connecting to the Outdoor Subscriber Unit Transceiver...................................... 58
6.5.4 Connecting to the Indoor Junction Box ................................................................ 59
6.6 Grounding the System................................................................................................... 60
6.6.1 Installing a Grounding Rod................................................................................... 60
Axxcelera Broadband Product Install Manual Page 8 of 71
6.6.2 Grounding the Outdoor Subscriber Unit............................................................... 61
6.6.3 Grounding the Indoor Junction Box ..................................................................... 62
6.6.4 Assembling and Mounting the Junction Box........................................................ 63
7 Indoor Junction Box.............................................................................................................. 64
7.1 ATM Cross-Over Cable................................................................................................ 65
7.2 FVC DB-9 to RJ-45 Converter ..................................................................................... 65
Glossary
............................................................................................................................... 66
Acronyms/Abbreviations
.......................................................................................... 69

Axxcelera Broadband Product Install Manual Page 9 of 71
List of Figures
Figure 1-1 AB-Access Typical Deployment................................................................................. 13
Figure 1-2 AB-Access Typical Network Architecture ................................................................. 13
Figure 2-1 Outdoor Subscriber Unit Components........................................................................ 17
Figure 2-2 Access Point Locations ............................................................................................... 18
Figure 2-3 Aligning the Compass and Map.................................................................................. 19
Figure 2-4 Selecting an Access Point ........................................................................................... 20
Figure 3-1 Base Station Overview................................................................................................ 22
Figure 3-2 Outdoor Access Point and Mounting Pole.................................................................. 22
Figure 4-1 Diagram of Six Access Points for 360 degree Coverage............................................ 24
Figure 4-2 Outdoor Access Point Components ............................................................................ 26
Figure 4-3 Mounting Pole Installed on Pole or Antenna Mast..................................................... 27
Figure 4-4 Mounting Pole Installation.......................................................................................... 27
Figure 4-5 Mounting Pole on Clapboard Siding........................................................................... 28
Figure 4-6 Mounting Parts for an Outdoor Access Point ............................................................. 28
Figure 4-7 Access Point Rear View.............................................................................................. 29
Figure 4-8 Tilt Bracket.................................................................................................................. 29
Figure 4-9 Access Point with Mounted Tilt Bracket .................................................................... 29
Figure 4-10 Grommet Location - Underside of Access Point ...................................................... 30
Figure 4-11 Outdoor Transceiver End of the Interconnect Cable with Cable Preparation........... 31
Figure 4-12 Interconnect Cable Installation to Outdoor Access Point - Bottom View ................ 32
Figure 4-13 Interconnect Cable Connections to Indoor Junction Box ......................................... 33
Figure 4-14 Ground Connections to Access Point Transceiver.................................................... 34
Figure 4-15 Mounting Pole with Ground Lug.............................................................................. 35
Figure 4-16 Indoor Junction Box Ground Connection ................................................................. 36
Figure 5-1 Outdoor AB-Extender Components............................................................................ 38
Figure 5-2 Mounting Pole Installed on Pole or Antenna Mast..................................................... 39
Figure 5-3 Mounting Pole Installation.......................................................................................... 40
Figure 5-4 Mounting Pole on Clapboard Siding........................................................................... 40
Figure 5-5 Mounting Parts for an Outdoor AB-Extender............................................................. 41
Figure 5-6 AB-Extender Rear View ............................................................................................. 41
Figure 5-7 Tilt Bracket.................................................................................................................. 42
Figure 5-8 AB-Extender with Mounted Tilt Bracket.................................................................... 42
Figure 5-9 Grommet Location - Underside of AB-Extender........................................................ 43
Figure 5-10 Outdoor Transceiver End of the Interconnect Cable with Cable Preparation........... 44
Figure 5-11 Interconnect Cable Installation to Outdoor AB-Extender - Bottom View................ 45
Figure 5-12 Interconnect Cable Connections to Indoor Junction Box ......................................... 46
Figure 5-13 Ground Connections to AB-Extender Transceiver ................................................... 47
Figure 5-14 Mounting Pole with Ground Lug.............................................................................. 48
Figure 5-15 Indoor Junction Box Ground Connection ................................................................. 49
Figure 6-1 AB-Access Subscriber Unit Installation Overview..................................................... 50
Figure 6-2 Mounting Pole Drill Locations.................................................................................... 51
Figure 6-3 Mounting Pole Installation Using Expansion Sleeves and Lag Bolts......................... 52
Figure 6-4 Mounting Pole on Clapboard Siding........................................................................... 53
Axxcelera Broadband Product Install Manual Page 10 of 71
Figure 6-5 Mounting Pole Installed on Pole or Antenna Mast..................................................... 53
Figure 6-6 Outdoor Subscriber Unit Mounted on Wall................................................................ 54
Figure 6-7 Junction Box Wall Mount (Face Plate and PCB Removed) ....................................... 55
Figure 6-8 Interconnect Cable Routing Solutions ........................................................................ 56
Figure 6-9 Grommet Location -- Underside of Subscriber Unit................................................... 57
Figure 6-10 Outdoor Subscriber Unit of the Interconnect Cable with Cable Preparation............ 57
Figure 6-11 Interconnect Cable Installation to Subscriber Unit -- Bottom View......................... 59
Figure 6-12 Interconnect Cable Connections to Indoor Junction Box ......................................... 59
Figure 6-13 Ground Connections for Subscriber Unit.................................................................. 61
Figure 6-14 Mounting Pole with Ground Lug.............................................................................. 62
Figure 6-15 Indoor Junction Box Ground Connection ................................................................. 63
Figure 7-1 Indoor Junction Box (Wall Plate Enclosure) .............................................................. 64
Figure 7-2 Indoor Junction Box Inside........................................................................................ 64
Figure 7-3 ATM Cross-Over Cable.............................................................................................. 65
Figure 7-4 DB-9 To RJ-45 Converter........................................................................................... 65

Axxcelera Broadband Product Install Manual Page 11 of 71
List of Tables
Table 2-1 Required Tools and Extra Equipment .......................................................................... 16
Table 2-2 Packing List.................................................................................................................. 17
Table 4-1 Required Tools and Equipment.................................................................................... 24
Table 4-2 AP Components............................................................................................................ 25
Table 4-3 Cable Legend for Interconnect Cable........................................................................... 31
Table 5-1 Required Tools and Equipment.................................................................................... 37
Table 5-2 EX Components............................................................................................................ 38
Table 5-3 Cable Legend for Interconnect Cable........................................................................... 44
Table 6-1 Required Tools And Equipment................................................................................... 51
Table 6-2 Required Tools and Equipment................................................................................... 52
Table 6-3 Required Tools and Equipment.................................................................................... 53
Table 6-4 Required Tools and Equipment.................................................................................... 54
Table 6-5 Required Tools and Equipment.................................................................................... 55
Table 6-6 Required Tools and Equipment.................................................................................... 56
Table 6-7 Cable Legend for Interconnect Cable........................................................................... 58
Table 6-8 Required Tools and Equipment.................................................................................... 60
Table 7-1 Cable Legend - Junction Box Interconnect Cable........................................................ 65

Axxcelera Broadband Product Install Manual Page 12 of 71
Section 1
1 AB-Access Product Overview
1.1 AB-Access System
The Axxcelera Broadband AB-Access System is a broadband, fixed, wireless access network for
Internet, data, video, and voice applications. AB-Access can enhance or replace existing
networks, wired or wireless, or be used to develop new networks. The AB-Access System offers:
• Point-to-Multipoint (PMP) Wireless Access Network
• Point-to-Point (PTP) Wireless Access Network [AB-Extender]
• End-to-End Connectivity
• Spectrum Efficiency per Offered Load
• Powerful, Flexible Elements.
1.2 AB-Access Network
The AB-Access network consists of wireless 25 Mbps cells similar in topology to the cellular
networks of today. AB-Access networks are designed for rapid and easy deployment, and
constructed from a number of Base Stations deployed in a conventional cellular pattern.
Deployment can vary from a number of small island sites to complete coverage of a chosen
geographical area. AB-Extender allows these cell sites to be linked together with high-speed,
long range, point-to-point connections.
1.3 System Components
The AB-Access System is comprised of the following major components:
• Subscriber Unit (SU) – Located at customer premises and provides either ATM
or standard IP over Ethernet connectivity.
• Access Point (AP) - The Access Point is the cornerstone component of the
Base Station. The AP is the interface between the Service Provider’s terrestrial
network and the wireless fabric. Each AP has the capability to provide network
service at the Physical, Data Link, and Network Layers of the OSI reference
model.
• AB-Extender (EX) - The AB-Extender is the inter-Base Station linking
component. The EX is the interface between the Service Provider’s terrestrial
network and the wireless PMP fabric. Each EX has the capability to provide
network service at the Physical, Data Link, and Network Layers of the OSI
reference model. Each EX can provide ATM or Ethernet backhaul.
1.3.1 AB-Access System Architecture
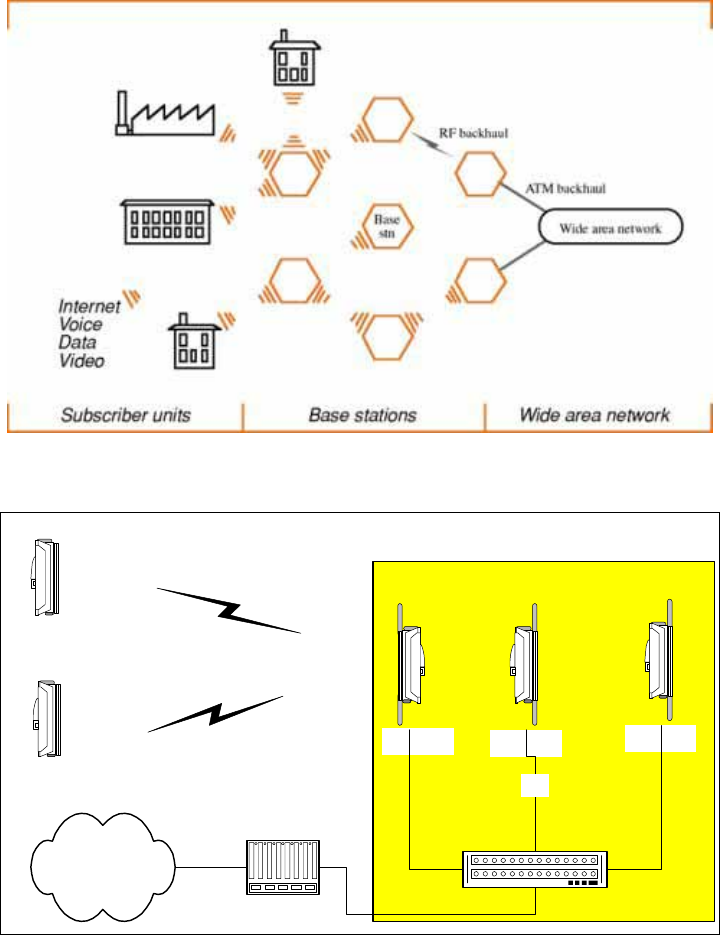
Figures 1-1 and 1-2 show an AB-Access System’s typical deployment and network architecture.
Axxcelera Broadband Product Install Manual Page 13 of 71
Figure 1-1 AB-Access Typical Deployment
Access
Point
Subscriber
Unit
Subscriber
Unit
Access
Point
Access
Point
Up to 254 SU per AP
Eth
NOC Router
WAN
Eth Switch
Typically 6 Access
Points per Base Station
Base Station
Figure 1-2 AB-Access Typical Network Architecture
1.3.2 Base Station Function
The Base Station enables wireless communications between the Subscriber Units and the Wide
Area Network (WAN). Base Station elements may include:
• Access Point
• AB-Extender
• Switch
Axxcelera Broadband Product Install Manual Page 14 of 71
• Termination Point and Lightning Arrestor
• 48 VDC Power Supply
• Uninterruptible Power Supply (UPS) (optional).
1.3.3 Subscriber Unit Function
The Subscriber Unit is an integrated device that mounts externally at the customer site. This
device provides either ATM or Ethernet communications via the 25Mbps ATM wireless
connection with the Base Station. Subscriber Unit elements may include:
• Internal Junction Box
• Cabling.
• Switch, hub or router
1.3.4 System Configuration Selection
Before installing a new unit or upgrading a unit, the network manager must know what
configuration option to use. The upgrade process will place a unit in a certain state. The state of
this unit will be very important depending upon whether the unit is already being used in
production or about to be put into use. Units in production will need to be upgraded and placed
back into production using the configuration currently in place. New units will require the
proper configuration in order to come online fast and efficiently. This whole process relies on
the fact that the units are programmed properly.
Units operating in static mode will want to retain this mode. Selecting the wrong configuration
may result in a static unit being placed in a dynamic registration mode, making it potentially
unmanageable remotely. Similarly, upgrading a unit running in a routed topology to a bridge
topology will have a significant impact on functionality.
For more information about configuring your AB-Access System, reference the AB-Access
Configuration and User’s Guide.
Following are instructions for setting up Subscriber Units, Base Stations, AB-Extender and
Access Points. A Glossary of definitions and acronyms is at the end of this manual.

Axxcelera Broadband Product Install Manual Page 15 of 71
Section 2
2 Getting Started
2.1 Skills Required
The AB-Access Product Installation procedures require some construction-related experience
using both power and hand tools. Answer the following questions to determine whether you
have the skills to attempt the installation.
• Are you comfortable working at heights?
• (The installation may require you to climb a ladder and work at heights
depending on where you need to install your outdoor transceiver. Keep in mind,
you will also carry tools and equipment with you to the installation site.)
• Have you ever installed an RJ-45 connector to an Ethernet cable?
• (This is required to connect the outdoor transceiver and the indoor junction box
or access panel.)
• Have you run telephone cable, wired a telephone jack, or connected telephone
wire connections to a punch down block?
• Have you ever installed expansion shields into brick or masonry walls?
• (This requires drilling holes in masonry using masonry drill bits.)
• Have you ever wired an electrical outlet?
• Although you won’t wire an outlet, you will be required to run ground wires and
clamp them to an earth grounding rod or a cold water pipe.
If you can perform all the above tasks, then you should be able to install the AB-Access System.
If you are unsure of your ability to perform these tasks, contact a more qualified installer.
2.2 Information Needed From Your Service Provider
Your service provider should have supplied you with the following information. Please contact
your service provider before commencing installation, if you do not have all of this information:
• Locations of any local Access Points, which you should be able to connect to.
• The IP address of the radio being installed.
• An IP address and subnet mask needed to configure a Test PC. This is so you
can check to see if your SU is working, align your outdoor transceiver correctly,
and confirm that you can connect to your service provider.

Axxcelera Broadband Product Install Manual Page 16 of 71
2.3 Required Tools and Equipment
This section lists all the extra tools and equipment mentioned in this guide that you will need to
perform the installation. None of the items listed in Table 2-1 are supplied with the kit, so make
sure you gather everything you need before you start. Use the table below to check exactly what
you will need (this will depend on where you are going to install the outdoor transceiver).
Table 2-1 Required Tools and Extra Equipment
Tools Required Extra Equipment Required
Compass ¼ inch grounding rod
Area map with an accurate direction
legend showing magnetic north Grounding clamp
Phillips-head screwdriver Grounding wire
Flat-head screwdriver Roll of UTP CAT 5 cable
Hammer or mallet #6 wood screws
Power drill Cable clip
1/8 inch drill bit Anchor sleeves
¼ inch masonry drill bit RJ-45 connectors (plastic bodied)
3/16 inch, 4mm hex (Allen) wrench 1 inch copper tape
Bubble level or plumb line Ethernet Hub (10BaseT)
Adjustable wrench
Wire snake (if routing cable through
interior walls) Recommend a 19” rack to hold the monitor, Element
Management System, Anchor Switch, and Control
Server.
Crimping tool (must be specifically
matched for the RJ-45 connector used)
Wire stripper
Small wire cutters
Punch down tool
2.4 Unpacking the Equipment
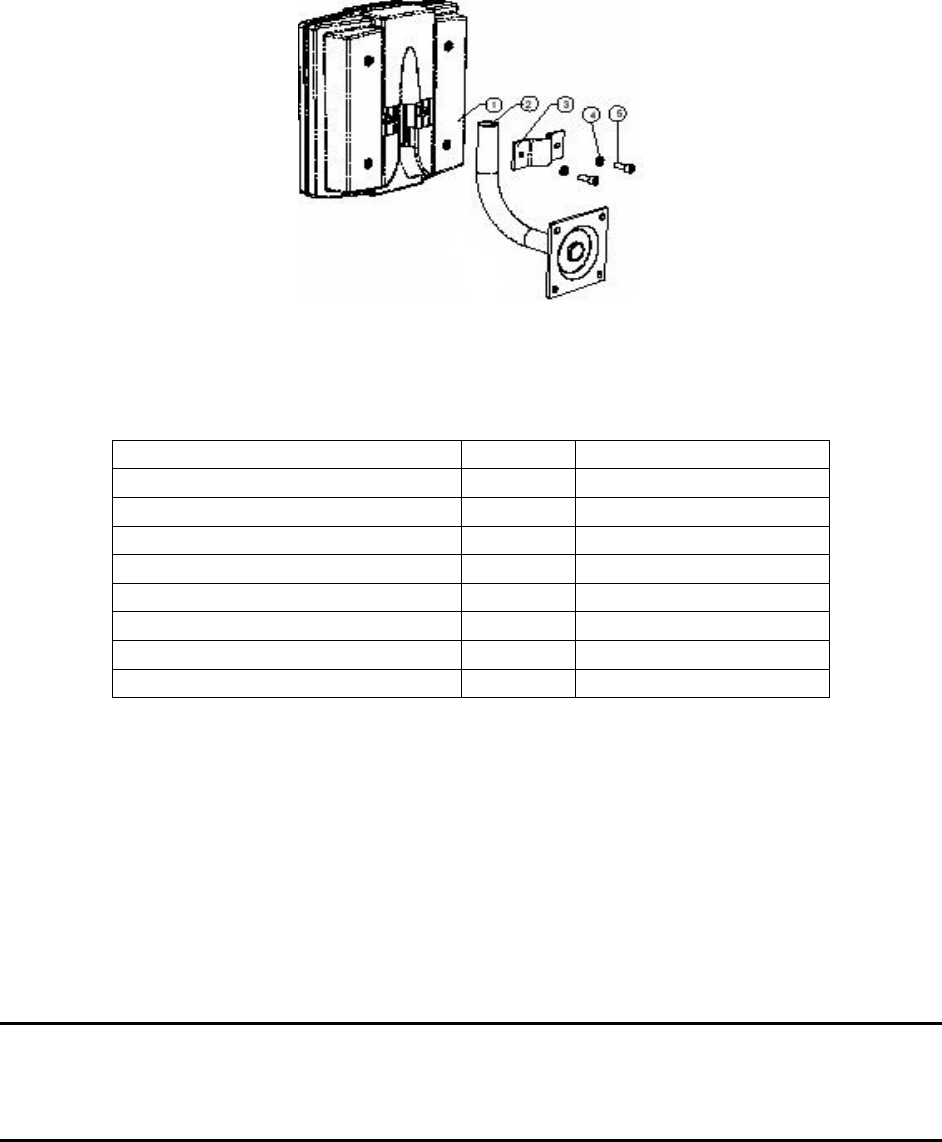
Table 2-2 lists all the standard parts that are supplied in your AB-Access Subscriber Unit
Installation Package. Please take the time to unpack the package and check its contents against
this list.
Axxcelera Broadband Product Install Manual Page 17 of 71
Figure 2-1 Outdoor Subscriber Unit Components
Table 2-2 Packing List
Item Quantity Notes
Outdoor Subscriber Unit 1 See item 1 in Figure 2-1
Mounting pole 1 See item 2 in Figure 2-1
Pole clamp 1 See item 3 in Figure 2-1
M6 washer 2 See item 4 in Figure 2-1
M3 x M10 machine thread screws 2 See item 5 in Figure 2-1
Power supply 1
Power cord 1
Indoor junction box 1
2.5 Performing a Site Survey
This section explains how to select the best location for mounting the outdoor transceiver. The
steps you will perform are:
• Determine which Access Points you can communicate with.
• Determine the direction of available Access Points from the house or building.
• Select an Access Point with an unobstructed Line of Sight (LOS).
Attention! It is very important that you choose a CLEAR LINE OF
SIGHT for the placement of your Access Point Units and Subscriber
Units.
2.5.1 What You Need
• Compass (or protractor).
Axxcelera Broadband Product Install Manual Page 18 of 71
• Area map with an accurate direction legend showing magnetic north.
• Access Point locations – these should be provided by your service provider.
2.5.2 Access Point Locations
If you are installing the unit without the aid of a qualified installer, you need to determine the
general direction of any Access Points from your house or building. You may be able to ‘see’
several APs, depending on your coverage area.
Attention! The following method uses a compass to find the bearing of any APs from your
site. An alternative method is to use a protractor to measure the angle between North and a
line to the AP from your site. This tells you the compass bearing to use when aligning your
outdoor transceiver.
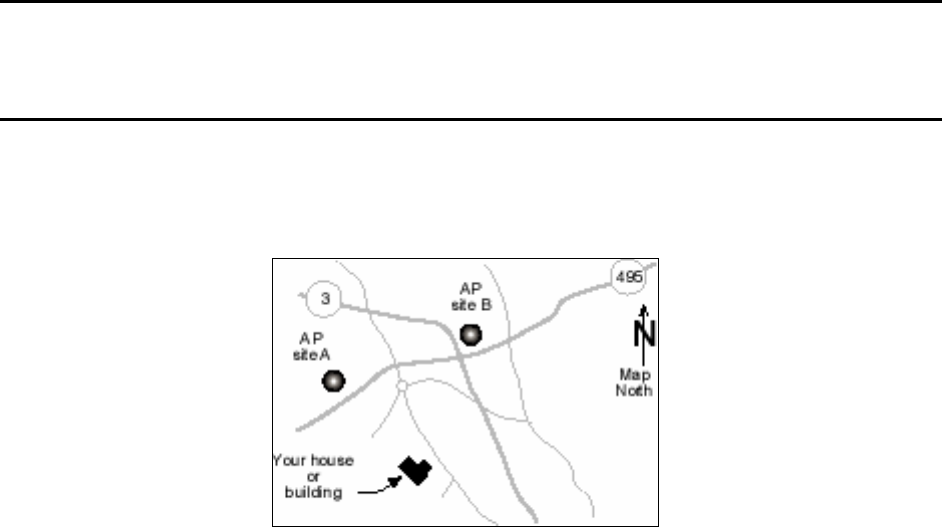
1. On your map, mark the location of your house or building
2. Mark the locations of any Access Points – these should have been supplied by your service
provider:
c
Figure 2-2 Access Point Locations
3. Place the compass on the map on or near the magnetic north indicator.
4. Turn the compass so that the magnetic north indicator needle aligns with the N or North
indicator on the compass body.
5. Rotate the map, keeping the compass stationary, so the map’s North Indicator aligns with the
North Indicator of the compass (see Figure 2-3).
6. Move the compass over your location on the map and read off the bearing to the AP.
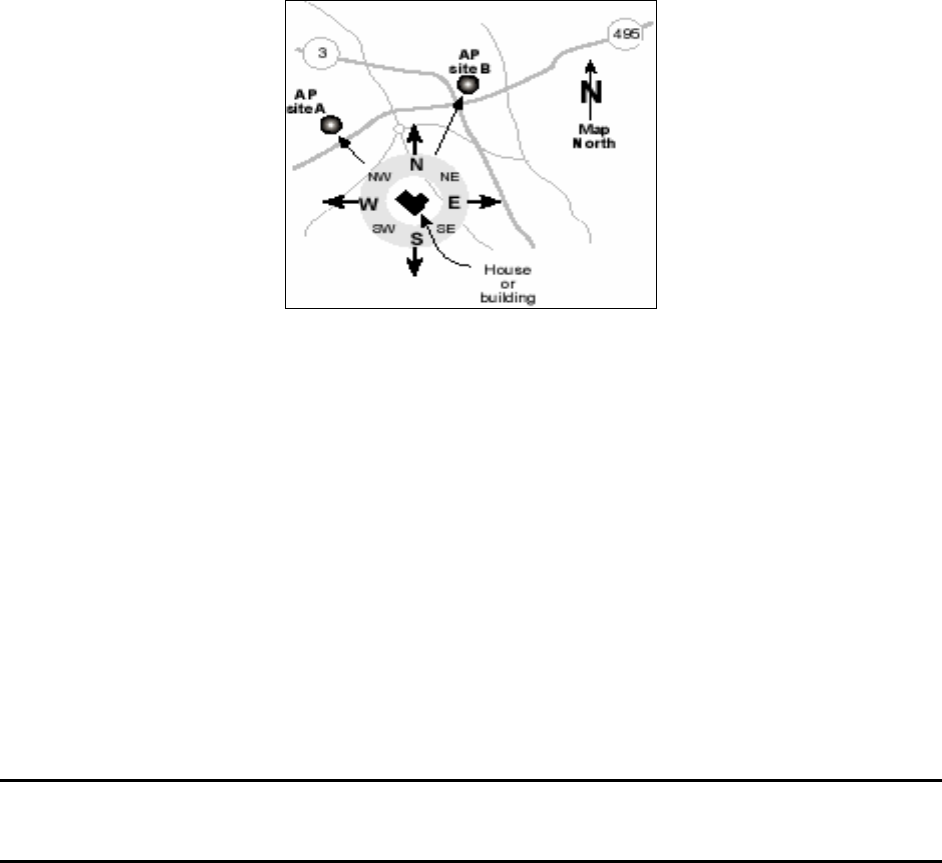
Axxcelera Broadband Product Install Manual Page 19 of 71
Figure 2-3 Aligning the Compass and Map
7. Write down the directions (compass bearings) of your Access Points. For example, in Figure
2-3, Access Point A is located northwest of the building and Access Point B is located
between north and northeast. (If you can be more accurate than this, you will get better
reception when you install your outdoor transceiver.)
2.5.3 Selecting an Access Point
In order for your AB-Access System to work correctly, you MUST establish a clear line of sight
to one or more of the Access Points recommended by your AB-Access System provider.
1. Using the compass bearings you wrote down in the previous section, walk around your
building to find a suitable line of sight path to mount your outdoor transceiver – see Figure 2-
4.
Attention! A clear line of sight means a path unobstructed by trees,
dense foliage, or other buildings.
If necessary, move to an upstairs window or rooftop location to better view the surrounding area
for possible blockages in the path. Also, be sure to consider seasonal changes. A location that is
unobstructed in the winter may be obstructed by foliage in the spring, summer, and autumn.
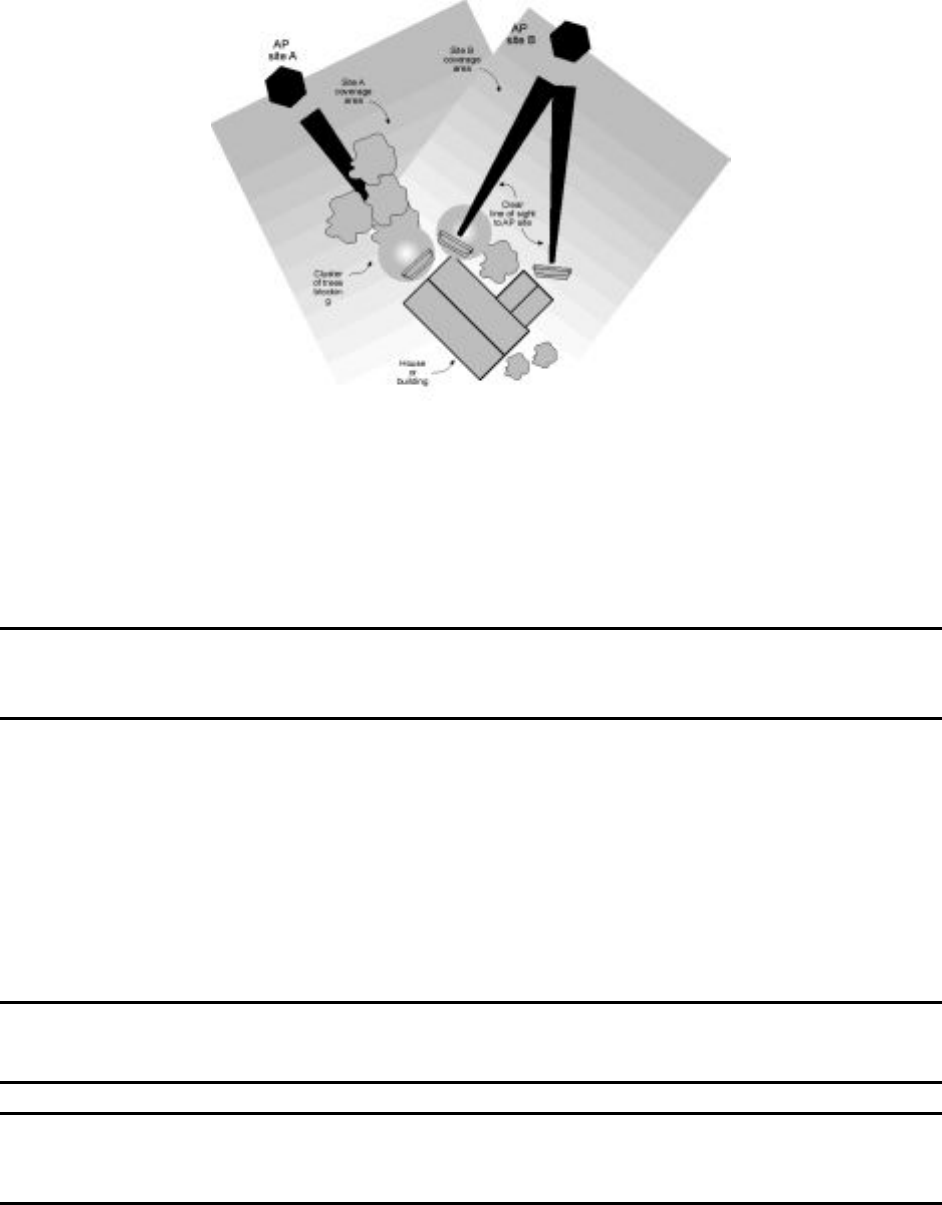
Axxcelera Broadband Product Install Manual Page 20 of 71
Figure 2-4 Selecting an Access Point
You should mount your outdoor Subscriber Unit as high as possible on your building, and align
it to the compass reading you have just taken. For example, the previous Figure 2-4 shows the
path to Access Point A obstructed by a cluster of trees. However, there are two possible
mounting locations for the outdoor Subscriber Unit giving a clear line of sight to Access Point B.
Attention! Your outdoor transceiver has a beam width of approximately 20 degrees. You
will need to be fairly accurate when aligning your transceiver to the compass bearing you
wrote down earlier (the more accurate your compass readings, the better).
2. If you do come up with two or more suitable locations for the outdoor Subscriber Unit,
choose the one that is easiest for you to reach, when it comes to installing!
2.5.4 AB-Extender Locations
In order for your AB-Extender link to work correctly, you MUST establish a clear line of sight
between the Extender AP and Extender SU.
Attention! A clear line of sight means a path unobstructed by trees,
dense foliage, or other buildings.
Attention! Your outdoor transceiver has a beam width of approximately 10 degrees. You
will need to be fairly accurate when aligning your transceiver to the compass bearing you
wrote down earlier (the more accurate your compass readings, the better).
Axxcelera Broadband Product Install Manual Page 21 of 71
Follow the same instructions for aligning and locating the AB-Extender units as for the standard
AP and SU. Note: the difference in beam width will make alignment more difficult but has the
advantage of lower susceptibility to interference.
Axxcelera Broadband Product Install Manual Page 22 of 71
Section 3
3 Base Station Installation
3.1 System Overview
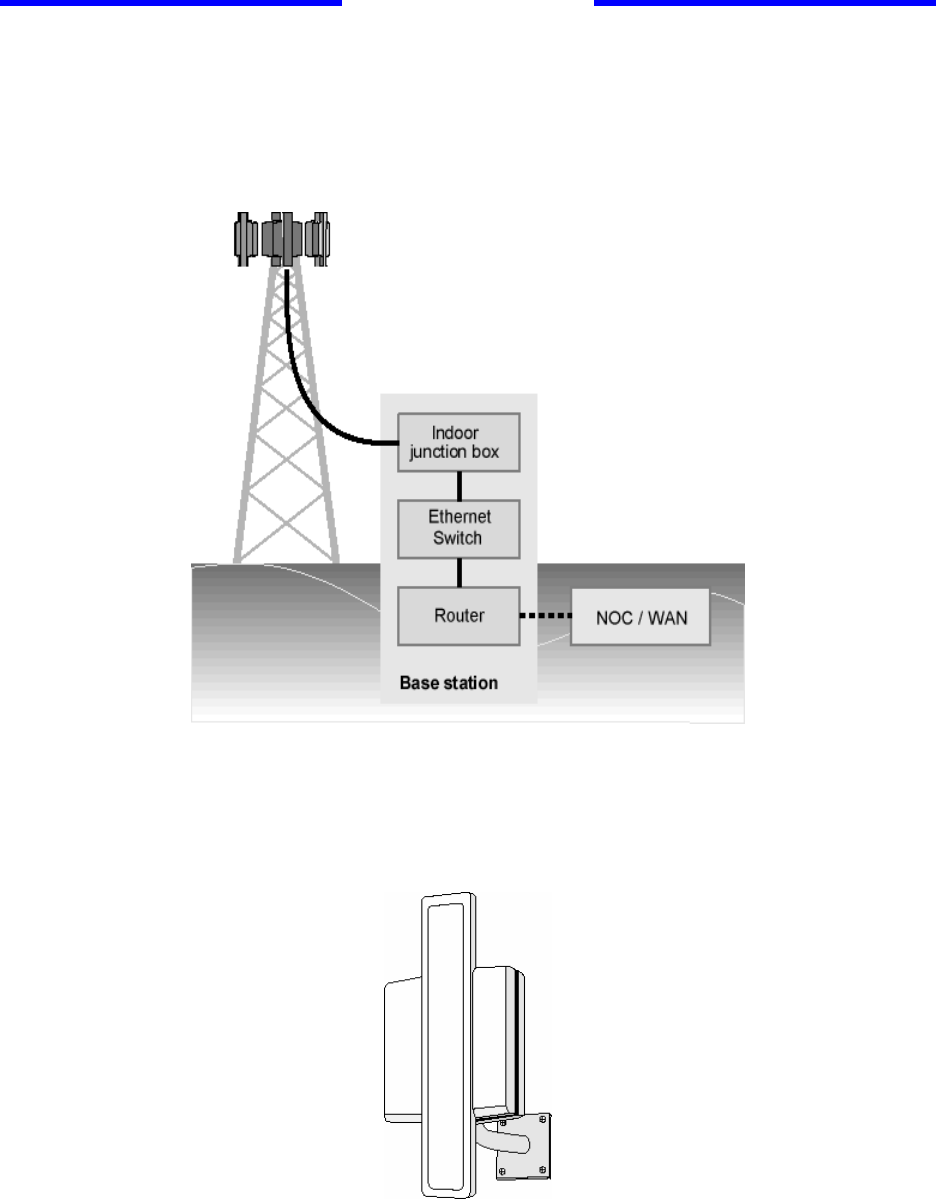
This section briefly describes the AB-Access hardware and software system components that
comprise a Base Station.
Figure 3-1 Base Station Overview
3.2 Access Points
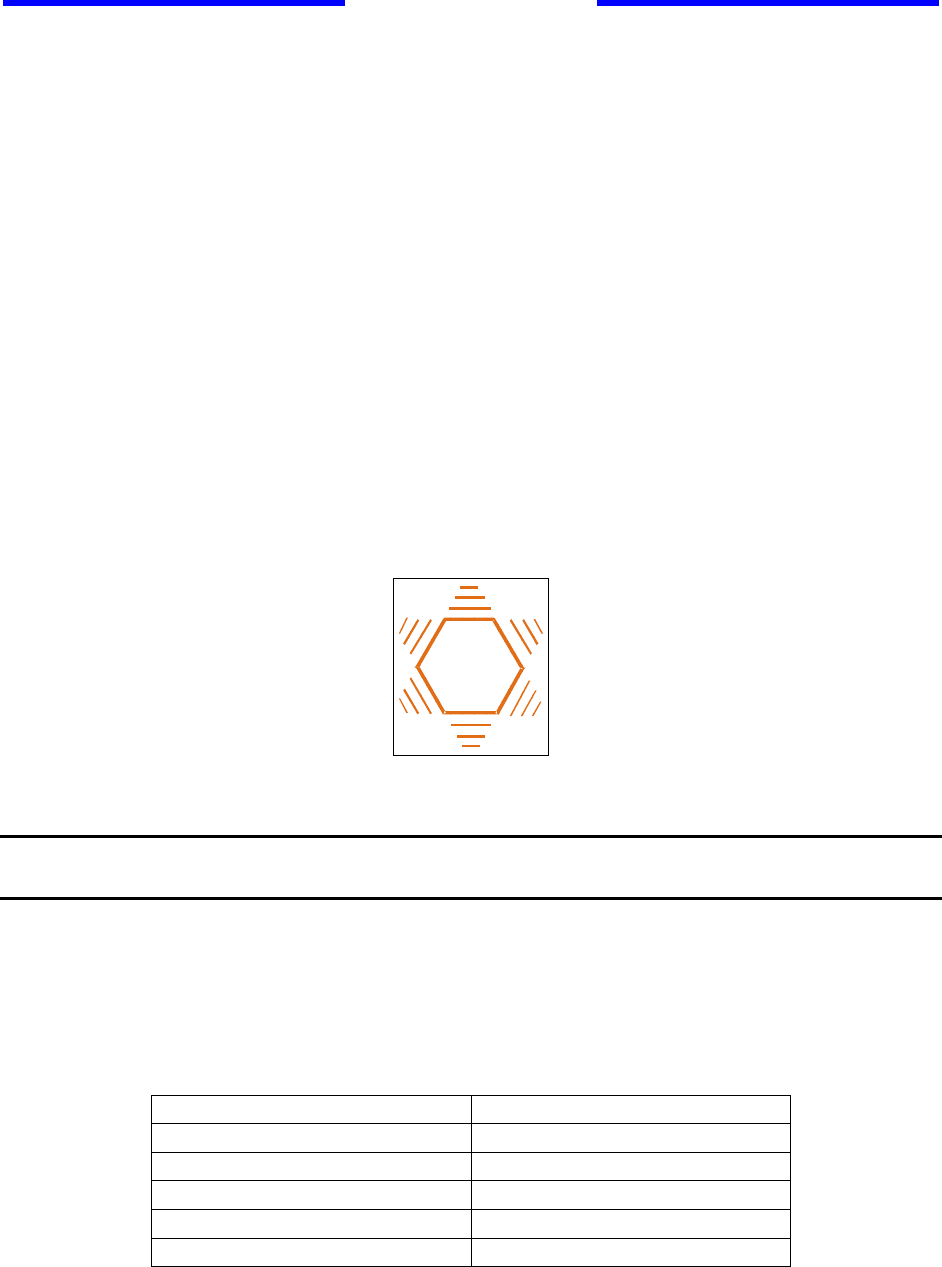
Figure 3-2 Outdoor Access Point and Mounting Pole

Axxcelera Broadband Product Install Manual Page 23 of 71
A Base Station can have up to six Access Points. Each AP consists of an outdoor transceiver
(which contains the antenna and associated electronics that transmit and receive broadband
wireless signals to and from Subscriber Units) and an indoor wallbox or access panel.
3.3 AB-Extender Units
A Base Station may have a number of AB-Extender units. Each EX consists of an outdoor
transceiver and an indoor wallbox or access panel.
3.4 A Note On Cabling
Attention! Most of the cabling used in the AB-Access System is CAT5. You will need to be
aware of the following limits on CAT5 cable lengths:
• The interconnect cable from the indoor junction box to an outdoor transceiver
must be less than 60 meters. This is due to DC resistance loss over the distance
of the cable run.
• The combined length of ATM or Ethernet interconnect cable (from the radio to
the switch) must be less than 100 meters.
Axxcelera Broadband Product Install Manual Page 24 of 71
Section 4
4 Access Point Installation
4.1 Before You Start
This section lists the information needed to install an AP.
4.2 Information Required
Before you perform the installation, a site survey should have been performed by the service
provider. From this, you will need to know:
• Number of APs to install
• Where the outdoor transceivers will be mounted (antenna mast, pole or building)
• Heights at which the outdoor transceivers will be mounted.
• Transceiver directional information (azimuth and elevation).
You will probably be installing six APs on a mast or pole, giving 360 degree coverage in 60
degree sectors, as shown in Figure 4-1.
Figure 4-1 Diagram of Six Access Points for 360 degree Coverage
IMPORTANT – Be sure to record the MAC address found on the AP unit BEFORE you
install it for future reference.
4.2.1 Equipment Required
Table 4-1 lists the tools and equipment you will need to install Access Points.
Table 4-1 Required Tools and Equipment
Tools Required Equipment Required
Compass and protractor ¼ inch grounding rod
Area map Grounding clamp
Phillips-head screwdriver Grounding wire
Flat-head screwdriver CAT5 cable
Hammer or mallet #6 wood screws

Axxcelera Broadband Product Install Manual Page 25 of 71
Power drill Cable clips
1/8 inch drill bit Anchor sleeves
¼ inch masonry drill bit RJ-45 connectors (plastic
bodied)
3/16 inch hex (Allen) wrench
or 10 mm
Bubble level or plumb line
Adjustable wrench
Wire snake (if routing cable
through interior walls)
Crimping tool (must be
specifically matched for the
RJ-45 connector used)
Wire stripper
Small wire cutters
Punch down tool
4.3 Access Points
Table 4-2 lists the main components of an Access Point.
Table 4-2 AP Components
Item Quantity Notes
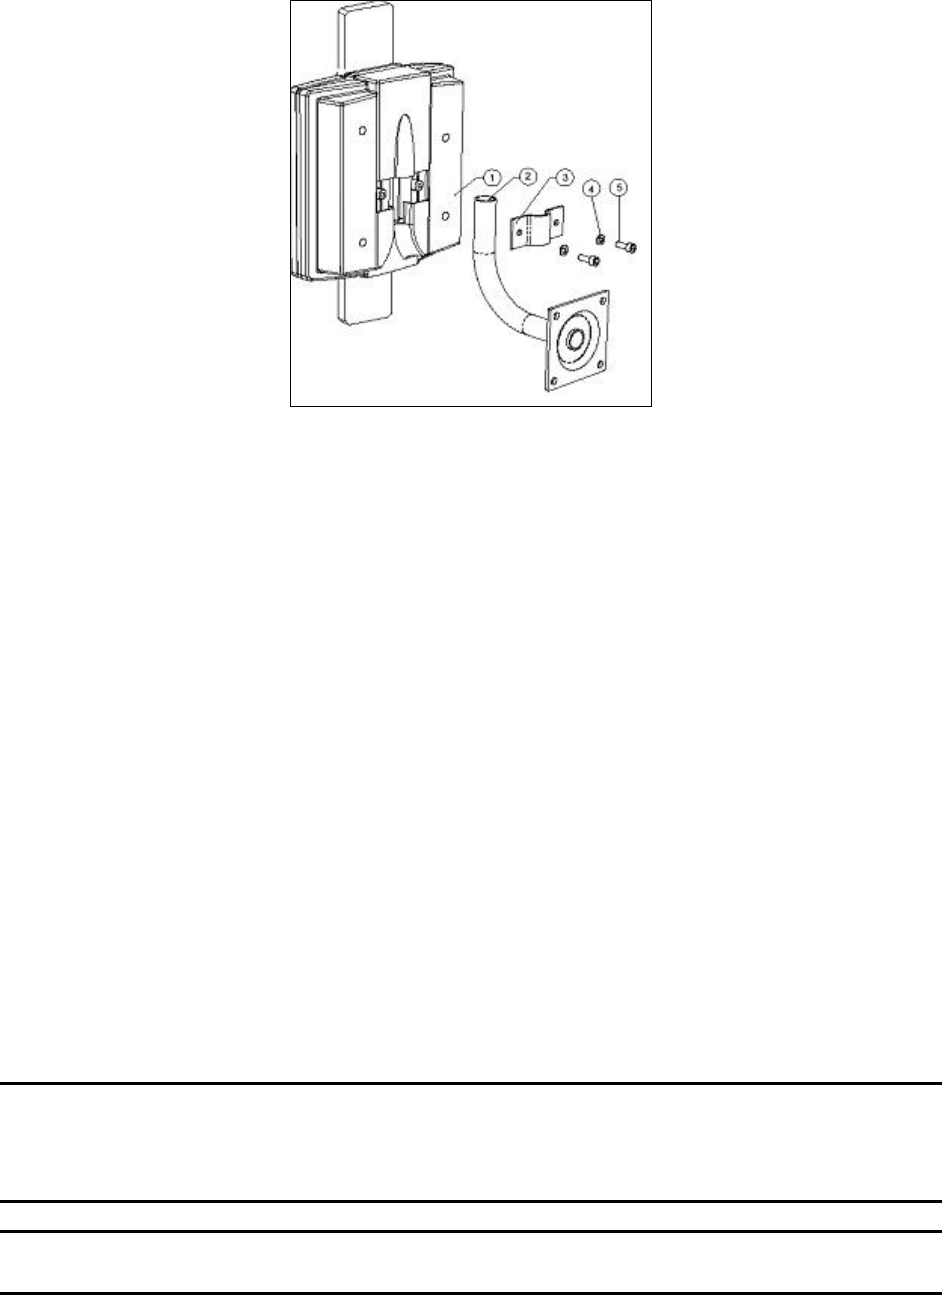
Outdoor transceiver 1 See item 1 in Figure 4-2
Mounting pole 1 See item 2 in Figure 4-2
Pole clamp 1 See item 3 in Figure 4-2
M6 washer 2 See item 4 in Figure 4-2
M3 x M10 machine thread screws 2 See item 5 in Figure 4-2
Indoor junction box 1 white wall box
Power supply and cord 1
Axxcelera Broadband Product Install Manual Page 26 of 71
Figure 4-2 Outdoor Access Point Components
4.4 Installing the Equipment
This section explains how to install an AP transceiver onto a variety of surfaces, connect them to
the indoor junction box, and ground the system. The most likely scenario is to install six
transceivers on a single tower or mast 60 degrees apart.
4.4.1 Overview
Following are the installation steps you will perform:
1. Install the mounting poles.
2. Mount the outdoor transceivers.
3. Mount the access panel.
4. Ground the outdoor transceivers and access panel
5. Connect the interconnect cables.
4.4.2 Installing the Mounting Poles
First install the mounting poles, on which you will mount the outdoor transceivers.
Bear in mind the direction in which the transceivers will point.
Attention! The mounting pole must be mounted in a vertical position. Failure to do so
may result in improper alignment of the outdoor transceiver. If you need to tilt the
transceiver down to avoid self-interference in a cellular-style deployment, you should use
an (optional) tilt bracket.
Warning! The mounting pole must be grounded. See Grounding The System in Section
5.6.3.
Axxcelera Broadband Product Install Manual Page 27 of 71
4.4.3 Installing On an Antenna Mast
1. Position the mounting pole on the antenna mast.
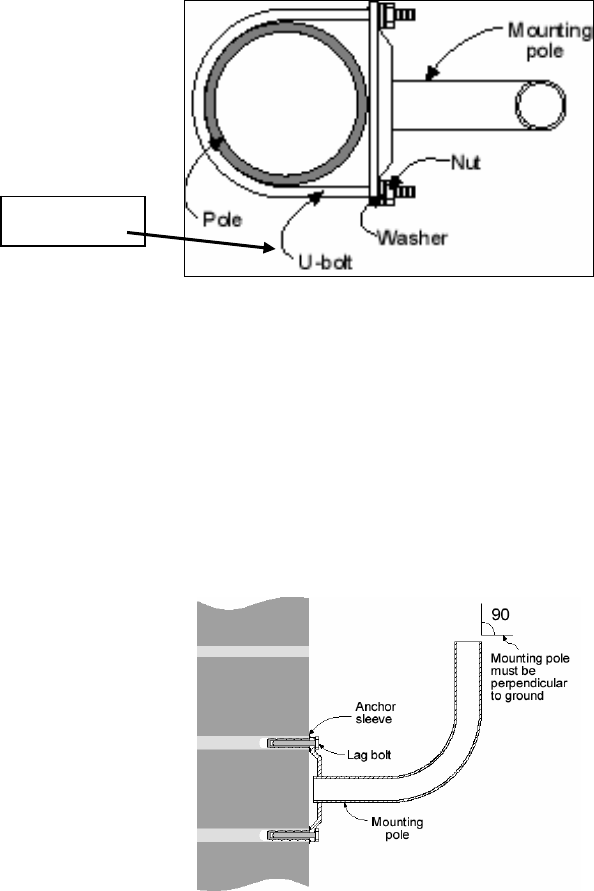
2. Insert the U-bolts around the mast and through the holes in the mounting pole. Install a
washer and nut to each side of the threaded U-bolt and hand tighten. Repeat this step for the
second U-bolt.
3. Tighten nuts equally until mounting pole is secure and cannot rotate.
Figure 4-3 Mounting Pole Installed on Pole or Antenna Mast
4.4.4 Installing On Brick or Masonry
1. Place the mounting plate against the wall. Use a level or plumb line to set the mounting pole
perpendicular to the ground.
2. Mark the hole locations.
3. Set the pole aside.
4. Drill ¼ inch holes at the marked locations. Drill the holes approximately ½ inch deep.
5. Insert the expansion shields into the drilled holes and tap them home.
6. Align the mounting pole with the drilled holes and fix with the lag bolts.
Figure 4-4 Mounting Pole Installation
4.4.5 Installing On a Wall with Wood Siding
1. Place the mounting plate against the wall.
Typically 2 ½
inch
Axxcelera Broadband Product Install Manual Page 28 of 71
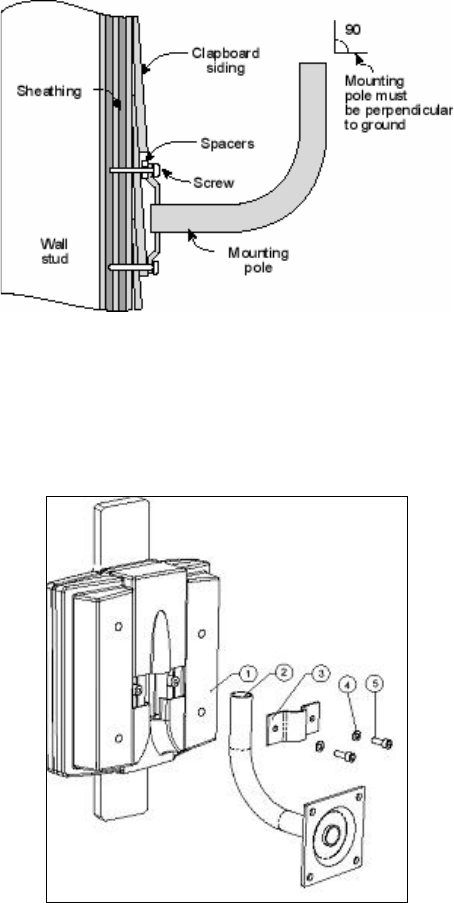
2. Using a level, be sure that the mounting pole is perpendicular to the ground. You may need
to use spacers, as shown in Figure 4-5.
3. Mark the hole locations for the drilled hole locations. Remove the mounting pole and set
aside.
4. Drill 1/8-inch holes in the places marked.
5. Use #10 or #12 wood screws to secure the mounting pole to the wall and tighten.
Figure 4-5 Mounting Pole on Clapboard Siding
4.5 Mounting the Outdoor Access Points
Now that you have installed the mounting pole, you are ready to install the Access Points onto
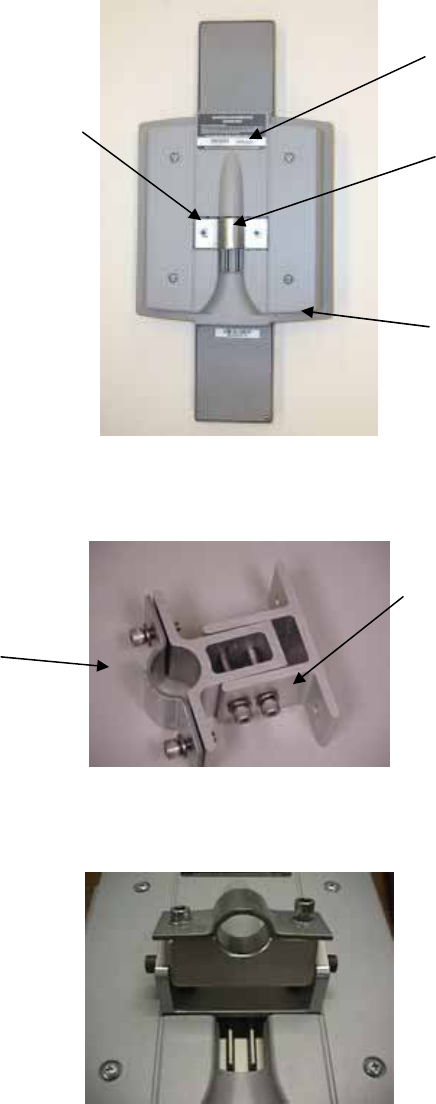
the mounting poles. Reference Figures 4-6 through 4-9.
Figure 4-6 Mounting Parts for an Outdoor Access Point
1. Place the outdoor Access Point on the mounting pole.
2. Align the pole clamp with the mounting holes.
3. Insert the mounting screws and hand tighten.
4. Rotate the outdoor Access Point so it is pointing in the correct direction.
Axxcelera Broadband Product Install Manual Page 29 of 71
5. Tighten the mounting screws.
Figure 4-7 Access Point Rear View
Figure 4-8 Tilt Bracket
Figure 4-9 Access Point with Mounted Tilt Bracket
Serial
Number
Pole Brace
MAC Address
(underside)
Hex Bolts (2)
Tilt Bracket
Side Hex
Bolts
Axxcelera Broadband Product Install Manual Page 30 of 71
4.5.1 Installing the Access Panel
You will probably install the Access Panel in a rack, along with the anchor switch and other
associated equipment. However, keep in mind that the access panel should be:
• Located where you can easily connect to a power supply.
• Close to the anchor switch.
• Accessible for service and troubleshooting.
• Protected from rain and extremes of temperature (it is designed for indoor use).
4.5.2 Installing the Interconnect Cables
For each interconnect cable, you will need to perform the following steps.
4.5.2.1 Route the Cables
1. Select where the cable will enter the building from the outside.
2. Determine the length of cable required. Allow three extra feet on each end to allow for strain
relief, as well as any bends and turns.
3. Route the cable.
4.5.2.2 Install the Interconnect Cables (Transceiver End)
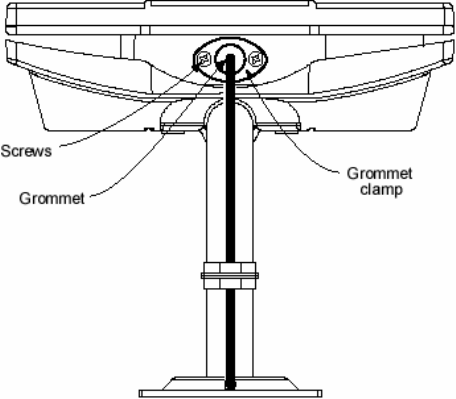
1. Remove the grommet and clamping plate from the outdoor transceiver by removing the two
screws.
Figure 4-10 Grommet Location - Underside of Access Point
Axxcelera Broadband Product Install Manual Page 31 of 71
NOTE: The Grommet is made of a special conductive material used to complete the
ground between the Access Point and Access Panel.
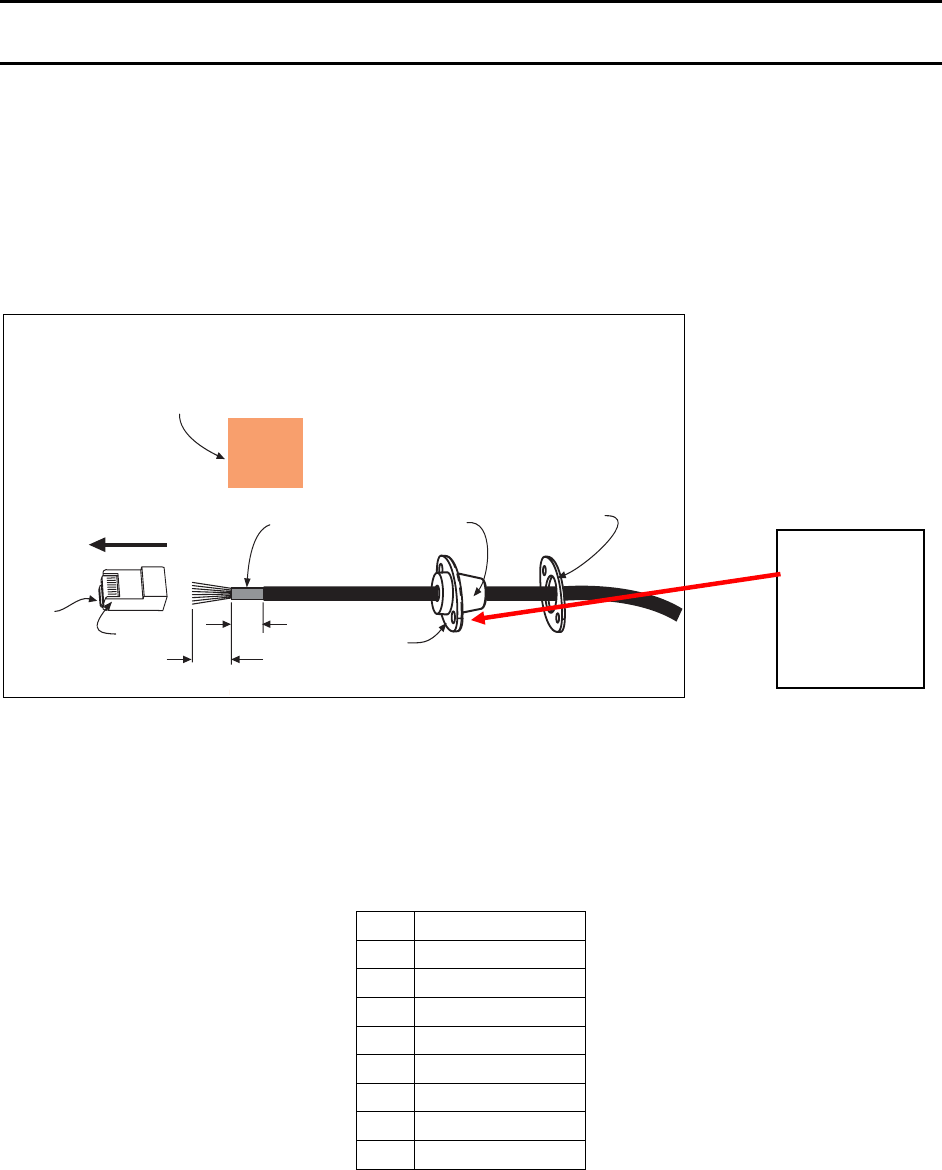
2. Insert the cable end through the grommet clamping plate (Figure 4-10)
3. Insert the cable end through the grommet. The tapered end of the grommet should be
opposite the cable end.
4. Strip 1 inch of insulation off the cable end. Leave 3/8 inch of shielding showing and trim the
wire ends flat ½ inch from there.
5. Using a piece of 1 inch squared tinned copper foil, wrap the foil around the shield/braid and
sheath with the left edge aligned with the edge of the braid, as shown in Figures 4-11.
Grommet
Grommet
clamping
plate
Note direction
of taper
Insert wire
into channels
1/2"
3/8"
Shielding
Pin 1
Tab on
underside
1" square tinned copper foil - wrap the copper foil around the
shield/braid and sheath with the left
edge aligned with the edge of the braid.
Figure 4-11 Outdoor Transceiver End of the Interconnect Cable with Cable Preparation
6. Separate the twisted pair wires and align by color code in the order listed in the following
Table 4-3.
Table 4-3 Cable Legend for Interconnect Cable
Pin Color Code
1 White / Orange
2 Orange
3 White / Green
4 Blue
5 White / Blue
6 Green
7 White / Brown
8 Brown
7. Using pin 1 as a reference, insert the individual wires into the channels of the RJ-45
connector. Each wire should penetrate the channels until flush with the connector end. The
Grommet is
conductive
and used to
complete
the ground
Axxcelera Broadband Product Install Manual Page 32 of 71
copper foil tape should extend past the casing of the RJ-45 connector by approximately ½
inch.
8. When all wires are inserted into the channels in their correct order, use the crimping tool to
permanently crimp the wires to the connector.
Attention! Carefully read the instructions for the crimping tool you are using. Use the
correct crimping tool for the RJ-45 connector you are using. Incorrect installation of the
RJ-45 connector may result in a bad connection between the outdoor transceiver and the
indoor junction box.
9. Insert the RJ-45 connector into the receptacle located underneath the outdoor AP. Make sure
that the connector tab engages the slot in the receptacle.
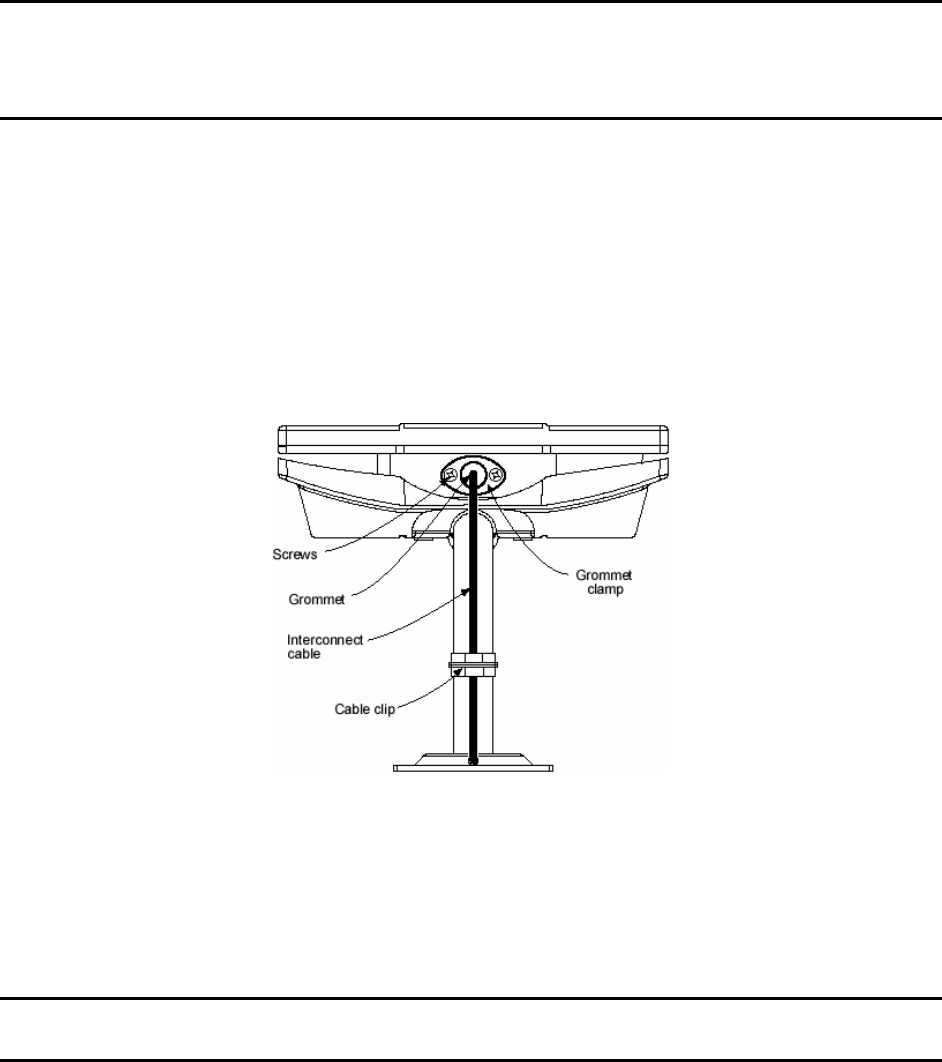
10. Slide the grommet up the cable and press it into the bottom of the outdoor AP.
11. Slide the grommet clamp up the cable and align the holes with the mounting holes on the
bottom of the outdoor transceiver.
12. Insert the two screws in the mounting holes and tighten until the grommet has a slight bulge.
Be sure to tighten both screws equally so that the grommet is seated correctly.
13. Secure the interconnect cable to the mounting pole with the cable clip as shown in Figure 5-
13.
Figure 4-12 Interconnect Cable Installation to Outdoor Access Point - Bottom View
4.5.2.3 Installing the Interconnect Cables to Junction Box
Note that the junction box should still be disassembled and not screwed to the wall at this point.
1. Strip 2 inches of insulation off the junction box end of the interconnect cable.
Attention! Don’t cut off the shield from the cable – you will need it to ground the system
later.
2. Insert the cable end through the notched out section of the junction box.
Axxcelera Broadband Product Install Manual Page 33 of 71
3. Reinstall the PCB into the junction box using the two screws, allowing enough of the
interconnect cable to be able to reach the punch down block and wrap around the mounts of
the cover plate for strain relief.
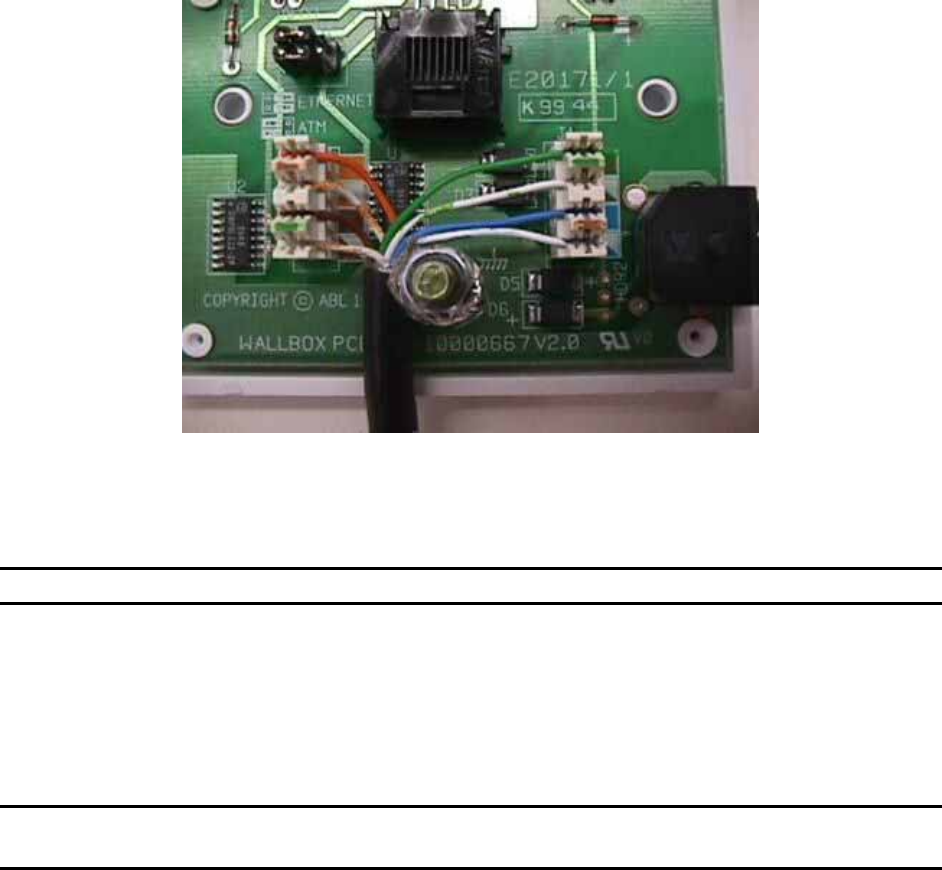
4. Using Figure 4-13 as a guide, use the 110 punch down tool to punch down each wire into the
slot on the punch down block.
Figure 4-13 Interconnect Cable Connections to Indoor Junction Box
5. Snip off excess wire ends, if necessary.
Attention! Avoid excessive wire loops when connecting the wire to the punch down block.
For now, set the junction box to one side leaving it disassembled. You will reassemble it and
mount it on the wall when you have grounded the system.
4.5.2.4 Mark the Access Point Cables
Attention! Step 1 is important, and will enable the network installer to configure the
system easily.
1. Mark the cable with a permanent label and make a note so that the network installer knows
which outdoor AP transceiver is connected to which port on the Access Panel junction box.
4.6 Grounding the System
The AB-Access System must be properly grounded in order to protect it and the structure it is
installed on from lightning damage. This requires:
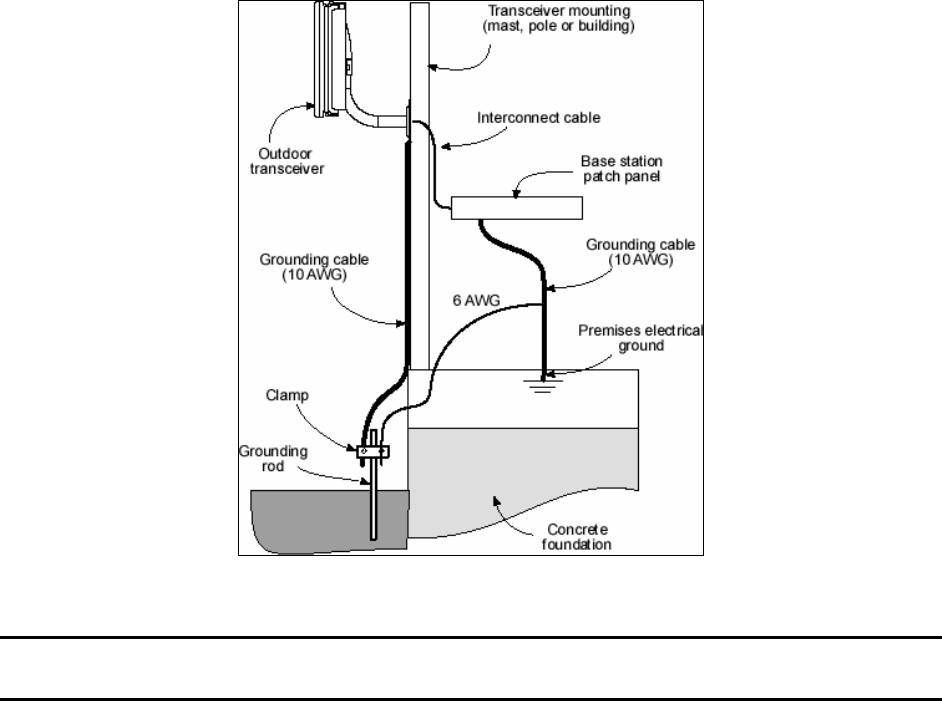
Axxcelera Broadband Product Install Manual Page 34 of 71
1. Grounding all the outdoor transceivers as shown in Figure 4-12.
2. Grounding the Access Panel to the rack.
4.6.1 Grounding the Outdoor Access Points
1. Place the grounding rod so as to allow for the shortest possible path from the grounding
cable to the outdoor Access Points.
2. Drive the grounding rod into the ground at least eight inches from the ground surface.
3. Attach a grounding clamp to the grounding rod. You will use this clamp to attach grounding
wires for both the outdoor transceiver and indoor junction box, reference Figure 4-14.
Figure 4-14 Ground Connections to Access Point Transceiver
Attention! The grounding wire should be long enough to reach from the mounting pole to
the grounding rod with 3 to 6 extra feet allowed for strain relief.
4. Connect a ground lug to one end of the grounding wire.
5. Remove one of the lower mounting screws of the mounting pole. Insert a screw through the
grounding lug terminal and re-install it to the mounting pole.
6. Attach the grounding wire to the clamp on the grounding rod, reference Figure 4-15. If
necessary, use wire staples to secure the grounding wire to the outside wall.
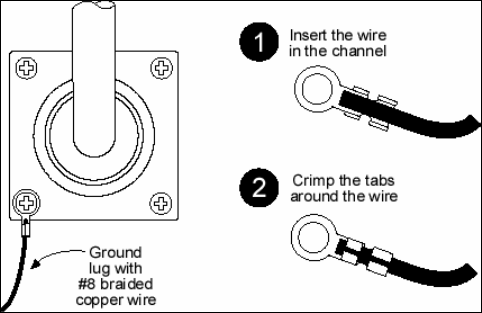
Axxcelera Broadband Product Install Manual Page 35 of 71
Figure 4-15 Mounting Pole with Ground Lug
7. Install a grounding wire from the junction box to the grounding rod.
4.6.2 Grounding the Indoor Junction Box
To ground the indoor junction box, you will need to install a grounding wire from the junction
box to the grounding rod. The wire should be long enough to reach from the junction box to the
grounding rod with 3 to 6 extra feet to allow for strain relief.
1. Feed the grounding cable through the broken out section of the wall cover (alongside the
interconnect cable).
2. Connect a ground lug to the grounding cable by crimping the lug to the wire, as shown in
Figure 4-16.
3. Remove the hex nut on the grounding post, as shown in Figure 4-16.
4. Install the grounding lug terminal onto the grounding post.
5. Attach the wire shield of the interconnect cable to the ground post. You may need to crimp
or solder an extra length of wire to the shield in order to attach it to the grounding post.
6. Re-install the hex nut to the grounding post and tighten.
7. Attach the grounding wire to the clamp on the grounding rod.
8. Use the provided small wire tie to firmly attach the interconnect cable to the ground lug.
This will provide strain relief for the cable and prevent the data and power leads from being
disturbed during installation.
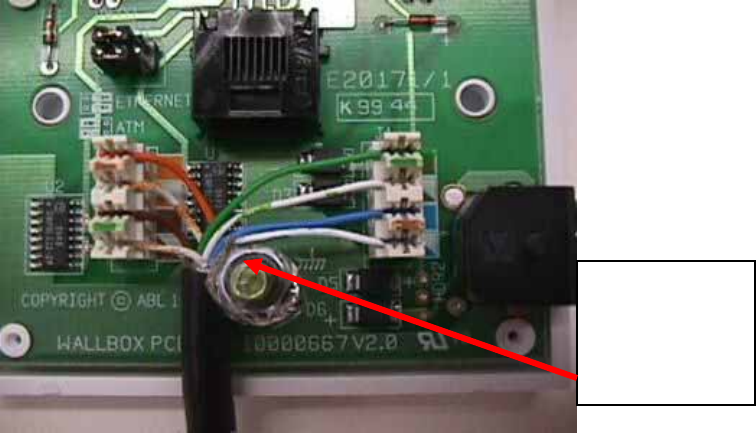
Axxcelera Broadband Product Install Manual Page 36 of 71
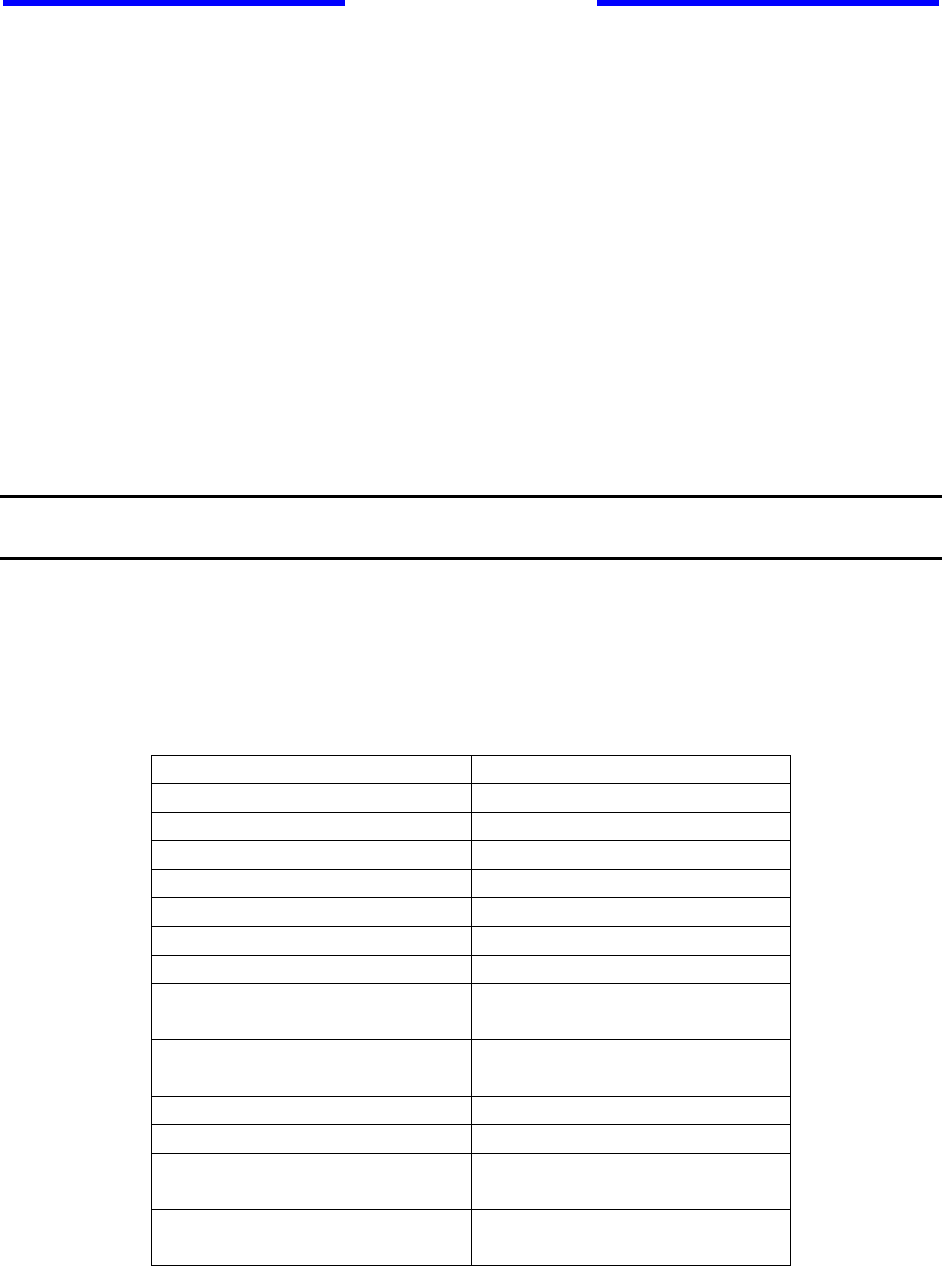
Figure 4-16 Indoor Junction Box Ground Connection
4.6.3 Assembling and Mounting the Junction Box
1. Place the junction box wall mount over the drilled holes.
2. Insert the screws and tighten.
3. Reinstall the faceplate onto the junction box using the two screws.
Indoor
Junction Box
Ground
Connection
Axxcelera Broadband Product Install Manual Page 37 of 71
Section 5
5 AB-Extender Installation
5.1 Before You Start
This section lists the information you will need to install an AB-Extender unit.
5.2 Information Required
Before you perform the installation, a site survey should have been performed by the service
provider. From this, you will need to know:
• Number of EXs to install
• Where the outdoor transceivers will be mounted (antenna mast, pole or building)
• Heights at which the outdoor transceivers will be mounted.
• Transceiver directional information (azimuth and elevation).
IMPORTANT – Be sure to record the MAC address found on the EX unit BEFORE you
install it for future reference.
5.2.1 Equipment Required
Table 5-1 lists the tools and equipment you will need to install AB-Extender units.
Table 5-1 Required Tools and Equipment
Tools Required Equipment Required
Compass and protractor ¼ inch grounding rod
Area map Grounding clamp
Phillips-head screwdriver Grounding wire
Flat-head screwdriver CAT5 cable
Hammer or mallet #6 wood screws
Power drill Cable clips
1/8 inch drill bit Anchor sleeves
¼ inch masonry drill bit RJ-45 connectors (plastic
bodied)
3/16 inch, 4mm hex (Allen)
wrench or 10 mm
Bubble level or plumb line
Adjustable wrench
Wire snake (if routing cable
through interior walls)
Crimping tool (must be
specifically matched for the
Axxcelera Broadband Product Install Manual Page 38 of 71
RJ-45 connector used)
Wire stripper
Small wire cutters
Punch down tool
5.3 AB-Extender
Table 5-2 lists the main components of an AB-Extender.
Table 5-2 EX Components
Item Quantity Notes
Outdoor transceiver 1
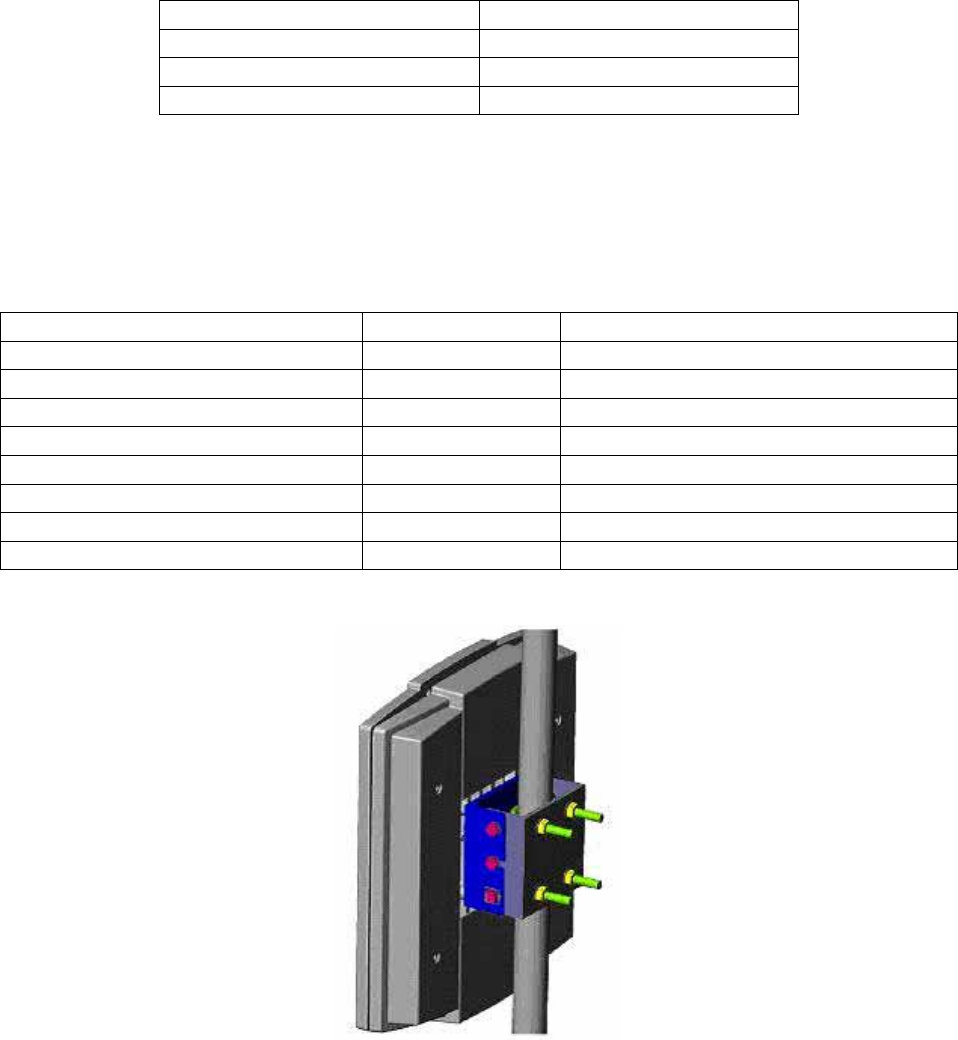
Unit/pole bracket 1 Blue and Grey bracket in Figure 5-1
M10 U Bolts 2 Green bolts in Figure 5-1
M10 Washers 4
M10 Nyloc Nuts 4 Yellow nuts in Figure 5-1
Grommet Kit 1 includes grommet, clamp, and screws
Indoor junction box 1 White wallbox
Power supply and cord 1
Figure 5-1 Outdoor AB-Extender Components
5.4 Installing the Equipment
This section explains how to install an EX transceiver onto a variety of surfaces, connect them to
the indoor junction box, and ground the system.
Axxcelera Broadband Product Install Manual Page 39 of 71
5.4.1 Overview
Following are the installation steps you will perform:
1. Install the mounting poles.
2. Mount the outdoor transceivers.
3. Mount the access panel.
4. Ground the outdoor transceivers and access panel
5. Connect the interconnect cables.
5.4.2 Installing the Mounting Poles
First install the mounting poles, on which you will mount the outdoor transceivers.
Bear in mind the direction in which the transceivers will point.
Attention! The mounting pole must be mounted in a vertical position. Failure to do so
may result in improper alignment of the outdoor transceiver. If you need to tilt the
transceiver down to avoid self-interference, you should use an (optional) tilt bracket.
Warning! The mounting pole must be grounded. See Grounding The System in Section
4.5.3.
5.4.3 Installing On an Antenna Mast
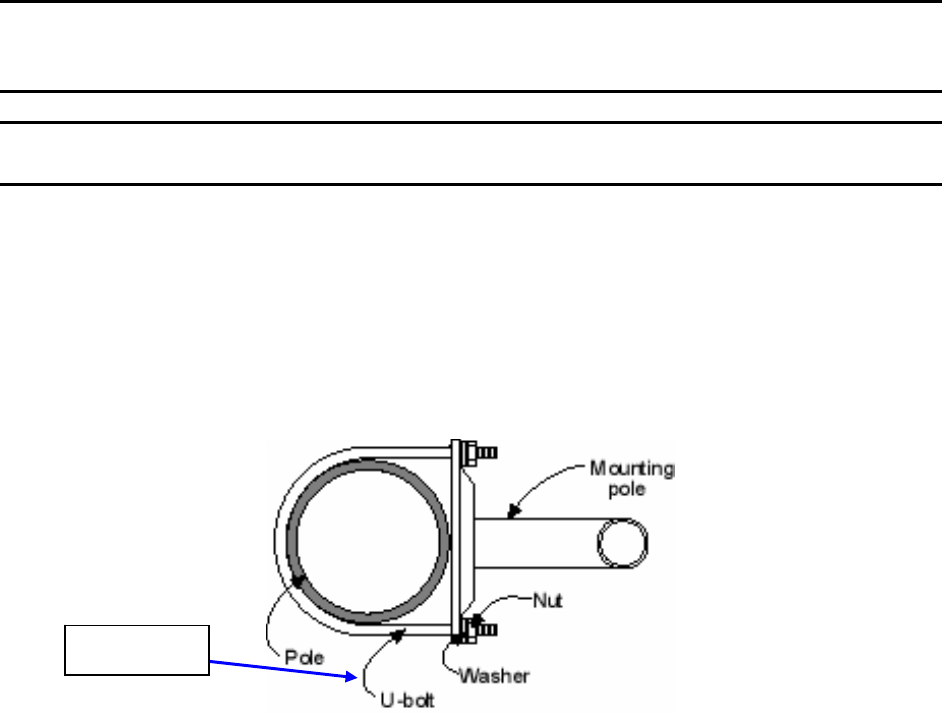
1. Position the mounting pole on the antenna mast.
2. Insert the U-bolts around the mast and through the holes in the mounting pole. Install a
washer and nut to each side of the threaded U-bolt and hand tighten. Repeat this step for the
second U-bolt.
3. Tighten nuts equally until mounting pole is secure and cannot rotate.
Figure 5-2 Mounting Pole Installed on Pole or Antenna Mast
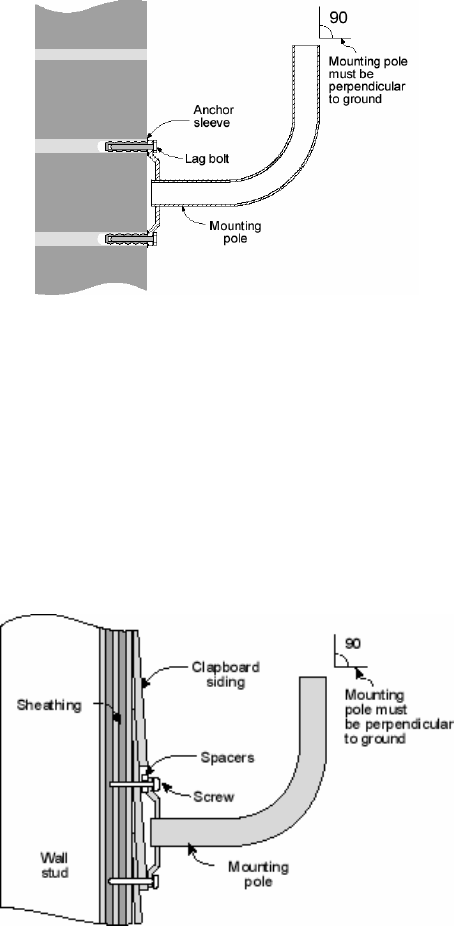
5.4.4 Installing On Brick or Masonry
1. Place the mounting plate against the wall. Use a level or plumb line to set the mounting pole
perpendicular to the ground.
2. Mark the hole locations.
Typically 2 ½
inch
Axxcelera Broadband Product Install Manual Page 40 of 71
3. Set the pole aside.
4. Drill ¼ inch holes at the marked locations. Drill the holes approximately ½ inch deep.
5. Insert the expansion shields into the drilled holes and tap them home.
6. Align the mounting pole with the drilled holes and fix with the lag bolts.
Figure 5-3 Mounting Pole Installation
5.4.5 Installing On a Wall with Wood Siding
1. Place the mounting plate against the wall.
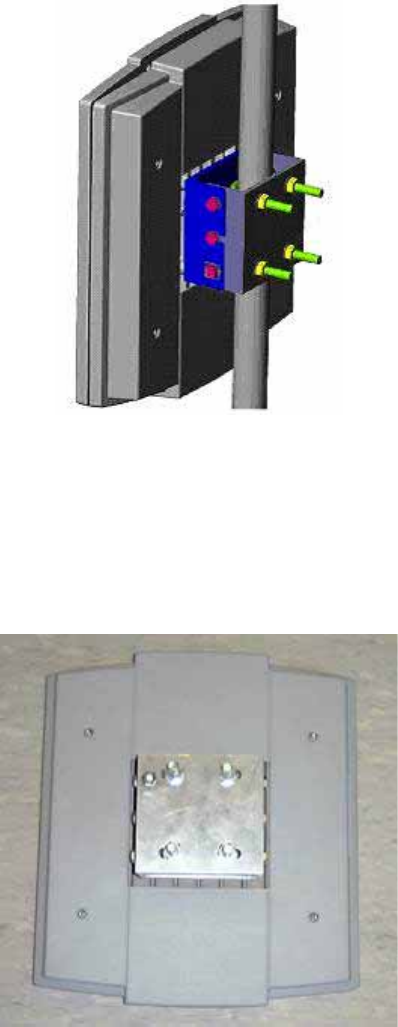
2. Using a level, be sure that the mounting pole is perpendicular to the ground. You may need
to use spacers, as shown in Figure 5-4.
3. Mark the hole locations for the drilled hole locations. Remove the mounting pole and set
aside.
4. Drill 1/8-inch holes in the places marked.
5. Use #10 or #12 wood screws to secure the mounting pole to the wall and tighten.
Figure 5-4 Mounting Pole on Clapboard Siding
5.5 Mounting the Outdoor AB-Extender
Now that you have installed the mounting pole, you are ready to install the AB-Extender onto the
mounting poles. Reference Figures 5-5 through 5-8.
Axxcelera Broadband Product Install Manual Page 41 of 71
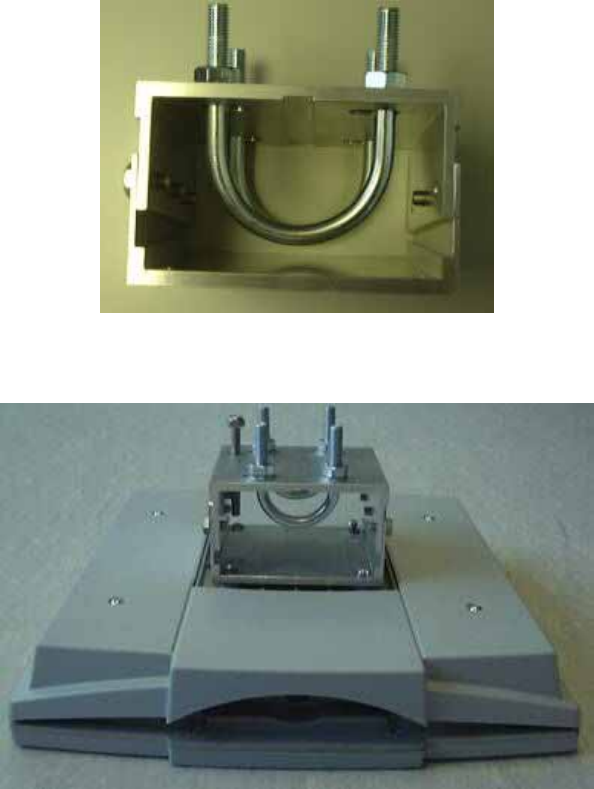
Figure 5-5 Mounting Parts for an Outdoor AB-Extender
1. Place the outdoor AB-Extender on the mounting pole.
2. Align the pole clamp with the mounting holes.
3. Insert the mounting screws and hand tighten.
4. Rotate the outdoor AB-Extender so it is pointing in the correct direction.
5. Tighten the mounting screws.
Figure 5-6 AB-Extender Rear View
Axxcelera Broadband Product Install Manual Page 42 of 71
Figure 5-7 Tilt Bracket
Figure 5-8 AB-Extender with Mounted Tilt Bracket
5.5.1 Installing the Interconnect Cables
For each interconnect cable, you will need to perform the following steps.
5.5.1.1 Route the Cables
1. Select where the cable will enter the building from the outside.
2. Determine the length of cable required. Allow three extra feet on each end to allow for strain
relief, as well as any bends and turns.
3. Route the cable.
5.5.1.2 Install the Interconnect Cables (Transceiver End)
Axxcelera Broadband Product Install Manual Page 43 of 71
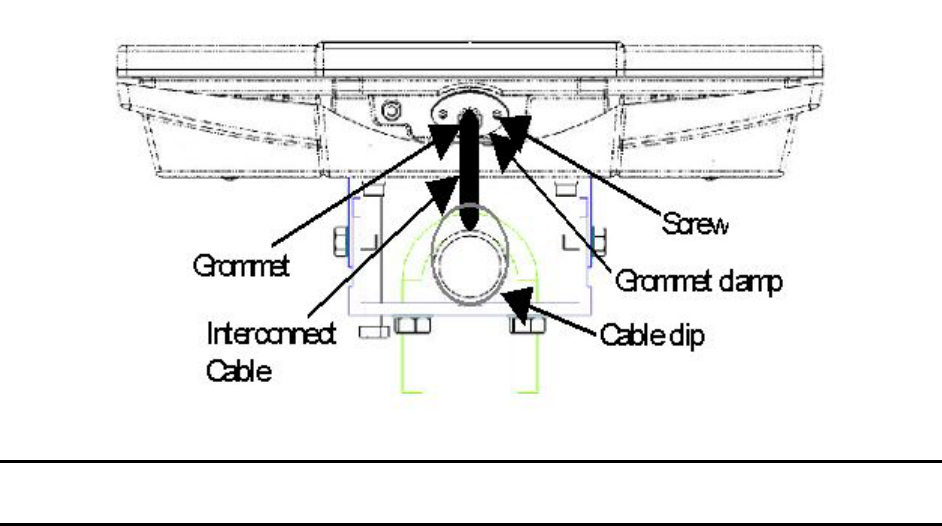
1. Remove the grommet and clamping plate from the outdoor transceiver by removing the two
screws.
Figure 5-9 Grommet Location - Underside of AB-Extender
NOTE: The Grommet is made of a special conductive material used to complete the
ground between the AB-Extender and Access Panel.
2. Insert the cable end through the grommet clamping plate (Figure 5-10)
3. Insert the cable end through the grommet. The tapered end of the grommet should be
opposite the cable end.
4. Strip 1 inch of insulation off the cable end. Leave 3/8 inch of shielding showing and trim the
wire ends flat ½ inch from there.
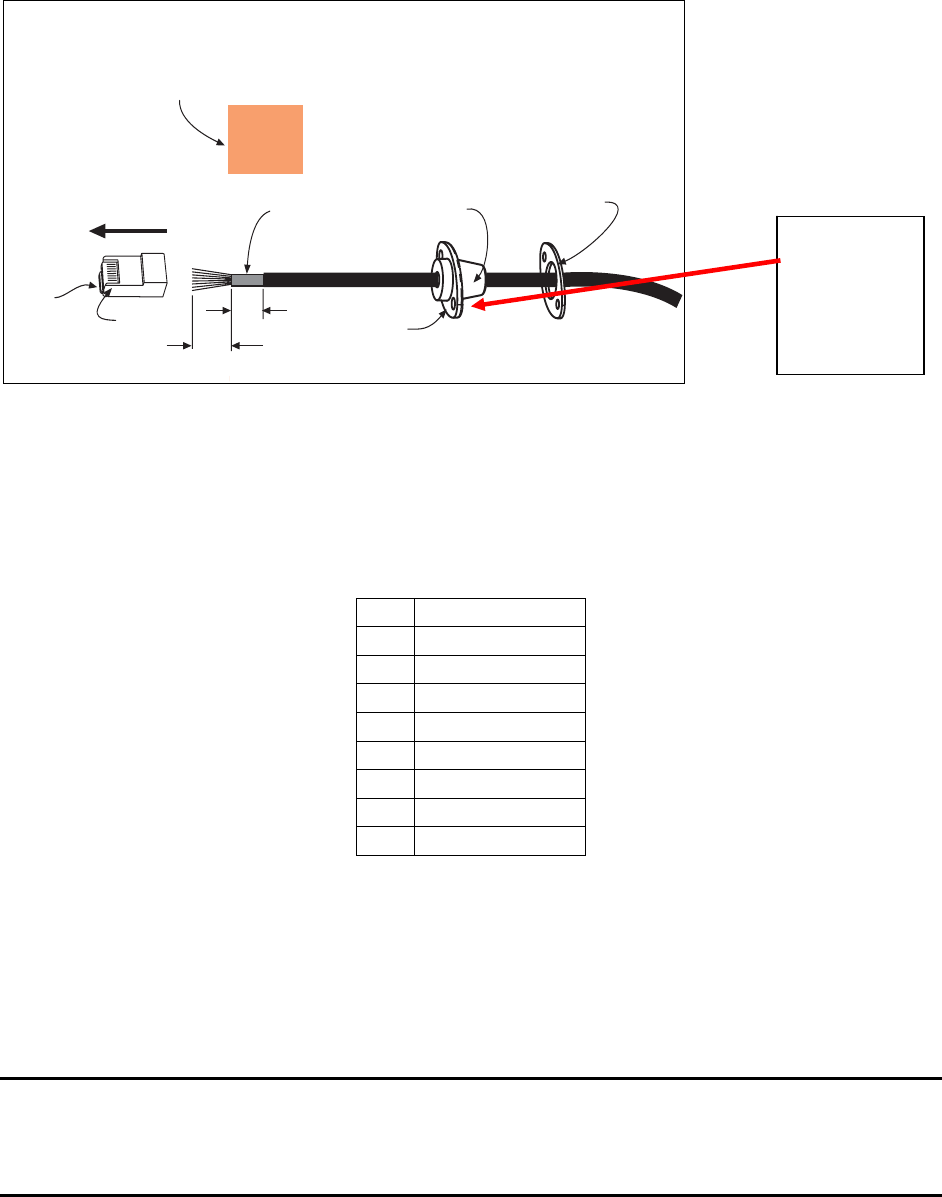
5. Using a piece of 1 inch squared tinned copper foil, wrap the foil around the shield/braid and
sheath with the left edge aligned with the edge of the braid, as shown in the following Figure
5-10.
Axxcelera Broadband Product Install Manual Page 44 of 71
Grommet
Grommet
clamping
plate
Note direction
of taper
Insert wire
into channels
1/2"
3/8"
Shielding
Pin 1
Tab on
underside
1" square tinned copper foil - wrap the copper foil around the
shield/braid and sheath with the left
edge aligned with the edge of the braid.
Figure 5-10 Outdoor Transceiver End of the Interconnect Cable with Cable Preparation
6. Separate the twisted pair wires and align by color code in the order listed in the following
Table 5-3.
Table 5-3 Cable Legend for Interconnect Cable
Pin Color Code
1 White / Orange
2 Orange
3 White / Green
4 Blue
5 White / Blue
6 Green
7 White / Brown
8 Brown
7. Using pin 1 as a reference, insert the individual wires into the channels of the RJ-45
connector. Each wire should penetrate the channels until flush with the connector end. The
copper foil tape should extend past the casing of the RJ-45 connector by approximately ½
inch.
8. When all wires are inserted into the channels in their correct order, use the crimping tool to
permanently crimp the wires to the connector.
Attention! Carefully read the instructions for the crimping tool you are using. Use the
correct crimping tool for the RJ-45 connector you are using. Incorrect installation of the
RJ-45 connector may result in a bad connection between the outdoor transceiver and the
indoor junction box.
9. Insert the RJ-45 connector into the receptacle located underneath the outdoor EX. Make sure
that the connector tab engages the slot in the receptacle.
Grommet is
conductive
and used to
complete
the ground
Axxcelera Broadband Product Install Manual Page 45 of 71
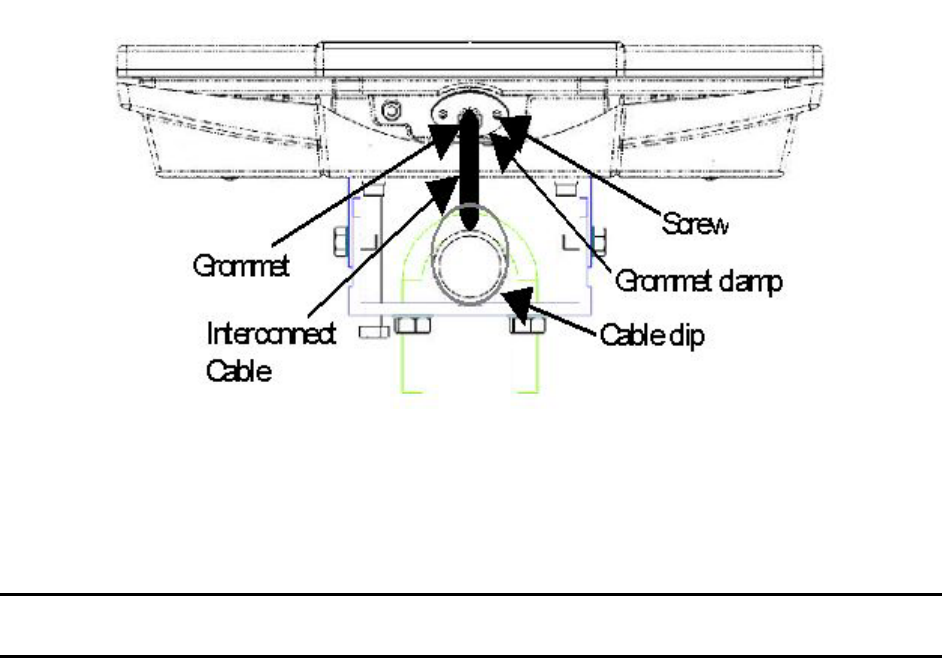
10. Slide the grommet up the cable and press it into the bottom of the outdoor EX.
11. Slide the grommet clamp up the cable and align the holes with the mounting holes on the
bottom of the outdoor transceiver.
12. Insert the two screws in the mounting holes and tighten until the grommet has a slight bulge.
Be sure to tighten both screws equally so that the grommet is seated correctly.
13. Secure the interconnect cable to the mounting pole with the cable clip as shown in Figure 5-
11.
Figure 5-11 Interconnect Cable Installation to Outdoor AB-Extender - Bottom View
5.5.1.3 Installing The Interconnect Cables to Junction Box
Note that the junction box should still be disassembled and not screwed to the wall at this point.
6. Strip 2 inches of insulation off the junction box end of the interconnect cable.
Attention! Don’t cut off the shield from the cable – you will need it to ground the system
later.
7. Insert the cable end through the notched out section of the junction box.
8. Reinstall the PCB into the junction box using the two screws, allowing enough of the
interconnect cable to be able to reach the punch down block and wrap around the mounts of
the cover plate for strain relief.
9. Using Figure 5-12 as a guide, use the 110 punch down tool to punch down each wire into the
slot on the punch down block.
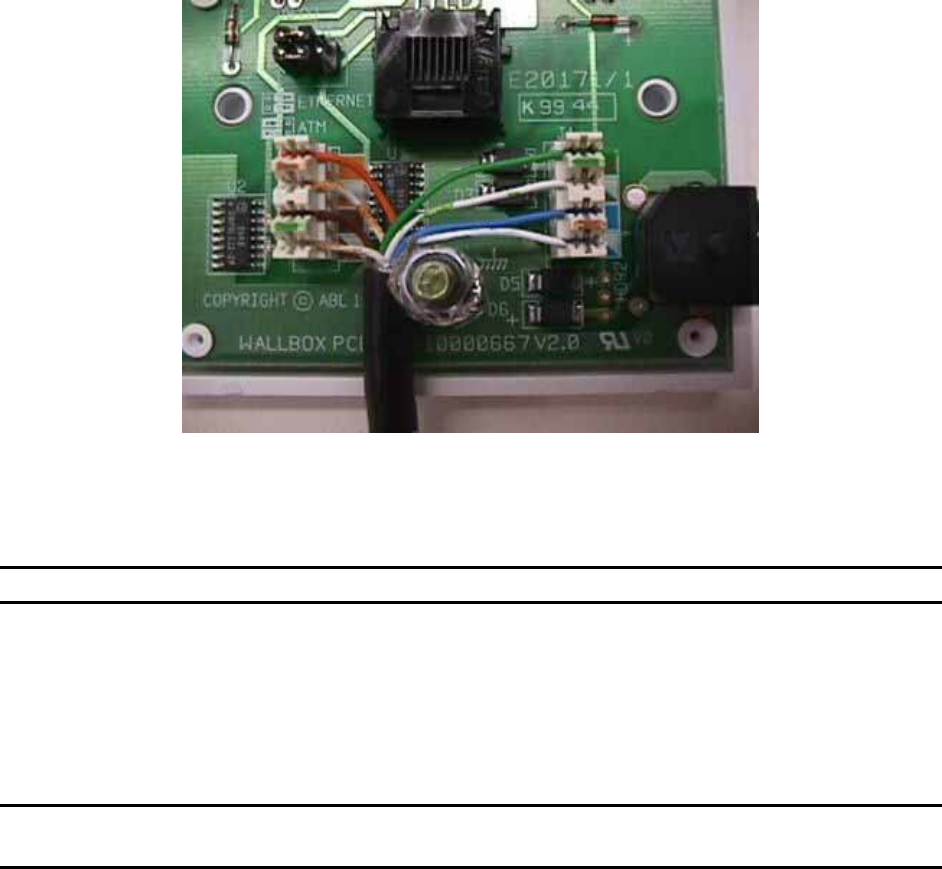
Axxcelera Broadband Product Install Manual Page 46 of 71
Figure 5-12 Interconnect Cable Connections to Indoor Junction Box
10. Snip off excess wire ends, if necessary.
Attention! Avoid excessive wire loops when connecting the wire to the punch down block.
For now, set the junction box to one side leaving it disassembled. You will reassemble it and
mount it on the wall when you have grounded the system.
5.5.1.4 Mark the AB-Extender Cables
Attention! Step 1 is important, and will enable the network installer to configure the
system easily.
1. Mark the cable with a permanent label and make a note so that the network installer knows
which outdoor EX transceiver is connected to which port on the Access Panel junction box.
5.6 Grounding the System
The AB-Access System must be properly grounded in order to protect it and the structure it is
installed on from lightning damage. This requires:
1. Grounding all the outdoor transceivers as shown in Figure 5-11.
2. Grounding the Access Panel to the rack.
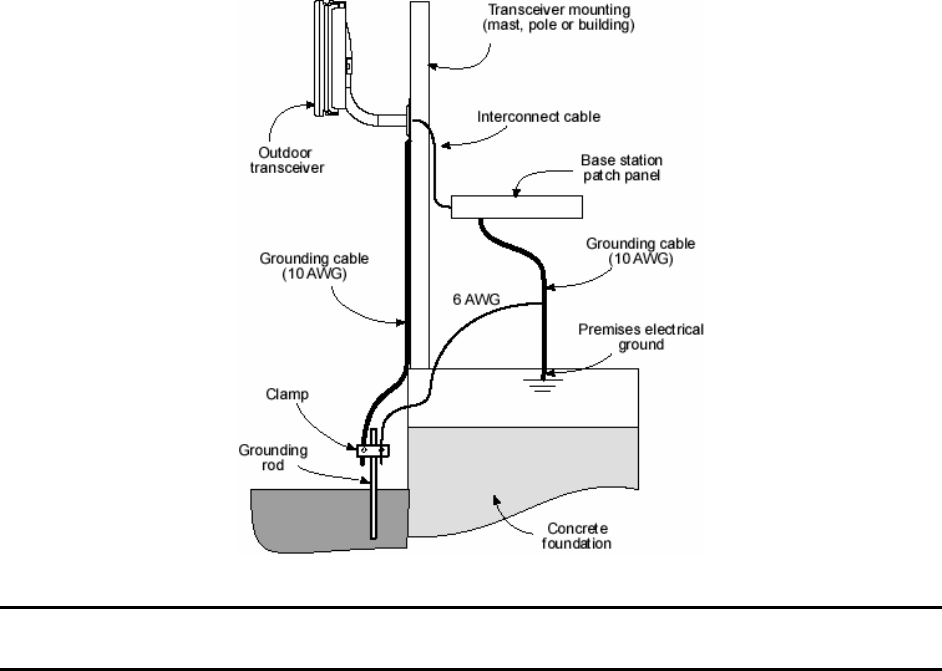
Axxcelera Broadband Product Install Manual Page 47 of 71
5.6.1 Grounding the Outdoor AB-Extender
1. Place the grounding rod so as to allow for the shortest possible path from the grounding
cable to the outdoor AB-Extender.
2. Drive the grounding rod into the ground at least eight inches from the ground surface.
3. Attach a grounding clamp to the grounding rod. You will use this clamp to attach grounding
wires for both the outdoor transceiver and indoor junction box, reference Figure 5-13.
Figure 5-13 Ground Connections to AB-Extender Transceiver
Attention! The grounding wire should be long enough to reach from the mounting pole to
the grounding rod with 3 to 6 extra feet allowed for strain relief.
4. Connect a ground lug to one end of the grounding wire.
5. Remove one of the lower mounting screws of the mounting pole. Insert a screw through the
grounding lug terminal and re-install it to the mounting pole.
6. Attach the grounding wire to the clamp on the grounding rod, reference Figure 5-14. If
necessary, use wire staples to secure the grounding wire to the outside wall.
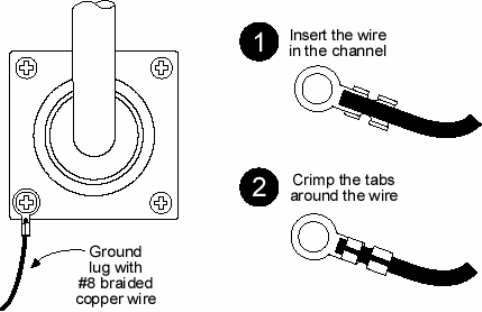
Axxcelera Broadband Product Install Manual Page 48 of 71
Figure 5-14 Mounting Pole with Ground Lug
7. Install a grounding wire from the junction box to the grounding rod.
5.6.2 Grounding the Indoor Junction Box
To ground the indoor junction box, you will need to install a grounding wire from the junction
box to the grounding rod. The wire should be long enough to reach from the junction box to the
grounding rod with 3 to 6 extra feet to allow for strain relief.
9. Feed the grounding cable through the broken out section of the wall cover (alongside the
interconnect cable).
10. Connect a ground lug to the grounding cable by crimping the lug to the wire, as shown in
Figure 5-15.
11. Remove the hex nut on the grounding post, as shown in Figure 5-15.
12. Install the grounding lug terminal onto the grounding post.
13. Attach the wire shield of the interconnect cable to the ground post. You may need to crimp
or solder an extra length of wire to the shield in order to attach it to the grounding post.
14. Re-install the hex nut to the grounding post and tighten.
15. Attach the grounding wire to the clamp on the grounding rod.
16. Use the provided small wire tie to firmly attach the interconnect cable to the ground lug.
This will provide strain relief for the cable and prevent the data and power leads from being
disturbed during installation.
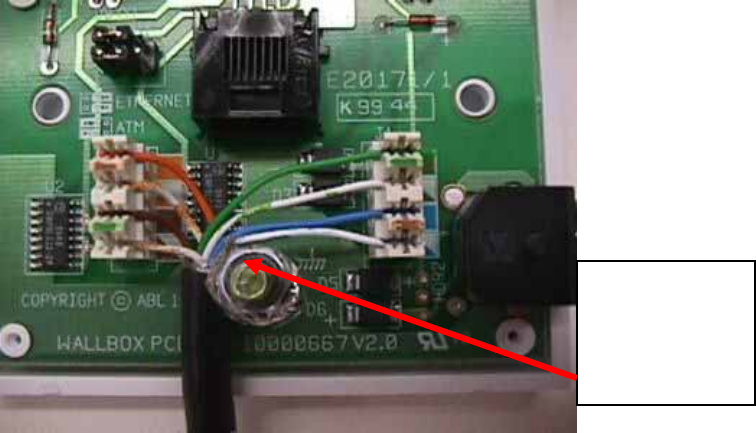
Axxcelera Broadband Product Install Manual Page 49 of 71
Figure 5-15 Indoor Junction Box Ground Connection
5.6.3 Assembling and Mounting the Junction Box
4. Place the junction box wall mount over the drilled holes.
5. Insert the screws and tighten.
6. Reinstall the faceplate onto the junction box using the two screws.
Indoor
Junction Box
Ground
Connection
Axxcelera Broadband Product Install Manual Page 50 of 71
Section 6
6 Subscriber Unit Installation
6.1 Installation Overview
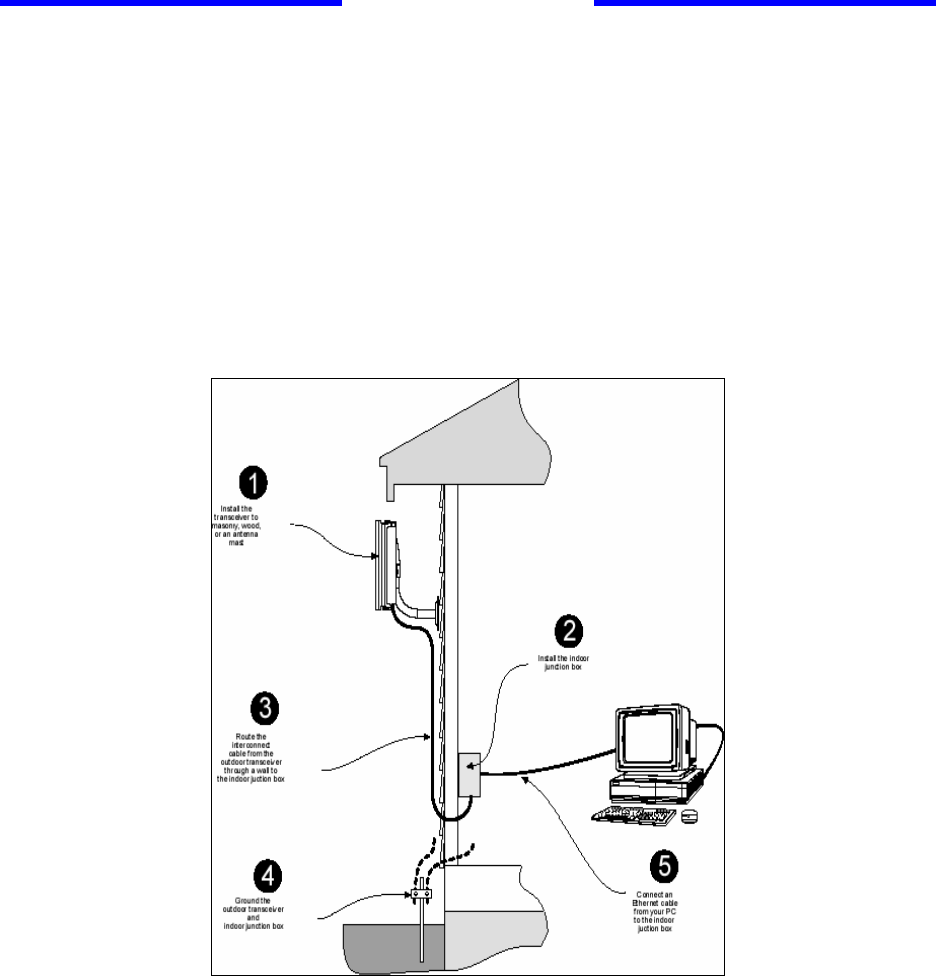
The Subscriber Unit installation steps are as follows:
1. Install the mounting pole and mount the outdoor Subscriber Unit (see Figure 6-1).
2. Install the indoor junction box.
3. Route the interconnect cable. Connect it to the outdoor Subscriber Unit and the indoor
junction box.
4. Ground both the outdoor Subscriber Unit and indoor junction box.
5. Perform initial startup and testing.
Figure 6-1 AB-Access Subscriber Unit Installation Overview
6.2 Installing Mounting Pole
Once you have selected a site for installing the outdoor transceiver/Subscriber Unit, determine
what type of surface you will use for your installation. Select from the following list:
• Installing on a Brick Or Masonry Wall
• Installing on a Wall With Wood Siding
Axxcelera Broadband Product Install Manual Page 51 of 71
• Installing on an Antenna Mast
The following sections describe the installation procedure for each of the above.
6.2.1 Installing on a Brick or Masonry Wall
Table 6-1 describes the tools and equipment needed when installing on a brick or masonry wall.
Table 6-1 Required Tools And Equipment
Tools Equipment Quantity
Power drill Mounting pole 1
¼ inch masonry drill bit Anchor sleeves 4
A bubble level or plumb line Lag bolts 4
Phillips head screwdriver or
power drill 1
Hammer or mallet 1
Adjustable wrench 1
1. Place the mounting plate against the wall.
2. Using a level, be sure that the mounting pole is perpendicular to the ground.
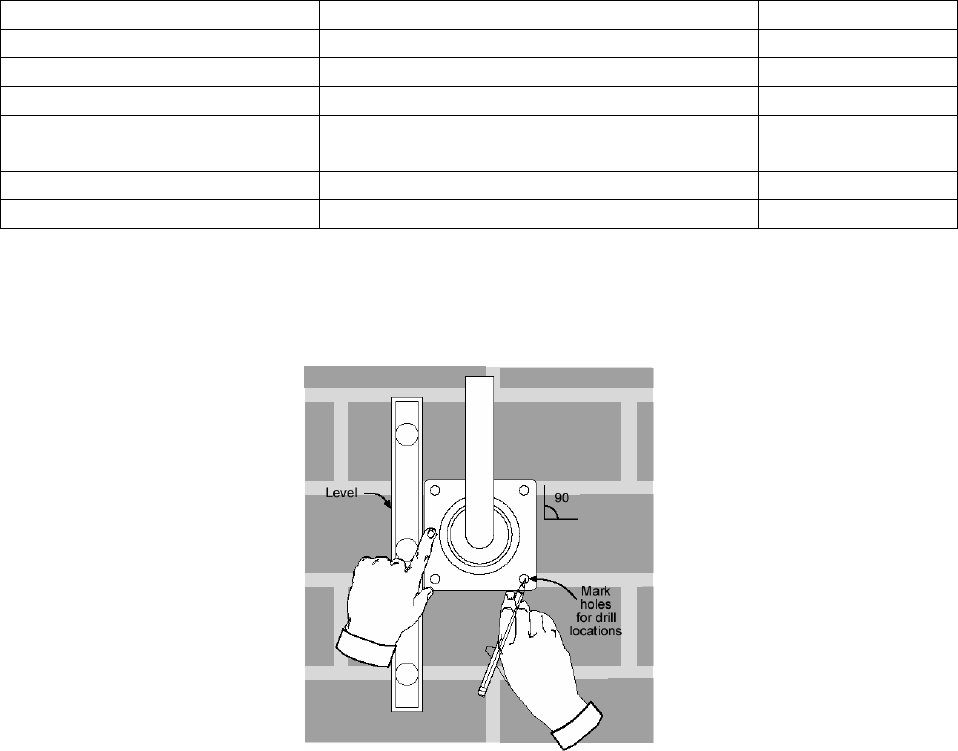
3. Using a pencil, mark the hole locations for the drilled hole locations (Figure 6-2).
Figure 6-2 Mounting Pole Drill Locations
4. Set the mounting pole aside.
5. Using a ¼ inch masonry drill bit, drill holes approximately ½ inch deep at the marked
locations.
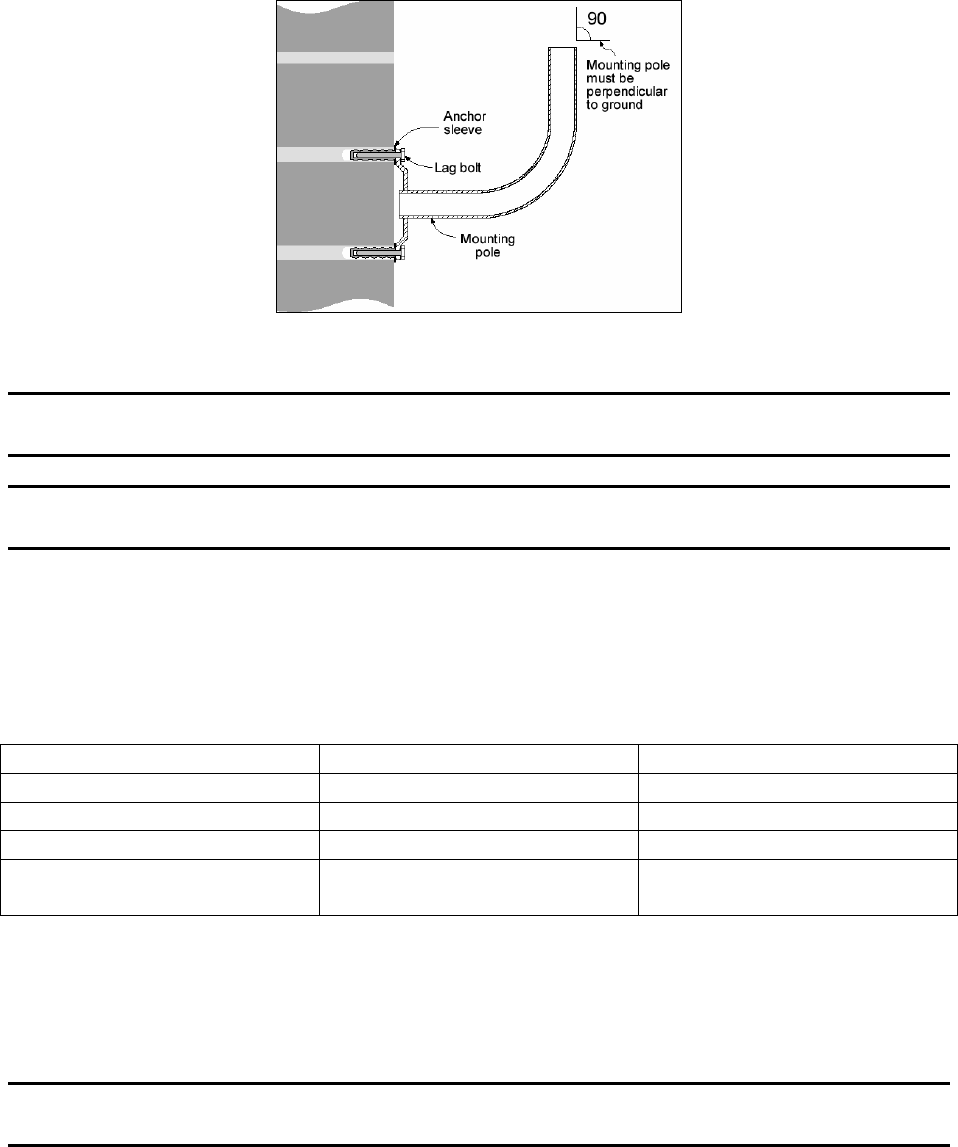
6. Insert the anchor sleeves into the drilled holes. Using a small hammer, gently tap the anchor
sleeves into the masonry until tight. Check that the anchor sleeves are flush with the wall.
(Figure 6-3)
7. Align the mounting pole with the drilled holes.
Axxcelera Broadband Product Install Manual Page 52 of 71
8. Insert a lag bolt in each of the holes and hand tighten.
9. Tighten all lag bolts with a wrench, being careful not to over tighten.
Figure 6-3 Mounting Pole Installation Using Expansion Sleeves and Lag Bolts
Attention! The mounting pole must be mounted in a vertical position. Failure to do so
may result in improper alignment of the outdoor transceiver.
IMPORTANT – Before you install the SU, be sure to record the MAC address found on the
SU for future reference.
6.2.2 Installing on a Wall with Wood Siding
Table 6-2 describes the tools and equipment needed when installing on a wall with wood siding.
Table 6-2 Required Tools and Equipment
Tools Equipment Quantity
Power Drill Mounting pole 1
1/8 inch drill bit #6 wood screws 4
Bubble level or plumb line Spacers 1
Phillips head screwdriver or
power drill 1
1. Place the mounting plate against the wall. Using a level, be sure that the mounting pole is
perpendicular to the ground.
This procedure is similar to that shown previously in Figure 6-2.
Note that when mounting on clapboard siding, you may need to use spacers to make sure that the
mounting pole is perpendicular, as shown in Figure 6-4.
Attention! The mounting pole must be in a vertical position for proper alignment of the
outdoor transceiver.
2. Mark the locations for the drilled holes.
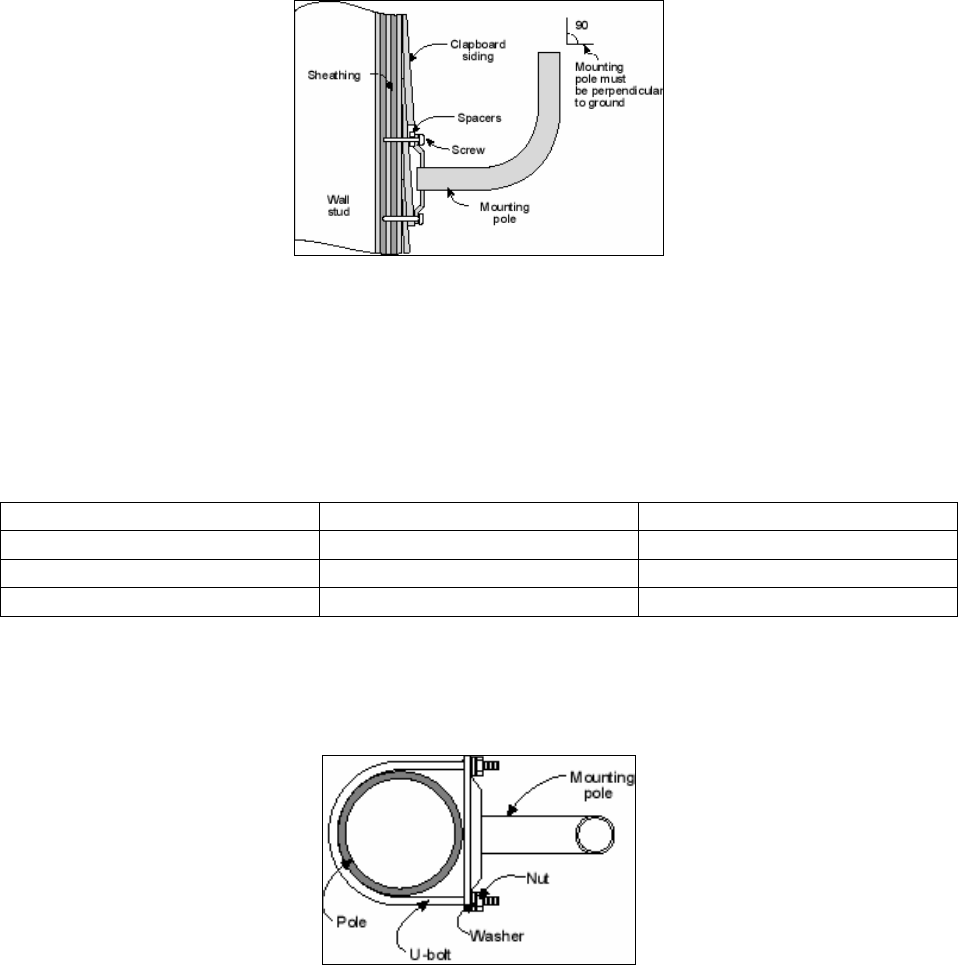
Axxcelera Broadband Product Install Manual Page 53 of 71
3. Remove the mounting pole and set it aside.
4. Drill 1/8 inch diameter in the places marked.
5. Use #10 or #12 wood screws to secure the mounting pole to the wall and hand tighten.
6. Using the level, check that the mounting plate is perpendicular to the ground. Readjust if
necessary (you might need to add or remove spacers) and then tighten all screws with a
screwdriver or power drill, being careful not to over tighten.
Figure 6-4 Mounting Pole on Clapboard Siding
6.2.3 Installing on an Antenna Mast
Table 6-3 describes the tools and equipment needed when installing on an antenna mast.
Table 6-3 Required Tools and Equipment
Tools Equipment Quantity
Adjustable wrench U-bolts 2
Washers 4
Hex nuts 4
1. Position the mounting pole on the pole or antenna mast (Figure 6-5).
2. Insert the U-bolts around the pole and through the holes in the mounting pole.
3. Install a washer and nut to each side of the threaded U-bolts and hand tighten.
Figure 6-5 Mounting Pole Installed on Pole or Antenna Mast
4. Tighten nuts equally until mounting pole is secure and cannot rotate.
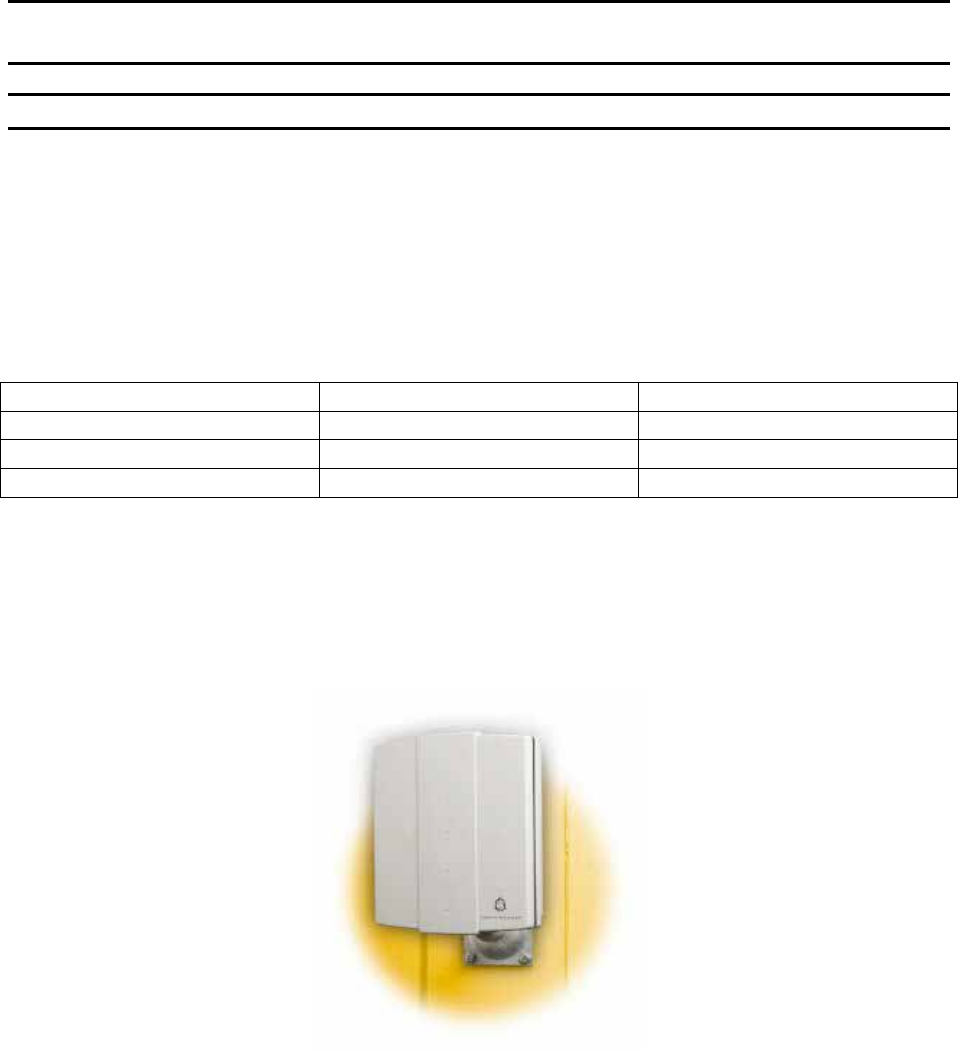
Axxcelera Broadband Product Install Manual Page 54 of 71
Attention! The mounting pole must be mounted in a vertical position. Failure to do so
may result in improper alignment of the outdoor transceiver.
Warning! The mounting pole must be grounded. See Grounding the System in Section 6.6.
6.3 Installing the Outdoor Subscriber Unit
Now that you have installed the mounting pole, you are now ready to install the outdoor
Subscriber Unit (SU) to the mounting pole. Table 6-4 describes the tools and equipment needed
to install the SU.
Table 6-4 Required Tools and Equipment
Tools Equipment Quantity
Phillips-head screwdriver Pole clamp 2
3/16” hex wrench Washers 2
Mounting screws 2
1. Loosen the mounting screws and place the outdoor Subscriber Unit on the mounting pole, as
shown in Figure 6-6.
2. Hand tighten the mounting screws.
3. Rotate the outdoor transceiver in the direction of the Access Point.
4. Tighten the mounting screws.
Figure 6-6 Outdoor Subscriber Unit Mounted on Wall
6.4 Preparing the Indoor Junction Box
This section explains how to prepare the indoor junction box for installation. You will drill the
mounting holes, but leave the box uninstalled, as it is easier to route the interconnect cable.
Table 6-5 describes the tools and equipment you will need.
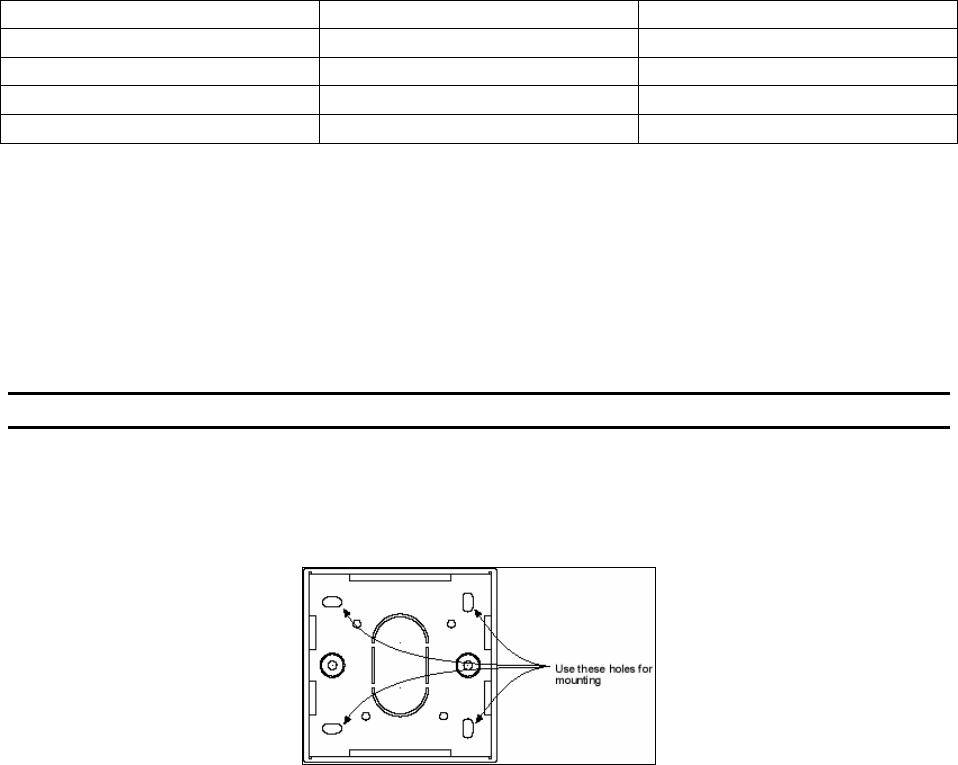
Axxcelera Broadband Product Install Manual Page 55 of 71
Table 6-5 Required Tools and Equipment
Tools Required Equipment Required Quantity
Phillips-head screwdriver Screws 2
Flat head screwdriver Wallboard inserts 2
Power drill 1
1/8 inch drill bit 1
1. Select a location for the junction box. This should be:
• Somewhere you can easily connect to your PC and a power outlet.
• Somewhere that is accessible for service and troubleshooting (not too close to
the floor).
2. Remove the two screws which attach the junction box faceplate to the wall mount.
3. Set aside the faceplate with PCB and jack.
Attention! Be careful not to damage the two LEDs when removing the PCB.
4. On the Wall Mount portion of the Wall Box, use a flat head screwdriver, or a pair of thin-
nosed pliers, to break out the pre-scored section of casing wall along the bottom edge of the
junction box (see Figure 6-7). This is where later on you will route the interconnect cable.
Figure 6-7 Junction Box Wall Mount (Face Plate and PCB Removed)
5. Using the wall plate as a template, mark the mounting hole locations, as shown in Figure 6-7.
6. Drill 1/8 inch diameter holes at the marked locations.
7. Insert the wallboard inserts.
For now, set the junction box to one side, leaving it disassembled. You will reassemble it and
mount it on the wall when you have prepared and routed the interconnect cable and grounded the
system.
6.5 Installing the Interconnect Cable
6.5.1 Routing the Interconnect Cable
Now that you have installed the outdoor Subscriber Unit and indoor junction box, you are ready
to route the interconnect cable.
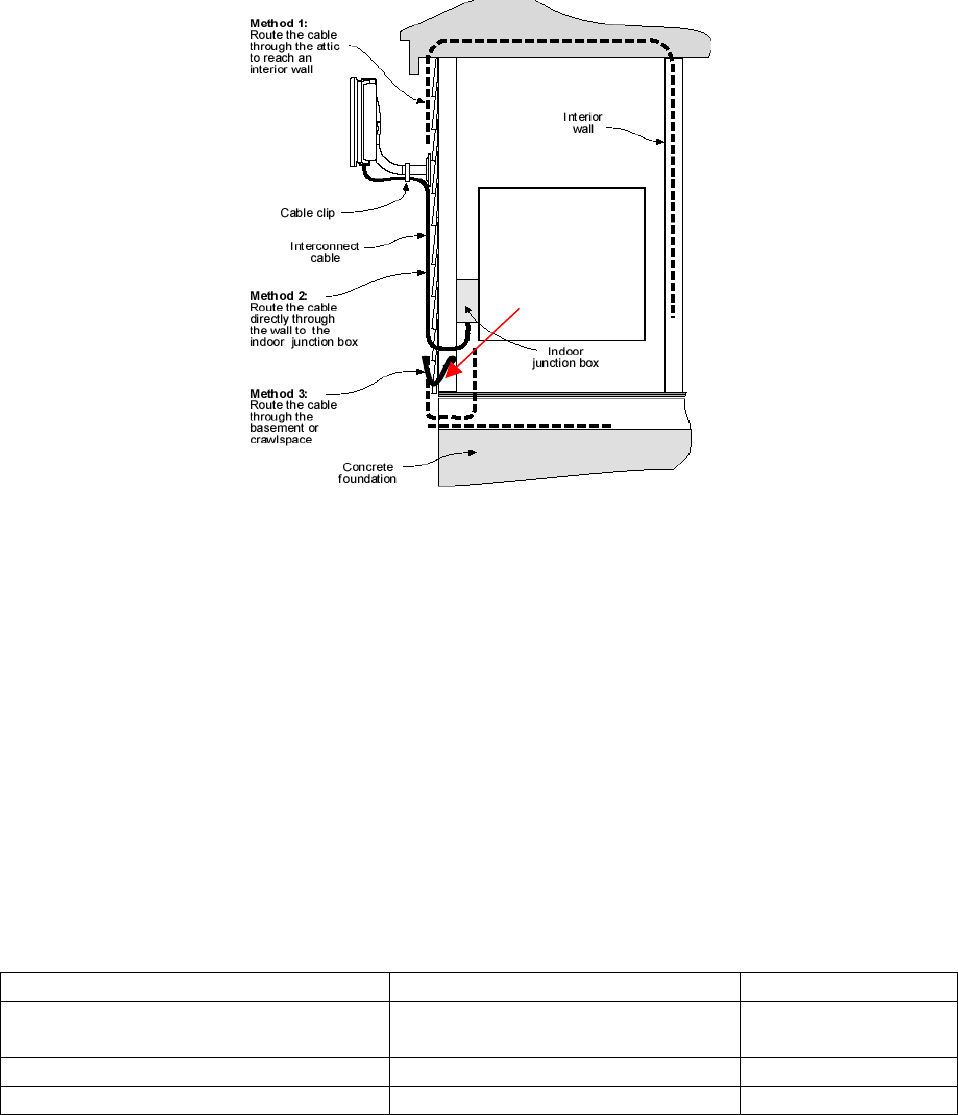
Axxcelera Broadband Product Install Manual Page 56 of 71
1. Select where the cable will enter the building from the outside (Figure 6-8).
NOTE - Add a
drip loop at wall
penetration
to
prevent water
from entering
Figure 6-8 Interconnect Cable Routing Solutions
2. Once you have chosen the route, determine the length of cable required. Allow three extra
feet on each end to allow for strain relief as well as any bends and turns.
3. Install the cable, leaving the ends free and ready to fit the RJ-45 connector (transceiver end),
and install to the indoor junction box.
4. Remember to form a drip loop on the exterior of the building where the cable enters the
penetration. This will help prevent water from entering.
6.5.2 Preparing the Interconnect Cable
Table 6-6 shows the tools you need to install an RJ-45 connector on the outdoor subscriber end
of the interconnect cable.
Table 6-6 Required Tools and Equipment
Tools Equipment Quantity
Crimping tool (specific to RJ-45
used) RJ-45 connector (metal bodied) 1
Wire stripper
Small wire cutters
1. Remove the grommet (Figure 6-9) and clamping plate from the Subscriber Unit by undoing
the two screws. Be careful not to lose them if you are working on a ladder.
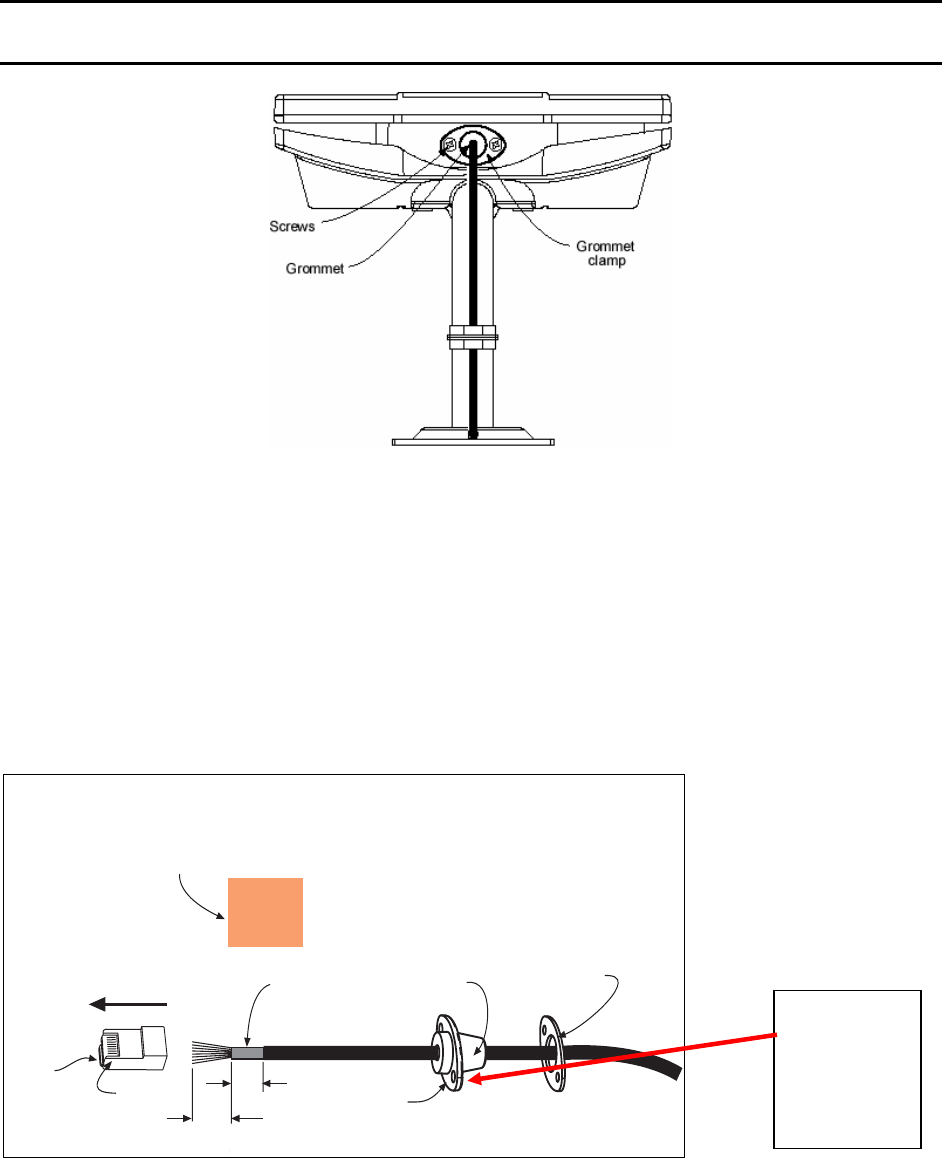
Axxcelera Broadband Product Install Manual Page 57 of 71
NOTE: The Grommet is made of a special conductive material used to complete the
ground between the Subscriber Unit and indoor junction box.
Figure 6-9 Grommet Location -- Underside of Subscriber Unit
2. Insert the cable end through the grommet clamping plate (Figure 6-10).
3. Insert the cable end through the grommet. The tapered end of the grommet should be
opposite the cable end.
4. Strip 1 inch of insulation off the cable end. Leave 3/8 inch of shielding showing, and trim
the wire ends flat ½ inch from there.
5. Using a piece of 1inch squared tinned copper foil, wrap the foil around the shield/braid and
sheath with the left edge aligned with the edge of the braid, as shown in the following Figure
6-10.
Grommet
Grommet
clamping
plate
Note direction
of taper
Insert wire
into channels
1/2"
3/8"
Shielding
Pin 1
Tab on
underside
1" square tinned copper foil - wrap the copper foil around the
shield/braid and sheath with the left
edge aligned with the edge of the braid.
Figure 6-10 Outdoor Subscriber Unit of the Interconnect Cable with Cable Preparation
6. Separate the twisted pair wires and align by color code in the order listed in the following
Table 6-7.
Grommet is
conductive
and used to
complete
the ground
Axxcelera Broadband Product Install Manual Page 58 of 71
Table 6-7 Cable Legend for Interconnect Cable
Pin Color Code
1 White / Orange
2 Orange
3 White / Green
4 Blue
5 White / Blue
6 Green
7 White / Brown
8 Brown
7. Using pin 1 as a reference, insert the individual wires into the channels of the RJ-45
connector. Each wire should penetrate the channels until flush with the connector end. The
copper foil tape should extend past the casing of the RJ-45 connector by approximately ½
inch.
8. When all wires are inserted into the channels in their correct order, use the crimping tool to
permanently crimp the wires to the connector.
Attention! Carefully read the instructions for the crimping tool you are using. Use the
correct crimping tool for the RJ-45 connector you are using. Incorrect installation of the
RJ-45 connector may result in a bad connection between the outdoor transceiver and the
indoor junction box.
6.5.3 Connecting to the Outdoor Subscriber Unit Transceiver
Now that you have prepared the interconnect cable, you are ready to connect the cable to the
outdoor Subscriber Unit.
Attention! Always Disconnect Power from wall box BEFORE inserting RJ-45 connector
into transceiver. This prevents arcing damage from occurring.
1. Insert the RJ-45 connector into the receptacle located underneath the outdoor Subscriber Unit
(refer to Figure 6-12). Make sure that the connector tab engages the slot in the receptacle.
2. Slide the grommet up the cable and press it into the bottom of the outdoor transceiver.
3. Slide the grommet clamp up the cable and align the holes with the mounting holes on the
bottom of the outdoor transceiver.
4. Insert the two screws in the mounting holes and tighten until the grommet has a slight bulge.
Be sure to tighten both screws equally so that the grommet is seated correctly.
5. Secure the interconnect cable to the mounting pole with the cable clip, as shown in Figure 6-
11.
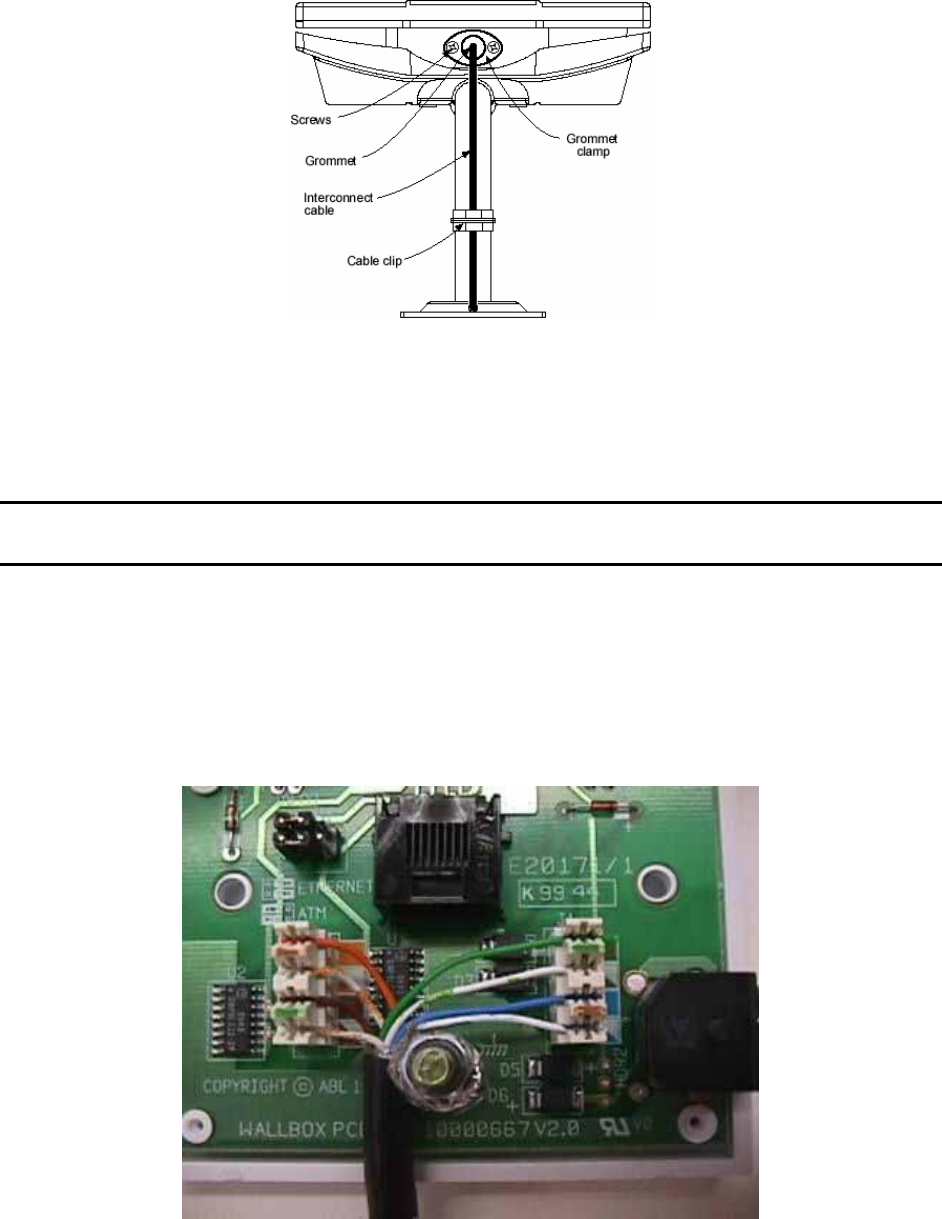
Axxcelera Broadband Product Install Manual Page 59 of 71
Figure 6-11 Interconnect Cable Installation to Subscriber Unit -- Bottom View
6.5.4 Connecting to the Indoor Junction Box
Note that the junction box should still be disassembled and not screwed to the wall at this point.
11. Strip 2 inches of insulation off the junction box end of the interconnect cable.
Attention! Don’t cut off the shield from the cable – you will need it to ground the system
later.
12. Insert the cable end through the notched out section of the junction box.
13. Reinstall the PCB into the junction box using the two screws, allowing enough of the
interconnect cable to be able to reach the punch down block and wrap around the mounts of
the cover plate for strain relief.
14. Using Figure 6-12 as a guide, use the 110 punch down tool to punch down each wire into the
slot on the punch down block.
Figure 6-12 Interconnect Cable Connections to Indoor Junction Box
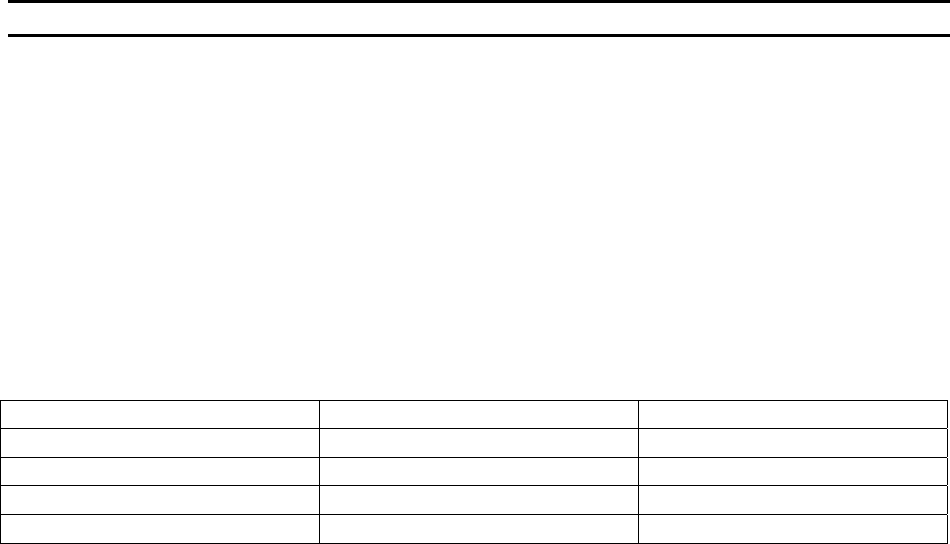
Axxcelera Broadband Product Install Manual Page 60 of 71
15. Snip off excess wire ends, if necessary.
Attention! Avoid excessive wire loops when connecting the wire to the punch down block.
For now, set the junction box to one side leaving it disassembled. You will reassemble it and
mount it on the wall when you have grounded the system.
6.6 Grounding the System
The AB-Access System must be properly grounded in order to protect it and the building it is
installed on from lightning damage. This requires grounding both the outdoor transceiver and
indoor junction box. The following Table 6-8 describes the tools you will need to ground the
system.
Table 6-8 Required Tools and Equipment
Tools Equipment Quantity
Mallet Grounding rod 1
Wire stripper #8 braided copper wire
Wire cutters Grounding lugs 2
Hex wrench Grounding clamp 1
6.6.1 Installing a Grounding Rod
1. Place the grounding rod to allow for the shortest possible path from the grounding cable to
the outdoor Subscriber Units.
2. Drive the grounding rod into the ground at least eight inches from the ground surface.
3. Attach a grounding clamp on the grounding rod. You will use this clamp to attach grounding
wires for both the outdoor Subscriber Unit and indoor junction box.
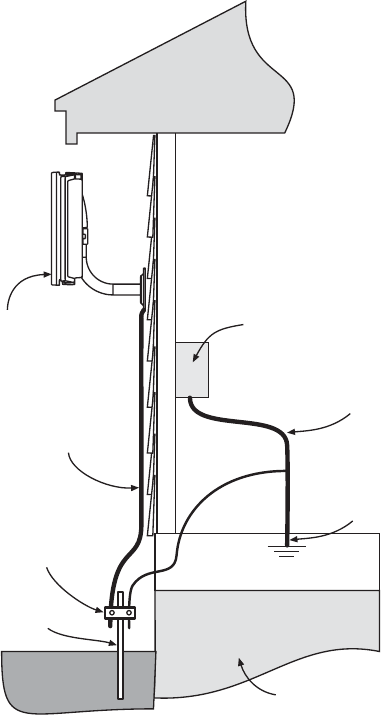
Axxcelera Broadband Product Install Manual Page 61 of 71
Outdoor
transceiver
Indoor
wall box
Grounding
rod
Concrete
foundation
Clamp
Grounding cable
(10 AWG)
6 AWG
Premises electrical
ground
Grounding cable
(10 AWG)
Figure 6-13 Ground Connections for Subscriber Unit
6.6.2 Grounding the Outdoor Subscriber Unit
1. To ground the outdoor Subscriber Unit, you will need to install a grounding wire from the
mounting pole to the grounding rod. The wire should be long enough to reach from the
mounting pole to the grounding rod with 3 to 6 feet extra to allow for strain relief.
2. Connect a ground lug to one end of a measured length of copper braided wire by crimping
the lug to the wire, as shown in Figure 7-14.
3. Remove one of the lower mounting screws of the mounting pole. Insert a screw through the
grounding lug terminal and re-install it to the mounting pole.
4. Attach the grounding wire to the clamp on the grounding rod. If necessary, use wire staples
to secure the grounding wire to the outside wall.
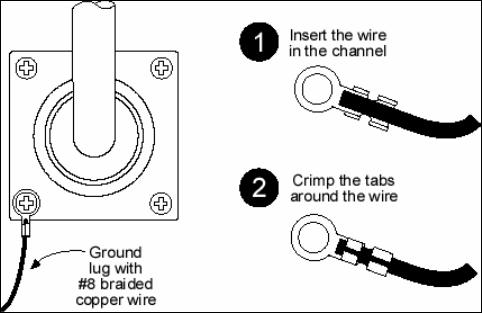
Axxcelera Broadband Product Install Manual Page 62 of 71
Figure 6-14 Mounting Pole with Ground Lug
6.6.3 Grounding the Indoor Junction Box
To ground the indoor junction box, you will need to install a grounding wire from the junction
box to the grounding rod. The wire should be long enough to reach from the junction box to the
grounding rod with 3 to 6 extra feet to allow for strain relief.
17. Feed the grounding cable through the broken out section of the wall cover (alongside the
interconnect cable).
18. Connect a ground lug to the grounding cable by crimping the lug to the wire, as shown in
Figure 6-15.
19. Remove the hex nut on the grounding post, as shown in Figure 6-15.
20. Install the grounding lug terminal onto the grounding post.
21. Attach the wire shield of the interconnect cable to the ground post. You may need to crimp
or solder an extra length of wire to the shield in order to attach it to the grounding post.
22. Re-install the hex nut to the grounding post and tighten.
23. Attach the grounding wire to the clamp on the grounding rod.
24. Use the provided small wire tie to firmly attach the interconnect cable to the ground lug.
This will provide strain relief for the cable and prevent the data and power leads from being
disturbed during installation.
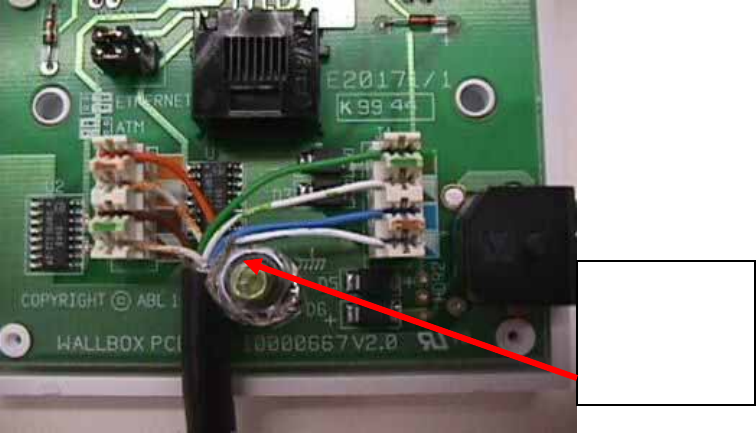
Axxcelera Broadband Product Install Manual Page 63 of 71
Figure 6-15 Indoor Junction Box Ground Connection
6.6.4 Assembling and Mounting the Junction Box
7. Place the junction box wall mount over the drilled holes.
8. Insert the screws and tighten.
9. Reinstall the faceplate onto the junction box using the two screws.
Indoor
Junction Box
Ground
Connection
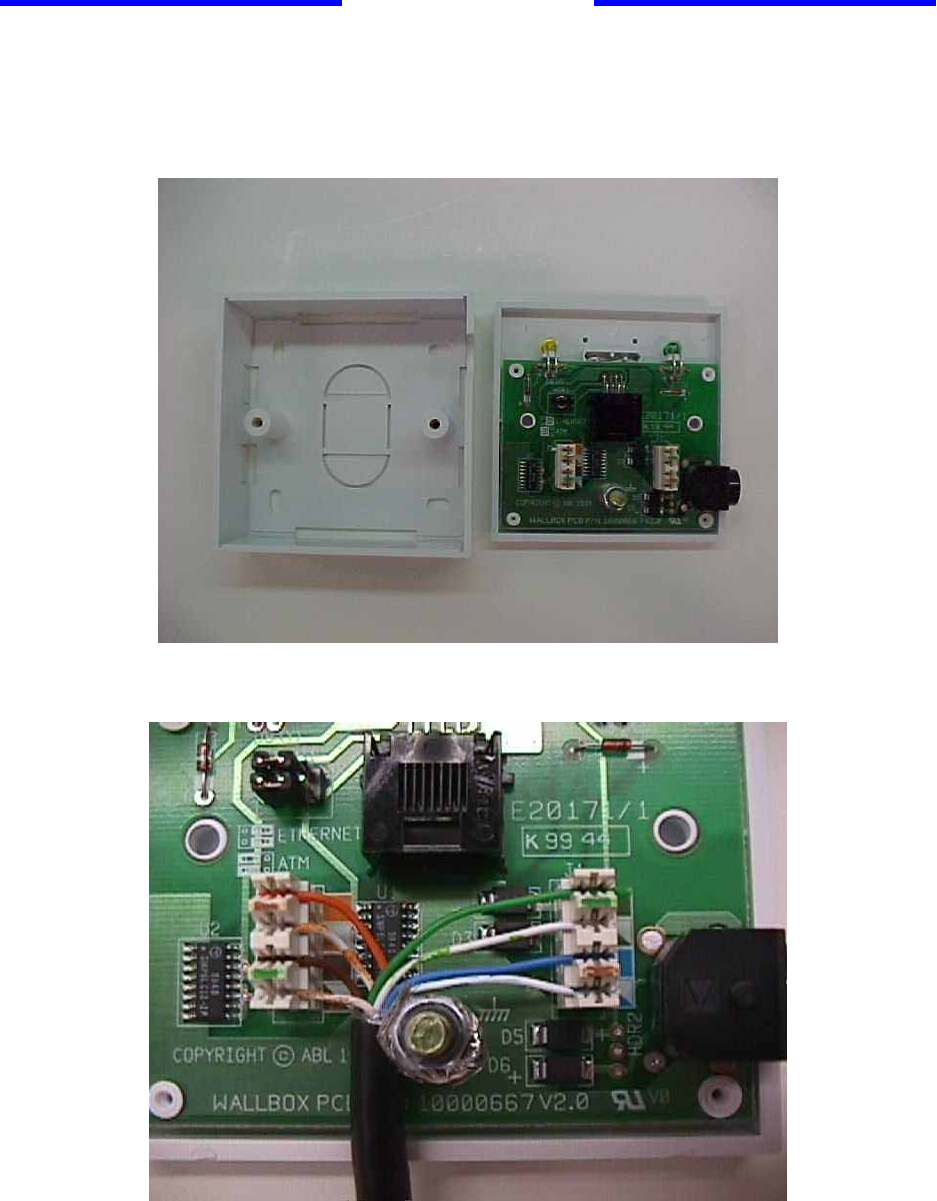
Axxcelera Broadband Product Install Manual Page 64 of 71
Section 7
7 Indoor Junction Box
The indoor junction box/wall box consists of a PCB that inserts power into the CAT-5 cable and
provides secondary lightening protection. Photos of the indoor Junction Box are shown in
Figures 7-1 and 7-2.
Figure 7-1 Indoor Junction Box (Wall Plate Enclosure)
Figure 7-2 Indoor Junction Box Inside
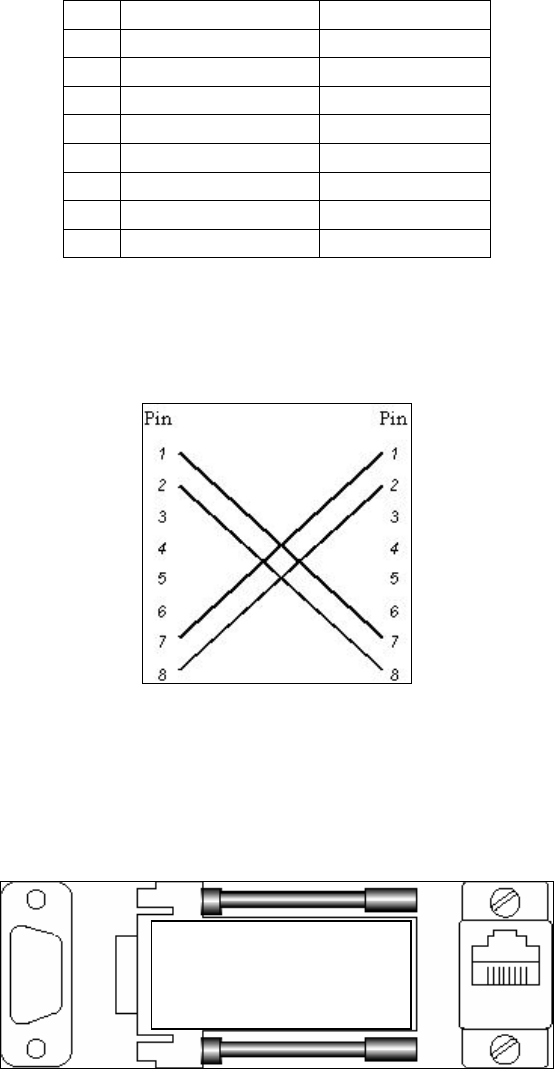
Axxcelera Broadband Product Install Manual Page 65 of 71
The indoor junction box can be wired for ATM25 or Ethernet interfaces. Note that the PCBs
may be housed in separate plastic boxes or mounted in a card cage. Table 7-1 describes the
cable legend to follow.
Table 7-1 Cable Legend - Junction Box Interconnect Cable
Pin Signal Color Code
1 Transmit High (+) White / Orange
2 Transmit Low (-) Orange
3 LED2 White / Green
4 Supply Minus Blue
5 Supply Plus White / Blue
6 LED1 Green
7 Receive High (+) White / Brown
8 Receive Low (-) Brown
7.1 ATM Cross-Over Cable
Figure 7-3 shows how to wire an ATM cross-over cable:
Figure 7-3 ATM Cross-Over Cable
7.2 FVC DB-9 to RJ-45 Converter
Figure 7-4 shows a DB-9 to RJ-45 converter.
Figure 7-4 DB-9 To RJ-45 Converter
2----------------------------------------3
3----------------------------------------7
5----------------------------------------5

Axxcelera Broadband Product Install Manual Page 66 of 71
Glossary
TERM DEFINED
Access Point An Access Point (AP) is a component of a Base Station (BS) that
contains the antenna used to communicate with a Subscriber Unit
(SU).
Anchor Switch The Anchor Switch (AS) is an ATM access switch that is a
component of a Base Station (BS).
Antenna A device for transmitting and/or receiving radio waves.
Asynchronous
A
data transmission method in which data may be sent at irregular
intervals (without reference to clock signals).
ATM Asynchronous Transfer Mode is a high-performance, cell-oriented
switching and multiplexing technology, which utilizes fixed-length
packets to carry different types of traffic. It integrates the
multiplexing and switching functions, is well suited for bursty
traffic, and allows communications between devices that operate
at different speeds.
ATM Switch The ATM switch provides layer 2 switching of ATM cells through
virtual circuits. An ATM switch is contained in the SU, the AP, and
the AS.
Available Bit Rate
(ABR) Service that provides rate-based flow control and is aimed at data
traffic such as file transfer and e-mail.
Azimuth The angle along the horizon usually referenced to north.
Bandwidth The data carrying capacity of a communications channel,
measured in Hertz as the difference between the highest and
lowest frequencies of the channel.
Base Station The Base Station is the part of the AB-Access System that sends
signals to and receives signals from the Subscriber Units (SUs) to
enable communication with the WAN.
Baud A measure of data transmission speed. The baud rate denotes the
number of symbols per second.
Bit Error Rate The Bit Error Rate (BER) is the fraction of transmitted bits that are
received in error.
Cell A 53-Byte packet of data used in ATM networks. Also used to
refer to the coverage area of one Base Station.
Constant Bit Rate
(CBR) Service that operates on a connection basis and offers consistent
delay predictability; used for applications such as circuit
emulation, voice, and video.
Control Server The Control Server (typically one per BS) is a computer
responsible for management of the BS, its APs, and the
associated SUs.
DS1 A data transmission rate of 1.544 Mbps, also referred to as a T-1.
DS3 A data transmission rate of 45 Mbps

Axxcelera Broadband Product Install Manual Page 67 of 71
TERM DEFINED
Element
Management
System
The Element Management System (EMS), located on a
workstation at an appropriate point in the network, allows you to
configure, control, and monitor all components of the AB-Access
System.
MIB Management information base allows external management
system access.
Multiplexer A multiplexer is device or system capable of combining
elementary streams into one aggregate transport stream.
Network A network is an interconnection of computer systems, terminals,
or data communications facilities.
OC3 A data transmission rate of 155 Mbps
Packet A packet is a sequence of data, with associated control
information, that is switched and transmitted as a whole.
Packet Switching Packet switching is the data transmission method that divides
messages into standard-sized packets for greater efficiency of
routing and transport through a network.
Parsing Parsing is the process of analyzing a data stream and breaking it
down into more easily processed components.
Permanent Virtual
Circuit Provides end-to-end connectivity for transmission in a network.
Point-to-Point A single communication circuit connecting two locations.
Point-to-Multipoint A communications circuit connecting one location to many
locations.
Radio Frequency Radio frequency (RF) is a portion of the electromagnetic spectrum
in the frequency range of 100 kHz to 20 GHz.
Subscriber Unit The Subscriber Unit (SU) is the part of the AB-
A
ccess System that
is installed at the customer premises and provides communication
with the Base Station (BS).
Synchronous A data transmission method in which data transfer is at a fixed
rate. The transmitter and receiver are both controlled by clock
pulses.
TCP/IP Transmission Control Protocol/Internet Protocol, a layered set of
protocols that allows sharing of applications among PCs, hosts, or
workstations in a high-speed communications environment. The
suite of protocols is designed to allow communication between
networks regardless of the technologies implemented in each
network.
TDD Time Division Duplex, the transmission method where a single
channel is used to alternately carry data in each direction of a link.
Time-Division
Multiplexing A form of multiplexing used with digital signals. A device scans
individual channels in rotation, takes bits from each channel,
transmits the bits in a string (according to a predetermined
sequence), and repeats the process.

Axxcelera Broadband Product Install Manual Page 68 of 71
TERM DEFINED
Transmitter A transmitter is an electronic device, consisting of oscillator,
modulator, and other circuits, that produce a radio or television
electromagnetic wave signal for radiation into the atmosphere by
an antenna.
Unspecified Bit
Rate Service that operates on a connection basis and allows for raw
cell or best effort transport by the network. In this service, cells
are transported by the network whenever bandwidth is available
and traffic is presented by the user. Data using UBR service is
more apt to be discarded during peak traffic times in deference to
data using other classes of service.
Uninterruptible
Power Supply An optional BS element used to provide power in the event of an
AC power failure.
Variable Bit Rate-
Real Time (VBR-RT) Service that operates on a connection basis and offers very low
delay variance but requires access to a variable amount of
network bandwidth; used for such applications as packet video
and voice.
Variable Bit Rate-
Non-Real Time
(VBR-NRT)
Service that operates on both a connection and connectionless
basis and allows delay variance between the delivery of cells;
used for data applications which have potentially bursty traffic
characteristics, including LAN interconnect, CAD/CAM, and
multimedia.
Virtual Circuit A logical connection, not a physical connection, provides multiple
connections that can be defined simultaneously across a single
network facility, with each connection having flexible bandwidth.

Axxcelera Broadband Product Install Manual Page 69 of 71
Acronyms/Abbreviations
The following is a list of acronyms and abbreviations associated with the AB-Access System,
some of which may appear in this guide.
ACRONYM DEFINED
AAL ATM Adaptation Layer
ADC Analog to Digital Converter
AFC Automatic Frequency Control
AGC Automatic Gain Control
ALG Application Layer Gateway
AP Access Point
ARP Address Resolution Protocol
ARPAnet Advanced Research Projects Agency Network
ARQ Automatic Repeat Request
AS Anchor Switch
ASIC Applications Specific Integrated Circuit
ATM Asynchronous Transfer Mode
ATMOS ATM Operating System
AWGN Additive White Gaussian Noise
BER Bit Error Rate
BOOTP Bootstrap Protocol
BS Base Station
CBR Constant Bit Rate
CCIR Comite Consultatif International des Radiocommunications
CHAP Challenge-Handshake Authentication Protocol
CIDR Classless Interdomain Routing
CLIP Classical Internet Protocol
CNR Carrier To Noise Ratio
COTS Commercial Off The Shelf
CPE Customer Premise Equipment
CS Control Server
dB Decibel
dBm Decibel over 1mW
DBS Direct Broadcast Satellite
DC Direct Current
DES Data Encryption Standard
DFE Decision Feedback Equalizer
DHCP Dynamic Host Configuration Protocol
DS1,2,3 Digital Signal 1,2,3
E1 2.048 Mbps circuit supporting (30) 64 Kbps digital channels for voice or data
calls
EIRP Effective Isotropic Radiated Power
EMS Element Management System

Axxcelera Broadband Product Install Manual Page 70 of 71
ACRONYM DEFINED
FCC Federal Communications Commission
FDD Frequency Division Duplex
FPMS Fault and Performance Management System
Gbps Gigabits per second
GFC Generic Flow Control
GHz Gigahertz
GUI Graphical User Interface
I&Q In Phase and Quadrature
IETF Internet Engineering Task Force
IF Intermediate Frequency
IP Internet Protocol
ISI Inter-Symbol Interference
ITFS Instructional Television Fixed Service
Kbps kilobits per second
LAN Local Area Network
LLC Logical Link Control
LOS Line of Sight
MAC Media Access Control
Mbps Megabits per second
MDS Multipoint Distribution Service
MIB Management Information Base
MID Mobile ID
MMDS Multichannel Multipoint Distribution System
MSE Mean Square Error
NAT Network Address Translation
NMS Network Management System
NOC Network Operations Center
OAM Operations, Administration, and Maintenance
OC3 Optical Carrier 3
OSI Open Systems Interconnection
PAT Port Address Translation
PCB Printed Circuit Board
PHY Physical Layer
POTS Plain Old Telephone System
PPP Point-to-Point Protocol
PTMP Point to Multipoint
PVC Permanent Virtual Circuit
QOS Quality of Service
RAID Redundant Array of Inexpensive Disks
RF Radio Frequency
RFC Request For Comment
RISC Reduced Instruction Set Computer
RSSI Receiver Signal Strength Indication

Axxcelera Broadband Product Install Manual Page 71 of 71
ACRONYM DEFINED
RT-VBR Real Time Variable Bit Rate
RX Receiver
SAR Segmentation And Reassembly
SCSI Small Computer System Interface
SNMP Simple Network Management Protocol
SNR Signal to Noise Ratio
SO/HO Small Office/Home Office
SONET Synchronous Optical Network
STP Shielded Twisted Pair
SU Subscriber Unit
SUMP Subscriber Unit Management Protocol
SVC Switched Virtual Circuit
T1 1.544 Mbps circuit supporting (24) 56/64 Kbps voice-grade channels
TCP/IP Transmission Control Protocol/Internet Protocol
TDD Time Division Duplex
TDMA Time Division Multiple Access
Telnet Terminal-remote host protocol developed for ARPAnet
TMS Topology Management System
TX Transmit
UBR Unspecified Bit Rate
UDP User Datagram Protocol
UNI User-Network Interface
UPS Uninterruptible Power Supply
UTP Unshielded Twisted Pair
VBR-RT Variable Bit Rate-Real Time
VBR-NRT Variable Bit Rate-Non-Real Time
VCC Virtual Circuit Connection
VPC Virtual Path Connection
VPI Virtual Path Identifier
WAN Wide Area Network
WLL Wireless Local Loop