Axxcelera Broand Wireless EX-F058 AB-Access EXTENDER User Manual part 2
Axxcelera Broadband Wireless, Inc. AB-Access EXTENDER part 2
Contents
User manual part 2
Internal DRAFT Copy
Document Number: ABA-U-NII-PIM-3 (part2 – chapters 7 to 11)
May 2001
AB-ACCESS
SYSTEM
U-NII PRODUCT INSTALLATION MANUAL
for Subscriber Units, Base Stations, Access Points
and AB-Access Extender Units
Company Proprietary
Adaptive Broadband U-NII Product Installation Manual 07/04/2001 7-1
7 Subscriber Unit Installation
TBD: Update the figure numbers etc. in this section an onwards.
7.1 Installation Overview
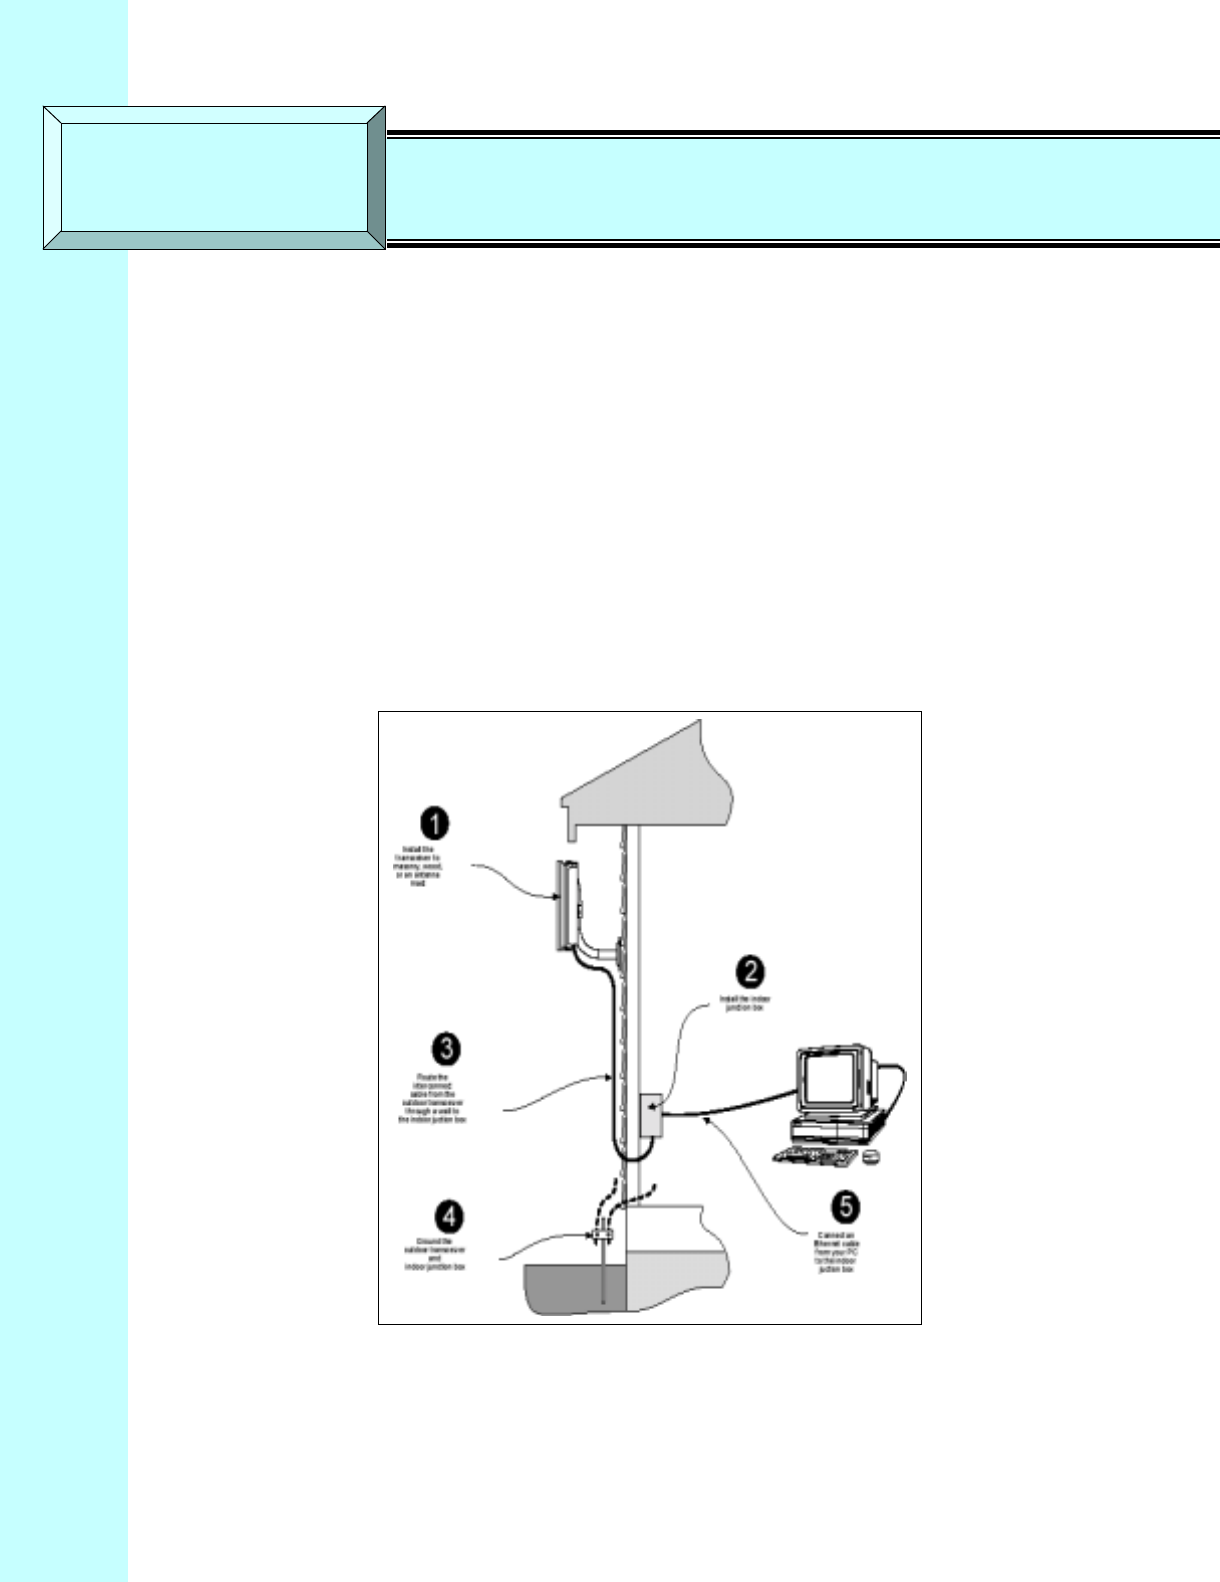
The Subscriber Unit installation steps are as follows:
1. Install the mounting pole and mount the outdoor Subscriber Unit (see Figure 6-1).
2. Install the indoor junction box.
3. Route the interconnect cable. Connect it to the outdoor Subscriber Unit and the indoor
junction box.
4. Ground both the outdoor Subscriber Unit and indoor junction box.
5. Perform initial startup and testing.
Figure 7-1 AB-Access Subscriber Unit Installation Overview
SECTION 7 Subscriber Unit Installation
Company Proprietary
Adaptive Broadband U-NII Product Installation Manual 07/04/2001 7-2
7.2 Installing Mounting Pole
Once you have selected a site for installing the outdoor transceiver/Subscriber Unit, determine
what type of surface you will use for your installation. Select from the following list:
• Installing on a Brick Or Masonry Wall
• Installing on a Wall With Wood Siding
• Installing on an Antenna Mast
The following sections describe the installation procedure for each of the above.
7.2.1 Installing on a Brick or Masonry Wall
Table 7-1 describes the tools and equipment needed when installing on a brick or masonry wall.
Table 7-1 Required Tools And Equipment
Tools Equipment Quantity
Power drill Mounting pole 1
¼ inch masonry drill bit Anchor sleeves 4
A bubble level or plumb line Lag bolts 4
Phillips head screwdriver or
power drill 1
Hammer or mallet 1
Adjustable wrench 1
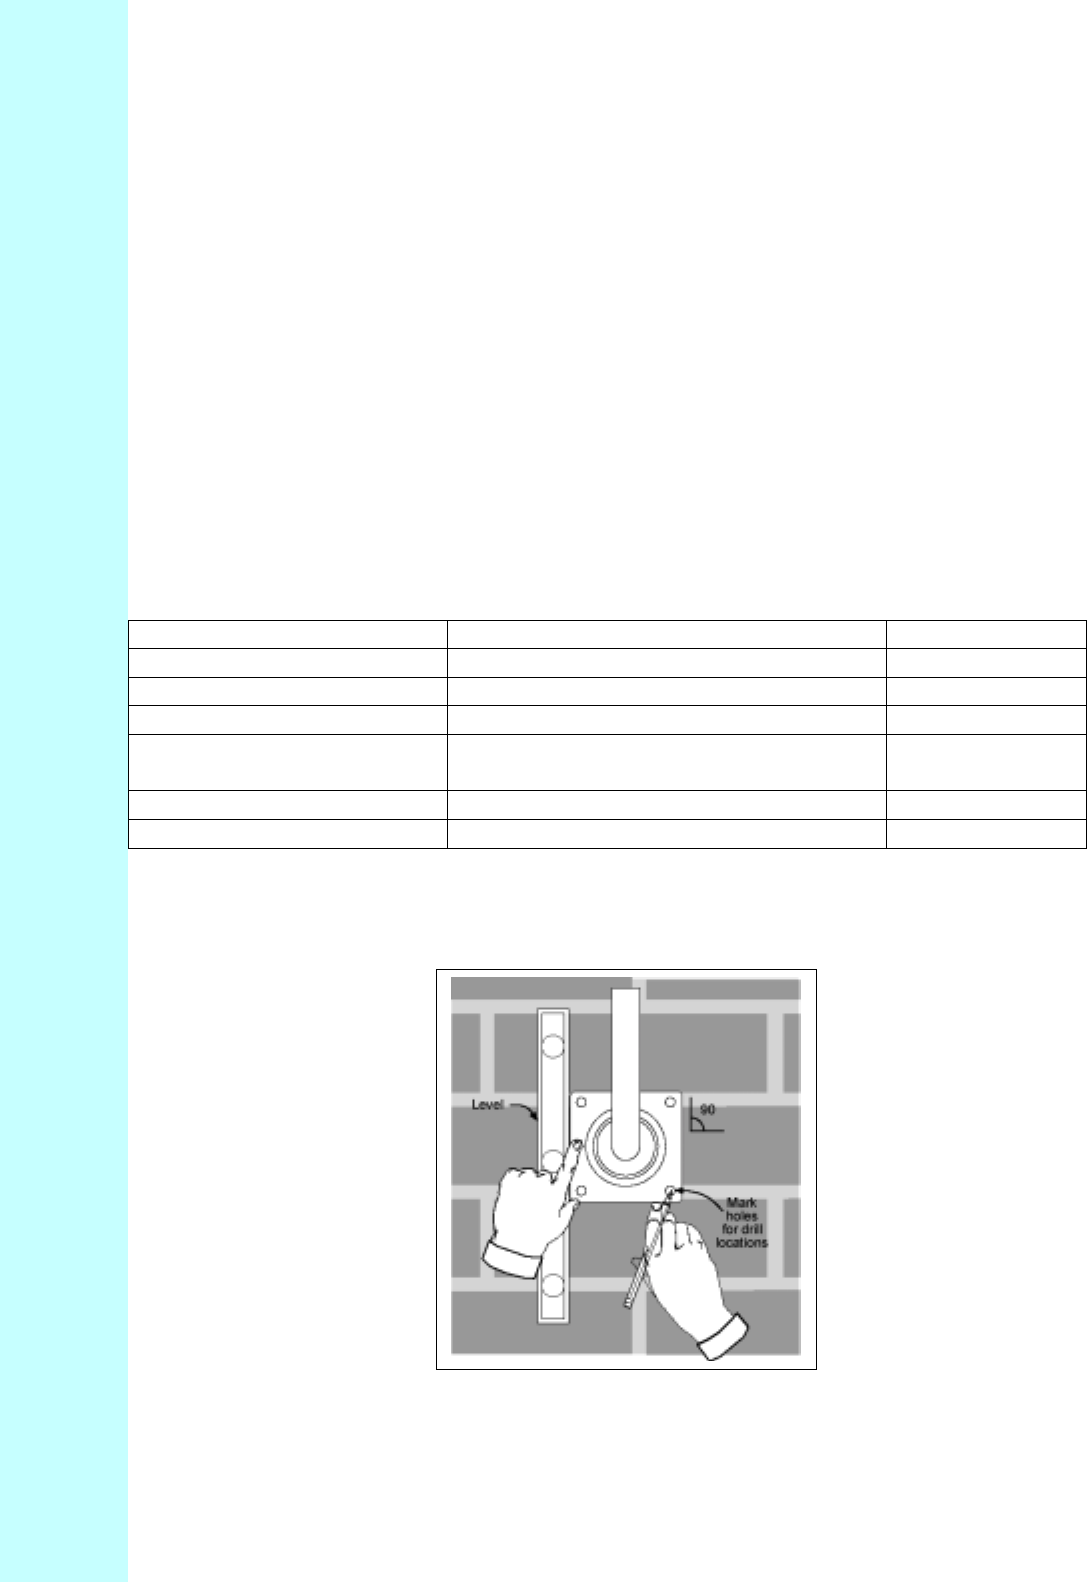
1. Place the mounting plate against the wall.
2. Using a level, be sure that the mounting pole is perpendicular to the ground.
3. Using a pencil, mark the hole locations for the drilled hole locations (Figure 6-2).
Figure 7-2 Mounting Pole Drill Locations
Company Proprietary
Adaptive Broadband U-NII Product Installation Manual 07/04/2001 7-3
4. Set the mounting pole aside.
5. Using a ¼ inch masonry drill bit, drill holes approximately ½ inch deep at the marked
locations.
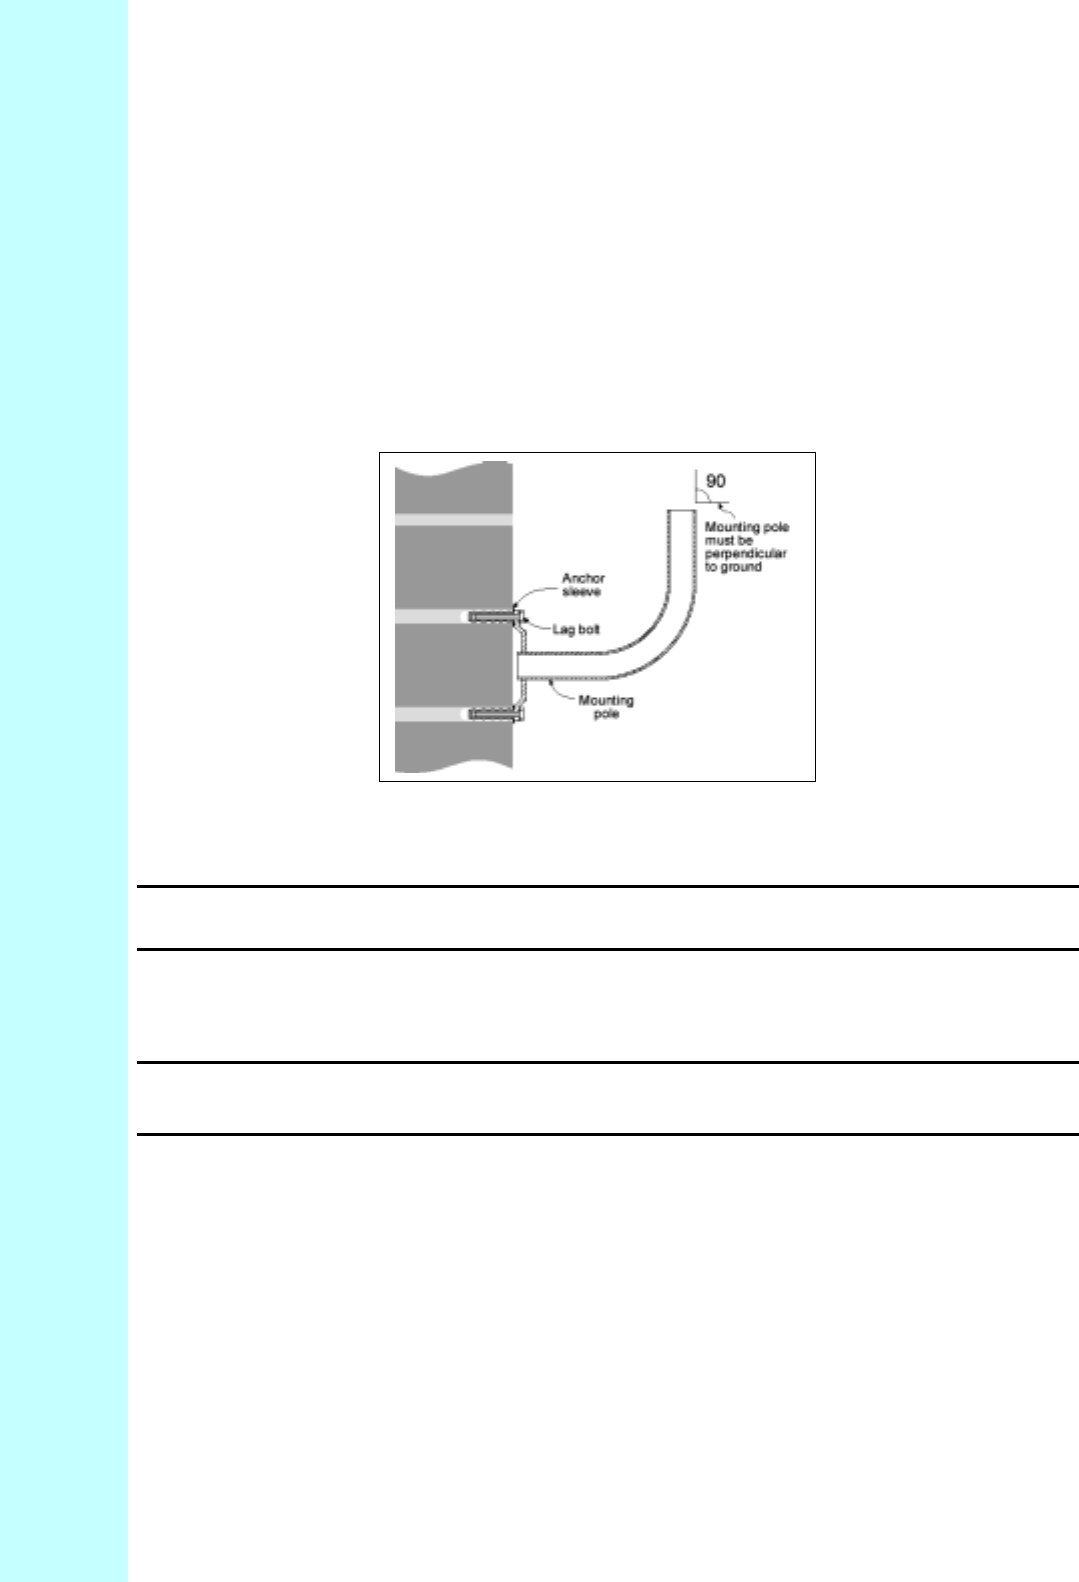
6. Insert the anchor sleeves into the drilled holes. Using a small hammer, gently tap the
anchor sleeves into the masonry until tight. Check that the anchor sleeves are flush
with the wall. (Figure 6-3)
7. Align the mounting pole with the drilled holes.
8. Insert a lag bolt in each of the holes and hand tighten.
9. Tighten all lag bolts with a wrench, being careful not to over tighten.
Figure 7-3 Mounting Pole Installation Using Expansion Sleeves and Lag Bolts
Attention! The mounting pole must be mounted in a vertical position. Failure to do so
may result in improper alignment of the outdoor transceiver.
IMPORTANT – Before you install the SU, be sure to record, for future
reference, the MAC address found on the SU.
10. Now proceed to Installing the Outdoor Subscriber Unit in Section 6.3.
Company Proprietary
Adaptive Broadband U-NII Product Installation Manual 07/04/2001 7-4
7.2.2 Installing on a Wall with Wood Siding
Table 7-2 describes the tools and equipment needed when installing on a wall with wood siding.
Table 7-2 Required Tools and Equipment
Tools Equipment Quantity
Power Drill Mounting pole 1
1/8 inch drill bit #6 wood screws 4
Bubble level or plumb line Spacers 1
Phillips head screwdriver or
power drill 1
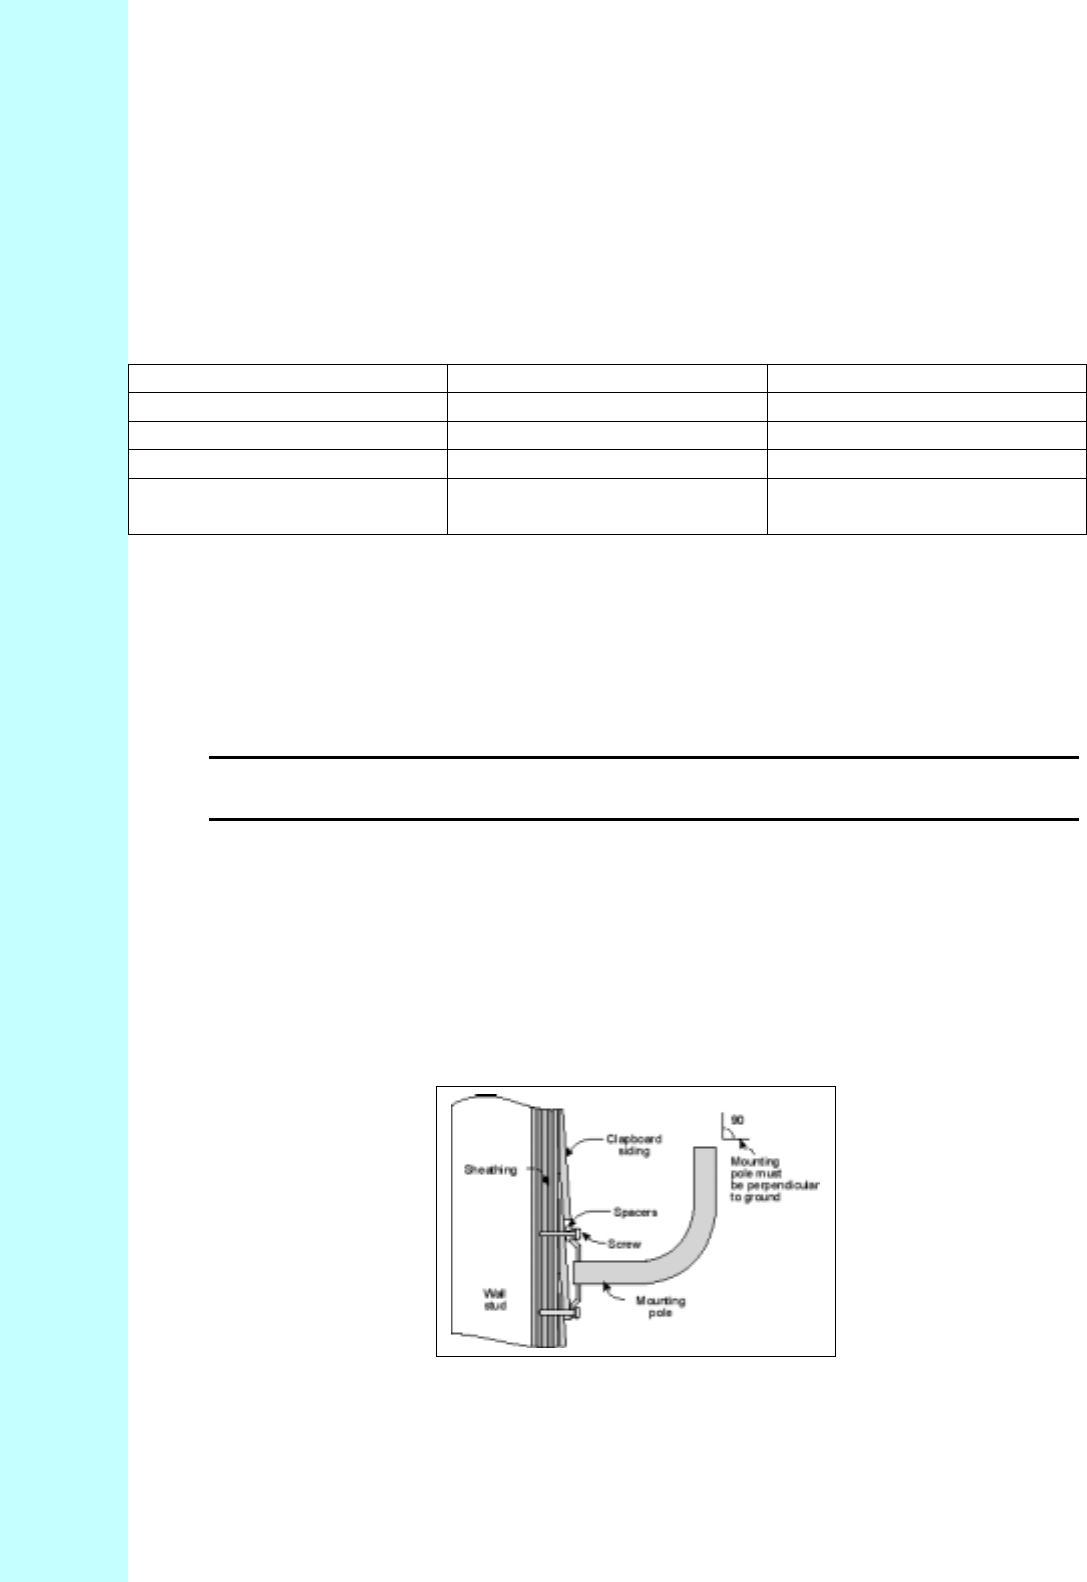
1. Place the mounting plate against the wall. Using a level, be sure that the mounting
pole is perpendicular to the ground.
This procedure is similar to that shown previously in Figure 6-2.
Note that when mounting on clapboard siding, you may need to use spacers to make
sure that the mounting pole is perpendicular, as shown in Figure 6-4.
Attention! The mounting pole must be in a vertical position for proper alignment of
the outdoor transceiver.
2. Mark the locations for the drilled holes.
3. Remove the mounting pole and set it aside.
4. Drill 1/8 inch diameter in the places marked.
5. Use #10 or #12 wood screws to secure the mounting pole to the wall and
hand tighten.
6. Using the level, check that the mounting plate is perpendicular to the ground.
Readjust if necessary (you might need to add or remove spacers) and then tighten all
screws with a screwdriver or power drill, being careful not to over tighten.
Figure 7-4 Mounting Pole on Clapboard Siding
Company Proprietary
Adaptive Broadband U-NII Product Installation Manual 07/04/2001 7-5
7. Now proceed to Installing the Outdoor Transceiver.
7.2.3 Installing on an Antenna Mast
Table 7-3 describes the tools and equipment needed when installing on an antenna mast.
Table 7-3 Required Tools and Equipment
Tools Equipment Quantity
Adjustable wrench U-bolts 2
Washers 4
Hex nuts 4
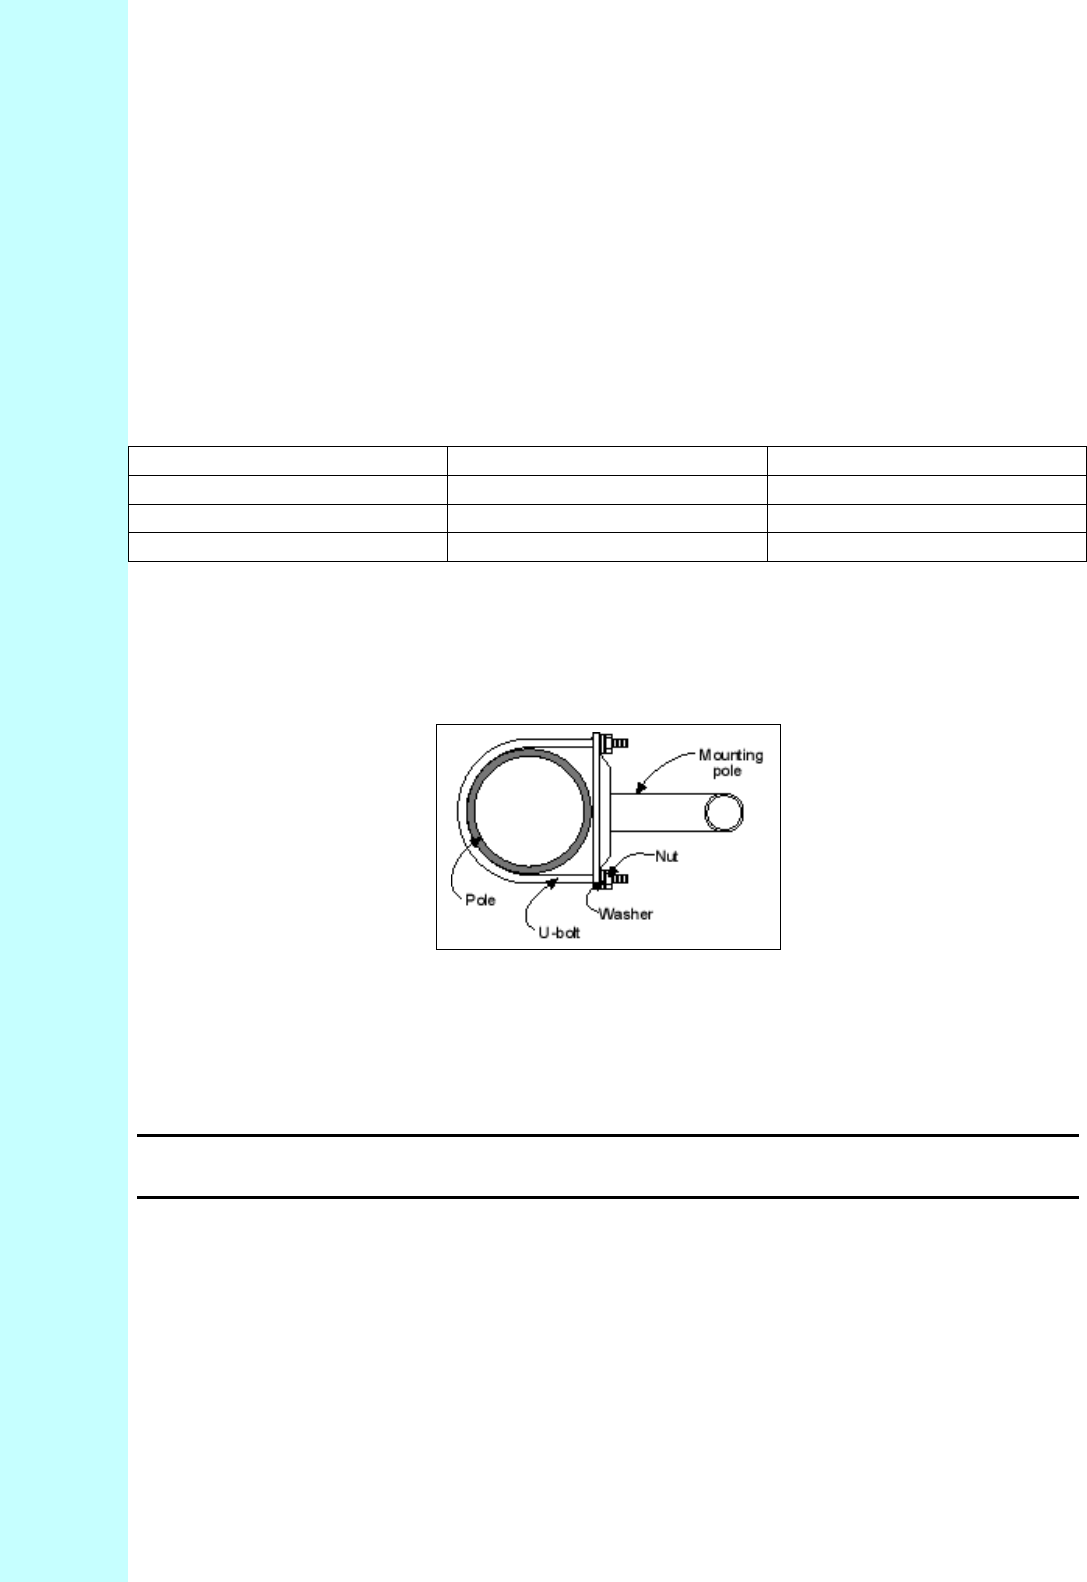
1. Position the mounting pole on the pole or antenna mast (Figure 6-5).
2. Insert the U-bolts around the pole and through the holes in the mounting pole.
3. Install a washer and nut to each side of the threaded U-bolts and hand tighten.
Figure 7-5 Mounting Pole Installed on Pole or Antenna Mast
4. Tighten nuts equally until mounting pole is secure and cannot rotate.
Attention! The mounting pole must be mounted in a vertical position. Failure to do so
may result in improper alignment of the outdoor transceiver.
Warning! The mounting pole must be grounded. See Grounding the System in Section 6.6.
Company Proprietary
Adaptive Broadband U-NII Product Installation Manual 07/04/2001 7-6
7.3 Installing the Outdoor Subscriber Unit
Now that you have installed the mounting pole, you are now ready to install the outdoor
Subscriber Unit (SU) to the mounting pole. Table 7-4 describes the tools and equipment needed
to install the SU.
Table 7-4 Required Tools and Equipment
Tools Equipment Quantity
Phillips-head screwdriver Pole clamp 2
3/16” hex wrench Washers 2
Mounting screws 2
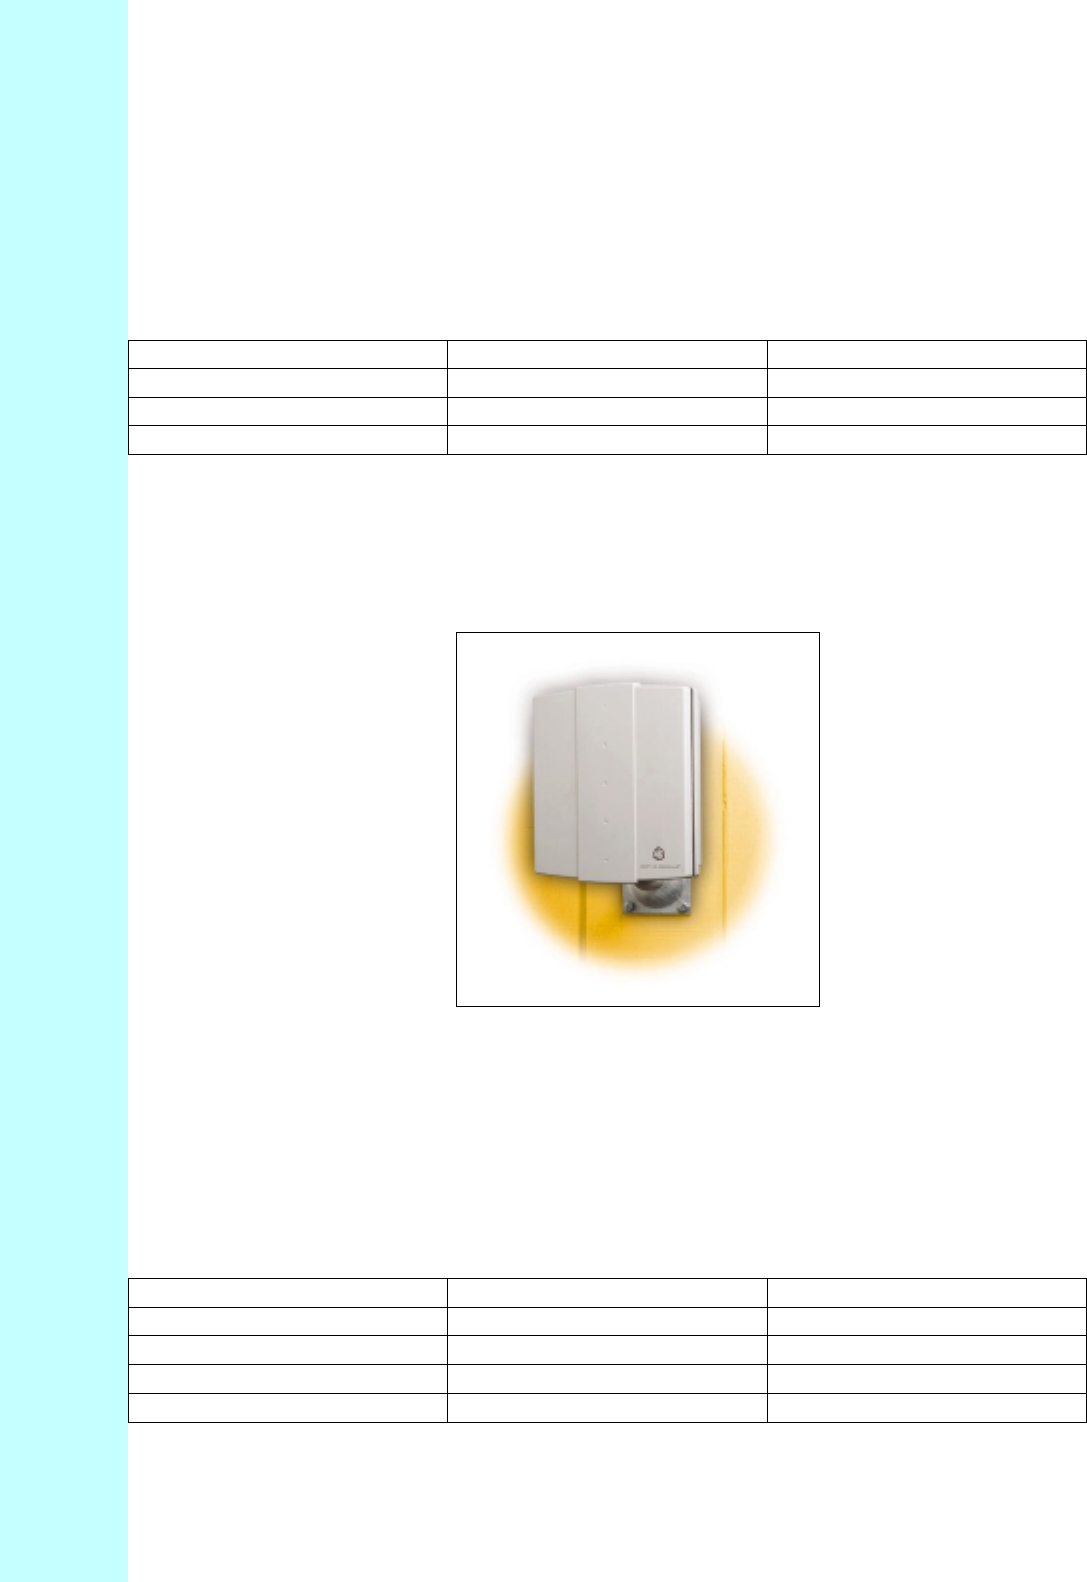
1. Loosen the mounting screws and place the outdoor Subscriber Unit on the mounting pole, as
shown in Figure 6-6.
2. Hand tighten the mounting screws.
3. Rotate the outdoor transceiver in the direction of the Access Point.
4. Tighten the mounting screws.
Figure 7-6 Outdoor Subscriber Unit Mounted on Wall
7.4 Preparing The Indoor Junction Box
This section explains how to prepare the indoor junction box for installation. You will drill the
mounting holes, but leave the box uninstalled, as it is easier to route the interconnect cable.
Table 7-5 describes the tools and equipment you will need.
Table 7-5 Required Tools and Equipment
Tools Required Equipment Required Quantity
Phillips-head screwdriver Screws 2
Flat head screwdriver Wallboard inserts 2
Power drill 1
1/8 inch drill bit 1
Company Proprietary
Adaptive Broadband U-NII Product Installation Manual 07/04/2001 7-7
1. Select a location for the junction box. This should be:
• Somewhere you can easily connect to your PC and a power outlet.
• Somewhere that is accessible for service and troubleshooting (not too close to the floor).
2. Remove the two screws which attach the junction box faceplate to the wall mount.
3. Set aside the faceplate with PCB and jack.
Attention! Be careful not to damage the two LEDs when removing the PCB.
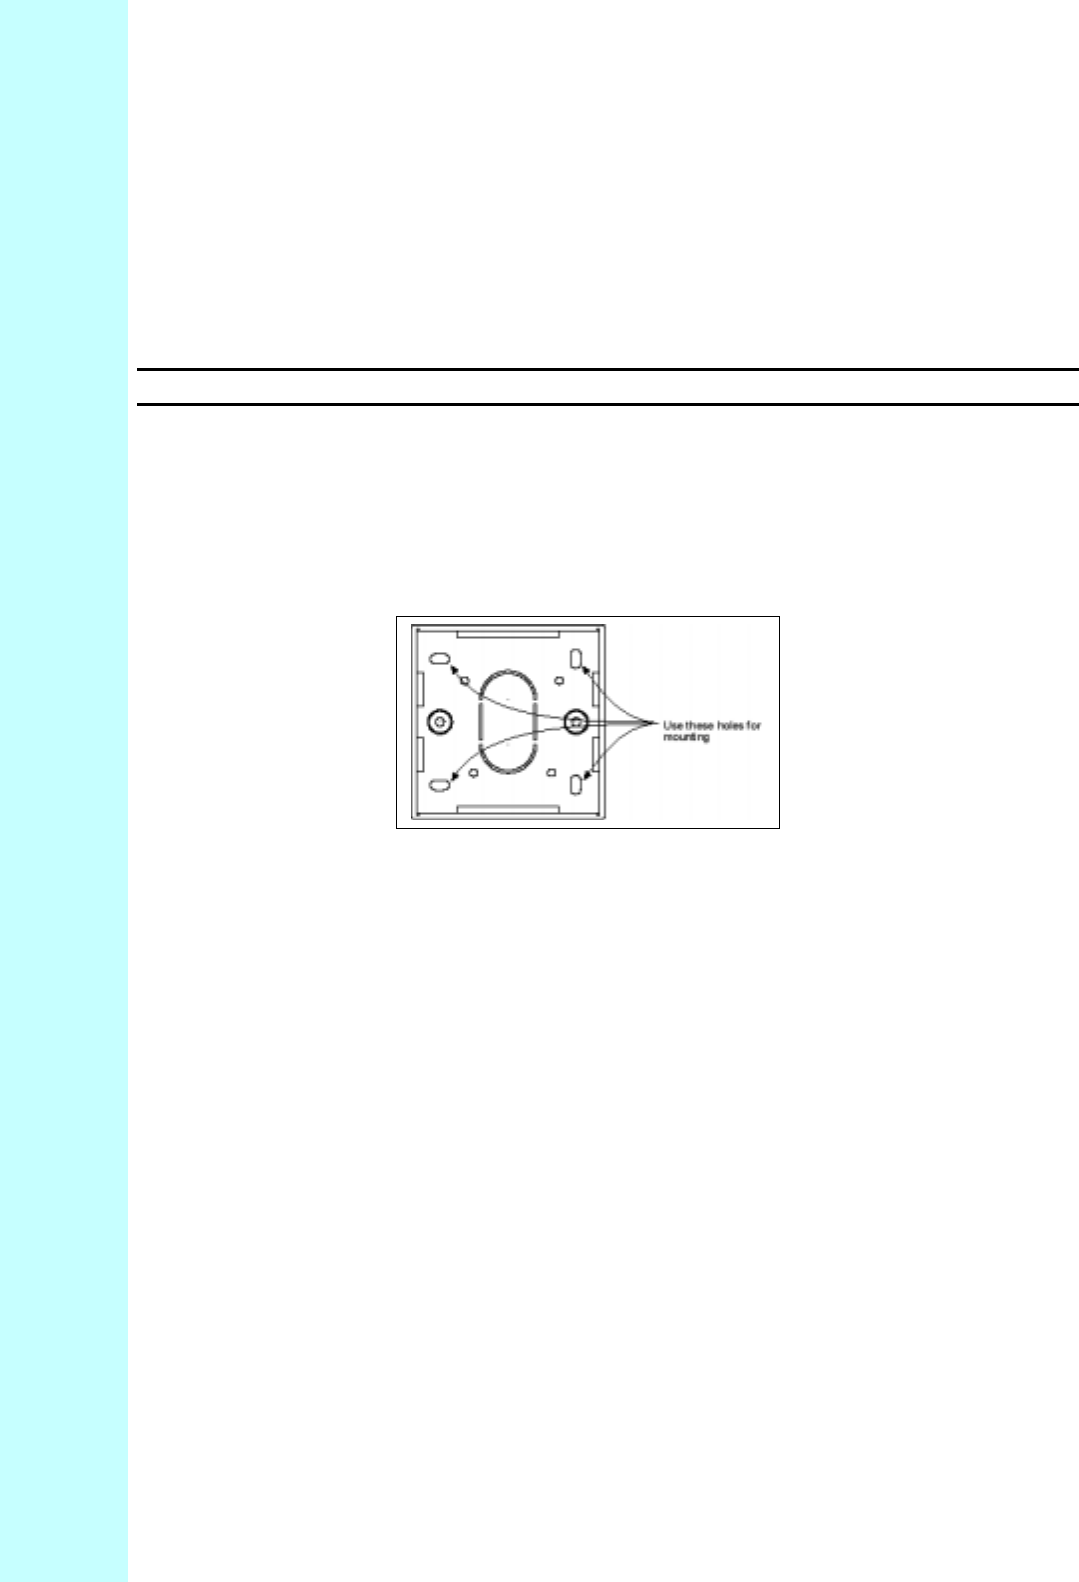
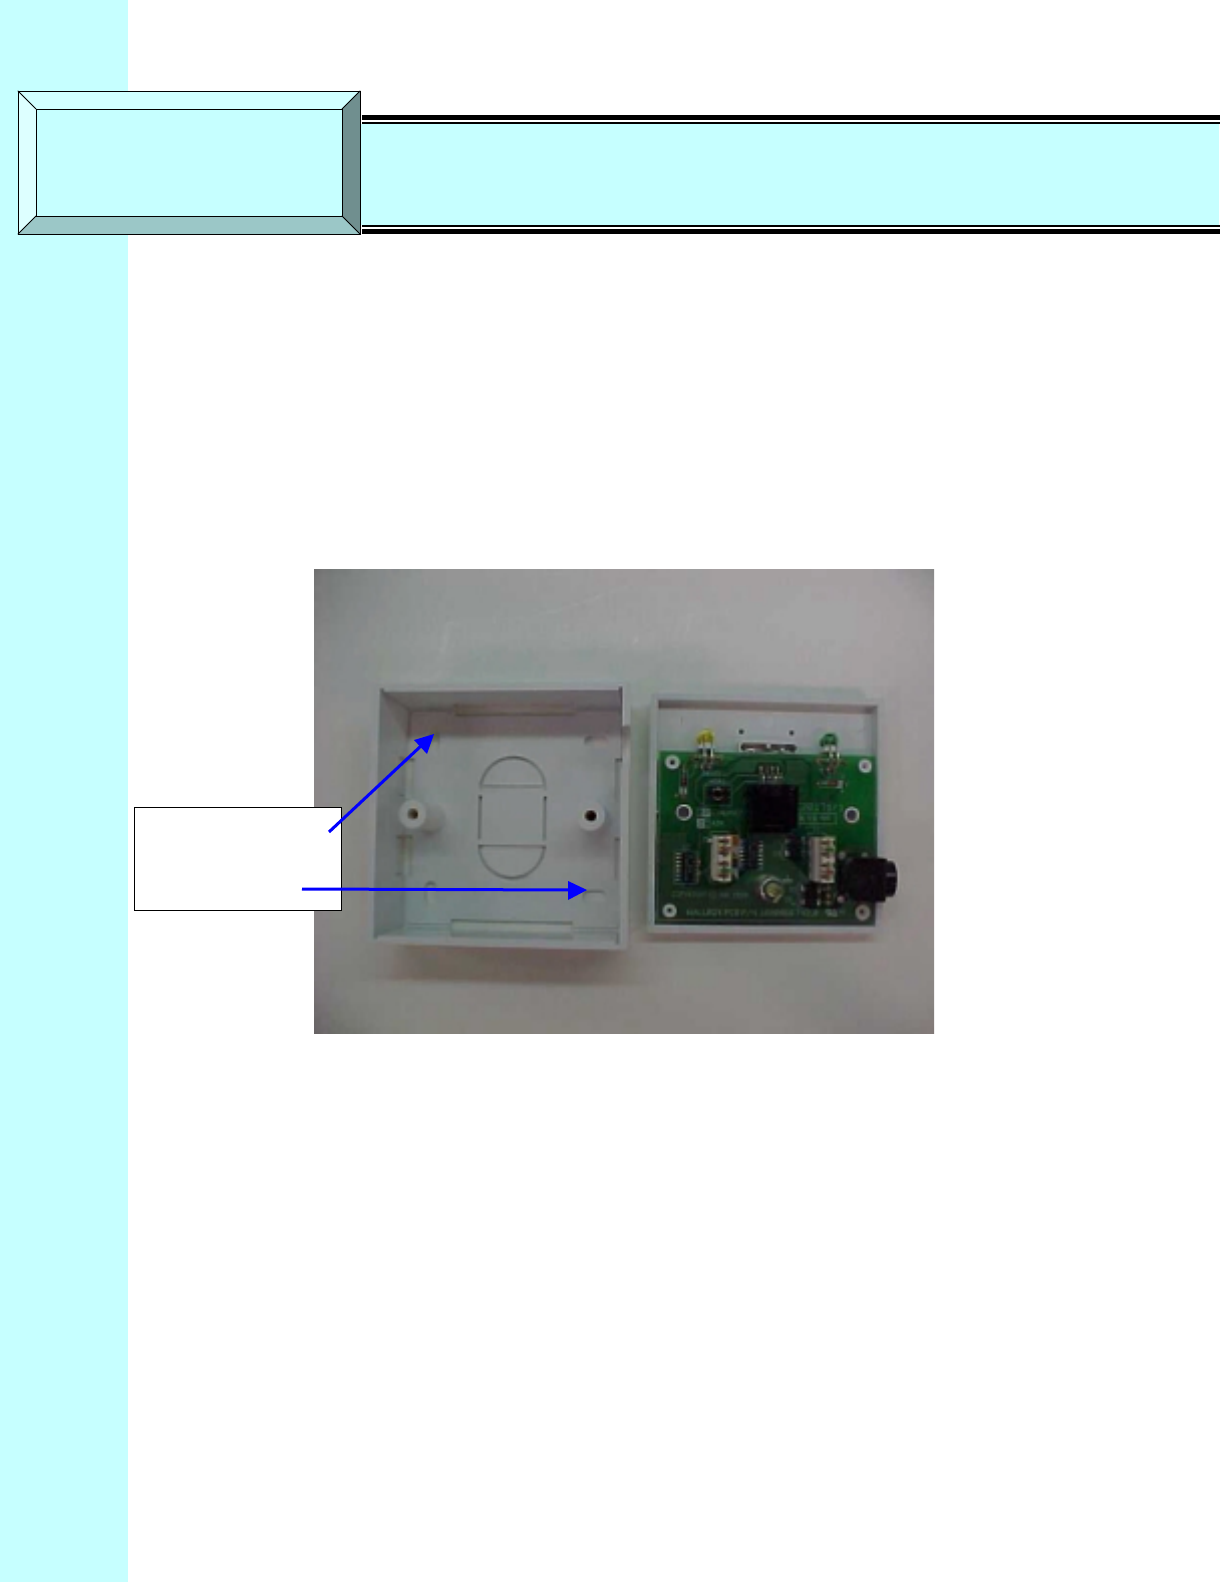
4. On the Wall Mount portion of the Wall Box, use a flat head screwdriver, or a pair of thin-
nosed pliers, to break out the pre-scored section of casing wall along the bottom edge of the
junction box (see Figure 7-7). This is where later on you will route the interconnect cable.
Figure 7-7 Junction Box Wall Mount (Face Plate and PCB Removed)
5. Using the wall plate as a template, mark the mounting hole locations, as shown in Figure 6-7.
6. Drill 1/8 inch diameter holes at the marked locations.
7. Insert the wallboard inserts.
For now, set the junction box to one side, leaving it disassembled. You will reassemble it and
mount it on the wall when you have prepared and routed the interconnect cable and grounded the
system.
7.5 Installing the Interconnect Cable
7.5.1 Routing the Interconnect Cable
Now that you have installed the outdoor Subscriber Unit and indoor junction box, you are ready
to route the interconnect cable.
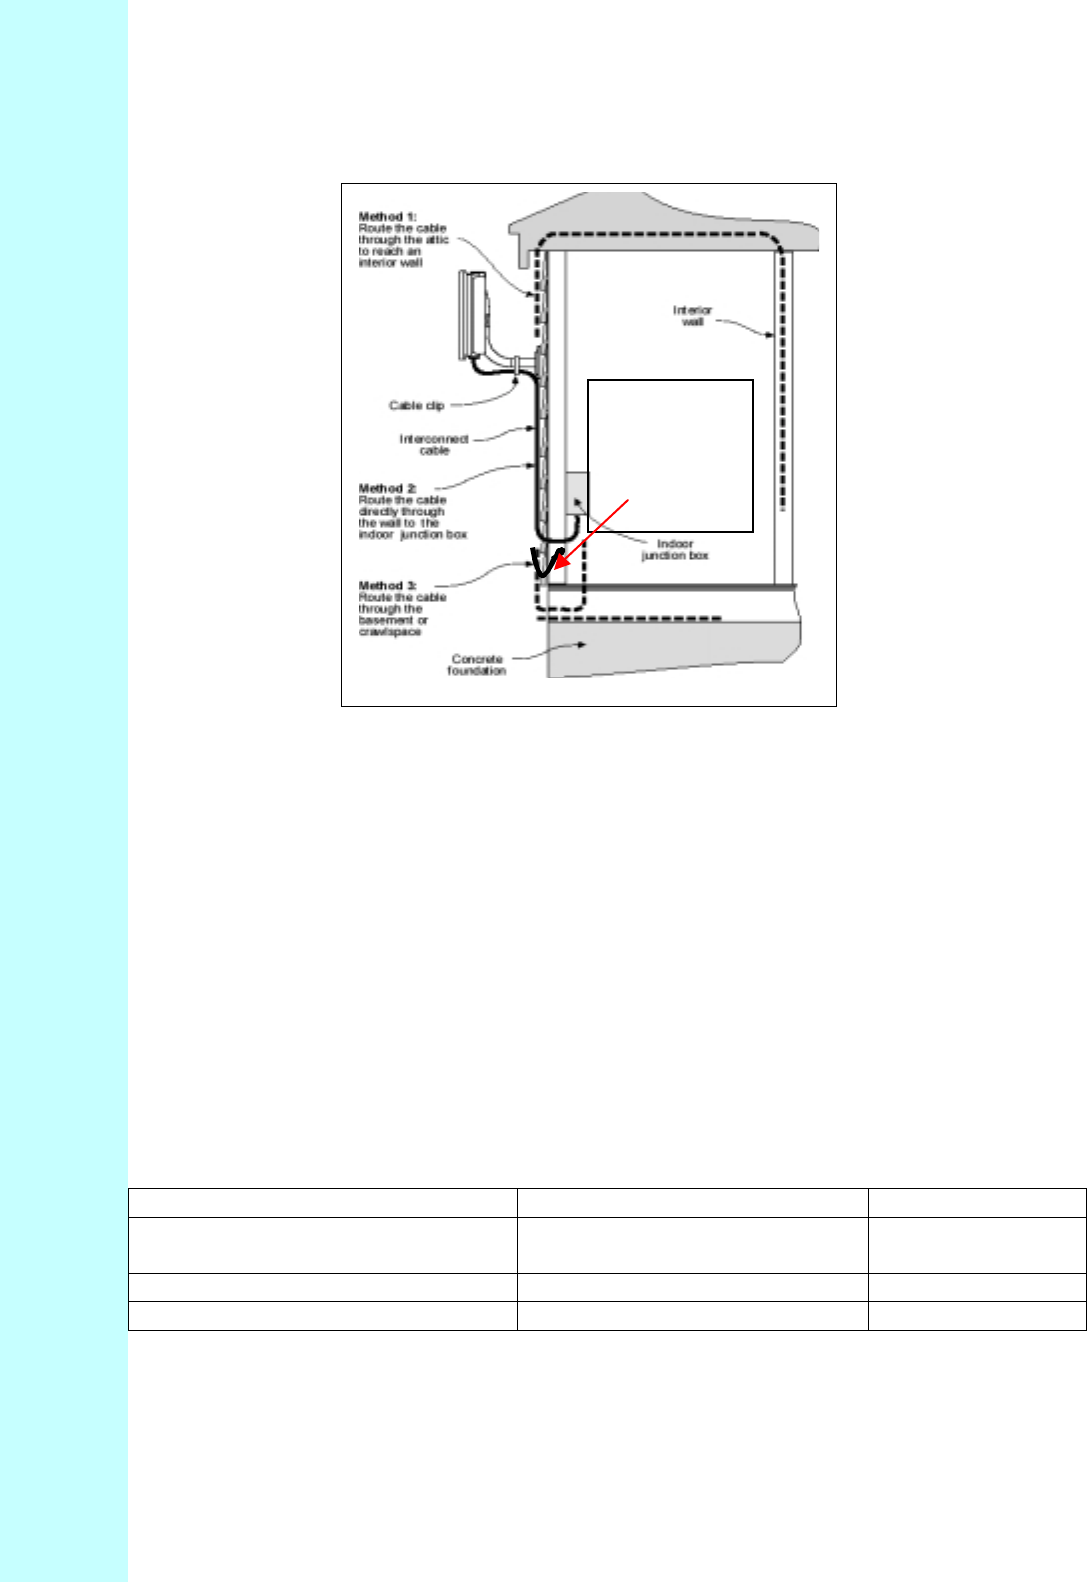
1. Select where the cable will enter the building from the outside (Figure 7-8).
Company Proprietary
Adaptive Broadband U-NII Product Installation Manual 07/04/2001 7-8
Figure 7-8 Interconnect Cable Routing Solutions
2. Once you have chosen the route, determine the length of cable required. Allow three extra
feet on each end to allow for strain relief as well as any bends and turns.
3. Install the cable, leaving the ends free and ready to fit the RJ-45 connector (transceiver end),
and install to the indoor junction box.
4. Remember to form a drip loop on the exterior of the building where the cable enters the
penetration. This will help prevent water from entering.
7.5.2 Preparing the Interconnect Cable
Table 7-6 shows the tools you need to install an RJ-45 connector on the outdoor subscriber end
of the interconnect cable.
Table 7-6 Required Tools and Equipment
Tools Equipment Quantity
Crimping tool (specific to RJ-45
used) RJ-45 connector (metal bodied) 1
Wire stripper
Small wire cutters
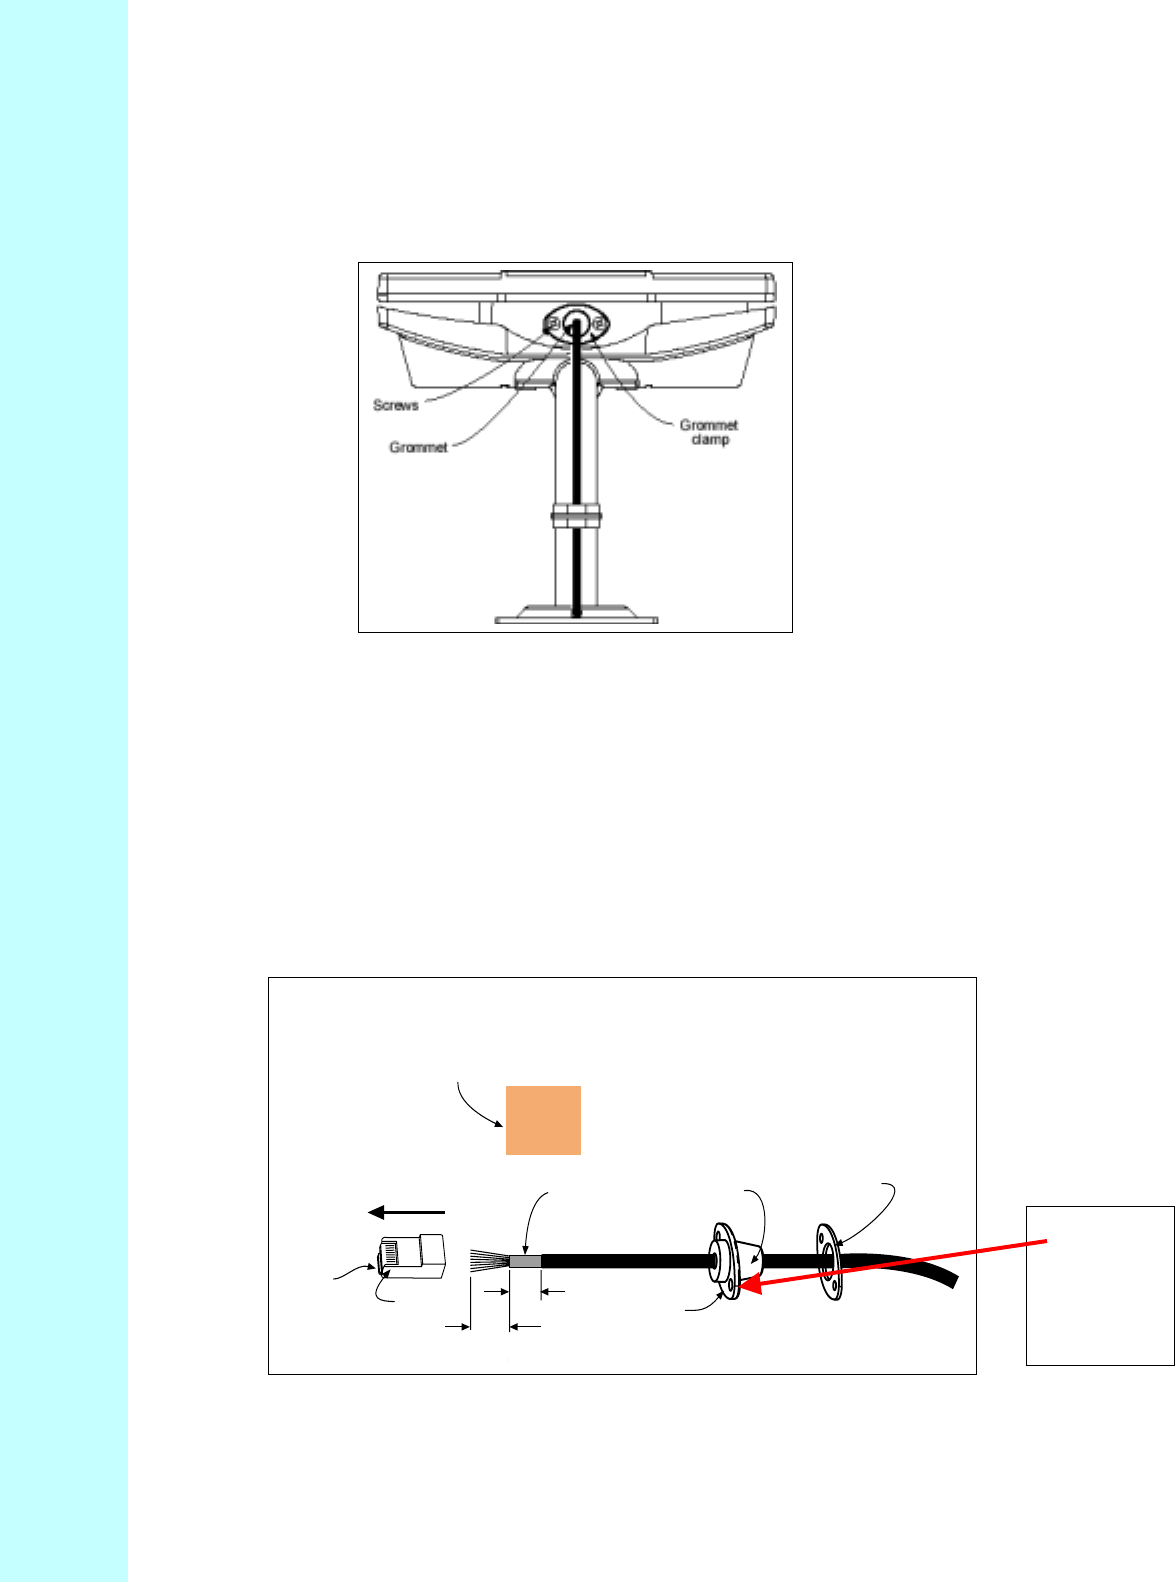
1. Remove the grommet (Figure 7-9) and clamping plate from the Subscriber Unit by undoing
the two screws. Be careful not to lose them if you are working on a ladder.
NOTE - Add a
drip loop at wall
penetration to
prevent water
from entering
Company Proprietary
Adaptive Broadband U-NII Product Installation Manual 07/04/2001 7-9
NOTE: The Grommet is made of a special conductive material used to complete
the ground between the Subscriber Unit and indoor junction box.
Figure 7-9 Grommet Location -- Underside of Subscriber Unit
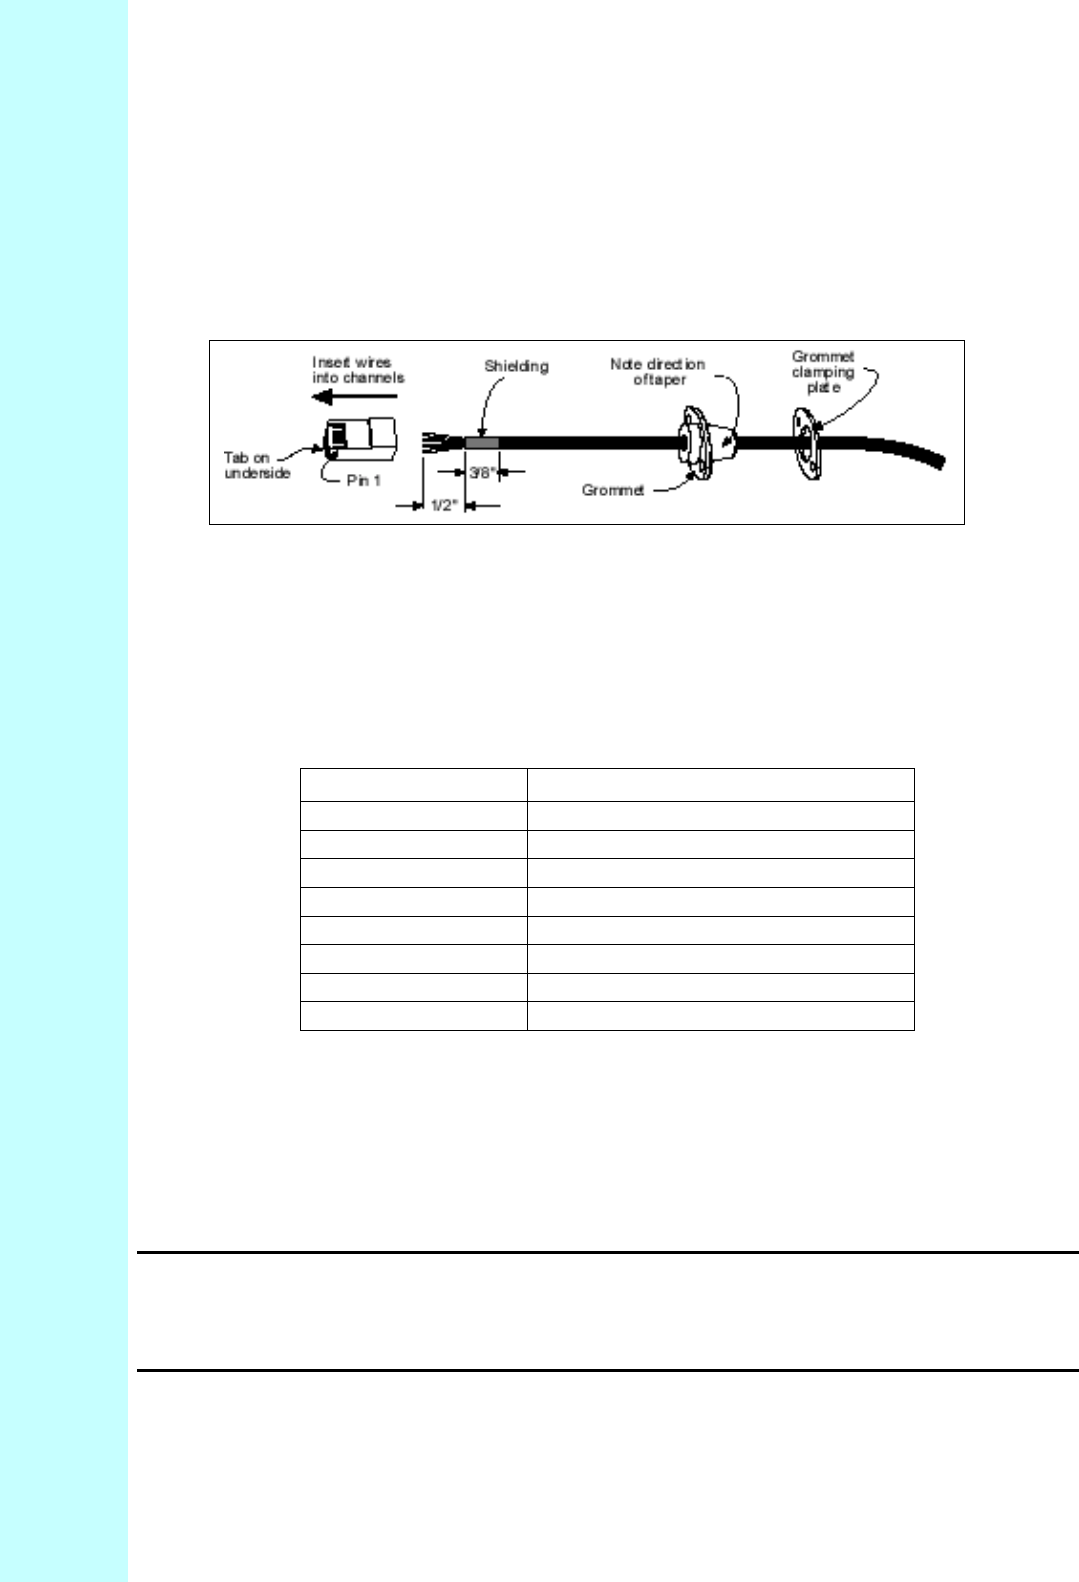
2. Insert the cable end through the grommet clamping plate (Figure 7-10).
1. Insert the cable end through the grommet. The tapered end of the grommet should be
opposite the cable end.
2. Strip 1 inch of insulation off the cable end. Leave 3/8 inch of shielding showing, and trim
the wire ends flat ½ inch from there.
3. Using a piece of 1inch squared tinned copper foil, wrap the foil around the shield/braid and
sheath with the left edge aligned with the edge of the braid, as shown in the following
Figures 7-10 and 7-11.
Figure 7-10 Outdoor Subscriber Unit of the Interconnect Cable with Cable Preparation
Grommet
Grommet
clamping
plate
Note direction
of taper
Insert wire
into channels
1/2"
3/8"
Shielding
Pin 1
Tab on
underside
1" square tinned copper foil - wrap the copper foil around the
shield/braid and sheath with the left
edge aligned with the edge of the braid.
Grommet is
conductive
and used to
complete
the ground
Company Proprietary
Adaptive Broadband U-NII Product Installation Manual 07/04/2001 7-10
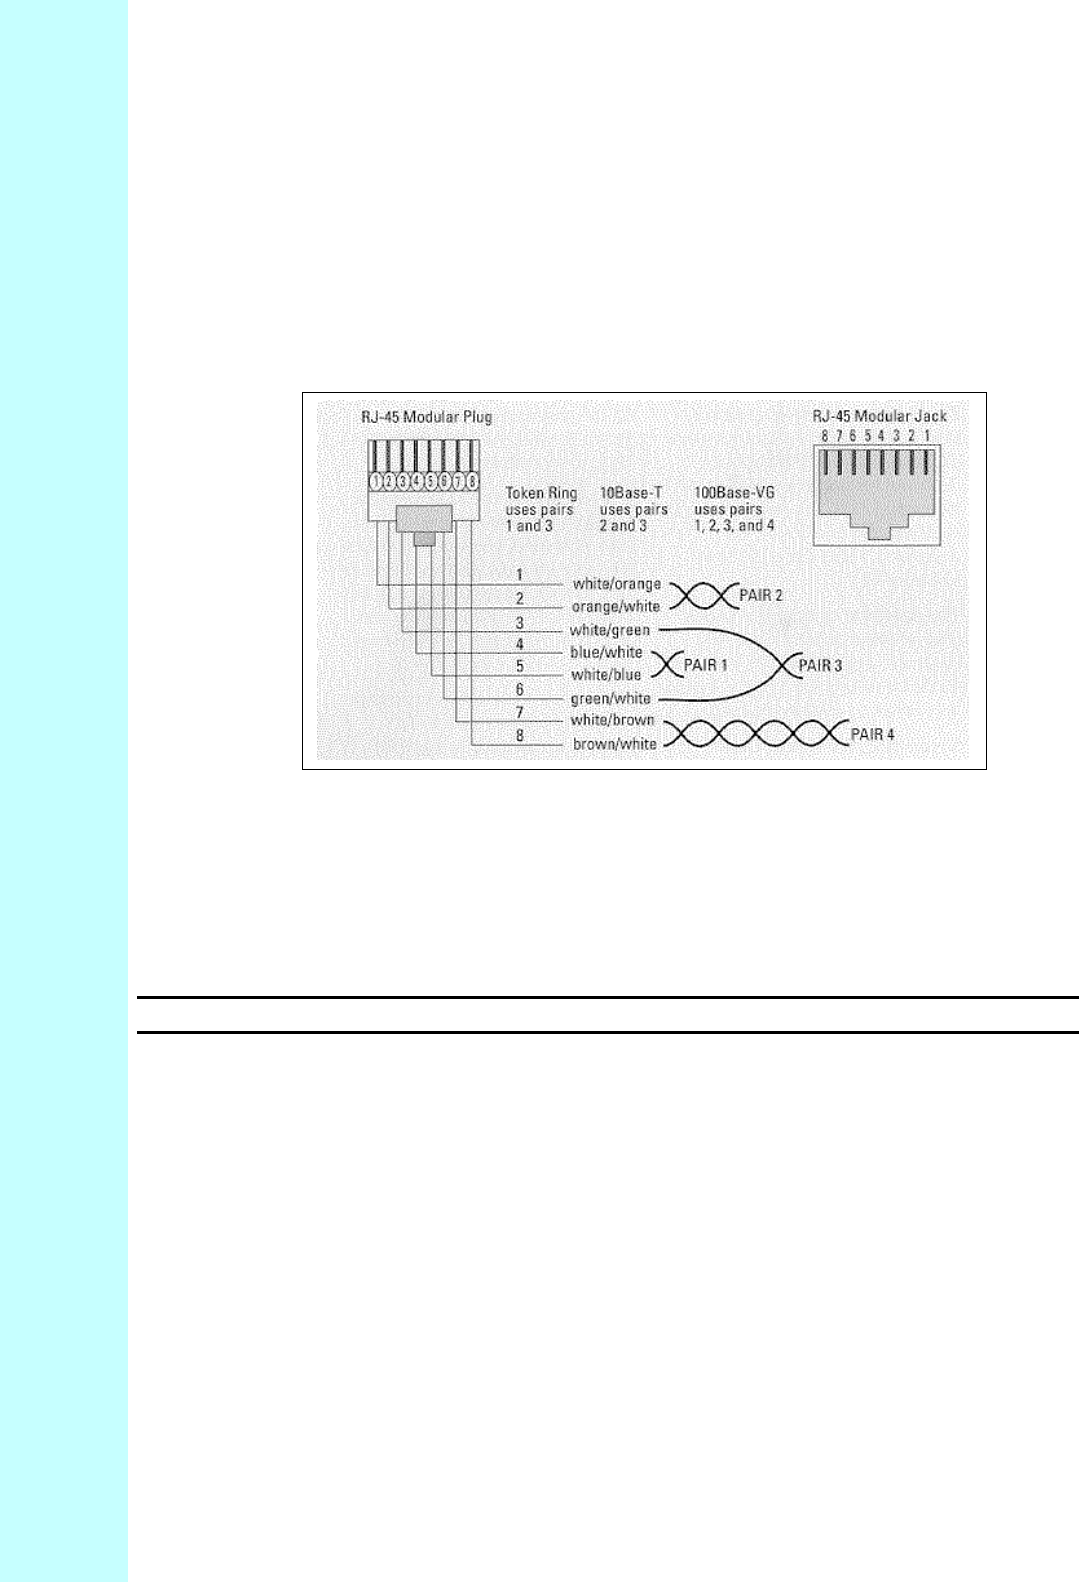
4. Separate the twisted pair wires and align by color code in the order listed in the following
Table 7-7.
Figure 7-11 Outdoor Subscriber Unit End of the Interconnect Cable with Shielding
Table 7-7 Cable Legend for Interconnect Cable
Pin Color Code
1 White / Orange
2 Orange
3 White / Green
4Blue
5 White / Blue
6 Green
7 White / Brown
8Brown
5. Using pin 1 as a reference, insert the individual wires into the channels of the RJ-45
connector. Each wire should penetrate the channels until flush with the connector end. The
copper foil tape should extend past the casing of the RJ-45 connector by approximately ½
inch.
6. When all wires are inserted into the channels in their correct order, use the crimping tool to
permanently crimp the wires to the connector.
Attention! Carefully read the instructions for the crimping tool you are using. Use the
correct crimping tool for the RJ-45 connector you are using. Incorrect
installation of the RJ-45 connector may result in a bad connection between the
outdoor transceiver and the indoor junction box.
Company Proprietary
Adaptive Broadband U-NII Product Installation Manual 07/04/2001 7-11
7.5.3 Connecting to the Outdoor Subscriber Unit Transceiver
Now that you have prepared the interconnect cable, you are ready to connect the cable to the
outdoor Subscriber Unit.
Attention! Always Disconnect Power from wall box BEFORE inserting RJ-45 connector
into transceiver. This prevents arcing damage from occurring.
1. Insert the RJ-45 connector into the receptacle located underneath the outdoor Subscriber Unit
(refer to Figure 6-9). Make sure that the connector tab engages the slot in the receptacle.
2. Slide the grommet up the cable and press it into the bottom of the outdoor transceiver.
3. Slide the grommet clamp up the cable and align the holes with the mounting holes on the
bottom of the outdoor transceiver.
4. Insert the two screws in the mounting holes and tighten until the grommet has a slight bulge.
Be sure to tighten both screws equally so that the grommet is seated correctly.
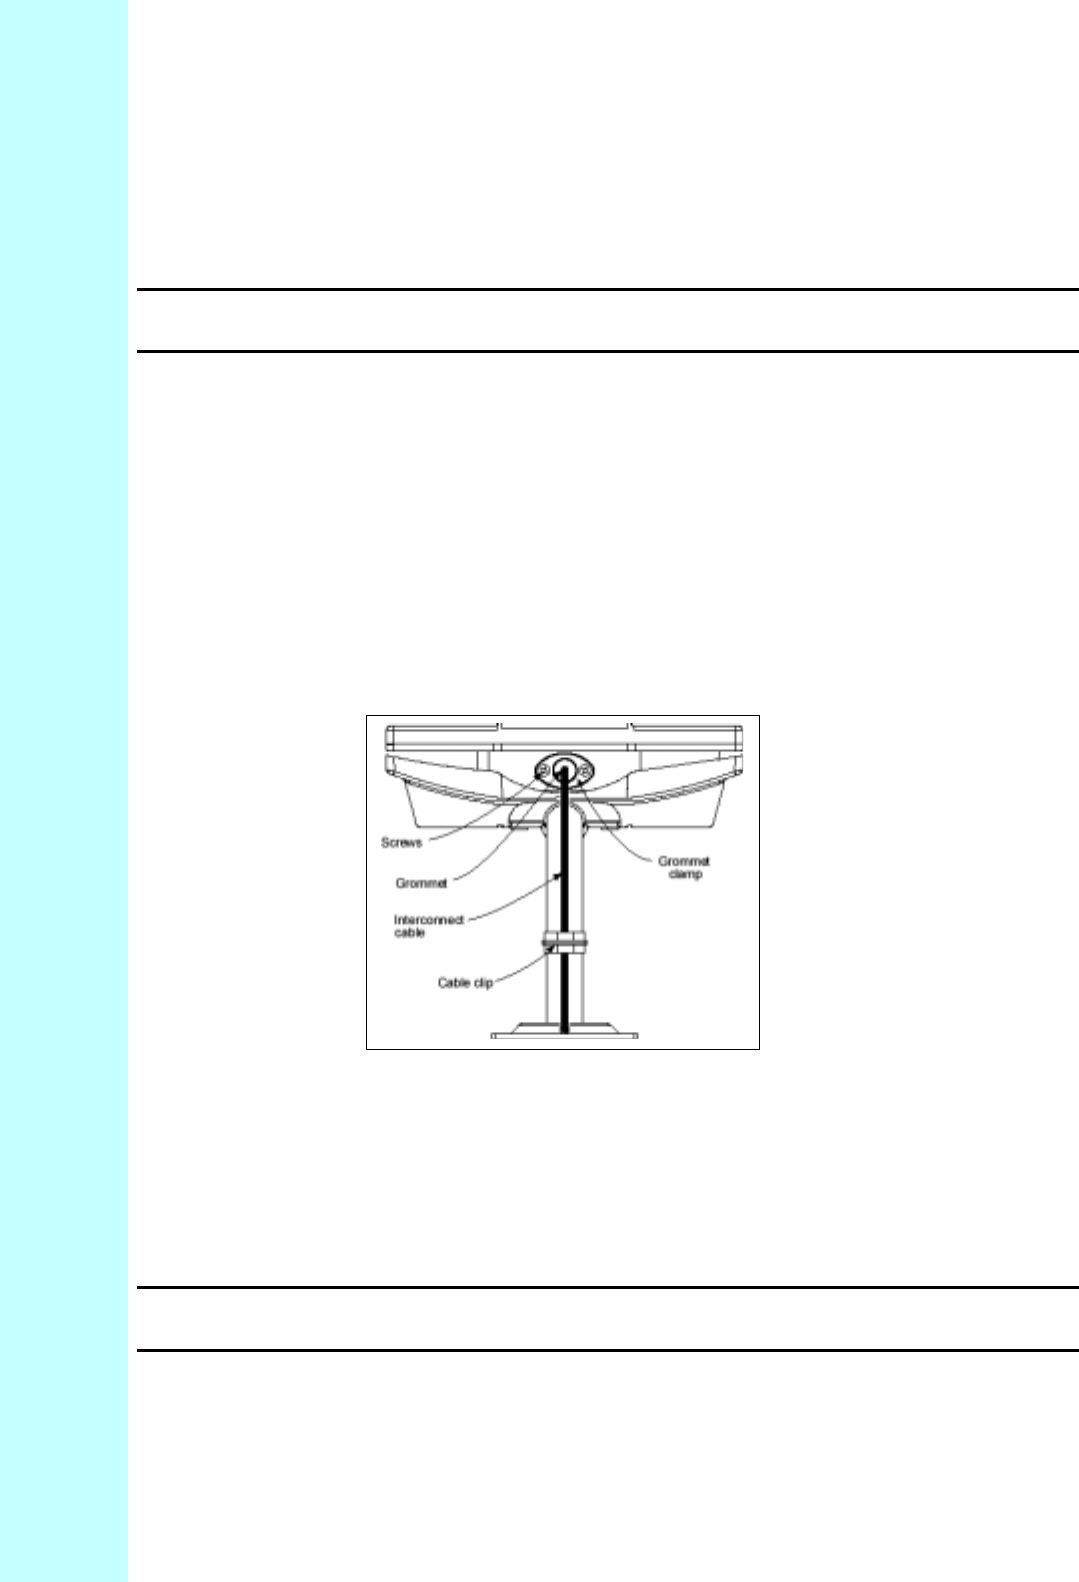
5. Secure the interconnect cable to the mounting pole with the cable clip, as shown in
Figure 7-12.
Figure 7-12 Interconnect Cable Installation to Subscriber Unit -- Bottom View
7.5.4 Connecting to the Indoor Junction Box
Note that the junction box should still be disassembled and not screwed to the wall at this point.
1. Strip 2 inches of insulation off the junction box end of the interconnect cable.
Attention! Don’t cut off the shield from the cable – you will need it to ground the
system later.
Company Proprietary
Adaptive Broadband U-NII Product Installation Manual 07/04/2001 7-12
2. Insert the cable end through the notched out section of the junction box.
3. Reinstall the PCB into the junction box using the two screws, allowing enough of the
interconnect cable to be able to reach the punch down block and wrap around the mounts of
the cover plate for strain relief.
4. Using Figure 7-13 as a guide, use the 110 punch down tool to punch down each wire into the
slot on the punch down block (reference the following Figure 6-16 which shows the inside of
the Junction Box).
Figure 7-13 Interconnect Cable Connections to Indoor Junction Box
5. Snip off excess wire ends, if necessary.
Attention! Avoid excessive wire loops when connecting the wire to the punch down block.
For now, set the junction box to one side leaving it disassembled. You will reassemble it and
mount it on the wall when you have grounded the system.
7.6 Grounding The System
The AB-Access System must be properly grounded in order to protect it and the building it is
installed on from lightning damage. This requires grounding both the outdoor transceiver and
indoor junction box. The following Table 7-8 describes the tools you will need to ground the
system.

Company Proprietary
Adaptive Broadband U-NII Product Installation Manual 07/04/2001 7-13
Table 7-8 Required Tools and Equipment
Tools Equipment Quantity
Mallet Grounding rod 1
Wire stripper #8 braided copper wire
Wire cutters Grounding lugs 2
Hex wrench Grounding clamp 1
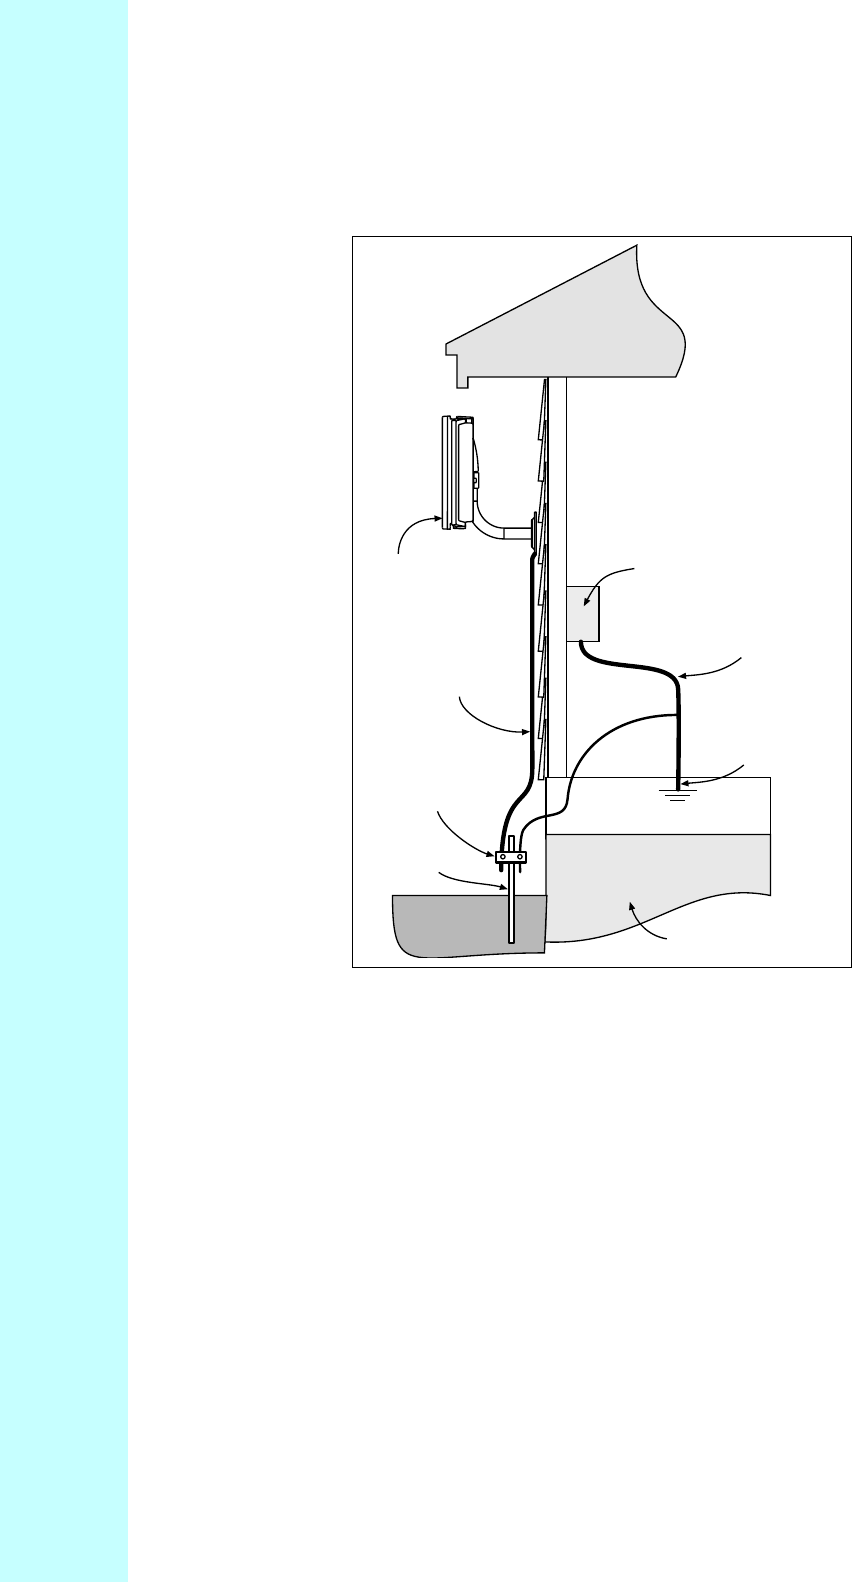
7.6.1 Installing A Grounding Rod
1. Place the grounding rod to allow for the shortest possible path from the grounding cable to
the outdoor Subscriber Units.
2. Drive the grounding rod into the ground at least eight inches from the ground surface.
3. Attach a grounding clamp on the grounding rod. You will use this clamp to attach grounding
wires for both the outdoor Subscriber Unit and indoor junction box.
Company Proprietary
Adaptive Broadband U-NII Product Installation Manual 07/04/2001 7-14
Figure 7-14 Ground Connections for Subscriber Unit
7.6.2 Grounding the Outdoor Subscriber Unit
1. To ground the outdoor Subscriber Unit, you will need to install a grounding wire from the
mounting pole to the grounding rod. The wire should be long enough to reach from the
mounting pole to the grounding rod with 3 to 6 feet extra to allow for strain relief.
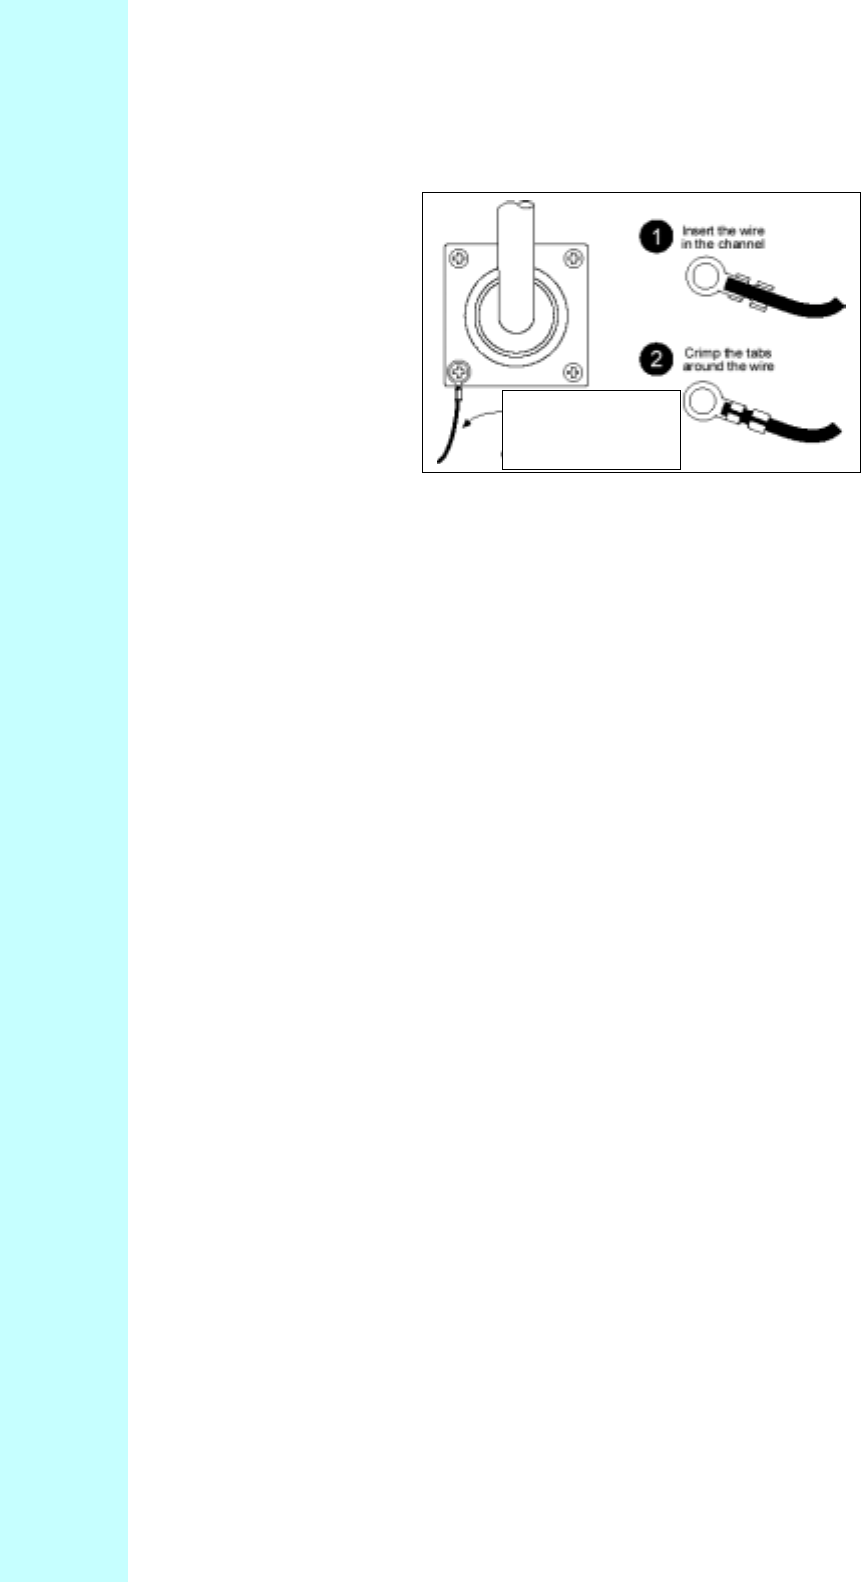
2. Connect a ground lug to one end of a measured length of copper braided wire by crimping
the lug to the wire, as shown in Figure 7-15.
3. Remove one of the lower mounting screws of the mounting pole. Insert a screw through the
grounding lug terminal and re-install it to the mounting pole.
4. Attach the grounding wire to the clamp on the grounding rod. If necessary, use wire staples
to secure the grounding wire to the outside wall.
Outdoor
transceiver
Indoor
wall box
Grounding
rod
Concrete
foundation
Clamp
Grounding cable
(10 AWG)
6 AWG
Premises electrical
ground
Grounding cable
(10 AWG)
Company Proprietary
Adaptive Broadband U-NII Product Installation Manual 07/04/2001 7-15
Figure 7-15 Mounting Pole with Ground Lug
7.6.3 Grounding the Indoor Junction Box
To ground the indoor junction box, you will need to install a grounding wire from the junction
box to the grounding rod. The wire should be long enough to reach from the junction box to the
grounding rod with 3 to 6 extra feet to allow for strain relief.
1. Feed the grounding cable through the broken out section of the wall cover (alongside the
interconnect cable).
2. Connect a ground lug to the grounding cable by crimping the lug to the wire, as shown in
Figure 7-15.
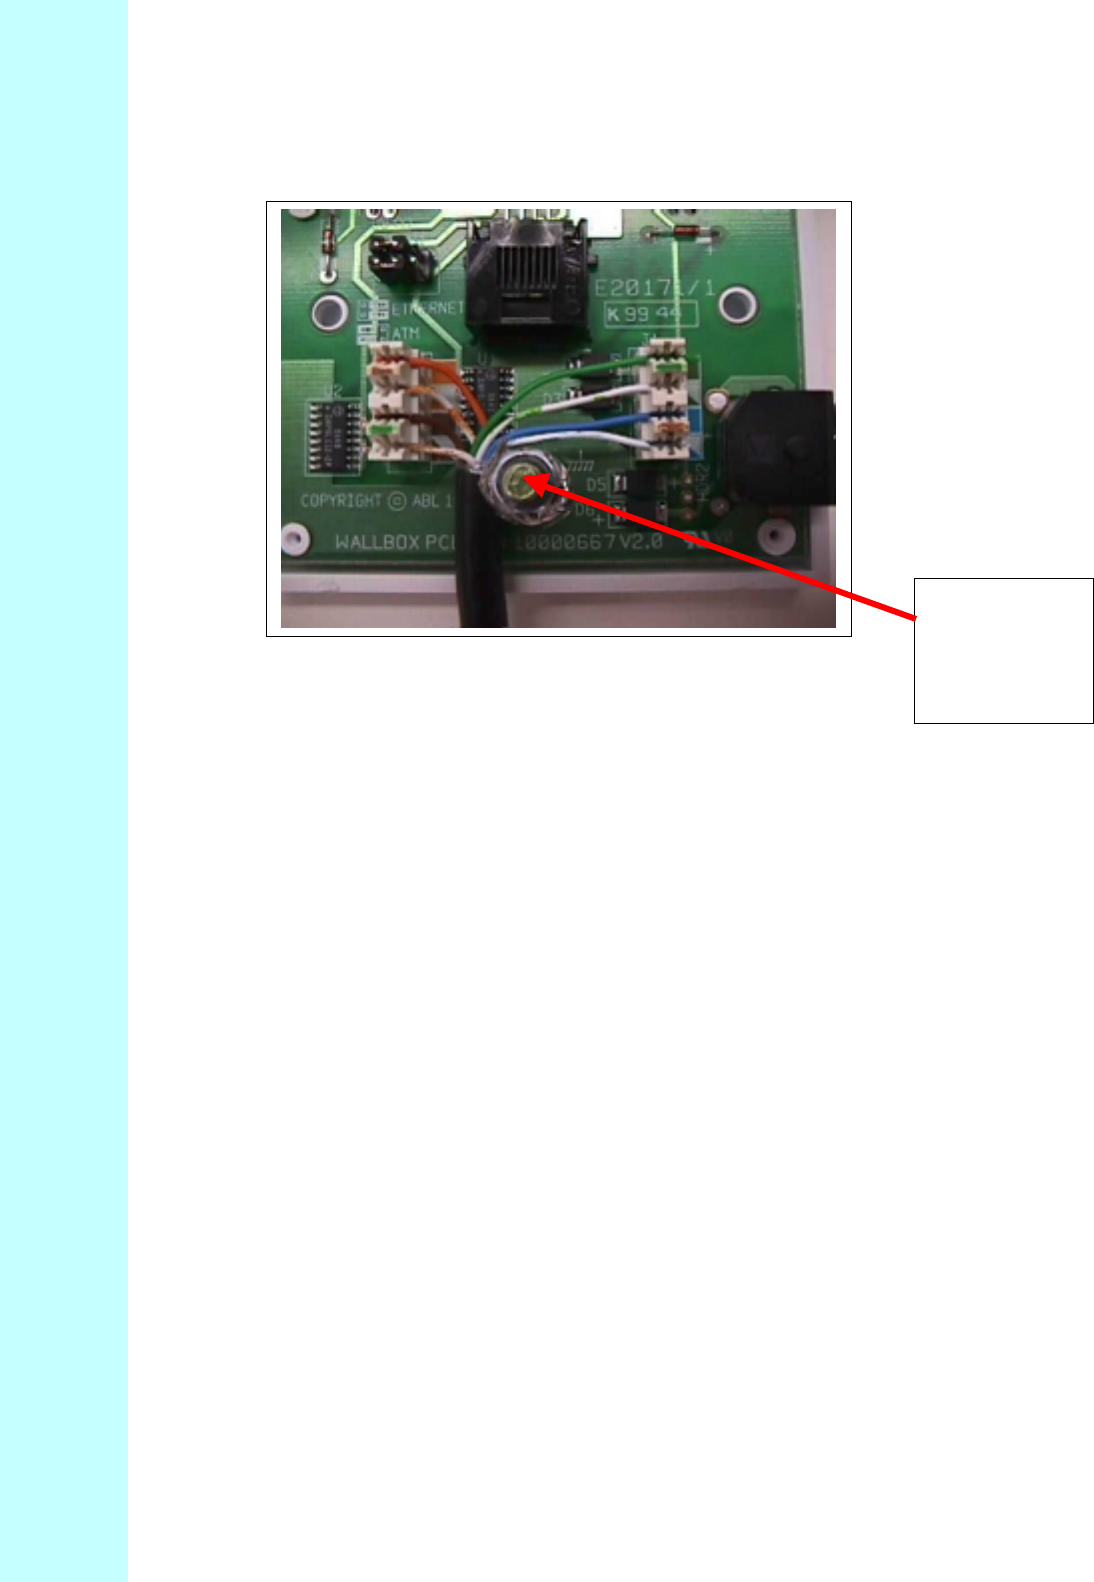
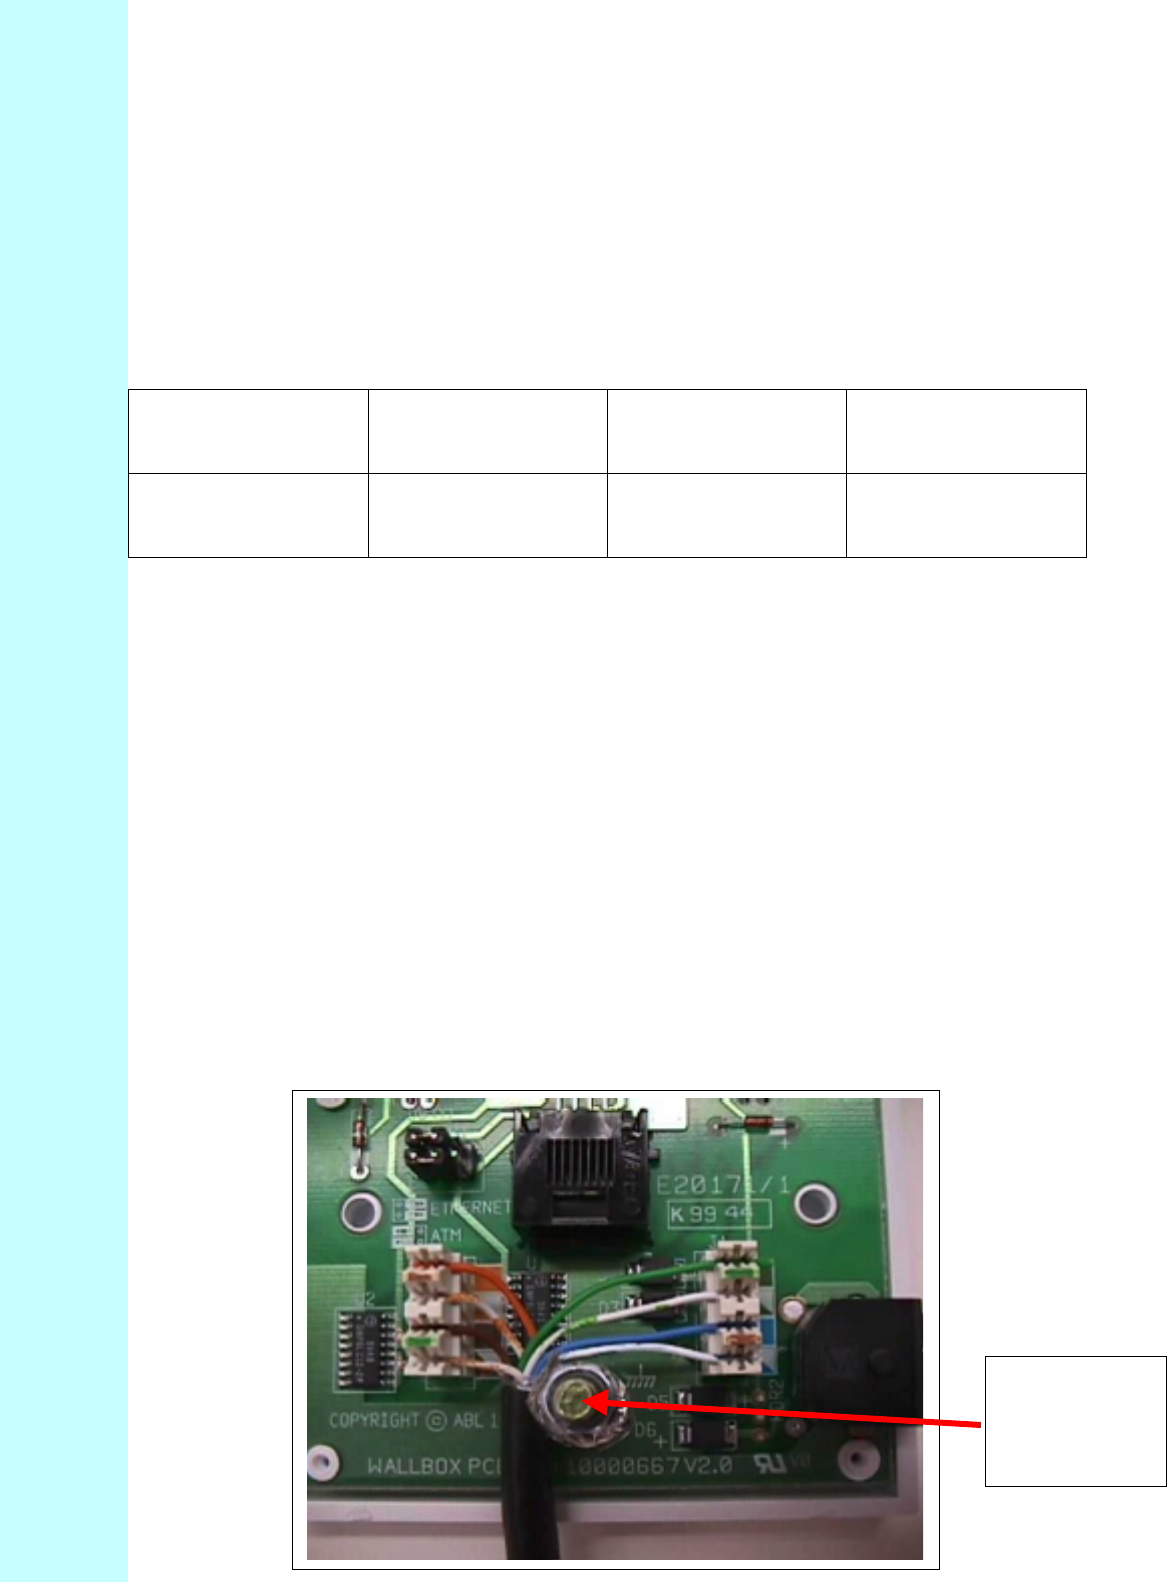
3. Remove the hex nut on the grounding post, as shown in Figure 7-16.
4. Install the grounding lug terminal onto the grounding post.
5. Attach the wire shield of the interconnect cable to the ground post. You may need to crimp
or solder an extra length of wire to the shield in order to attach it to the grounding post.
6. Re-install the hex nut to the grounding post and tighten.
7. Attach the grounding wire to the clamp on the grounding rod.
8. Use the provided small wire tie to firmly attach the interconnect cable to the ground lug.
This will provide strain relief for the cable and prevent the data and power leads from being
disturbed during installation.
Ground lug with #10
awg coppe r wire
Company Proprietary
Adaptive Broadband U-NII Product Installation Manual 07/04/2001 7-16
Figure 7-16 Indoor Junction Box Ground Connection
7.6.4 Assembling and Mounting the Junction Box
1. Place the junction box wall mount over the drilled holes.
2. Insert the screws and tighten.
3. Reinstall the faceplate onto the junction box using the two screws.
Indoor
Junction Box
Ground
Connection
Company Proprietary
Adaptive Broadband U-NII Product Installation Manual 07/04/2001 8-1
8 Indoor Junction Box
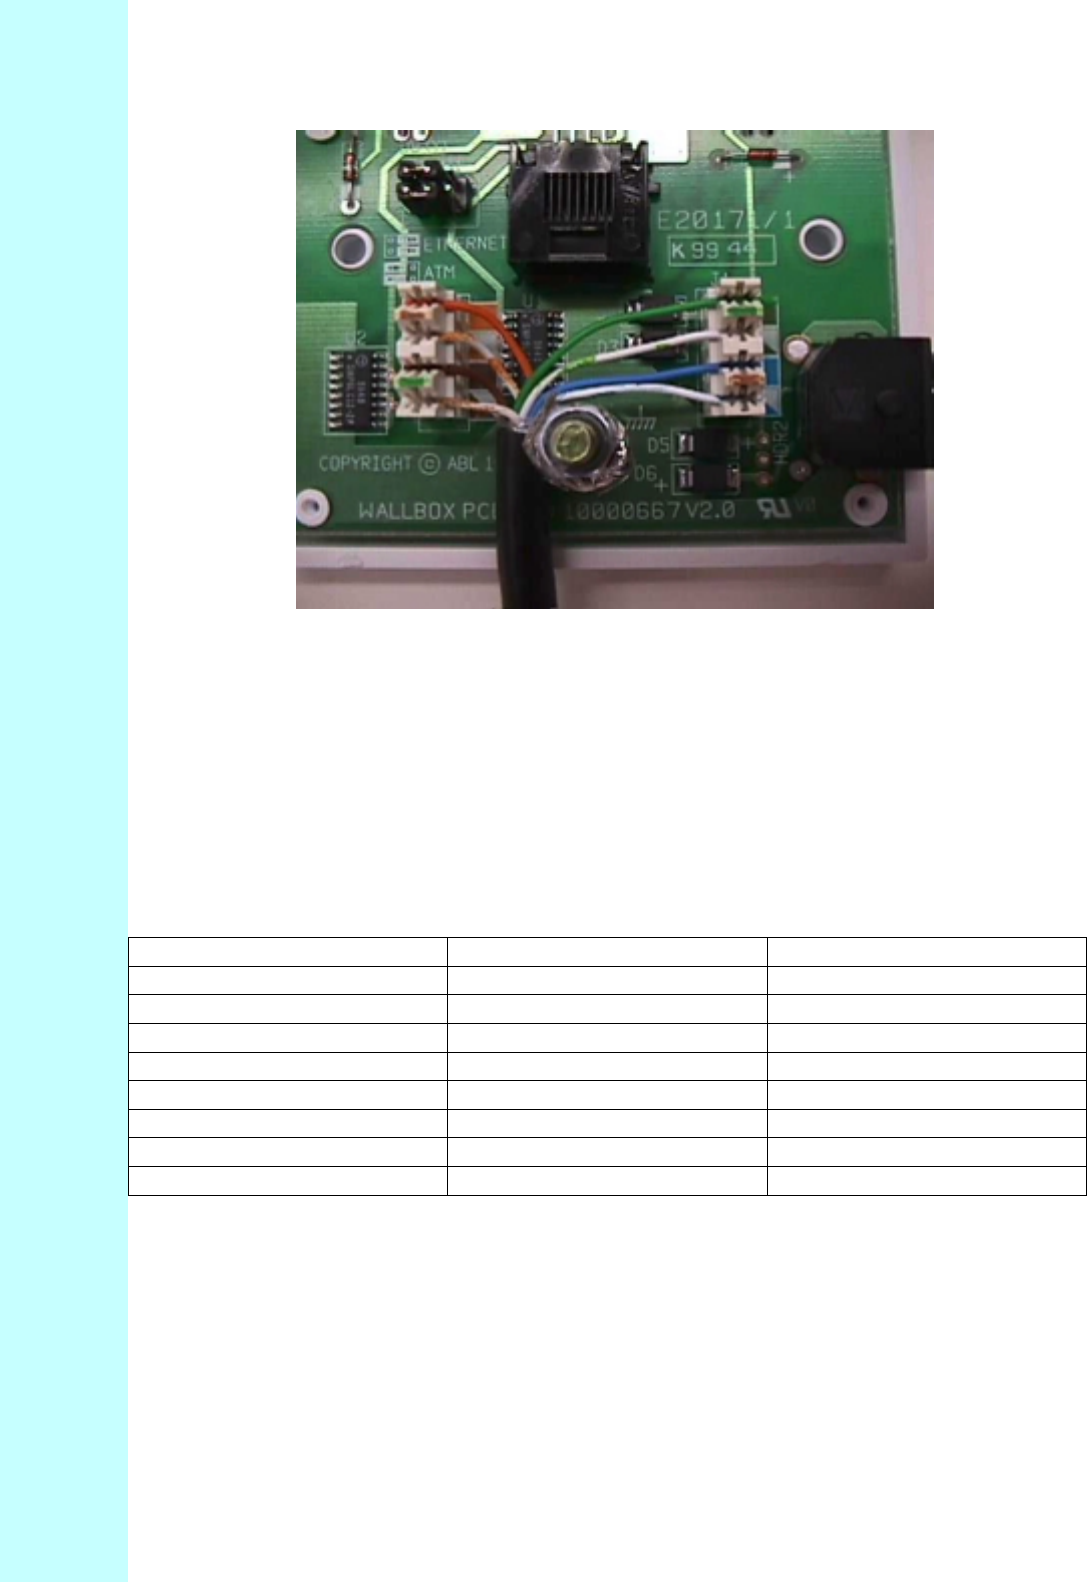
The indoor junction box/wall box consists of a PCB that inserts power into the CAT-5 cable and
provides secondary lightening protection. Photos of the indoor Junction Box are shown in
Figures 8-1 and 8-2.
Figure 8-1 Indoor Junction Box (Wall Plate Enclosure)
The indoor junction box can be wired for ATM25 or Ethernet interfaces. Note that the PCBs
may be housed in separate plastic boxes or mounted in a card cage. Table 8-1 describes the
cable legend to follow.
Note, Four pre-scored
notches that can be
removed for cable
insertion.
SECTION 8 Indoor Junction Box
Company Proprietary
Adaptive Broadband U-NII Product Installation Manual 07/04/2001 8-2
Figure 8-2 Indoor Junction Box Inside
Table 8-1 Cable Legend - Junction Box Interconnect Cable
Pin Signal Color Code
1 Transmit High (+) White / Orange
2 Transmit Low (-) Orange
3 LED2 White / Green
4 Supply Minus Blue
5 Supply Plus White / Blue
6 LED1 Green
7 Receive High (+) White / Brown
8 Receive Low (-) Brown
Company Proprietary
Adaptive Broadband U-NII Product Installation Manual 07/04/2001 8-3
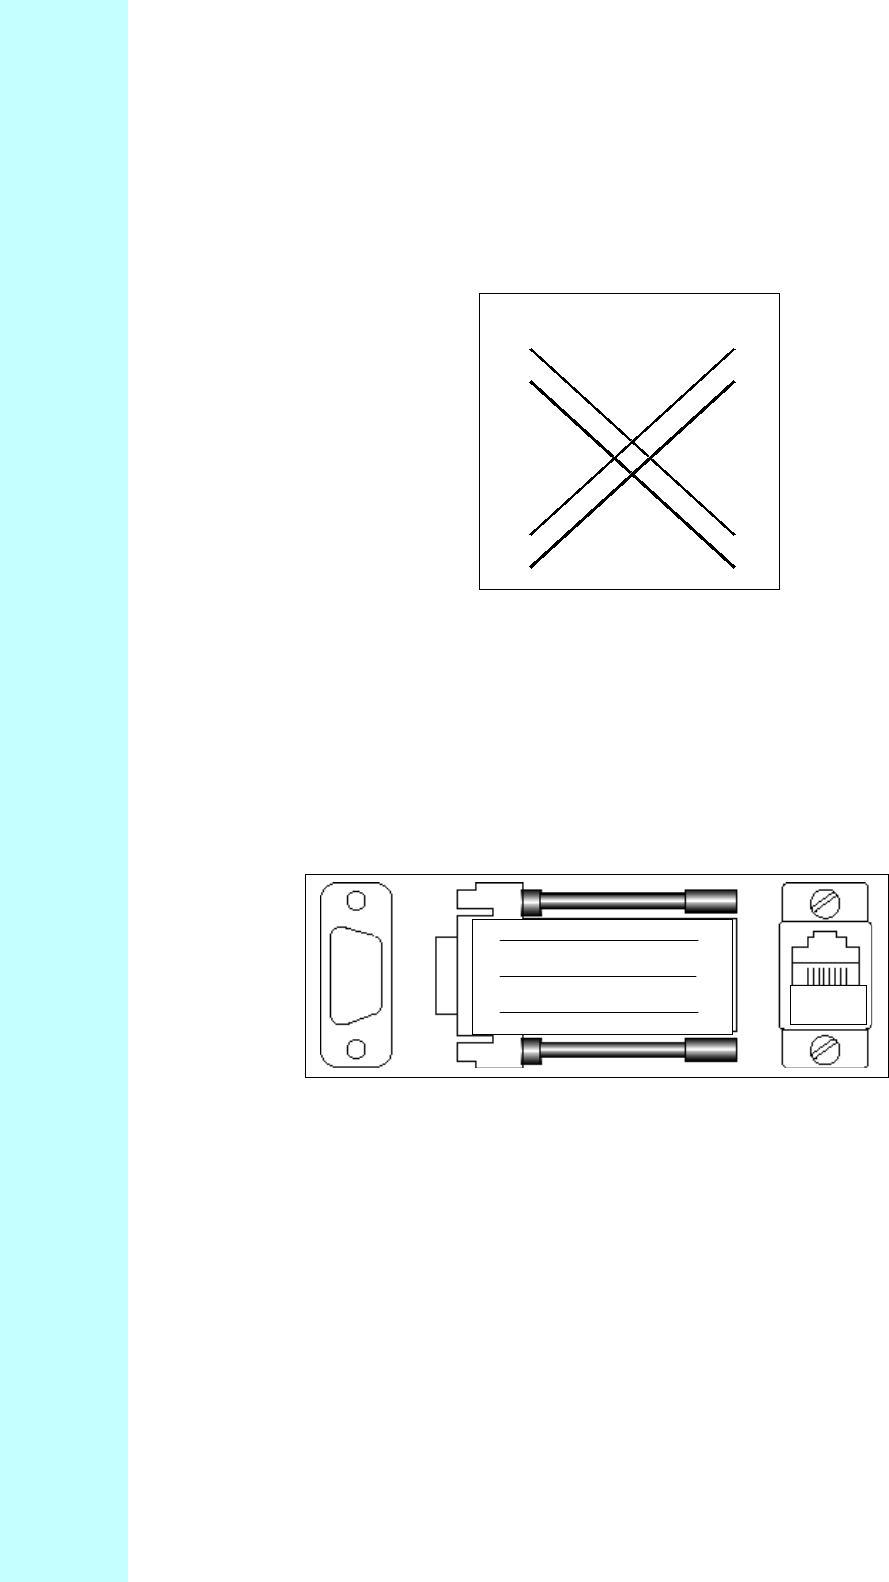
8.1 ATM Cross-Over Cable
Figure 8-3 shows how to wire an ATM cross-over cable:
Figure 8-3 ATM Cross-Over Cable
8.2 FVC DB-9 To RJ-45 Converter
Figure 8-4 shows a DB-9 to RJ-45 converter.
Figure 8-4 DB-9 To RJ-45 Converter
Pin
1
2
3
4
5
6
7
8
Pin
1
2
3
4
5
6
7
8
2 3
3 7
5 5 1 8

Company Proprietary
Adaptive Broadband U-NII Product Installation Manual 07/04/2001 9-1
9 Testing the System
9.1 Introduction
This section explains how to:
• Power up your AB-Access System
• Use a PC (known as the Test PC) to check the alignment of your outdoor transceiver
• Make sure you have the best connection to your service provider.
Attention! This operation may need two people – one to operate the Test PC and one
to align the outdoor transceiver.
Note: For purposes of AB-Access Extender, the two ends of the AB-Access Extender link appear
like static point-to-point AP and SUs with respect to testing.
9.2 Equipment Required
You will need the following equipment to test your AB-Access System:
• Standalone PC or laptop (Test PC) with a web browser (e.g., Netscape Navigator 4.5 or
higher, Internet Explorer 4.0 or higher).
• Standard 10Base-T Ethernet cable with RJ-45 connectors to connect the Test PC to the
indoor junction box.
You will also need to know the correct IP address and subnet mask to configure the Test PC.
Your service provider should have supplied these. The defaults for an SU are 192.168.3.254
Netmask 255.255.255.0.
9.3 Testing
In order to be able to check the alignment of your outdoor transceiver, along with the connection
to your service provider, you need to know how to configure an IP address and subnet mask. If
you are not sure how to do this, look in the manual that came with the PC you are using as the
Test PC. You could also check the online help.
9.3.1 Connecting Test PC
1. Connect the Test PC to the indoor junction box using a standard 10Base-T Ethernet cable
(with RJ-45 connectors).
2. Insert the power plug adapter into the indoor junction box.
3. Insert the AC power plug into an AC outlet.
4. Check the LEDs on the junction box.
SECTION 9 Testing the System

Company Proprietary
Adaptive Broadband U-NII Product Installation Manual 07/04/2001 9-2
Attention! If the yellow LED is on, this indicates that power is being supplied to the unit.
If not, check the connections.
9.4 Configure The IP Address
1. Switch on the Test PC.
2. Configure the Test PC to use the recommended IP address supplied by your system provider
or installer (example: 192.168.3.1).
3. Configure the Test PC to use the recommended netmask supplied by your system provider or
installer.
Attention! These steps make sure that the test PC is on the same subnet as the AB-Access
System. The last number in the Test PC’s IP address must be different from
the last number in the IP address of the AB-Access System (see below).
9.5 Using the RSSI Interface for RF Alignment
One of more challenging aspects to RF systems is proper alignment of antennas. With distances
up to 3 miles, it can be very difficult to align an SU with an AP. To solve this problem, the RF
signal strength and packet error rate can be measured to provide feedback, which can be used to
properly align a unit. This information is typically called the Receive Signal Strength Indicator
(RSSI).
While the RSSI interface is always present, it is primarily designed for use with SUs being
initially deployed. To use the RSSI interface, the SU should be set to “installation” mode when
upgraded in the Operation Center. Installation mode is used for SUs to be used in a dynamic
registration (EMS) environment. When an SU is in installation mode, the SU will wait for the
installer to align the antenna and will register only after the installer has initiated the registration
sequence via the browser interface. This is slightly different from registration mode, where the
SU automatically registers with the strongest AP immediately after booting.
For realignment, the SU must be set back into Installation mode from the hmm sub process by
issuing the command:
hmm> system mode installation
While the RSSI interface is always present, when not set to Installation mode, the SU will not
attempt registration once the proper channel is selected.
The RSSI application can also be effective in Static or Registration mode in analyzing the RF
landscape with respect to other AB-Access components. Using the RSSI interface, the network
manager can get readings on RSSI and Packet Error Rates in a convenient display. The only
difference is the SU to register in these modes. Registration via the RSSI interface only occurs
when the unit is in Installation mode.
Company Proprietary
Adaptive Broadband U-NII Product Installation Manual 07/04/2001 9-3
To take advantage of this information, the AB-Access Subscriber Units contain an interface,
which allows the installer to properly align the unit. Once an SU is mounted in place and
roughly aligned using a compass, the installer can attach a computer to the terrestrial interface of
the SU and interact with the RSSI web page on the SU to perform alignment (reference Figures
9-1 and 9-2). Connecting to the SU and enabling the RSSI interface is performed in the manner
described in the following sections.
NOTE: The RSSI interface is best viewed using a screen resolution of at least 800x600 with 256
colors. Netscape Navigator is recommended as the viewing browser, reference following Figure
9-1 RSSI Sample Web Page.
9.6 Display The Security Page
1. From your Test PC, start up a web browser.
2. In the URL field, enter the default IP address of the AB-Access System (supplied by your
service provider (example, http://192.168.3.2).
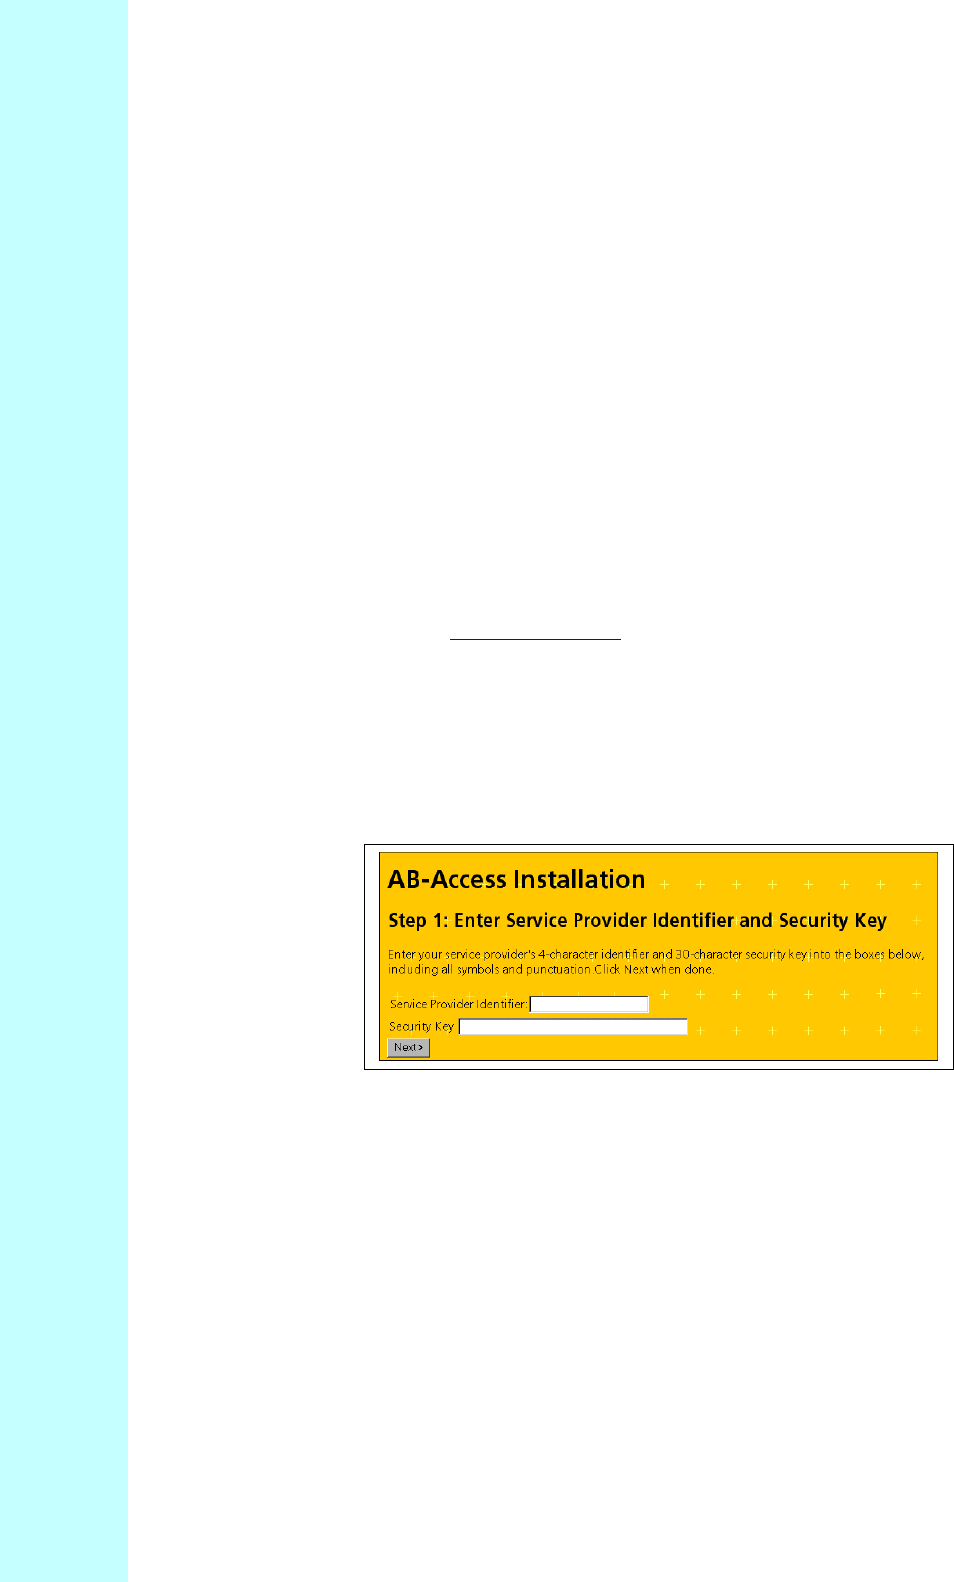
3. The Security screen appears as shown in Figure 9-1.
Figure 9-1 Security Screen
9.7 Optimize The Antenna Alignment
At the security screen, enter the Service Provider Identifier and Security Key. The key is
supplied by your service provider as a secure login.
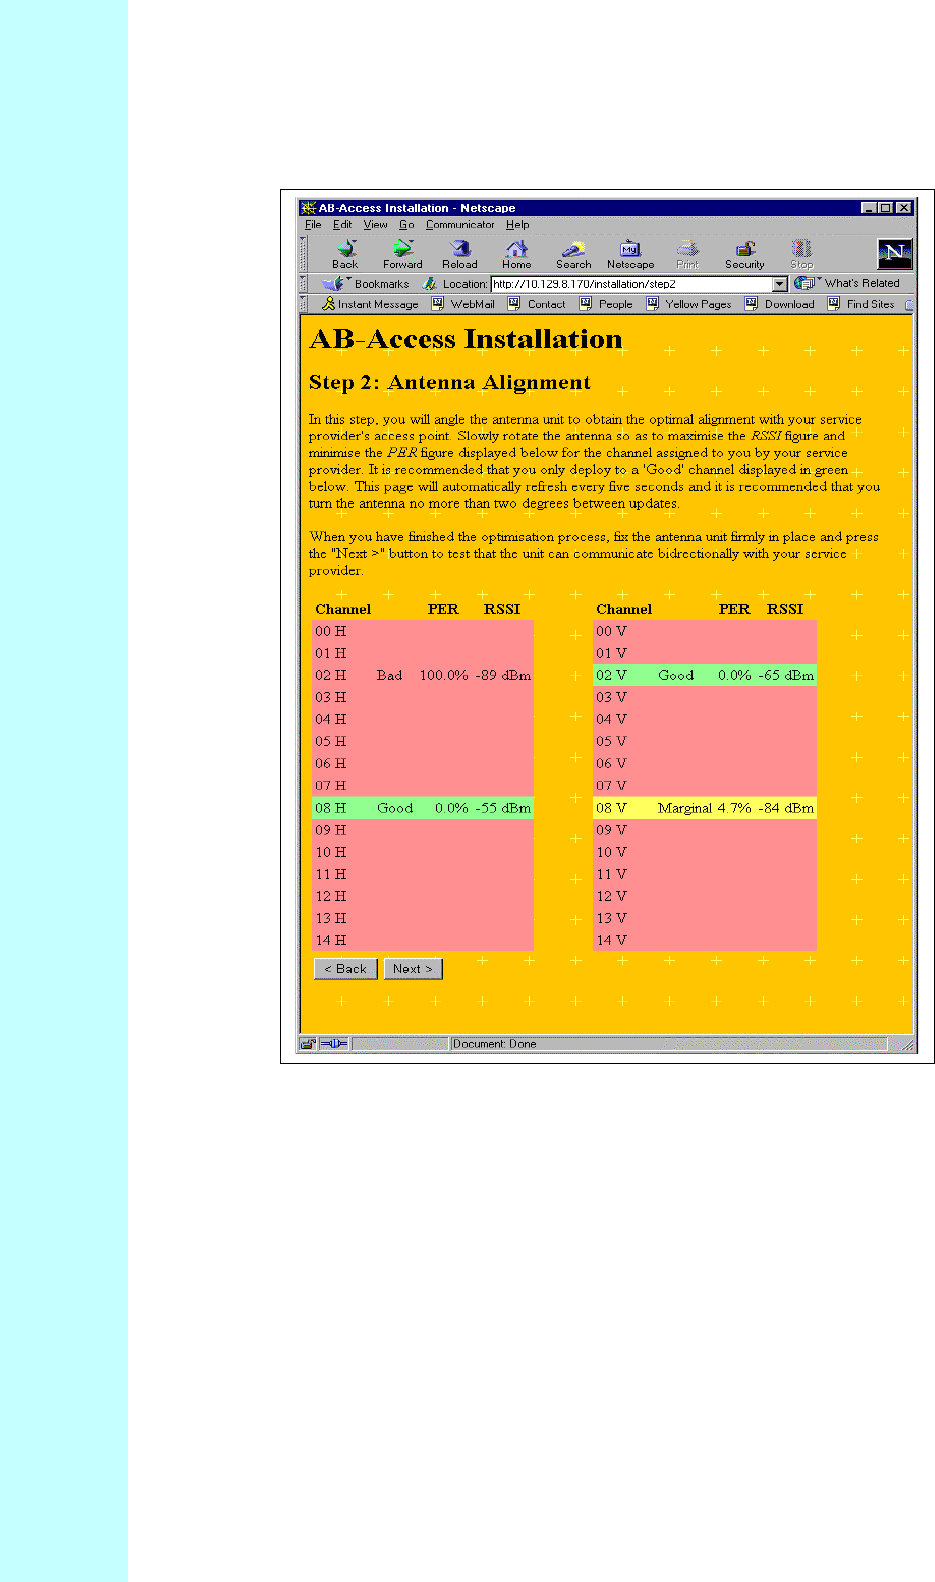
Click Next. The Antenna Alignment screen appears as shown in Figure 9-2.
Company Proprietary
Adaptive Broadband U-NII Product Installation Manual 07/04/2001 9-4
Figure 9-2 RSSI Sample Web Page
1. Note the desired channel for registration (example, Channel 14, horizontal polarization).
2. Attach a computer to the terrestrial interface of the SU.
3. Change computer IP address to be in the same subnet as the SU. For example, set the
computer to address 192.168.254.1 to connect to an SU with the IP address of
192.168.254.254.
4. Verify connectivity to the SU using the Ping utility (example, ping 192.168.254.254)
5. Open a browser interface on the computer (Netscape Navigator is recommended)
6. Enter the address of the RSSI web interface:

Company Proprietary
Adaptive Broadband U-NII Product Installation Manual 07/04/2001 9-5
http://<ip address of SU>/installation/step2 (ex http://192.168.254.254/installation/step2)
7. This will display two columns of data, one column for RF channels using horizontal
polarization and a second for vertical polarization. Turn the SU in 2 degree arcs until the
channel desired is listed as “Good” and is green in color.
8. Click on the “next” button to initiate registration of the SU with the AB-Access network.
The RSSI web interface will refresh itself every 5 seconds, allowing the installer to adjust the SU
until the best alignment possible is achieved. The RSSI application will actually rank connection
validity. Table 8-1 details these rankings.
Table 9-1 RSSI Link Validity
Link Validity Color CNR2PER1
Good Green Greater than or equal to 10dB Less than 1%
Marginal Yellow Less than 10dB Less than 1%
Bad Pink Non Applicable Greater than 5%
1: PER is Frame Downlink Header Error Rate (FDHDR)
2: CNR = RSSI –81.6dbm
Bad links will not allow any registration. Marginal links will allow registration but may be
subject to interference by a number of factors. Good links will be the best selection for
registration.
Company Proprietary
Adaptive Broadband U-NII Product Installation Manual 07/04/2001 10-1
10 Specifications
10.1 Subscriber Unit Antenna
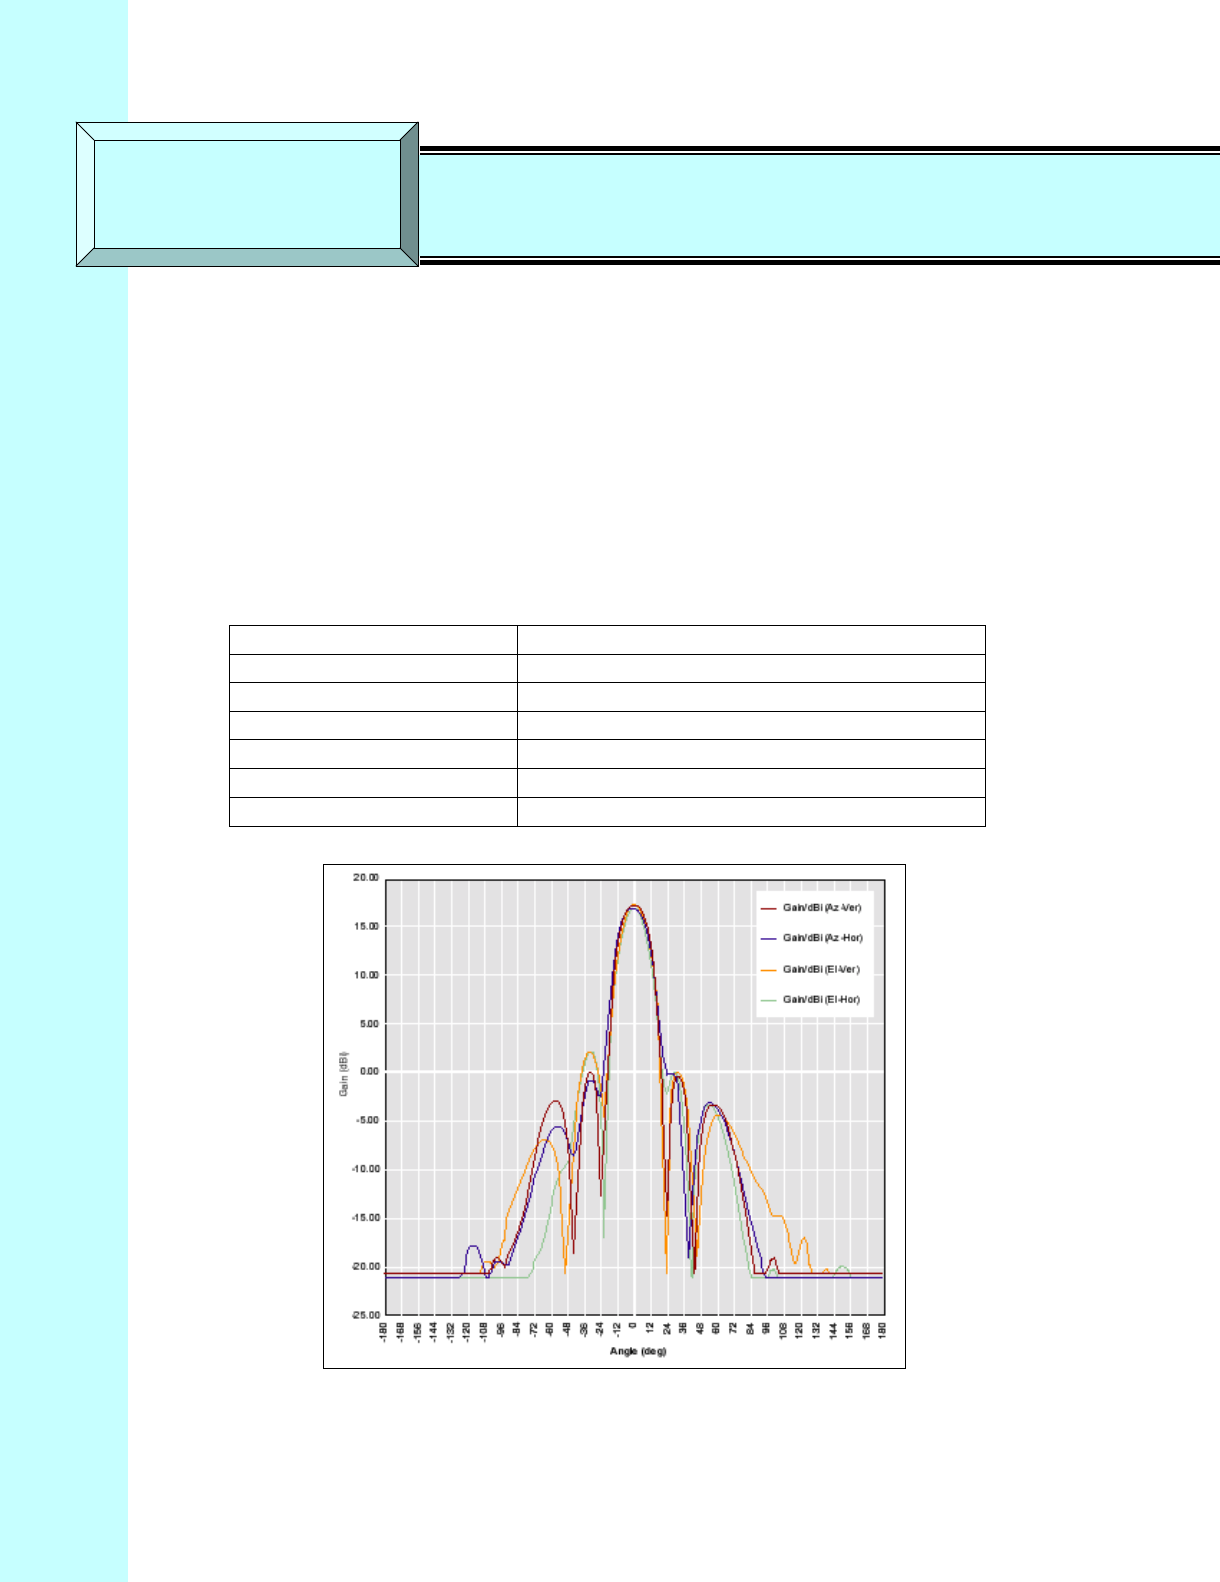
Table 10-1 describes the Subscriber Unit (SU) Antenna specifications and Figure 10-1 shows a
typical SU antenna pattern.
Table 10-1 Subscriber Unit Antenna Specifications
Peak Gain 18 dBi
3 dB beam width 20° azimuth x 20° elevation
Front to back ratio 30 dB
Sidelobe suppression 15 dB
Input impedance 50 Ohms
Polarization Linear – vertical or horizontal switchable
VSWR 2:1 max
Figure 10-1 Typical SU Antenna Pattern
SECTION 10 Specifications
Company Proprietary
Adaptive Broadband U-NII Product Installation Manual 07/04/2001 10-2
10.2 Access Point Antenna
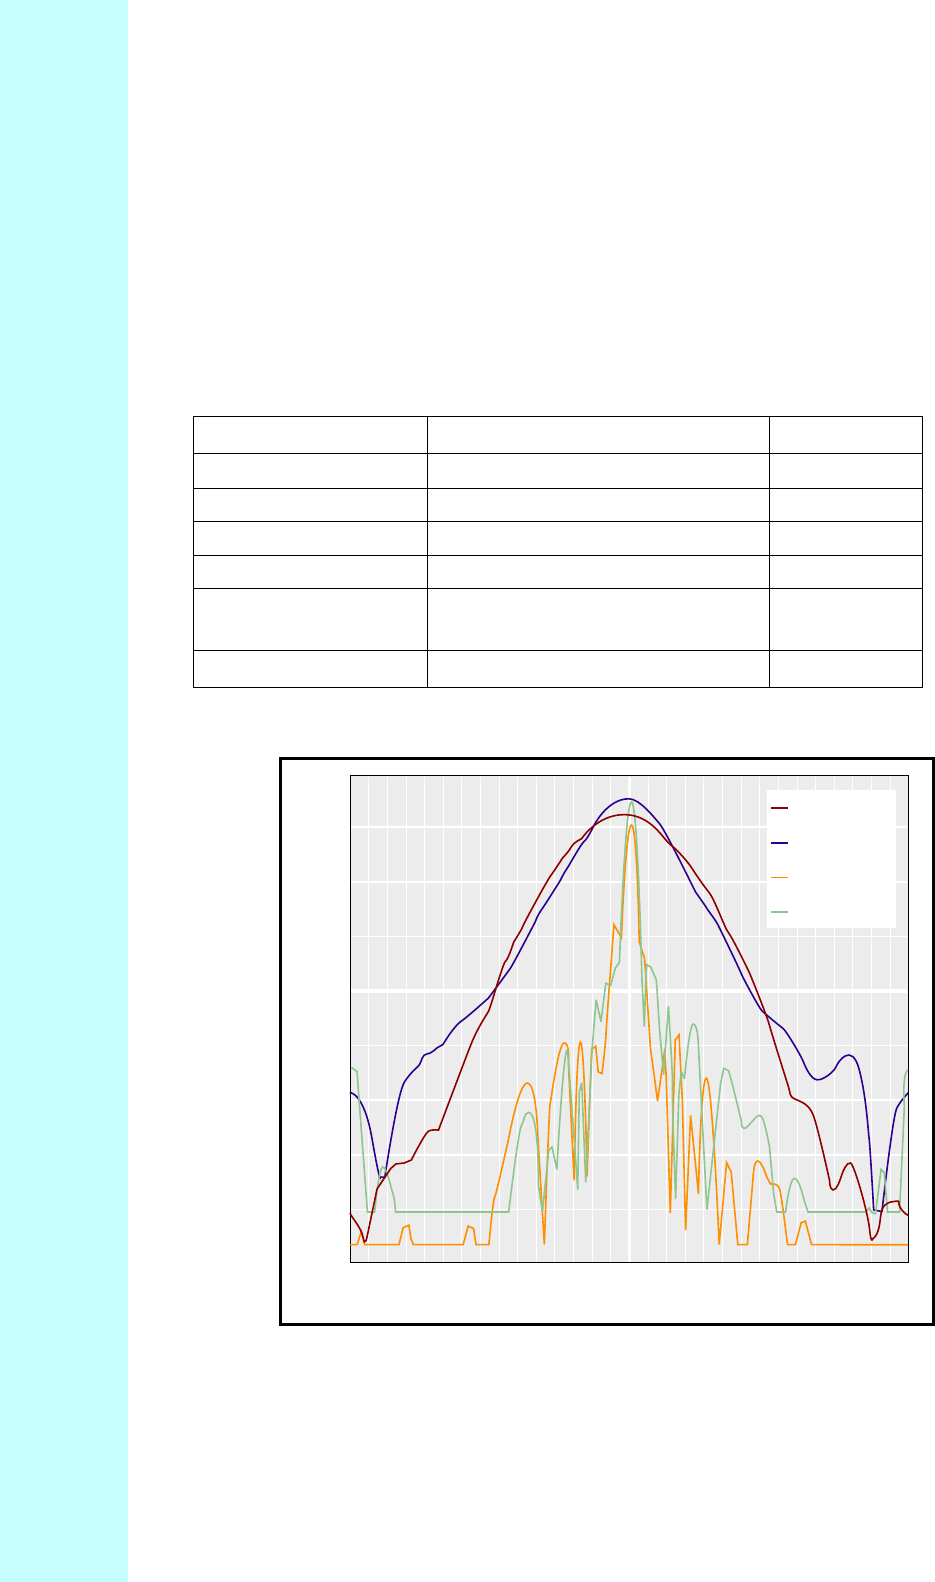
Table 10-2 describes the Access Point antenna specifications and Figure 10-2 shows a typical AP
antenna pattern.
Table 10-2 Access Point Antenna Specifications
Peak gain 18 dBi typical
3 dB beamwidth 60° azimuth x 7° elevation typical
Front to back ratio 25 dB min
Sidelobe suppression 15 dB min
Input impedance 50 ohm typical
Polarization Linear vertical or horizontal
switchable
VSWR 2:1 max
Figure 10-2 Typical AP Antenna Pattern
-180
-168
-156
-144
-132
-120
-108
-96
-84
-72
-60
-48
-36
-24
-12
0
12
24
36
48
60
72
84
96
108
120
132
144
156
168
180
-25.00
-20.00
-15.00
-10.00
-5.00
0.00
5.00
10.00
15.00
20.00
Angle (deg)
Gain (dBi)
Gain/dBi (Az-Ver)
Gain/dBi (Az-Hor)
Gain/dBi (El-Ver)
Gain/dBi (El-Hor)

Company Proprietary
Adaptive Broadband U-NII Product Installation Manual 07/04/2001 10-3
10.3 AB-Access Extender Antenna
Table 10-3 describes the AB-Access Extender antenna specifications and Figure 10-3 shows a
typical EX antenna pattern.
Table 10-3 AB-Access Extender Antenna Specifications
Peak gain 23 dBi typical
3 dB beamwidth 10° azimuth x 10° elevation typical
Front to back ratio 25 dB Min
Sidelobe suppression 15 dB Min
Input impedance 50 ohm Typical
Polarization Linear vertical or horizontal
switchable
VSWR 2:1 max

Company Proprietary
Adaptive Broadband U-NII Product Installation Manual 07/04/2001 10-4
TBD: Insert AB-Access Extender Antenna Pattern image
Figure 10-3 Typical EX Antenna Pattern
TBD: Update all section and figure numbers from here on forward
10.4 Modem Specifications
The QPSK modem design for the transceiver is driven primarily by the 32-symbol correlator and
Decision Feedback Equalizer (DFE). The correlator output is used for:
• Burst detection
• Digital AGC setting
• Phase reference
• AFC control
• Course symbol timing.
The DFE is used to remove the Inter-Symbol Interference (ISI) introduced by the filters and
imperfect sampling, as well as compensate for pre-cursor and post-cursor channel multipath.
Table 10.4 shows the Modem Specifications.
Table 10-4 Modem Specifications
Modulation Coherent QPSK
Symbol rate 12.5 Msym/s
ADC 10 bits I and Q
Receive filter Root raised cosine =0.35
AWGN performance 14.4 dB CNR for 10-4 BER (including 3 dB
implementation loss)
Equalizer Decision Feedback (DFE); 5 forward taps, 4
feedback taps; delay spreads up to 0.32 s;
post cursor to cursor ratios up to 0.5
Training 32 symbols per burst
Transmit filter Raised cosine =0.35
10.5 Environmental Specifications
10.5.1 Temperature/Humidity Operation
The entire unit is constructed in a weatherproof housing and designed for outdoor use. The
minimum and maximum operating temperatures and the relative humidity for all system
elements are listed in Table 10.5.
Company Proprietary
Adaptive Broadband U-NII Product Installation Manual 07/04/2001 10-5
Table 10-5 Environmental Specifications
Item Operating
Temperature Range,
min
Operating
Temperature Range,
max
Operating Humidity,
max
Subscribe Unit,
Access Point and
AB-Access Extender
-40°C (-40°F) 55°C (131°F) 100
10.5.2 Grounding
Article 810 of the U.S. National Electric Department of Energy Handbook 1996 specifies that
radio and television lead-in cables must have adequate surge protection at or near the point of
entry to the building. The code specifies that any shielded cable from an external antenna must
have the shield directly connected to a 10 AWG wire that connects to a building ground
electrode.
10.5.3 Electrical Specifications
The Subscriber Unit is powered from a typical notebook-style power supply that is included with
the unit. This power supply is plugged into a standard 110/220 VAC main (or a UPS unit) and
the output supply of 48 VDC is plugged into a wall box which feeds the –48 VDC through the
CAT5 cable to the installed units, reference Figure 9-3. The power supplies used to convert 110
VAC to 48 VDC are 80% efficient at this load.
Wire shield to
grounding
post and to
grounding rod

Company Proprietary
Adaptive Broadband U-NII Product Installation Manual 07/04/2001 10-6
Figure 10-4 Powering SU through Junction Box
10.5.4 Power Consumption
Table 10-6 shows the power consumption of an SU, EX and AP.
Table 10-6 SU, EX and AP Power Consumption
Item Power Source Power Range Power Consumption
W (typical)
Subscriber Unit,
AB-Access
Extender and
Access Point Unit
48 VDC 38 to 72 VDC including
fluctuations 14
10.5.5 Distance Limitations
The SU uses shielded outdoor rated CAT5 cable between the installed unit and the indoor
junction box. For the unit to receive acceptable voltage to operate, this cable is limited to 60
meters. Between the junction box and the customer premises PC (or hub, Ethernet Switch,
Router, etc.), the system uses standard indoor CAT5 cable, which is rated for a maximum
functional distance of 100 meters when running the Ethernet 10BaseT interface. For an AP (or
SU) connected via ATM25, the distance limitation of the data signaling is 270 meters.
10.5.6 Physical Specifications
Table 10-7 provides the weight and dimensions of an SU.
Table 10-7 SU Weight and Size
Item Weight Dimension
Subscriber unit 7.8 lb. (3.5 kg) 13W x 13H x 3D in.
(32W x 32H x 8D cm)

Company Proprietary
Adaptive Broadband U-NII Product Installation Manual 07/04/2001 10-7
10.6 Cable Specifications
10.6.1 Outdoor Cable Specifications
The following Table 10-8 describes all the outdoor cable specifications.
Table 10-8 Outdoor Cable Specifications
Item Specification
Product type Twisted pair
Performance category CAT 5
Frequency 100 MHz
No. of pairs 4
Impedance 100 Ohms +/- 15 Ohms
Capacitance (nominal) 4.5 nF/100 meters
Attenuation EIA/TIA 568 CAT5
Near end cross talk EIA/TIA 568 CAT5
DC resistance/unbalanced < 10 Ohms/100 meters max.
Shielded Yes
Wire/cable type Solid
Wire size 24 AWG
Cable outer diameter (nominal) 0.232 inches
Jacket thickness (nominal) 0.030 inches
Cable jacket material Polyethylene, UV resistant
Conductor material Copper
Insulation material Solid polyolefin
Shield type BBDN or BBDG
Dielectric breakdown 2500 Volts DC conductor to conductor
Operating temperature range -40° C to +70° C
Installation temperature range 0° C to +60° C

Company Proprietary
Adaptive Broadband U-NII Product Installation Manual 07/04/2001 10-8
10.7 RJ-45 Plug Specifications
Table 10-9 describes all the RJ-45 plug specifications.
Table 10-9 RJ-45 Plug Specifications
Item Specification
Product type Plug
No. of positions 8
Shielded No
Cable style Round solid
Performance category High (Cat 5)
Latch style Standard
Keyed No
Housing material Polycarbonate
Housing material flammability rating UL 94V-2
Contact material Phosphor bronze
Contact mating area plating Gold (50) over nickel
Contact termination end plating Gold Flash over nickel
Conductor outer diameter (mm [in]) .89-.99 [.035-.039]

Company Proprietary
Adaptive Broadband U-NII Product Installation Manual 07/04/2001 11-1
11 Glossary & Acronyms
TERM DEFINED
Access Point An Access Point (AP) is a component of a
Base Station (BS) that contains the antenna
used to communicate with a Subscriber Unit
(SU).
Anchor Switch The Anchor Switch (AS) is an ATM access
switch that is a component of a Base Station
(BS).
Antenna A device for transmitting and/or receiving
radio waves.
Asynchronous A data transmission method in which data
may be sent at irregular intervals (without
reference to clock signals).
ATM Asynchronous Transfer Mode is a high-
performance, cell-oriented switching and
multiplexing technology, which utilizes fixed-
length packets to carry different types of
traffic. It integrates the multiplexing and
switching functions, is well suited for bursty
traffic, and allows communications between
devices that operate at different speeds.
ATM Switch The ATM switch provides layer 2 switching of
ATM cells through virtual circuits. An ATM
switch is contained in the SU, the AP, and the
AS.
Available Bit Rate
(ABR) Service that provides rate-based flow control
and is aimed at data traffic such as file
transfer and e-mail.
Azimuth The angle along the horizon usually
referenced to north.
Bandwidth The data carrying capacity of a
communications channel, measured in Hertz
as the difference between the highest and
lowest frequencies of the channel.
SECTION 11 Glossary

Company Proprietary
Adaptive Broadband U-NII Product Installation Manual 07/04/2001 11-2
Base Station The Base Station is the part of the AB-Access
System that sends signals to and receives
signals from the Subscriber Units (SUs) to
enable communication with the WAN.
Baud A measure of data transmission speed. The
baud rate denotes the number of symbols per
second.
Bit Error Rate The Bit Error Rate (BER) is the fraction of
transmitted bits that are received in error.
Cell A 53-Byte packet of data used in ATM
networks. Also used to refer to the coverage
area of one Base Station.
Constant Bit Rate
(CBR) Service that operates on a connection basis
and offers consistent delay predictability; used
for applications such as circuit emulation,
voice, and video.
Control Server The Control Server (typically one per BS) is a
computer responsible for management of the
BS, its APs, and the associated SUs.
DS1 A data transmission rate of 1.544 Mbps, also
referred to as a T-1.
DS3 A data transmission rate of 45 Mbps
Element Management
System The Element Management System (EMS),
located on a workstation at an appropriate
point in the network, allows you to configure,
control, and monitor all components of the
AB-Access System.
MIB Management information base allows external
management system access.
Multiplexer A multiplexer is device or system capable of
combining elementary streams into one
aggregate transport stream.
Network A network is an interconnection of computer
systems, terminals, or data communications
facilities.
OC3 A data transmission rate of 155 Mbps
Packet A packet is a sequence of data, with
associated control information, that is
switched and transmitted as a whole.
Packet Switching Packet switching is the data transmission
method that divides messages into standard-
sized packets for greater efficiency of routing
and transport through a network.
Parsing Parsing is the process of analyzing a data
stream and breaking it down into more easily
processed components.

Company Proprietary
Adaptive Broadband U-NII Product Installation Manual 07/04/2001 11-3
Permanent Virtual
Circuit Provides end-to-end connectivity for
transmission in a network.
Point-to-Point A single communication circuit connecting two
locations.
Point-to-Multipoint A communications circuit connecting one
location to many locations.
Radio Frequency Radio frequency (RF) is a portion of the
electromagnetic spectrum in the frequency
range of 100 kHz to 20 GHz.
Subscriber Unit The Subscriber Unit (SU) is the part of the
AB-Access System that is installed at the
customer premises and provides
communication with the Base Station (BS).
Synchronous A data transmission method in which data
transfer is at a fixed rate. The transmitter and
receiver are both controlled by clock pulses.
TCP/IP Transmission Control Protocol/Internet
Protocol, a layered set of protocols that allows
sharing of applications among PCs, hosts, or
workstations in a high-speed communications
environment. The suite of protocols is
designed to allow communication between
networks regardless of the technologies
implemented in each network.
TDD Time Division Duplex, the transmission
method where a single channel is used to
alternately carry data in each direction of a
link.
Time-Division
Multiplexing A form of multiplexing used with digital
signals. A device scans individual channels in
rotation, takes bits from each channel,
transmits the bits in a string (according to a
predetermined sequence), and repeats the
process.
Transmitter A transmitter is an electronic device,
consisting of oscillator, modulator, and other
circuits, that produce a radio or television
electromagnetic wave signal for radiation into
the atmosphere by an antenna.
Unspecified Bit Rate Service that operates on a connection basis
and allows for raw cell or best effort transport
by the network. In this service, cells are
transported by the network whenever
bandwidth is available and traffic is presented
by the user. Data using UBR service is more
apt to be discarded during peak traffic times in

Company Proprietary
Adaptive Broadband U-NII Product Installation Manual 07/04/2001 11-4
deference to data using other classes of
service.
Uninterruptible
Power Supply An optional BS element used to provide
power in the event of an AC power failure.
Variable Bit Rate-
Real Time (VBR-RT) Service that operates on a connection basis
and offers very low delay variance but
requires access to a variable amount of
network bandwidth; used for such applications
as packet video and voice.
Variable Bit Rate-
Non-Real Time (VBR-
NRT)
Service that operates on both a connection
and connectionless basis and allows delay
variance between the delivery of cells; used
for data applications which have potentially
bursty traffic characteristics, including LAN
interconnect, CAD/CAM, and multimedia.
Virtual Circuit A logical connection, not a physical
connection, provides multiple connections that
can be defined simultaneously across a single
network facility, with each connection having
flexible bandwidth.

Company Proprietary
Adaptive Broadband U-NII Product Installation Manual 07/04/2001 11-5
11.1 Acronyms/Abbreviations
The following is a list of acronyms and abbreviations associated with the AB-Access System,
some of which may appear in this guide.
ACRONYM DEFINED
AAL ATM Adaptation Layer
ADC Analog to Digital Converter
AFC Automatic Frequency Control
AGC Automatic Gain Control
ALG Application Layer Gateway
AP Access Point
ARP Address Resolution Protocol
ARPAnet Advanced Research Projects Agency Network
ARQ Automatic Repeat Request
AS Anchor Switch
ASIC Applications Specific Integrated Circuit
ATM Asynchronous Transfer Mode
ATMOS ATM Operating System
AWGN Additive White Gaussian Noise
BER Bit Error Rate
BOOTP Bootstrap Protocol
BS Base Station
CBR Constant Bit Rate
CCIR Comite Consultatif International des
Radiocommunications
CHAP Challenge-Handshake Authentication Protocol
CIDR Classless Interdomain Routing
CLIP Classical Internet Protocol
CNR Carrier To Noise Ratio
COTS Commercial Off The Shelf

Company Proprietary
Adaptive Broadband U-NII Product Installation Manual 07/04/2001 11-6
CPE Customer Premise Equipment
CS Control Server
dB Decibel
dBm Decibel over 1mW
DBS Direct Broadcast Satellite
DC Direct Current
DES Data Encryption Standard
DFE Decision Feedback Equalizer
DHCP Dynamic Host Configuration Protocol
DS1,2,3 Digital Signal 1,2,3
E1 2.048 Mbps circuit supporting (30) 64 Kbps digital
channels for voice or data calls
EIRP Effective Isotropic Radiated Power
EMS Element Management System
FCC Federal Communications Commission
FDD Frequency Division Duplex
FPMS Fault and Performance Management System
Gbps Gigabits per second
GFC Generic Flow Control
GHz Gigahertz
GUI Graphical User Interface
I&Q In Phase and Quadrature
IETF Internet Engineering Task Force
IF Intermediate Frequency
IP Internet Protocol
ISI Inter-Symbol Interference
ITFS Instructional Television Fixed Service
Kbps kilobits per second
LAN Local Area Network
LLC Logical Link Control

Company Proprietary
Adaptive Broadband U-NII Product Installation Manual 07/04/2001 11-7
LOS Line of Sight
MAC Media Access Control
Mbps Megabits per second
MDS Multipoint Distribution Service
MIB Management Information Base
MID Mobile ID
MMDS Multichannel Multipoint Distribution System
MSE Mean Square Error
NAT Network Address Translation
NMS Network Management System
NOC Network Operations Center
OAM Operations, Administration, and Maintenance
OC3 Optical Carrier 3
OSI Open Systems Interconnection
PAT Port Address Translation
PCB Printed Circuit Board
PHY Physical Layer
POTS Plain Old Telephone System
PPP Point-to-Point Protocol
PTMP Point to Multipoint
PVC Permanent Virtual Circuit
QOS Quality of Service
QPSK Quadrature Phase Shift Keying
RAID Redundant Array of Inexpensive Disks
RF Radio Frequency
RFC Request For Comment
RISC Reduced Instruction Set Computer
RSSI Receiver Signal Strength Indication
RT-VBR Real Time Variable Bit Rate

Company Proprietary
Adaptive Broadband U-NII Product Installation Manual 07/04/2001 11-8
RX Receiver
SAR Segmentation And Reassembly
SCSI Small Computer System Interface
SNMP Simple Network Management Protocol
SNR Signal to Noise Ratio
SO/HO Small Office/Home Office
SONET Synchronous Optical Network
STP Shielded Twisted Pair
SU Subscriber Unit
SUMP Subscriber Unit Management Protocol
SVC Switched Virtual Circuit
T1 1.544 Mbps circuit supporting (24) 56/64 Kbps
voice-grade channels
TCP/IP Transmission Control Protocol/Internet Protocol
TDD Time Division Duplex
TDMA Time Division Multiple Access
Telnet Terminal-remote host protocol developed for
ARPAnet
TMS Topology Management System
TX Transmit
UBR Unspecified Bit Rate
UDP User Datagram Protocol
UNI User-Network Interface
U-NII Unlicensed National Information Infrastructure
UPS Uninterruptible Power Supply
UTP Unshielded Twisted Pair
VBR-RT Variable Bit Rate-Real Time
VBR-NRT Variable Bit Rate-Non-Real Time
VCC Virtual Circuit Connection
VPC Virtual Path Connection
VPI Virtual Path Identifier
Company Proprietary
Adaptive Broadband U-NII Product Installation Manual 07/04/2001 11-9
WAN Wide Area Network
WLL Wireless Local Loop