AzureWave Technologies NU706 802.11 b/g/n Wireless USB Mini card User Manual AW NU706H
AzureWave Technologies, Inc. 802.11 b/g/n Wireless USB Mini card AW NU706H
UserManual.wiki
>
AzureWave Technologies
>
NU706 User Manual
>
User manual
Contents
1.
User manual
2.
host manual
3.
Host User manual
4.
Host user manual
5.
UserMan Part1_20100827
6.
UserMan Part2_20100827
7.
User Manual
User manual
Navigation menu
Upload a User Manual
Namespaces
Wiki Guide
HTML
PDF
Info
Views
User Manual
Discussion / Help
Navigation
![62. Please wait few seconds for wizard to prepare installation 3. Please select click [Install] to proceed](https://usermanual.wiki/AzureWave-Technologies/NU706.User-manual/User-Guide-1028332-Page-6.png)
![86. When it is completed, please click [Finish] iii. Setup: Windows Vista OS Please follow the steps to complete installation. 1. Launch the setup driver](https://usermanual.wiki/AzureWave-Technologies/NU706.User-manual/User-Guide-1028332-Page-8.png)
![92. When you see the permission dialogue box, please click [Continue] 3. Now the Wizard is preparing installation](https://usermanual.wiki/AzureWave-Technologies/NU706.User-manual/User-Guide-1028332-Page-9.png)
![104. Please click [Install] to proceed 5. The system is processing installation](https://usermanual.wiki/AzureWave-Technologies/NU706.User-manual/User-Guide-1028332-Page-10.png)
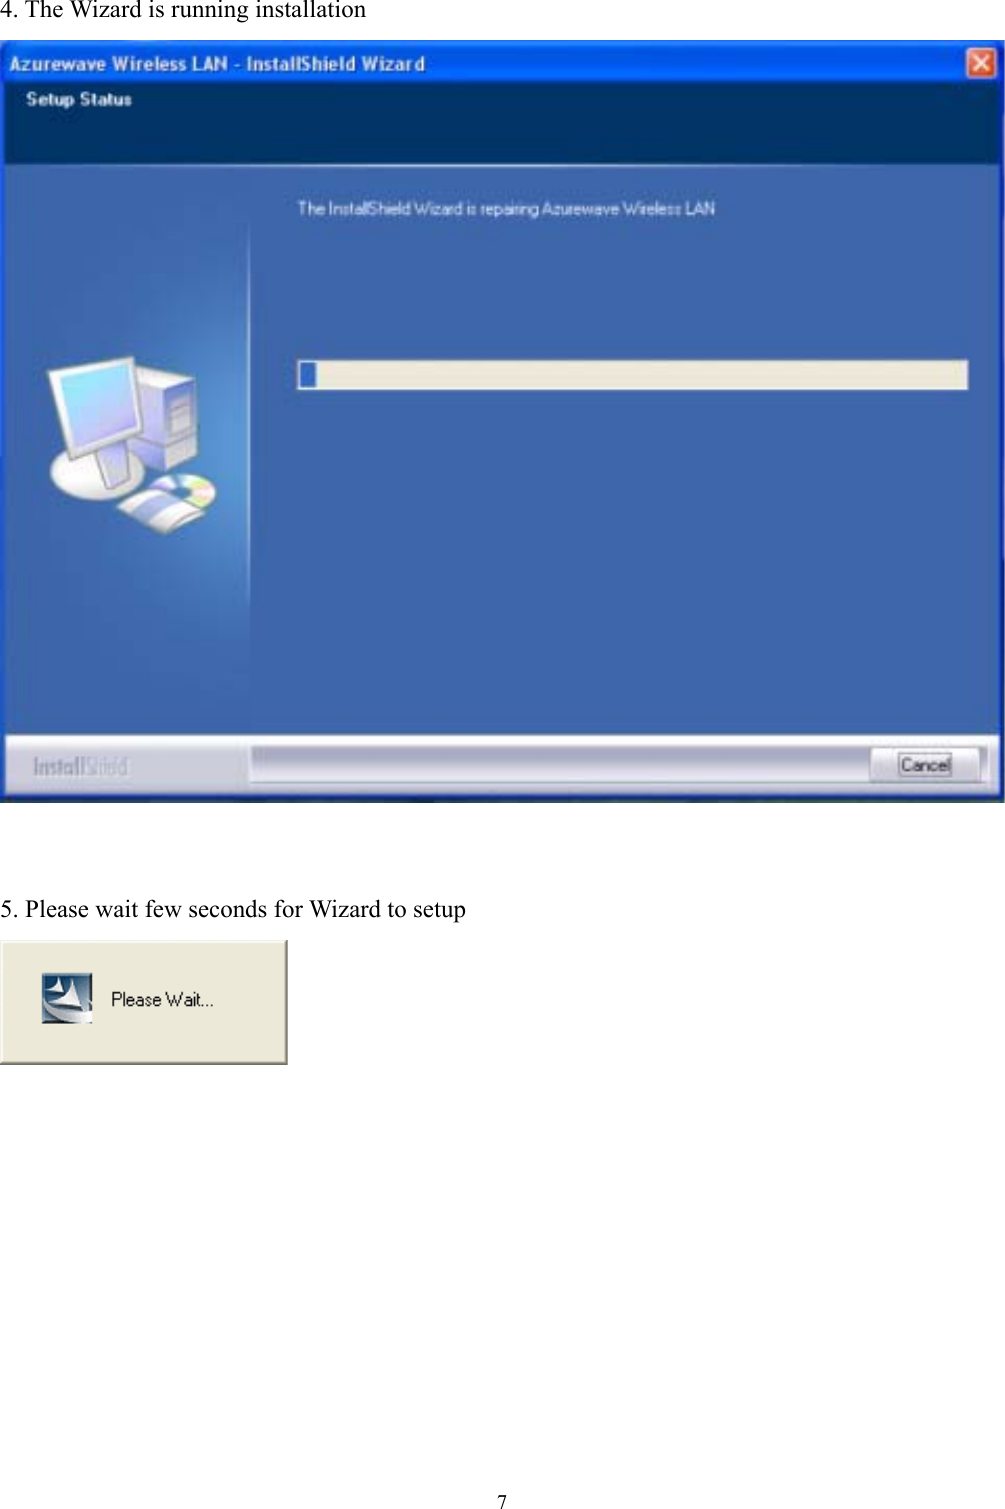
![116. Please wait few seconds for Wizard to setup 7. When the setup is completed, please click [Finish]](https://usermanual.wiki/AzureWave-Technologies/NU706.User-manual/User-Guide-1028332-Page-11.png)
![12III. Network Connection i. For Windows XP OS Please see the following steps to setup network connection for Windows XP. 1. Find the network icon on the desktop shortcut and right-click on it. Choose “View Available Wireless networks” 2. You will see several options, please select one and click [Connect]](https://usermanual.wiki/AzureWave-Technologies/NU706.User-manual/User-Guide-1028332-Page-12.png)
![146. You can check the connection status by clicking [Status] in the pop-up dialogue 7. Here is the wireless network connection status ii. For Windows Vista OS Following are the instructions to setup wireless connection for Windows Vista. 1. Right-click on the network icon located on desktop shortcut. When you see the dialogue, please click [Connect to a network]](https://usermanual.wiki/AzureWave-Technologies/NU706.User-manual/User-Guide-1028332-Page-14.png)
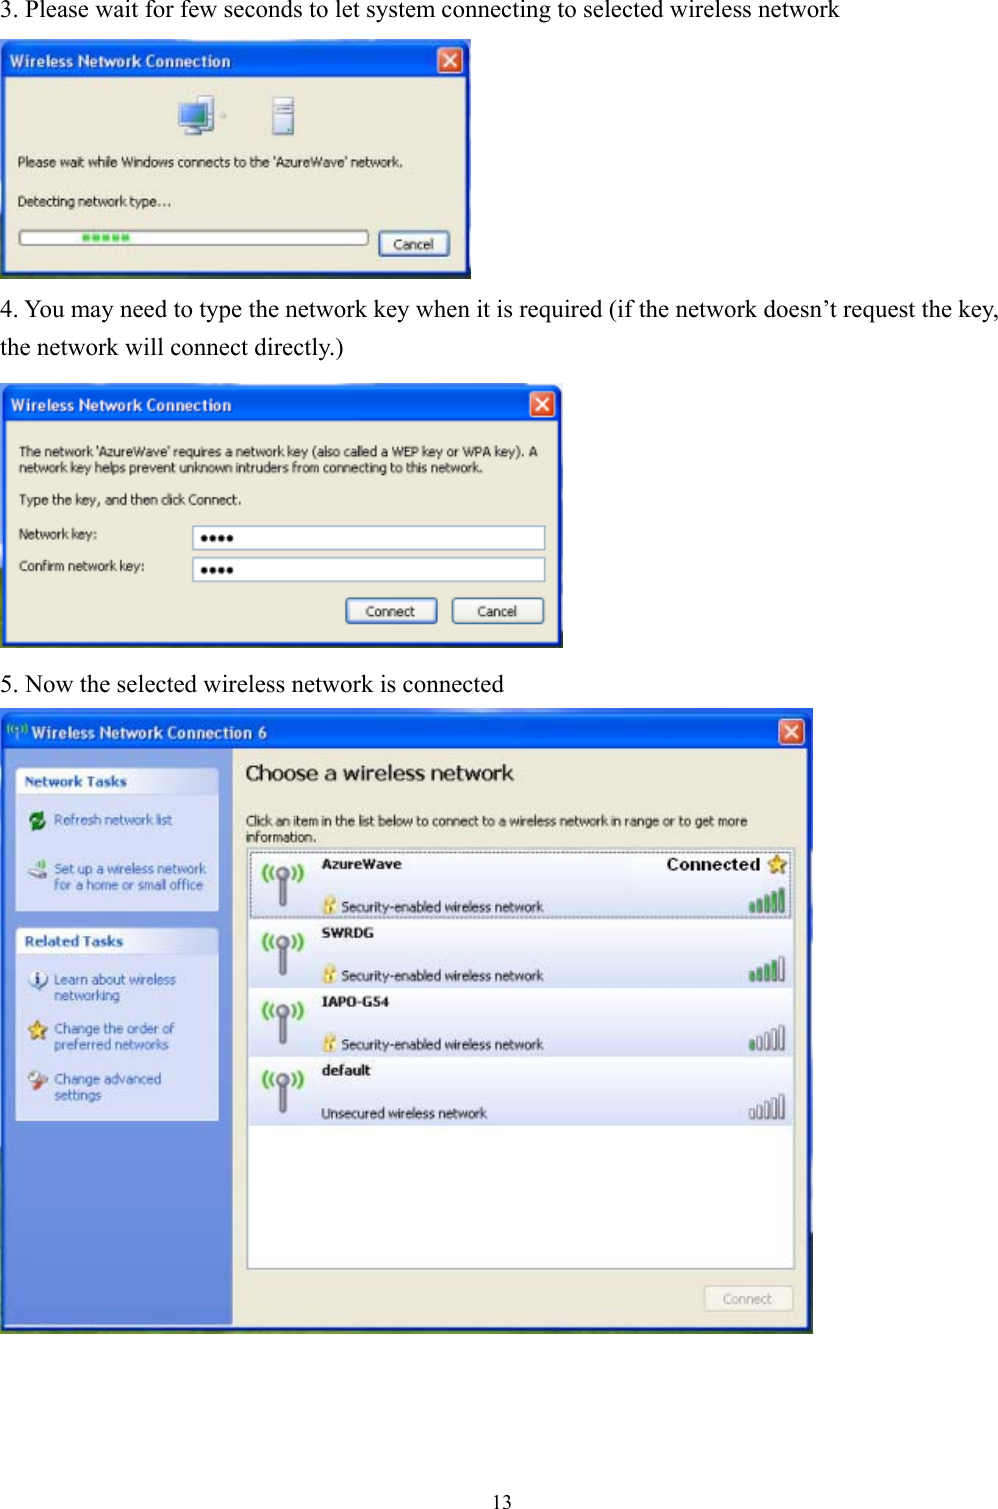
![152. Choose wireless network within your range and click [Connect] * If selected network is not secure, please choose [Connect anyway] 3. You may need to wait for few seconds when Windows connects to wireless network](https://usermanual.wiki/AzureWave-Technologies/NU706.User-manual/User-Guide-1028332-Page-15.png)
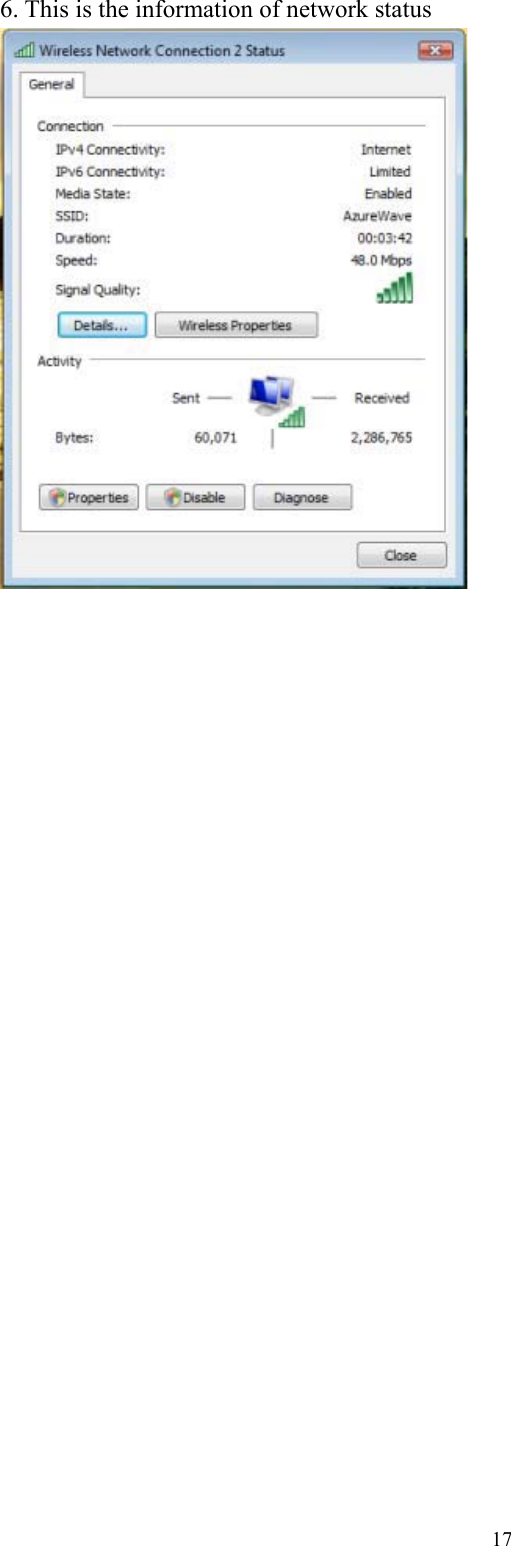
![164. Now the selected wireless network is connected 5. If you want to see the connection status, please right-click on the network you choose and select [Status]](https://usermanual.wiki/AzureWave-Technologies/NU706.User-manual/User-Guide-1028332-Page-16.png)
![18IV. Setup for Ad-hoc Mode i. For Windows XP OS If you want to choose Ad-hoc mode, please right-click network icon on desktop shortcut and choose “Open Network Connections”, or go to [Control Panel] and double-click “Network Connection” icon.When you see the “Network Connections” screen, please follow the steps below to setup Ad-hoc mode.](https://usermanual.wiki/AzureWave-Technologies/NU706.User-manual/User-Guide-1028332-Page-18.png)
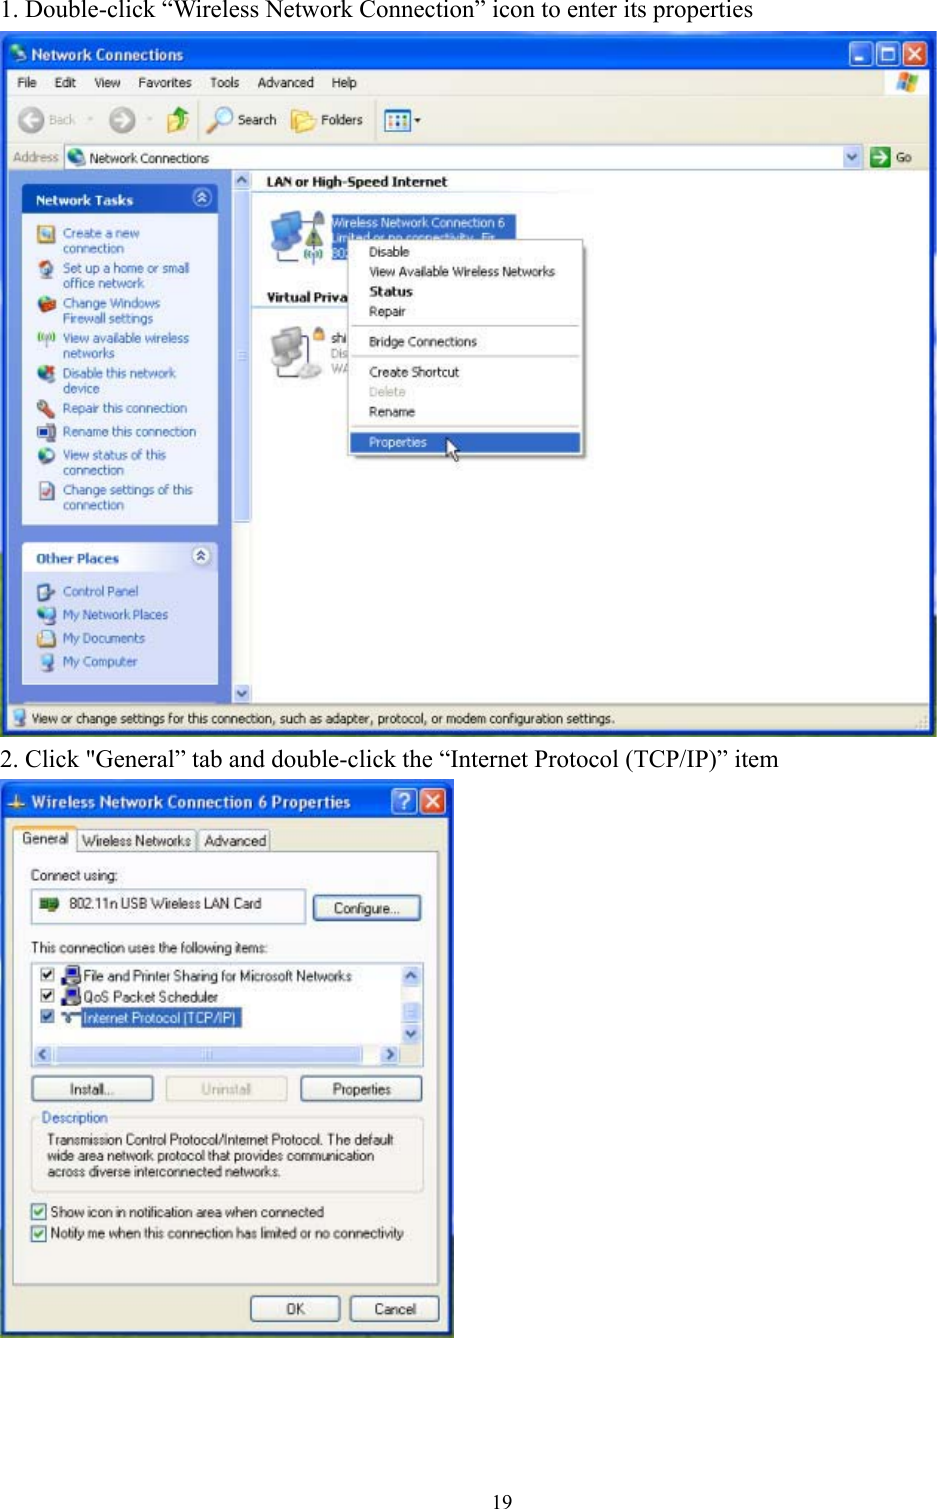
![203. Choose “Use the following IP address:” and type the IP address; then click [OK] *Note: the IP address of the other wireless card should be set with the same subnet mask 4. Right-click the “Wireless Network Connection” icon and choose “properties”](https://usermanual.wiki/AzureWave-Technologies/NU706.User-manual/User-Guide-1028332-Page-20.png)
![215. Select “Wireless Network” tab and choose [Add] 6. Type “Network name (SSID)” and choose “Data encryption” if you want to protect the network security7. When you see the dialogue showing your network is unsecured, please click [Continue Anyway]](https://usermanual.wiki/AzureWave-Technologies/NU706.User-manual/User-Guide-1028332-Page-21.png)
![243. Right-click the connected network icon and choose “Properties” 4. When you see the warning message, please click [Continue]](https://usermanual.wiki/AzureWave-Technologies/NU706.User-manual/User-Guide-1028332-Page-24.png)
![255. Choose “Networking” tab and double-click the “Internet Protocol Version 4 (TCP/IPv4)” item 6. Choose “Use the following IP address:” and type the IP address; then click [OK] *Note: the IP address of the other wireless card should be set with the same subnet mask](https://usermanual.wiki/AzureWave-Technologies/NU706.User-manual/User-Guide-1028332-Page-25.png)
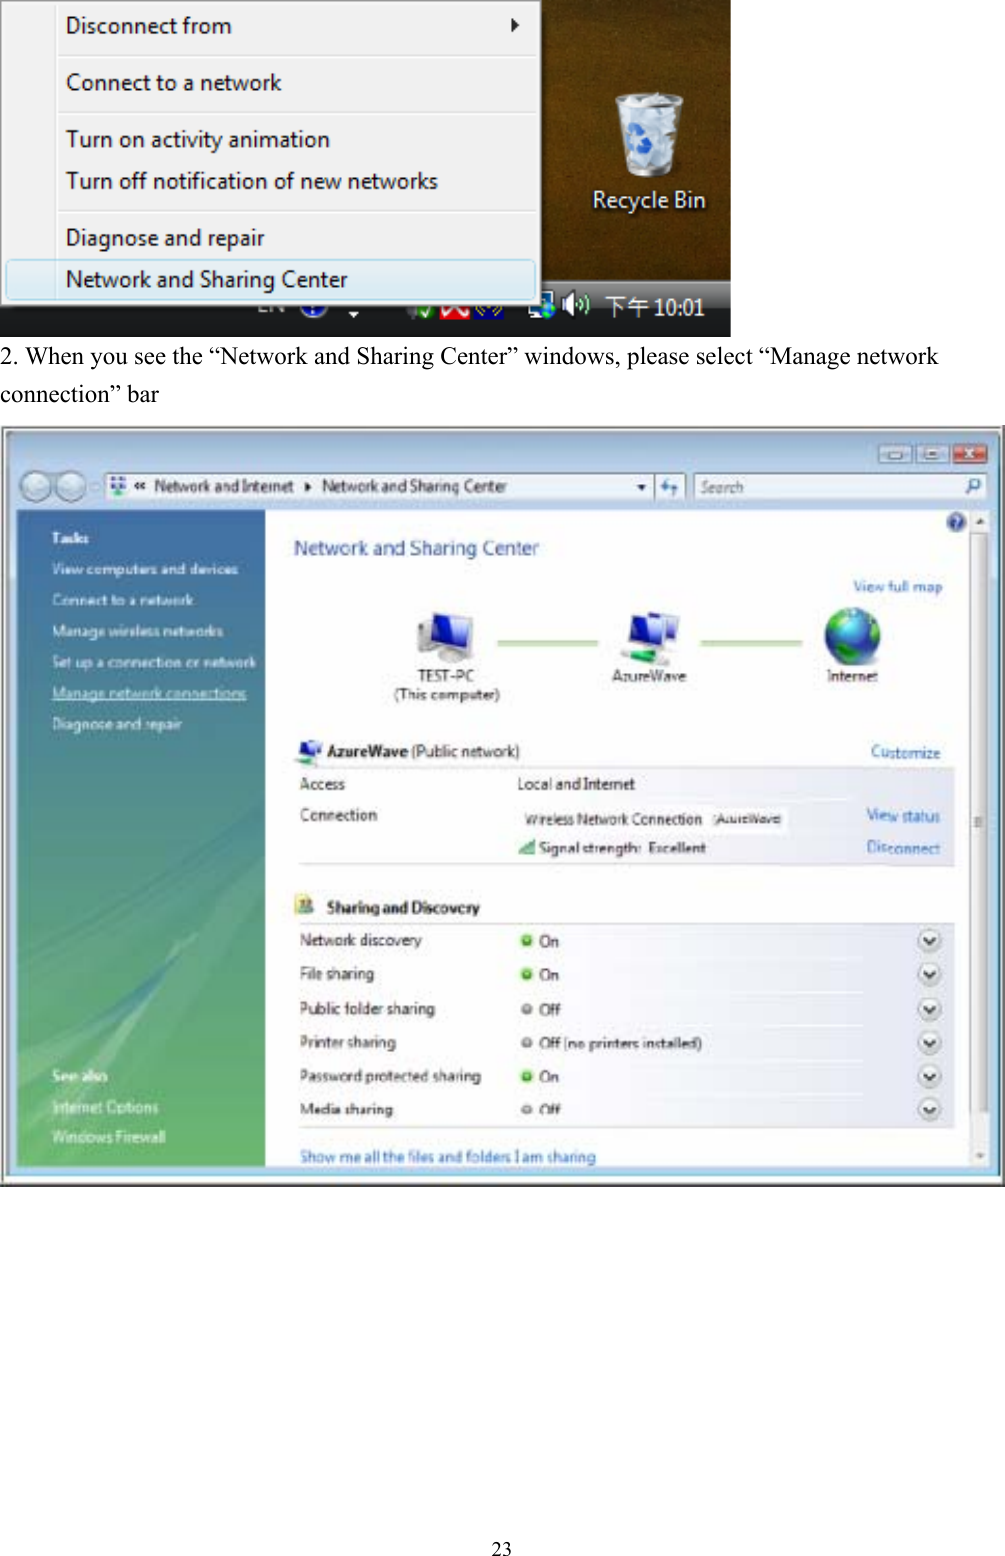
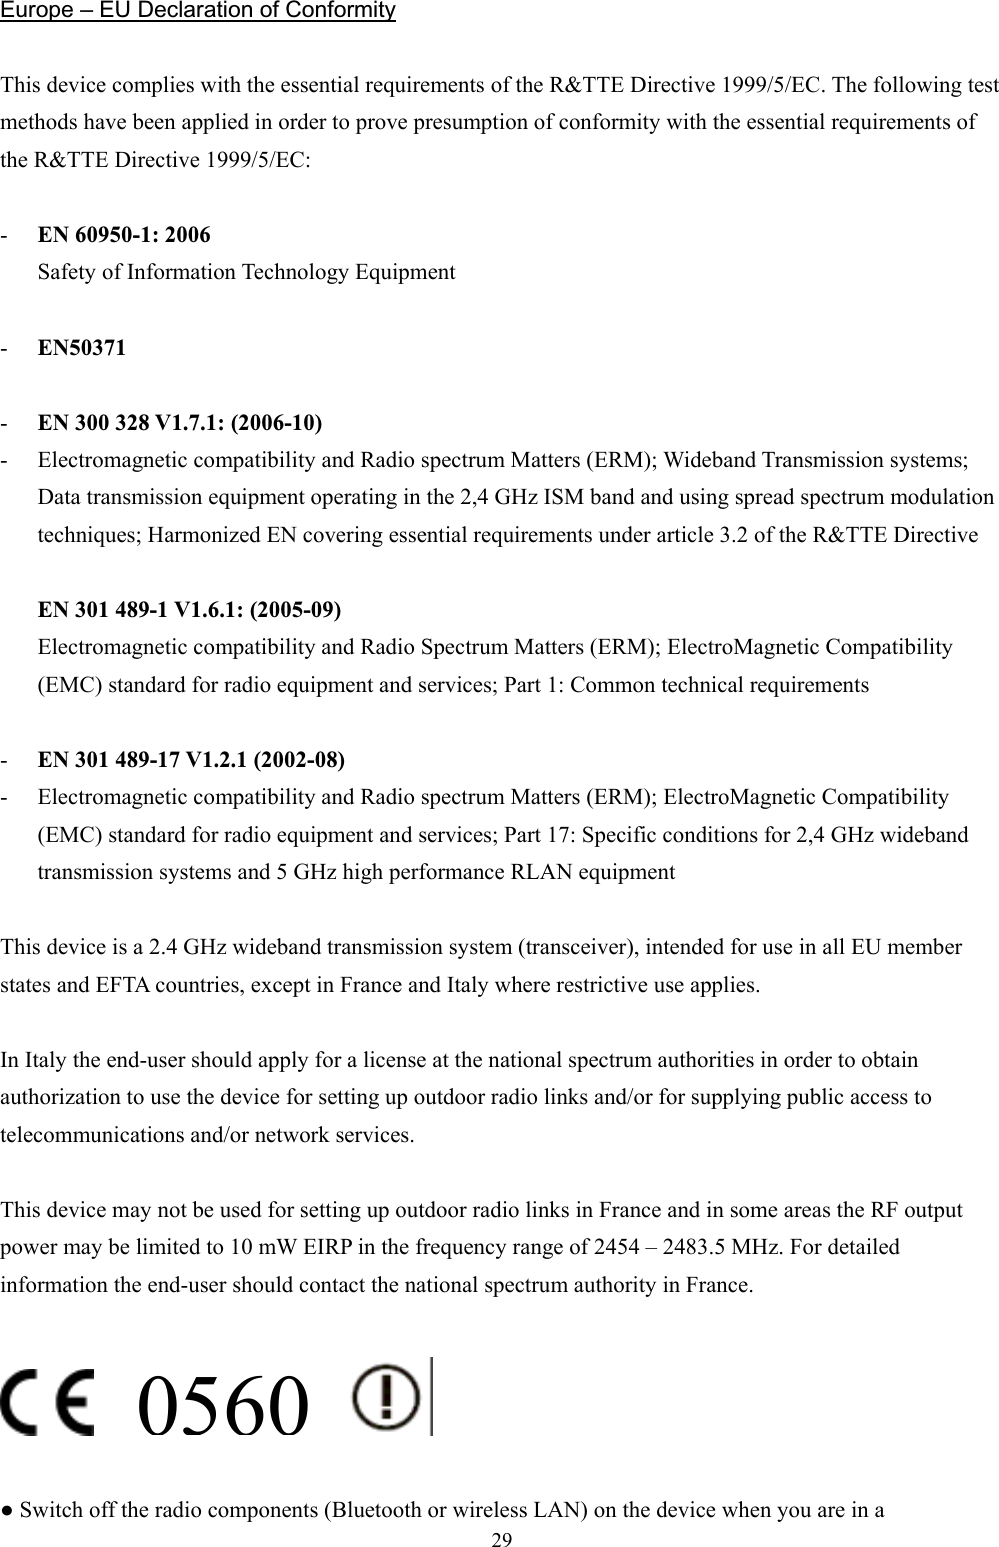
![267. Choose “Manage wireless networks” bar 8. Select [Add]](https://usermanual.wiki/AzureWave-Technologies/NU706.User-manual/User-Guide-1028332-Page-26.png)
![279. Choose “Create ad-hoc network” 10. Please click [Next]](https://usermanual.wiki/AzureWave-Technologies/NU706.User-manual/User-Guide-1028332-Page-27.png)
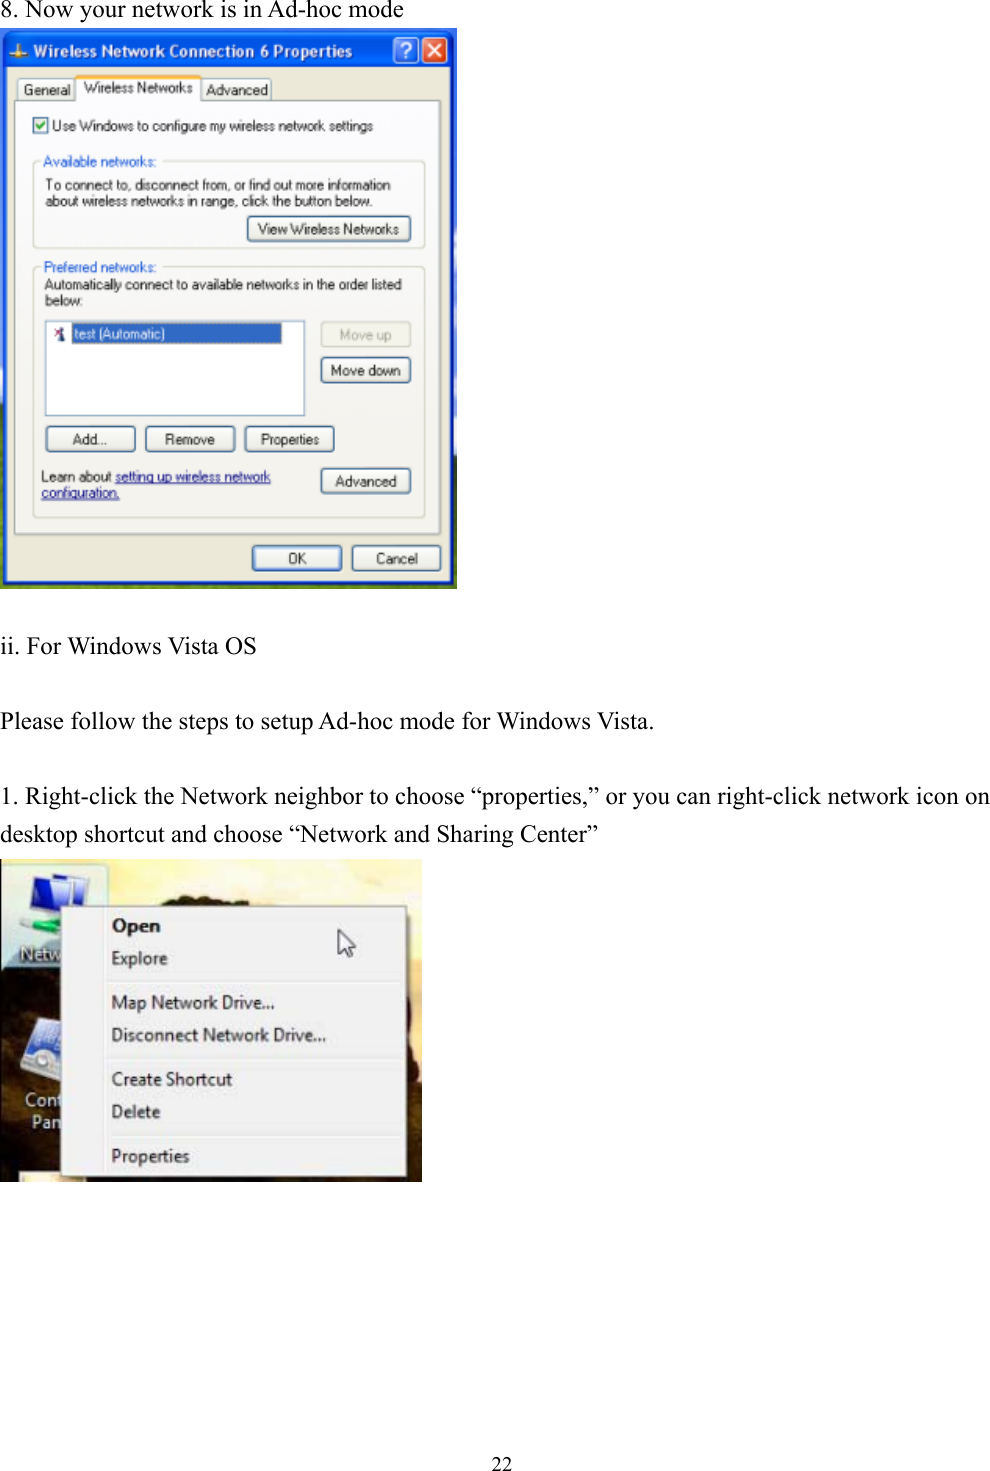
![2811. Enter “Network name” and if you want to protect the network security, please choose in “security type”; then click [Next] 12. Now your network is in Ad-hoc mode](https://usermanual.wiki/AzureWave-Technologies/NU706.User-manual/User-Guide-1028332-Page-28.png)
![30 hospital, an operating room or near a medical electronics system. The transmitted radio waves can impair the operation of the medical devices. Ɣ Keep the device at least 20 cm from a pacemaker, as otherwise the proper operation of the pacemaker may be impaired by radio waves. Ɣ The transmitted radio waves can cause an unpleasant humming in hearing aids. Ɣ Switch off the device when you are in an aircraft or driving in a car. Ɣ Do not let the device near flammable gases or into hazardous environments (e.g. paintshops) with radio components switched on, as the transmitted radio waves can cause an explosion or a fire. ýesky [Czech] [Jméno výrobce] tímto prohlašuje, že tento [typ zaĜízení] je ve shodČ se základními požadavky a dalšími pĜíslušnými ustanoveními smČrnice 1999/5/ES. Dansk[Danish] Undertegnede [fabrikantens navn] erklærer herved, at følgende udstyr [udstyrets typebetegnelse] overholder de væsentlige krav og øvrige relevante krav i direktiv 1999/5/EF. Deutsch[German] Hiermit erklärt [Name des Herstellers], dass sich das Gerät [Gerätetyp] in Übereinstimmung mit den grundlegenden Anforderungen und den übrigen einschlägigen Bestimmungen der Richtlinie 1999/5/EG befindet. Eesti[Estonian] Käesolevaga kinnitab [tootja nimi = name of manufacturer] seadme [seadme tüüp = type of equipment] vastavust direktiivi 1999/5/EÜ põhinõuetele ja nimetatud direktiivist tulenevatele teistele asjakohastele sätetele. English Hereby, [name of manufacturer], declares that this [type of equipment] is in compliance with the essential requirements and other relevant provisions of Directive 1999/5/EC. Español[Spanish] Por medio de la presente [nombre del fabricante] declara que el [clase de equipo]cumple con los requisitos esenciales y cualesquiera otras disposiciones aplicables o exigibles de la Directiva 1999/5/CE. ǼȜȜȘȞȚțȒ[Greek] ȂǼ ȉǾȃ ȆǹȇȅȊȈǹ [name of manufacturer] ǻǾȁȍȃǼǿ ȅȉǿ [type of equipment] ȈȊȂȂȅȇĭȍȃǼȉǹǿ ȆȇȅȈ ȉǿȈ ȅȊȈǿȍǻǼǿȈ ǹȆǹǿȉǾȈǼǿȈ Ȁǹǿ ȉǿȈ ȁȅǿȆǼȈȈȋǼȉǿȀǼȈ ǻǿǹȉǹȄǼǿȈ ȉǾȈ ȅǻǾīǿǹȈ 1999/5/ǼȀ.Français[French] Par la présente [nom du fabricant] déclare que l'appareil [type d'appareil] est conforme aux exigences essentielles et aux autres dispositions pertinentes de la directive 1999/5/CE. Italiano[Italian] Con la presente [nome del costruttore] dichiara che questo [tipo di apparecchio] è conforme ai requisiti essenziali ed alle altre disposizioni pertinenti stabilite dalla direttiva 1999/5/CE. Latviski[Latvian] Ar šo [name of manufacturer / izgatavotƗja nosaukums] deklarƝ, ka [type of equipment / iekƗrtas tips] atbilst DirektƯvas 1999/5/EK bnjtiskajƗm prasƯbƗm un citiem ar to saistƯtajiem noteikumiem.](https://usermanual.wiki/AzureWave-Technologies/NU706.User-manual/User-Guide-1028332-Page-30.png)
![31Lietuviǐ[Lithuanian] Šiuo [manufacturer name] deklaruoja, kad šis [equipment type] atitinka esminius reikalavimus ir kitas 1999/5/EB Direktyvos nuostatas. Nederlands[Dutch] Hierbij verklaart [naam van de fabrikant] dat het toestel [type van toestel] in overeenstemming is met de essentiële eisen en de andere relevante bepalingen van richtlijn 1999/5/EG. Malti[Maltese] Hawnhekk, [isem tal-manifattur], jiddikjara li dan [il-mudel tal-prodott] jikkonforma mal-ƫtiƥijiet essenzjali u ma provvedimenti oƫrajn relevanti li hemm fid-Dirrettiva 1999/5/EC. Magyar [Hungarian] Alulírott, [gyártó neve] nyilatkozom, hogy a [... típus] megfelel a vonatkozó alapvetõ követelményeknek és az 1999/5/EC irányelv egyéb elõírásainak. Polski[Polish] Niniejszym [nazwa producenta] oĞwiadcza, Īe[nazwa wyrobu] jest zgodny z zasadniczymi wymogami oraz pozostaáymi stosownymi postanowieniami Dyrektywy 1999/5/EC. Português[Portuguese] [Nome do fabricante] declara que este [tipo de equipamento] está conforme com os requisitos essenciais e outras disposições da Directiva 1999/5/CE. Slovensko[Slovenian] [Ime proizvajalca] izjavlja, da je ta [tip opreme] v skladu z bistvenimi zahtevami in ostalimi relevantnimi doloþili direktive 1999/5/ES. Slovensky [Slovak] [Meno výrobcu] týmto vyhlasuje, že [typ zariadenia] spĎĖa základné požiadavky a všetky príslušné ustanovenia Smernice 1999/5/ES. Suomi [Finnish] [Valmistaja = manufacturer] vakuuttaa täten että [type of equipment = laitteen tyyppimerkintä] tyyppinen laite on direktiivin 1999/5/EY oleellisten vaatimusten ja sitä koskevien direktiivin muiden ehtojen mukainen. Svenska[Swedish] Härmed intygar [företag] att denna [utrustningstyp] står I överensstämmelse med de väsentliga egenskapskrav och övriga relevanta bestämmelser som framgår av direktiv 1999/5/EG. Countries: Austria, Belgium, Cyprus, Denmark, Estonia, Finland, France, Germany, Greece, Hungary, Iceland, Ireland, Italy, Latvia, Lithuania, Luxembourg, Malta, Netherlands, Norway, Poland, Portugal, Romania, Slovenia, Slovak, Spain, Bulgaria, Czech Republic, Switzerland, Sweden & UK.](https://usermanual.wiki/AzureWave-Technologies/NU706.User-manual/User-Guide-1028332-Page-31.png)