User Manual

*All Models: How to enter the Config Mode.
*All Models: How to enter the Config Mode.*All Models: How to enter the Config Mode.
*All Models: How to enter the Config Mode.
1)
2)
(cf. "Controllable Settings" for function item)
3)
(cf. "Controllable Settings" for function item)
* Basically number of "digit of 1"becomes:
Larger, the function item becomes greater strength / longer time.
Smaller, the function item becomes less strength / shorter time.
4)
Tour Mic 900 1/9
Press Volume button to change "digit of 1," and choose number (or alphabet)
of function item which you want to change.
Press Center button shortly to determin changed function item:
exit from the Config Mode and return to normal operation mode.
* Please do not change the numbers and alphabets of items that are not
* Please do not change the numbers and alphabets of items that are not* Please do not change the numbers and alphabets of items that are not
* Please do not change the numbers and alphabets of items that are not
listed in each model controllable setting items from the next page. Non
listed in each model controllable setting items from the next page. Nonlisted in each model controllable setting items from the next page. Non
listed in each model controllable setting items from the next page. Non
listed numbers are items of invalid or for the engineer use only.
listed numbers are items of invalid or for the engineer use only.listed numbers are items of invalid or for the engineer use only.
listed numbers are items of invalid or for the engineer use only.
Taking advantage of the convenience of the digital machine, "Tour de Guide 900" is
designed to change a variety of settings from Config Mode.
Turn on the power by pressing the power button, then press 5 times the center
button within one second.
*Please press the center button firmly until hear a clicking sound.
The button does not react if pressing the button too slowly or too fast.
Press Channel button to change "digit of 10," and choose number (or alphabet
) of function item which you want to change.
Config Mode

Transmitter Controllable Settings
Transmitter Controllable SettingsTransmitter Controllable Settings
Transmitter Controllable Settings
4x: Microphone Gain (sensitivity of the microphone), Default: 45
*Default is "0dB" =
8 stage of the number "0~7" in digit of 1
40:-6dB ~ 47:+8dB
5x: Time to enter the save-mode, Default: 51
8 stage of the number "0~7" in digit of 1
6x: Time to enter the auto-power-off, Default: 63
8 stage of the number "0~7" in digit of 1
Ax: Reagion Selection,
* Use both transmitter & receiver with the same settings.
A8:US 918.00MHz ~ 925.50MHz (500KHz_STEP_16ch
CH5: Chane 920→ to 926.00MHz)
Tour Mic 900 2/9
60: 0 min(non save-mode), 61: 10 min, 62: 20 min, 63: 30 min,
64: 40 min, 65: 50 min, 66: 60 min, 67: 70 min.
not weakened or strengthened the performance parts
have. It does'nt mean the microphone volume "zero."
50: 0 sec(non save-mode), 51: 10 sec, 52: 20 sec, 53: 30 sec,
54: 40 sec, 55: 50 sec, 56: 60 sec, 57: 70 sec.

Receiver Controllable Settings
Receiver Controllable SettingsReceiver Controllable Settings
Receiver Controllable Settings
7x: Intermittent reception detection time, Default:75
8 stage of the number "0~7" in digit of 1
8x: Time to enter the auto-power-off, Default: 83
8 stage of the number "0~7" in digit of 1
Ax: Reagion Selection,
* Use both transmitter & receiver with the same settings.
A8:US 918.00MHz ~ 925.50MHz (500KHz_STEP_16ch
CH5: Chane 920→ to 926.00MHz)
Transceiver Controllable Settings
Transceiver Controllable SettingsTransceiver Controllable Settings
Transceiver Controllable Settings
1x: 10: Transmitter only
11: Receiver only
12: Momentarily -- Initial Receiveing Mode
13: Momentarily -- Initial Transmission Mode
14: Alternate -- Initial Receiving Mode (To push ⑪ TX/RX switch)
15: Alternate -- Initial Transmission Mode (To push ⑪ TX/RX switch)
Tour Mic 900 3/9
(Interval to check whether there is a communication from the
transmitter)
70: No intermittent (always is checked), 71: 1 second, 72: 2 seconds,
73: 3 seconds, 74: 4 seconds, 75: 5 seconds, 76: 6 seconds, 77: 7
seconds
80: 0 min(non save-mode), 81: 10 min, 82: 20 min, 83: 30 min,
84: 40 min, 85: 50 min, 86: 60 min, 87: 70 min.
Transceiver
*
**
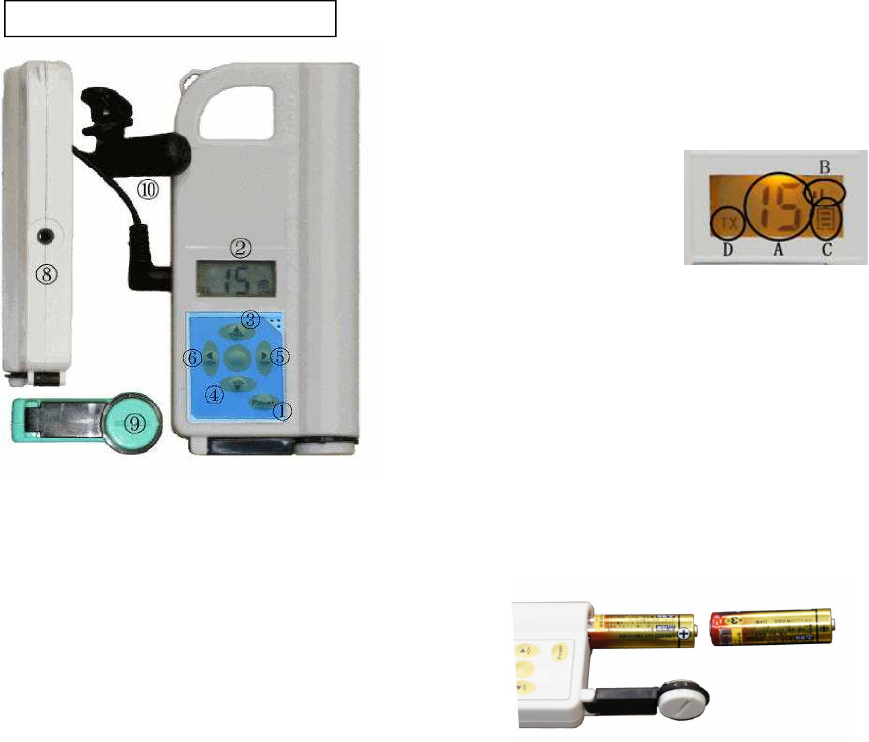
* Names of parts
Names of partsNames of parts
Names of parts
① Power switch
② LCD
A Channel display
B Volume display
C Battery indicator
D Save mode display
③ Volume button (Up)
④ Volume button (Down)
⑤ Channel button (Up)
⑥ Channel button (Down)
⑧ Microphone jack
⑨ Battery cap
⑩ External microphone
*Before to use
*Before to use*Before to use
*Before to use
I : How to replace battery
Power-On
Power-OnPower-On
Power-On
Power-Off
Power-OffPower-Off
Power-Off
Tour Mic 900 4/9
When open the battery cap, batteries can be
seen. Take out batteries by gently tilt the device.
(Please note that batteries fall easily.)
Push power switch button ① for more than 1 second -- the power is turned
off.
As shown in the upper right phote, put two AA alkaline batteries in the battery case.
Make sure the plus side of batteries (convex) comes to the cap side.
Push power switch button ①, and indication will appears on ② LCD. Lamp
is lit on the display for 2 seconds.
While pressing, turn the battery cap 90 degrees int the clockwide direction until it
locked.
II : Insert the plug of an external microphone all the way into the microphone jack,
until you hear "click" sound.
Turn the battery cap 90 degrees by using coins
in the counterclockwise direction, and remove the
cap.
*Using the Trans
*Using the Trans*Using the Trans
*Using the Transceiv
ceivceiv
ceiver
erer
er
Transceiver
* The following operations are performed while the power is on.
* The following operations are performed while the power is on.* The following operations are performed while the power is on.
* The following operations are performed while the power is on.
! Notes when using the transceiver.
! Notes when using the transceiver.! Notes when using the transceiver.
! Notes when using the transceiver.
・Two or more machines in the same channel cannot be sent at the same time.
・Please use insert an earphone-microphone in the jack.
[Alternate mode]
[Alternate mode][Alternate mode]
[Alternate mode]
[Momentarily mode]
[Momentarily mode] [Momentarily mode]
[Momentarily mode]
*Conventional general transceiver mode
Initial receiving mode:
To press the central button ⑪ when you talk to send signals.
Initial transmission mode:
To press the central ⑪button while you receiving signals.
*During not touching the central button ⑪, the machine is state of initial mode.
Tour Mic 900 5/9
*Taking advantage of a digital feature, this machine can be used to change the mode.
*Taking advantage of a digital feature, this machine can be used to change the mode.*Taking advantage of a digital feature, this machine can be used to change the mode.
*Taking advantage of a digital feature, this machine can be used to change the mode.
However, please only person responsible is to change the mode.
However, please only person responsible is to change the mode.However, please only person responsible is to change the mode.
However, please only person responsible is to change the mode.
* Every time a central button ⑪ is pressed, transmission
⇔ receiving is switched over.
・While "D" part of LCD is displayed as "TX", it has
become transmittable
・Pressing the middle button ⑪ while "TX" is displayed, to
change to receiving state. While in the receiveing state,
you can find volume bars in the "B" part
・During receiving state, please press ⑪ button to change
to transmittable state again.
Transceiver
Change Channels ("A"part of the LCD)
Change Channels ("A"part of the LCD)Change Channels ("A"part of the LCD)
Change Channels ("A"part of the LCD)
・ Press the channel button ⑤(+CH) once, and one channel up.
Goes up to "16" channels, and then will return to "01."
・ Press the channel button ⑥(-CH) once, and one channel down.
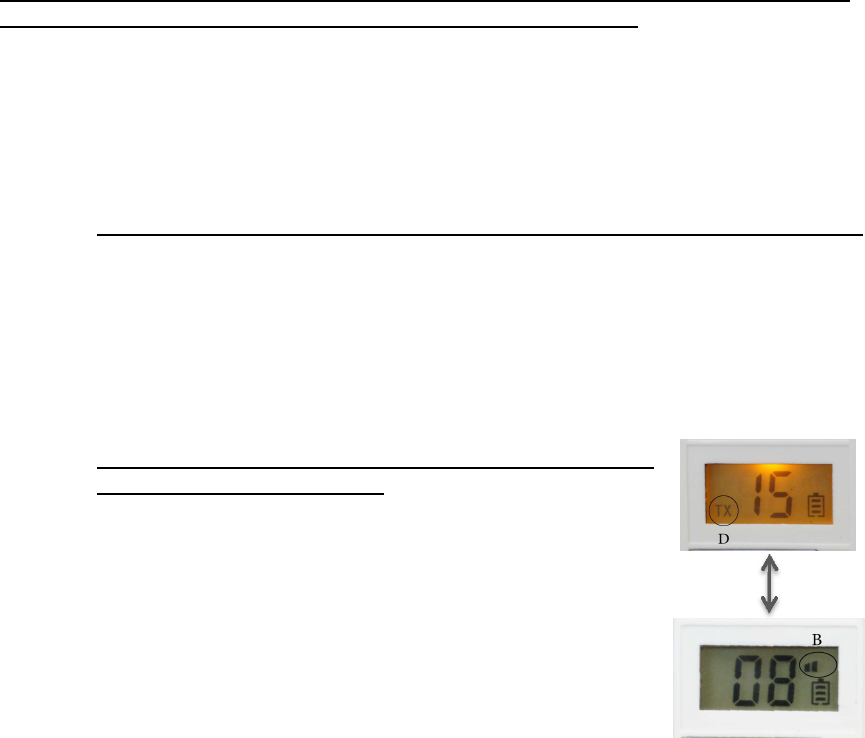
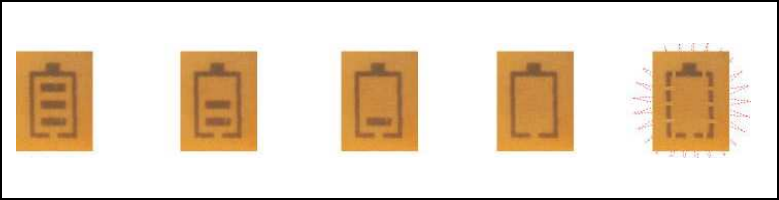
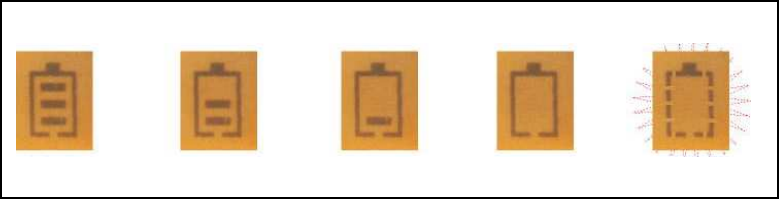
Battery Indicator ("C"part of the LCD)
Battery Indicator ("C"part of the LCD)Battery Indicator ("C"part of the LCD)
Battery Indicator ("C"part of the LCD)
・ When lines of the display becomes 0 (None), replace batteries.
Full ↑Replace batteries
Transmission ("D"part of the LCD)
Transmission ("D"part of the LCD)Transmission ("D"part of the LCD)
Transmission ("D"part of the LCD)
Battery Save Mode ("D"part of the LCD)
Battery Save Mode ("D"part of the LCD)Battery Save Mode ("D"part of the LCD)
Battery Save Mode ("D"part of the LCD)
Auto Power Off
Auto Power OffAuto Power Off
Auto Power Off
・ The device automatically turns off, after 1hour of non use.
*During not touching the central button ⑪, the machine is state of initial mode.
Tour Mic 900 6/9
・ If there is no voice input for 20 seconds, "TX"display of the LCD will blink.
Then, the device will enter "battery save mode"-- to prevent battery drain.
・ While in "battery save mode," the device stands up automatically with any
operations (such as voice input, button operation).
・ 2 seconds after the power turned on, the battery level is displayed in 5
steps below.
Blinking = End
・ Accordance with the same transmitter and receiver channels.
When speak into the microphone, the device start transmission automatically,
and "TX" appears on LCD.
Receiver
*
**
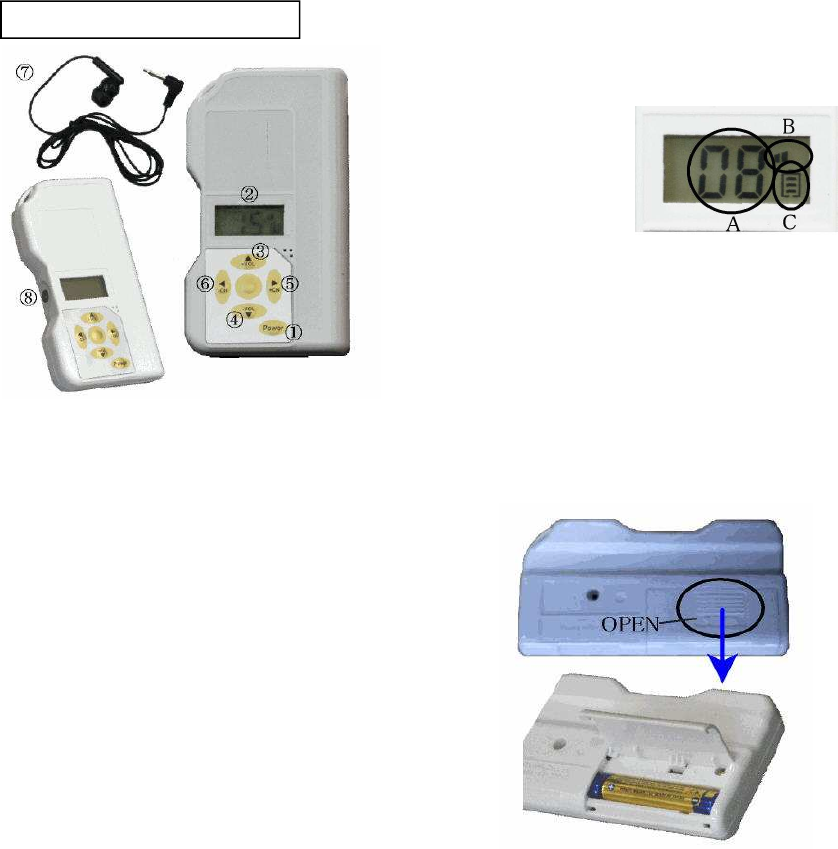
* Names of parts
Names of partsNames of parts
Names of parts
① Power switch
② LCD
A Channel display
s Volume display
C Battery indicator
③ Volume button (Up)
④ Volume button (Down)
⑤ Channel button (Up)
⑥ Channel button (Down)
⑦ Canal Earphone
⑧ Earphone jack
*Before to use
*Before to use*Before to use
*Before to use
I : How to replace battery
Power-on
Power-onPower-on
Power-on
Power-off
Power-offPower-off
Power-off
Push power switch button ①, and indication will appears on ② LCD. Lamp
is lit on the display for 2 seconds.
II : Insert the plug of an earphone all the way into the microphone jack, until you
hear "click" sound.
Tour Mic 900 7/9
As the right photo, slide the part embossed
"OPEN" towards the blue arrow direction, and
lift. (The lid does not come off.)
Place the plus side (convex) of two AAA
alkaline batteries towards right of the photo,
and while pushing to the left, put two batteries
in straight.
When removing batteries, take out the seen
battery first, then tilt the device to slide the
second battery to remove.
Push power switch button ① for more than 1 second -- the power is
turned off.
*Using the Receiver
*Using the Receiver*Using the Receiver
*Using the Receiver
Receiver
* The following operations are performed while the power is on.
* The following operations are performed while the power is on.* The following operations are performed while the power is on.
* The following operations are performed while the power is on.
Change Channels ("A"part of the LCD)
Change Channels ("A"part of the LCD)Change Channels ("A"part of the LCD)
Change Channels ("A"part of the LCD)
・ Press the channel button ⑤(+CH) once, and one channel up.
Goes up to "16" channels, and then will return to "01."
・ Press the channel button ⑥(-CH) once, and one channel down.
Change Volume ("B"part of the LCD)
Change Volume ("B"part of the LCD)Change Volume ("B"part of the LCD)
Change Volume ("B"part of the LCD)
Battery indicator ("C"part of the LCD)
Battery indicator ("C"part of the LCD)Battery indicator ("C"part of the LCD)
Battery indicator ("C"part of the LCD)
・ When lines of the display becomes 0 (None), replace batteries.
Full ↑Replace batteries
Battery save mode ("D"part of the LCD)
Battery save mode ("D"part of the LCD)Battery save mode ("D"part of the LCD)
Battery save mode ("D"part of the LCD)
Auto power off
Auto power offAuto power off
Auto power off
・ The device automatically turns off, after 1hour of non use.
・ If there is no voice input for 20 seconds, "TX"display of the LCD will blink.
Then, the device will enter "battery save mode"-- to prevent battery drain.
・ While in "battery save mode," the device stands up automatically with any
operations (such as voice input, button operation).
Tour Mic 900 8/9
・Press the volume button ③(▲VOL)to increase earphone volume.
Press the volume button ④(▼VOL)to decrease earphone volume.
・ The volume level will be showed as lines on LCD -- more lines represent
greater sound.
・ 2 seconds after the power turned on, the battery level is displayed in 5
steps below.
Blinking = End

Product Spec.
Model No. Tour de Mic 900
Regulation
Corresponds to Wireless Telegraph Law of each
Content transmission
Digital signal
Transmission speed
50Kbps
Radio format
F1D F1E
Data modulation scheme
GFSK system
Communication system
Simplex method
Oscillation method
PLL synthesizer system
Operating frequency
918.0
~
925.5MH
z
Channel 16ch (Digital display)
Antenna Built-in antenna (Helical whip antenna)
Consumprion current
During transmission: Less than 200mA
During reception: Less than 70mA
Rated voltage
3.0V
±
10
%
The minimum operating voltage
2.3V or more
Operating temperature range
-10
~
+55
℃
Storage temperature range
-20
~
+75
℃
Size
TX device: 117 x 55 x 23 mm
RX device: 100 x 54 x 15 mm
Total weight (including batteries) TX device: 103g / RX device: 63g
FCC Statement
This equipment has been tested and found to comply with the limits for a Class B digital device,
pursuant to part 15 of the FCC Rules.
These limits are designed to provide reasonable protection against harmful interference in a residential installation.
This equipment generates uses and can radiate radio frequency energy and, if not installed and used in accordance with the instructions,
may cause harmful interference to radio communications. However, there is no guarantee that interference will not occur in a particular installation.
If this equipment does cause harmful interference to radio or television reception, which can be determined by turning the equipment off and on,
the user is encouraged to try to correct the interference by one or more of the following measures:
—Reorient or relocate the receiving antenna.
—Increase the separation between the equipment and receiver.
—Connect the equipment into an outlet on a circuit different from that to which the receiver is connected.
—Consult the dealer or an experienced radio/TV technician for help.
FCC Statement
This device complies with Part 15 of the FCC Rules. Operation is subject to the following two conditions:
(1) this device may not cause harmful interference, and
(2) this device must accept any interference received, including interference that may cause undesired operation.
Caution!
Any changes or modifications not expressly approved by the party responsible for compliance
could void the user's authority to operate the equipment.
Tour Mic 900 9/9