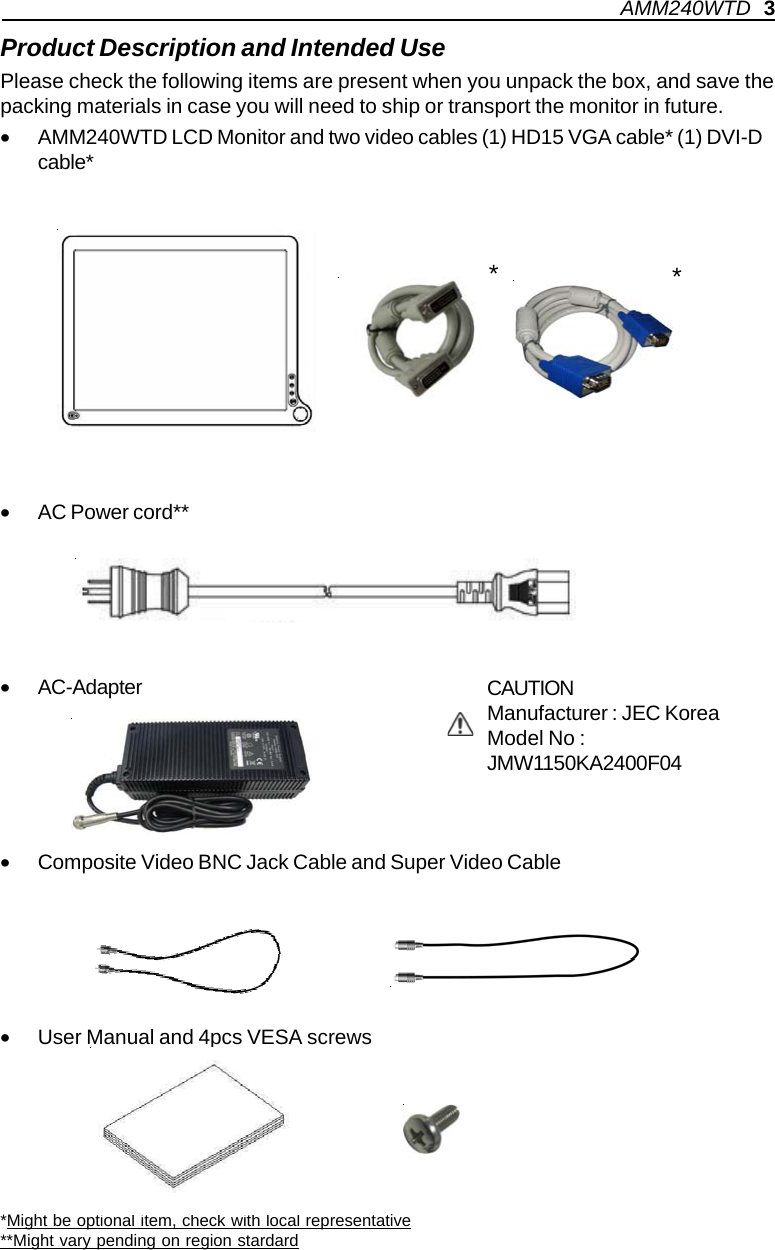
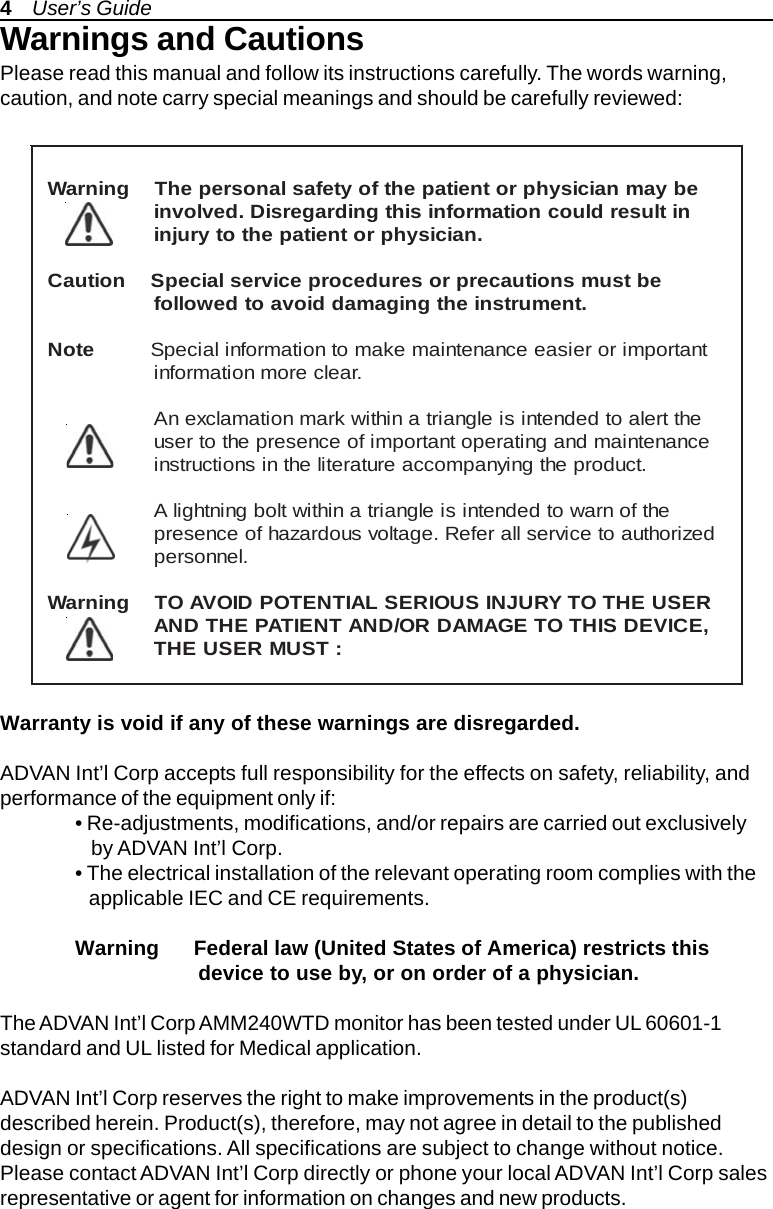
BARCO AMM240WTD LCD Color Display User Manual 1

Advan Int'l Corp. LCD Color Display 1

User Manual

AUTO - SCANNING WITH DIGITAL CONTROLLCD COLOR MEDICAL MONITORAMM240WTDOperation ManualFor future reference, record the serial number of your displaymonitor in the space below :Serial NumberThe serial number is located on the back of the monitor
back of the monitorADAVN INT’L CORP.2007All other trademarks are the property of their reference owners.This document is subject to change without notice.Advan provides this information as reference only. Reference to other vendor’sproducts does not imply any recommendation or endorsement.Revision ControlGNINRAWelbissopfosresuehtmrofniotdesusi"GNINRAW"eltitehT egamadytreporpro,htaed,yrujniehttcilfnidluoctahtsesuac .stneitapehtotNOITUACelbissopfosresuehtmrofniotdesusi"NOITUAC"eltitehT tonthgimtihguohtlastneitapehttcilfnidluoctahtsesuac .shtaedesuacothguoneerevesETONeratahtsmetifosresuehtmrofniotdesusi"ETON"eltitehT ro,noitarepo,noitallatsnifosmretniecnatropmifo tonseoderuliafehthguohtlatnempiuqEehtfoecnanetniam .stneitapehtotmrahylidobehttcilfnietaDnoitpircseD70119020.VERrebmuntnemucoDAMM240WTD   1
TABLE OF CONTENTSProduct Description and Intended Use......................................................Warnings and Cautions................................................................................Symbol Explanations....................................................................................EU Declaration of Conformity for Medical Applications...........................Safety Precaution.........................................................................................Cleaning Your Monitor..................................................................................Power Management Function....................................................................Preset Modes..............................................................................................Video Signals..............................................................................................PIP / POP / PBP function...........................................................................DDC.............................................................................................................Installation....................................................................................................Connecting the Power Cord......................................................................User Function / Messages.........................................................................OSD Section...............................................................................................Troubleshooting..........................................................................................Specification of (AMM240WTD)..................................................................Classification..............................................................................................Electromagnetic Compatibility..................................................................Dimension Drawing (mm)..........................................................................Connectors..................................................................................................Description of Warranty..............................................................................  3  4  7  8  9  9101112131414151617242526273031322    User’s Guide
Product Description and Intended UsePlease check the following items are present when you unpack the box, and save thepacking materials in case you will need to ship or transport the monitor in future.•AMM240WTD LCD Monitor and two video cables (1) HD15 VGA cable* (1) DVI-Dcable*•AC Power cord**•AC-Adapter•Composite Video BNC Jack Cable and Super Video Cable•User Manual and 4pcs VESA screws*Might be optional item, check with local representative**Might vary pending on region stardardCAUTIONManufacturer : JEC KoreaModel No :JMW1150KA2400F04**AMM240WTD   3
Warnings and CautionsPlease read this manual and follow its instructions carefully. The words warning,caution, and note carry special meanings and should be carefully reviewed:Warranty is void if any of these warnings are disregarded.ADVAN Int’l Corp accepts full responsibility for the effects on safety, reliability, andperformance of the equipment only if:• Re-adjustments, modifications, and/or repairs are carried out exclusively   by ADVAN Int’l Corp.• The electrical installation of the relevant operating room complies with the   applicable IEC and CE requirements.Warning      Federal law (United States of America) restricts this                    device to use by, or on order of a physician.The ADVAN Int’l Corp AMM240WTD monitor has been tested under UL 60601-1standard and UL listed for Medical application.ADVAN Int’l Corp reserves the right to make improvements in the product(s)described herein. Product(s), therefore, may not agree in detail to the publisheddesign or specifications. All specifications are subject to change without notice.Please contact ADVAN Int’l Corp directly or phone your local ADVAN Int’l Corp salesrepresentative or agent for information on changes and new products.ebyamnaicisyhprotneitapehtfoytefaslanosrepehTgninraW nitluserdluocnoitamrofnisihtgnidragersiD.devlovni .naicisyhprotneitapehtotyrujniebtsumsnoituacerproserudecorpecivreslaicepSnoituaC .tnemurtsniehtgnigamaddiovaotdewollofetoN tnatropmiroreisaeecnanetniamekamotnoitamrofnilaicepS .raelceromnoitamrofniehttrelaotdednetnisielgnairtanihtiwkramnoitamalcxenA ecnanetniamdnagnitarepotnatropmifoecneserpehtotresu .tcudorpehtgniynapmoccaerutaretilehtnisnoitcurtsniehtfonrawotdednetnisielgnairtanihtiwtlobgninthgilA dezirohtuaotecivresllarefeR.egatlovsuodrazahfoecneserp .lennosrepRESUEHTOTYRUJNISUOIRESLAITNETOPDIOVAOTgninraW,ECIVEDSIHTOTEGAMADRO/DNATNEITAPEHTDNA :TSUMRESUEHT4    User’s Guide
Warnings1.  Read the operating manual thoroughly and be familiar with its contents prior to using     this equipment.2.  Carefully unpack the unit and check if any damage occurred during shipment.3.  Should any solid object or liquid fall into the panel, unplug the unit and have it checked     by qualified personnel before operating it any further.4.  Uplug the unit if it is not to be used for an extended period of time. To disconnect the     cord, pull it out by the plug. Never pull the cord itself.5.  Be a qualified physician, having complete knowledge of the use of this equipment.6.  Test this equipment prior to a medical procedure. This monitor was fully tested at the     factory before shipment.7.  Avoid removing covers on control unit to avoid electric shock.8.  Attempt no internal repairs or adjustments not specifically detailed in this operating     manual.9.  Pay close attention to the care, cleaning instructions in this manual. A deviation may     cause damage (refer to the Cleaning section).10. DO NOT STERILIZE MONITOR.11. Read the entire instruction manual before assembling or connecting the camera.12. Do not place the monitor or any other heavy object on the power cord. Damage to the      cable can cause fire or electirc shock.13. Monitor with power supply is suitable for use in patient environment.14. DO NOT stack more than 8 boxes high.15. When the monitor is equipped with the base stand, please install the base stand      at horizontally flat place for normal use.This equipment has been tested and found to comply with the limits for medical devicesin IEC 601-1-2:2003. These limits are designed to provide reasonable protection againstharmful interference in a typical medical installation.This equipment generates, uses and can radiate radio frequency energy and, if notinstalled and used in accordance with the instructions, may cause harmful interference toother devices in the vicinity. However, there is no guarantee that interference will not occurin a particular installation. If this equipment does cause harmful interference to otherdevices, which can be determined by turning the equipment off and on, the user isencouraged to try to correct the interference by one or more of the following measures:- Reorient or relocate the receiving device.- Increase the separation between the equipment.- Connect the equipment into an outlet on a circuit different from that to which the other  device(s) are connected.- Consult the manufacturer or field service technician for help.NOTICES TO USERThis device complies with Part 15 of the FCC Rules. Operation is subject to the followingtwo conditions:(1) this device may not cause harmful interference, and (2) this device must accept anyinterference received, including interference that may cause undesired operation.FCC WARNINGThis equipement generates or uses radio frequency energy.  Changes or modifications notexpressly approved by the party responsible for compliance could void the user’s authorityto operate the equipment. The user could lose the authority to operate this equipment if anunauthorized change or modification is made.AMM240WTD   5
Cautions1.  The AC Adapter must be plugged into a Grounded power outlet.2.  Use only the proprietary  AMM240WTD power supply for the AMM240WTD monitor.     Make a proper connection by ensuring that the shrink tubing completely secures the     connection between the DC power cord and the extension cord.3.  Turn power off when unit is not in use.4.  Never operate the unit right after having transported from a cold location directly to a     warm location.5.  Do not expose the monitor to moisture or directly apply liquid cleaners directly to the     screen. Spray the cleaning solution into a soft cloth and clean gently.6.  Handle the monitor with care. Do not strike or scratch the screen.7.  Do not block the monitor cooling vents. The monitor is cooled by natural convection     and has no fan.8.  Do not force the monitor past 28 degrees of vertical when adjusting the screen     position. (For monitors equipped with stands only.)9.  Remove the power module and connection when transporting the unit.10. Save the original carton and associated packing material. They will be useful should       you have to transport or ship the unit.11. Allow adequate air circulation to prevent internal heat buildup.12. Do not place the unit on surfaces (rugs, blankets, etc.) or near materials (curtains,      draperies) that may block the ventilation slots.13. Do not install the unit near sunlight, excessive dust, mechanical vibration or shock.14. The unit is designed for operation in a horizontal position. Never operate the unit in       a vertical position.15. Keep the unit away from equipment with strong magnets (i.e. a large loudspeaker.)16. Do not expose the monitor to moisture or excessive dust.17. Equipment with SIP/SOP connectors should either comply with IEC 60601-1 and/or      IEC 60601-1-1 harmonized national standard or the combination should be evaluated.      Do not touch the patient with signal input or output connectors.18. Use only a hospital grade power supply cord.19. This equipment has been tested and found to comply with the limit for a Class B     digital device, pursuant to Part 15 of the FCC Rules. These limits are designed to     provide resonable generates, uses and can radiate radio frequency energy and, if not     installed and used in accordance with the instructions, may cause harmful     interference to radio communications. However, there is no guarantee that interference     will not occur in a particular installation, which can be detemined by turing the     equipment off and on, the user is encourage to try to correct the interference by one     or more of the following measures:•  Reorient or relocate the receiving device.•  Increase the separation distance between the equipment.•  Connect the equipment to an outlet on a circuit different from that to which the    other device(s) are connected.•  Consult the manufacturer or field service technican for help.20. Grounding reliability can only be achieved when the equipment is connected to an      equipment receptacle labeled “Hospital Only” or “Hospital Grade.”Note To connect to an international power supply, use a an attachment plug               appropriate for the power outlet.Note Refer to the “Electromagnetic Compatibility” (EMC) section of this manual to               ensure EMC. The AMM240WTD must be installed and operated according to the               EMC information provided in this manual.6    User’s Guide
Symbol Definitions AMM240WTD   7
EU Declaration of Conformity for Medical ApplicationsA Declaration of Conformity has been filed for this product. A sample ofthis document may be found in the addendum which accompanied thismanual.  For a copy of the Declaration of Conformity document, pleasecontact ADVAN Int’l Corp. and request for AMM240WTD DOC.Prepare for UnpackBefore you unpack your monitor, prepare a suitable workspace. Youneed a stable and level surface near a grounded wall outlet in an areawhich is relatively free of glare from sunlight or other sources of brightlight. The monitor is cooled by natural convection (it has no fan).For optimum performance, do not block the cooling vents.While unpacking the monitor, inspect it and other package contents forshipping damage that could cause a fire or shock hazard. Immediatelyreport any shipping damage to the carrier or transportation companyand contact customer service for monitor in the future or in case ofreturn.After you unpack the monitor, make sure the following items are in-cluded  •  Monitor with video cable  •  AC adapter with cable          CAUTION: AC Adapter must be plugged into Grounded a power outlet          CAUTION : AC adapter        Manufacturer: JEC Korea        Model No: JMW1150KA2400F04   •  This operations manual         Note:  Your system provider may offer alternative cords or cablesdepending on the installation requirement and local geography issues.8    User’s Guide
SAFETY PRECAUTION· Avoid placing the monitor, or any other heavy object, on the power cord to preventfire or electrical shock from damage to the power cord.· Do not expose the monitor to rain, excessive moisture, or dust to avoid fire or shockhazard.· Do not cover the slots or openings of the monitor for proper heat dissipation. Alwaysput the monitor in a place where there is adequate ventilation.· Avoid placing the monitor against a bright background or where sunlight or otherlight sources may reflect on the area of the monitor. Place the monitor just beloweye level.· Handle with care when transporting the monitor.· Refrain from giving the shock or scratch to the screen, as screen is fragile.CLEANING YOUR MONITORNo specific liquid or chemical necessary when cleaning this LCD monitorHowever, we suggest to clean the monitor with non-abrasive cloths and cleaningsolutions used in hospitals to clean similar equipment. We recommend using 70%Isopropyl alcohol for the screen surface and warm water and a mild detergent for allother surfaces. Other acceptable cleaning agents are listed below:  •  70% isopropyl alcohol  •  Cidex (2.4% glutaraldehyde solution)  •  0.5% Chlorhexidine in 70% isopropyl alcoholTo clean the screen, do not spray liquid cleaners directly on to the unit. Stand awayForm the monitor and spray cleaning solution onto a cloth. Without applying exces-sive pressure, clean the screen with the slightly dampened rag.AMM240WTD   9
POWER MANAGEMENT FUNCTIONThe monitor is equipped with the power management function which automatically reducethe power consumption when not in use in three power level modes.•Stand-by ModeThe monitor goes into stand-by mode when the horizontal sync signal is off forabout 10 seconds. In this mode, the screen goes off and the power LED blinks for 1seconds On and 1 second Off. The screen is displayed after the horizontal syncsignal is restored.•Suspend ModeThe monitor goes into suspend mode when the vertical sync signal is off for about10 seconds. The power consumption during this is less than 8 W. In this mode, thescreen goes off and the power LED blinks for 1 seconds On and 1 second Off. Thescreen is displayed after the vertical sync signal is restored.•Off ModeThe monitor goes into power-off mode when the vertical and horizontal sync signalsare off for about 10 seconds. In this mode, the screen goes off and the power LEDblinks for 1 seconds On and 1 second Off. The screen is displayed after the verticaland horizontal sync signals are restored.Power Management SystemThe AMM240WTD Medical Monitor power management proposal.  Provides fourphases of power-saving modes by detecting the horizontal sync signal as shown inthe table below.When the monitor is power saving mode or detects an incorrect timing, the screen willbe blank and power LED indicator will blink.10    User’s Guide27W27W27W97WPower ConsumptionRed Flashing(1 sec. Interval)Red Flashing(1 sec. Interval)Red Flashing(1 sec. Interval)GreenPower IndicatorBlankedBlankedBlankedActiveVideoInactiveInactiveActiveActiveVertical SyncInactiveActiveInactiveActiveHorizontal SyncDPMS OffDPMS suspendDPMS StandbyNormal OperationState27W27W27W97WPower ConsumptionRed Flashing(1 sec. Interval)Red Flashing(1 sec. Interval)Red Flashing(1 sec. Interval)GreenPower IndicatorBlankedBlankedBlankedActiveVideoInactiveInactiveActiveActiveVertical SyncInactiveActiveInactiveActiveHorizontal SyncDPMS OffDPMS suspendDPMS StandbyNormal OperationState
PRESET MODESAMM240WTD   11noituloseRlatnoziroH ycneuqerf )zHK(lacitreV ycneuqerf )zH(kcolclexiP )zHM(zH06@053x046964.13149.95571.52zH07@053x046964.13780.07571.52zH58@053x04668.73080.58005.13zH06@004x046964.13149.95571.52zH07@004x046964.13780.07571.52zH58@004x04668.73080.58005.13zH06@084x046964.13049.95571.52zH27@084x046168.73908.27005.13zH57@084x046005.73000.57005.13zH58@084x046962.34800.58000.63zH58@004x027729.73830.58005.53zH65@006x008651.53052.65000.63zH06@006x008978.73713.06000.04zH27@006x008770.84881.27000.05zH57@006x008578.64000.57005.94zH58@006x008476.35160.58052.65zH34@867x4201225.53859.68009.44zH06@867x4201363.84400.06000.56zH07@867x4201674.65960.07000.57zH57@867x4201320.06920.57057.87zH58@867x4201776.86799.48005.49zH06@468x2511843.45350.06000.08zH07@468x2511559.36610.07002.49zH57@468x2511005.76000.57000.801zH06@069x0821000.06000.06000.801zH58@069x0821839.58200.58005.841zH06@4201x0821479.36310.06005.801zH57@4201x0821679.97520.57000.531zH58@4201x0821641.19420.58005.751zH06@0021x0061000.57000.06000.261zH06@0021x0291990.47999.95521.451
Video Signals12    User’s GuidetamroFoediV-CoediV-S1IDS2IDSBGR/tnenopmoCrP/bP/YBGRCSTNOOLAPOOi49.95/084 OOO Op49.95/084OOi05/675 OOO Op05/675OOp05/027 OOOp49.95/027 OOO Op06/027 OOO Oi49.95/5301 OOO Oi06/5301 OOO Ofsp89.32/0801 OOOfsp42/0801 OOOp89.32/0801 OOOp42/0801 OOOp52/0801 OOOp79.92/0801 OOOp03/0801 OOOi05/0801 OOO Op05/0801Oi49.95/0801 OOO Op49.95/0801Oi06/0801 OOO Op06/0801O
AMM240WTD   13PIP / POP / PBP functionThe following combination options are available to you:PIPniaMAGVIVD1IDS2IDSoediV-CoediV-StnenopmoCAGV OOOOOO OIVD OOOOOO O1IDS OOO OO O2IDS OO OOO OoediV-C OOOOOO OoediV-S OOOOOO OtnenopmoC OOOOOO O
DDCTo make your installation easier, the monitor is able to Plug and Play with your systemif your system also supports DDC protocol. The DDC (Display Data Channel) is acommunication protocol through which the monitor automatically informs the host systemabout its capabilities, for example, supported resolutions and corresponding timing. Themonitor supports DDC1 and DDC2B standard.INSTALLATIONTo install the monitor to your host system, please follow the steps as given below:Steps1. Use the supplied video cable (DVI, VGA, S-Video, C-Video) then connect to the hostsystem accordingly.2. Connect the DC power to the DC power connector on the monitor.3. Connect one end of AC power cord into the AC Adapter and the other end to AC poweroutlet.4. Then turn the host system on and then the monitor.5. If the monitor still does not function properly, please refer to the troubleshootingsection to diagnose the problem.14    User’s GuideDVI VGA SDI INS - VideoC - VideoDC PowerINOUTRGB / Component SDI OUT
CONNECTING the POWER CORD*  Check first to make sure that the power cord you use is the correct type required foryour area.*  This monitor has an universal AC adapter that allows operation in eitherAC 100 - 240 V ac voltage area.  No user-adjustment is required.*  Plug one end of the power cord to the AC adapter, plug another end to a properAC outlet.The cord set should have the appropriate safety approvals for the country in which theequipment will be installed and marked HAR.For 120 volt Applications, use only UL Listed deachable power cord with NEMAconfiguration 5-15P type (parallel blades) plug cap.  For 240 volt applications use onlyUL Listed Detachable power supply cord with NEMA configuration 6-15P type (tandemblades) plug cap.AMM240WTD   15Hospital-gradepower cordPower SupplyManufacturer: JEC KoreaModel No: JMW1150KA2400F04Extension power cord (optional)Manfacturer: JEC KoreaModel No: 1501047      (15ft)          or 1501047001  (75ft)AMM240WTD
16    User’s GuideUser Functions / MessagesKey Name and FunctionPower LED : Lights up to indicate the power is turned ON.Power Switch : To power ON or OFF the monitor.Rotary switch : With the OSD menu activated, increases the value of the selected(Ture Right)      parameter or moves rightward in OSD menu.Rotary switch : With the OSD menu activated, increases the value of the selected(Ture Left)         parameter or moves leftward in OSD menu.PIP Switch : To enable or disable Picture In Picture function.PBP Switch : To enable or disable Picture By Picture function.POP Switch : To enable or disable Picture On Picture function.Adjust Switch : To activate or deactivate image adjustment in sub screen of PIP,           PBP, POP mode.Locker Switch : To turn ON or OFF the system.How to access the menu1. Push the “Knob” button to activate the OSD menu.2. Able to turn left or right the button to select those icons. The icon will be    highlighted when is selected.3. Push the “knob” button to go into the another OSD menu.4. Turn left or right “Knob” button to increase or decrease the number of selected    function.5. In order to exit from the OSD menu in a different layer, then choose the “Exit    option”. In case of long pushing and holding the button around two or three    seconds, then it will completely out from the menu regardless wherever you are.6. Turn the “Knob” button in a fast way to the left or right, while the menu is not    activated, then input signal menu will turns up with “V” mark which is chosen    current available input signal. You can switch to another input signal source by    turning the knob slowly then select the target source by pushing the knob.
AMM240WTD   17OSD SectionChromatic Adjust Color Temp, GammaVisual Adjust Brightness, Contrast, Phase, Chroma,Sharpness-H, Sharpness-VSetting Adjust Scale Mode, Mirror, Freeze Frame, Zoom / Pan,PIP / POP, PBPAdvanced Adjust OSD Position Control, Screen Control, DPMS, AutoSource Select, Smart Select, Restore Factory, Key LockInformation Adjust Custom Entry, SN, Run Time, Input FormatMain Menu
18    User’s GuideOSD SectionChromaticColor Temp Change the color temperature - D65, D93, S1, S2, S3, S4Gamma Change the gamma value - 1.8, 1.9, 2.0, 2.1, 2.1S, 2.2, 2.3,2.4, 2.4S, S0, Radio graphExit Exit the menuVisualBrightness Adjust the brightness of panel (Range 0 - 100)Contrast Adjust the contrast of video (Range 0 - 100)Phase Adjust the phase of video (Range 0 - 100)*available for C and S - videoChroma Adjust the chroma of video (Range 0 - 100)*available for C and S - videoSharpness-H Set the sharpness of horizontal image (Range 0 - 100)Sharpness-V Set the sharpness of vertical image (Range 0 - 100)Exit Exit the menu
OSD SectionSettingScale Mode Change the scale mode - Fill all, Vertical - fill,Horizontal - fill, One to One, Center - fill, Fill aspect ratioMirror Off / On mirror imageFreeze Frame Off / On freeze frameZoom / Pan Enable zoom - in and pan functionPIP Enable PIP (Picture In Picture) functionPBP Enable PBP (Picture By Picture) functionExit Exit the menuAMM240WTD   19
20    User’s GuideOSD SectionMode PIP Mode ON / OffSource PIP sub screen source - SDI1,2, C-Video, S-Video,Component, VGA, DVIPosition PIP sub screen position - Top L, Top R, Bottom L, Bottom RSize PIP sub screen size - Small, Medium, LargeBlending PIP sub screen blending (Range 0 - 100)Swap PIP sub screen swapExit Exit the menuMode PBP Mode ON / OffSource PBP sub screen source - SDI1,2, C-Video, S-Video,Component, VGA, DVISwap PBP sub screen swapExit Exit the menuSub menu of PBPSub menu of PIP
OSD SectionAdvancedOSD Position Change the OSD menu - Position, Background,Control OSD time out, LanguageScreen Control Control and adjust H and V position, Freqency, PhaseNoise Reduction, Motion OffsetDPMS Change the DPMSAuto Source Adjust Auto Source Select between on and offSelectSmart Select Enable / Disable smart select sub menuRestore Factory Changes the all OSD value to factory outgoing statusKey Lock Set to key lock modeExit Exit the menuAMM240WTD   21
22    User’s GuideOSD SectionSub menu of OSD ControlH-position Adjust OSD H - position (Range 0 - 100)V-position Adjust OSD V - position (Range 0 - 100)Back ground Adjust transparency of OSD back ground (Range 0 - 100)OSD Time out Adjust OSD time out - 5s, 10s, 15s, 20s, 1m, 2mLanguage OSD language - English, Japanese, Chinese, Korean,French, GermanExit Exit the menuH-position Adjust screen H - position (Range 0 - 100)V-position Adjust Screen V - position (Range 0 - 100)Frequency Adjust frequency (Range 0 - 100)*available for VGAPhase Adjust phase (Range 0 - 100)*available for VGANoise Noise Reduction (Range 0 - 100)Reduction *available for Component, C-Video and S-VideoMotion Offset Motion Offset (Range 0 - 15)*available for Component, C-Video and S-VideoExit Exit the menuSub menu of Screen Control
OSD SectionInformationCustom Entry Change the user or monitor’s nameSN Display the serial numberRun Time Display the total run timeInput Format Display the current input resolution and vertical frequencyExit Exit the menuAMM240WTD   23
24    User’s GuideTROUBLESHOOTINGBefore sending your LCD monitor for servicing, please check the troubleshooting listbelow to see if you can self-diagnose the problem.smelborPsutatStnerruCydemeRerutciPoNNODEL· ottsartnocdnassenthgirbtsujda,DSOgnisU .sgnittestluafedriehtotteserromumixamFFODEL· .hctiwsrewoPdnahctiwsrekcoLehtkcehC·detcennocylreporpsidrocrewopCAfikcehC .retpadaCAehtotgniknilBDEL· ylreporpsielbaclangisoedivfikcehC .rotinomfokcabehttadetcennoc·.NOsimetsysretupmocotrewopehtfikcehClamronbA erutciPerutciPelbatsnU· retpadascihpargfonoitacificepsehtfikcehC ebyamhcihwecnailpmocnisirotinomdna .hctamsimycneuqerflangistupniehtgnisuac,gnissimsiyalpsiD ootro,tfihsretnec egralootrollams ezisyalpsidni·yalpsidllitsfi,nottubputeSotuAgnisU -KCOLC,KCOLCtsujdanehterutciplamronba htiwNOITISOP-VdnaNOITISOP-H,ESAHP .slangisdradnats-non·neercs-llufgnissimfoesacni,DSOgnisU ruoyninoituloserrehtotcelesesaelp,egami ro)TN,89/59swodniW(metsySgnitarepO .gnimithserferlacitrevrehto·ehtgnitsujdaretfasdnoceswefaroftiawtsuM rognignahcerofebegamiehtfoezis ehtFFOgnirewoprolangisehtgnitcennocsid .rotinom
** All contents are subject to change without notice.SPECIFICATIONDT312MMAlenaPDCLlenaPDCLTFT"0.42epyTxirtaMevitcAnoituloseRzH57@0021x0291hctiPlexiPmm72.0roloCyalpsiDsrolocM7.61enoTroloCenotroloc652otpUemiTesnopseR.pyTsm52<gnihsiniFecaF detaoCdraHdetcelfeR-itnAhtiwretliFevitcetorPelgnAgniweiV )lacitrev(°58-/+,)latnoziroH(°58-/+)latigiD&golanA(langiStupnI)golanA(cnyS cnysdetarapesp-pV0.5~5.2)golanA(cnySetisopmoC )LAP/CSTN(oediVetisopmoC)golanA(cnySC/Y)LAP/CSTN(oediV-S)golanA(ecnadepmItupnImhO57-oediV mhOk1-cnySlatigiD -BSMtib-42lexipelgnis,reviecerSDMTlennahc3 TFTBGRdengilaycneuqerFgninnacSlatnoziroHzHk89.97~74.13lacitreVzH3.57~05eziSyalpsiDVxH )mm423xmm4.815("8.21x"4.02selacSyarG,oitdaRtsartnoC,ssenthgirBssenthgirB).pyT(2m/dc007oitaRtsartnoC).pyT(1:009rotcennoCtupnIlangiSoediV ,G/YtnenopmoC,2dna1IDS-DH/DS,51DH,IVD oediV-SdnaoediV-C,SV,SC/H,R/rP,B/bPnoitacinummoC)232SR(9BD)hguorhTpooL(rotcennoCtuptuOlangiSoediV ,SV,SC/H,R/rP,B/bP,G/YtnenopmoC,IDS-DH/DS oediV-SdnaoediV-CtnemnorivnEegarotS/gnitarepOerutarepmeTgnitarepO)C°23-°0(F°09~°23erutarepmeTegarotS )C°06-°02-(F°041~°4-ytidimuH )noitasnednoctuohtiw(HR%09~01gnitnuoMASEVmm001xmm001ecruoSrewoProtinoMyalpsiDV42CDretpadA-CA %01-/+xaMW021V042~001CAsnoitalugeRlatnemnorivnE&IME,ytefaS ,EC,CCF,2-1-10606NE,1-10606NE,1-10606LU ecnailpmoC1X:PI,SHOR,ICCV,CCCnoisnemiDtnuoMeerF )D("93.4x)H("70.51x)W("45.32 )D(mm5.111x)H(mm9.283x)W(mm895thgieWtnuoMeerF)gK66.7(sbl9.61eludoMlanoitpOdnatSesaB dnatsesabtlitdnaleviws,hgihelbatsujdAAMM240WTD   25
26    User’s GuideThis monitor is intended for use in Health Care Facilities model AMM240WTDEquipment is not suitable for use in the presence of flammable anesthetic mixturewith air or with oxygen or nitrous oxide.No user serviceable parts inside, ask qualified personnel when accessing inside.For disposal of waste product, follow the requirement of local code.Electrical input rating: 24V DC 6.25AClassificationType of protection against electric shock: Class I Equipment.Degree of protection against the ingress of water: IPX1 compliance.Mode of operation: ContinuousThis monitor has been tested to comply with IEC/EN 60601-1, IEC/EN60601-1-2 andis certified by UL to medical standard UL60601-1(UL/cUL Mark).Because many medical offices are located in residential areas, this monitor, inaddition to the medical requirements, has also been tested and found to comply withthe limits for FCC Class B computing devices in a typically configured system. It isthe system integrator or configurer’s responsibility to test and ensure that the entiresystem complies with applicable EMC laws.Environmental conditions for transport and storage:- Temperature range within -4°  to 140° F (-20° to 60° C)- Relative humidity range within 10% to 90%- Atmospheric pressure range within 500 to 1060 hPa.51LJMedical EquipmentE215822
Electromagnetic CompatibilityLike other electrical medical equipment, the AMM240WTD requires specialprecautions to ensure electromagnetic compatibility with other electrical medicaldevices. To ensure electromagnetic compatibility (EMC), the AMM240WTD must beinstalled and operated according to the EMC information provided in this manual.Note The AMM240WTD has been designed and tested to comply with IEC 60601-1-2:2001 requirements for EMC with other devices.Caution   Portable and mobile RF communications equipment may affectthe normal function of the AMM240WTD.Warning   Do not use cables or accessories other than those providedwith the AMM240WTD, as this may result in increased electromagneticemissions or decreased immunity to such emissions.Warning    If the AMM240WTD is used adjacent to or stacked with otherequipment, observe and verify normal operation of the AMM240WTD in theconfiguration in which it will be used prior to using it in a surgical procedure.Consult the tables below for guidance in placing the AMM240WTD.deificepstnemnorivnecitengamortceleehtniesurofdednetnisiDTW042MMAledoMehT .woleb nahcusnidesusititahterussadluohsDTW042MMAforesuehtroremotsucehT .tnemnorivnetsetnoissimEecnailpmoCecnadiug-tnemnorivnecitengamortcelEsnoissimeFR 11RPSIC 1puorG lanretnistirofylnoygreneFRsesuDW0412MMAledoMehT toneradnawolyreverasnoissimeFRsti,eroferehT.noitcnuf tnempiuqecinortceleybraenniecnerefretniynaesuacotylekilsnoissimeFR 11RPSICBssalC,stnemhsilbatsellaniesurofelbatiussiDTW042MMA detcennocyltceridesohtdnastnemhsilbatsecitsemodgnidulcni seilppustahtkrowtenylppusrewopegatlov-wolcilbupehtot sesoprupcitsemodrofdesusgnidliubsnoissimecinomraH 2-3-00016CEI DssalCsnoitautculFegatloV 3-3-00016CEI seilpmoCAMM240WTD   27Manufacturer’s declaration - electromagnetic emission.wolebdeificepstnemnorivnecitengamortceleehtniesurofdednetnisiDTW042MMAledoMehT .tnemnorivnenahcusnidesusititahterussadluohsDTW042MMAforesuehtroremotsucehTtseTytinummIleveLtseT10606CEIleveLecnailpmoC citengamortcelE ecnadiug-tnemnorivneegrahcsidcitatsortcelE )DSE( 2-4-00016CEItcatnocVk6 riaVk8 tcatnocVk6 riaVk8,doowebdluohssroolF fI.elitcimarecroetercnoc htiwderevocerasroolf eht,lairetamcitehtnys taebdluohsytidimuhevitaler .%03tsaeltsrub/tneisnarttsaflacirtcelE 4-4-00016CEI senilylppusrewoprofVk2 seniltuptuo/tupnirofVk1 senilylppusrewoprofVk2 seniltuptuo/tupnirofVk1dluohsytilauqrewopsniaM lacipytafotahteb latipsohrolaicremmoc .tnemnorivneegruS 5-4-00016CEI edomlaitnereffidVk1 edomnommocVk2 edomlaitnereffidVk1 edomnommocVk2dluohsytilauqrewopsniaM lacipytafotahteb latipsohrolaicremmoc .tnemnorivneManufacturer’s declaration - electromagnetic immunity
28    User’s Guide)zH06/05(ycneuqerfrewoP dleifcitengam 8-4-00016CEI m/A0.3m/A0.3citengamycneuqerfrewoP sleveltaebdluohssdleif lacipytafocitsiretcarahc lacipytaninoitacol latipsohrolaicremmoc .tnemnorivnetrohs,spidegatloV egatlovdnasnoitpurretni ylppusrewopnosnoitairav seniltupni 11-4-00016CEI)tUnipid%59>(tU%5< elcyc5.0rof)tUnipid%06(tU%04 selcyc5rof)tUnipid%03(tU%07 selcyc52rof)tUnipid%59>(tU%5< .ces5rof)tUnipid%59>(tU%5< elcyc5.0rof)tUnipid%06(tU%04 selcyc5rof)tUnipid%03(tU%07 selcyc52rof)tUnipid%59>(tU%5< .ces5rofdluohsytiliauqrewopsniaM lacipytafotahteb latipsohrolaicremmoc foresuehtfI.tnemnorivne egamiDTW042MMAeht deunitnocseriuqerreifisnetni rewopgnirudnoitarepo siti,snoitpurretnisniam ehttahtdednemmocer egamiDTW042MMA morfderewopebreifisnetni rewopelbitpurretninuna .yrettabaroylppustU:etoN .leveltsetehtfonoitacilppaotroirpegatlovsniam.C.Aehtsi.wolebdeificepstnemnorivnecitengamortceleehtniesurofdednetnisiDTW042MMAledoMehT .tnemnorivnenahcusnidesusititahterusnedluohsDTW042MMAforesuehtroremotsucehTtseTytinummIleveLtseT10606CEIleveLecnailpmoC citengamortcelE ecnadiug-tnemnorivneFRdetcudnoC 6-4-00016CEIFRdetaidaR 3-4-00016CEIsmrV3 zHM08otzHK051m/V3 zHG5.2otzHM08smrV3 zHM08otzHK051m/V3 zHG5.2otzHM08FRelibomdnaelbatroP tnempiuqesnoitacinummoc otresolcondesuebdluohs ehtfotrapyna DTW042MMA gnidulcni,ehtnaht,selbac noitarapesdednemmocer ehtmorfdetaluclacecnatsid ehtotelbacilppanoitauqe .rettimsnartehtfoycneuqerfdednemmoceR ecnatsiDnoitarapeS zHM08otzHM51.0zHM008otzHM08zHG5.2otzHM008erehw Pmumixamehtsi ehtfognitarrewoptuptupo (sttawnirettimsnart W)rettimsnartehtotgnidrocca dnarerutcafunam dehtsi noitarapesdednemmocer (sretemniecnatsid m.)FRdexifmorfshtgnertsdleiF denim-retedsa,srettimsnart etiscitengamortcelenayb yevrus )a( sselebdluohs, nilevelecnailpmocehtnaht egnarycneuqerfhcae )b(.ehtniruccoyamycnerefretnI dekramtnempiuqefoytiniciv :lobmysgniwllofehthtiw.seilppaegnarycneuqerfrehgiheht,zHM008dnazHM08tA:1ETONdnanoitprosbaybdetceffasinoitagaporpcitengamortcelE.snoitautisllaniylppatonyamsenilediugesehT:2ETON .elpoepdna,stcejbo,serutcurtsmorfnoitcelferelibomdnaldnasenohpelet)sseldroc/ralullec(oidarrofsnoitatsesabsahcus,srettimsnartdexifmorfshtgnertsdleiF)a( .ycaruccahtiwyllaciteroehtdetciderpebtonnoc,tsacdaorbVTdnatsacdaorboidarMFdnaMA,oidarruetama,soidar ebdluohsyevrusetiscitengamortcelena,srettimsnartFRdexifoteudtnemnorivnecitengamortceleehtssessaoT FRelbacilppaehtsdeecxedesusiDTW042MMAehthcihwninoitacolehtnihtgnertsdleifderusaemehtfI.deredisnoc siecnamrofreplamronbafI.noitarepolamronyfirevotdevresboebdluohsDTW042MMAeht,evobalevelecnailpmoc .DTW042MMAehtgnitacolerrognitneiroersahcus,yrassecenebyamserusaemlanoitidda,devresbo.m/V]1V[nahtsselebdluohsshtgnertsdleif,zHM08otzHk051egnarycneuqerfehtrevO)b(Manufacturer’s declaration - electromagnetic immunity
FReliboMdnaelbatroPneewteBsecnatsiDnoitarapeSdednemmoceR metsySDTW042MMAehtdnatnemepiuqEsnoitacinummoCnitnemnorivnecitengamortcelenaniesurofdednetnisimetsysDTW042MMAehT metsysDTW042MMAehtforesuehT.dellortnocerasecnabrutsidFRdetaidarhcihw ecnatsidmuminimagniniatniamybecnerefretnicitengamortceletneverpplehnac ehtdna)srettimsnart(tnempiuqesnoitacinummocFRelibomdnaelbatropneewteb rewoptuptuomumixamehtotgnidrocca,wolebdednemmocersametsysDTW042MMA .tnempiuqesnoitacinummocehtfomumixamdetaR fo)W(rewoptuptuo rettimsnartrettimsnartfoycneuqerfotgnidrocca)m(ecnatsidnoitarapeSzHM08otzHk051 p,71.1=d zHM008otzHM08 p,71.1=d zHG5.2otzHM008 p,33.2=d10.021.021.032.01.073.073.047.0171.171.133.20107.307.373.700107.1107.1103.32dednemmocereht,evobadetsiltonrewoptuptuomumixamatadetarsrettimsnartroF ehtotelbacilppanoitauqeehtgnisudetamitseebnac)m(sretemni)d(ecnatsidnoitarapes nirettimsnartehtfognitarrewoptuptuomumixamehtsiPerehw,rettimsnartehtfoycneuqerf .rerutcafunamrettimsnartehtotgnidrocca)W(sttawegnarycneuqerfrehgihehtrofecnatsidnoitarapeseht,zHM008dnazHM08tA:1ETON .seilppasinoitagaporpcitengamortcelE.snoitautisllaniylppatonyamsenilediugesehT:2ETON .elpoepdna,stcejbo,serutcurtsmorfnoitcelferdnanoitprosbaybdetceffaAMM240WTD   29
30    User’s GuideDimension Drawing (mm)
ConnectorsDC InputConnector Jack Power InputVideo Input24 pin DVI-I connector.DDWG or equivalent connector.niPnoitpircseDniPnoitpircseDniPnoitpircseD1-2ataD.S.D.M.T11dleihS1ataD.S.D.M.T12CN2+2ataD.S.D.M.T21CN22dleihSkcolC.S.D.M.T3dleihS2ataD.S.D.M.T31CN32+kcolC.S.D.M.T4CN41rewoPV5+42-kcolC.S.D.M.T5CN51)V5+rof(dnuorG52deRgolanA6kcolCCDD61tceteDgulPtoH62neerGgolanA7ataDCDD71-0ataD.S.D.M.T72eulBgolanA8cnyS-VgolanA81+0ataD.S.D.M.T82cnyS-HgolanA9-1ataD.S.D.M.T91dleihS0ataD.S.D.M.T92)langisgolanarof(DNG01+1ataD.S.D.M.T02CN15 pin VGA connector.niPnoitpircseDniPnoitpircseDniPnoitpircseD1DERG6DNG11CN2NEERGG7DNG21ADSG3EULBG8DNG31SHI4DNG9V5G41SVI5DNG01DNG51LCSGS - Video connector.C - Video connector.niPnoitpircseDniPnoitpircseD1DNG3 AMORHC2DNG4 AMULniPnoitpircseD1TUO/NIATADniPnoitpircseDniPnoitpircseD1DNG4CN2DNG5 V42_CCV3V42_CCVAMM240WTD   31
32    User’s GuideDescription of WarrantyAdvan warrants that the goods the goods sold hereunder will be free of defects inmaterials and workmanship, and such goods will substantially conform to the specifi-cations furnished by Advan, and to any drawings or specifications furnished to Advanby the Buyer if approved by Advan. This warranty shall be effective only if Advanreceives notice of such defect or nonconformance during the period of the warranty.Advan sole and exclusive the Advan product(s) with refurbished units provide a creditto buyer in the amount of the purchase price.Commencement and Duration of WarrantyThe warranty period begins on the date of shipment from Advan. The goods soldhereunder are warranted for a period of 18 months from date of shipment unlessotherwise agreed to by Buyer and Advan. No extension of the warranty will be givenduring the time the goods are in Advan possession.Place of Repair or ReplacementIn order to obtain service under this warranty, Buyer must notify Advan of the defectbefore expiration on the warranty period, and request a “Return Material AuthorizationNumber.” If the configuration has been modified in any manner, the product must bereturned to its original configuration before any warranty service will be perfomed byAdvan. No goods are to be returned to Advan without prior authorization. Buyer will beresponsible for packaging and shipping the defective goods to the Advan ServiceFacility with shipping charges prepaid.Limitation of WarrantyMonitor:For 18 months after the date of purchase, ADVAN or its Authorized Service Centers, willrepair or replace if defective in material or workmanship.  This Limited Warranty does notinclude cleaning, or damage caused by accident, neglect, misuse or improper installationor operation, any damage caused from service, maintenance, modifications or tamperingby anyone other than an ADVAN Authorized Service Representative, or by the use ofsupplies, consumable items and conditions beyond the control of ADVAN, such ascommon carrier provided equipment and/or facilities, operation of ADVAN product inexcess of the specifications or with the Serial Number or Rating label removed.
ADVAN DISCLAIMS ALL OTHER WARRANTIES EXPRESS OR IMPLIED INCLUD-ING, WITHOUT LIMITATION, ANY IMPLIED WARRANTIES OF MERCHANTABILITYOR FITNESS FOR PARTICULAR PURPOSE, EXCEPT TO THE EXTENT THAT ANYWARRANTIES IMPLIED BY LAW CANNOT BE VALIDLY WAIVED.No oral or written information or advice given by ADVAN, its authorized service center,distributors, dealers, agents or employees, shall create another warranty or modifythis warranty.  This warranty states ADVAN’s entire liability and your exclusiveremedy against ADVAN for any failure of the ADVAN’s product to operate properly.Neither ADVAN nor anyone else involved in the development, production, or delivery ofthis product shall be liable for any indirect, incidental, special consequential, exem-plary, or punitive damages, including lost profits, arising from the use of or inability toconsequential or incidental damages, the above limitation may not apply to you.This Limited Warranty gives you special legal rights and you may also have otherright, which vary from State to State.InstallationAdvan makes no warranty with respect to any installation of Advan’s product(s)by Advan, any authorized dealer, or any other person.Technical AssistanceFor technical assistance please call (510)490-1005 between 8:00 a.m. and 5:00 p.m.PST, Monday through Friday or email to support@advancorp.com with a descriptionof your technical issues.ServiceIf your Medical Monitor needs service, call Advan Customer Service / RMA at(510)490-1005 between 7:00 a.m and 4:00 p.m PST, Monday through Friday or fax to(510)490-1151. You will need the unit’s serial number and a brief description of theproblem and where unit were purchased to receive a RMA number.If a service is required please return the product for service using the originalshipping container with the RMA number included in package on the outsideof the box.In order to protect ADVAN employees form potential health hazards, ADVANrequires that the RMA product be disinfected before returning to ADVAN forservice. Any product not cleaned prior to shipment will be returned to thecustomer.In-transit damage is not covered by warranty. We suggest you always insure yourshipment. Advan will only pay for the return shipment by surface transportation. It isthe responsibility of the sender to prepay transportation charges.Note: Returns will not be accepted without an assigned RMA number.AMM213TD   33
ADVAN INT’L CORP47817 Fremont Blvd. Fremont, CA 94538Tel  : 510-490-1005Fax : 510-490-1151Web Page : http://www.advancorp.com

Navigation menu