BAYCOM OPTO ELECTRONICS TECHNOLOGY EK10H Wireless Network IP Camera User Manual QIG front
BAYCOM OPTO-ELECTRONICS TECHNOLOGY CO., LTD. Wireless Network IP Camera QIG front
Users manual
Quick Installation Guide
Plug & Play Camera
BAYCOM K10
1. Package Contents
Camera / Mounting Bracket / AC Power Adapter
/ Mounting Screws / Quick Installation Guide
/ Warranty Card/ CD
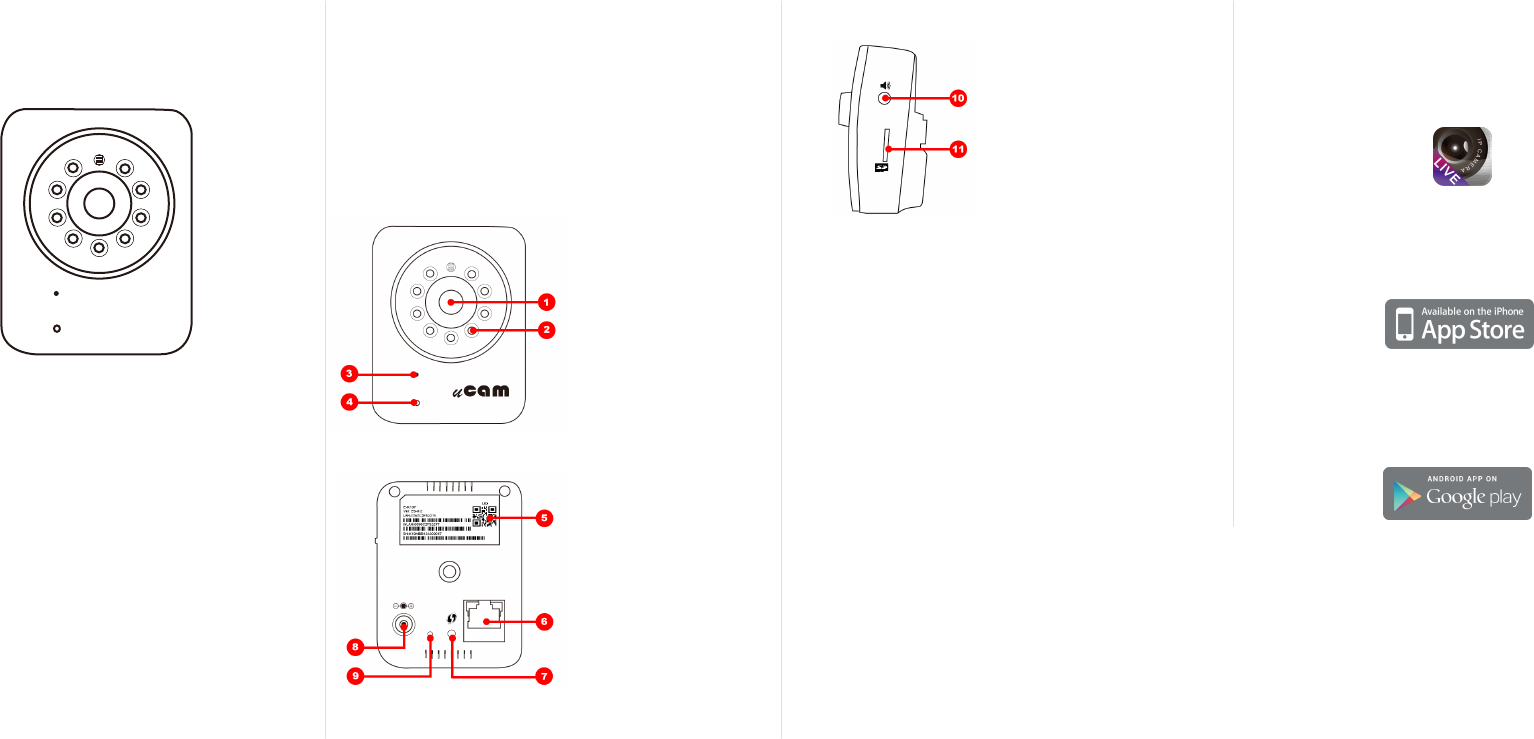
2. Physical Descriptions
1. Lens
2. IR LED
(Night vision function)
3. Built-in Microphone
4. Power / WPS / Reset
LED indicator,
Network LED Indicator
5. UID
6. RJ-45 Network port
7. WPS botton
8. DC5V-IN Socket
9. Reset botton
10. Audio jack (to speaker)
11. Micro SD Card Slot
720P HD
Day & Night
3. Network Requirements
- An ADSL modem with Internet connection.
- A broadband router, preferably with Wi-Fi
capability. Please make sure DHCP is enabled
on your router.
- Android or iOS smartphones ; 3G/WiFi
netwrok connection preferred.
4. Installation
Step 1 : Install APP “P2PCamLive” to your
mobile device.
- For iPhone / iPad,
please download P2PCam_Live from
Apple Store and install it.
- For Android Smartphone / Tablet,
please download P2PCamLive from
Play Store and install it.
Wireless Network IP Camera
K10H(K10/K10S/K10K)
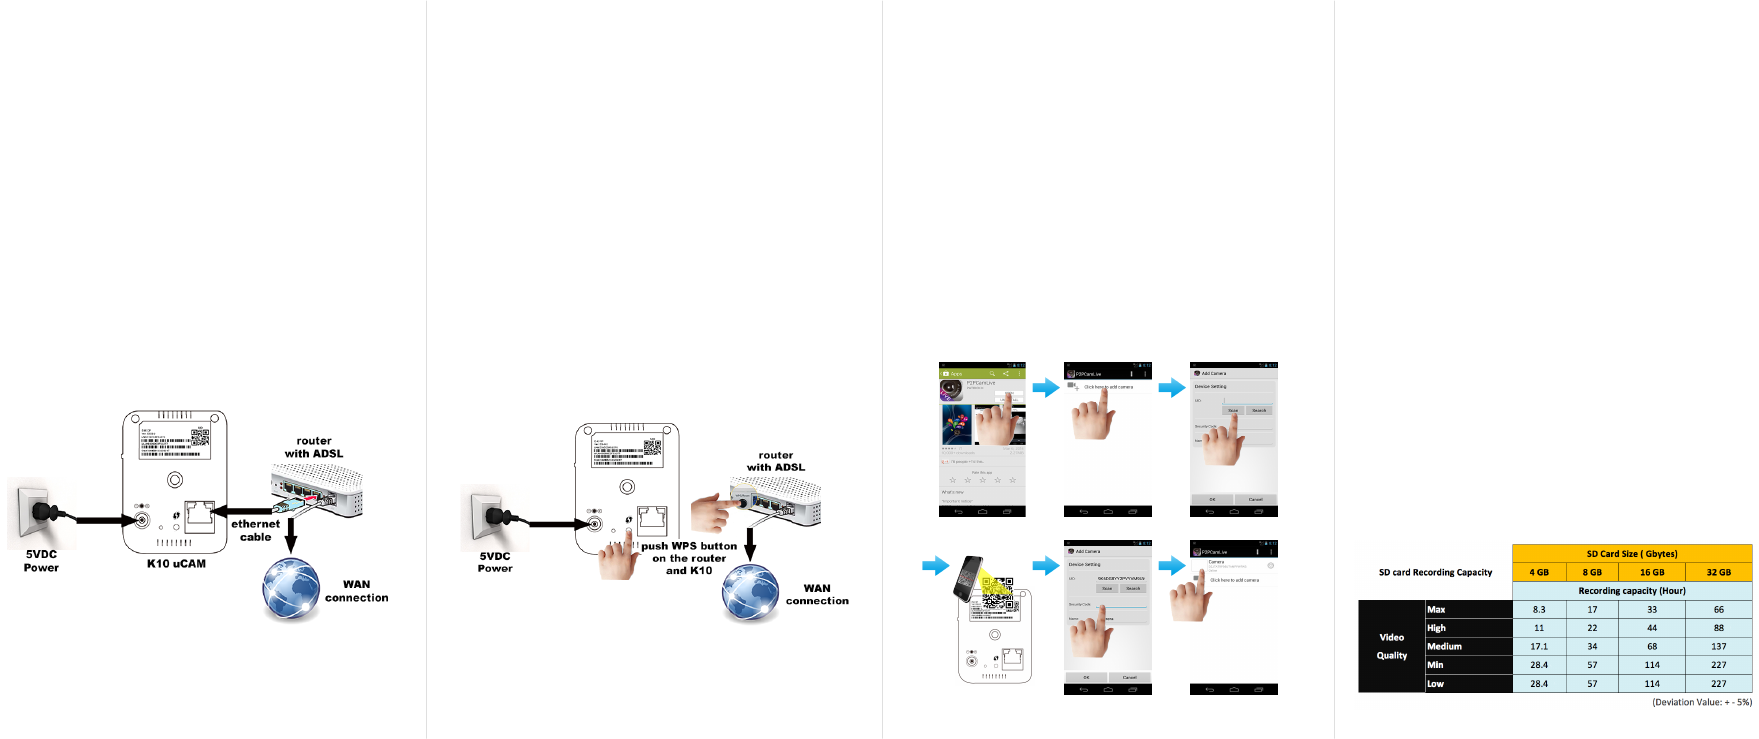
WPS setup
Note: Please unplug the network cable
for WPS setup.
1. Plug the power adapter and power on your
then wait for 40 seconds to boot the camera
(operating system).
2. Press the WPS button (on the lower back of
for 4 seconds until its LED blinks. Then press
the WPS button on your router and wait for
the Wi-Fi connection to be established
(within 10 to 120 seconds).
Step 3 : Add camera
1. Download APP “P2PCamLive” from
Google Play for Android devices or
from Apple Store for iOS devices.
2. Open P2PCamLive and “Click here to
add camera”, by scan QR code on the
back of to get the UID (Unique ID) or
you can enter it manually.
3. Enter Security Code ( default 888888 )
then press OK to add your .
4. Once you have seen the status of your
is Online and then you can click and
watch the live video right away.
5. Frequently Asked Questions
1. How to move your uCAM to a new
environment:
- Wired mode:Remove the power adapter of
and follow the Wired setup of step 2. - Wi-Fi
mode:Remove the power adapter of uCAM
and follow the Wi-Fi setup of step 2.
2. If you are still having diculty, you may
attempt to perform a factory reset on your .
With the power on, press the RESET button
on the back of your for 10 seconds and
then proceed to setup your camera from
the beginning again.
3. can support up to 32GB (FAT32) Micro
SD Card for recording storage.
4. The maximum recording time of 32GB
Micro SD Card is 71 hours (about 2.9 days)
with the highest resolution.
Step 2 : Connect to Internet
Please check if your router has a WPS
botton, then follow the WPS setup.
If not (or unsure), please follow the
Wired setup.
Wired setup
1. Connect a network cable to the network
port, which is on the back of and a LAN
port of the router.
2. Then plug the power adapter of to
power on the camera.
Federal Communication Commission Interference Statement
This equipment has been tested and found to comply with the limits for a Class B
digital device, pursuant to Part 15 of the FCC Rules. These limits are designed to
provide reasonable protection against harmful interference in a residential installation.
This equipment generates, uses and can radiate radio frequency energy and, if not
installed and used in accordance with the instructions, may cause harmful interference
to radio communications. However, there is no guarantee that interference will not
occur in a particular installation. If this equipment does cause harmful interference
to radio or television reception, which can be determined by turning the equipment off
and on, the user is encouraged to try to correct the interference by one of the
following measures:
zReorient or relocate the receiving antenna.
zIncrease the separation between the equipment and receiver.
zConnect the equipment into an outlet on a circuit different from that to which
the receiver is connected.
zConsult the dealer or an experienced radio/TV technician for help.
15.21
FCC Caution: Any changes or modifications not expressly approved by the party
responsible for compliance could void the user's authority to operate this equipment.
15.19
This device complies with Part 15 of the FCC Rules. Operation is subject to the
following two conditions: (1) This device may not cause harmful interference, and (2)
this device must accept any interference received, including interference that may
cause undesired operation.
FCC RF Radiation Exposure Statement:
1. This Transmitter must not be co-located or operating in conjunction with any other
antenna or transmitter.
2. This equipment complies with FCC RF radiation exposure limits set forth for an
uncontrolled environment. This equipment should be installed and operated with a
minimum distance of 20 centimeters between the radiator and your body.