BBPOS WISECUBE WiseCube User Manual Cube QSG Eng 20180809
BBPOS International Limited WiseCube Cube QSG Eng 20180809
BBPOS >
User Manual

Advanced mPOS Design Integrating Bluetooth®
EMV and NFC Card Reading Functions
WiseCube
www.bbpos.com
Supported Operating System:
iOS, Android
Package Contents
Device X1
USB cable X1
Quick start guide X1
Application Download & Installation
This device can support iOS and Android.
1. Please download the ocial application from app stores before operation.
2. Please follow app instructions to register and login for proper operation.
3. For any questions, please contact the ocial application developer or solution
provider.
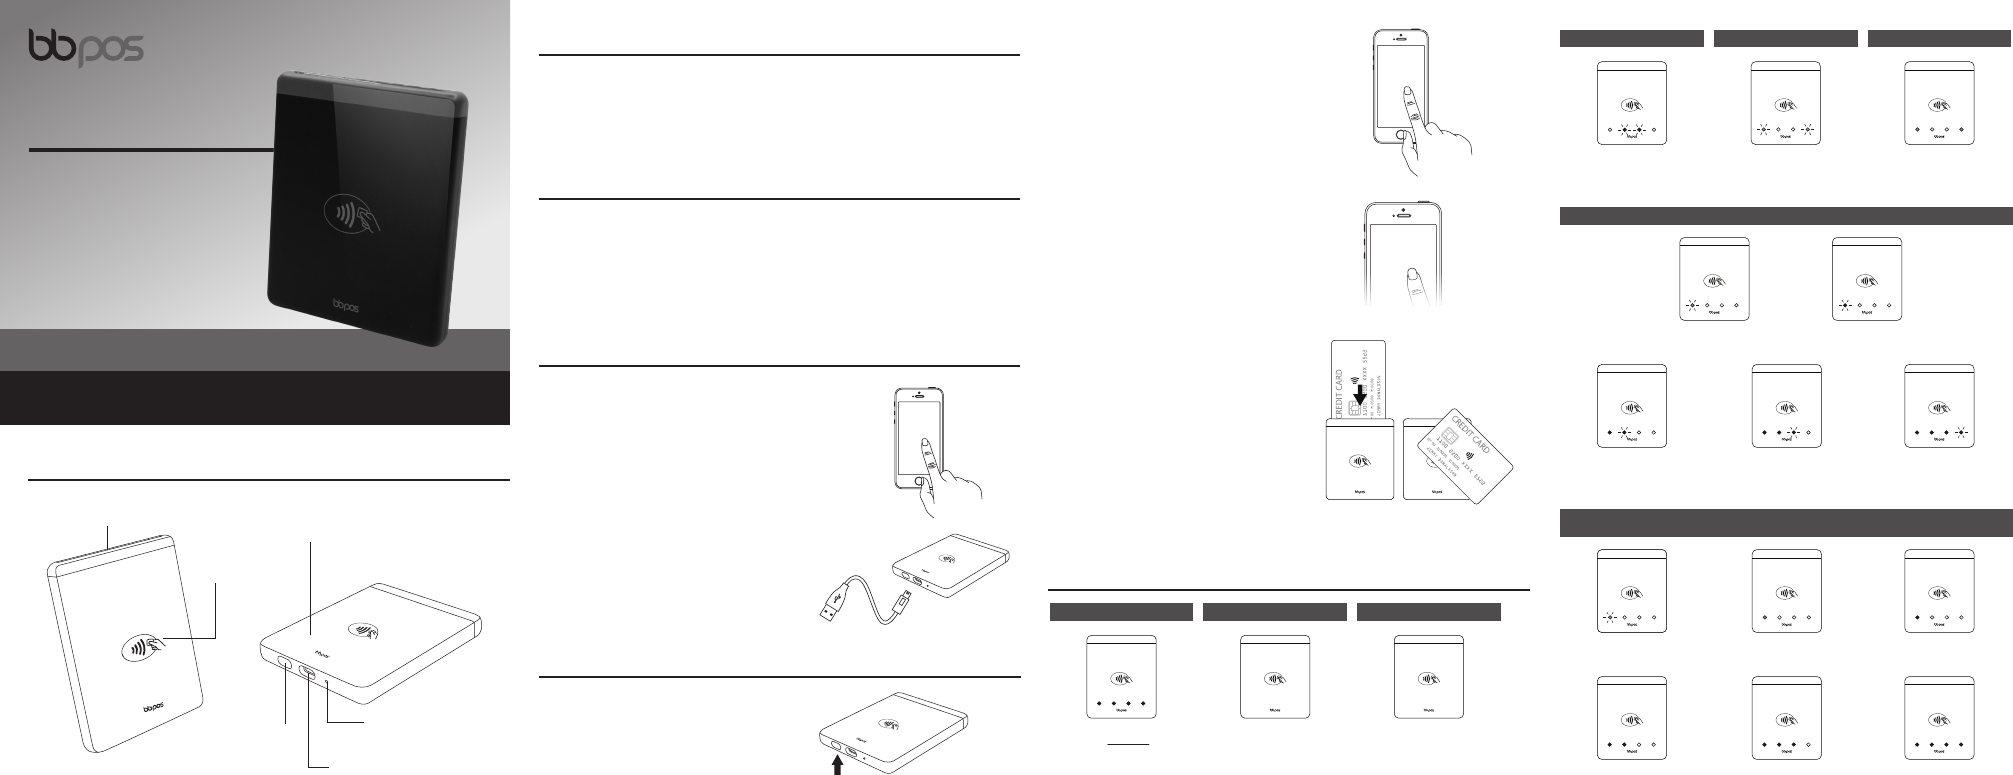
Index & Accessories (Fig.1)
LED status indicator
Quick Start Procedures
Connect the USB Type-C charging cable to charge the
device as shown to the right.
Download the ocial application from APP Store or Google
Play Store.
** Cube is powered by an internal Lithium Polymer rechargeable battery pack
that cannot be removed or replaced. Before rst use, charging is required for
approximately two to three hours. To prevent potential electrical damage to
the Cube, it is recommended to use the USB Type-C cable provided with the
packaging.**
APP
DOWNLOAD
Enter
Bluetooth Pin
STEP 3
Enter bluetooth pin on smartphone/tablet.
** Default bluetooth pin is printed on the back of Cube.
After device is successfully paired, Cube is
ready to use.
Now, you can follow the application
instructions to start the transaction process,
then insert or tap card to complete the
transaction.
** If you are paying using an EMV card, please ensure that the
EMV chip of the card is facing the right direction. If you are
paying using an NFC card, please ensure you tap the NFC
payment card or your device with your NFC wallet within 4cm
range on top of the NFC marking.
Bluetooth ON
Search Cube
STEP 2
Search for Cube on smartphone/tablet.
** Please ensure that the Bluetooth® function of your
smartphone/tablet is ‘ON’ before device pairing.
EMV card reader
Reset button
(**please use paper
clip for reset)
USB Type-C port for charging
Power
button
NFC card
reader LED Status Indicators
STEP 1
Press power button to turn on Cube.
Bluetooth Pairing
Power On
Show battery level
for 4 seconds
Power O
No action needed
to power o
Idle
No light status
Battery Charging Status
26-50%
FLASHING second light
51-79%
FLASHING third light
80-100%
FLASHING last light
0-10%
FLASHING rst red light
11-25%
FLASHING rst light
Battery Level
When power on, it is shown as below in rst four second
0%
FLASHING rst red light
26-50%
Two lights ON
0-10%
First red light ON
51-79%
Three lights ON
11-25%
First light ON
80-100%
All lights ON
OTA Self Check Interity Fail
FLASHING second and
third light alternatively
Temper
FLASHING rst
and last red light
First and last
red light ON

FCC Caution Statements:
This device complies with Part 15 of the FCC Rules. Operation is subject to the following two
conditions: (1) This device may not cause harmful interference, and (2) this device must accept
any interference received, including interference that may cause undesired operation.
NOTE: This equipment has been tested and found to comply with the limits for a Class B digital
device, pursuant to Part 15 of the FCC Rules. These limits are designed to provide reasonable
protection against harmful interference in a residential installation. This equipment generates,
uses and can radiate radio frequency energy and, if not installed and used in accordance with the
instructions, may cause harmful interference to radio communications. However, there is no
guarantee that interference will not occur in a particular installation. If this equipment does
cause harmful interference to radio or television reception, which can be determined by turning
the equipment o and on, the user is encouraged to try to correct the interference by one of the
following measures:
- Reorient or relocate the receiving antenna.
- Increase the separation between the equipment and receiver.
- Connect the equipment into an outlet on a circuit dierent from that to which the receiver is
connected.
- Consult the dealer or an experienced radio/TV technician for help.
Caution: Any changes or modications not expressly approved by the party responsible for
compliance could void the user's authority to operate this equipment.
This transmitter must not be co-located or operating in conjunction with any other antenna or
transmitter.
This equipment complies with FCC RF radiation exposure limits set forth for an uncontrolled
environment. This equipment should be installed and operated with a minimum distance of 20
centimetres between the radiator and your body.
Warranty
• Any damage or defects caused by a failure to follow the instructions which relate to this device or
as the result of an accident, abuse, misuse, misapplication, product modication, improper voltage
or current, acts of God, shipping damages or loss, or damage caused by service performed by
anyone other than our company are expressly excluded from the warranty stated below.
• We are not under any obligation to support the device for all operating environments, including
but not limited to, interoperability with all current and/ or future versions of software or
hardware.
• Please contact the dealer for any warranty or customer support services. Any repair of the device
by yourself will void the Warranty.
©2018 BBPOS Limited. All rights reserved. BBPOS are either trademark or registered trademarks of BBPOS Limited. iOS is the
trademark of Apple Inc. Android™ is a trademark of Google Inc. Windows® is registered trademark of Microsoft Corporation in the
United States and/or other countries. The Bluetooth® word mark and logos are registered trademarks owned by Bluetooth SIG,
Inc. and any use of such marks by BBPOS Limited is under license. Other trademarks and trade names are those of their respective
owners.All details are subject to change without prior notice.
Room 1903-04, 19/F, Tower 2, Nina Tower, No. 8 Yeung Uk Road, Tsuen Wan, Hong Kong
www.bbpos.com
Need Help?
E: sales@bbpos.com | T: +852 3158 2585
Revise v.1 / 20180509
Cautions & Important Notes
• Ensure the device is fully charged before use.
• Please ensure the EMV chip of the card is facing the right direction when inserting card.
• The NFC card or mobile wallet should be tapped within 4 cm range on top of the reader mark.
• Don’t drop, disassemble, tear, open, crush, bend, deform, puncture, shred, microwave, incinerate,
paint or insert foreign object into the device. Doing any of which will damage the device and
void the Warranty.
• Don’t immerse the device into water and place near washbasins or any wet locations. Don’t spill
food or liquid on the devices. Don’t attempt to dry the device with external heat sources, such as
microwave or hair dryer. Don’t use any corrosive solvent or water to clean the device. We
recommend using dry cloth to clean the surface only.
• Don’t use any sharp tools to probe the internal components, connectors or contacts, doing
which may lead to device malfunction and void the Warranty simultaneously.
Product Specications
Functions • EMV chip card reader (ISO 7816 compliant class A, B, C card)
• NFC Card Reader (EMV contactless, ISO 14443A/B)
• Over-the-air rmware update
• Over-the-air key update
Communication Interface Bluetooth® 4.2 BLE
Power & Battery Lithium polymer rechargeable battery 500mAh, 3.7V
Charging Via USB Type-C
Key Management DUKPT, MK/SK
Encryption Algorithm TDES
Support Operating System Android 4.2 or above, iOS (iPhone 6s or above, iPad Air 2 above,
iPad Mini 5 or above, iPad Pro except 2016 version)
Product Size 82.5 x 69.0 x 10.5mm (approx.)
Product Weight 75g (approx.)
Operating Temperature 0°C – 45°C (32°F – 113°F)
Operating Humidity Max 95%
Storage Temperature -20°C – 55°C (-4°F – 131°F)
Storage Humidity Max 95%
• Please use a paper clip to press the reset button at the bottom for reboot. Device has no response
Troubleshooting
Problems Recommendations
• Please ensure the Bluetooth® function of your smartphone or tablet is
turned on.
• Please check the version of your operating system is supported for this
device’s operation.
• Please press the power on button to turn on the device again. The device
will automatically connect with your smartphone or tablet again.
• The device may be at lower battery level, please use the USB cable to
recharge it, then retry.
• Please ensure the device or smartphone/tablet is within the reception
range.
Inserting card
• Please check if the device has power when operating and ensure devices
are connected.
• Please follow the application instruction to insert or tap card.
• Please ensure that there is no obstacle in the card slots.
• Please check if the chip of the card is facing the right direction when
inserting card.
• Please ensure that your phone/ tablet is a supported model for this
device’s operation.
• Please insert card with a more constant speed.
Tap Card/Mobile Wallet
• Please check if your card supports NFC payment.
• Please ensure if your card is placed within 4 cm range on top of the NFC
marking.
• Please take out your NFC payment card from wallet or purse for payment
to avoid any interference.
Device does not work with
your phone or tablet
Device cannot read your
card successfully
• Please press the power on button to restart your device.
• Please check to see if you can nd the device’s “Serial Number” (Shown
on the back of device) in the “Scanned Device List” of your smartphone or
tablet.
Device cannot be paired
• Please press the power on button to turn on the device again. The device
will automatically connect with your smartphone or tablet again.
• The device may be at lower battery level, please use the USB cable to
recharge it, then retry.
• Please ensure the device or smartphone/tablet is within the reception range.
Device loses the connection
with your smartphone or
tablet when the device has
gone into auto-o mode.
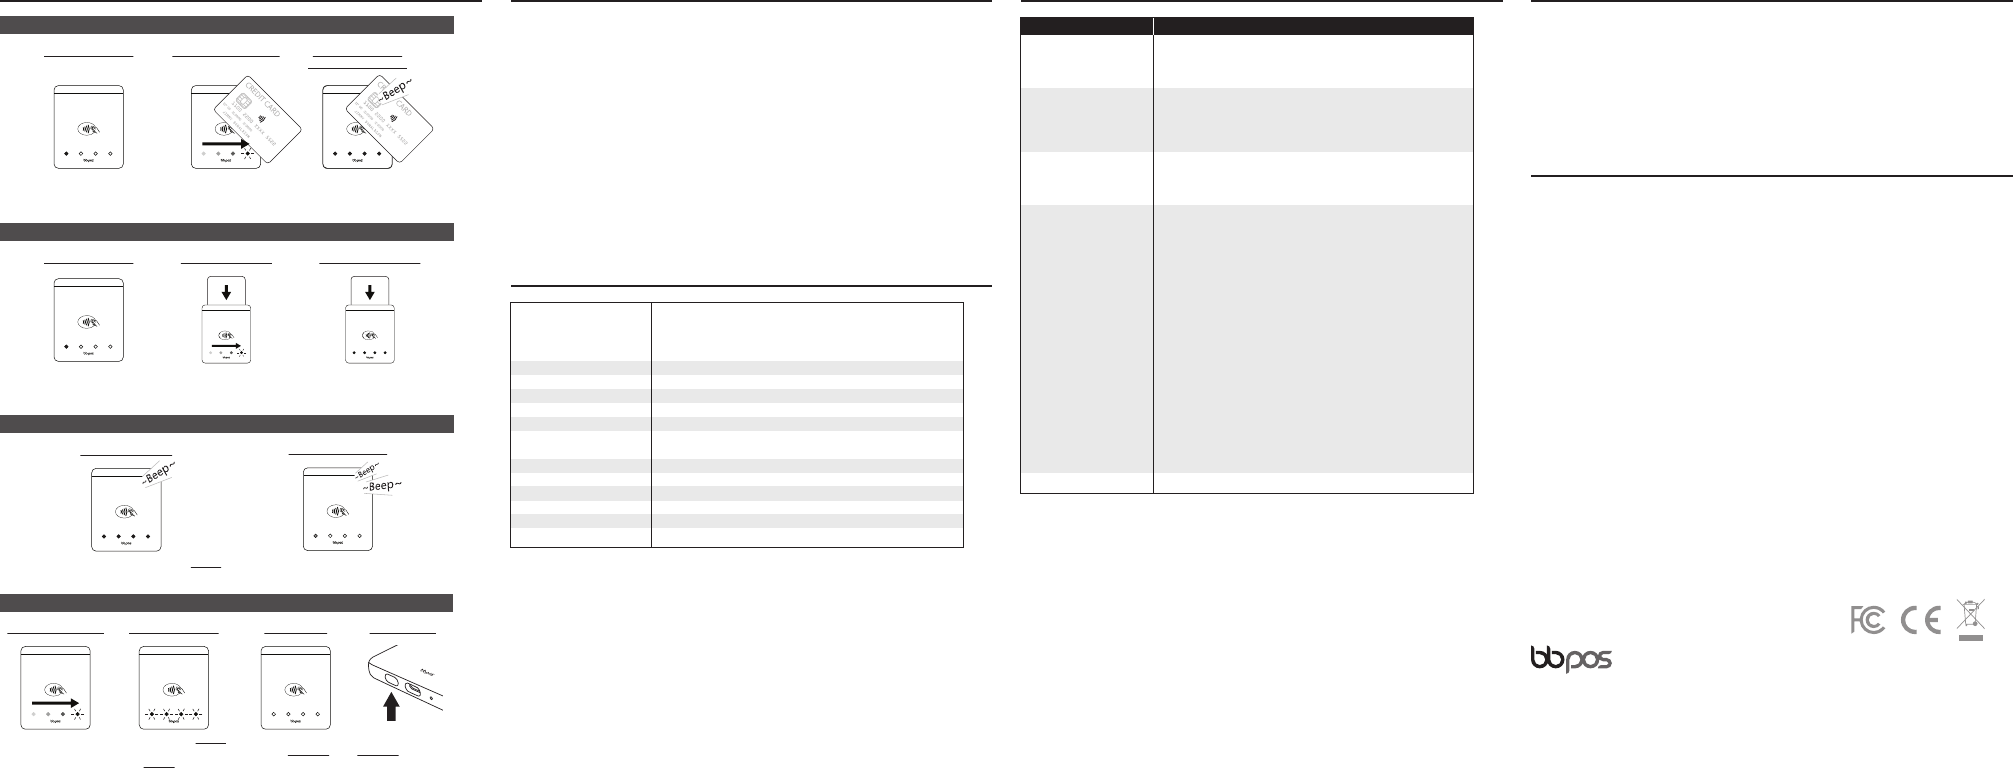
LED Status Indicators
First light ON
Ready for Transaction
NFC Operation
All lights ON with
“BEEP” sound
Card Reading Process
Successfully Completed
Lights COME ON in
consecutive order
Reading Card Information
First light ON
Ready for Transaction
EMV Operation
Transaction Result
Two “BEEPS” sound and rst red light ON
Transaction Failed/Error
“BEEP” sound and FLASHING all lights 3 times
Transaction Approved
Bluetooth Connection
Lights COME ON
in consecutive order
Waiting for Connection
Flashing all lights 3 times
*Power O completely
after 3 hours of inactivity
Connected Bluetooth
Power o completely
when 5 minutes
without any connection
No Connection
Long press for
4 seconds and release
power button
Reset Bluetooth
When Card is Inserted
Lights COME ON
in consecutive order
Card Removal Detection
Leave all lights ON
until card is removed