BBPOS WISEPAD2PLUS WisePad 2 Plus User Manual WP2 QSG Eng 20170322
BBPOS International Limited WisePad 2 Plus WP2 QSG Eng 20170322
BBPOS >
User Manual
Magstripe, EMV and NFC Card Reader
with integrated thermal printer
WisePad™ 2 Plus
www.bbpos.com
Support Operating Systems:
iOS, Android, Windows Phone 8, MS Windows
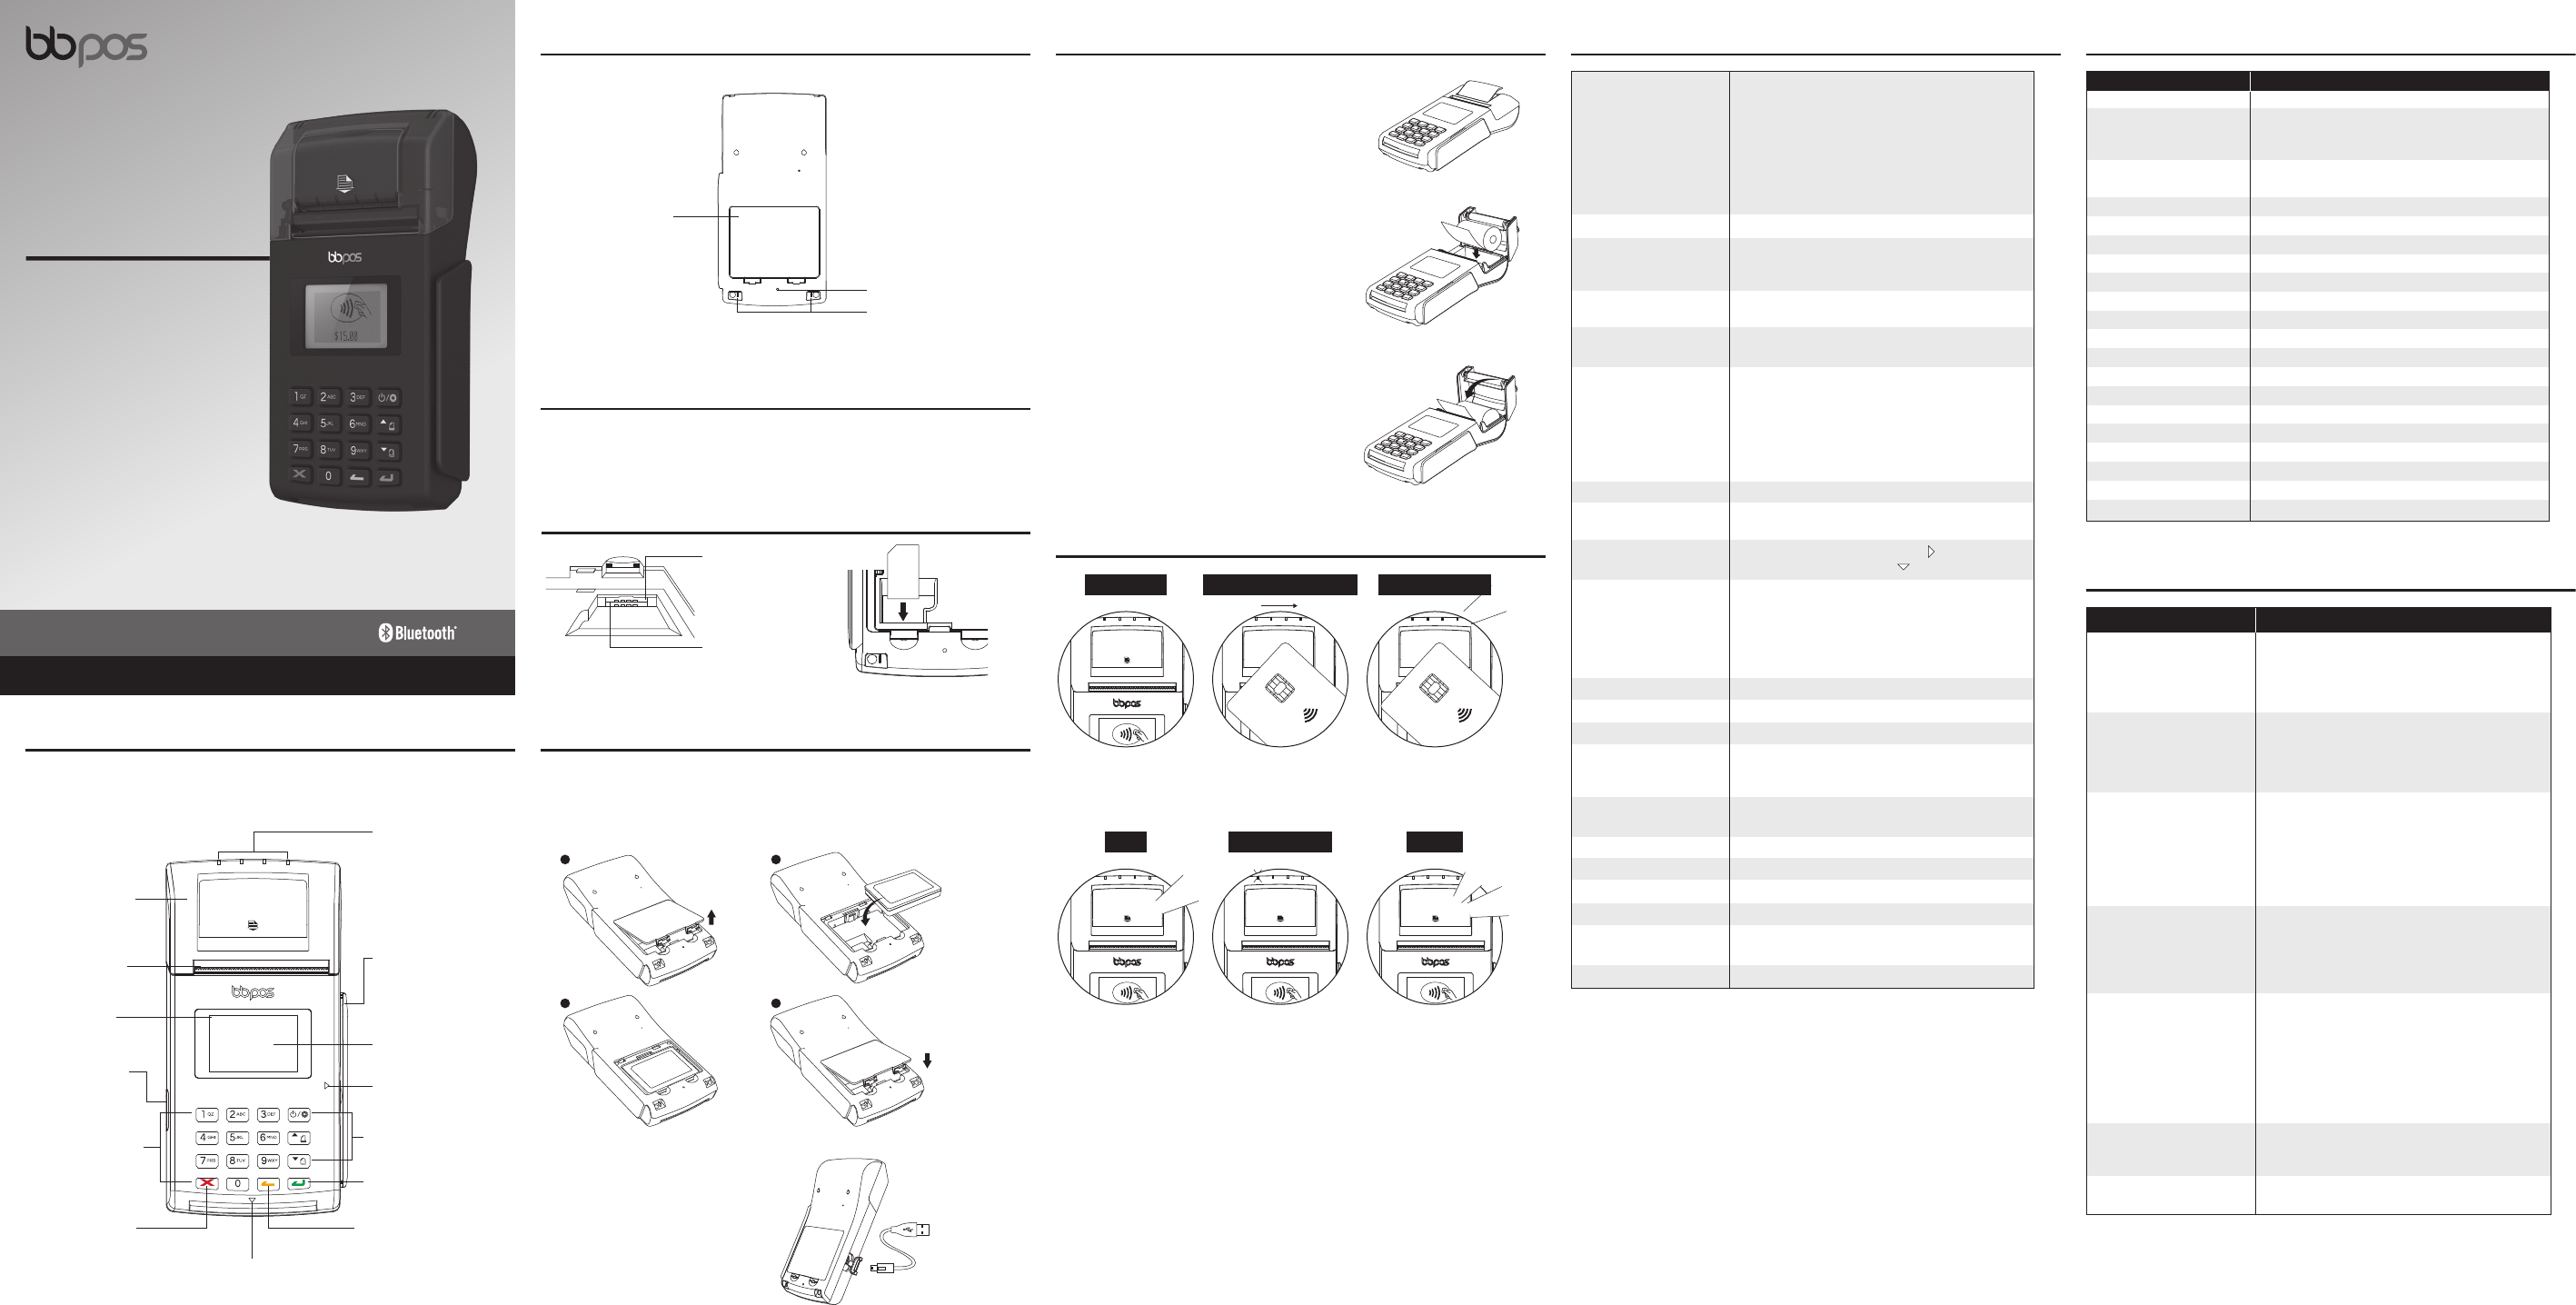
STEP 1
Open the paper compartment by gently lifting the lever
and pulling it towards the rear of the terminal (Refer to
Fig. 1.1)
STEP 2
After discarding the packing material on the paper roll,
t the paper roll in the compartment with paper feeding
underneath the roll. The correct placement of paper is
critical. (Refer to Fig. 1.2)
STEP 3
Gently close the printer cover until a “click” is heard.
(Refer to Fig. 1.3)
STEP 4
Remove excess paper by tearing it along the serrated
cutting edge.
Caution: Please use paper approved by the manufacturer. If not, it
may cause damages to the printer. When installing paper, the user
needs to be cautious of the serrated metal cutting edge.
Paper Roll Installation Method
“BEEP” 2 “BEEP”s
Transaction completed
First LED ashing
Standby mode Error, please retry
~BEEP~
~BEEP~
~BEEP~
~BEEP~
NFC Status Indicators
First LED ON
Ready for tapping card
LEDs ON in consecutive order
Reading card information
4 LEDs ON + “BEEP”
Card reading process
successfully completed
1100 2200 XXXX 5522
Member
Since
00
Valid
From
00/00
Valid
Thru
00/00
Cardholder Name
CREDIT CARD
1100 2200 XXXX 5522
Member
Since
00
Valid
From
00/00
Valid
Thru
00/00
Cardholder Name
CREDIT CARD
NFC LED indicators
LED indicator
Power / Setting button,
Up / Paper Feed button,
Down / Reprint button
ENTER button
CLEAR button
Thermal printer
Receipt cutter
For magstripe
card reading
Micro USB port
for charging &
operation
Secure PIN pad
for PIN input
LCD display
CANCEL button
For EMV card reading
with LED indicator
Index & Accessories (Fig.1)
FRONT
For NFC card reading
Index & Accessories (Fig.1)
Reset button
Battery door
compartment**
Package Contents
Device x 1
USB cable x 1
Rechargeable battery x 1
Paper roll x 1
Quick start guide x 1
BACK
**Remarks: SAM card slot inside the battery compartment. For any questions of SAM card installation, please contact the
ocial distributors to follow up.
Charging contacts
Connect Micro USB charging cable to charge
the device as shown to the right.
Battery Installation And Charging Method
1 2
3 4
SIM and SAM Cards Installation Method
**Please make sure the SIM and SAM cards are facing down.**
SAM card slot
SIM/SAM card slot
To insert or replace the battery, please lift up the latches to remove the battery door.
**WisePad™ 2 Plus is powered by a removable Lithium Polymer rechargeable battery. Before rst use, charging is required
for approximately two to three hours. To prevent potential electrical damage to the WisePad™ 2 Plus, please be
recommended to use the Micro USB cable provided with the packaging.
Fig. 1.1
Fig. 1.2
Fig. 1.3
LCD Message Details
WisePad™ 2 Plus Message Description
BBPOS WisePad™ 2 Plus opening screen
STANDBY Waiting for connection via Bluetooth®, WiFi or GPRS
network. WisePad™ 2 Plus enters “SLEEP MODE” if no
operation for 5 minutes
BLUETOOTH ON Bluetooth® is turned on and pairing with
PAIRING NOW .... smartphone or tablet.
CONNECTING NETWORK .... Connecting to WiFi or GPRS network
PROCESSING Transaction is processing
INPUT PIN Remind to enter PIN
INCORRECT PIN Incorrect PIN input, please retry
COMPLETED Transaction is completed
CANCELLATION Transaction is cancelled
TERMINATE Transaction is terminated
DECLINED Transaction is declined
MSR SUCCESS Succeeds to swipe card
MSR FAIL Fails to swipe card
NO ICC No ICC card is inserted/detected
NO RESPONSE Time out message for no card is inserted or swiped
INSERT CARD Remind to insert ICC card
SWIPE CARD Remind to swipe magstripe card
NFC Remind to tap card
ACCEPTED Transaction is successful
POWER OFF? Conrm or decline to turn o the WisePad™ 2 Plus
Troubleshooting
Device cannot be paired
Problems Recommendations
Display turned o
automatically
Device lost the connection
with your smartphone or
tablet when the device is
auto-o.
• Please press & hold the power on/o button to
restart your device.
• Please check if you can nd the device’s “Serial
Number” (Shown on the back of device) in the
“Scanned Device List” of your smartphone or tablet.
• The display may turn o after enter the “SLEEP
MODE” to save power. Please press and hold the
power on/o button to restart it.
• The device may be out of power, please use the USB
cable to recharge it, then retry.
• Please press and hold the power on/o button to turn
on the device again. The device will automatically
connect with your smartphone or tablet again.
• The device may be at lower battery level, please use
the USB cable to recharge it, then retry.
• Please ensure the device or smartphone/tablet is
within the reception range.
Device cannot read your card
successfully through NFC
reading
• Please check if your card supports NFC payment.
• Please ensure if your card is placed within 4cm
range on top of the NFC marking.
• Please take out your NFC payment card from wallet
or purse for payment to avoid any interference.
Product Specications
Functions • EMV chip card reader (ISO 7816 compliant class A, B, C card)
• Triple track magnetic stripe card reader
• NFC reader (EMV contactless, ISO 14443A/B)
• Thermal printer
• Secure PIN pad
• Thermal printer
• Over-the-air rmware update
• Over-the-air key update
• Over-the-air terminal conguration
Display Backlit dot-matrix LCD display
Buttons 10 numerical buttons, enter, cancel & clear buttons,
power/setting button, up/paper feed button,
down/reprint button
Communication Interface mPOS mode - Bluetooth® 2.1, Micro USB
Standalone mode - WiFi, GPRS (optional) /3G (optional)
Connectivity Dual SAM cards OR
single SAM card & single SIM card if with GPRS/3G
Thermal Printer
- Paper Width 58mm / 2.28inch
- Eective Printing 48mm
- Paper Roll Diameter Max 30mm / 1.18inch (can print 60 receipts with
printing length 10mm per receipt)
- Resolution 8 dots/mm, 384 dots/line
- Sensor Paper and cover open sensor, low battery
Power & Battery Lithium polymer rechargeable battery 1300mAh, 3.7V
Charging Via Micro USB or charging contacts
(Charging cradle optional)
LED indicator • Ready for magstripe card swiping - LED on
• Ready for ICC card insertion - LED on
NFC LED Indicator • Connecting with POS terminal - First LED ashing
• Ready for NFC Reading - First LED on
• Success Reading - 4 LEDs on in consecutive order
• Transaction Completed - One “BEEP” sound
• Errors - Two “BEEP” sound
• Power o - All LEDs o
Key Management DUKPT, MK/SK
Encryption Algorithm TDES
Swipe Speed 15cm/sec - 100cm/sec
Battery Life Above 1200 EMV transactions, or above 4000 magnetic
card swipe transactions, or above 700 EMV contactless
transactions, or 12 hrs BLE broadcasting for one fully charge
Support Operating Systems Android 2.1 or above, iOS 6.0 or above,
Windows Phone 8, MS Windows
Operating Temperature 0°C – 45°C (32°F – 113°F)
Operating Humidity Maximum 95%
Storage Temperature -20°C - 55°C (-4°F – 131°F)
Storage Humidity Maximum 95%
Product Size 155 x 78 x 38.4mm (approx.) /
6.1 x 3.07 x 1.51inch (approx.)
Product Weight 280g / 9.9oz (approx., including Paper Roll)
Device cannot read your
card successfully
• Please ensure your phone/tablet is supported model
for this device’s operation.
• Please swipe or insert card with a more constant speed.
Device has no response • Please use a paper clip to press the reset button at
the back for reboot.
Device cannot read your
card successfully
• Please check if the device has power when operating
and ensure devices are connected.
• Please check if the application instructs to swipe or
insert card.
• Please ensure that there is no obstacle in the card slots.
• Please check if the magstripe or chip of the card is
facing the right direction when swiping or inserting
card.
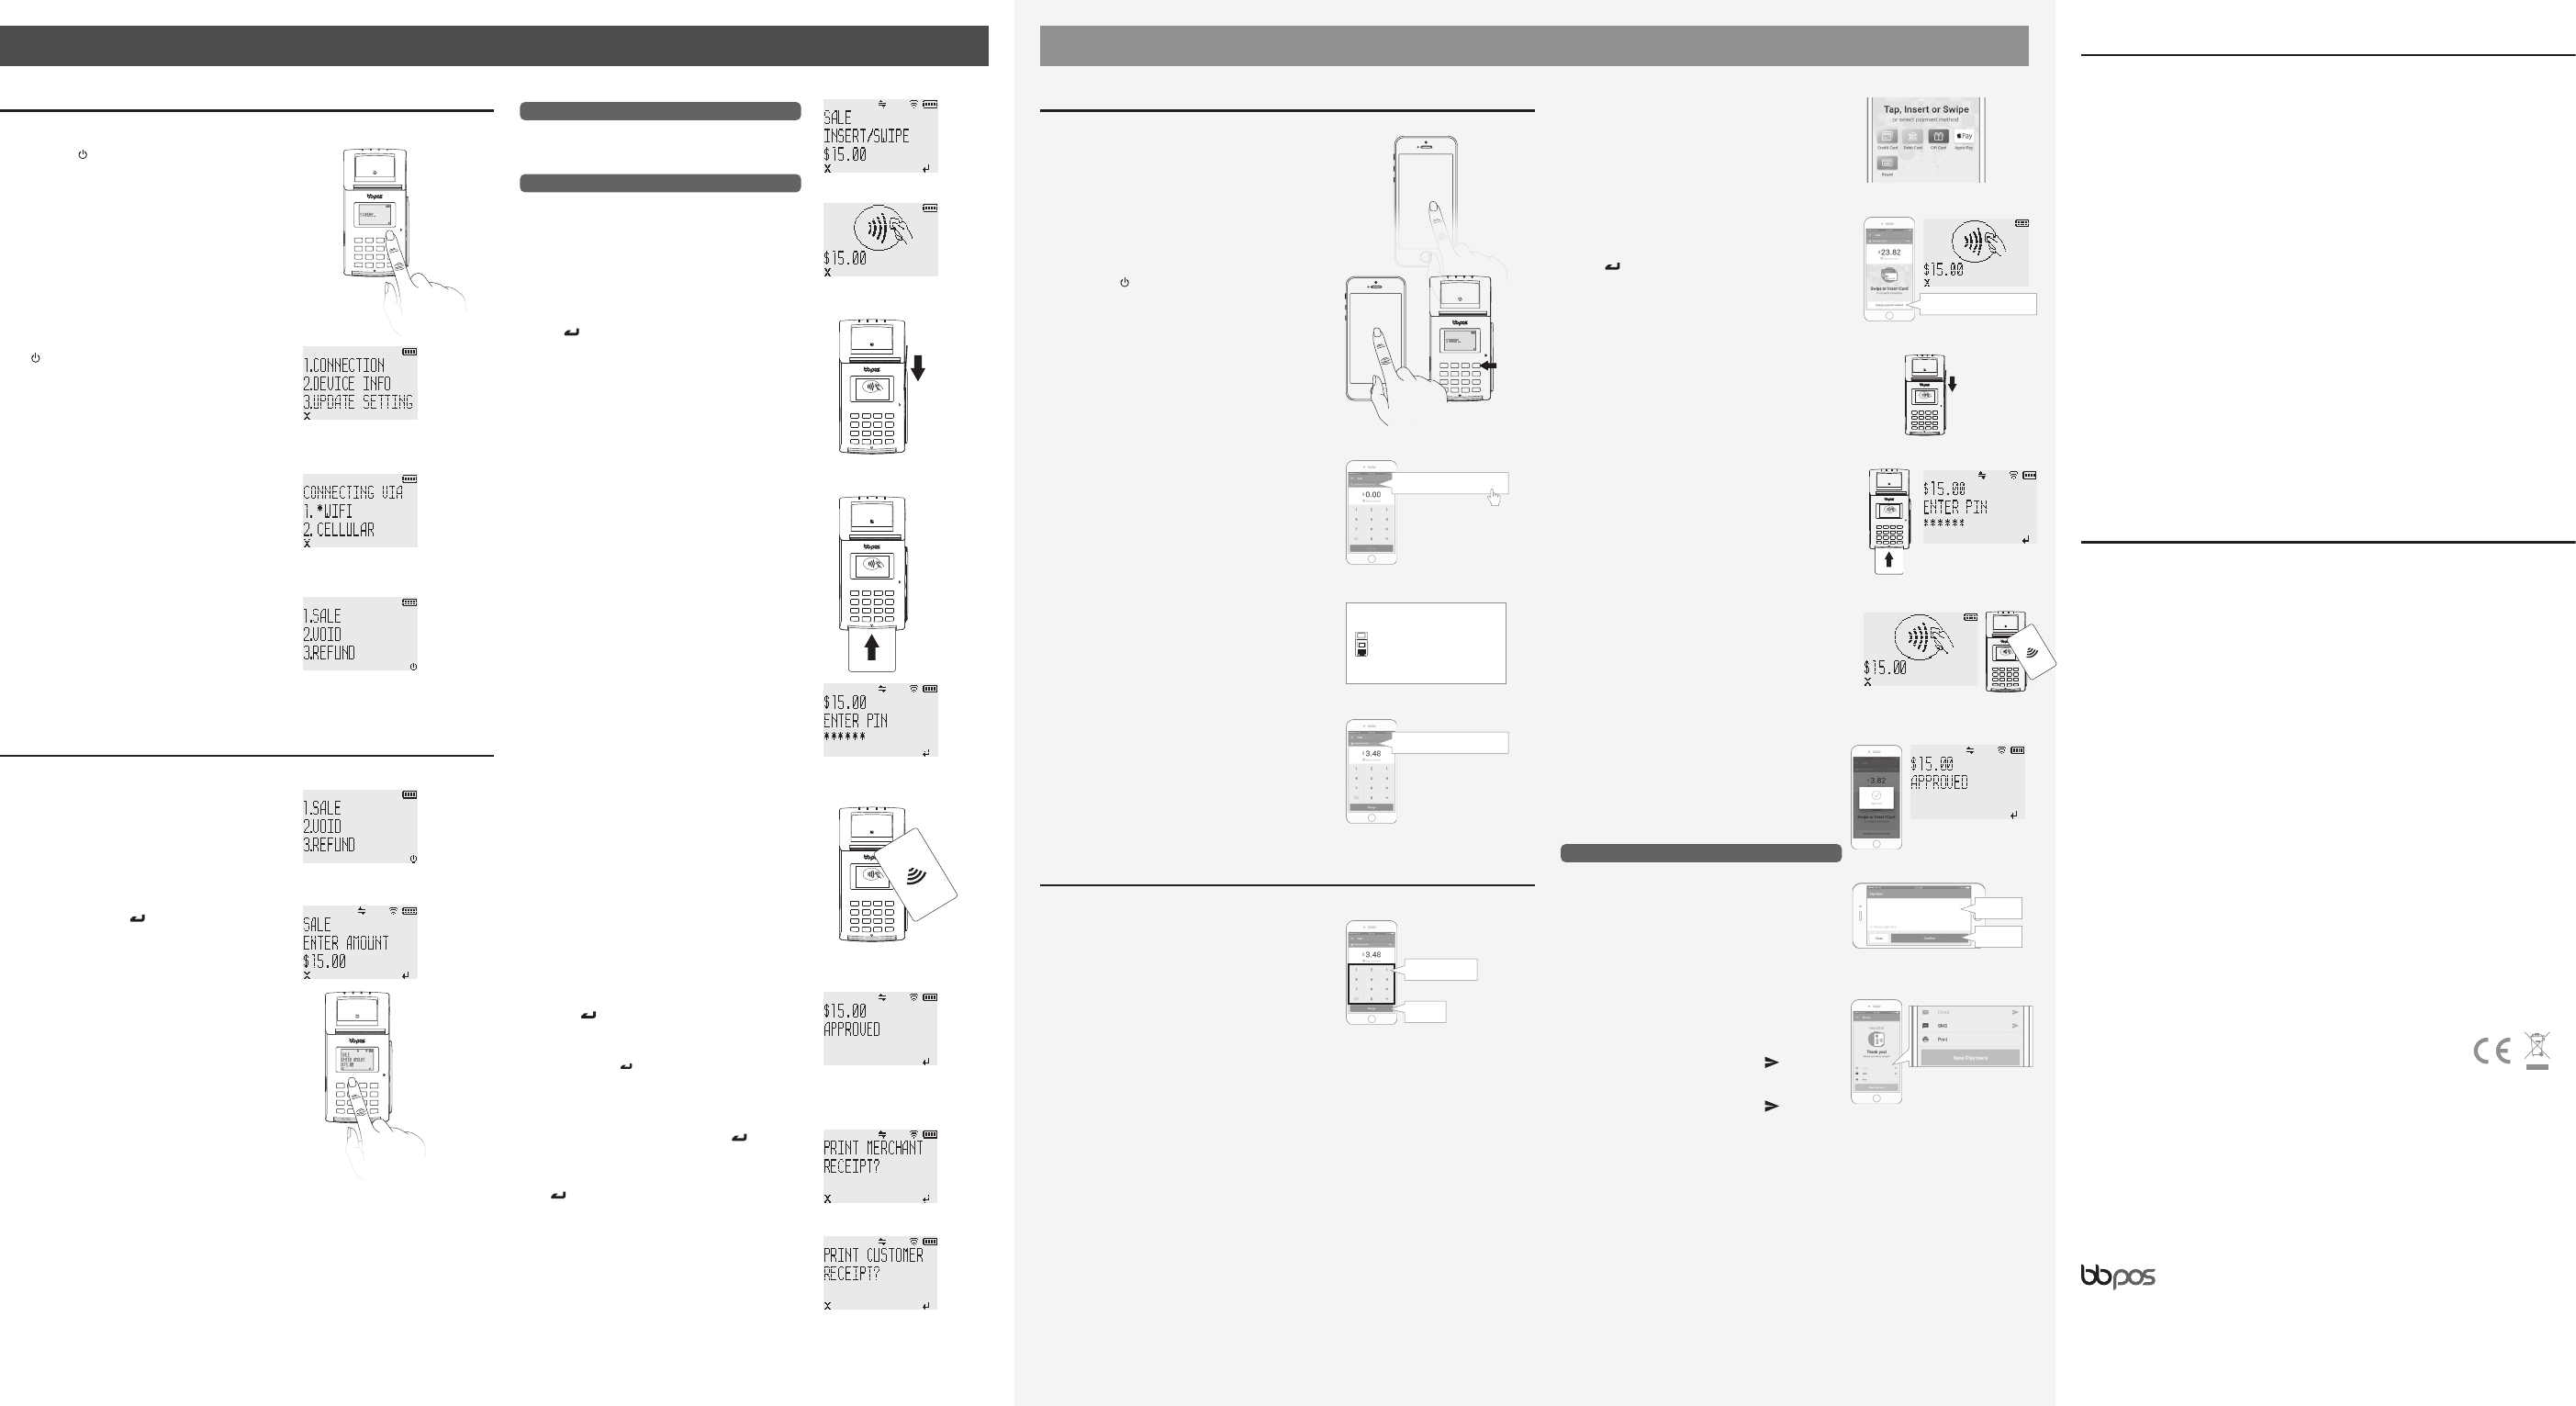
STEP 2
Press “ ” to enter the Setting Menu (Fig. 2.2), press “1” to
enter the Connection Menu (Fig. 2.3). Then, choose one
of connection methods by pressing:
- “1” to connect WiFi or
- “2” to connect Cellular (GPRS/3G)
After network is successfully connected, WisePad™ 2 Plus
will enter the Transaction Menu (Fig. 2.4).
Quick Start Procedures
Sale Operation
Standalone Mode (Model: WPP22, WPP23)
STEP 1
Press and hold “ ” to turn on WisePad™ 2 Plus until
“STANDBY” is shown (Fig. 2.1).
STEP 1
In Transaction Menu (Fig. 3.1), press “1” to start the Sale
Operation.
STEP 2
Enter amount, then press “ ” to conrm (Fig. 3.2).
Fig. 2.2 - Setting Menu
Fig. 2.3 - Connection Menu
Fig. 2.4 - Transaction Menu
Fig. 3.1 - Transaction Menu
Fig. 3.2 - Enter Amount
Fig. 2.1 - Standby Mode
STEP 4
When transaction nish, “Approved” is shown (Fig. 3.8).
Then, press “ ” to print receipts.
** Remarks:
If the transaction is not successful, “DECLINED” will be shown on
the display. Then, press “ ” back to Enter Amount page (Fig. 3.2) to
start next transaction.
Fig. 6.7 - Approved
STEP 5
To print merchant receipt (Fig. 3.10), press “ ” to print
merchant receipt. If you don’t need, press “X”.
After nish, you can print customer receipt (Fig. 3.10),
press “ ” to print customer receipt, else press “X” to skip
this step.
Fig. 3.9 - Print Merchant Receipt
Fig. 3.8 - Approved
Fig. 3.10 - Print Customer Receipt
STEP 3
It will display Insert/Swipe screen (Fig. 3.3) and the
device can accept either magstripe or EMV IC card.
Steps of dierent payment methods:
a. Swipe magstripe card (Fig. 3.5)
b. Insert EMV IC card (Fig. 3.6). If you are required to
input PIN, please input via secure PIN pad and
press “ ” to conrm.
c. Tap NFC card (Fig. 3.7). Success tapping will have beep
sound and LED indication. (Please refer to NFC status
indicators)
** Remarks:
- If you need to cancel the transaction, please press “X” to cancel.
“CANCALLED” will be shown on the display and it will back to
Enter Amount page (Fig. 3.2) to start next transaction.
- If you pay by magstripe card or EMV IC card, please ensure that
the magstripe or EMV chip of the card is facing the right
direction.
- If you pay by using NFC card, please ensure you tap the NFC
payment card within 4cm range on top of the NFC marking.
- If the amount is higher than CVM limit in NFC payment, input
PIN is required.
Fig. 3.3 - Insert/Swipe
Fig. 3.4 - Start Payment
1100 2200 XXXX 5522
Member
Since 00 Valid
From 00/00 Valid
Thru 00/00
JIMMY DONALDSON
CREDIT CARD
Fig. 3.5 - Swipe magstripe card
Fig. 3.6 - Insert EMV IC card
Fig. 3.7 - Tap NFC card
When the amount EXCEED the contactless limit
It will display the Start Payment (Fig. 3.4), the device can
accept one of magstripe, EMV IC and NFC card.
When the amount HAVEN’T EXCEED the contactless limit
Bluetooth
ON
STEP 2
Press and hold “ ” to turn on WisePad™ 2 Plus until
“STANDBY” is displayed on the LCD. And, turn on your
smartphone/tablet Bluetooth® pairing function (Fig. 4.2).
STEP 3
For rst time pairing, open the APP and click “Tap to
connect” (Fig. 4.3). Then, select “WisePad™ 2 Plus” in the
“Select the reader model” pop-up window (Fig. 4.4).
After that, “Device Ready” is shown on the top in Sale page
(Fig. 4.5).
** If you paired the device before, it will automatically pairing to the
device when open the APP.
Quick Start Procedures
Fig. 5.5 - Approved
Fig. 5.6 - Signature
Fig. 4.3
Fig. 4.4
Fig. 4.2
DOWNLOAD
APP
STEP 1
WisePad™ 2 Plus can support iOS (iOS 6.0 or above), Android
(Android 2.1 or above), Windows Phone 8 & MS Windows.
Download and install ocial application from APP Store
(Fig. 4.1).
mPOS Mode (Model: WPP21)
Fig. 4.1
Fig. 5.7 - Receipt
Fig. 4.5 - Sale
WisePad™ 2 Plus (0023)
Charge
Enter amount
No Reader. Tap to connect.
Select the reader model
WisePad™ 2 Plus
CANCEL
Sale Operation
STEP 1
In Sale page (Fig. 4.5), enter amount and press “Charge”.
Fig. 4.5 - Sale
STEP 2
In Payment Method page (Fig. 5.1), press a payment
method which you choose.
When you press “Credit Card”, the APP and the device will
go to Start Payment page (Fig. 5.2). Then, you can use
one of below payment methods to start the transaction.
a. Swipe magstripe card (Fig. 5.3)
b. Insert EMV IC card. If you are required to input PIN
(Fig. 5.4), please input via secure PIN pad and
press “ ” to conrm on device.
c. Tap NFC card (Fig. 5.5). Success tapping will have beep
sound and LED indication. (Please refer to NFC status
indicators)
** Remarks:
- If you would like to change to the other payment method in
Start Payment page (Fig. 5.2), press “Change payment method”.
Then, it will back to Payment Method page (Fig. 5.1) for next
transaction.
- If you pay by magstripe card or EMV IC card, please ensure that
the magstripe or EMV chip of the card is facing the right
direction.
- If you pay by using NFC card, please ensure you tap the NFC
payment card within 4cm range on top of the NFC marking.
- If the amount is higher than CVM limit in NFC payment, input
PIN is required.
Fig. 5.1 - Payment Method
Fig. 5.2 - Start Payment
Fig. 5.3 - Swipe magstripe card
Fig. 5.5 - Tap NFC card
1100 2200 XXXX 5522
Member
Since 00 Valid
From00/00 Valid
Thru 00/00
JIMMY DONALDSON
CREDIT CARD
Fig. 5.4 - Insert EMV IC card
STEP 3
When transaction nish, “Approved” is shown on the APP
and the device. (Fig. 5.5).
** Remarks:
If the transaction is not successful, “DECLINED” will be shown on
the APP and the device. Then, it will go back to Sale page (Fig. 4.5).
STEP 4
In Receipt page (Fig. 5.7), you can choose email, SMS
and print a receipt.
a. To send a receipt, press “Email” to input the email
address and press “enter”. Then, press “ ”.
b. To SMS a receipt, press “SMS” to input the contact
number and press “enter”. Then, press “ ”.
c. To print a receipt, press “print”. Then, the receipt will
be printed out from the device.
d. If you do not need receipt, press “New Payment” back
to Sale Page (Fig. 4.5) to start another payment.
Fig. 6.7 - Approved
i. Depends on card type.
ii. If amount is exceed the limit.
Under these situations, the APP will go to Signature page
(Fig. 5.6). To sign on white area and then press “Conrm”.
Cardholder’s signature is required under these situations:
Sign here
Conrm
Change payment method
Room 1602, 16/F, Tower 2, Nina Tower, No. 8 Yeung Uk Road, Tsuen Wan, Hong Kong
www.bbpos.com
Need Help?
E: sales@bbpos.com | T: +852 3158 2585
FCC Caution Statements:
This device complies with Part 15 of the FCC Rules. Operation is subject to the following two conditions: (1)
This device may not cause harmful interference, and (2) this device must accept any interference received,
including interference that may cause undesired operation.
NOTE: This equipment has been tested and found to comply with the limits for a Class B digital device,
pursuant to Part 15 of the FCC Rules. These limits are designed to provide reasonable protection against
harmful interference in a residential installation. This equipment generates, uses and can radiate radio
frequency energy and, if not installed and used in accordance with the instructions, may cause harmful
interference to radio communications. However, there is no guarantee that interference will not occur in a
particular installation. If this equipment does cause harmful interference to radio or television reception,
which can be determined by turning the equipment o and on, the user is encouraged to try to correct the
interference by one of the following measures:
- Reorient or relocate the receiving antenna.
- Increase the separation between the equipment and receiver.
- Connect the equipment into an outlet on a circuit dierent from that to which the receiver is connected.
- Consult the dealer or an experienced radio/TV technician for help.
Caution: Any changes or modications not expressly approved by the party responsible for compliance could
void the user's authority to operate this equipment.
This equipment complies with FCC radiation exposure limits set forth for an uncontrolled environment. End
user must follow the specic operating instructions for satisfying RF exposure compliance. This transmitter
must not be co-located or operating in conjunction with any other antenna or transmitter.
The mobile device is designed to meet the requirements for exposure to radio waves established by the
Federal Communications Commission (USA). These requirements set a SAR limit of 1.6 W/kg averaged over
one gram of tissue. The highest SAR value reported under this standard during product certication for use
when properly worn on the body is 1.362W W/kg.
For body operation, this device has been tested and meets FCC RF exposure guidelines when used with any
accessory that contains no metal and that positions a minimum of 15mm from the body. Use of other
accessories may not ensure compliance with FCC RF exposure guidelines.
Caution
Risk of explosion if battery is replaced by an incorrect type.
Dispose of used batteries according to the instructions.
©2017 BBPOS Limited. All rights reserved. BBPOS and WisePad™ are either trademark or registered trademarks of BBPOS Limited. iOS
is the trademark of Apple Inc. Android™ is a trademark of Google Inc. Windows® is registered trademark of Microsoft Corporation in
the United States and/or other countries. The Bluetooth® word mark and logos are registered trademarks owned by Bluetooth SIG, Inc.
and any use of such marks by BBPOS Limited is under license. Other trademarks and trade names are those of their respective owners.
All details are subject to change without prior notice.
CAUTION & IMPORTANT NOTES
• Ensure to turn on the Bluetooth® function of your smartphone or tablet
before use.
• Please fully charge your WisePad™ 2 Plus before use.
• Please ensure that you have chosen the desired “Pairing” method of
WisePad™ 2 Plus before to start the connection process.
• Please ensure magstripe/EMV chip of the card is facing the right direction
when swiping or inserting card.
• Don’t drop, disassemble, tear, open, crush, bend, deform, puncture, shred,
microwave, incinerate, paint, or insert foreign object into the device. Doing
any of which will void the Warranty.
• Don’t immerse the device into water and place near washbasins or any wet
locations. Don’t spill any food or liquid on the device. Don’t attempt to dry
the device with external heat sources, such as microwave or hair dryer.
• Don’t use any corrosive solvent or water to clean the device. Recommend
using dry cloth to clean the surface only.
• Don’t use any sharp tools to point the internal components or connectors,
doing which may lead to malfunction and void the Warranty.
• Don’t try to disassemble the device to repair. Please contact your dealer for
repair and maintenance.
Revise v.4 / 20170322