BEDJET 6002NA2 Forced Air Climate Comfort System for Bed, Forced air animal warmer User Manual for Engilish
BEDJET LLC Forced Air Climate Comfort System for Bed, Forced air animal warmer for Engilish
BEDJET >
Contents
- 1. user manual for Engilish
- 2. user manual for French_rev1
user manual for Engilish
USER MANUAL – MODELS 6002NA/V1/V2/ & 7002xx
QUESTIONS? EMAIL US AT INFO@BEDJET.COM OR CALL 401-404-5250
WE ARE HERE TO HELP – PLEASE CALL US FOR ADVICE!
Revision 1.6 www.bedjet.com P a g e | 1
Bed Climate Comfort System
with Remote Control & Bluetooth App
This device is for residential home use only. It is not intended to be
used in commercial, industrial, or human medical settings.
READ AND SAVE THESE INSTRUCTIONS
READ CAREFULLY BEFORE ATTEMPTING TO ASSEMBLE,
INSTALL, OPERATE OR MAINTAIN THE PRODUCT DESCRIBED.
PROTECT YOURSELF AND OTHERS BY OBSERVING ALL
SAFETYINFORMATION. FAILURE TO COMPLY WITH
INSTRUCTIONS COULD RESULT IN PERSONAL INJURY AND/OR
PROPERTY DAMAGE!
RETAIN INSTRUCTIONS FOR FUTURE REFERENCE.
SAVE THESE INSTRUCTIONS
®

USER MANUAL – MODELS 6002NA/V1/V2/ & 7002xx
QUESTIONS? EMAIL US AT INFO@BEDJET.COM OR CALL 401-404-5250
WE ARE HERE TO HELP – PLEASE CALL US FOR ADVICE!
Revision 1.6 www.bedjet.com P a g e | 2
Letter from the President:
Thank you for your purchase of the BedJet. We wanted you to know who we are. Our company is not a
division of a massive multinational consumer appliance company or funded by big corporate capital.
We are a true American start-up company based in Rhode Island, full of bright eyed inventors, engineers
and gadget nerds who are part of the community of Makers. We simply love creating and sharing
awesome new technology and our company was fully self-funded out of our own pockets as well as
contributions from our very first customers.
We come from diverse technical backgrounds in the Aerospace, Medical Device, Automotive and Defense
industries. My own technical background came out of being an engineer on the NASA space suit program,
responsible for some of the cooling and heating and climate control life support components. Our goal is
cross-pollination of technologies out of these technologically sophisticated industries into the Bedroom
and the creation of devices which are delightful, therapeutic and luxurious.
Along the way we believe it is also possible to build a profitable company while doing right by our
customers and showing them love and appreciation. We want to be a company that deals with each of
our customers as if they were our neighbors. We also understand that the BedJet is a luxury product and
that there are many in the world who cannot afford such luxuries. In recognition of that, a portion of the
proceeds from every BedJet goes to charities for the less fortunate, who do not have the benefit of
enjoying such products themselves.
We ask that you please give us the opportunity to right any issues you may experience with our product
and we promise to put your needs and interests first. If you love your BedJet, please do spread the word
for us among your friends and family, as we do not have the marketing budgets of the big consumer
appliance companies.
Finally, in support of my personal commitment to your satisfaction, I offer you my own contact
information. If our BedJet team or Customer Care associates fail to meet your expectations in any way,
please don’t hesitate to reach out to me directly. You have my personal commitment to set things right.
With the deepest regard and appreciation for you, our customer,
Mark Aramli
President & Chief BedJetter
Office of the President:
maramli@bedjet.com
+1.401.404.5250 ext. 102
USER MANUAL – MODELS 6002NA/V1/V2/ & 7002xx
QUESTIONS? EMAIL US AT INFO@BEDJET.COM OR CALL 401-404-5250
WE ARE HERE TO HELP – PLEASE CALL US FOR ADVICE!
Revision 1.6 www.bedjet.com P a g e | 3
IMPORTANT INSTRUCTIONS
DANGER: TO REDUCE RISKS OF BURNS, ELECTRIC SHOCK, FIRE AND PERSONAL INJURY, THIS
PRODUCT MUST BE USED IN ACCORDANCE WITH THE FOLLOWING INSTRUCTIONS
1. Read all instructions before using this device.
2. WARNING – Do not use this heated bed system with any other heated – blanket, comforter,
quilt, sheet, mattress pad, mattress, foot warmer, throw blanket or similar heated bedding.
3. Let power cord hang free – Do not place between mattress and foundation. Do not allow the
cord to be pinched.
4. Use this device only as described in this manual. Any other use not recommended by the
manufacturer may cause fire, electrical shock, or injury to persons.
5. Do not operate device unattended. Turn off or unplug when not in use.
6. DO NOT OPERATE MORE THAN ONE BEDJET ON SAME BEDROOM AC-POWER CIRCUIT
WITHOUT ADJUSTING DUAL MODE SWITCH LOCATED ON REAR OF DEVICE TO “DUAL ZONE
ON, LOW POWER” FOR REDUCED POWER, OR DEVICES MAY EXCEED CIRCUIT BREAKER
CAPACITY AND CAUSE POWER DISTRUPTION OR ELECTRICAL HAZARD.
7. This appliance has a polarized plug (one blade is wider than the other). To reduce the risk of
electric shock, this plug is intended to fit in a polarized outlet only one way. If the plug does
not fit fully in the outlet, reverse the plug. If it still does not fit, contact a qualified electrician.
Do not attempt to defeat this safety feature.
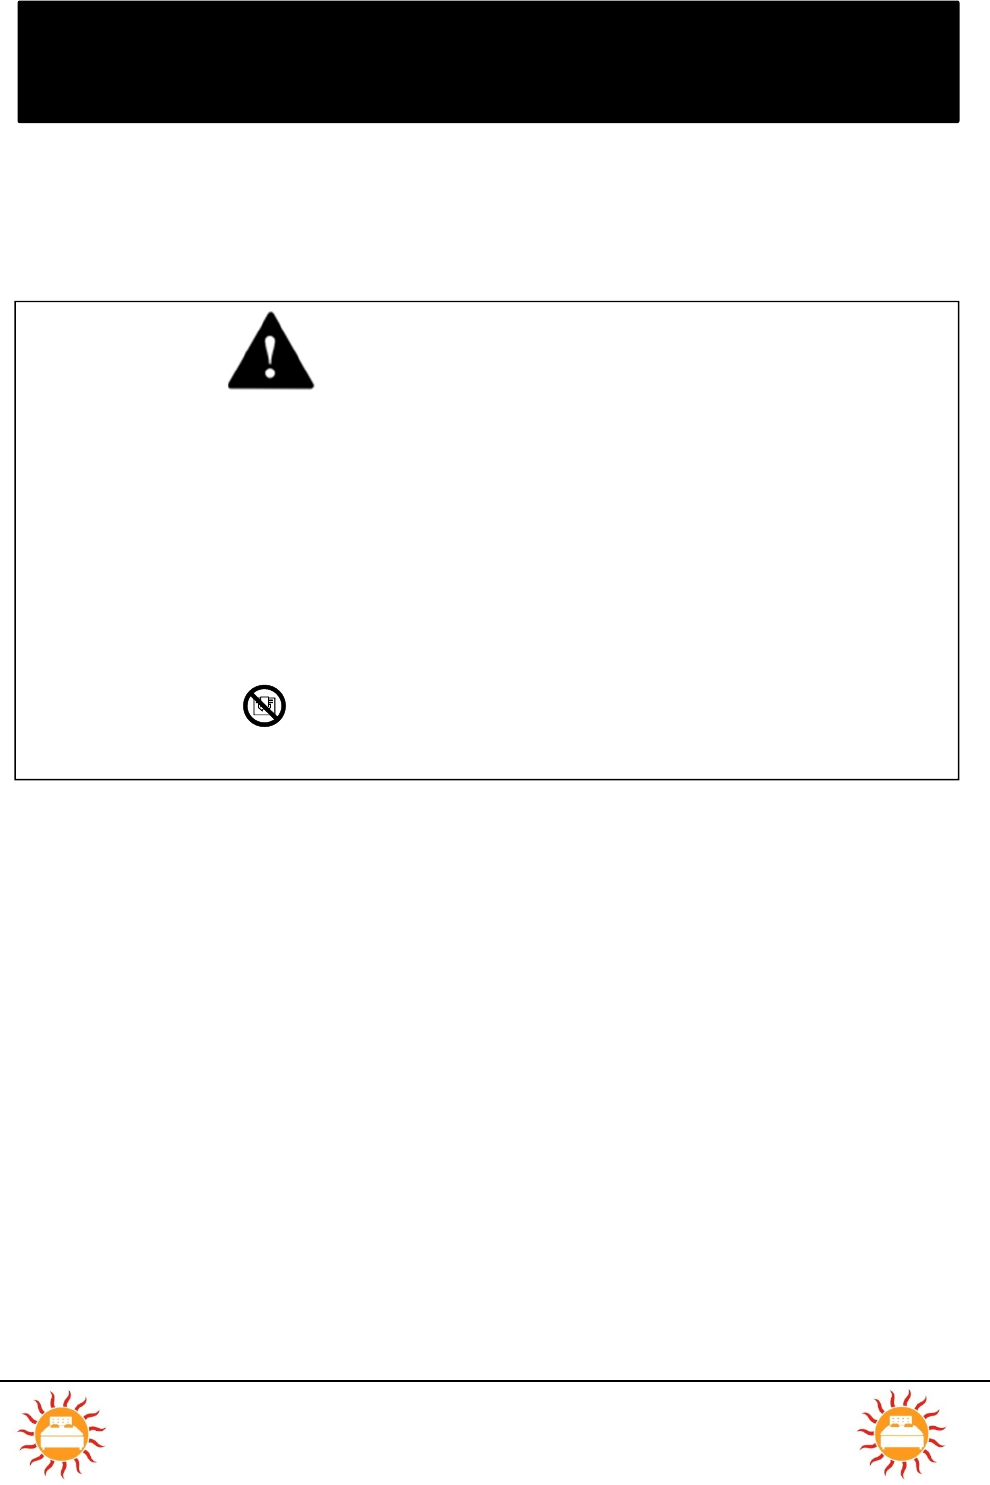
WARNING
DO NOT place body parts directly into or in front of the air nozzle exhaust
when used on high heat setting
WARNING – DO NOT use this heated bed system with an infant, a disabled
person, a person with diminished capacity or anyone insensitive to heat,
such as a person with very poor blood circulation
DO NOT use with children or persons with mental or sensory handicaps or
who cannot understand these warnings
DO NOT use for medical, oxygen, or wet environments
DO NOT cover
PERSONAL INJURY COULD OCCUR

USER MANUAL – MODELS 6002NA/V1/V2/ & 7002xx
QUESTIONS? EMAIL US AT INFO@BEDJET.COM OR CALL 401-404-5250
WE ARE HERE TO HELP – PLEASE CALL US FOR ADVICE!
Revision 1.6 www.bedjet.com P a g e | 4
8. Always plug this device directly into a wall outlet/receptacle. Never use with an extension
cord or relocatable power tap (outlet/power strip).
9. Do not operate this device with a damaged cord or plug or after the device malfunctions or
has been dropped or damaged in any manner. Return device to authorized service facility for
examination, electrical or mechanical adjustment or repair.
10. To disconnect device, make sure device is not currently operating in heat or cool mode, turn
Power Switch to OFF, then remove plug from outlet.
11. Always unplug device when not in regular use. Unplug power cord before servicing or moving
the device.
12. Do not insert or allow fingers or foreign objects to enter any ventilation or exhaust opening as
it may cause an electric shock, fire, or damage the device. Do not block or tamper with the
device in any manner while it is in operation.
13. To prevent a possible fire, do not block air intakes or exhaust in any manner. Do not place
unit on soft surfaces, like a bed, where openings may become blocked.
14. This device has hot and arcing or sparking parts inside. Do not use the BedJet in areas where
gasoline, paint, or flammable liquids are used or stored. It must NOT be used in potentially
dangerous locations such as flammable, explosive, chemical-laden or wet atmospheres. This
device is intended for residential bedroom use ONLY.
15. This device is not intended for use in wet or damp locations. This device is NOT INTENDED for
use in bathrooms, laundry areas and similar indoor locations. Do not use this heater in the
immediate surroundings of a bath, a shower or a swimming pool. Never locate the device
where it may fall into a bathtub or other water container. Do not immerse BedJet in water.
16. This device is not intended for use as a room air heater.
17. Do not use device outdoors.
18. Keep the cord away from heated surfaces.
19. Do not operate where aerosol (spray) products are being used or where oxygen is being
administered.
20. Do not run cord under carpeting. Do not cover cord with throw rugs, runners, or similar
coverings. Do not route cord under furniture or appliances. Arrange cord away from traffic
area and where it will not be tripped over.
21. Check your BedJet cord and plug connections:
a) Faulty wall outlet connections or loose plugs can cause the outlet or plug to overheat. Be
sure the plug fits tight in the outlet.
b) Heaters draw more current than small appliances, overheating of the outlet may occur
even if it has not occurred with the use of other appliances.

USER MANUAL – MODELS 6002NA/V1/V2/ & 7002xx
QUESTIONS? EMAIL US AT INFO@BEDJET.COM OR CALL 401-404-5250
WE ARE HERE TO HELP – PLEASE CALL US FOR ADVICE!
Revision 1.6 www.bedjet.com P a g e | 5
c) During use check frequently to determine if your plug outlet or faceplate is HOT!
d) If so, discontinue use of the heater and have a qualified electrician check and/or replace
the faulty outlets.
22. For household use only
23. Children of less than 3 years should be kept away unless continuously supervised. Children
aged from 3 years and less than 8 years shall only switch on/off the appliance provided that it
has been placed or installed in its intended normal operating position and they have been
given supervision or instruction concerning use of the appliance in a safe way and understand
the hazards involved.
24. Children aged from 3 years and less than 8 years shall not plug in, regulate and clean the
appliance or perform user maintenance.
25. Children should be supervised to ensure that they do not play with the appliance.
26. CAUTION — Some parts of this product can become very hot and cause burns. Particular
attention has to be given where children and vulnerable people are present.
27. Heater must not be located immediately below a socket outlet.
28. If the supply cord is damaged, it must be replaced by the manufacturer, its service agent
or similarly qualified persons in order to avoid a hazard.
29. This appliance is not intended for use by persons (including children) with reduced physical,
sensory or mental capabilities, or lack of experience and knowledge, unless they have been
given supervision or instruction concerning use of the appliance by a person responsible for
their safety.
WARNING: REDUCE THE RISK OF FIRE OR ELECTRIC SHOCK – DO NOT USE THIS DEVICE WITH
ANYSOLID STATE SPEED CONTROL DEVICES.
SAVE THESE SAFETY INSTRUCTIONS

USER MANUAL – MODELS 6002NA/V1/V2/ & 7002xx
QUESTIONS? EMAIL US AT INFO@BEDJET.COM OR CALL 401-404-5250
WE ARE HERE TO HELP – PLEASE CALL US FOR ADVICE!
Revision 1.6 www.bedjet.com P a g e | 6
THIS DEVICE IS A DOUBLE INSULATED PRODUCT:
SERVICING OF DOUBLE-INSULATED PRODUCTS
In a double-insulated product, two systems of insulation are provided instead of grounding. No
grounding means is provided on a double-insulated product, nor is a means for grounding to be
added to the product. Servicing a double-insulated product requires extreme care and knowledge
of the system, and is to be done only by qualified service personnel. Replacement parts for a
double-insulated product must be identical to the parts they replace. A double-insulated product
is marked with the words DOUBLE INSULATION or DOUBLE INSULATED. The symbol (square
within a square) is also able to be marked on the product.
MANUFACTURER INFORMATION:
BEDJET LLC
217 Goddard Row
Newport, RI 02840 USA
Phone: +1-401-404-5250
Email: info@bedjet.com

USER MANUAL – MODELS 6002NA/V1/V2/ & 7002xx
QUESTIONS? EMAIL US AT INFO@BEDJET.COM OR CALL 401-404-5250
WE ARE HERE TO HELP – PLEASE CALL US FOR ADVICE!
Revision 1.6 www.bedjet.com P a g e | 7
Product Overview
The patented BedJet®is a forced air cooling, heating and climate comfort system designed just
for your bed at home. BedJet technology utilizes a gentle flow of air blown directly into your
bedding to provide rapid cooling and heating comfort. The Bedjet®attaches as an accessory
device to any size bed, any type mattress and works with your existing bedding. The BedJet ®
base unit is intended to be installed underneath the bed, or at the foot of the bed. The BedJet®
product cools and heats your bed while keeping all electricity safely out of your bed where it
belongs. Convenient bedside controls include a RF remote control and a Bluetooth connected
smartphone App, available for android and iPhone devices.
Cooling is achieved by powered ventilation of the bed, utilizing fresh room temperature air to
disperse accumulated body moisture and heat out from under the sheets. Cooling mode is most
effective when the room ambient air temperature is below 79 °F(27°C). BedJet®cooling is not a
replacement for room air conditioning in extremely hot climates and may not be highly effective
if room ambient temperatures are over 80 °F(27°C).
Heating of the airflow in the base unit is achieved via a unique patent pending ceramic stone
heating element. These advanced technology ceramic stone heating elements have been
specially engineered to gently heat the air flow while maintaining internal element surface
temperatures below the burning flashpoint of air born dust and lint. This prevents any noticeable
“electric heater”odor from the BedJet®, which is commonly experienced with ordinary room
space heaters using electric coils and fans.
The BedJet’s specially engineered ceramic stone heating element also represents the highest
level of technological safety for an air heating device. Under any possible malfunction or misuse
condition, the ceramic stones will never get hot enough to melt the BedJet casing or cause
ignition of flammable materials. The heated air outlet temperatures are safe, about the same
temperature as your household HVAC register and less than the cabin heat temperature of your
automobile. While warmth will be felt in the air delivery hose, the external BedJet case is cool
the touch under any heat setting.
These technological innovations were developed by the BedJet®engineering team to ensure the
highest level of safety for our product and its new home as an extension of your bed.
USER MANUAL – MODELS 6002NA/V1/V2/ & 7002xx
QUESTIONS? EMAIL US AT INFO@BEDJET.COM OR CALL 401-404-5250
WE ARE HERE TO HELP – PLEASE CALL US FOR ADVICE!
Revision 1.6 www.bedjet.com P a g e | 8
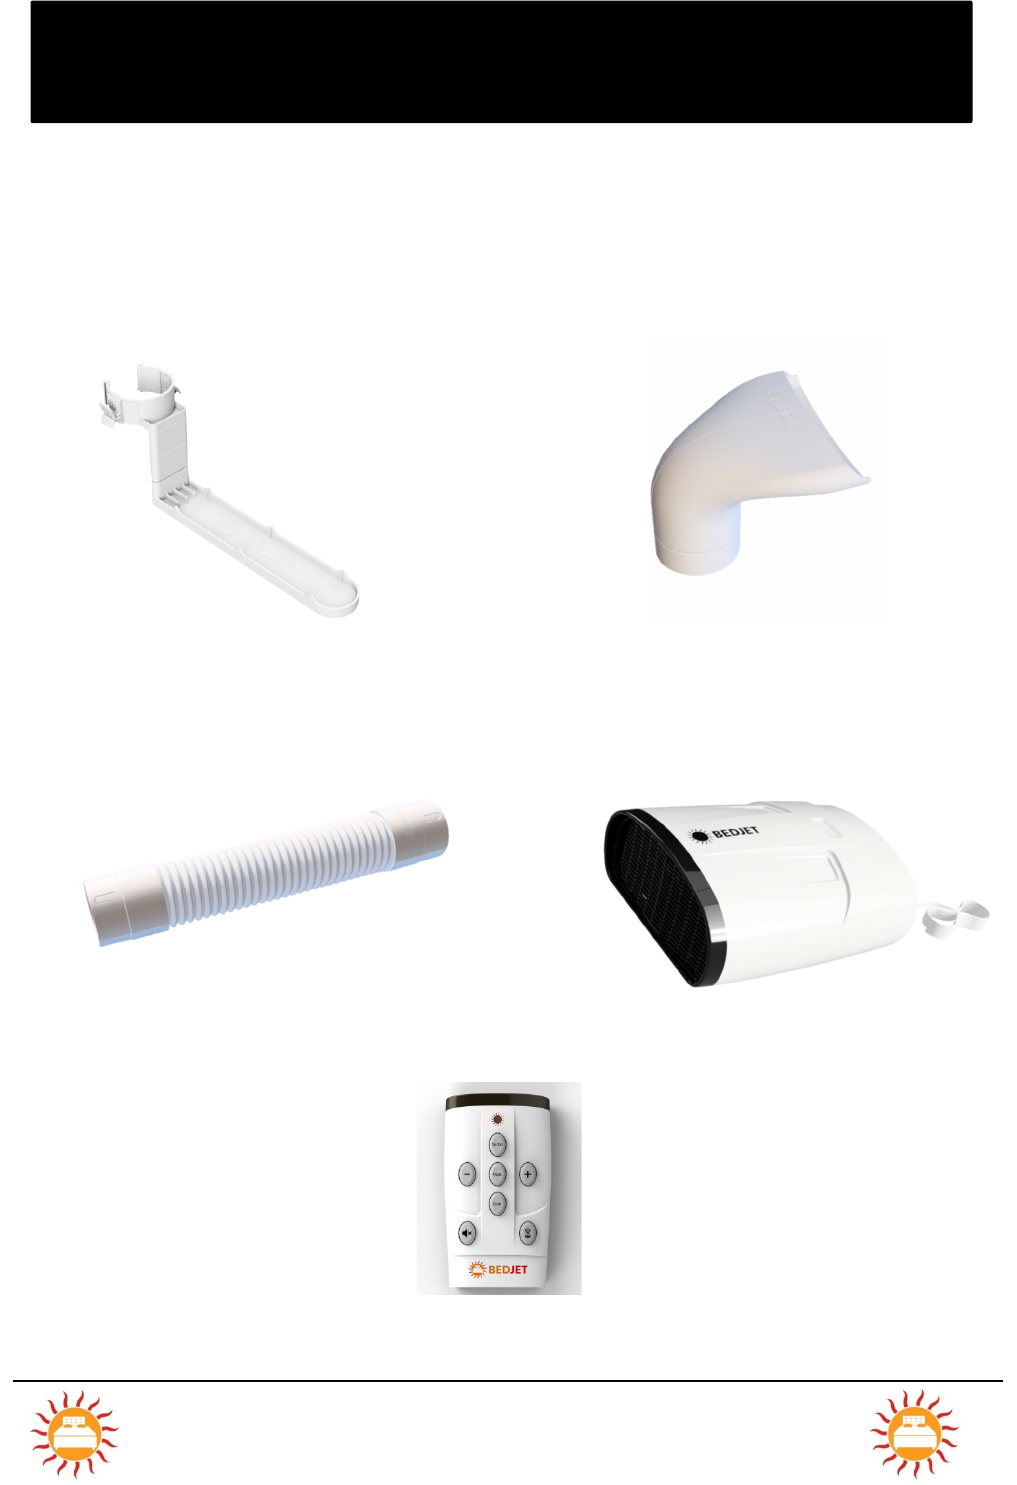
BedJet and pre-installed
washable air intake filter
Pre-Installation Checklist
Before attempting installation of the BedJet, please verify the following standard parts list from
your BedJet package:
Adjustable height mattress mount
with qty. 2 pre-installed sheet clamps
and qty. 4 height extending links
Air Nozzle
BedJet base unit
Radio wireless remote control
with A23 alkaline battery
1)
Air Hose with fabric liner,
stretchable, compressible
and bendable

USER MANUAL – MODELS 6002NA/V1/V2/ & 7002xx
QUESTIONS? EMAIL US AT INFO@BEDJET.COM OR CALL 401-404-5250
WE ARE HERE TO HELP – PLEASE CALL US FOR ADVICE!
Revision 1.6 www.bedjet.com P a g e | 9
Proper Assembly Required:
The BedJet is required to be installed onto a bed for proper operation. All parts included are
required to be fully assembled and installed onto the BedJet as part any operation. Do not
operate the BedJet without the included Air hose and Air Nozzle installed onto the BedJet. Do
not attempt to use the BedJet with air delivery accessories or air delivery components not
approved or supplied by BEDJET, LLC. Install only qualified air delivery components supplied by
BEDJET, LLC onto the BedJet.
Bedding Requirements & JetConvect™Theory of Operation:
The BedJet JetConvect™ air technology sends air directly into your sleeping layer. The BedJet
requires a typical top sheet or comforter to be used in bed for proper cooling and warming
operation. A quality top sheet or comforter must always be used to help trap and distribute the
BedJet air flow within the bed. Requirements for the top sheet or comforter are very simple, just
use any bedding material type (cotton, cotton blends, microfiber, etc) with a 250thread count
weave or higher. Alternatively the BedJet AirComforter™ accessory may be used as a
replacement for a typical top sheet or comforter (see Dual Zone Installation).
Use of loosely knit low quality top sheets with thread count below 250, or loose knit top sheet
weaves such as jersey knit or flannel, or performance “cooling” top sheets will result in sub-
optimal BedJet experience. Use of loose knit blankets with no top sheet or no comforter will
result in sub-optimal experience. Using this type of bedding will allow the BedJet air to escape
at the bottom of the bed near the nozzle and only cool/warm your feet instead of the whole
bed.
Air Delivery Preferences:
The BedJet JetConvect™ technology warms and cools via quiet injection
of air into your bedding. Some users enjoy the feeling of ventilation and
movement air around their body and consider it delightful. Other users
may only wish to feel cooled or warmed and prefer to minimize the
movement of air under the sheets or around the body.
The BedJet accommodates both types of operation, depending on user
preference. See Cooling & Heating sections for more detail.
USER MANUAL – MODELS 6002NA/V1/V2/ & 7002xx
QUESTIONS? EMAIL US AT INFO@BEDJET.COM OR CALL 401-404-5250
WE ARE HERE TO HELP – PLEASE CALL US FOR ADVICE!
Revision 1.6 www.bedjet.com P a g e | 10
System Overview
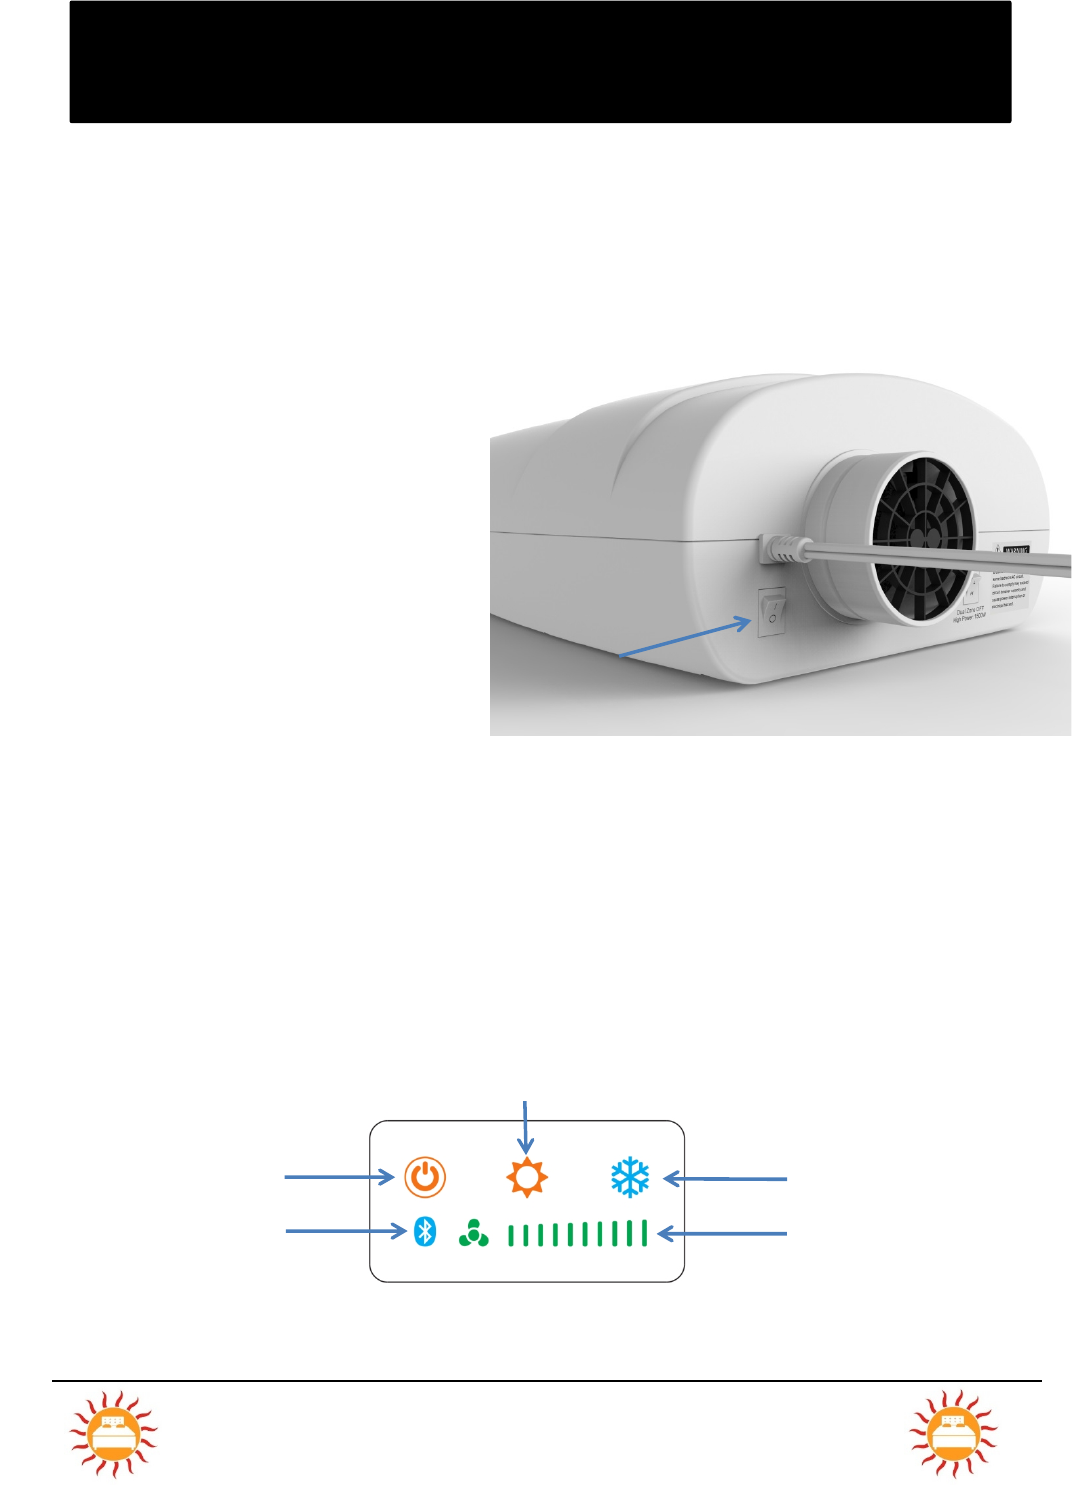
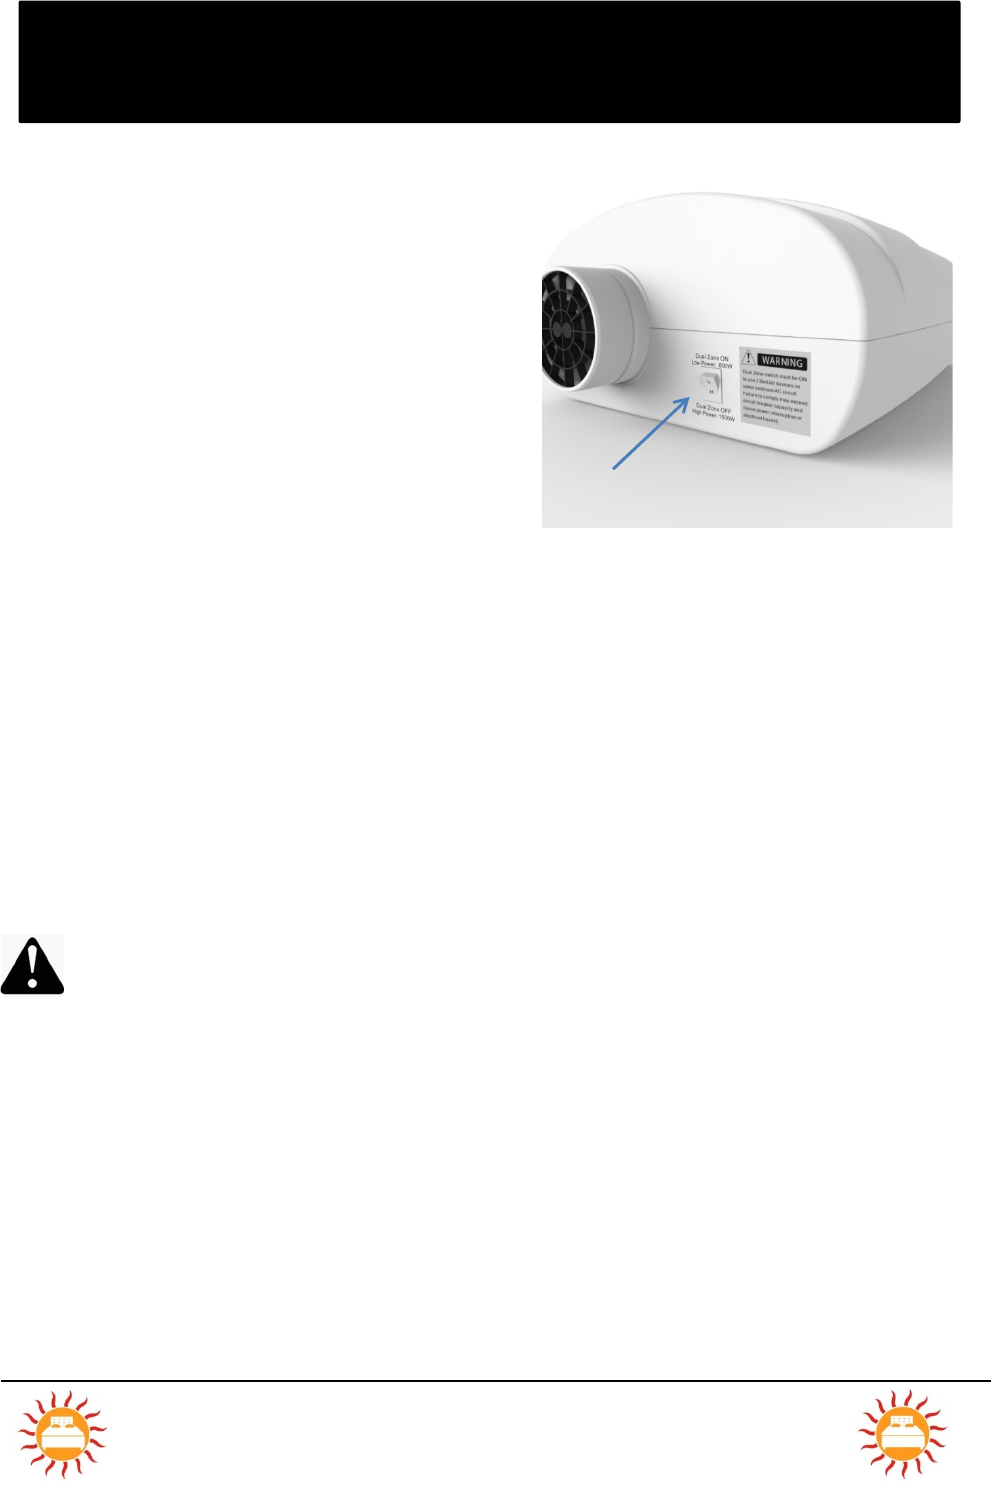
BedJet Power Switch
The ON/OFF power switch is located
directly below the power cord at the
rear of the unit to the left of the air
exhaust port. Plug the unit in, switch
the unit on and within 5 seconds a
single beep should be heard and the
orange Power ON LED on the BedJet
Status Display (see below) will light.
This signifies the BedJet is in stand-by
mode and ready to accept commands
from the wireless remote control or
link to a Bluetooth enabled smart
device. The BedJet uses very little
power when in standby mode.
BedJet Status Display:
Located on top of the BedJet, the Status Display gives information on current mode setting of the
BedJet. This is not a control panel. Controlling the BedJet is performed via the wireless remote
or Bluetooth smartphone/tablet App.
Heat Mode ON
Cool Mode ON
Power ON
Bluetooth Smartlink
Connected to Device
Air Flow level
(relative to current mode)
USER MANUAL – MODELS 6002NA/V1/V2/ & 7002xx
QUESTIONS? EMAIL US AT INFO@BEDJET.COM OR CALL 401-404-5250
WE ARE HERE TO HELP – PLEASE CALL US FOR ADVICE!
Revision 1.6 www.bedjet.com P a g e | 11
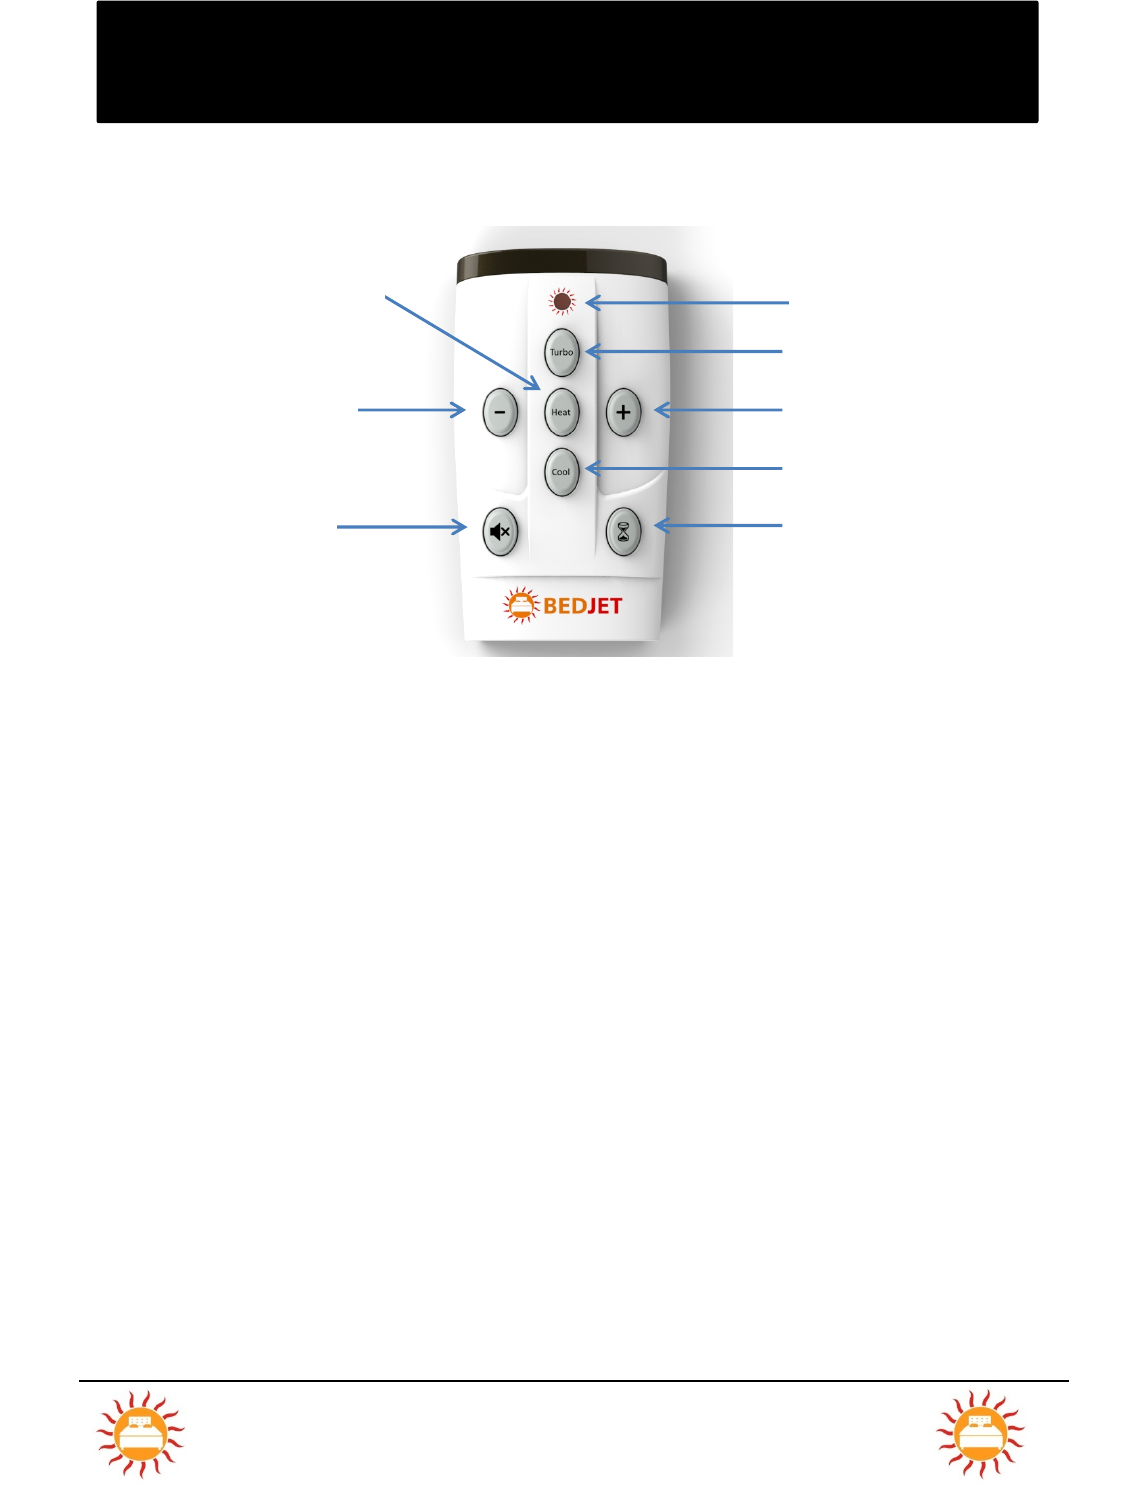
BedJet Wireless Remote Control:
REMOTE CONTROL OPERATION OF BEDJET: The wireless remote control and Bluetooth
smart device App are the only methods of commanding operation of the BedJet. The BedJet
main power switch needs to be ON and the Power ON LED light on main display lit for the
remote control or Bluetooth device to operate the BedJet. There are no external operating
mode buttons on the BedJet base unit.
BEDJET REMOTE CONTROL SYNC TO BEDJET: The wireless remote control needs to be paired
to your BedJet in order to correctly operate. This is normally done at the factor y prior to
delivery. If BedJet is powered on (verified by Power LED on BedJet display) and wireless
remote control buttons are pressed (verified by LED indicator on remote) but the BedJet does
not activate, then re-pair the remote control to BedJet with the following procedure:
To pair your remote control to your BedJet, make sure BedJet is powered OFF for 10 seconds.
Turn BedJet switch ON while simultaneously pressing and holding the COOL Button on remote
control until the BedJet Power ON indicator lights. BedJet will make 3 fast beeps to indicate
successful pairing to remote. The pairing is permanent until a new remote control is paired.
BATTERY: The battery is an A23 type alkaline battery, commonly available and used
frequently in garage door opener remote controls. When needing replacement, the battery
may still light the LED on remote but be too weak for transmit. If remote control has
previously worked properly and then stops functioning, replace the battery.
Any button pressed LED indicator
Turbo Heat Mode ON/OFF
Air Flow power increase
Cool Mode ON/OFF
Auto-shutoff timer advance
Normal Heat Mode ON/OFF
Air Flow power decrease
Beeper Mute ON/OFF
USER MANUAL – MODELS 6002NA/V1/V2/ & 7002xx
QUESTIONS? EMAIL US AT INFO@BEDJET.COM OR CALL 401-404-5250
WE ARE HERE TO HELP – PLEASE CALL US FOR ADVICE!
Revision 1.6 www.bedjet.com P a g e | 12
BedJet Dual Zone Switch
The BedJet Dual Zone switch sets the maximum
allowable air flow and power utilized by the
BedJet in any heat mode. In Turbo Heat Mode,
the BedJet can consume a large amount of
power for an electrical appliance, up to 1440
watts.
Any installation with two BedJet devices on the
same household AC branch circuit or two
BedJets on the same bed must have the Dual
Zone Switch set ON to LOW Power 800W, in order not to exceed AC circuit Amp capacity. The
Dual Mode ON Low Power setting reduces the available airflow and heating power by
approximately 50% in the Turbo heat mode, and 20% in regular heat mode in order that two
BedJet’s being used simultaneously on the same AC bedroom circuit will not exceed AC circuit
capacity. This is still plenty of power to warm the bed quickly.
Installations where only one BedJet is used on the same household branch AC Circuit and one
BedJet device is installed on the bed should set the Dual Zone Switch OFF to HIGH power 1500W
to enjoy the full power heating comfort of the system. Users with single or twin size beds
should set the Dual Zone Switch to LOW Power.
WARNING: Failure to comply with the correct Dual Zone Switch setting with more
than one BedJet installed on the same AC branch circuit may result in overloaded electrical
circuit, electrical hazard or personal injury. Never use more than one BedJet on the same
household AC circuit or same bed without setting Dual Zone switch to LOW Power.
USER MANUAL – MODELS 6002NA/V1/V2/ & 7002xx
QUESTIONS? EMAIL US AT INFO@BEDJET.COM OR CALL 401-404-5250
WE ARE HERE TO HELP – PLEASE CALL US FOR ADVICE!
Revision 1.6 www.bedjet.com P a g e | 13
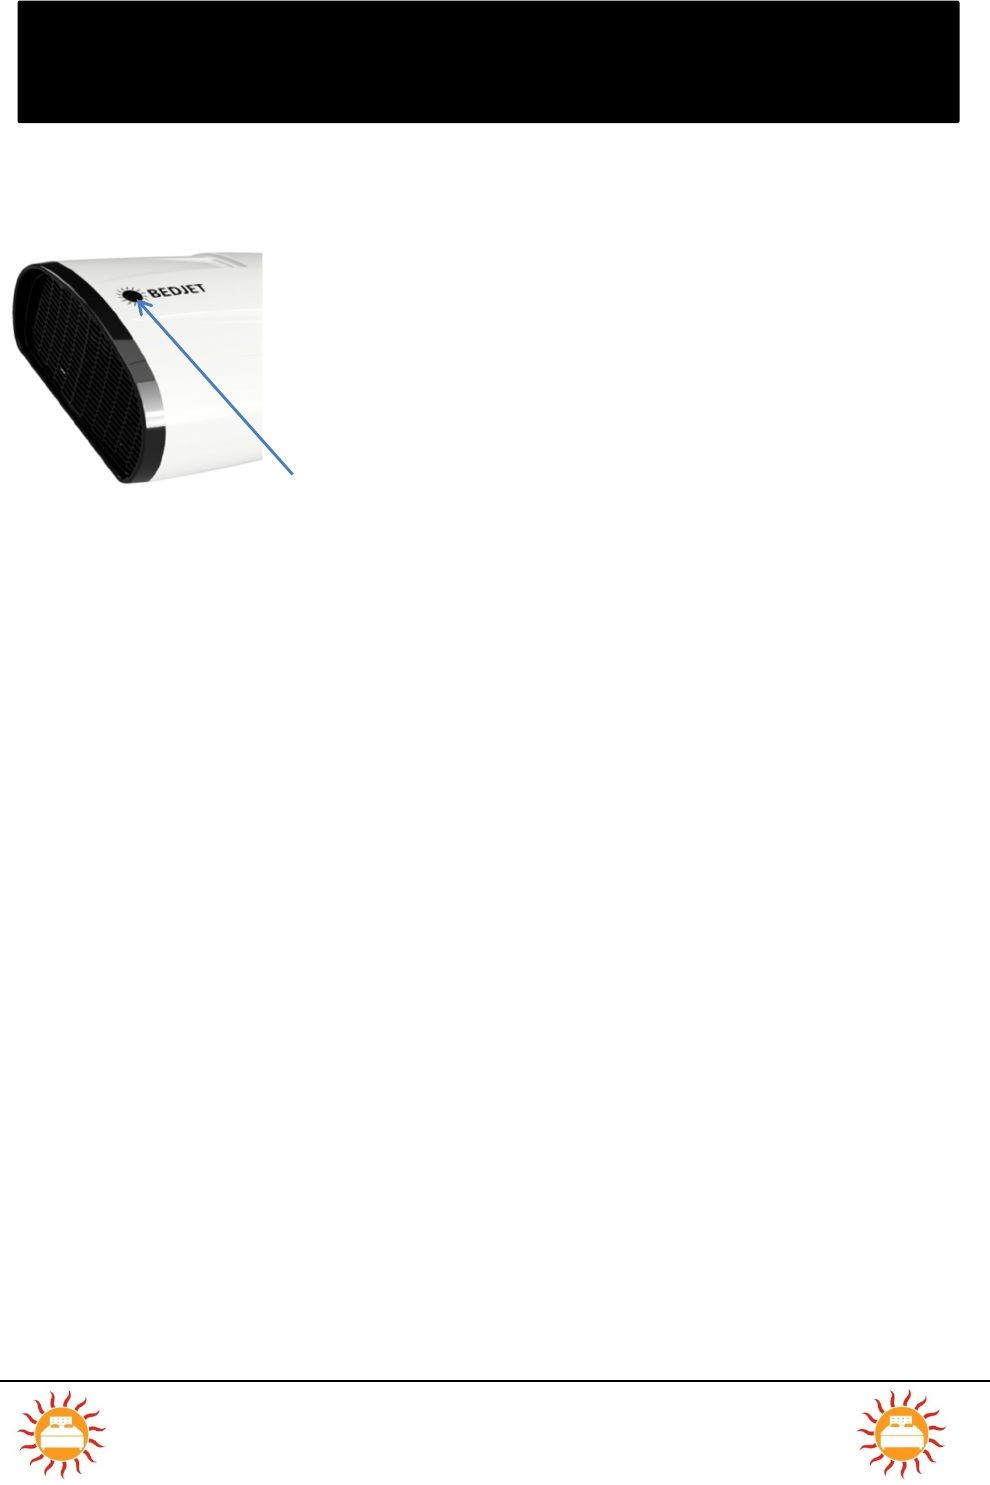
Maintenance
The only maintenance required for the BedJet is periodic inspection
and cleaning of the lifetime washable air intake filter. The lifetime
washable intake filter is designed to keep dust, lint, pet hair, etc.
out of the BedJet air flow stream.
Inspect and clean the filter every 3 months or when visually dirty
(or more frequently if shedding pets are near or around BedJet):
Press the round BedJet logo and pull air intake grill open to access
filter, remove the mesh filter and clean under household running
water. Reinstall filter when dry and close the air intake grill until it
snaps back in place.
Installation: Single Zone BedJet
Use the following instructions for a single zone BedJet installation. A single zone BedJet
installation is a single BedJet installed on any size bed, resulting in heating or cooling of the entire
bed as a single temperature zone. Settings on medium or low may allow only half sections of the
bed to be heated or cooled if desired (see Step #3). All required items and components for the
single zone installation are included in the BedJet box.
BedJet Installation Checklist:
Before installing BedJet under the Bed, assemble all parts and become familiar with BedJet
operation while the Status Display is still easily viewable:
1) Make sure battery is installed in remote control, the amber LED on remote control should
turn on when any button is pressed. Weak, flickering LED indicates low battery.
2) Adjust the BedJet Dual Mode Switch according to your installation type (see page 12).
THIS IS VERY IMPORTANT.
USER MANUAL – MODELS 6002NA/V1/V2/ & 7002xx
QUESTIONS? EMAIL US AT INFO@BEDJET.COM OR CALL 401-404-5250
WE ARE HERE TO HELP – PLEASE CALL US FOR ADVICE!
Revision 1.6 www.bedjet.com P a g e | 14
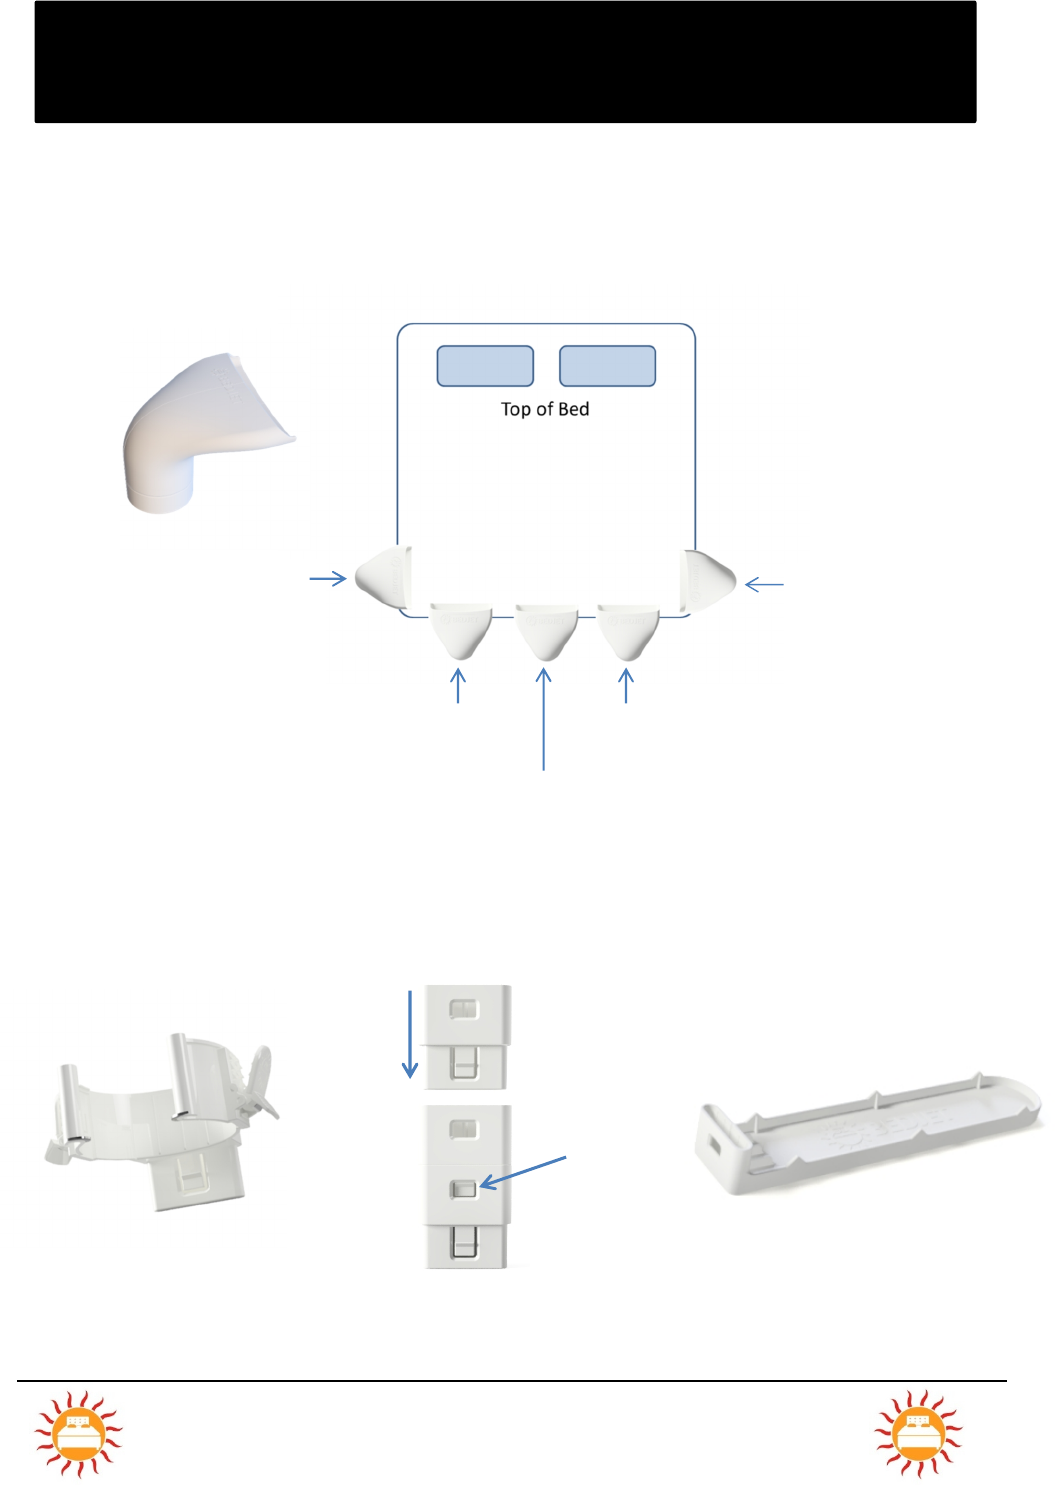
3) Determine best Air Nozzle location near the bottom of the bed per your personal heating
and cooling zone preferences on the chart below and limitations of your bedframe. It’s
good to experiment with these over a few nights to learn what works best for you. For
installations using AirComforter, please consult instructions found in the AirComforter
package, available Nozzle locations will be different than shown below.
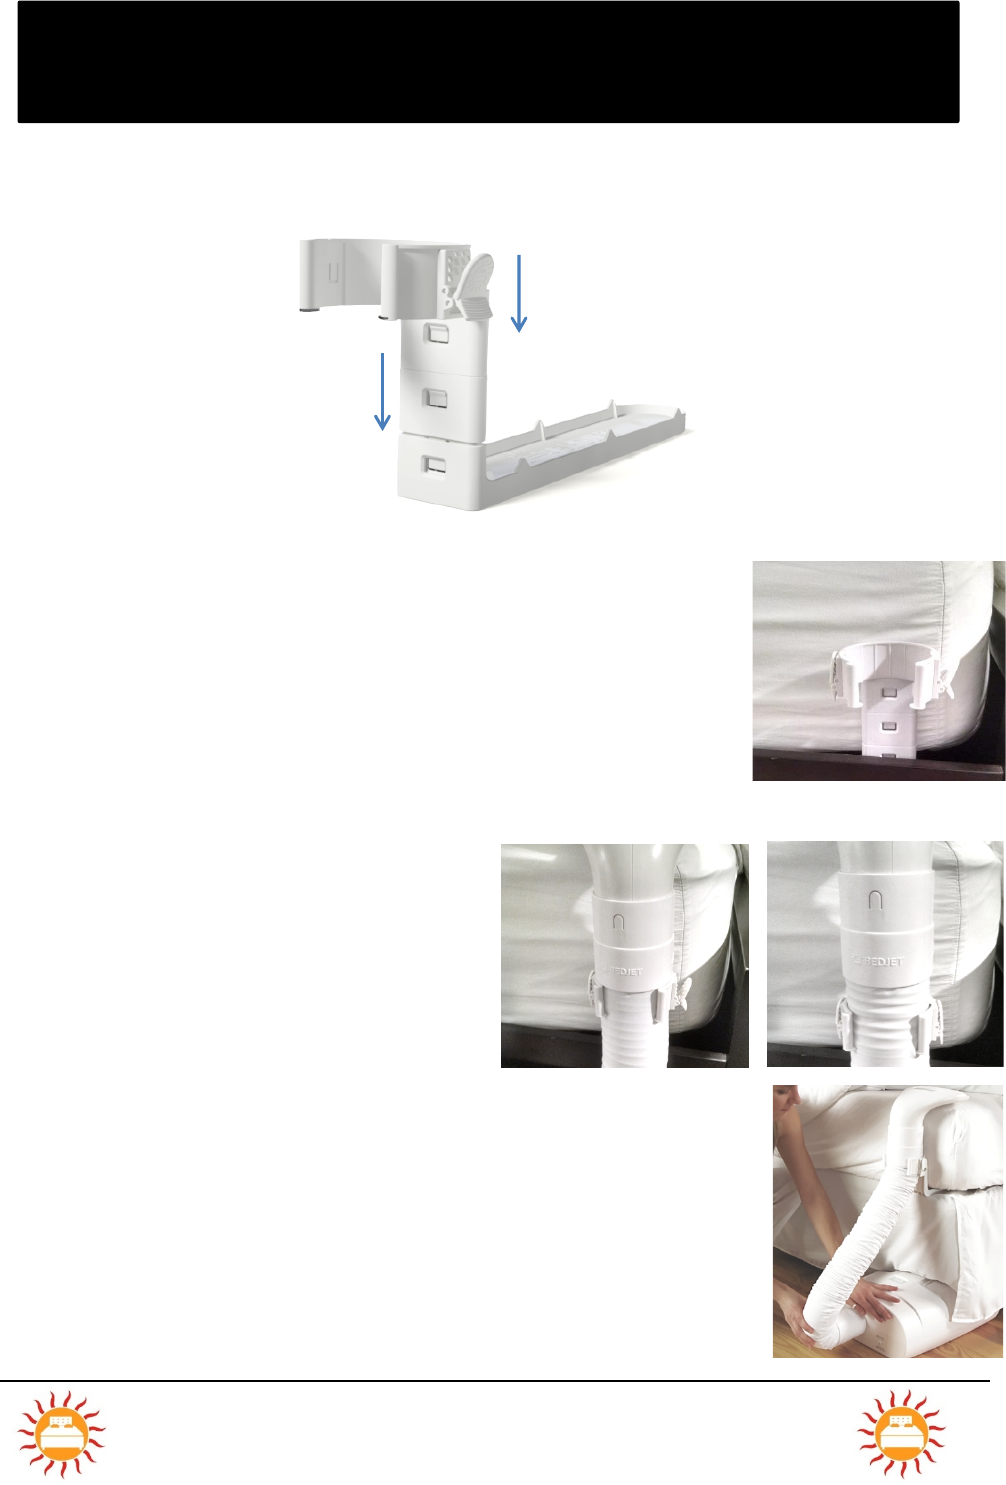
4) Locate parts for adjustable Hose Mattress Mount assembly. The adjustable Hose Mattress
Mount comes in multiple pieces:
Whole bed warming and
cooling, slightly favors
left side on low air
settings (best)
Mostly left side of bed
warming and cooling
Mostly right side of bed
warming and cooling
Whole bed warming and
cooling, slightly favors
right side on low air
settings (best)
Middle of bed warming
and cooling
Hose Grip with
2 sheet Clamps
Height Extending Links, slide in
to snap lock, press tab to
release and pull apart
Mattress Mount Base
USER MANUAL – MODELS 6002NA/V1/V2/ & 7002xx
QUESTIONS? EMAIL US AT INFO@BEDJET.COM OR CALL 401-404-5250
WE ARE HERE TO HELP – PLEASE CALL US FOR ADVICE!
Revision 1.6 www.bedjet.com P a g e | 15
5) Assemble Hose Mattress Mount using the Height Extending links as shown below. All
parts should snap together, thicker mattresses will require more Height Extender links:
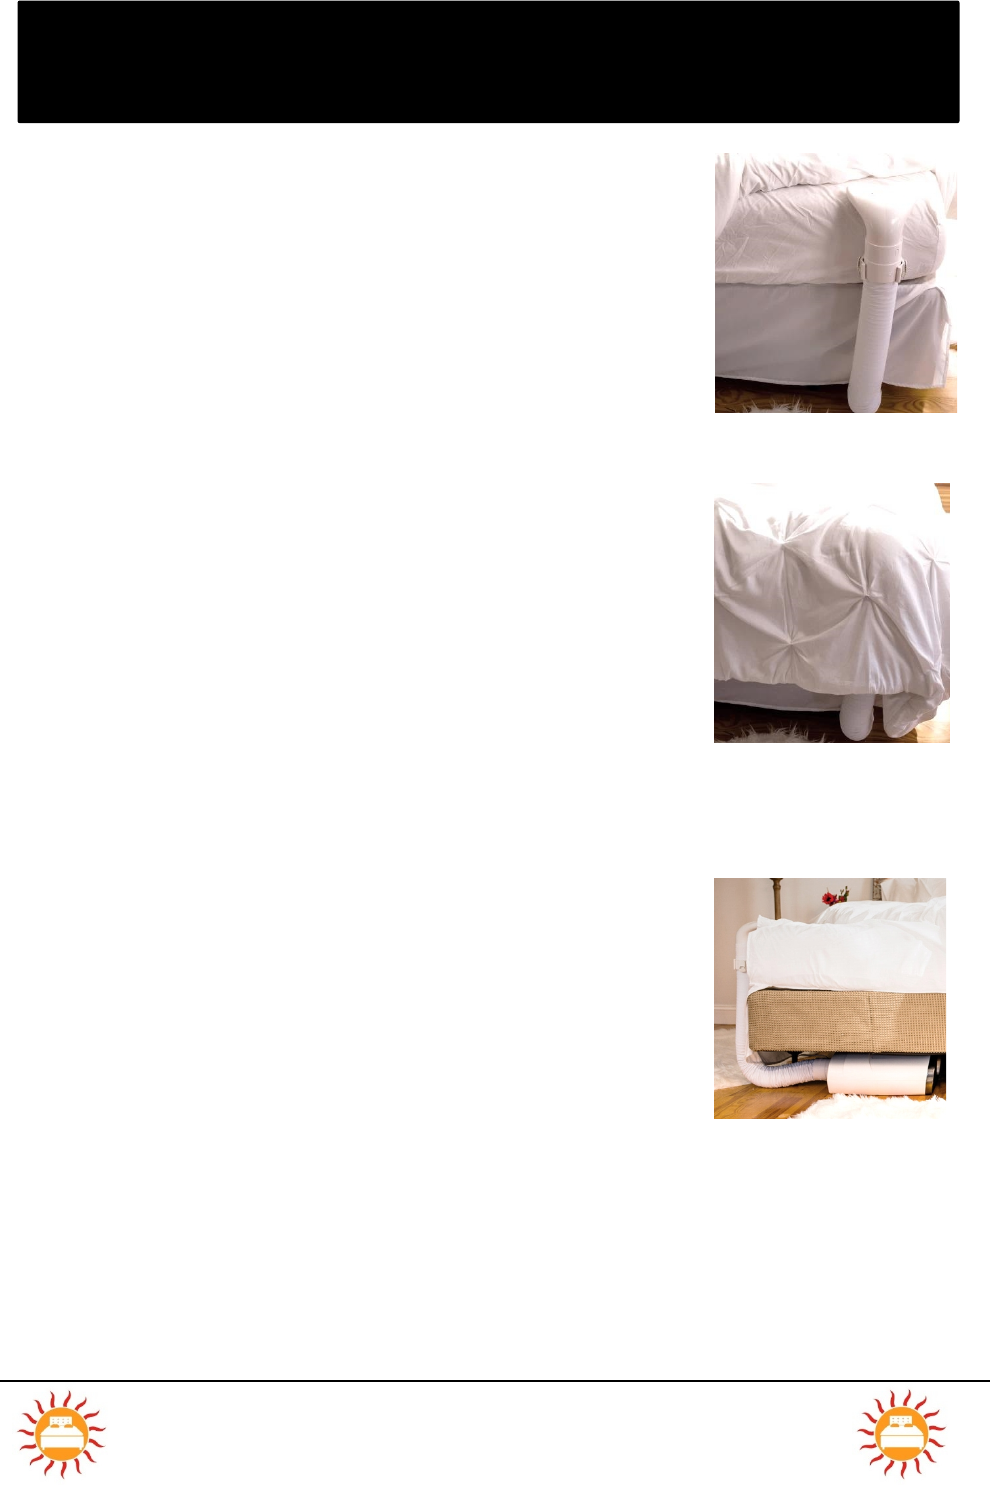
6) Slide the Mattress Mount base under your mattress directly underneath the location
identified in step #3 for the Air Nozzle. The Mattress Mount will
be used to secure the Air Hose and Air Nozzle assembly against
the side of the bed Slide the Mattress Mount base as deeply as
possibly under the mattress until the Mattress Mount is flush
against the mattress.
7) Assemble Air Nozzle onto the Air Hose. Stretch and compress the
Air Hose, note how it can be expanded, contracted and bent to
retain any desired shape.
8) Push the fabric section of Air Hose onto Mattress Mount Hose Grip. Grip will stretch
open to accept the hose. Remove or
add Mattress Mount Height
Extending Links to adjust height of
the Hose Grip so that bottom of the
Air Nozzle rests on the top of the
mattress. The Hose Grip can be flush
against the plastic hose cuff or very
close to it – both installation
methods shown in photo are good. When finished, the Air Nozzle
should be resting on and project onto the mattress surface. Add
Height Links if Air Nozzle flops off mattress too easily.
9) Place BedJet on the floor near the bottom of the bed directly
beneath the Mattress Mount, the intake should be facing
towards the bed. Assemble the Air Hose onto air output port of
BedJet.
USER MANUAL – MODELS 6002NA/V1/V2/ & 7002xx
QUESTIONS? EMAIL US AT INFO@BEDJET.COM OR CALL 401-404-5250
WE ARE HERE TO HELP – PLEASE CALL US FOR ADVICE!
Revision 1.6 www.bedjet.com P a g e | 16
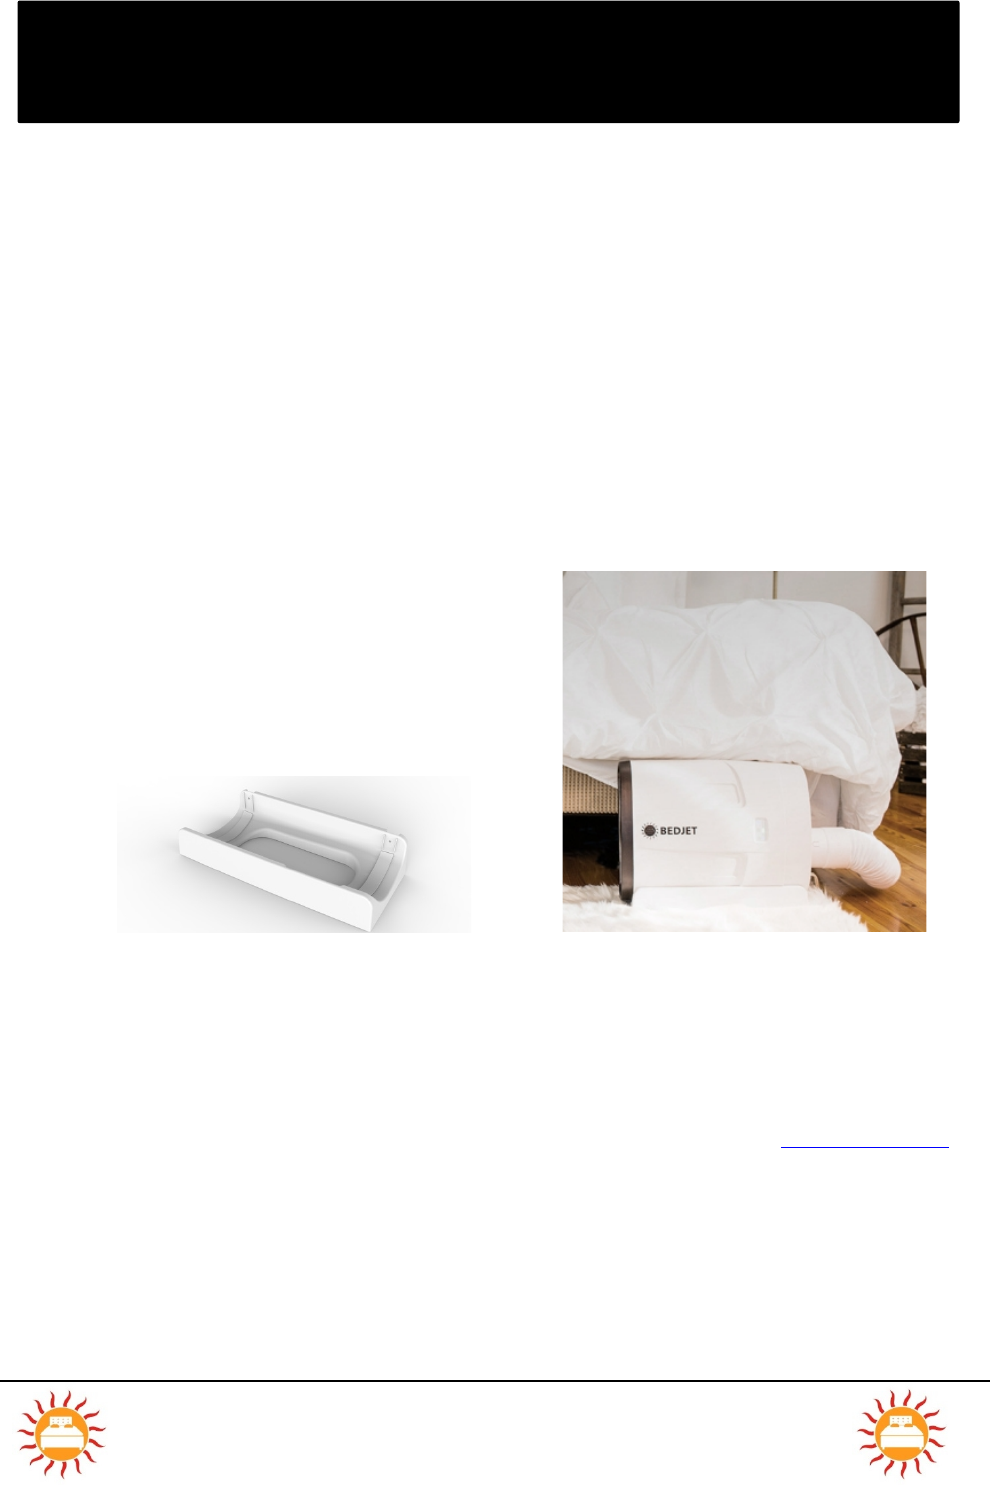
10) If using the AirComforter, please consult the instructions
in the AirComforter package for installation of the Air
Nozzle into the AirComforter sheet. If you are using your
own sheets, cover the Air Nozzle with your sheets or
comforter. The Air Nozzle must be covered by a sheet or
comforter in order to distribute the air throughout the bed.
Twin sheet clamps are located on Mattress Mount to hold
your sheets in place over the nozzle so they are not pulled
off easily when turning over in bed. If bedding sheets are
not typically tucked in around the nozzle, the sheet clamps are highly recommended to be
used.
11) Plug BedJet in AC power outlet (do not use power strip)
and switch on. Power switch is located directly below
power cord. BedJet makes single beep on successful
power ON, and the remote control can now be used.
12) The Remote Control should already be synchronized with
BedJet on delivery. However, if pressing remote control
center buttons does not activate BedJet after power ON,
try synchronizing the Remote Control per instructions on
page 11. If still not working, replace the battery.
13) Familiarize yourself with turning on and off the various operating modes while the Status
Display of BedJet is visible before the BedJet is pushed under the Bed.
14) The ideal BedJet final installation location is under the bed. This product is designed to be
an extension of your bed and has been electrically
approved as safe for this installation. The BedJet requires
7 inches clearance and will fit under nearly all beds with
standard frames. Some bedframes with low hanging side
rails may look like they cannot fit the BedJet underneath,
but this is just the side rail and the under mattress area
may still have 7 inches height clearance. In these cases,
the bed frame may be lifted up and the BedJet placed
underneath. As long as the mattress or frame does not rest on the BedJet and the 3”
hose can clear the low side rail, the installation is acceptable.
15) When installing under the bed, adjust the location of the BedJet exhaust port to be as
close as possible to the Air Nozzle. Best location is for the exhaust port to be directly
under the Air Nozzle so that it can be reached with only a single 90 degree bend in hose.
The best setup will minimize the length of Air Hose and minimize the number of bends.
USER MANUAL – MODELS 6002NA/V1/V2/ & 7002xx
QUESTIONS? EMAIL US AT INFO@BEDJET.COM OR CALL 401-404-5250
WE ARE HERE TO HELP – PLEASE CALL US FOR ADVICE!
Revision 1.6 www.bedjet.com P a g e | 17
Compress excess length in the Air Hose so that only the shortest length need ed is used.
Compress the hose length not needed nearest the BedJet exhaust, and leave the hose
completely expanded going to the Air Nozzle. Straighten the Air Hose as much as possible
for the most efficient operation.
HELP – WILL IT WORK WITH MY ARTICULATED BED FRAME?
The BedJet is articulated bed frame approved. It will work fine underneath adjustable bed
frames, provided care is taken to make sure that the BedJet and Air Hose are installed in a
location where the full range of frame articulation will not crush either component. This may
require fully extending the Air Hose to move BedJet further away from the Air
Nozzle/Mattress mount location than shown here.
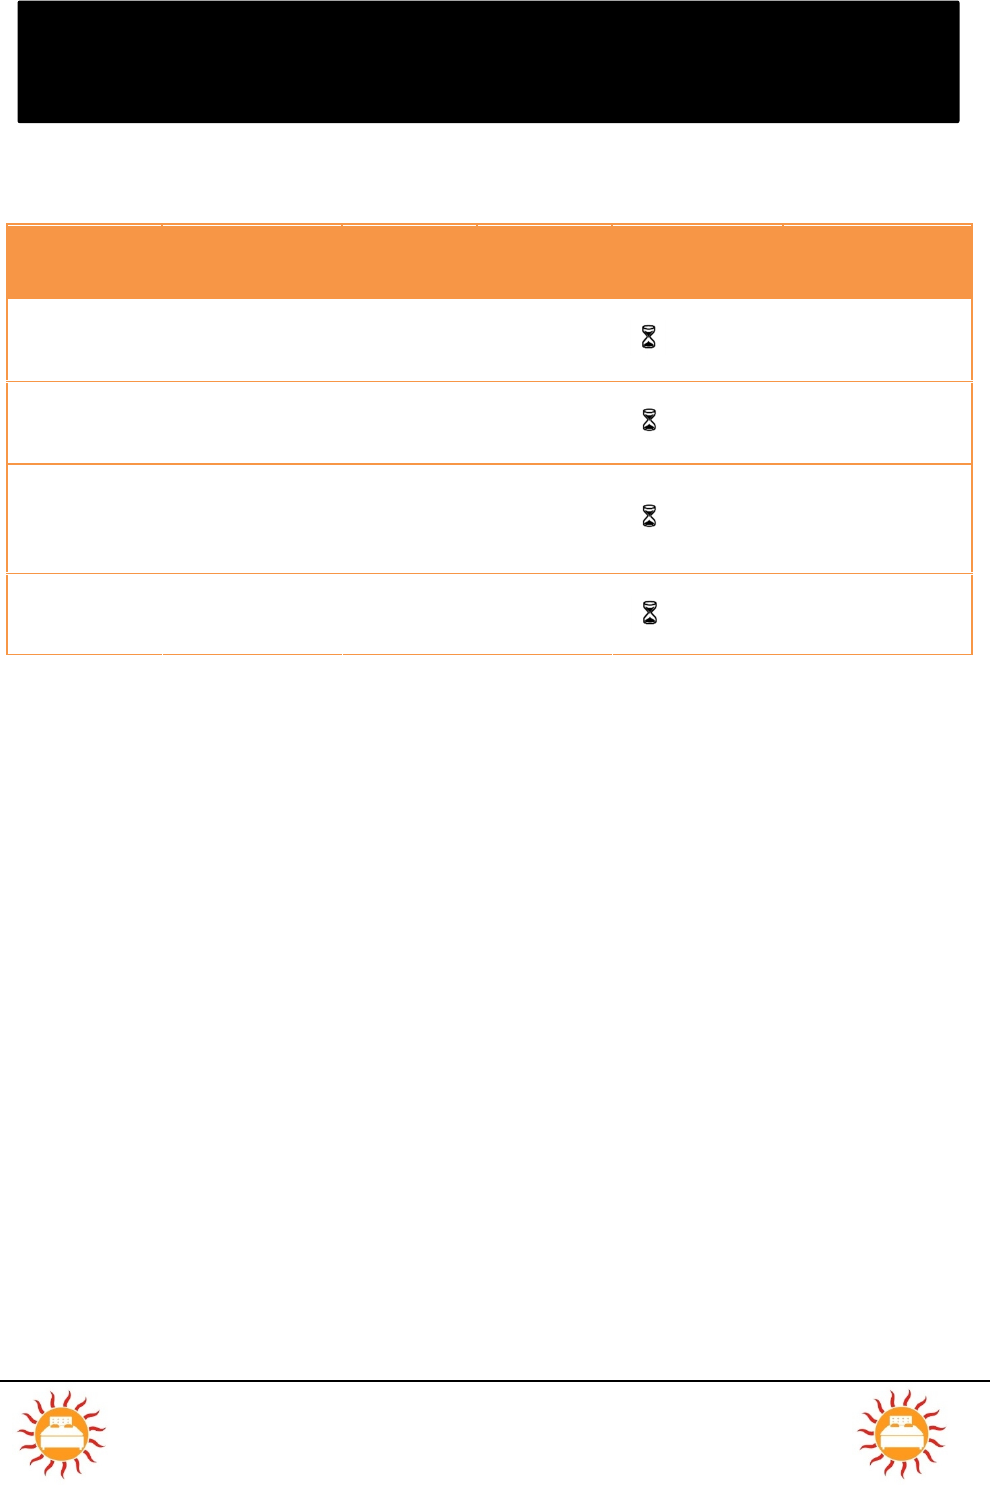
HELP – CAN’T FIT THE BEDJET UNDER THE BED?
For situations where the BedJet cannot fit under
the bed, we offer the vertical mount BedJet stand
that allows you tuck the BedJet neatly against the
foot of the bed, out of the way and taking up a
tiny 6.5” by 17” footprint. The accessory can be
ordered from bedjet.com:
HELP – POWER CORD ISN’T LONG ENOUGH?
For situations where the BedJet power cord cannot conveniently reach a power outlet, we
offer users a low cost 4-foot Air Hose extension, giving 8-feet total hose length. The Air Hose
extension will allow you to place the BedJet nearly anywhere under the bed or around the
bed to be closer to the power outlet. You can order the hose extension at www.bedjet.com
PLEASE EMAIL AT INFO@BEDJET.COM OR CALL US WITH ANY
INSTALLATION RELATED QUESTIONS. WE ARE HERE TO HELP!

USER MANUAL – MODELS 6002NA/V1/V2/ & 7002xx
QUESTIONS? EMAIL US AT INFO@BEDJET.COM OR CALL 401-404-5250
WE ARE HERE TO HELP – PLEASE CALL US FOR ADVICE!
Revision 1.6 www.bedjet.com P a g e | 18
BedJet Operating Modes
Note: Basic operating functions are supported by the standard wireless remote
control. Utilize the Bluetooth linked BedJet App from your smartphone or tablet
computer to unlock advanced features.
The BedJet main power switch (under the power cord) must be turned ON for the remote
control to function. Once the power switch is ON, the BedJet will beep once to indicate
successful boot-up of the internal microcontroller. The BedJet is now in standby mode.
Activate the BedJet by pressing the desired Turbo, Heat or Cool mode button on
the remote once. A single beep confirms an ON command.
Deactivate BedJet into standby by pressing the same mode button a second time. A double
beep confirms a mode OFF command.
While active in any given cooling/heating mode, pressing a different mode button will switch
cooling/heating modes without shutoff of the BedJet. The BedJet will beep once to indicate
the mode change. Please note when changing from heating to cooling mode it will take some
number of minutes for the air exhaust temperature to become cool.
Adjust the Air Flow using the “+” or “-“buttons on the remote to increase or decrease the Air
Flow to the bed. More Air Flow means more heating/cooling, less Air Flow means less
heating/cooling power. The BedJet will beep once for each increase/decrease. Each
increase/decrease increments 5% of allowable Air Flow range for each mode, thus pressing 20
times gets you from full power to lowest power for any given mode. Press and hold the
buttons for rapid increase or decrease.
Press the Auto-Shutoff Timer Advance button to increase the time left on the
Auto-Shutoff function above the default time settings (see table below).
Press the Mute button on remote control to silence all beeps. Press again to
reactivate beep acknowledgement of remote commands.
USER MANUAL – MODELS 6002NA/V1/V2/ & 7002xx
QUESTIONS? EMAIL US AT INFO@BEDJET.COM OR CALL 401-404-5250
WE ARE HERE TO HELP – PLEASE CALL US FOR ADVICE!
Revision 1.6 www.bedjet.com P a g e | 19
Operating Mode Summary& Auto-Shutoff Times
Remote Control
Mode
Air Flow
Adjustable Range
Specific to Mode
Air Output
Regulated
Temperature
Auto-Shutoff
Default Time
Auto-Shutoff
TimerRemote
Control Button
Max.Increased
Auto-Shutoff
Time
Turbo
(Heat)
Very High to
Moderate Air
109 °F
43 °C
5 minutes
+1 minutes
10 minutes
Heat
via wireless
remote
Moderate to
Very Low Air
104 °F
40°C
20 minutes
+20 minutes
1 hour @ >50% Air
2 hours @<50% Air
4 Hours @< 20% Air
Heat
via Bluetooth
smart remote
App*
Moderate to
Very Low Air
72 to 104 °F
29 to 40°C
20 minutes
+20 minutes
Up to 12 hours*
Cool
Moderate to
Very Low Air
Room
temperature
from floor
10 hours
+30 minutes
12 hours
*Please note 12-hour auto-shutoff operation on warming mode requires use of the BedJet
Bluetooth App on your smartphone or tablet
Cooling Mode Information & Tips for Better Enjoyment
Cooling mode has a default Auto-Shutoff time of 10 hours. The first press of the hourglass button
on the wireless remote will reduce the default Auto-Shutoff time to 30 minutes and then each
additional press of the hourglass button shall increase time by an additional 30 minutes.
The BedJet cools you via powered ventilation of fresh ambient temperature air directly into the
bed. This powered ventilation gently wicks away the body heat and body moisture that gets
trapped in the bed by your mattress and bed covers. This method of in-bed cooling has been
demonstrated by infra-red cameras to provide the most rapid removal of body heat and body
moisture from a bed of any product available on the market today.
BedJet cooling is not a replacement for zero air conditioning in extremely hot or humid bedroom
environments, but will enable reduced air conditioning thermostat settings to save money on
utility bills. Ambient bedroom air temperature must generally be below 79 °F (26 °C) for cooling
mode to be effective.
For night sweats, also try using the BedJet App to set the BedJet heat mode to its lowest
temperature settings. For most this will provide some cooling while also helping dry the bed.

USER MANUAL – MODELS 6002NA/V1/V2/ & 7002xx
QUESTIONS? EMAIL US AT INFO@BEDJET.COM OR CALL 401-404-5250
WE ARE HERE TO HELP – PLEASE CALL US FOR ADVICE!
Revision 1.6 www.bedjet.com P a g e | 20
HELP – FEET TOO COLD?
Try using Heat mode at the lowest temperature settings, starting at 72 degrees or more (using “Heat
Set” menu in App). This will provide gentler cooling. Try locating the Air Nozzle at different
locations around the bed. Try placing the Air Nozzle ABOVE your top sheet, and then placing
another top sheet or comforter over the Air Nozzle, creating a sandwich layer for the air to flow
above your body but not in your sleep layer. The very best solution if you experience cold feet is use
of the AirComforter. It dramatically improves the distribution of air away from your feet. Of course,
there are always socks….
HELP – DON’T LIKE FEELING THE AIR BLOWING UNDER THE COVERS?
Don’t locate the Air Nozzle to blow directly into your sleeping layer (under your top sheet). Use the
same solution as above, run the Air Nozzle above your top sheet instead of below it and make sure
you have another tightly knit layer of bedding above the Air Nozzle to guide the air through the
sandwiched layer. An even better solution is use of the AirComforter, which dramatically improves
distribution of the air and reduces the feeling of air movement.
HELP - COOLING FELT ONLY ON YOUR FEET AND NOT ON BODY?
The BedJet requires a good quality top sheet or comforter of generally 250 thread count or higher to
keep the cooling air trapped and circulating in the bed. This condition results from use a top sheet
that is not compatible with the BedJet, or use of no top sheet at all and just a loose knit blanket. At
100% airflow your bed should have nearly all of your bedding ballooning slightly off the bed and air
flow will be felt exiting at the very top of the bed from under the top sheet. You should be able to
feel the cooling air on your torso. If this is not occurring, then your top sheet is too breathable or
too low a thread count. Performance “cooling” sheets, highly breathable loose knit sheets, jersey
knit type sheets and blankets without any top sheet let all the air out at the bottom of the bed
before it can circulate to the top of bed properly. Solution: change top sheet types or utilize the
BedJet AirComforter.
Tips for Better Cooling Enjoyment
More Air Flow isn’t always cooler -- experiment with the full range of Air Flow to find the perfect
settings for your unique set of bedding.
Experiment with different Air Nozzle locations to see what works best for you
Expect the sheets to balloon up a bit on high airflows. If this bothersome, place a pillow half in
and half out of the sheets at the top of the bed. This will “unseal” your bedding from the air and
allow it to deflate back down.
For customers primarily interested in cooling performance, the AirComforter accessory is a
highly recommended BedJet add-on that improves the cooling mode performance significantly
Always place another layer of bedding over the AirComforter (blanket or comforter or quilt),
it performs better with some weight on it
USER MANUAL – MODELS 6002NA/V1/V2/ & 7002xx
QUESTIONS? EMAIL US AT INFO@BEDJET.COM OR CALL 401-404-5250
WE ARE HERE TO HELP – PLEASE CALL US FOR ADVICE!
Revision 1.6 www.bedjet.com P a g e | 21
Heating Mode Information & Tips for Better Enjoyment
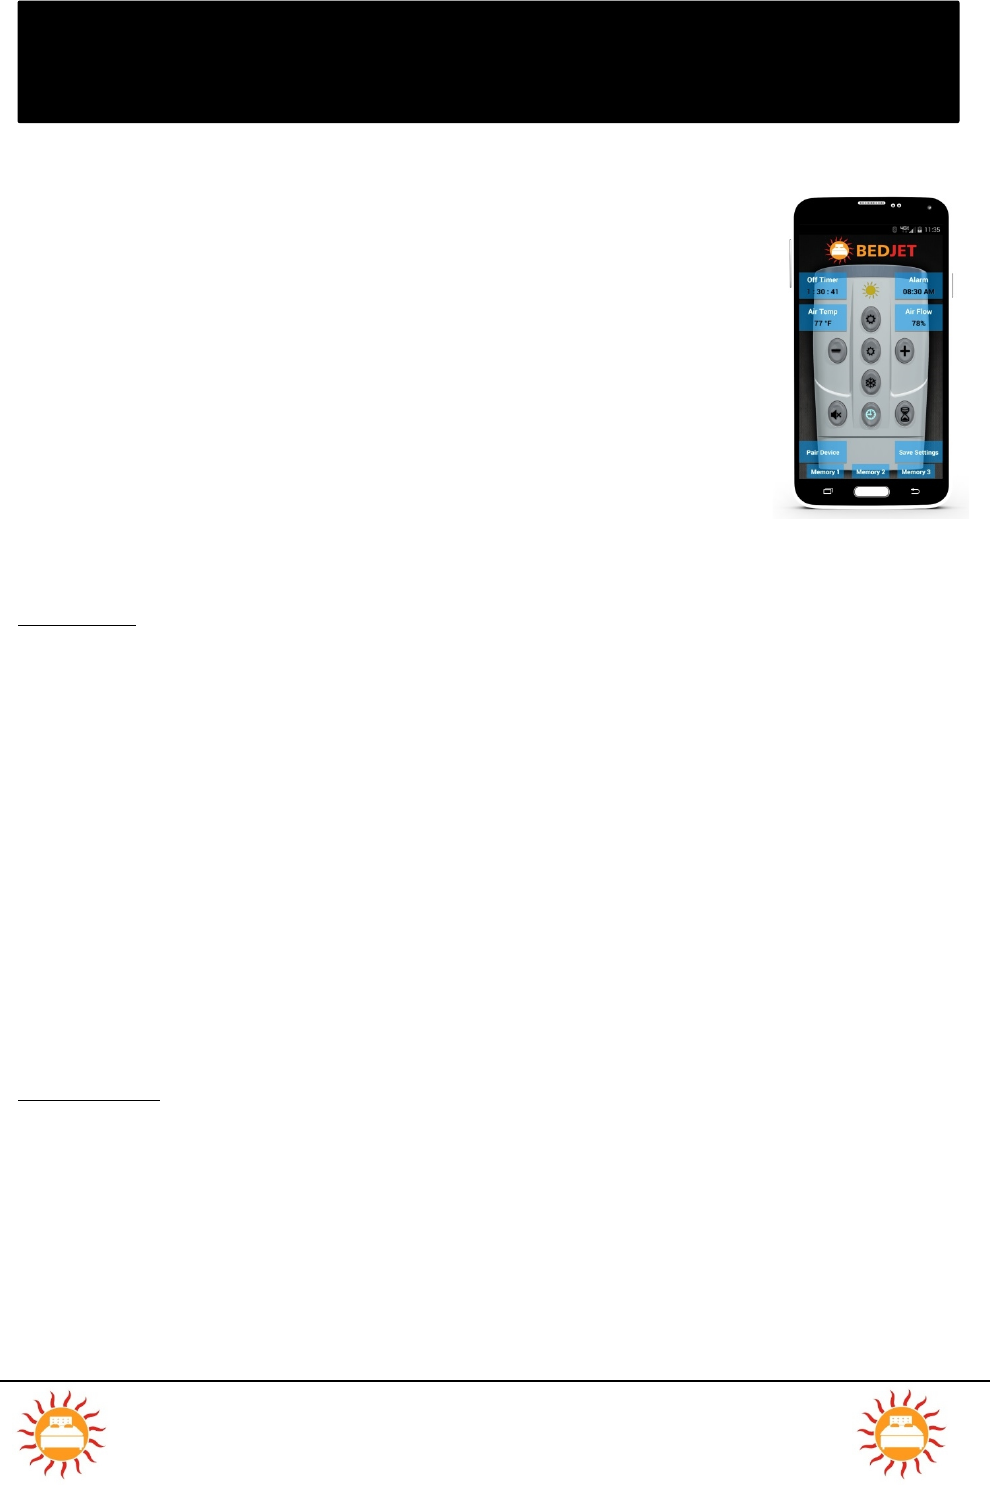
Basic heating mode functions are available via the wireless remote control.
Operation using only the wireless remote control is limited to 1 to 4 hours
continuous warming as a safety feature (depending on Air Flow setting, set
page 19). Utilize the Bluetooth smart remote App with a smartphone or
tablet to activate advanced features including:
Warming auto-shutoff time extension to 12 hours using lower
temperature settings
Customized warming air temperatures(72 to 104 °F)
Presets for night-sweat drying modes
See Bluetooth App instructions for more information.
Turbo Heat:
This mode is best used as a pre-heater for warming your bed very quickly before getting into bed,
or for single short bursts while in bed. Turbo Heat pumps the maximum amount o f heat into the
bed with the maximum amount of airflow and can warm the temperature of your bedding by up
to 30 °F (17°C) above ambient in just five minutes. This mode has a very short default Auto-
Shutoff time of 5 minutes, as the warmth generated and noise levels are too powerful for
extended use or comfortable sleeping. Each press of the hourglass button on the wireless
remote will extend Auto-Shutoff by 1 additional minute, to maximum of 10 minutes.
Do not continuously re-cycle the BedJet into Turbo-Heat mode while in bed.
Do not place body parts directly into or in front of Air Nozzle in TurboHeat mode
TURBO HEAT MODE IS SOFTWARE LIMITED TO 10 MINUTES OPERATION OUT OF EVERY
30 MINUTES. ATTEMPTS TO CONTINUE OPERATION BEYOND THIS LIMIT WILL CAUSE
AUDIBLE BEEPING AND BEDJET WILL DEFAULT TO REGULAR HEAT MODE.
Heat (Normal)
This mode is suitable for gentle warming over extended periods and can be used while sleeping.
This mode has a default Auto-Shutoff time of 20 minutes. Each press of the hourglass button on
the wireless remote will extend Auto-Shutoff by an additional 20 minutes, to a maximum of 1
hour. For Auto-Shutoff heating operation extended to a full 12 hours, you must use custom Heat
Set mode on Bluetooth App using your smartphone or tablet. The Bluetooth App is the only
method to operate the BedJet in an all-night 12 hour heating mode.
USER MANUAL – MODELS 6002NA/V1/V2/ & 7002xx
QUESTIONS? EMAIL US AT INFO@BEDJET.COM OR CALL 401-404-5250
WE ARE HERE TO HELP – PLEASE CALL US FOR ADVICE!
Revision 1.6 www.bedjet.com P a g e | 22
Tips for Better Warming Enjoyment:
1) Try using the Turbo-Heat mode as a pre-heater five to ten minutes before you get into bed.
Turbo-heat can make your bedding feel like it just came out of the dryer in only 3 minutes.
Get in with as few clothes on as you can and enjoy the cuddly warmth directly on your skin .
Don’t be shy and wiggle around, it feels great!
2) Hate getting out of a warm shower on cold winter days? Dry off briefly, or don’t dry off at all
– but in either case, run into the bed, turn on Turbo-Heat mode and enjoy the powerful dry
heating luxury. It’s like giant hair dryer for your whole body! Trust us on this one, it sounds
silly but it feels wonderful.
3) The highest settings of normal Heat will become too warm for most people after some period
of time in the bed. Experiment with lower settings and work your way up to what feels
comfortable.
4) Just like your home central HVAC forced air heat, the BedJet heating modes can lower the
local humidity in the bed. For individuals who suffer from dry itchy skin in the winter,
extended duration use of the BedJet heating while in bed may contribute to the dryness. Use
moisturizer (your partner will love your soft skin!) or better yet, use the BedJet as a toasty
pre-heater before getting in bed, or short burst heat when needed while in bed, rather than
for extended periods while you sleep. Sleep science says that you achieve deeper sleep by
not having long-duration external heat sources in the bed while trying to sleep.
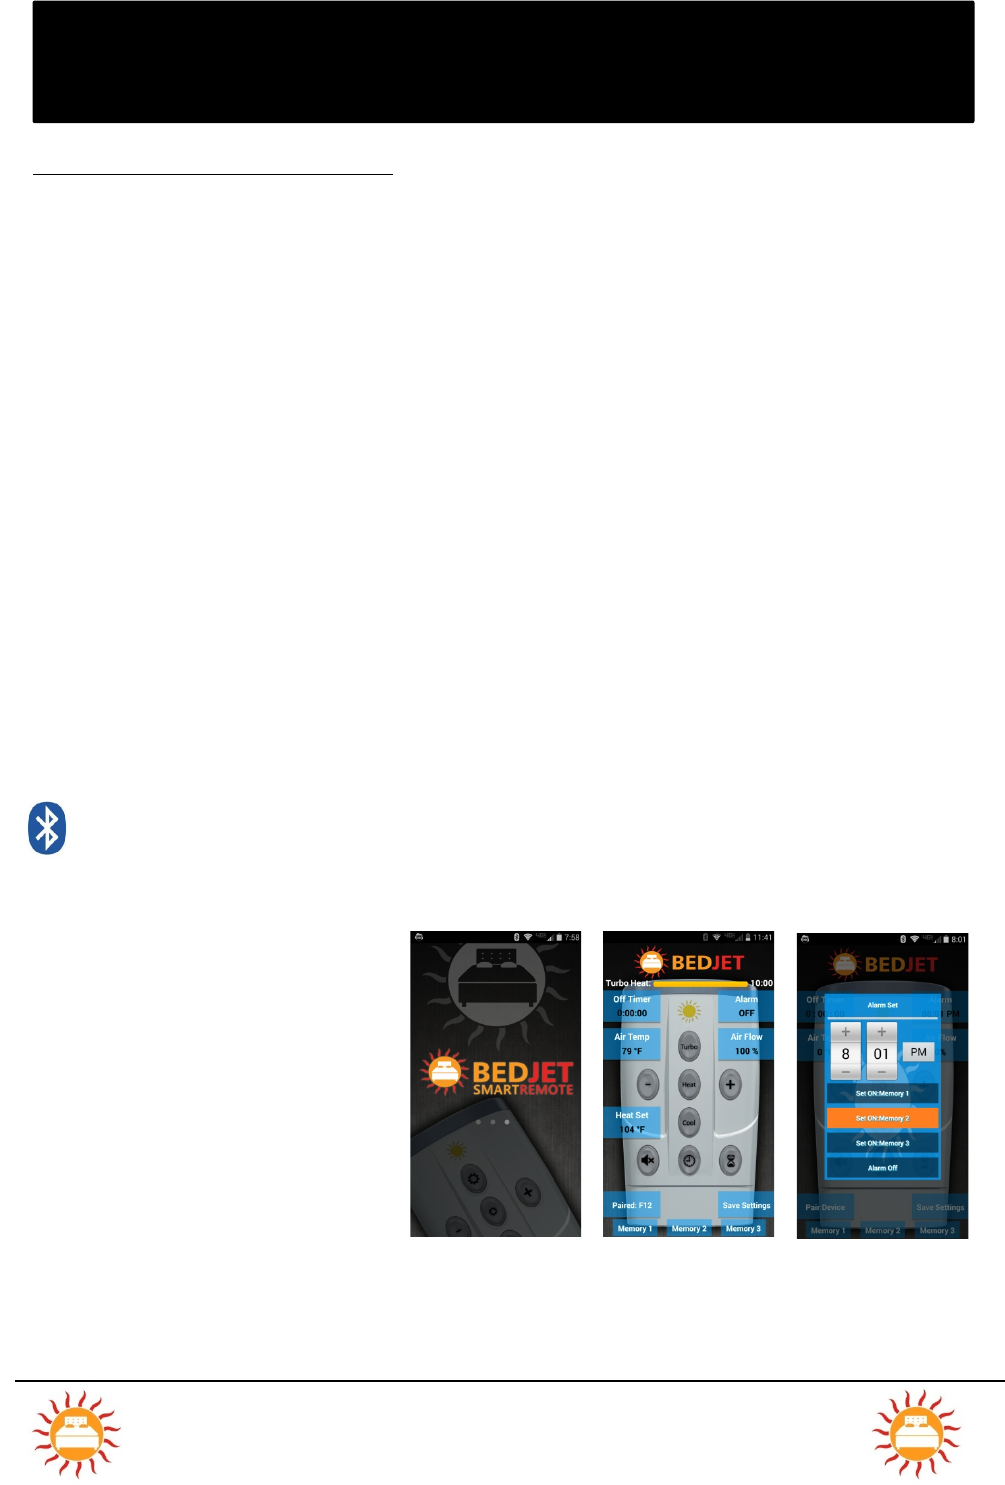
Bluetooth Smart Remote App: USE THE APP & UNLOCK ADVANCED
FUNCTIONS NOT AVAILABLE WITH STANDARD WIRELESS REMOTE
The BedJet comes standard with
integrated Bluetooth 4.0 for
connection to Android and iPhone
smart devices. The BedJet Smart
Remote App provides more intelligent
remote control capabilities than the
standard wireless remote. These
include one-touch memory functions,
a programmable turn-on time setting,
customizable heat temperatures and
extension of auto-shutoff heat mode times to a full 12 hours. You can even program the BedJet to
wake you up in the morning with a cool blast of air! Real time information is displayed on the App
on Air Flow power setting, Air Flow temperature, and time remaining to Auto-shutoff.
USER MANUAL – MODELS 6002NA/V1/V2/ & 7002xx
QUESTIONS? EMAIL US AT INFO@BEDJET.COM OR CALL 401-404-5250
WE ARE HERE TO HELP – PLEASE CALL US FOR ADVICE!
Revision 1.6 www.bedjet.com P a g e | 23
Android Instructions:
Download the BedJet App from the Google Play Store. Once the BedJet is powered on, run the
BedJet App and press the blue window on the bottom left of main screen that says “Pair”. On
following screen press Search, the local BedJet device should show up on the list. Press the
device ID and the pairing should begin. The Bluetooth symbol on the BedJet Status Display will
light once the Bluetooth link is active with your smart device.
iOS Instructions (iPhone, iPad, iPod Touch):
Download the BedJet App from the iTunes Store. Once the BedJet is powered on, run the BedJet
App and press the blue window on the bottom left of main screen that says “Pair”. On following
screen press Search, the local BedJet device should show up on the list. Press the device ID and
the pairing should begin. The Bluetooth symbol on the BedJet Status Display will light once the
Bluetooth link is active with your smart device. FOR APPLE PRODUCTS, BLUETOOTH PAIRING TO
THE BEDJET MUST BE DONE VIA THE BEDJET APP, THE BLUETOOTH CONNECTION WILL NOT
PAIR IF YOU TRY TO CONNECT THROUGH THE BLUETOOTH GENERAL CONTROL PANEL OF YOUR
APPLE SMARTPHONE OR TABLET.
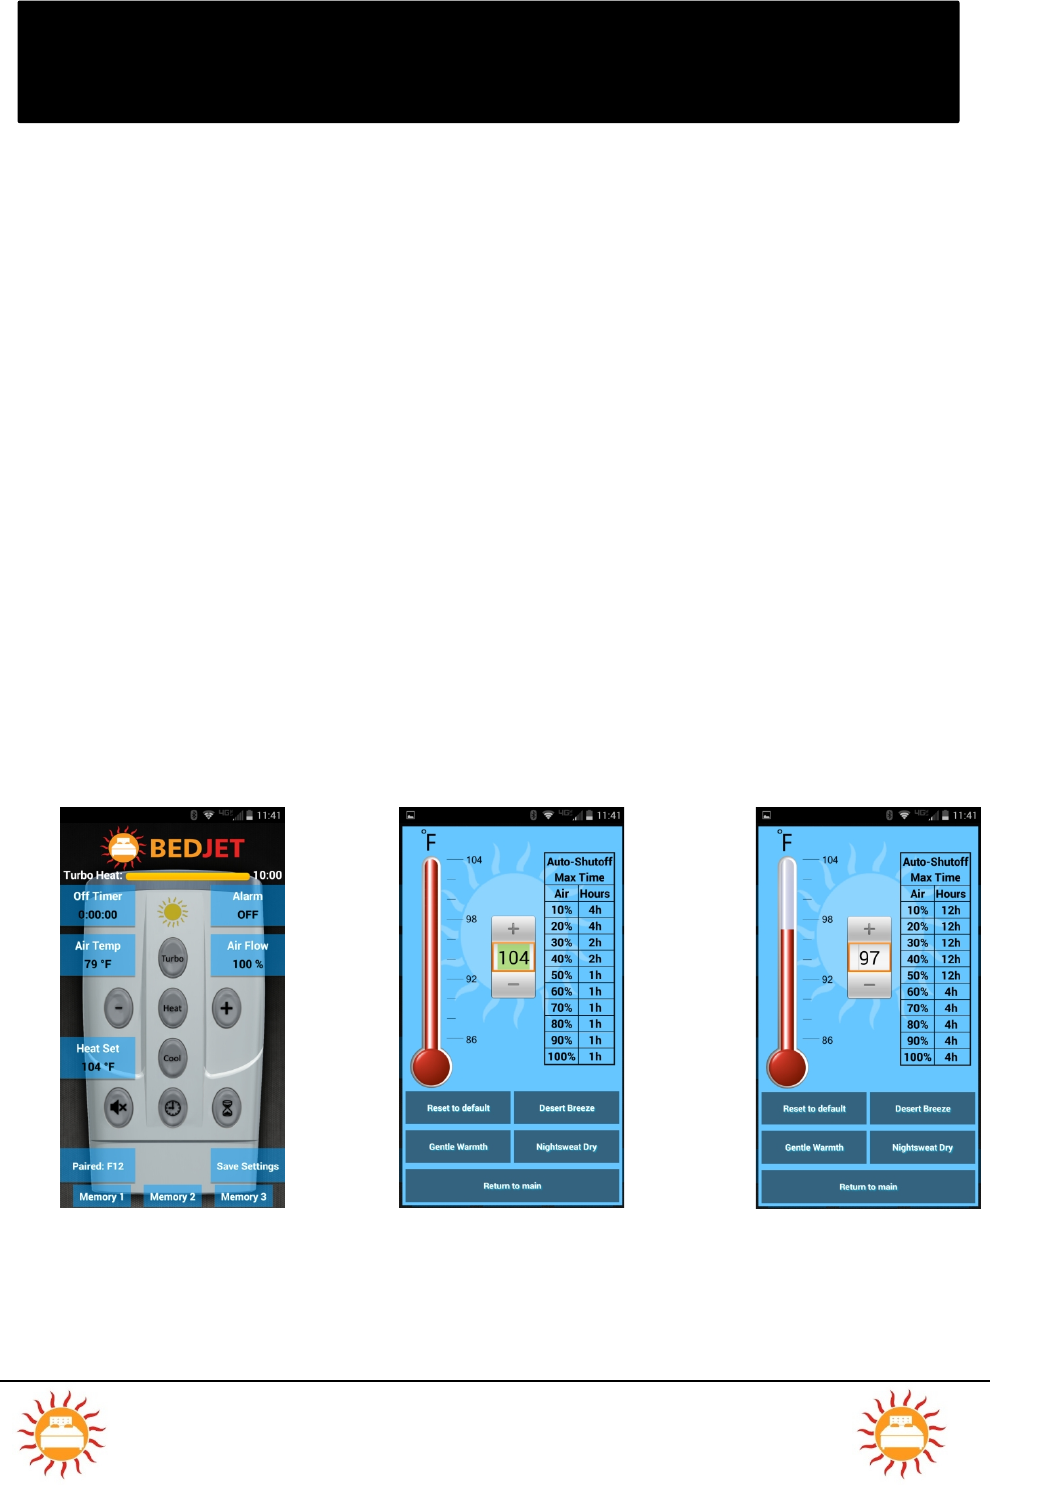
Accessing 12-Hour Auto-Shutoff Heating Time with the App:
1) Press “Heat Set” while
heat mode is on
1) Lower temperature
set point
3) Available auto-shutoff
times will increase in table
on left
set point
USER MANUAL – MODELS 6002NA/V1/V2/ & 7002xx
QUESTIONS? EMAIL US AT INFO@BEDJET.COM OR CALL 401-404-5250
WE ARE HERE TO HELP – PLEASE CALL US FOR ADVICE!
Revision 1.6 www.bedjet.com P a g e | 24
BedJet v2 Model
The BedJet v2 incorporates the same cooling and heating features as the standard BedJet, but
with upgraded intelligence and improved features accessed exclusively through the Bluetooth
smart device App. BedJet v2 models are labeled with an identifying v2 sticker. Additional
features include:
Programmable heating/cooling settings vs. time, allowing you to create custom sleep
temperature profiles over the course of the night and into the morning
Ambient bedroom temperature sensing and programmable actions based on room temp.
BedJet v2 operating firmware can be updated via smartphone link to keep your BedJet up to
date with the latest improvements.
Upon first paring, BedJet Bluetooth App will identify your BedJet as a v2 model and provide
instructions on how to utilize the biorhythm sleep temperature technology features.
Aromatherapy Accessory Kit
Optional aromatherapy diffuser kits are available for the
BedJet. These kits provide a convenient means for diffusing
essential oils into the air exhaust of the BedJet. The
aromatherapy kit consists of Qty. 8 essential oil diffuser strips
(1” x 3” long, black foam) and a spring clip for mounting the
diffuser strips inside of the BedJet air nozzle.
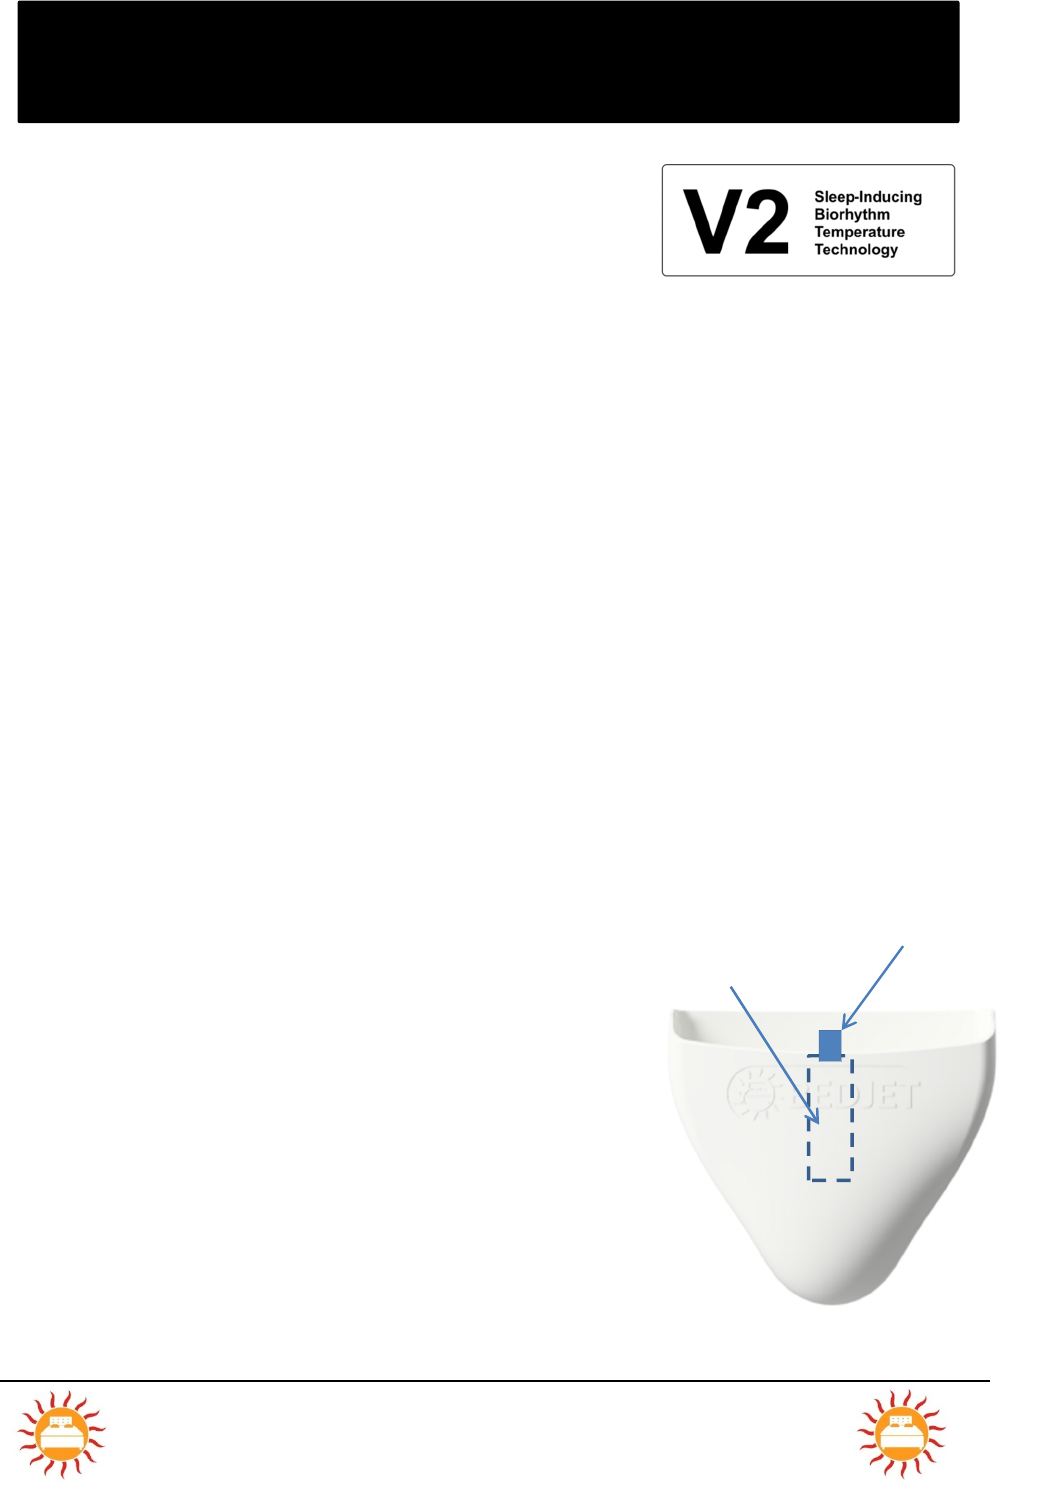
1) Place 3-5 drops of essential oil into the very middle of a 1
inch by 3 inch long foam diffuser strip. You can adjust
this to personal preference, but do not soak the strip.
2) Clip the diffuser strip to the inside of the air exhaust
nozzle per the diagram right (see dashed lines), using the
clip to clamp the strip to the top lip of the nozzle. The
diffuser strip should hang freely inside the nozzle.
3) Turn on BedJet air. Best essential oil diffusion
performance is achieved using warm air.
4) Use different diffuser strips for different essential oil
types. Strips can be washed with dish soap and reused.
While visible oil may remain in diffuser strip, essential
scents may be depleted and require re-application.
White spring clip
on top lip of
nozzle holds
strip in place
Foam diffuser
strip location,
clipped inside of
nozzle
USER MANUAL – MODELS 6002NA/V1/V2/ & 7002xx
QUESTIONS? EMAIL US AT INFO@BEDJET.COM OR CALL 401-404-5250
WE ARE HERE TO HELP – PLEASE CALL US FOR ADVICE!
Revision 1.6 www.bedjet.com P a g e | 25
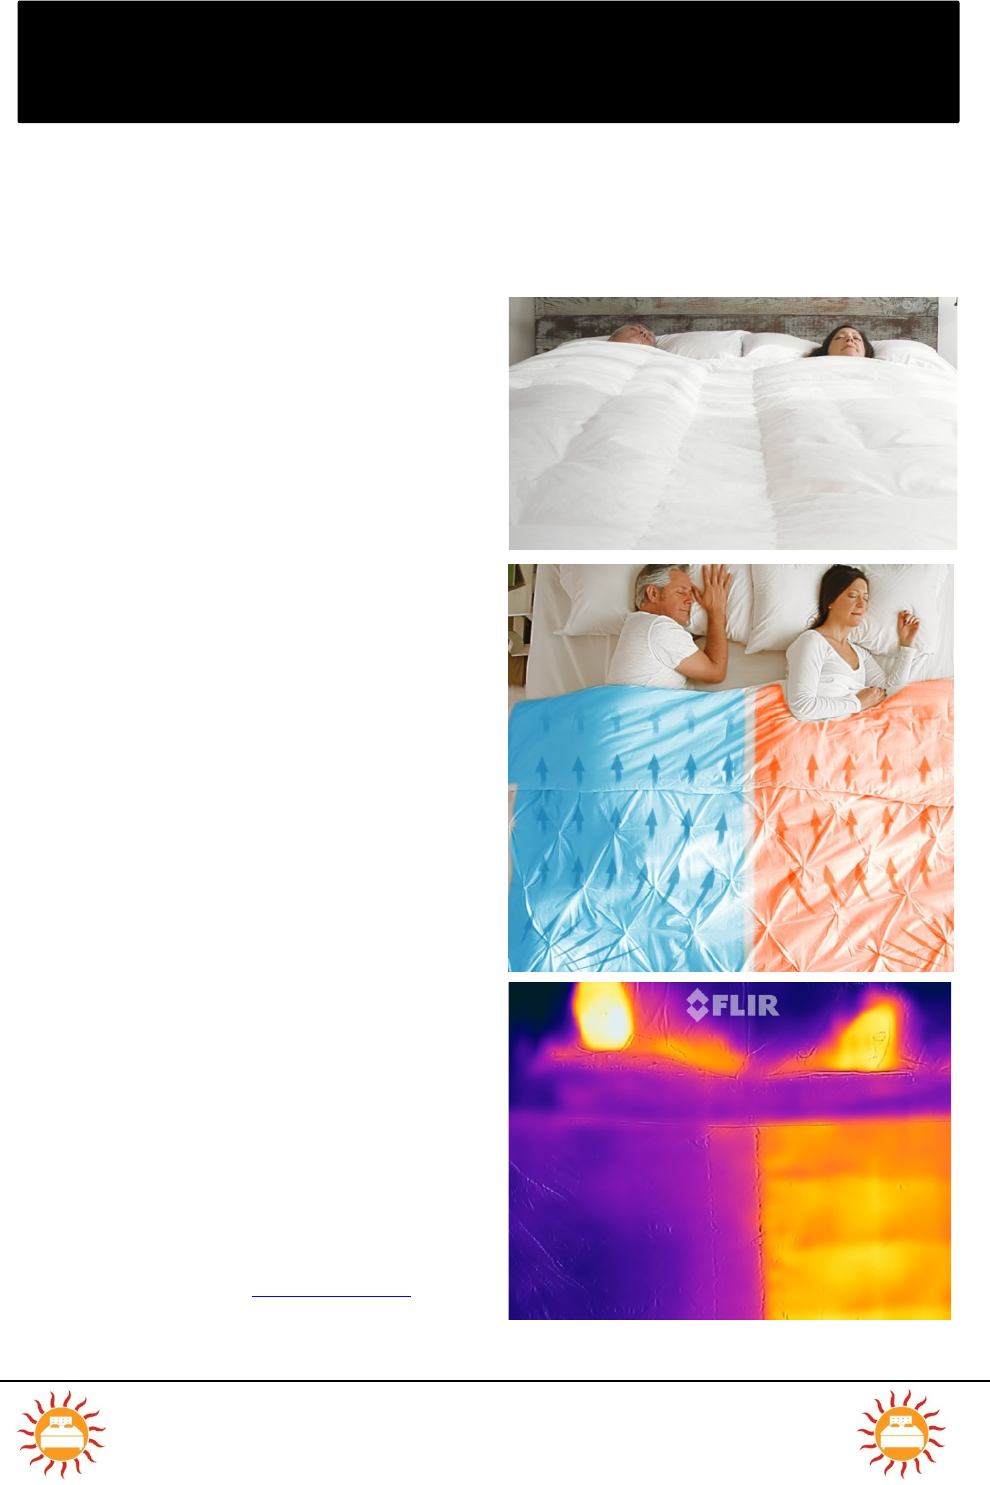
AirComforter Sheet + Dual Zone Temps
The AirComforter sheet (optional accessory)is a high
quality super-soft 100% cotton bedding layer for use
with one or two BedJet base units. The AirComforter
sheet contains two separate hollow cavities which
BedJet Air Nozzles plug into. Each hollow cavity
gently distributes the warming or cooling air to one
half of the bed. The AirComforter replaces your
normal bedding top sheet and works underneath
blankets, quilts, or regular comforters. Unlike
electric blankets, the BedJet is just pure, soft cotton
and can be washed over and over again.
When operating with a BedJet, the AirComforter
looks wonderfully puffy, luxurious and down filled,
but it’s actually only filled with conditioned air from
the BedJet, making it one of the softest and lightest
comforters ever created! The AirComforter sheet
can be used in the following configurations:
Single BedJet: One BedJet is installed on the bed
and the BedJet’s heating and cooling power is
directed to mostly that half of the bed. The
AirComforter cavity on the other side of the bed
receives no air and will look and feel just like an
ordinary top sheet. Significantly improves cooling
experience and performance.
Dual BedJets: Two BedJet units are used, one
installed on each side of the bed. Each BedJet can
be independently controlled to warm or cool each
side of the bed for very high temperature gradients
(see right).
The AirComforter can be purchased from retailers
carrying the BedJet, or at www.bedjet.com. The
AirComforter dramatically improves the
performance of the BedJet in cooling mode.

USER MANUAL – MODELS 6002NA/V1/V2/ & 7002xx
QUESTIONS? EMAIL US AT INFO@BEDJET.COM OR CALL 401-404-5250
WE ARE HERE TO HELP – PLEASE CALL US FOR ADVICE!
Revision 1.6 www.bedjet.com P a g e | 26
Specifications
The BedJet has been designed to operate as a safe extension of your bed. This product has been
rigorously tested by an accredited 3rdparty testing lab to be qualified as a safe electric appliance. The
BedJet complies with the following safety and product standards:
Underwriters Laboratories 962: Powered Furniture, Indirectly Heated & Cooled Beds (6002NA)
Underwriters Laboratories 499: Heating Appliances (6002NA)
Canada CSA Standard 22.2 No 64 (6002NA)
European CE and Australia SSA (Model 7002xx only)
This device complies with Part 15 of the FCC Rules. Operation is subject to the following two conditions:
(1) this device may not cause harmful interference, and (2) this device must accept any interference
received, including interference that may cause undesired operation.
This equipment has been tested and found to comply with the limits for a Class B digital device, pursuant to
Part 15 of the FCC Rules. These limits are designed to provide reasonable protection against harmful
interference in a residential installation. This equipment generates, uses and can radiate radio frequency
energy and, if not installed and used in accordance with the instructions, may cause harmful interference to
radio communications.
However, there is no guarantee that interference will not occur in a particular installation. If this equipment
does cause harmful interference to radio or television reception, which can be determined by turning the
equipment off and on, the user is encouraged to try to correct the interference by one or more of the
following measures:
Reorient or relocate the receiving antenna.
Increase the separation between the equipment and receiver.
Connect the equipment into an outlet on a circuit different from that to which the receiver is
connected.
Consult the dealer or an experienced radio/TV technician for help.
Warning: Changes or modifications to this unit not expressly approved by the party responsible for
compliance could void the user’s authority to operate the equipment.
This device complies with Industry Canada license-exempt RSS standard(s). Operation is subject to the
following two conditions: (1) this device may not cause interference, and (2) this device must accept any
interference, including interference that may cause undesired operation of the device.

USER MANUAL – MODELS 6002NA/V1/V2/ & 7002xx
QUESTIONS? EMAIL US AT INFO@BEDJET.COM OR CALL 401-404-5250
WE ARE HERE TO HELP – PLEASE CALL US FOR ADVICE!
Revision 1.6 www.bedjet.com P a g e | 27
Troubleshooting
Use this guide to address problems with your BedJet Product. If problems cannot be resolved, please
contact Customer Service at info@bedjet.com or +1.401.404.5250. Do not return any product requiring
service without first obtaining Return Authorization Number (RMA) and shipping instructions.
BedJet Audible Notifications – What does the BEEP mean?
Issue
Indication
Recommendation
1 Beep
BedJet switched on
Cooling/heating mode ON command
received from the remote control or App
Air Flow increase/decrease command
received from remote control or App
This is normal operation
2 Beeps
Cooling/heating mode OFF command
received from the remote control or App
This is normal operation
3 Beeps
Remote control learning/pairing function
has been successfully accomplished
This indicates successful learning/pairing
of a remote control to the BedJet
Remote control has not been learned if 3
beeps are not made
4 Beeps
User is over-cycling the Turbo-Heat mode
by running it more than 10 minutes out of
every 30 minutes. This over-cycling is
caused by turning the Turbo-Heat back on
over and over again after shutoff, or
constantly advancing the auto-shutoff
timer.
Follow the instructions on Turbo-Heat
mode. Stop trying to over-cycle this
setting. While the BedJet machine can
handle operating in this mode
continuously, over-cycling will not be
comfortable for a person in the bed due
to the very high levels of warming.
5 Beeps
A system monitoring error has occurred
The BedJet will be non-functional until
resolved
CHECK POWER LED FOR BLINKING LIGHT,
THE # OF BLINKS IN SEQUENCE WILL BE
AN ERROR CODE.
See diagnostic table below
Call BedJet technical support after
checking Power LED for blinking light
error code (count the blinks)

USER MANUAL – MODELS 6002NA/V1/V2/ & 7002xx
QUESTIONS? EMAIL US AT INFO@BEDJET.COM OR CALL 401-404-5250
WE ARE HERE TO HELP – PLEASE CALL US FOR ADVICE!
Revision 1.6 www.bedjet.com P a g e | 28
Diagnose & Fix
Issue
Possible Causes
Action
Every LED light on BedJet
blinking, OR FAN LED rolling
back and forth – BedJet not
operable
A firmware update was started
and not completed, the BedJet is
still waiting complete download of
new firmware.
Re-Connect to the BedJet using the
Bluetooth App and re-start the
firmware update
Remote control will not
operate BedJet
Dead battery in remote
Remote control has a unique code
identifier and may need to be re-
paired to your BedJet
Make sure remote control LED lights
when button pressed, if not then
replace battery
Re-pair remote control to BedJet
with learning function on page 11
Remote control commands are
not acknowledged with a beep
anymore
Beeper mute may have been
accidentally turned on
Press Mute button on remote
control to unmute beeper
BedJet keeps shutting off
without a shutoff command
being given or beep; BedJet
POWER LED is ON and NOT
flashing and BedJet can be
restarted normally.
This is normal. Once turned on,
every mode has an automatic
shutoff timer. Please see page 19
for these auto-shutoff time limits.
Shutoff Timer can be advanced
within certain limits using timer
advance button
BedJet Power LED is flashing,
all other LED lights are off and
unit will no longer operate,
BedJet beeps 5 times
The BedJet microprocessor has
discovered a monitoring error
within the system. This does not
always mean your BedJet is
malfunctioning and typically may
occur if you rapidly change modes
or airflow while at the same time
obstructing inlets or outlets.
The number of blinks the Power
LED shows is an error code
Shut the BedJet off for 10 seconds
and restart. If this does not solve
the problem, or if the problem
occurs again, contact BedJet support
and record the number of flashes
from the Power LED.
Check to make sure air filter is clean
and there are no air inlet or outlet
obstructions
UPDATE FIRMWARE ON V2 MODELS
BedJet Heat delivered warm air
but then while still in heat
mode is blowing cold air
In addition to real time
microprocessor control of the
heat, the BedJet contains multiple
mechanical thermal overheat
switches for your protection. They
are extremely sensitive and may
have disabled the heater unit.
They are self-resetting but remain
open until power is removed and
the unit is allowed to cool off.
They may have been triggered by
inlet or outlet blockages.
Switch off BedJet and unplug for 5
minutes. Plug back in, run on cool
mode for 1 minute and then attempt
to operate the heat mode. This will
help reset the thermal overheat
switch.
Check air filter to make sure it is
clean, make sure there are no inlet
or outlet obstructions
If this does not solve the issue,
contact BedJet support.
If the above solves the issue but the
problem repeats again later then
contact BedJet support

USER MANUAL – MODELS 6002NA/V1/V2/ & 7002xx
QUESTIONS? EMAIL US AT INFO@BEDJET.COM OR CALL 401-404-5250
WE ARE HERE TO HELP – PLEASE CALL US FOR ADVICE!
Revision 1.6 www.bedjet.com P a g e | 29
Diagnose & Fix Continued
Issue
Possible Causes
Action
BedJet is on but
cooling/heating or air flow not
felt in bed
Check to make sure Air Nozzle and
Air Hose are properly installed on
bed, they can shift and move over
time.
Check to make sure the
bedding/sheets are not bunched
up directly in front of Air Nozzle
Low quality top sheets with too
low thread count in sheets, or use
of jersey knit type loose knit top
sheet will allow air to escape
before spreading through entire
bed
Too heavy a blanket load
Adjust Air Nozzle and Hose so that
Air Nozzle extends at least 1 inch
onto the top of the mattress
Pull bedding/sheets flatter so they
can allow the air to flow through the
bed
Make sure top layer sheet or
comforter is used over Air nozzle and
is 250 thread count or higher
Use AirComforter accessory
DUAL ZONE AIRCOMFORTER
BedJet is on but it’s not cooling
or heating very well
Check to make sure Air Nozzle is
properly installed with
AirComforter, they can shift and
move over time.
Make sure AirComforter elastic
opening is fully installed around Air
Nozzle and pulled down as far on the
Air Hose as possible. The Air
Comforter elastic opening should be
reaching the sheet clamps.
BedJet cool mode is on, user
feels the air but is not
experiencing cooling
Room temperature needs to be
below 79 degrees F for cooling
mode to be effective
Air Flow setting may need
adjustment
Make sure room ambient air
temperature is below 79 degrees.
Adjust air flow up and down through
full range to see if cooling is
improved
BedJet is on heat mode but
after 1 minute operation Air
Flow feels only slightly warm
and not hot
Extreme cold ambient air
temperature and too high an Air
Flow setting
If the room air temperature is
extremely cold, the BedJet may not
be able to fully warm up the air at
very high air flow settings
Try turning down Air Flow and the
output air temperature should
increase to normal
If this does not correct the issue
then contact BedJet support

USER MANUAL – MODELS 6002NA/V1/V2/ & 7002xx
QUESTIONS? EMAIL US AT INFO@BEDJET.COM OR CALL 401-404-5250
WE ARE HERE TO HELP – PLEASE CALL US FOR ADVICE!
Revision 1.6 www.bedjet.com P a g e | 30
Warranty – North American Customers
BEDJET LLC gives to the original purchaser (“the purchaser”) of a new BedJet (“the product”) this limited express warranty
which covers any defects in materials or workmanship in the product under normal use. Except for this limited express
warranty and any implied warranties under applicable law, BEDJET LLC makes no express or implied representations or
warranties, either in this document or in any of its instruction manuals, product packaging, or other materials
accompanying or used in conjunction with sale or marketing of the product.
DURATION OF WARRANTY
This limited express warranty, and any implied warranties (including implied warranties of merchantability and fitness for a
particular purpose) on the product will be for two (2) years from the documented date of purchase, as noted below.
Coverage terminates if the purchaser sells, disposes of, or otherwise transfers the product.
1. During year one (1) following the documented date of purchase, BEDJET LLC will repair or replace any product or part(s)
that are defective in either materials or workmanship to include parts, labor, and delivery back to the purchaser at the
expense of BEDJET LLC. Delivery charges are covered under this warranty only for the continental United States.
2. During year two (2) following the documented date of purchase, BEDJET LLC will repair or replace any product or part(s)
that are defective in either materials or workmanship to include parts and labor at the expense of BEDJET LLC. Return
delivery and handling shall be billed to the purchaser. Payment for shipping and handling must be made at time of issuance
of Return Authorization Number.
EXCLUSIONS OF COVERAGE
This limited express warranty is conditioned upon proper use of the product by the purchaser. Any problem with the
product that is caused by abuse, misuse, and operation contrary to or inconsistent with the written instructions or an act of
God (such as a flood) is not covered. BEDJET LLC does not have any obligations if our inspection reveals that the product
has been altered, modified, damaged, subjected to or involved in an accident, disassembled, repaired or attempted to be
repaired by someone other than us, or used in a manner in consistent with its intended purpose.
Indirect, special, incidental or consequential damages (including any lost revenues, loss of use or lost profits) are not
recoverable under the warranty, or with respect to the sale or use of the product. In no event will our entire liability to you
exceed the purchase price actually paid by you for the product, or any defective portion thereof, whichever is less. This
limitation does not apply to any claims for personal injury. Also, because some states do not allow, or restrict, limitations of
incidental or consequential damages, some or all the foregoing may not apply to you
What Are Your Rights Under State Law and Other Considerations?
This warranty, and any unresolved claims and disputes between you and BEDJET LLC shall be governed by and subject to
the laws (exclusive of conflict-of-law provisions) of the State of Rhode Island, which shall also be the exclusive venue and
jurisdiction for all such claims and disputes. All claims against BEDJET LLC must be brought within three (3) months from
the time they arise. As some states do not allow, or restrict, limitations on how long an implied warranty lasts, some or all
of the foregoing may not apply to you. This warranty gives you specific legal rights, and you may also have other rights that
vary from state to state. Other than as expressly set forth above, BEDJET LLC does not authorize any agent or
representative to assume any obligation or liability here under. IF YOU DO NOT AGREE WITH THE ABOVE TERMS YOU MAY
RETURN YOUR PRODUCT FOR A FULL REFUND WITHIN 30 DAYS AFTER PURCHASE.