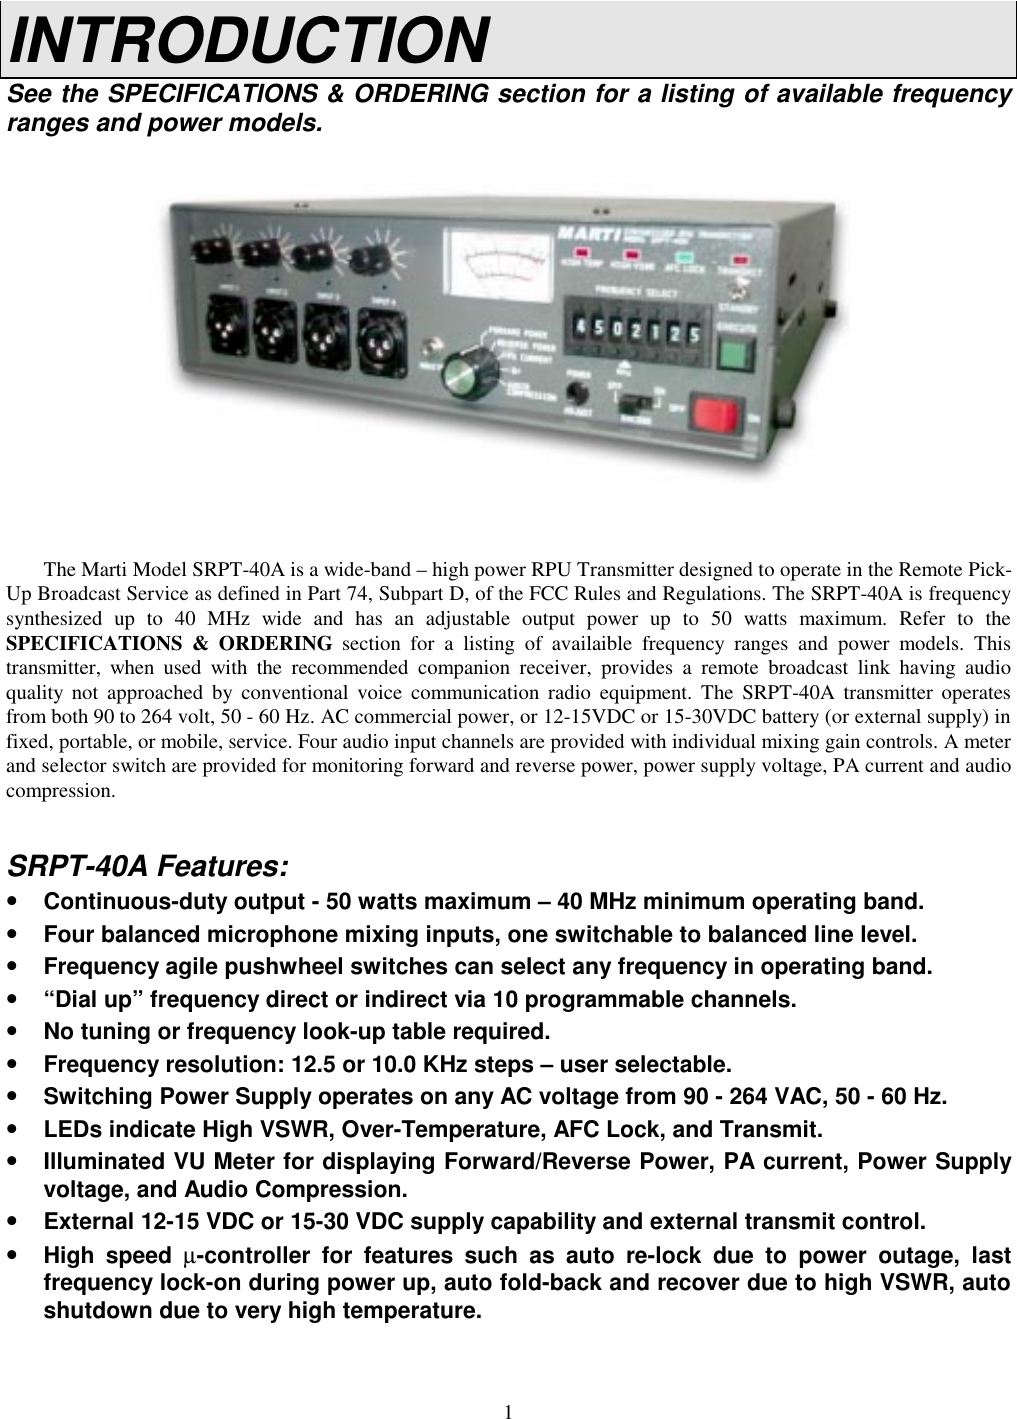
BEI Electronics RPU-60W-150S RPU Transmitter User Manual SRPT 40A

BEI Electronics, LLC RPU Transmitter SRPT 40A

MANUAL

MARTIELECTRONICSRPU TRANSMITTERMODEL SRPT-40A
iWARNINGTHIS EQUIPMENT MUST BE OPERATED WITH A 3-PRONGGROUNDED OUTLET RECEPTACLE.  FAILURE TO USE APROPERLY GROUNDED OUTLET MAY RESULT IN IMPROPEROPERATION OR SAFETY HAZARD!LIMITED WARRANTYThe Seller warrants that, at the time of shipment, the products manufactured by the Seller are free from defects inmaterial and workmanship. The Seller’s obligation under this warranty is limited to replacement or repair of suchproducts which are returned to Marti at its factory, transportation prepaid and properly insured, provided:a.  Notice of the claimed defect is given to Marti within one (1) year  [two (2) years for STL systems] from date oforiginal shipment and goods are returned in accordance with Marti instructions.b.  Equipment, accessories, tubes and batteries not manufactured by Marti are subject to only such adjustments asMarti may obtain from the supplier thereof.c. This warranty does not apply to equipment which has been altered, improperly handled, or damaged in any way.The Seller is in no event liable for consequential damages, installation cost or other costs of any nature as a result of theuse of the products manufactured or supplied by the Seller, whether used in accordance with instructions or not.This warranty is in lieu of all others, either expressed or implied. No representative is authorized to assume for the Sellerany other liability in connection with Seller’s products.MAILING & SHIPPING ADDRESS:Broadcast ElectronicsMARTI Electronics Division4100 North 24th StreetQuincy, IL 62301The United States of AmericaCOPYRIGHT NOTICE©2001 All Rights ReservedMarti Electronics1st printing, June 2001No part of this manual may be reproduced, transmitted, transcribed, stored in a retrieval system , or translated into anylanguage, natural or computer, in any form or by any means, without the prior written permission of Marti Electronics.
iiArtwork depicting circuitry in this manual is protected by copyright laws.Information in this manual is subject to change without notice and does not represent a commitment on the part of MartiElectronics.Marti Electronics may make improvements and/or changes in this manual or in the product described herein at any time.This product could include technical inaccuracies or typographical errors.PHONE NUMBERS:Sales (817) 645-9163Service (217) 224-9600FAX (817) 641-3869
iiiTABLE OF CONTENTSIntroduction ..........………................................................................................................. 1Specifications & Ordering................................................................................................. 2Unpacking and Inspection ................................................................................................. 4Installation ........................................................................................................................ 5Antennas ........................................................................................................................... 11Control & Connector Functions ………………………………………………………… 13Operation .......................................................................................................................... 18Theory of Operation .......................................................................................................... 25     Drawing 702-115 “SRPT-40A Functional Block Diagram”........................................ 28     Drawing 702-117 “SRPT-40A RF Systems & Control”............................................... 29Recommended Test Equipment ………………………………………………………… 30Tools For Alignment ……………………………………………………………………. 30SRPT-40A Transmitter Factory Test Report …………………………………………… 31Tune-up and Adjustments ……………………................................................................. 32     Drawing 702-116 “SRPT-40A Adjustment Locations”……………………………… 43     Drawing 702-114 “SRPT-40A Main Frame” .............................................................. 44SRPT-40A Bill of Material ……………........................................................................... 45SRPT-40A Schematics ………………........................................................................... 72
1INTRODUCTIONSee the SPECIFICATIONS & ORDERING section for a listing of available frequencyranges and power models.The Marti Model SRPT-40A is a wide-band – high power RPU Transmitter designed to operate in the Remote Pick-Up Broadcast Service as defined in Part 74, Subpart D, of the FCC Rules and Regulations. The SRPT-40A is frequencysynthesized up to 40 MHz wide and has an adjustable output power up to 50 watts maximum. Refer to theSPECIFICATIONS & ORDERING section for a listing of availaible frequency ranges and power models. Thistransmitter, when used with the recommended companion receiver, provides a remote broadcast link having audioquality not approached by conventional voice communication radio equipment. The SRPT-40A transmitter operatesfrom both 90 to 264 volt, 50 - 60 Hz. AC commercial power, or 12-15VDC or 15-30VDC battery (or external supply) infixed, portable, or mobile, service. Four audio input channels are provided with individual mixing gain controls. A meterand selector switch are provided for monitoring forward and reverse power, power supply voltage, PA current and audiocompression.SRPT-40A Features:•Continuous-duty output - 50 watts maximum – 40 MHz minimum operating band.•Four balanced microphone mixing inputs, one switchable to balanced line level.•Frequency agile pushwheel switches can select any frequency in operating band.•“Dial up” frequency direct or indirect via 10 programmable channels.•No tuning or frequency look-up table required.•Frequency resolution: 12.5 or 10.0 KHz steps – user selectable.•Switching Power Supply operates on any AC voltage from 90 - 264 VAC, 50 - 60 Hz.•LEDs indicate High VSWR, Over-Temperature, AFC Lock, and Transmit.•Illuminated VU Meter for displaying Forward/Reverse Power, PA current, Power Supplyvoltage, and Audio Compression.•External 12-15 VDC or 15-30 VDC supply capability and external transmit control.•High speed µ-controller for features such as auto re-lock due to power outage, lastfrequency lock-on during power up, auto fold-back and recover due to high VSWR, autoshutdown due to very high temperature.
2Model SRPT-40ARemote Pick-Up Broadcast TransmitterSPECIFICATIONS & ORDERINGFrequency Bands andMaximum Output Power: See ORDERING INFORMATION below.Frequency Resolution: 12.5 or 10.0 KHz steps (user selectable)RF Connector: Type N-FemaleOperating Temp. Range: -10 Cº to +45 CºModulation (Specify): 10KOF3E25KOF3E50KOF3EFCC Frequency Group PFCC Frequency Group K, L, N2FCC Frequency Group N1, ROr special orderPreselect StorageChannels: Can store and recall up to 10 frequency channels.Frequency Stability: Mobile:  .00025%Base:  .00025%Spurious Emissions: Less than 60 dBAudio inputs: Four balanced microphone (150 ohms) inputs (XLR-3) withmixing controls. One input switchable to balanced line levelat microphone #4 input and D connector on rear panel.Modulation Control: Broadcast-quality compressor/limiter built in.Encoding: Subaudible 27 Hz. tone encoder built in.Metering/Indicators: Illuminated meter indicates forward and reverse power, PAcurrent, B+, and audio compression. LEDs indicatetransmit, AFC lock, high VSWR, and temperature.Controls: (4) INPUT LEVEL, METER control knob, ENCODEswitch, FREQUENCY SELECT switches, EXECUTEswitch, POWER ADJUST pot, TRANSMIT switch, andMONITOR jack.Power Requirements: 90 to 264 VAC, 50/60 HzDC operation on 12 - 15 volts or 15 – 30 volts.Accessory Connector: 15-pin D connector for DC power, remote control, encode,line level input.
3Weight: Net 8 pounds.  Domestic packed 11 pounds.Net 3.63 kilograms.  Export packed 5.27 kilograms.Dimensions: 11.5 in. wide x 3.5 in. high x 13.3 in. deep.(29.21 cm. wide x 8.89 cm. high x 33.78 cm. deep.)Options available: For a complete listing see below.ORDERING INFORMATIONMARTI PART # Frequency Range(MHz) Maximum RFOutput Power(W)CertificationsSRPT-40A/450 435 - 475 50 FCC ID: DDE-RPU-50W-450S(FCC Part 74 Subpart D)NOTE: Other models will be available by 11/1/2001.Available OPTIONS for the SRPT-40A TransmitterMarti No. Description700-251 Mobile Mounting kit.585-141 12-15 VDC External Supply Cable585-142 15-30 VDC External Supply Cable585-139 12-15 VDC Mobile Repeat Cable, CR/AR-10 to SRPT-40A585-140 15-30 VDC Mobile Repeat Cable, CR/AR-10 to SRPT-40A585-143 Fixed Repeat Cable, CR/AR-10 to SRPT-40A700-253 Rack mounting kit.
4UNPACKING & INSPECTINGThis equipment was factory tested, inspected, packed, and delivered to the carrier with utmostcare. Do not accept shipment from carrier which shows damage or shortage until the carrier’s agentendorses a statement of the irregularity on the face of the carrier’s receipt. Without documentaryevidence, a claim cannot be filed.Unpack equipment immediately upon receipt and thoroughly inspect for concealed damage. Ifdamage is discovered, stop further unpacking and  request  immediate inspection by local agent ofcarrier. A written report of the agent’s findings, with his signature is necessary to support claim.Check your shipment against the shipping papers for possible shortage. Do not discard any packingmaterial until all items are accounted for. Small items are often thrown away with packing material.Packing material should be retained until equipment testing is completed. Any equipment returned tothe factory should be packed in original cartons, insured, and pre-paid.
5INSTALLATION  Install rack-mounted equipment in a well-ventilated, well-grounded, and shielded rack cabinet.Do not locate solid-state equipment in a rack above tube-type equipment which produces hightemperatures. It is highly recommended that if the equipment is mounted in a rack cabinet, a blowershould be installed in the cabinet as well.   Problems can also be avoided by locating this unit away from other equipment which hastransformers that produce strong magnetic fields. These fields can induce hum and noise into theMarti equipment thus reducing performance. Strong radio-frequency (RF) fields should be avoidedwhere possible. Extensive shielding and filtering have been incorporated into this equipment to permitoperation in moderate RF environments. All equipment racks, cabinets, etc., should be bondedtogether by wide copper grounding strap to ensure that all system elements are at RF ground poten-tial.Stationary Remote Broadcast InstallationThe basic stationary remote installation consists of the SRPT-40A transmitter, a 90-264 VAC power source, micro-phones and other audio program sources, and a portable antenna. Remotes using portable antennas inside buildings havevery limited range (typically less than one mile). If greater range is needed, consider locating the transmitting antennaoutside the building at a height necessary to provide a line-of-sight path to the receiving antenna. This may not bepractical if a great length of coaxial cable is required. Many broadcasters are using the Marti mobile relay system to doremotes from inside buildings. This system consists of the originating transmitter with its antenna inside the buildingwhich transmits to a “mobile relay” parked outside the building. The mobile relay consists of a Marti Model AR-10 re-ceiver and Marti RPT series transmitter with mobile  antennas installed in a vehicle. The AR-10 receiver picks up theencoded signal originating from the RPT series transmitter located inside the building, automatically turns on the relaytransmitter (on a different frequency), which re-transmits the program to the distant receiving antenna at the radio stationstudio or transmitter site. (Mobile relay equipment packages are available from Marti.)Stationary Remote Installation Procedure1. The transmitter is normally located near the announcer or engineer to permit access to gain controls, microphoneinputs, the monitor jack, and metering.Personnel must not be near the antenna when radiating. Locate antenna as far as possible frompeople and equipment susceptible to RF radiation. Do not mount antenna directly on transmitter.Refer to ANSI C95.1 “Limits on Non-Ionizing Radiation.”2. With the SRPT-40A TRANSMIT/STANDBY switch in “STANDBY” position, plug the transmitter into agrounded, three-prong, 90-264 volt, AC outlet.
6WARNINGTHIS EQUIPMENT MUST BE OPERATED WITH A 3-PRONG, GROUNDED, 90-264 VOLT, ACOUTLET RECEPTACLE!FAILURE TO USE A PROPERLY GROUNDED OUTLET COULD RESULT IN A SAFETY HAZARDOR FAULTY EQUIPMENT PERFORMANCE.IF AN EXTENSION CORD IS  USED, IT MUST BE THE THREE-WIRE GROUNDING TYPE TOINSURE SAFETY.WARNINGDO NOT CUT OFF THE GROUND PIN OF A 3-PRONG PLUG!EXCESSIVELY LONG EXTENSION CORDS SHOULD BE AVOIDED SINCE THE VOLTAGE DROPCAN DEGRADE EQUIPMENT PERFORMANCE.DO NOT ALLOW THE SRPT-40A TO GET WET.DO NOT OPERATE WHERE PERSONNEL TOUCHING THE TRANSMITTER (OR ITSMICROPHONE, ANTENNA, OR OTHER CONNECTED EQUIPMENT) ARE STANDING ON WETGROUND OR CONCRETE.3. For locations where AC power is not available, the SRPT-40A can be powered from a fully charged automobilebattery. The SRPT-40A draws eight (8) amps at 12.6 volts DC and at 50 Watts.4. Connect a portable antenna such as the Marti PAV/150, PAV-450, or YC-450 to the ANTENNA connector on theback of the transmitter.Mobile InstallationThe SRPT-40A transmitter can be installed in the vehicle where the TRANSMIT/STANDBY function can beoperated directly, or the transmitter can be located elsewhere (in the trunk of a car or rear of a van) and controlledremotely. The choice depends upon the type of vehicle and the type of operation anticipated. The antenna(s) are usuallymounted on top of the vehicle to provide maximum height.Transmitter Mounting1. Locate transmitter where vent holes on top and rear of unit are not obstructed. Leave enough space for the mic. plugon the front panel and the accessory plug on rear of unit.2. Hook the four mounting fasteners (in retracted position in the four slots on the sides of the transmitter. See Fig. 1.(Fasteners are in Mobile Mounting Kit, 700-251).3. Mark the location of the two mounting holes in each fastener bracket. Drill 7/64” diameter holes into the mountingsurface at the marked places for #6 x 1/2” sheet metal screws.4. Attach the mounting fasteners with the sheet metal screws provided. Secure the transmitter with the fasteners.
7Receiver MountingFor mobile repeat using the Marti AR-10 Mobile Repeat Receiver, mount the receiver near the transmitter using thethree fasteners supplied in Mobile Mounting Kit, 700-251.SRPT-40A and RPT-30Mobile Remote ControlRemote control of the SRPT-40A transmitter requires a switch to control primary 12-15 VDC power (or 15-30VDC) and a second switch to control the transmit function. The primary 12-15 VDC (or 15-30 VDC) controlrequirement can be met by tapping the ignition switch circuitry of the vehicle. The “transmit” function can be performedby installing a switch on the vehicle.FIG. 2A and 2B show the electrical circuit of a mobile installation for 12-15 VDC (585-141) and 15-30 VDC (585-142), respectively.Mobile RepeatMobile repeat operation is covered under Stationary Remote Broadcast Installation. Electrical connection for a12-15 Volt supply is made through Mobile Repeat Cable No. 585-139. This cable is connected between the SRPT-40Atransmitter and AR/CR-10 receiver. Power is obtained by connecting the fused RED wire to the 15-30 VDC battery orsupply. The supply must be capable of delivering 10 Amps minimum. The electrical diagram of this cable is shown inFIG. 3A.Electrical connection for a 15-30 Volt supply is made through Mobile Repeat Cable No. 585-140. This cable isconnected between the SRPT-40A transmitter and AR/CR-10 receiver. Power is obtained by connecting the fused BLUEwire to the vehicle 15-30 VDC battery or supply. The supply must be capable of delivering 10 Amps minimum. Theelectrical diagram of this cable is shown in FIG. 3B.Mobile Antenna InstallationOne or more mobile antennas are required depending upon the various receive and transmit frequencies and whetherantenna duplexing is used. Antennas are specified in the various system packages listed in the Marti literature. Theinstaller should follow the instructions supplied with the mobile antennas.
8
9
10Fixed Base Station and Repeater Installation1. Install transmitter in standard rack by using Rack Mounting Kit No. 700-253 available from Marti.CAUTIONALLOW ONE PANEL SPACE ABOVE AND BELOW TRANSMITTER FOR INLET AIR-FLOW TOINTERNAL FAN.2. Connect transmitting antenna to ANTENNA connector on SRPT-40A rear panel.3. Plug transmitter into a 3-prong, grounded 90-264 volt, AC outlet.WARNINGFAILURE TO USE A PROPERLY GROUNDED OUTLET COULD RESULT IN A SAFETY HAZARDOR FAULTY EQUIPMENT PERFORMANCE.4. For fixed automatic repeater operation, connect Cable No. 585-143 (FIG. 4.) between accessory connectors of thereceiver and SRPT-40A transmitter. Connect receiving antenna to receiver J6 and transmit antenna to SRPT-40AANTENNA connector.
11ANTENNASBASE STATION ANTENNA INSTALLATION CHECKLISTThe following suggestions are offered to help those responsible for antenna installations avoidcostly errors in assembly and adjustment.  Marti Electronics assumes no responsibility for theinstallation and performance of antenna systems associated with its equipment. The followingsuggestions are not intended to be a complete step-by-step procedure, simply a listing of some of themost frequently reported errors in antenna system installation.Antenna AssemblyFollow the manufacturer’s instructions carefully.  If no instructions were included with the antenna, call or write theantenna manufacturer for instructions.   Antennas which have phasing or stacking cables must be assembled carefully toavoid phase reversal or signal cancellation.Transmission Line Connector AssemblyDo not use RG-58 U or RG-8 U cable for STL station antennas!  They have too much loss at VHF and UHFfrequencies.  Follow the instructions furnished by the manufacturer when cutting coaxial cable.  Inspect the cable endsfor small metal fragments which can short-circuit the line inside the connector assembly.  Check the line for a short-circuit condition after each connector is installed by using an ohmmeter.  Pressurized line should be checked for severaldays under pressure before installation on a tower to ensure that there are no leaks in the line or fittings.Moisture Proofing Coax Connectors and FittingsExtreme care must be exercised with coaxial cable before and after connectors have been installed to ensure thatmoisture does not enter the line.  Foam dielectric line can take on moisture absorption which is difficult to detect andremedy.  Therefore, keep the line dry while in storage with ends tightly capped. Coaxial splices, connectors, and fittings,to be located outside should be made mechanically tight, then coated with a weather-proofing material over at least twolayers of vinyl plastic electrical tape. Moisture problems in antenna systems are usually traced back to connectors whichhave NOT been properly taped. The Marti K-1 Grounding and Weatherproofing Kit is recommended for use in eachnew antenna installation.Location and Grounding of Coaxial CableKeep the RPU receiver coaxial cable as far from the broadcast transmitter and its coaxial cable as possible.WARNINGDO NOT STRAP RECEIVER CABLE TO THE MAIN ANTENNA CABLE AT ANY POINT.PLACE THE RECEIVER ANTENNA COAXIAL CABLE ON THE OPPOSITE SIDE OF THE TOWERFROM THE MAIN ANTENNA CABLE.Maintain maximum separation between these cables at all points, including the distance from tower base to transmitterbuilding as well as inside the building.
12System GroundingIt is essential that the RPU antenna system be properly grounded for safety and proper operation.Antenna Installation and AdjustmentThe polarization of the transmit and receive antennas of the RPU system must be the same! This means that if thetransmitting antenna is vertical, the receiving antenna must also be vertical.  Each antenna should be attached to thetower using the proper side mount or top mount hardware. If an RF wattmeter is available, each antenna andtransmission line can be checked for VSWR when the transmitter is supplying power to it.  The VSWR should be lessthan 1.5 to 1 (1.5:1).If the antenna system fails to give the predicted signal strength level, the followingitems should be checked:1. Check for correct assembly of antenna.2. Check that antennas have same polarity.3. Check VSWR of both transmit and receive antennas. VSWR should be less that 1.5:1.4. Check for obstructions in the path such as trees and man-made structures.  The base antenna must be high enough toprovide  a line-of-sight path to the remote transmitting antenna.CAUTION & WARNINGYOU CAN BE KILLED IF AN ANTENNA COMES IN CONTACT WITH ELECTRIC POWER LINESOR EXPOSED ELECTRICAL WIRING.FOR YOUR SAFETY, USE EXTREME CAUTION WHEN IN-STALLING ANTENNAS.KEEP AWAY FROM POWER LINES.
13CONTROL & CONNECTORFUNCTIONSACCESSORY Input ConnectorAudio Input:When Input 4 is switched to “HI” level, audio can be fed into pins 4 and 5 of the ACCESSORY connector on therear of the transmitter. Input level should be between 0.2 volts to 2.0 volts rms. The output impedance of the deviceconnected to Input 4 should be 8 - 600 ohms. For unbalanced operation ground pin 5 to pin 1, 8, 11, or 12 and connectaudio to pin 4. Use standard 15-pin “subminiature D” female connector with cover.Transmit Control:“TRANSMIT” control can be accomplished remotely by a switch circuit connected between pin 15 and one of theavailable ground pins (pin 1, 8, 11, or 12).External DC supply:The SRPT-40A can be powered externally by either a 12-15 Volt DC supply or a 15-30 Volt supply. If powered offa 12-15 Volt supply, connect three positive leads of the supply to pins 6, 7, and 14. Connect three negative leads of thesupply to three of the four ground pins (pins 1, 8, 11, and 12).  Each of the three positive leads and each of the threenegative leads should be an 18 gauge wire.ATTENTIONFOR 12-15 VOLT EXTERNAL SUPPLY, THE OPTIMUM VOLTAGE IS FROM 13.5 TO 14.5 VOLTS.APPLYING A VOLTAGE LOWER THAN 13.5, COULD LIMIT THE MAXIMUM RF OUTPUT POWERAND/OR LIMIT THE OVERALL FREQUENCY RANGE.If powered off a 15-30 Volt supply, connect four positive leads of the supply to the four 15-30VDC pins (pins 2, 3,9, and 10). Connect four negative leads of the supply to the four ground pins (pins 1, 8, 11, and 12).  Each of the fourpositive leads and each of the four negative leads should be an 18 gauge wire.ATTENTIONFOR 15-30 VOLT EXTERNAL SUPPLY, IF APPLYING A VOLTAGE LESS THAN 16 VDC, THESRPT-40A INTERNAL B+ SHOULD BE ADJUSTED NO MORE THAN 12 VDC.IF THIS IS THE CASE, THE MAXIMUM RF OUTPUT POWER AND/OR THE OVERALLFREQUENCY RANGE COULD BE LIMITED.
14CAUTION & WARNINGNEVER INSTALL AND CONNECT THE 12-15 VOLT AND THE 15-30 VOLT SUPPLIES AT THESAME TIME.ALSO, NEVER CONNECT THE 15-30 VOLT SUPPLY TO THE 12-15 VOLT PINS AND NEVERCONNECT THE 12-15 VOLT SUPPLY TO THE 15-30 VOLT PINS.DOING SO MAY DAMAGE THE INTERNAL SWITCHING SUPPLY OR EITHER OF THEEXTERNAL DC SUPPLIES.CAUTION & WARNINGNEVER CONNECT THE SRPT-40A TO THE AC LINE AND EITHER OF THE EXTERNAL DCSUPPLIES AT THE SAME TIME.DOING SO MAY DAMAGE THE INTERNAL SWITCHING SUPPLY OR THE EXTERNAL DCSUPPLY.AC LINE Switch, AC Receptacle & FuseWhen the transmitter is not in use or if the SRPT-40A is to run off of an external supply, the AC LINE switchshould be in the “OFF” position.When ready to use the SRPT-40A off of the AC line voltage, plug power cord into the AC Receptacle and switchthe AC LINE switch to the “ON” position.The AC line fuse is rated at 2.5 amps.AFC LOCK LEDThe AFC LOCK LED will either be flashing or solid green at all times, except during initial power up – and in thatcase it will only be off for a few seconds.When the SYNTHESIZER is searching for a frequency to lock on to and is therefore not locked, the AFC LOCKLED will flash green. When the SYNTHESIZER finds and locks onto the frequency it was searching for, the AFCLOCK LED will stay on, solid green. Three seconds after the SYNTHESIZER becomes locked, it will then be ready andwill enable the transmitter to output power.In normal conditions, the SYNTHESIZER will not come “unlocked” unless sent a command to change to change toa new frequency. However, other conditions can cause the SYNTHESIZER to come unlocked such as an AC line surgeor a sudden and very large change in VSWR. In those cases, the SYNTHESIZER will re-lock back on the assignedfrequency. The AFC LOCK LED will flash green until the SYNTHESIZER is locked. Once the SYNTHESIZER islocked it will stay on, solid green.
15ANTENNA ConnectorConnection of various antenna systems is covered under INSTALLATION and ANTENNAS. It is only necessaryfor the operator or announcer to see that the ANTENNA connector is tight and that the antenna is clear of objects whichmay affect its radiation efficiency.CAUTION & WARNINGNEVER INSTALL AND CONNECT THE 12-15 VOLT AND THE 15-30 VOLT SUPPLIES AT THESAME TIME.ALSO, NEVER CONNECT THE 15-30 VOLT SUPPLY TO THE 12-15 VOLT PINS AND NEVERCONNECT THE 12-15 VOLT SUPPLY TO THE 15-30 VOLT PINS.DOING SO MAY DAMAGE THE INTERNAL SWITCHING SUPPLY OR EITHER OF THEEXTERNAL DC SUPPLIES.ENCODE SwitchThe internal subaudible encoder can be switched “ON” or “OFF” by the front panel switch. Encoding is used toactivate a repeater station, tape recorder, etc.FREQUENCY SELECT Pushwheel Switches and EXECUTE SwitchDial in the numbers that represent a frequency, channel number, or other command using the FREQUENCYSELECT Pushwheel switches. Then press and release the EXECUTE switch to “send” the command numbers on theFREQUENCY SELECT pushwheel switches to the internal controller to be decoded and executed. See theOPERATION section for a listing and understanding of all commands.AUDIO GAIN ControlsThe GAIN potentiometer located above each input connector provides an independent level adjustment for thatinput. Each GAIN potentiometer is adjusted as follows:1. Connect input source at normal audio level.2. Turn GAIN potentiometer to maximum counter-clockwise (“OFF”) position.3. Place TRANSMIT/STANDBY switch in “STANDBY” position and allow METER pointer to reach 0 VU. Slowlyincrease gain (clockwise) until METER begins deflecting to the left on audio peaks. Maximum deflection should be-3 to -5 VU on the METER scale. This indicates 100% modulation of the transmitter. Excessive gain settings causehigh compression values which result in annoying increase in background noise. A 600 ohm headset may beplugged into the MONITOR jack to aid in arriving at the proper gain adjustment. In high noise environments, close-talk the microphone and reduce MIC gain until a maximum of -2 VU gain-reduction is indicated.4. Once the proper gain level is determined, it will not be necessary to change it for that particular microphone or tapeplayer. The broadcast quality compressor/limited built into the unit will maintain modulation at the maximum levelwhile preventing overmodulation.HIGH TEMP LEDWhen the internal controller detects a PA temperature between 65 and 90 degrees C, the HIGH TEMP LED willflash red at a rate of once per second.
16When the internal controller detects a PA temperature of greater than 90 degrees C, the RF output power willcompletely shutdown, and the HIGH TEMP LED will flash red at a rate of twice a second. The RF output power willstay shutdown until the PA temperature has dropped below 65 degrees C. When the internal controller detects that thePA temperature is below 65 degrees C, it will turn off the HIGH TEMP LED and then enable the PA to transmit power.A HIGH TEMP alarm could be due to the fan malfunctioning, the SRPT-40A placed in a closed-in area with limitedair circulation, or an experience of high VSWR.HIGH VSWR LEDWhen the internal controller detects a VSWR of greater than 2 but less than 4, the HIGH VSWR LED will flash redat a rate of once per second.When the internal controller detects a VSWR of greater than 4, the output power will limit to a maximum of 25Watts and the HIGH VSWR LED will flash red at a rate of twice per second. When the detected VSWR falls less than 4,the output will resume to it’s previous power setting (if the setting was greater than 25 Watts before going into powerfold-back), the HIGH VSWR LED will flash at a rate of once per second if VSWR greater than 2, and will turn off ifVSWR is less than 2.METER and METER SELECT KnobWhen the METER SELECT Knob is either in the FORWARD POWER or REVERSE POWER position, thecorresponding measurement can be read off of the top "WATTS" scale of the METER.When the METER SELECT knob is either in the PA CURRENT or the B+ position, the correspondingmeasurement can be read off of the middle “VOLTS/AMPS” scale of the METER.When the METER SELECT knob is in the AUDIO COMPRESSION position, the corresponding measurement canbe read off of the bottom “VU” scale of the METER.MIC Input ConnectorsThese balanced inputs are for a 150 ohm dynamic microphone such as the Shure BG 1.0 with standard XLR-3 orA3M connector. Microphone connections are given in INSTALLATION.Input 4 can operate at MIC LEVEL or HIGH LEVEL by means of a SELECTOR switch inside the transmitter justbehind the Input 4 pot. The unit is factory selected for “HI” (HIGH) LEVEL balanced input for use with tape machines,etc. To convert Input 4 to MIC (microphone) LEVEL, remove top cover and move switch to “MIC”.MONITOR JackThe MONITOR jack is active in “STANDBY” and “TRANSMIT” positions of the TRANSMIT/STANDBYswitch. A high-quality headset having 300 ohms or higher impedance can be plugged into the MONITOR jack to makeadjustments or to monitor the quality of the audio being transmitted. A miniature, single circuit, 1/8 inch, phone plugshould be used with the MONITOR jack.POWER ADJUST PotWhen the SRPT-40A is transmitting, this pot can be adjusted to increase or decrease the output power from theMAXIMUM power setting to almost zero Watts.
17TRANSMIT LEDWhen the TRANSMIT/STANDBY switch is in the STANDBY position, the SRPT-40A will not transmit and theTRANSMIT LED will be off.When the TRANSMIT/STANDBY switch is in the TRANSMIT position but the SYNTHESIZER is not ready, theSRPT-40A will not transmit and the TRANSMIT LED will flash red.When the TRANSMIT/STANDBY switch is in the TRANSMIT position and the SYNTHESIZER is ready (whichis always three seconds after the SYNTHESIZER becomes locked), the SRPT-40A will transmit and the TRANSMITLED will be on, solid red.TRANSMIT/STANDBY SwitchThis switch should be placed in the “STANDBY” position at least 1 minutes before transmission is anticipated. Thisactivates all audio circuits, MONITOR jack and METER. Current drain is minimal in “STANDBY” position. TheTRANSMIT/STANDBY switch is placed in the “TRANSMIT” position when transmission is desired. TheTRANSMIT/STANDBY switch should be returned to the “STANDBY” position as soon as a transmission is completed.
18OPERATIONConnect up SRPT-40A to the AC Line Receptacle or ExternalDC SupplyCAUTION & WARNINGNEVER CONNECT THE SRPT-40A TO THE AC LINE AND EITHER OF THE EXTERNAL DCSUPPLIES AT THE SAME TIME.DOING SO MAY DAMAGE THE INTERNAL SWITCHING SUPPLY OR THE EXTERNAL DCSUPPLY.AC Line OperationPosition AC LINE switch to “OFF”, then plug SRPT-40A into a 90 - 264 volt, AC, grounded, 3-prong receptacle.WARNINGTHIS EQUIPMENT MUST BE OPERATED WITH A 3-PRONG, GROUNDED, 90-264 VOLT, ACOUTLET RECEPTACLE!FAILURE TO USE A PROPERLY GROUNDED OUTLET COULD RESULT IN A SAFETY HAZARDOR FAULTY EQUIPMENT PERFORMANCE.IF AN EXTENSION CORD IS USED, IT MUST BE THE THREE-WIRE GROUNDING TYPE TOINSURE SAFETY.DO NOT CUT OFF THE GROUND PIN OF A 3-PRONG PLUG!!External DC Supply (12-15 Volt) OperationThe front panel AC LINE switch does not control the External DC Supply (12-15 Volt) operation.The external supply must be capable of delivering 10 Amps if running the SRPT-40A at 50 Watts. Connect threepositive leads of the supply to pins 6, 7, and 14 of the ACCESSORY connector. Connect three negative leads of thesupply to three of the four ground pins (pins 1, 8, 11, and 12) of the ACCESSORY connector.  Each of the three positiveleads and each of the three negative leads should be an 18 gauge wire.External DC Supply (15-30 Volt) OperationThe front panel AC LINE switch does not control the External DC Supply (15-30 Volt) operation.The external supply must be capable of delivering 12 Amps if running the SRPT-40A at 50 Watts. Connect fourpositive leads of the supply to the four 15-30VDC pins (pins 2, 3, 9, and 10). Connect four negative leads of the supplyto the four ground pins (pins 1, 8, 11, and 12).  Each of the four positive leads and each of the four negative leads shouldbe an 18 gauge wire.
19CAUTION & WARNINGNEVER INSTALL AND CONNECT THE 12-15 VOLT AND THE 15-30 VOLT SUPPLIES AT THE SAME TIME.ALSO, NEVER CONNECT THE 15-30 VOLT SUPPLY TO THE 12-15 VOLT PINS AND NEVER CONNECT THE12-15 VOLT SUPPLY TO THE 15-30 VOLT PINS.DOING SO MAY DAMAGE THE INTERNAL SWITCHING SUPPLY OR EITHER OF THE EXTERNAL DCSUPPLIES.Connect up AntennaConnect antenna to the ANTENNA connector on the SRPT-40A rear panel. Connection of various antenna systemsis covered under INSTALLATION and ANTENNAS.CAUTIONDO NOT TURN ON AC LINE OR EXTERNAL DC POWER UNTIL ANTENNA HAS BEENPROPERLY CONNECTED TO ANTENNA CONNECTOR!Power-Up SRPT-40AIf using AC line, turn on SRPT-40A by turning on front panel AC LINE switch.If using 12-15 Volt or 15-30 Volt external DC supply, turn on SRPT-40A by turning on external DC supply. Thefront panel AC LINE switch has no control of external DC supply.The SRPT-40A will begin a power-up routine. The front panel meter will illuminate immediately. After about threeseconds the AFC LOCK LED will begin flashing green indicating that the synthesizer is searching for the last frequencyit was last locked on to.If the TRANSMIT/STANDBY switch is in the TRANSMIT position, the TRANSMIT LED will flash red in unisonwith the green flashing AFC LOCK LED. Once the synthesizer has found and locked onto the frequency, the AFCLOCK LED will immediately stay on solid green and the TRANSMIT LED will continue to flash red for threeadditional seconds. After the three seconds, the SYNTHESIZER will be ready, will enable the power amplifier totransmit RF power, and the TRANSMIT LED will stay on solid red.If the TRANSMIT/STANDBY switch is in the STANDBY position, the TRANSMIT LED and hence, thetransmitter RF power, will be off and will stay off even after the SYNTHESIZER has locked and the AFC LOCK LEDhas illuminated solid green. When the TRANSMIT/STANDBY switch is placed in the TRANSMIT position (and threeseconds have elapsed since the SYNTHESIZER became locked) the PA will begin transmitting and the TRANSMITLED will illuminate solid red.Adjusting Output PowerTurn the METER CONTROL knob to the FORWARD POWER position and observe the forward power reading onthe top scale of the METER. Using a small flat-head screwdriver, adjust the POWER ADJUST pot (located about ¾ of
20an inch behind the POWER ADJUST bezel ring) to adjust the forward power to a desired output power as indicated onthe METER.What Frequency Will the SRPT-40A Power-Up on?If you’re not sure what frequency the SRPT-40A will power up on, first make sure that the POWER ADJUST pot isat a minimum (turned fully counter-clockwise) before powering up the SRPT-40A. After the SYNTHESIZER is lockedand the TRANSMIT/STANDBY switch is set in the TRANSMIT position, monitor the RF output with a frequencycounter. If necessary, increase the POWER ADJUST pot (turn clockwise) slowly until the frequency counter registers afrequency reading.WARNINGNEVER CONNECT THE FREQUENCY COUNTER DIRECTLY TO THE RF OUTPUT CONNECTOROF THE SRPT-40A.THE FREQUENCY COUNTER SHOULD BE COUPLED OFF OF AN RF COUPLER OR A WATTMETER.EXCEEDING THE INPUT POWER RATING OF THE FREQUENCY COUNTER COULD DOINTERNAL DAMAGE TO IT.Inputting AudioPlug in microphones (Inputs 1 - 3) or tape player (Input 4 internally switched to “HI” position; See MIC InputConnections, above) and check operation by setting the METER CONTROL knob to the AUDIO COMPRESSIONposition and observing the compression on METER and by a headset plugged into MONITOR jack. Set AUDIO GAINcontrols paragraph in the CONTROL & CONNECTOR FUNCTIONS section for how to adjust for no more than  -3 VUaudio compression on the METER.Changing Output Frequency DirectTo change the frequency of the SRPT-40A, the S1 dip-switches on the Front Panel Control & Meter board (800-378) behind the front panel (see the SRPT-40A Adjustment Locations) need to be set with switches 1 and 2 in the “ON”position and switches 3 and 4 in the “OFF” position. These positions are the normal position and are set at the factory,so there should be no need to remove the top cover.When the S1 switches are set as described in the last paragraph, then all that is required is to enter the desiredfrequency from left to right into the FREQUENCY SELECT pushwheel switches and then press and release theEXECUTE pushbutton switch.If a valid frequency is entered and the EXECUTE pushbutton is pressed and released, then the RF output power willimmediately turn off (if it was on to begin with) and the SYNTHESIZER will go through it’s normal routine in searchingand locking onto the requested frequency. When the frequency is found, the AFC LOCK LED will stop flashing andilluminate solid green. After three seconds the TRANSMIT LED will stop flashing and illuminate solid red (assumingthe TRANSMIT/STANDBY switch is in the TRANSMIT position) and the SRPT-40A will resume transmitting at thenew frequency and at the same output power it was before leaving the previous frequency.
21What is A Valid Output Frequency?A valid output frequency is defined as an output frequency that is divisible by the set reference frequency (12.5 KHzor 10.0 KHz) and one which is within the valid operating bands. All seven digits on the front panel FREQUENCYSELECT pushwheel switches must be entered. The frequency is entered in MHz where the first three digits represent theleft side of the decimal place, and the last four digits represent the right side of the decimal place. For example, thefrequency 450.0125 MHz will simply be entered as 4500125.If an invalid frequency is entered in, or if the same frequency that the SRPT-40A is currently locked on to is enteredin, then the SRPT-40A will remain at its current frequency and current RF output power, i.e., nothing will happen.Changing Output Frequency via Channel SelectThe frequency can also be changed by entering a channel number that was previously stored with a frequency. SeeStoring Output Frequencies into Channels for instructions on how to store frequencies. There are ten channelsavailable for storing and recalling frequencies. These ten channels are preset with default or customer requestedfrequencies at the factory.To change frequency via channel select, the S1 dip-switches behind the front panel must be set with switches 1 and2 in the “ON” position and 3 and 4 in the “OFF” position. These switches are in the same position as when changing thefrequency direct. Again, these are the normal dip-switch positions, and there probably is no need to remove the topcover.Now you’re ready to enter the channel. This is done by setting the six left-most digits (digits 2-7) of theFREQUENCY SELECT pushwheel switches equal to zero. Then the far right digit (digit 1) is set to the channel ofchoice (channel 0 – channel 9). After entering the channel, press the EXECUTE pushbutton down and then release. TheSYNTHESIZER will change to the frequency that was stored in the channel.WARNINGTHE REMAINING OPERATIONS ARE FEATURES THAT REQUIRE SETTING INTERNAL DIP-SWITCHES.IN ALL CASES, WHEN PERFORMING THESE OPERATIONS, THE SRPT-40A MUST BE ON ANDTHE TOP COVER MUST BE REMOVED.WHEN THE OPERATION IS COMPLETE, ALWAYS SET THE INTERNAL S1 DIP-SWITCHES WITHSWITCHES 1 AND 2 “ON” AND SWITCHES 3 AND 4 “OFF”. THEN RE-INSTALL THE TOP COVER.Storing Output Frequencies into ChannelsThe SRPT-40A must be locked on a frequency before storing that frequency into one of the ten available channels.It is not necessary, however, that the SRPT-40A be transmitting, hence the TRANSMIT/STANDBY switch can be inSTANDBY.First, lock on to the desired frequency either directly or via channel select. Remove the top cover of the SRPT-40A.Set the S1 dip-switches (located behind the front panel) as follows: Switches 1, 3, and 4 set to the “OFF” position andswitch 2 set to the “ON” position.
22Next, set the six left-most digits (digits 2-7) of the FREQUENCY SELECT pushwheel switches equal to zero. Thenthe far right digit (digit 1) is set to the channel of choice (channel 0 – channel 9) to be stored. After entering the channel,press the EXECUTE pushbutton down and then release. The current frequency-in-lock will be stored in the selectedchannel and the SRPT-40A will remain at its current frequency. If you need to store more channels, repeat the steps inthis paragraph.Finally, put the S1 dip-switches back to where they were, i.e., switches 1 and 2 in the “ON” position and switches 3and 4 in the “OFF” position. Re-install the top cover.It would be a good idea to test the stored channel(s) by changing the frequency to some other frequency and thenrecalling the stored channel(s).Changing the Reference FrequencyThe reference frequency setting is usually set such that it is divisible into any operating frequency within yourcountry’s RPU frequency assignment. The reference frequency of the SRPT-40A can be set to either 10.0 KHz or 12.5KHz. The default reference frequency will be set at the factory according to where the SRPT-40A will be used orwhatever the customer requests.If you try to change to an output frequency that is not divisible by the set reference frequency, the frequency will notchange. If the output frequency (or frequencies) that you are required to operate at are not all divisible by 10.0 KHz or12.5 KHz, you may be able to special order a software change to accommodate your required reference frequency.To change the reference frequency, remove the top cover of the SRPT-40A. The SRPT-40A should be powered onand locked on a frequency. Set the S1 dip-switches so that switches 1, 3, and 4 are “OFF”, and switch 2 is “ON”. Fromthe front panel, adjust the FREQUENCY SELECT pushwheel switches so that digit seven (the left-most digit) is zero;and digits six, five, and four are 1, 2, and 5 respectively for 12.5 KHz reference frequency or 1, 0, and 0 respectively for10.0 KHz. It does not matter what pushwheel switches three, two, and one are set to. Now press the EXECUTEpushbutton down and then release. At this point the output frequency will remain as is and no noticable change will takeplace. Re-position the S1 dip-switches such that switches 1 and 2 are “ON” and switches 3 and 4 are “OFF”. Re-installthe top cover.At this point, the reference frequency is only temporarily stored. Therefore, if the power to the SRPT-40A wasturned off and then on, it would revert back to its original reference frequency. The user must therefore change theoutput frequency to permanently change the reference frequency.Control Switch SettingsControl Switch Settings enable or disable important controls used in the SRPT-40A. These control settings includethe following:Rotary Power Adjust EnableVSWR Foldback DisableReverse Power Calibration EnableForward Power Calibration EnableHi Temperature Shutdown DisableDirect Frequency Change EnableChannel Frequency Change EnableFor changing the setting on any of these controls, it’s important to remember that you cannot just change one settingwithout updating (or setting) all the other settings at the same time. This is because one command does all. Thereforeyou must consider and set all controls at the same time.
23Refer to the Control Switch Settings Command (Figure 5) for disabling or enabling the desired controls. Removethe top cover. Set the internal dip-switch S1 switches and the FREQUENCY SELECT pushwheel decimals as outlinedin Figure (5). The entries in bold italics are default settings from the factory. Notice that in some cases, some settingscan be achieved by more than just one unique decimal entry. For example, if it was required to disable the Rotary PotPower Adjust, enable  VSWR Foldback, and enable Reverse Power Calibration, DECIMAL 4 could be set to a “1” or a“9” and achieve the same settings. Or if it was required to disable Forward Power Calibration and enable HiTemperature Shutdown, DECIMAL 3 could be set to a “0”, “1”, “8” or “9”.When all FREQUENCY SELECT pushwheel decimals have been set to their required values that correspond to thedesired control switch settings, you must send the command by pressing the EXECUTE pushbutton down and thenreleasing. The internal controller will set the controls. Set the internal dip-switch S1 back to it’s normal position withswitch 1 and 2 “ON” and switch 3 and 4 “OFF”. Re-install top cover.Following is a description of the control settings:Rotary Pot Power Adjust Enable – The default for this setting is “yes” which allows the user to change the powerfrom almost 0 Watts to the maximum RF output power setting via the front panel POWER ADJUST pot. Refer to theMaximum Power Setting paragraph in the CALIBRATION AND ADJUSTMENT section of this manual forinformation on how to set the maximum power. If this user selects “no” for this setting, then the RF output power willmaintain where last set and tuning of the POWER ADJUST pot will have no effect.VSWR Foldback Disable – The default for this setting is “no”, therefore the VSWR Foldback is enabled. Thismeans when a VSWR is detected greater than 4, the power will limit to 25 Watts maximum. If “yes” is chosen, todisable VSWR foldback, then the forward RF power will not try to foldback, even when the controller detects a VSWRof greater than 4. The HIGH VSWR LED will still flash however. For maintaining long life from the power amplifier, itis not recommended to disable VSWR Foldback.Reverse Power Calibration Enable – The default setting for this setting is “no”. This setting should only be selected“yes” during calibration (see the Reverse Power Calibration paragraph in the CALIBRATION AND ADJUSTMENTsection).Forward Power Calibration Enable – The default setting for this setting is “no”. This setting should only beselected “yes” during calibration (see the Forward Power Calibration paragraph in the CALIBRATION ANDADJUSTMENT section).High Temperature Shutdown Disable – The default for this setting is “no”, therefore High Temp Shutdown isenabled (see High Temp LED paragraph in the CONTROL & CONNECTOR FUNCTIONS section for completedescription). If “yes” is chosen, then the power amplifier will not shutdown due to high temperature but the HIGHTEMP LED will still flash. Again, for maintaining long life from the power amplifier, it is not recommended to disableHigh Temperature Shutdown.Direct Frequency Change Enable – The default for this setting is “yes” to be able to change the output frequencydirect. If “no” is chosen, then attempting to change the output frequency will be ignored by the internal controller. Thissetting is useful for allowing only certain frequencies to be transmitted by selecting from pre-stored channels.Channel Frequency Change Enable – The default for this setting is “yes” to be able to change the output frequencyby channel select. If “no” is chosen, then attempting to change the output frequency by selecting channels will beignored by the internal controller. This setting is mainly useful if the Direct Frequency Change setting is also disabled.Therefore, only one frequency can ever be transmitted.
24Figure (5) CONTROL SWITCH SETTINGS COMMANDInternal Dip-Switch (S1): Switch 1, 3, and 4 are “OFF”; Switch 2 is “ON”DECIMAL 7 (far left digit): “1”DECIMAL 6, DECIMAL 5, DECIMAL 1 (far right digit): Does Not MatterDECIMAL 4INPUT NUMBER ROTARY POTPOWER ADJUSTENABLEDVSWR FOLDBACKDISABLED REVERSE POWERCALIBRATIONENABLED0NoNo No1NoNo Yes2NoYesNo3NoYesYes4 Yes No No5Yes No Yes6Yes Yes No7Yes Yes Yes8NoNo No9NoNo YesNote: Entries in bold italics are standard default from factory. A “4” input will set all three controls to default.DECIMAL 3INPUT NUMBER FORWARD POWERCALIBRATIONENABLEDHI TEMPERATURESHUTDOWNDISABLED0NoNo1NoNo2No Yes3No Yes4YesNo5YesNo6YesYes7YesYes8NoNo9NoNoNote: Entries in bold italics are standard default from factory. A “0, 1, 8, or 9” input will set both controls todefault.DECIMAL 2INPUT NUMBER DIRECTFREQUENCYCHANGE ENABLEDCHANNELFREQUENCYCHANGE ENABLED0NoNo1NoYes2Yes No3YesYes4NoNo5NoYes6Yes No7YesYes8NoNo9NoYesNote: Entries in bold italics are standard default from factory. A “3 or 7” input will set both controls to default.
30RECOMMENDED TESTEQUIPMENTDistortion Analyzer Krohn-Hite Model 6801Oscillator Krohn-Hite Model 4500Attenuator Set Hewlett-Packard Model 3500Frequency Counter Hewlett-Packard Model 5383A(option 001)Digital Multimeter Beckman Model 3030Analog Multimeter Triplett Model 630RF Attenuator adjustable 0-110 dBRF Signal Generator Marconi Model 2022CSpectrum Analyzer Hewlett-Packard Model 8558BWattmeter (50 ohms impedance) Bird Model 435 or 50 watt element 100-250 MHz or 400-1000 MHz, BirdAutomatic Modulation Meter Wavetek Model 410150 watt RF Load Microwave Associates Model 44003Stereo Monitor Belar Model FMS-2Stereo Generator Aphex Model AX400Oscilloscope Tektronix Model 2215TOOLS FOR ALIGNMENTTuning Tool GC 9300Tuning Tool GC 9440Tuning Tool Spectrol 8T000Tuning Tool Sprague-GoodmanScrewdriver Xcelite R184, 1/8” x 4”
31 SRPT-40A TRANSMITTERFACTORY TEST REPORTCustomer: _______________________________________________________________________Address: ________________________________________________________________________Serial No.:__________Test Frequency:_________   Test Frequency:_________   Test Frequency:_________ Forward Power Calibration Reverse Power CalibrationAudio Compressor Meter set at 0 VULimiter SetEncode frequency set at 27 Hz.Encode frequency set at 1 KHz. deviationSet power on 120 volt AC operation at __________watts External Supply (12-15 Volts DC) External Supply (15-30 Volts DC) On-board regulator set for B+ = 14.0 VoltsFrequency response within specificationsDistortion within specificationsSignal to noise within specificationsMetering satisfactoryTest Equipment ______________________________________Frequency Counter, HP Model 5383A DATEDeviation Monitor, Wavetek Model 4101 ______________________________________SIGNATURE
44

Navigation menu