BIOTRONIK SE and KG CM06-1 Patient Device User Manual Manual1
BIOTRONIK SE & Co. KG Patient Device Manual1
Contents
- 1. Manual1
- 2. Manual2
- 3. Manual3
- 4. user manual
Manual1

CardioMessenger II®
Transmitter for
BIOTRONIK Home Monitoring®
sbiotronik
Technical Manual
356845_Cover_CMII_US.qxd 10.05.06 13:45 Seite 1

Overview
Physician callback signal . . . . . . . . . . .
Follow-up data transmission . . . . . . . .
Ready (CardioMessenger II) . . . . . . . . .
Battery monitor light . . . . . . . . . . . . . . .
Ready (charging station) . . . . . . . . . . . .
Data interface
A view of the rear side of the device can be
found on the back cover.
356845_Cover_CMII_US.qxd 10.05.06 13:45 Seite 2

Overview
On/off button
Restart
Power supply port
Telephone jack
Belt clip
356845_Cover_CMII_US.qxd 10.05.06 13:45 Seite 3

BIOTRONIK GmbH & Co. KG
Woermannkehre 1
12359 Berlin · Germany
Tel +49 (0) 30 68905-0
Fax +49 (0) 30 6852804
BIOTRONIK, Inc.
6024 SW Jean rd. Bldg. B
Lake Oswego, OR 97035
Phone (800) 547-0394 (24-hr)
Fax (503) 635-9936
sales@biotronik.com
www.biotronik.com
© by BIOTRONIK GmbH & Co. KG
All rights reserved.
Specifications subject to modification, revision
and improvement.
® CardioMessenger is a registered trademark of
BIOTRONIK GmbH & Co. KG
sbiotronik
356845/A/6D20
356845_Cover_CMII_US.qxd 10.05.06 13:45 Seite 4
1
Contents
What is Home Monitoring? . . . . . . . . . . . . 3
Included Equipment . . . . . . . . . . . . . . . . . . 4
How Do I Use the CardioMessenger? . . . . 6
Where Should I Put the CardioMessenger? 6
How Do I Install the CardioMessenger? . . 9
Telephone Connection . . . . . . . . . . . . . 12
Version A . . . . . . . . . . . . . . . . . . . . . . . . 13
Version B . . . . . . . . . . . . . . . . . . . . . . . . 19
How Do I Understand the Lights of the
CardioMessenger? . . . . . . . . . . . . . . . . . . 25
Light 1 . . . . . . . . . . . . . . . . . . . . . . . . . . 25
Light 2 . . . . . . . . . . . . . . . . . . . . . . . . . . 26
Light 3 . . . . . . . . . . . . . . . . . . . . . . . . . . 26
Light 4 . . . . . . . . . . . . . . . . . . . . . . . . . . 27
Light 5 . . . . . . . . . . . . . . . . . . . . . . . . . . 28
How Do I Turn On the CardioMessenger? 29
How Do I Turn Off the CardioMessenger? 30
How Do I Charge the CardioMessenger? .31
How Do I Resolve Problems? . . . . . . . . . .32
Light 3 . . . . . . . . . . . . . . . . . . . . . . . . . .32
Light 4 . . . . . . . . . . . . . . . . . . . . . . . . . .33
Light 5 . . . . . . . . . . . . . . . . . . . . . . . . . .33
How Do I Reset the CardioMessenger? . .34
How Do I Take Care of the
CardioMessenger? . . . . . . . . . . . . . . . . . . .35
How Do I Carry the CardioMessenger? . .36
Safety Precautions - What Should I Watch
Out For? . . . . . . . . . . . . . . . . . . . . . . . . . . . 38
Guidelines . . . . . . . . . . . . . . . . . . . . . . . . . . 40
USA . . . . . . . . . . . . . . . . . . . . . . . . . . . . . . .40
Canada . . . . . . . . . . . . . . . . . . . . . . . . . . . .41
Electromagnetic Compatibility . . . . . . . . .42
Warranty . . . . . . . . . . . . . . . . . . . . . . . . . . . 43
CardioMessenger.book Page 1 Tuesday, May 2, 2006 5:05 PM

2
Technical Data . . . . . . . . . . . . . . . . . . . . . . 44
General . . . . . . . . . . . . . . . . . . . . . . . . . . . 44
Permissible Environmental Conditions . . 44
During Operation: . . . . . . . . . . . . . . . . . 44
Shipping and Storage: . . . . . . . . . . . . . 44
CardioMessenger Remote Unit . . . . . . . . 44
CardioMessenger Charging Station . . . . 45
Rechargeable Battery (integrated) . . . . . 45
Power Supply . . . . . . . . . . . . . . . . . . . . . . . 45
Appendix . . . . . . . . . . . . . . . . . . . . . . . . . . 46
CardioMessenger.book Page 2 Tuesday, May 2, 2006 5:05 PM

3
What is Home Monitoring?
Dear Patient:
You have received a BIOTRONIK pacemaker
or implantable cardioverter-defibrillator
(ICD) with Home Monitoring function.
Home Monitoring pacemakers and ICDs are
additionally equipped with a special
transmitter. This transmitter automatically
transmits medical and technical information
to a mobile device, the CardioMessenger.
The CardioMessenger works like a cell
phone and automatically transmits the
information received from your implant as
encoded messages to the BIOTRONIK
Service Center.
The transmission power from your implant
is low so as to not impair your health in any
way. Since the transmission range is short,
the CardioMessenger is needed to send the
information to the BIOTRONIK Service
Center.
At the Service Center, the data are
processed and can be viewed only by your
physician on a secured Internet site in the
form of a comprehensive report called a
Cardio Report.
Your doctor can use this Cardio Report to
decide whether your implant settings need
to be updated or if your therapy plan needs
to be changed. Thus, Home Monitoring
serves as a practical diagnostic aid.
CardioMessenger.book Page 3 Tuesday, May 2, 2006 5:05 PM
4
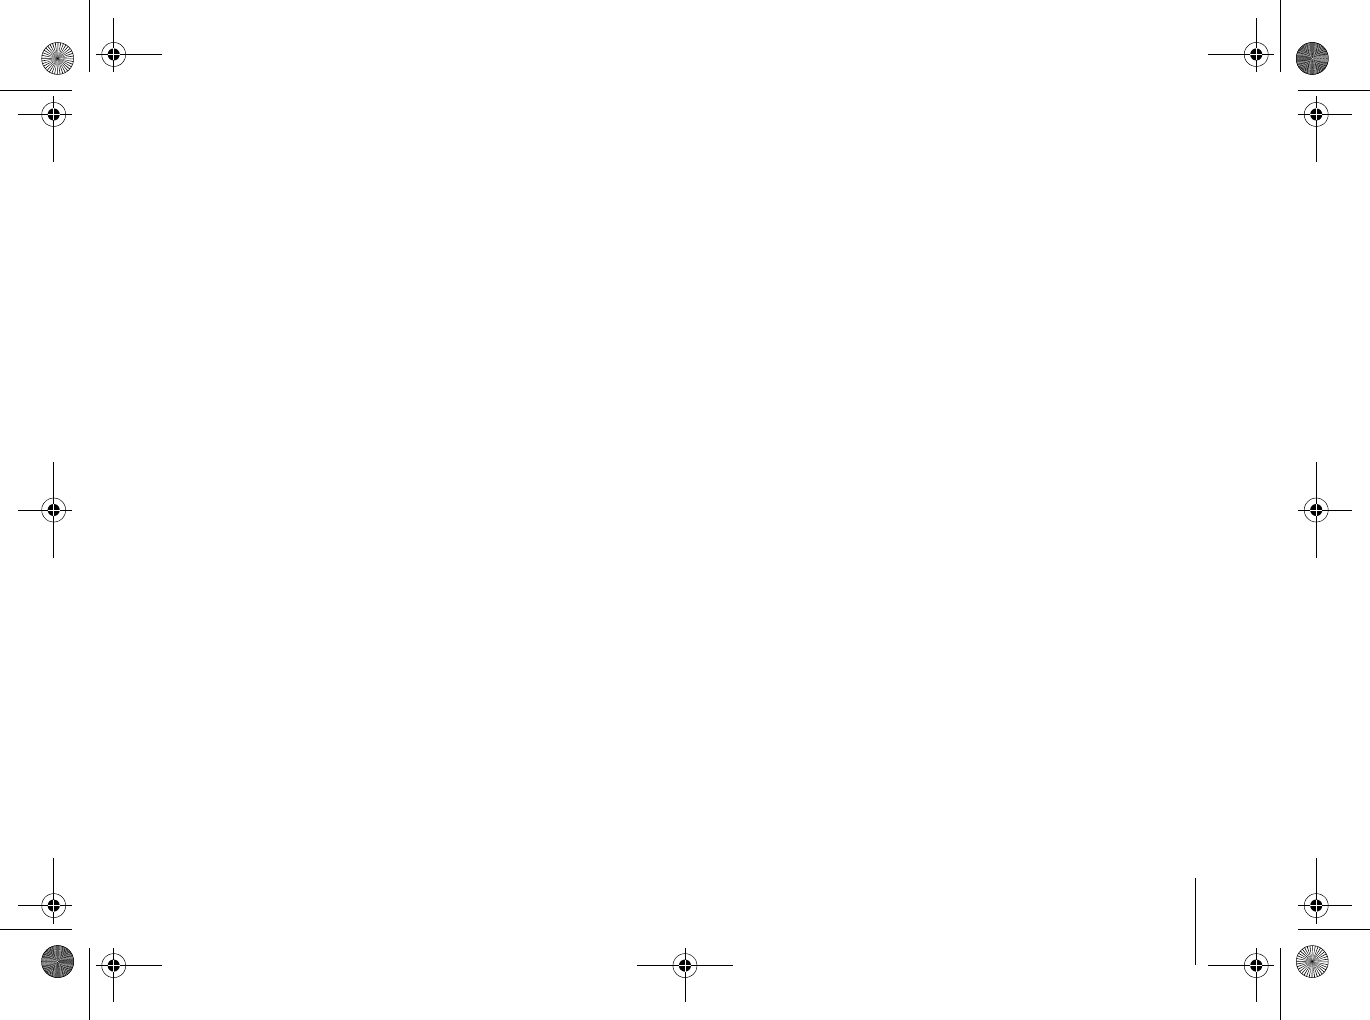
Included Equipment
The set comes equipped with the following
components:
1. Mobile unit
2. Charging station
3. Power supply unit
4. Power supply cable
5. Belt clip (already affixed)
6. Carrying strap
7. Patient manual
8. Telephone cable
CardioMessenger.book Page 4 Tuesday, May 2, 2006 5:05 PM

5
Before use, make sure that none of the
components are visibly damaged and that all
necessary components have been delivered
to you.
Caution! Never use the CardioMessenger
if it has been damaged; return it to your
physician.
Only use the following original
BIOTRONIK devices, as other accessories
can increase the interference emitted and
the device's susceptibility to interference:
- The CardioMessenger
- The charging station with the
appropriate power supply unit (type: FW
7555 M/06)
- The power cord (type: BIOTRONIK
NK-29, NK-30, or NK-31)
- The telephone cord (type: BIOTRONIK
VK-117)
CardioMessenger.book Page 5 Tuesday, May 2, 2006 5:05 PM
6
How Do I Use the CardioMessenger?
The following section describes:
2How to optimize CardioMessenger
placement
2How to operate it
2How it functions
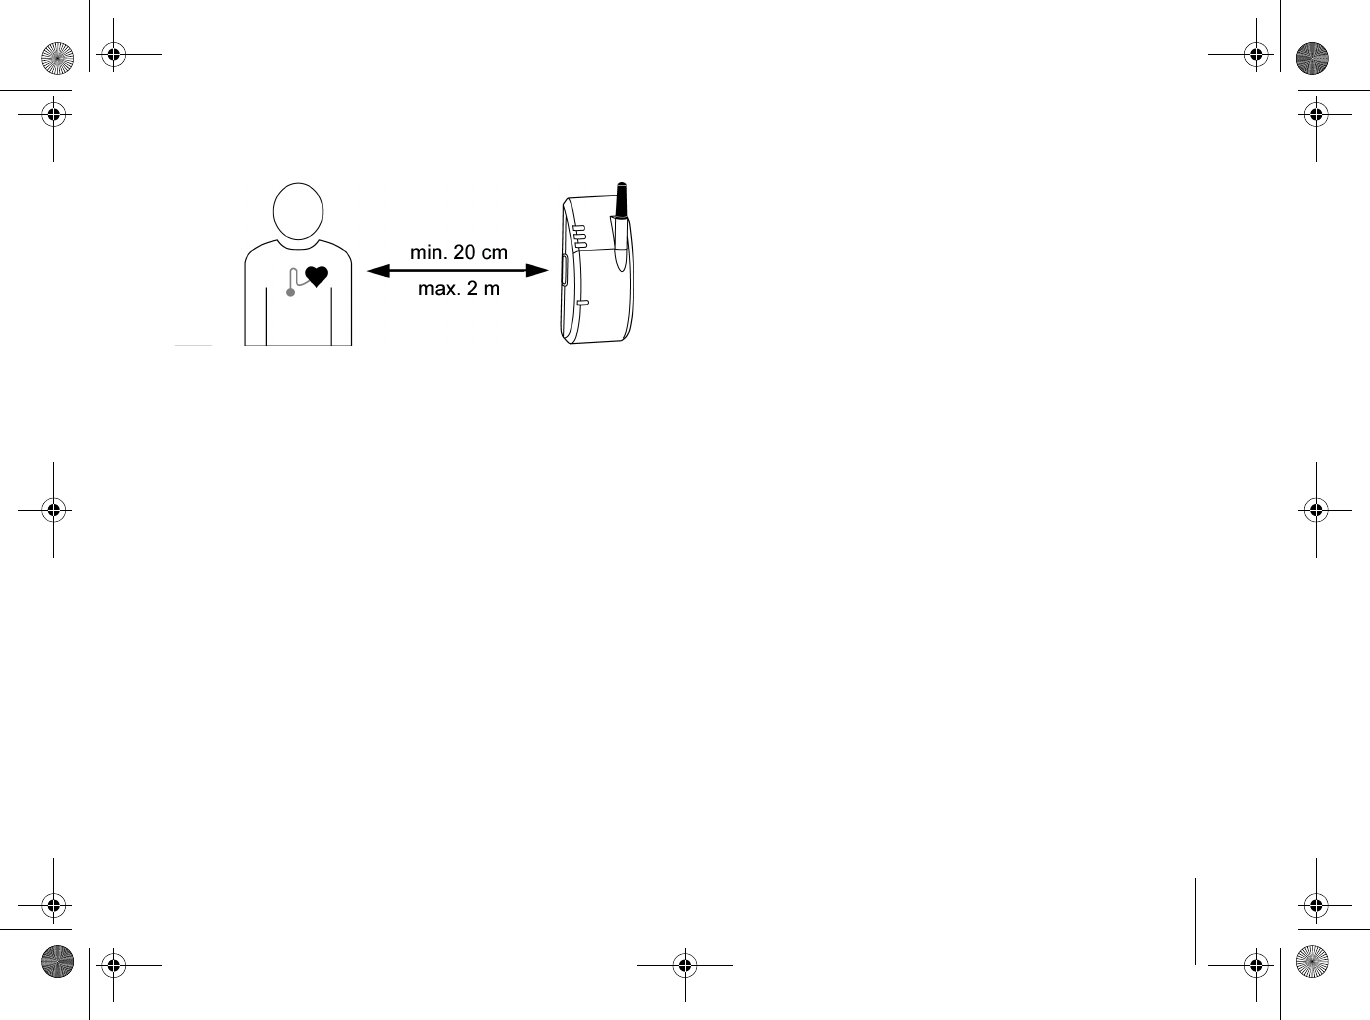
Where Should I Put the CardioMessenger?
On your bedside table or close to your bed is
a suitable place for your CardioMessenger
since it generally fulfills the following
conditions:
2The distance to the implant is less than 2
meters (6 feet), so that regular data
transmission at night is guaranteed.
2The distance to the implant is more than
20 centimeters (7 inches), so that the
CardioMessenger does not interfere with
the implant.
2The CardioMessenger is placed on a solid
base and cannot fall.
Please also consider the following:
2Do not expose the device to moisture or
heat; exposure to direct sunlight and
taking the device into the bathroom are
not recommended.
2The CardioMessenger should not be
connected to a power outlet controlled by
a light switch.
2Do not place the device next to a television
set, microwave oven, or similar source of
electromagnetic interference.
Warning! The distance between the
implant and CardioMessenger must not
be less than 20 centimeters (7 inches).
CardioMessenger.book Page 6 Tuesday, May 2, 2006 5:05 PM
7
Note: If the CardioMessenger is too close
to a loudspeaker (or a radio alarm or TV),
you may hear interference noises typical
for mobile phones.
CardioMessenger.book Page 7 Tuesday, May 2, 2006 5:05 PM

8
CardioMessenger.book Page 8 Tuesday, May 2, 2006 5:05 PM

9
How Do I Install the CardioMessenger?
Insert the power cable plug into a socket in
your wall and the other end of the cable into
the power supply.
Make sure you do not connect the
CardioMessenger to a power outlet
controlled by a light switch.
Now the green light on the upper side of the
power supply should be illuminated; if not,
please refer to „How Do I Resolve
Problems?" on page 32.
CardioMessenger.book Page 9 Tuesday, May 2, 2006 5:05 PM

10
Now, insert the other end of the power
supply cable (the end with the small plug)
into the charging station. The port for the
small plug is situated on the rear side of the
charging station and is marked with the
following symbol:
Use only the original power supply unit that
came with the CardioMessenger, see
„Included Equipment" on page 4.
CardioMessenger.book Page 10 Tuesday, May 2, 2006 5:05 PM

11
Light 5 is situated on the front side of the
charging station. The charging station is
operational when this light is illuminated.
If this light is not illuminated, please refer to
„How Do I Resolve Problems?" on page 32.
CardioMessenger.book Page 11 Tuesday, May 2, 2006 5:05 PM
12
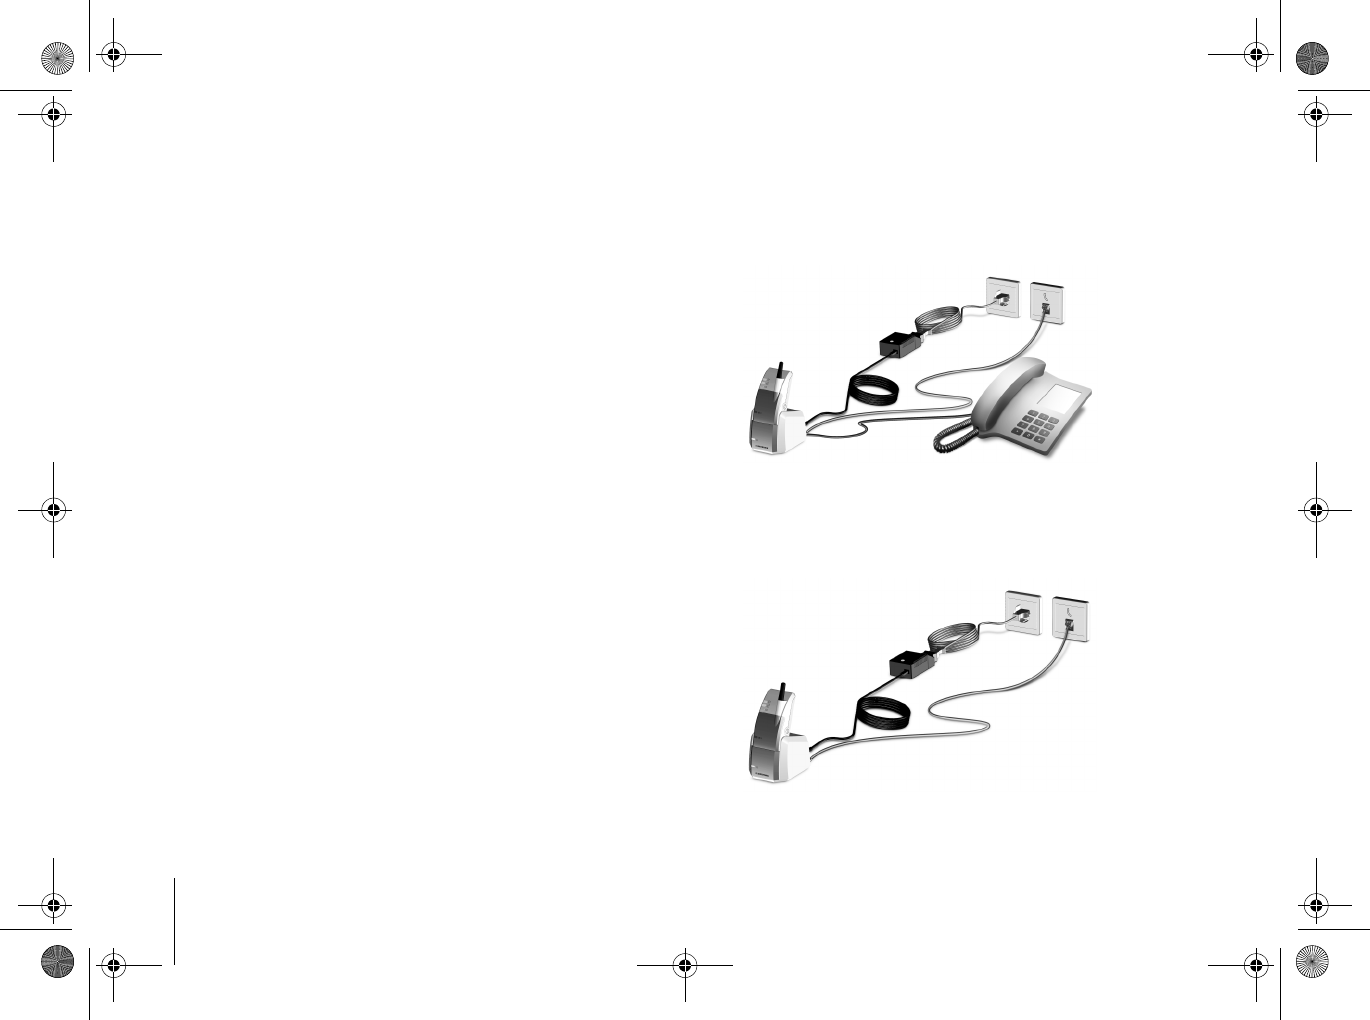
Telephone Connection
You need a telephone connection so that
your CardioMessenger can send the Home
Monitoring data to your physician.
You may operate your CardioMessenger with
your existing telephone sharing one single
telephone socket (version A) or connect it
directly to a free telephone socket (version
B).
Either way, your normal phone use remains
unaffected.
Version A
Version B
CardioMessenger.book Page 12 Tuesday, May 2, 2006 5:05 PM
13
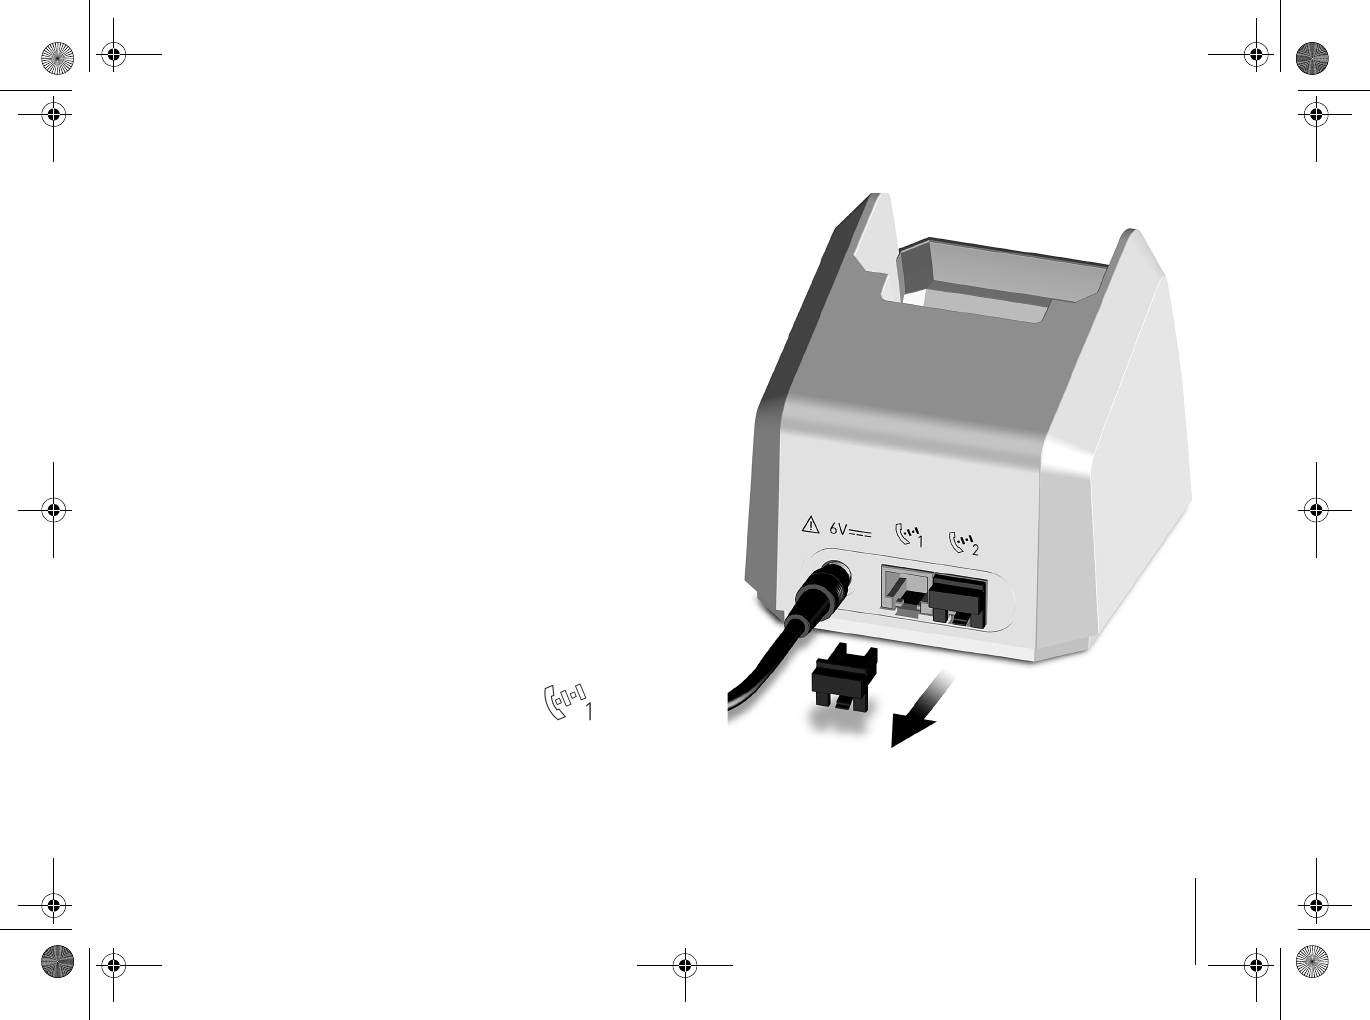
Version A
Unplug your telephone cable from your
telephone socket in your wall.
Remove the safety plug on port 1
on the rear side of the charging station.
CardioMessenger.book Page 13 Tuesday, May 2, 2006 5:05 PM
14
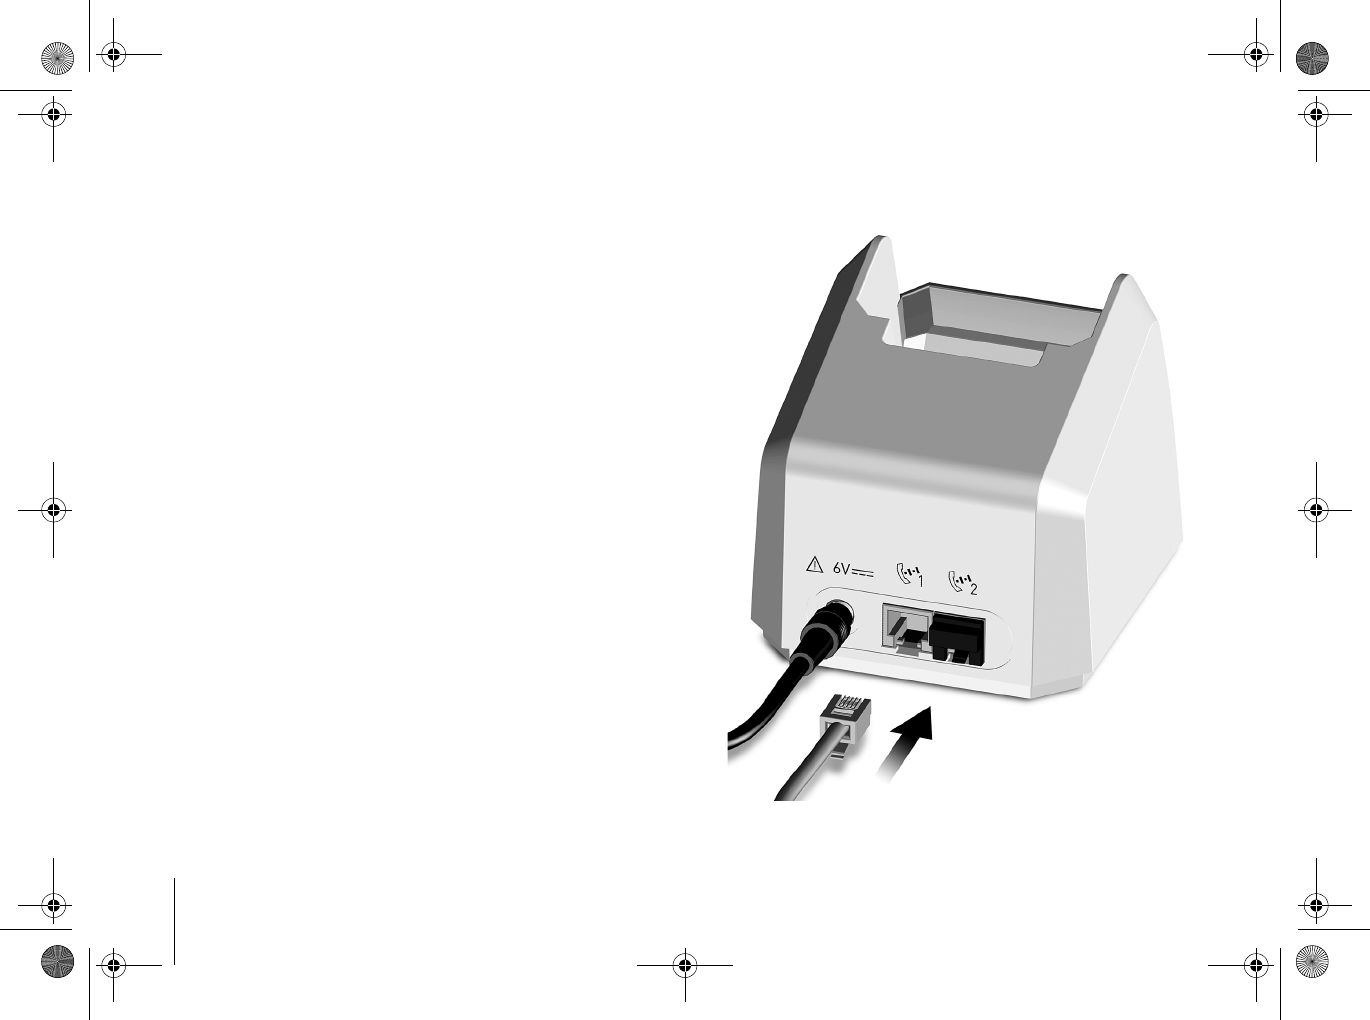
Now insert the free end of your telephone
cable into the inlet of the charging station.
CardioMessenger.book Page 14 Tuesday, May 2, 2006 5:05 PM