BITWAVE HAD1000 Hearing Assistive Device User Manual T2F UM 1 1 11032015 new
Bitwave Private Limited Hearing Assistive Device T2F UM 1 1 11032015 new
BITWAVE >
User Manual
HAD1000
Hearing Assistive Device
User Manual
I

Contents
Contents ---------------------------------------------------------
Kit Includes ------------------------------------------------------
Quick User Guide ----------------------------------------------
Warnings and Safety Instructions --------------------------
Features -----------------------------------------------------------
Installation --------------------------------------------------------
General Operations ----------------------------------------------
Music Streaming Operations ----------------------------------
Hearing Assist Operations--------------------------------------
Mobile Phone Operations --------------------------------------
Button Configurations Summary ------------------------------
Status Indicator Configuration Summary -------------------
Technical Data ----------------------------------------------------
Troubleshooting Operational Tips------------------------------
Notices --------------------------------------------------------------
01
02
03
09
11
11
13
16
17
18
25
26
27
27
28
EN PAGE 1
I
EN PAGE 2
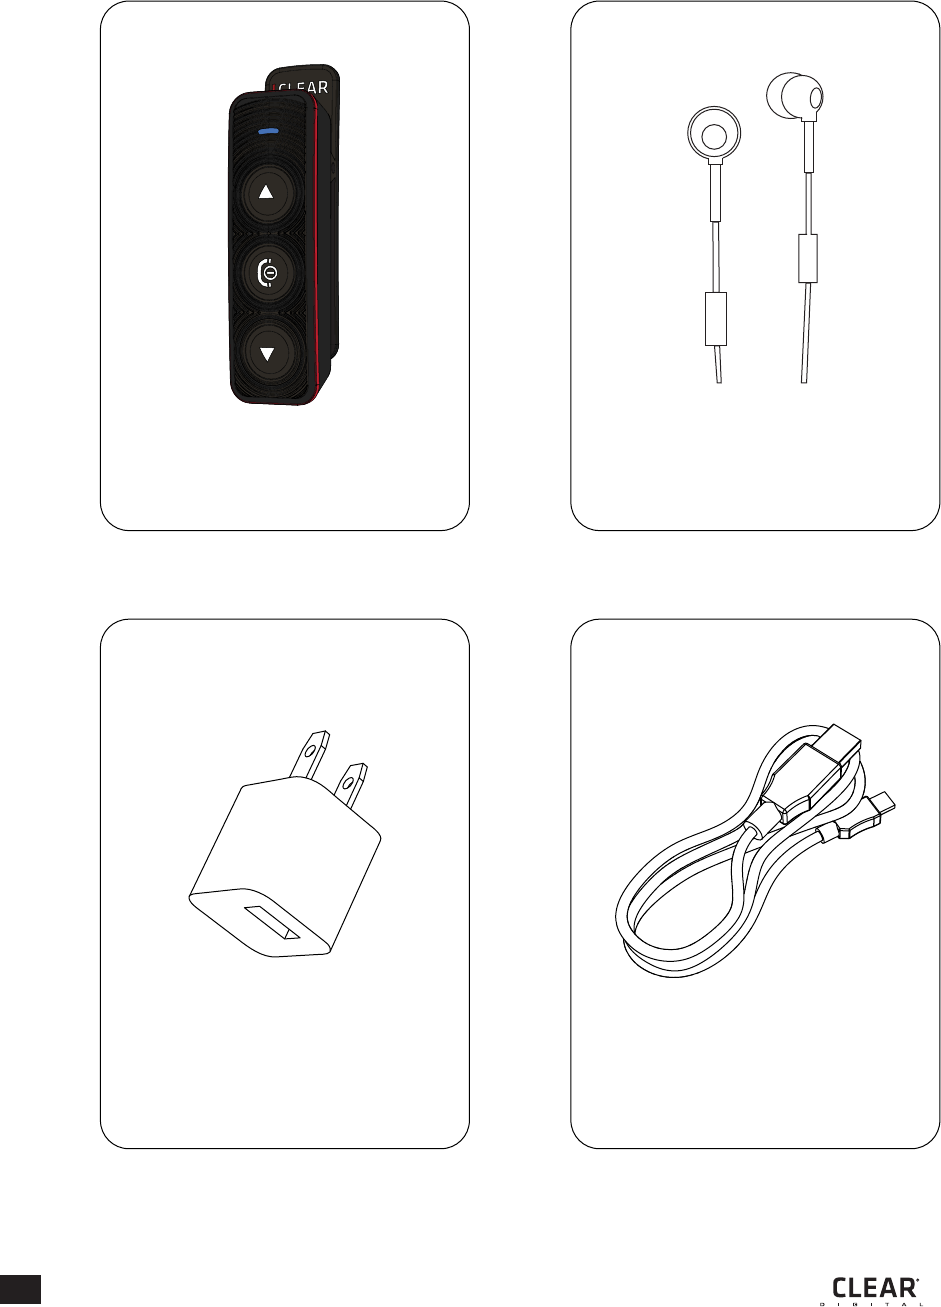
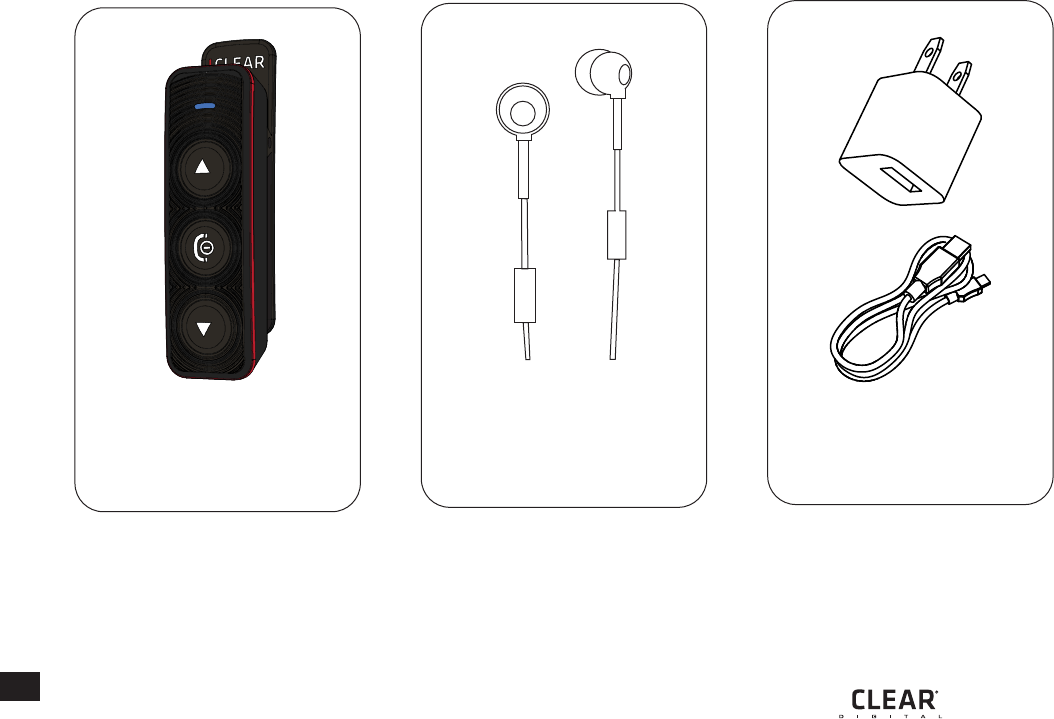
KIt Includes
Please read these rules. Do not follow these rules may result in dangerous or violation of the law.
This user manual provides more detailed information about safety instructions.
HAD1000
Hearing assistive device
I
Universal Earbud - Short
AC charger USB charging cable
EN
Quick User Guide
General Functions and Layouts
NOTE: Please charge before use
Make sure you have the latest firmware which can support your hearing assistive device.
You may visit iclear-digital.com for downloading.
Charge
Check Bluetooth phone capabilities before use.
To charge, use the provided charging cable by connecting it either to a USB port or to the
adaptor provided. While charging, the status indicator light will be red. Upon being fully
charged, the status indicator light will be blue.
Low Battery Indicator
You need to charge the helmet communicator when the status indicator light blinks red
twice every 2 seconds with a beep every minute.
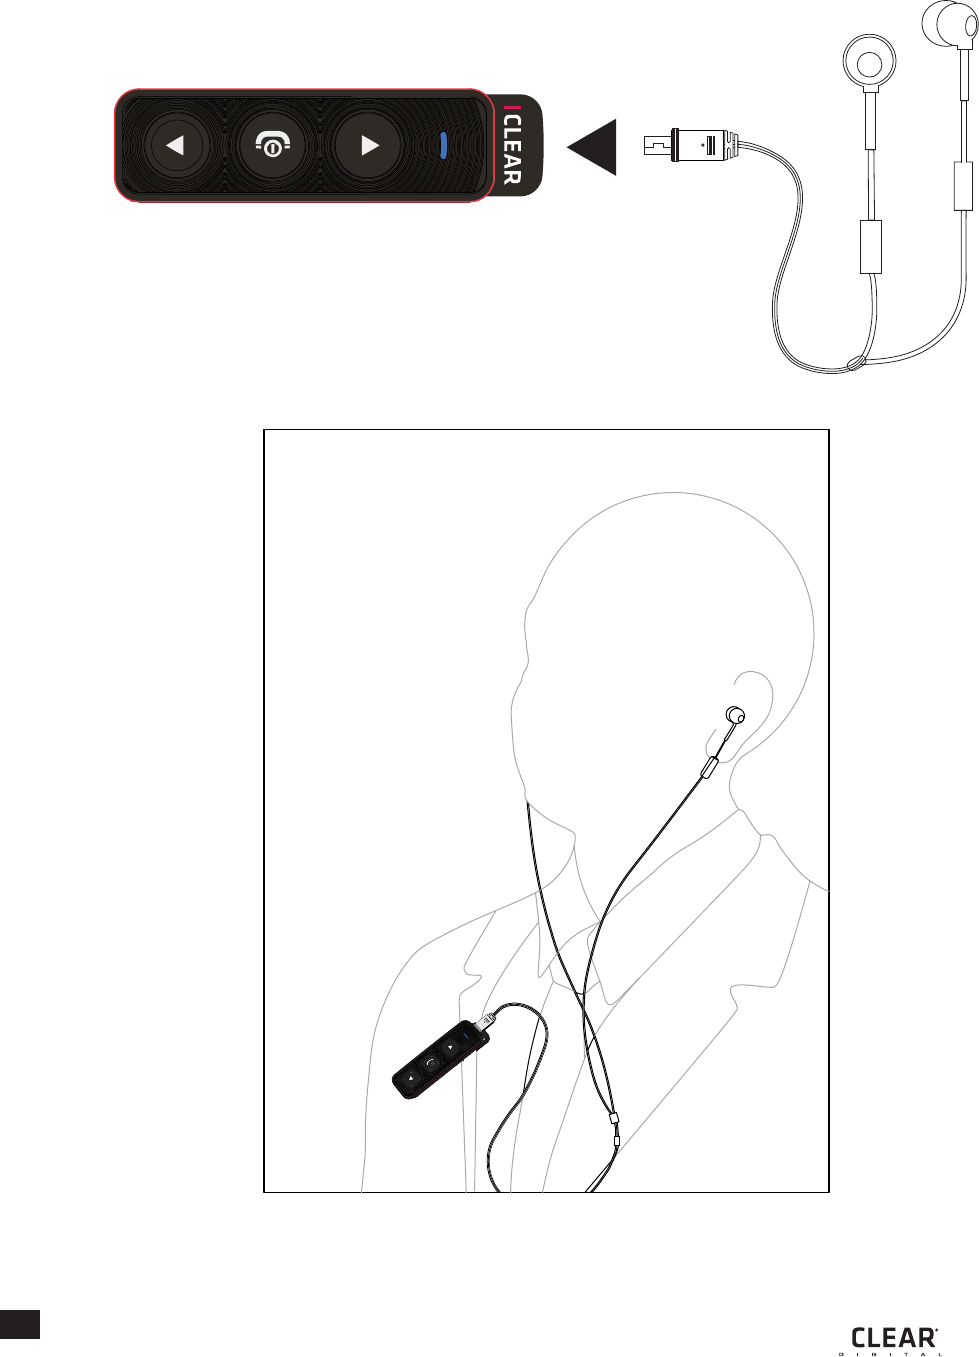
Install Speakers
Make sure the speaker wire is inserted into the main unit.
IPAGE 3
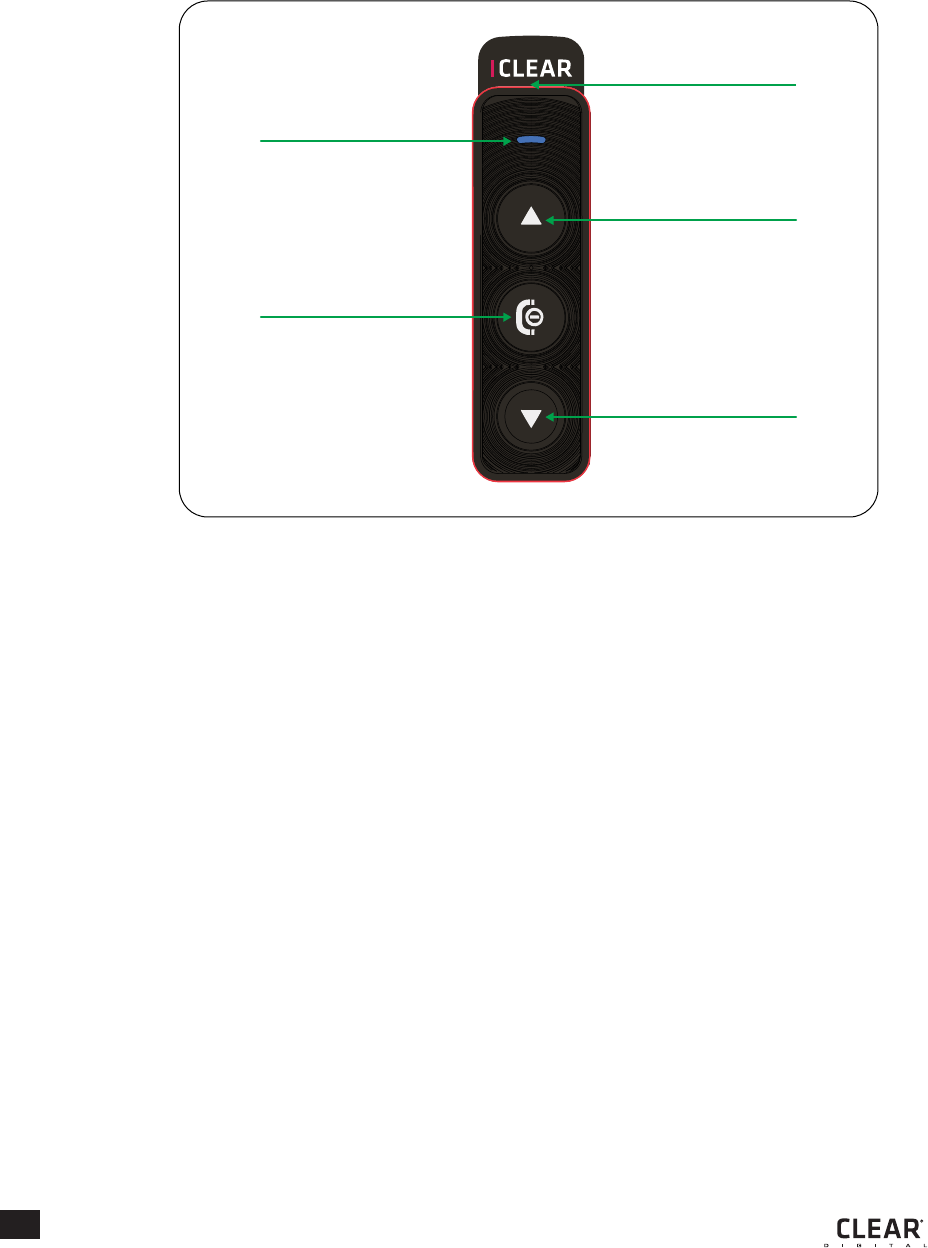
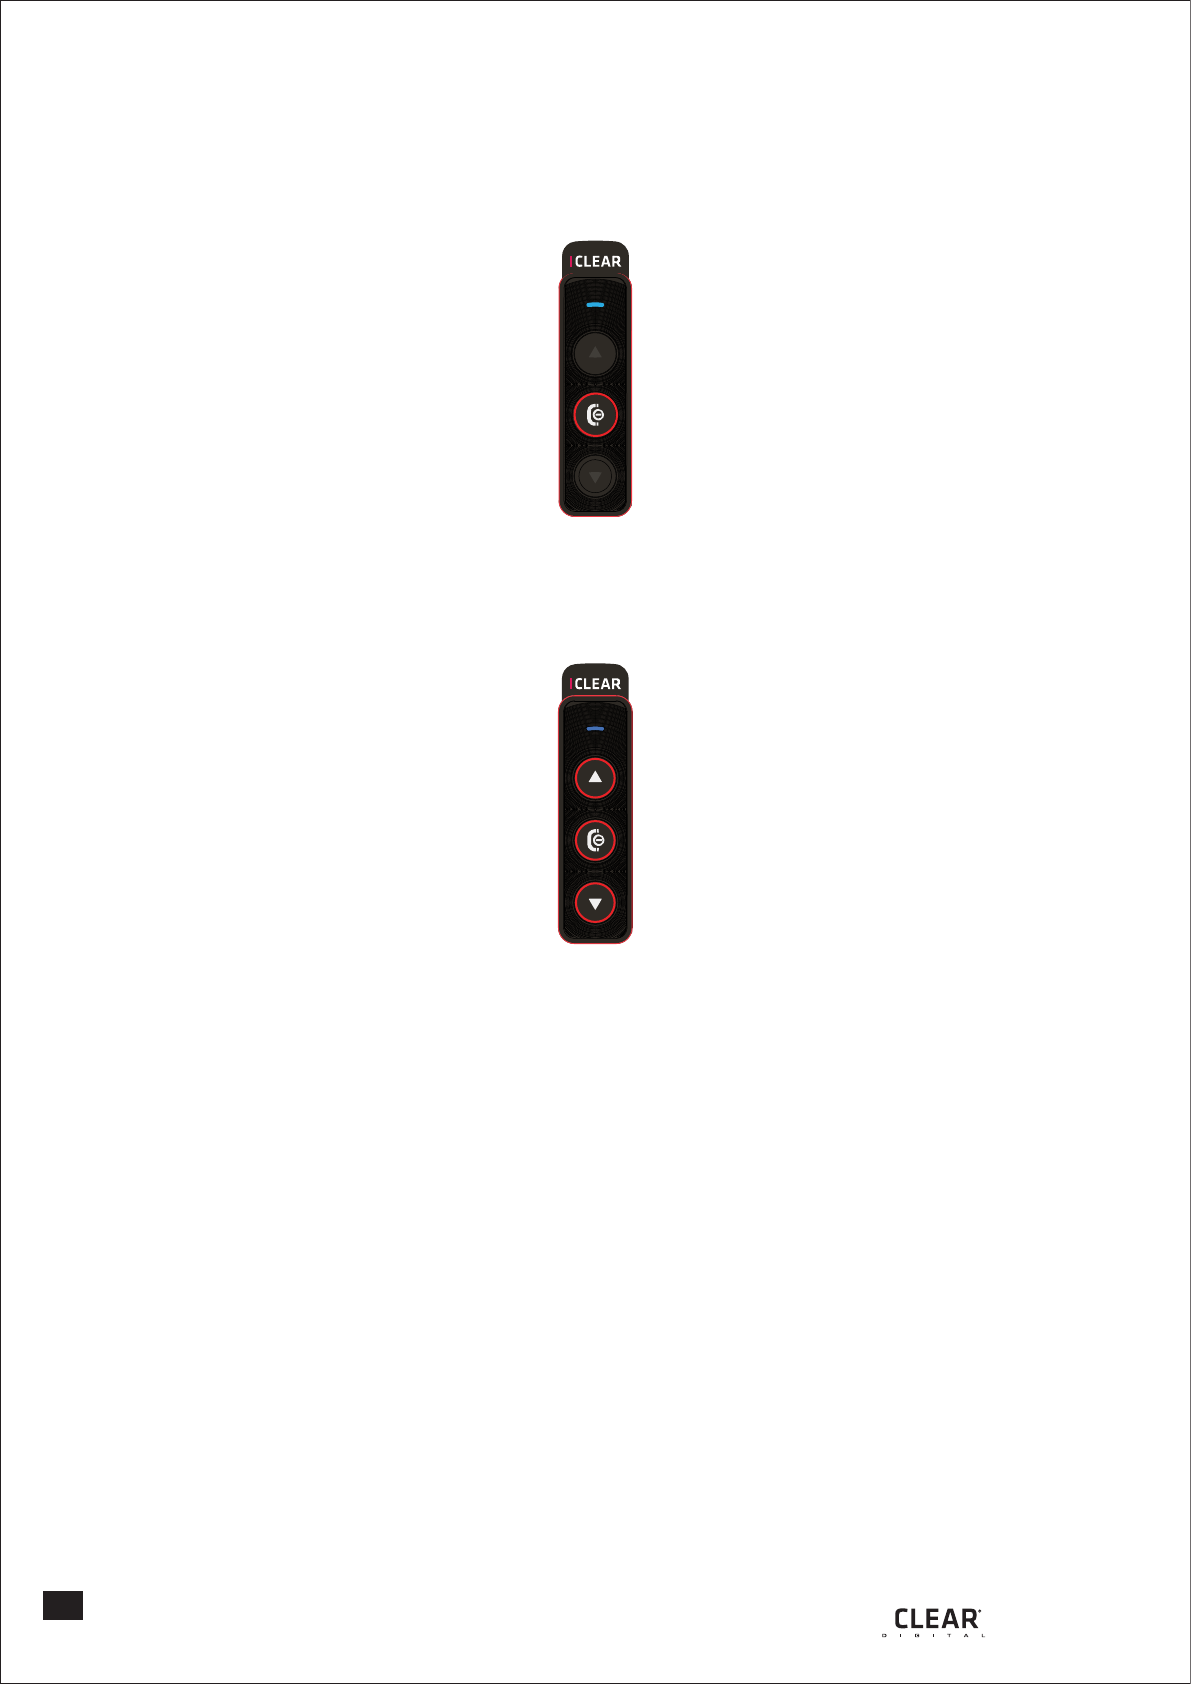
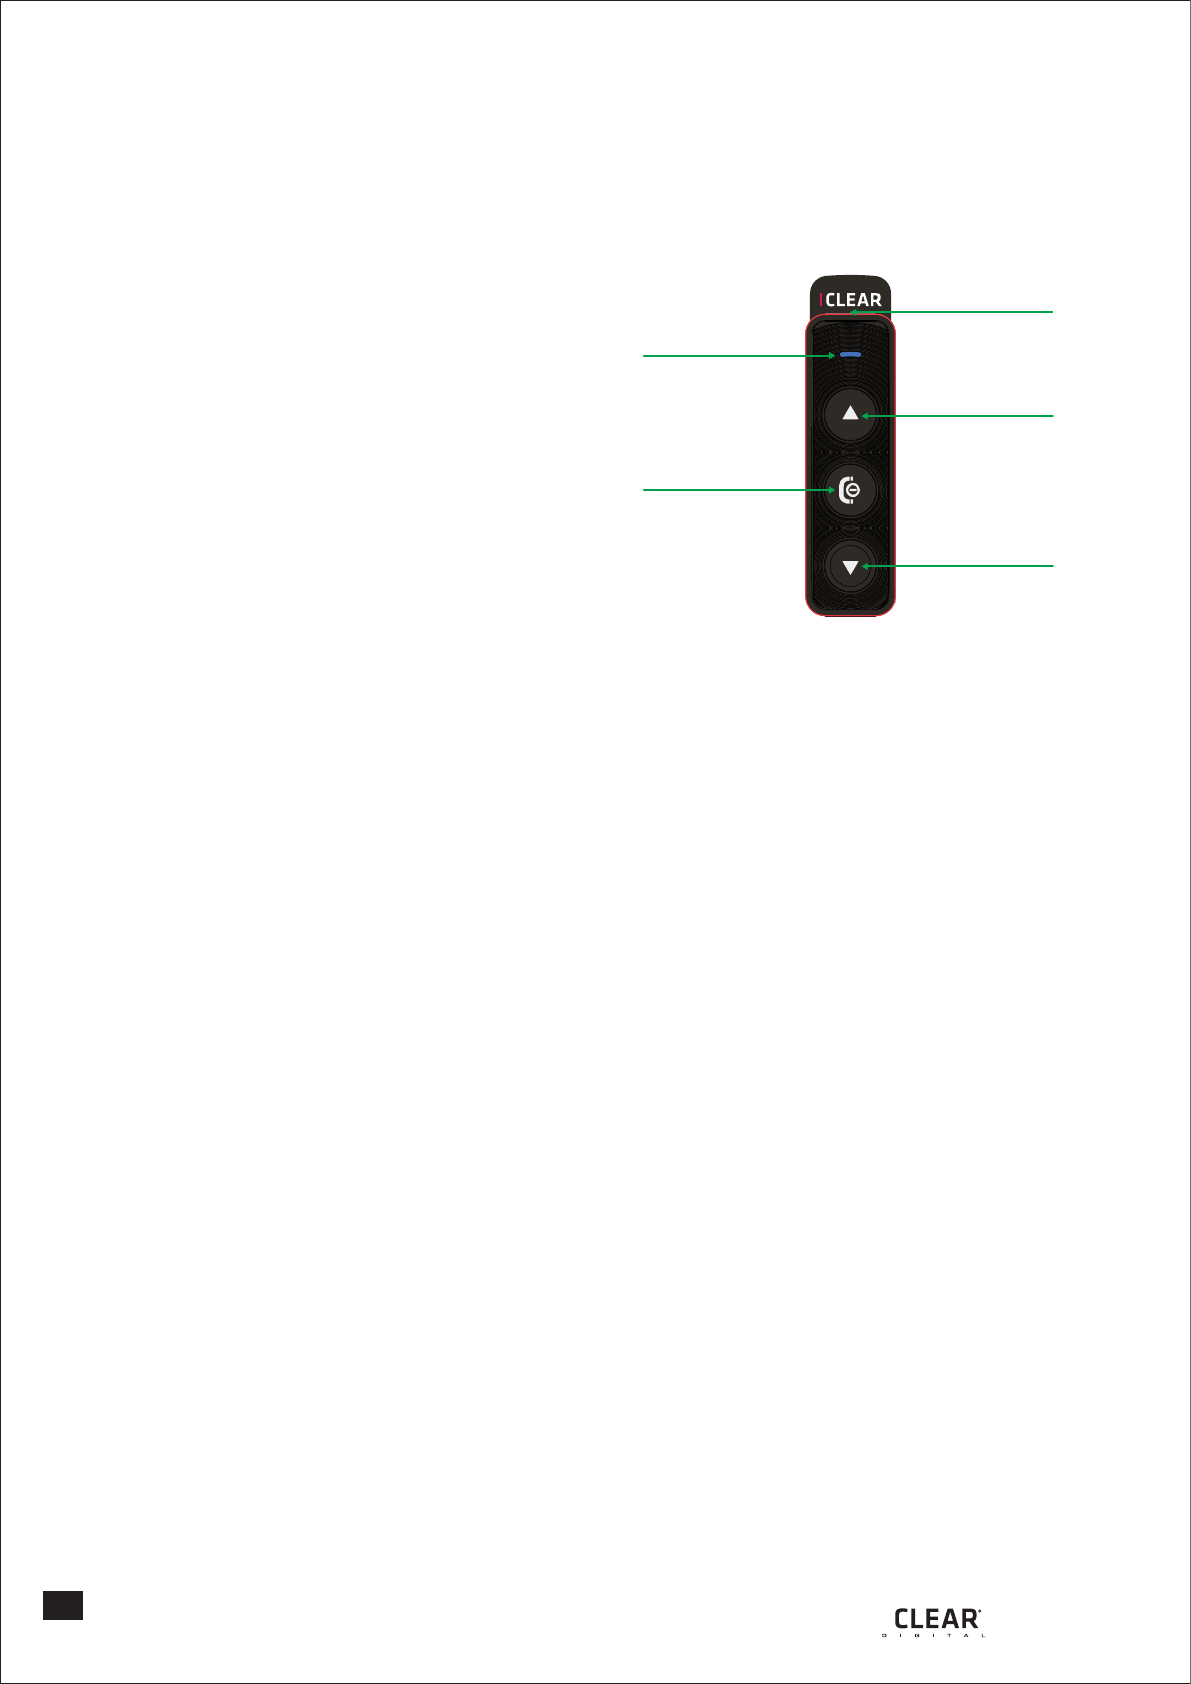
Status Indicator
‘Up’ Button
‘Power’ Button
‘Down’ Button
Charging Socket
EN
Quick User Guide
General Functions and Layouts
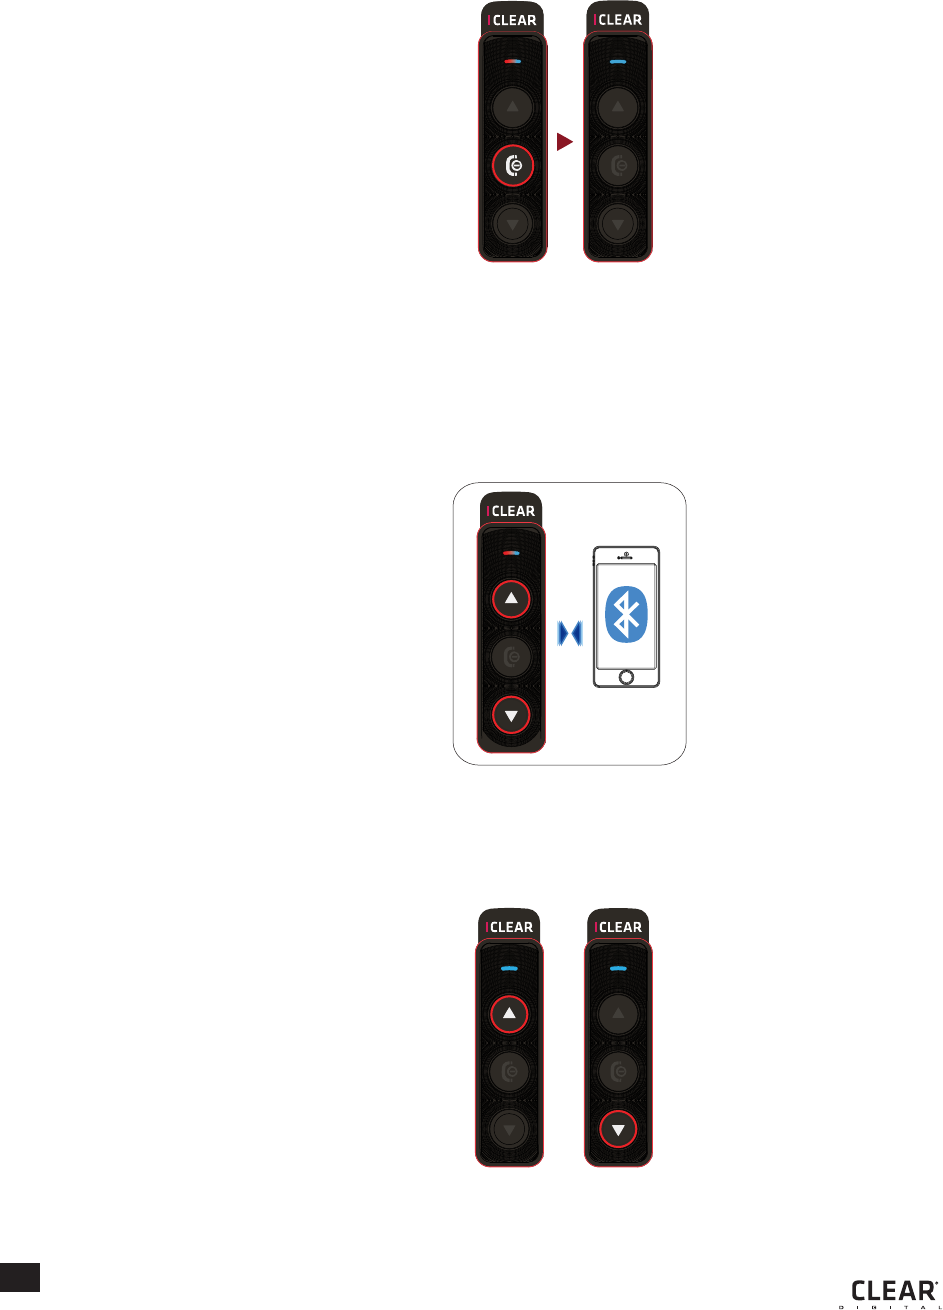
Power On
Hold the ‘Power’ button for 3 seconds.
The LED will flash purple for 2 seconds before changing to a blinking blue LED.
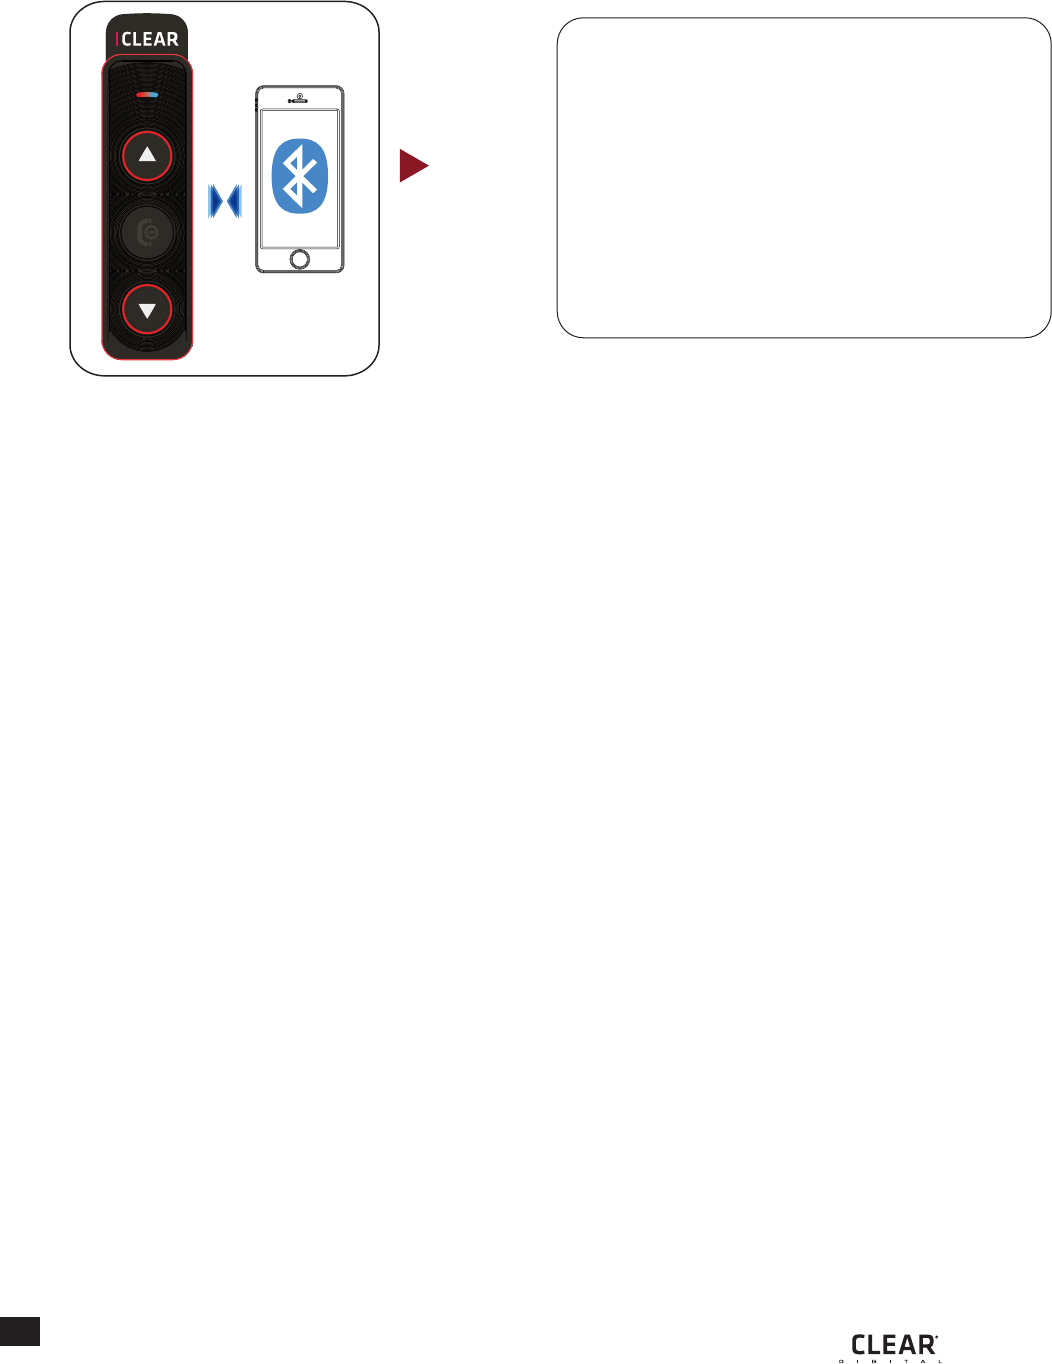
Pairing Mode
After power on, continue and hold the ‘Up’ and ‘Down’ button to enter into device
pairing mode. The LED will blink blue and red alternately.
Volume
Press ‘Up’ button once to increase volume.
Press ‘Down’ button once to decrease the volume.
Pairing mode
Turn on Bluetooth
search for
ICLEAR HAD1000
IPAGE 4
EN
Power Off
Hold ‘Power’ button for 5 seconds until LED flash red in color.
Reset
Press all three buttons at the same time to reset the device.
NOTE: The volumes for mobile phone, music and hear assist functions are controlled separately.
Quick User Guide
IPAGE 5
EN
Quick User Guide
Mobile Phone Functions
Pairing your hearing assistive device with your mobile phone.
Answer Incoming Call
Manually press ‘Power’ button once.
Reject/ End Incoming Call
Hold ‘Power’ button for 2 seconds.
Last Number Redial
Hold ‘Power’ and ‘Up’ button for 2 seconds.
Voice Dial
Hold ‘Power’ and ‘Down’ button for 2 seconds.
3 Way Calling
To swap between 2 concurrent calls, press the POWER button once.
Pairing
completed
Pairing mode
Turn on Bluetooth
search for
ICLEAR HAD1000
• Check Bluetooth phone capabilities
before use.
• Hold Up and Down buttons together
for 2 seconds. The status indicator
light will blink blue and red alternately.
• From your mobile phone Bluetooth menu,
search for ‘ICLEAR HAD1000’.
• If your phone requires a password,
enter ‘0000’.
IPAGE 6
Quick User Guide
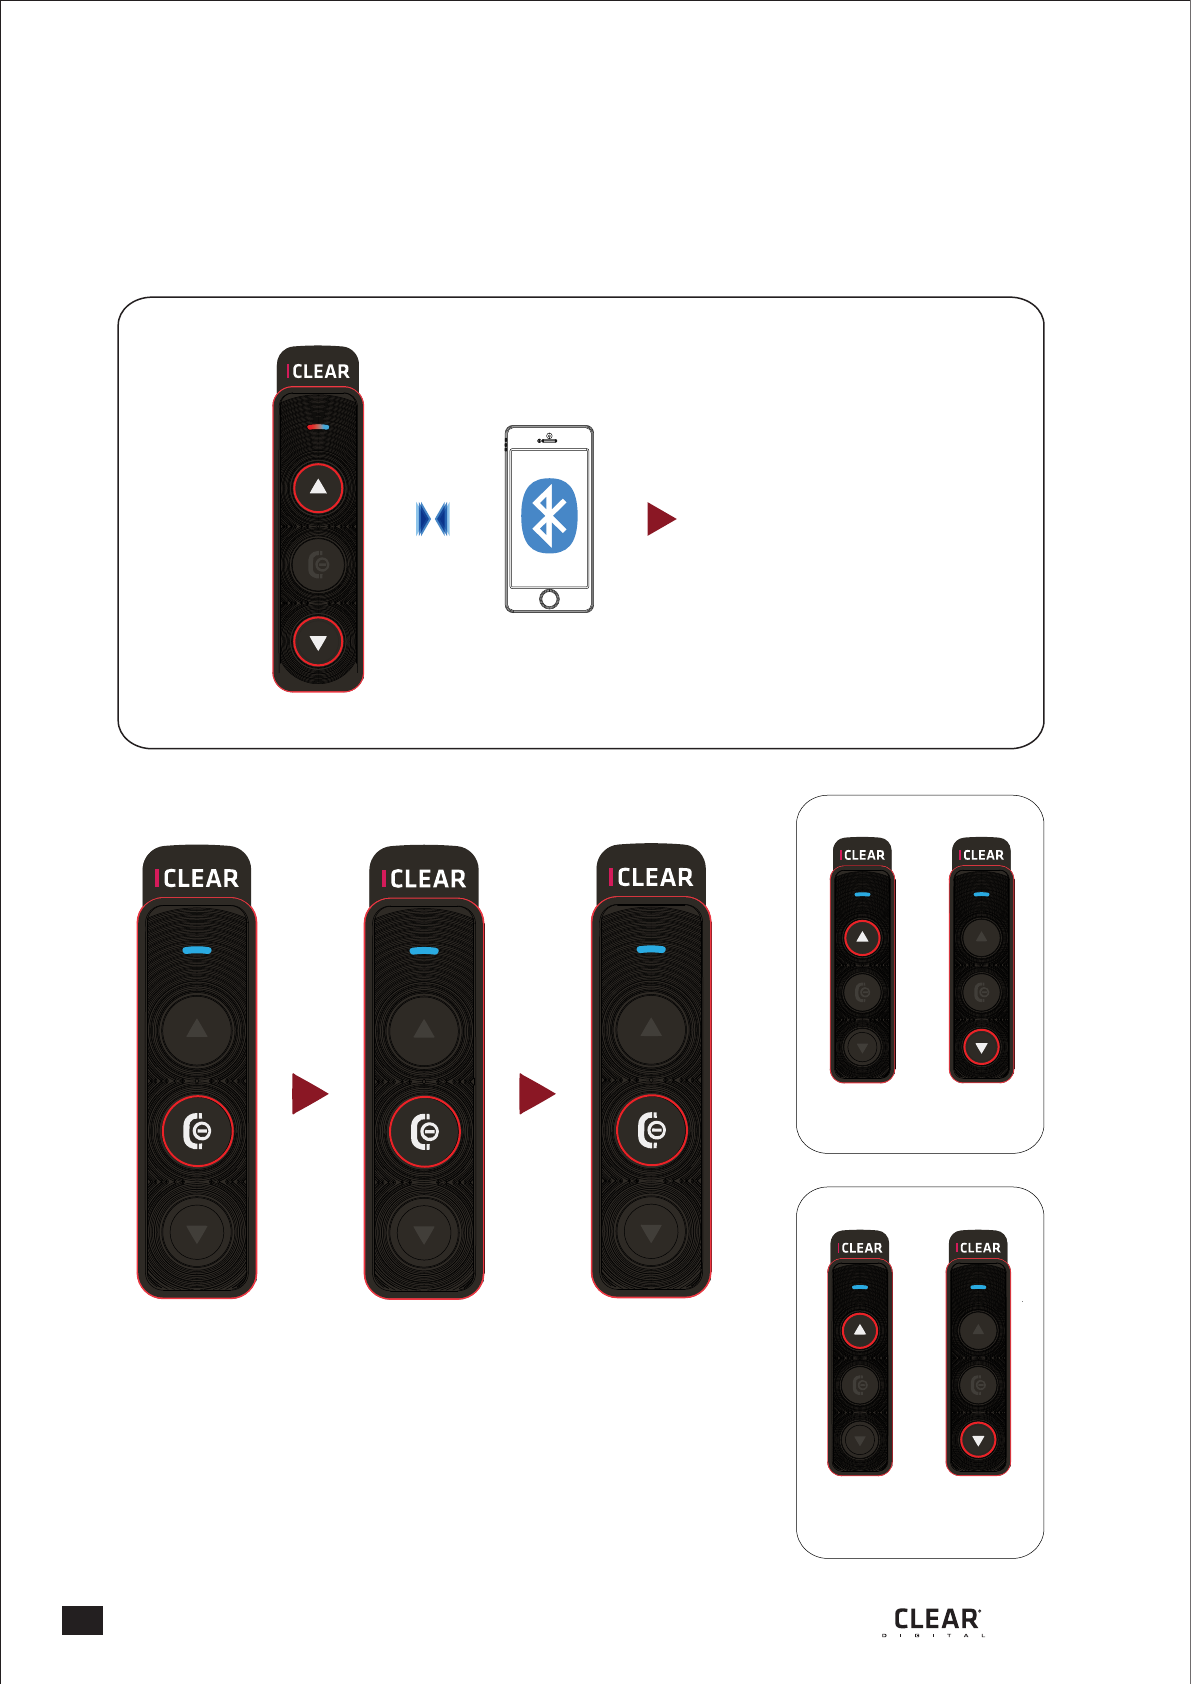
Music Streaming Function
NOTE: For music Bluetooth adaptor you would need to pair the music bluetooth adaptor
before using it with hearing assistive device.
Pairing mode
Press ‘Power’
twice
Playing music
Press ‘Power’
once
Pause
Press ‘Power’
twice
Resume
EN
Press ‘Up’
twice
Fast forward
Press ‘Down’
twice
Back track
Press ‘Up’
once per level
Volume up
Press ‘Down’
once per level
Volume down
Pairing completed
Turn on Bluetooth
search for
ICLEAR HAD1000
IPAGE 7
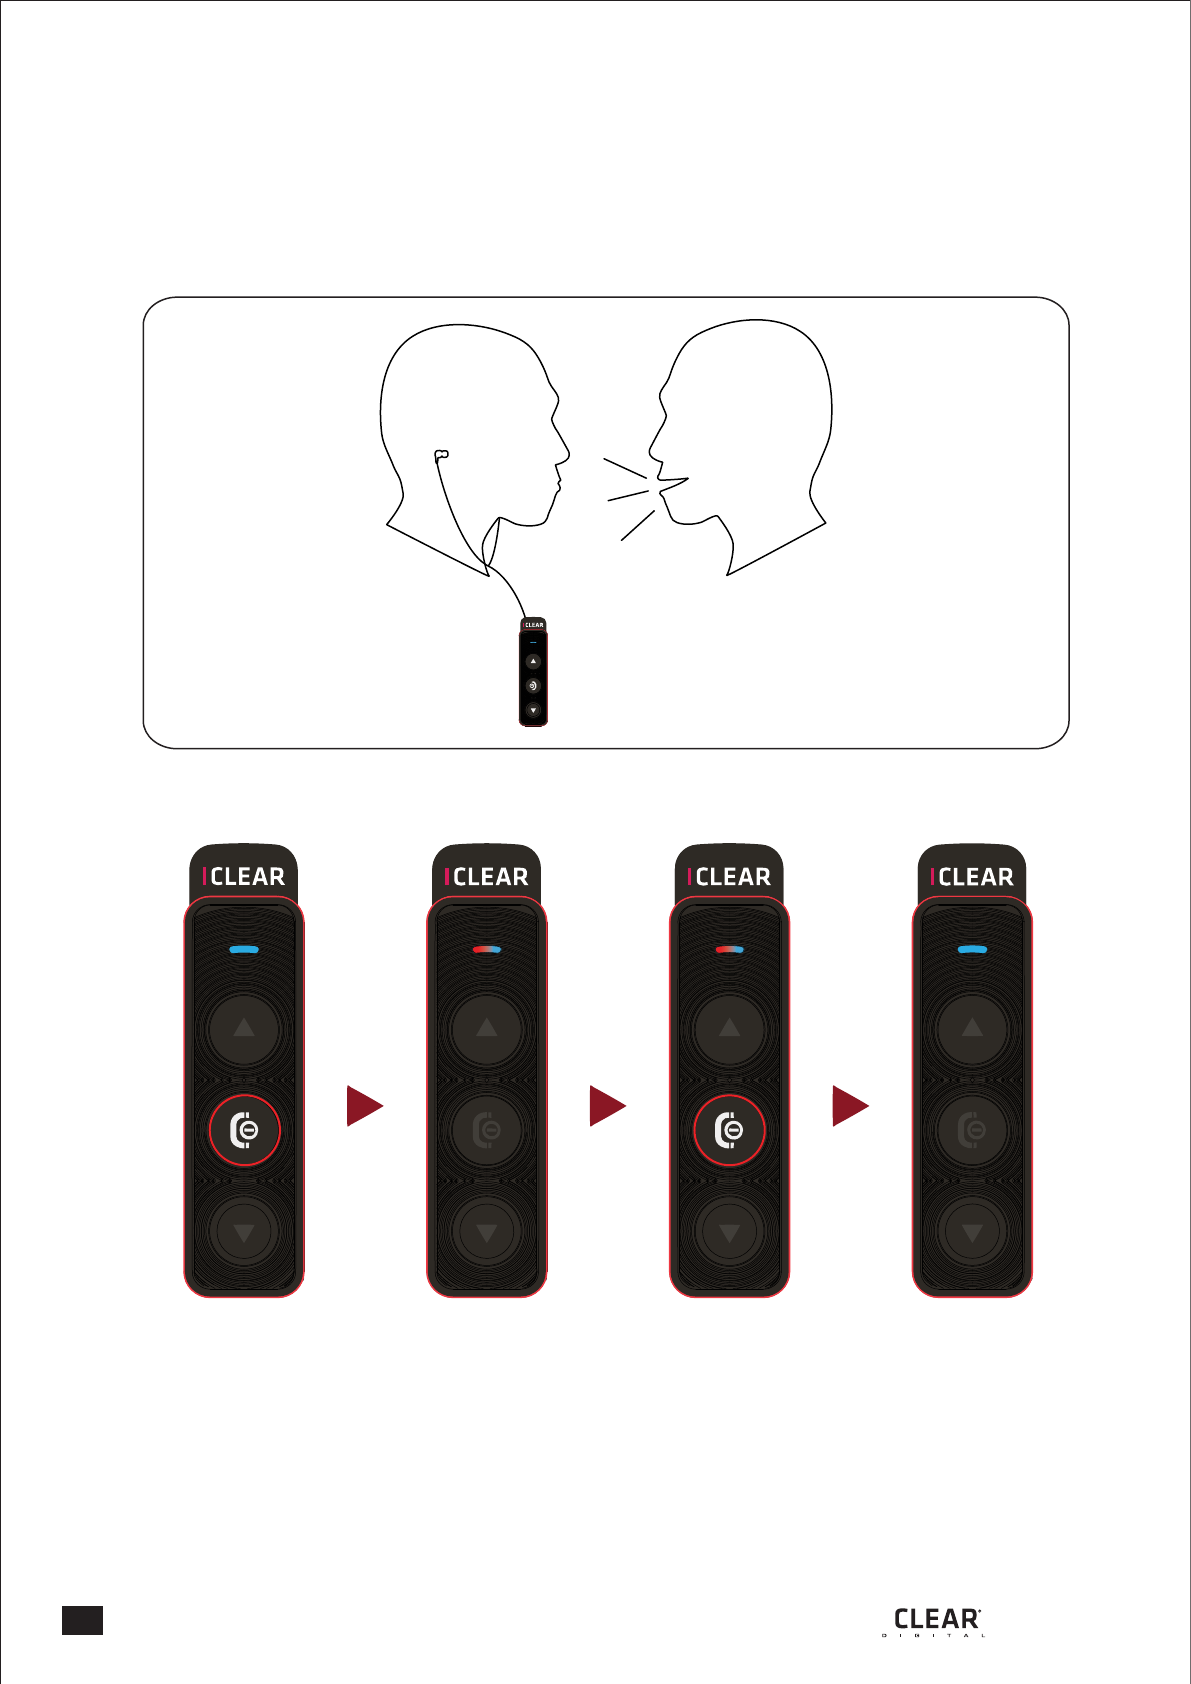
Press ‘Power’
once
Hearing assist
is activated
Press ‘Power’
once
Hearing assist
is deactivated
EN PAGE 8
Quick User Guide
Hearing Assist
I

Quick User Guide
General Functions and Layouts
Power On
Hold the ‘Power’ button for 3 seconds.
The LED will flash purple for 2 seconds before changing to a blinking blue LED.
Pairing Mode
After power on, continue and hold the ‘Up’ and ‘Down’ button to enter into device
pairing mode. The LED will blink blue and red alternately.
Volume
Press ‘Up’ button once to increase volume.
Press ‘Down’ button once to decrease the volume.
Warning and Safety Instructions
This manual uses the and icons to highlight certain instructions.
Below is an explanation of the icons.
Attention
This icon highlights special instructions and precautions intended to avoid damage to the
system. Non-compliance may void the product warranty.
Warning
This icon provides precautions important to prevent injuries to the user.
Attention
Please read through the operating instructions to understand how to operate the system, in
particular the safety instructions.
Warning
Please note that there are some countries that by law disallow theuserto set the device to a
volume that prevents you from perceiving the surrounding.
Please note that there are some countries the use of both speakers simultaneously is authorized
only out of public traffic conditions.
Please check with the relevent authorities for local safety legislation before using the device
on the road.
Prolonged exposure to loud sounds may lead to permanent hearing damge.
Speaker volume is greater than 90dB may lead to permanent hearing damage.
Do not attempt to place an outgoing call through the mobile phone while riding on the
motorcycle at any point of time.
Please do not use the Universal Remote in anyway that may distract you or hinder your
judgment while on the move. Never ever compromise your safety and the safety of others.
EN
!
!
!
IPAGE 9

!
EN
Warning and Safety Instructions
Attention
Charging and handling rechargeable battery products incorrectly may cause them to overheat,
catch fire or explode.
To prevent this please follow the instructions below:
1. Never change the batteries yourself, always bring the device to an authorised dealer to
perform the replacement for you.
2. When charging, use ONLY the charging cable provided or a replacement cable from the
dealer. Using similar, compatible or any other cables may lead to permanent product
damage and will void the product warranty.
Never make any modifications to any part of the hearing assistive device in any way as it may
cause the system to malfunction causing hurt to you.
IPAGE 10
EN
Features
Hearing assistive device has three main functions:
1. Make mobile phone calls.
2. Listen to music.
3. Hearing assist.
Mobile phone functions
• Bluetooth phone audio capabilities, HFP & HSP profile.
• Hearing assist function applied to your phone call.
Music streaming functions
• Bluetooth music streaming with hi-fi and stereo capabilities, A2DP profile.
• Bluetooth audio/ video remote control capability, AVRCP profile.
• Hearing assist function not applied to music streaming.
Hearing Assist Function
Advanced Product Features
• Noise suppression
• Directivity enhancement
• Comfort zone adjustment
IPAGE 11
Installation
The hearing assistive device package contains:
HAD1000
Hearing assistive
device
Universal Earbud
(Short)
AC charger &
USB charging cable
Installation
EN IPAGE 12
Install Universal Earbud
Make sure the speaker wire is inserted into the main unit. lnsert the speaker wire into the control
unit until you can no longer see the 3 ribs on the speaker wire plug.
EN
General Operations
Your hearing assistive device is now all set and ready to go!!!
The operations described here are applicable to all modes of
operations.
Power On
Hold the ‘Power’ button for 2 seconds to power
on the hearing assistive device. The status
indicator will blink blue and a power up tone
can be heard.
Power Off
To switch off the hearing assistive device, press
and hold the ‘Power’ button for 5 seconds. The
status indicator will blink red 5 times followed
by a long beep before fully shutting down.
Power Save Mode (Auto Power Off)
If the hearing assistive device feature has not been in use and not connected to any other
devices, the system will auto shut down in 5 minutes.
Low Battery
When the battery level is low, the status indicator light will flash red twice every 2 seconds
while emitting a warning beep every minute.
Charging
To charge the helmet communicator, connect it to the adaptor/ USB Port with the USB
charging cable provided. Upon charging, if the unit is on, the system will automatically
initiate power down.
Volume Control
The volume control of the helmet communicator can be controlled using the ‘Up’ and ‘Down’
buttons. Press ‘Up’ or ‘Down’ button will increase the volume respectively. The volume
control for each mode is independent of each other.
Automatic Speaker Loudness (Communication only)
The speaker loudness will be automatically adjusted depending on the environment noise level.
However you can still adjust the volume manually.
Automatic Pairing
• Hearing assistive device has the ability connecting to the last paired device automatically for
two features - music and mobile phone.
• Automatic pairing of the control unit with music devices is dependent on the music devices.
Automatic Profile Switch
The hearing assistive device supports multiple profiles concurrently, but at any point in time only
one profile is active. The automatic profile switch determines which profile should be active at
any point of time starting from the highest priority:
(1) Mobile phone functions
(2) Music functions.
IPAGE 13
Status Indicator
‘Up’ Button
‘Power’ Button
‘Down’ Button
Charging Socket

EN
General Operations
To use the hearing assistive device with your mobile phone for the first time, you must first
connect them wirelessly by pairing.
Pairing
• To connect the control unit to a mobile phone, hold the ‘Up’ and ‘Down’ buttons for 2
seconds. This puts the control unit into paring mode. The status indicator would blink
blue and red alternately.
• Turn on the mobile phone Bluetooth functions and search for Bluetooth devices.
• Select ‘IClear HAD1000’ to pair with the desired device.
• If prompted to enter a passcode, enter ‘0000’.
NOTE: Most mobile phones when paired would be automatically connected with both phone
and music Bluetooth capabilities.
After pairing the control unit to your mobile phone, you may now use the hearing assistive
device to answer and make calls or listen to music.
Pick Up Calls
When a call comes to the mobile phone, press the ‘Power’ button once.
Reject Calls
To reject an incoming call or an incorrectly placed outgoing call, hold the ‘Power’ button
for 2 seconds.
Voice Call
To activate voice call, hold the ‘Down’ and ‘Power’ buttons for 2 seconds. The accuracy of
this function is dependent on the mobile phone.
IPAGE 14

EN
General Operations
Mobile phone opeartions
Hearing Assist (Activated automatically)
Allows you to experience the adaptive hearing enhancement in the phone call according to
the hearing curve obtained in the testing of Tune2Fit apps.
Last Number Redial
To redial the last number, hold the ‘Up’ and ‘Power’ buttons for 2 seconds. The capability
of this function is dependent on the mobile phone used.
3 way calling
• While on a call, if an incoming call comes in, you may answer the call by pressing the
‘Power’ button once.
• To swap between 2 concurrent calls, press the ‘Power’ button once.
• To end a call during a 3 way call, hold the ‘Power’ button for 2 seconds to end the active call.
Upon terminating the active call, the call on hold will automatically become the active call.
Music feature
If the mobile phone supports A2DP/AVRCP profile, user may activate the music by playing it
directly from the phone or by controlling the music via the ICLEAR. To operate refer to Music
Streaming Operations section. Should the documented steps not work, refer to your phone user
manual on how to activate the A2DP/AVRCP feature.
IPAGE 15

Music Streaming Operations
To use the control unit with your music devices you must connect them wirelessly through
Bluetooth pairing. The music device must have Bluetooth capability.
Pairing
- To connect the control unit a Bluetooth music device, hold the Up and Down buttons for
2 seconds. This puts the ICLEAR into pairing mode. The status indicator will blink blue
and red alternately.
- Next, put the Bluetooth music device into pairing mode. Both the control unit and the music
device should automatically pair together.
After pairing to a music device, you may use the ICLEAR to wirelessly listen to music stored on
the device. In order to use the control unit to remotely control the music, the music device must
have Bluetooth Audio/ Video Remote Control capability, AVRCP profile.
Play
To play music, press the Answer button 2 times.
Stop
To stop music, press the Answer button 1 time.
Fast Forward
To skip to the next track, press the Up button 2 times.
Backtrack
To skip to previous track, press the Down button 2 times.
EN IPAGE 16
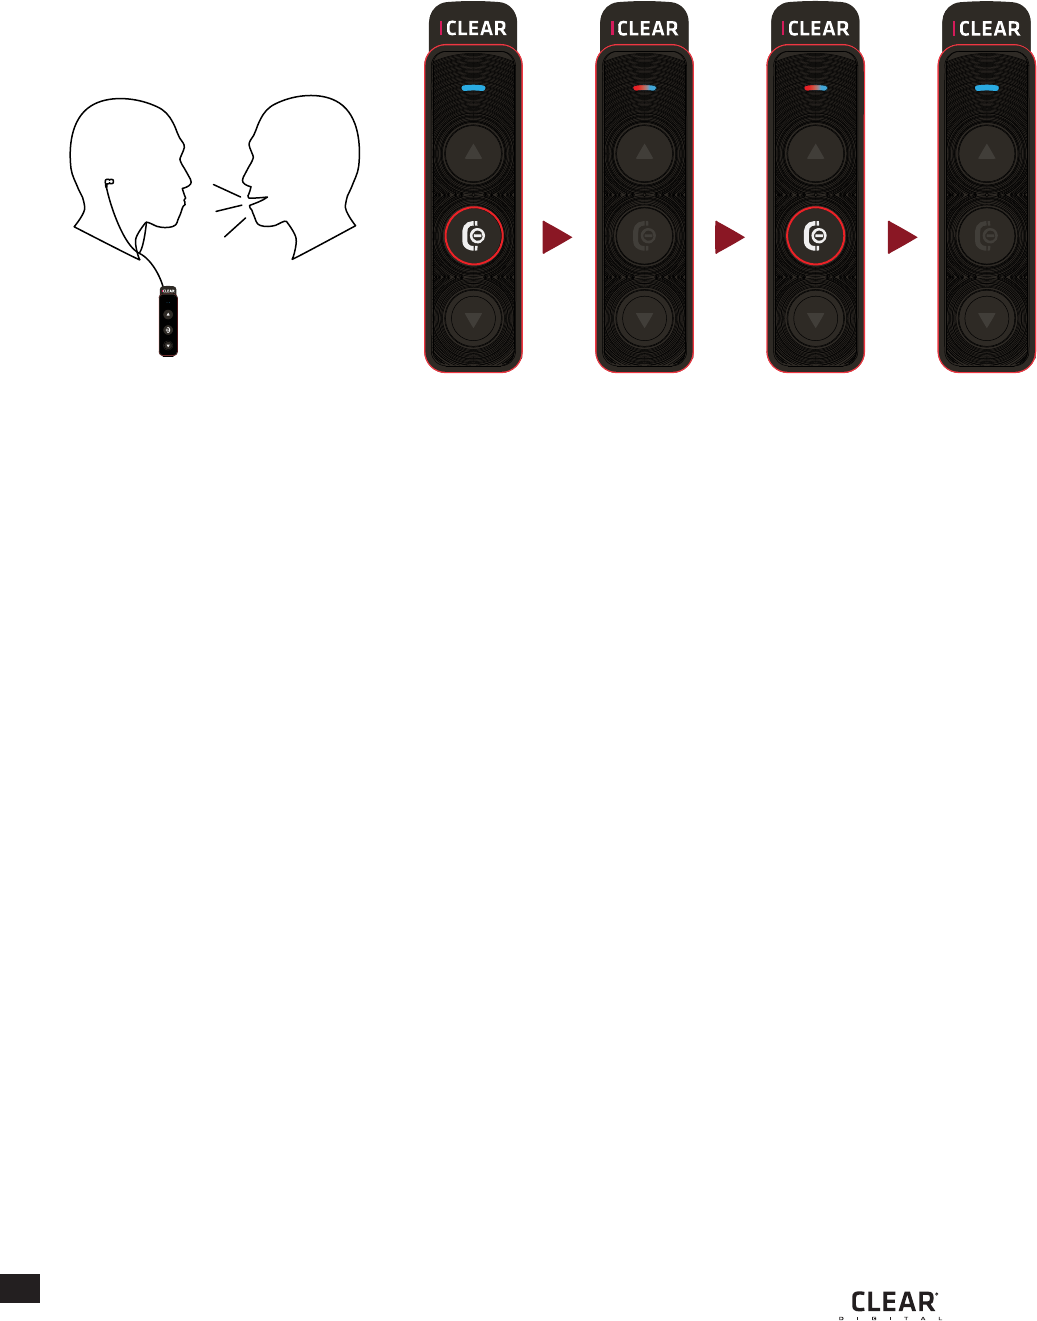
Hearing Assist operations
Allows you to experience the adaptive hearing enhancement in daily conversation according to
the hearing curve obtained in the testing of Tune2Fit apps.
Hearing Assist, Phone Call and Music Switching
Music has the lowest priority. If you are in music mode, an incoming hearing assist request
will stop the music and you will be connected to the hearing assist mode. If you need to switch
from hearing assist to music mode, you need to deactive the hearing assist mode.
Music will resume automatically after that.
To activate hearing assist mode while listening to music you must pause music first by
pressing the “Power” button once. Then proceed with pressing the “Power” button to
turn on the hearing assist mode.
Other Functions
USB Firmware Upgrade
Upon purchase, and periodically thereafter, please visit www.iclear-digital.com to ensure you’re
operating with the latest firmware and taking advantage of feature enhancements.
Wireless Firmware Upgrade
EN
Press ‘Power’
once
Hearing assist
is activated
Press ‘Power’
once
Hearing assist
is deactivated
IPAGE 17
Mobile Phone Operations
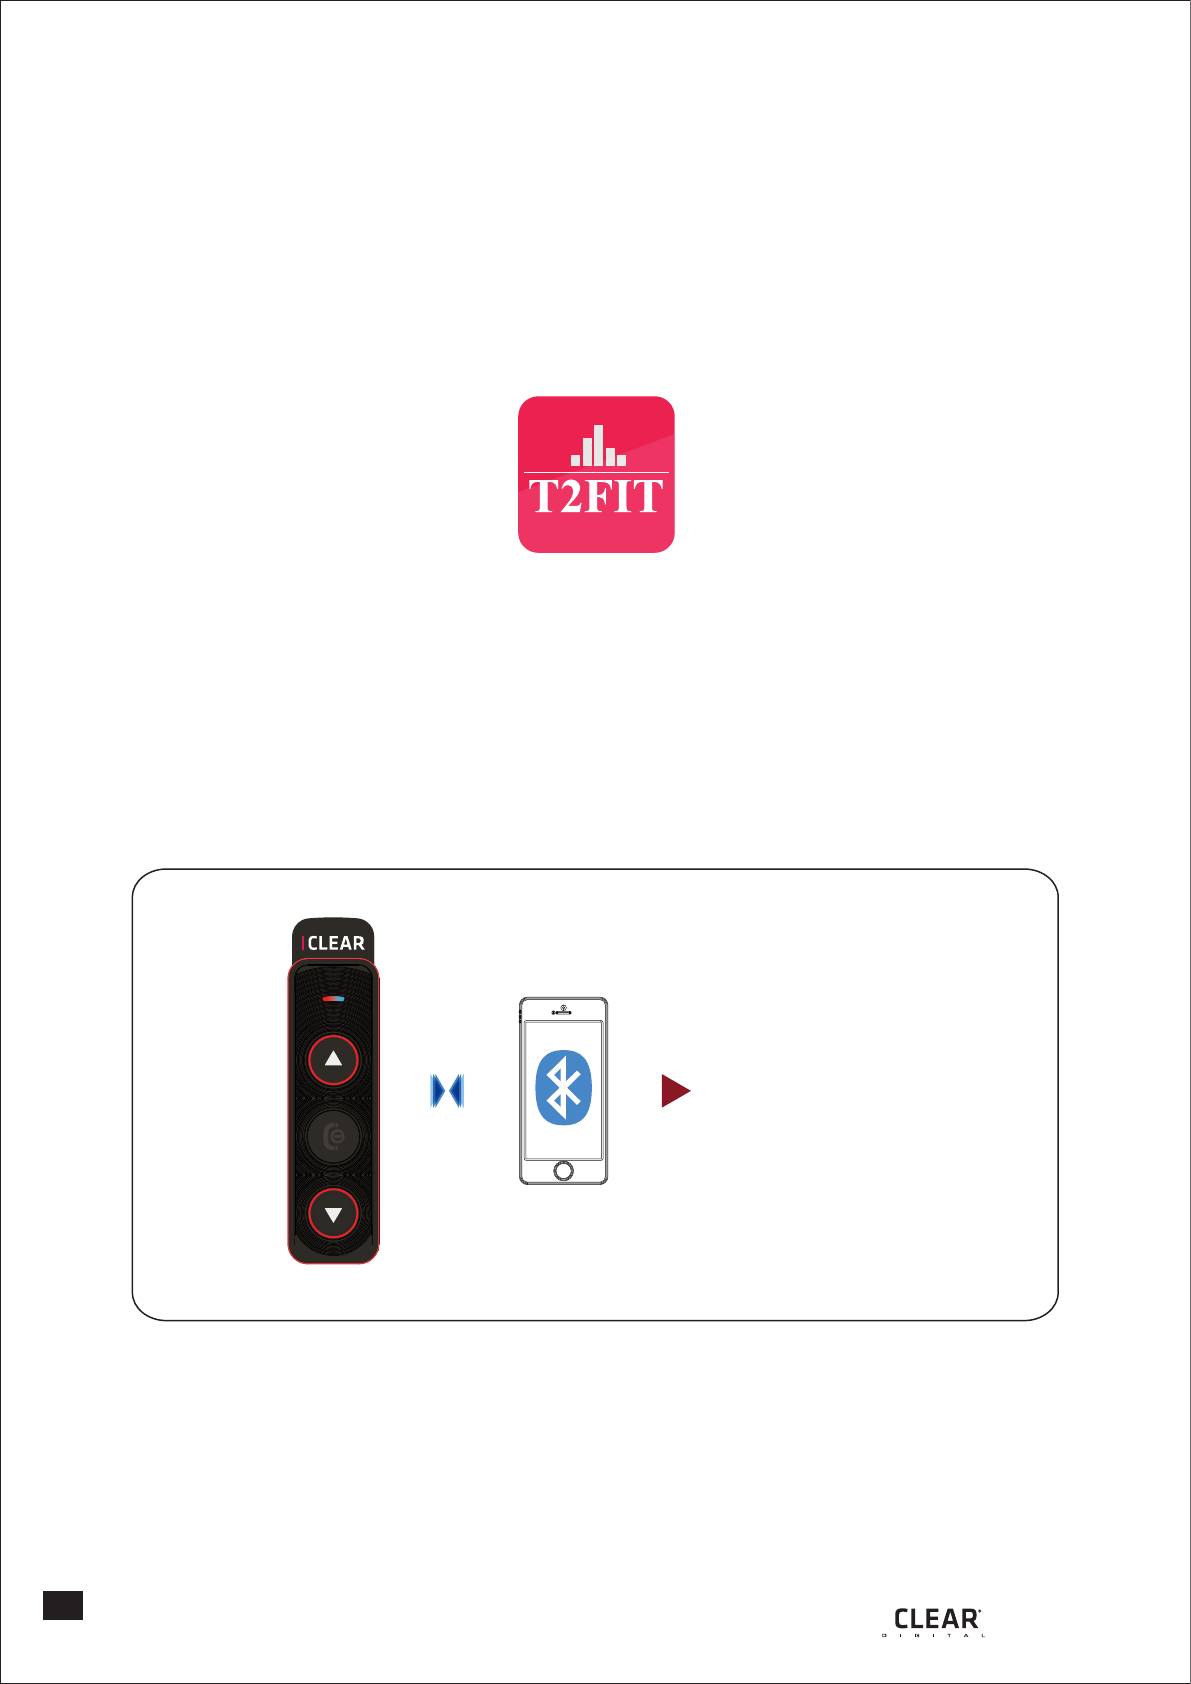
TUNE 2 FIT App
Download Tune2Fit.apk file from http://www.iclear-digital.com
(Only applicable for Android)
Open the file and install the app.
NOTE: To tune the hearing assistive device using the Tune2Fit app you would need to pair
the unit with an Android Smartphone.
EN
Hold ‘Up’ and ‘Down’
2 seconds
Pairing mode
Pairing completed
Turn on Bluetooth
search for
ICLEAR HAD1000
IPAGE 18
General Operations
Your hearing assistive device is now all set and ready to go!!!
The operations described here are applicable to all modes of
operations.
Power On
Hold the ‘Power’ button for 2 seconds to power
on the hearing assistive device. The status
indicator will blink blue and a power up tone
can be heard.
Power Off
To switch off the hearing assistive device, press
and hold the ‘Power’ button for 5 seconds. The
status indicator will blink red 5 times followed
by a long beep before fully shutting down.
Power Save Mode (Auto Power Off)
If the hearing assistive device feature has not been in use and not connected to any other
devices, the system will auto shut down in 5 minutes.
Low Battery
When the battery level is low, the status indicator light will flash red twice every 2 seconds
while emitting a warning beep every minute.
Charging
To charge the helmet communicator, connect it to the adaptor/ USB Port with the USB
charging cable provided. Upon charging, if the unit is on, the system will automatically
initiate power down.
Volume Control
The volume control of the helmet communicator can be controlled using the ‘Up’ and ‘Down’
buttons. Press ‘Up’ or ‘Down’ button will increase the volume respectively. The volume
control for each mode is independent of each other.
Automatic Speaker Loudness (Communication only)
The speaker loudness will be automatically adjusted depending on the environment noise level.
However you can still adjust the volume manually.
Automatic Pairing
• Hearing assistive device has the ability connecting to the last paired device automatically for
two features - music and mobile phone.
• Automatic pairing of the control unit with music devices is dependent on the music devices.
Automatic Profile Switch
The hearing assistive device supports multiple profiles concurrently, but at any point in time only
one profile is active. The automatic profile switch determines which profile should be active at
any point of time starting from the highest priority:
(1) Mobile phone functions
(2) Music functions.
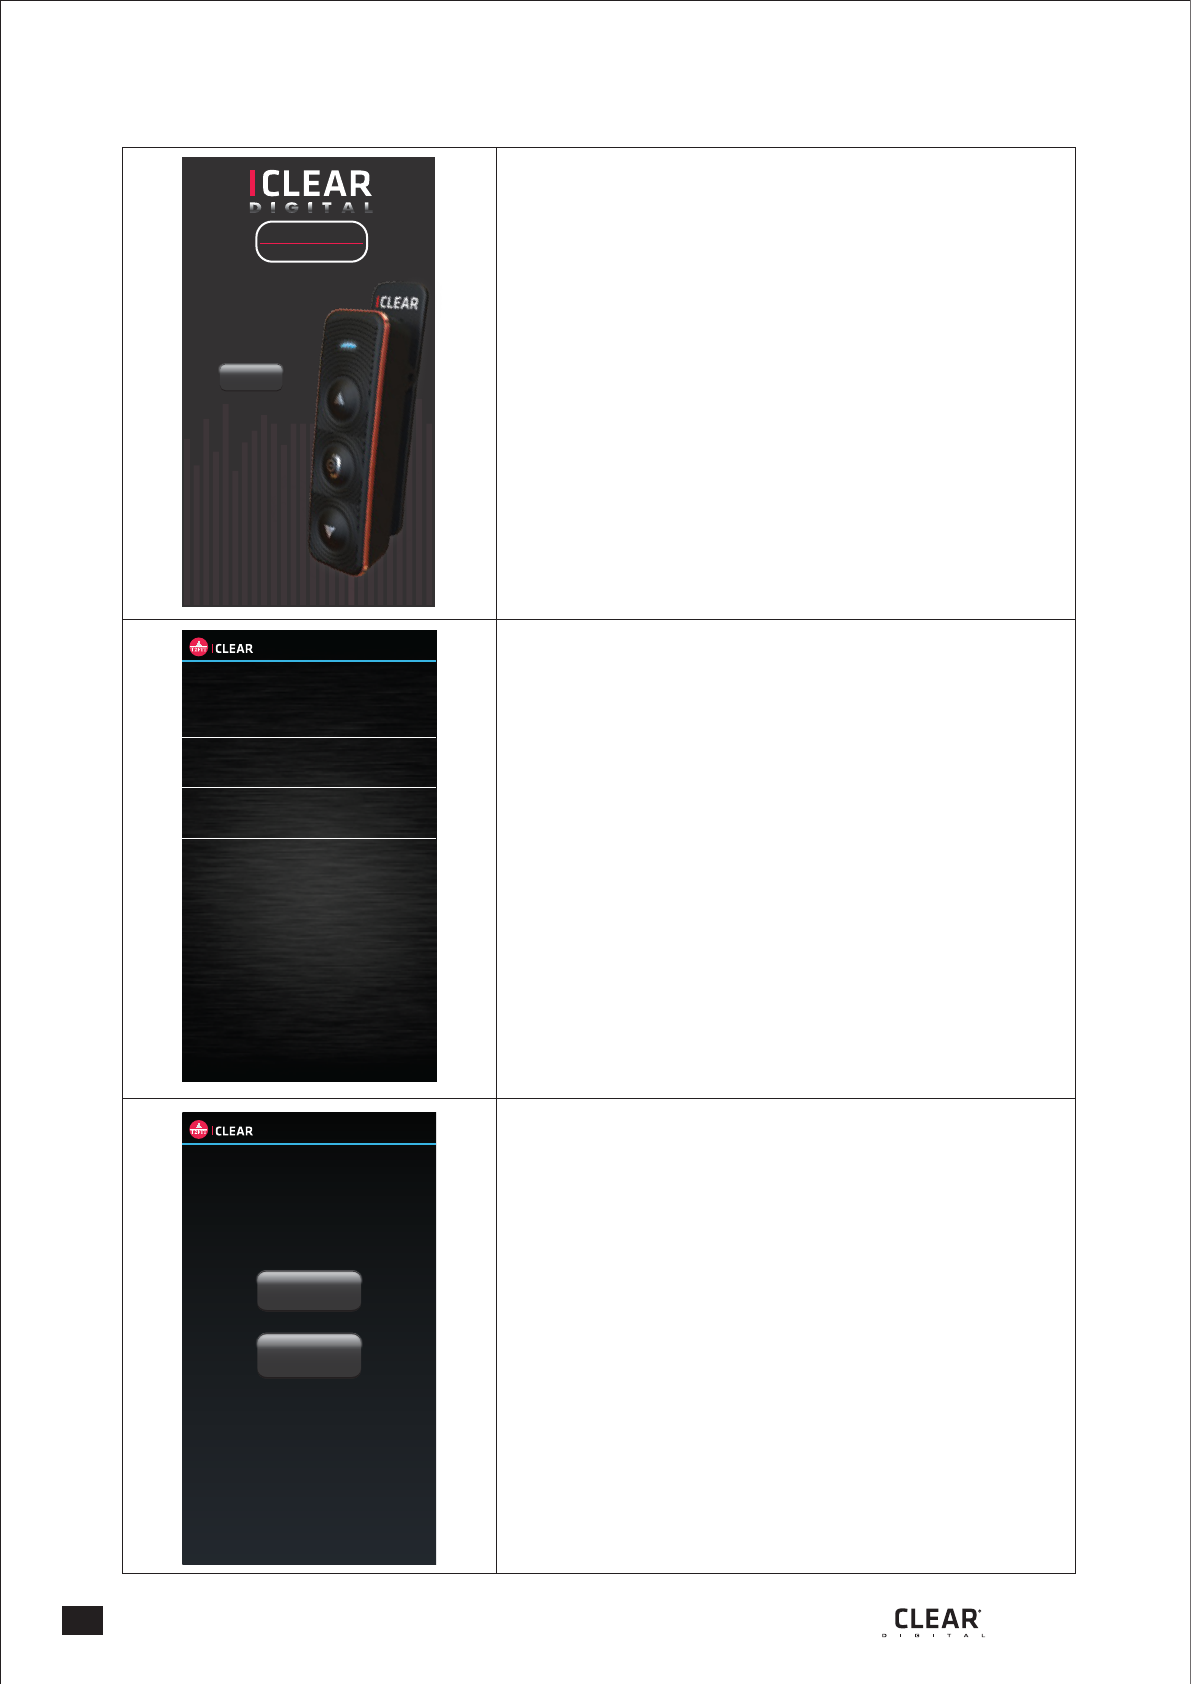
Select ICLEAR HAD1000
Select to tune your own hearing curve or configure
the device. If this is the first time you are using
the device. Please tune your hearing curve to be
saved in the device before going to the configuration
mode.
TUNE2FIT
Make You Hear Clearer
Start
TUNE2FIT
Select Device
ICLEAR HAD1000
00:02:5B:BB:10:07
ICLEAR HAD1000
00:05:5B:BB:10:06
ICLEAR HAD1000
00:02:5B:BB:10:02
TUNE2FIT
Select Mode
Tuning Mode
Conguration
Mode
EN
Mobile Phone Operations
Open the app.
Click the ‘Start’ button to begin
IPAGE 19
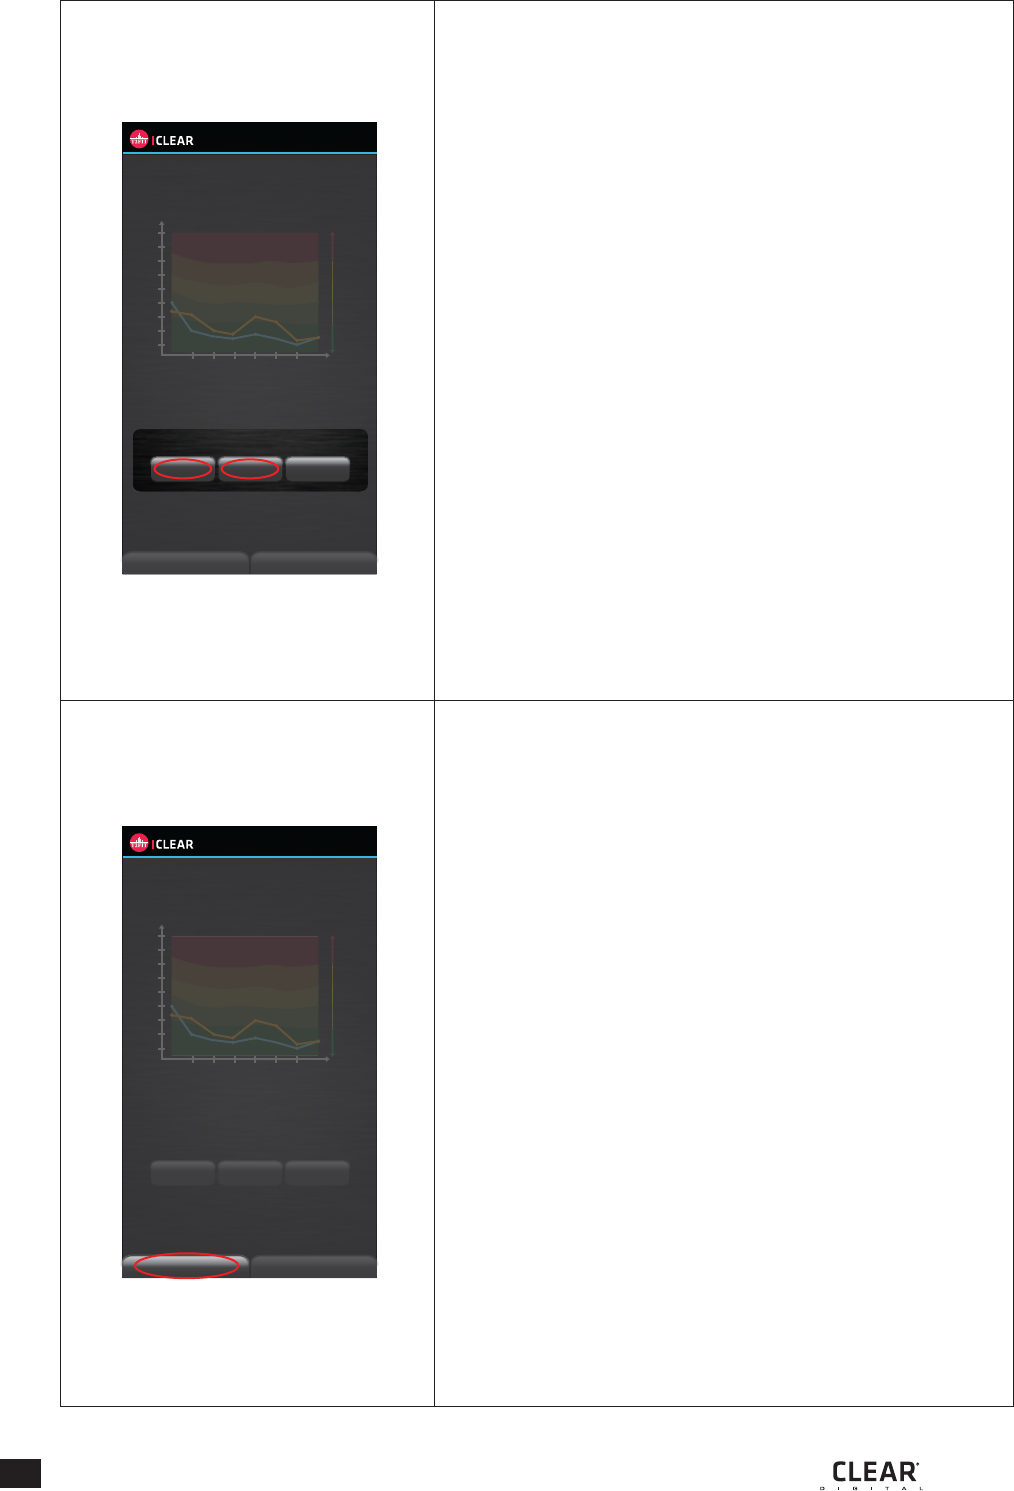
TUNE2FIT
Left Ear
400 Hz
Volume (dB)
90
45
0
17
Progress
Prev Band
Band 1
Next Band
+
-
TUNE2FIT
Right Ear
3500 Hz
Volume (dB)
90
45
0
12
Progress
Prev Band
Band 8
Preview
+
-
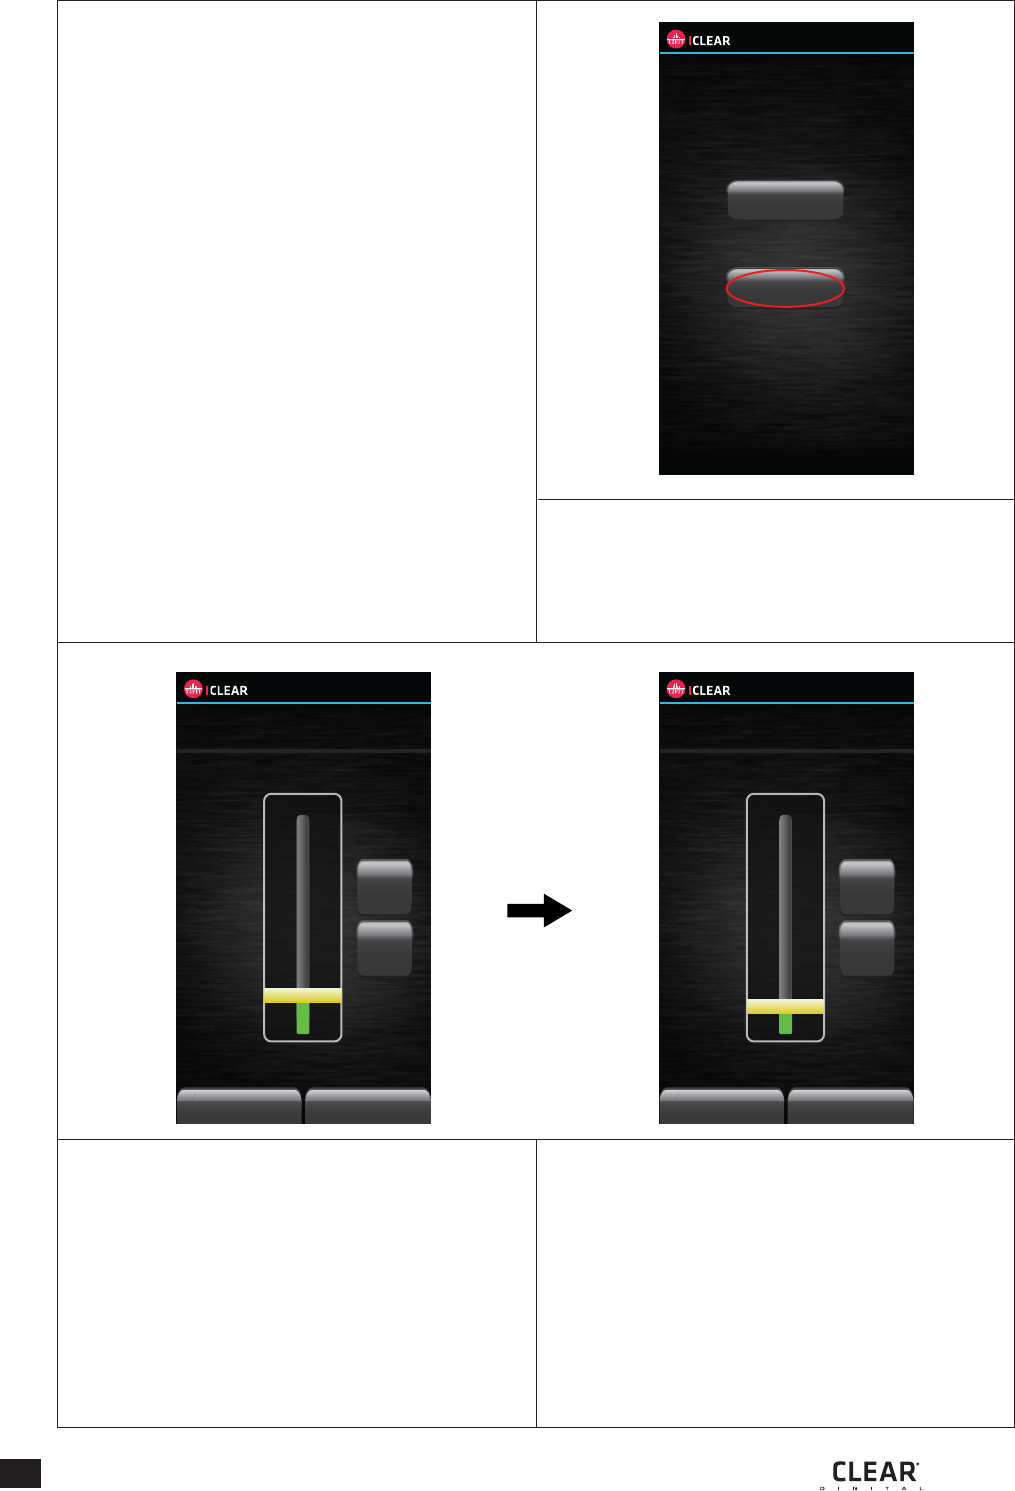
Click the ‘+’ button to increase the volume
Click the ‘–’ button to decrease the volume
You can also press and hold the yellow bar
to scroll up and down to increase or decrease
the volume.
You can click ‘Next Brand’ to tune the next
point or click‘Prev Band’ to retune the previous
point.
Once you complete the 16 tuning points,
you can go to the preview screen to
experience how the device can help you
hear better.
(Please continued on page 22)
EN
Mobile Phone Operations
IPAGE 20
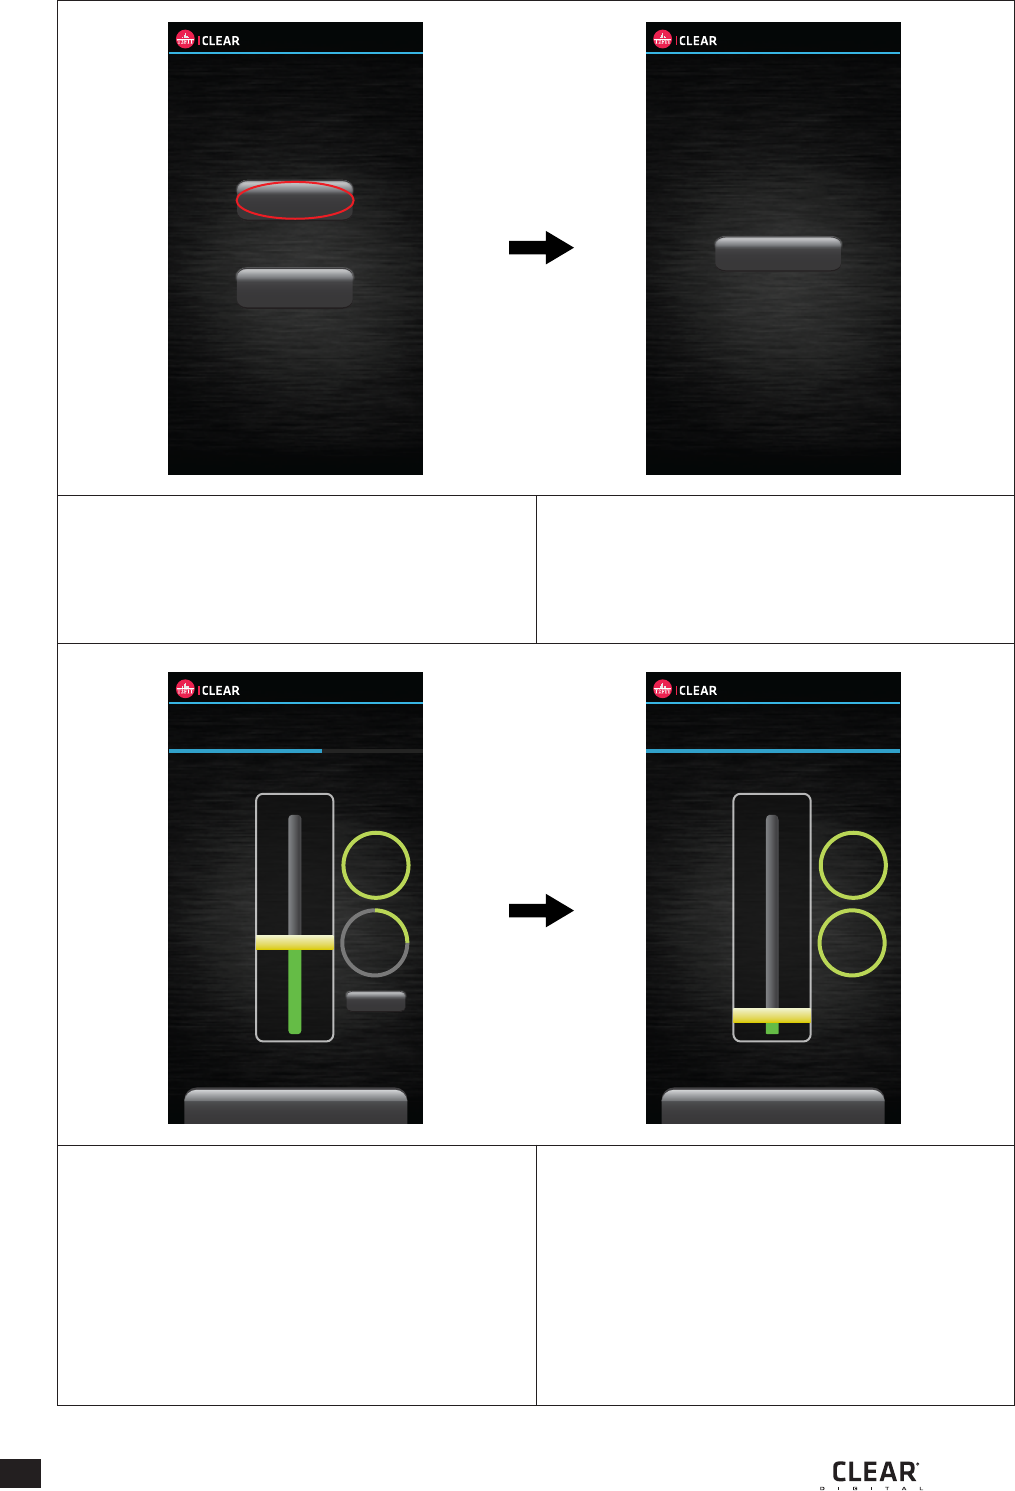
Manual Tuning
Manual Tuning is recommended for first
time user or user who wants to fine tune
his hearing curve.
TUNE2FIT
How will you tune it?
Auto Tuning
Manual Tuning
What is Auto Tuning?
What is Manual Tuning?
Select tuning mode:
If you select Manual Tuning
Please continued on (page 20)
If you select Auto Tuning
Please continued on (page 21)
The program will require you to tune
each ear’s hearing sensitivity in 8
different frequency bands.
A total of 16 tuning points is required.
EN
Mobile Phone Operations
IPAGE 21
Auto Tuning
Auto Tuning allows user to have a simpler
and faster tuning method for quick fix.
Click the start button and the tuning
will start immediately.
TUNE2FIT
How will you tune it?
Auto Tuning
Manual Tuning
What is Auto Tuning?
What is Manual Tuning?
TUNE2FIT
Instruction
The volume will increase slowly from 0. Press
OK when you hear it.
There will be 8 tests on each ear, a total of 16
tests.
Click START to begin!
Start
The volume level will increase automatically.
If you feel that you miss the hearing level,
you can press and hold the yellow bar and
scroll it down.
Hit the “OK” button when you hear the sound.
Once you complete the 16 tuning points,
you can go to the preview screen to
experience how the device can help you
hear better.
(Please continued on page 22)
TUNE2FIT
Press OK when you hear it!
1050 Hz
Left Ear
Completed!
Right Ear
Band 3
Volume (dB)
90
45
0
37
Progress
OK
Preview
TUNE2FIT
Press OK when you hear it!
3500 Hz
Left Ear
Completed!
Right Ear
Completed!
Volume (dB)
90
45
02
Progress
Preview
Completed
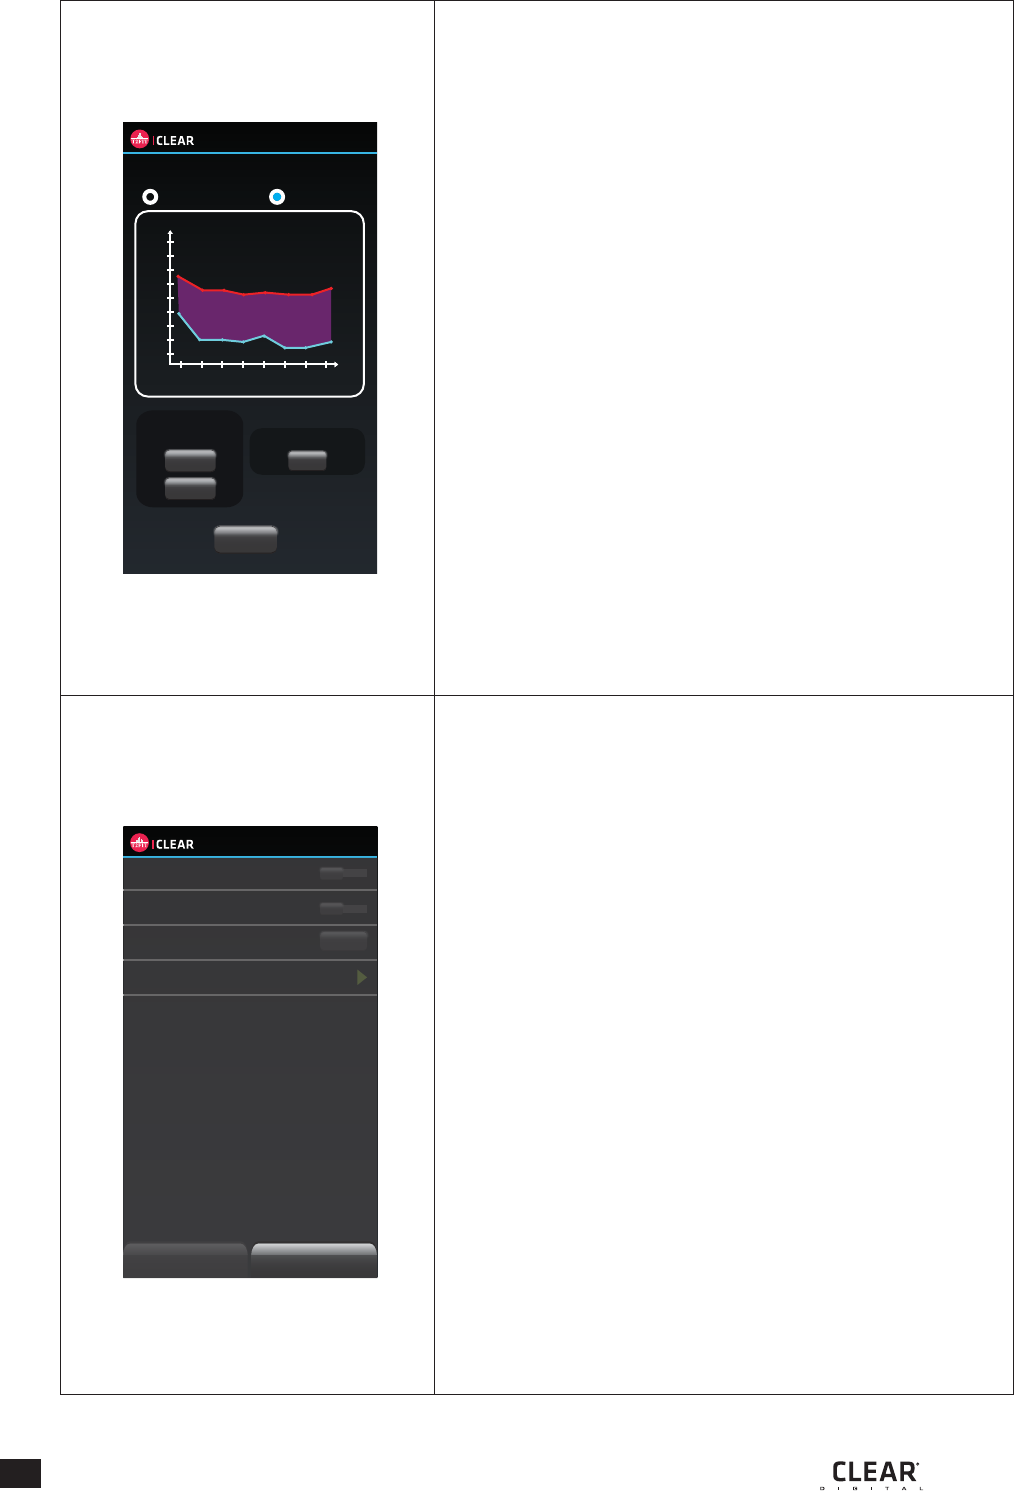
TUNE2FIT
Preview Sound
Hearing Curve
Listening Comparison
Before After Stop
Congure Done
10
20
30
40
50
60
70
80
90
Volume (dB)
400 750 1050 1350 1800 2300 2900 3500
Severe
Normal
Orange: Left Ear
Cyan: Right Ear
Frequency (Hz)
Congure
Click Configure button to directly go to
Configuration Mode.
EN PAGE 22
Mobile Phone Operations
I
The Hearing Curve allows you to understand
your hearing capability.
Click the Before button to experience your
listening capability before using HAD1000.
Click the after button to experience your
listening capability with the help of HAD1000.
TUNE2FIT
Preview Sound
Hearing Curve
Listening Comparison
Before After Stop
Congure Done
10
20
30
40
50
60
70
80
90
Volume (dB)
400 750 1050 1350 1800 2300 2900 3500
Severe
Normal
Orange: Left Ear
Cyan: Right Ear
Frequency (Hz)
Listening Comparison
Before After Stop
Listening Comparison
Before After Stop
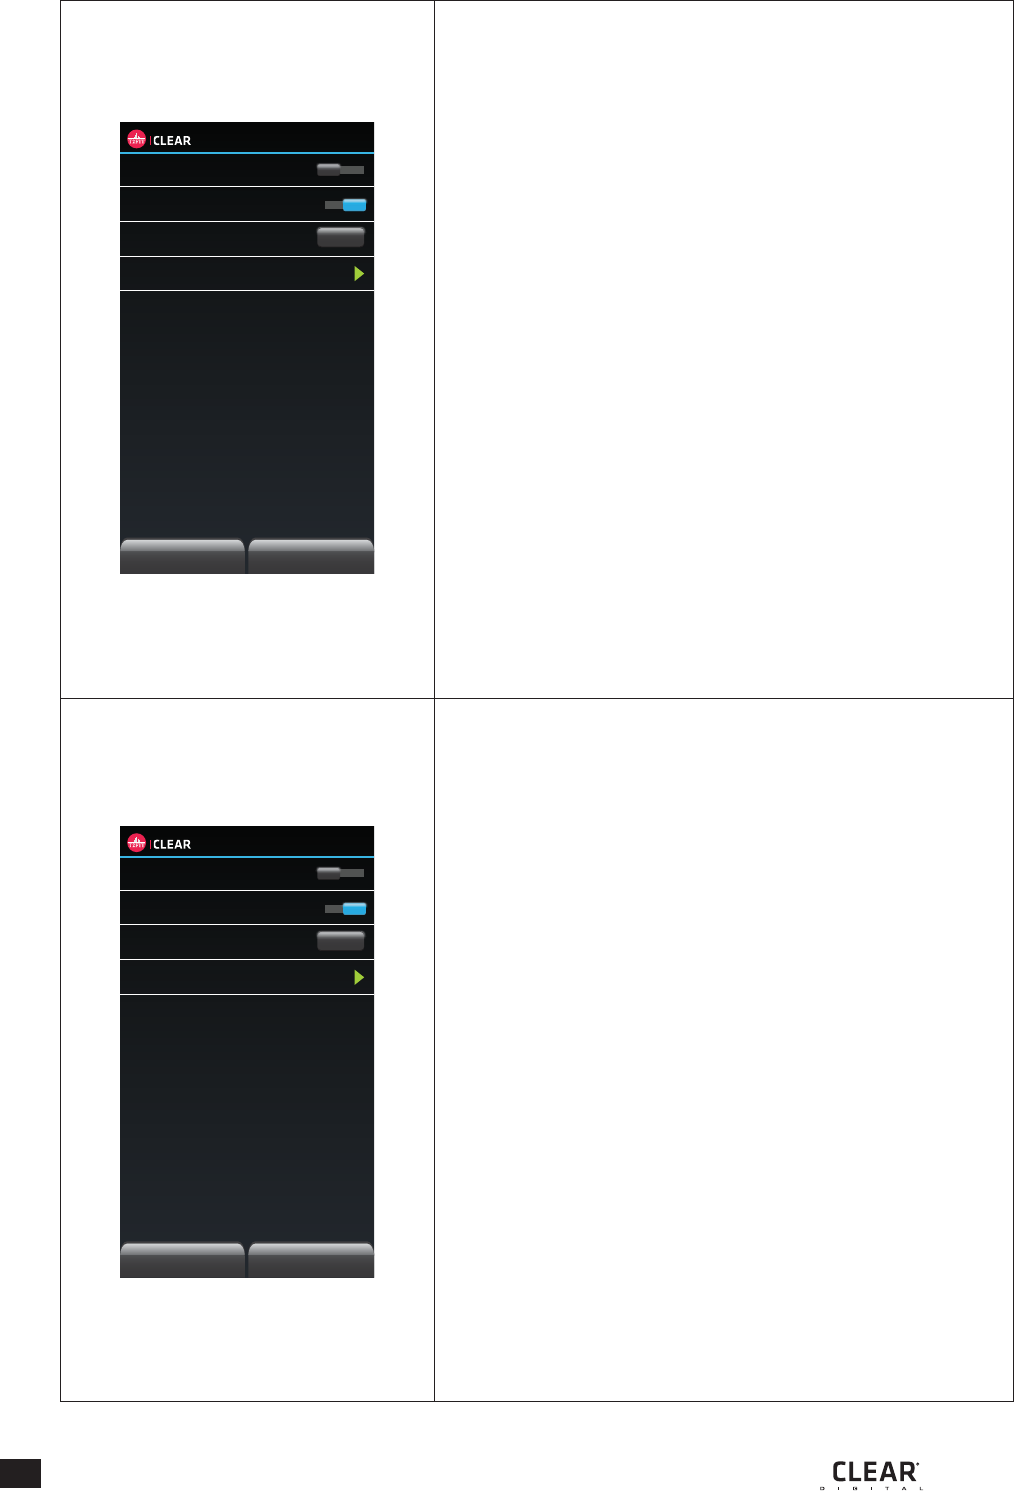
TUNE2FIT
Noise Suppression
Adaptive Double Beamforming
Battery Level 79%
Hearing ComfortZone
Refresh
OFF
ON
Back to Tuning Done
Noise Suppression
Allows you to enjoy your hearing experience
even in noisy environment.
Directivity Enhancement
Allows you to obtain an extra directivity for the
sound source in front of you.
(especially for 1-to-1 conversation)
Battery Level
Allows you to check whether you need to recharge
your device. Press the refresh button when you
need a more instant reading.
TUNE2FIT
Noise Suppression
Adaptive Double Beamforming
Battery Level 79%
Hearing ComfortZone
Refresh
OFF
ON
Back to Tuning Done
Once you are in configuration mode, the hearing
assist mode will be activated. This is to help you
experience the different setting live.
EN PAGE 23
Mobile Phone Operations
I
TUNE2FIT
Noise Suppression
Adaptive Double Beamforming
Battery Level 79%
Hearing ComfortZone
Refresh
OFF
OFF
Back to Tuning Done
You must click the Done button for all the
setting to be saved into you HAD1000
control unit.
TUNE2FIT
Hearing Comfort Zone
Left Ear Right Ear
10
20
30
40
50
60
70
80
90
Volume (dB)
400 750 1050 1350 1800 2300 2900 3500
Frequency (Hz)
Volume (dB)
400 750 1050 1350 1800 2300 2900 3500
Frequency (Hz)
Comfort Zone
Back
Dynamic Display
Adjust Max
Threshold
UP
DOWN
OFF
Comfort Zone Adjustment
Allows you to adjust the maximum threshold
of your hearing comfort zone. The algorithm
will adaptively maintain the power level of
the sound you hear in different frequency bands
within the hearing comfort zone.
EN PAGE 24
Mobile Phone Operations
I
EN PAGE 25
Button Configurations Summary
I
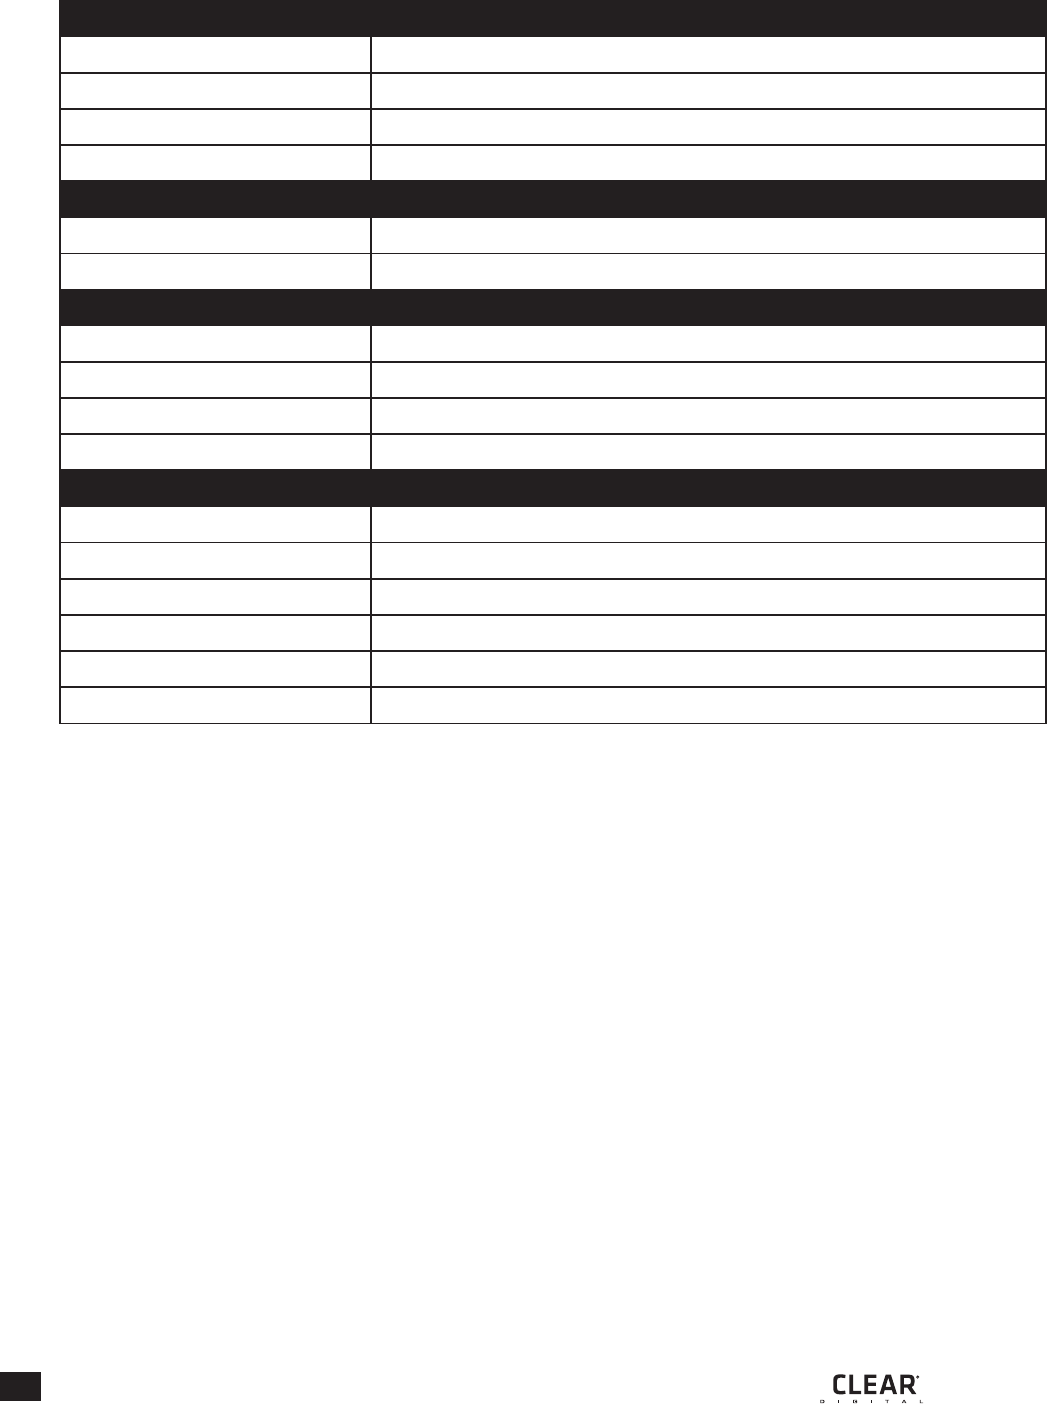
Basic
Power On Press and hold ‘Power’ button for 2 seconds
Power Off Press and hold ‘Power’ button for 5 seconds
Enter Pairing Press and hold both ‘Up’ and ‘Down’ buttons for 2 seconds
Reset Press ‘Power’, ‘Up’ and ‘Down’ buttons at the same time
Hearing Assist
Start Hearing Assist Press ‘Power’ once
Stop Hearing Assist Press ‘Power’ once
Phone Functions
Answer Incoming Call Press ‘Power’ once
Reject/ End Incoming Call Press and hold ‘Power’ button for 2 seconds
Volume Up Press ‘Up’ once
Volume Down Press ‘Down’ once
Music Functions
Play/ Resume Music Press ‘Power’ button twice
Stop Music Press ‘Power’ button once
Fast Forward Double press ‘Up’ button
Back Track Double press ‘Down’ button
Volume Up Press ‘Up’ once
Volume Down Press ‘Down’ once

Status Indicator Configurations Summary
The table below shows the status indicator configurations.
EN PAGE 26
Status LED
Power On Red blink 3 times
Power Off Purple 2 seconds
Standby Blue 2 seconds blink
Hearing Assist Purple 2 seconds blink
Hearing Tuning Blue and red slowly switching
Music Playing Blue double blink 2 seconds
Incoming Call Blue and red switching
In Call Slow blue blinking
Pairing Blue and red switching
Battery Low Blink red every 2 seconds
Battery Charging Solid red
Battery Fully Charged Solid blue
I
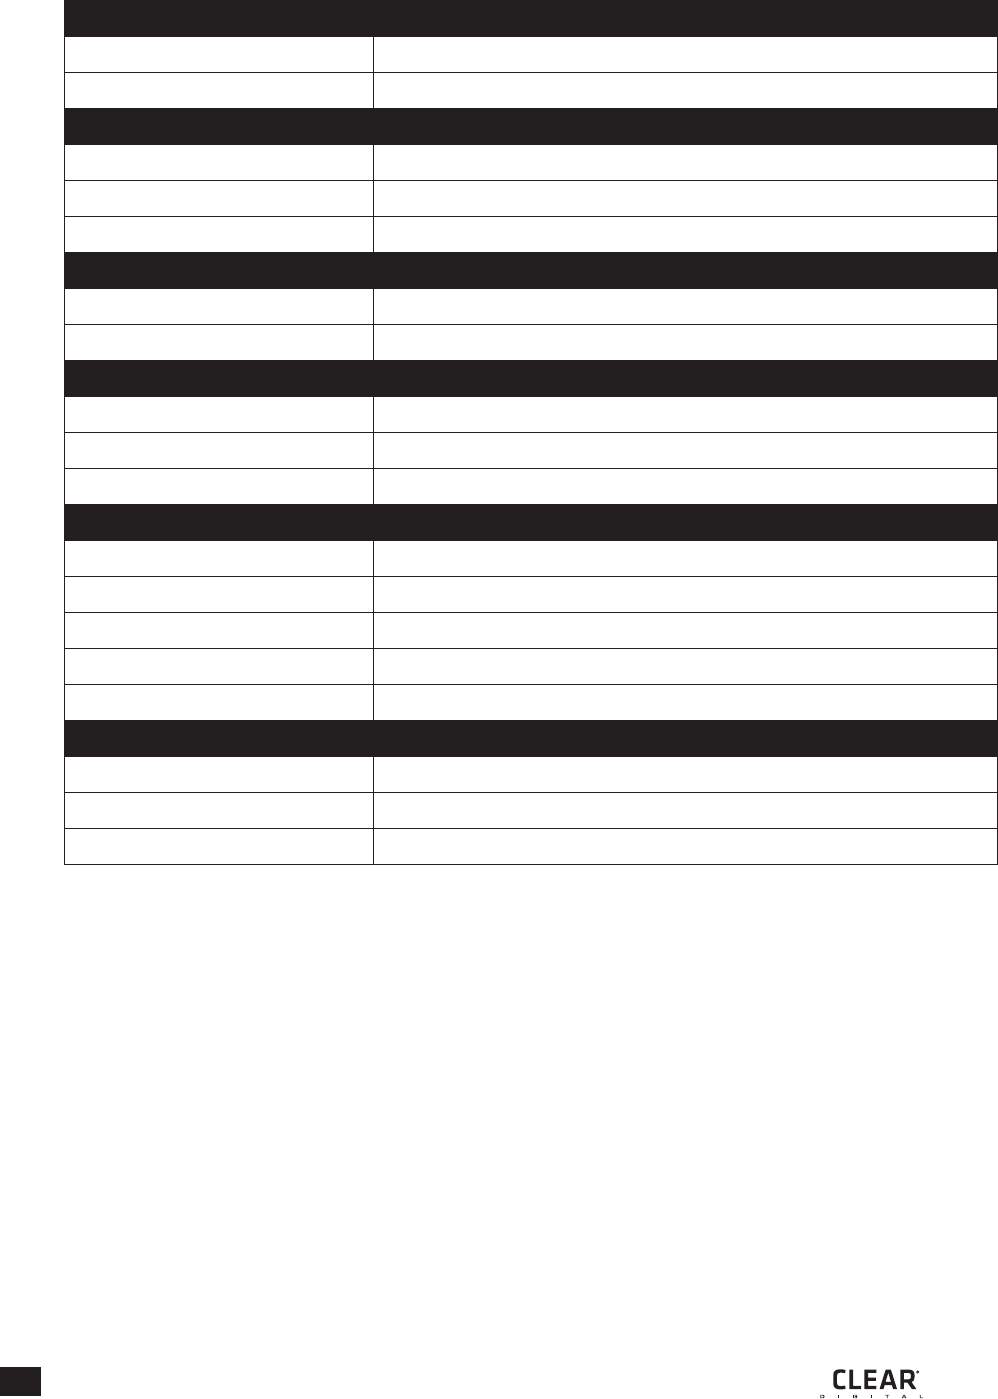
Unit
Dimensions (L x W x H) 67.7mm x 18mm x 19mm
Weight 14.19g
Audio
Frequency response 20Hz to 20000Hz
Sampling rate 8000Hz
SPL 105dB+ / -3dB
Bluetooth
Specifications Version 4.0 Compatible
Profiles A2DP, AVRCP, HSP, HFP
Radio
Carrier frequency 2.402 - 2.480 GHz
Range Class 2: Up to 10m
RF output power 4dBm
Power
Power consumption 200mW (max)
Power input (Charging) 5V / 120mA / 0.6W
Built – in Battery 3.7V, 220mAh, Lithium-ion Polymer (Rechargeable)
Music / Talk time Up to 10 hours/ 8 hours
Standby time Up to 220 hours
Temperature
Operation temperature -10ºC to 60ºC (-20ºF to +140ºF)
Charging temperature 0 ºC to 45ºC (+32ºF to +113ºF)
Storage temperature -40ºC to 80ºC (-38ºF to +176ºF)
Technical Data
Troubleshooting Operational Tips
During your hearing assist session, if your phone causes problem to your hearing assistive
device, please disconnect your phone from the device.
EN PAGE 27
I

Notices
Changes or modifications not expressly approved by the party responsible for compliance
could void the user’s authority to operate the equipment.
This equipment has been tested and found to comply with the limits for a Class B digital
device, pursuant to Part 15 of the FCC. Rules these limits are designed to provide
reasonable protection against harmful interference in a residential installation.
This equipment generates, uses and can radiate radio frequency energy and, if not installed
and used in accordance with the instructions, may cause harmful interference to radio
communications. However, there is not guarantee that interference will not occur in a
particular installation.
If this equipment does cause harmful interference to radio or television reception, which can
be determined by turning the equipment off and on, the user is encouraged to try to correct
the interference by one or more of the following measures:
• Reorient or relocate the receiving antenna.
• Increase the separation between the equipment and receiver.
• Connect the equipment into an outlet on a circuit different from that to which the
receiver is connected.
• Consult the dealer or an experienced radio/TV technician for help.
This equipment complies with FCC radiation exposure limits set forth for an uncontrolled
environment. End user must follow the specific operating instructions for satisfying RF
exposure compliance. This transmitter must not be co-located or operating in conjunction
with any other antenna or transmitter.
BATTERY WARNING:
The IClear Hearing Assistive Device contains a rechargeable lithium ion polymer battery. To
reduce risks of fire or burns, do not disassemble, crush, puncture and short external
contacts or dispose in fire or water.
CHARGING NOTICE:
To reduce the risk of personal injury, electrical shock, fire or damage to equipment, please
follow all the instructions below:
• Do not immerse the product, AC adaptor or speakers in water.
• Do not install, place or use the product near any source of heat for example: stove, radiator,
oven, toaster, coffee maker or other apparatus that gives off heat.
• Always use the provided AC power adaptor and cable included in the package to charge the
product. Use of any incorrect power supply to charge the product may cause permanent
damage to the product and render the warranty void.
EN PAGE 28
I

Notices
WARRANTY:
Without prejudice of legal warranty, the product is covered under a 2 year warranty by
manufacturer from the date of purchase. Please provide the proof of purchase when you return
the item to the supplier. The warranty covers manufacturing defects only. The warranty is
voided by any unauthorized repairs, misuse, and misapplication, tampering of the product,
modifications, upgrading or results of any failures to follow the guidelines as set out in the
product brochure or by any of the actions specified in this brochure or anywhere in our
technical publishing released to the public from time to time which would have voided the
warranty.
Warranty does not cover data recovery and physical deterioration due to use, damages resulting
from accidents, storage, loss or data loss or damage during repairs or transits. The sender will
bear all transportation charges for functioning products but which were declared defective.
LIMITATIONS OF WARRANTY:
All product warranties for the product by are limited to those mentioned in the product manual.
Warranty period is good for two years from purchase date.
WAIVER AND DISCLAIMER:
BITwave, and all their representatives, partners, agents, distributors, suppliers and resellers
shall not be liable and will be held harmless from any and all litigation, claims, debts, demands,
actions and liability which may arise, directly or indirectly, from operating or using the product
for any damages, losses, distress, pain, suffering, discomfort, loss and injuries including bodily
harm illness, strains, fractures, partial and/or total paralysis, death or other ailments that could
cause serious disability either to any persons, or any parties whether the user or other third
parties or their possessions, or to any goods, vehicles, properties, assets among others including
your own suffered by any persons, organizations, or any third parties whether physical or otherwise
and which may accrue to you in the future, to the fullest extent permitted by law as a result of
the use, operation, malfunctioning, misuse, disposal or repairs of the product or any other reasons,
conditions or circumstances or attempts to do so whether due to negligence, omissions, or
otherwise of BITwave, or any of their representatives, partners, agents, .distributors, suppliers,
resellers, designer, manufacturer or any others in its supply and distribution chain or any third
parties involved.
EN PAGE 29
I

Notices
All risks from operating or usage of the product rest solely and entirely with the user of this product,
the original purchaser or any third parties, who assumes full responsibility for all injuries, losses and/
or damages, whether caused in whole or in part by the negligence, omissions or other conduct of
others, including that of BITwave, and all their representatives, partners, agents, distributors, suppliers,
resellers and all others in its supply and distribution chain either due to the designer’s or manufacturer’s
negligence or omissions or any third parties involved.
CORRECT DISPOSAL OF THIS PRODUCT:
Do not dispose this product with other household wastes at the end of its working life.
There is a separate collection system for used electronic products in accordance with legislation that
requires proper treatment, recovery and recycling. Household users should contact either the retailer
where they purchased this product, or their local government office, for details of where and how they
can take this item for environmentally safe recycling. Business users should contact their suppliers and
refer to the terms and conditions of the purchase contract. This product should not be mixed with other
commercial wastes for disposal.
PRODUCT INFORMATION:
BITwave, and all their representatives, agents, distributors, suppliers or resellers shall not be held
responsible for any consequences arising from any errors or omissions in the guide or resulting directly
or indirectly from the use of the information herein.
BITwave reserves the right to amend or improve the product design or user guide without any restrictions
and without any obligation to notify users. All information here is accurate as of the date of printing.
Please periodically check for the latest firmware version to receive feature enhancements on
www.iclear-digital.com
EN PAGE 30
I

Notices
PERSONAL SAFETY:
Do not open the seal of the hardware, tamper, repair or modify any parts. Do not touch the product
with metal objects or parts or chemical products.
Violation of the above will lead to potential fire hazards and mishaps. Please contact the technical
support or your local supplier if your product malfunctions.
Always comply with the local law and traffic regulations.
Where use of the product is not permitted or allowed by any laws and regulations including the traffic
laws of your country, we warn you not to go against such restrictions.
You will bear the full responsibilities of any breaches of law and regulations.
You should not allow the operations or use of the product or any attempts to use it by any persons
including yourself to compromise anyone’s safety including your own or to cause harm to any vehicles,
property, objects, livestock, inventories, assets and the like under any circumstances. You or any users
of the product are to take all necessary safety measures and precautions and to remain alert to all
surrounding conditions. You are warned not to operate the product if you are not physically capable of
doing so in a safe manner, if you have or will consume any alcohol or any mind-altering substance
during its operation so that your alertness is compromised or if you have any medical conditions or
needs that may compromise your abilities to do so in a safe manner. We warn you of the inherent,
unforeseeable and unlimited risks and dangers in using the product while in traffic, including injury or
illness, strains, fractures, partial and/or total paralysis, death or other ailments that could cause serious
disability due to any causes. This product is only for use by persons eighteen (18) years of age and
above who have understood the warnings, risks and the terms of use. You confirm that you have read
this release of liability and fully understand its terms and that you have given up substantial rights by
using or attempting to use the product.
NOTICES:
TECHNICAL SUPPORT:
For additional information please visit our website at
www.iclear-digital.com
For customer and technical support in the US and Canada, please contact:
BITwave USA LLC
1093 E lron Eagle Dr. #115
Eagle, ID 83616
1-855-BIT-WAVE
COPYRIGHTS:
Copyright © 2015 BITwave Pte Ltd. All rights reserved. No part of this guide maybe reproduced in any
form or by any process whatsoever without prior written consent from BITwave Pte Ltd.
EN PAGE 31
I

NOTE: This equipment has been tested and found to comply with the limits for a Class B digital
device, pursuant to part 15 of the FCC Rules. These limits are designed to provide reasonable protection
against harmful interference in a residential installation. This equipment generates, uses and can radiate
radio frequency energy and, if not installed and used in accordance with the instructions, may cause
harmful interference to radio communications. However, there is no guarantee that interference will not
occur in a particular installation. If this equipment does cause harmful interference to radio or television
reception, which can be determined by turning the equipment off and on, the user is encouraged to try to
correct the interference by one or more of the following measures:
—Reorient or relocate the receiving antenna.
—Increase the separation between the equipment and receiver.
—Connect the equipment into an outlet on a circuit different from that to which the receiver is
connected.
—Consult the dealer or an experienced radio/TV technician for help.
Thisdevicecomplieswithpart15oftheFCCrules.Operationissubjecttothefollowingtwo
conditions:
(1)thisdevicemaynotcauseharmfulinterference,and
(2)thisdevicemustacceptanyinterferencereceived,includinginterferencethatmaycause
undesiredoperation.
Changesormodificationstothisunitnotexpresslyapprovedbythepartyresponsiblefor
compliancecouldvoidtheuser'sauthoritytooperatetheequipment.
In order to comply with RF exposure requirements, a minimum
all persons distance of 5mm must be
maintained between the antenna and

Notices
Changes or modifications not expressly approved by the party responsible for compliance
could void the user’s authority to operate the equipment.
This equipment has been tested and found to comply with the limits for a Class B digital
device, pursuant to Part 15 of the FCC. Rules these limits are designed to provide
reasonable protection against harmful interference in a residential installation.
This equipment generates, uses and can radiate radio frequency energy and, if not installed
and used in accordance with the instructions, may cause harmful interference to radio
communications. However, there is not guarantee that interference will not occur in a
particular installation.
If this equipment does cause harmful interference to radio or television reception, which can
be determined by turning the equipment off and on, the user is encouraged to try to correct
the interference by one or more of the following measures:
• Reorient or relocate the receiving antenna.
• Increase the separation between the equipment and receiver.
• Connect the equipment into an outlet on a circuit different from that to which the
receiver is connected.
• Consult the dealer or an experienced radio/TV technician for help.
This equipment complies with FCC radiation exposure limits set forth for an uncontrolled
environment. End user must follow the specific operating instructions for satisfying RF
exposure compliance. This transmitter must not be co-located or operating in conjunction
with any other antenna or transmitter.
The portable device is designed to meet the requirements for exposure to radio waves
established by the Federal Communications Commission (USA). These requirements set a
SAR limit of 1.6 W/kg averaged over one gram of tissue. The highest SAR value reported
under this standard during product certification for use when properly worn on the body is
0.044 W/kg
BATTERY WARNING:
The IClear Hearing Assistive Device contains a rechargeable lithium ion polymer battery. To
reduce risks of fire or burns, do not disassemble, crush, puncture and short external
contacts or dispose in fire or water.
CHARGING NOTICE:
To reduce the risk of personal injury, electrical shock, fire or damage to equipment, please
follow all the instructions below:
• Do not immerse the product, AC adaptor or speakers in water.
• Do not install, place or use the product near any source of heat for example: stove, radiator,
oven, toaster, coffee maker or other apparatus that gives off heat.
• Always use the provided AC power adaptor and cable included in the package to charge the
product. Use of any incorrect power supply to charge the product may cause permanent
damage to the product and render the warranty void.
MAR 2015
I