BIXOLON SPP-R300 Mobile printer User Manual
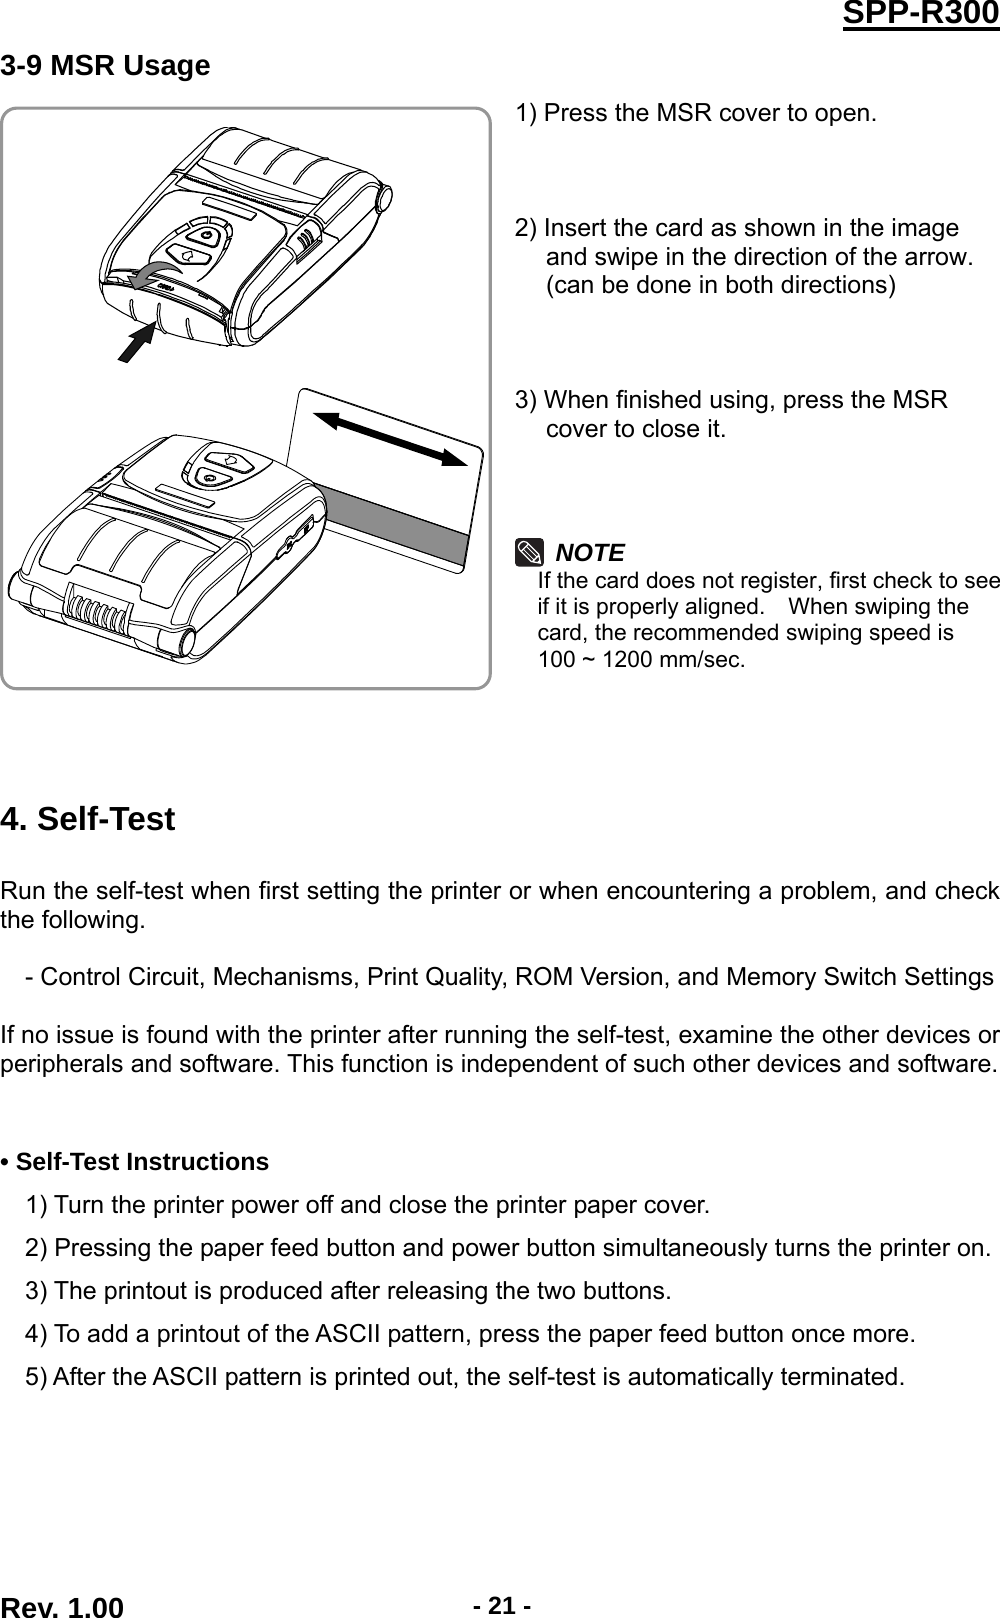
BIXOLON Co.,Ltd. Mobile printer
UserManual.wiki
>
BIXOLON
>
SPP R300 User Manual
User Manual
Navigation menu
Upload a User Manual
Namespaces
Wiki Guide
HTML
PDF
Info
Views
User Manual
Discussion / Help
Navigation
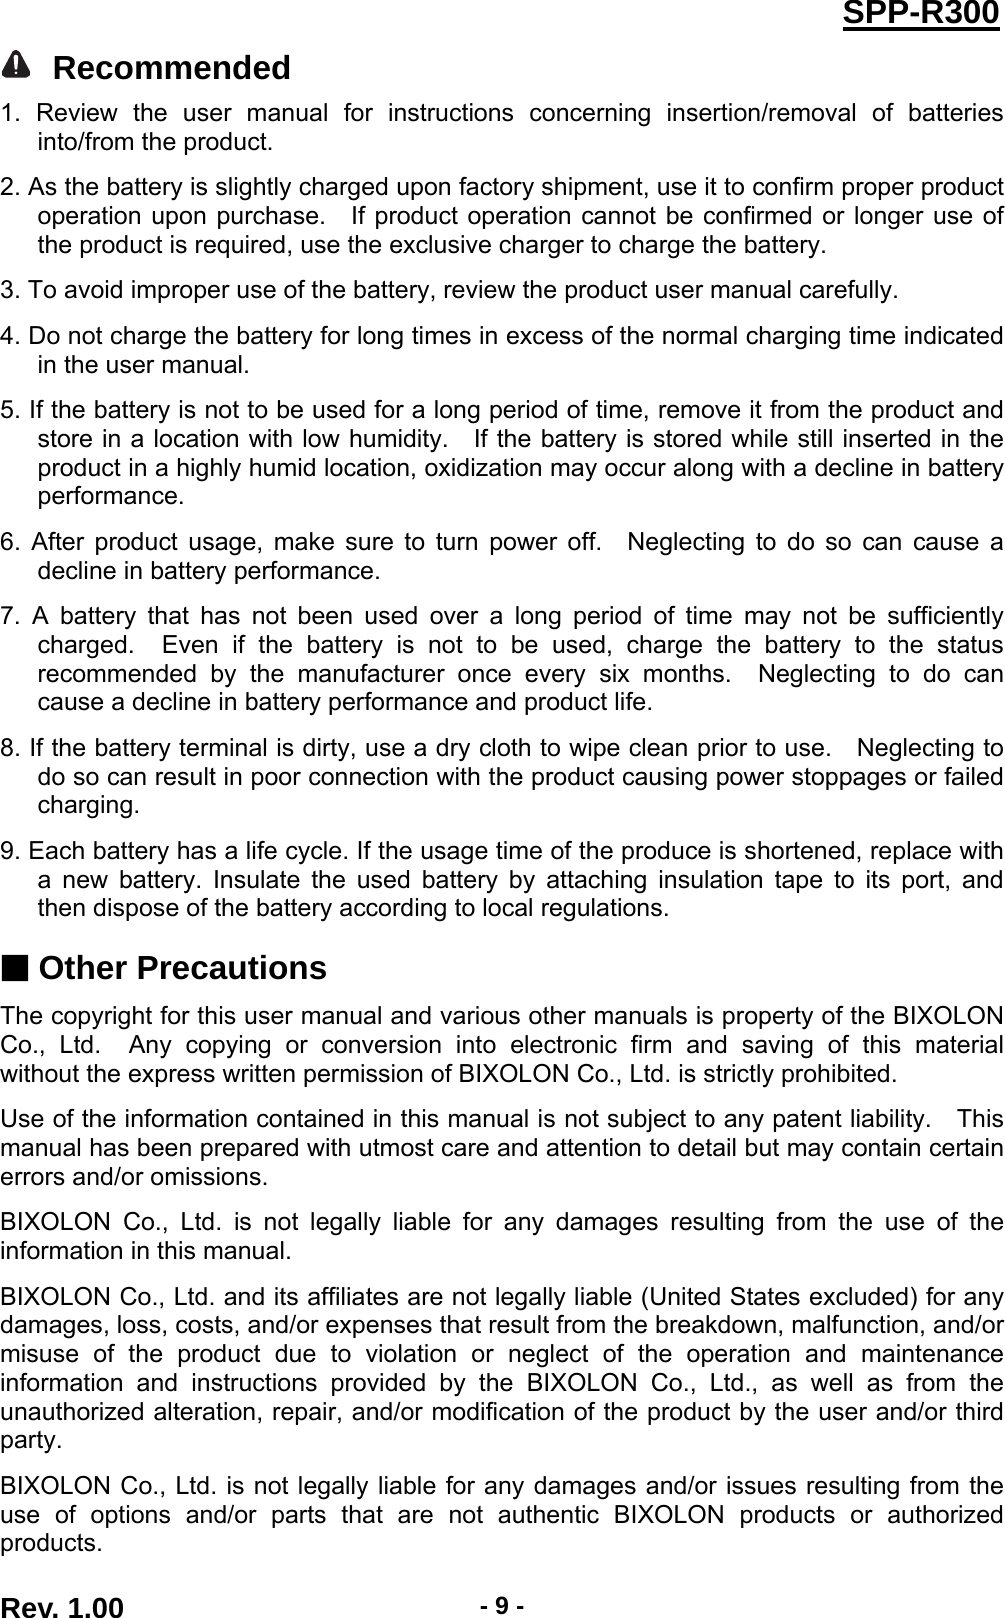


![Rev. 1.00 - 22 -SPP-R300• Self-Test Sample (For Bluetooth) Boot loader version : VER v2.02 20100817 Firmware version : V01.00 STOB 042211 BT embedded Bluetooth firmware version : 3.0.0 Bluetooth BD address : 001901223194 - Auth. & Encry. are enable - Connection Mode = 2 Not available WLAN Butter Capacity : 128K Bytes Print Density : 100% Bluetooth Interface - Baud rate : 115200 bps Serial Interface - Baud rate : 115200 bps Data bits : 8 bits Parity : None Stop bit : 1 bit or more Handshaking : DTR/DSR Default Codepage : PC437 Print Speed : 100mm/s Double byte character mode:Off Font : 12 x 24 Paper out Bell : Off Low Battery Buzzer : On Power off time : 15 Min Idle mode time : 60 Sec MSR data including sentinel Character mode : None MSR read mode : Auto TRACK1/2/3 Memory switch setup status Memory S/W1 1 2 3 4 5 6 7 8 ON █ █ OFF █ █ █ █ █ █ Memory S/W2 1 2 3 4 5 6 7 8 ON OFF █ █ █ █ █ █ █ █ Memory S/W3 1 2 3 4 5 6 7 8 ON █ █ █ █ OFF █ █ █ █ Memory S/W5 (Power off time) 1 2 3 4 5 6 7 8 ON █ █ █ █ OFF █ █ █ █ Memory S/W6 (Idle time) 1 2 3 4 5 6 7 8 ON █ █ █ █ OFF █ █ █ █ Memory S/W7 1 2 3 4 5 6 7 8 ON █ █ █ OFF █ █ █ █ █ Memory S/W8 1 2 3 4 5 6 7 8 ON OFF █ █ █ █ █ █ █ █ Memory S/W Serial condition 1 2 3 4 5 6 7 8 ON OFF █ █ █ █ █ █ █ █ If you want to continue SELF-TEST printing, please press FEED button. ASCII !"#$%&'()*+,-./0123456789:;<=>?@ABCDEFGHIJKLMNOP"#$%&'()*+,-./0123456789:;<=>?@ABCDEFGHIJKLMNOPQ#$%&'()*+,-./0123456789:;<=>?@ABCDEFGHIJKLMNOPQR$%&'()*+,-./0123456789:;<=>?@ABCDEFGHIJKLMNOPQRS%&'()*+,-./0123456789:;<=>?@ABCDEFGHIJKLMNOPQRST&'()*+,-./0123456789:;<=>?@ABCDEFGHIJKLMNOPQRSTU'()*+,-./0123456789:;<=>?@ABCDEFGHIJKLMNOPQRSTUV()*+,-./0123456789:;<=>?@ABCDEFGHIJKLMNOPQRSTUVW)*+,-./0123456789:;<=>?@ABCDEFGHIJKLMNOPQRSTUVWX*+,-./0123456789:;<=>?@ABCDEFGHIJKLMNOPQRSTUVWXY+,-./0123456789:;<=>?@ABCDEFGHIJKLMNOPQRSTUVWXYZ,-./0123456789:;<=>?@ABCDEFGHIJKLMNOPQRSTUVWXYZ[-./0123456789:;<=>?@ABCDEFGHIJKLMNOPQRSTUVWXYZ[₩./0123456789:;<=>?@ABCDEFGHIJKLMNOPQRSTUVWXYZ[₩]/0123456789:;<=>?@ABCDEFGHIJKLMNOPQRSTUVWXYZ[₩]^0123456789:;<=>?@ABCDEFGHIJKLMNOPQRSTUVWXYZ[₩]^_123456789:;<=>?@ABCDEFGHIJKLMNOPQRSTUVWXYZ[₩]^_`23456789:;<=>?@ABCDEFGHIJKLMNOPQRSTUVWXYZ[₩]^_`a3456789:;<=>?@ABCDEFGHIJKLMNOPQRSTUVWXYZ[₩]^_`ab456789:;<=>?@ABCDEFGHIJKLMNOPQRSTUVWXYZ[₩]^_`abc56789:;<=>?@ABCDEFGHIJKLMNOPQRSTUVWXYZ[₩]^_`abcd6789:;<=>?@ABCDEFGHIJKLMNOPQRSTUVWXYZ[₩]^_`abcde789:;<=>?@ABCDEFGHIJKLMNOPQRSTUVWXYZ[₩]^_`abcdef89:;<=>?@ABCDEFGHIJKLMNOPQRSTUVWXYZ[₩]^_`abcdefg9:;<=>?@ABCDEFGHIJKLMNOPQRSTUVWXYZ[₩]^_`abcdefgh:;<=>?@ABCDEFGHIJKLMNOPQRSTUVWXYZ[₩]^_`abcdefgh PC437 ÇüéâäàåçêëèïîìÄÅÉæÆôöòûùÿÖÜ¢£¥PtƒüéâäàåçêëèïîìÄÅÉæÆôöòûùÿÖÜ¢£¥PtƒáéâäàåçêëèïîìÄÅÉæÆôöòûùÿÖÜ¢£¥PtƒáíâäàåçêëèïîìÄÅÉæÆôöòûùÿÖÜ¢£¥PtƒáíóäàåçêëèïîìÄÅÉæÆôöòûùÿÖÜ¢£¥PtƒáíóúàåçêëèïîìÄÅÉæÆôöòûùÿÖÜ¢£¥PtƒáíóúñåçêëèïîìÄÅÉæÆôöòûùÿÖÜ¢£¥PtƒáíóúñÑçêëèïîìÄÅÉæÆôöòûùÿÖÜ¢£¥PtƒáíóúñѪêëèïîìÄÅÉæÆôöòûùÿÖÜ¢£¥PtƒáíóúñѪºëèïîìÄÅÉæÆôöòûùÿÖÜ¢£¥PtƒáíóúñѪº¿èïîìÄÅÉæÆôöòûùÿÖÜ¢£¥PtƒáíóúñѪº¿┌ïîìÄÅÉæÆôöòûùÿÖÜ¢£¥PtƒáíóúñѪº¿┌ ┐îìÄÅÉæÆôöòûùÿÖÜ¢£¥PtƒáíóúñѪº¿┌ ┐½ìÄÅÉæÆôöòûùÿÖÜ¢£¥PtƒáíóúñѪº¿┌ ┐½¼ÄÅÉæÆôöòûùÿÖÜ¢£¥PtƒáíóúñѪº¿┌ ┐½¼¡ÅÉæÆôöòûùÿÖÜ¢£¥PtƒáíóúñѪº¿┌ ┐½¼¡«ÉæÆôöòûùÿÖÜ¢£¥PtƒáíóúñѪº¿┌ ┐½¼¡«»æÆôöòûùÿÖÜ¢£¥PtƒáíóúñѪº¿┌ ┐½¼¡«»▓ÆôöòûùÿÖÜ¢£¥PtƒáíóúñѪº¿┌ ┐½¼¡«»▓▒ôöòûùÿÖÜ¢£¥PtƒáíóúñѪº¿┌ ┐½¼¡«»▓▒░öòûùÿÖÜ¢£¥PtƒáíóúñѪº¿┌ ┐½¼¡«»▓▒░┃òûùÿÖÜ¢£¥PtƒáíóúñѪº¿┌ ┐½¼¡«»▓▒░┃┤ûùÿÖÜ¢£¥PtƒáíóúñѪº¿┌ ┐½¼¡«»▓▒░┃┤╡ùÿÖÜ¢£¥PtƒáíóúñѪº¿┌ ┐½¼¡«»▓▒░┃┤╡╢ÿÖÜ¢£¥PtƒáíóúñѪº¿┌┐½¼¡«»▓▒░┃┤╡╢╖ *** Completed ***](https://usermanual.wiki/BIXOLON/SPP-R300/User-Guide-1528338-Page-22.png)
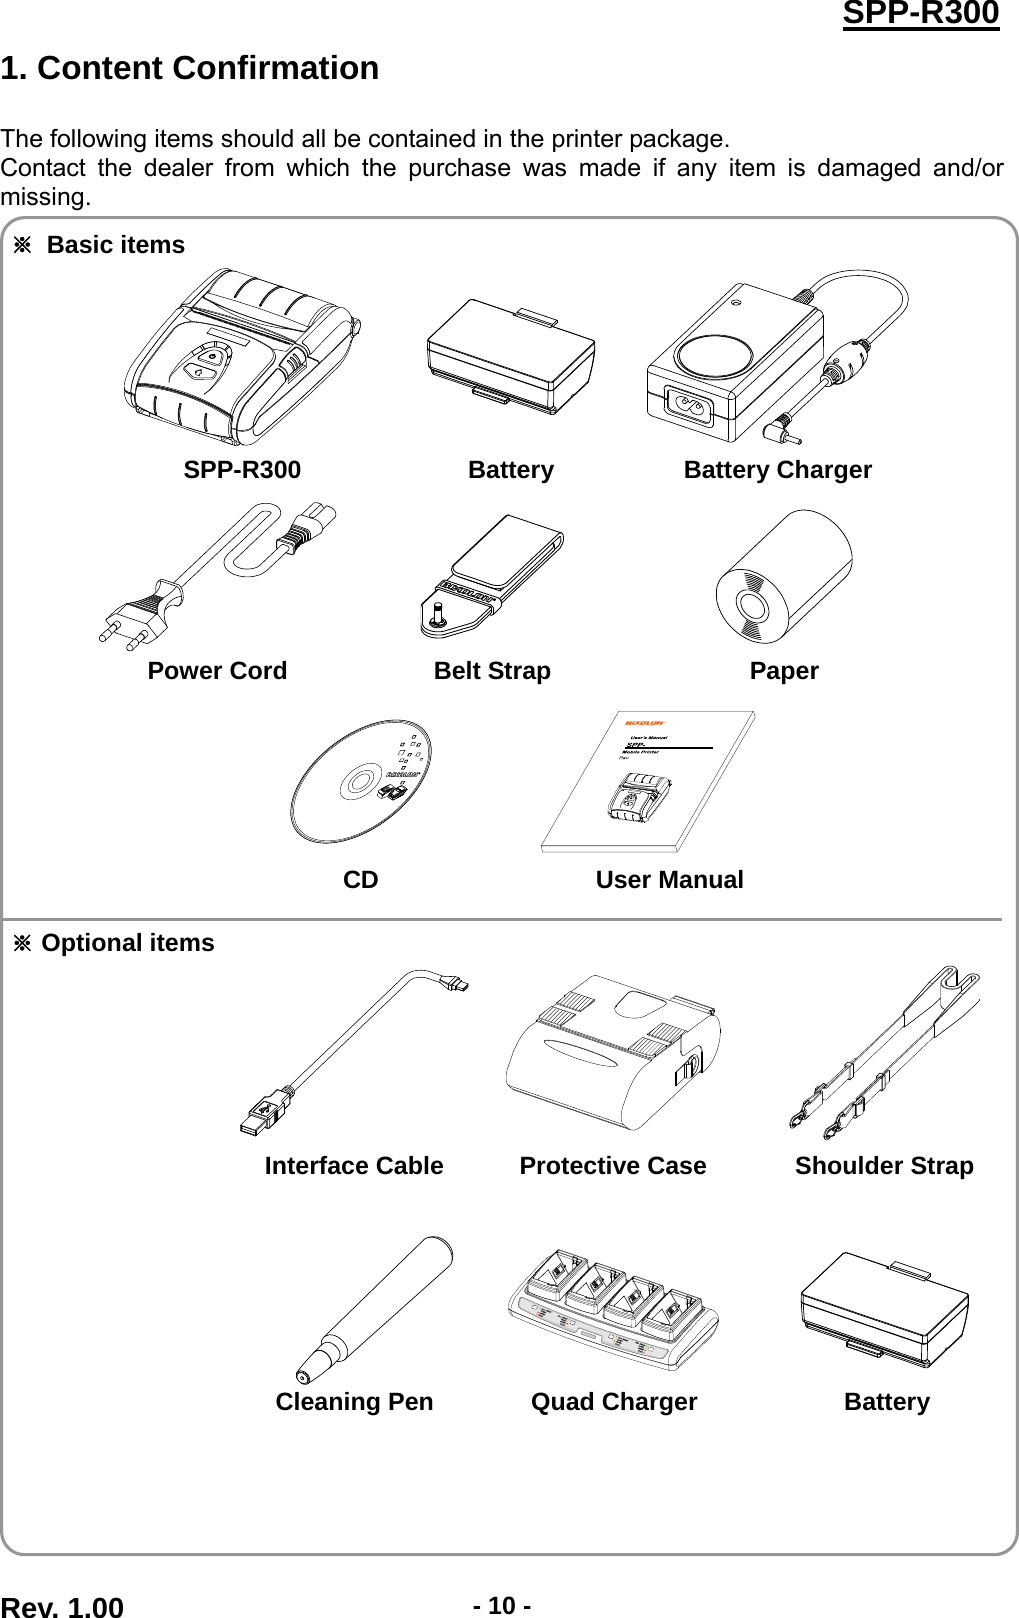
![Rev. 1.00 - 23 -SPP-R300• Self-Test Sample (For Wireless LAN) Boot loader version : VER v2.02 20100817 Firmware version : V01.00 STOB 042211 Not available bluetooth WLAN firmware version : Ver 0.1 WLAN MAC address : cc7a00010877 - System Name : SPP-R300 - Network Mode : Adhoc - Encryption : None - ESSID : BIXOLON_adhoc - DHCP : Disabled - IP : 192.168.1.1 - Netmask : 255.255.255.0 - Gateway : 192.168.1.2 - Port : 9100 - HTTPS : Disabled - Telnet : Disabled - FTP : Disabled - SNMP : Disabled Butter Capacity : 128K Bytes Print Density : 100% Bluetooth Interface - Baud rate : 115200 bps Serial Interface - Baud rate : 115200 bps Data bits : 8 bits Parity : None Stop bit : 1 bit or more Handshaking : DTR/DSR Default Codepage : PC437 Print Speed : 100mm/s Double byte character mode:Off Font : 12 x 24 Paper out Bell : Off Low Battery Buzzer : On Power off time : 15 Min Idle mode time : 60 Sec MSR data including sentinel Character mode : None MSR read mode : Auto TRACK1/2/3 Memory switch setup status Memory S/W1 1 2 3 4 5 6 7 8 ON █ █ OFF █ █ █ █ █ █ Memory S/W2 1 2 3 4 5 6 7 8 ON OFF █ █ █ █ █ █ █ █ Memory S/W3 1 2 3 4 5 6 7 8 ON █ █ █ █ OFF █ █ █ █ Memory S/W5 (Power off time) 1 2 3 4 5 6 7 8 ON █ █ █ █ OFF █ █ █ █ Memory S/W6 (Idle time) 1 2 3 4 5 6 7 8 ON █ █ █ █ OFF █ █ █ █ Memory S/W7 1 2 3 4 5 6 7 8 ON █ █ █ OFF █ █ █ █ █ Memory S/W8 1 2 3 4 5 6 7 8 ON OFF █ █ █ █ █ █ █ █ Memory S/W Serial condition 1 2 3 4 5 6 7 8 ON OFF █ █ █ █ █ █ █ █ If you want to continue SELF-TEST printing, please press FEED button. ASCII !"#$%&'()*+,-./0123456789:;<=>?@ABCDEFGHIJKLMNOP"#$%&'()*+,-./0123456789:;<=>?@ABCDEFGHIJKLMNOPQ#$%&'()*+,-./0123456789:;<=>?@ABCDEFGHIJKLMNOPQR$%&'()*+,-./0123456789:;<=>?@ABCDEFGHIJKLMNOPQRS%&'()*+,-./0123456789:;<=>?@ABCDEFGHIJKLMNOPQRST&'()*+,-./0123456789:;<=>?@ABCDEFGHIJKLMNOPQRSTU'()*+,-./0123456789:;<=>?@ABCDEFGHIJKLMNOPQRSTUV()*+,-./0123456789:;<=>?@ABCDEFGHIJKLMNOPQRSTUVW)*+,-./0123456789:;<=>?@ABCDEFGHIJKLMNOPQRSTUVWX*+,-./0123456789:;<=>?@ABCDEFGHIJKLMNOPQRSTUVWXY+,-./0123456789:;<=>?@ABCDEFGHIJKLMNOPQRSTUVWXYZ,-./0123456789:;<=>?@ABCDEFGHIJKLMNOPQRSTUVWXYZ[-./0123456789:;<=>?@ABCDEFGHIJKLMNOPQRSTUVWXYZ[₩./0123456789:;<=>?@ABCDEFGHIJKLMNOPQRSTUVWXYZ[₩]/0123456789:;<=>?@ABCDEFGHIJKLMNOPQRSTUVWXYZ[₩]^0123456789:;<=>?@ABCDEFGHIJKLMNOPQRSTUVWXYZ[₩]^_123456789:;<=>?@ABCDEFGHIJKLMNOPQRSTUVWXYZ[₩]^_`23456789:;<=>?@ABCDEFGHIJKLMNOPQRSTUVWXYZ[₩]^_`a3456789:;<=>?@ABCDEFGHIJKLMNOPQRSTUVWXYZ[₩]^_`ab456789:;<=>?@ABCDEFGHIJKLMNOPQRSTUVWXYZ[₩]^_`abc56789:;<=>?@ABCDEFGHIJKLMNOPQRSTUVWXYZ[₩]^_`abcd6789:;<=>?@ABCDEFGHIJKLMNOPQRSTUVWXYZ[₩]^_`abcde789:;<=>?@ABCDEFGHIJKLMNOPQRSTUVWXYZ[₩]^_`abcdef89:;<=>?@ABCDEFGHIJKLMNOPQRSTUVWXYZ[₩]^_`abcdefg9:;<=>?@ABCDEFGHIJKLMNOPQRSTUVWXYZ[₩]^_`abcdefgh:;<=>?@ABCDEFGHIJKLMNOPQRSTUVWXYZ[₩]^_`abcdefgh PC437 ÇüéâäàåçêëèïîìÄÅÉæÆôöòûùÿÖÜ¢£¥PtƒüéâäàåçêëèïîìÄÅÉæÆôöòûùÿÖÜ¢£¥PtƒáéâäàåçêëèïîìÄÅÉæÆôöòûùÿÖÜ¢£¥PtƒáíâäàåçêëèïîìÄÅÉæÆôöòûùÿÖÜ¢£¥PtƒáíóäàåçêëèïîìÄÅÉæÆôöòûùÿÖÜ¢£¥PtƒáíóúàåçêëèïîìÄÅÉæÆôöòûùÿÖÜ¢£¥PtƒáíóúñåçêëèïîìÄÅÉæÆôöòûùÿÖÜ¢£¥PtƒáíóúñÑçêëèïîìÄÅÉæÆôöòûùÿÖÜ¢£¥PtƒáíóúñѪêëèïîìÄÅÉæÆôöòûùÿÖÜ¢£¥PtƒáíóúñѪºëèïîìÄÅÉæÆôöòûùÿÖÜ¢£¥PtƒáíóúñѪº¿èïîìÄÅÉæÆôöòûùÿÖÜ¢£¥PtƒáíóúñѪº¿┌ïîìÄÅÉæÆôöòûùÿÖÜ¢£¥PtƒáíóúñѪº¿┌ ┐îìÄÅÉæÆôöòûùÿÖÜ¢£¥PtƒáíóúñѪº¿┌ ┐½ìÄÅÉæÆôöòûùÿÖÜ¢£¥PtƒáíóúñѪº¿┌ ┐½¼ÄÅÉæÆôöòûùÿÖÜ¢£¥PtƒáíóúñѪº¿┌ ┐½¼¡ÅÉæÆôöòûùÿÖÜ¢£¥PtƒáíóúñѪº¿┌ ┐½¼¡«ÉæÆôöòûùÿÖÜ¢£¥PtƒáíóúñѪº¿┌ ┐½¼¡«»æÆôöòûùÿÖÜ¢£¥PtƒáíóúñѪº¿┌ ┐½¼¡«»▓ÆôöòûùÿÖÜ¢£¥PtƒáíóúñѪº¿┌ ┐½¼¡«»▓▒ôöòûùÿÖÜ¢£¥PtƒáíóúñѪº¿┌ ┐½¼¡«»▓▒░öòûùÿÖÜ¢£¥PtƒáíóúñѪº¿┌ ┐½¼¡«»▓▒░┃òûùÿÖÜ¢£¥PtƒáíóúñѪº¿┌ ┐½¼¡«»▓▒░┃┤ûùÿÖÜ¢£¥PtƒáíóúñѪº¿┌ ┐½¼¡«»▓▒░┃┤╡ùÿÖÜ¢£¥PtƒáíóúñѪº¿┌ ┐½¼¡«»▓▒░┃┤╡╢ÿÖÜ¢£¥PtƒáíóúñѪº¿┌┐½¼¡«»▓▒░┃┤╡╢╖ *** Completed ***](https://usermanual.wiki/BIXOLON/SPP-R300/User-Guide-1528338-Page-23.png)