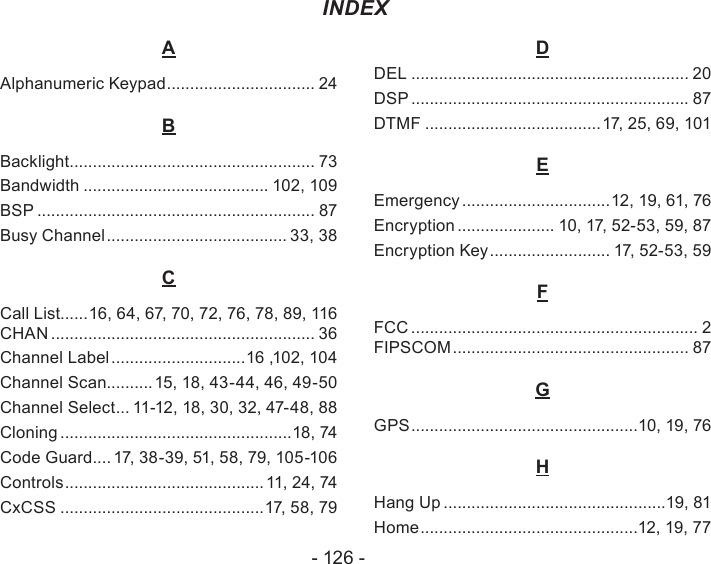
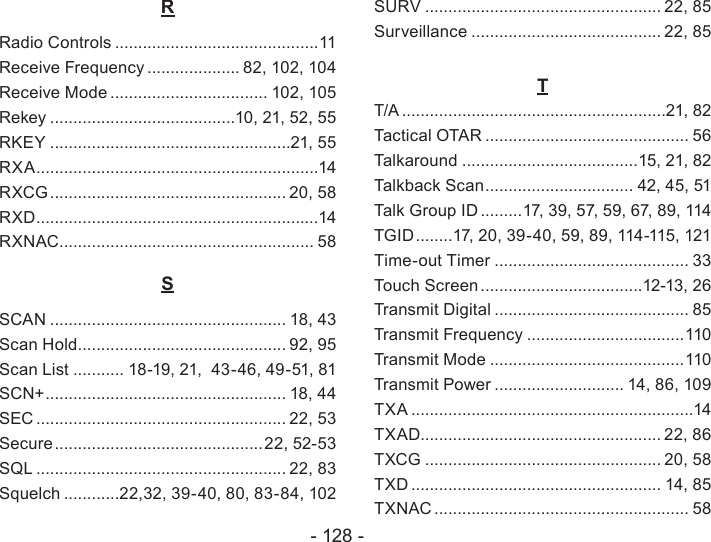
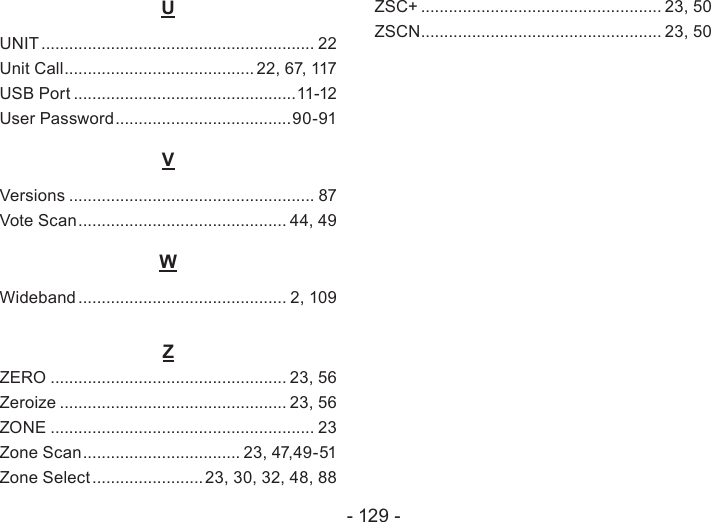
BK Technologies KNGM150LP MOBILE LAND MOBILE TRANSCEIVER User Manual
RELM WIRELESS CORP. - BK RADIO MOBILE LAND MOBILE TRANSCEIVER
UserManual.wiki
>
BK Technologies
>
KNGM150LP User Manual
User Manual
Navigation menu
Upload a User Manual
Namespaces
Wiki Guide
HTML
PDF
Info
Views
User Manual
Discussion / Help
Navigation


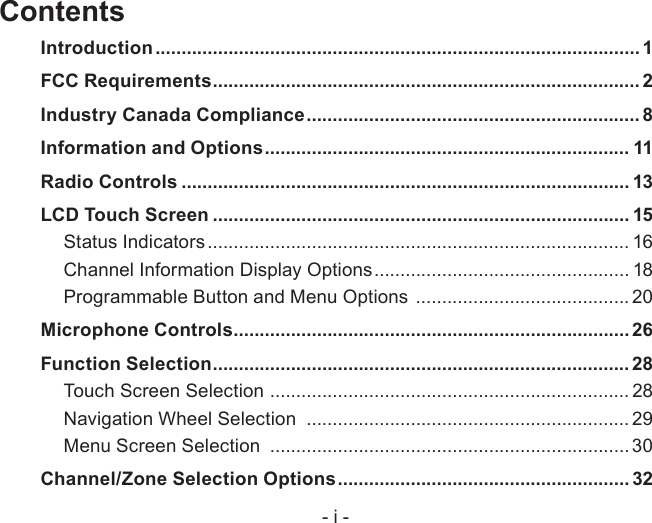
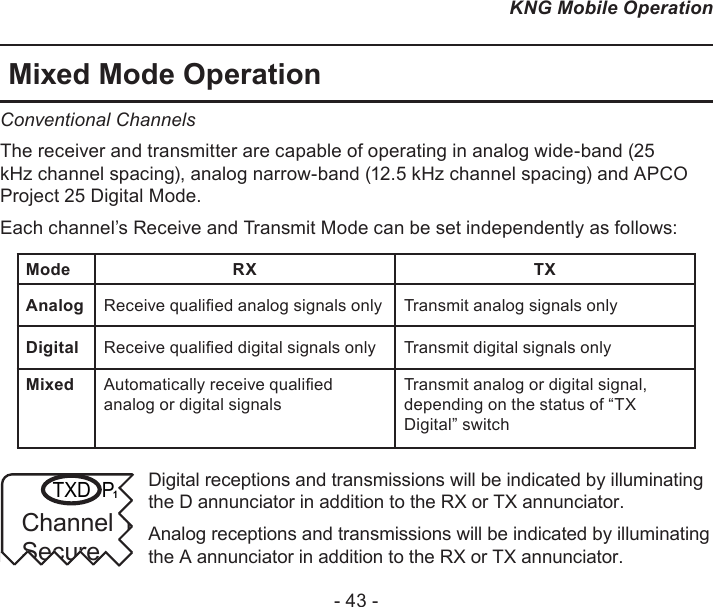
![- ii -Basic Operation .................................................................................... 34Trunking Channel Basic Operation .................................................... 36Command Zone Operation .................................................................. 38Building a Command Zone [CHAN+] .................................................. 38Editing a Command Zone [CHAN-] ....................................................39Code Guard/NAC Operation ................................................................40Code Guard Receive .......................................................................... 40Code Guard Transmit ......................................................................... 40Analog Squelch Control ...................................................................... 41APCO Project 25 Digital Squelch Control .......................................... 41Mixed Mode Operation ......................................................................... 43Scan Options ......................................................................................... 45Channel Scan [SCAN] ........................................................................ 45Channel Scan List [SCN+] .................................................................. 46Talkback Scan..................................................................................... 47Dual Mode Scan [DSCN] .................................................................... 47Dual Mode Scan List [DSED] .............................................................48](https://usermanual.wiki/BK-Technologies/KNGM150LP/User-Guide-3483252-Page-5.png)
![- iii -Enhanced Scan [ESCN] ..................................................................... 48Priority Scan/System Scan [PSCN] ....................................................48Priority Channel Select [PRI] .............................................................. 49Vote Scan............................................................................................ 51Zone Scan [ZSCN].............................................................................. 52Zone Scan List [ZSC+] ........................................................................ 52Encryption Operation ........................................................................... 54Required Setup ...................................................................................54Transmit Secure [SEC] ...................................................................... 55Transmit Encryption Key Selection [KEY] .......................................... 55Encryption Keyset Selection [KEYST] ............................................... 56Rekey Request [RKEY] ...................................................................... 57Keyset Viewing and Selecting [KSET] ................................................58Zeroizing [ZERO] ................................................................................ 58User Pick List Options.......................................................................... 59TX/RX CxCSS Picklist [TXCG] [RXCG] .............................................60TX/RX Network Access Code Picklist [TNAC] [RNAC] ..................... 60](https://usermanual.wiki/BK-Technologies/KNGM150LP/User-Guide-3483252-Page-6.png)
![- iv -Talk Group ID Picklist [TGID] .............................................................. 61Encryption Key Picklist [KEY] ............................................................. 61Keyset Picklist [KSET] ........................................................................ 62Emergency Signaling ........................................................................... 62Messaging Options ...............................................................................64Text Messaging [TXT] ........................................................................ 64Short Message Update [MSG] ........................................................... 68User Status Messaging [STS] ............................................................68Paging and Call Alert ............................................................................ 71Conventional Two-Tone/DTMF/MDC1200 Paging [MUTE] ............... 71Call Alert Paging [ALRT] ................................................................... 72Radio Check [RCHK] ......................................................................... 73Other Functions & Options .................................................................. 75Backlight [LITE] ................................................................................... 75Cloning ................................................................................................ 76Control Lockout [LOCK] ...................................................................... 76Date and Time [DATE] ........................................................................ 77](https://usermanual.wiki/BK-Technologies/KNGM150LP/User-Guide-3483252-Page-7.png)
![- v -Global Positioning [GPS] .................................................................... 78Hard Power Down [PWRD] ................................................................. 79Home [HOME] .................................................................................... 79Inhibit/Uninhibit [INH]/UINH]............................................................... 79Keypad Programming ......................................................................... 81Minimum Volume [VOL] ...................................................................... 82Monitor [MON] .................................................................................... 82Nuisance Channel Delete [NUIS] ....................................................... 83Phone [PHN] and Hang Up [HANG] ................................................... 83Radio Accountability Tone [RAT] ........................................................83Radio Info ............................................................................................84Repeater Talkaround [T/A] .................................................................. 84Send Alert Tone [SNDT] .....................................................................85Send Signal [SEND] ........................................................................... 85Squelch Adjust [SQL] .......................................................................... 85Site Display [STDS] ............................................................................86Site Lock [STLK] .................................................................................86Site Search [STSR] ............................................................................. 87](https://usermanual.wiki/BK-Technologies/KNGM150LP/User-Guide-3483252-Page-8.png)
![- vi -Surveillance Mode [SURV] ................................................................. 87Transmit Digital [TXD] ......................................................................... 87Transmit Power [PWR]........................................................................ 88Two-Tone Select [TONE] .................................................................... 88Versions .............................................................................................. 89Zone Select [ZONE] ...........................................................................90Keypad Programming Options ............................................................ 91Entering Programming Mode .............................................................. 91Keypad Programming ......................................................................... 92Call List Programming .......................................................................118Code Guard Picklist Programming ................................................... 120NAC Picklist Programming ............................................................... 122Talkgroup ID Picklist Programming .................................................. 123](https://usermanual.wiki/BK-Technologies/KNGM150LP/User-Guide-3483252-Page-9.png)


![- 34 -KNG Mobile OperationBasic OperationReceiveTurn power on by pushing and releasing the Volume knob. The radio will 1. beep, indicating that it has passed its self test and is operational. Set volume by pressing and holding the [MON] button, to hear squelch noise 2. or by selecting “Monitor Mode” from the menu list and selecting "Open" . Turn the Volume knob to set a comfortable volume level. Press the [MON] button again or select desired monitor mode from the “Monitor” menu to stop squelch noise.Select a channel zone (if applicable) by pressing the [ZONE] button or 3. selecting “Zone Select” from the menu and scrolling to the desired zone. Press the “OK” button to return to Channel Select mode. Select a channel by turning the Channel Selector knob. When the unstopped 4. channel selector is rotated past the highest channel, the radio will return to the lowest channel. When rotated past the lowest (1st) channel, the radio will go to the highest channel.](https://usermanual.wiki/BK-Technologies/KNGM150LP/User-Guide-3483252-Page-43.png)
![- 38 -KNG Mobile OperationCommand Zone OperationThe KNG radio allows construction of Command Zones drawn from any of the programmed channels in standard operating zones. Each zone is designated as a Standard Operating Zone or a Command Zone with the PC Radio Editor software. Building a Command Zone [CHAN+]To build a Command Zone, the “Channel Add/Delete” function must be assigned to a programmable button.While operating in a standard zone press the “CHAN+” button to add the currently selected channel to a command zone. The list of available command zones will be displayed. Use the up/down arrows to select the zone to add the channel or use the number keys to move directly to the desired zone.Pressing the “Enter” button copies the channel information to the rst available channel slot in the selected command zone.Example: If the command zone has three channels, the newly added channel will be channel four.](https://usermanual.wiki/BK-Technologies/KNGM150LP/User-Guide-3483252-Page-47.png)
![- 39 -KNG Mobile OperationEditing a Command Zone [CHAN-]When operating in a Command Zone, press the “CHAN-” button to remove the selected channel from the zone. When a channel is deleted, the display momentarily shows “Channel Deleted”, and the following channels move up in the list. For example, if channel 5 is deleted, channel 6 becomes the new channel 5, channel 7 becomes the new channel 6, etc. Press and hold the “CHAN-” button to remove all channels in the selected command zone.NOTE: Modications to a command zone channel, such as User Selected Tones, do not aect the original standard zone channel. Also, modications to the original standard zone channel do not aect the command zone channel.](https://usermanual.wiki/BK-Technologies/KNGM150LP/User-Guide-3483252-Page-48.png)
![- 45 -KNG Mobile OperationScan OptionsChannel Scan [SCAN]Conventional ChannelsWhen on, Channel Scan monitors activity on the scan list channels in the currently operating zone. Scan operates only while the radio is not transmitting.Channels designated as scan channels are identied by the symbol at the top of the LCD display. When Channel Scan is on, the C symbol will be shown at the top of the LCD display.When a signal is detected on a scanned channel, scanning stops and the message is received. The received channel is displayed in place of the selected channel. Once the signal ends, the radio continues to monitor the channel for the preset scan delay time before it resumes scanning. Channel Scan operation can be a button or menu list item. If assigned to a button, press and hold to add or remove selected channel from the scan list.Channel Scan may be used in conjunction with Priority Scan operation (see Priority Scan).](https://usermanual.wiki/BK-Technologies/KNGM150LP/User-Guide-3483252-Page-54.png)
![- 46 -KNG Mobile OperationChannel Scan List [SCN+]Conventional ChannelsThe Channel Scan List allows the radio user to add or remove channels from the list of channels to be monitored while channel scanning. Channels designated as scan channels are identied by the symbol at the top of the LCD display. Scan List operation can be assigned as a button or menu list item.When Channel Scan List is assigned to a button, press the button to add or remove the selected channel from the scan list.1: Voted Channel2: Normal Scan Channel3: Channel not scannedChannel 16Secure One155.645 MHzZPPH✓P1TXDØESC PREV NEXT +/-Channel Scan List 1: Channel #1 (V) 2: Channel #2 3: Channel #3When assigned as a menu item, open the menu and select the channel you wish to add or remove from the scan list. Press “+/-” to cycle between no scan, normal scan and vote scan. Channels in the scan list will be indicated with the symbol. Voted channels will display "(V)". Pressing "ESC" will save the selections.In addition, normal scanned channels can be added or deleted by pressing and holding a button assigned "Scan". (See also, Vote Scan)](https://usermanual.wiki/BK-Technologies/KNGM150LP/User-Guide-3483252-Page-55.png)
![- 47 -KNG Mobile OperationTalkback ScanConventional ChannelsIf your radio is programmed for Talkback Scan, pressing PTT while a channel is active during the scan delay time remains, will cause the radio to transmit on the transmit frequency of the received channel. The "RX" indicator will be shown in the display while scan delay time remains.Talkback Scan will not work if Priority Scan is on and your radio is also programmed to transmit on the Priority 1 channel. (See Priority Scan.)Dual Mode Scan [DSCN]Conventional and Trunking ChannelsDual Mode scan provides the ability to scan trunking and conventional channels simultaneously. When Dual Mode Scan is turned on the D icon is displayed and the radio scans all channels in the dual mode scan list.Dual Mode Scan can be assigned to a button or menu list item. For best operation, Dual Mode Scan should be assigned in both conventional and trunking global settings with the PC Radio Editor.(See also Dual Mode Scan List)](https://usermanual.wiki/BK-Technologies/KNGM150LP/User-Guide-3483252-Page-56.png)
![- 48 -KNG Mobile OperationDual Mode Scan List [DSED]Conventional and Trunking ChannelsDual Mode Scan List must be assigned as a button or menu item in order to allow user viewing or editing of the dual scan channel list.Enhanced Scan [ESCN]Conventional ChannelsEnhanced Scan combines Priority Scan and Channel Scan to one switch/button. Enabling Enhanced Scan will turn on both Priority and Channel Scan.Priority Scan/System Scan [PSCN]Conventional ChannelsTwo channels can be designated as priority channels. When Priority Scan is on, these channels are monitored for incoming trac. When a qualied signal is detected the speaker is opened to listen to the message.If a message is detected on the channel designated as Priority 2, the radio will continue to monitor Priority 1 channel for activity. If activity is detected the radio will switch to the Priority 1 channel.When used in conjunction with Channel Scan, the radio monitors the Priority channels and will switch from a scanned channel to the Priority channel if a qualied signal is detected.](https://usermanual.wiki/BK-Technologies/KNGM150LP/User-Guide-3483252-Page-57.png)
![- 49 -KNG Mobile OperationDepending on radio setup, priority channels can be tied to the currently operating zone or can be assigned to a specic channel regardless of the operating zone.Channels designated as Priority channels are identied by the P1 or P2 symbol at the top of the LCD display. When Priority Scan is on, the CP symbol will be shown. Priority Scan operation can be assigned as a switch, a button or a menu list item.While Priority Scanning, Zone scan settings are disabled.Trunked ChannelsOn trunked channels, the [PSCN] button is used to turn system scanning on or o.Priority Channel Select [PRI]Conventional ChannelsDepending on programming, priority channels can be radio-wide (System) or zone specic (Zone). Radio-wide priority channels are monitored regardless of the current operating zone. (See Priority Scan for more details.)When the function is enabled, the user can change the priority channels. Priority Channel Select can be assigned to a button or as a menu list item.Selecting a System Priority ChannelOpen the menu and select the System Priority channel you wish to change.](https://usermanual.wiki/BK-Technologies/KNGM150LP/User-Guide-3483252-Page-58.png)
![- 52 -KNG Mobile OperationZone Scan [ZSCN]Conventional ChannelsWith Zone Scan enabled, the radio scans all programmed scan channels in zones designated as Zone Scan zones whenever Channel Scan is on. NOTE: Enabling Zone Scan while Channel Scan is o does not begin the scanning process. Scan is turned on or o with the Channel Scan switch.When Zone Scan is on (and when the Channel Scan is also on), the ZP symbol will be shown at the top of the LCD display. The icon is not displayed if only Zone Scan is on. Zone Scan operation can be a button or menu list item. While Zone Scanning, Priority Scan settings are disabled.If allowed, the scanned zone list can be edited by the radio user. (See Zone Scan List).Zone Scan List [ZSC+]Conventional ChannelsThe Zone Scan List allows the radio user to add or remove zones from the list of zones to be scanned.](https://usermanual.wiki/BK-Technologies/KNGM150LP/User-Guide-3483252-Page-61.png)
![- 53 -KNG Mobile OperationThe Zone Scan List operation can be assigned as a button or menu list item.When Zone Scan List is assigned to a button [ZSC+], press the button to add or remove the currently operating zone from the scan list.When assigned as a menu item, open the menu and select the Zone you wish to add or remove from the scan list. Press “+/-” to add or remove. Zones in the scan list will be indicated with the symbol.Pressing "ESC" does not abandon changes.Scanning Code Guarded ChannelsConventional Analog Channels When a signal is detected, scanning stops while the radio checks for the proper Code Guard value. If the signal contains the proper Code Guard value, the radio receives the message. Otherwise, the radio resumes scanning immediately.Transmitting with Scan On The radio transmits on the channel selected by the Channel Selector knob unless Talkback Scan is enabled (see Talkback Scan) or Priority Scan is on and Transmit on Priority 1 is enabled (see Priority Scan).](https://usermanual.wiki/BK-Technologies/KNGM150LP/User-Guide-3483252-Page-62.png)
![- 55 -KNG Mobile OperationTransmit Secure [SEC] When SEC is on, encrypted channels programmed for switchable encryption will transmit an encrypted signal. NOTE: The SEC switch has no eect on channels programmed as Encrypted Only or Clear Only. Channels in the Ready-to-Transmit Encrypted mode will display the symbol on the top line of the LCD.When receiving an encrypted signal a ashing symbol will be displayed.When transmitting or receiving an encrypted signal, the TX/RX LED will alternate blue.Transmit Secure selection can be assigned as a touch screen button, menu list item or to a microphone function button.Transmit Encryption Key Selection [KEY]The radio can hold up to 32 DES or AES encryption keys. Each channel is assigned a default key for transmit. The key can be locked to the channel, or if programming allows, a transmit key other than the default key can be selected from the radio’s Key Pick List.](https://usermanual.wiki/BK-Technologies/KNGM150LP/User-Guide-3483252-Page-64.png)
![- 56 -KNG Mobile OperationTo change an encryption key, open the KEY menu. Programmed key labels will be displayed.Select the desired key and press “ENTER”.To return the key to the pre-programmed value select “Default”.If a key is selected that has not been programmed, the radio will emit a three beep tone and display “Key Fail” before going to standby mode. The radio will not transmit but will beep and display “Key Fail” when PTT is pressed.Encryption Keyset Selection [KEYST]OTAR equipped radios only.Selecting a keyset from the Pick List will cause the radio to use encryption keys from the selected keyset. User selectable pick list access can be assigned to a button or menu list item.To change the encryption keyset, open the KEYST menu. Programmed Keyset labels will be displayed.Select the desired keyset and press “ENTER”.](https://usermanual.wiki/BK-Technologies/KNGM150LP/User-Guide-3483252-Page-65.png)
![- 57 -KNG Mobile OperationRekey Request [RKEY]OTAR equipped radios only. On radios equipped with over-the-air rekeying (OTAR), a radio user can manually request an encryption rekey from the Key Management Facility (KMF). For a radio to receive encryption keys or keysets over-the-air, the selected channel must be designated as an OTAR channel via PC programming. Refer to your PC programming documentation for more information.To request a re-key:Open the Rekey Request menu. Press the “YES” button to Request Keys, or press “ESC” to cancel the operation.If the “YES” button is pressed while on a channel that has not been marked as an OTAR channel, the radio will beep and “NON-OTAR” will appear on the display.If a successful rekey occurs, a tone will sound, and the display will momentarily show “REKEYED”.](https://usermanual.wiki/BK-Technologies/KNGM150LP/User-Guide-3483252-Page-66.png)
![- 58 -KNG Mobile OperationKeyset Viewing and Selecting [KSET]OTAR equipped radios only. The radio can hold up to 8 encryption keysets. Only one keyset can be active at any time. The radio will receive messages encrypted with any of the keys in any of the keysets, but transmit keys can only be selected from the active keyset. To change an encryption keyset, open the KEYST menu. Programmed keyset labels will be displayed. Select the desired keyset and press “ENTER”.Zeroizing [ZERO]The radio provides a method for the user to “panic-zeroize” all encryption keys. Zeroizing removes all encryption keys from the radio, including keys used for OTAR and Tactical OTAR operation.Zeroize can be assigned as a button or menu list item.Open the “Zeroize Keys” menu.Press “YES” to erase all encryption keys or “ESC” to cancel the action.When successfully removed the “Keys Removed” message will momentarily be displayed.](https://usermanual.wiki/BK-Technologies/KNGM150LP/User-Guide-3483252-Page-67.png)
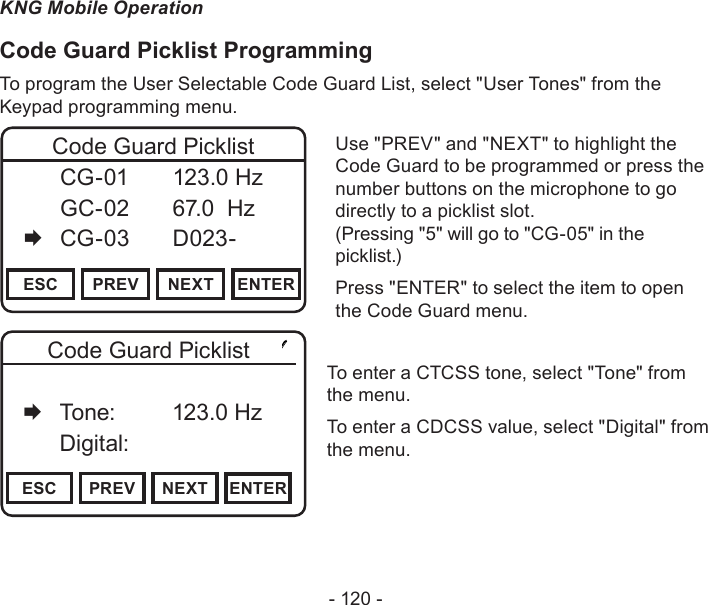
![- 60 -KNG Mobile OperationTX/RX CxCSS Picklist [TXCG] [RXCG]Conventional Analog or Mixed Mode ChannelsSelecting a CTCSS/CDCSS Code Guard from the Pick List will assign the tone to the currently select analog or mixed-mode channel. User assigned Transmit and Receive Code Guards are selected independently. To change a Code Guard, open the RXCG or TXCG menu, select the desired tone and press “ENTER”.To return the tone to the pre-programmed value select “Default”.If allowed, picklist values can be changed through keypad programming.TX/RX Network Access Code Picklist [TNAC] [RNAC]Conventional Digital or Mixed Mode ChannelsSelecting a Network Access Code (NAC) from the Pick List will assign the NAC to the currently select digital or mixed-mode channel. User assigned Transmit and Receive NACs are selected independently. To change a NAC, open the RXNAC or TXNAC menu, select the desired NAC and press “ENTER”.To return the NAC to the pre-programmed value select “Default”.If allowed, picklist values can be changed through keypad programming.](https://usermanual.wiki/BK-Technologies/KNGM150LP/User-Guide-3483252-Page-69.png)
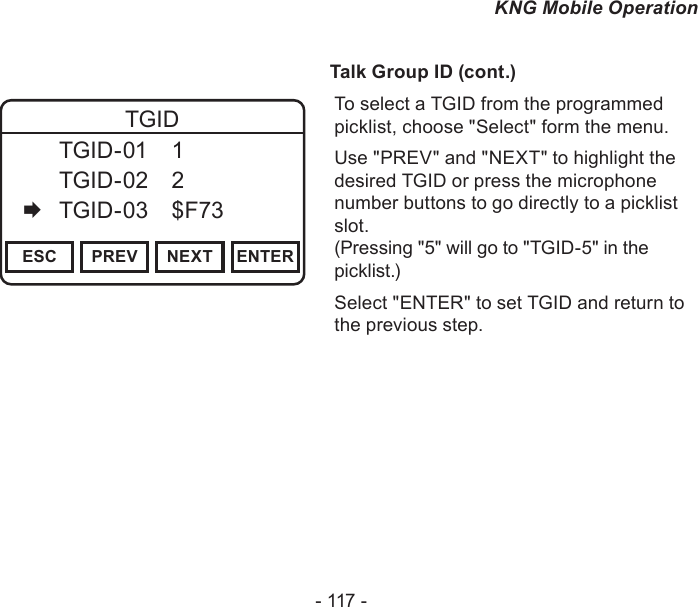
![- 61 -KNG Mobile OperationTalk Group ID Picklist [TGID]Conventional Digital ChannelsSelecting a Talk Group ID from the Pick List will assign the TGID to the currently select channel. All other channels are unaected.Open the menu of available TGIDs. Select the desired Talk Group ID or, to return the TGID to the pre-programmed value, select “Default”.Press “ENTER” to set the selection.If allowed, picklist values can be changed through keypad programming. Encryption Key Picklist [KEY]Digital or Mixed Mode Channels Encryption equipped radios only. Requires option KZA0576.Selecting an Encryption Key from the Pick List will assign the key to all encrypted channels that do not have ‘Key Lock’ programmed. Locked key channels will continue to use the pre-programmed key. (See Encryption Operation)](https://usermanual.wiki/BK-Technologies/KNGM150LP/User-Guide-3483252-Page-70.png)
![- 62 -KNG Mobile OperationKeyset Picklist [KSET]Digital or Mixed Mode Channels OTAR equipped radios only. Requires option KZA0580 or KAA0580.Selecting a Keyset from the Pick List will cause the radio to use encryption keys from the selected Keyset. (See Encryption Operation)Emergency SignalingIf programmed, the Orange button on the front panel is used to send an emergency call and/or emergency alarm on the programmed Emergency channel. If the emergency channel is assigned for digital operation, the emergency signal is broadcast using digital P25 protocol. If the assigned channel is analog, the emergency signal is broadcast using MDC protocol.Sending an Emergency CallPress and hold the button to initiate an Emergency Call mode. The radio will emit a series of beeps and "EMERGENCY" will ash on the display. The emergency transmission is not sent automatically.Once Emergency Call is initiated, the PTT must be pressed to transmit the emergency message. Audio is also transmitted.](https://usermanual.wiki/BK-Technologies/KNGM150LP/User-Guide-3483252-Page-71.png)
![- 64 -KNG Mobile OperationMessaging OptionsDigital Conventional P25 channels can be programmed to send and receive text messages and radio status messages.Text messages can be selected from a pre-programmed list or manually entered using the radio keypad.Status messages are pre-programmed only.Text Messaging [TXT]Conventional Digital Channels Message types include predened messages, manually entered messages or locally stored messages.Predened Messages - Predened messages are programmed into the radio memory using the PC Radio Editor.Manually Entered Messages - Text messages can be manually entered via the radio’s keypad. (Can only function by enabling OTAR/Data on each channel through PC Radio Editor.)Locally Stored Messages - Up to ve manually entered messages can be stored in individual radios.](https://usermanual.wiki/BK-Technologies/KNGM150LP/User-Guide-3483252-Page-73.png)
![- 68 -KNG Mobile OperationStored MessagesUp to ve messages can be programmed into the “Manual Entry List” and are accessed from the “Select Entry Type” menu.Short Message Update [MSG]Conventional Digital ChannelsShort Message Update is a way for the radio to transmit an enumeration that corresponds to a predened message that is stored in other radios.User Status Messaging [STS]Conventional Digital ChannelsSending a Status UpdateNOTE: When sending a message the message ID is transmitted. The receiving radio will display the message programmed with the corresponding ID. If the receiving radio has no programmed message with the transmitted ID “Status: Status X” is displayed, where “X” is the received ID number.Select Status MessagePress the “STS” button or select “Status Update” from the menu.From the “Select Status” menu, select the programmed message to send and press “Enter”.](https://usermanual.wiki/BK-Technologies/KNGM150LP/User-Guide-3483252-Page-77.png)
![- 71 -KNG Mobile OperationPaging and Call AlertConventional Two-Tone/DTMF/MDC1200 Paging [MUTE] Conventional Analog ChannelsThe KNG can be programmed to receive two-tone, DTMF or MDC1200 pages on conventional analog channels.Receiving a pageSelect an analog or mixed-mode receive channel.Turn on “Voice Mute” from the programmed button or menu item.When voice mute is activated the icon is displayed.The radio ignores all voice trac until the proper tone sequence is received.When a proper signal is received the radio will emit an alert tone and allow the audio to pass.If Auto Reset is programmed, the radio will return to the muted standby mode when the time conditions have been met.](https://usermanual.wiki/BK-Technologies/KNGM150LP/User-Guide-3483252-Page-80.png)
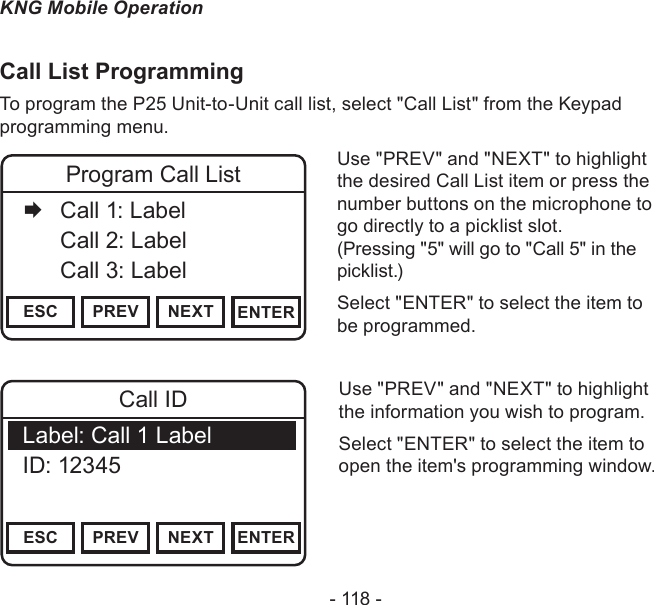
![- 72 -KNG Mobile OperationCall Alert Paging [ALRT] Digital ChannelsThe KNG can be programmed to send and receive Call Alert messages on digital channels.Sending a Call AlertPress the “ALRT” button or open “Call Alert” from the menu.Select Target RadioLast CallSelect “Last Call” to send the message to radio which you last sent or received a call alert. Press “Enter” to send the message.Call ListSelecting “Call List” opens a list alias’ for the pre-programmed Unit IDs. Select the desired target radio and press “Enter” to send the Call Alert.Enter IDSelect “Enter ID” to enter the ID of the target radio.Use the keypad to enter the ID then press “Enter” to send the Call.](https://usermanual.wiki/BK-Technologies/KNGM150LP/User-Guide-3483252-Page-81.png)
![- 73 -KNG Mobile OperationReceiving a Call AlertWhen a Call Alert is received, an alert tone will sound and the incoming unit ID or alias is displayed for approximately 5 seconds.The top display line will alternated between the programmed display information and a Call Alert Received message.Select “Call Alert” to reset. Radio Check [RCHK] Conventional Digital ChannelsThe KNG can be programmed to check the availability of a KNG radio with a specic P25 ID. Requesting a Radio CheckPress the “RCHK” button or open “Radio Check” from the menu.Select Target RadioLast CallSelect “Last Call” to send the request to the radio which you last sent a radio check request. Press “Enter” to send the query.](https://usermanual.wiki/BK-Technologies/KNGM150LP/User-Guide-3483252-Page-82.png)
![- 75 -KNG Mobile OperationOther Functions & OptionsMany operational features and functions can be programmed for user selection and control. Items can be programmed as touch-screen buttons or to the three buttons available on some microphone models.In addition to these quick set buttons, a menu of multiple functions can be accessed with a "MENU" button.This section covers the operation of user accessible functions.Backlight [LITE]Conventional and Trunked Channels Radio lighting can be adjusted using the backlight function. To adjust the display press the "LITE" button or select "Backlight" from the menu.Select the desired setting:Auto - The display brightness adjusts automatically with ambient conditions.O - Display and microphone lighting are all turned o. Touch the bottom area of the display to turn the display back on.Dim, Medium, Bright - Sets to a xed brightness.](https://usermanual.wiki/BK-Technologies/KNGM150LP/User-Guide-3483252-Page-84.png)
![- 76 -KNG Mobile OperationCloningConventional Zones The KNG Mobile radio can be set up to send or receive programmed information from other BK Radio products via a cloning cable available from RELM Wireless.Refer to the cloning cable instruction manual for cloning information between radios. Control Lockout [LOCK]Conventional and Trunked ChannelsThe KNG mobile oers two lockout settings, "Lock Keypad Only" and "Lock All Controls".Unlocked - Disables Control Lockout on all touch screen and button operations.Lock Keypad Only - Locks all touch screen and button operations except the three side buttons on the microphone.Lock All Controls - Locks all functions programmed with the PC Radio Editor for lockout.](https://usermanual.wiki/BK-Technologies/KNGM150LP/User-Guide-3483252-Page-85.png)
![- 77 -KNG Mobile OperationTo enable the lock function press the "LOCK" button or select "Control Lock" from the menu.Select the desired lockout setting and press "ENTER"When attempting to access a locked function the radio will display a message with instructions to disable Control Lock. The navigation wheel on the radio front panel or microphone is used to unlock the controls. To disable Control Lock press the left arrow button twice, then the right arrow button twice.Date and Time [DATE]Conventional and Trunked ChannelsDisplays the date and time. The edit button allows the user to change the date and time. The time will be stored in the radio when powered o, so long that it is not disconnected from a power supply.](https://usermanual.wiki/BK-Technologies/KNGM150LP/User-Guide-3483252-Page-86.png)
![- 78 -KNG Mobile OperationGlobal Positioning [GPS]Conventional Digital Channels.Requires GPS Option KZA0589 or KAA0589.To access GPS functions press the "GPS" button or select "GPS" form the menu.Viewing GPS informationTo view current coordinates open the GPS menu and select "GPS Information".After acquisition, the current location is displayed in degrees, minutes and seconds.Sending GPS informationDepending on radio programming, GPS information is sent by a variety of triggers.PTT - After a digital transmission the GPS coordinates will be automatically transmitted.Periodic - GPS coordinates are transmitted periodically using a programmed time. Emergency - GPS coordinates are sent if the radio activates emergency.Power on/o - GPS coordinates are sent once the radio powers up and acquires a position and also on power o.User Request - To send GPS information, open the GPS menu and select "Transmit Request". From the Request menu select the desired target ID and press "Enter".](https://usermanual.wiki/BK-Technologies/KNGM150LP/User-Guide-3483252-Page-87.png)
![- 79 -KNG Mobile OperationHard Power Down [PWRD]Conventional and Trunking ChannelsWhen pressed, turns the radio completely o.Home [HOME]Conventional and Trunking ChannelsWhen pressed, the radio returns to a preprogrammed channel that is congured in the PC Radio Editor.Inhibit/Uninhibit [INH]/UINH]Conventional Digital ChannelsWith “Inhibit” assigned to a button or menu function, a KNG Radio can temporarily disable other KNG radios using the targeted radio’s unit ID number.The disabled radio can only be re-enabled by sending an “Uninhibit” command.NOTE: Inhibited radios cannot be read with the PC Radio Editor.Sending a commandTo initiate an inhibit/uninhibit message, press the programmed button or select from the menu.If prompted, use the keypad to enter the User or Administrator password.Press “ENTER” to open the menu.](https://usermanual.wiki/BK-Technologies/KNGM150LP/User-Guide-3483252-Page-88.png)
![- 82 -KNG Mobile OperationMinimum Volume [VOL]Conventional and Trunking ChannelsMust be congured as "Customizable" in the PC Radio Editor to access through the radio. When pressed, changes the volume level at lower volumes. This allows the user to set their minimum volume to an audible level.Monitor [MON]Conventional ChannelsThere are three settings available for monitoring trac on a selected channel.O - Requires NAC or Tone. On - Monitors activity on selected frequency regardless of NAC or Tone. Open - Open Squelch. If assigned as a Touch Screen or function button, press the button to toggle On/O. Press and hold for Open Squelch.When assigned as a menu item, open the menu as described in the Navigation section and select the Monitor mode you wish to use. Press "ENTER" to select.](https://usermanual.wiki/BK-Technologies/KNGM150LP/User-Guide-3483252-Page-91.png)
![- 83 -KNG Mobile OperationNuisance Channel Delete [NUIS]Conventional and Trunked Channels Nuisance Channel Delete can be assigned as a touch screen item or on a microphone function button.To temporarily remove a channel from the scan list, press the assigned button while the nuisance channel is being received.To revert to the programmed scan list, turn o Scan, cycle radio power or select another zone or channel.Phone [PHN] and Hang Up [HANG]Conventional ChannelsThe Phone function is a way for a conventional radio to instruct the system to dial a phone number and begin a call with that radio. Using the Hang Up button allows the user to end that call.Radio Accountability Tone [RAT]Conventional and Trunked ChannelsThe Radio Accountability Tone transmits a preprogrammed sequence of DTMF tones when the RAT button is pressed and held. Must be programmed with a Radio Accountability Tone ID in the PC Radio Editor.](https://usermanual.wiki/BK-Technologies/KNGM150LP/User-Guide-3483252-Page-92.png)
![- 84 -KNG Mobile OperationRadio InfoConventional and Trunking ChannelsInformation about your radio can be viewed via the “Radio Info” menu item.To review the information, open the Radio Info menu. Use the NEXT or PREV to view individual items.Radio Info information includes:UID - P25 Unit ID.IP - IP Address of the radio.OTAR Registered - Acknowledges if radio is registered to an OTAR system.Up Time - Amount of time the radio has been on.Repeater Talkaround [T/A]Conventional ChannelsIn Repeater Talkaround (T/A) mode, the radio will transmit on the programmed receive frequency of the selected channel. When T/A is enabled the icon will be displayed on the top line of the LCD. NOTE: Channels programmed as receive only are not aected by the Talkaround selection.Talkaround selection can be assigned as a touch screen button, menu list item or a microphone function button.](https://usermanual.wiki/BK-Technologies/KNGM150LP/User-Guide-3483252-Page-93.png)
![- 85 -KNG Mobile OperationSend Alert Tone [SNDT]Conventional and Trunking ChannelsWhen pressed and held, the radio will transmit a 781.3Hz tone for the programmed duration. Duration can be set in the range from 0.5 to 5 seconds.Send Signal [SEND]Conventional Analog ChannelsActivated by a long-press and is the 5-tone equivalent to emergency alarm. ANI Mode needs to be set to ve-tone. Holding this button will send the ve-tone signal.Squelch Adjust [SQL]Conventional Analog and Mixed Mode ChannelsSquelch Adjust is used to change the signal strength required for the radio's speaker to unmute on a per channel basis.Adjusting Squelch LevelPress the "SQL" button or select "Squelch Adjust" from the menu.Select "Adjust Chan Squelch" form the menu.Use the -/+ buttons to adjust the desired squelch level.Press "ENTER" to set the level.](https://usermanual.wiki/BK-Technologies/KNGM150LP/User-Guide-3483252-Page-94.png)
![- 86 -KNG Mobile OperationResetting Squelch LevelSelect "Reset Squelch" from the Squelch Adjust menu.Select which channels to return to factory set squelch setting.Selected Channel - Resets the selected channel.Selected Zone - Resets all channels in the current operating zone.All Channels - Resets all radio channels.Site Display [STDS]Trunking ChannelsWhen selected, the Site Display functions shows information for the currently operating site.Displayed information includes: Site ID, Site Alias and RSSI.Site Display can be assigned as a button or menu list item.Site Lock [STLK]Trunking ChannelsSite lock prevents the radio from searching for other sites by locking it to the currently selected site.Site Lock can be assigned as a button or menu list item.](https://usermanual.wiki/BK-Technologies/KNGM150LP/User-Guide-3483252-Page-95.png)
![- 87 -KNG Mobile OperationSite Search [STSR]Trunking ChannelsSite Search automatically searches and selects the best available trunking site.Site Lock can be assigned as a button or menu list item.Surveillance Mode [SURV]Conventional and Trunked ChannelsWhen Surveillance Mode is on, all audible indicators (beeps etc.) and lighting functions (LEDs and Display) are disabled. The LCD Touchscreen is set to the dimmest setting. For best operation, Surveillance Mode should be assigned as a touch screen button or on a microphone function button.To enable or disable surveillance mode, press the assigned button.Transmit Digital [TXD]Conventional Mixed Mode ChannelsWhen Transmit Digital is on, channels programmed for selectable transmit mode will transmit in digital mode. When o, mixed-mode channels transmit in analog mode.When transmitting in digital mode the display shows 'D' behind the TX indicator. In analog transmit, 'A" will follow the indicator.](https://usermanual.wiki/BK-Technologies/KNGM150LP/User-Guide-3483252-Page-96.png)
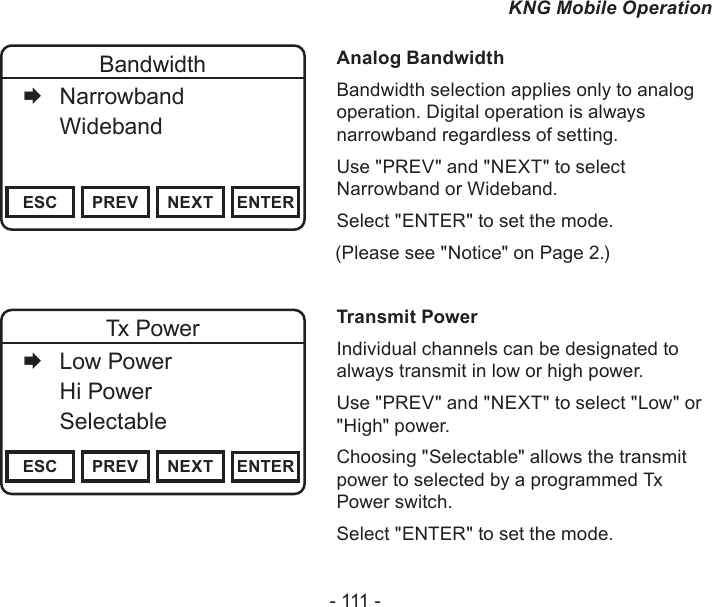
![- 88 -KNG Mobile OperationTransmit Digital selection can be assigned as a touch screen button, menu list item or a microphone function button.When assigned as a touch screen function, the "TXAD" button will be highlighted when in the Transmit Digital mode.To switch transmit mode on mixed mode channels press the "TXAD" button or select "Tx Digital" from the menu and choose "Analog" or "Digital".Transmit Power [PWR]Conventional and Trunked Channels.Transmit Power can be selected between the programmed high and low settings. The power output of the settings depend on radio options, model and editor settings.When operating in the high power mode, "H" will be displayed on the top line of the LCD. In low power mode, "L" is displayed.To change the transmit power setting, press the "PWR" button or select "Tx Power" from the menu and choose "High" or "Low".Press "ENTER" to set the selection.Two-Tone Select [TONE]Conventional Analog Channels.Allows the user to select from their two-tone list (programmed with the PC Radio Editor). Selecting an item will send the two-tone signal.](https://usermanual.wiki/BK-Technologies/KNGM150LP/User-Guide-3483252-Page-97.png)
![- 90 -KNG Mobile OperationZone Select [ZONE]Conventional and Trunked ChannelsZone Select allows the radio user to switch between programmed channel zones.The Zone Select operation can be assigned to a touch screen button, menu list item or a microphone function button.When Zone is assigned to the touch screen or as a microphone function button, press the button to open the menu of available zones. When assigned as a menu item, open the menu as described in the Navigation section.Select the Zone you want to use.Press "ENTER" select the Zone.Additionally, the channel select knob can be used to change the operating zone.Also, If enabled, a zone can also be accessed directly for the microphone keypad.(Refer to your PC Radio Editor documentation.)(See also, Channel/Zone Selection Options.)](https://usermanual.wiki/BK-Technologies/KNGM150LP/User-Guide-3483252-Page-99.png)