User manual

WCDMA Digital Mobile Phone
Neo 4.5
User Manual
BLU

Catalog
Safety Precautions .................................................................................................................................................... 1
Packing list................................................................................................................................................................ 2
Your Mobile Phone ................................................................................................................................................... 2
Power on and off ...................................................................................................................................................... 5
The use of touch screen ............................................................................................................................................ 6
Standby screen ......................................................................................................................................................... 8
MicroSD .................................................................................................................................................................... 9
USB Data Line: Shielded USB Cable......................................................................................................................... 10
Application Program ............................................................................................................................................... 10
Custom mobile phone ............................................................................................................................................ 11

Input Text ............................................................................................................................................................... 14
The downloading of files from Internet .................................................................................................................. 16
Install the application ............................................................................................................................................. 17
Synchronous data ................................................................................................................................................... 17
To use of WLAN to get on the internet ................................................................................................................... 19
Hotspot................................................................................................................................................................... 20
Bluetooth ............................................................................................................................................................... 20
Speak ...................................................................................................................................................................... 21
Security Code.......................................................................................................................................................... 24
Phone book ............................................................................................................................................................ 25

3
Short Message ........................................................................................................................................................ 28
Call log .................................................................................................................................................................... 31
Email....................................................................................................................................................................... 32
Multi-Media ........................................................................................................................................................... 35
Browser .................................................................................................................................................................. 42
Clock ....................................................................................................................................................................... 44
Calculator ............................................................................................................................................................... 45
Calendar ................................................................................................................................................................. 45
Non environmental protection material or element name and content description .............................................. 46
FCC Regulations: ..................................................................................................................................................... 48


1
Mobile Phone User Manual
Safety Precautions
For the safe and effective use of your mobile phone, please read the information carefully before use
Safety boot
On the prohibition of the use of mobile phone location, or to use mobile phone will case interface or
danger, please do not use mobile phone.
Traffic safety first
Dot use oile phone while driving, so as not to hinder the safe driving
In the restricted area to be shutdown
Please comply with all relevant regulations and rules. On the plane or in the inflammable goods
chemicalsmedical equipment should be shutdown.
Interference
Mobile communication may be affected by the radio interface, thereby affecting performance
Waterproof
The mobile phone is not waterproof, please keep it dry.
The mobile phone is placed in the children can not touch.
Mobile phone and all its accessories(including accessories)should be placed in the children can not touch.
Accessories and batteries
Please use the company designated the battery and charger, otherwise it may cause an explosion.

2
Professional Services
Do not remove the mobile phone and accessories, only authorized agencies can repair the mobile phone.
Packing list
Mobile Phone
The USB Connection Line
Earphone
Charger
Battery
Uses Maual
Your Mobile Phone
Thank you for choosing BLU dual sim touch screen mobile phone. You can read through this manual, a full
understanding of BLU mobile phone use, enjoy its perfect function and enjoy operation method.
Mobile Phone Appearance
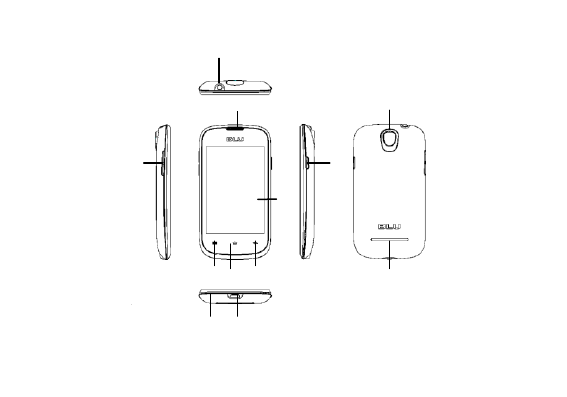
3
1
2
3
4
5
6
7
8
9
10
11
12

4
1Power Key 23.5mm Headphone jack 3Receiver 4The Volume Keys 5USB Interface
6Main Panel 7The Home Key 8Menu Key 9Return Key 10Microphone 11Camera
12LoudSpeaker
Install SIM card and cell
The mobile phone is a dual card dual standby, can be inserted into the two sim cards. each sim card in a
card slot, insert SIM 1 card slot for card 1,insert SIM 2 slot for card 2,SIM card and its contact is easily
scratched or damage, so use or remove the SIM card must be careful
1Remove the battery cover(if the mobile phone is turned on, please shutdown).
2Remove the battery(Please turn off your mobile phone battery and disconnect mobile phone and
charger)
3Slide the SIM card into the fixing seat.
4Insert the Battery.
5Cover the cover of battery.
For battery charging
When the battery power is low, mobile phone will emit a warning tone, showing the lack of electricity
information and available power icon. In this case , may not be able to use mobile phone part function.
If the battery is low, mobile phone will automatically shutdown, please to mobile phone charging.

5
Mobile phone boot rechargeable battery, battery icon will flash on the screen. After charging , the screen
will display the full lattice of battery icon(no longer flashing ).Mobile phone charging off ,screen will
display the charging state picture. Standby mode, charging time is about 2-3 hours.
1The charger into the AC power supply socket.
2Open mobile phone charging interface of the rubber protective sleeve, will be connected to the mobile
phone charger.
3Charging indicator appears on screen. ( if the battery is completely discharged, it may need to wait a
few minutes, the screen will appear charge prompting symbol).
4Charging complete, taking down charger from the electrical and then taking down charger from a
mobile phone.
Be careful
The mobile phone battery charging only about 50% of the electricity , of the electricity , open to use.
Please use the first completely exhausted after the full after; The second is to completely exhausted after
the full power, this requires three sequential cycle, easy to achieve the best state of battery.
Power on and off
Power on

6
Long press and will be powered on,if you are the first,You can conduct some Personalization
according to your preference on mobile phone.
Power off
1Long press ,open mobile phone menu
2Choose shutdown
The use of touch screen
The use of mobile phone touch screen can more easily select a project or executive function, understand
the basic actions to use the touch screen.
Be careful
1In order to avoid scratching the touch screen, do not use sharp objects.
2The touch screen can not contact with other electronic equipment, equipment, electrostatic discharge
may lead touch screen to failure.
3The touch screen may not contact with water, a touch screen in a humid environment or when in
contact with water may malfunction.
the mobile phone touch screen to perform the following operations.
1Click: touch the screen to select command, or launch an application.

7
2Live: live an item to view the available list of operations. And then in the pop-up list and click on the
operation to be performed
3Scroll: click and upward, downward, drag left or right finger to move to an item in the list.
4Drag and drop: point to a project, and then drag the fingers to move the project.
5Double: rapid finger click two times.
larger or smaller
View photos, webpage, or map, you can zoom in or out.
1Will your fingers to fold or unfold to zoom in or out.
2View photos, double-click the photo to enlarge, again double photo reducing to a minimum.
3View the webpage, double-click the webpage display zoom icon, click on the icon to zoom in or out.
Webpage amplification to maximum again after double-click can be reduced to the minimum value of webpage.
4Look at the map ,double-click on the map can be enlarged, with two fingers can be reduced.
Be careful
1If not use mobile phone time reaches a specified length of time, mobile phone will close touch screen .
Such as the need to open the screen, press the power button.
2To adjust the background light time. Standby mode, open up the application list, select settigs
→Displa →“ee tieout.

8
Standby screen
Mobile phone is in the standby mode, it will display the standby screen, it can view the mobile phone
status and access application.
Standby screen has a plurality of panels. Scroll left or right to choose a standby panel.
add items to the standby screen standby
You can add the application, small parts or folder shortcut to customize the standby screen.
If you want to add an item to a standby screen:
1Press the [ menu ] → Add( or live screen blank area ).
2Select item categories:
1Shortcuts: applications, contacts, bookmarks and music play lists and other projects to add a shortcut.
2Widget: as analog clock, photo frame, music and other projects to add widgets.
3Folder: for the contacts to create a new folder or add folder.
4Wallpaper: selection of wallpaper, pictures set the background picture.
In the standby screen of mobile project
1Touch and hold the item you want to move.
2The project will become larger and dragged to the desired location.
the standby screen deleting items

9
1Touch and hold the item to delete, project becomes larger and the bottom of the screen appears
recycling label
2Dragging the item to the recycle bin tag.
3When the project turns red, released project.
view of network information and notification
From the top of the screen and drag down the status bar that you can access to network information and
notification list.
If you want to hide the list, please drag up the list of the lower frame dragging.
MicroSD
Mobile phone support T-Flash card, T-Flash card is used for mobile phone multimedia card memory that
to increase the memory. This card is more compact, the installation or removal need careful, cautious, so
as to avoid damage.
1If the mobile phone has the boot, then press the switch machine key, until appear the shutdown
options menu and select shutdown.
2 Go to the back of the mobile phone, and then to open the rear cover and remove the battery;
3T-Flash card metal contact down, close to the metal contact is inserted into the card slot, Lock plate;

10
4To remove the T-Flash card, remove the battery and take out the T-Flash card.
USB Data Line: Shielded USB Cable
The mobile phone supporting USB interface. you can through USB data line and connect mobile phone to
the computer, you can copy, move files and other operations between mobile phone and computer and
can also browse through computer mobile phone on the saved photos, video, sound and other
documents.
1The USB data line plug is inserted into the mobile phone USB interface.
2The USB data line and the other end is connected to the computer USB interface.
3To select the desired mode storing device.
Application Program
access application
1Standby mode, select the open the application list.
2Scroll left or right to choose the other application screen.
3Select application.
Be careful

11
1For the use of Google application, you must have a Google account.
2If no Google account, please register an account.
3When the application icon added to the standby screen, you can live the icon and drag it to the
appropriate position on the standby screen.
access recently used applications
1Press the [ the home key ] open access list of the applications.
2Choose the application that want to visit
Custom mobile phone
According to personal preferences to customize mobile phone.
Set time and date
1Standby mode, open up the application list to select settigs →data and tie.
2Set the date and time as well as other options.
adjusting the ringing volume
Standby mode, you can [ press the volume keys ] and regulate ring volume.
starting or cancel the silent mode

12
Standby mode, long press[the power button] →“ilet ode, and you can start mobile phone silent
mode.
If you want to cancel the mobile phone silent mode, you must make the operation again.
Change ringing
Be careful
If use silent mode, that you cannot change ringing .
1Standby mode, open up the application list and select settigs →soud →phoe igtoe
2Choose the bell from the list, then select ok.
change wallpapers
1Standby mode, press the [ menu ] →allpape.
2Choose the source of the wallpaper
3Choose to set the wallpaper.
start switching window display animation
Standby mode, open up the application list, select “ettigs → Displa → Aiatio→ No
aiatios“oe aiatiosAll aiatios.
Adjusting the brightness of the display screen
Standby mode, open up the application list, select settigs→ Displa → Bightess.
Setting the lock screen

13
Can set the pattern, PIN or password to prevent unauthorized use of your mobile phone.
Be careful
Set screen lock, It will require the input pattern to unlock, PIN or password. when each booting or lifting
touch the screen mobile phone. If the mobile phone is no longer required to enter unlock pattern so, PIN
or password, select settigs → Loatio ad seuit →“et up “ee lok →Noe.
To set the pattern
1Standby mode, open up the application list, select “ettigs→Loatio ad seuit→ “et up “ee
lok → patte.
2View settings descriptions and examples of patterns, and then select the next step.
3Draw pattern to unlock .drag the fingers are connected to at least 4 points, draw the pattern. According
to the [ menu ] watch the screen and click on OK ( when necessary).
4Drawing is complete, choose to continue.
5Redraw the pattern, and then select the confirm.
Set PIN
1Standby mode, open up the application list, selet settigs→ Loatio ad seuit→ “et up
“ee lok → PIN.
2Enter at least4 digits, choose to continue. Set password
3To enter the PIN, and then select the confirm.

14
Set password
1Standby mode, open up the application list, selet settigs→ Loatio ad seuit→ “et up
“ee lok → Passod.
2Enter at least4 character, choose to continue.
3Enter the password again, and then select the confirm.
Set the SIM card lock
You can set SIM card locking, starting up at every time to enter the PIN code to unlock.
1Standby mode, open up the application list, selet settigs→ Loatio ad seuit→ “et up “IM
ad lok → Lok “IM ad.
2Enter the PIN code and select ok.
Be careful
1If the PIN code input error too many times, the SIM card is locked. You need to enter the PUK unlock.
2If the PUK code input error which led to SIM lock, you will need to SIM by the network operator to
unlock.
Input Text
The use of mobile phone touch screen, you can enter text and new information and contacts.

15
Change text input method
According to the input box, select Iput Method → Select the input method that you need
Be careful
When entering text, press the [ menu ] to show or hide a virtual keyboard.
The use of Android Keyboard
1According to the input box, select Iput ethod→ Android Keyboard
2When the Android Keyboard displays, select the appropriate virtual keypad input text.
Copying and pasting text
When entering text, you can use the copy and paste function in other applications using the text.
1Touch and hold the text input field.
2From the list of options to select text.
3Drag the finger to select text.
4Touch and hold the highlighted text.
5Select Cop, Copy text to the clipboard.
6In another application, touch and hold the text input field.
7Choose the paste and insert the text into the field

16
The downloading of files from Internet
The downloading of files from the Internet or Internet application, mobile phone will be stored in the
memory card.
Warning
Downloaded files from the Internet may contain the virus that will damage the mobile phones. In order to
reduce risk, please only trusted sources to download the file.
Be careful
Some media files include" digital rights management" That it is to protect copyright .This protection will
prevent the mobile phone to download, copy, modify or transmission some documents.
download files from the Internet
1Standby mode, open up the application list, select the browser.
2Click on the address bar that above the screen, enter the Internet address, and then click.
3Select file or application and download.
View download history
1In the main browser screen, press the [menu ]→ Moe → Doloads
2If you wish to remove download history list, press the [menu] → Clea If you want to cancel the
download, press the [ menu ] →ael all doload.

17
Install the application
If you want to allow the website that outside electronic market to download the application, must
choose “ettigs → Appliatios → Uko soues
1Standby mode, open up the application list and select management application.
2Select the installation file that the SD card have downloaded. Uninstall application
3Viewing the screen ,choose to install.
4Uninstall application
5Standby mode, open up the application list, select “ettigs → Appliatios →Maage
Appliatios
6Choose the application that will uninstall
7“elet uistall→ OK
Synchronous data
You can set the data with various web server for synchronization, and backup or restore your data. When
synchronization is complete, mobile phone and web stay connected. If web have any changes, update information
to be displayed on the mobile phone and mobile phone will automatically start sync.
Set server account

18
1Standby mode, open up the application list, select “ettigs → Aout ad “
2“elet Add aout → account type.
3Follow the on-screen instructions to complete the account settings.
4For an online community service, enter the account name and password, and select save.
Start the automatic synchronization
1Standby mode, open up the application list, select “ettigs → Aout ad “
2Select Auto-s Start the automatic synchronization
3Select account
4Select the application that will be synchronized
If you don't want to set the application to automatically synchronize, clear the check box next to the
corresponding application program.
Manual data synchronization
1Standby mode, open up the application list, select “ettigs → Aout ad “
2Select account
3Choose an immediate synchronization. Mobile phone will start synchronization has been set to
synchronize data.

19
To use of WLAN to get on the internet
Open Wi-Fi
1Press[ Menu ]→settigs
2pess ieless ad etoks, select the Wi-Fi marquee.
Be careful
If you have opened the wireless local area network and supplied by the operators of the data service,
wireless business priorities, supplied by the operators of the data service in wireless LAN connection
after an interruption.
Connect to Wi-Fi
1After opening Wi-Fi,pess→settigs
2press Wieless ad etok settigs →Wi-Fi settings. Mobile phone will list search within a wireless
local area network.
3You have to choose the connected network:
• If you choose an open network, you can directly connect to the network.
• If you choose an encrypted network, you need to enter a password to access connection.
Be careful
In the Wi-Fi setup, click the add Wi-Fi network and you can add new Wi-Fi network.

20
Hotspot
Open the hotspot
1Press[ Menu ] → “ettigs
2press Wieless ad etok settigs, select Tethering & portable hotspot ,open Portable Wi-Fi
hotspot . The top mobile phone screen indicative of the status bar will display the hotspot icon.
3pess Portable Wi-Fi hotspot settigs →Configure Wi-Fi hotspot. Setup hotspot state.
Connect to hotspot
1Other devices open Wi-Fi to search the hotspot and connect it.
3Choose the connected network:
• If you choose an open network, you can directly connect to the network.
• If you choose an encrypted network, you need to enter a password to access connection.
Bluetooth
Open the Bluetooth
1Press[ Menu ] → “ettigs

21
2press Wieless ad etok settigs, Select Bluetooth marquee, open the Bluetooth. The top mobile
phone screen indicative of the status bar will display the Bluetooth icon.
3pess Bluetooth settigs →Disoeale. Setup Bluetooth visible state.
Search has Bluetooth enabled devices and pairing
You and the other Bluetooth devices for data transfer, need and the matching devices.
1Examination of mobile phone sets, confirm your mobile phone Bluetooth function has been opened.
2pess “ettigs →Wieless ad etok settigs → Bluetooth settigs. Mobile phone will
automatically start the scanning range of Bluetooth device.
3In search of the Bluetooth device list click you paired devices.
4Enter the password to complete the pair.
Transfer files via Bluetooth
You can through Bluetooth, pictures, videos or music file sharing with family and friends.
1Long press the document that will be sent, it will eject a options menu.
2Click the share, and then click the Bluetooth, choose to receive files for transmission equipment.
Speak
Dial telephone.

22
1On the standby screen click to dial the icon to enter dialing interface, enter the area code and the
phone number and click the call key
2For international calls, according to the"0" key until the emergence of" +", then enter the country code,
area code and telephone number.
Be carefulAfter opening the mobile phone, if in the main network, mobile phone will automatically select
the connection to the main network. If not in this within a network, when the network operator
agreement allows, mobile phone can use other network, called the roaming.
When the network operator logo appears on the screen, you can dial or answer the phone.
Answer the call
When someone calls , mobile phone reminded in the way of bell, vibration, vibration and bell ringing. At
the same time the background will light and the screen will display the caller ID information.
Click on the" answer key" to answer calls;
Click once button or press side key" mute" and then click" reject" keys to reject a call.
Be careful
If you have plug in the headphones, you can also through the button to answer the phone.
View the missed calls
In the standby state, if there is a missed call, the status bar will show the missed call notification
The function of communication process

23
During a call, you can use the side key to adjust the volume.
The use of options during voice call
For voice calls may use the following options:
1If you want to adjust the voice volume, you can press the [volume keys ].
2If you want to open the dialing screen, you can select a dialing keyboard.
3If you want to start the hands-free function, you can choose a hands-free.
4If you want to close the microphone so that the other party can not hear their own voice, you can
choose silence.
5If you want to keep the call, you can choose to remain.
6If you want to return to keep call, you can select restore.
7If you want to make a second call, select Add call, and then dial the number.
8If you want to answer the second call, call waiting in bell sound from time to time, choose to answer.
Mobile phone will be the first call. Must be customized call waiting service in order to use this function.
9For switching between the two calls, you can choose ehage.
10As for multi-party call( call ), dial or answer the second party's phone, and on second party options
combined call.
11Open / close the hands-free function. Click < hands-free >, < hands-free> highlight, hands-free function
open. Click again on the < hands-free >, < hands-free> is not bright, hands-free function off.

24
Security Code
PIN code
PIN ( personal identification number) to protect your SIM card being used illegally. PIN code and SIM card
with. If three consecutive mismatched PIN code, should enter the PUK code to unlock. The details please contact
the company and network operation.
PIN2 code
Access to certain features ( such as call billing ) need to enter the PIN2 code, if three consecutive input
wrong PIN2 code, should enter the PUK2 code to unlock. The details please contact the company and
network operation.
PUK code
Changes in the locked PIN code, need to enter the PUK code ( personal unlocking number ). PUK code with
SIM card together with. If not available, please contact your service provider. If ten successive input wrong PUK
code, the SIM card can not be used again. Please contact your service provider to purchase a new card. You can not
change the PUK code. If the loss of the code, please contact your service provider.
PUK2 code
The change is locked to the PIN2code, need to enter the PUK2 code. If ten successive input wrong
PUK2code, you cannot use PIN2code function. Please contact your service provider to purchase a new card. You can
not change the PUK2 code. If the loss of the code, please contact your service provider.

25
Mobile phone code
In order to prevent the illegal use of your mobile phone, mobile phone can set the password protection.
When using this function, every time you boot must enter a password so that you can unlock the mobile
phone, mobile phone, and send or receive a call. Users may turn off the mobile phone code, in this case,
mobile phone cannot prevent the illegal use of.
Mobile phone input password, click OK to complete the input. For example, if the mobile phone password
is set to 1234, then the input :1234
Phone book
This feature allows you to browse the phone book store, edit, delete, mobile phone and SIM card in the
name and telephone number. In order to facilitate the records management, the mobile phone set the group
function, the related items in the same group. The SIM card storage capacity depending on the card set, The
storage capacity of mobile phone memory as the mobile phone set.
Search contacts
Mail list interface fixed with a search box, this feature allows you to browse by name in pinyin order
phone book. Using this function, you can in the phone book to find your desired telephone number.
Search contacts

26
In" search input" input to find the name of the first phonetic alphabet, the screen automatically displays
containing the letters of the record number. Also can be according to the selected records out" options"
menu, carry out the following operations:
1View contact: view contact details.
2Call contact : from the SIM card 1 or SIM card 2 call contact.
3Edit number before callcan edit number before cal
4IP callIf the IP dial has been activated, will automatically in each other's number before directly
coupled with the IP prefix number for IP call ( call settings in the " IP dial" ); as an activation of IP dialing prompt " IP
is not set prefix! Please set the IP prefix! Deteie.
5Text contactYou can add contacts to the recipient.
6Add to favoritesYou can add contacts to favorites.
7Edit contactEdit the contact information .Such as: namephone numberemail address and so on.
8Delete contactDelete this contact.
9Send contact via SMSSend contact information in short massage form
Fast operation
Click the contact image, can eject shortcut operation: dialing, sending message .
Long press the menu

27
Long press contacts menu options includeview contactcall contactedit number before callIP call
text contactadd to favoritesedit contactdelete contactsend contact via SMS.
Add contact
1press+add otat,add contacts can be saved to mobile phone or SIM card
2Import contactsImport from SIM card/SD card.
Delete contacts
With this feature,you can delete oneseveralor all contacts.
Import/Export contact
1Import from SIM card(SIM1/SIM2)
2Import from SD card
3Export to SIM card(SIM1/SIM2)
4Export to SD card
Groups
1This function can be added with different packet.
2Long press the added grouping, you can set the group name and dissolve the group.
3Entry for the group, press [ Menu ],ou a set eoe eesadd ees ring to
and otifiatio
Preferred storage location

28
Set the preferred business card storage location ,can choose: mobile ,card 1,card 2.When only insert one
card,the other card display gray and you can not save contacts.
Display options
1Only contacts with phonesonly display contacts that have phone numbers
2Phone contactsDisplay contacts saved in Phone
3SIM1 contactsDisplay contacts saved in SIM1If there is no card, this display gray.
4SIM2 contactsDisplay contacts saved in SIM2If there is no card, this display gray.
RemarksWhen you have added account,you can also display account contact.
5Sort list byYou can choose the first name or the last name .
6View contact names asYou can choose First name first or Last name first.
Short Message
New message
1add contactDirect input number or press+,fo otat to add, can add onemany or all of
2add contentInput text content or add message templatesThe default is four.
3send messagepress sed “IM/sed “IM or click the menu to send.
New MMS
1add contactDiet iput ue o pess+,fo otat to add, can add onemany or all of

29
2add contentInput text content or add message templatesThe default is four.
3add subjectClick the menu an, you can add subject
4add attachClick the menu, you can add attach,The attach includedpicturescapture picturevideos
capture videoaudiorecord audioslideshow.
5send MMSpress sed “IM/sed “IM o lik the eu to sed.
Insert smiley
This function can insert expression in the content of the text.
Discard
This function abandons the SMS or MMS.
SMS or MMS save as draft
Press the return key can be MMS or SMS save as draft.
Search message
The function can search information matching the message session.
Information session shortcut operation
Click on the image of information session that you can conduct fast operationDialView contactSend a
message
Long press a single message options menu
1Lock messagecan lock information

30
2Callcalling the number
3Forwardcan be forwarded message
4Copy message textCan copy the message text content
5View message detailsYou can review the message detail(receivertransmitting timeerror code and
so on).
6Delete messageYou can delete individual information.
Long press information session options menu
Long press information session options menu and will showView threadView contactDelete thread
Delete thread
This function can delete all conversations.
Message settings
1Storage settingsdelete old messagesText message limitmultimedia message limit
2Text message(SMS) settingsdeliverymessage templatestore message in sim cardmanage sim card
messages.
3Multimedia message(MMS) settingsdelivery reportsread reportsauto-retrieveroaming
auto-retrieverestricted mode.
4Notificationsnotificationselect ringtonevibratebroadcast message.

31
Call log
All calls
This function can review all calls.
Received calls
This function can review received calls.
Outgoing calls
This function can review outgoing calls.
Missed calls
This function can review missed calls.
Both SIMs
This function can review the SIM card calls.
SIM1
This function can review the SIM 1 calls.
SIM2
This function can review the SIM 2 calls.
Long press the options menu
1callcan call contact
2edit number before calledit number before call.

32
3send text messagecan send text message.
4view contactthe stored contacts can view the contacts
5add to contacta strange number can add to contacts.
6remove from call logthis record can be removed from the mail list.
Clear all call log
This function can clear all call log.
Email
Learn how to personal or corporate email account to send email or view email information.
Account settings
1Standby mode, open up the application list and select an email.
2Input address and password, and then select the et step.
3Follow the on-screen instructions.
Send email messages
1Standby mode, open up the application list, select email →email account.
2Press[ Menu ] → compose.
3Choose recipient field and enter the name or email address.

33
4Select the subject field and enter the subject .
5Choose the field that it is to write the message, and enter text
6If you want to add sound or picture attachment, press [ Menu] → add attahet → select the file
and add
7Select send to send message
Be careful
If the user is disconnected or not in service area,before on line or to enter the service area, information
will be kept in the information session list.
Check email information
Open the email account, can be off-line viewing email that have retrieved some time ago, or connected to
an email server to check for new messages. After extracting mail, you can view email offline.
1Standby mode, open up the application list, select email
2Press[ Menu ] → Refresh, a new email message will update to your inbox
3Select the email message from the information list.
In view of the mail, can use the following options:
1If you want to reply to the message, select reply
2If you want to forward the mail to other people, press [ Menu ] → foad.
3If you want to delete message, press [ Menu ] → delete.

34
4If you want to mark as unread mail ,press[ Menu] → Mak as uead.
5If you want to see pictures in the message, select sho pitues.
To delete the email account
1Standby mode, open up the application list, select email
2Touch and hold the account that will be deleted.
3Choose to delete account.
Add other account
Add a new email account
1Standby mode, open up the application list, select email →eail aout.
2Press[ Menu] → aout
3In the account list interface, press[ Menu ] → Add aout
Custom email account settings
1Standby mode, open up the application list, select email →eail aout.
2Press[ Menu ] → Aout settigs.
3Customize the following options
General settings:
1Account nameChange the account name.
2Your nameChange your name.

35
3Signature: set signature to send mail
4Inbox check frequency: setting email check frequency.
5Default account: The mobile phone is set as the default for the selected account to send email .
6Sync size per mail: Set the single message buffer size.
Notification settings
1Email notifications: Notify in status bar when email arrives
2Select ringtone: choose a new email message ringtone
3Vibrate: Also vibrate when emails arrives
Server settings
1Incoming settings: Change incoming setting.
2Outgoing settings: Change outgoing setting.
Multi-Media
Learn to use music, video, camera, camera and picture library.
Music
36
Using the music player to listen to music. Adding music files to mobile phone, you can download over a
network or copied to memory card. Be carefulFor the downloading of files from the Internet, please refer to" the
downloading of files from the internet".
If you want to copy the file to the memory card:
1Insert a memory card
2Using the computer data line selection, The mobile phone of the multifunctional socket connected with
a computer.
3Open the notification bar and select USB mass-storage.
4After a successful connection, computer will appear on a pop-up window.
5Open folder to view files.
6The file from the computer to the memory card.
Play music files
1In the standby screen, open the application list and select music.
2Can choose various categories of label card→Select the music file.
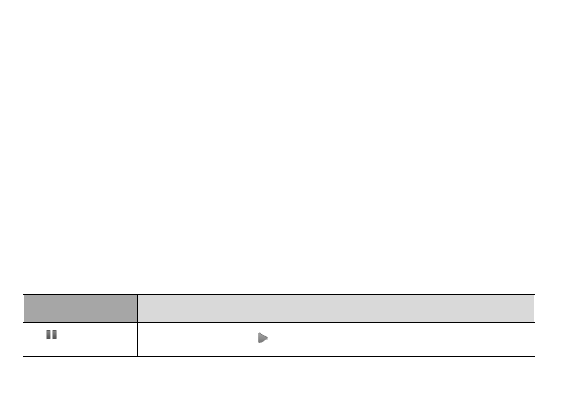
3Use the following icons and buttons to control the playing process:
Icon/Button
Function
Pause playbackSelect continue to play
37
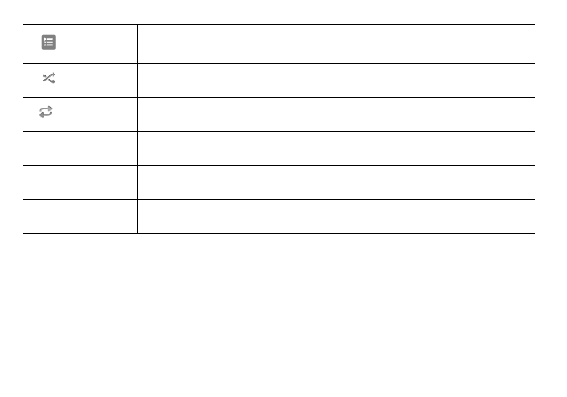
Open playlist
Start random mode
Change the duplicate mode
The volume keys
Adjust the Volume
Menu key
Access options
The progress bar
Moving figure from progress, you can play document from a particular point
Create a playlist:
1In the standby screen, open the application list and select music.
2Can choose various categories of label card →Select the music file.
3Press [ Menu ] → Add to playlist→ New playlist.
4Enter the new name for the playlist, and select save.
Tips: also can touch and hold the file and then choose add to playlist, to add a music file.

38
Using party shuffle:
All the music files can be added to the current playing playlist.
1In the standby screen, open the application list and select music.
2Can choose various categories of label card → Select the music file.
3Press [ Menu] → Party shuffle
4If you want to close the party shuffle function, select
The music file is set as a ring tone
If you want to be a playlist of music files to set as a ring tone:
1、In the standby screen, open the application list and select music.
2、Can choose various categories of label card →Select the music file.
3、Touch and hold the music file, then select Use as ringtone.
For the current play music files to set as a ring tone, In the music player screen, press[ Menu ] →Use as
ringtone.
Camera
Understanding the basic operation of the filming and viewing photos and videos . If you want to use the
camera, you have to insert SD memory card.
Take photo
1In the standby screen, open the application list and select camera.
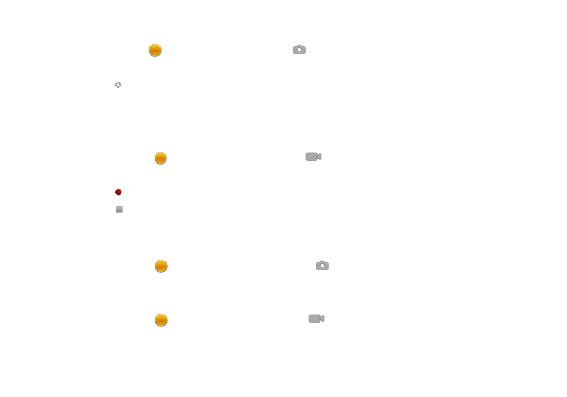
39
2Counterclockwise rotation mobile phone into a flat screen mode.
3Hold polka dot of slid bar, and drag it to the .
4Take camera lens shootings at objects and adjust.
5Select and take photo. Photo will automatically save.
Shoot video
1In the standby screen, open the application list and select camera.
2Counterclockwise rotation mobile phone into a flat screen mode.
3Hold polka dot of slid bar, and drag it to the .
4Take camera lens shootings at objects and adjust.
5Select and shoot video
6Select and end the videoThe video will automatically save.
Camera definition set
1In the standby screen, open the application list and select camera.
2Hold polka dot of slid bar, and drag it to the .
Video recorder definition set
1In the standby screen, open the application list and select camera.
2Hold polka dot of slid bar, and drag it to the .
Video player

40
Learn how to use the video player to play a variety of video.
Be careful
1Some files are not supported, depending on the mobile phone software.
2If the file size exceeds the available memory, when opening the file it will be wrong.
3In the standby screen, open the application list and select video player.
4Choose the video that will be played.
5Counterclockwise rotation mobile phone into a flat screen mode.
Gallery
Understanding how to administrate all photos and video files from the gallery
View photos
1In the standby screen, open the application list and select Gallery.
2Select folder.
3Choose the photo that you want to view.
View photos, use the following options:
1If you want to view more photos, can scroll or right.
2If you want to zoom in or out ,select or .
3 If you want to start in the selected folder continuous broadcast picture, choose to play slide. Click on
the screen to stop the continuous playback.

41
Play video
1In the standby screen, open the application list and select Video.
2Choose the video that will be played.
3Counterclockwise rotation mobile phone into a flat screen mode.
Sharing pictures or videos:
1In the standby screen, open the application list and select Gallery.
2Select the folder and click[ Menu ].
3Select the picture or video files.
4Select share. You can select file via MMS, e-mail sent or uploaded to the community.
Sound recorder
Learn how to use mobile phone recorder. You can set the voice memo as an incoming call ring.
Voice memo
1In the standby screen, open the application list and select sound recorder.
2Select to begin recording.
3Speak to the microphone
4Select ,end recording and select save.
5To record more memos, choose again
Play voice memos

42
1In the standby screen, open the application list and select music.
2In the play list, choose the voice memo that you want to play.
Browser
Learn how to access common Internet pages, and how to add it to the bookmarks.
Be careful
1If access to the Internet or to download media, may have other costs.
2Browser application label may vary, depending on the service provider.
3Available options may be vary due to local or service providers .
Browsing the Internet page
1In the standby screen, open the application list and select Browser.
2Access to the Internet page:
3Press[ Menu ] → Bookmarks→ select a bookmarks.
4Touch screen above the address bar, enter the Internet address, and then click
5If you want to return to the previous page, press [ return key ]
Open multiple pages
Can open multiple pages, and switch between pages. Open multiple pages
1In the standby screen, open the application list and select Browser.

43
2If you want to open more Internet page, press [ Menu ] → windows→New window.
3Open in a new window to another web page.
4Press [ Menu ] → windows.
5Select the page that you want to visit or press to close the page.
In the Internet page search text
1In the standby screen, open the application list and select Browser.
2Press [ Menu ] → more → find on page.
3Enter the keyboard. Web page will display the text that conform to the input content.
Take the inter page that you like as bookmarks.
1In the standby screen, open the application list and select Browser.
2Press [ Menu ] → Bookmarks → Add bookmarks.
3Input webpage name and Internet location, choose OK.
Copy text from web pages.
Available from the internet page copy text and insert it into another application, for example to create a
note.
1Browsing the Internet page, press [ Menu ] → More→ Select Text.
2Drag the finger to select the text that it is required. The highlighted text that is copied to the clipboard.
3In another application, touch and hold the text input field.

44
4Choose the paste and inserted text into the field.
Clock
To understand how important event set and control alarm clock.
Set a new alarm clock
1In the standby screen, open the application list and select Clock.
2Press[ Menu ] →Add clock.
3In each field in the set alarm details ( time, bell, vibration, repetition and label).
4Select Done.
Stop alarm clock.
The ala lok igs , hoose Cael to ed ala, hoose to susped igs agai i iutes sooze
alarm.
Remove the alarm clock.
1In the standby screen, open the application list and select Clock.
2Press [ Menu ] → Clock.
3Touch and hold to delete an alarm clock.
4Select delete alarm → OK.
Play alarm even when the phone is in silent mode.

45
1In the standby screen, open the application list and select Clock.
2Press[ Menu] → settings→ Alarm in silent mode.
Calculator
Learn how to do mathematics.
1In the standby screen, open the application list and select Calendar.
2Use button and contact the basic arithmetic operations.
3As for advanced computing,press [ Menu ] → Advanced panel.
Calendar
Use the calendar to create activities
In the calendar interface ,press [ Menu ],Click the day weekmonth or the calendar to switch view
mode
Create activity
1In the standby screen, open the application list and select Calendar.
2Press[ Menu] → More → New event ,or hold the certain time or date and click New event.
3Set active items.

46
4Click Done.
Viewing activities.
In the program , day, week, month view ,click activity can view detailed information.
Delete activity
1In the standby screen, open the application list and select Calendar.
2Press[ Menu ] →Day ,switch to the schedule view.
3Click to the event that would be deleted.
4Press[ Menu ] →Delete event.
5Click OK.
Non environmental protection material or element name and content description
1. Environmental description
The products according to the national laws and regulations electronic information products pollution
control management measures of the relevant provisions. Using the national industry standard SJ/T
11364-2006 of the pollution control of electronic information products in the pollution control of
electronic information products logo.
2. Produces of environmental protection type of substance or element name and content
Component Name
Non environmental substances and elements
Lead
P b
Mercury
H g
Cadmium
C d
Hexavalent
Chromium
CrVI
Polybrominat
biphenyls
PBB
Polybrominated
diphenylethers
PBDE
47
Body Shell
○
○
○
○
○
○
Casing internal
alloy parts
Χ
○
○
○
○
○
Display
Χ
○
○
○
○
○
Circuit Board
Including
Speakers a
microphone
and a vibrator
Χ
○
○
○
○
○
charger
○
○
○
○
○
○
Battery
Χ
○
○
○
○
○
Earphone
Χ
○
○
○
○
○
Data Line
Χ
○
○
○
○
○
○ The toxic and harmful substances in the components of all homogeneous materials in the content in the
SJ/T11363-2006 standard limits for the following
Χ The toxic and harmful substances in at least the components of a homogenous material content beyond the
limits specified in SJ/T11363-2006 standard
Note The product shell component uses the non-toxic environmental materials manufacturing, contain toxic
substances or elements of the component because of the global technology development level limit to achieve the
complete replacement of toxic and harmful substances, but the toxic and harmful substances accounted for only
this product extremely tiny content, long term use will not cause injuries to the human body. The actual product
configuration please to packing lists.

48
FCC Regulations:
This mobile phone complies with part 15 of the FCC Rules. Operation is subject to the following two conditions: (1)
This device may not cause harmful interference, and (2) this device must accept any interference received,
including interference that may cause undesired operation.
This mobile phone has been tested and found to comply with the limits for a Class B digital device, pursuant to Part
15 of the FCC Rules. These limits are designed to provide reasonable protection against harmful interference in a
residential installation. This equipment generates, uses and can radiated radio frequency energy and, if not installed
and used in accordance with the instructions, may cause harmful interference to radio communications. However,
there is no guarantee that interference will not occur in a particular installation If this equipment does cause
harmful interference to radio or television reception, which can be determined by turning the equipment off and on,
the user is encouraged to try to correct the interference by one or more of the following measures:
-Reorient or relocate the receiving antenna.
-Increase the separation between the equipment and receiver.
-Connect the equipment into an outlet on a circuit different from that to which the receiver is connected.
-Consult the dealer or an experienced radio/TV technician for help.
FCC Note:
Caution: Changes or modifications not expressly approved by the party responsible for compliance could void the
uses authoit to opeate the euipet.

49
RF Exposure Information (SAR)
This phone is designed and manufactured not to exceed the emission limits for exposure to radio frequency (RF)
energy set by the Federal Communications Commission of the United States.
During SAR testing, this device was set to transmit at its highest certified power level in all tested frequency bands,
and placed in positions that simulate RF exposure in usage against the head with no separation, and near the body
with the separation of 10 mm. Although the SAR is determined at the highest certified power level, the actual SAR
level of the device while operating can be well below the maximum value. This is because the phone is designed to
operate at multiple power levels so as to use only the power required to reach the network. In general, the closer
you are to a wireless base station antenna, the lower the power output.
The exposure standard for wireless devices employing a unit of measurement is known as the Specific Absorption
Rate, or SAR.
The SAR limit set by the FCC is 1.6W/kg.
This device is complied with SAR for general population /uncontrolled exposure limits in ANSI/IEEE C95.1-1992 and
had been tested in accordance with the measurement methods and procedures specified in IEEE1528. This device
has been tested and meets the FCC RF exposure guidelines when tested with the device directly contacted to the
body.
The FCC has granted an Equipment Authorization for this model phone with all reported SAR levels evaluated as in
compliance with the FCC RF exposure guidelines. SAR information on this model phone is on file with the FCC and
can be found under the Display Grant section of www.fcc.gov/oet/ea/fccid after searching on FCC ID:
YHLBLUNEO45.

50
For this device, the highest reported SAR value for usage against the head is 0.41 W/kg, for usage near the body is
1.49 W/kg.
While there may be differences between the SAR levels of various phones and at various positions, they all meet
the government requirements.
SAR compliance for body-worn operation is based on a separation distance of 10 mm between the unit and the
human body. Carry this device at least 10 mm away from your body to ensure RF exposure level compliant or lower
to the reported level. To support body-worn operation, choose the belt clips or holsters, which do not contain
metallic components, to maintain a separation of 10 mm between this device and your body.
RF exposure compliance with any body-worn accessory, which contains metal, was not tested and certified, and use
such body-worn accessory should be avoided.