BLU BLUTATTOOMN GSM Mobile Phone User Manual Tattoo Mini UserMan
CT Asia GSM Mobile Phone Tattoo Mini UserMan
BLU >
Contents
- 1. User Manual
- 2. user manual
User Manual

MTK6252_ WP9
User Guide
Document Name WP9(SM) User Guide
Document No. UM-GW-AL-048(E) Department for
Editing
Technology
Management
Department
Version V1.0 Prepared By Xi Wang
Security Class Confidential Effective Date 2011-07-25
Shenzhen Ginwave Technologies Co., Ltd.

《WP9(SM) User Guide》_V1.0
Proprietary & Confidential -0-
Revision History
Date Editor Revision Items Version Verified by Approved by
2011-07-25 Xi Wang Initial version 1.0 Huili Zhu Xiang Pan

《WP9(SM) User Guide》_V1.0
Proprietary & Confidential -I-
Table of Contents
1 SAFETY AND GENERAL INFORMATION ...................................................................................................... 1
1.1 BRIEF INTRODUCTION ................................................................................................................................................... 1
1.2 IMPORTANT SAFETY PRECAUTIONS ................................................................................................................................. 1
1.2.1 General Precautions ....................................................................................................................................... 1
1.2.2 Phone Precautions .......................................................................................................................................... 1
1.2.3 Battery Safety Precautions ............................................................................................................................ 2
1.2.4 Disposing of Used Battery ............................................................................................................................. 2
1.2.5 Charger Precautions ....................................................................................................................................... 3
1.2.6 Clean and Maintenance.................................................................................................................................. 3
1.3 TERMINOLOGY EXPLANATION .......................................................................................................................................... 3
2 SPECIFICATION ............................................................................................................................................. 4
2.1 SPECIFICATION ............................................................................................................................................................. 4
2.2 TECHNICAL PERFORMANCE ............................................................................................................................................. 4
3 PHONE APPEARANCE AND KEYS ................................................................................................................. 5
3.1 PHYSICAL IMPRESSION .................................................................................................................................................. 5
3.2 KEYS SPECIFICATION ..................................................................................................................................................... 5
3.3 ICONS .......................................................................................................................................................................... 6
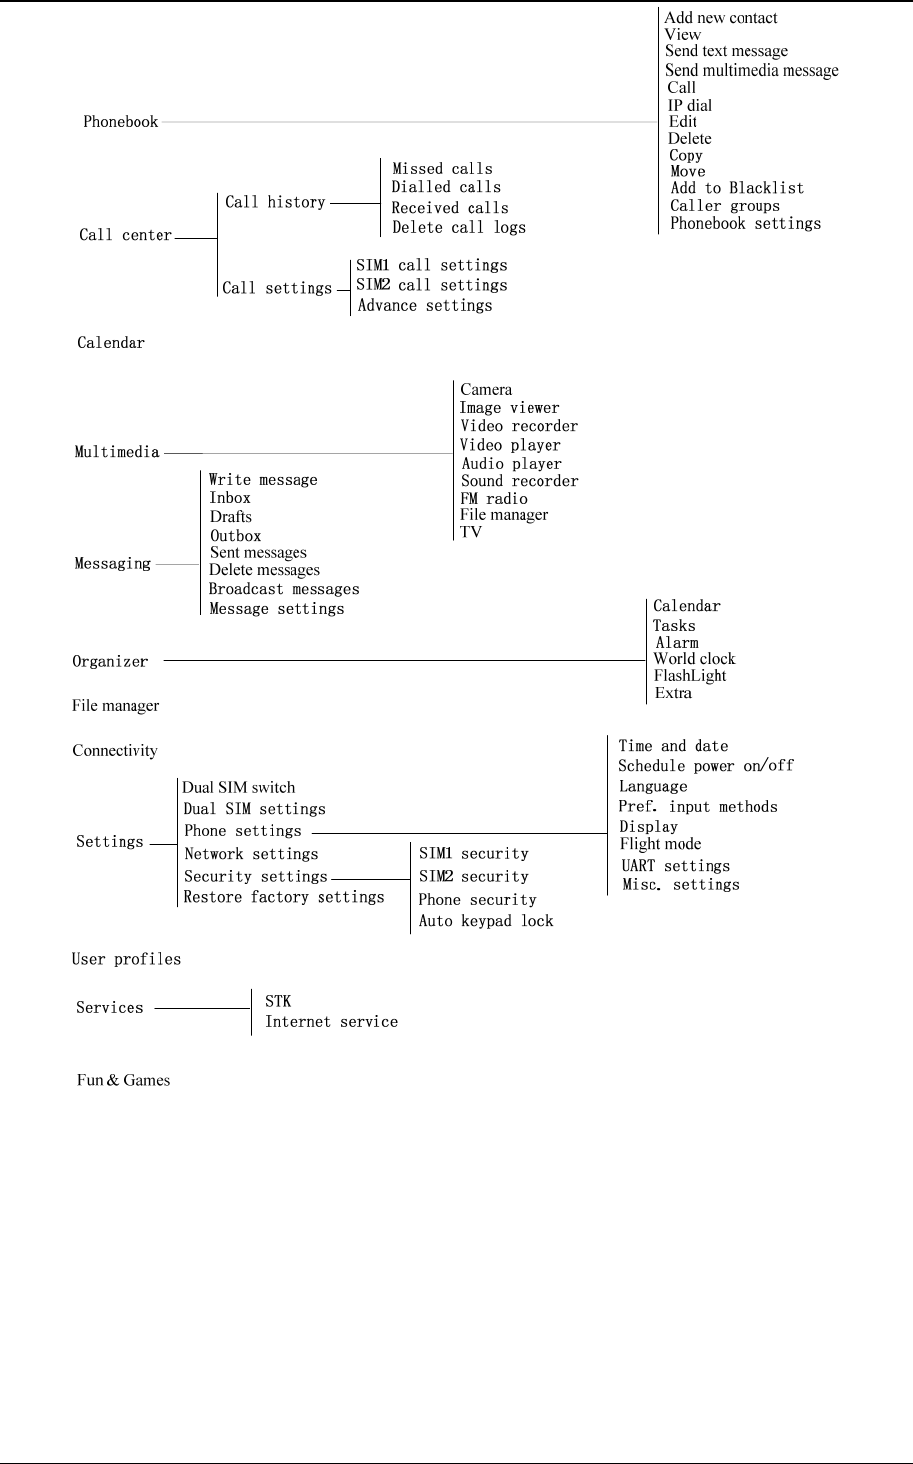
4 MENU FUNCTION ........................................................................................................................................... 6
5 USER GUIDE ................................................................................................................................................... 7
5.1 INSTALLING/ REMOVING THE BATTERY ............................................................................................................................ 7
5.2 CHARGING THE BATTERY ................................................................................................................................................ 8
5.3 INSERTING/REMOVING THE SIM CARD ........................................................................................................................... 8
5.4 T-FLASH CARD USE ........................................................................................................................................................ 8
5.4.1 Installing/Removing T-Flash card ................................................................................................................. 8
5.4.2 T-Flash card use .............................................................................................................................................. 9
5.5 POWER ON OR OFF ....................................................................................................................................................... 9
6 CALL FUNCTIONS ........................................................................................................................................... 9
6.1 MAKING A CALL ............................................................................................................................................................ 9
6.2 ANSWERING A CALL .................................................................................................................................................... 10
6.3 H-FREE/H-HELD ........................................................................................................................................................ 10
6.4 CALL WAITING ............................................................................................................................................................ 10
6.5 CALL OPTIONS ............................................................................................................................................................ 10
6.5.1 During a call .................................................................................................................................................. 10
6.5.2 Making a Multiparty Call .............................................................................................................................. 11
7 PHONEBOOK ................................................................................................................................................. 11
7.1 ADD NEW CONTACT ..................................................................................................................................................... 11
7.2 VIEW ......................................................................................................................................................................... 12
7.3 SEND TEXT MESSAGE ................................................................................................................................................... 12
7.4 SEND MULTIMEDIA MESSAGE ........................................................................................................................................ 12
7.5 CALL .......................................................................................................................................................................... 12
7.6 IP DIAL ...................................................................................................................................................................... 12
7.7 EDIT .......................................................................................................................................................................... 12
7.8 DELETE ...................................................................................................................................................................... 12
7.9 COPY ......................................................................................................................................................................... 12
7.10 MOVE......................................................................................................................................................................... 12
7.11 ADD TO BLACKLIST ..................................................................................................................................................... 12
7.12 CALLER GROUPS .......................................................................................................................................................... 12
7.13 PHONEBOOK SETTINGS ................................................................................................................................................ 13
8 CALL CENTER ................................................................................................................................................ 13
8.1 CALL HISTORY ............................................................................................................................................................. 13
8.1.1 Missed calls .................................................................................................................................................... 13
8.1.2 Dialed calls ..................................................................................................................................................... 13

《WP9(SM) User Guide》_V1.0
Proprietary & Confidential -II-
8.1.3 Received calls ................................................................................................................................................ 13
8.1.4 Delete call logs .............................................................................................................................................. 13
8.2 CALL SETTINGS ........................................................................................................................................................... 14
8.2.1 SIM1 call settings.......................................................................................................................................... 14
8.2.2 SIM2 call settings.......................................................................................................................................... 14
8.2.3 Advance settings ........................................................................................................................................... 14
9 CALENDAR ..................................................................................................................................................... 15
10 MULTIMEDIA ................................................................................................................................................ 15
10.1 CAMERA ..................................................................................................................................................................... 15
10.2 IMAGE VIEWER ............................................................................................................................................................ 16
10.3 VIDEO RECORDER ........................................................................................................................................................ 16
10.4 VIDEO PLAYER ............................................................................................................................................................. 16
10.5 AUDIO PLAYER ............................................................................................................................................................ 16
10.6 SOUND RECORDER ....................................................................................................................................................... 17
10.7 FM RADIO .................................................................................................................................................................. 17
10.8 TV ............................................................................................................................................................................. 17
11 MESSAGING .................................................................................................................................................. 18
11.1 WRITE MESSAGE ......................................................................................................................................................... 18
11.1.1 Text meaasge ................................................................................................................................................ 18
11.1.2 Multimedia meaasge .................................................................................................................................... 18
11.2 INBOX ........................................................................................................................................................................ 19
11.3 DRAFTS ...................................................................................................................................................................... 19
11.4 OUTBOX ..................................................................................................................................................................... 19
11.5 SENT MESSAGES .......................................................................................................................................................... 20
11.6 DELETE MESSAGES ...................................................................................................................................................... 20
11.7 BROADCAST MESSAGE .................................................................................................................................................. 20
11.8 MESSAGE SETTINGS ..................................................................................................................................................... 20
11.8.1 Text meaasge ................................................................................................................................................ 20
11.8.2 Multimedia meaasge .................................................................................................................................... 21
11.8.3 Service message ........................................................................................................................................... 21
12 ORGANIZER .................................................................................................................................................. 21
12.1 TASKS ........................................................................................................................................................................ 21
12.2 ALARM ....................................................................................................................................................................... 21
12.3 WORLD CLOCK ........................................................................................................................................................... 21
12.4 FLASHLIGHT ................................................................................................................................................................ 22
12.5 EXTRA ........................................................................................................................................................................ 22
12.5.1 Calculator ....................................................................................................................................................... 22
12.5.2 Unit Converter ............................................................................................................................................... 22
12.5.3 Currency Converter ...................................................................................................................................... 22
12.5.4 Health ............................................................................................................................................................. 22
12.5.5 Stopwatch ...................................................................................................................................................... 22
12.5.6 Ebook reader ................................................................................................................................................. 23
13 FILE MANAGER ............................................................................................................................................. 23
13.1 PHONE ....................................................................................................................................................................... 23
13.2 MEMORY CARD ............................................................................................................................................................ 24
14 CONNECTIVITY ............................................................................................................................................ 24
14.1 BLUETOOTH ................................................................................................................................................................ 24
14.2 DATA ACCOUNT ........................................................................................................................................................... 25
15 SETTINGS ...................................................................................................................................................... 25
15.1 DUAL SIM SWITCH ..................................................................................................................................................... 25
15.2 DUAL SIM SETTINGS ................................................................................................................................................... 25
15.3 PHONE SETTINGS ........................................................................................................................................................ 25
15.3.1 Time and date ............................................................................................................................................... 25
15.3.2 Schedule power on/off ................................................................................................................................. 25
15.3.3 Language ....................................................................................................................................................... 26
15.3.4 Preferred input method................................................................................................................................ 26
15.3.5 Display ............................................................................................................................................................ 26
15.3.6 Flight mode: .................................................................................................................................................. 26
15.3.7 UART settings ................................................................................................................................................ 26

《WP9(SM) User Guide》_V1.0
Proprietary & Confidential -III-
15.3.8 Misc. settings ................................................................................................................................................. 26
15.4 NETWORK SETTINGS .................................................................................................................................................... 26
15.5 SECURITY SETTINGS .................................................................................................................................................... 26
15.5.1 SIM1 security................................................................................................................................................. 26
15.5.2 SIM2 security................................................................................................................................................. 27
15.5.3 Phone security ............................................................................................................................................... 27
15.5.4 Auto keypad lock .......................................................................................................................................... 27
15.6 RESTORE FACTORY SETTINGS ....................................................................................................................................... 27
16 USER PROFILES ........................................................................................................................................... 27
16.1 GENERAL .................................................................................................................................................................... 27
16.2 SILENT ....................................................................................................................................................................... 27
16.3 MEETING .................................................................................................................................................................... 27
16.4 OUTDOOR .................................................................................................................................................................. 27
16.5 MY STYLE ................................................................................................................................................................... 27
17 SERVICES ...................................................................................................................................................... 28
17.1 STK .......................................................................................................................................................................... 28
17.2 INTERNET SERVICES .................................................................................................................................................... 28
18 FUN & GAMES ............................................................................................................................................... 28
19 TEXT INPUT SETTINGS ............................................................................................................................... 28
19.1 KEY FUNCTIONS FOR INPUT MODE................................................................................................................................ 28
19.2 MULTITAP ABC MODE ................................................................................................................................................. 28
20 GUIDELINES FOR SAFE AND EFFICIENT USE ......................................................................................... 29
20.1 CARE AND MAINTENANCE ............................................................................................................................................. 29
20.2 BATTERY MAINTENANCE ............................................................................................................................................... 29
21 TROUBLESHOOTING ................................................................................................................................... 29

《WP9(SM) User Guide》_V1.0
Proprietary & Confidential -1-
1 Safety and General Information
1.1 Brief Introduction
This part will be edited by the client.
1.2 Important Safety Precautions
Read these guidelines before using your wireless phone. Failure to comply with them may
be dangerous or illegal.
1.2.1 General Precautions
1) Mobile Phone
Please use the phone at a temperature of -10℃~55 and a relative humidity of ℃35%~85%.
Avoid using the phone near regular telephone, television, radio and automatic office
equipment, as they may interfere with one another.
Please keep the removable SIM card out of the reach of children as there is a risk they
could swallow it.
2) Battery
Please put the battery in a cool and well-ventilated place out of direct sunlight.
Batteries have life cycles. If the time that the battery powers equipment becomes much
shorter than usual, the battery life is at an end. Replace the battery with a new battery of
the same.
Do not discard battery with household trash. Please dispose of used battery according to
your local environmental laws and guidelines.
3) Charger
Do not charge the phone in the below environment:
Under direct sunlight;
Temperature out of range: -10℃ to 45℃;
Humid, dusty or severely shaking environment (could cause a malfunction);
Near appliances such as television, radio (could affect the image, audio effect).
1.2.2 Phone Precautions
1) Switch off your phone in aircraft, hospital and any facility where posted notices instruct you
to do so. Wireless phone can cause interference to electronic instruments and medical
equipment, when using your phone in such kind of area, meet any special regulations in
force. Your phone features automatically power on function, check your power settings and
make sure your mobile phone will not automatically switch on when on board an aircraft.
Turn off your phone whenever on board an air craft, so as not to interfere with electronic
system and result in aircraft accidents.
2) To avoid electromagnetic interference and/or compatibility conflicts, turn off your mobile
phone in any facility where posted notices instruct you to do so. Hospitals or health care
facilities may be using equipment that is sensitive to external RF energy. Especially when
near the below devices: hearing aid, pacemaker and other medical devices, fire detector,
automatic door and other automatic control devices. In the event of mobile phone interfering
with pacemaker and other medical electronic devices, consult the manufacturer of the device
or local salesman. Mobile phone may interfere with appliances like television, radio, or PC
3) Do not hit the LCD display with extreme force or use it to hit other things. Doing so may
break the glass and cause the LCD liquid to leak. If the liquid enters into eyes, it may blind
you. In such case, rinse with a large quantity of water immediately (do not rub your eyes)
and consult a doctor.
4) Do not disassemble or remodel your phone. Doing this may damage your phone or result in

《WP9(SM) User Guide》_V1.0
Proprietary & Confidential -2-
the leakage of electricity and circuit fault.
5) In a very few cases, the use of mobile phone may interfere with the electronic equipments in
some cars. In such case, for safety, do not use mobile phone.
6) Do not press keys with sharp things like needle or pen head. Doing so may cause damage to
your phone or operation mistakes.
7) Do not use the mobile phone if it has a damaged antenna, as it may cause injury to persons.
8) Turn your phone off and do not remove its battery or charge the battery when in an area with
a potentially explosive atmosphere. Sparks in such areas could cause an explosion or fire
resulting in property damage, bodily injury or even death. For example: switch off the phone
before entering refueling point. Do not use the phone near at a refueling point (service
station) or near fuels or chemicals.
9) Keep your phone away from moisture. If water or other liquids get into phone, it will cause
phone overheating, leakage of electricity and malfunction.
1.2.3 Battery Safety Precautions
1) Battery Precautions
Do not throw a battery into a fire. A battery may rupture or bum violently when thrown into
a fire. Please dispose of the used battery according to your local environmental laws.
When installing battery, do not forcibly put pressure on the battery, or it may result in
overheating, leaking, rupturing or fire.
Do not short-circuit the positive (+) and negative (-) terminals. If the positive and negative
terminals come into contact with each other or are shorted with wire or other metallic
objects, an instantaneous high current will flow, possibly damaging the battery structure
due to the generated heat, with the possible result of overheating, leaking, rupturing or fire.
Do not exceed the battery manufacturer's charging current or voltage limitations. And only
use the approved peripherals.
Do not directly solder anything onto the battery terminals. Direct soldering onto the battery
terminals can cause heat generation, leaking, rupturing or fire.
If the electrolyte inside the battery gets into your eyes, it may blind you. In such case, do
not rub your eyes but rinse with a large quantity of water immediately and consult a doctor.
For safety, do not put the battery into your mouth or use the damaged battery.
Do not attempt to disassemble or modify a battery. Doing so may result in leaking,
overheating, rupture or fire.
Do not use or put battery near high temperature places like fire or heat-generating parts,
or it may cause leaking, overheating, rupture or fire.
Stop using the battery if abnormal heat, odor, discoloration, deformation, or abnormal
conditions are detected during use, charge, or storage.
Do not allow leaked electrolyte to come into contact with your skin or clothes. If this
happens, rinse with a large quantity of water immediately and consult a doctor.
If the battery leaks electrolyte or emits a strange odor, immediately remove it from open
flame to avoid fire and rupture.
Keep battery from moisture, as it may cause the battery to overheat, smoke and corrode.
Do not place or store the battery in an automobile in hot weather, under direct sunlight.
Use or storage of the battery in these places may cause battery leakage and overheating,
and possibly lower the performance and shorten the battery's life.
Only use the approved batteries and fittings. Do not connect to unspecified devices.
Do not continuously charge the battery for more than 24 hours, as battery may be
damaged by extensive overcharging.
2) Battery Capability
Calling, backlight on and playing game drain your battery much quicker. Long talk-time
decreases the duration of the standby time.
Idle time becomes shorter if the phone is out of coverage.
Battery capability varies along with charging level, temperature, signal strength, and
backlight.
1.2.4 Disposing of Used Battery
The rechargeable batteries contain toxic heavy metals like mercury, cadmium, and lead.

《WP9(SM) User Guide》_V1.0
Proprietary & Confidential -3-
Improperly disposed batteries will cause heavy metal contamination. These batteries when
discarded in ordinary household or workplace, after a long time, the heavy metal will leach slowly
into the soil, ground water and surface water. Therefore, please dispose of used battery in a
proper way.
1) Do not land filled, because the heavy metal will leach slowly into the soil, ground water and
surface water.
2) Do not incinerate, because the heavy metals can enter the air through smokestack
emissions and can concentrate in the ash produced by combustion.
3) Do not compost, because the heavy metals in the compost may exceed standards.
4) Do not throw away used batteries random, avoiding environmental pollution.
5) Separate wasted batteries from household trash, reducing its harm to the environment.
1.2.5 Charger Precautions
1) Use charger to charge battery quickly. Before charging, make sure the battery has been
inserted in the phone correctly. Do not remove the battery while charging.
2) Please use the specified alternating current. Using other voltage will cause electricity
leakage, fire or damage to the phone and charger.
3) Charge your battery for at least 12 hours at the first time for its best performance and long
cycle life.
4) If the charger still plugs in the charge slot and the phone has been fully charged, the phone
will check the battery state automatically, and recharge the battery once it is not at full
level.
5) While the mobile phone is being charged, keep it out of the reach of children.
6) Do not short-circuit the charger. A short-circuit may result in electric shock, smoke and
damage to the charger.
7) If the power cord is damaged, please do not use the charger, or it may cause fire or electric
shock.
8) Please clean the dust on the power outlet in time.
9) Do not put container filled with water beside charger, as water may be splashed on charger,
causing the charger overheating, leakage of electricity and malfunction.
10) If the charger comes into contact with water or any other liquids, immediately unplug the
charger from outlet to reduce the risk of overheating, fire, electric shock or charger
malfunction.
11) Do not disassemble or modify the charger. Doing so could result in risk of injury to persons,
electric shock, fire and damage to the charger.
12) Do not use charger in a high moisture environment like bathroom, or it may cause electric
shock, fire and damage to the charger.
13) Do not touch the charger, power cord and power outlet with wet hands as it may cause
electric shock.
14) Never put a heavy object on the power cord or modify the power cord. Doing so may cause
electric shock or fire.
15) To reduce risk of electric shock or injury, unplug the charger from the power outlet before
cleaning or maintenance.
16) When you disconnect the power cord of the charger, grasp and pull the plug, not the cord.
Pulling the cord may cause electric shock and fire.
1.2.6 Clean and Maintenance
1) Your phone, battery and charger are not waterproof. Do not use them in a high moisture
environment like bathroom, and meanwhile, avoid getting wet in the rain.
2) Use soft dry cloth to clean the phone, battery and charger.
3) Do not use liquor like alcohol, thinner or benzene to clean the phone.
4) The dust or dirt on power outlet may cause poor contact, power failure and even fail to
charge. Please clean it up within a certain time.
1.3 Terminology explanation
GSM Global system of mobile
SMS Short message service

《WP9(SM) User Guide》_V1.0
Proprietary & Confidential -4-
SIM Subscriber identify module card
PC Personal computer
PIN PIN code is a 4-8 digit personal identification number, and is used to
prevent your SIM card from misuse. It is provided by your service
provider. If you enter 3 times error PIN code continuously, the SIM
card will be locked, and then you must enter PUK code to unlock.
PIN2 PIN code is a 4-8 digit personal identification number. It is provided by
your service provider. To protect the access of some advanced
functions like fixed dial. If you enter 3 times error PIN2 code
continuously, the SIM card will be locked, and then you must enter
PUK2 code to unlock.
PUK An 8 digit key code. Used to unlock SIM cards after the wrong PIN
has been entered. PUK is provided by your service provider.
PUK2 An 8 digit key code. Used to unlock SIM cards after the wrong PIN2
has been entered. PUK2 is provided by your service provider.
2 Specification
2.1 Specification
Band: GSM 900/1800 Dual sim cards, dual standby, single pass
Phone Type: Bar phone
Dimensions: (Pending)
Weight: (Pending)
Talk Time: 4~6 hrs.(Network Dependent)
Stand-by time: 400-600 hrs. (Network Dependent)
Phonebook Storage: 250
Phone SMS storage: 50
2.2 Technical Performance
Cellular System
Technical
Performance GSM900 DCS1800
Receive frequency
range 925~960MHz 1805~1880 MHz
Transmitter
frequency range 880~915 MHz 1710~1785 MHz
Transmitter output
Power +5…+33dBm/3.2mW…2W +0…+30dBm/1mW…1W
Frequency
Spacing 45 MHz 95 MHz
Channels 174 374
Adjacent channel
spacing 200KHz 200KHz
Power levels 15 16
Sensitivity -102dBm/BER<2% -100dBm/BER<2%

《WP9(SM) User Guide》_V1.0
Proprietary & Confidential -5-
Frequency Error <±0.1ppm <±0.1ppm
RMS Phase Error <5° <5°
Peak phase
Error <20° <20°
3 Phone Appearance and Keys
3.1 Physical Impression
(Pending)
3.2 Keys specification
Keys Specification
Left/Right soft key
Perform the functions indicated on the left/ right bottom line of the
display.
Press right soft key to return to upper menu.
In idle mode, press right soft key to access Name menu.
In idle mode, press left soft key to access main menu.
Dial key
Answer the call by pressing dial key.
In idle mode, enter phone number and press the key to make a call. Or
dial a number from phonebook or call records.
In idle mode, press the key to display the call logs.
End key
End the call.
Long press to power on/off the mobile.
Return to idle menu.
Navigation keys
Indicates 【↑】【↓】【←】【→】four directions.
In idle mode, press【←】【→】to select shortcuts icons on the screen;
In other interface, press navigation keys to scroll through options.
During the call speaking, press middle key to enable/close loud
speaker.
In option menu, press middle navigation key to confirm selection.
In Calculator menu, press middle navigation key to show result.
Alphanumeric Keys
When dial a number, enter corresponding number.
In input mode, enter different characters according to input mode, like
letter or number.
1) Letter key A~Z: press to show A~Z.
2) Sym key: select symbol.
3) Alt key: press this key, switch between uppercase and
lowercase.
4) Del key: delete one character.
5) Space key: press to enter space. In idle mode, long press
Space key to open/close the flashlight on the front of phone.
6) Ctrl key: used to change input type.
7) ↑ key: press this key, switch between upper and bottom
character.
8) $ key: In idle mode, long press can switch to silent mode.
* key

《WP9(SM) User Guide》_V1.0
Proprietary & Confidential -6-
When dial a number, press to enter “*”.
In idle mode, press left soft key then press * key to lock/unlock keypad.
In input mode, enter punctuation.
# key
In edit interface, press to switch input mode.
When dial a number, press to enter “#”.
In Calculator menu, input “.”.
※Note: In idle mode means that your phone is switched on but not being used for any function.
※
3.3 Icons
Icon Specification
Network signal strength
Straight stripe is more,the network signal is stronger. Top right
number indicates use line. Left bottom number indicates current
SIM card.
Bluetooth
The phone opens Bluetooth function.
Message
Receive new SMS message.
Receive new MMS message.
Keypad lock
The keypad is locked.
Earphone
The phone is inserted earphone.
Alarm
Set the alarm time and activate the function.
Incoming call alert type:
That is “Ring”.
That is “Vib. only”.
That is “Vib. And ring”.
That is “Vib. then ring”.
Battery
Straight stripe is more, the battery is more.
※ Note: Here roaming refers to the extending of connectivity service in a network with which
your service provider has a roaming agreement. For example, suppose your service provider is
“China Mobile Communications (CMCC)”, and “HongKong Telecom (HKT)” is the network with
which CMCC has a roaming agreement. When you move from CMCC coverage to HKT, then
you can select HKT as your service provider. In such case, you are roaming. ※
4 Menu Function
In idle mode, press middle key to access menu. Scroll through options by pressing
navigation keys, and press left soft key to access selected option.
《WP9(SM) User Guide》_V1.0
Proprietary & Confidential -7-
※Note:
(a) When the mobile have one valid SIM card, the SIM1/2 corresponding menu will not show.
(b) Part of secondary menu and its submenu are not listed on the above. ※
5 User Guide
5.1 Installing/ Removing the battery
1) Installing the battery
With the top of battery (the terminal with pole) facing right toward the contacting points in

《WP9(SM) User Guide》_V1.0
Proprietary & Confidential -8-
the battery compartment, press the bottom of battery slightly until it enters into place;
Slide battery cover forward along the side slot until it clicks into place.
2) Removing the battery
Long press end key to switch the phone off;
Slide downward the battery cover;
Use your nail to lightly lift the battery away.
5.2 Charging the battery
Your phone is powered by a rechargeable battery. When the battery is weak, the battery
sensor informs you. At this time, you need charge the battery. When the battery becomes too
weak for the phone to operate, it switches off automatically.
1) Plug the charger into the charger port at the right side of the phone, and then plug the
other end of the charger into the appropriate electrical outlet.
2) When charging is complete, disconnect the connector from the phone and unplug the
charger from electrical outlet.
* Notice:
i) Charging with phone on, battery icon scrolling on the display.
ii) During charging, the phone can operate as usual. But the charging time increases.
iii) Charging with phone off, the display says ‘Charging’ with charging indicator icon
flash.*
5.3 Inserting/Removing the SIM card
The mobile support two SIM cards on-line at one time. The method of the two SIM cards of
inserting or removing is same.
a) Inserting: make sure that the phone is already switched off and is not charging:
Remove the battery;
Contacting points downwards. slide the card into the carrier;
Insert battery.
b) Removing: make sure that the phone is already switched off:
Remove the battery;
Slide the card downward out of the carrier;
Insert battery.
※ Note:
(a) Be careful when handling, inserting or removing the SIM card, friction or bending may
damage SIM card.
(b) If left unused, keep SIM card out of the reach of small children.
(c) Keep SIM card away from static, dusty and water.
(d) When inserting or removing SIM card, always make sure that the phone is switched off
before you remove the battery. Or the SIM card memory might be damaged. ※
5.4 T-Flash card use
5.4.1 Installing/Removing T-Flash card
This mobile supports the T-Flash card feature. Make sure that the T-Flash card has already
inserted into mobile. T-Flash card slot locate at the right top of the SIM card.
1) Installing
Power off, and remove the battery;
Make contacting points downwards. Ensure the angled corner is positioned correctly
and slide the card into the carrier;
Lock it.
2) Removing
Power off, and remove the battery;
Make contacting points downwards. Ensure the angled corner is positioned correctly

《WP9(SM) User Guide》_V1.0
Proprietary & Confidential -9-
and slide the card into the carrier;
Take out T-Flash card。
5.4.2 T-Flash card use
1) File operation specification
The music and video file are saved in the T-Flash card. If you need operate with the files, the
files must be saved in the card firstly. Act as following:
Connect PC port and USB port with specific USB line. USB port is on the bottom of the
phone.
After inserting the USB line, the display shows tip information. There shows “Mass
storage” and “Webcam” option. Select “Mass storage”.
Or insert initial T-Flash card into specific card reader, and then insert the reader into USB
port.
Select “My computer—movable disk”, can use the T-Flash function. Add or delete files in
the music / video fold on the card.
Stop the USB function on computer; disconnect the USB line with mobile. (*Note: Must
stop the function on the computer firstly, then disconnect the line with mobile, otherwise
the data will be lost*).
2) T-Flash card directory specification
My Music: Save the MP3 music on the folder. The length of the music file is not limit. The
quantity depend on the capacity of the T-Flash card.(The folder will be established
automatically when select the music, such as add playing music, set alarm clock and so
on)
Photos: Save the photos through camera (The folder will be established automatically
when taking picture).
Videos: Save .3gp and .MP4 video files, and the film recorded.( The folder will be
established automatically when making a video)
Audio: Save the audio record files.
5.5 Power On or Off
Make sure the battery is already inserted:
1) Power On: Hold down end key until the phone-on image display. After power on, the
phone searches for your network automatically. Some SIM card is protected by the PIN
number, if you are asker for inputting the PIN number, please enter it, then press left
soft key.
2) Power Off: Hold down end key until the power-off image display.
※ Note:
(a) PIN is provided by your service provider. If the PIN is entered incorrectly three times, the
SIM card is barred.
(b) If the phone asks for an unlock code when switched on, enter the unlock code and press left
soft key. ※
6 Call Functions
6.1 Making a Call
When you want a call, press the phone keypad to input the area code and phone number.
Click middle key to save, select To SIM1/2, or To phone.
Press and hold down 0 key until character “+” appears, and then you can dial an international
number. (The ‘+’ stands for international dial code.) Press dial key to dial the number. If the
number is stored with a name, it appears on the display when you dial the number.
Only in GSM system coverage, you can make an emergency call, even though the phone is
locked, without SIM card, or cannot enroll to the system.
※Note: This phone, like any wireless phone, operates using radio signals, wireless, and
landline networks as well as user programmed functions, which cannot guarantee connection in
all conditions. Therefore, you should never rely solely on any wireless phone for essential

《WP9(SM) User Guide》_V1.0
Proprietary & Confidential -10-
communications like medical emergencies. Check with local service providers to make an
emergency call.※
Quick making a call
i) Enter [Menu]- [Phonebook], select Browse and find the required number;
ii) Enter [Menu]-[Call]-[Call history], select corresponding SIM card, select Missed calls,
Dialed calls, Received calls list. Scroll the navigation keys to find the required number;
iii) In idle mode, press right soft key to enter phonebook.
iv) In idle mode, press dial key to display the last number dialed.
v) Press dial key to make a call.
※Note: You can quickly search numbers from [Phonebook] via navigation keys and
alphanumeric keys. Use navigation keys to move through pages; Use alphanumeric keys to
search by keywords. ※
6.2 Answering a Call
When somebody calls you, the phone rings, and displays the incoming call area. If the caller
can be identified, the caller’s phone number (or name if stored in your phonebook) is displayed.
When a call is coming, Answer the call by pressing dial keys. The missed incoming calls
appear on the display. Press left soft key to check the details of the missed calls or press dial key
to call the number. Press end key to end the call.
※Note: To answer a call, the function of call forwarding should be disabled, nor is unconditional
divert. ※
6.3 H-Free/H-Held
When you are driving, you can enable the phone hands free function during a call. The
phone sound will be heard from the speaker. During a call, press right soft key to select “H-Free”,
then the speaker is enabled. To disable the hands free function, press right soft key to select
“H-Held”, then the receiver is enabled.
※Note:The speaker sound volume maybe loud, so please not use the speaker beside
ear.※
6.4 Call Waiting
You can answer an incoming call while you have a call in progress, if this service is
supported by the network and you have set the Call Waiting menu option to activate. You will be
notified of an incoming call by a call waiting tone.
6.5 Call Options
6.5.1 During a call
Call with one party, press left soft key to select:
Hold/Retrieve single call: pause the call, the caller will not be heard the sound. If
you want to retrieve the call, select “Retrieve”.
End single call: Disconnect the call.
New call: input new phone number, press left soft key to save number to
phonebook, and press dial key to call the new number. During a call, press middle
key to input the number.
Phonebook: enter phonebook menu.
Call history: enter the call history menu.
Messaging: enter message menu.
Sound recorder: during the call, record the sound.
Mute: turn on/off microphone.
DTMF: activate the sending of the DTMF signal, or clean the sending.

《WP9(SM) User Guide》_V1.0
Proprietary & Confidential -11-
6.5.2 Making a Multiparty Call
A multiparty call is a network service that allows up to six people (require network support) to
take part simultaneously in a multiparty or conference call. For more information, contact your
service provider.
Making a Conference Call:
1) Call the first participant in the normal way.
2) Call the second participant in the normal way. The first call is automatically put on hold.
3) To join the first participant to the multiparty call, press left soft key to access <Option>:
Conference: add incoming callers or a new person to the multiparty call.
Swap: swap the speaking party.
End single call: end the specific connected call.
End all calls: end all calls.
Transfer: assign the specific call to divert.
New call: input new phone number, press left soft key to save number to phonebook,
and press dial key to call the new number. During a call, press middle key to input
the number.
Phonebook: enter phonebook menu.
Call history: enter the call history menu.
Messaging: enter message menu.
Sound recorder: during the call, record the sound.
Mute: turn on/off microphone.
DTMF: activate the sending of the DTMF signal, or clean the sending.
4) To add a new person to the multiparty call, call the person in the normal way, then press
left soft key to access <Option>, and select “Conference”.
5) You can add incoming callers by answering the call and pressing <Option>, followed by
“Conference”. Repeat as required.
6) During the conference, press left soft key to select:
Hold/Retrieve conf.call: during the conversing with multiparty, if new call comes, hold
the conversing call, answer the new call
Split: separate one part from multiparty calls for alone converse.
End single call: end the specific call.
End conf. calls: end all the calls.
New call: input new phone number, press left soft key to save number to phonebook,
and press dial key to call the new number. During a call, press middle key to input
the number.
Phonebook: enter phonebook menu.
Call history: enter the call history menu.
Messaging: enter message menu.
Sound recorder: during the call, record the sound.
Mute: turn on/off microphone.
DTMF: activate the sending of the DTMF signal, or clean the sending.
※Note: Multiparty Call requires network support. ※
7 Phonebook
This feature allows you to store phone numbers and their corresponding names in the
memory of your SIM card and phone’s memories, at the same time, provides browsing, adding,
managing functions. Your phone can store up to 250 contacts, while SIM card memory depends
on various SIM card. There is “1” or “2” icon displayed on the right side of some contacts, it
means this contact is stored in SIM1 or SIM2.
7.1 Add new contact
Add new entry and related information to phonebook.
1) Press navigation key to move the cursor to “Add new contact”, first, confirm the
storage media in <Preferred storage>: To SIM1,To SIM2, To phone.
2) If preferred storage is phone, then input Name, Number, Caller ringtone.
※Note:If add new entry to SIM card, there only need input name and number.※
Press corresponding alphanumeric keys to search for a number by name. Enter the first

《WP9(SM) User Guide》_V1.0
Proprietary & Confidential -12-
letter of the name that you want to find. The phonebook entries are listed, starting with the first
entry matching your input. For example, you want to find the number named “zhang san”, then
press 9 key four times, the display will show the name list starting with “z”.
You can finish the following operations with the find number:
7.2 View
View the detailed information of the selected number.
7.3 Send text message
Send SMS to the selected number.
7.4 Send multimedia message
Send MMS to the number.
7.5 Call
call the number you select.
7.6 IP dial
Make an IP dial to the selected number by SIM1 or SIM2 card.
7.7 Edit
Edit the selected number.
7.8 Delete
Delete the number from phone or SIM card.
7.9 Copy
Copy the number from the SIM1card to phone, or copy from SIM1 card to SIM2 card.
7.10 Move
Move the number from SIM1 to phone or move from SIM1 to SIM2.
7.11 Add to Blacklist
Add this contact to the blacklist. You can view the lists in the <Call settings>-<Advance
settings>-<Blacklist>.
7.12 Caller groups
1) Press navigation key to move the cursor to “Caller groups”, confirm to enter, the
display will show: Friends, Family, VIP, Business, Others.
2) Select group name by navigation key, press left soft key to view members, then pree
left soft key to view, add, remove the members.
3) Select group name by navigation key, press left soft key to send SMS.
4) Select group name by navigation key, press left soft key to select group settings,
select ring tone, associate picture, associate video, which can discriminate the caller

《WP9(SM) User Guide》_V1.0
Proprietary & Confidential -13-
group.
7.13 Phonebook settings
Set the phonebook parameter.
Preferred storage: set the preferred storage media: SIM1/2, Phone or all.
Speed dial: on or off the function. Allows you to assign up to eight phone numbers from
Phonebook that you use most frequently to the number keys (2~9), and then dial them
easily whenever you want, by pressing and holding the associated number key.
My number: edit my number.
Extra numbers: the menu is used to save the mobile used SIM1/2 owner number, fixed
dial. It can set owner number of current using. The menu can set the name and number of
SIM card. It can be operated: Edit. If your SIM card support, you can set the fixed dial
number. If the function is activated, you can only dial the number in the fixed dial list.
Before enable the feature, need input PIN2.Enter fixed dial list, you can add, edit the
number. When save the number, need input PIN2.
※Note: For avoiding change the fixed dial status by others, after setting, please power off then
power on. ※
Memory status: show the used storage and total storage of SIM card and phone.
Copy contacts: copy the number from the SIM1card to phone, or copy from SIM1 card to
SIM2 card.
Move contacts: move the number from SIM1 to phone or move from SIM1 to SIM2.
Delete all contacts: delete all the numbers from phone or SIM card.
8 Call center
In this menu, you can view the calls you missed, dialed and received, as well as the length of
your calls.
8.1 Call history
There is “1” or “2” icon displayed on the right side of every call logs, it means this call is
dialed or received by SIM1 or SIM2.
8.1.1 Missed calls
This menu lets you view the SIM1 card missed call number, there is showing most 20
numbers. You can View, Call, Send SMS, Send MMS, Save to Phonebook, Add to Blacklist, Edit
before call, Delete.
8.1.2 Dialed calls
This menu lets you view the SIM1 card recent numbers you dialed, there is showing most 20
numbers. You can View, Call, Send SMS, Send MMS, Save to Phonebook, Add to Blacklist, Edit
before call, Delete.
8.1.3 Received calls
This menu lets you view the SIM1 card recent numbers you received, there is showing most
20 numbers. You can View, Call, Send SMS, Send MMS, Save to Phonebook, Add to Blacklist,
Edit before call, Delete.
8.1.4 Delete call logs
This menu lets you delete the SIM1 card missed call, dialed call, received call, or all the calls.

《WP9(SM) User Guide》_V1.0
Proprietary & Confidential -14-
8.2 Call settings
8.2.1 SIM1 call settings
8.2.1.1 Caller ID
Set sent caller Id by network, send Id, or hide Id.
8.2.1.2 Call waiting
This feature means you are informed of a second incoming call by an audible tone in the
earpiece. Activating this feature enables you to specify whether or not answer the second
incoming call. Deactivating this feature, you are not informed of a second incoming call by an
audible tone in the earpiece, and the caller will hear a busy tone (If the divert feature is activated,
the second incoming call is automatically diverted to another phone.)
8.2.1.3 Call divert
This network feature allows you to divert your incoming calls to another number. If you can
not answer the phone, forward your incoming calls.
1) Divert All Voice Calls: when activated, all of your incoming calls will be diverted. You
can Interrogate, Activate or Deactivate this feature.
2) Divert If Unreachable: when power off or not in the network covering area, the call will
be diverted into specific number. You can Interrogate, Activate or Deactivate this
feature.
3) Divert If No Answer: when activated, calls will be diverted if you do not answer your
phone. You can Interrogate, Activate or Deactivate this feature.
4) Divert If Busy: when activated, calls will be diverted when you are already in a call.
You can Interrogate, Activate or Deactivate this feature.
5) Divert All Data Calls: divert all incoming calls into new number, or voice mail. You can
Interrogate, Activate or Deactivate this feature.
6) Cancel All Divert: when activated, calls will be diverted if your phone is off or if you
are out of coverage. You can Interrogate, Activate or Deactivate this feature.
8.2.1.4 Call barring
The call barring network service allows you to restrict your calls. This feature needs call
barring password supplied by your service provider.
1) Outgoing Calls: calls cannot be made except emergency call.
2) Incoming Calls: calls cannot be received.
3) Cancel All: cancel all the limitation, it need input barring password.
4) Change Barring password: change the barring password.
※ Note: The call barring password is provided by your service provider. ※
8.2.1.5 Line switching
This is a network service. If your SIM card supports one card two number functions, you can
select line 1 or line 2 for making a call. If your card does not support the service, select “line 1” to
dial/ receive calls. When select “line 2”, you cannot dial calls.
8.2.2 SIM2 call settings
Please refer to “SIM1 call settings”.
8.2.3 Advance settings
8.2.3.1 Black list
1) Mode: on/off this function.
2) Black list number: input the numbers you want to shield, then you cannot get this
number’s call.

《WP9(SM) User Guide》_V1.0
Proprietary & Confidential -15-
8.2.3.2 Auto redial
If activate the function, when dial failed, the phone will dial the number automatically.
8.2.3.3 IP dial
Set IP prefix number. Enter the IP number, press <Option> and select Accept. Selecting
Discard rejects your setting.
8.2.3.4 Call time display
If activate the function, the call time will display.
8.2.3.5 Call time reminder
If activate the function, during the calling, there is voice prompt to show the call time.
8.2.3.6 Answer mode
set answer mode, Any key. Press left soft key to set On or Off.
9 Calendar
Through the calendar, you can view the date and task list at specific day. Press left soft key
to access:
View: Select the time to show the event.
View all: show the task list of selected day. Press left soft key to View, Add, Edit, Delete,
Send vCalendar, Save as file.
Add event: add new task at selected day.
Delete event: delete the event.
Jump to date: directly jump to a specific date.
Go to today: return to today.
Go to weekly/monthly view: view the calendar through weekly or monthly mode.
10 Multimedia
10.1 Camera
With the phone camera feature, you can take picture at any time without carrying digital
camera. Enter the menu, the display shows the preview image.
Press left soft key to access:
Change camera: switch between back and front camera.
Photos: select one image and press left soft key to access:
View: view the image.
Image information: shoe the detailed information of the image.
Browse style: set display mode.
Send: send the photo to MMS OR Bluetooth.
Use as: use the photo to wallpaper, screen saver, etc.
Rename: rename the image.
Delete: delete the selected image.
Sort by: sort the image as name, type, time, size.
Delete all files: delete all the images.
Storage: select the image storage path.
Camera settings: set Shutter sound, EV, Contrast, Anti-flicker, Contrast, Delay
timer, Cont. shot.
Image settings
Image size: set the image size through left or right navigation key.
Image quality: set the image quality.
White balance: set white balance mode.
Scene mode: set auto or night mode.
Effect settings: set photo effect.
Storage: select file storage path.

《WP9(SM) User Guide》_V1.0
Proprietary & Confidential -16-
Restore default: restore default value.
Shortcut key operation:
Press middle key to take a photo.
Press Up/Down navigation key to adjust the focal distance.
Press Left/Right navigation key to adjust EV.
Press 1 key to change image size.
Press 2 key to change image quality.
Press 4 key to change white balance.
Press 6 key to change delay timer.
Press 7 key to change cont shot.
Press 9 key to change camera.
Press # key to show/hide the icons.
10.2 Image viewer
Show image list, press left soft key to do: View, Image information, Browse style, Send, Use
as, Rename, Delete, Sort by, Delete all files, Storage.
10.3 Video recorder
Through the menu, you can record video by yourself. Press middle key to start recording.
During scanning, press left soft key to access:
CamCorder settings: set the record parameter.
White balance: set white balance mode.
EV: set the light compensate value.
Night Mode: set night on or off.
Anti-flicker: set frequent.
Video Setting: set the video quality.
White Balance: set the white balance value.
Effect Setting: set the video effect.
Storage: select the video storage path.
Restore Default: restore default value.
Shortcut key operation:
Press middle key to Start/Pause record.
Press Up/Down navigation key to adjust the focal distance.
Press Left/Right navigation key to adjust EV.
10.4 Video player
The menu supports play video file. When the file list is null, select the storage path first, and
then select the video folder. There will update the video file list, select one file from the list, press
left soft key to play. Press end key to exit and return list. The phone supports the AVI, 3GP and
MP4 video files.
Select one video file, press middle key to operate:
Play: play the file.
Send: send file as MMS or via Bluetooth.
Rename: rename the file.
Delete: delete the selected file.
Delete all files: delete all video files.
Sort by: sort the file by name, type, time, size or none.
Storage: select file from phone or T-Flash card.
10.5 Audio player
Through the menu, you can play music or ring tone file. Press left soft key to access music
list, press left soft key to operate:
Play: play the music file.
Details: show the file details.

《WP9(SM) User Guide》_V1.0
Proprietary & Confidential -17-
Add to ringtones: add the selected music to ring tone database.
Refresh list: refresh the list.
Settings: set the parameter.
Pre. play list: select the storage media.
List audio gen: set On or Off.
Repeat: set the play repeat mode.
Shuffle: set whether play music stochastic.
Background play: power on or off background play.
Lyrics display: set whether show audio text.
Bluetooth settings:
BT stereo output: set BT stereo output: on or off.
BT stereo headset: set whether output from headset.
During playing the music, press left or right navigation key to next music file; long press left
or right navigation key to fast forward or Rewind; press middle key to pause/play the playing file;
press up and down navigation key to adjust volume.
10.6 Sound recorder
You can record sound through the menu. The sound recorded can be set as ring tone for call
or message. Press left soft key to access:
New record: begin a new recording.
List: show all the recording files.
Settings: set the storage media, saving format.
Select “New record” to begin recording. During recording, the display shows record time.
Press left soft key to pause recording, and then press again to restore. Press right soft key to
stop recording, then select whether to save it. The record file is saved as .amr format. After
recording, press left soft key to select “List”, select the file and press middle key to access:
Play: play the record.
Append: begin a new record, and the new record is after the selected record, they
are saved on one file.
Rename: rename the record.
Delete: delete the record.
Delete all files: delete all records.
Use as: use to User profiles.
Send: send the file as MMS or via Bluetooth.
10.7 FM radio
Before starting FM radio, insert the earphone into left side of the phone. The earphone line
equates in FM radio antenna. Please let it hang freely. Open the FM radio, the phone will show
the channel frequency that the phone searched automatically. You can press left/right navigation
keys to change the channel frequency. Press side key to adjust volume. And press right soft key
to exit, and press left soft key to operate:
Channel List: show all radio channels. Press OK key to edit the frequency, the value is
among 87.5MHZ and 108.0MHZ.
Manual Input: input channel manually.
Auto Search: search channel automatically.
Settings: set the radio player parameter
10.8 TV
The mobile supports TV function. You can see the TV program at any time. If the signal is
weak, you can draw out the antenna of the mobile to receive TV. Press middle key to select:
Set Region: select mobile locate area.
Manual Set Channel: input the channel number, open the channel program
automatically.
Channel list: show the channel frequency list which the mobile can receive.
Auto search: mobile searches the TV channel automatically. After search channels,
the mobile saves the channels automatically into channel list.

《WP9(SM) User Guide》_V1.0
Proprietary & Confidential -18-
Full Screen: play the TV grogram with full screen.
During the TV play, press left/ right navigation key to adjust the channel frequency one by one.
Press up/ down navigation key to adjust volume.
11 Messaging
User can send text and multimedia messages.
11.1 Write message
11.1.1 Text meaasge
Each text message has limitation in length, that is 1224 English characters. If exceed the
limitation, the message will be cut to many messages for sending.
Screen icon that displays in standby mode refers to any new message just received and
unviewed. You can set the message tone to remind you of receiving any new message. No more
messages can be received when the Inbox is full. You can receive the new message after you
have deleted some old ones to release memory space.
Write new message for sending. During editing the message, press left soft key to operate:
Send to: enter number or add from phonebook. You can add many numbers.
Input method: select input method.
Input template: select the template message from the template list.
Advanced:
Insert object: select multimedia object into the text.
Insert number: insert the contact number from phonebook into message.
Insert name: inset the contact name from phonebook into message.
Insert bookmark: insert bookmark into text.
Text format: select text style, alignment and new paragraph.
Save to Drafts: save the message to draft of SIM1 or SIM2.
After editing the message, select “Send to” and select the number, press left soft key to
access:
Send: send the message to the selected numbers.
Edit recipient: edit the number.
Remove recipient: delect this number.
Remove all recipients: delect all the numbers.
Save to Drafts: save the message to draft of SIM1 or SIM2.
11.1.2 Multimedia meaasge
You can write a new MMS message through the menu, such as insert text, image, audio and
video. Before using MMS, you need set the MMS parameter, for details please contact with your
service provider to confirm that if you can use the MMS service and how to apply it. Single MMS
message limitation is 100KB, if the MMS message is out of the limitation, the phone will can not
receive it. If you insert image, audio or video that make the MMS message is out of limitation, the
phone will show the prompting information.
You maybe can not copy, update, send or forward some image, picture, ring or other
multimedia content that is protected by copyright.
After enter writing message interface, press left soft key to operate as following:
Send to: enter number or add from phonebook. You can add many numbers.
Input method: select input method to write the message.
Add picture: insert picture that saved on the phone or memory card into the message.
After adding the picture, there will show the “Edit picture” and “Remove picture” after
the menu.
Add sound: insert the audio file that saved on the phone or memory card into the
message. After adding the audio, there will show the “Edit audio” and “Remove audio”
after the menu.
Add video: insert the video file that saved on the phone or memory card into the
message.

《WP9(SM) User Guide》_V1.0
Proprietary & Confidential -19-
Add subject: input the message subject. After adding the subject, there will show the
“Edit subject” after the menu.
Preview MMS: view the edited MMS message.
Slide options:
Add slide before: add new slide before the current slide, and edit new message
content. After add the slide, there will show “Delete slide” and “Next slide” after the menu.
Add slide after: add new slide after the current slide, and edit new message
content. After add the slide, there will show “Delete slide” and “Next slide” after the menu.
Slide timing: set the slide time.
Advanced:
Add attachment: insert the attachment that saved on the phone or memory card
into the message. After adding the attachment, there will show the “Edit attachment” and
“Remove attachment” after the menu.
Add bookmark text: add website address into the message.
Save to Drafts: not send the message, and save it on [Drafts] folder.
After editing the message, select “Send to” and select the number, press left soft key to
access:
Send: send the message to the selected numbers.
Send options: set the sending parameter, such as validity period, Delivery report, Read
report, Priority.
Edit recipient: edit the number.
Remove recipient: delect this number.
Remove all recipients: delect all the numbers.
Change to Cc: change the send mode of this number to Cc.
Change to Bcc: change the send mode of this number to Bcc. If you input bcc number,
the MMS message will send by encryption mode.
Save to Drafts: save the message to draft of SIM1 or SIM2.
11.2 Inbox
Through the menu you can read received SMS and MMS messages of SIM1 and SIM2.
There is “1” or “2” icon displayed on the right side of every messages, it means this message is
received by SIM1 or SIM2.
To the message list, select one and open it, press left soft key:
View: view the message content.
Reply by SMS or MMS: replay the message.
Call sender: call the number that sends this SMS.
Forward: send the message to others.
Delete: delete the selected message.
Delete all: delete all messages.
Save to Phonebook: save this new number to the phone or replace existing.
Advanced(SMS):
Copy to phone/Copy to SIM: copy the message to phone/SIM1/2.
Move to phone/Move to phone: move the message to phone/SIM1/2.
Copy all: select the copy mode then copy all the messages.
Move all: select the move mode then move all the messages.
Move to memory card(MMS): move the MMS message to T-card.
Copy to memory card(MMS): copy the MMS message to T-card.
Details(MMS): show the details of the MMS message.
11.3 Drafts
Select a draft message, press left soft key to select the menu: View, Send, Edit, Delete,
Delete all, Advanced. The operation details please refer to [Write message].
11.4 Outbox
The outbox stores any messages that you have failed to delivery. For the messages in this
box, you can access options: View, Resend, Edit, Delete, Delete all, Advanced. The details refer
to [Inbox].

《WP9(SM) User Guide》_V1.0
Proprietary & Confidential -20-
11.5 Sent messages
Show the sent messages you saved.
11.6 Delete messages
Delete messages in inbox, drafts, outbox, sent messages or all messages.
11.7 Broadcast message
This network service allows you to receive text messages on various topics, such as the
weather or traffic. Messages are displayed immediately as they are received, you can directly
read the messages. At present, only a few networks support this feature. For further information,
contact your service provider.
Select “SIM1 broadcast message” or “SIM2 broadcast message”. The display shows
options: Receive mode, Read message, Languages, Channel setting. Press navigation keys to
select option and press middle key to access.
Receive mode: power on or off the function.
Channel settings: select, add, edit or delete the old channel.
Languages: select the message language.
Read message: read the broadcast message.
11.8 Message settings
11.8.1 Text meaasge
Set the SMS parameter. Select “SIM1 message settings” or “SIM2 message settings”.
Profile settings
i) Confirm to access, the display show “Profile 1”、“Profile 2/3/4”.
ii) “Profile 1” operation:
Profile name: edit the profile name.
SMSC address: set short message center number. Only input the number, the
message can be sent or received.
Valid period: if messages can not be delivered from your message center due to
some reason (i.e. your phone is switched off). Select the period in which the
service center tries to deliver the message.
Message type: select the message send type.
iii) “Profile 2/3/4” is same with “Profile 1”.
Voice mail server
Voice mail server is provided by ISP. It will make you not missing any call. It likes message
machine, you can check the message at any time. In idle mode, long press 1 key. Before use
the function, please apply with ISP.
Call voice mail:connect to voice mail number, if successfully connect, you will hear
the message.
Edit: edit the voice mail name, input name and voice mail number.
Common settings
Set the message sending parameter.
Delivery report: Informs you whether or not your message has been delivered. To
enable or disable this option, choose the On or Off.
Reply path: allow the recipient of your message to send you a reply via your
message center, if your network supports this service. To enable or disable this
option, choose the On or Off.
Save sent message: save the sent message in the “Sent message”.
Memory status: show the storage status of SIM card and phone.
Preferred storage: set the preferred storage media.
Preferred connection: select prefer GPRS, GSM or GSM only.

《WP9(SM) User Guide》_V1.0
Proprietary & Confidential -21-
11.8.2 Multimedia meaasge
Set the MMS parameter.
Data account: select server to send or receive MMS message.
Common settings:
Compose: set creation mode is free or restricted, set whether resize the picture, set
whether close the auto signature function.
Sending: set send parameter.
Retrieve: set retrieve parameter, including: home network immediate / rejected /
delayed setting, roaming as home / delayed / rejected setting, Filter: allow or reject
anonymous, or advertisement to filter received message. set read report parameter,
set delivery report on or off.
Preferred storage: set the preferred storage media.
Memory status: show the usage, used space and free space of the phone
memory.
11.8.3 Service message
Set enable push and service loading.
12 Organizer
12.1 Tasks
Through the menu, you can view the task list, and set ring tone prompt mode. The feature
can reminder you important events. Press left soft key to access:
View: show the task list.
Add: add new task. Select task type, then edit task content, and select alarm ring tone
mode.
Edit: edit task content.
Delete: delete selected task.
Search: search the tasks by time or subject.
Delete overdue: delete the overdued tasks.
Delete all: delete all tasks.
Jump to date: directly jump to a specific date.
View uncompleted: show uncompleted tasks.
12.2 Alarm
Through the menu, the phone sends out the noisy bell sound at specific time. If the specific
time arrives, the phone will ring even if the phone is powered off. Press left soft key to access:
On/Off: power on or off the alarm through left or right navigation key.
Edit alarm: set the alarm time.
Repeat: select the ring mode: Once, Everyday, Days.
Snooze: set continuous alarm time.
Alert type: select the alert type.
12.3 World Clock
The menu allows inquiry time of world each place. When you are outside the country, you
can change the system time into the locating place time.
Press left/right navigation key to view the country date and time at different longitude. The
country name displays on the upper screen, and the date and time displays below. A world map
displays in the middle. Select the country, press left soft key to access “Daylight saving time for
foreign city”. Set the feature is On or Off.

《WP9(SM) User Guide》_V1.0
Proprietary & Confidential -22-
12.4 Flashlight
On or off the flashlight function. The flashlight is on the front of the mobile.
12.5 Extra
12.5.1 Calculator
Through the calculator, you can operate: Addition, Subtraction, Multiplication and Division.
1) Enter the menu, and press numerical key and navigation key to input number and
operative symbol “+、-、×、÷”.
2) Press middle key to get the result.
3) Press right soft key to clean screen information. When all the character is cleaned, you
press right soft key to return upper menu.
4) Press END key to exit the function and return idle mode.
“M+”: Add the input number to saved number.
“M-”: The saved number subtracts input number.
“MR”: Show the saved number.
“MC”: Clean the saved number.
12.5.2 Unit Converter
Through the menu, you can operate unit conversion with different weight and length unit.
Weight: convert unit includes: “kg-pound”, ”kg-ounce”. Press dial key 1 to change unit.
Length: convert unit includes: “km-mile”, “m-yard”, “m-foot”, “cm-inch”. Press dial key
1 to change unit.
12.5.3 Currency Converter
Through the menu, you can operate currency conversion with local and foreign currency.
Enter the currency rate, then confirm. Press left or right navigation key to select proportion, and
then convert the currency.
12.5.4 Health
Through the menu, you can know your health condition.
BMI: according to BMI, you can calculate your health condition.
12.5.5 Stopwatch
The menu provides stopwatch timer function.
Typical stopwatch: time with one stopwatch, you can select different timing mode.
Split timing: the cumulative time length from start to stop. Press the left soft key to
start timing, the screen will show the time length. During timing, press right soft key,
the current time will be kept to show on the top of the screen, at the same time the
timer is continually. Press the left soft key, the timer stops. Press right soft key to
exit. Before exit, you will be asked whether to save the record.
Lap timing: time with lap, and the time length will be zero after a lap. Press the left
soft key to start timing, the screen will show the time length. During timing, press
right soft key, the current time will be kept to show on the top of the screen, at the
same time the time is set to zero. Press the left soft key to stop the timer. Press
right soft key to return upper menu, before exit, you will be asked whether to save
the record.
View record: view the timer record.
nWay stopwatch: time with four directional stopwatches. Slide four direction navigation
key to select the stopwatch, the stopwatch will show the current direction time length.
The total time length will show on the top of the screen from start until stop. When one
way stopwatch is run, the other three stopwatches is pause and keep the time length.
Slide the navigation key to select different direction stopwatch. Press end key to exit.

《WP9(SM) User Guide》_V1.0
Proprietary & Confidential -23-
12.5.6 Ebook reader
E-Book Reader supports read e-book files on your phone. You also can set the reader
parameter for convenience. Now the phone only supports TXT and PDB format files.
1)If the bookshelf is null, press middle key to access:
Cleanup bookshelf: cleanup the bookshelf.
Global settings: set the reading parameter.
Font style: set font style.
Scroll by: select scroll mode: Page, Line.
Auto scroll: if set auto scroll, the reader can automatically scroll page/line.
Scroll speed: set scroll speed.
Full screen: set the reader with full screen display.
Encoding: select encoding mode.
※ Note:Before reading, you need select correct encoding mode. Or there is unreadable
code.※
Alignment: select left or right aligning mode.
Select storage: select memory media to open the e-book.
2)If there is ebook in the shelf, select one, and press middle key to access:
Open ebook: open the e-book.
Clean up bookshelf: update the e-book file.
Global settings: set the reader parameter.
Book info: show the file details.
Delete: delete selected file.
Delete all files: delete all the e-book files.
Sort by: sort the files in the same folder, or disable the feature.
Apply global settings: execute the system settings.
Help: show the help information.
3)Open the ebook file, show the content, and press middle key to access:
Find: find the specific character, select find mode: Case Sensitive, Case Insensitive.
Jump to: directly jump to specific position.
Go to bookmark: go to specific bookmark position.
Add bookmark: add a new bookmark in the current position.
Delete bookmark: delete bookmark.
Book info: show the file details.
Settings: set the reader parameter.
Apply global settings: execute the system setting.
Help: show the help information.
Close: close the book.
13 File manager
For saving more information, the phone support memory card. The card can be installed at
any time. The menu can manage the files on the phone.
Enter File Manager menu, show storage media list. Select one, the total storage and used
storage will be shown on the up display, and an icon shows use proportion on the left-up.
13.1 Phone
1) Select “Phone”, press left soft key to access [Options]:
Open: open the folder and show the file list.
Format: format the phone memory.
※Note: After formatting, all date saved on the phone will be lost forever.※
2) Select one folder, press left soft key to access:
Open: open the folder and show the file list.
New folder: create a new folder under the current folder.
Rename: Rename the selected folder.
Delete: delete selected folder.
Sort by: sort the selected folder.

《WP9(SM) User Guide》_V1.0
Proprietary & Confidential -24-
3) Select one file under the folder, press left soft key to access:
View: view the photo, the menu is valid to image file.
Play: play the video file. The menu is valid to audio, video file.
Open ebook: open the e-book file. The menu is valid to e-book file.
Use: if the selected file is a ring, then send it to profile.
Send: send it to MMS or bluetooth.
Details: show the file details.
Rename: rename the selected file.
Copy: copy the file to specific folder.
Move: move the file to specific folder.
Delete: delete the selected file.
Delete all files: delete all files of the folder.
Mark several: mark the photos.
Sort by: sort the file on the current folder.
13.2 Memory card
If the phone is inserted into memory card, the display will show “Memory Card”. Select the
menu, press left soft key to access:
Open: open the folder and show the file list.
Format: format the phone memory.
Rename: Rename the selected folder.
Details: show the file details.
※Note: After formatting, all date saved on the memory card will be lost forever.※
The operation of the folder and file, please refer to the details of chapter “Phone”.
Note:Our phone supports USB2.0 standard. If your computer system is Windows2000 or
Windows XP or above, the computer will recognize the USB automatically without installing
driver. ※
14 Connectivity
14.1 Bluetooth
The phone support Bluetooth communication mode.
Power: set the function on or off.
Visibility: Select On or Off. If disable the feature, the phone will not be used as a BT
device.
My device: show my BT device list. If the list is null, press OK key to search the new
device. Select one device, press left soft key to access:
Connect: connect to this device.
Set as default audio device: set this device as default audio device.
Service list: show the device service list.
Rename: edit the device name.
Authorize: select Always ask, Always connect or Always reject.
Delete: delete the selected device.
Delete all: delete all online devices.
Search audio device: Before search Bluetooth device, power on Bluetooth function.
After searching new device, connect the new device in pairs according to the display
information. When successfully connected, the devices can communicate.
My name: edit the device name.
Advanced: set Bluetooth parameter。
Audio Path: set the audio path, you can select leave in phone or forward to BT

《WP9(SM) User Guide》_V1.0
Proprietary & Confidential -25-
device. Example: if connect the BT headset, you can set forward to BT headset.
Storage: select storage location of transfer file from Bluetooth.
Sharing permission: set the right as Full Control, or Read Only.
My address: show the device address.
14.2 Data account
It can support to view Internet webpage and MMS service. Select one account from the list,
press left soft key to edit:
Account name: edit account name.
APN: edit APN name.
User name: input the network connection account (provided by your network
service provider).
Password: input your account password (provided by your network service
provider).
Auth. type: select authentication type: normal or secure.
SIM selection : select the using SIM card.
Advanced settings
15 Settings
Many different features of your phone can be customized to suit your preferences.
15.1 Dual SIM switch
Select SIM switch mode.
Manually selected by user: In this mode, when the phone is power on, there is a prompt
pop-up to select SIM mode.
Automatically decided by SIM cards: when SIM1 and SIM2 are all valid, or only SIM1
or SIM2 is valid, the phone will select SIM mode automatically.
15.2 Dual SIM settings
Set the SIM card mode:
Dual SIM open: SIM1 and SIM2 are valid at one time.
Only SIM1 open: only SIM1 is valid.
Only SIM2 open: only SIM2 is valid.
15.3 Phone settings
Set the phone parameter.
15.3.1 Time and date
Set the time and date of the phone.
Set home city: select the home city in the list.
Set time/date: edit the time or date, and set daylight saving is on or off.
Set format: set the time format or date format.
15.3.2 Schedule power on/off
Set the phone scheduled powering on or off. When the set time arrive, the phone will power
on or off automatically. Press left soft key to select:
Status: enable or disable the function of powering on/off.
Power on/off: select power on or off.

《WP9(SM) User Guide》_V1.0
Proprietary & Confidential -26-
Edit power on/off: set the scheduled time of power on/off.
15.3.3 Language
It allows you to select language for the display text.
15.3.4 Preferred input method
It allows you to set the default input mode. Use navigation keys to select input mode and
press left soft key to confirm.
15.3.5 Display
Set the display parameter in idle mode.
Wallpaper: set the wallpaper in idle mode. The image can be selected from system, or
from the file manager menu.
Screen saver: enable or disable the screen saver. If enable the screen saver function,
select waiting time, and the animation of the screen saver.
Power on display: select the animation of the powering on display.
Power off display: select the animation of the powering off display.
Show date and time: select on or off. If enable the function, the date and time will be
shown on the idle display.
15.3.6 Flight mode:
After setting the flight mode, you need not power off the phone on the plane, at the same
time cannot make a call.
15.3.7 UART settings
Select SIM card 1 or SIM card 2, the settings used to determine the current uart port which
accepts AT is used by SIM 1 or SIM 2.
15.3.8 Misc. settings
Set LCD backlight.
15.4 Network settings
Set the network selection mode. Select “SIM1 network settings” or “SIM2 network settings”.
Network selection
New Research: search new network.
Select network: search new network, and show the network list.
Selection Mode: set “Automatic” or “Manual”.
Preferred networks: set the preferred network.
15.5 Security settings
The menu allows encrypting with some phone functions. It can avoid your phone or SIM card
misused. When you input password, the password will be shown with “*”. If input wrong number,
press end key to clean. You can change PIN1, PIN2, or phone lock password and so on.
15.5.1 SIM1 security
15.5.1.1 PIN lock
If activate PIN lock, before you use SIM1 card, you need input correct PIN.
15.5.1.2 Change PIN/PIN2
The menu can change SIM1 card PIN, PIN2 password. After input correct password, enter

《WP9(SM) User Guide》_V1.0
Proprietary & Confidential -27-
new password for two times.
15.5.2 SIM2 security
Please refer to “SIM1 security”.
15.5.3 Phone security
15.5.3.1 Phone lock
If activate Phone lock, before you use phone, you need input correct phone password.
15.5.3.2 Change password
Change phone password.
15.5.4 Auto keypad lock
Set the keypad lock mode. You can activate or disable the function.
15.6 Restore factory settings
In this menu enter your phone code (the initial value is 1122) and press <Accept> to reset
your phone to its default settings.
16 User profiles
The menu allows setting different prompt mode for call and message in different environment.
Press left soft key to access, select profile through up/down navigation key.
16.1 General
Set the phone ring tone and other prompt mode as your prefer.
1) Activate: activate and set as default mode.
2) Customize: Set Alert type, Ring type, SIM1/2 incoming call, Power on, Power off,
SIM1/2 Message tone, Keypad tone and the volume of Ring tone, Key tone.
3) Reset: reset to default settings.
16.2 Silent
Activate silent mode.
16.3 Meeting
Alert type is “Vib. only”. Operation details are same with [General].
16.4 Outdoor
The ring tone volume is 7 levels, and Ring type is “Repeat”. Operation details are same with
[General].
16.5 My style
Set your own style settings, and rename it.

《WP9(SM) User Guide》_V1.0
Proprietary & Confidential -28-
17 Services
17.1 STK
STK features are provided by your service provider. If your SIM card supports STK feature,
you will see the STK menu. Different STK has different STK main menu. Please contact your
service provider if the STK does not work.
17.2 Internet services
Wireless Application Protocol, a kind of browse Internet webpage mode. It makes you
browse the webpage in any place and time. You can enjoy the resource of Internet, and grasp
any information through your mobile. You need apply the service to your network service provider
before you use the service.
Homepage: browse the homepage.
Bookmarks: enter the network address set advanced.
Input address: input a new address.
Recent pages: enter the network address history list.
Settings: set the WAP browser connection mode.
18 Fun & Games
For making some funny, the phone designs some games. The details of operation please
refer to game help file.
19 Text input settings
19.1 Key functions for Input Mode
1) Letter key A~Z: press to show A~Z.
2) Sym key: select symbol.
3) Alt key: press this key, switch between uppercase and lowercase.
4) Del key: delete one character.
5) Space key: press to enter space. In idle mode, long press Space key to open/close the
flashlight on the front of phone.
6) Ctrl key: used to change input type.
7) ↑ key: press this key, switch between upper and bottom character.
8) $ key: In idle mode, long press can switch to silent mode.
19.2 Multitap ABC mode
When typing in Multitap ABC or abc mode, press the key which corresponds to the desired
letter several times until the letter you want appears.
Example: input “how”, in Multitap abc mode, you press numeric key 4 two times to show “h”;
press numeric key 6 three times to show “o”; press numeric key 9 once to show “w”.
ABC means to enter uppercase letters; abc means to enter lowercase letters.

《WP9(SM) User Guide》_V1.0
Proprietary & Confidential -29-
20 Guidelines for safe and efficient use
20.1 Care and maintenance
Your phone is a product of superior design and craftsmanship and should be treated with
care. By following the warranty obligations and by caring for your mobile, you can enjoy it for
many years:
1) Keep the phone dry. Precipitation, humidity and liquids containing minerals will corrode the
electronic circuits;
2) Do not use or store the phone in dusty areas as the dust could obstruct or damage the
moveable parts;
3) Do not store the phone in hot areas. High temperatures can shorten the life of electronic
devices, damage batteries and warp or melt certain plastics;
4) Do not store the phone in cold areas, because moisture can form inside the phone when
temperature rises, which may damage the electronic circuits;
5) Do not drop, knock, bump or shake the phone. Rough handling may damage the internal
circuits. Put the phone in a safe place when you do not use it;
6) Use a slightly cloth damping with clean water or neutral soap to clean your phone housing.
Never use any chemical or abrasive cleaners, as they could damage the phone;
7) Do not paint your phone as the paint could obstruct any moving parts and prevent normal
use;
8) Use only approved batteries and accessories. Use of any unauthenticated batteries and
accessories could damage your phone and may be dangerous;
9) If there’s something wrong with your phone or its accessories, do not attempt to dismantle
the phone. Contact qualified service personnel to repair your phone.
20.2 Battery maintenance
1) A new battery will require two or three times full charge/discharge cycles in order to achieve
its optimum performance.
2) Batteries typically have several hundreds charge cycles in their life span. When the talk time
and standby time decrease obviously, replace a new battery.
3) If left unused, a fully charged battery will discharge itself in approximately 24 hours.
4) To extend the life of the battery, you can get the battery fully discharge until the phone turns
itself off. Do not attempt any other unapproved discharge ways.
5) When the battery level is low and only a few minutes talk time remain, a warning signal will
sound. When the battery is completely discharged, your phone will turn off.
21 Troubleshooting
If problems occur when using the phone, try to find a solution here first.
Problems Reasons and Solutions
Can’t switch on
Press and hold end key until image appears on the display.
Check the battery contacts. Remove and insert battery and switch
your phone on again.
Check the battery charge level.
Can’t connect to
network
Move into an area of better coverage.
Beyond the network cover area;
Contact your service provider if your SIM card is invalid.
The audio quality of
the call is poor
Press navigator key to increase the volume when you are in a call.
Check the signal strength indicator on the display.
The line is busy and can not be connected to network; you can not
make a call.

《WP9(SM) User Guide》_V1.0
Proprietary & Confidential -30-
Standby time too
short
When failing to connect to network, the phone will keep searching
base station that consumes much battery and reduces standby time.
Move to an area with stronger signal strength or switch your phone
off temporarily.
Replace the battery.
SIM card error
Make sure that the chips in SIM card are not damaged; use the
clean cloth to scratch it.
Make sure that SIM card is inserted correctly.
SIM card invalid. Contact your service provider.
Can not dial calls
Make sure that the number you dialed is available and the dial key
has been pressed.
Make sure that there is enough money to make a call.
Make sure that SIM card is valid.
Fixed Dial is set or has call barring feature turned on. Deactivate
fixed dial function or call barring.
Can not receive calls
Make sure that your phone has connected to network (Check if the
network is too busy or invalid).
Make sure that there is enough money to receive the call.
Make sure that SIM card is valid.
Check call divert settings and incoming call barring settings.
The battery won’t
charge
Make sure that the battery is inserted correctly. Securely connect
the charger to the phone.
Only charge the battery in an environment where the temperature
does not go below -10℃ or above 55℃.
The battery or charge need to be changed.
Can not set some
functions
The operation is wrong.
The network providers do not support the function, or you don’t
apply the function.

《WP9(SM) User Guide》_V1.0
Proprietary & Confidential -31-
21.1 FCC Regulations:
This mobile phone complies with part 15 of the FCC Rules. Operation is subject to the following two
conditions: (1) This device may not cause harmful interference, and (2) this device must accept any
interference received, including interference that may cause undesired operation.
This mobile phone has been tested and found to comply with the limits for a Class B digital device,
pursuant to Part 15 of the FCC Rules. These limits are designed to provide reasonable protection against
harmful interference in a residential installation. This equipment generates, uses and can radiated radio
frequency energy and, if not installed and used in accordance with the instructions, may cause harmful
interference to radio communications. However, there is no guarantee that interference will not occur in a
particular installation If this equipment does cause harmful interference to radio or television reception,
which can be determined by turning the equipment off and on, the user is encouraged to try to correct the
interference by one or more of the following measures:
-Reorient or relocate the receiving antenna.
-Increase the separation between the equipment and receiver.
-Connect the equipment into an outlet on a circuit different from that to which the receiver is connected.
-Consult the dealer or an experienced radio/TV technician for help.
Changes or modifications not expressly approved by the party responsible for compliance could void the
user‘s authority to operate the equipment.
The antenna(s) used for this transmitter must not be co-located or operating in conjunction with any other
antenna or transmitter.

《WP9(SM) User Guide》_V1.0
Proprietary & Confidential -32-
21.2 4RF Exposure Information (SAR)
This mobile phone meets the government’s requirements for exposure to radio waves.
This phone is designed and manufactured not to exceed the emission limits for exposure to radio frequency
(RF) energy set by the Federal Communications Commission of the U.S. Government.
The exposure standard for wireless mobile phones employs a unit of measurement known as the Specific
Absorption Rate, or SAR. The SAR limit set by the FCC is 1.6W/kg. *Tests for SAR are conducted
using standard operating positions accepted by the FCC with the phone transmitting at its highest certified
power level in all tested frequency bands. Although the SAR is determined at the highest certified power
level, the actual SAR level of the phone while operating can be well below the maximum value. This is
because the phone is designed to operate at multiple power levels so as to use only the poser required to
reach the network. In general, the closer you are to a wireless base station antenna, the lower the power
output.
The highest SAR value for the model phone as reported to the FCC when tested for use at the ear is 0.434
W/kg and when worn on the body, as described in this user guide, is 0.754 W/kg (Body-worn
measurements differ among phone models, depending upon available accessories and FCC requirements.)
While there may be differences between the SAR levels of various phones and at various positions, they all
meet the government requirement.
The FCC has granted an Equipment Authorization for this model phone with all reported SAR levels
evaluated as in compliance with the FCC RF exposure guidelines. SAR information on this model phone
is on file with the FCC and can be found under the Display Grant section of
www.fcc.gov/oet/ea/fccid after searching on FCC ID: YHLBLUTATTOOMN.
For body worn operation, this phone has been tested and meets the FCC RF exposure guidelines for use
with an accessory that contains no metal and the positions the handset a minimum of 1.5 cm from the body.
Use of other accessories may not ensure compliance with FCC RF exposure guidelines. If you do not use a
body-worn accessory and are not holding the phone at the ear, position the handset a minimum of 1.5 cm
from your body when the phone is switched on.