BLUEBIRD BM150RE PDA User Manual BM 150R 12 0110
BLUEBIRD INC. PDA BM 150R 12 0110
UserManual.wiki
>
BLUEBIRD
>
BM150RE User Manual
Users Manual
Navigation menu
Upload a User Manual
Namespaces
Wiki Guide
HTML
PDF
Info
Views
User Manual
Discussion / Help
Navigation
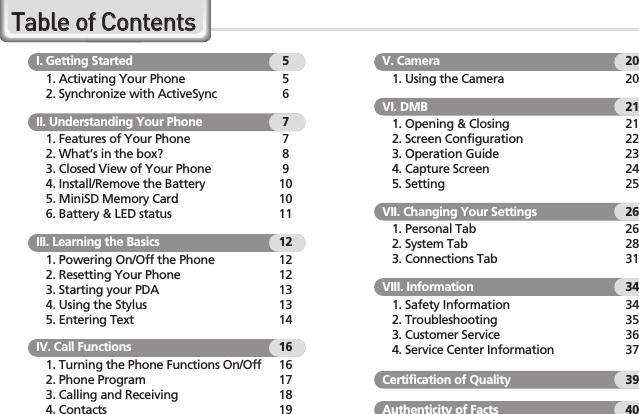
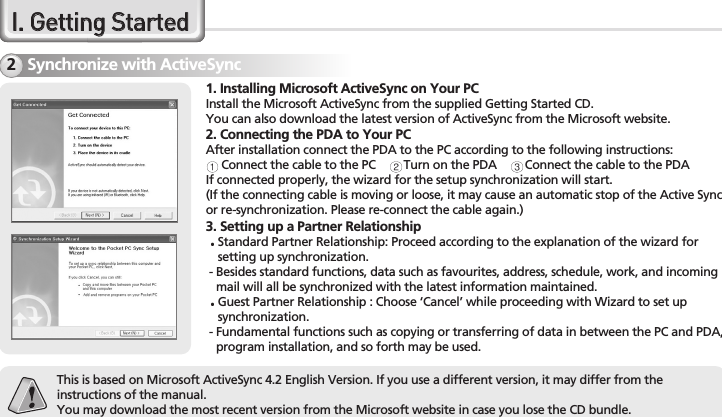
![BM-150R5II.. GGeettttiinngg SSttaarrtteeddActivating Your Phone1The plug-in SIM card and its contents can be easily damaged by scratches or bending.Use caution when inserting or removing the card and keep all SIM cards out of reach of children.[Remove the Battery]1. Push down using both thumbs toremove battery cover.2. Raise the battery by using thegroove on the lower part toremove the battery.[Insert the SIM Card]Insert the SIM card with its goldcontacts face down.Its cut off corner should match thecut off corner in the slot.[Remove the SIM Card]To remove the SIM card, lightlyslide it away from slot.[Install the Battery]1. Put the battery in line with theleft part of the PDA and thenpush the right part to lock.2. Put the projected part of thecover on top of the groove in theback and then push carefullywith both thumbs.](https://usermanual.wiki/BLUEBIRD/BM150RE/User-Guide-888029-Page-6.png)
![8BM-150R Series ManualIIII.. UUnnddeerrssttaannddiinngg YYoouurr PPhhoonneeWhat’s in the box?2[Main Body] [Stylus Pen][Standard Battery] [USB Cable][Earphones] [Adaptor][MS Companion CD][LCD Protect Film]Thank you for purchasing a PIDION Product. Please make sure all the above components are included.The pictures and photos in this manual may slightly differ due to model compositions.(When purchasing extra accessories please go to your nearest dealer.)](https://usermanual.wiki/BLUEBIRD/BM150RE/User-Guide-888029-Page-9.png)
![10 BM-150R Series ManualInstall/Remove the Battery4We strongly recommend that you use the adapter which was purchased with the product for charging the battery.However, the 24 pin charger of an ordinary mobile phone may also be used to charge the PDA battery. (Due to thecharacteristics of a standard charger, there may be small discharge of electricity despite the charger being fully charged.)[Install the Battery]1. Put the battery in line with theleft part of the PDA and thenpush the right part to lock.2. Put the projected part of thecover on top of the groove in theback and then push carefullywith both thumbs.[Remove the Battery]1. Push down using both thumbs toremove the cover.2. Raise the battery by using thegroove on the lower part toremove the battery.MiniSD Memory Card5Make sure that the gold plate terminal of the memory cardis pointed towards the back when inserting into the MiniSDslot. For removal push the exposed part of the memorycard. It will pop out.Frequent insertion/removal of the memorycard, or applying too much force to it, maycause the product to malfunction.Card removal and turning the power off/onusing the memory card may result in loss ofdata or cause the memory card and PDA tomalfunction.Important data should always be saved on thecomputer. The company will not take anyresponsibility for the loss of data on thisproduct.If the memory card cannot be removed easily,instead of removing it with force, inquire tothe service center for its removal, or ask for anexchange or refund of the product.IIII.. UUnnddeerrssttaannddiinngg YYoouurr PPhhoonnee](https://usermanual.wiki/BLUEBIRD/BM150RE/User-Guide-888029-Page-11.png)
![BM-150R11Battery & LED status6Charge on a connectionfrom the USBCharge on a connectionto the AdapterMaximum hours of usewhen chargedApproximately 4 hoursApproximately 2 hoursStandby: 15 hoursPhone call: 5 hours 30 minutes[ Hours for Charging & Use ] [ Safety Notice for Using the Battery ]While ChargingAfter ChargingRedGreen[ Battery Charge LED]DivisionIn UseStandbySearchingWLANBlue-BluetoothBlue--DMBBlue--PhoneAmberBlinking SlowlyBlinking Quickly[ Radio Function LED ]If the battery is running low on power, a warning notice may appear on the monitor with a warning sound.Charging and usage hours may differ from that of the manual, according to the user’s application environment.New batteries are not charged, therefore you must fully charge the battery before use.Batteries are expendable products and with regular use over timethey will lose there ability to fully charge.The battery may overheat from its application environment.If the fully charged battery lasts only half the time from itsoriginally purchased state, you should purchase a new battery.(Batteries have a 6 month period guarantee.)The time that a battery may last may differ according to thelighting of the monitor, temperature, length of its use, etc.Battery exhaustion may be considerably faster in areas whereBluetooth, wireless Internet, or phones cannot be used. (Bluetooth,wireless Internet, and phone functions should be turned off whenthese functions are not in use. This will help save the battery.)Leaving the battery on the re-charger after it has been recharged,will not damage the battery.If the cables to the main body are not properly connected, thelights on the main body may not come on during the rechargingprocess. Always check and make sure that all cables are connectedproperly.Do not remove the battery while it is in use. This may result indamage of data and the PDA may be initialized.If the battery is not sufficiently charged, the PDA may turn offwhile in use. Always check and make sure that the battery yourusing has been sufficiently charged.](https://usermanual.wiki/BLUEBIRD/BM150RE/User-Guide-888029-Page-12.png)
![12 BM-150R Series ManualPowering On/Off the Phone1Resetting Your Phone2The power button is located on the right side of theproduct.The power button should be pressed shortly.If the power button is pushed for more than 3 seconds, theLCD Back Light will turn On/Off.Even when the power is turned off, if the GSM modem isturned on the PDA will also power on automatically so youcan answer the phone.IIIIII.. LLeeaarrnniinngg tthhee BBaassiiccssPowerButton[Soft Reset]Exemplary SituationsWhen memory conversion is not processed smoothly due tolong hours of program use, or when there is an unexpectederror resulting in a clash between programs, and so forth.(This function is equivalent to rebooting the PC)Process MethodPress the reset button located at the back of the body usingthe Stylus Pen.[Hard Reset] Send Key + OK Key + Reset ButtonSafety Precautions : All unsaved files will be lostand programs currently in use will be shut downwhen the screen is initialized.Safety Precautions : All data will be lost and allprograms will be initialized as they were whenfirst purchased. Please note that all addresses,schedules, and information saved in the memoryof the PDA will be lost when processing hard reset.Remove Battery CoverReset Button](https://usermanual.wiki/BLUEBIRD/BM150RE/User-Guide-888029-Page-13.png)
![14 BM-150R Series ManualEntering Text5IIIIII.. LLeeaarrnniinngg tthhee BBaassiiccssThere are five different character input methodsavailable. They are:1. Block Recognizer2. Keyboard3. Letter Recognizer4. TranscriberThis input method uses the traditional writing areabox split in the middle.The left side is used to write letters and the rightside is for number entry.Symbols and common functions are located inother smaller boxes located in the right of thewriting box area.[ Selecting Text Input Mode ] [ Block Recognizer ]](https://usermanual.wiki/BLUEBIRD/BM150RE/User-Guide-888029-Page-15.png)
![BM-150R15This input method displays an on-screen keyboard that can be used toinput characters by tapping the screenusing the stylus pen.This option allows you to enter textusing your own handwriting.The screen is divided into threedifferent areas. A capital letter area,small letter area, and a number area.Characters are entered by printingletters in each area. The character isthen analyzed and typed on thescreen automatically.The transcriber option is similar to theletter recognizer, except instead ofentering characters into a designatedarea, you can enter entire words andsentences using your ownhandwriting.Transcriber supports both printingand cursive writing styles and thenautomatically types the informationon the screen.[ Keyboard ] [ Letter Recognizer ] [ Transcriber ]](https://usermanual.wiki/BLUEBIRD/BM150RE/User-Guide-888029-Page-16.png)
![16 BM-150R Series ManualTurning the Phone Functions On/Off1IIVV.. UUssiinngg tthhee PPhhoonneeIf the end key is pushed for more than 3seconds, the Phone Functions will turn On/Off.Touch this part orselect [Wireless Manager] from[Start] [Settings] [Connections]tabsTouch this part to turn On/Off.[ Using the Key ] [ Block Recognizer ]Please refrain from using the phone while driving or walking. This is very dangerous and may be illegal in your country.End Key](https://usermanual.wiki/BLUEBIRD/BM150RE/User-Guide-888029-Page-17.png)
![BM-150R17Phone Program2[ Key ] [ ’Today‘ screen ] [ ’Phone‘ screen ]Method of OperationPress Send Key on the PDA.Touch [Phone] on the lowerpart of the ‘Today’ screen.Exit MethodPress End Key on the PDA.Touch the [X] button on theupper right part of the‘Phone’ screen.Please refrain from using the phone while driving or walking. This is very dangerous and may be illegal in your country.](https://usermanual.wiki/BLUEBIRD/BM150RE/User-Guide-888029-Page-18.png)
![18 BM-150R Series ManualCalling and Receiving3IIVV.. UUssiinngg tthhee PPhhoonneeCalling1. Call the number by using the PDA keypad input screen, and then press Send Key.2. Push the [Talk] button by using the keypad on the screen.Receiving1. Press Send Key on the PDA.2. Touch the [Answer] button on the lower left part of the screen.Refuse Calls- Touch the [Ignore] button on the lower right part of the screen to refuse a call.(Pressing the volume controller on the left side of the PDA will only mute the bell.)Finishing the Call1. Press End Key on the PDA.2. Touch the [Finish] button appearing on the phone screen.Please refrain from using the phone while driving or walking. This is very dangerous and may be illegal in your country.](https://usermanual.wiki/BLUEBIRD/BM150RE/User-Guide-888029-Page-19.png)
![BM-150R19Contacts4Using ContactsContacts may be searched by inputting the name/number or by touching thetab button.Contacts Menu- New Contact : Register new contact.- Copy/Delete Contact : The chosen contact will be copied/deleted.- View By : Contacts will be indicated according to name/company.- Filter : Filter mode can be inputted to show only relevant items.Various options can be used by touching the contact for a few seconds.- Calling a company/home/mobile number : Calls will be made to the enlistednumbers.- Sending E-mails : E-mails may be sent to the enlisted e-mail address.- Sending Text Messages : Text messages may be sent to the enlisted numbers.Registration of New Contacts1. Register new contacts by touching [New Contact].2. Input the name and occupation into the appropriate office columns.Please refrain from using the phone while driving or walking. This is very dangerous and may be illegal in your country.](https://usermanual.wiki/BLUEBIRD/BM150RE/User-Guide-888029-Page-20.png)
![20 BM-150R Series ManualUsing the Camera1VV.. CCaammeerraaIf the battery does not have enough power, the camera might automatically turn off or may not start. It willautomatically power off if it is not used for more than 1 minute. The camera will automatically exit when operating theDMB. The Camera and DMB cannot be processed simultaneously.Press either the Camera Key on theright side of the product, or launch[Start] [Programs] [Camera]Set ScreenClose Camera ProgramAdjust BrightnessSet Resolutions: 320*240~1280*960Special Effects: Normal,Gray, Sepia, NegativeImage Quality Setup :High, Medium, LowPhotographPhoto AlbumPress the viewer button on the upperright hand corner of the screen.Set ScreenClose the Photo AlbumBrief ViewZoom In/Zoom OutDeleteMove to camera mode](https://usermanual.wiki/BLUEBIRD/BM150RE/User-Guide-888029-Page-21.png)
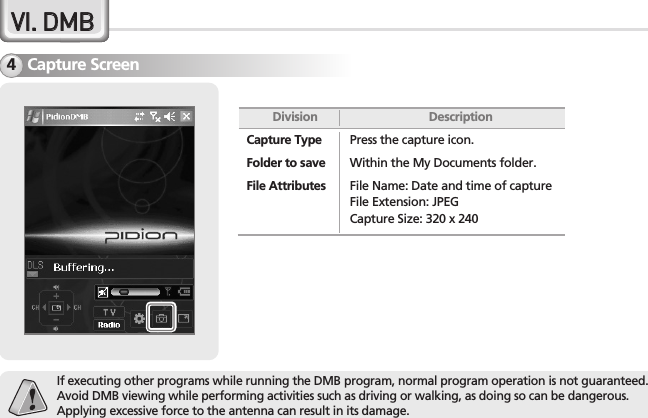
![BM-150R21VVII.. DDMMBBOpening & Closing1If executing other programs while running the DMB program, normal program operation is not guaranteed.Avoid DMB viewing while performing activities such as driving or walking, as doing so can be dangerous.Applying excessive force to the antenna can result in its damage. If opening the camera during DMB operation, the DMBbroadcast automatically ends, as simultaneous running of the camera and DMB function is not possible.You can watch and listen to terrestrial DMB and radio.How to open[Start] [Program] [PidionDMB]How to close1. Closing the program is identical to the process for other programs.(Press the “X” button at the upper right corner of the program window.)2. The program closes when the “OK” button of the keypad is pressed.Fully extend the antenna for reception when viewing terrestrial DMB broadcasts, andwhen not viewing, collapse and insert the antenna within the main unit.For product with DMB option.](https://usermanual.wiki/BLUEBIRD/BM150RE/User-Guide-888029-Page-22.png)
![22 BM-150R Series ManualScreen Configuration2VVII.. DDMMBBIf executing other programs while running the DMB program, normal program operation is not guaranteed.Avoid DMB viewing while performing activities such as driving or walking, as doing so can be dangerous.Applying excessive force to the antenna can result in its damage.[ Vertical Mode ] [ Horizontal Mode ]Upper Display AreaDMB Status DisplayControl Menu Display](https://usermanual.wiki/BLUEBIRD/BM150RE/User-Guide-888029-Page-23.png)
![26 BM-150R Series ManualPersonal Tab1VVIIII.. CChhaannggiinngg YYoouurr SSeettttiinnggss[Start] [Settings] [Personal] [Buttons]Method of changing the shortcut key allocation program:Choose the button that you want to set up, then choosethe program you need from the allocation program below.Programs you can choose: Aside from the basic programs,you can institute personally installed programs.Defining Buttons mode: Front navigation key providesfavorite buttons for quick access or navigation.[Start] [Settings] [Personal] [Menus]Programs that can be used will appear on the check list.The checked icon will appear on the title bar of the startmenu. (You may check up to 7 items.)[ Buttons ] [ Menus ]This is used for setting up the startmenu of the title bar.](https://usermanual.wiki/BLUEBIRD/BM150RE/User-Guide-888029-Page-27.png)
![BM-150R27The skin file (*.TSK) will appear on the background imagesetup after it has been printed into ‘My Documents’.[ Today ]You may choose the skin and thesurrounding screen according toyour taste.[Start] [Settings] [Personal][Today]It will appear on the ‘Today’ screen according to the orderthat it appeared on the screen. This order may be changedby moving it up or down.Choose the categories that appearon the [today] screen.[Start] [Settings] [Personal][Today]](https://usermanual.wiki/BLUEBIRD/BM150RE/User-Guide-888029-Page-28.png)
![28 BM-150R Series ManualSystem Tab2VVIIII.. CChhaannggiinngg YYoouurr SSeettttiinnggss[Start] [Settings] [System][Memory]This shows the current status of thememory (the memory used andremaining).[ Memory ]This indicates the present conditionof the Program Store (Used Capacity,Remaining Capacity), and the Mini SDmemory card that is inserted into thePDA.This indicates the current operatingprogram lists, so you may choose tostop all or part of the programs.](https://usermanual.wiki/BLUEBIRD/BM150RE/User-Guide-888029-Page-29.png)
![BM-150R29[Start] [Settings] [System] [Screen]The screen may be converted to portrait or landscape(righthanded, left-handed). You may readjust the styluspoint by pressing the [Align Screen]. The text size thatappears on the screen may be adjusted in 5 stages.Choose the program that needs to be deleted from thelist and press [Remove] for an automatic deletion.[ Screen ] [ Remove Programs ]This indicates the list of programsinstalled personally or by a group.[Start] [Settings] [System][Remove Programs]](https://usermanual.wiki/BLUEBIRD/BM150RE/User-Guide-888029-Page-30.png)
![NamePower On/OffRecommendedfrequency SelectionFrequency SelectionScreen DescriptionWhen power is on: ONWhen power is off: OFF98.9, 100.7, 106.5Select from 3 recommendedfrequencies. (Select “NOT USE” if noneof the 3 recommended frequencies areto be used.)Use the left/right buttons to select afrequency within the range of 88.1 ~107.9 MHz.30 BM-150R Series ManualSystem Tab2VVIIII.. CChhaannggiinngg YYoouurr SSeettttiinnggss[Start] [Settings][System] [FM Transmitter]The FM Transmitter can beused to listen to music filesin a PDA via a car stereo.[FM Transmitter ]](https://usermanual.wiki/BLUEBIRD/BM150RE/User-Guide-888029-Page-31.png)
![BM-150R31Connections Tab3Turn on Bluetooth : Setup as Use/Non-use.(The removal of this function when not in use mayprolong the life of the battery.)Make this device visible to other devices : Thisenables the search of BM-150R from other devices.It scans thesurroundingBluetooth deviceand conductspairing.[ Bluetooth ]Setup for the communicationof Bluetooth equipment.[Start] [Settings][Connections] [Bluetooth]Bluetooth Setup Method1. On touching the [Add new device...], it willscan the surrounding Bluetooth device.2. Select the device to connect and press[Next].3. Input the pass key to setup for a securedconnection and then choose [Next]. (Checkthe relevant device manuals, as the passkey for each device is different.)4. Check the indicated name and see whetherthe connecting operation is correct. Thenselect [End].5. The process has been successfullycompleted when the model no. and icon ofthe product appears on the screen.The pairing method may be different for each Bluetooth device. Please check the manual.](https://usermanual.wiki/BLUEBIRD/BM150RE/User-Guide-888029-Page-32.png)
![32 BM-150R Series ManualVVIIII.. CChhaannggiinngg YYoouurr SSeettttiinnggssWireless LAN Setup sets up the network card environmentwhich connects it to the surrounding AP through thesetting up of the wireless LAN.[ Wi-Fi ]Set Up Wireless LAN through Wi-Fi.[Start] [Settings][Connections] [Wi-Fi]Set Up Method for Wireless LAN1. If you turn on Wi-Fi from Wireless Manager, it will searchthe AP within the vicinity and show it on the screen.2. Choose the AP from the wireless network list indicatedand press [Connect].- If the AP information cannot be received please set it upmanually.1. Touch [Add New...] from the Configure WirelessNetworks window.2. Input the AP name of [Network name].Then check the AP setup content.3. Press [Finish].4. The AP name will appear on the screen list.5. The process will be completed by pressing [Connect].Connections Tab3](https://usermanual.wiki/BLUEBIRD/BM150RE/User-Guide-888029-Page-33.png)
![BM-150R33[ Wireless Manager ] [ USB-PC Connect ][Start] [Settings] [Connections] [Wireless Manager]By touching [All], you may start 3 functions at the sametime. [Wi-Fi], [Bluetooth], [Phone] may be turned on or offseparately. When turning on these functions, a detailedsetup is possible through the [Settings] that appears on thelower part of the screen. Also, turning off the [Menu]button on the lower right of the screen may be used to setup individual settings.If you decide to uncheck [Enable advanced networkfunctionality], the PC will not synchronize.If ActiveSync does not synchronize after a rightconnection to the PC, please recheck the checking status.You may set up the syncenvironment with the PC.[Start] [Settings][Connections] [USB to PC]](https://usermanual.wiki/BLUEBIRD/BM150RE/User-Guide-888029-Page-34.png)
![36 BM-150R Series ManualCustomer Service3VVIIIIII.. IInnffoorrmmaattiioonnFor any enquires of problems or inconveniences while using theproduct please call +82-2-1588-1380.[ Before Requesting After-Sales Service ]Please backup all the data in your PDA before requestingcustomer service.We do not backup products registered at the customers servicecenter. Therefore, we are not responsible for any damage orloss of data.[ Bluebird Soft Customer Service ]< Hours >Mon.-Fri. : 9 A.M. ~ 6 P.M.(GMT Time: +9 Hours)Sat. : 9 A.M. ~ 2 P.M.We are not open on Sundaysand National Holidays.Phone : +82-2-1588-1380Fax : +82-2-548-0870E-Mail : gcs@bluebird.co.krAddress : Customers ServiceCenter 2nd Floor, 558-8,Sinsa-dong Gangnam-guSeoul, Korea[ Registering for After-Sales Service ]According to company rules, registering for customer service requires prepaid postal or delivery service, or visitation.If you have purchased the product through any store other than Bluebird Soft, you have to be registered as a user in order to requestcustomer service.In order to be registered as a user, call Bluebird Soft Inc. Call center number: +82-2-1588-1380.When you register for customer service, you need to attach the purchase receipt with the product.If you also post your name, contact number, address, and the problematic symptoms, the product will go through a faster and moreefficient examination.You can either ask for service from the company you purchased it from, or talk directly to customers service at Bluebird Soft Inc.Do not intentionally damage the label on the product.Customers may have disadvantages if the label is damaged.If you have to return the product to Bluebird Soft Inc., you need to put it in a safely packed box.We do not warrant you for the damages incurred during transportation. Please use the original box of the product and bubble wrap it.Transport the product safely. Bluebird Soft Inc. is not responsible for any components lost during the transportation.](https://usermanual.wiki/BLUEBIRD/BM150RE/User-Guide-888029-Page-37.png)
![BM-150R37Service Center Information4[ Regulations on Free/Charging Repairs ]Abiding to the Regulations of Customer Damage Repayment, Terms of Component Possession: 3 yearsExchange will be made to the same product. If an exchange for the same product is impossible, then it will be exchanged for a similar product.However, there should be a repayment if the customer does not want an exchange for a similar product. Repayment amount should be theamount written in the receipt. If the price on the receipt is higher than the price, than the usual price will be used as a standard, consideringthat other incidental expenses had been added to the higher price.Type of Customer DamageWhen requesting important repairs within 10 days of purchaseRequesting important repairs within 1 month since purchase dateAn important repair is needed after 1 month of exchangeWhen it is impossible to exchange within 1 monthPossible Repairs The same problem occurs 3 timesThe same problem occurs 4 times5 problems in all different partsImpossible Repairs When the manufacturer has lost the product inwhich the customer has requested for a repairWhen it is impossible to repair within 1 month.Impossible to exchange.Contents of CompensationWithin the Term of Guarantee After term of guaranteeExchange or RepaymentExchange or Repair Free of ChargeExchange or Repair Free of ChargeRepaymentRepair Free of Charge Charged RepairExchange or Repayment Charged RepairExchange or Repayment Exchange after depreciation of the fixed price.Repayment Exchange after adding 10% to the depreciated price of the fix price (the highest price-purchased price).](https://usermanual.wiki/BLUEBIRD/BM150RE/User-Guide-888029-Page-38.png)