BROTHER Mechanical Sewing Manual L0904207
User Manual: BROTHER BROTHER Mechanical Sewing Manual BROTHER Mechanical Sewing Owner's Manual, BROTHER Mechanical Sewing installation guides
Open the PDF directly: View PDF ![]() .
.
Page Count: 96
KNOWING YOUR
SEWING MACHINE
0
SEWING BASICS
®
@
@
UTILITY STITCHES
APPENDIX
Basic Sewing and Mending Machine
Operation Manual
Please visit us at http://soJutions.brother.com where you can get product support and answers to frequently
asked questions (FAQs).
@
"IMPORTANT SAFETY INSTRUCTIONS"
When using the sewing ma(hine, bask safety pre(autions should always be followed,
including the following:
"Read all instructions before using."
DANGER - To reduce the risk of electric shock:
1. The sewing machine should never be left unattended when plugged in. Always unplug this
sewing machine from the electrical outlet immediately after using and before cleaning.
2. Always unplug before changing the light bulb. Replace bulb with same type rated 15 watts.
WARNING - To reduce tile risk of burns, fire, electric shock, or injury to persons:
1. Do not allow this machine to be used as a toy. Close attention is necessary when the sewing
machine is used by or near children.
2. Use this sewing machine only for its intended use as described in this manual. Use only
accessories recommended by the manufacturer as contained in this manual.
3. Never operate this sewing machine if it has a damaged cord or plug, if it is not working properly,
if it has been dropped or damaged, or dropped into water. Return the sewing machine to the
nearest authorized dealer or service center for examination, repair, electrical or mechanical
adjustment.
4. Never operate the sewing machine with any of the air openings blocked. Keep the ventilation
openings of the sewing machine and foot controller free from the accumulation of lint, dust and
loose cloth.
5. Never drop or insert any object into any openings.
6. Do not use this machine outdoors.
7. Do not operate this machine where aerosol (spray) products are being used or where oxygen is
being admillistered,
8, To disconnect, turn the main switch to the symbol "0" position which represents off, then
remove plug from outlet,
9, Do not unplug by pulling on the cord, To unplug, grasp the plug and pull, not the cord,
10, Keep fingers away from all moving parts, Special care is required around the sewing machine
needle,
11, Always use the proper needle plate, The wrong plate can cause the needle to break,
12, Do not use a bent needle,
13, Do not pull or push the fabric while stitching, It may deflect the needle causing it to break,
14, Switch the sewing machine to the off, symbol "0" position when making any adjustments in the
needle area, such as threading the needle, changing the needle, threading the bobbin, or
changing the presser foot.
15. Always unplug the sewing machine from the electrical outlet when removing covers, lubricating,
or when making any other user service adjustments mentioned in this instruction manual.
16. This sewing machine is not intended for use by young children or impaired persons without
supervision.
17. Young children should be supervised to ensure that they do not play with this sewing machine.
"SAVE TH ESE I NSTRUCTIONS"
"This sewing machine is intended for household use."

CONGRATULATIONS ON CHOOSING OUR MACHINE
To fully enjoy all the features, we suggest that you study the manual before using the mac hine.
PLEASE READ BEFORE USING THIS MACHINE
For safe operation
]. Be sure to keep your eye on the needle while sewing. Do not touch the handwheel, thread take-
up lever, needle, or other moving parts.
2. Remember to turn off the power switch and unplug the cord when:
• Operation is completed
• Replacing or removing the needle or any other parts
• A power failure occurs during use
• Maintaining the machine
• Leaving the machine unattended
3. Do not store anything on the foot controller.
4. Plug the machine directly into the wall. Do not use extension cords.
For alonger service life
]. When storing this machine, avoid direct sunlight and high humidity locations. Do not use or
store the machine near a space heater, iron, halogen lamp, or other hot objects.
2. Use only neutral soaps or detergents to clean the case. Benzene, thinner, and scouring powders
can damage the case and machine, and should never be used.
3. Do not drop or hit the machine.
4. Always consult the operation manual when replacing or installing any assemblies, the presser
feet, needle, or other parts to assure correct installation.
For repair or adjustment
In the event a malfunction occurs or adjustment is required, first follow the troubleshooting table in
the back of the operation manual to inspect and adjust the machine yourself. If the problem persists,
please consult your local authorized Brother dealer.
For additional product information and updates, visit our web site at www.brother.com
The contents of this manual and specifications of this product are subject to change without notice.
FOR USERS IN THE UK, EIRE, MALTA AND CYPRUS ONLY
IMPORTANT
• In the event of replacing the plug fuse, use a fuse approved by ASTA to BS ]362, i.e. carrying
the <_ mark, rating as marked on plug.
• Always replace the fuse cover. Never use plugs with the fuse cover omitted.
• If the available electrical outlet is not suitable for the plug supplied with this equipment, you
should contact your authorized dealer to obtain the correct lead.
FOR USERS IN AUSTRALIA AND NEW ZEALAND
This sewing machine is not intended to be used by young children, and assistam e may be required if
used by a person with a disability.

CONTENTS ......................................................................................................................... 3
1. KNOWING YOUR SEWING MACHINE .......................................................... 5
NAMES OF MACHINE PARTS AND THEIR FUNCTIONS .................................................... 5
The main parts ................................................................................................................................................. 5
Needle and presser foot section ...................................................................................................................... 6
Flat bed attachment ......................................................................................................................................... 6
ACCESSORIES ..................................................................................................................... 7
OPTIONAL ACCESSORIES .................................................................................................. 7
USING YOUR SEWING MACHINE ..................................................................................... 8
Power supply precautions ................................................................................................................................ 8
Power supply .................................................................................................................................................... 8
Foot controller .................................................................................................................................................. 9
Steadying the machine ..................................................................................................................................... 9
THREADING THE MACHINE ............................................................................................ 10
Winding the bobbin ........................................................................................................................................ 10
Lower threading ............................................................................................................................................. 11
Upper threading ............................................................................................................................................. 13
Drawing up the lower thread .......................................................................................................................... 14
REPLACING THE NEEDLE ................................................................................................. 15
Needle precautions ........................................................................................................................................ 15
Selecting the needle depending on the thread and fabric types .................................................................... 15
Checking the needle ...................................................................................................................................... 16
Replacing the needle ..................................................................................................................................... 16
Sewing with a twin needle (Option) ................................................................................................................ 18
REPLACING THE PRESSER FOOT ...................................................................................... 19
Replacing the presser foot ............................................................................................................................. 19
Removing the presser foot holder .................................................................................................................. 20
2. SEWING BASICS ........................................................................................... 21
SEWING ............................................................................................................................ 21
General sewing procedure ............................................................................................................................. 21
Selecting stitching .......................................................................................................................................... 22
Starting to sew ............................................................................................................................................... 23
Sewing in reverse ........................................................................................................................................... 23
Thread tension ............................................................................................................................................... 24
USEFUL SEWING TIPS ...................................................................................................... 25
Trial sewing .................................................................................................................................................... 25
Changing the sewing direction ....................................................................................................................... 25
Sewing curves ................................................................................................................................................ 25
Sewing thick fabrics ....................................................................................................................................... 25
Sewing thin fabrics ......................................................................................................................................... 26
Sewing stretch fabrics .................................................................................................................................... 26
Using a free-arm style .................................................................................................................................... 26
3. UTILITY STITCHES ........................................................................................ 27
USEFUL STITCHES ............................................................................................................ 27
Zigzag stitches ............................................................................................................................................... 27
Basic stitching ................................................................................................................................................ 28
Blind hem stitching ......................................................................................................................................... 28
Darning ........................................................................................................................................................... 30
/i
BUTTONHOLE SEWING ................................................................................................... 31
Making the buttonhole .................................................................................................................................... 31
Adjusting buitching stitching ........................................................................................................................... 32
Button sewing ................................................................................................................................................. 33
ZIPPER INSERTION ........................................................................................................... 34
APPLIQUI !, MONOGRAMMING AND EMBROIDERING ................................................. 35
Appliques ....................................................................................................................................................... 35
Monogramming and embroidering ................................................................................................................. 35
DECORATIVE STITCHING ................................................................................................ 37
Gathering ....................................................................................................................................................... 37
Shell tuck stitching ......................................................................................................................................... 37
Elastic stitching .............................................................................................................................................. 38
4. APPENDIX ..................................................................................................... 39
MAINTENANCE ................................................................................................................ 39
Oiling .............................................................................................................................................................. 39
Changing the bulb .......................................................................................................................................... 39
Cleaning the machine surface ........................................................................................................................ 40
Cleaning the shuttle race ............................................................................................................................... 40
Cleaning the feed dogs .................................................................................................................................. 41
Bobbin case tension adjustment .................................................................................................................... 42
TROUBLESHOOTING ....................................................................................................... 43
INDEX ............................................................................................................................... 46
®
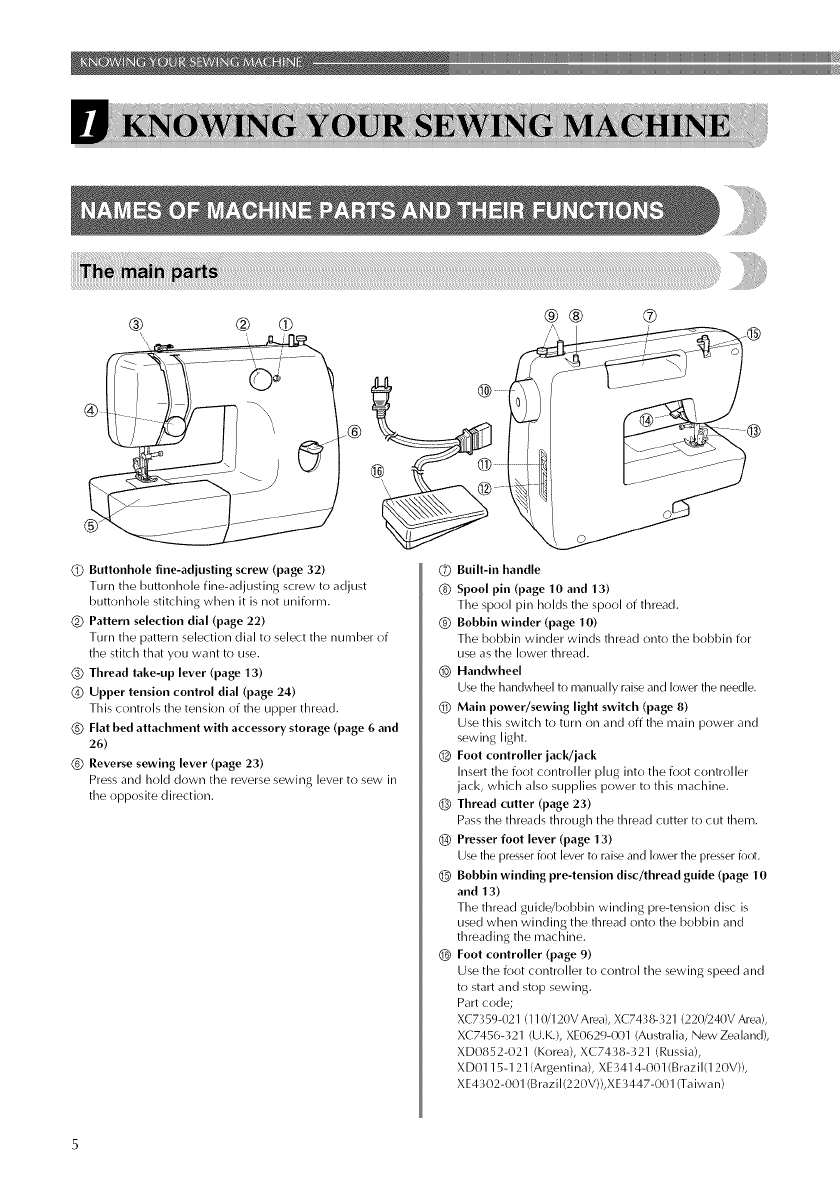
QButtonhole fine-adjusting screw (page 32)
Turn the buttonhole fine-adjusting screw to adjust
buttonhole stitching when it is not unii_m_l.
(_) Pattern selection dial (page 22)
Turn the pattern selection dial to select the nunlber of
the stitch that you want to use.
(_ Thread take-up lever (page 13)
(_ Upper tension control dial (page 24)
This controls the tension of the upper thread.
(_) Flat bed attachment with accessory storage (page 6and
26)
(_ Reverse sewing lever (page 23)
Press and hold down the reverse sewing lever to sew in
the opposite direction.
®® ®
(_ Built-in handle
OSpool pin (page 10 and 13)
The spool pin holds the spool of thread.
0 Bobbin winder (page 10)
The bobbin winder winds thread onto the bobbin for
use as the lower thread.
(_ Handwheel
Use the handwheel to manually raise and lower the needle.
(_ Main power/sewing light switch (page 8)
Use this switch to turn on and off the main power and
sewing light.
OFoot controller lack/lack
Insert the foot controller plug into the l_)ot controller
jack, which also supplies power to this machine.
OThread cutter (page 23)
Pass the threads through the thread cutter to cut them.
OPresser foot lever (page 13)
Use the presser foot lever to raise and lower the presser foot.
O Bobbin winding pre-tension disc/thread guide (page 10
and 13)
The thread guide/bobbin winding pre-tension disc is
used when winding the thread onto the bobbin and
threading the machine.
OFoot controller (page 9)
Use the foot controller to control the sewing speed and
to start and stop sewing.
Part code;
XC7359-021 (1] 0/120V Area), XC7438-321 (220/240V Area),
XC7456-321 (U.K.), XE0629-001 (Australia, New Tealand),
XD0852-021 (Korea), XC7438-321 (Russia),
XD0115-121 (Argentina), XE3414-001 (Brazil(120V)),
XE4302-001 (Brazil(220V)),XE3447-O01 (Taiwan)
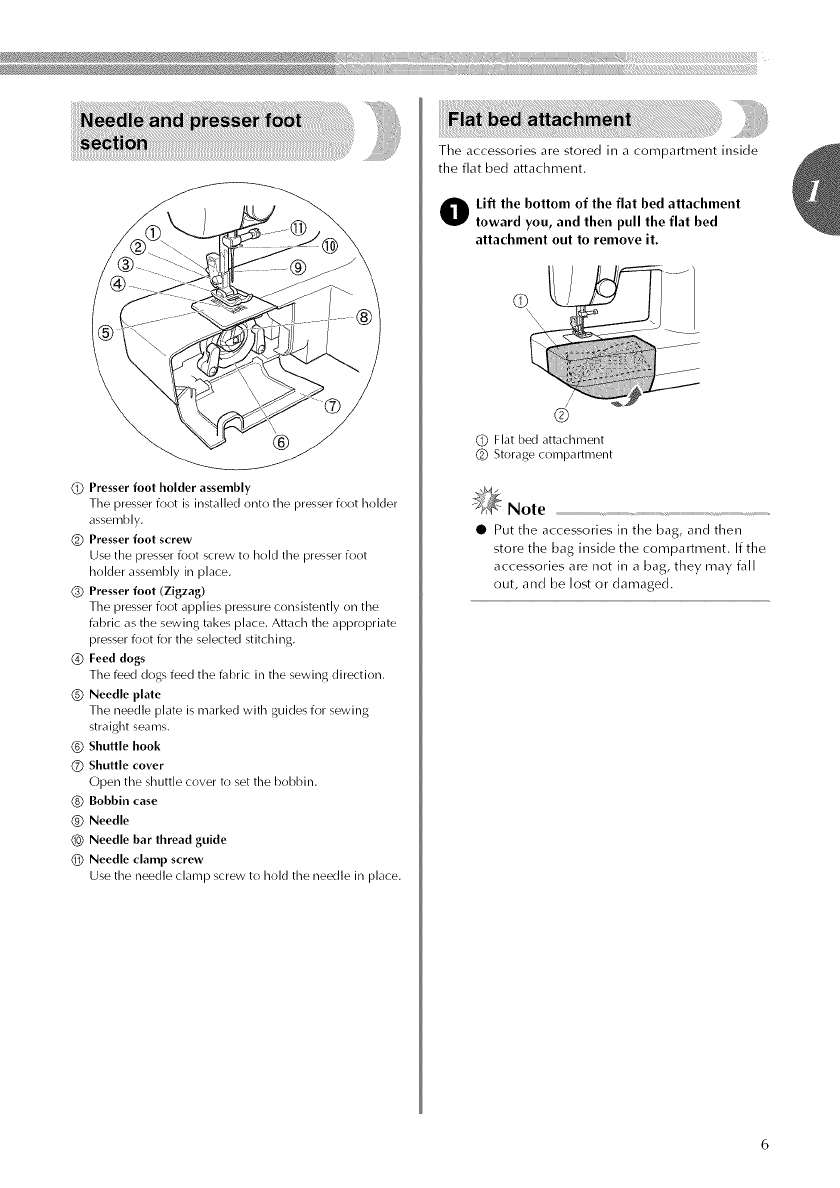
@Presserfoot holder assembly
Tile presser foot is instal led onto the presser foot holder
assembly.
@ Presser foot screw
Use the presser foot screw to hold the presser foot
holder assembly in place.
(_) Presser foot (Zigza 8)
Tile presser foot applies pressure consistently on tile
t\lbric as tile sewing takes place. Attach tile appropriate
presser (oot i_)r tile selected stitching.
@Feed dogs
Tile feed dogs feed tile t\d_ric in tile sewing direction.
@Needle plate
The needle plate is marked with guides for sewing
straight seams.
@ Shuttle hook
(Z) Shuttle cover
Open tile shuttle cover to set tile bobbin.
@Bobbin case
@Needle
(_ Needle bar thread guide
(_) Needle clamp screw
Use tile needle clamp screw to hold tile needle in place.
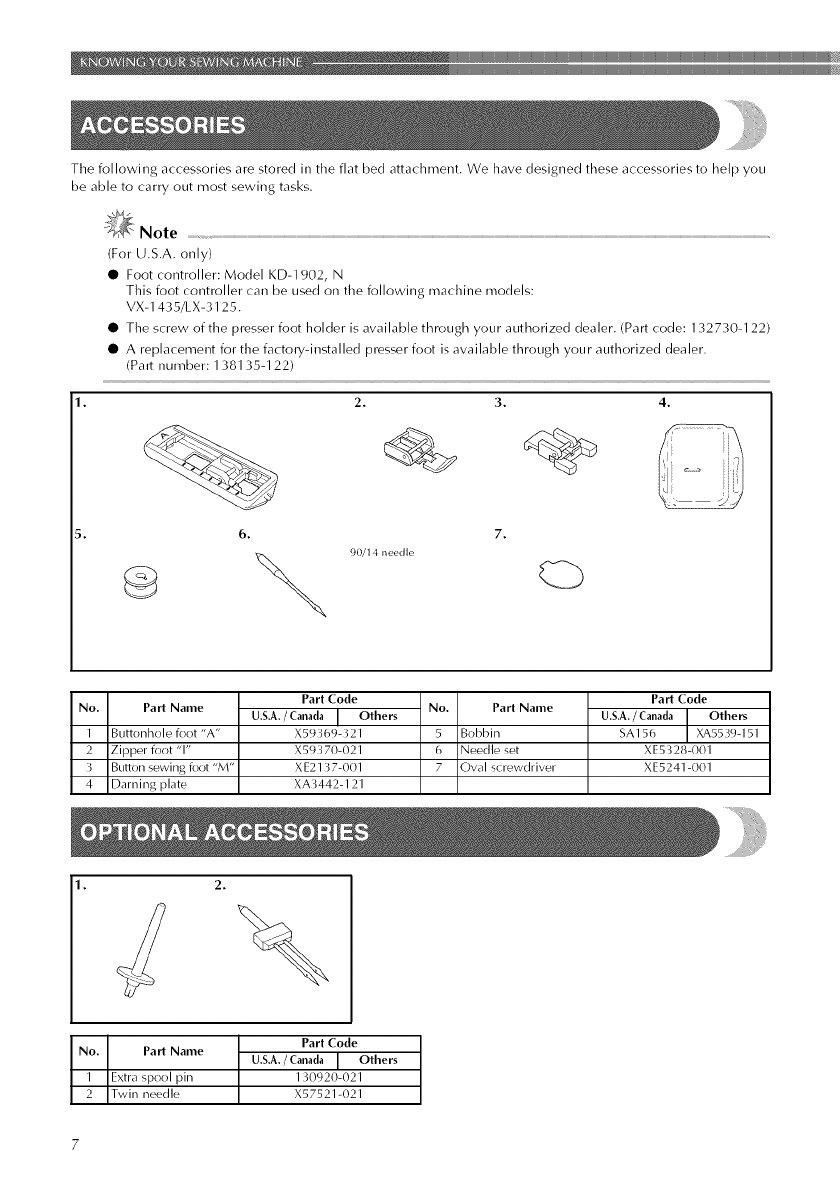
The accessories are stored in a compartment inside
the flat bed attachment.
O ift the bottom of the flat bed attachment
toward you, and then pull the flat bed
attachment out to remove it.
©
/
®
@Flat bed attachment
@Storage compartment
_Note
• Put the accessories in the bag, and then
store the bag inside the compartment. If the
accessories are not in a bag, they may fall
out, and be lost or damaged.
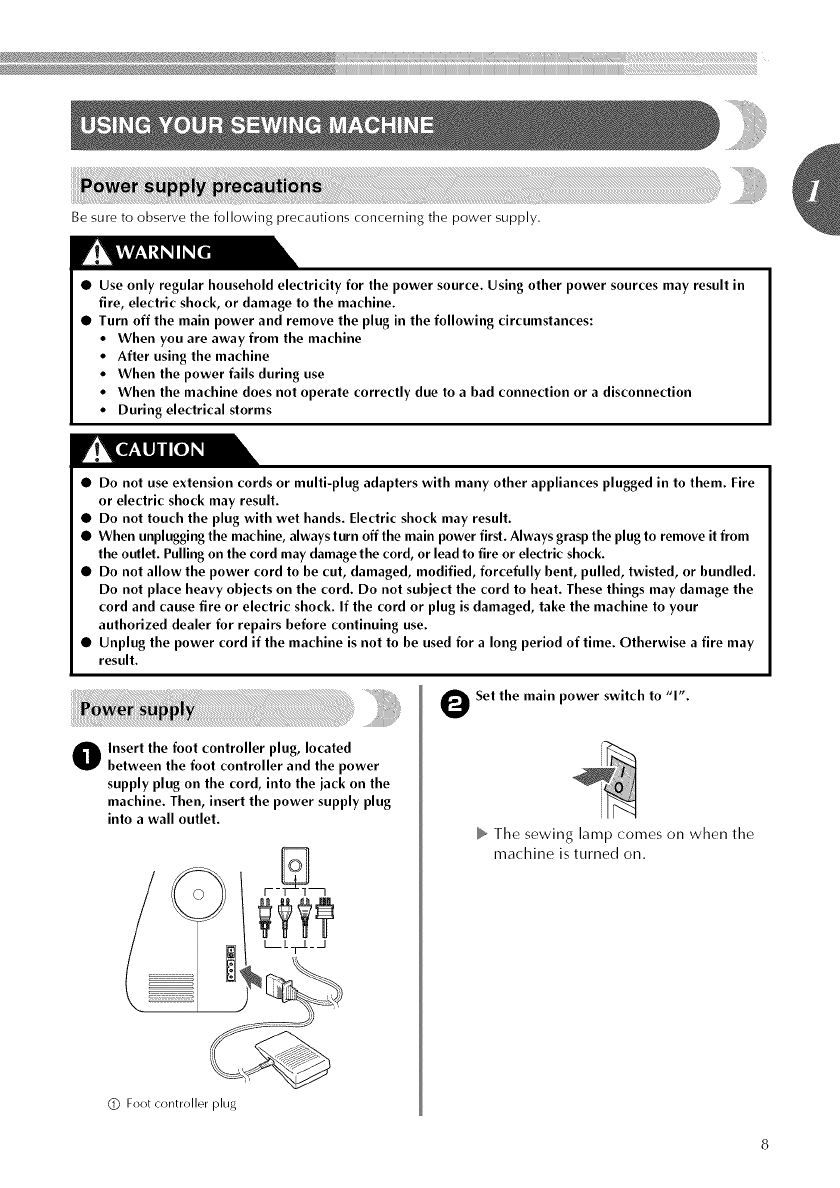
Tile following accessories are stored in tile flat bed attachment, We have designed these accessories to hel I) you
be able to carry out most sewing tasks,
1.
5.
_Note
(For U.S.A. only)
• Foot controller: Model KD-1902, N
This foot controller can be used oil the following machine models:
VX-1435/LX-3125,
• The screw of the presser foot holder is available through your authorized dealer. (Part code: 132730-122)
• A replacement for the factory-installed presser foot is available through your authorized dealer.
(Part number: 138135-122)
2. 3. 4.
6. 7.
_ 90/,4 lie........ Q
No,
1
2
3
4
Part Name
Buttonhole foot "A"
Zipper Rx)t "1"
Butk)n sewing foot "M"
Darning plate
Part Code No. Part Name
U.S.A./Canada I Others
X59369-321 5 Bobbin
X59370-021 6 Needle set
XE2137-001 7 Oval screwdriver
XA3442-121
Part Code
U.S.A./Canada Others
SA156 XA5539-151
XE5328-001
XE5241-001
1.
No,
1
2
Part Name
Extra spool pin
Twin needle
Part Code
U.S.A./Canada I Others
130920-021
X57521-021
Be sure to observe the following precautions concerning the power supply.
•Use only regular household electricity for the power source. Using other power sources may result in
fire, electric shock, or damage to the machine.
•Turn off the main power and remove the plug in the following circumstances:
• When you are away from the machine
•After using the machine
•When the power fails during use
•When the machine does not operate correctly due to a bad connection or a disconnection
•During electrical storms
•Do not use extension cords or multi-plug adapters with many other appliances plugged in to them. Fire
or electric shock may result.
•Do not touch the plug with wet hands. Electric shock may result.
•When unplugging the machine, always turn off the main power first. Always grasp the plug to remove it from
the outlet. Pullingon the cord may damage the cord, or lead to fire or electric shock.
•Do not allow the power cord to be cut, damaged, modified, forcefully bent, pulled, twisted, or bundled.
Do not place heavy objects on the cord. Do not subject the cord to heat. These things may damage the
cord and cause fire or electric shock. If the cord or plug is damaged, take the machine to your
authorized dealer for repairs before continuing use.
•Unplug the power cord if the machine is not to be used for a long period of time. Otherwise a fire may
result.
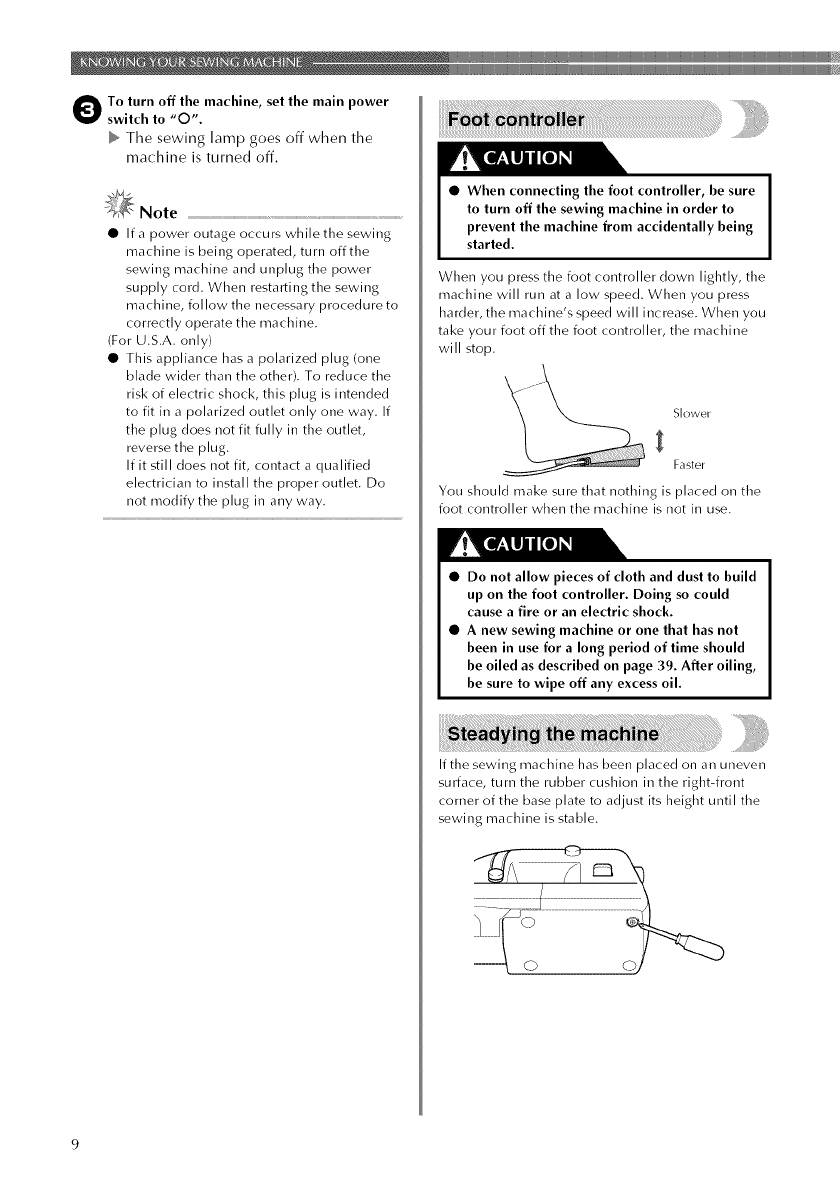
Onsert the foot controller plug, located
between the foot controller and the power
supply plug on the cord, into the jack on the
machine. Then, insert the power supply plug
into a wall outlet.
(]]) Foot controller plug
OSet the main power switch to "1".
The sewing lamp comes on when the
machine is turned on.
Oo turn off the machine, set the main power
switch to "O".
Tile sewing lamp goes off when tile
machine is turned off.
_Note
•If a power outage occurs while the sewing
machine is being operated, turn off the
sewing machine and unplug the power
supply cord. When restarting the sewing
machine, follow the necessary procedure to
correctly operate the machine.
(For U.S.A. only)
• This appliance has a polarized plug (one
blade wider than the other). To reduce the
risk of electric shock, this plug is intended
to fit in a polarized outlet only one way. If
the plug does not fit fully in the outlet,
reverse the plug.
If it ,,till does not fit, contact a qualified
electrician to install the proper outlet. Do
not modify the plug in any way.
• When connecting the foot controller, be sure
to turn off the sewing machine in order to
prevent the machine from accidentally being
started.
When you press the foot controller down lightly, the
machine will run at a low speed. When you press
harder, the machine's speed will increase. When you
take your foot off the foot controller, the machine
will stop.
Slower
Faster
You should make sure that nothing is placed on the
foot controller when the machine is not in use.
• Do not allow pieces of cloth and dust to build
up on the foot controller. Doing so could
cause a fire or an electric shock.
•A new sewing machine or one that has not
been in use for a long period of time should
be oiled as described on page 39. After oiling,
be sure to wipe off any excess oil.
If the sewing machine has been placed on an uneven
surface, turn the rubber cushion in the right-front
comer of the base plate to adjust its height until the
sewing machine is stable.
i_F_i_i?_i_i_i_i_i_i_i_i_i_i_i_i_i_i_i_i_i_i_i_i_i_i_i_!_ii_i_!_!_¸i¸I¸!i!_ili¸i¸iiii_ii_i¸!I!¸iiii¸ii!_!IiiI¸i¸I¸!i!_ili¸i¸iiii_ii_i¸!I!¸iiii¸ii!_!IiiI¸i¸I¸!i!_ili¸i¸iiii_ii_i¸!I!¸iiii¸ii!_!IiiI¸i¸I¸!i!_ili¸i¸ilii_ii_ilI
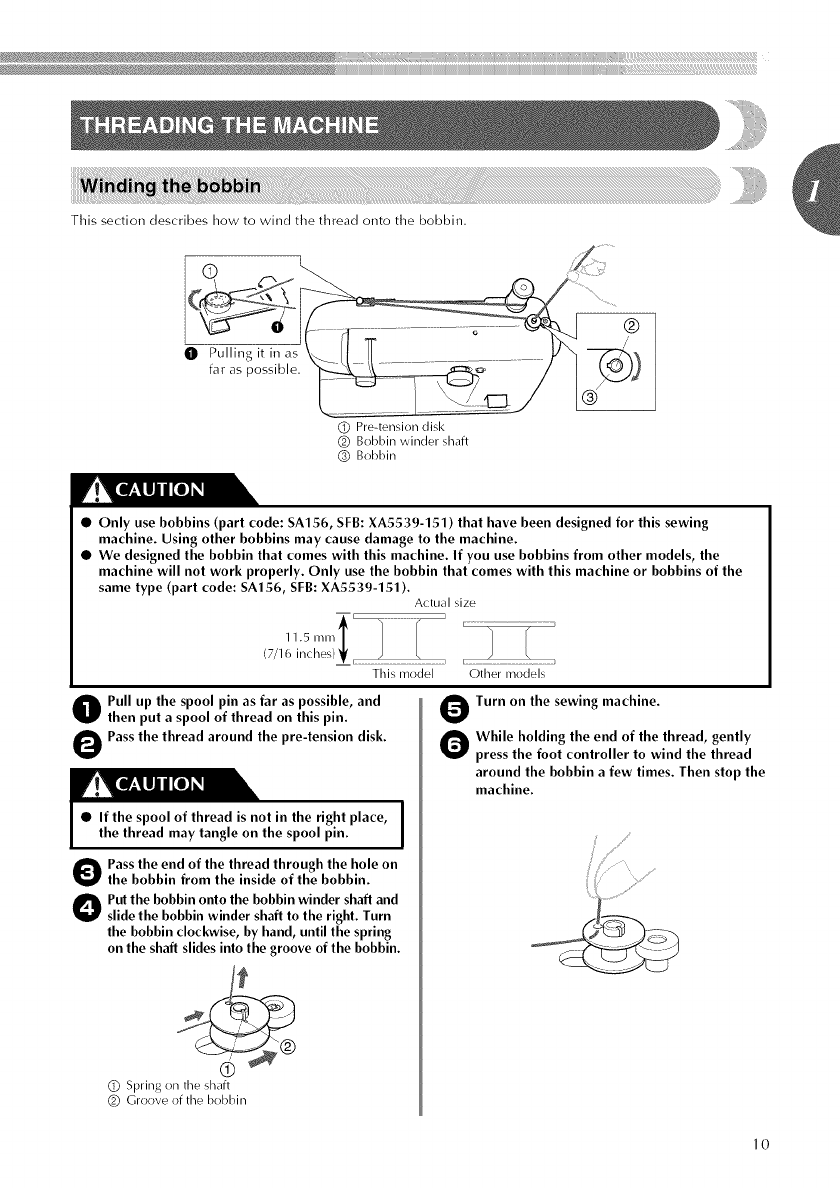
Thissectiondescribeshowtowindthethreadontothebobbin,
O Pullingitinas
faraspossible,
(!) Pre-tension disk
(_) Bobbin winder shaft
(_) Bobbin
• Only use bobbins (part code: SA156, SFB: XA5539-151) that have been designed for this sewing
machine. Using other bobbins may cause damage to the machine.
•We designed the bobbin that comes with this machine. If you use bobbins from other models, the
machine will not work properly. Only use the bobbin that comes with this machine or bobbins of the
same type (part code: SA156, SFB: XA5539-151). Actual size
11.5 ......t .....................
(7/16 inches> "_ _ k ..................................................................
This model Other models
O Pull up the spool pin as far as possible, and
then put a spool of thread on this pin.
OPass the thread around the pre-tension disk.
•If the spool of thread is not in the right place,
the thread may tangle on the spool pin.
O ass the end of the thread through the hole on
the bobbin from the inside of the bobbin.
Out the bobbin onto the bobbin winder shaft and
slide the bobbin winder shaft to the right. Turn
the bobbin clockwise, by hand, until the spring
on the shaft slides into the groove of the bobbin.
@ Spring on the shaft
(_) Groove of the bobbin
Turn on the sewing machine.
Ohile holding the end of the thread, gently
press the foot controller to wind the thread
around the bobbin a few times. Then stop the
machine.
10
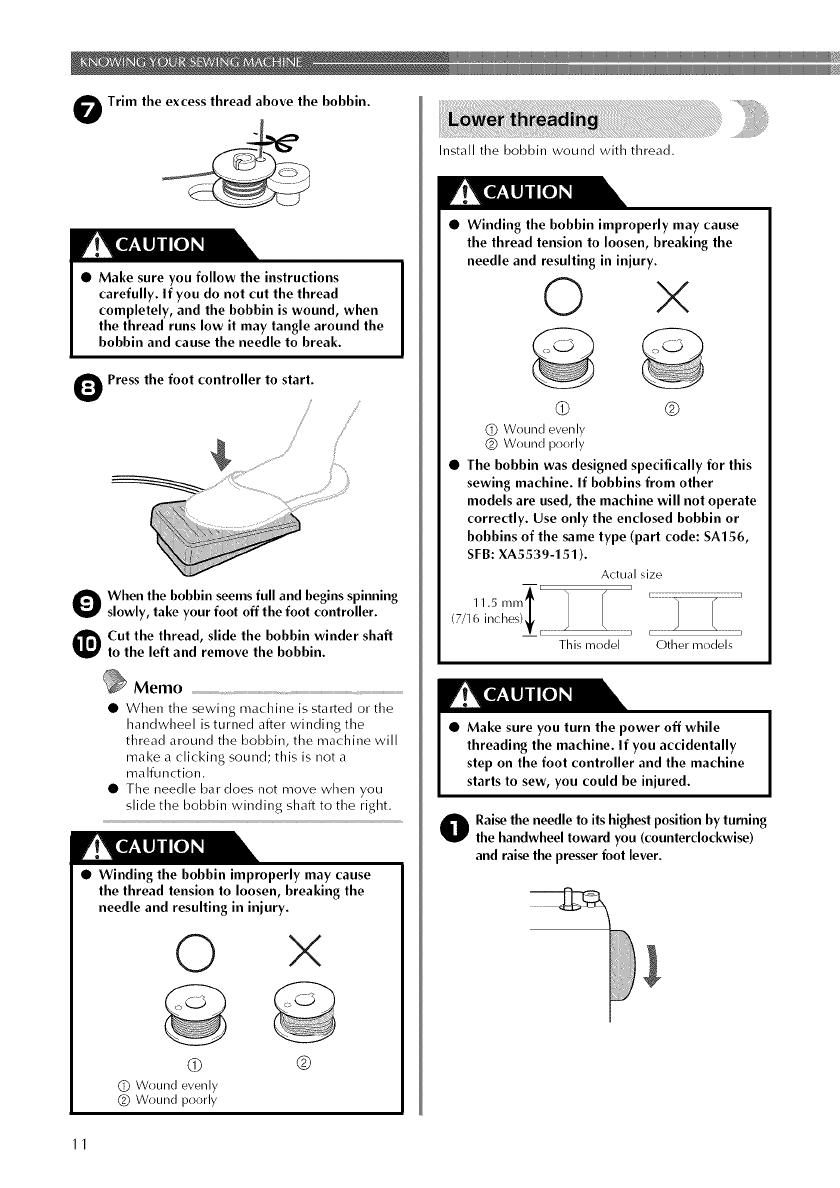
OTrim the excess thread above the bobbin.
•Make sure you follow the instructions
carefully. If you do not cut the thread
completely, and the bobbin is wound, when
the thread runs low it may tangle around the
bobbin and cause the needle to break.
Press the foot controller to start.
....¢'
/
Ohen the bobbin seemsfull and begins spinning
slowly, take your foot off the foot controller.
Cut the thread, slide the bobbin winder shaft
to the left and remove the bobbin.
Memo ..............................................................................................................................................................................................................
• VVhen tile sewing machine is started or tile
handwheel is turned after winding the
thread around the bobbin, the machine will
make a clicking sound; this is not a
malfunction.
• The needle bar does not move when you
slide the bobbin winding shaft to the right,
•Winding the bobbin improperly may cause
the thread tension to loosen, breaking the
needle and resulting in injury.
© X
©
(b ®
(_) Wound evenly
(_) Wound poorly
Install the bobbin wound with thread.
• Winding the bobbin improperly may cause
the thread tension to loosen, breaking the
needle and resulting in injury.
© ×
©
0 ®
(_) Wound evenly
(_) Wound poorly
•The bobbin was designed specifically for this
sewing machine. If bobbins from other
models are used, the machine will not operate
correctly. Use only the enclosed bobbin or
bobbins of the same type (part code: SA156,
SFB: XA5539-151).
Actual size
F]
] ]. 5 Illlll f
(7/1 _, ..........................
This model Other models
•Make sure you turn the power off while
threading the machine. If you accidentally
step on the foot controller and the machine
starts to sew, you could be injured.
Oaise the needle to its highestposition by turning
the handwheel toward you (counterclockwise)
and raise the presser foot lever.
11
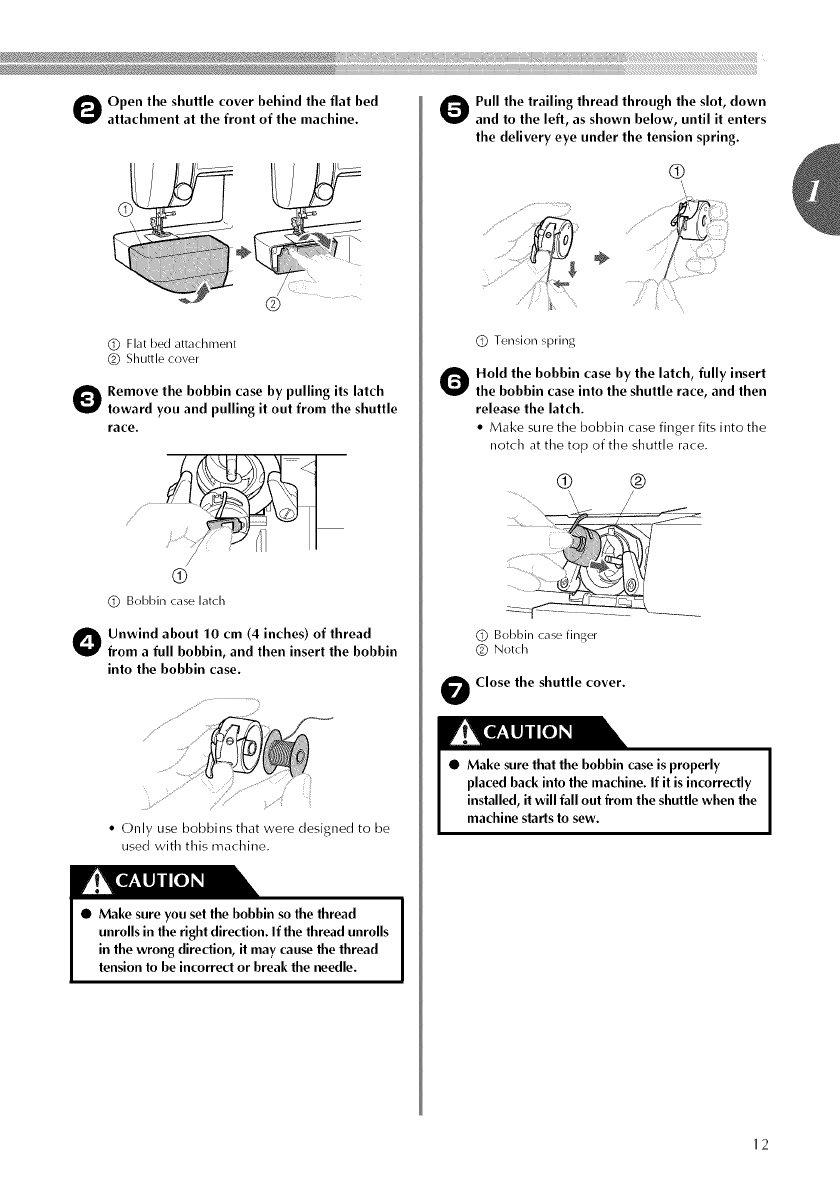
Open the shuttle cover behind the flat bed
attachment at the front of the machine.
®
(]]) Flat bed attachment
(_) Shuttle cover
ORemove the bobbin case by pulling its latch
toward you and pulling it out from the shuttle
race.
(_) Bobbin case latch
Onwind about 10 cm (4 inches) of thread
from a full bobbin, and then insert the bobbin
into the bobbin case.
• Only use bobbins that were designed to be
used with this machine,
•Make sure you set the bobbin so the thread
unrolls in the right direction. If the thread unrolls
in the wrong direction, it may cause the thread
tension to be incorrect or break the needle.
O Pull the trailing thread through the slot, down
and to the left, as shown below, until it enters
the delivery eye under the tension spring.
®
÷
Q:) Tension spring
Oold the bobbin case by the latch, fully insert
the bobbin case into the shuttle race, and then
release the latch.
• Make sure the bobbin case finger fits into file
notch at tile top of tile shuttle race.
(_) Bobbin case finger
(_) Notch
OClose the shuttle cover.
•Make sure that the bobbin case is properly
placed back into the machine. If it is incorrectly
installed, it will fall out from the shuttle when the
machine starts to sew.
12

Settileupperthreadantithreacltheneedle.
@
@ Spool pin
@ Thread guide (rear)
@ Thread guide (front)
@ Thread take-up lever
•Make sure you thread the machine properly. Otherwise, the thread could tangle and break the needle.
Raise the presser foot using the presser foot
lever.
@Presser foot level
Raise the needle by turning the handwheel
toward you (counterclockwise) to raise the
thread take-up lever to its highest position.
• If tile needle is not correctly raised, tile
sewing machine can not be threaded. Be
sure to turn tile handwheel before threading
tile sewing machine.
O Pull up the spool pin as far as possible, and
then put a spool of thread on this pin.
O Feed the upper thread through both thread
guides: the rear one first, then the front one.
Oull the thread down and around the upper
tension control dial from the right to the left
so the thread picks up the thread check
spring.
@
@Upper tension control dial
@Thread check spring
13
i_i_l_i_i_iii_l:iii_iiiii_ii_iiiiii_ii_iiiiii_ii_iiiiii@_ii%i_iiiil_i_ii_iii_iii_iii_!iii!_i_i_i_ii_/_i_lii_il_i_i_ililillllllllllllllllllllllllllllllllll:l_!_liiiillliiiiiiiiiiiiiiiiiiiiiiiiiiiiiiiiil_ll_llllllilliililllilliillll_ll_lllillllllllllllllilllill!lllllllil_
iiiiiiiiiii_iiiiii_illiiiiiiiillillillillillillillillillillillillillillii=_ii_iiiiiiiii_iiiiiiiiii/i/i/I/_________iiiiii/iiii_iii/i/i///______________iiiii!iii!li!iiil!ii!iill!illiiii!ii_!ii!!iii!iiili_!i!!iiiiii!i_i!ii!!iii!iiili_!i!!iiiiii!i_i!ii!!iii!iiiiiiiil_ili!iiiiiiiiii
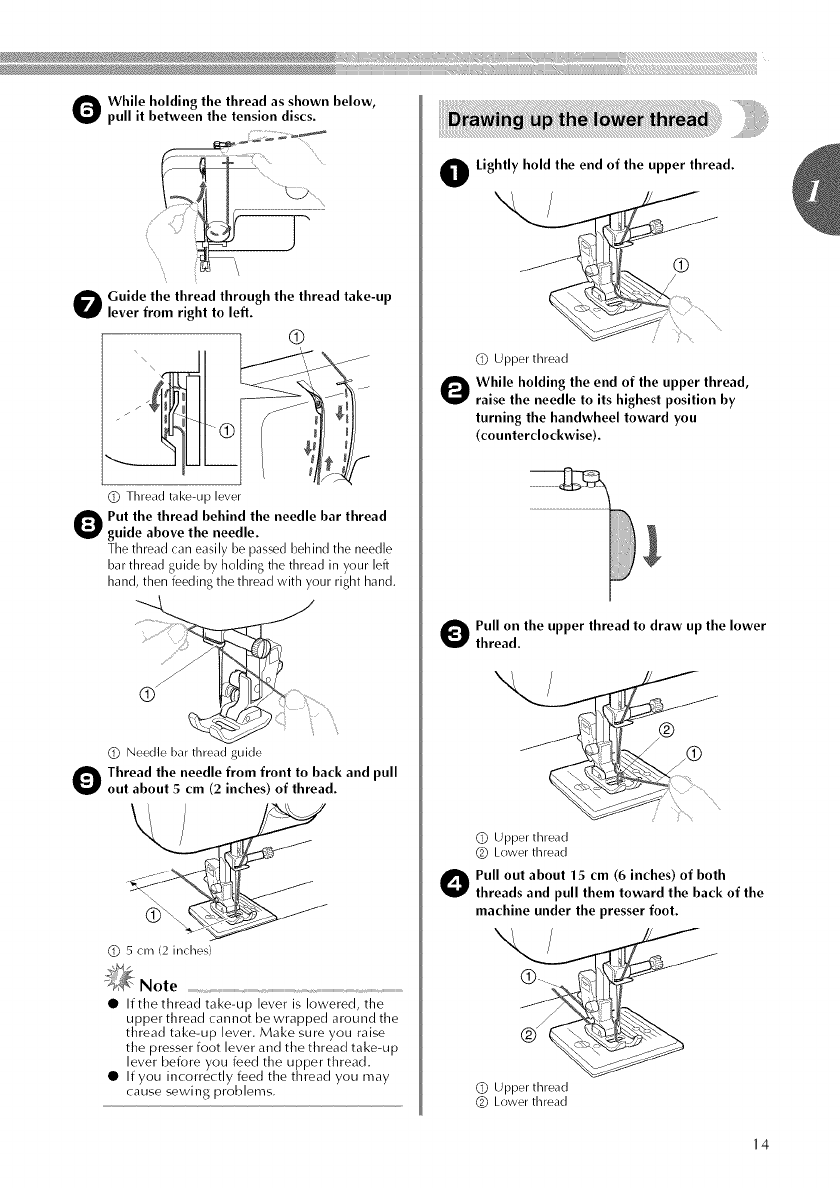
Ohile holding the thread as shown below,
pull it between the tension discs.
Ouide the thread through the thread take-up
lever from right to left.
@
./
(_) Thread take-up lever
Put the thread behind the needle bar thread
guide above the needle.
The thread _an easily be passed behind the needle
bar thread guide by holding the thread in your left
hand, then feeding the thread with your right hand.
(_) Needle bar thread guide
Ohread the needle from front to back and pull
out about 5cm (2 inches) of thread.
\
(_) 5 cm (2 inches)
Note
•If the thread take-up lever is lowered, the
upper thread cannot be wrapped around the
thread take-up lever, Make sure you raise
the presser foot lever and the thread take-up
lever before you feed the upper thread.
• If you incorrectly feed the threacl you may
cause sewing problems,
OLightly hold the end of the upperthread.
\
®
/
\
(_) Upper thread
Ohile holding the end of the upper thread,
raise the needle to its highest position by
turning the handwheel toward you
(counterclockwise).
1
Oull on the upper thread to draw up the lower
thread.
\
%%
• ?%%
(_) Upper thread
(_) Lower thread
OPull out about 15 cm (6 inches) of both
threads and pull them toward the back of the
machine under the presser foot.
(_)- -.
@ Upper thread
(_) Lower thread
14
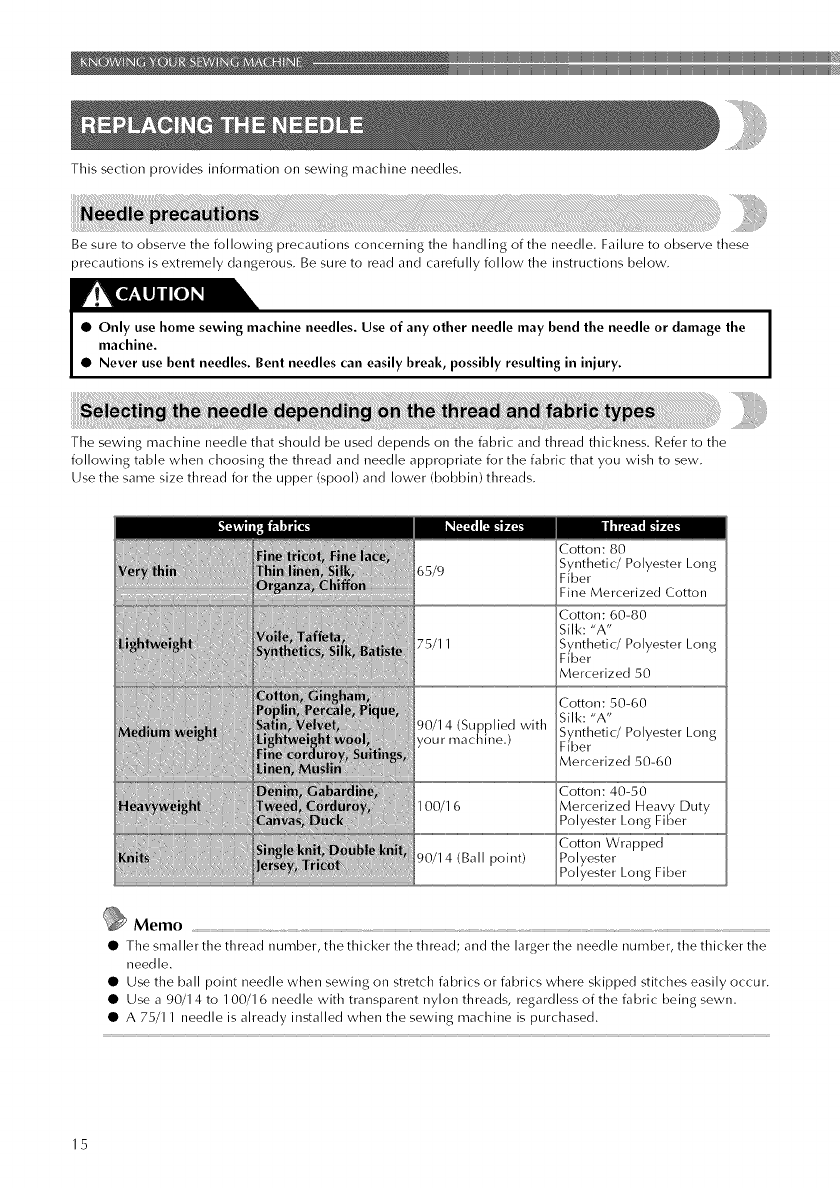
Thissectionprovidesinformationonsewingmachineneedles.
Besuretoobservethefollowingprecautionsconcerningthehandlingoftheneedle.Failuretoobservethese
precautionsisextremelydangerous.Besuretoreadandcarefullyfollowtheinstructionsbelow.
•Only use home sewing machine needles. Use of any other needle may bend the needle or damage the
machine.
•Never use bent needles. Bent needles can easily break, possibly resulting in injury.
The sewing machine needle that should be used depends on the fabric and thread thickness. Refer to the
following table when choosing the thread and needle appropriate for the fabric that you wish to sew.
Use the same size thread for the upper (spool) and lower (bobbin) threads.
90/14 (Ball point) Cotton Wrapped
Polyester
Polyester Long Fiber
Memo
• The smaller the thread number, thethicker the thread; and the larger the needle number, the thicker the
needle.
• Use the ball point needle when sewing on stretch fabrics or fabrics where skipped stitches easily occur.
• Use a 90/14 to 100/16 needle with transparent nylon threads, regardless of the fabric being sewn.
• A 75/11 needle is already installed when the sewing machine is purchased.
15
l__dli_i_1iiiii_i_i_iiii_iiiiiiiIiIiIII_iIiIII_i_iIiIi_iilillllli!i_i_ii_i;i_i_iiiIiIiII_i_iiiiii_i_illlll!lilliilll!lillllllililllli_i_ii!!;ii_ii!iiiiii!!iiiiii!i_i_ii!!;ii_ii!iiiiii!!iiiiii!i_i_iii!ili;i_ii!iliiiiiil_iii:iill_ii!i
•The appropriate fabric, thread and needle
combinations are shown in the table on the
previous page. If the combination of the
fabric, thread and needle is not correct,
particularly when sewing thick fabrics (such
as denim) with thin needles (such as 65/9 to
75/11), the needle may bend or break. In
addition, the stitching may be uneven or
puckered or there may be skipped stitches.
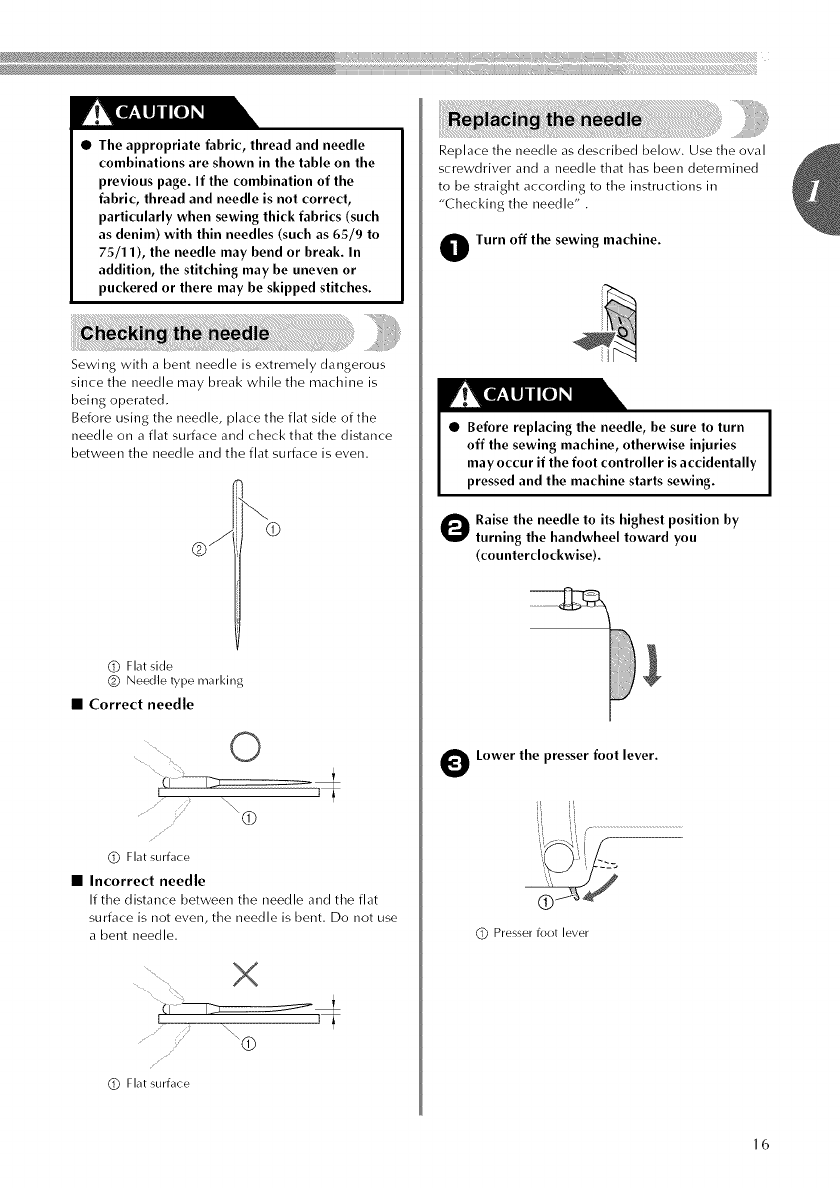
Sewing with a bent needle is extremely dangerous
since the needle may break while the machine is
being operated.
Before using the needle, place the flat side of the
needle on a flat surface and check that the distance
between the needle and the flat surface is even.
@ Flat side
@ Needle type marking
• Correct needle
@ Flat surface
• Incorrect needle
If the distance between the needle and the flat
surface is not even, the needle is bent. Do not use
a bent needle.
•%
%
@ Flat surface
Replace the needle as described below. Use the oval
screwdriver and a needle that has been determined
to be straight according to the instructions in
"Checking the needle" .
OTurn off the sewing machine.
•Before replacing the needle, be sure to turn
off the sewing machine, otherwise injuries
may occur if the foot controller is accidentally
pressed and the machine starts sewing.
Raise the needle to its highest position by
turning the handwheel toward you
(counterclockwise).
OLower the presser foot lever.
@Presser foot lever
16

Oold the needle with your left hand, and then
use a oval screwdriver to turn the needle
clamp screw counterclockwise to remove the
needle.
_Note
• The needle can be removed lay simply
loosening the needle clamp screw about
one turn, (If the needle clamp screw is
loosened too much, the needle clarnp
(which holds the needle)may fall off.
Therefore, do not loosen the needle clamp
screw too much.)
/
©
(]) Oval screwdriver
(_) Needle clamp screw
• Do not apply strong force when loosening or
tightening tire needle clamp screw,
otherwise certain parts of tire sewing
machine may be damaged,
O With the flat side of the needle toward the
rear of the machine, insert the needle until it
touches the needle stopper.
(]) Needle stopper
O While holding the needle with your left hand,
use the oval screwdriver to tighten the needle
clamp screw by turning it clockwise.
Install tire twin needle in tire same way.
•Be sure to insert the needle until it touches
the needle stopper and securely tighten the
needle clamp screw with the oval
screwdriver, otherwise the needle may break
or damage may result.
•Installing the needle clamp
If tire needle clamp is removed, follow tire
procedure below to attach it to the needle bar.
O s seen from the front of the machine, slide
the needle clamp onto the needle bar so that
the needle clamp screw is on the right side
and the needle bar thread guide is at the
bottom.
/
t
® ©
(]) Needle clamp screw
_) Needle bar thread guide
_) Needle bar
Olign the bottom edge of the needle holder
with the end of the needle bar, and then
tighten the needle clamp screw.
©
(]) Needle bar
(_) Needle holder
_) Needle clamp screw
(]) Align
17
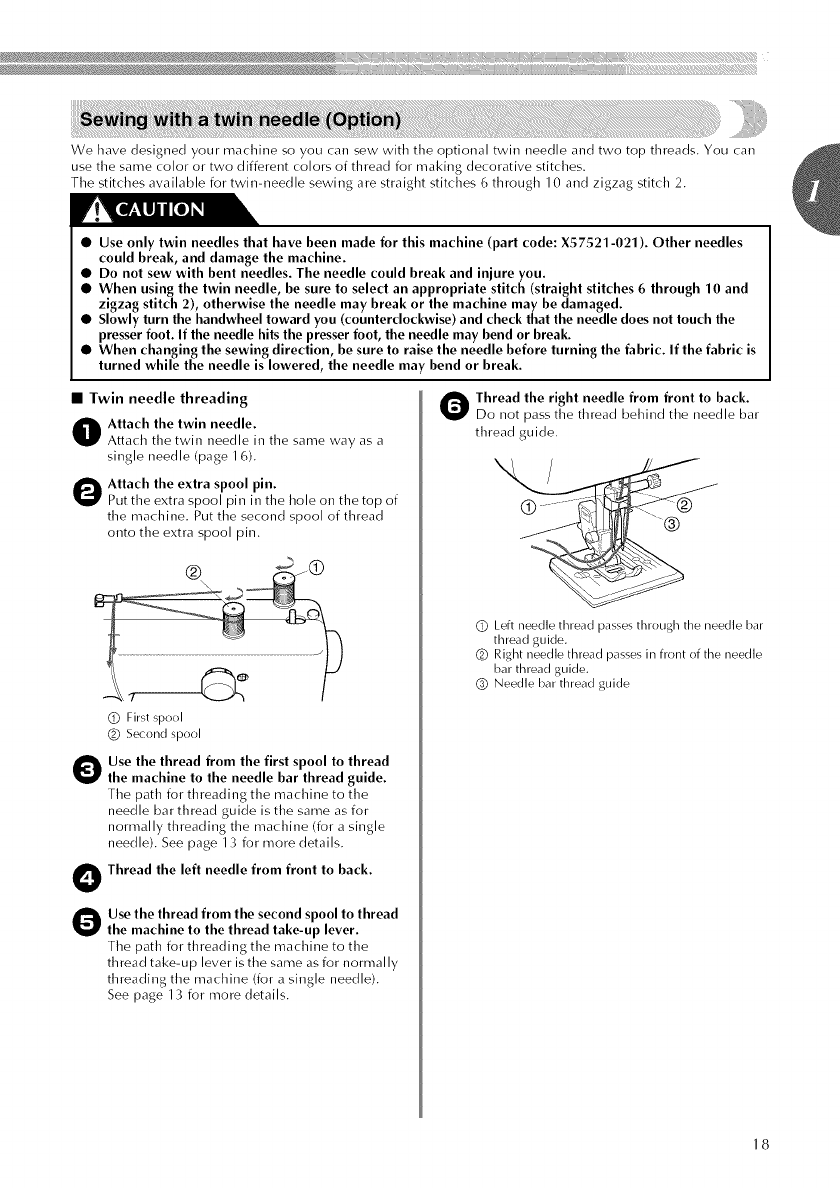
Wehavedesignedyourmachinesoyoucansewwiththeoptionaltwinneedleandtwotopthreads,Youcan
usethesamecolorortwodifferentcolorsofthreadformakingdecorativestitches.
Thestitchesavailablefortwin-needlesewingarestraightstitches6through10andzigzagstitch2,
•Use only twin needles that have been made for this machine (part code: X57521-021). Other needles
could break, and damage the machine.
•Do not sew with bent needles. The needle could break and injure you.
•When using the twin needle, be sure to select an appropriate stitch (straight stitches 6 through 10 and
zigzag stitch 2), otherwise the needle may break or the machine may be damaged.
•Slowly turn the handwheel toward you (counterclockwise) and check that the needle does not touch the
presser foot. If the needle hits the presser foot, the needle may bend or break.
•When changing the sewing direction, be sure to raise the needle before turning the fabric. If the fabric is
turned while the needle is lowered, the needle may bend or break.
•Twin needle threading
O ttach the twin needle.
Attach the twin needle in the same way as a
single needle (page 16),
O Attach the extra spool pin.
Put the extra spool pin in the hole on the top of
the machine. Put the second spool of thread
onto the extra spool pin,
(_) First spool
(_) Second spool
O
O
Use the thread from the first spool to thread
the machine to the needle bar thread guide.
The path for threading the machine to the
needle bar thread guide is the sarne as for
normally threading the machine (for a single
needle), See page 13 for more details,
Thread the left needle from front to back.
Osethe thread from the second spool to thread
the machine to the thread take-up lever.
The path for threading the machine to the
thread take-up lever is the same as for normally
threading the machine (for a single needle).
See page 13 for more details.
O hread the right needle from front to back.
Do not pass the thread behind the needle bar
thread guide.
Q Left needle thread passes through the needle bar
thread guide.
(_) Right needle thread passes in front of the needle
bar thread guide.
(_ Needle bar thread guide
18
•Always turn off the power before you change the presser foot. If you leave the power on and step on the
controller, the machine will start and you may be injured.
•Always use the correct presser foot for the stitch pattern you have chosen. If you use the wrong presser
foot, the needle may strike the presser foot and bend or break, and may cause injury.
•Only use presser feet that have been designed to be used with this machine. Using other any presser feet
may cause an accident or injury.
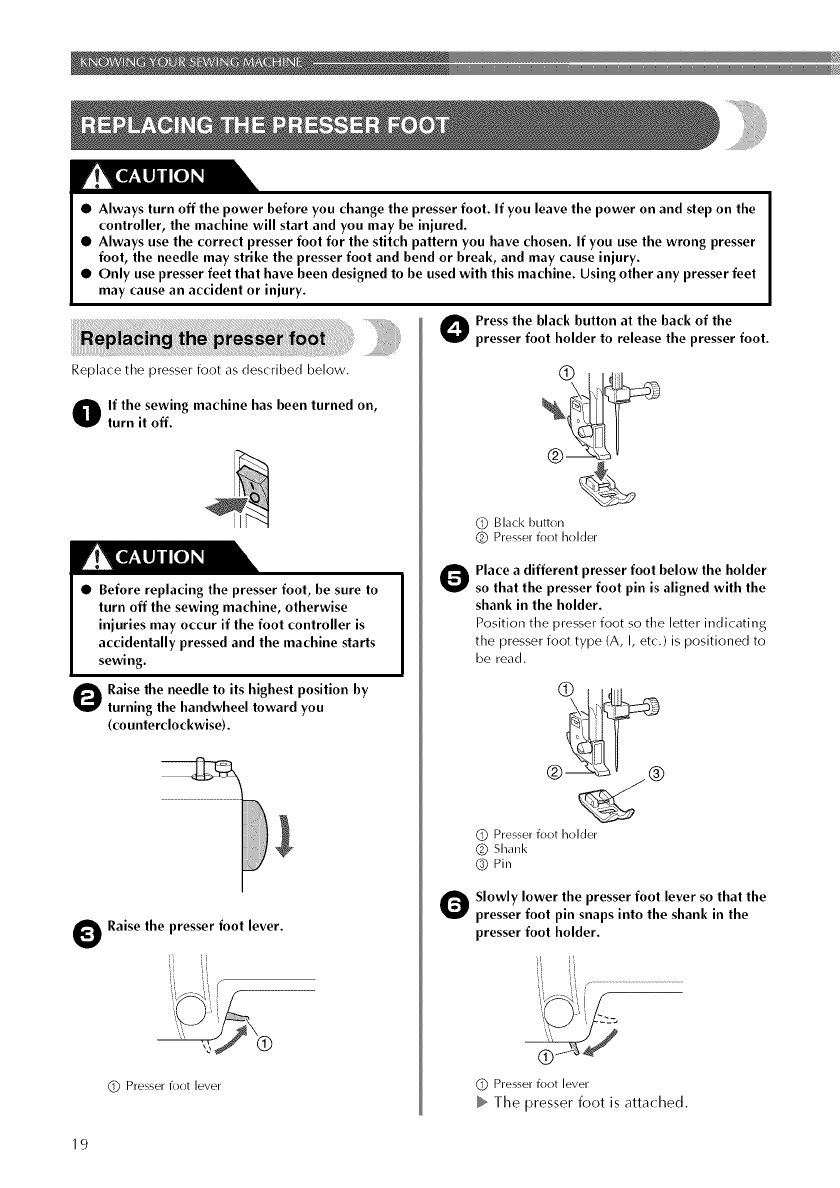
Replace the presser foot as described below.
O f the sewing machine has been turned on,
turn it off.
•Before replacing the presser foot, be sure to
turn off the sewing machine, otherwise
injuries may occur if the foot controller is
accidentally pressed and the machine starts
sewing.
Raise the needle to its highest position by
turning the handwheel toward you
(counterclockwise).
O Raise the presser foot lever.
@Presser foot level
O Press the black button at the back of the
presser foot holder to release the presser foot.
@ Black button
@ Presser foot holder
O lace a different presser foot below the holder
so that the presser foot pin is aligned with the
shank in the holder.
Position the presser foot so the letter indicating
tile presser foot type (A, I, etc.) is positioned to
be read.
@ Presser foot holder
@ Shank
@ Pin
Olowly lower the presser foot lever so that the
presser foot pin snaps into the shank in the
presser foot holder.
ii il
@Presserfoot lever
The presser foot is attached.
19
il#iiiii!/i i%ii_iiiiiiiiiiiiiiiiiii%ii#iii#iii#iii#iii#iii#iii#iii#iii#iiiii!iiiiii!i!i¸i!i¸iiii¸ii!_!:iii¸ii!iiiii¸i¸iiii::i!;i!i¸iiii¸ii!_!:iii¸ii!iiiii¸i¸i¸i¸i¸i¸i¸i¸iiii::i!;i!i¸iiii¸ii!_!:iii¸ii!iiiii¸i¸iiii::i!;i!i¸iiii¸ii!_!:iii¸iii!iiii_i
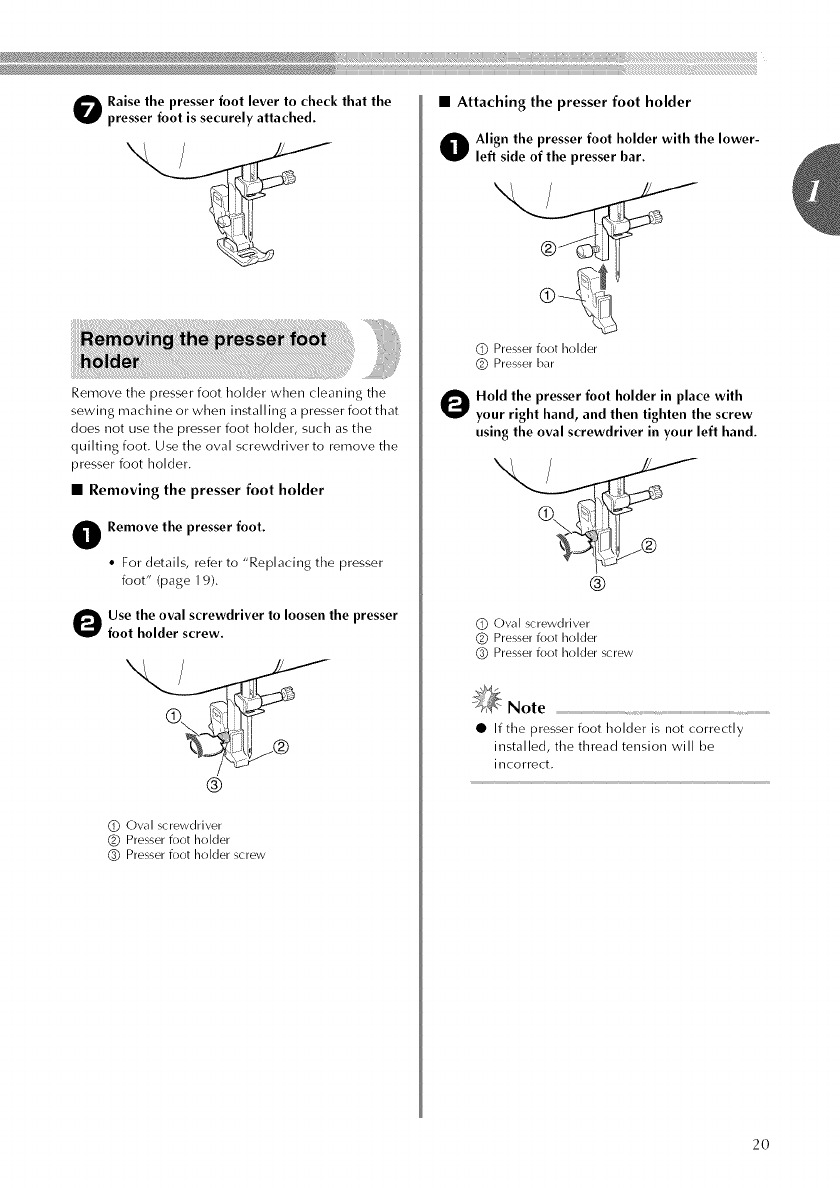
Oaise the presser foot lever to check that the
presser foot is securely attached.
Remove the presser foot holder when cleaning the
sewing machine or when inst,_lling ,_presser foot that
does not use the presser foot holder, such as the
quilting foot. Use the oval screwdriver to remove the
presser foot holder,
•Removing the presser foot holder
ORemove the presser foot.
• For details, refer to "Replacing the presser
foot" (page 19).
O se the oval screwdriver to loosen the presser
foot holder screw.
®
@ Oval screwdriver
@ Presser foot holder
@Presser foot holder screw
•Attaching the presser foot holder
Olign the presser foot holder with the lower-
left side of the presser bar.
@Presserfoot holder
@Presser bar
O Hold the presser foot holder in place with
your right hand, and then tighten the screw
using the oval screwdriver in your left hand.
%
®
@ Oval screwdriver
@ Presser foot holder
@Presser foot holder screw
_Note
•If the presser foot holder is not correctly
installed, the thread tension will be
incorrect.
2O
Basicsewingoperationsaredescribedbelow.
Beforeoperatingtilesewingmachine,readtilefollowingprecautions.
• Whilethe machine is in operation, pay special attention to the needle location. In addition, keep your
hands away from all moving parts such as the needle and handwheel, otherwise injuries may occur.
•Do not pull or push the fabric too hard while sewing, otherwise injuries may occur or the needle may
break.
•Never use bent needles. Bent needles can easily break, possibly resulting in injuries.
•Make sure that the needle does not strike basting pins, otherwise the needle may break or bend.
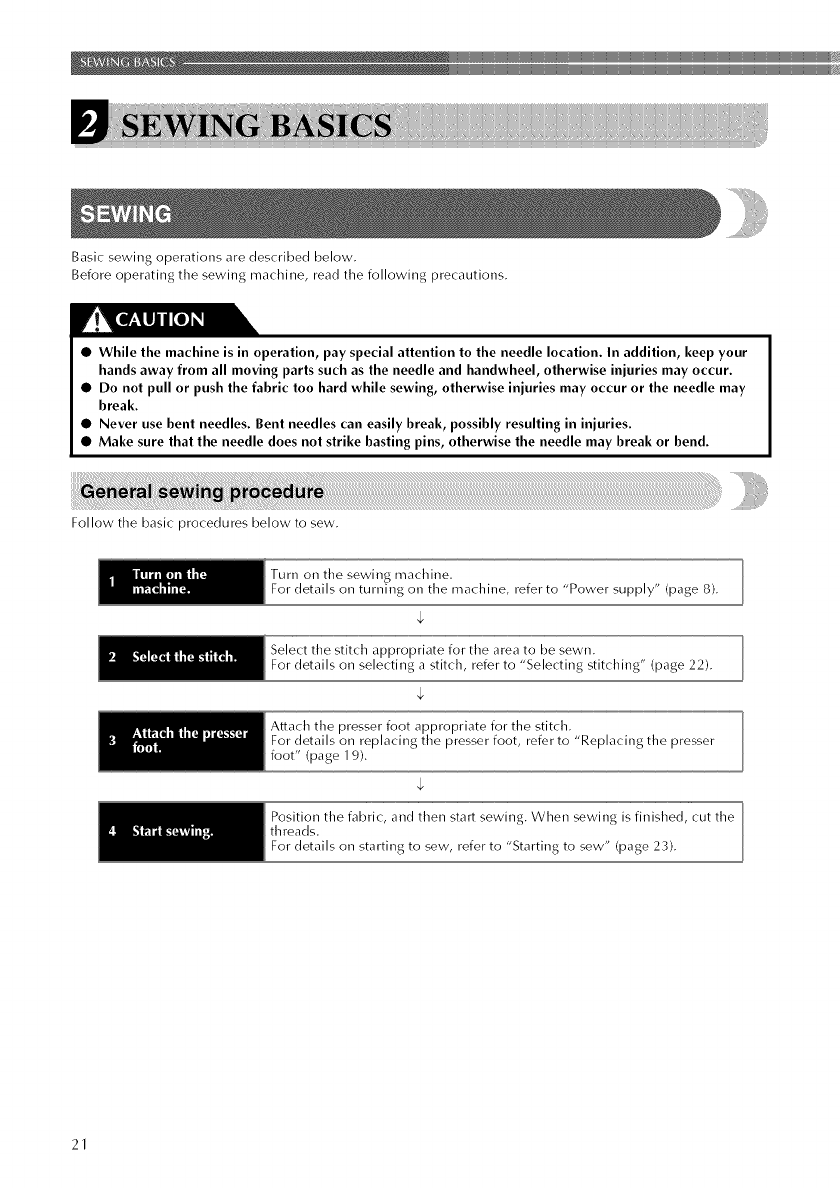
Follow the basic procedures below to sew,
Turn on tile sewing machine.
For details on turning on tile machine, refer to "Power supply" (page 8).
Select tile stitch appropriate for tile area to be sewn.
For details on selecting a stitch, refer to "Selecting stitching" (page 22).
Attach the presser foot appropriate for the stitch.
For details on replacing the presser foot, refer to "Replacing the presser
foot" (page 19).
Position the fabric, and then start sewing. When sewing is finished, cut the
threads.
For details on starting to sew, refer to "Starting to sew" (page 23).
21

i,_i_iii'illill:iiii:i_iiiii!liii/iiiiiiiiii'i_iiiiii/iiiiii/i/iliiiiiii//i/ii//!_/liiiii/i!i_iiii;i'i_iii!!i_iiiii¸i@iiiiiiiii//li!iiiiiiiiiiiiiiii_iiiilliiiiiiiiliiiiiiiiiii'iiii!iiii_/_iiiiiiiilliiii!illiill¸illi_iiiiiill¸illiiiiiiiiiiiiiiiiiiiiiiiiiii!ii!_ii_il_i_i_il_i_i_il_i_i_il_i_i_!ilfill_i_i!!illii_i_i_i_ii!ili!i!ill!iiii¸_i¸!!_iii¸i!l
_i_i_II_ilill_l!lii_l_i_i_i_i_i_i_i_i_i_l!iliii!_li_l_li_l_i_i_i_ilil_lll!il_il_l_i_i_li_i_i_l_i_i_ii_i_i_i_l!iliii!_li_l_li_l_li_l_ll_llll_l;l_l_i_ii!ii!_!iiii_ii!!_i_ii_iiiiii_!;i!i_i_ii!ii!_!iiii_ii!!_i_ii_iiiiii_!;i!i_i_ii!ii!_!iiii_ii!!_i_ii_i_i_!ii_iiii!iiii'i!iii!i_il;iiiiiiiiiiiiiil;ili
Turning the stitch selection dial in either direction, select the desired stitch.
I÷
Pattern selection dial
2
3
4
5
6 -10
11
12
13
14
27, 35
6 7 8 9 10
c_ co _ Q co 28, 30,
Select the desired length.
(£D
28
[
_ 37
38
22
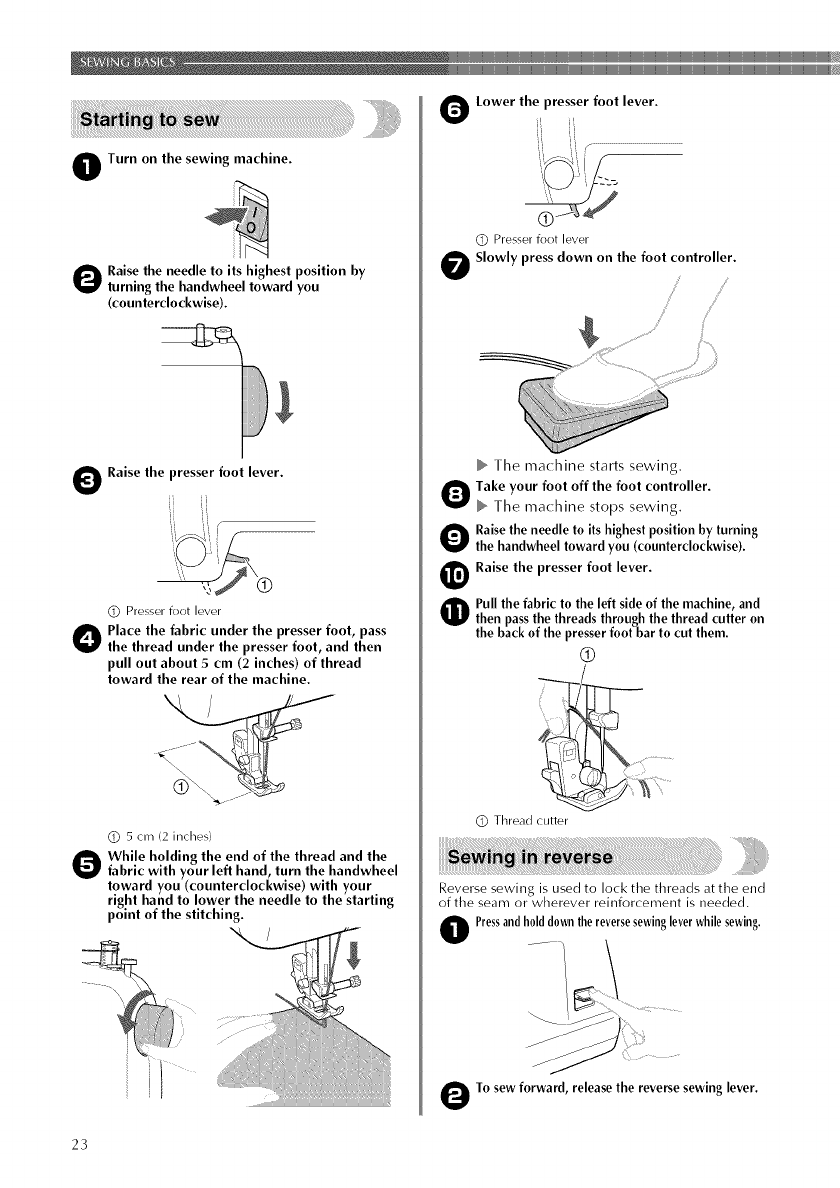
O Turn on the sewing machine.
Raise the needle to its highest position by
turning the handwheel toward you
(counterclockwise).
ORaise the presser foot lever.
i
@Presser foot lever
O lace the fabric under the presser foot, pass
the thread under the presser foot, and then
pull out about 5 cm (2 inches) of thread
toward the rear of the machine.
@5 cm (2 inches}
Ohile holding the end of the thread and the
fabric with your left hand, turn the handwheel
toward you (counterclockwise) with your
right hand to lower the needle to the starting
point of the stitching.
OLower the presser foot lever.
@Presserfoot lever
Slowly press down on the foot controller.
Tile machine starts sewing.
Take your foot off the foot controller.
Tile machine stops sewing,
O aise the needle to its highest position by turning
the handwheel toward you (counterclockwise).
Raise the presser foot lever.
OPull the fabric to the left side of the machine, and
then pass the threads through the thread cutter on
the back of the presser footbar to cut them.
®
@Thread cutter
is used to loci< the threads at the end
of the searn ol- wherever reinforcement is needed,
Pressand h01ddown the reverse sewing lever while sewing.
Reverse sewi ng
OTo sew forward, release the reverse sewing lever.
23
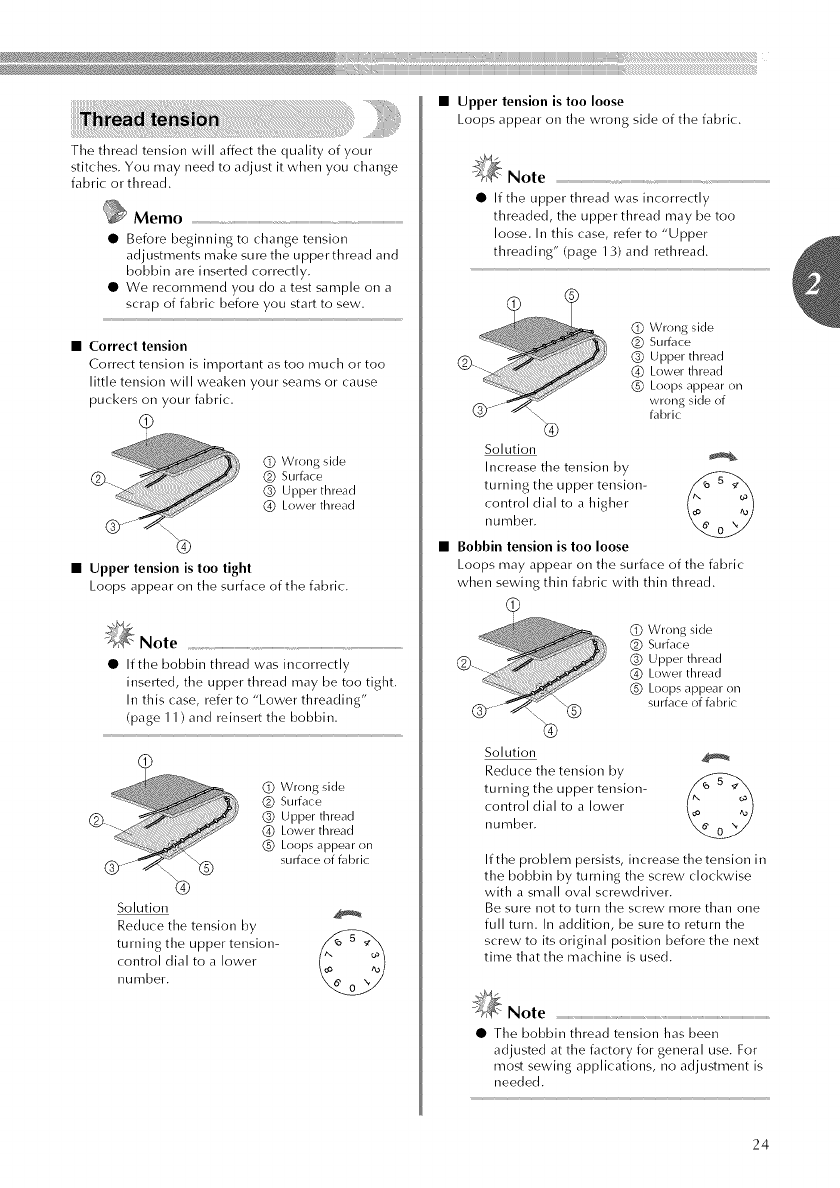
Thethreadtensionwillaffectthequalityofyour
stitches.Youmayneedtoadjustitwhenyouchange
fabricorthread.
Memo
• Before beginning to change tension
adjustments make sure the upper thread and
bobbin are inserted correctly.
• We recommend you do a test sample on a
scrap of fabric before you start to sew,
•Correct tension
Correct tension is important as too much or too
little tension will weaken your seams or cause
puckers on your fabric.
@
_<_ (_) Wrong side
(]_L. (_) Surface
(_) Upper thread
(_ Lower thread
•Upper tension is too tight
Loops appear on the surface of the fabric.
_Note
• If the bobbin thread was incorrectly
inse_ted, the upper thread may be too tight.
In this case, refer to "Lower threading"
(page 11) and reinsert the bobbin.
@
Solution
Reduce the tension by
(_) Wrong side
_) Surface
_) Upper thread
(_) Lower thread
@ Loops appear on
surface of fabric
turning the upper tension-
control dial to a lower
number,
•Upper tension is too loose
Loops appear on the wrong side of the fabric.
_Note
•If the upper thread was incorrectly
threaded, the upper thread may be too
loose. In this case, refer to "Upper
threading" (page 13) and rethread.
(_) Wrong side
(_) Surtbce
@ Upper thread
(_ Lower thread
@ Loops appear on
wrong side of
fabric
Solution
Increase the tension by
turning the upper tension- ._ 5 __
control dial to a higher
number.
• Bobbin tension is too loose
Loops may appear on the surface of the fabric
when sewing thin fabric with thin thread,
@ Wrong side
(_) Surface
_) Upper thread
(_ Lower thread
@ Loops appear on
surface of fabric
Solution
Reduce the tension by
turning the upper tension- _ r_ _ ,_,_
control dial to a lower
number,
If the problem persists, increase the tension in
the bobbin by turning the screw clockwise
with a small oval screwdriver.
Be sure not to turn the screw more than one
full turn. In adclition, be sure to return the
screw to its original position before the next
time that the machine is used.
_Note
• The bobbin thread tension has been
adjusted at the factory for general use. For
most sewing applications, no adju<ment is
needed,
24
Variouswaystoachievebetterresultsforyoursewingprojectsaredescribedbelow.Refertothesetipswhen
sewingyourproject.
Atrialpieceoffabricshouldbesewnsince,depending
onthetypeoffabricandstitchingbeingsewn,the
desiredresultsmaynotbeachieved.
Fortiletrialsewing,useapieceoffabricandthread
thataretilesarneasthoseusedforyourproject,and
checktirethreadtensionandstitchlengthandwidth.
Sincetireresultsdifferdependingontiretypeof
stitchingandtirenumberoflayersoffabricsewn,
performtiretrialsewingundertiresameconditions
thatwillbeusedwithyourproject.
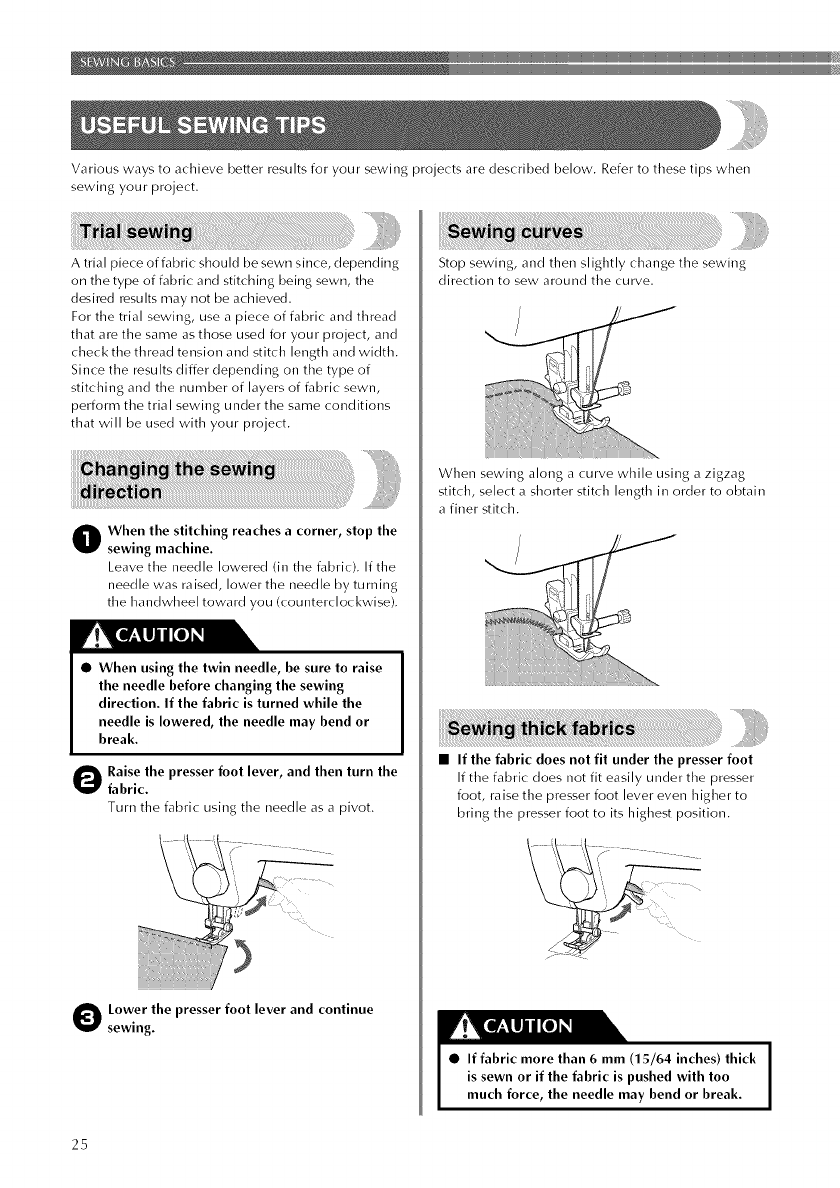
O hen the stitching reaches acorner, stop the
sewing machine.
Leave tire needle lowered (in tire fabric). If tire
needle was raised, lower the needle by turning
the handwheel toward you (counterclockwise).
• When using the twin needle, be sure to raise
the needle before changing the sewing
direction. If the fabric is turned while the
needle is lowered, the needle may bend or
break.
Raise the presser foot lever, and then turn the
fabric.
Turn tire fabric using tire needle as a pivot.
Oower the presser foot lever and continue
sewing.
Stop sewing, and then slightly change tire sewing
direction to sew around tire curve.
When sewing along a curve while using a zigzag
stitch, select a sholter stitch length in order to obtain
a finer stitch.
• If the fabric does not fit under the presser foot
If tire fabric does not fit easily under tire presser
foot, raise tire presser foot lever even higher to
bring tire presser foot to its highest position.
25
lillillil_iiii_iiii_iiiiiiiiiiiiiiiiiiii#_illlllllllllllli_l;l_llil_lii_ll_iiill_iiill_iiill_iiill_iiill_iiill_iiill_iiill_iiill_iiill_iiill_iiill_iiill_iiill_iiill_iiill_iiill_iiill_iiill_iiill_iiill_iiill_iiill_iiill_iiill_iiill_iiill_iiill_iiill_iiill_iiill_iiill_iiill_iiill_iiilliillllllllllllllllllllllllllllllllllllllllllllllllllllllllllllllllllllllllllllllllllllllllll!l!
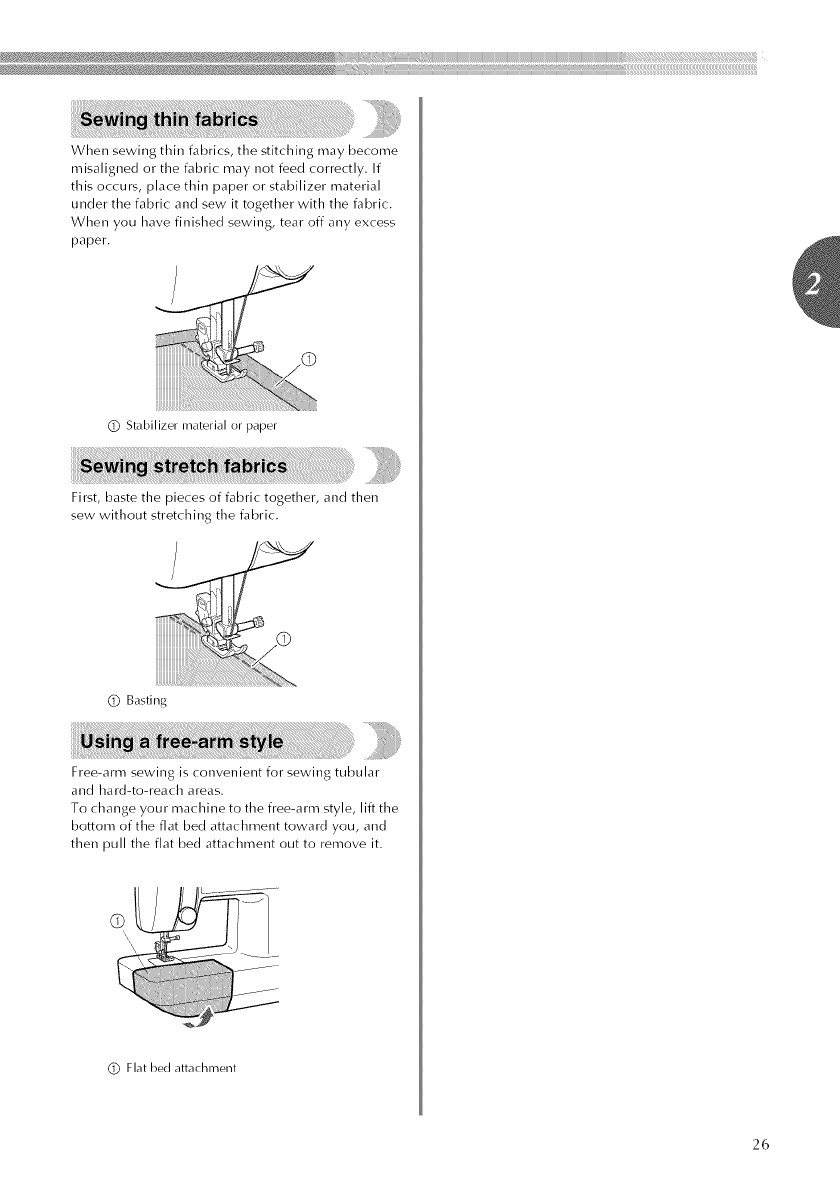
Whensewingthinfabrics,tilestitchingmaybecome
misalignedorthefabricmaynotfeedcorrectly.If
thisoccurs,placethinpaperorstabilizermaterial
undertirefabricandsewittogetherwithtirefabric.
Whenyouhavefinishedsewing,tearoffanyexcess
paper.
Q Stabilizer material or paper
First, baste tire pieces of fabric together, and then
sew without stretching tire fabric.
Q Basting
Free-arm sewing is convenient for sewing tubular
and hard-to-reach areas.
To change your machine to tire flee-arm style, lift tire
bottom of tire flat bed attachment toward you, and
then pull tire flat bed attachment out to remove it.
Q Flat bed attachment
26
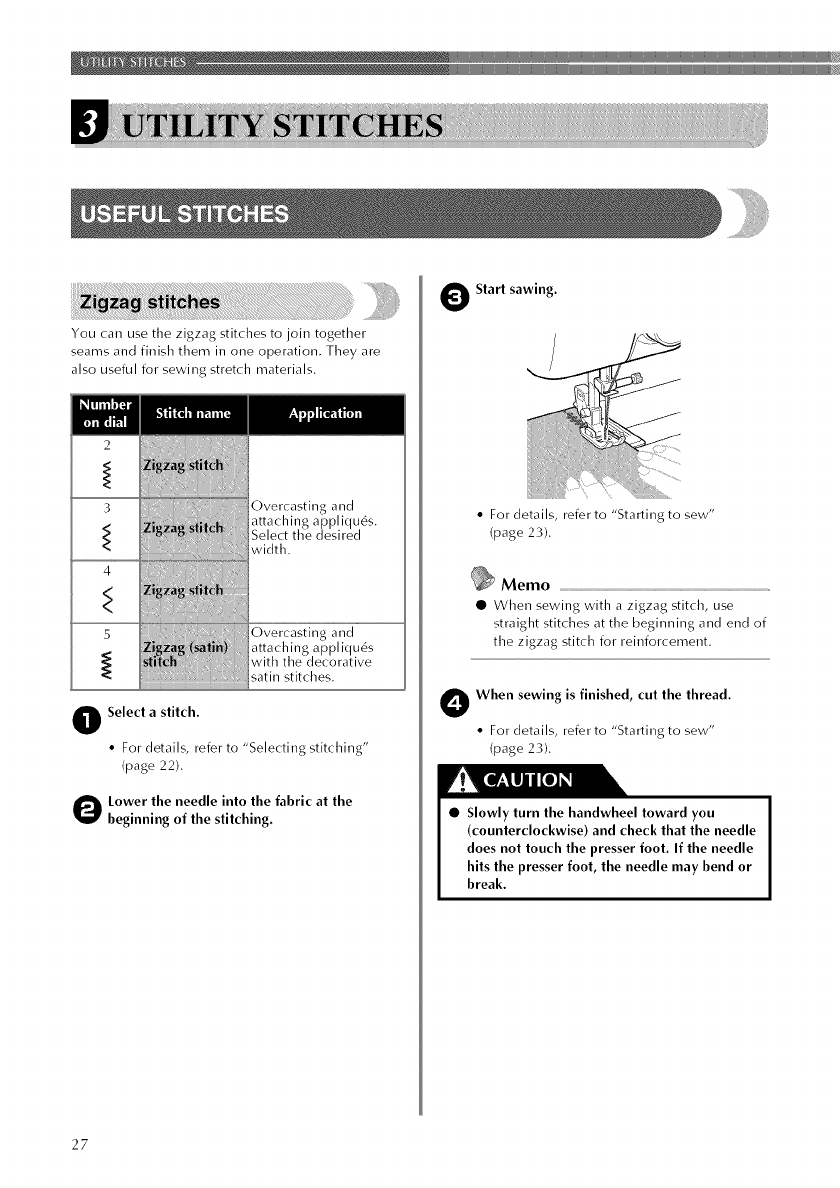
Youcanusetilezigzagstitchestojointogether
seamsandfinishtheminoneoperation,Theyare
alsousefulforsewingstretchmaterials,
ELL_l,|t.'l_l
I[nil _1_11
2
3
4
5
@
Overcasting and
attaching appliqu6s.
Select tire desired
width.
Overcasting and
attaching appliqu6s
with tire decorative
satin stitches.
Select a stitch.
• For details, refer to "Selecting stitching"
(page 22).
Lower the needle into the fabric at the
beginning of the stitching.
OStart sawing.
• For details, refer to "Starting to sew"
(page 23).
Memo
• VVhen sewing with a zigzag stitch, use
straight stitches at tire beginning ancl end of
tire zigzag stitch for reinforcement.
OWhen sewing is finished, cut the thread.
• For details, refer to "Starting to sew"
(page 23).
• Slowly turn the handwheel toward you
(counterclockwise) and check that the needle
does not touch the presser foot. If the needle
hits the presser foot, the needle may bend or
break.
27
iii_liii_i_l_iiii_i_iiii_iiiii_ll_liil:li_l_:i:i:i:i:i:i:i:i:_iiiiiii_iiii_iii_iiliiii_i}i_1iHiiiiii;iii{i_liiiiiii_iiiiiili_iiiiiii_iiiiii:i_ijilll_}}}iiiii_i1iiiii_ililii_iiiiiiiiiiiiiiiiii[_iiiiiiiiillili_iii_ii_iii_iiiiiliilil_¸lll_;_l_i_!!!!!!!!!!!!!!l!!ii_liliiilll_:_i
iii!_i_iii/i/iiiiiii!iiiiiiiiiiiiiiiiiiiiii_iiii_iiiii_iiiiii_iiiii_iiii_iiii_iiii_iiii_iiii_ilii_iii_iiiiiii_iii_i!iiiii_iiiii_i_iii_iiIiIiIiII_iiii_i_iIiI_i_iiiIiIiIII_iiii_iilll_l_iii!i_i!i_iii_!ii!!i_i_i_iiii_!i!i_i_iii_ii!_!i_ii_ii!!i_i_i_iiiiii_!i!i_i_iii_ii!_!i_ii_ii!!i_i_i_iiii_!iiiiiiiii!iii_!iii!iiiiiiiiiiiiil
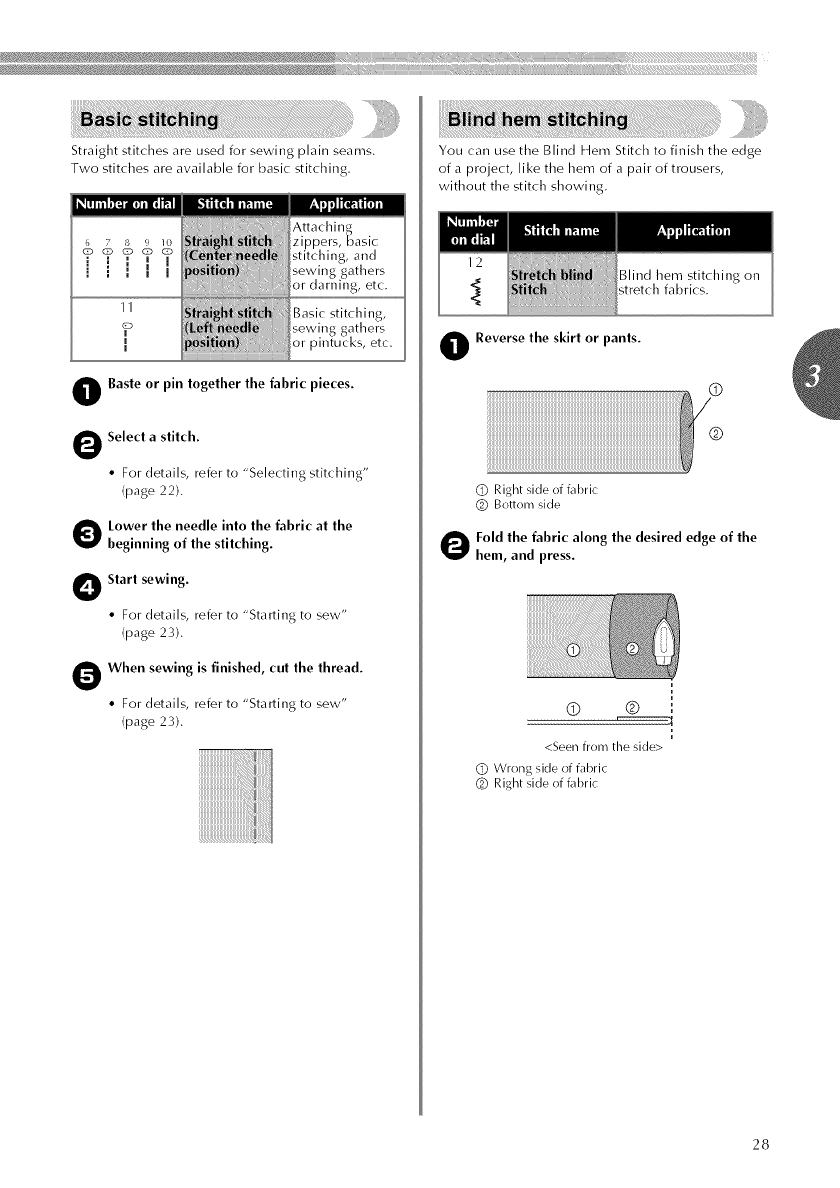
Straightstitchesareusedforsewingplainseams,
Twostitchesareavailableforbasicstitching,
11 g,
sewing gathers
or pintucks, etc,
Baste or pin together the fabric pieces.
Select a stitch.
• For details, refer to "Selecting stitching"
(page 22),
Lower the needle into the fabric at the
beginning of the stitching.
OStart sewing.
• For details, refer to "Starting to sew"
(page 23),
When sewing is finished, cut the thread.
• For details, refer to "Starting to sew"
(page 23),
You can use tile Blind Hem Stitch to finish tile edge
of a project, like the hem of a pair of trousers,
without the stitch showi%,
Reverse the skirt or pants.
©
®
QRight side of fabric
(_ Bottom side
O old the fabric along the desired edge of the
hem, and press.
© ®
<Seen from the side>
(i) Wr(}ng side of fabric
(i_ Right side of fabric
28
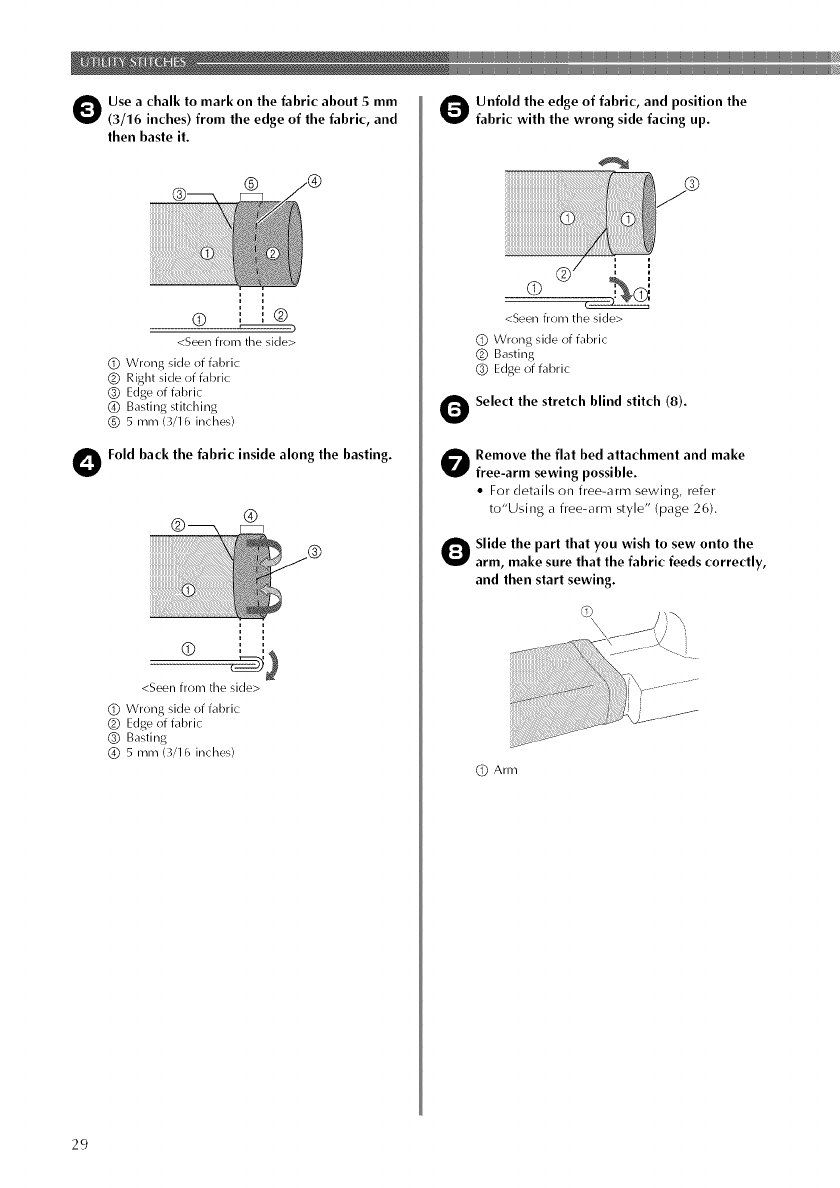
OUse a chalk to mark on the fabric about 5 mm
(3/16 inches) from the edge of the fabric, and
then baste it.
®
® ! !®
<Seen from the side>
(_) Wrong side of fabric
(_) Right side of fabric
_) Edge of fabric
(_ Basting stitching
(_) 5 mm (3/16 inches)
OFold back the fabric inside along the basting.
®
<Seen from the side>
(_) Wrong side of fabric
_) Edge of fabric
_) Basting
(_ 5 mm (3/16 inches/
OUnfold the edge of fabric, and position the
fabric with the wrong side facing up.
<Seen from the side>
(_) Wrong side of fabric
(_) Basting
(_) Edge of fabric
O Select the stretch blind stitch (8).
Remove the flat bed attachment and make
free-arm sewing possible.
•For details on free-aml sewing, refer
to"Using a free-aml style" (page 26).
Slide the part that you wish to sew onto the
arm, make sure that the fabric feeds correctly,
and then start sewing.
(_) Arm
29
llii_i_1_i_ii#%iiiii_#_iiiiiiiiii#ii_iii#iii_i_%i_li_iiiiii#_iiiliiiiiiiiiiil%lllliiii'i:iiiiii_iiiiil_l_iiiii_tiil_#iiiiiIi_#l!iiiiiiiiliiiiiiii_iii_#ii!_#ii_iiii_i_iil#iiIIliiiiIllllllllllllllllllllllllil¸i!i%%!i%l####lll;lliiii!liiiili:i!;i!i¸iiii¸ii!ili
lll_ililil_illl_il_ill_il_ill_il_ill_il_ill_il_il_il_il_il_il_il_il_il_ill_il_il_il_il_il_il_il_il_il_il_il_il_il_il_il_il_il_il_il_il_ili#i_ii_iI_I_I_III_i_i_i_iIi_iiiiiiiiiiiiiiii_iiilllliillillilii_ii_ii_ii_ii_ii_ii_ill_iii#ii_I_II_i_i#iliii_iiili_ll!ii_i!il_li_i_i!ii:!i!;i!ii_ii!!ii!i!:i_ii_ii!iii_ii_i_i!ii:!i!;i!ii_ii!!ii!i!:i_ii_ii!iii_ii_i_i!ii:!i!;i!ii_ii!!ii!i!:i_ii_ii!iiii_i!!iii!iiiiii'iiiiiiii!_i_i_i_i_il
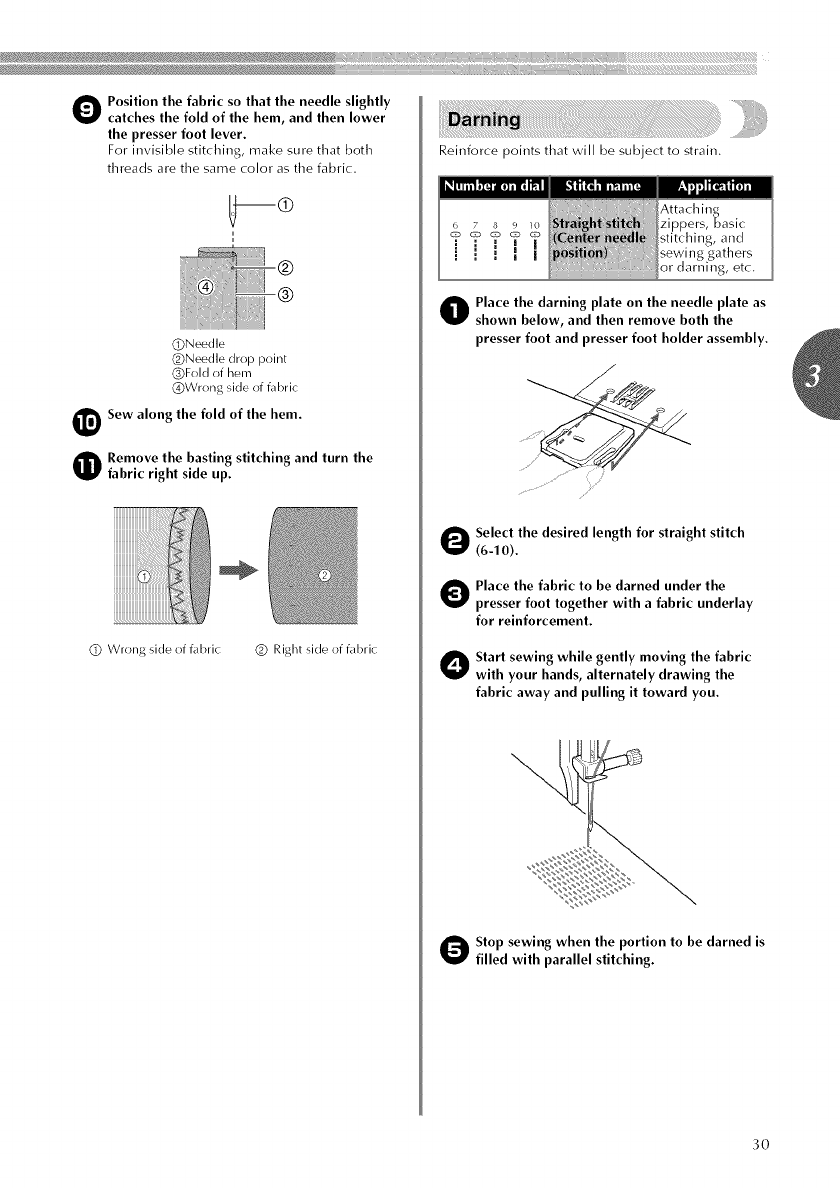
O ositionthe fabric so that the needle slightly
catches the fold of the hem, and then lower
the presser foot lever.
For invisible stitching, make sure that both
threads are the same color as the fabric.
QNeedle
(_)Needle drop point
_)Fold of hem
(])Wrong side of fl_bric
Sew along the fold of the hem.
Remove the basting stitching and turn the
fabric right side up.
(_) Wrong side of fabric (_) Right side of fabric
Reinforce points that will be subject to strain.
Place the darning plate on the needle plate as
shown below, and then remove both the
presser foot and presser foot holder assembly.
Select the desired length for straight stitch
(6-10).
O Place the fabric to be darned under the
presser foot together with a fabric underlay
for reinforcement.
Otart sewing while gently moving the fabric
with your hands, alternately drawing the
fabric away and pulling it toward you.
Otop sewing when the portion to be darned is
filled with parallel stitching.
3O

Buttonholes can be sewn and buttons can be sewn on.
Buttonholes are sewn from the front of the presser
foot to the back, as shown below.
Step a
(Front end
of button hole)
Step b
(Left side)
Step c
(Back end
of button hole)
Step d
(Right side)
!:
[°
(_) Reinforcement stitching
.........................................................................................................................
7 7 7i!iii i!iiiiiiiiiiiiiiiiiiiiiiiiiiiiiiii7iiiiiiiiiii i iii i i iiii i i i
The names of parts of buttonhole foot "A", which is
used for sewing buttonholes, are indicated below.
®
(]) Presser ikx)t scale
(_) Pin
@ Marks on buttonhole foot
I_ 5 mm (3/16 inches)
_Memo
• Before sewing buttonholes, check the stitch
length and width by sewing a trial
buttonhole on a scrap piece of fabric.
• When sewing buttonholes on ,,tretch
fabrics, place stabilizer material under the
fablic.
O se chalk to mark the position and length of
the buttonhole on the fabric.
(D Marks on fabric
OAttach buttonhole foot "A" and push the
outside frame back until the sliding insert
reaches the front of the outside frame.
Oelect stitch "a" of the 4-step automatic
buttonhole (1).
O osilion the fabric under the presser foot so
thai the middle of the front chalk line is
directly in the center of the presser foot and
aligned with the two red lines on the insert.
Passthe upper thread down through the hole
in the presser foot.
1D
(]) Mark on fabric
(_) Red marks on the sliding insert
OStart sewing. Sew 5to 6 stitches.
31
lll_i_ii!!il!i_il!i_ii_!i_il!i_ill!li_!!ill!li_!!ill!li_!!ill!i_ii_!i_il!i_il!i_il!i_ii_!i_il!i_il!i_il!i_ii_!i_il!i_il!iiiiii!_ii_iIiIi_i_i#illl}i_}i_iiIiIiII_#_iiil_!iill#iii_ili_ili_i_iiii_ili_ihii{/i/i//_iiiiiiiiiiiiiiiiiiiii_!_iii!i_iiiiii!i!ii!i_iii!!i!_iiiiiiiii_ii!!;i_ii_iiiii:i_!;i!i_i_ii!!ii!_!ii_ii_ii!!;i_ii_iiiii:i_!;i!i_i_ii!!ii!_!ii_ii_ii!!;i_ii_iiil;iiii_iii!i;!ii!ili_;!iii_!i
@
0
®
Otop sewing when the needle is at the left side
of the stitching, and then raise the needle by
turning the handwheel toward you.
Select stitch "b" of the 4-step automatic
buttonhole (1).
Start sewing, and then sew the length of the
chalk line.
OStop sewing when the needle is at the right
side of the stitching, and then raise the needle
by turning the handwheel toward you.
Select stitch "c" (same as "a") of the 4-step
automatic buttonhole (1).
Start sewing. Sew 5 to 6 stitches.
Stop sewing when the needle is at the right
side of the stitching, and then raise the needle
by turning the handwheel toward you.
Select stitch "d" of the 4-step automatic
buttonhole (1).
Start sewing. Sew the right side of the
buttonhole until the needle reaches the
stitching sewn in step O.
For reinforcement, turn the fabric 90 de_rees
counterclockwise, select the straight stitch (6
through 1O) with the desired length, and then
sew to the edge of the fi-ont bar tack.
®
®
Raise the presser foot lever, remove the
fabric, and cut the thread.
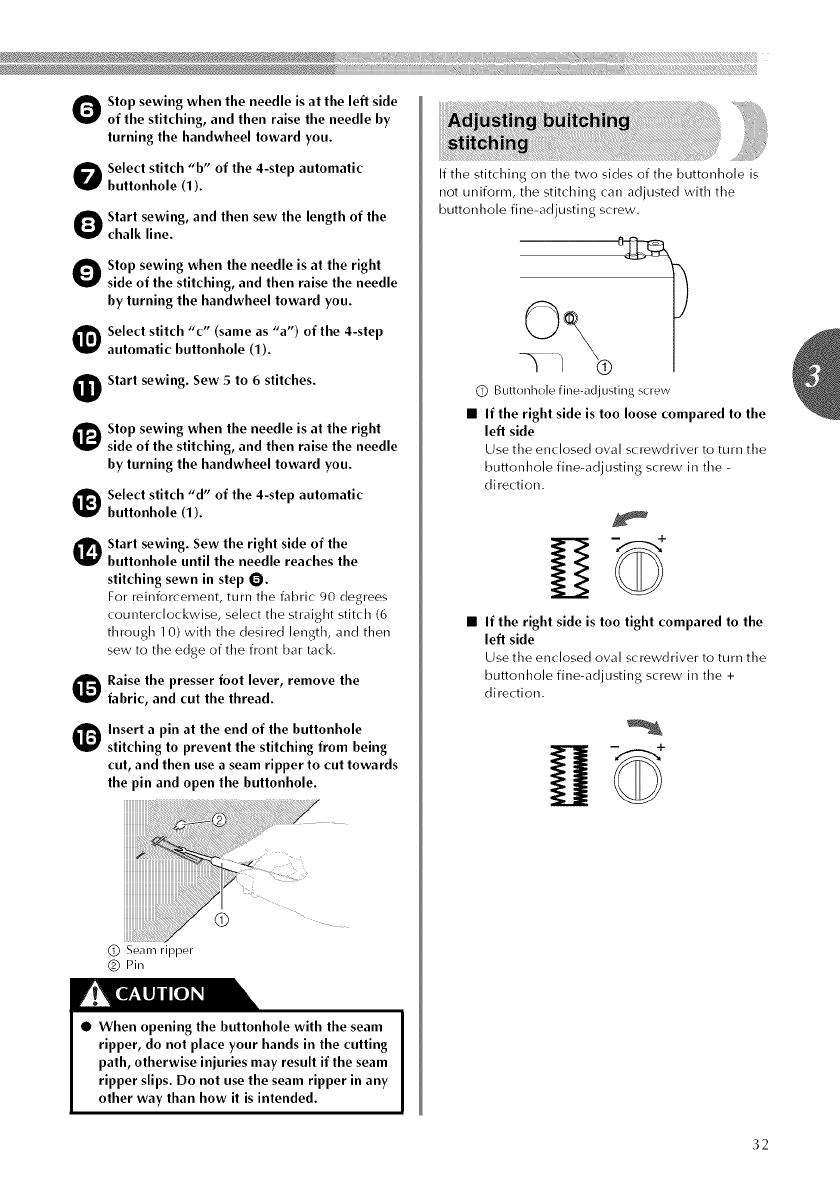
Insert a pin at the end of the buttonhole
stitching to prevent the stitching from being
cut, and then use a seam ripper to cut towards
the pin and open the buttonhole.
(_) Seam ripper
(_) Pin
•When opening the buttonhole with the seam
ripper, do not place your hands in the cutting
path, otherwise injuries may result if the seam
ripper slips. Do not use the seam ripper in any
other way than how it isintended.
If the stitching on the two sides of the buttonhole is
not uniform, the stitchin8 can adjusted with the
buttonhole fine-adjustin8 screw.
%
Q Buttonhole fine-adjusting screw
• If the right side is too loose compared to the
left side
Use the enclosed oval screwdriver to turn the
buttonhole fine-adjusting screw in the -
direction.
• If the right side is too tight compared to the
left side
Use the enclosed oval screwdriver to turn the
buttonhole fine-adjusting screw in the +
direction.
32
Buttonscanbesewnonwiththesewingmachine,
Buttonswith2orwith4holescanbeattached,
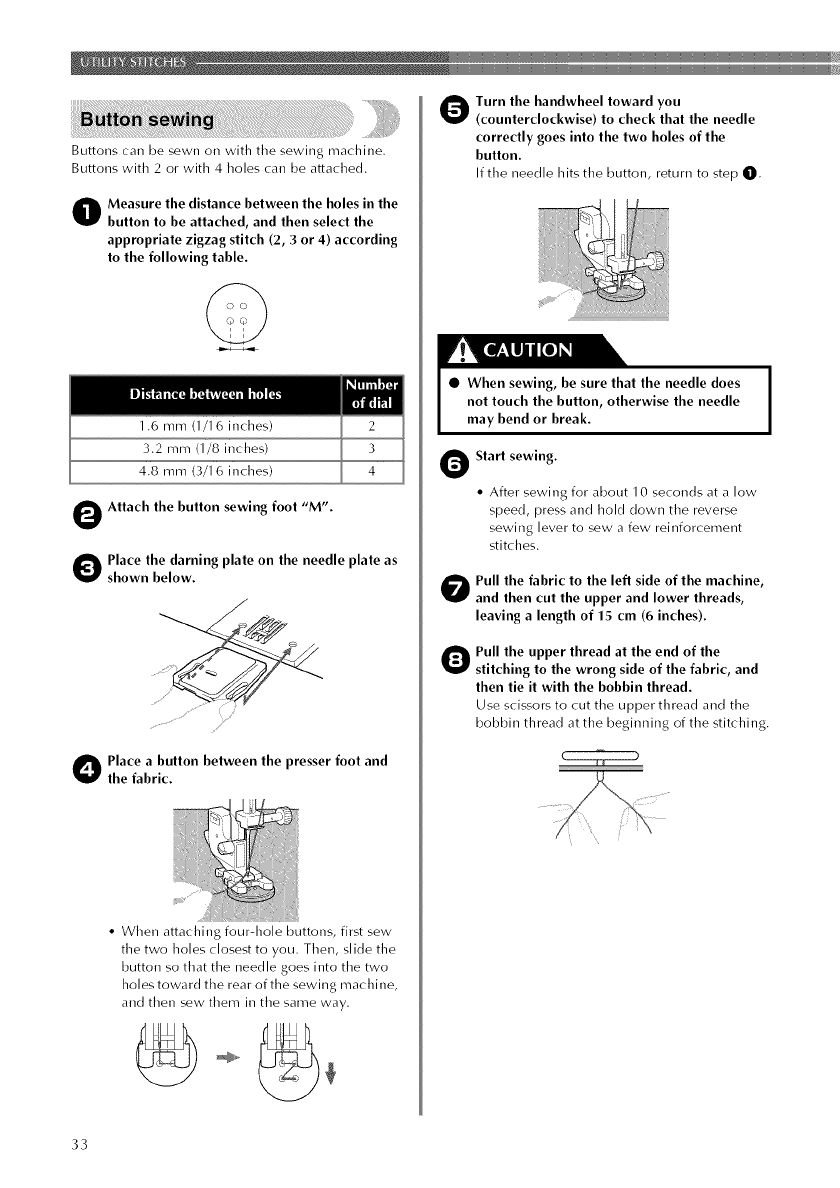
Oeasure the distance between the holes in the
button to be attached, and then select the
appropriate zigzag stitch (2, 3 or 4) according
to the following table.
©
1.6 rum (1/16 inches)
3.2 mm (1/8 inches)
4.8 mm (3/16 inches)
OAttach the button sewing foot "M".
O lace the darning plate on the needle plate as
shown below.
/
Olace a button between the presser foot and
the fabric.
• When attaching four-I/ole buttons, first sew
the two holes closest to you. Then, slide the
button so that the needle goes into the two
holes toward the rear of the sewing machine,
and then sew them in the same way.
© -0.,
Ourn the handwheel toward you
(counterclockwise) to check that the needle
correctly goes into the two holes of the
button.
If the needle hits the button, return to step 0.
• When sewing, be sure that the needle does
not touch the button, otherwise the needle
may bend or break.
OStart sewing.
• After sewing for about 10 seconds at a low
speed, press and hold down the reverse
sewing lever to sew a few reinforcement
stitches.
O ull the fabric to the left side of the machine,
and then cut the upper and lower threads,
leaving a length of 15 cm (6 inches).
Pull the upper thread at the end of the
stitching to the wrong side of the fabric, and
then tie it with the bobbin thread.
Use scissors to cut the upper thread and the
bobbin thread at the beginning of the stitching,
33
_i_il_l_ili_l_i_iil_il_il_il_il_il_il_il_il_il_il_il_il_il_il_il_l_i_lllllllllllllllllllllll_lll_lli_iil_i_iil_il_il_il_il_l_iliiililiililiililiililiililiililiililiililiililiililiililiililiililiililiililiililiii_llil_llllllili)llllillii¸ii!!iiii¸iliiii!!iiiiiii!ii¸ii!!iiii¸iiiiii¸ill¸iii!ii¸ii!!iiii¸iliiii!!iiiiiii!ii¸ii!!iiii¸i!!iii!
____lllliiiiliilili_li_illi_ll_l_il_l_iliilliilili_li_illi_ll_l_il_l_illiilil_ll;ilil_l_l_l_l_l_l_l_l_l_l_l_l_l_l_l_l_l_l_l_l_l_l_l_l_l_l_l_l_il_l_II
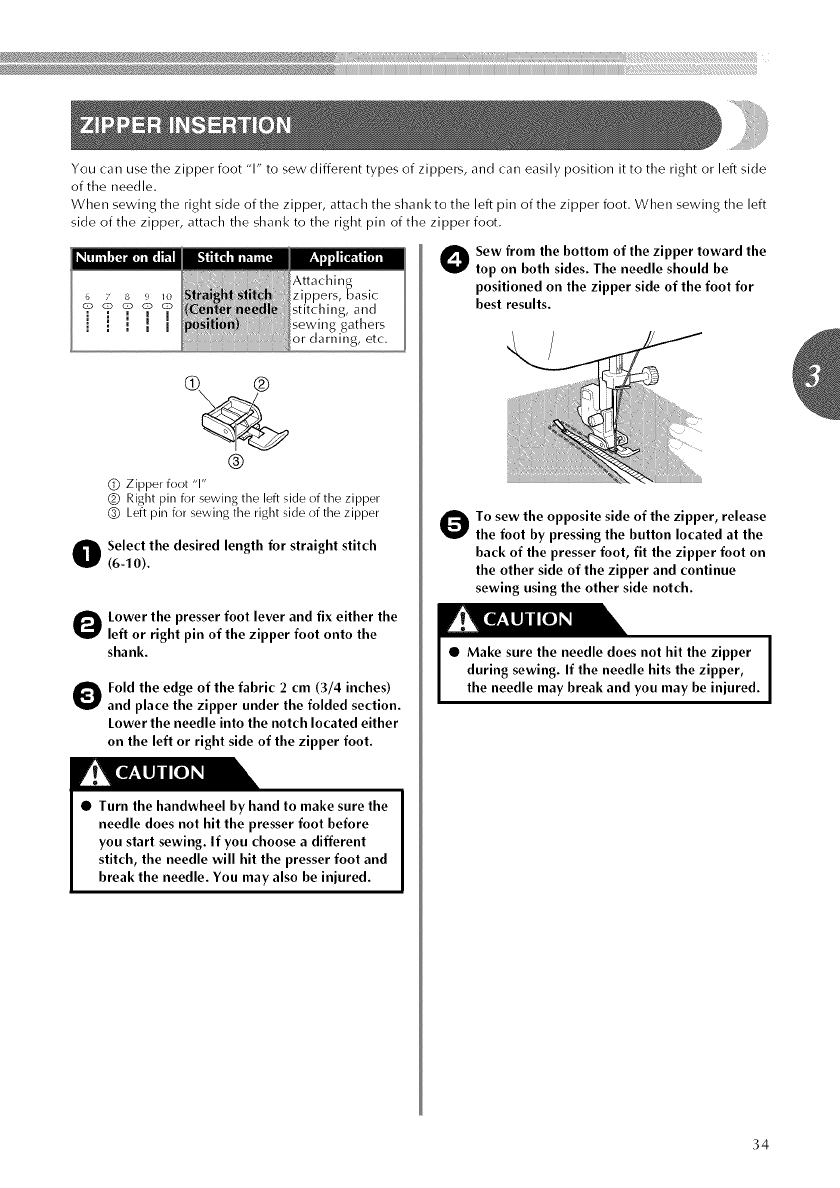
You can use the zipper foot "1" to sew different types of zippers, and can easily position it to the right or left side
of the needle.
When sewing the right side of the zipper, attach the shank to the left pin of the zipper foot. When sewing the left
side of the zipper, attach the shank to the right pin of the zipper foot.
®
Q Zipper foot "1"
(_ Right pin for sewing the left side of the zipper
_) Left pin for sewing the right side of the zipper
Select the desired length for straight stitch
(6-10).
Lower the presser foot lever and fix either the
left or right pin of the zipper foot onto the
shank.
OFold the edge of the fabric 2 cm (3/4 inches)
and place the zipper under the folded section.
Lower the needle into the notch located either
on the left or right side of the zipper foot.
•Turn the handwheel by hand to make sure the
needle does not hit the presser foot before
you start sewing. If you choose a different
stitch, the needle will hit the presser foot and
break the needle. You may also be injured.
Oew from the bottom of the zipper toward the
top on both sides. The needle should be
positioned on the zipper side of the foot for
best results.
Oosew the opposite side of the zipper, release
the foot by pressing the button located at the
back of the presser foot, fit the zipper foot on
the other side of the zipper and continue
sewing using the other side notch.
34
Zigzag stitches can be used for sewing appliqu6s, monogramming and embroidering.
ELL_ll|t.'l_l
I[,] il _1_11
2
3
4
5ing and
, app (lU6S
:lecorative
satin stitches.
You can create an appliqu6 by cutting a different
piece of fabric into a shape and using it as a
decoration,
Baste the cut design to the fabric.
Select a stitch.
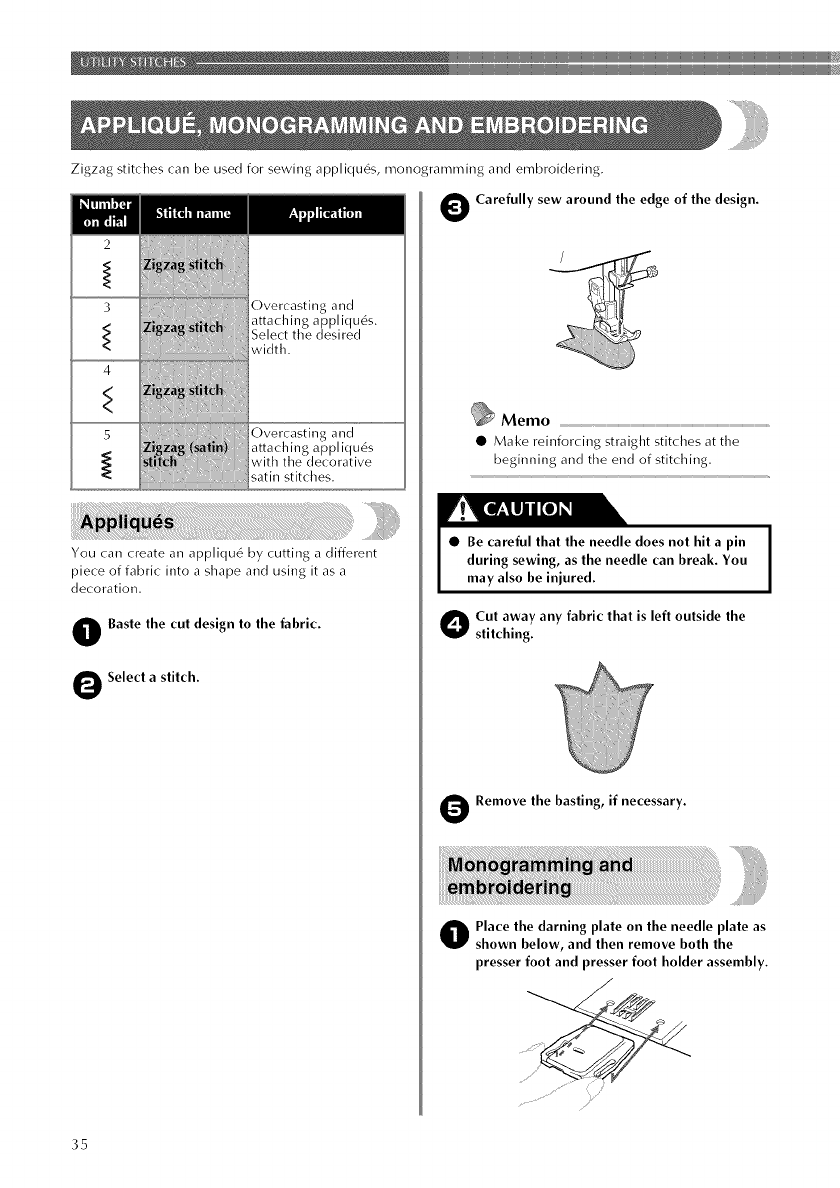
OCarefully sew around the edge of the design.
Memo
• Make reinforcing straight stitches at the
beginning and the end of stitching.
•Be careful that the needle does not hit a pin
during sewing, as the needle can break. You
may also be injured.
O ut away any fabric that is left outside the
stitching.
Remove the basting, if necessary.
Place the darning plate on the needle plate as
shown below, and then remove both the
presser foot and presser foot holder assembly.
35
i_iiiiiiiiiili_iiiiiilli_iii#iilllii#_liiiiiiii_liiiiiiii_liiiiiiii#li#iilill#iilill#iilillii_lliiiiiii_lliiiiiii_lliiiiiii_liillii_liillii_liillii_lii_iiiiilii_i#i%llilllllllll!_l!llllillllllllllllllllllllllillllilllilllll!lil!lllllllllilllilllll!lil!lll¸ilii_¸i¸iiiii¸i¸i;_
Select astitch.
O Draw the lettering (for monogramming) or
design (for embroidering) on the surface of
the fabric.
O Put the fabric in the embroidery hoop with
the surface of the fabric facing up inside the
well.
Place the project under the needle and lower
the presser bar.
Draw up the lower thread through the project
at the starting position by turning the
handwheel toward you (counterclockwise),
and then sew a few stitches to reinforce the
stitching.
O Grip the hoop with the thumbs and
forefingers of both hands while pressing the
fabric with the middle and third fingers, and
support the outside of the hoop with your
little fingers.
Start sewing.
•Be sure to keep your fingers away from
moving parts, especially needles.
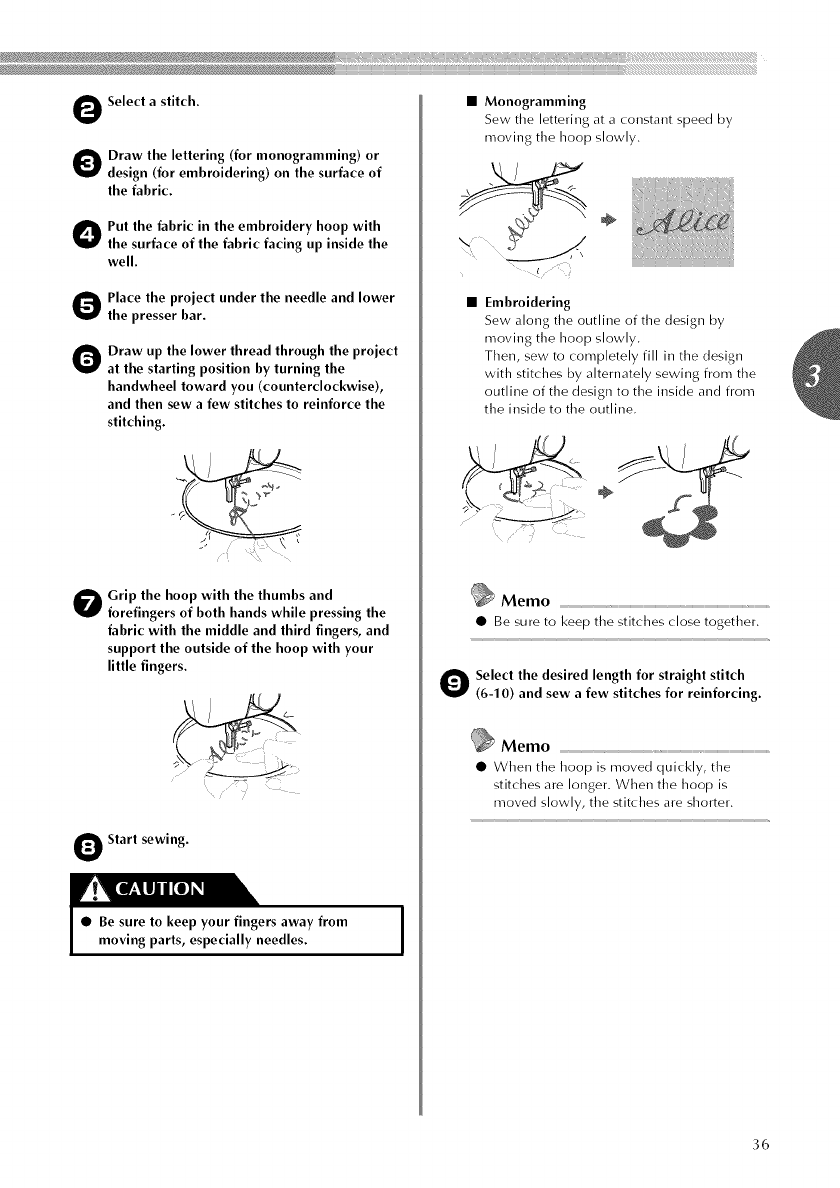
•Monogramming
Sew tile lettering at a constant speed by
moving the hoop slowly.
÷
•Embroidering
Sew along tile outline of tile design by
moving the hoop slowly.
Then, sew to completely fill in the design
with stitches by alternately sewing from the
outline of the design to the inside and from
the inside to the outline.
_Memo
• Be sure to keep the stitches close together.
O Select the desired length for straight stitch
(6-10) and sew a few stitches for reinforcing.
@Memo
• When the hoop is moved quickly, the
stitches are longer. When the hoop is
moved slowly, the stitches are sho_ter.
1
36
Various decorative stitches can be sewn with this sewin machine.
Select the desired length for straight stitch
(6-10).
Loosen the tension of the upper thread (to
about 2).
• For details, refer to "Thread tension"
(page 24).
Oew a single or multiple parallel rows of
stitches.
• Do not sew reverse stitches or cut tile thread.
O Pull the bobbin threads to create gathers.
Smooth the gathers by ironing them.
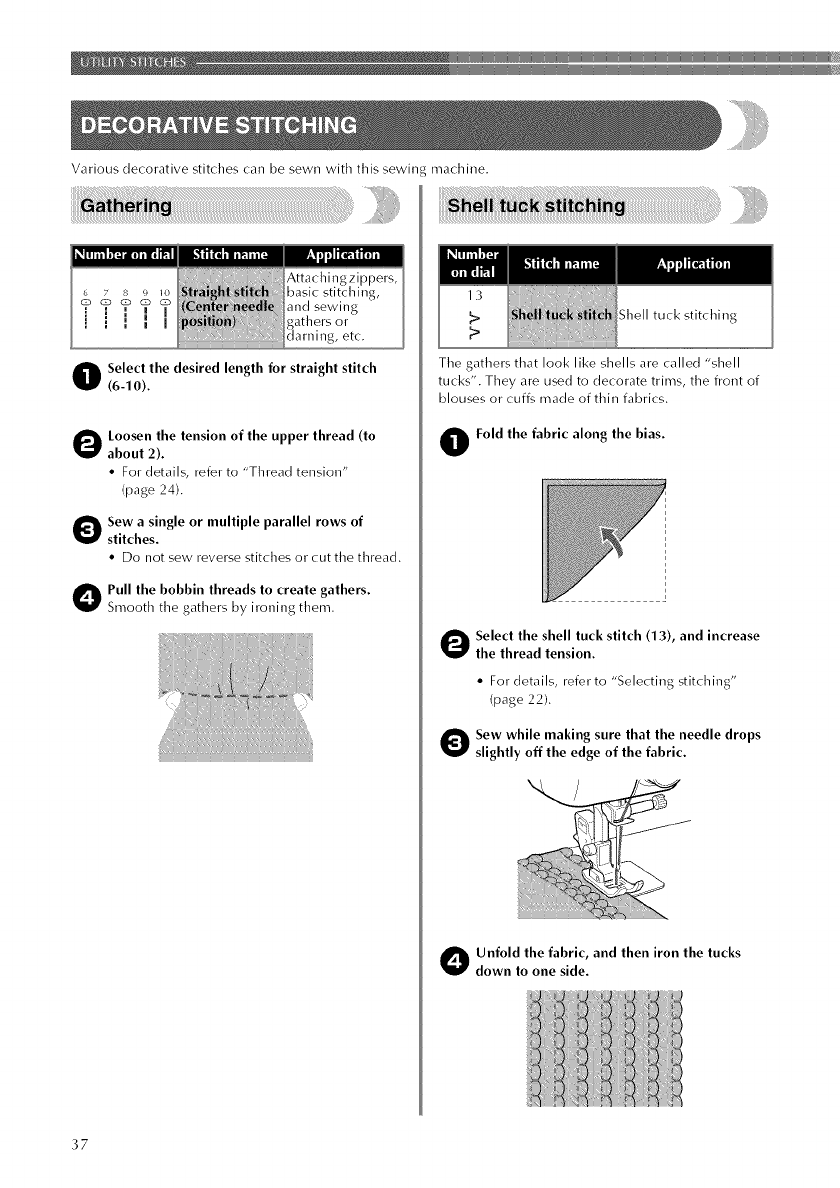
Shell tuck stitching
The gathers that look like shells are called "shell
tucks". They are used to decorate trirns, tile front of
blouses or cuffs made of thin fabrics.
OFold the fabric along the bias.
Select the shell tuck stitch (13), and increase
the thread tension.
• For details, refer to "Selecting stitching"
(page 22).
Oew while making sure that the needle drops
slightly off the edge of the fabric.
Onfold the fabric, and then iron the tucks
down to one side.
37
@iii%iiiiiiii_ii_iiii_ilillllillllilllllli_iiiiiiii_ii_iiiiiiiiiiiiiiiiiiiiiiiiiiiiiiiiiiiiiiiiiiiiiiiiiiiiiiiiiiiiiiiiii_ililllllllllllli_ii_illllliii_i#iii#iii#iii#iii#iii#iii#iii#iii#i_iii_iilililili!l_l!ll¸i!ii!!iii!!iiii!iii!_i!!_iiii¸iliiii!iiiiii!iiiiii!!iiii¸iliiii!iiiiii!iiiiii!!iiii¸iliiii!iiiiii!iiiii!i
iiiiii@i_iiiiiiii!iiiiiiiiiii%iiii_,iiii_lllil'lil_il'il_il'il_il'il_il'il_il'il_il'il_il'il_il'il_il'il_il'il_il'il_il'il_il'il_il'il_il'il_il'il_il'il_il'il_il'il_il'llli'llli'llli'llli'llli'lil_lil'llil_lil'llil_lil'llil_lil'llil_lil'llil_lil'llil_lil'llil_lil'llil_lil'llil_lil'llil_lil'llil_lil'l_.... iii
Mending,sewing
elastictapeorjoining
fabric.
Tileelasticstitchcanbeusedingways:mending,
sewingelasticorjoiningfabric,Eachisexplained
below.
Selecttileelasticstitch(14),
• Mending
Placetilereinforcementfabricundertiletear
tobemended,andthensewovertiletear,
• Sewingelastic tape
Place the elastic tape on the fabric, and then
sew over the elastic tape while holding the
tape both in front and behind the presser foot.
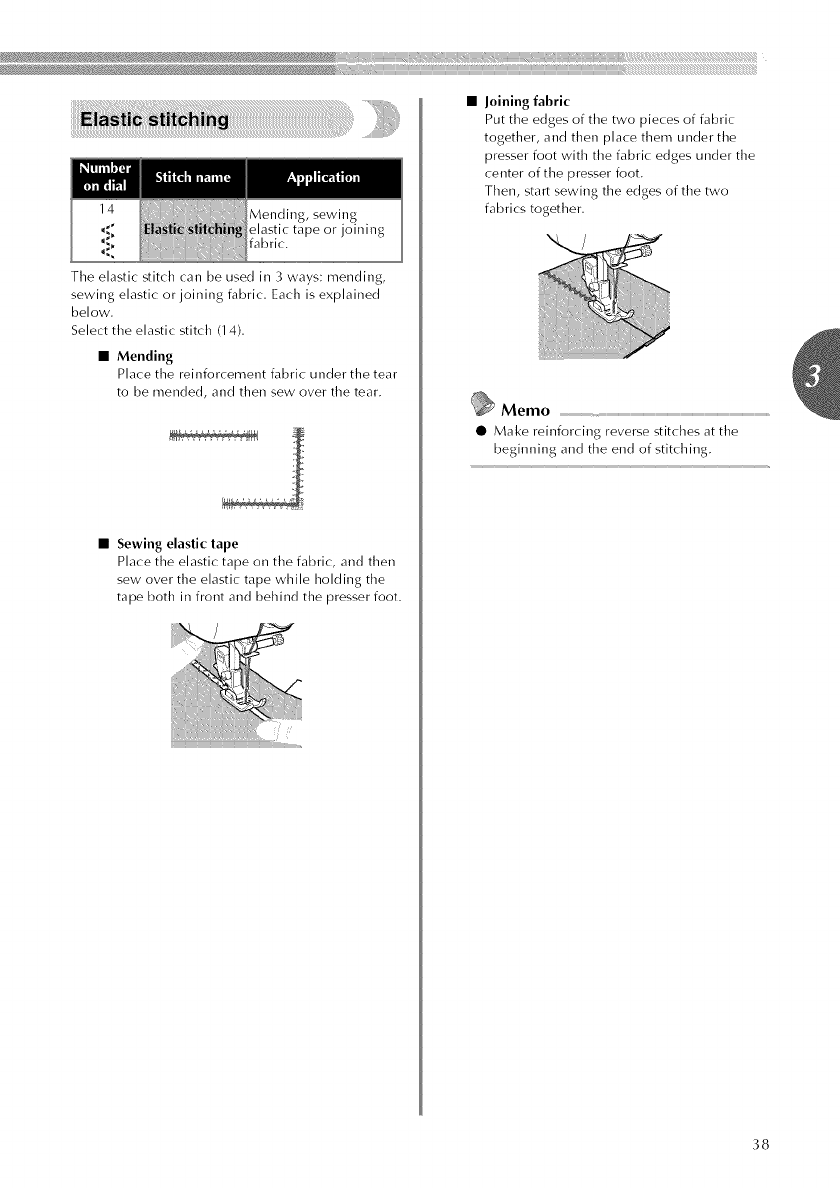
•Joining fabric
Put the edges of the two pieces of fabric
together, and then place them under the
presser foot with the fabric edges under the
center of the presser foot.
Then, start sewing the edges of the two
fabrics together.
Memo
• Make reinforcing reverse stitches at the
beginning and the end of stitching.
38
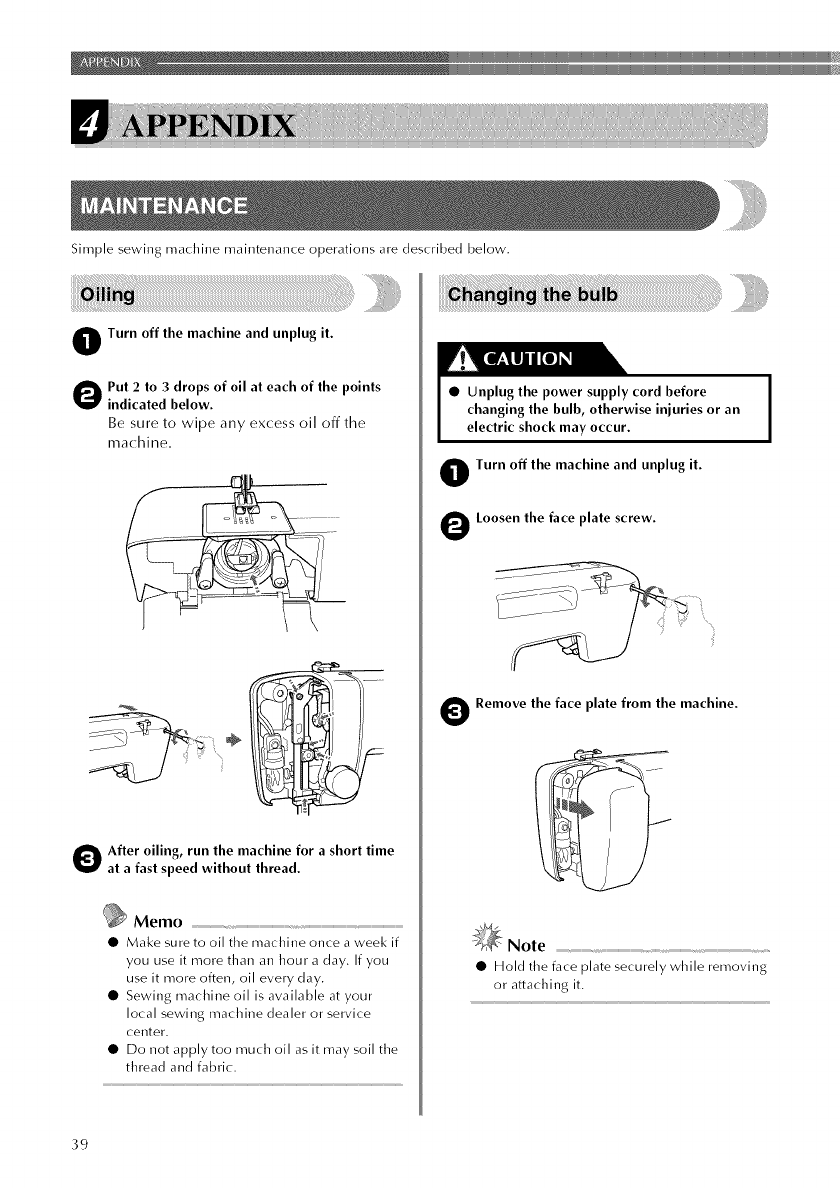
Simple sewing machine maintenance operations are described below.
OTurn off the machine and unplug it.
Out 2 to 3 drops of oil at each of the points
indicated below.
Be sure to wipe any excess oil off the
machine,
Ofter oiling, run the machine for a short time
at a fast speed without thread.
Memo
• Make sure to oil the machine once a week if
you use it more than an hour a day. If you
use it more often, oil every day.
• Sewing machine oil is available at your
local sewing machine dealer or service
center.
• Do not apply too much oil as it may soil the
thread and fabric.
iiiiiiiiiiiiiii_i!i_iii_i_ii!!_ii!iii!!_ii!_iiiiiiiiiiii!ii!_i!!_ilili!ii!ii!ii_!_!ii!i!i!_i!ii!ii!ii!ii!ii!ii!ii!ii!ii!ii!ii!ii!ii!ii!ii!ii!ii!ii!ii!ii!ii!ii!ii!ii!ii!ii!ii!ii!ii!ii!ii!ii!ii!ii!ii!ii!ii!ii!ii!ii!ii!ii!ii!ii!ii!ii!ii!ii!ii!ii!ii!i!!i!!i!!!i!i!i!!i!ili!ii!ii!ii!!i!ii!!!!!!!!i!iiiii!!i!i!iiiliii!
•Unplug the power supply cord before
changing the bulb, otherwise injuries or an
electric shock may occur.
OTurn off the machine and unplug it.
OLoosen the face plate screw.
ORemove the face plate from the machine.
_Note
• Hold the face plate securely while removing
or attaching it.
39
i_i_ii_i!iiiiiiiii_iiiiiiiii_ii{ill_iiii!iiiiiiiiiii!ii{iiiiiiii!iiiiii_iiii!ii{ill_iiii!iiiiiiiiiiiiiiiiiiiii/_iiiiiiiiiii]ii!_iiiiiiii_iiiiiiiiiiiiiiiiiiiiiiii@}}i]ili!iiiiiiii_!i_iiiiii!!_iiiii/i_!iiiiiiiiiiiiiiiiiiiiill}iiiiiiiii_iiiiiiii/iiil_iiii¸iliiiiiiiilii!iii_!ililiiliifillilliiliifilliliiill!iiiiiiiiiillilliiiiiiilli!!iililiiiiiiiiliilliiiiiiiliilli_i!!i!ii!iilii!i_iiii!!il_!!i
___________________________________________________________________________________________________________________________________________________________________________________________________________________________:___:___:_______________________________________________iii!i!_iiiii!i_iiii_ii!i_ii!iiililili_i!!iii!!iii!i_iiii_ii!i_ii!iiililili_i!!iii!!iii!i_iiii_ii!i_ii!iiililili_i!!iii!!iii!i_iiiiiiiili_iiiiiiiiillililil
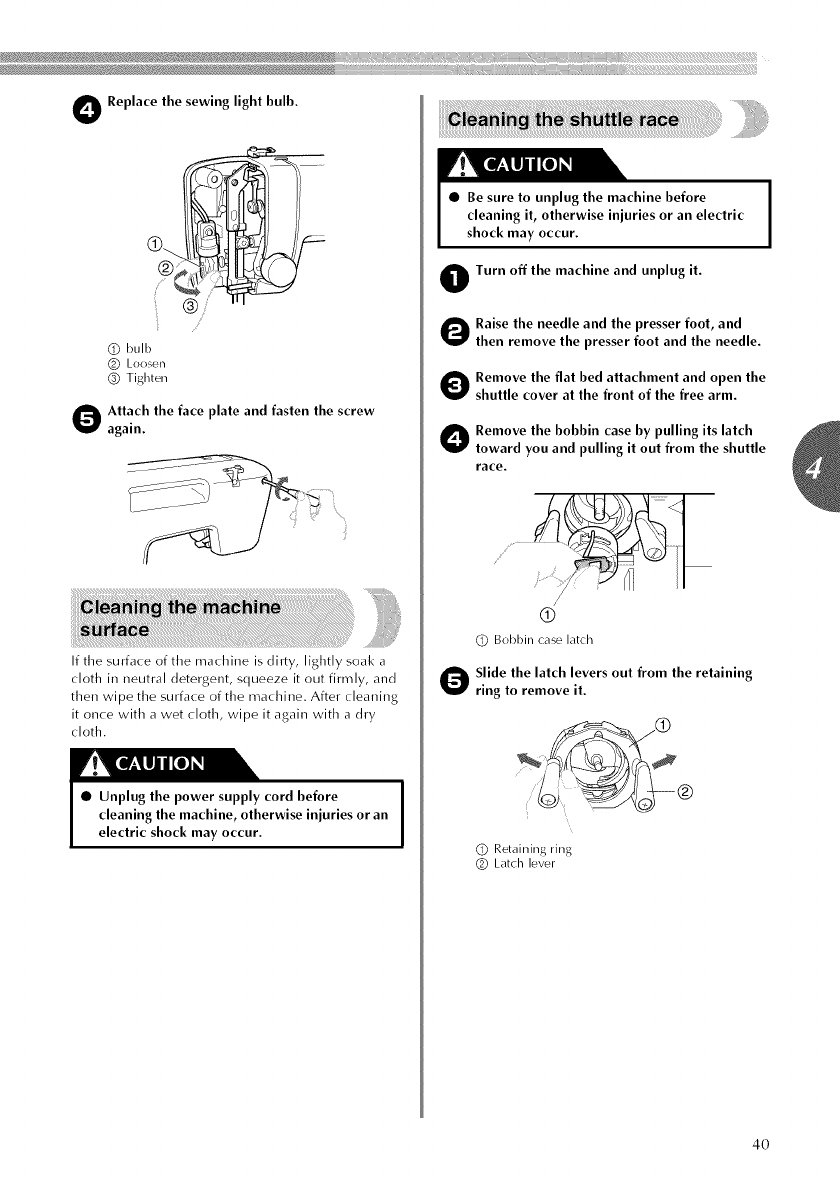
OReplace the sewing light bulb.
Q bulb
(_) Loosen
(]) Tighten
Ottach the face plate and fasten the screw
again.
If the surface of the machine is dirty, lightly soak a
cloth in neutral detergent, squeeze it out firmly, and
then wipe the surface of the machine. After cleaning
it once with a wet cloth, wipe it again with a dry
cloth.
•Unplug the power supply cord before
cleaning the machine, otherwise injuries or an
electric shock may occur.
•Be sure to unplug the machine before
cleaning it, otherwise injuries or an electric
shock may occur.
OTurn off the machine and unplug it.
Raise the needle and the presser foot, and
then remove the presser foot and the needle.
Oemove the flat bed attachment and open the
shuttle cover at the front of the free arm.
ORemove the bobbin case by pulling its latch
toward you and pulling it out from the shuttle
race.
(9
@ Bobbin case latch
O lide the latch levers out from the retaining
ring to remove it.
_®
(_) Retaining ring
(_) Latch lever
4O
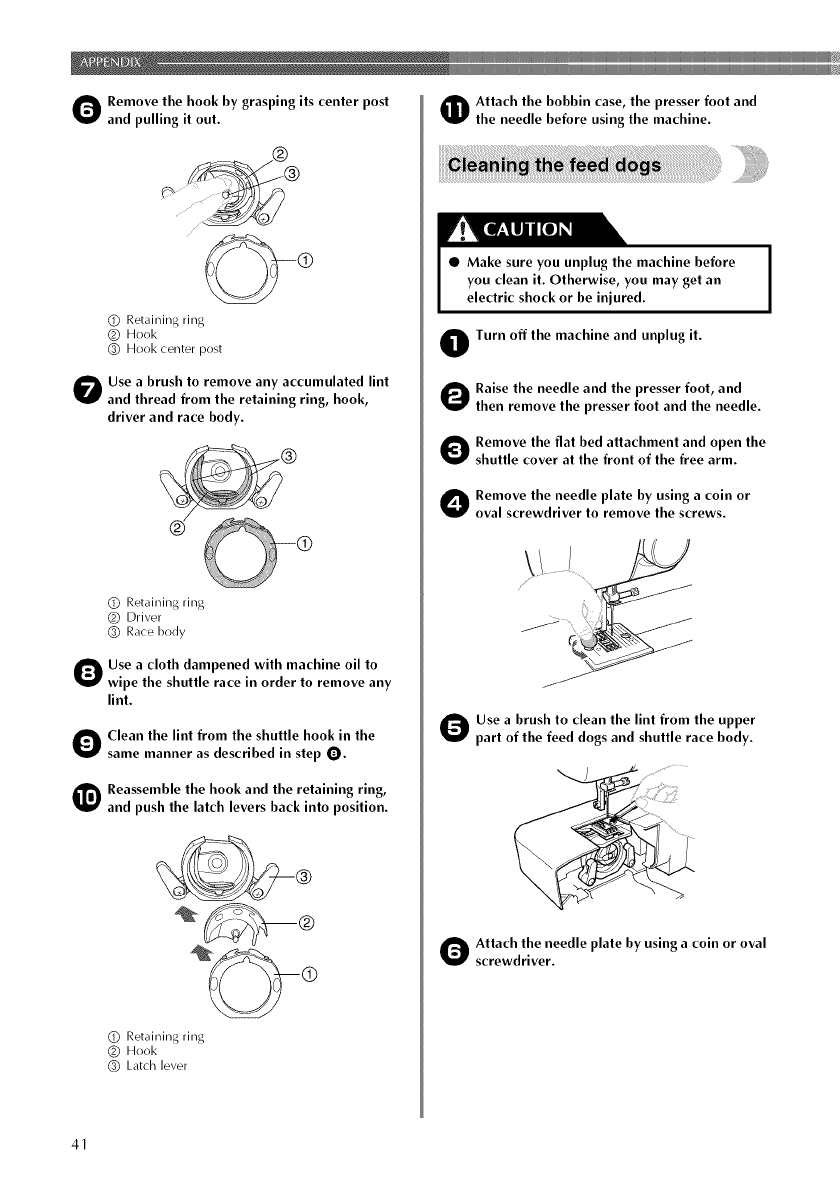
Oemove the hook by grasping its center post
and pulling it out.
®
(_) Retaining ring
Q Hook
(_) Hook center post
O se a brush to remove any accumulated lint
and thread from the retaining ring, hook,
driver and race body.
d
(]) Retaining ring
(_) Driver
(_ Race Body
Use a cloth dampened with machine oil to
wipe the shuttle race in order to remove any
lint.
Olean the lint from the shuttle hook in the
same manner as described in step O.
Reassemble the hook and the retaining ring,
and push the latch levers back into position.
_®
(_) Retaining ring
(_) Hook
(_) Latch level
Attach the bobbin case, the presser foot and
the needle before using the machine.
•Make sure you unplug the machine before
you clean it. Otherwise, you may get an
electric shock or be injured.
OTurn off the machine and unplug it.
Raise the needle and the presser foot, and
then remove the presser foot and the needle.
Oemove the flat bed attachment and open the
shuttle cover at the front of the free arm.
Oemove the needle plate by using a coin or
oval screwdriver to remove the screws.
O se a brush to clean the lint from the upper
part of the feed dogs and shuttle race body.
Ottach the needle plate by using a coin or oval
screwdriver.
41
_iiii in
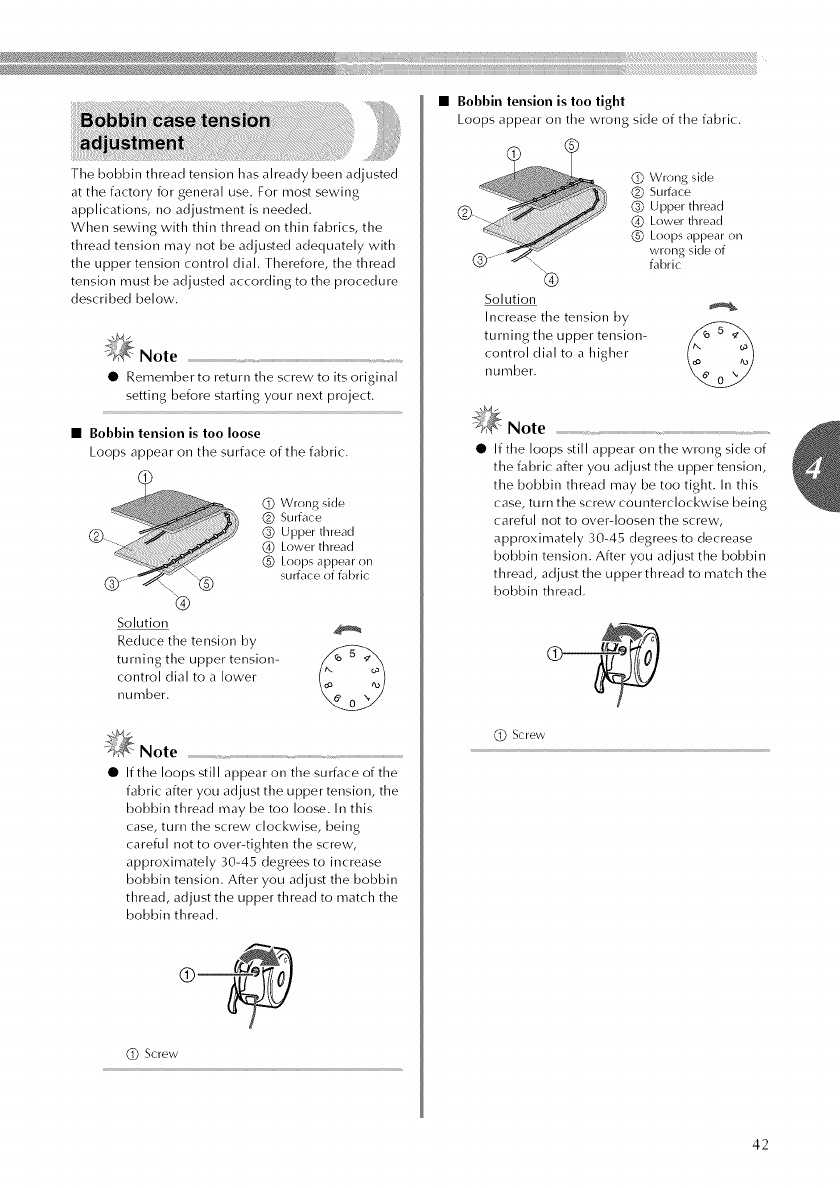
Tile bobbin thread tension has already been adjusted
at tile factory for general use. For most sewing
applications, no adjustment is needed.
When sewing with thin thread on thin fabrics, tile
thread tension may not be adjusted adequately with
tile upper tension control dial. Therefore, the thread
tension must be adju<ed according to the procedure
described below.
_Note
• Remember to return the screw to its original
setting before starting your next project.
•Bobbin tension is too loose
Loops appear on the surface of the fabric.
(_) Wrong side
_) Surface
_) Upper thread
(_) Lower thread
@ Loops appear on
surface of fabric
9
Solution
Reduce the tension by
turning the upper tension-
control dial to a lower
number.
_Note
•If the loops <ill appear on the surface of the
fabric after you adjust the upper tension, the
bobbin thread may be too loose. In this
case, turn the screw clockwise, being
careful not to over-tighten the screw,
approximately 30-45 degrees to increase
bobbin tension. After you adjust the bobbin
thread, adjust the upper thread to match the
bobbin thread.
•Bobbin tension is too tight
Loops appear on the wrong side of the fabric.
(_) Wrong side
(_) Surt\lce
@ Upper thre_d
(_ Lower thread
@ Loops appear on
wrong side of
fabric
Solution
Increase the tension by
turning the upper tension- ._ u _'_
control dial to a higher
number.
_;_ Note
•If the loops still appear on the wrong side of
the fabric after you adjust the upper tension,
the bobbin thread may be too tight. In this
case, turn the screw counterclockwise being
careful not to over-loosen the screw,
approximately 30-45 degrees to decrease
bobbin tension. After you adjust the bobbin
thread, adjust the upper thread to match the
bobbin thread.
(_) Screw
42
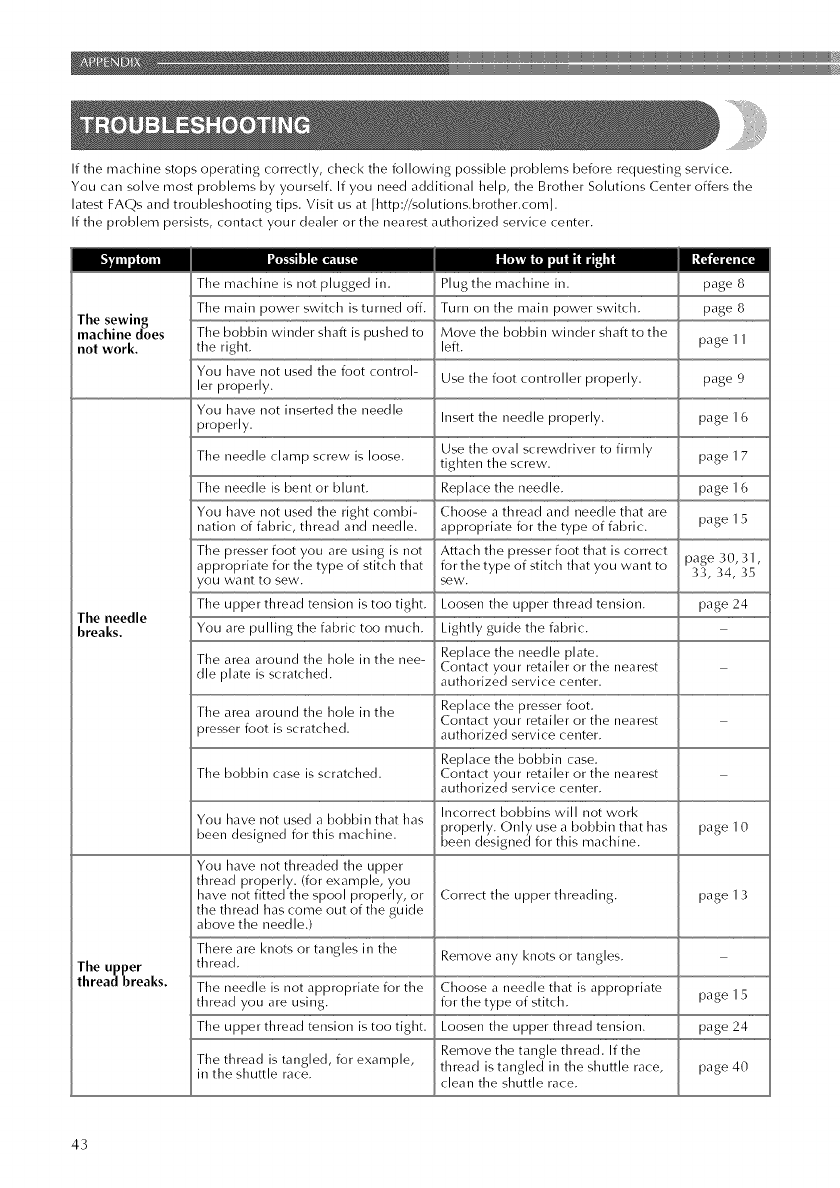
Ifthemachinestopsoperatingcorrectly,checkthefollowingpossibleproblemsbeforerequestingservice.
Youcansolvemostproblemsbyyourself.Ifyouneedadditionalhelp,theBrotherSolutionsCenteroffersthe
latestFA(,)sandtroubleshootingtips.Visitusat[http://solutions.brother.com].
Iftheproblempersists,contactyourdealerorthenearestauthorizedservicecenter.
Themachineisnotpluggedin. Plugthemachinein. page8
Themainpowerswitchisturnedoff.Turnonthemainpowerswitch, page8
The sewing
machine does The bobbin winder shaft is pushed to Move the bobbin winder shaft to the
not work. the right, left. page 11
You have not used the foot control- Use the foot controller properly, page 9
ler properly.
You have not inserted the needle
properly. Insert the needle properly, page 16
Use the oval screwdriver to firmly page 17
The needle clamp screw is loose, tighten the screw.
The needle is bent or blunt. Replace the needle, page 16
You have not used the right combi- Choose a thread and needle that are page 15
nation of fabric, thread and needle, appropriate for the type of fabric.
The presser foot you are using is not Attach the presser foot that is correct page 30,31,
appropriate for the type of stitch that for the type of stitch that you want to 33, 34, 35
/OU want to sew, sew,
The upper thread tension is too tight. Loosen the upper thread tension, page 24
The needle
breaks. You are pulling the fabric too much. Lightly guide the fabric.
The area around the hole in the nee- Replace the needle plate
die plate is scratched Contact your retailer or the nearest
authorized service center
The area around the hole in the Replace the presser foot
Contact your retailer or the nearest
)resser foot is scratched authorized service center
Replace the bobbin case
The bobbin case is scratched Contact your retailer or the nearest
authorized service center
You have not used a bobbin that has Incorrect bobbins will not work
properly Only use a bobbin that has page 10
been designed for this machine, been designed for this machine.
You have not threaded the upper
thread properly. (for example, you
have not fitted the spool properly, or Correct the upper threading, page 13
the thread has come out of the guide
above the needle.)
There are knots or tangles in the
thread. Remove any knots or tangles.
The upper
threadbreaks. The needle is not appropriate for the Choose a needle that is appropriate
thread you are using for the type of stitch page 15
The upper thread tension is too tight Loosen the upper thread tension page 24
Remove the tangle thread If the
The thread is tangled, for example, thread is tangled in the shuttle race, page 40
in the shuttle race clean the shuttle race
43
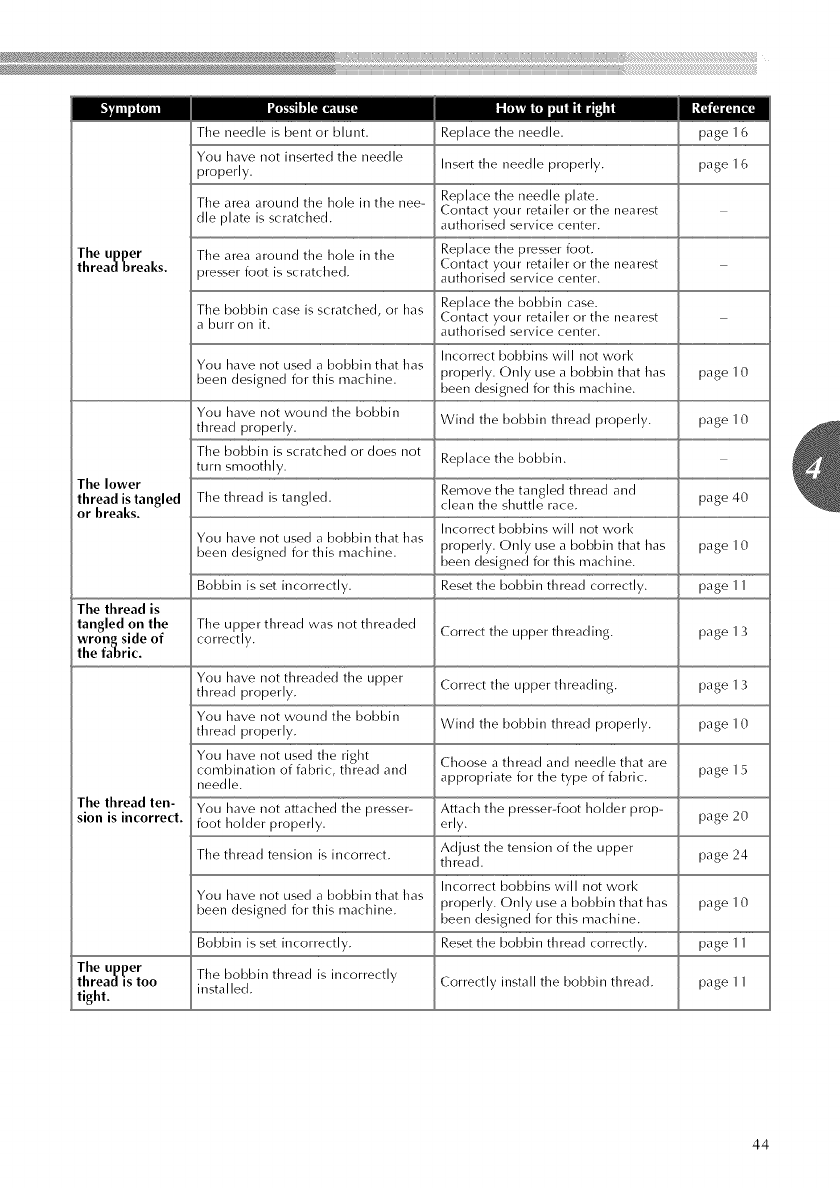
lll_iH_ii_l_iil_i_l_iil_iil_iil_iil_iil_iil_iil_iil_iil_iil_iil_iil_iii_iii_iii_iii_iii_iii_iii_iii_iii_iii_iii_iii_iii_iii_iii_iii_iii_iii_iii_iii_iii_iii_iii_iii_iii_iii_iii_iii_iii_iii_iii_ii_li_i_tii1!!7lli¸i!iiiiii!iii¸ii!!iiiii¸iliiii!iiiiii!iii¸ii!!iiiii¸iliiii!iiiiii!iii¸ii!!iiiii¸iliiii!iiiiii!iii¸ii!!iiiii¸iiiiil
Theneedleisbentorblunt. Replacetheneedle, page16
Youhavenotinsertedtheneedle
properly. Inserttheneedleproperly, page16
Theareaaroundtheholeinthenee-Replacetheneedleplate.
Contactyourretailerorthenearest
(lieplateisscratched, authorisedservicecenter.
Theupper The area around the hole in the Replace the presser foot.
Contact your retailer or the nearest
threadbreaks. )resser foot is scratched, authorised service center.
The bobbin case is scratched, or has Replace the bobbin case.
Contact your retailer or the nearest
a burr on it. authorised service center.
Incorrect bobbins will not work
You have not used a bobbin that has
been designed for this machine, properly. Only use a bobbin that has page 10
been designed for this machine.
You have not wound the bobbin Wind the bobbin thread properly, page 10
thread properly.
The bobbin is scratched or does not
turn smoothly. Replace the bobbin.
The lower Remove the tangled thread and
thread is tangled The thread is tangled, page 40
clean the shuttle race.
or breaks. Incorrect bobbins will not work
You have not used a bobbin that has
been designed for this machine, properly. Only use a bobbin that has page 10
been designed for this machine,
Bobbin is set incorrectly. Reset the bobbin thread correctly, page 11
The thread is
tangled on the The upper thread was not threaded
wrongside of correctly. Correct the upper threading, page 13
the fabric.
You have not threaded the upper Correct the upper threading, page 13
thread properly.
You have not wound the bobbin Wind the bobbin thread properly, page 10
thread properly.
You have not used the right Choose a threacl and needle that are
combination of fabric, thread and page 15
appropriate for the type of fabric.
needle,
The thread ten- You have not attached the presser- Attach the presser-foot holder prop-
sion is incorrect, foot holder properly, erly. page 20
The thread tension is incorrect. Adjust the tension of the upper
thread, page 24
Incorrect bobbins will not work
You have not used a bobbin that has
been designed for this machine, properly. Only use a bobbin that has page 10
been designed for this machine,
Bobbin is set incorrectly. Reset the bobbin thread correctly, page 11
The upper
threadis too The bobbin thread is incorrectly Correctly install the bobbin thread, page 11
instal led.
tight.
44
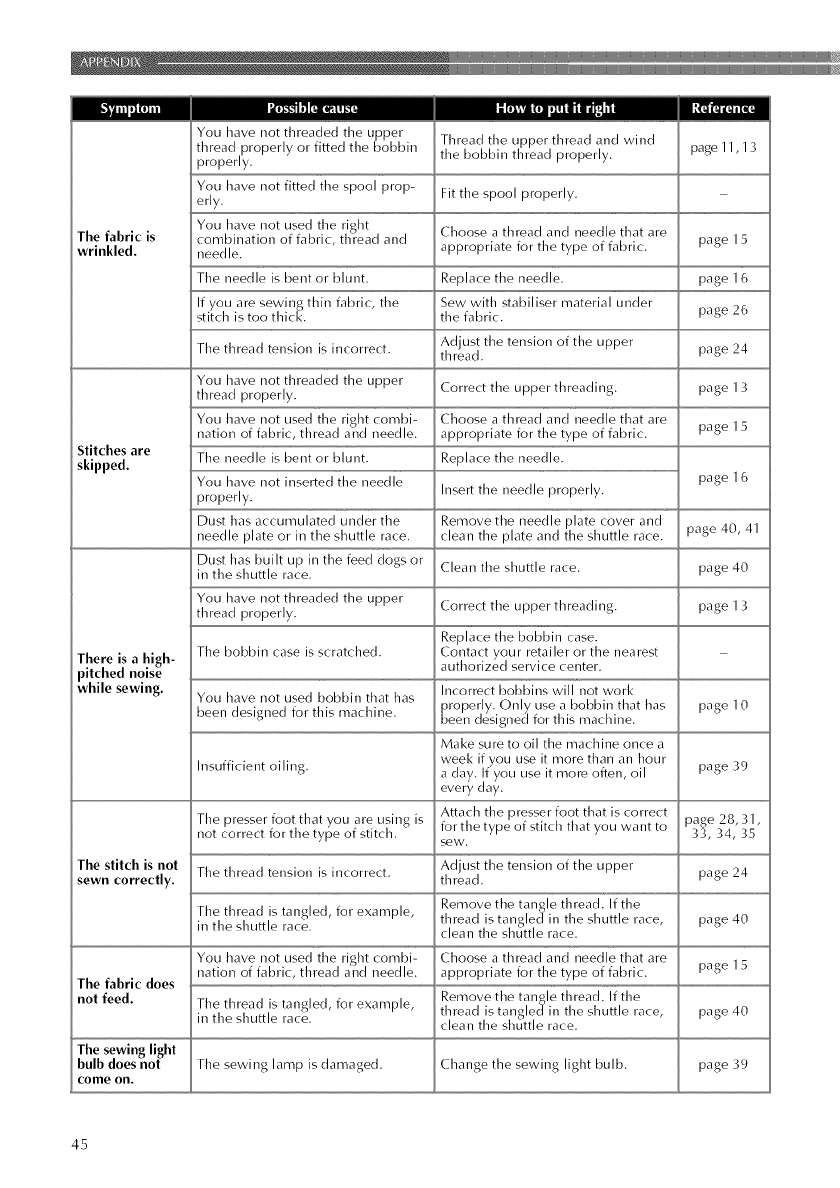
Youhavenotthreadedtheupper
threadproperlyorfittedtilebobbin
properly.
Youhavenotfittedthespoolprop-
erly.
Youhavenotusedtheright
combinationoffabric,threacland
needle
Thread the upper thread and wind
the bobbin thread properly. page 11,13
Fit tile spool properly
The fabric is Choose a threacl and needle that are page 15
wrinkled, appropriate for tile type of fabric
Tile needle is bent or blunt Replace the needle page 16
If you are sewing thin fabric, the Sew with stabiliser material under page 26
stitch is too thick the fabric
Adjust the tension of the upper page 24
The thread tension is incorrect thread
You have not threaded the upper Correct the upper threading page 13
thread properly
You have not used the right combi- Choose a threacl and needle that are page 15
nation of fabric, thread and needle appropriate for the type of fabric
Stitches are
skipped. The needle is bent or blunt. Replace the needle.
You have not inserted the needle page 16
properly Insert the needle properly
Dust has accumulated under the Remove the needle plate cover and
needle plate or in the shuttle race clean the plate and the shuttle race page 40, 41
Dust has built up in the feed clogs or Clean the shuttle race page 40
in the shuttle race
You have not threaded the upper
thread properly Correct the upper threading page 13
Replace the bobbin case
There is a high- The bobbin case is scratched. Contact your retailer or the nearest
pitched noise authorized service center.
while sewing. You have not used bobbin that has Incorrect bobbins will not work
properly Only use a bobbin that has page 10
been designed for this machine been designed for this machine
Make sure to oil the machine once a
Insufficient oiling week if you use it more than an hour page 39
a clay If you use it more often, oil
every clay.
The presser foot that you are using is Attach the presser foot that is correct page 28, 31,
not correct for the type of stitch, for the type of stitch that you want to 33, 34, 35
sew,
The stitch is not The thread tension is incorrect. Adjust the tension of the upper page 24
sewn correctly, thread.
The thread is tangled, for example, Remove the tangle thread If the
in the shuttle race thread is tangled in the shuttle race, page 40
clean the shuttle race
You have not used the right combi- Choose a threacl and needle that are page 15
nation of fabric, thread and needle appropriate for the type of fabric
The fabric does
Remove the tangle threacl If the
not feed. The thread is tangled, for example, thread is tangled in the shuttle race, page 40
in the shuttle race clean the shuttle race
The sewing light
bulb does not The sewing lamp is damaged Change the sewing light bulb page 39
come on.
45
A
accessories ..................................................................... 7
appliqu6s ...................................................................... 35
B
basic stitching ............................................................... 28
blind hem stitching ....................................................... 28
bobbin .......................................................................... 11
bobbin case .................................................................. 12
bobbin winder .............................................................. 10
button sewing ............................................................... 33
buttonhole foot ............................................................. 31
buttonhole sewing ........................................................ 31
c
cleaning ........................................................................ 40
D
darning ......................................................................... 30
E
embroidering ................................................................ 35
extra spool pin .............................................................. 18
F
feed dogs ................................................................. 6_ 41
flat bed attachment .................................................. 6_ 26
foot controller ............................................................... 23
free-arm style ................................................................ 26
O
gathering ...................................................................... 37
H
handwheel ...................................................................... 5
I
joining .......................................................................... 38
M
main parts ....................................................................... 5
main power switch ......................................................... 8
monogramming ............................................................ 35
N
needle .......................................................................... 15
needle bar thread guide .................................................. 6
needle clamp screw ................................................. 6_ 17
needle plate ............................................................. 6_ 41
o
oiling ............................................................................ 39
overcasti ng stitches ....................................................... 27
P
pattern selection dial ............................................... 5_ 22
presser foot .............................................................. 6_ 19
presser foot holder ................................................... 6_ 20
presser foot lever ..................................................... 5 _ 13
pre-tension disk ............................................................ 10
R
relative chart of sewing fhbrics, needles and threads ..... 15
reverse sewing lever ..................................................... 23
s
satin stitching ................................................................ 27
seam ripper ................................................................... 32
sewing machine needles .................................................
shell tuck stitching ........................................................ 37
shuttle hook removal .................................................... 41
shuttle race cleaning ..................................................... 41
spool pin ............................................................... 10_ 13
straight stitch ................................................................ 28
stretch blind stitch ........................................................ 28
stretch fllbrics ............................................................... 26
T
thick fabrics .................................................................. 25
thin fabrics .................................................................... 26
thread cutter ................................................................. 23
thread guide ...................................................................
thread tension ............................................................... 24
trial sewing ................................................................... 25
troubleshooting ............................................................. 43
twin needle ............................................................ 17_ 18
u
upper tension-control dial ...................................... 24_ 42
upper threading ..............................................................
w
winding the bobbin ...................................................... 10
z
zigzag stitches ................................................ 25_ 27_ 35
zipper foot .................................................................... 34
zipper insertion ............................................................. 34
46

English
Spanish
885-405/407
XE2346-001
PrintedinChina
CONOZCA SU
MAQUINA DE COSER
@
®
®
®
FUNCIONES DE
COSTURA B/_SICAS
PUNTADAS CON
APLICACIONES
ANEXO
M6quina de Coser y Remendar B6sica
Manual de instrucciones
Visite nuestro sitio web http://soJutions.brother.com donde puede obtener soporte tecnico sobre productos
y respuestas alas preguntas mas frecuentes (FAQs).
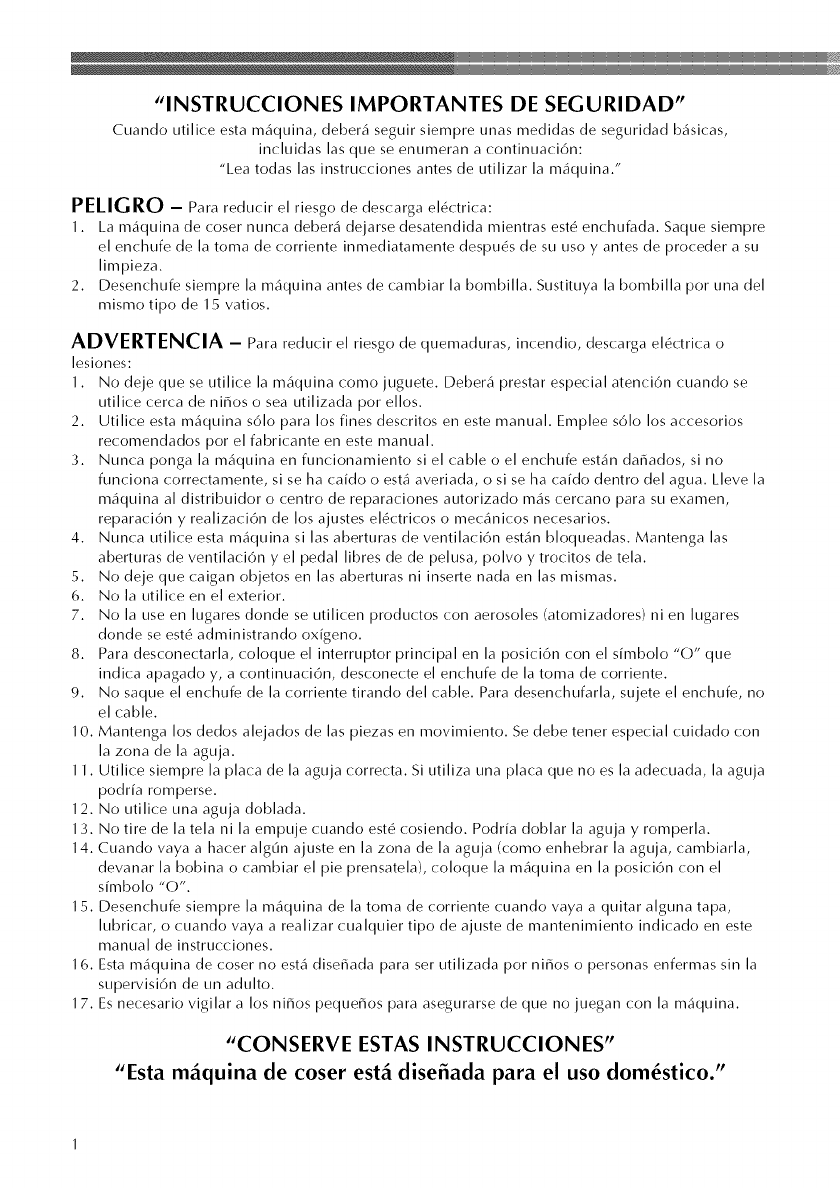
@
"INSTRUCCIONES IMPORTANTES DE SEGURIDAD"
Cuando utili(e esta m_iquina, deber_i seguir siempre unas medidas de seguridad b_si(as,
incluidas las que se enumeran a continuaci6n:
"Lea todas las instrucciones antes de utilizar la m_iquina."
PELIGRO - Para reducir el riesgo de descarga el_ctrica:
]. La m_iquina de coser nunca deber_i dejarse desatendida mientras est(! enchufada. Saque siempre
e[ enchufe de [a toma de corriente inmediatamente despu(!s de su uso y antes de proceder a su
[impieza.
2. Desenchufe siempre [a m_iquina antes de cambiar [a bombilla. Sustituya [a bombilla por una de[
mismo tipo de ]5 vatios.
ADVERTENClA - Para reducir el riesgo de quemaduras, incendio, descarga el(!ctrica o
lesiones:
]. No deje que se utilice [a m_iquina como juguete. Deber_i prestar especial atenci6n cuando se
utilice cerca de niffos o sea utilizada por eilos.
2. Utilice esta m_iquina s61o para los fines descritos en este manual. Empiee s61o los accesorios
recomendados por el fabricante en este manual.
3. Nunca ponga [a m_iquina en funcionamiento si el cable o e[ enchufe est_in daffados, si no
funciona correctamente, si se ha cafdo o est,1 averiada, o si se ha caido dentro de[ agua. Lleve [a
m_iquina a[ distribuidor o centro de reparaciones autorizado m_is cercano para su examen,
reparaci6n y realizaci6n de los ajustes el(!ctricos o mec_inicos necesarios.
4. Nunca utilice esta m_iquina si [as aberturas de ventilaci6n est_in bloqueadas. Mantenga [as
aberturas de ventilaci6n y el pedal [ibres de de pelusa, polvo y trocitos de tela.
5. No deje que caigan objetos en las aberturas ni inserte nada en las mismas.
6. No la utilice en el exterior.
7. No [a use en [ugares donde se utilicen productos con aerosoles (atomizadores) ni en [ugares
donde se est_ administrando oxfgeno.
8. Para desconectaria, co[oque el interruptor principal en [a posici6n con el simbo[o "O" que
indica apagado y, a continuaci6n, desconecte e[ enchufe de [a toma de corriente.
9. No saque el enchufe de la corriente tirando del cable. Para desenchufarla, sujete el enchufe, no
el cable.
]0. Mantenga los dedos alejados de las piezas en movimiento. Se debe tener especial cuidado con
[a zona de [a aguja.
] ]. Utilice siempre la placa de la aguja correcta. Si utiliza una placa que no es la adecuada, la aguja
podrfa romperse.
]2. No utilice una aguja doblada.
]3. No tire de la tela ni la empuje cuando est(! cosiendo. Podria doblar la aguja y romperla.
]4. Cuando vaya a hacer alg(m ajuste en la zona de la aguja (como enhebrar la aguja, cambiarla,
devanar [a bobina o cambiar e[ pie prensatela), co[oque [a m_iquina en [a posici6n con e[
simbolo "0".
15. Desenchufe siempre [a m_quina de la toma de corriente cuando vaya a quitar alguna tapa,
lubricar, o cuando vaya a realizar cualquier tipo de ajuste de mantenimiento indicado en este
manual de instrucciones.
16. Esta m_quina de coser no est_ disefiada para ser utilizada por nifios o personas enfermas sin la
supervisi6n de un aduIto.
]7. Es necesario vigilar a los niffos pequeffos para asegurarse de que no juegan con la m_iquina.
"CONSERVE ESTAS I NSTRUCCION ES"
"Esta m_quina de coser est_ diseffada para el uso dom_stico."
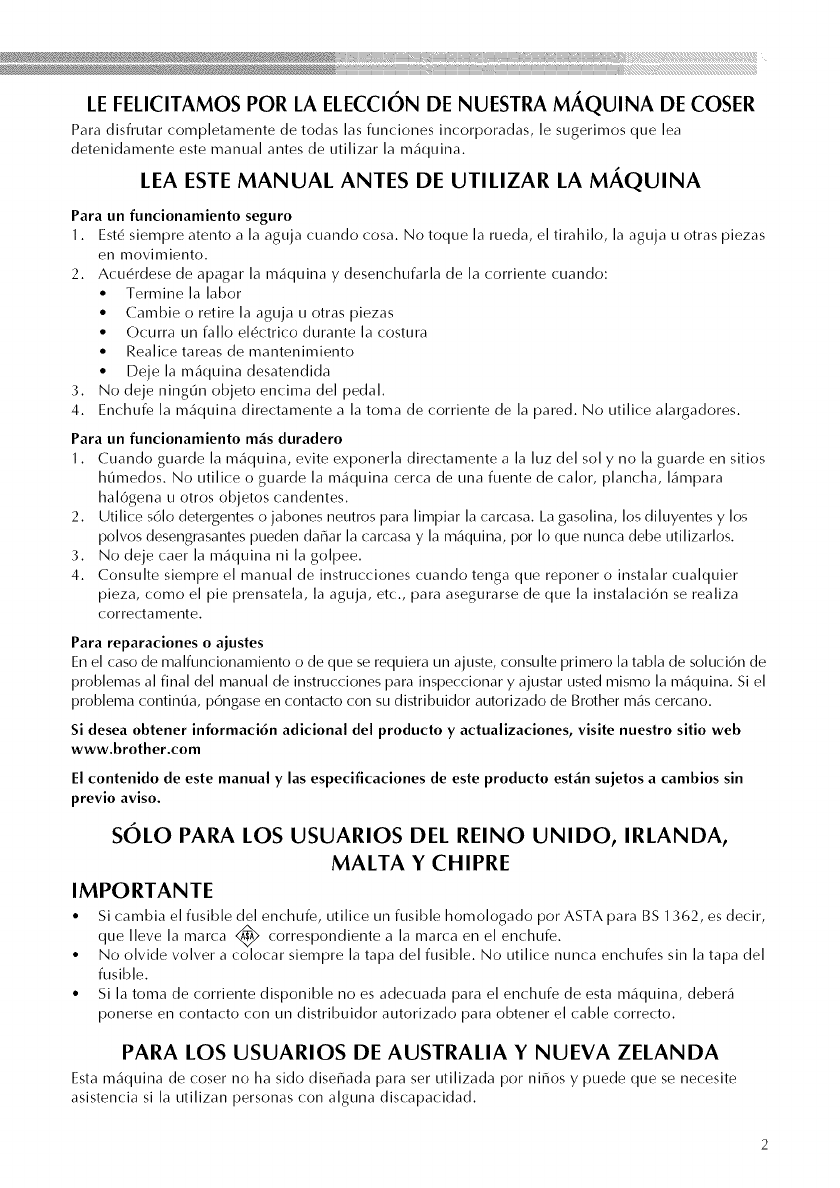
i__iiiiii_iiiiiiii_i_i _iii%iiiii%iiiii%_iiiiiiii_ii_??_i_??i_i_??i_i_??i_i_??i_i_??i_i_??i_i_??i_i_??i_i_??i_i_??i_i_??i_i_??i_i_??i_?_iiiii_iiiiii_i_!i_i_ii_ii_ii_ii_ii_ii_ii_i_i_i!i!i!i_i_!i_i_i!_i_i!_!_!i_!i_!i_!i_!i_!i_!i_!i_!i_!i_!i_!i_!i_!i_!i_!i_!i_!i_!i_!i_!i_!i_!i_!i_!i_!i_!i_!i_!i_!i_!i_!i_!i_!i_!i_!i_!i_!i_!i_!i_!i_!i_!i_!i_!i_!i_!i_!i_!i_!i_!i_!i_!i_!i_!i_!i_!i_!i_!i_!i_!i_!i_!i_!_!_!_!!i
LE FELICITAMOS POR LA ELECCION DE NUESTRA M_.QUINA DE COSER
Para disfrutar (ompletamente de todas las fun( iones in(orporadas, le sugerimos que lea
detenidamente este manual antes de utilizar la m_iquina.
LEA ESTE MANUAL ANTES DE UTILIZAR LA MAQUINA
Para un funcionamiento seguro
1. Est(! siempre atento a la aguja cuando cosa. No toque la rueda, el tirahi[o, la aguja u otras piezas
en movimiento.
2. Acu(!rdese de apagar [a m_iquina y desenchufaria de [a corriente cuando:
• Termine [a labor
• Cambie o retire [a aguja u otras piezas
• Ocurra un faI[o ei(!ctrico durante [a costura
• ReaIice tareas de mantenimiento
• Deje [a m_iquina desatendida
3. No deje ning(m objeto encima de[ pedal
4. Enchufe [a m_iquina directamente a [a toma de corriente de [a pared. No utilice alargadores.
Para un funcionamiento m_s duradero
1. Cuando guarde [a m_iquina, evite exponerIa directamente a [a [uz de[ so[ y no [a guarde en sitios
h0medos. No utiIice o guarde [a m_iquina cerca de una fuente de calor, piancha, [_impara
hal6gena u otros objetos candentes.
2. Utilice s61o detergentes o jabones neutros para [impiar [a carcasa. La gasolina, los diIuyentes y los
poIvos desengrasantes pueden daffar [a carcasa y [a m_iquina, por 1o que nunca debe utilizarios.
3. No deje caer [a m_iquina ni [a goipee.
4. Consuite siempre e[ manual de instrucciones cuando tenga que reponer o instaIar cuaiquier
pieza, como eI pie prensatela, [a aguja, etc., para asegurarse de que [a instalaci6n se realiza
correctamente.
Para reparaciones oajustes
En el caso de malfuncionamiento o de que se requiera un ajuste, consulte primero la tabia de soluci6n de
probiemas a[ final de[ manual de instrucciones para inspeccionar y ajustar usted mismo [a m_iquina. Si e[
probIema contin(_a, p6ngase en contacto con su distribuidor autorizado de Brother m_is cercano.
Si desea obtener informaci6n adicional del producto y actualizaciones, visite nuestro sitio web
www.brother.com
El contenido de este manual y las especificaciones de este producto est_n sujetos a cambios sin
previo aviso.
SOLO PARA LOS USUARIOS DEL REINO UNIDO, IRLANDA,
MALTA Y CHIPRE
IMPORTANTE
• Si(ambia el fusible del en(hufe, utili(e un fusible homologado por ASTA para BS 1362,es de(ir,
que Ileve la marca <_ correspondiente a la marca en el enchufe.
• No olvide volver a colocar siempre la tapa del fusible. No utilice nunca enchufes sin la tapa del
fusible.
• Si la toma de corriente disponible no es adecuada para el enchufe de esta m_iquina, deber_i
ponerse en contacto con un distribuidor autorizado para obtener el cable correcto.
PARA LOS USUARIOS DE AUSTRALIA Y NUEVA ZELANDA
Esta m_iquina de (oser no ha sido diseffada para ser utilizada por niffos y puede que se ne(esite
asistencia si la utilizan personas con alguna discapacidad.
CONTENIDO ...................................................................................................................... 3
1. CONOZCA SU MA,QUINA DE COSER ........................................................... 5
NOMBRES Y FUNCIONES DE LAS PIEZAS DE LA M,_QUINA ............................................ 5
Componentes principales ................................................................................................................................. 5
SecciSn de aguja y pie prensatela ................................................................................................................... 6
Unidad de cama plana ..................................................................................................................................... 6
ACCESORIOS ...................................................................................................................... 7
ACCESORIOS OPCIONALES ............................................................................................... 7
USO DE LA M,_QUINA DE COSER ..................................................................................... 8
Medidas de precauci6n con la corriente electrica ............................................................................................ 8
Corriente electrica ............................................................................................................................................ 8
Pedal ................................................................................................................................................................ 9
EstabilizaciSn de la maquina ............................................................................................................................ 9
ENHEBRADO DE LA M,_QUINA ....................................................................................... 10
Devanado de la bobina .................................................................................................................................. 10
Enhebrado del hilo inferior ............................................................................................................................. 11
Hilo superior ................................................................................................................................................... 13
Procedimiento para tirar del hilo inferior ........................................................................................................ 14
CAMBIO DE LA AGUJA .................................................................................................... 15
Precauciones con las agujas ......................................................................................................................... 15
SelecciSn de la aguja segOn el tipo de tela y de hilo ..................................................................................... 15
ComprobaciSn de la aguja ............................................................................................................................. 16
Cambio de la aguja ........................................................................................................................................ 16
Costura con aguja gemela (opciSn) ............................................................................................................... 18
CAMBIO DEL PIE PRENSATELA ........................................................................................ 19
Cambio del pie prensatela ............................................................................................................................. 19
ExtracciSn del soporte del pie prensatela ...................................................................................................... 20
2. FUNCIONES DE COSTURA BA,SICAS ........................................................... 21
COSTURA ......................................................................................................................... 21
Procedimiento general para la costura .......................................................................................................... 21
Selecci6n de puntadas ................................................................................................................................... 22
Inicio de la costura ......................................................................................................................................... 23
Costura en reversa ......................................................................................................................................... 23
Tensi6n del hilo .............................................................................................................................................. 24
CONSEJOS UTILES DE COSTURA ..................................................................................... 25
Costura de prueba ......................................................................................................................................... 25
Cambio de direcci6n de la costura ................................................................................................................. 25
Costura de curvas .......................................................................................................................................... 25
Costuras de telas gruesas ............................................................................................................................. 25
Costura de telas finas .................................................................................................................................... 26
Costura de telas elasticas .............................................................................................................................. 26
Uso del estilo de brazo libre ........................................................................................................................... 26
3. PUNTADAS CON APLICACIONES ............................................................... 27
PUNTADAS UTILES ........................................................................................................... 27
Puntadas de zig-zag ...................................................................................................................................... 27
Costura basica ............................................................................................................................................... 27
Costura invisible para dobladillo .................................................................................................................... 28
Zurcidos ......................................................................................................................................................... 29
/i
COSTURA DE OJALES ....................................................................................................... 30
Costura de ojales ........................................................................................................................................... 30
Ajuste de costura ........................................................................................................................................... 31
Costura de bot6n ............................................................................................................................................ 32
COSTURA DE CREMALLERAS ........................................................................................... 33
APLICACIONES, MONOGRAMAS Y BORDADOS ............................................................ 34
Aplicaciones ................................................................................................................................................... 34
Monogramas y bordado ................................................................................................................................. 34
COSTURAS DECORATIVAS .............................................................................................. 36
Fruncidos ....................................................................................................................................................... 36
Puntada de concha ........................................................................................................................................ 36
Costura elastica ............................................................................................................................................. 37
4. ANEXO .......................................................................................................... 38
MANTENIMIENTO ............................................................................................................ 38
Engrase .......................................................................................................................................................... 38
Cambio de la bombilla .................................................................................................................................... 38
Limpieza de la superficie de la maquina ........................................................................................................ 39
Limpieza de la pista de la lanzadera .............................................................................................................. 39
Limpieza de los dientes de arrastre ............................................................................................................... 40
Ajuste de la tensiSn de la caja de la bobina ................................................................................................... 41
SOLUCION DE PROBLEMAS ............................................................................................ 42
iNDICE .............................................................................................................................. 46
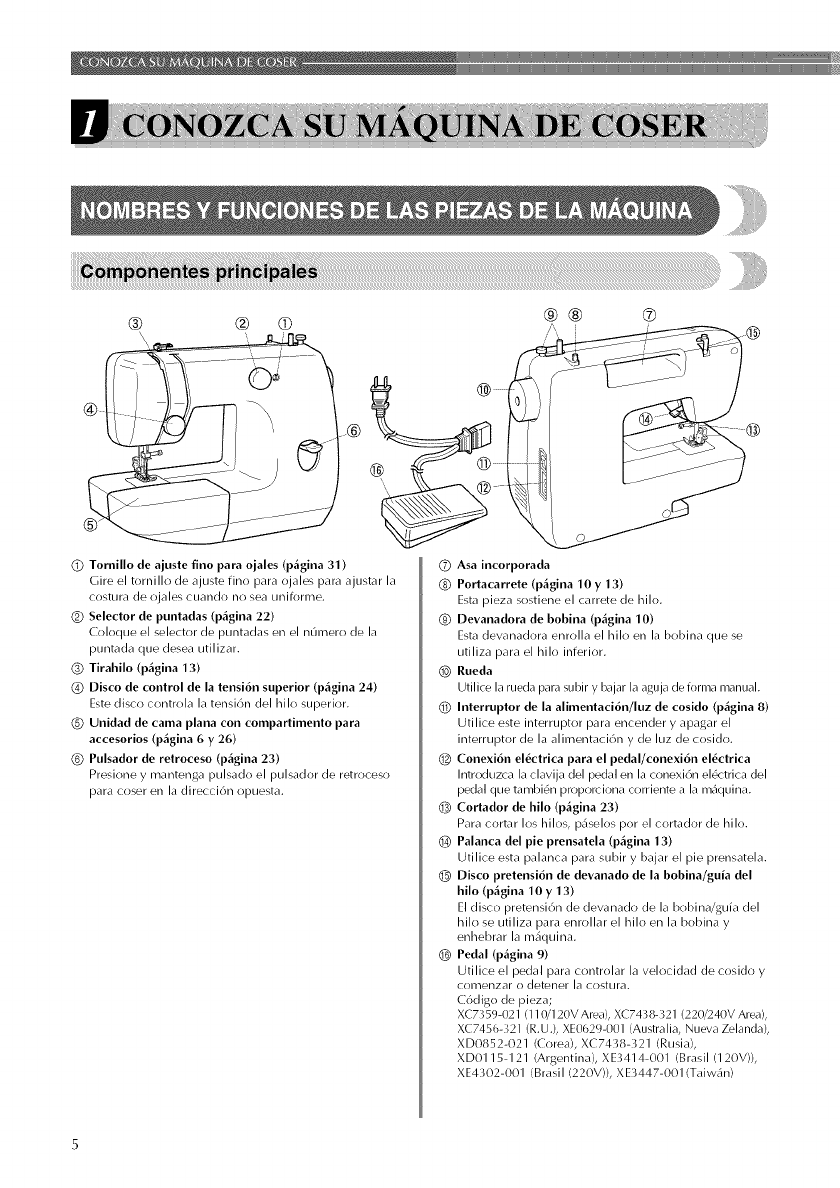
® ® _ ®® ®
\ ,,, i ®
Toroillo de ajuste fioo para ojales (p_gioa 31) _Asa iocorporada
Portacarrete (p_gioa 10 y 13)
Gire el tornillo de ajuste fino para ojales para ajustar la
costura de ojales cuando no sea uniforl_3e.
(_) Selector de puntadas (p_gina 22)
Coloque el selector de puntadas en el n(mlero de la
puntada que desea utilizar.
(_ Tirahilo (p_gioa 13)
(_ Disco de control de la tensi6o superior (p_gioa 24)
Este disco controla la tensi6n del hilo superior.
(_) Uoidad de cama plaoa coo compartimeoto para
accesorios (p_gioa 6 y26)
@ Pulsador de retroceso (p_gina 23)
Presione y mantenga pulsado el pulsador de retroceso
para coser en la direcci6n opuesta.
Esta pieza sostiene el carrete de hilo.
0Devanadora de bobina (p_gioa 10)
Esta devanadora enrolla el hilo en la bobina que se
utiliza para el hilo inferior.
(_ Rueda
Utilice la rueda para subir y bajar la aguja de forma manual.
(_) Ioterruptor de la alimentaci6o/luz de cosido (p_gioa 8)
Utilice este interruptor para encender y apagar el
interruptor de la alimentaci6n y de luz de cosido.
O Cooexi6o el_ctrica para el pedal/cooexi6o el_ctrica
Introduzca la clavija del pedal en la conexiOn el6ctrica del
pedal que tambi6n proporciona corriente a la m_iquina.
O Cortador de hilo (p_gioa 23)
Para cortar los hilos, p_iselos por el cortador de hilo.
OPalaoca del pie prensatela (p_gioa 13)
Utilice esta palanca para subir y bajar el pie prensatela.
O Disco pretensi6n de devaoado de la bobioa/guia del
hilo (p_gioa 10 y 13)
El disco pretensi6n de devanado de la bobina/guia del
hilo se utiliza para enrollar el hilo en la bobina y
enhebrar la m_'lquina.
@Pedal (p4gioa 9)
Utilice el pedal para controlar la velocidad de cosido y
comenzar o detener la costura.
C6digo de pieza;
XC7359-021 (110/120V Area), XC7438-321 (220/240V Area),
XC7456-321 (R.U.), XE0629-001 (Australia, Nueva Zelanda),
XD0852-021 (Corea), X(7438-321 (Rusia),
XD0115-121 (Argentina), XE3414-001 (Brasil (120V)),
XE4302-001 (Brasil (220V)), XE3447-001 (Taiw_'u/)
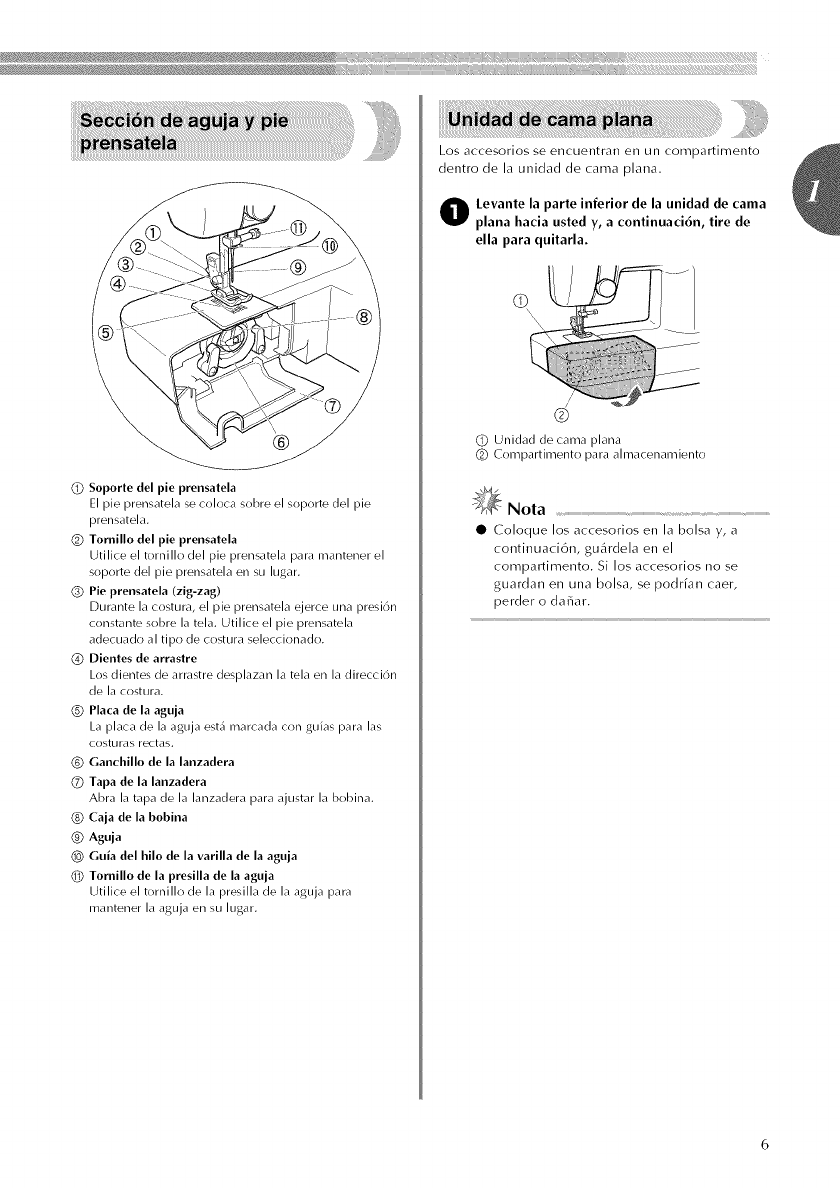
(!)Soporte del pie prensatela
El pie prensatela se coloca sobre el soporte del pie
prensatela.
(_) Tomillo del pie prensatela
Utilice el tornillo del pie prensatela para mantener el
soporte del pie prensatela en su lugar.
(_) Pie prensatela (zig-zag)
Durante la costura, el pie prensatela ejerce una presi6n
constante sobre la tela. Utilice el pie prensatela
adecuado al tipo de costura seleccionado.
Dientes de arrastre
Los dientes de arrastre desplazan la tela en la direcci6n
de la costura.
_) Placa de la aguja
La plata de la aguja estJI marcada con guias para las
costuros rectas.
(_) Ganchillo de la lanzadera
(_) Tapa de la lanzadera
Abra la tapa de la lanzadera para ajustar la bobina.
(_) Caja de la bobina
O Aguja
(_ Guia del hilo de la varilla de la aguja
(_) Tornillo de la presilla de la aguja
Utilice el tornillo de la presilla de la aguja para
mantener la aguja en su lugar.
Los accesorios se encuentran en un col'npartimento
dentro de la unidad de cama plana.
O evante la parle inferior de la unidad de cama
plana hacia usted y, acontinuaci6n, tire de
ella para quitarla.
©
/
®
(_) Unidad de cama plana
(_) Compartimento para almacenamiento
_Nota
•Coloque los accesorios en la bolsa y, a
continuaci6n, gu_irdela en el
compartimento. Si los accesorios no se
guardan en una bolsa, se podffan caer,
perder o dafiar.

Los accesorios siguientes estiln guardados en la unidad de cama plana. Hemos diseiiado estos accesorios para
ayudarle a realizar la mayoda de las tareas de costura.
1.
_Nota
• Puede obtener el tomillo del sopolte del pie prensatela a trav6s de su distribuidor autorizado, (C(_digo de
pieza: 132730-122)
• Puede obtener recambio para el pie prensatela de f_brica a trav6s de su distribuidor autorizado.
(C6digo de pieza: 138135-122)
4.
5. 6. 7.
_ aguja de 90/14 _)
N°
1
2
3
4
Nombre de la pieza
Pie para ojales "A"
Pie para cremalleras
"F'
_ie especial para
x)tones "M"
Placa de zurcir
C6digo de la pieza
IOtros N" Nombre de la pieza
EE.UU/Canad_ I
X59369-321 5 Bobina
X59370-021 6 Juego de agujas
XE2137-001 7 Destorni Ilador ovalado
XA3442-121
C6digo de la pieza
EE.UU/Canad_ Otros
SA156 XA5539-151
XE5328-001
XE5241-001
1.
N" Nombre de la pieza
1 Portacarrete adicional
2 Aguja gemela
C6digo de la pieza
EE.UU/Canad_ I Otros
1 _0920-021
X57521-021
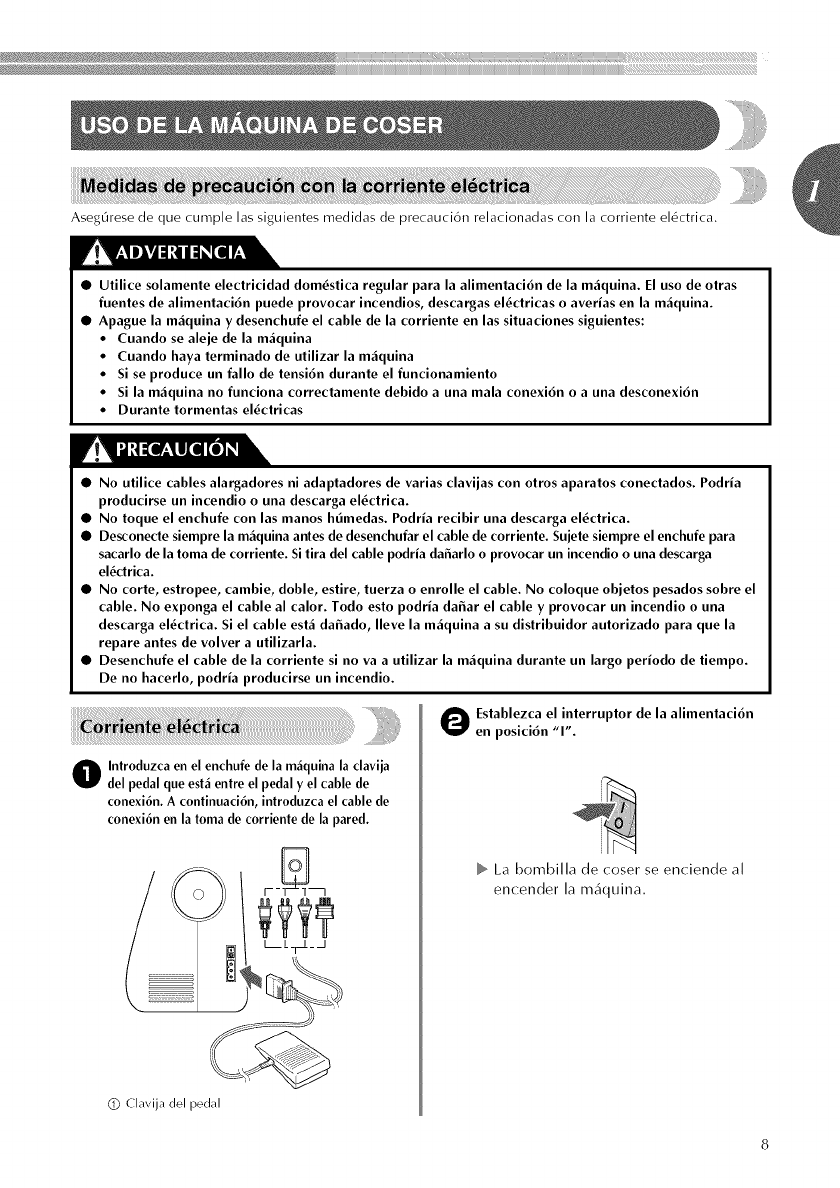
1jiiii!jiiii_:_}iD:_}iiii_iiiiiii_iiiii_iiiii_iiiii_iiiii_iiiii_iiiii_iiiii_iiiiii_iii_i_¸iii;iiiii_ii_ii_ii_ii_ii_ii_ii_ii_ii_ii_ii_ii_ii_ii_ii_ii_iii¸iiiiiiiiiiiiiii/iiiiiiiiiiiiiiiiiiiiii,iii_iiiii_iiiii_iiiii_iiiii_iiiiiii!i!i_I¸!I!¸I¸i!!i'i¸iiii:_ii_i¸!i!iiii¸ii!_!iiil¸i¸I¸!i!:ili¸i¸iiii:_ii_i!i!iiii¸ii!_!iiil¸i¸I¸!i!ii_il¸ii¸ii¸ii¸ii¸i!!i:!il¸_i!!:ili¸i¸iiii:_ii_i¸!i!iiii¸ii!_!iiil¸i¸I¸!i!:ili¸i¸ii:i!ijll
Aseg0rese de que cumple las siguientes medidas de precauci6n relacionadas con la corriente el6ctrica.
•Utilice solamente electricidad dom6stica regular para la alimentaci6n de la m_iquina. El uso de otras
fuentes de alimentaci6n puede provocar incendios, descargas el6ctricas o averias en la m_iquina.
•Apague la m_iquina y desenchufe el cable de la corriente en las situaciones siguientes:
• Cuando se aleje de la m_iquina
•Cuando haya terminado de utilizar la m_iquina
•Si se produce un fallo de tensi6n durante el funcionamiento
•Si la m_iquina no funciona correctamente debido a una mala conexi6n o a una desconexi6n
•Durante tormentas el6ctricas
•No utilice cables alargadores ni adaptadores de varias clavijas con otros aparatos conectados. Podria
producirse un incendio o una descarga el6ctrica.
•No toque el enchufe con las manos htimedas. Podria recibir una descarga el6ctrica.
•Desconecte siempre la m_quina antes de desenchufar el cable de corriente. Sujete siempre el enchufe para
sacarlo de la toma de corriente. Si tira del cable podria dafiarlo o provocar un incendio o una descarga
el6ctrica.
•No corte, estropee, cambie, doble, estire, tuerza o enrolle el cable. No coloque objetos pesados sobre el
cable. No exponga el cable al calor. Todo esto podria dafiar el cable y provocar un incendio o una
descarga el6ctrica. Si el cable est_ida_ado, Ileve la m_iquina a su distribuidor autorizado para que la
repare antes de volver a utilizarla.
•Desenchufe el cable de la corriente si no va a utilizar la m_iquina durante un largo periodo de tiempo.
De no hacerlo, podria producirse un incendio.
O ntroduzca en el encbufe de la m_iquina la claviia
del pedal que est_ entre el pedal y el cable de
conexi6n. A continuaci6n, introduzca el cable de
conexi6n en la toma de corriente de la pared.
(_Z) Clavija del pedal
O stablezca el interruptor de la alimentaci6n
en posici6n "1".
La bombilla de coser se enciende al
encender la m_iquina.
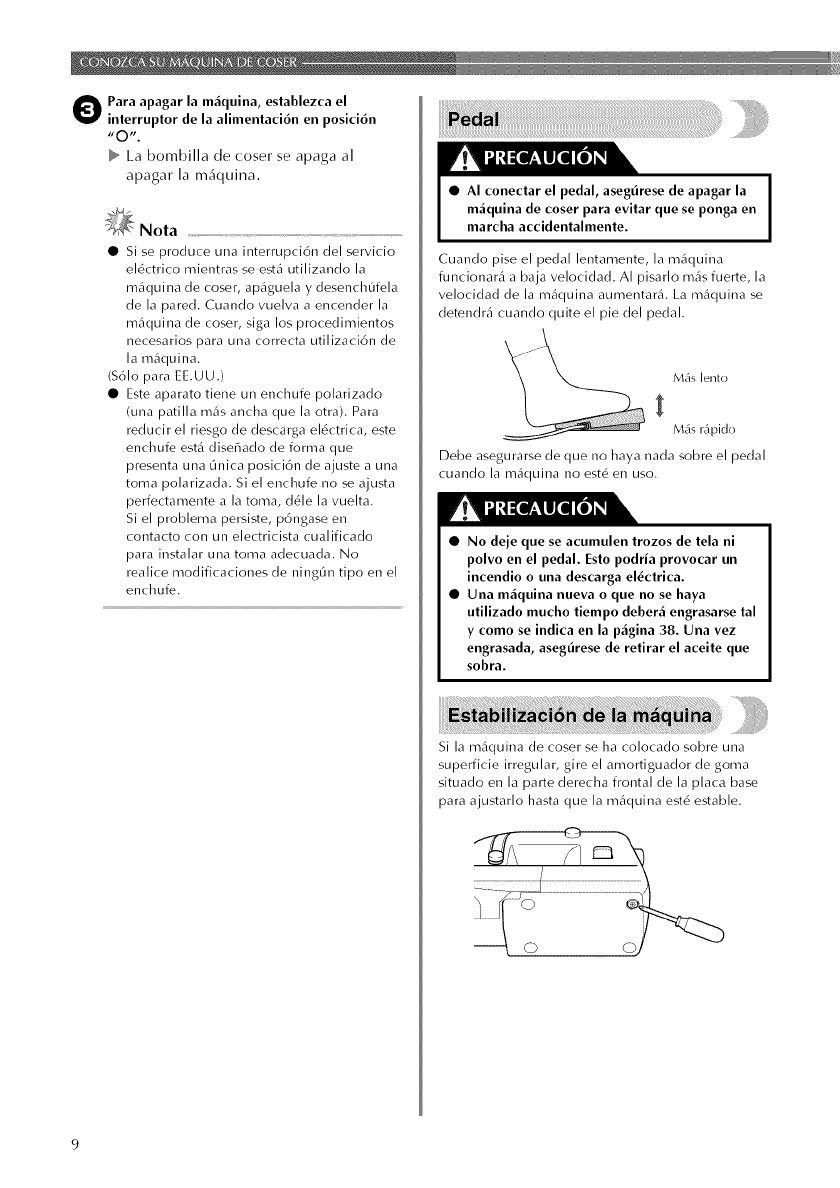
O ara apagar la m_iquina, establezca el
interruptor de la alimentaci6n en posici6n
J_O _r"
La bombi][a de coser se apaga a[
apagar [a m_iquina.
_Nota
• si se produce una intenupci6n del servicio
el6ctrico mientras se est_ utilizando la
m4quina de coser, ap_iguela ydesench_fela
de la pared. Cuando vuelva a encender la
m4quina de coser, siga los procedirnientos
necesarios para una correcta utilizaci6n de
la m_iquina.
($61o para EE.UU.)
• Este aparato tiene un enchufe polarizado
(una patilla m4s ancha que la otra). Para
reducir el riesgo de descarga el6ctrica, este
enchufe est_ disefiado de forma que
presenta una _nica posici6n de ajuste a una
toma polarizada. Si el enchufe no se ajusta
perfectamente a la toma, d61e la vuelta.
Si el problema persiste, p6ngase en
contacto con un electricista cualificado
para instalar una toma adecuada. No
realice modificaciones de ning_n tipo en el
enchuf( _ ,
V! I U:,i:[Ir:ll[ll [t] _Ik
I
•AI conectar el pedal, asegtirese de apagar la I
m_iquina de coser para evitar que se ponga en I
marcha accidentalmente.
Cuando pise el pedal lentamente, la m_quina
funcionar4 a baja velocidad. AI pisarlo m_s fuerte, la
velocidad de la m_iquina aumentar_i. La m_iquina se
detendr_i cuando quite el pie del pedal.
M_'lslento
M_isr_']pido
Debe asegurarse de que no haya nada sobre el pedal
cuando la m_iquina no est6 en uso.
•No deje que se acumulen trozos de tela ni
polvo en el pedal. Esto podria provocar un
incendio o una descarga el_ctrica.
•Una m_quina nueva o que no se haya
utilizado mucho tiempo deber_i engrasarse tal
y como se indica en la p_igina 38. Una vez
engrasada, asegt_rese de retirar el aceite que
sobra.
Si la m_quina de coser se ha colocado sobre una
superficie irregular, gire el amoltiguador de goma
situado en la parte derecha frontal de la plata base
para ajustarlo hasta que la m_iquina est6 estable.
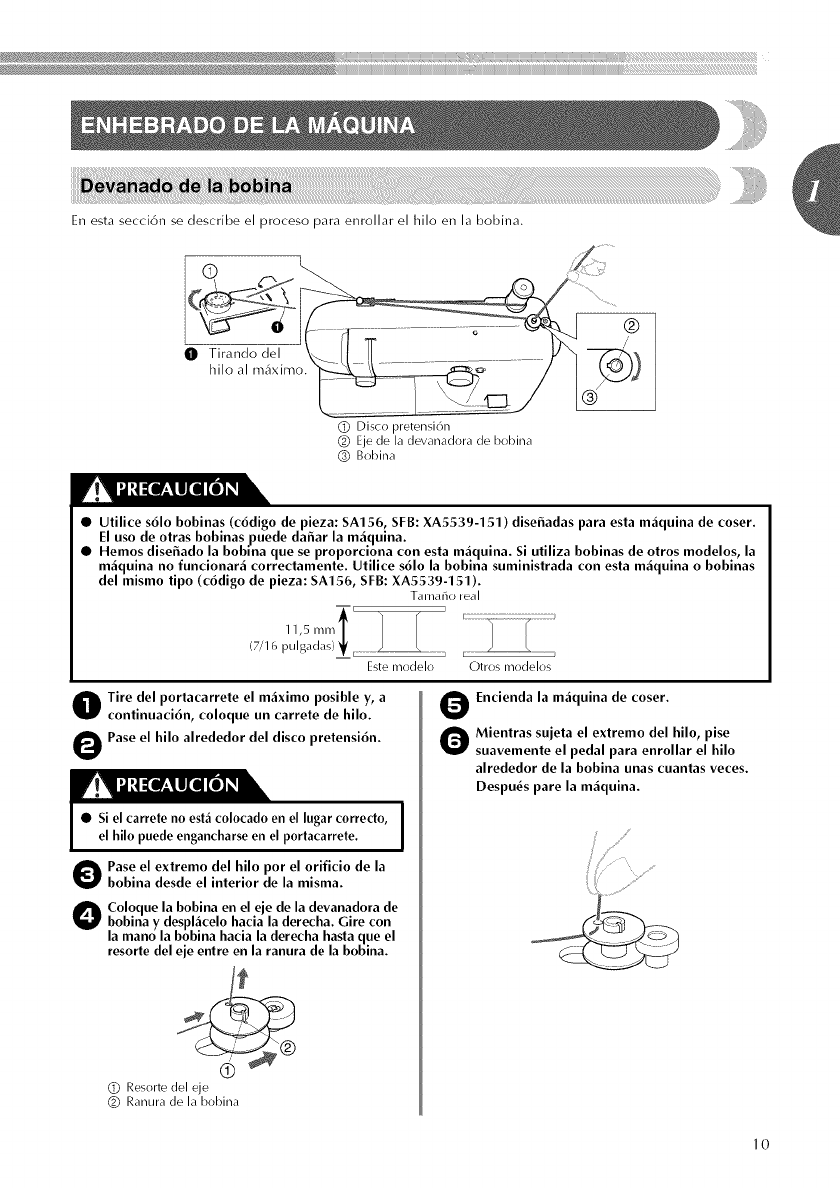
Enestasecci6nsedescribeelprocesoparaenrollarelhiloenlabobina.
O Tirandodel
hiloalm_iximo
(Z) Disco pretensi6n
(_) Eje de la devanadora de bobina
(_) Bobina
V! 11 U:t :[If:ll[ll [t] _Ik
•Utilice s61o bobinas (c6digo de pieza: SA156, SFB: XA5539-151) disefiadas para esta m_iquina de coser.
El uso de otras bobinas puede dafiar la m_iquina.
•Hemos disefiado la bobina que se proporciona con esta m_iquina. Si utiliza bobinas de otros modelos, la
m_iquina no funcionar_i correctamente. Utilice s61o la bobina suministrada con esta m_iquina o bobinas
del mismo tipo (c6digo de pieza: SA156, SFB: XA5539-151 ).
T_II i/_11]o le_ll
/ ¸¸:..........................
11,5mm _lf
(7/16 pulgadas) _ _ E.........................
Este modelo Otros modelos
O ire del portacarrete el m_iximo posible y, a
continuaci6n, coloque un carrete de hilo.
OPase el hilo alrededor del disco pretensi6n.
• Si el carrete no esl_icolocado en el lugar corredo,
el hilo puede engancharseen el portacarrete.
Oase el extremo del hilo pot el orificio de la
bobina desde el interior de la misma.
Ooloque la bobina en el eje de la devanadora de
bobina y despliicelo hacia la derecha. Gire con
la mann la bobina hacia la derecha hasta que el
resorte del eje entre en la ranura de la bobina.
®
(_) Resorte del eje
(_) Ranura de la bobina
Encienda la m_iquina de coser.
O ientras sujeta el extremo del hilo, plse
suavemente el pedal para enrollar el hilo
alrededor de la bobina unas cuantas veces.
Despu6s pare la m_iquina.
# J
10
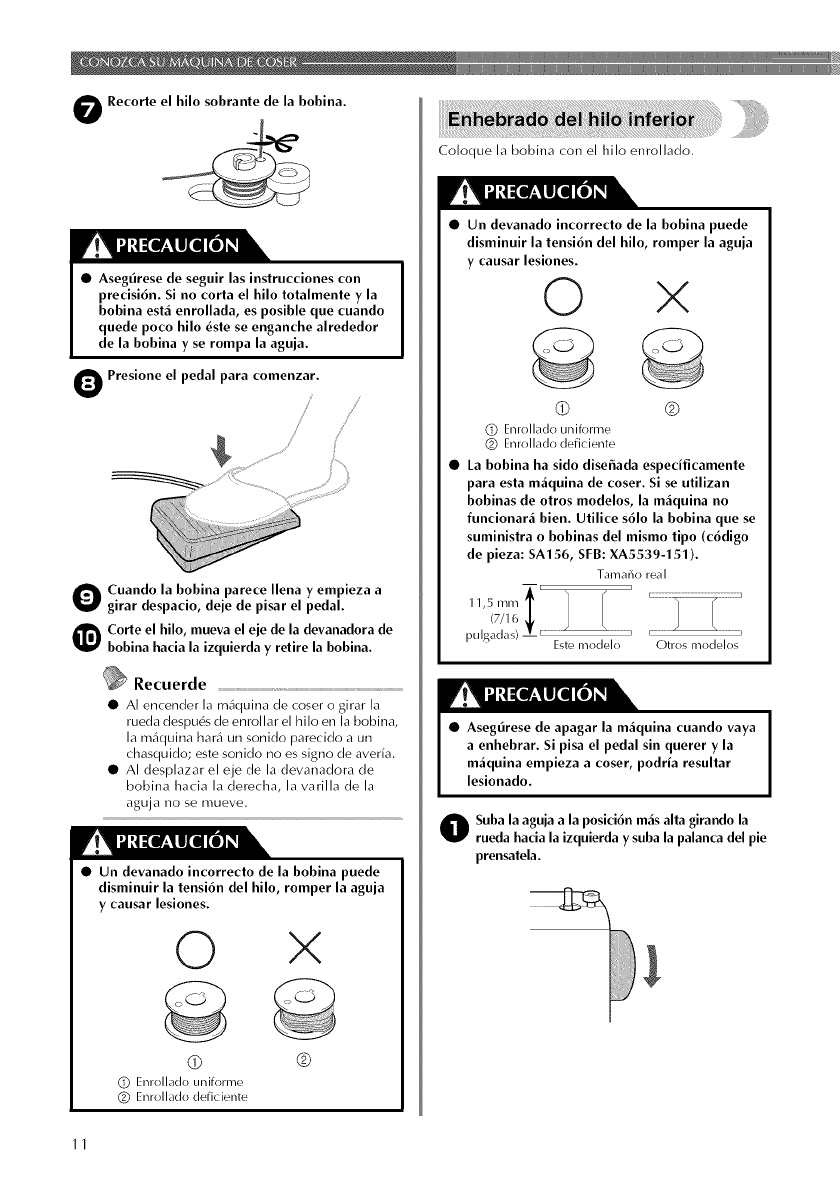
O Recorteel hilo sobrante de la bobina.
•Aseg_rese de seguir las instrucciones con
precisi6n. Si no corta el hilo totalmente y la
bobina est_ienrollada, es posible que cuando
quede poco hilo _ste se enganche alrededor
de la bobina y se rompa la aguja.
Presione el pedal para comenzar.
OCuando la bobina parece Ilena y empieza a
girar despacio, deje de pisar el pedal.
Corte el hilo, mueva el eje de la devanadora de
bobina hacia la izquierda y retire la bobina.
Recuerde
• AI encender la m4quina de coser o girar la
rueda despu_s de enrollar el hilo en la bobina,
la m<iquina har<i un sonido parecido a un
chasquido; este sonido no es signo de averfa,
• AI desplazar el eje de la devanadora de
bobina hacia la derecha, la varilla de la
aguja no se mueve.
r! I bi:t :[llF:l|[lll [e] _I
•Un devanado incorrecto de la bobina puede
disminuir la tensi6n del hilo, romper la aguja
y causar lesiones.
O X
©
@ ®
(_) Enrollado uniforme
(_) Enrollado deficiente
Coloque la bobina con el hilo enrollado.
I U_t:[IF:II[II [01_I
•Un devanado incorrecto de la bobina puede
disminuir la tensi6n del hilo, romper la aguja
y causar lesiones.
© ×
©
@ ®
(_) Enrollado uniforme
(_) Enrollado deficiente
I_abobina ha sido dise_ada espedficamente
para esta m_iquina de coser. Si se utilizan
bobinas de otros modelos, la m_iquina no
funcionar_i bien. Utilice s61o la bobina que se
suministra o bobinas del mismo tipo (c6digo
de pieza: SA156, SFB: XA5539-151).
Tamalio real
4rI
ll,5 A_K......T | | ..........................
pulgadas)-- .............................ir..........................•
Estemodelo Otros modelos
•Aseg4rese de apagar la m_iquina cuando vaya
a enhebrar. Si pisa el pedal sin querer y la
m_iquina empieza a coser, podria resultar
lesionado.
O Suba la aguja a la posici6n m_isalia girando la
rueda hacia la izquierda y suba la palanca del pie
prensatela.
11
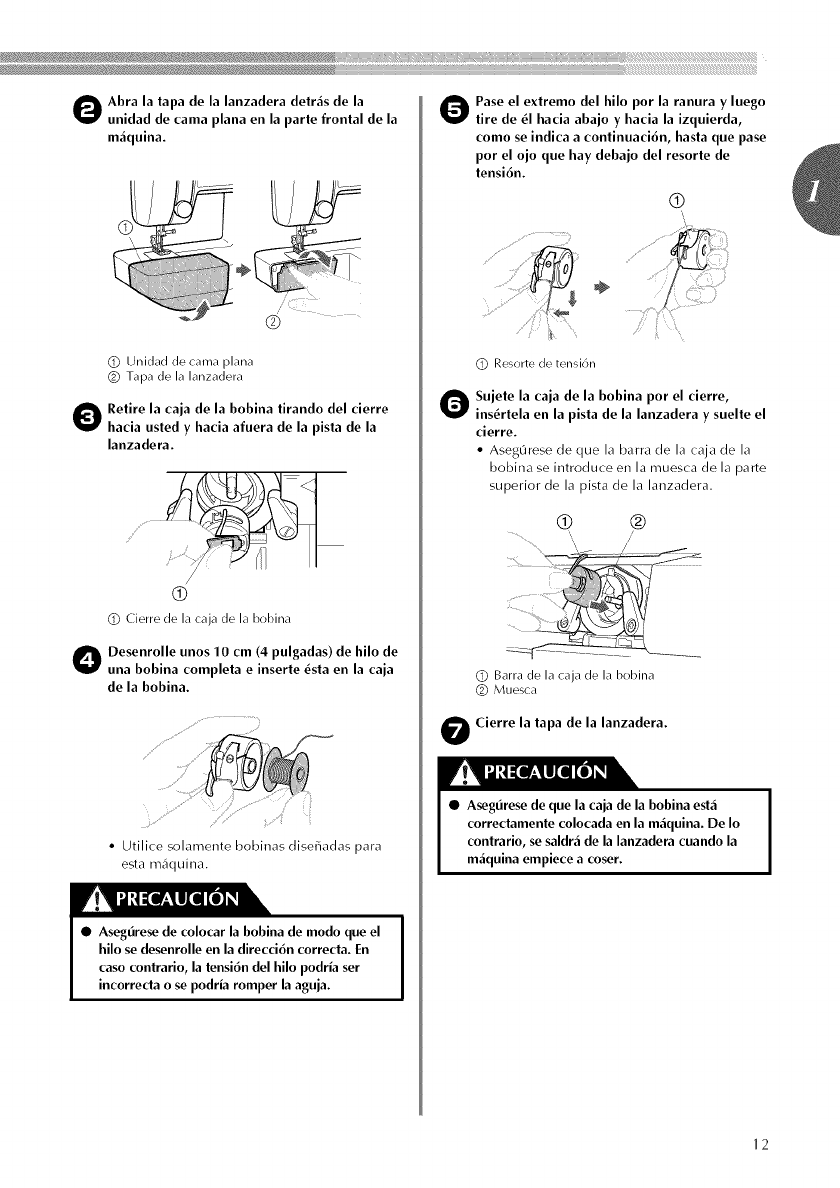
Obra la tapa de la lanzadera detr_is de la
unidad de cama plana en la parle frontal de la
m_iquina.
@
@ Unidad de cama plana
@ Tapa de la lanzadera
Oetire la caja de la bobina tirando del cierre
hacia usted y hacia afuera de la pista de la
lanzadera.
®
@ <ierre de la caja de la bd)ina
ODesenrolle unos 10 cm (4 pulgadas) de hilo de
una bobina completa e inserte _sta en la caja
de la bobina.
• Utilice solamente bobinas disefiaclas para
esta m_quina,
• Asegtirese de colocar la bobina de modo que el
hilo se desenrolle en la direcci6n correcta. En
caso contrario, la tensi6n del hilo podria set
incorrecta o se podria romper la aguja.
O ase el extremo del hilo por la ranura yluego
tire de _1 hacia abajo y hacia la izquierda,
como se indica a continuaci6n, hasta que pase
pot el ojo que hay debajo del resorte de
tensi6n.
®
÷
@ Resorte de tensi6n
O ujele la caja de la bobina por el derre,
ins_rtela en la pista de la lanzadera ysuelte el
cierre.
• Aseg@-ese de que la barr._ de la c._j._de la
bobina se introduce en la muesca de la parte
superior de la pista de la lanzadera.
@ ®
......... ,,, /
@ Barra de la caja de la I)d)ina
@ Muesca
OCierre la tapa de la lanzadera.
•Asegtirese de que la caja de la bobina est_i
correctamente colocada en la m_iquina. De Io
contrario, se saldr_i de la lanzadera cuando la
m_iquina empiece a coser.
12
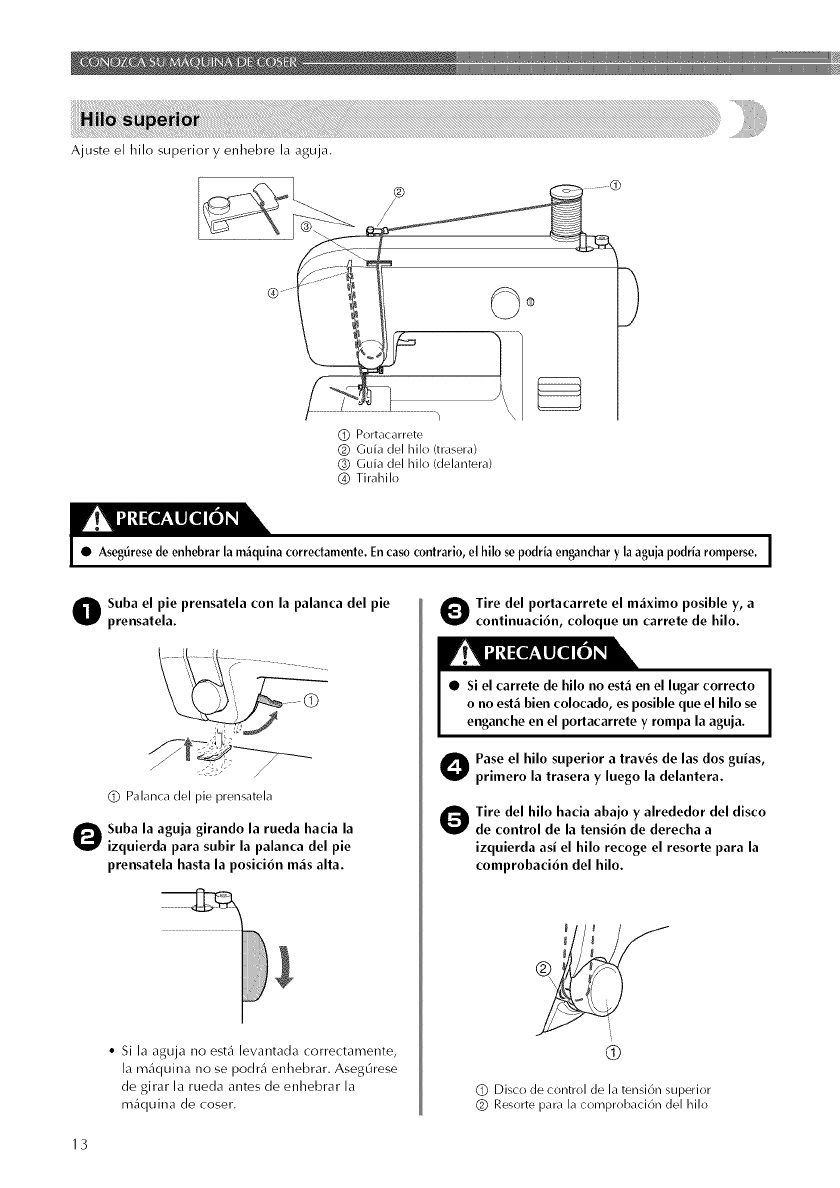
Ajusteelhilosuperioryenhebrelaaguja.
@
(_) Portacarrete
(_) Guia del hilo (trasera)
_) Guia del hilo (delantera)
(_ Tirahilo
•Asegtiresede enhebrarla m_quinacorrectamente. Encasocontrario, el hilo sepudriaenganchary la aguja podriaromperse.
O uba el pie prensatela con la palanca del pie
prensatela.
(_) Palanca del pie prensatela
OSuba la aguja girando la rueda hacia la
izquierda para subir la palanca del pie
prensatela hasta la posici6n m_is alia.
• Si la aguja no est_i levantada correctarnente,
la m_iquina no se podr_i enhebrar. Aseg_rese
de girar la rueda antes de enhebrar la
m_iquina de coser,
O ire del portacarrete el m_iximo posible y, a
continuaci6n, coloque un carrete de hilo.
V! I UN:[m'-_lll[OI[0] _iL
I
•Si el carrete de hilo no est&en el lugar correcto I
o no est& bien colocado, es posible que el hilo se Ienganche en el portacarrete y rompa la aguja.
O Pase el hilo superior a tray,s de las dos guias,
primero la trasera y luego la delantera.
Oire del hilo hacia abajo yalrededor del disco
de control de la tensi6n de derecha a
izquierda asi el hilo recoge el resorte para la
comprobaci6n del hilo.
Q
(_) Disco de control de la tensi6n superior
(_) Resorte para la comprobaci6n del hilo
13
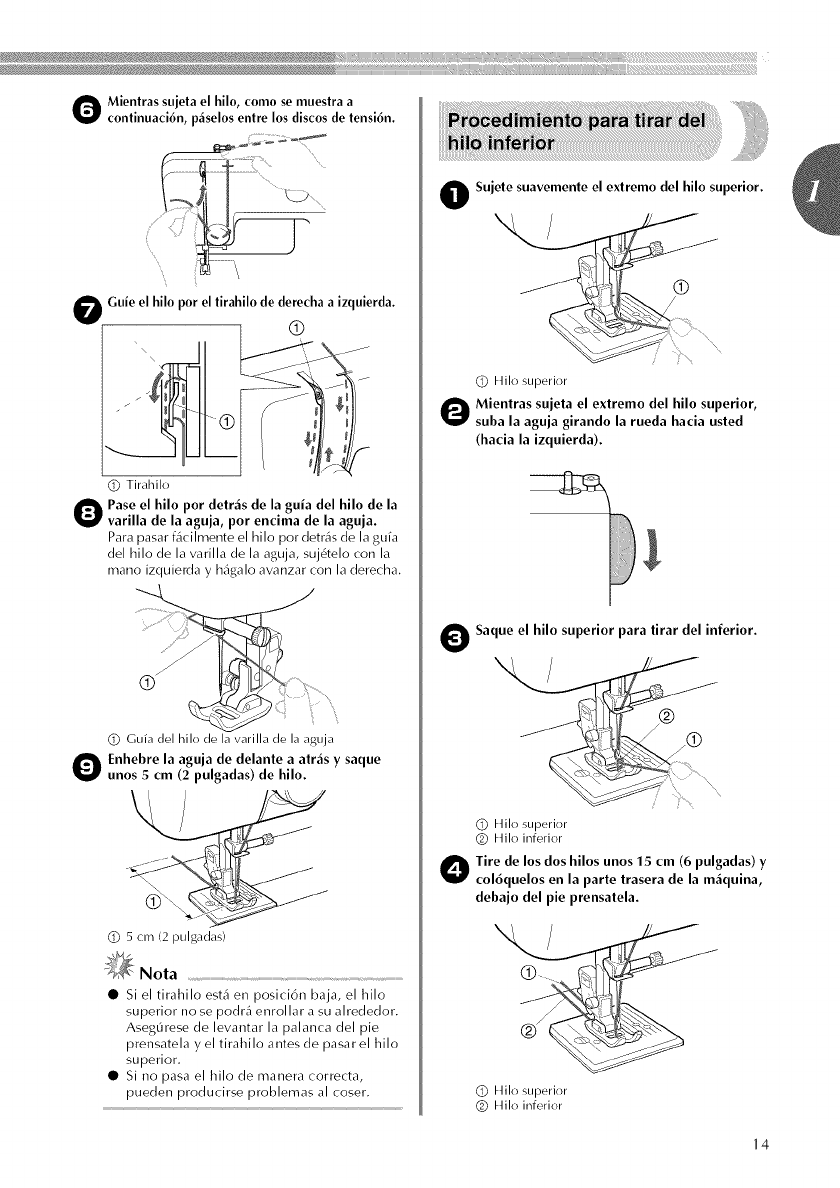
_ii_@iiiiiii_iii_iiJ_iiJ_iiJ_iiJ_iiJ_iiJ_iiJ_iiJ_iiJ_iiJ_iiJ_iiJ_iii_iii_i1iiiii_;_i_iii_i_I_ii_i¸I¸I¸I_I_I_I¸I¸I¸i_iiii{i111iii!_!_ii}]iiiiiiiiii_@?ii_iiiiiiiiiii_}]iiiii!_i_i_i1i_i_i_i_i_i_i_i_ii_iiiiiii1iiii_i]ii_iiiii_iiiiiiiiiiiiiiiiii!¸iiiiiiiiiiiiiiiiiiiiiii!iiiiiiiiiiiiiiiiil;il;!ili!iiiiiiiiiiiiiiiiii!!!ii¸i!!i!il¸_i!!;iiii¸i:ili
OMientras sujeta el hilo, como se muestra a
continuaci6n, p_iselos entre los discos de tensi6n.
Guie el hilo pot el tirahilo de derecha a izquierda.
®
(_) Tirahilo
Pase el hilo por detr_is de la guia del hilo de la
varilla de la aguja ,por encima de la aguja.
Para pasar f_cilmente el hilo pot detr,is de la gtffa
del hilo de la varilla de la aguja, suj6telo con la
mano izquierda y h_igalo avanzar con la derecha,
(_) Guia del hilo de la varilla de la aguja
O nhebre la aguja de delante a atr_is y saque
unos 5 cm (2 pulgadas) de hilo.
\
(_) 5 cm (2 pulgadas)
_i_ Nota
• si el tirahilo est.1 en posici6n baja, el hilo
superior no se podr_ enrollar a su alrededor.
AsegOrese de levantar la palanca del pie
prensatela y el tirahilo antes de pasar el hilo
superior.
• Si no pasa el hilo de manera correcta,
pueden producirse problemas al coser.
OSujete suavemente el extremo del hilo superior.
®
/
(_) Hilo superior
Oientras sujeta el extremo del hilo superior,
suba la aguja girando la rueda hacia usted
(hacia la izquierda).
O Saqueel hilo superior paratirar del inferior.
N
(_) Hilo superior
Q Hilo inferior
O ire de los dos hilos unos 1.5cm (6 pulgadas) y
col6quelos en la parte trasera de la m_iquina,
debajo del pie prensatela.
(_) Hilo superior
(_) Hilo inferior
14
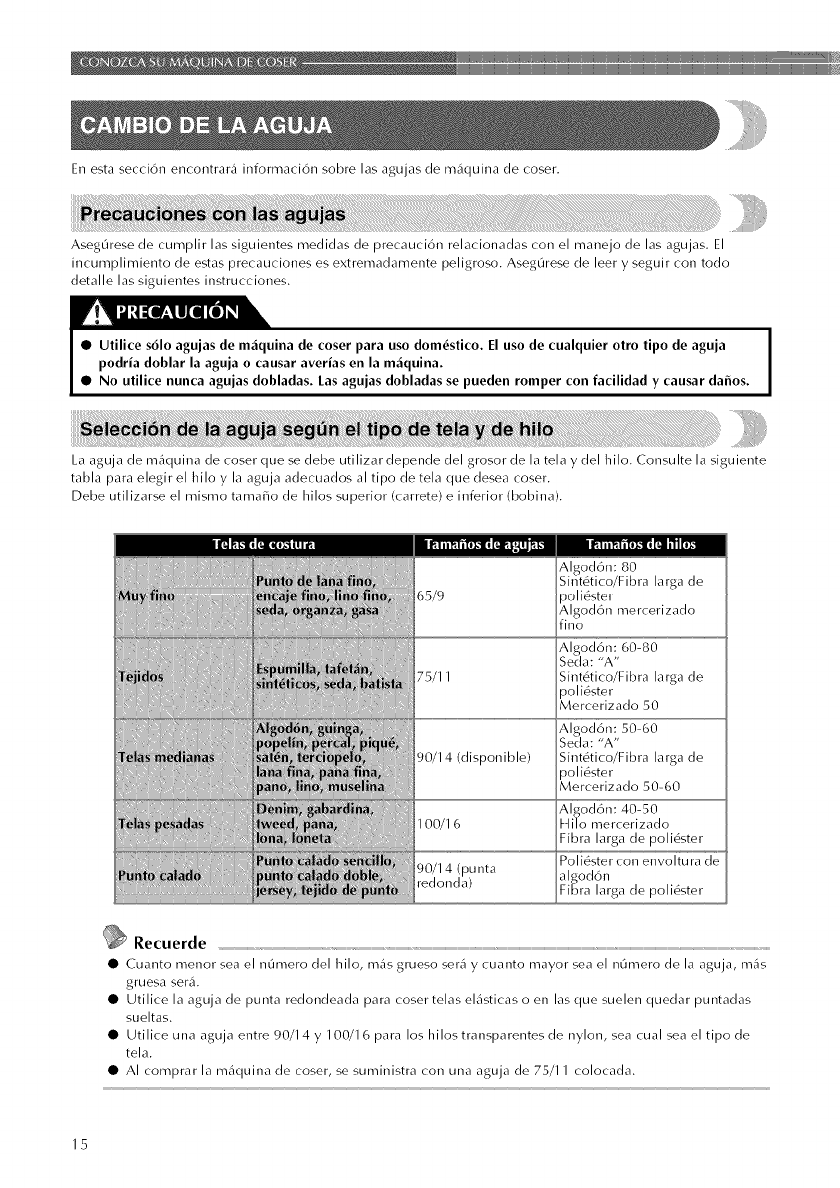
En esta secci6n encontrar,5 informaci6n sobre las agujas de rmSquina de coser.
AsegOrese de cumplir las siguientes medidas de precauci6n relacionadas con el manejo de las agujas. El
incumplimiento de estas precauciones es extremadamente peligroso. Aseg6rese de leer y seguir con todo
detalle las siguientes instrucciones.
r! I _iN :[OP':_L|£OI[O]_g_
i
•Utilice s61o agujas de m_iquina de coser para uso dom6stico. El uso de cualquier otro tipo de aguja [
podria doblar la aguja o causar averias en la m_iquina. I
•No utilice nunca agujas dobladas. Las agujas dobladas se pueden romper con facilidad y causar dafios.
La aguja de m4quina de coser que se debe utilizar depende del grosor de la tela y del hilo. Consulte la siguiente
tabla para elegir el hilo y la aguja adecuados al tipo de tela que desea coser.
Debe utilizarse el mismo tamai_o de hilos superior (carrete) e inferior (bobina).
Algod6n: 80
Sint6tico/Fibra larga de
65/9 pol i_stel
Algod6n mercerizado
fino
Algod6n: 60-80
Seda: "A"
75/11 Sint6tico/Fibra larga de
poli6ster
Mercerizado 50
Algod6n: 50-60
Seda: "A"
90/14 (disponible) Sint6tico/Fibra larga de
poli6ster
Mercerizado 50-60
Algod6n: 40-50
100/16 Hilo mercerizado
Fibra larga de poli6ster
Poli6ster con envoltu ra de
90/14 (punta
redonda) algod6n
Fibra larga de poli6ster
Recuerde
• Cuanto menor sea el n6mero del hilo, m_s grueso ser_ y cuanto mayor sea el n6mero de la aguja, m_s
gruesa seri1.
• Utilice la aguja de punta redondeada para coser telas el(lgticas o en las que suelen quedar puntadas
sueltas.
• Utilice una aguja entre 90/14 y 100/16 para los hilos transparentes de nylon, sea cual sea el tipo de
tela.
• AI comprar la mSquina de coser, se suministra con una aguja de 75/11 colocada.
15
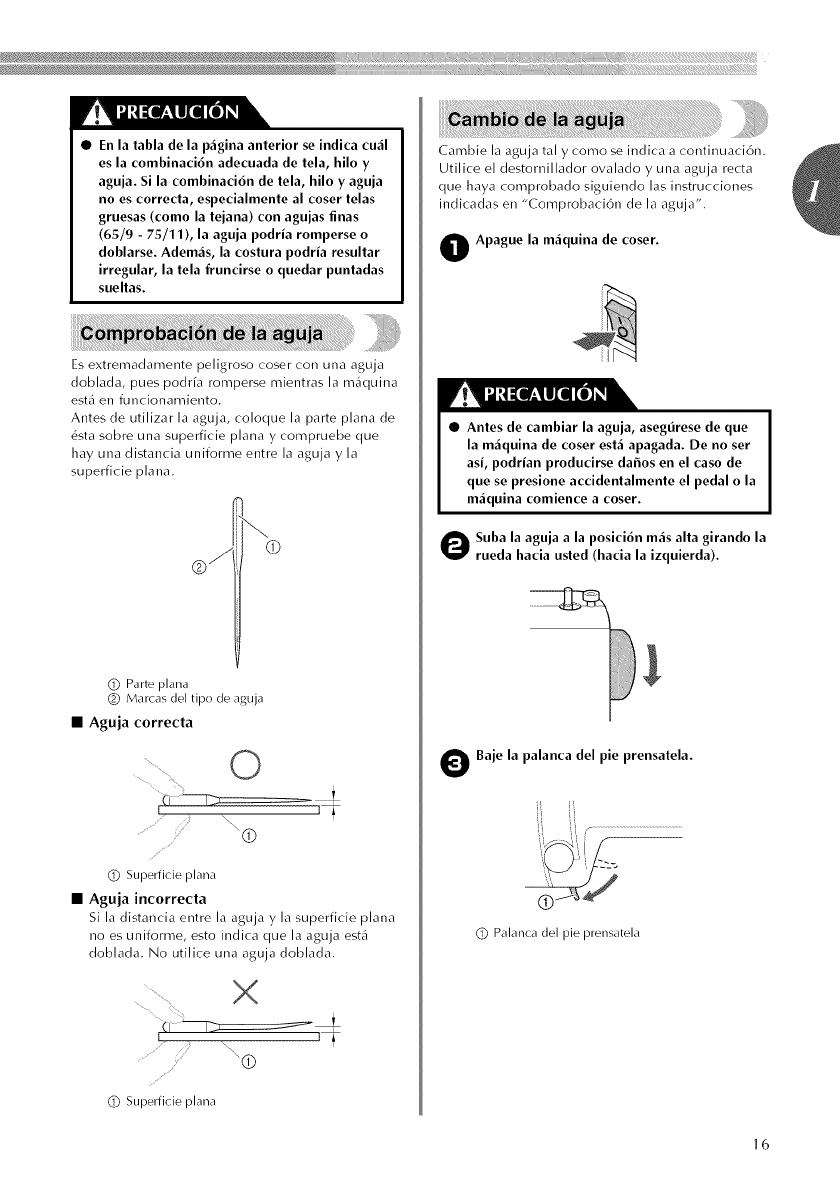
_iHiiiii_i_iiJ_i_3_iiJ_iiJ_iiJ_iiJ_iiJ_iiJ_iiJ_iiJ_iiJ_iiJ_iiJ_iii_iii_iiii_ii_i:i;_iiiiiiiiiiiii]ii11iiii11iiii_iiiiiii11111i}1iiiii_iiiiii_!_iiiiiiiiiiii!iiiiiiiiii[!iiii!_!_!_!_!_iiii_,_ii_iiiii]iiiiiiiiiiiiii_iiiiiiiiiiiii_;i!;!{i!i_%_i¸!_i_i_i_i_i_i_i_i_i_i_i_i_i_i_i_i_i_i:_i;%i%i%i%iiiiii_i!i!ii!i¸_i!_ii!ii¸_!!_!i_ii_iiill¸I
__"_]_ii_iii_iIiIiII_i_]iiiiiii!ii_iiiIiIiI_ii_i_!_!_!_!_!ii_iii!_!_ii;ii_iii_iiiiii!iii!iii!iii_iiIiIiII_i_iiiiiii!_!_i_;ii:i_I_!;!_;_i:i!i_i_i_!i!_i_i_i!i_i_i,!i!_;_i_i!i_i_ii!iiii:!i_i_i,!i!_i_i!i!i_i_i_!i!_i_i_i!i_i_i,!i!_;_i_i!i_i_ii!iiii:!i_i_i,!i!_i_i!i!i_i_i_!i!_i_i_i!i_i_i,!i!_;_i_i!i_i_ii!iiii:!i_i_i,!I_I';_:_I_i_II'ii!i_;!i_i_i_i'!ii_ii_:!ii_i_!_i_i_i_ili_i_i
V! I U14:[llr:lll[OI [0] _i_
•En la tabla de la p_igina anterior se indica cu_il
es la combinaci6n adecuada de tela, hilo y
aguja. Si la combinaci6n de tela, hilo y aguja
no es correcta, especialmente al coser telas
gruesas (como la tejana) con agujas finas
(65/9 - 75/11), la aguja podria romperse o
doblarse. Adem_is, la costura podria resultar
irregular, la tela fruncirse o quedar puntadas
sueltas.
Es extremadamente peligroso coser con una aguja
doblada, pues podffa romperse mientras la m_iquina
est4 en funcionamiento.
Antes de utilizar la aguja, coloque la parte plana de
6sta sobre una superficie plana y compruebe que
hay una distancia uniforme entre la aguja y la
superficie plana.
(_) Parte plana
(_) Marcas del tipo de aguja
• Aguja correda
\(9
(_) Superficie plana
• Aguja incorreda
Si la distancia entre la aguja y la superficie plana
no es uniforme, esto indica que la aguja est,1
doblada. No utilice una aguja doblada.
(_) Superficie plana
Cambie la aguja tal y como se indica a continuaci6n.
Utilice el destornillador ovalado y una aguja recta
que haya comprobado siguiendo las instrucciones
indicadas en "Comprobaci6n de la aguja'.
O Apague la m_iquina de coser.
V! I U14:[llr:lll[OI [0] _i_
•Antes de cambiar la aguja, aseg_rese de que
la m_iquina de coser est_iapagada. De no set
asi, podrian producirse daffos en el caso de
que se presione accidentalmente el pedal o la
m_iquina comience a coser.
Ouba la aguja a la posici6n m_isalia girando la
rueda hacia usted (hacia la izquierda).
OBaje la palanca del pie prensatela.
(_) Palanca del pie prensatela
16
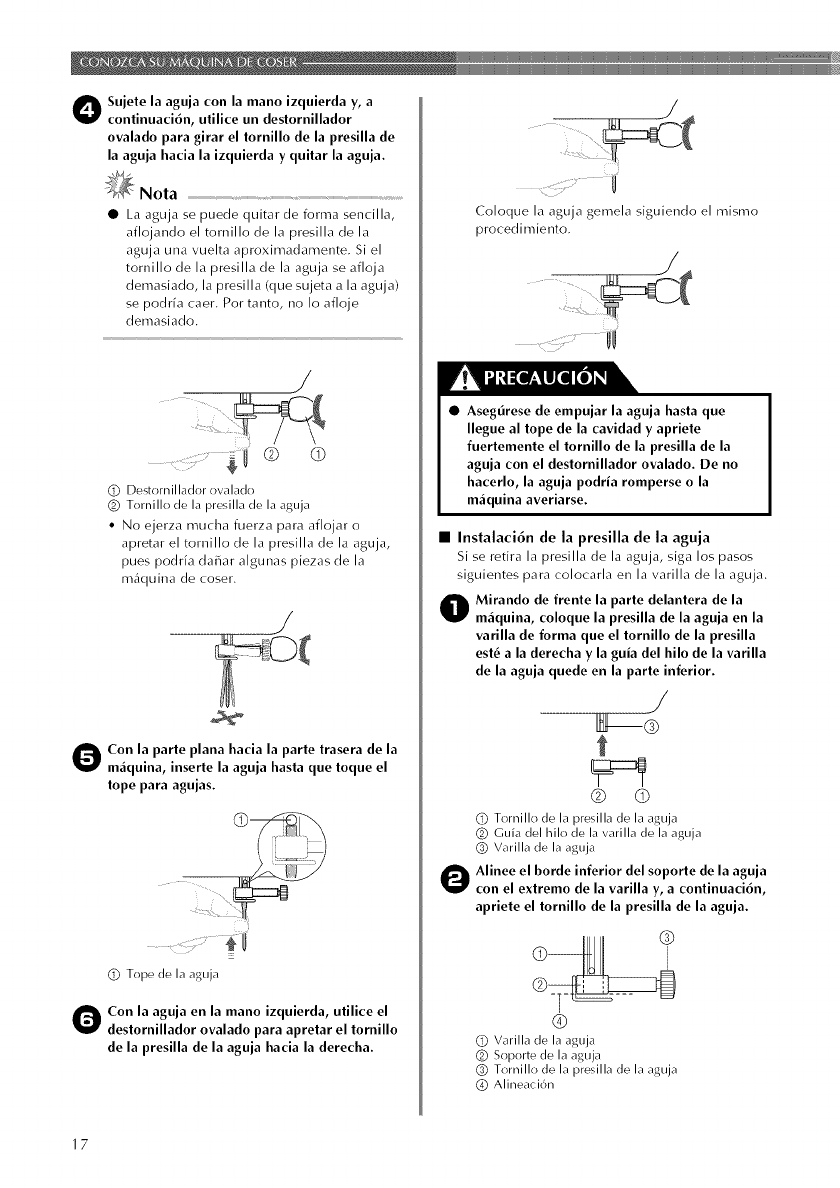
Oujete la aguja con la mano izquierda y, a
continuaci6n, utilice un destornillador
ovalado para girar el tornillo de la presilla de
la aguja hacia la izquierda y quitar la aguja.
_Nota
• La aguja se puede quitar de forma sencilla,
aflojando el tornillo de la presilla de la
aguja una vuelta aproximadarnente. Si el
tomillo de la presilla de la aguja se afloja
demasiado, la presilla (que sujeta a la aguja)
se podrfa caer. Por tanto, no Io afloje
demasiado.
/
"_U® ©
(_) Destornillador ovalado
Q Tornillo de la presilla de la aguja
• No ejerza mucha fuerza para aflojar o
apretar el tomillo de la presilla de la aguja,
pues podffa daiiar algunas piezas de la
m_flquina de coser.
Oon la parle plana hacia la parle trasera de la
m_iquina, inserte la aguja hasta que toque el
lope para agujas.
(_) Tope de la aguja
Oon la aguja en la mann izquierda, ulilice el
destomillador ovalado para apretar el tomillo
de la presilla de la aguja hacia la derecha.
Coloque la aguja gemela siguiendo el mismo
procedimiento.
•Asegtirese de empujar la aguja hasta que
Ilegue al tope de la cavidad y apriete
fuertemente el tornillo de la presilla de la
aguja con el destomillador ovalado. De no
hacerlo, la aguja podria romperse o la
m_iquina averiarse.
• Instalaci6n de la presilla de la aguja
Si se retira la presilla de la aguja, siga los pasos
siguientes para colocarla en la varilla de la aguja.
O irando de frente la parle delanlera de la
m_iquina, coloque la presilla de la aguja en la
varilla de forma que el tornillo de la presilla
est6 a la derecha y la guia del hilo de la varilla
de la aguja quede en la parle inferior.
/
t
® ©
@ Tornillo de la presilla de la aguja
(_) Guia del hilo de la varilla de la aguja
(_) Varilla de la aguja
O linee el borde inferior del soporte de la aguja
con el extremo de la varilla y, a continuaci6n,
apriete el tornillo de la presilla de la aguja.
®
(_) Varilla de la aguja
_) Soporte de la aguja
_) Tornillo de la presilla de la aguja
(_ Alineaci6n
17
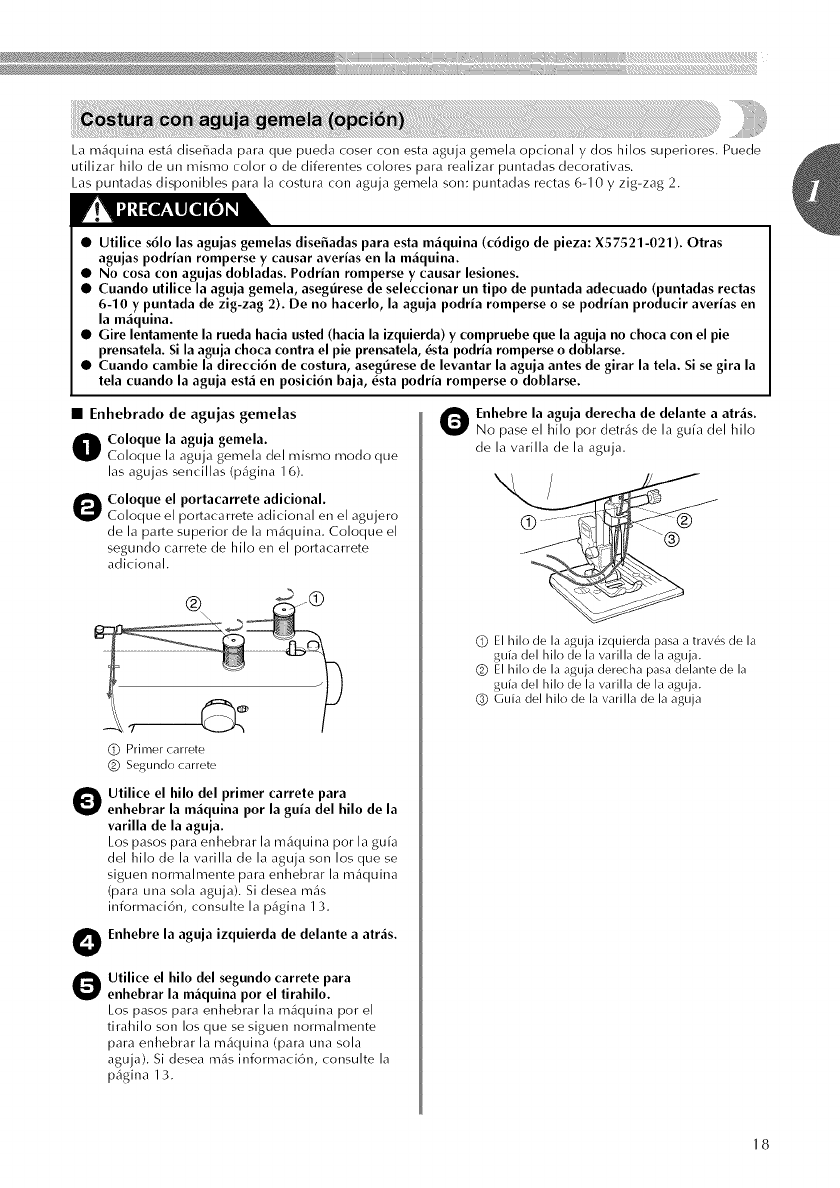
Lam4quinaest6disefiadaparaquepuedacosercol/e_taagujagemelaoptionalydo_hilo_superiore_.Puede
utilizarhilodeunmismocolorodediferentescolorespararealizarpuntadasdecoratiwls.
Laspuntadasdi_ponible_paralacosturaconagujagemelason:puntadasrectas610yzig-zag2
r! I U:_i:[Ir:ll[ll [O]_.Ik
•Ulilice s61o las agujas gemelas dise6adas para esta m_iquina (c6digo de pieza: X57521-021). Otras
agujas podrian romperse y causar averias en la m_iquina.
•No cosa con agujas dobladas. Podrian romperse y causar lesiones.
•Cuando utilice la aguja gemela, asegOrese de seleccionar un tipo de puntada adecuado (puntadas rectas
6-10 y puntada de zig-zag 2). De no hacerlo, la aguja podria romperse o se podrian producir averias en
la m_iquina.
•Gire lentamente la rueda hacia usted (hacia la izquierda) y compruebe que la aguja no choca con el pie
prensatela. Si la aguja choca contra el pie prensatela, 6sta podria romperse o doblarse.
•Cuando cambie la direcci6n de costura, asegOrese de levantar la aguja antes de girar la tela. Si se gira la
tela cuando la aguja est_ien posici6n baja, 6sta podria romperse o doblarse.
•Enhebrado de agujas gemelas
OColoqueC°l°quelalaaguja gemelaaguja gemela'del misrno rnodo que
las agujas sencillas (p_igina 16)
OC°l°qUecoloqueel portacarreteel portacarrete adidonal.adicionaI en el agujero
de la parte superior de la m,lquina Coloque el
segundo carrete de hilo en el poltacarrete
adicional.
(Z) Primer cJrret_
(_) Segundo carrete
0UflliCeenhebrarellahilo del primeporlacarreteparaguiadel hilo de la
varilla de la aguja.
Los paso_ para enhebrar la m_iquina por la gufil
del hilo de la vadlla de la aguja son los que se
siguen normalmente para enhebrar la m_quina
(para una sola aguja). Si desea m_is
informaci6n, congulte la p_igina 13.
Enhebre la aguja izquierda de delante a atr_is.
Utiliceenhebrarla m&quina potel hilo del segundo carreteeltirahilo.para
Los paso_ para enhebrar la m_quina por el
tirahilo son los que se siguen normalmente
para enhebrar la m,lquina (para una sola
aguja). Si desea m_is informaci6n, consulte la
p_igina 13.
OEnhebreNopase ellahilo poraguja derecha de delante aatr_iS.detr,_s de la gufa del hilo
de la varilla de la aguja
(_) El hilo de la aguja izquierda pasa a trav6'_ de la
guia del hilo de la varilla de la aguja.
(_) El hilo de la aguja derecha pasa delante de la
guia del hilo de la varilla de la aguja.
(_) Gufa del hilo de la varilla de la aguja
18
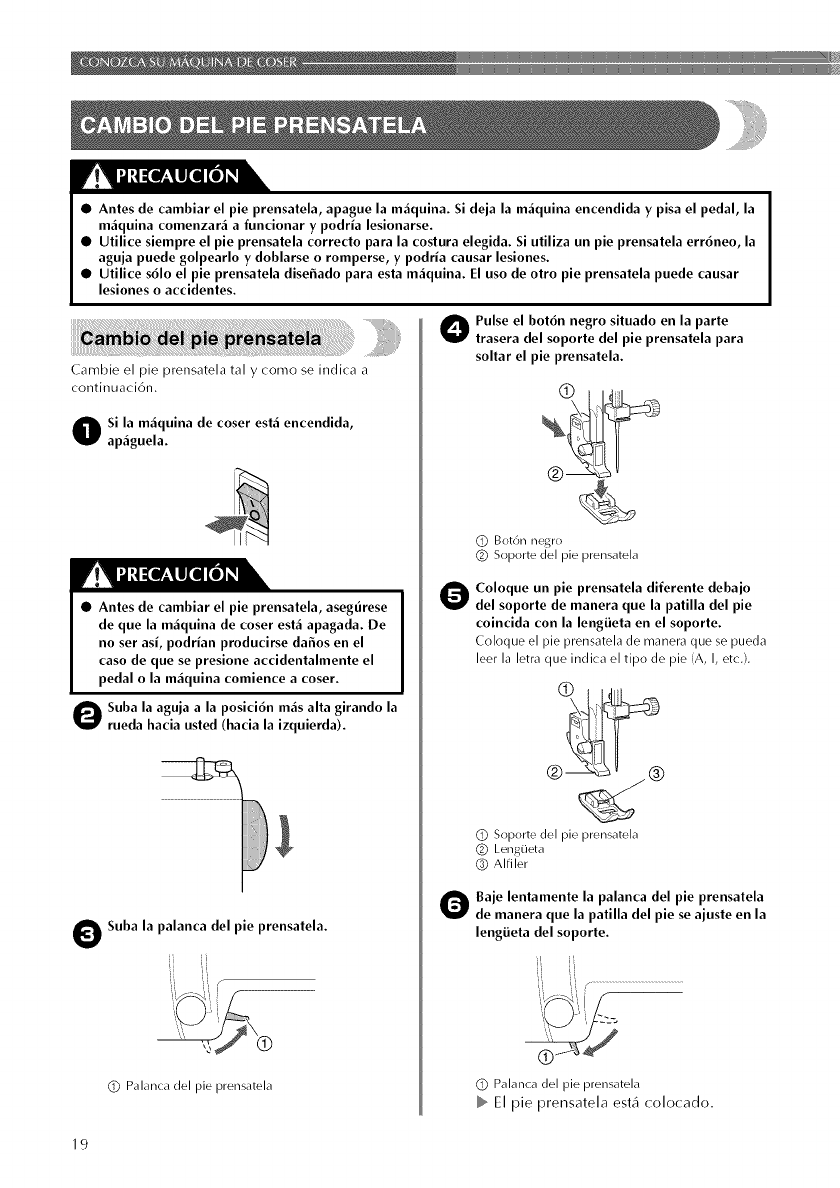
•Antes de cambiar el pie prensatela, apague la m_iquina. Si deja la m_iquina encendida y pisa el pedal, la
m_iquina comenzar_i a funcionar y podria lesionarse.
•Utilice siempre el pie prensatela correcto para la costura elegida. Si utiliza un pie prensatela err6neo, la
aguja puede golpearlo y doblarse o romperse, y podria causar lesiones.
•Utilice s61o el pie prensatela diseffado para esta m_iquina. El uso de otto pie prensatela puede causar
lesiones o accidentes.
Cambie el pie prensatela tal y como se indica a
continuaci6n.
O i la m_iquina de coser est_iencendida,
ap_iguela.
•Antes de cambiar el pie prensatela, asegt_rese
de que la m_iquina de coser est_i apagada. De
no set asi, podrian producirse daffos en el
caso de que se presione accidentalmente el
pedal o la m_iquina comience a coser.
Ouba la aguja a la posici6n m_isalta girando la
rueda hacia usted (hacia la izquierda).
OSuba la palanca del pie prensatela.
Q Palanca (]el pie prensatela
Oulse el bot6n negro situado en la parte
trasera del soporte del pie prensatela para
soltar el pie prensatela.
Q Bot6n negro
(_) Soporte del pie prensatela
OColoque un pie prensatela diferente debaio
del soporte de manera que la patilla del pie
coincida con la lengiieta en el soporte.
Coloque el pie prensatela de manera que se pueda
leer 1,1letra que indka el tipo de pie (A, I, etc.).
(_) Soporte del pie prensatela
(_) LengOeta
(:_ Alfiler
OBaje lentamente la palanca del pie prensatela
de manera que la patilla del pie se ajuste en la
lengiieta del soporte.
ii il
Q Palanca del pie prensatela
El pie prensatela est,1 colocado.
19
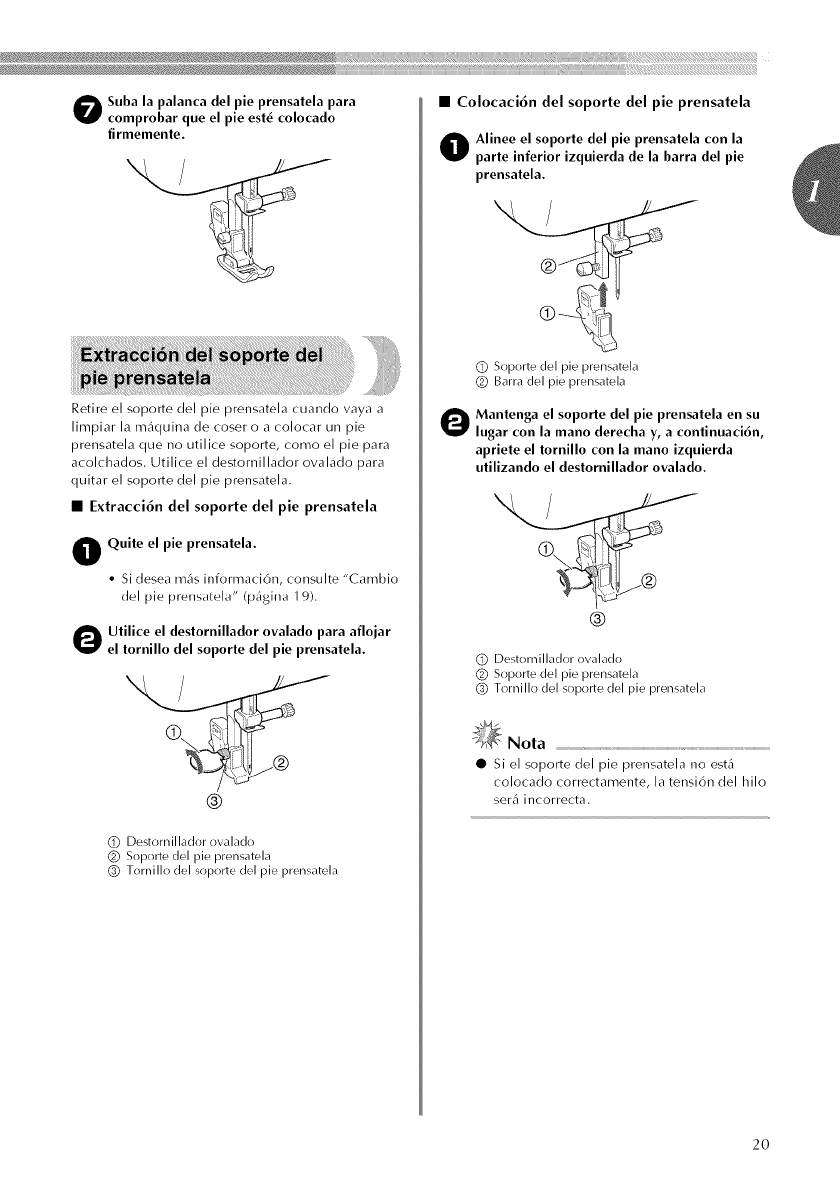
Ocomprobar que elSuba la palanca delpie estPieprensatelacolocadoPara
firmemente.
Retire el soporte del pie prensatela cuando vaya a
limpiar la m_iquina tie coser o a colocar un pie
prensatela que no utilice ,,oporte, como el pie para
acolchado_. Utilice el de_tomillador ovalado para
quitar el soporte del pie prensntela.
•Extracci6n del soporte del pie prensatela
O Quite el pie prensatela.
• Si desea m_is informaci6n, consulte "Cambio
del pie prell,,alela" (p_igina 19).
OelUfllicetornilloeldestornillador ovaladoparadeI soporte del pie prensatela,aft°jar
®
Q Destornillador ovalado
(_ Soporte del pie prensatela
Q Tornillo del soporte del pie prensatela
•Colocaci6n del soporte del pie prensatela
Alineeparte inferiorelsoportedelizquierda de la barrapie prensateladel piec°n la
prensatela.
(_) Soporte del pie prensatela
(_) Barra del pie prensatela
apriete el tornillo con la mano izquierda
utilizando el destornillador ovalado.
®
(]) Dest()rnillador ovalado
(_) Soporte del pie prensatela
(_) Tornillo del soporte del pie prensatela
_Nota
• si el soporte del pie prensntela no e_t_
colocndo correctamente, la tengi6n del hilo
ser_i incorrecta.
2O
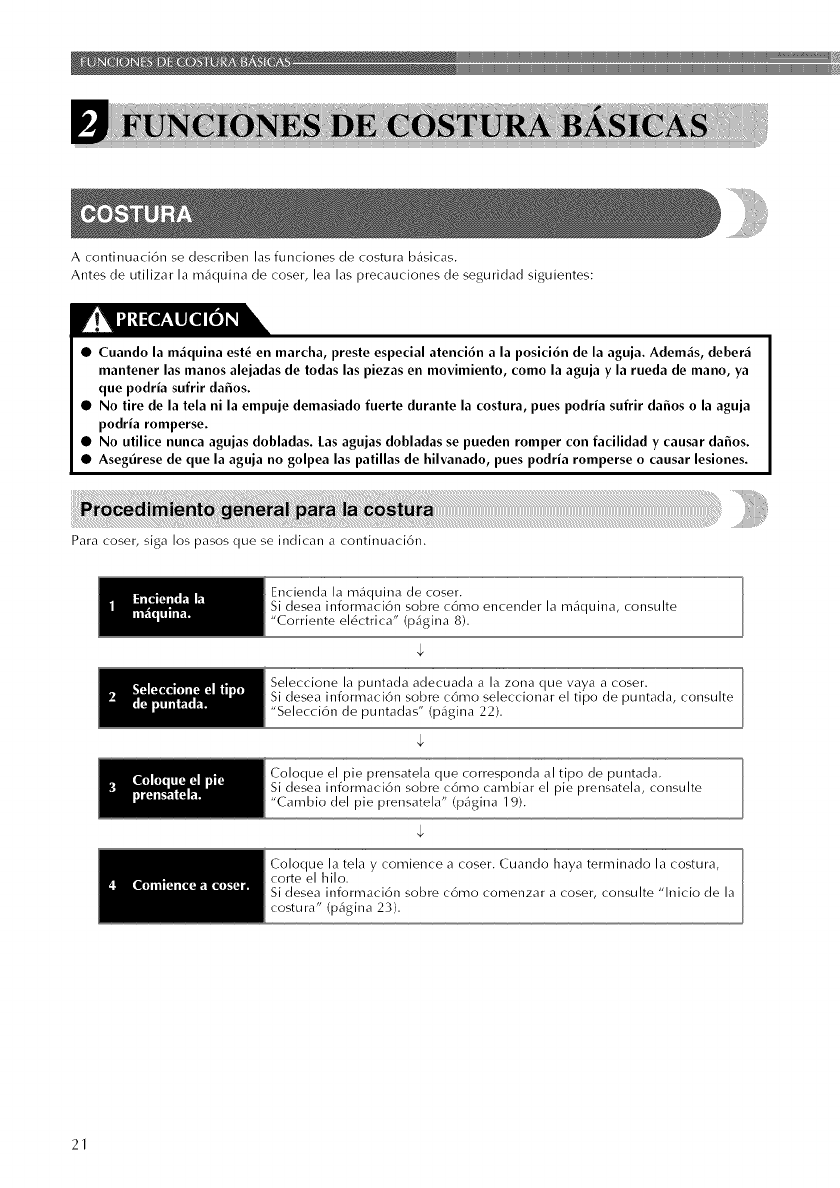
Acontinuaci6nsedescdbenlasfuncionesdecosturab_isicas.
Antesdeutilizarlam_quinadecoser,lealasprecaucionesdeseguridadsiguientes:
•Cuando la mliqoioa est_ en marcha, preste especial atenci6o a la posici6o de la aguja. Adem_is, deber_i
mantener las manos alejadas de todas las piezas en movimiento, como la aguja y la rueda de mano, ya
que podria sufrir da6os.
•No tire de la tela ni la empuje demasiado fuerte durante la costura, pues podria sufrir da6os o la aguja
podria romperse.
•No utilice nunca agujas dobladas. Las agujas dobladas se pueden romper con facilidad y causar da6os.
•Aseg4rese de que la aguja no golpea las patillas de hilvanado, pues podria romperse o causar lesiones.
Para coser, siga los pasos que se indican a continuaci6n.
Encienda la mlquina de coser.
Si desea informaci6n sobre c6mo encender la m_iquina, consulte
"Corriente el6ctrica" (p_igina 8).
Seleccione la puntada adecuada a la zona (ue vaya a coser.
Si (esea informaci6n so)re c6mo se eccionar e tipo (e puntaca, consulte
"Selecci6n de puntadas" (p_igina 22).
Coloque el pie prensatela que corresponda al tipo de puntada.
Si desea informaci6n sobre c6mo cambiar el pie prensatela, consulte
"Cambio del pie prensatela" (p_igina 19).
Coloque la tela y comience a coser. Cuando haya terminado la costura,
corte el hilo.
Si desea informaci6n sobre c6mo comenzar a coser, consulte "lnicio de la
costura" (p_igina 23).
2]
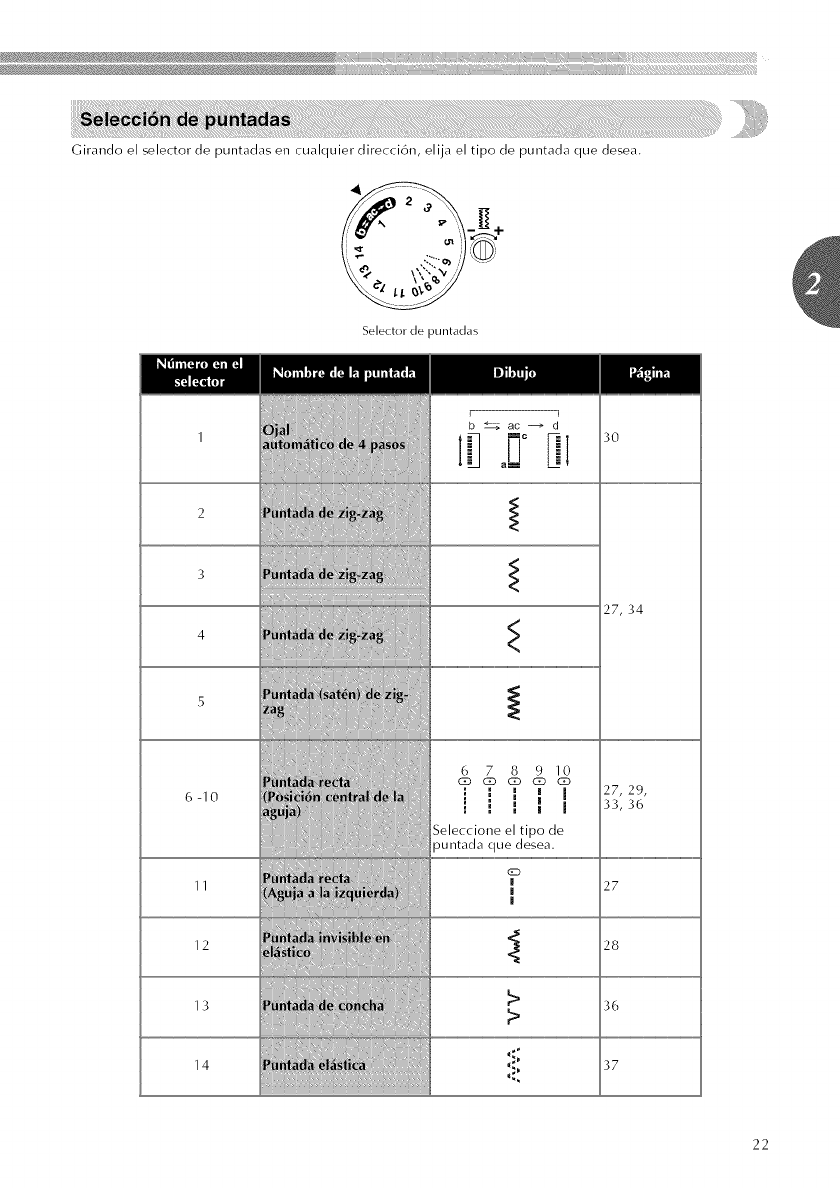
i_t_ii%1iiiiiiiiiiiiiii_}]iii_iiiiiiiiiiiiiij%jiiiIiIi_i1iiIiiiIiiiiii1iiiii!_i_ii1iiiii_ii_i_i:iiii¸iiiiiii_iiiiiljiiiiiiii_iiii/iiiiiiii_iiiii'_'_ii_'_'_i¸i¸iii¸i¸iii¸i¸iii}iiiiii!!!i_ii]iiii_,_???????????iiiiii_'_'iii{mi_iiiii_iiiiii¸iiiii!i!i!i¸i!i_i¸iiiiiiii¸iiiiiiii¸i_i!i!i!i!i!i!i!i!i!i!i!i!i!i!i!i!i!_:_!ii_!i_i_i_i_i_i_i_i_i_i_i_i_i_i_i_i_i_i_!i!_:!_i_i_i!_!_ii_ii!_!iiii_iiiiiii¸iiiiiiiiiiiiiiii¸i!_!iiiiiiiil¸II
i_iij_iIiII_ii_ji_iiIiIiIiii.!.!.!.!.i!_iii.!.iii.!.iii.!.iii.!.iii.ii_i_ii_iIiII_i_jiiiiiiii_i_!_!ii!iii!iiii!i!iii_ii!ii!ij!ij_i_ij{IiIiII_ii_i_!_!_!_!_!iii_iii_i_ii_i.i_i.i_i.i_ii_j_i_iiIiIiII_i]_i)_!__II!I!_i_i!i!i_i_i_!_!_i_i_i!i_i_i,!i!_:_i_i!i_i_i_iii_:_i_i_i,!i!_i_i!i!i_i_i_!_!_i_i_i!i_i_i,!i!_:_i_i!i_i_i_iii_:_i_i_i,!i!_i_i!i!i_i_i_!_!_i_i_i!i_i_i,!i!_:_i_i!i_i_i_!_i_ii_ii_ii_ii_iii_ii!!i_i_i!j'i_i_!_i_i_i_i_i_i_iii_!i_!i_!i_!i_!_!:_!_:_II
Girando el selector de puntadas en cualquier direcci6n, elija el tipo de puntada que desea.
Selector de puntadas
2
3
4
5
6 -10
11
12
13
14
_,@_i[[[[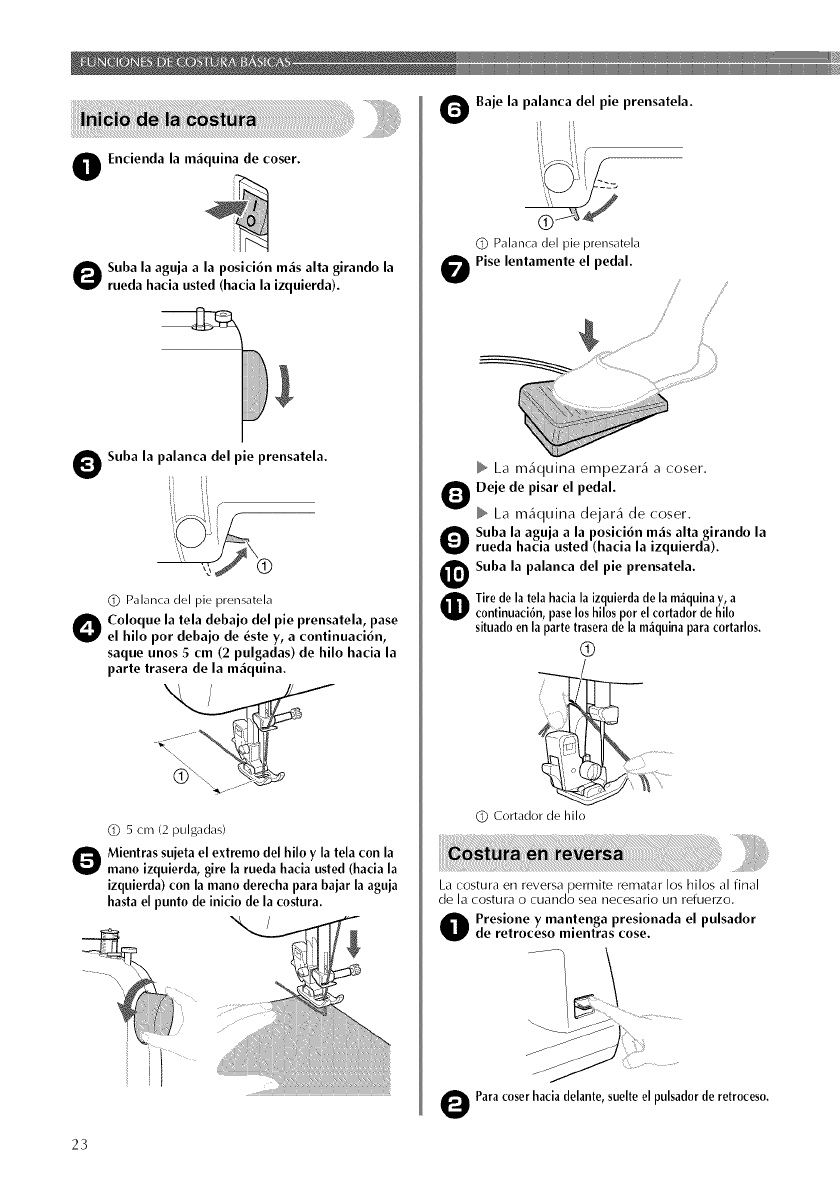
OEncienda la m_iquina de coser.
Ouba la aguja a la posici6n m_isalia girando la
rueda hacia usted (hacia la izquierda).
OSuba la palanca del pie prensatela.
i i
,,\
(_) Palanca del pie prensatela
Ooloque la tela debajo del pie prensatela, pase
el hilo pot debajo de _ste y, a continuaci6n,
saque unos 5 cm (2 pulgadas) de hilo hacia la
parte trasera de la m_iquina.
Q 5 cm (2 pulgadas)
OMientras suieta el extremo del hilo yla tela con la
mano izquierda, gire la rueda hacia usted (hacia la
izquierda) con la mano derecha para bajar la aguja
hasta el punto de inicio de la costura.
23
OBaie la palanca del pie prensatela.
(_) Palanca del pie prensatela
O Pise lentamente el pedal.
/ /
La m_iquina empezar_i a coser.
Deje de pisar el pedal.
La m_iquina dejar_i de (oser,
Ouba la aguja a la posici6n m_isalia girando la
rueda hacia usted (hacia la izquierda).
Suba la palanca del pie prensatela.
OTire de la telahaciala izquierdade la m_iquinay, a
continuaci6n,paseloshilosporel cortadorde hilo
situadoen la )arte traserade la m_quina paracortarlos.
Q
(_) Cortador de hilo
La costura en reversa permite rematar los hilos al final
de la costura o cuanc]o sea necesario un refuerzo,
Oresione y mantenga presionada el pulsador
de retroceso mientras cose.
.............
OParacoserhaciadelante,suelte el pulsadorde retroceso.

La tensi6n del hilo afectarl a la calidad de las
puntadas. Cuando cambie de tela o de hilo, es
posible clue necesite ajustar la tensi6n del hilo.
Recuerde ................................................................................................................................................................................
• Antes de comenzar a cambiar los ajustes de
tensi6n, aseg0rese de que el hilo superior y
la bobina est6n colocados correctamente.
• Antes de comenzar a coser, recomendamos
que haga una prueba en un fetal,
•Tensi6n adecuada
Una tensi6n adecuada es importante, puesto que
un exceso o defecto de la misma afectar4 a la
calidad de la costura y la tela podffa fruncirse.
(9
_<_ Q Rev6s
@_ @ Supefficie
@ Hilo superior
(_ Hilo inferior
-®
•El hilo superior est_ demasiado tenso
Aparecer_n ondas en la superficie de la tela.
_Nota
• si el hilo de la bobina no se ha insertado
correctamente, el hilo superior puede estar
demasiado tenso.
En este caso, consulte "Enhebrado del hilo
inferior" (Digina 11) y vuelva a insertar la
bobina.
Q Rev6s
(_ Superficie
(_) Hilo superior
(_ Hilo inferior
(_) Ondas en la
superficie de la tela
Soluci6n
Reduzca la tensi6n girando
el disco de control de la
tensi6n superior a un
nOmero inferior.
•El hilo superior est_i demasiado flojo
Aparecenln ondas en el rev6s de la tela.
_Nota
• si el hilo superior no se ha enhebrado
correctamente, podffa estar demasiado
flojo. En este caso, consulte "Hilo superior"
(p6gina 13) y vuelva a enhebrarlo.
Q Rev6s
(_ Superficie
(_) Hilo superior
(_ Hilo inferior
(_) Ondas en el
rev6s de la tela
Soluci6n
Aumente la tensi6n girando
el disco de control de la _ro 5 ¢_
tensi6n superior a un
n0mero superior.
•La tensi6n de la bobina es muy
floja
Pueden aparecer ondas en la superficie de la tela
cuando se cose con tela fina y con hilo fino.
(_) Rev6s
(_) Superficie
(_) Hilo superior
(_ Hilo inferior
_) Ondas en la
superficie de la tela
Soluci6n
Reduzca la tensi6n girando
el disco de control de la _ro _
tensi6n superior a un
nOmero inferior.
Si el problema contin0a, aumente la tensi6n
en la bobina girando el tornillo ovalado hacia
la derecha con un destornillador pecluefio.
Aseg0rese de no girar el tornillo m_is de una
wlelta completa. Aclem_qs, asegFirese de girar
el tornillo a su posici6n original antes de
volver a utilizar la m_icluina.
_Nota
• La tensi6n del hilo de la bobina se ha
ajustado en f_brk a para un uso general.
Para la mayorM de las aplicaciones de
costura no es necesario ning0n ajuste,
24
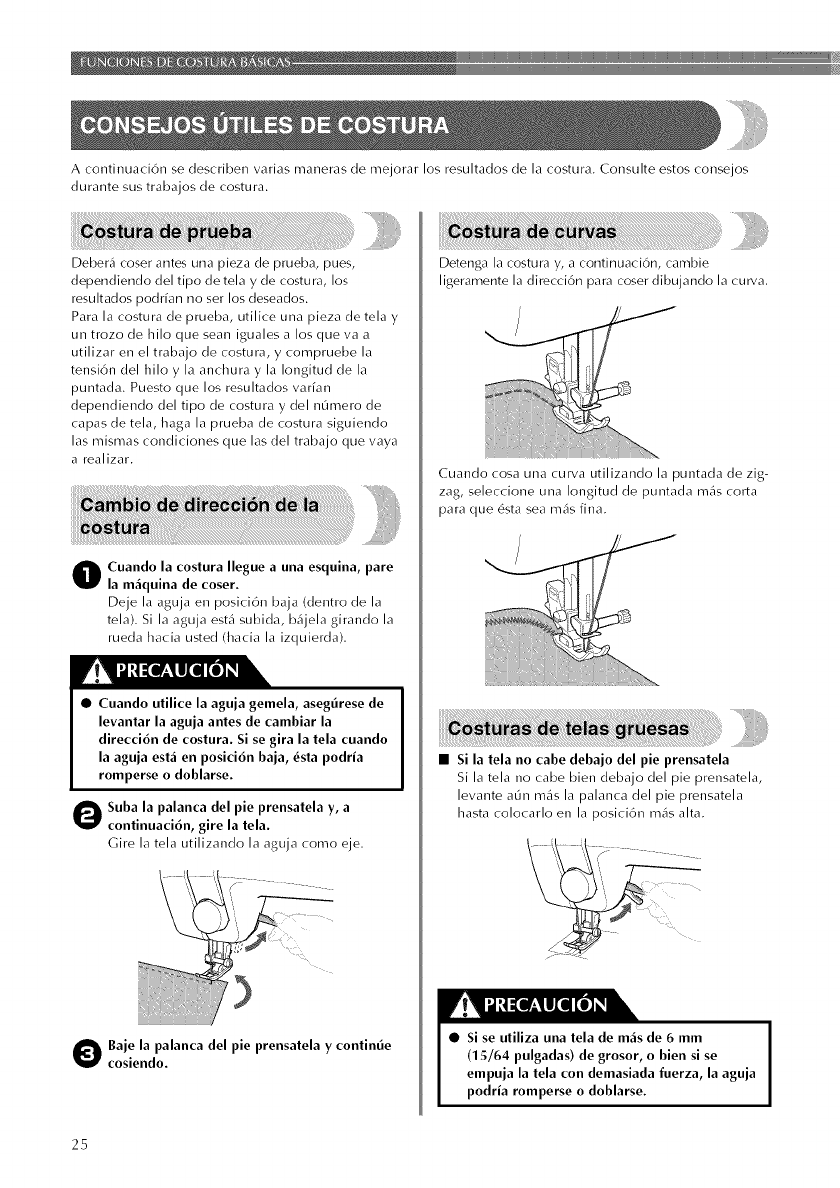
Acontinuaci6nsedescribenvariasmanerasdemejorarlosresultadosdelacostura.Consulteestosconsejos
durantesustrabajosdecostura.
Deber4 coser antes una pieza de prueba, pues,
dependiendo del tipo de telay de costura, los
resultados podffan no ser los deseados.
Para la costura de prueba, utilice una pieza de tela y
un trozo de hilo que sean iguales a los que va a
utilizar en el trabajo de costura, y compruebe la
tensi6n del hilo y la anchura y la Iongitud de la
puntada. Puesto que los resultados vaffan
dependiendo del tipo de costura y del n0mero de
capas de tela, haga la prueba de costura siguiendo
las mismas condiciones que las del trabajo que vaya
a realizar.
Cuando la costura Ilegue a una esquina, pare
la m_iquina de coser.
Deje la aguja en posici6n baja (dentro de la
tela), Si la aguja est,i subida, b6jela girando la
rueda hacia usted (hacia la izquierda),
•Cuando utilice la aguja gemela, asegtirese de
levantar la aguja antes de cambiar la
direcci6n de costura. Si se gira la tela cuando
la aguja est_ien posici6n baja, _sta podria
romperse o doblarse.
O uba la palanca del pie prensatela y, a
continuaci6n, gire la tela.
Gire la tela utilizando la aguja como eje.
O ajela palanca delpie prensatela y continue
cosiendo.
Detenga la costura y, a continuaci6n, cambie
ligeramente la direcci6n para coser dibujando la cull/a,
Cuando cosa una curva utilizanclo la puntada de zig-
zag, seleccione una Iongitud de puntada m_is colta
para que 6sta sea m_is fina.
• Si la tela no cabe debajo del pie prensatela
Si la tela no cabe bien debajo del pie prensatela,
levante a0n m_is la palanca del pie prensatela
hasta colocarlo en la )osici6n m_is alta.
•Si se utiliza una tela de m_is de 6mm
(15/64 pulgadas) de grosor, o bien si se
empuja la tela con demasiada fnerza, la aguja
podria romperse o doblarse.
25
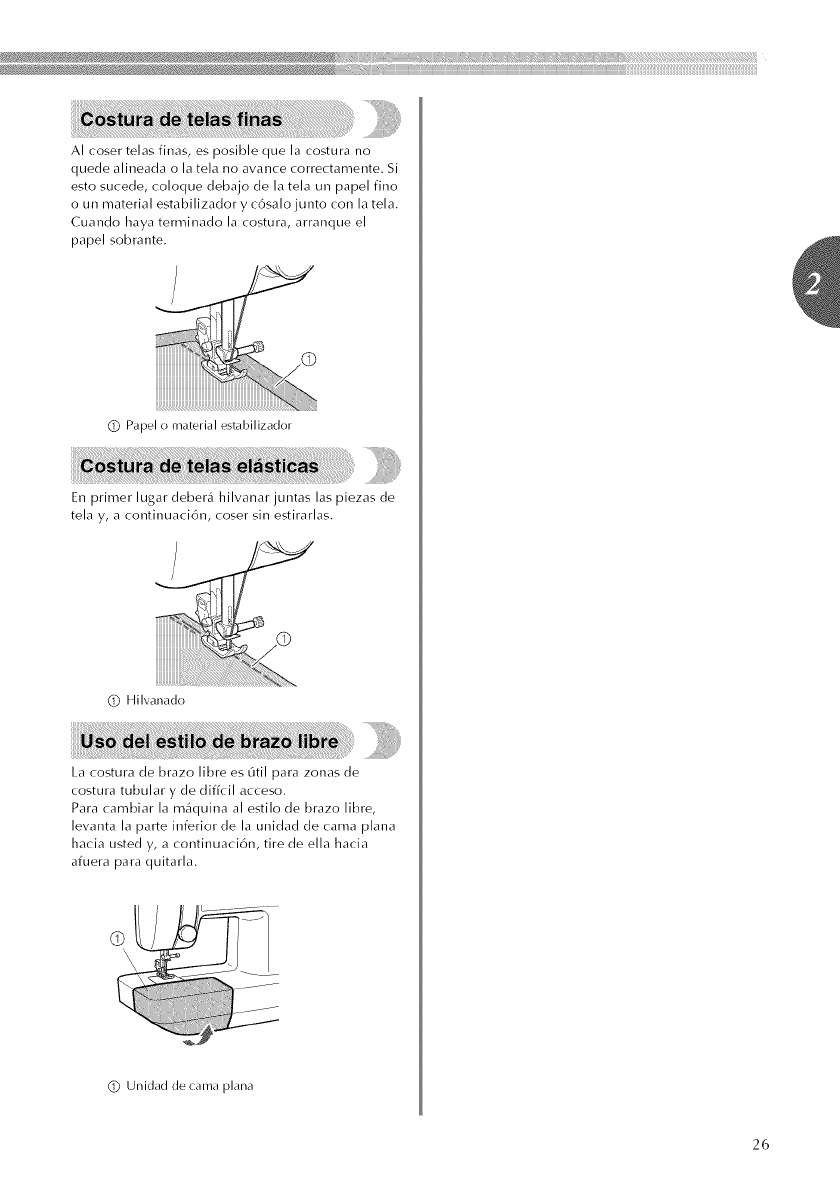
{lliiiiiii_iii{iiiiiii!iiiii_liliHiiiiiiiiiiiii!iiiii!i!,ii!ii,ii!ii,iiiiii_l_{_iii_}_iiii}ii_i_i_iiii}i1_i_i_iiii}i1_i_i_iiii}i1_i_i_iiii}i1_i_i_iiii}i1_i_i_iiii}i1_i_i_iiii}i1_i_i_iiii}il_iil_illill;¸iiiiiiii!_¸i!!;iiii¸iliiii!iiiiii!iiiiii!!;iiii¸iliiii!iiiiii!iiiiii!!;iiii¸iliiii!iiiiii!iiiiii!!;iiii¸iiiii_!!
lllli!iiliii_lii}i}i_@_iiii_iiiiiiiiii_iiiiiiiiiiiiiiiiiiiiiiiiiilli_iiili_iiili_iiili_iiili_iiili_iiili_iiili_iiili_iiili_iiili_iiili_iiili_iiili_iiili_iiili_iiili_iiili_iiili_iiili_iiili_iiili_iiili_iiili_iiili_iiili_iiili_iiili_iiili_iiili_iiili_iiili_iiili_iiili_iiili_iiili_iiii_i_illlllll_illlllll_illlllll_illlllll_illlllll_illlllll_illlllll_illlllll_illlllll_illlllll_illlllll_ill
AIcosertelasfinas,esposiblequelacosturano
quedealineadaolatelanoavancecorrectamente.Si
estosucede,coloquedebajodelatelaunpapelfino
ounmaterialestabilizadoryc6salojuntoconlatela.
Cuandohayaterminadolacostura,arranqueel
papelsobrante.
(_) Papel o material estabilizador
En primer lugar deber_i hilvanar juntas las piezas de
tela y, a continuaci6n, coser sin estirarlas.
(_) Hilvanado
La costura de brazo libre es Otil para zonas de
costura tubular y de dif_cil acceso.
Para cambiar la m_quina al estilo de brazo libre,
levanta la parte inferior de la unidad de cama plana
hacia usted y, a continuaci6n, tire de ella hacia
afuera para quitarla.
(_) Unidad de cama plana
26
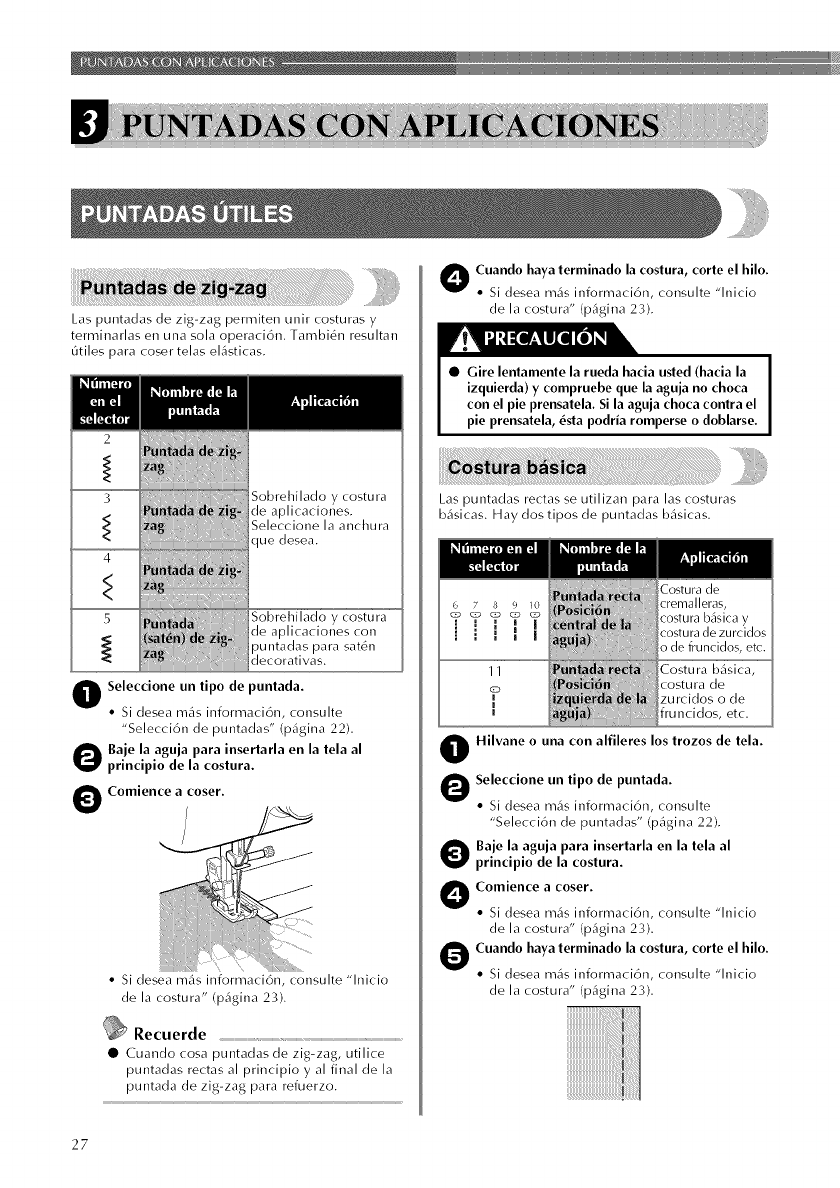
Laspuntadasdezig-zagpermitenunircosturasy
terminarlasenunasolaoperaci6n.Tambi6nresultan
_tilesparacosertelaselJlsticas.
2
3
4
5
Lie desea.
_U_ }i[ i[[i Sobrehilado y costura
de aplicaciones con
pu ntadas para sat6n
decorativas.
O Seleccione un tipo de puntada.
• Si desea m_is informaci6n, consulte
"Selecci6n de puntadas" (Digina 22).
Oaje la aguja para insertarla en la tela al
principio de la costura.
Comience a coser.
• Si desea m4s informaci6n, consulte "lnicio
de la costura" (Digina 23).
Recuerde
•Cuando cosa puntadas de zig-zag, utilice
puntadas rectas al principio y al final de la
puntada de zig-zag para refuerzo.
O Cuando haya terminado la costura, corte el hilo.
• Si desea m_s informaci6n, consulte "lnicio
de la costura" (Digina 23).
•Gire lentamente la rueda hacia usted (hacia la
izquierda) y compruebe que la aguja no choca
con el pie prensatela. Si la aguja choca contra el
pie prensatela, _sta podria romperse o doblarse.
Las puntadas rectas se utilizan para las costuras
bilsicas, Hay dos tipos de puntaclas bilsicas,
11
[ ffuncidos, etc.
OHilvane ouna con alfileres los trozos de tela.
OSeleccione un tipo de puntada.
• Si desea m_is informaci6n, consulte
"Selecci6n de puntadas" (Digina 22).
Oaje la aguja para insertarla en la tela al
principio de la costura.
O Comience a coser.
•Si desea mils informaci6n, consulte "lnicio
de la costura" (Digina 23).
OCuando haya terminado la costura, corte el hilo.
• Si desea m4s informaci6n, consulte "lnicio
de la costura" (Digina 23).
27
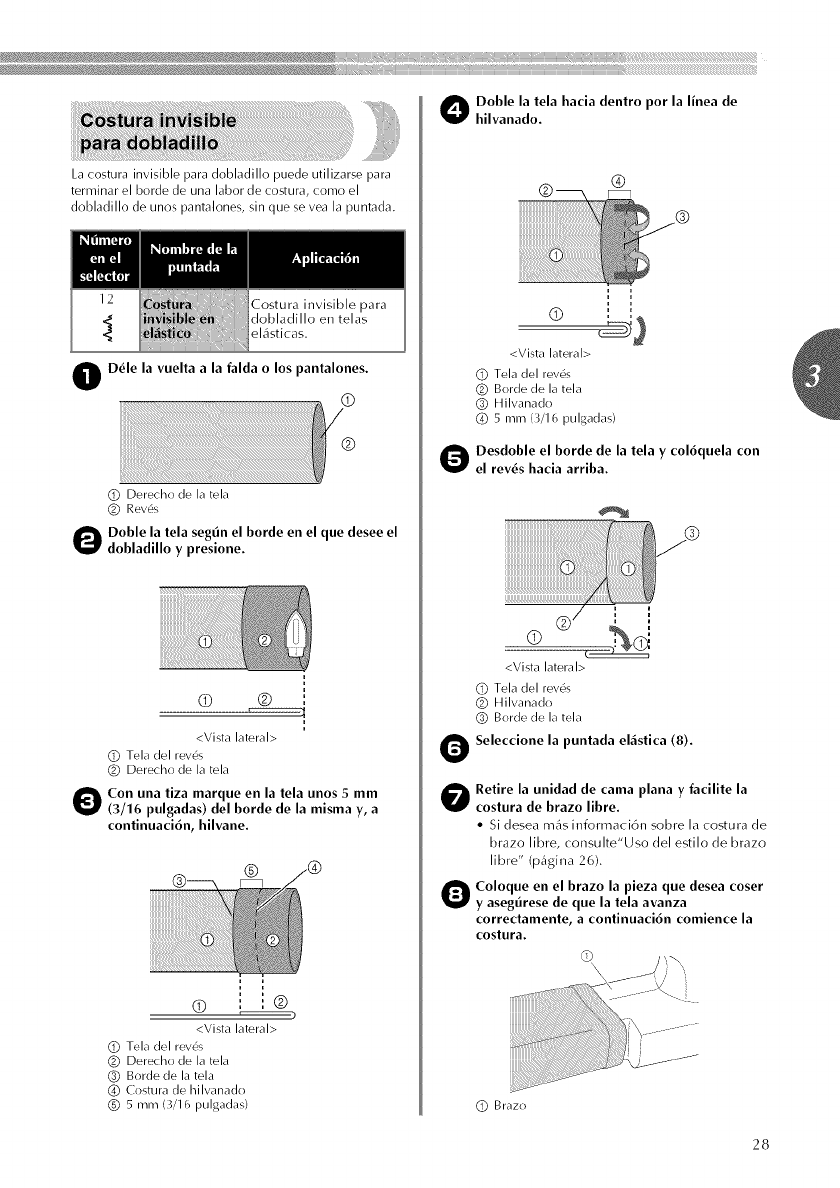
iijiiiiiiii_l_liiiiijiI_iilil!_ii_ii1iililiiii_iiilll_%iii_iiiiiliJiiiiilli_%iili1ii_l1_iiii_ililiilli_ii_i_illl_liiil_i_ii%lllll_ii1iii_ililllllllllllllllllllllllllli_iiiiii_ilil%i_ii%ii_iii%llli_l_iillll_li_ii!!iii!iiiiiii!iii!ii!!iii!iiiiiiiiii!!iiii¸iii!iii!il¸!!iii!iiiiiiiiii!!iiii¸iii!iii!il¸!!iii!iiiiiiiiii!!iiii¸iii!iiiiiiiii!ii
Lacosturainvisibleparadobladillopuedeutilizarsepara
terminarelbordedeunalabordecostura,comoel
dobladillodeunospantalones,sinqueseyealapuntada.
Costura invisible para
dobladillo en telas
el(_sticas,
OD_Ie la vuelta a la falda o los pantalones.
(_) Derecho de la tela
(#) Rev6s
Ooble la tela segtin el borde en el que desee el
dobladillo y presione.
I
<Vista lateral>
(_) Tela del rev6s
(_) Derecho de la tela
OCon una tiza marque en la tela unos 5mm
(3/16 pulgadas) del borde de la misma y, a
continuaci6n, hilvane.
®
O : :® )
<Vista lateral>
(_) Tela del rev6s
(_) Derecho de la tela
_) Borde de la tela
Costura de hilvanado
(_) 5 mm (3/16 pulgadas)
Ooble la tela hacia dentro pot la linea de
hilvanado.
®
<Vista lateral>
(_) Tela del rev6s
(_) Borde de la tela
_) Hilvanado
(_ 5 mm (3/16 pulgadas)
Oesdoble el borde de la telay col6quela con
el rev6s hacia arriba.
<Vista lateral>
(_) Tela del rev6s
(_) Hilvanado
_) Borde de la tela
OSeleccione la puntada el_stica (8).
Oetire la unidad de cama plana y facilite la
costura de brazo libre.
• Si desea m_is informaci6n sobre la costura de
brazo libre, consulte"Uso del estilo de brazo
libre" (Digina 26).
Coloque en el brazo la pieza que desea coser
y asegtirese de que la tela avanza
correctamente, a continuaci6n comience la
costura.
(_) Brazo
28
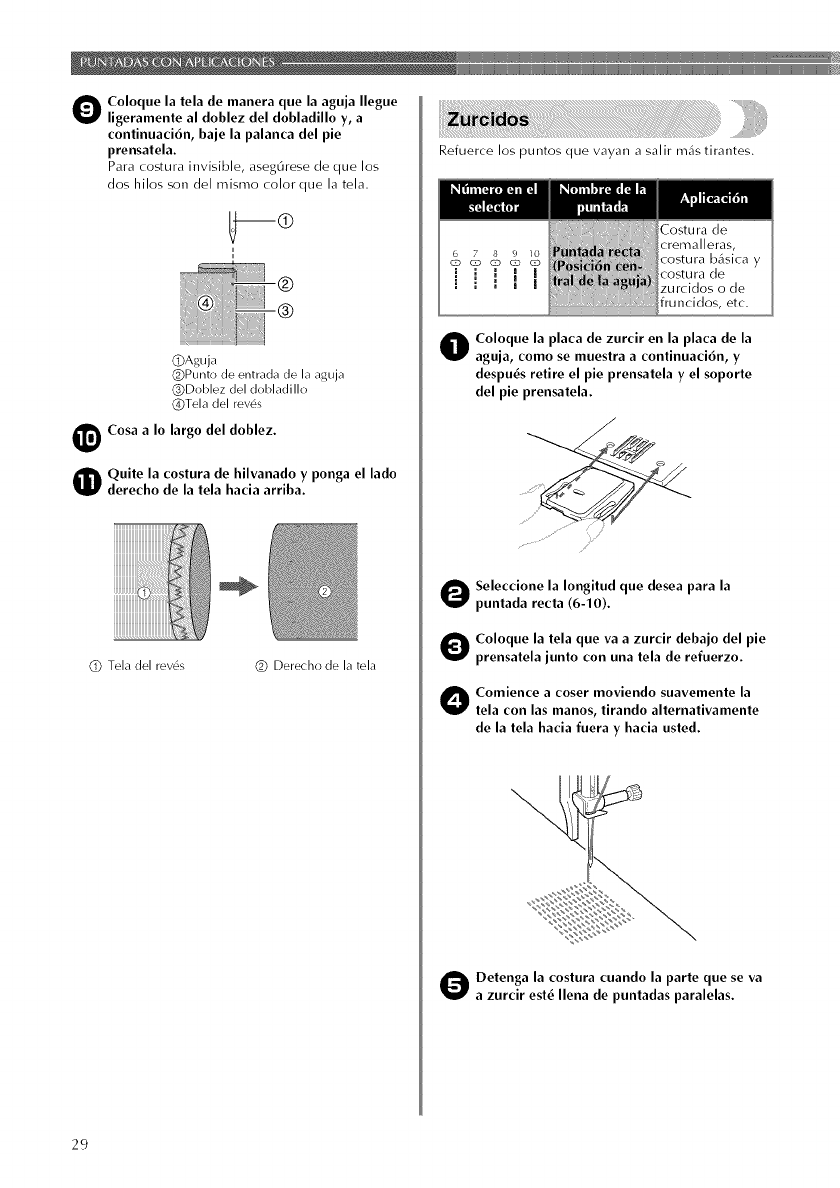
Ooloqoe la tela de manera que la aguja Ilegue
ligeramente al doblez del dobladillo y, a
contiouaci6n, baje la palanca del pie
prensatela.
Para costura invisible, asegOrese de que los
dos hilos son del mismo color que la tela.
QAguja
(_)Punto de entrada de la aguja
_)Doblez del dobladillo
(_Tela del rev6s
Cosa a Io largo del doblez.
Ouite la costura de hilvanado y pooga el lado
derecho de la tela hacia arriba.
(_) Tela del rev6s (_) Derecho de la tela
Refuerce los puntos que vayan a salir m_is tirantes.
iii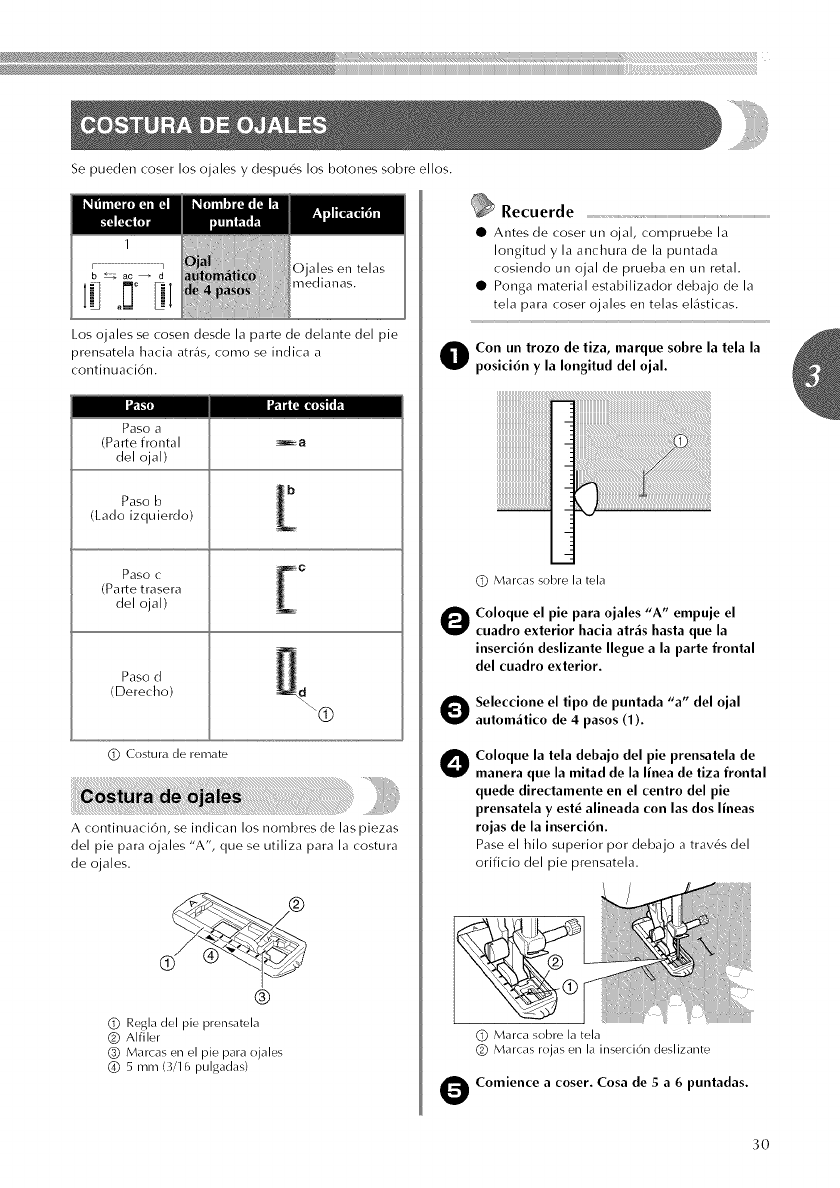
Se pueden coser los ojales y despu6s los botones sobre ellos,
1
r............................................_ O ales en telas
b _ ac _ d me( ianas,
Los ojales se cosen desde la parte de delante del pie
prensatela hacia atr_fls, como se indica a
continuaci6n.
I',_i_ I',_"i]L_R_k'__1
Paso a
(Parte frontal
del ojal)
Paso b
(Lado izquierdo)
Paso c
(Parte trasera
del ojal)
Paso d
(Dei_echo)
[°
-.®
(_ Gostura de ren_ate
A continuaci6n, se indican los nombres de las piezas
del pie para ojales "A", que se utiliza para la costura
de ojales.
®
(_) Regla del pie prensatela
(_) Alfiler
_) Marcas en el pie para ojales
(_ 5 mm (3/16 pulgadas)
_Recuerde
• Antes de coser un ojal, compruebe la
Iongitud y la anchura de la puntada
cosiendo un ojal de prueba en un retal.
• Ponga material estabilizador debajo de la
tela para coser ojales en telas el(]sticas.
Oon un trozo de tiza, marque sobre la tela la
posici6n y la Iongitud del ojal.
(_) Marcas sobre la tela
Ooloque el pie para ojales "A" empuje el
cuadro exterior hacia atr_is hasta que la
inserci6n deslizante Ilegue a la parte frontal
del cuadro exterior.
Seleccione el tipo de puntada "a" del ojal
autom_itico de 4 pasos (1).
Coloque la tela debajo del pie prensatela de
manera que la mitad de la linea de tiza frontal
quede directamente en el centro del pie
prensatela y est_ alineada con las dos lineas
rojas de la inserci6n.
Pase el hilo superior por debajo a trav6s del
orificio del pie prensatela.
(_) Marca sobre la tela
(_) Marcas rojas en la inserci(_n deslizante
OComience acoser. Cosa de 5a6puntadas.
3O
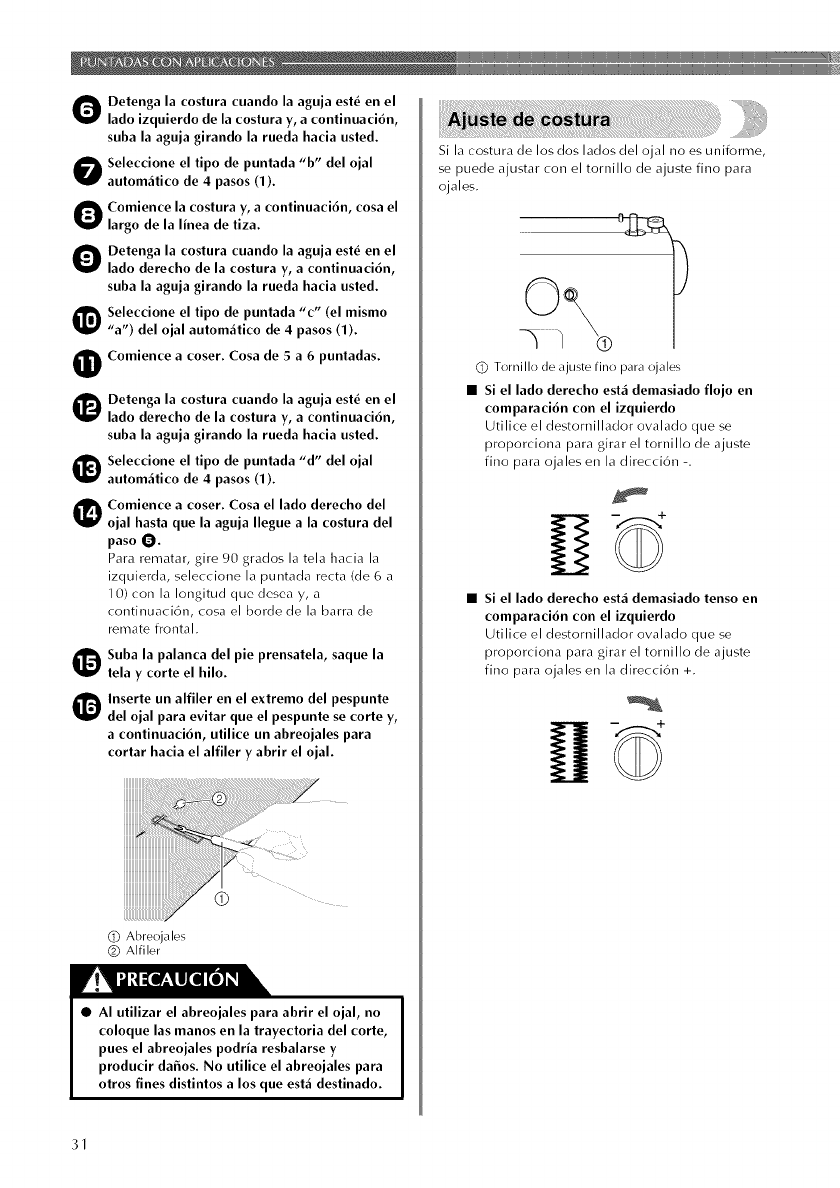
O Detenga la costura cuando la aguja est_ en el
lado izquierdo de la costura y, a continuaci6n,
suba la aguja girando la rueda hacia usted.
O eleccione el tipo de puntada "b" del ojal
autom_itico de 4 pasos (1).
O omience la costura y, a continuaci6n, cosa el
largo de la linea de tiza.
O etenga la costura cuando la aguja est_ en el
lado derecho de la costura y, a continuaci6n,
suba la aguja girando la rueda hacia usted.
Seleccione el tipo de puntada "c" (el mismo
"a") del ojal autom_itico de 4 pasos (1).
OComience a coser. Cosa de 5 a 6 puntadas.
Detenga la costura cuando la aguja est_ en el
lado derecho de la costura y, a continuaci6n,
suba la aguja girando la rueda hacia usted.
Seleccione el tipo de puntada "d" del ojal
autom_itico de 4 pasos (1).
Comience a coser. Cosa el lado derecho del
ojal hasta que la aguja Ilegue a la costura del
paso O.
Para rematar, gire 90 grados la tela hacia la
izquierda, seleccione la puntada recta (de 6 a
10) con la Iongitud que desea y, a
continuaci6n, cosa el borde de la barra de
remate frontal.
Ouba la palanca del pie prensatela, saque la
telay corte el hilo.
Inserte un alfiler en el extremo del pespunte
del ojal para evilar que el pespunte se torte y,
a continuaci6n, utilice un abreojales para
cortar hacia el alfiler y abrir el ojal.
Q Abreojales
(_) Alfiler
(_) • •
• AI utilizar el abreojales para abrir el ojal, no
coloque las manos en la trayectoria del corte,
pues el abreojales podria resbalarse y
producir dafios. No utilice el abreojales para
otros fines distintos a los que est_i destinado.
Si la costura de los (los lados del ojal no es uniforme,
se puede ajustar con el tornillo de ajuste fino para
ojales.
Q Tornillo de ajuste fino para ojales
•Si el lado derecho est5 demasiado flojo en
comparaci6n con el izquierdo
Utilice el destornillador ovalado que se
proporciona para girar el tornillo de ajuste
fino para ojales en la direcci6n -.
• Si el lado derecho est_idemasiado tenso en
comparaci6n con el izquierdo
Utilice el destornillador ovalado que se
proporciona para girar el tornillo de ajuste
fino para ojales en la direcci6n +,
31

Los botones pueden coserse con la m_iquina de
coser Se pueden colocar botones con 2 6 4 orificios
Oida la distancia entre los orificios del bot6n
que se va a colocar y, a continuaci6n,
seleccione la puntada de zig-zag adecuada (2,
364), segtin la siguiente tabla.
©
1,6 mm (1/16 pulgadas)
3,2 mm (1/8 pulgadas)
4,8 mm (3/1 6 pulgadas)
OColoque el pie especial para botones "M".
O Coloque la placa de zurcir en la placa de la
aguja, como se indica a continuaci6n.
Ooloque un bot6n entre el pie prensatela y la
tela.
• Cuando cosa botones con cuatro orificios,
cosa primero los dos orificios que est6n m_s
cerca de usted A continuaci6n, deslice el
bot6n de manera que la aguja penetre en los
(los orificios cercanos a la pa(te de atrls de
la m_iquina y c6salos del mismo modo
Oire la rueda hacia usted (hacia la izquierda)
para comprobar que la aguja penetra
correctamente en los dos orificios del bot6n.
Si la aguja golpea el bot6n, vuelva al paso O
•Asegtirese de que la aguja no choca contra el
bot6n, pues _sta podria romperse o doblarse.
OComience a coser.
• Tras coser durante unos 10 segundos a baja
velocidad, pulse y mantenga pulsado el
pulsador de retroceso para coser las costuras
de remate.
O ire del hilo hacia la derecha de la m_iquina y,
a continuaci6n, corte los hilos superiores e
inferiores, dejando una Iongilud de 15 cm
(6 pulgadas).
Saque el hilo superior al terminar la costura
hacia el rev_s de la tela y, a continuaci6n,
haga un nudo at_indolo con el hilo de la
bobina.
Utilice unas tijeras para cortar el hilo superior
y el hilo de la bobim_ al principio de la costura
32
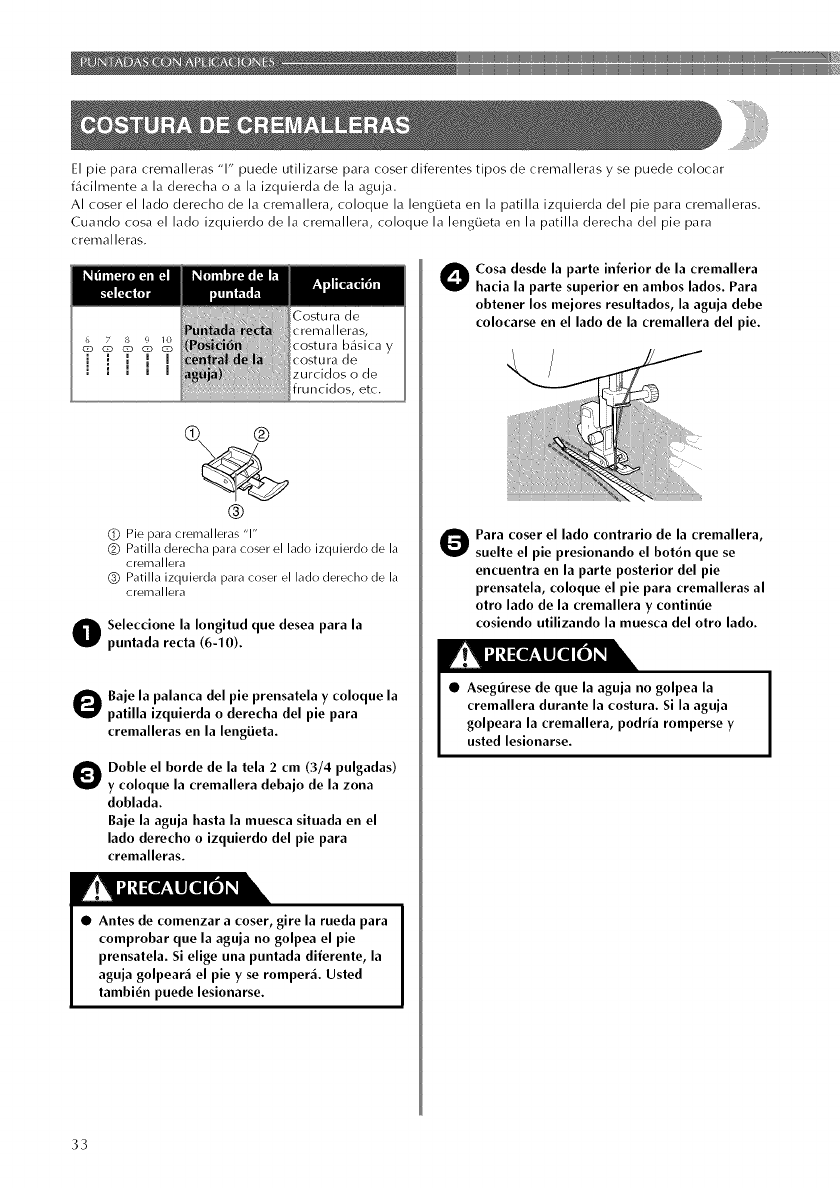
Elpieparacremalleras"1"puedeutilizarseparacoserdiferentestiposdecremallerasysepuedecolocar
fllcih-nentealaderechaoalaizquierdadelaaguja.
AIcoserelladoderechodelacremallera,coloquelaleng_ietaerrlapatillaizquierdadelpieparacremalleras.
Cuandocosaelladoizquierdodelacremallera,coloquelalengOetaenlapatilladerechadelpiepara
cremalleras.
Costurade
crenla[ [eras,
_ g 9 _ costura b,Jsica y
[ [[ii costurade
zurcidos o de
fruncidos, etc,
®
(_) Pie para cremalleras "1"
(_) Patilla derecha para coser el lado izquierdo de la
cremallera
(_) Patilla izquierda para coser el lado derecho de la
cremallera
O eleccione la Iongitud que desea para la
puntada recta (6-10).
OBaje la palanca del pie prensalela y coloque la
patilla izquierda o derecha del pie para
cremalleras en la lengi_eta.
Ooble el borde de la tela 2cm (3/4 pulgadas)
y coloque la cremallera debajo de la zona
doblada.
Baje la aguja hasta la muesca situada en el
lado derecho o izquierdo del pie para
cremalleras.
r! I UN:[ef:lll[OI [el _iL
•Antes de comenzar acoser, gire la rueda para
comprobar que la aguja no golpea el pie
prensatela. Si elige una puntada diferente, la
aguja golpear_ el pie y se romperS. Usted
tambi_n puede lesionarse.
Oosa desde la parle inferior de la cremallera
hacia la parle superior en ambos lados. Para
obtener los mejores resultados, la aguja debe
colocarse en el lado de la cremallera del pie.
Oara coser el lado contrario de la cremallera,
suelte el pie presionando el bot6n que se
encuentra en la parle posterior del pie
prensatela, coloque el pie para cremalleras al
otto lado de la cremallera y continue
cosiendo utilizando la muesca del otto lado.
V! I UN:[ef:lll[OI [e] _i_
•Aseg_rese de que la aguja no golpea la
cremallera durante la costura. Si la aguja
golpeara la cremallera, podria romperse y
usted lesionarse.
33
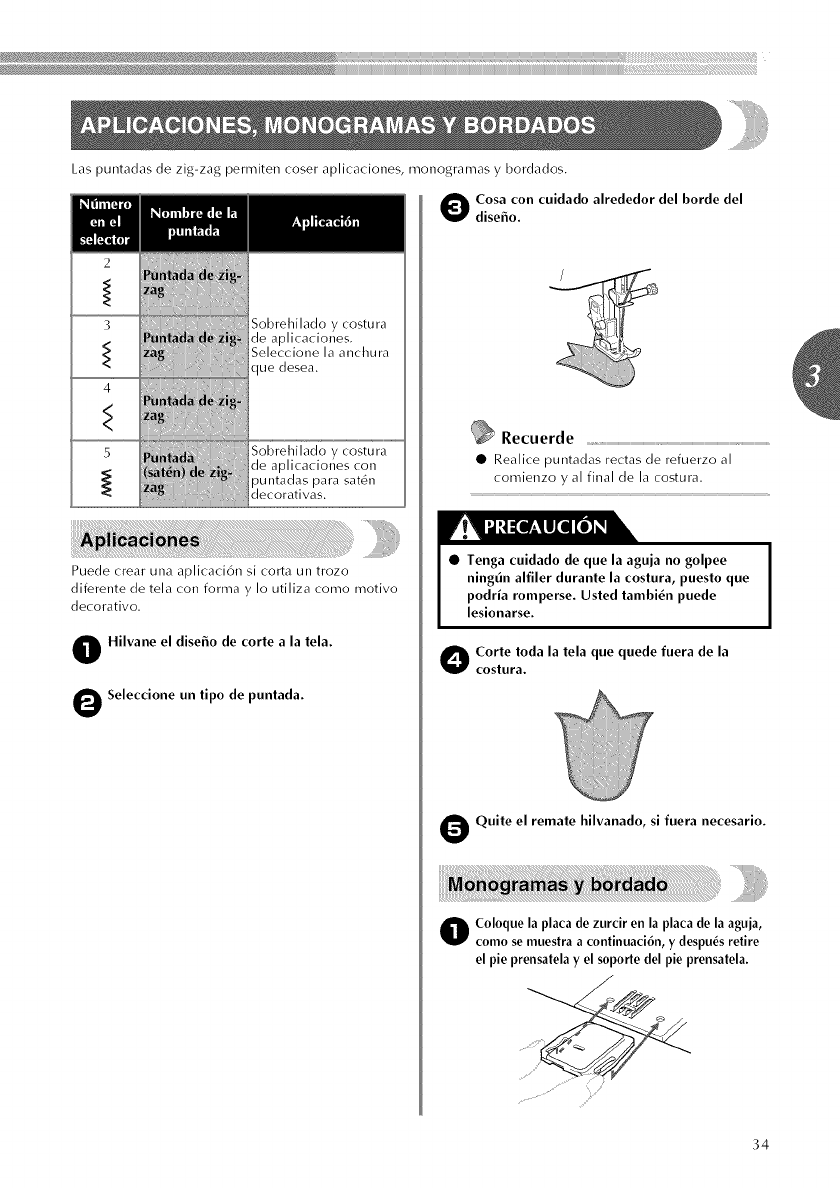
Laspuntadasdezig-zagpermitencoseraplicaciones,monogramasybordados.
O osa con cuidado
diseffo.
Lie desea,
Sobrehilado y costura
de aplicaciones con
puntadas para sat6n
decorativas.
Puede treat una aplicaci6n si corta un trozo
diferente de tela con forma y Io utiliza como motivo
decorativo.
OHilvane el diseffo de corte a la tela.
OSeleccione un tipo de puntada.
alrededor del horde del
Recuerde
• Realice puntadas rectas de refuerzo al
comienzo y al final de la costura,
• Tenga cuidado de que la aguja no golpee
ningt_n alfiler durante la costura, puesto que
podrla romperse. Usted tambi6n puede
lesionarse.
Corte toda la tela que qoede fuera de la
COS|Ura.
Quite el remate hilvanado, si fuera necesario.
O €oloque la plata de zurcir en la plata de la aguja,
como se muestra a continuaci6n, y despu_sretire
el pie prensatela y el soporte del pie prensatela.
34
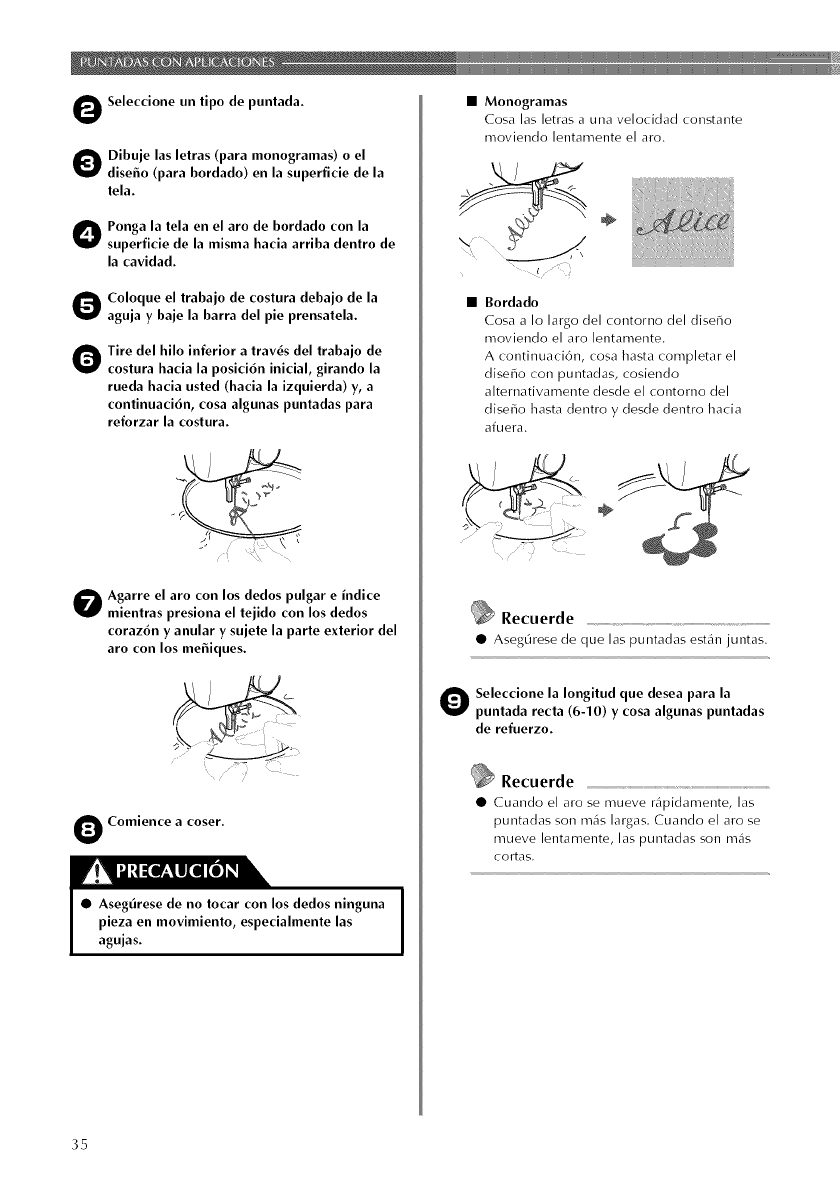
OSeleccione un tipo de puntada.
O ibuje las letras (para monogramas) o el
dise6o (para bordado) en la superficie de la
tela.
O Ponga la tela en el aro de bordado con la
superficie de la misma hacia arriba dentro de
la cavidad.
O oloque el trabajo de costura debajo de la
aguja y baje la barra del pie prensatela.
O ire del hilo inferior a trav6s del trabajo de
costura hacia la posici6n inicial, girando la
rueda hacia usted (hacia la izquierda) y, a
continuaci6n, cosa algunas puntadas para
reforzar la costura.
O garre el aro coo los dedos pulgar eindice
mientras presiona el tejido con los dedos
coraz6n y anular y sujete la parte exterior del
aro con los me6iques.
•Asegtirese de no tocar con los dedos ninguna
pieza en movimiento, especialmente las
agujas.
•Monogramas
Cosa las letras a una velocidacl constante
moviendo lentamente el aro.
• Bordado
Cosa a Io largo del contorno del disefio
moviendo el aro lentarnente.
A continuaci6n, cosa hasta completar el
diseffo con puntadas, cosiendo
alternativamente desde el contomo del
diseffo hasta dentro desde dentro hacia
afuera.
Recuerde
• AsegOresede que las puntadas est_injuntas.
O Seleccione la Iongitud que desea para la
puntada recta (6-10) y cosa algunas puntadas
de refuerzo.
Recuerde
•Cuando el arose mueve r_ipidamente, las
puntadas son m_is largas, Cuando el arose
mueve lentamente, las puntaclas son m_is
coltas,
35
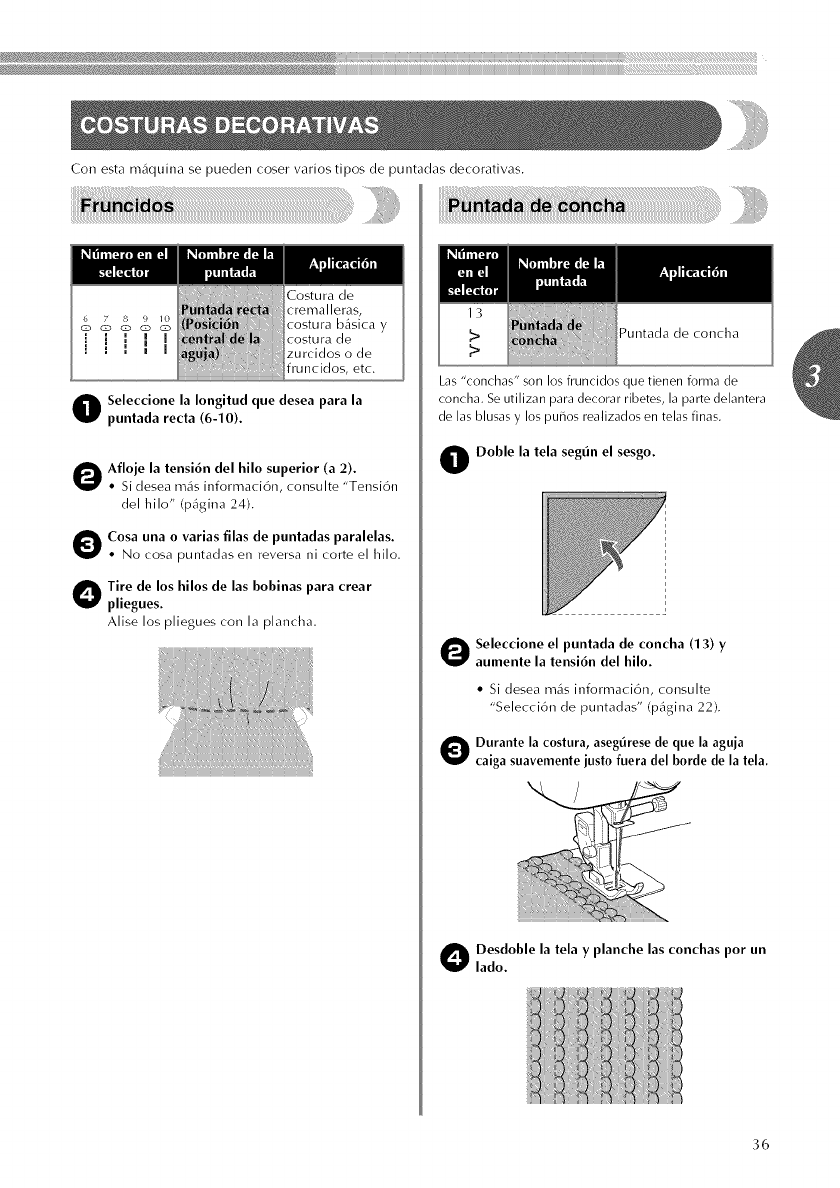
Conestam_quinasepuedencoservariostiposdepuntadasdecorativas.
O eleccione la Iongitud que desea para la
puntada recta (6-10).
O floje la tensi6n del hilo superior (a 2).
•Si desea m_s informaci6n, consulte "Tensi6n
del hilo" (Digina 24).
O Cosa una o varias filas de puntadas paralelas.
• No cosa puntadas en reversa ni colte el hilo
O ire de los hilos de las bobinas para crear
pliegues.
Alise los pliegues con la plancha
Puntada de concha
Las "conchas" son los fruncidos que tienen forma de
concha. Seutilizan para decorar ribetes, la parte delantera
de las blusas ylos puflos realizados en telas finas.
O Doble la tela segtin el sesgo.
Oeleccione el puntada de concha (13) y
aumente la tensi6n del hilo.
• Si desea m_s informaci6n, consulte
"Selecci6n de puntadas" (Digina 22).
O Duraute la costura, aseg_lrese de que la aguja
caiga suavemente justo fuera del borde de la tela.
Oesdoble la tela y planche las conchas pot un
lado.
36
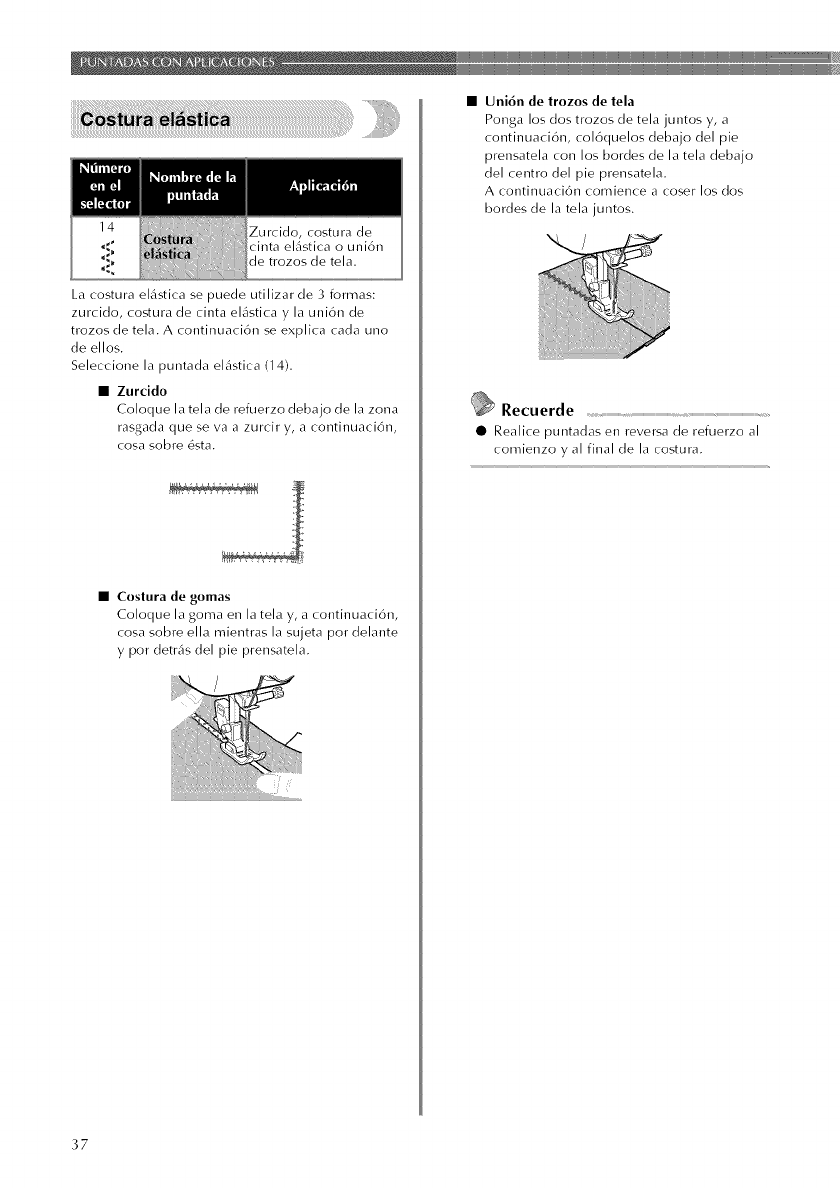
Zurcido, costura de
cinta el(lstica o uni6n
de trozos de tela.
La costura el(lstica se puede utilizar de 3 formas:
zurcido, costura de cinta elgstica y la uni6n de
trozos de tela. A continuaci6n se explica cada uno
de ellos.
Seleccione la puntada el_istica (14).
• Zurcido
Coloque la tela de refuerzo debajo de la zona
rasgada que se va a zurcir y, a continuaci6n,
cosa sobre 6sta.
• Costura de gomas
Coloque la goma en la tela y, a continuaci6n,
cosa sobre ella mientras la sujeta por delante
y por detr_is del pie prensatela.
•Unidn de trozos de tela
Ponga los dos trozos de tela juntos y, a
continuaci6n, col6quelos debajo del pie
prensatela con los bordes de la tela debajo
del centro del pie prensatela.
A continuaci6n comience a coser los dos
bordes de la tela juntos.
Recuerde
• Realice puntadas en reversa de refuerzo al
comienzo y al final de la co_tura.
37
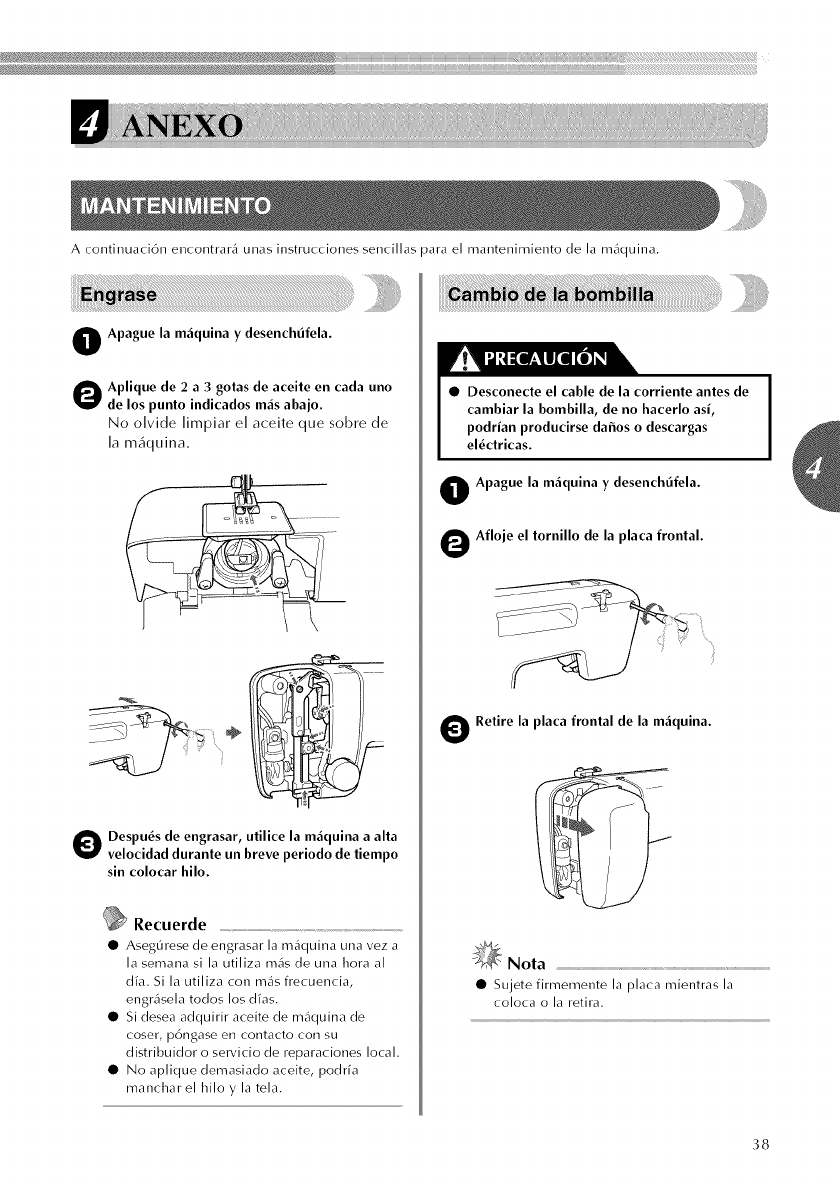
Acontinuaci6nencontran5unasinstruccionessencillasparaelmantenimientodelam_quina.
OApague la m_qoina y desench_fela.
OdP IliqsU_teto2 ia dicga°_a_dme_¢_en cadaun°
No olvide limpiar el aceite que sobre de
la m_iquina.
Oespots de engrasar,velocidaddurante un breve periodo deutilice la m_quina atiempoalla
sin colocar hilo.
Recuerde
• Aseg0rese de engrasar 1,1m_iquina una vez a
la semana si la utiliza m,ls de una hora al
dfa. Si la utiliza con m_s frecuencia,
engril_ela todos los dfas.
• Si desea adquidr aceffe de m_iquina de
coseh p6ngase en contacto con su
digtdbuidor o servicio de reparaciones local.
• No aplique demasiado aceite, podffa
manchar el hiloy la tela.
• Desconecte el cable de la corriente antes de
cambiar la bombilla, de no bacerlo asi,
podrian producirse da6os o descargas
el6ctricas.
OApague la m_quina y desenchfifela.
OAfloje el tornillo de la placa frontal.
O Retire la placa frontal de la maquina.
_Nota
• Sujete firmemente la plata mientras la
coloca o la retira.
38
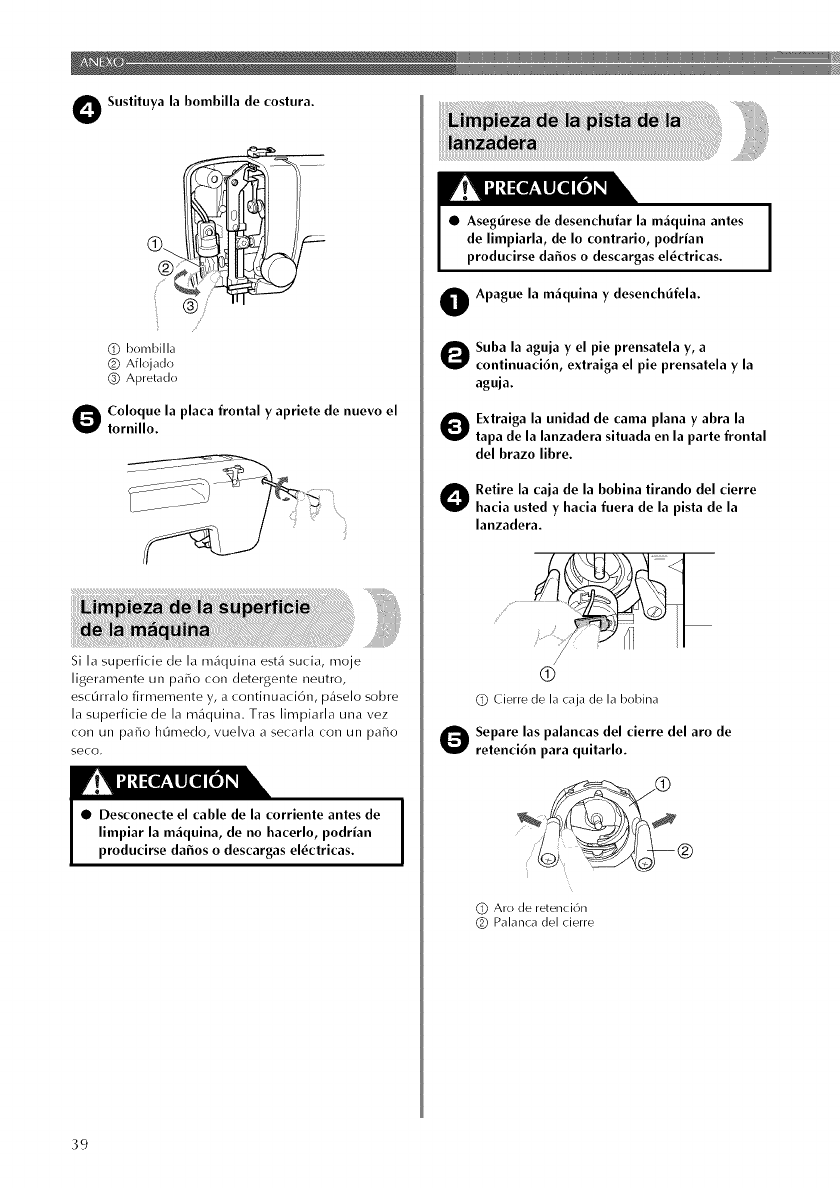
OSustituya la bombilla de costura.
/
Q bombilla
Q Aflojado
(_) Apretado
Ooloque la placa frontal y apriete de nuevo el
tornillo.
Si la superficie de la m_quina est_i sucia, moje
ligeramente un pai3o con detergente neutro,
esc0rralo firmemente y, a continuaci6n, p_selo sobre
[a superficie de la m_quina. Tras lirnpiarla una vez
con un patio h0medo, vuelva a secarla con un paffo
SeCO,
|
•Desconecte el cable de la corriente antes de I
limpiar la m_iquina, de no hacerlo, podrian I
producirse dafios o descargas el_ctricas.
!
•Asegtirese de desenchufar la m_iquina antes ]
de limpiarla, de Io contrario, podrian Iproducirse dafios o descargas el_ctricas.
OApague la m_iquina y desenchtifela.
OSuba la aguja y el pie prensatela y, a
continuaci6n, extraiga el pie prensatela y la
aguja.
Oxtraiga la unidad de cama plana y abra la
tapa de la lanzadera situada en [a parte frontal
del brazo libre.
Oetire la caja de la bobina tirando del cierre
hacia usted y hacia fuera de la pista de la
lanzadera.
(_) Cierre de la caja de la bobina
Oepare las palancas del cierre del aro de
retenci6n para quitarlo.
(!) Aro de retenci()n
(_) Palanca del cierre
39

_i_i_11_iii_;ii_iiiiii_i_ii_i_;(iiiiii%i1%i1%i1%i1%i1%i1%itii_i1tiii_iii_iiii1iiiiiiiii11iiii_iiiiiiiii11:i%ii_iiiiii_i_ii%%!i%iii_%!_¸ii!_i!i!i_i_i!!iil¸i¸I¸!i!_ili¸i¸iiii_ii_i!i!iiii¸ii!_!iiil¸i¸I¸!i!_ili¸i¸iiii_ii_i!i!iiii¸ii!_!iiil¸i¸I¸!i!_ili¸i¸iiii_ii_i!i!iiii¸ii!_!iiil¸i¸I¸!i!ilili¸I
Ouite el ganchillo agarr_indolo pot el centro y
tirando de _1.
®
(_) Aro de retenci(_n
(_) Ganchillo
(_) Centro del ganchillo
Otilice un cepillo para quitar la pelusa y el
hilo acumulados en el aro de retenci6n, la
guia y la pista.
d
(_) Aro de retenci()n
(_ Guia
(_ Pista
Utilice un pa_o mojado en aceite de la
m_iquina para quitar la pelusa de la pista de la
lanzadera.
O impie la pelusa de la pista de la lanzadera de
la misma manera que se describe en el paso
O.
Vuelva amontar el ganchillo y el aro de
retenci6n y vuelva acolocar las palancas del
cierre en su sitio.
_®
(_) Aro de retenci()n
(_) Ganchillo
(_) Palanca del cierre
Ooloque la caja de la bobina, el pie prensatela
y la aguja antes de utilizar la m_iquina.
•Asegt_rese de que desenchufa la m_iquina
antes de proceder a su limpieza. De Io
contrario, podria recibir una descarga
el_ctrica o resultar lesionado.
OApague la m_iquina y desenchtifela.
Ouba la aguja y el pie preusatela y, a
continuaci6n, extraiga el pie prensatela y la
aguja.
O Extraiga la unidad de cama plana y abra la
tapa de la lanzadera situada en la parle frontal
del brazo libre.
O xtraiga la placa de la aguja con una moneda
o un destornillador ovalado para quitar los
tornillos.
Oimpie con un cepillo la pelusa de la parte
superior de los dientes de arrastre y de la pista
delalanzadera.
O oloque la placa de la aguja con una moneda
oun destornillador ovalado.
4O
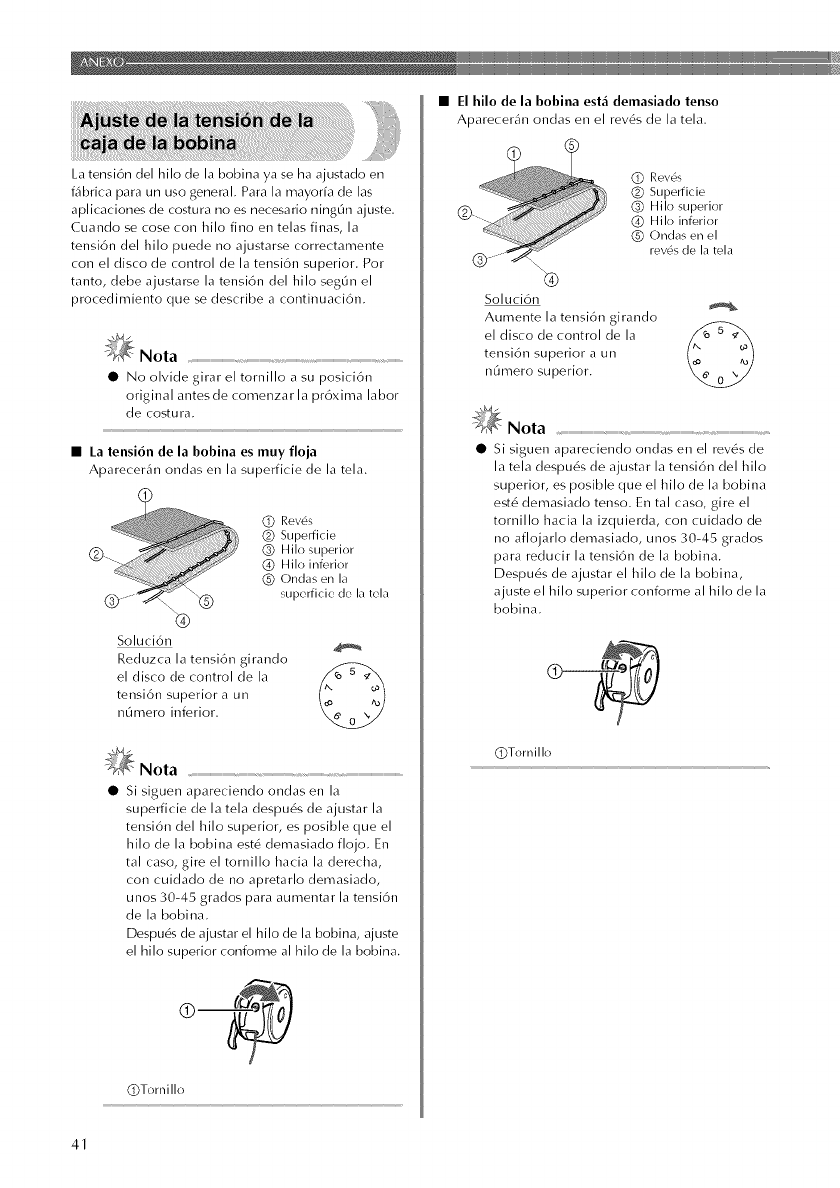
Latensi6ndelhilodelabobinayasehaajustadoen
f<ibricaparaunusogeneral.Paralamayorfadelas
aplicacionesdecosturanoesnecesarioningt]najuste.
Cuandosecosecol/hilofinoentelasfinas,la
tensi6ndelhilopuedenoajustarsecorrectamente
col/eldiscodecontroldelatensi6nsuperior.Por
tanto,debeajustarselatensi6ndelhiloseg0nel
procedimientoquesedescribeacontinuaci6n.
_Nota
• Noolvidegirareltornilloasuposici6n
originalantesdecomenzarla pr6xima labor
de costura.
•La tensi6n de la bobina es muy floja
Aparecer<in ondas en la superficie de la tela.
Q Rev6s
(_) Superficie
(_) Hilo superior
Q_ Hilo inferior
@ Ondas en la
superficie de la tda
®
Soluci6n
Reduzca la tensi6n girando
el disco de control de la
tensi6n superior a un
nOmero inferior.
_Nota
• si siguen apareciendo ondas en la
superficie de la tela despu6s de ajustar la
tensi6n del hilo superior, es posible que el
hilo de la bobina est_ denlasiado flojo, En
tal caso, gire el tornillo hacia la derecha,
con cuidado de no apretarlo demasiado,
unos 30-45 grados para aumentar la tensi6n
de la bobina.
Despu6s de ajustar el hilo de la bobina, ajuste
el hilo superior conforme al hilo de la bobina,
QTornillo
•El hilo de la bobina est_i demasiado tenso
Aparecer<fln ondas en el rev6s de la tela.
Q Rev6s
(_) Superficie
(_) Hilo superior
Q_ Hilo inferior
@ Ondas en el
rev6s de la tela
Soluci6n
Aumente la tensi6n girando
el disco de control de la f_ u _
tensi6n superior a un
nt]mero superior.
_;_ Nota
• si siguen apareciendo ondas en el rev6s de
la tela despu6s de ajustar la tensi6n del hilo
superior, es posible que el hilo de la bobina
est6 demasiado tenso. En tal caso, gire el
tornillo hacia la izquierda, con cuidado de
no aflojarlo demasiado, unos 30-45 grados
para reducir la tensi6n de la bobina.
Despu6s de ajustar el hilo de la bobina,
ajuste el hilo superior conforme al hilo de la
bobina.
QTornillo
41
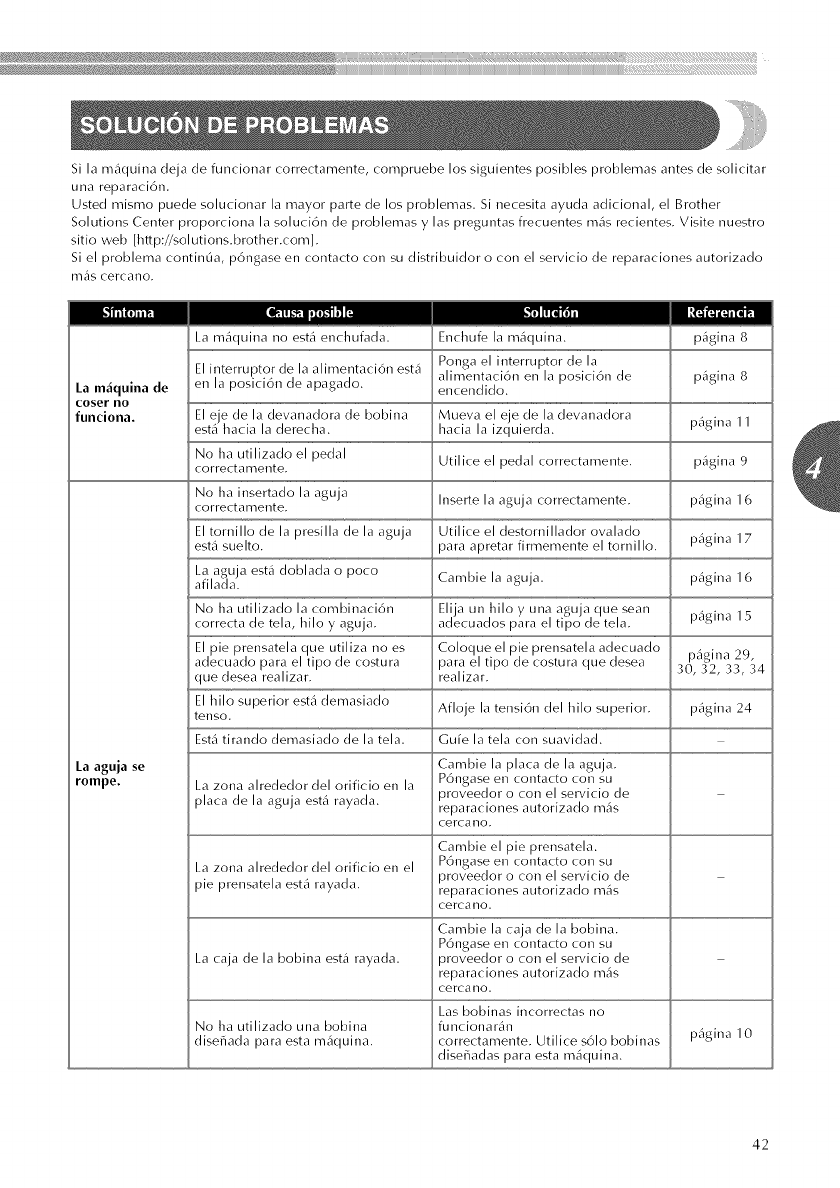
!iiijjiiiiYiiii}]}}jiii]iiiii_}]iiiii_}]iiiii_}]iiiii_}]iiiii_}]iiiii_}]iijiiii@ii.:.iiiii.:.iiiiii.iiiiii;iiiiii;@___i_1_iiiiiiiiiiiiiiiiiiiiiiii%i_¸II!II!II¸iiiiii!_!iiil¸ii!i!;ili¸iiiiiiiiiiiiiiiiiii_il;i!i!iiii¸ii!_!iiil¸ii!i!;ili¸iiiii_il;i!i!iiii¸ii!_!iiil¸ii!i!ii_iii_il
iijiiiiiiiiiiiiiiiiiiiiiiiiiiiiiiiiiiiiiiiiiiiiiiiiiiiiiiiiiiiiiiiiiiiiiiiiiiiiiiiiiiiiiiiiiiiiiiiiiiiiiiiiiiiiiiiiiiiiiiiiiiiiiiiiiiiiiiiiiiiiiiiiiiiiiiiiiiiiiiiiiiiiiiiiiiiiiiiiiiiiiiiiiiiiiiiiiiiiiiiiiiiiiiiiiiiiiiiiiiiiiiiiiiiiiiiiiiiiiiiiiiiiiiiiiiiiiiiiiiiiiiiiiiiiiiiiiiiiiiiiiiiiiiiiiiiiiiiii_ii_;!i_i_!_i1_i_i_i_;!_%_i_j_:_i_!_!_i_i!i_i_i_!_i_i_i_i_i_i_i!_i_i!i_!!_!i_!i_!i_!i_!i_!i_!i_!i_!i_!i_!i_!i_!i_!i_!i_!i_!i_!i_!i_!i_!i_!i_!i_!i_!i_!i_!i_!i_!i_!i_!i_!i_!i_!i_!i_!i_!i_!_!_!!i
Si la m_iquina deja de funcionar correctamente, compruebe los siguientes posibles problemas antes de solicitar
una reparaci6n.
Usted mismo puede solucionar la mayor parte de los problemas. Si necesita ayuda adicional, el Brother
Solutions Center proporciona la soluci6n de problemas y las preguntas frecuentes m_is recientes. Visite nuestro
sitio web [http://solutions.brother.com].
Si el problema contin0a, p6ngase en contacto con su distribuidor o con el servicio de reparaciones autorizado
m_s cercano.
La mdquina de
coser no
funciona.
La m_iquina no est,1 enchufada.
El interruptor de la alimentaci6n est,1
en la posici6n de apagado.
El e e de la devanadora de bobina
est,1 _acia a c erec _a.
No ha utilizado el pedal Utilice el pedal correctamente.
correctamente.
No ha insertado la aguja Inserte la aguja correctamente.
corl-ect amente.
El tomillo de la presilla de la aguja Utilice el destornillador ovalado
est,1 suelto, para apretar firmemente el tornillo.
La aguja est,1 doblada o poco Cambie la aguja.
afilacla.
No ha utilizaclo la combinaci6n Elija un hilo y una agu a que sean
correcta de tela, hilo y aguja, aclecuaclos para el tipo de tela.
El pie prensatela que utiliza no es Coloque el pie prensatela adecuado
adecuado para el tipo de costura para el tipo de costura que desea
que desea realizar, realizar. 30, 32, 33, 34
El hilo superior est,1demasiado Afloje la tensi6n del hilo superior.
tenso,
Est,1tirando demasiado de la tela. Cure la tela con suavidad.
La aguia se Carnbie la plata de la aguja.
rompe. La zona alrededor del orificio en la P6ngase en contacto con su
_roveedor o con el servicio de
plata de la aguja est,1 rayada, reparaciones autorizado m_is
cercano.
Carnbie el pie prensatela.
La zona alrededor del orificio en el P6ngase en contacto con su
_roveedor o con el servicio de
pie prensatela est_i rayada, reparaciones autorizado mAs
cercano.
Carnbie la caja de la bobina.
P6ngase en contacto con su
La caja de la bobina est,1 rayada. )roveedor o con el servicio de
reparaciones autorizado m_is
cercano.
Las bobinas incorrectas no
No ha utilizaclo una bobina funcionarln
diseF_ada para esta m_iquina, correctamente. Utilice s61o bobinas
diseF_adas para esta m_iquina.
Enchufe la m_iquina, p_igina 8
Ponga el interruptor de la
alimentaci6n en la posici6n de p_igina 8
encendido.
Mueva el e e de la devanadora p_igina 11
_acia a izquier(a.
p_igina 9
p_igina 16
p_igina 17
p_igina 16
p_igina 15
p_gina 29,
p_igina 24
p_igina 10
42
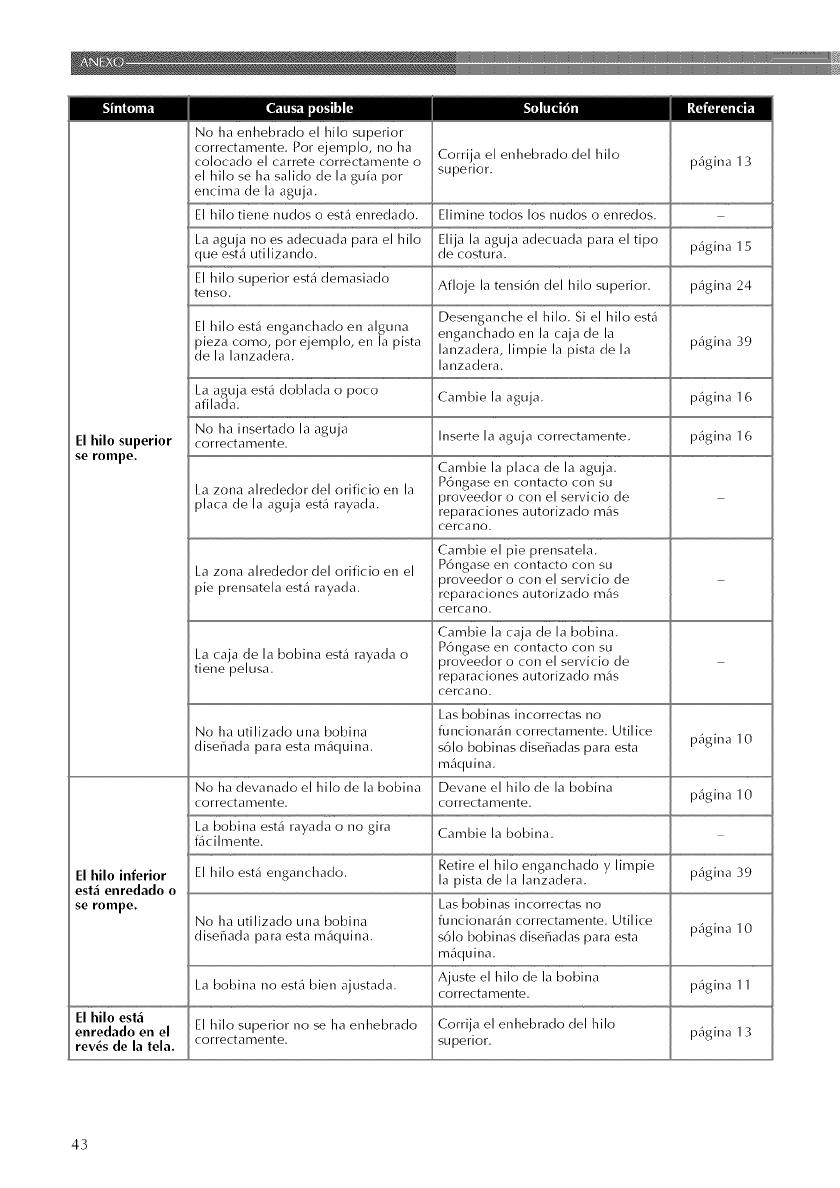
Nohaenhebradoelhilosuperior
correctamente,Porejemplo,noha
colocadoelcarretecorrectamenteo
elhilosehasalidodela8ufapor
encimade la aguja.
El hilo tiene nudos o est_i enredado.
Corrija el enhebrado del hilo
superior, p_igina 13
Elirnine todos los nudos o enredos.
La aguja no es adecuada para el hilo Elija la agu a adecuada para el tipo p_igina 15
que est_i utilizando, de costura.
El hilo superior est_i demasiado Afloje la tensi6n del hilo superior, p_igina 24
ter/so.
Desenganche el hilo, Si el hilo est_i
El hilo estl enganchado err alguna enganchado err la caja de la p_igina 39
pieza como, por ejemplo, err la pista lanzadera, limpie la pista de la
de la lanzadera. lanzadera.
La aguja esti1 doblada o poco Cambie la aguja, p_igina 16
afilada.
No Ira irrsertado la aguja Inserte la aguja correctamente, p_igina 16
El hilo superior correctamente.
se rompe. Carnbie la plata de la aguja.
La zona alrededor del orificio err la P6ngase err corrtacto corr su
_roveedor o corr el servicio de
plata de la aguja est_i rayada, reparaciones autorizado m_is
cercano.
Carnbie el pie prensatela.
La zona alrededor del orificio err el P6ngase err corrtacto corr su
_roveedor o corr el servicio de
pie prensatela esti1 rayada, reparaciones autorizado m_s
cercano.
Carnbie la caja de la bobina.
)6ngase en contacto con su
La caja de la bobina esti1 rayada o )roveedor o corr el servicio de
tiene pelusa, reparaciones autorizaclo m_is
cercano.
Las bobinas irrcorrectas no
No ha utilizaclo una bobina funcionar,in correctamente, Utilice
diseFlada para esta m_iquina, s61o bobinas diseFladas para esta p_igina 10
m_i(lUiha.
No Iradevanadoelhilodelabobina Devaneelhilodelabobina
correctamente, correctamente, pilgina 10
La bobina esti1 rayada o no gira Cambie la bobina.
filcilmente.
El hilo inferior El hilo esti1 enganchado. Retire el hilo enganchado y limpie pilgina 39
est_i euredado o la pista de la lanzadera.
se rompe. Las bobinas irrcorrectas no
No Ira utilizado una bobina funcionarln correctamente. Utilice
disefiacla para esta m_iquina, s61o bobinas disefiaclas para esta p_igina 10
m_i(lUiha.
La bobina no est_i bien ajustada. Ajuste el hilo de la bobina p_igina 11
correctarnente.
El hilo est_
enredado en el El hilo superior no se ha enhebrado Corrija el enhebrado del hilo p_igina 13
rev_s de la tela. correctamente, superior,
43
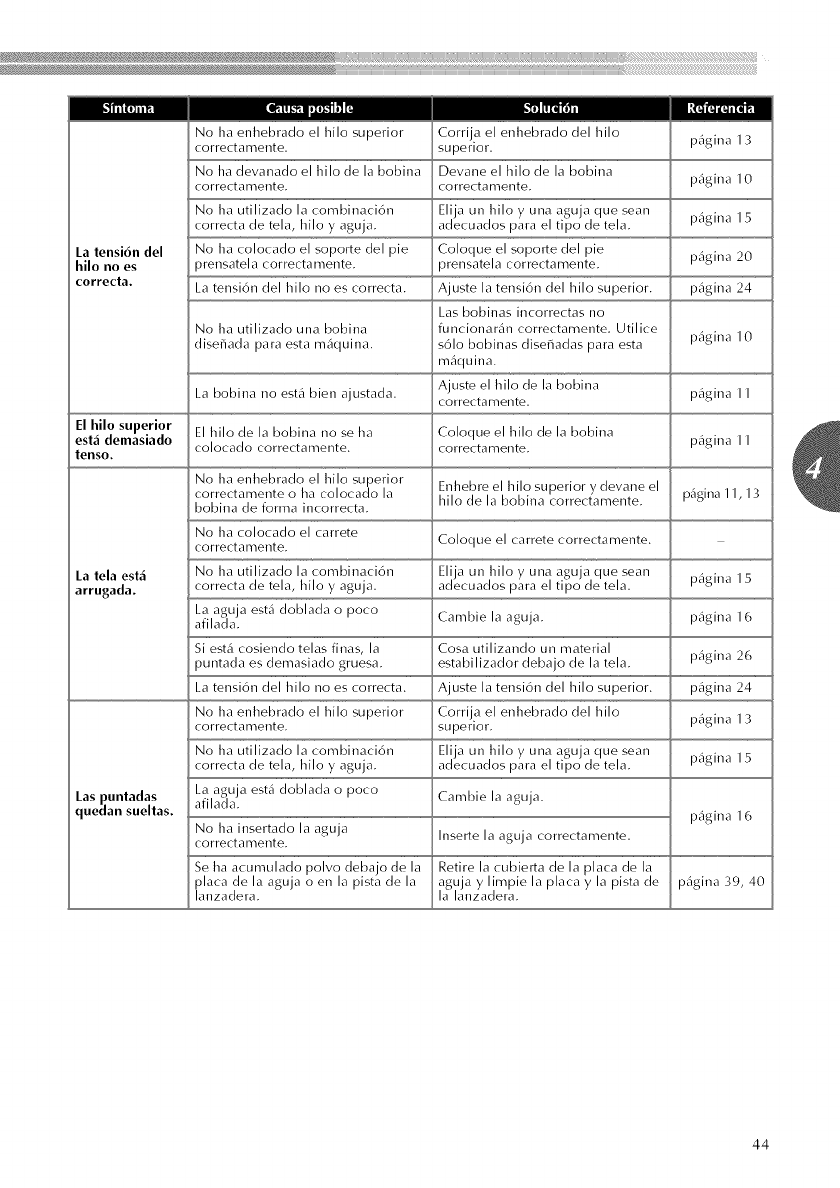
_i_iHiiiii_i_iiJ_i_3_iiJ_iiJ_iiJ_iiJ_iiJ_iiJ_iiJ_iiJ_iiJ_iiJ_iiJ_iii_iii_iii_iii_iii_iii_iii_iii_iii_iii_iii_iii_iii_iii_iii_iii_iii_iii_iii_iii_iii_iii_iii_iii_iii_iii_iii_iii_iii_iii_iii_iii_ii_ii1i_tii_i!_ii_!i¸I¸!iiiiiiiiiii¸I¸!i!;iiii¸iiii_iii!iiiiiiiiiii¸I¸!i!;iiii¸iiii_iii!iiiiiiiiiii¸I¸!i!;iiii¸iiii_iii!iiiiiiiiiii¸I¸!i!;iiii¸ill-ill
Nohaenhebradoelhilosuperior
correctamente.
Nohadevanadoelhilodelabobina
correctamente.
Nohautilizadolacombinaci6n
correctadetela,hiloyaguja.
Nohacolocadoelsoportedelpie
orensatelacorrectamente.
Latensi6ndelhilonoescorrecta.
Corrijaelenhebradodelhilo
superior.
Devaneelhilodelabobina
correctarnente.
pigina13
pigina10
Elijaunhiloyunaagujaquesean
adecuadosparaeltipodetela pigina15
La tensi6n del Coloque el soporte del pie
hilo no es )rensatela correctamente, pigina 20
correda. Ajuste la tensi6n del hilo superior pigina 24
Las bobinas incorrectas no
No ha utilizado una bobina funcionar,_n correctamente Utilice
disefiacla para esta m_iquina, s61o bobinas disefiaclas para esta pigina 10
m_iquina.
La bobina no est,1 bien ajustacla. Ajuste el hilo de la bobina p_igina 11
correctamente.
El hilo superior El hilo de la bobina no se ha Coloque el hilo de la bobina
esl_i demasiado pigina 11
lenso, colocado correctamente correctamente
No ha enhebrado el hilo superior Enhebre el hilo superior y devane el Digina 11,13
correctamente o ha colocado la hilo de la bobina correctamente.
bobina de forma incorrecta.
No ha colocaclo el carrete
correctamente. Coloque el carrete correctamente.
La tela est_i No ha utilizaclo la combinaci6n Elija un hilo y una agu a que sean pigina 15
arrugada, correcta de tela, hilo y aguja adecuados para el tipo de tela
La aguja est,1 doblada o poco Cambie la aguja pigina 16
afilada
Si est_ cosienclo telas finas, la Cosa utilizando un material pigina 26
auntada es demasiado gruesa, estabilizador debajo de la tela.
La tensi6n del hilo no es correcta. Ajuste la tensi6n del hilo superior, pigina 24
No ha enhebrado el hilo superior Corrija el enhebrado del hilo pigina 13
corl-ect amente, superior.
No ha utilizaclo la combinaci6n Elija un hilo y una agu a que sean pigina 15
correcta de tela, hilo y aguja adecuados para el tipo de tela
I_aspuntadas La aguja est,1 doblada o poco Cambie la aguja
quedan sueltas, afilada pigina 16
No ha insertado la aguja Inserte la aguja correctamente
correctarnente.
Se ha acumulado polvo debajo de la Retire la cubierta de la placa de la
placa de la aguja o en la pista de la agu a y limpie la placa y la pista de pigina 39, 40
lanzadera, la lanzaclera.
44
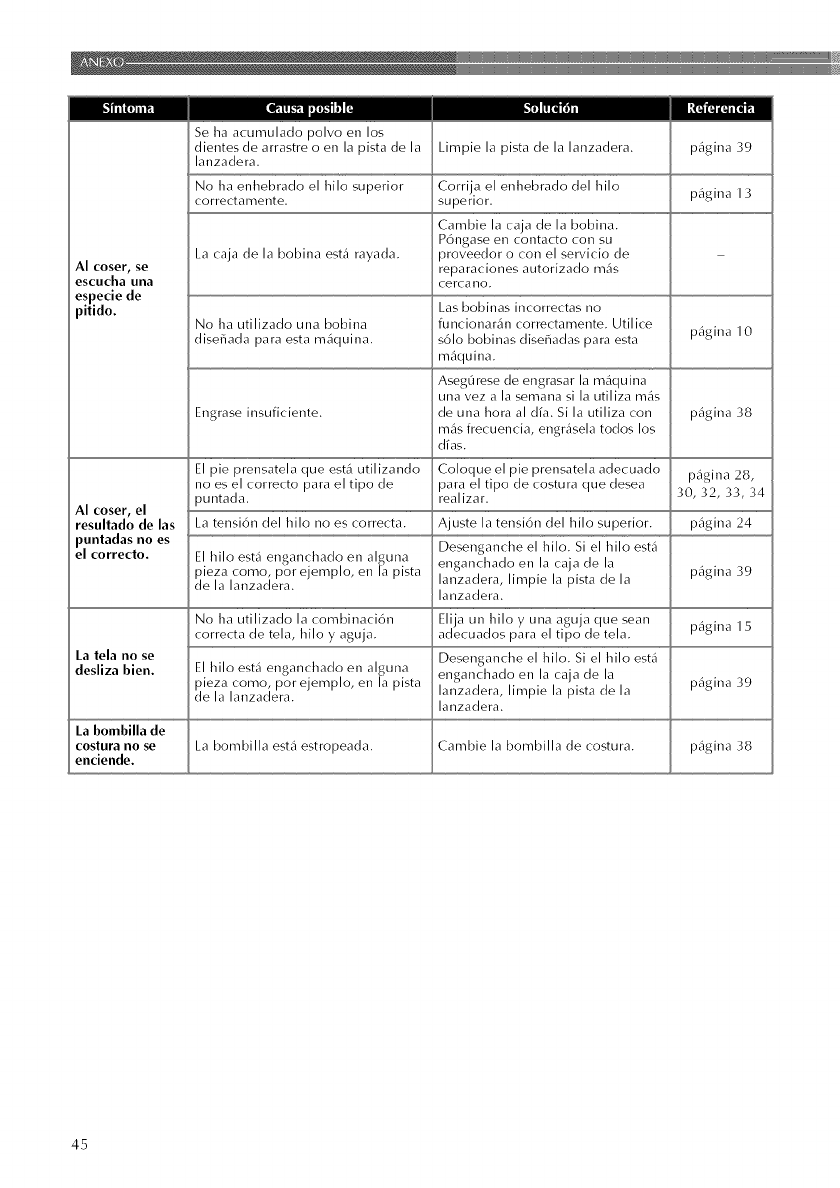
Sehaacumuladopolvoenlos
dientesdearrastreoenlapistadela
lanzadera Limpielapistadelalanzadera p_igina39
NohaenhebradoelhilosuperiorCorrijaelenl/ebradodelhilo p_igina 13
correctamente, superior.
Carnbie la caja de la bobina.
)6ngase en contacto con su
La caja de la bobina esti1 rayada. )roveedor o con el servicio de
AI coser_ se reparaciones autorizado m_is
escucha una cercano.
especie de
[pitido. Las bobinas incorrectas no
No Ira utilizado una bobina funcionarln correctamente Utilice
disefiacla para esta m_iquina, s61o bobinas disefiaclas para esta p_igina 10
m_quina.
Aseg0rese de engrasar la m_iquina
una vez a la semana si la utiliza m_is
Engrase insuficiente, de una hora al dfa. Si la utiliza con p_igina 38
m_is frecuencia, engr_isela todos los
dfas.
El pie prensatela que est,J utilizando Coloque el pie prensatela adecuado pilgina 28,
no es el correcto para el tipo de para el tipo de costura que desea
ountada realizar 30, 32, 33, 34
AI coser, el
resultado de las La tensi6n del hilo no es correcta Ajuste la tensi6n del hilo superior p_igina 24
puntadas no es Desenganche el hilo Si el hilo est_i
el correcto. El hilo estl enganchado err alguna
pieza como, pot ejemplo, en la pista enganchado en la caja de la p_igina 39
de la lanzadera lanzadera, limpie la pista de la
lanzadera.
No Ira utilizaclo la combinaci6n Elija un hilo y una aguja que sean p_igina 15
correcta de tela, hilo y aguja, adecuados para el tipo de tela.
La Ida no se Desenganche el hilo Si el hilo est_i
desliza bien. El hilo estl enganchado err alguna enganchado en la caja de la p_igina 39
pieza como, pot ejemplo, en la pista lanzadera, limpie la pista de la
de la lanzadera lanzadera.
La bombilla de
coslura no se La bombilla esti1 estropeada. Cambie la bombilla de costura, p/lgina 38
enciende.
45
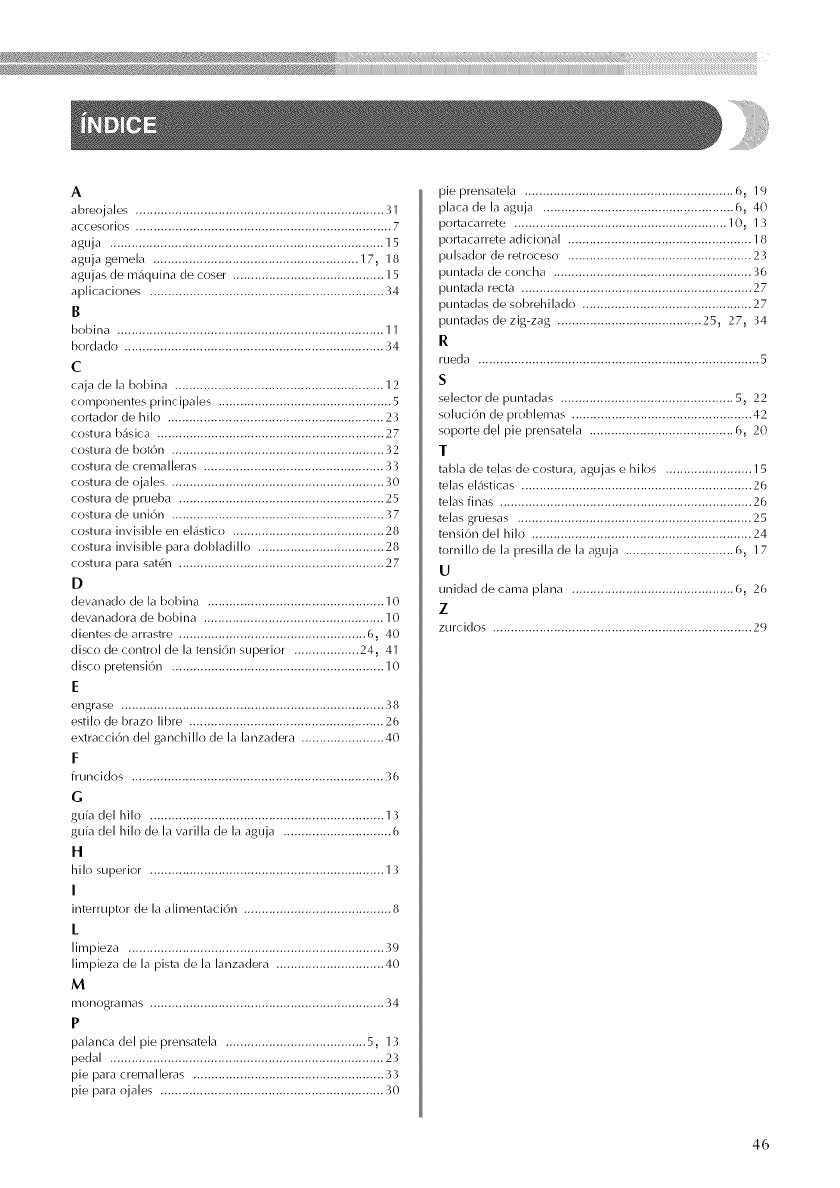
A
abreojales ..................................................................... 31
accesorios ....................................................................... 7
aguja ............................................................................ 15
aguja gemela ......................................................... 17_ 18
agujas de m_quina de coser .......................................... 15
aplicaciones ................................................................. 34
B
bobina .......................................................................... 11
bordado ........................................................................ 34
c
caja de la bobina .......................................................... 12
componentes principales ................................................ 5
cortador de hilo ............................................................ 23
costura b_isica ............................................................... 27
costura de bot6n ........................................................... 32
costura de cremalleras .................................................. 33
costura de ojales ........................................................... 30
costura de prueba ......................................................... 25
costura de uni6n ........................................................... 37
costura invisible en el_istico .......................................... 28
costura invisible para dobladillo ................................... 28
costura para sat6n ......................................................... 27
D
devanado de la bobina ................................................. 10
devanadora de bobina .................................................. 10
dientes de arrastre .................................................... 6_ 40
disco de control de la tensi6n superior .................. 24_ 41
disco pretensi6n ........................................................... 10
E
engrase ......................................................................... 38
estilo de brazo libre ...................................................... 26
extracci6n del ganchillo de la lanzadera ....................... 40
F
fruncidos ...................................................................... 36
o
guia del hilo ................................................................. 13
guia del hilo de la varilla de la aguja .............................. 6
H
hilo superior ................................................................. 13
I
interruptor de la alimentaci6n ......................................... 8
I_
limpieza ....................................................................... 39
limpieza de la pista de la lanzadera .............................. 40
M
monogramas ................................................................. :}4
palanca del pie prensatela ....................................... 5_ 13
pedal ............................................................................ 23
pie para cremalleras ..................................................... 33
pie para ojales .............................................................. 30
pie prensatela .......................................................... 6_ 19
plata de la aguja ..................................................... 6, 40
portacarrete ........................................................... 10_ 13
portacarrete adicional ................................................... 18
pulsador de retroceso ................................................... 23
puntada de concha ....................................................... 36
puntada recta ................................................................ 27
puntadas de sobrehilado ............................................... 27
puntadas de zig-zag ........................................ 25_ 27_ 34
R
rueda .............................................................................. 5
s
selector de puntadas ................................................ 5_ 22
soluci6n de problemas .................................................. 42
soporte del pie prensatela ........................................ 6_ 20
T
tabla de telas de costura, agujas e h ilos ..........................
telas el2_sticas ................................................................ 26
telas finas ...................................................................... 26
telas gruesas ................................................................. 25
tensi6n del hilo ............................................................. 24
tornillo de la presilla de la aguja .............................. 6_ 17
u
unidad de cama plana ............................................. 6, 26
z
zurcidos ........................................................................ 29
46

English
Spanish
885-405/407
XE2346-001
PrintedinChina
