BUFFALO 000000019 LPV4-U2-300S User Manual LPV4 U2 300S
BUFFALO INC. LPV4-U2-300S LPV4 U2 300S
BUFFALO >
Users Manual

Print Server
LPV4-U2-300S
User Manual
www.buffalotech.com
35020190-01

2
Contents
Chapter 1 - Configuration .................................................5
Introduction .........................................................................................5
Accessing Settings ...............................................................................6
Access by IP Address .......................................................................................6
Access from Network-USB Navigator ............................................................7
Status ....................................................................................................9
Device Status ...................................................................................................9
System Status ................................................................................................10
Wireless Status ..............................................................................................10
Network ..............................................................................................11
General Settings ...........................................................................................11
TCP/IP .............................................................................................................12
Wireless LAN Settings (Easy Setup) .............................................................13
Wireless LAN Settings (Advanced Settings) ................................................14
Wireless LAN Settings (WPS Settings) .........................................................15
Security ...............................................................................................16
Password Options .........................................................................................16
Maintenance .......................................................................................17
Restart ...........................................................................................................17
Initialize .........................................................................................................17
Firmware Update ..........................................................................................18
Default Configuration Settings .........................................................19

3
Chapter 2 - Network-USB Navigator ..............................20
Introduction .......................................................................................20
Install Network-USB Navigator .........................................................20
For Windows Users ........................................................................................20
For Mac Users ................................................................................................24
Confirm Settings ...........................................................................................27
Connect and Disconnect ....................................................................29
How to Connect to Printer ............................................................................29
How to Disconnect Printer ...........................................................................30
Send Disconnect Request ..................................................................31
Main Window ......................................................................................33
Buttons ..........................................................................................................33
Status .............................................................................................................34
Options ...............................................................................................34
How to Open Options ...................................................................................34
Description ....................................................................................................35
Notes ...................................................................................................37
Chapter 3 - Settings .........................................................38
Print Data from Your Mobile ..............................................................38
Check Ink Level ...................................................................................38
Use Scanning Function ......................................................................39
Change Print Server’s IP Address ......................................................39
Switch from Wired to Wireless Connection ......................................40
Select Wireless Access Point from List .........................................................40

4
Connect by WPS Pushbutton Method .........................................................42
Connect by WPS PIN .....................................................................................43
Switch from Wireless to Wired Connection ......................................44
Initializing the Print Server ...............................................................45
Press WPS Button ..........................................................................................45
Configure in Settings ....................................................................................45
Chapter 4 - Troubleshooting ...........................................46
Cannot Print........................................................................................46
Cannot Access Print Server from PC .................................................47
Print Server Is Not Displayed on LPV4 Port Setup Wizard ..............48
Print Server Is Not Displayed on Network-USB Navigator ..............50
Cannot Find Access Point from Settings ..........................................51
Cannot Connect Wirelessly Using WPS .............................................52
Forgot IP Address ...............................................................................53
How to Reconfigure the Printer Port ................................................55
For Windows Users ........................................................................................55
For Mac Users ................................................................................................58
Cannot Configure Printer Port with LPV4 Port Setup Wizard .........61
Appendix A - Supplemental Information ......................62
Technical Specifications ....................................................................62
FCC and IC Notice ...............................................................................63
5
Chapter 1 - Configuration
Introduction
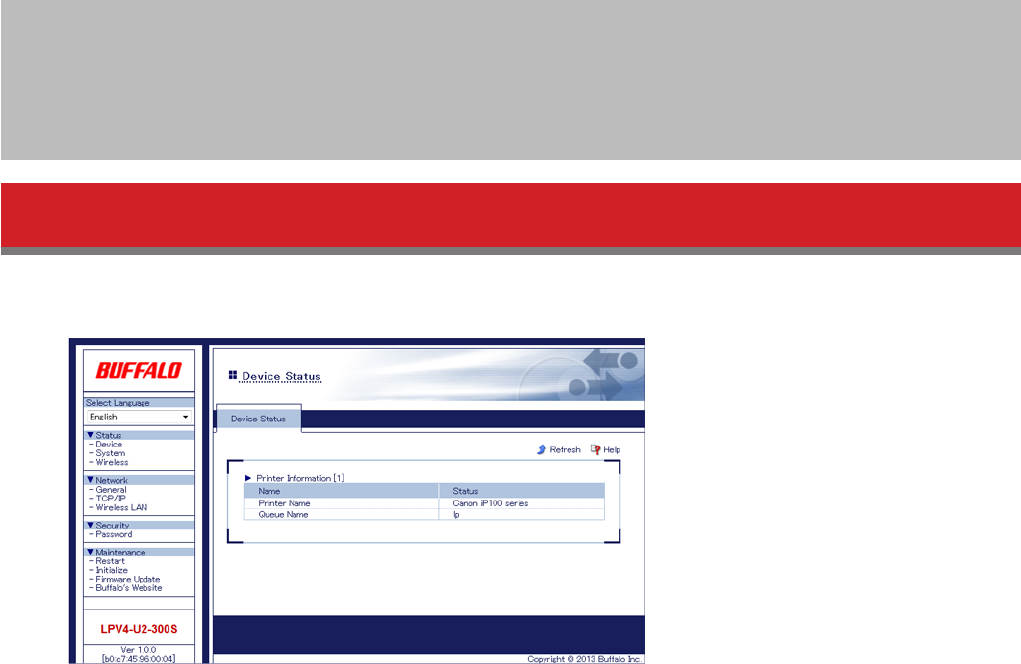
Configuration of the print server is done from Settings, the web-based configuration GUI.
Note: Supported browsers include Internet Explorer 8 and later, Firefox 20 and later, and Safari 5 and later.
6
Accessing Settings
Access by IP Address
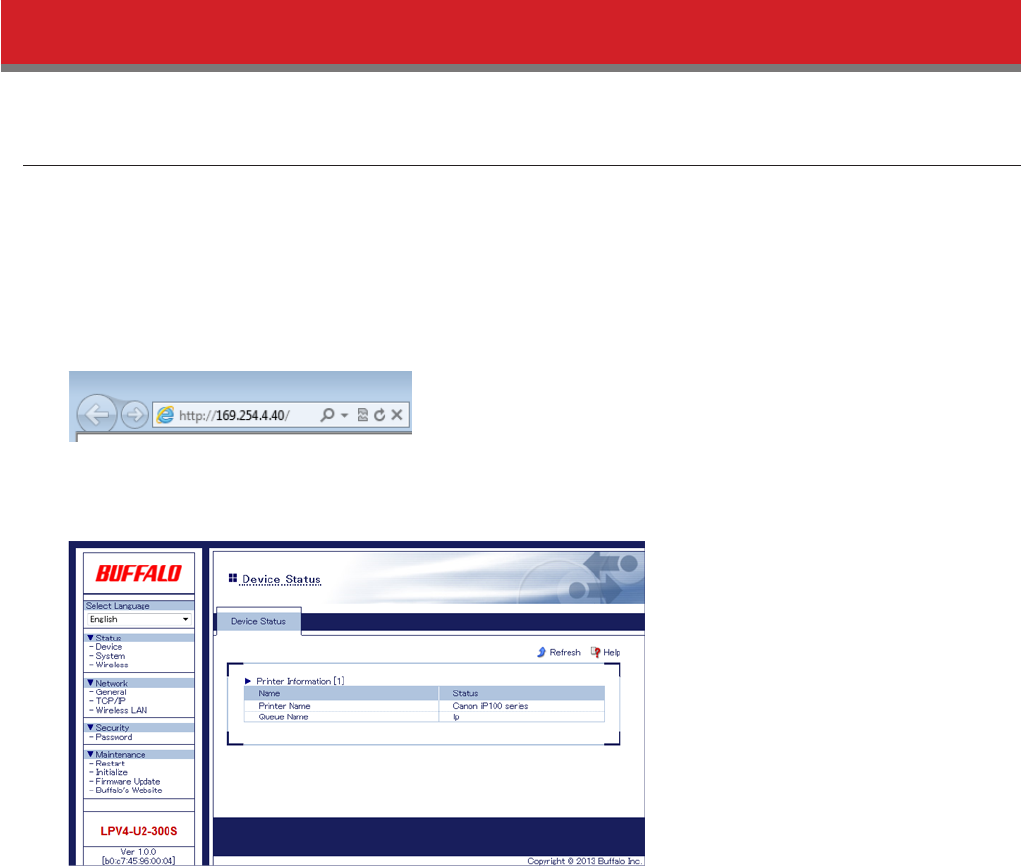
If you know the IP address of the print server on your network, just type it in to the URL field of your browser and
press the enter key to open Settings. If you don’t know the print servers IP address, refer to “Access from Network USB
Navigator” below.
1 Open a web browser.
2 Enter the print server’s IP address in the address field and press the enter key.
3 When the security window appears, enter “admin” for the username and “password” for the password, then click
OK.
7
Access from Network-USB Navigator
If Network-USB Navigator has been installed on your PC, you use it to open Settings.
Note: Refer to chapter 2 to install Network-USB Navigator.
1 Open Network-USB Navigator.
• For Windows 8, select Network-USB Navigator from the “Start” screen.
• For Windows 7, Windows Vista, or Windows XP, navigate to Start - All Programs - BUFFALO - Network-USB - Network-
USB Navigator.
• For Mac OS, click the Network-USB Navigator icon in the dock.
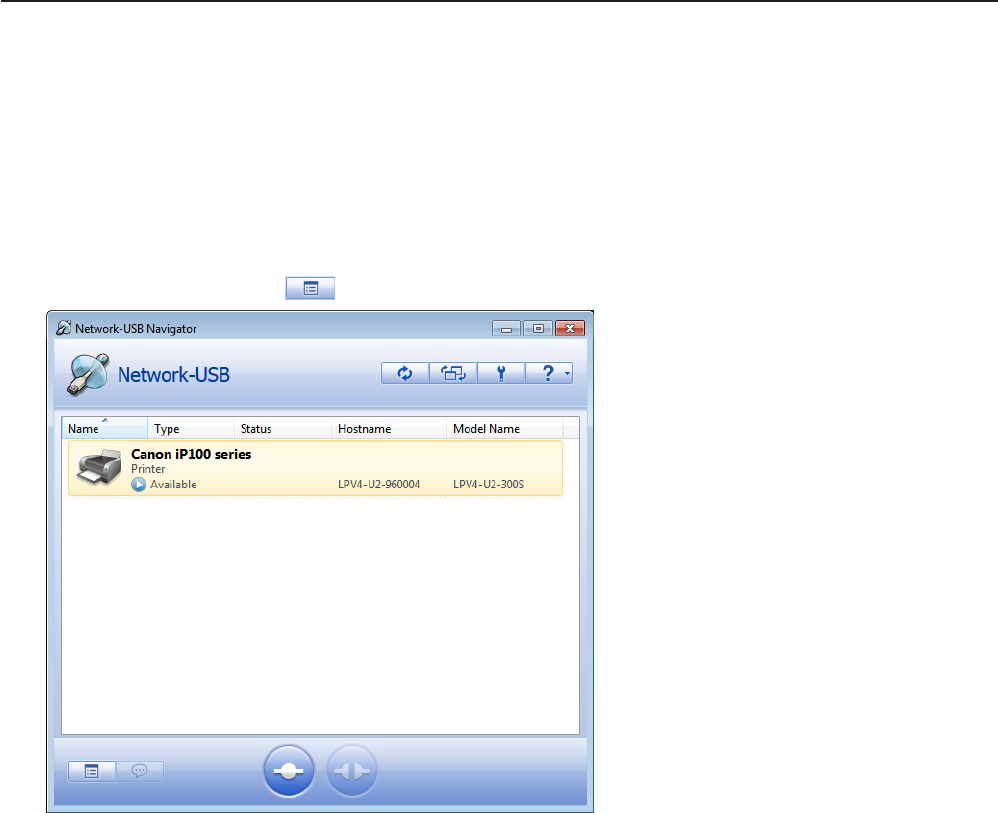
2 Select your printer and click (properties).
Note: If multiple USB devices are displayed, select the “LPV4-U2-300S”.
8
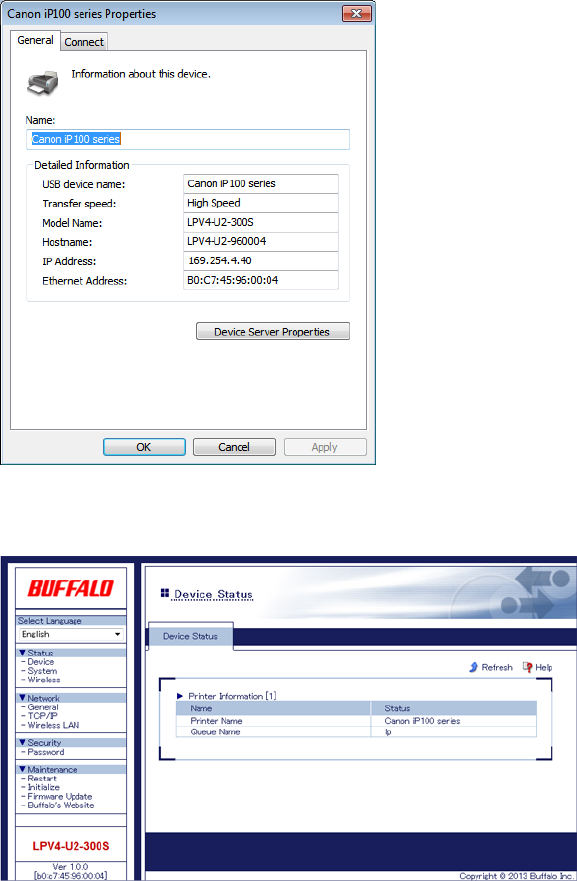
3 Click Device Server Properties.
4 Settings will open. When the security window appears, enter “admin” for the username and “password” for the
password, then click OK.
9
Status
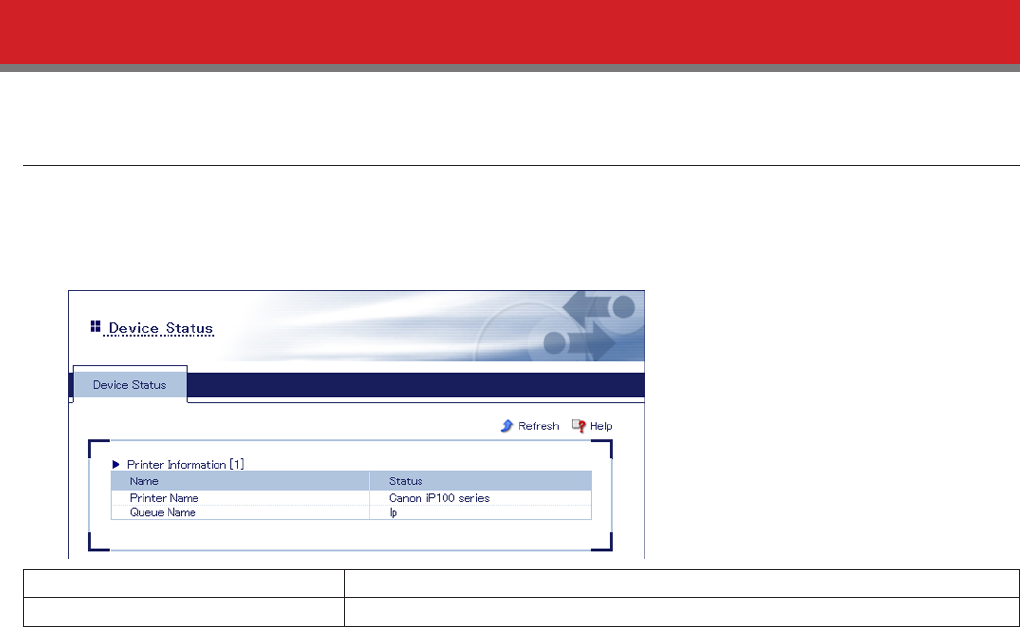
Device Status
View information for the device connected to the print server.
Status - Device
Printer Name Displays the name of the printer connected to the print server.
Queue Name Displays the queue name for LPR printing.
10
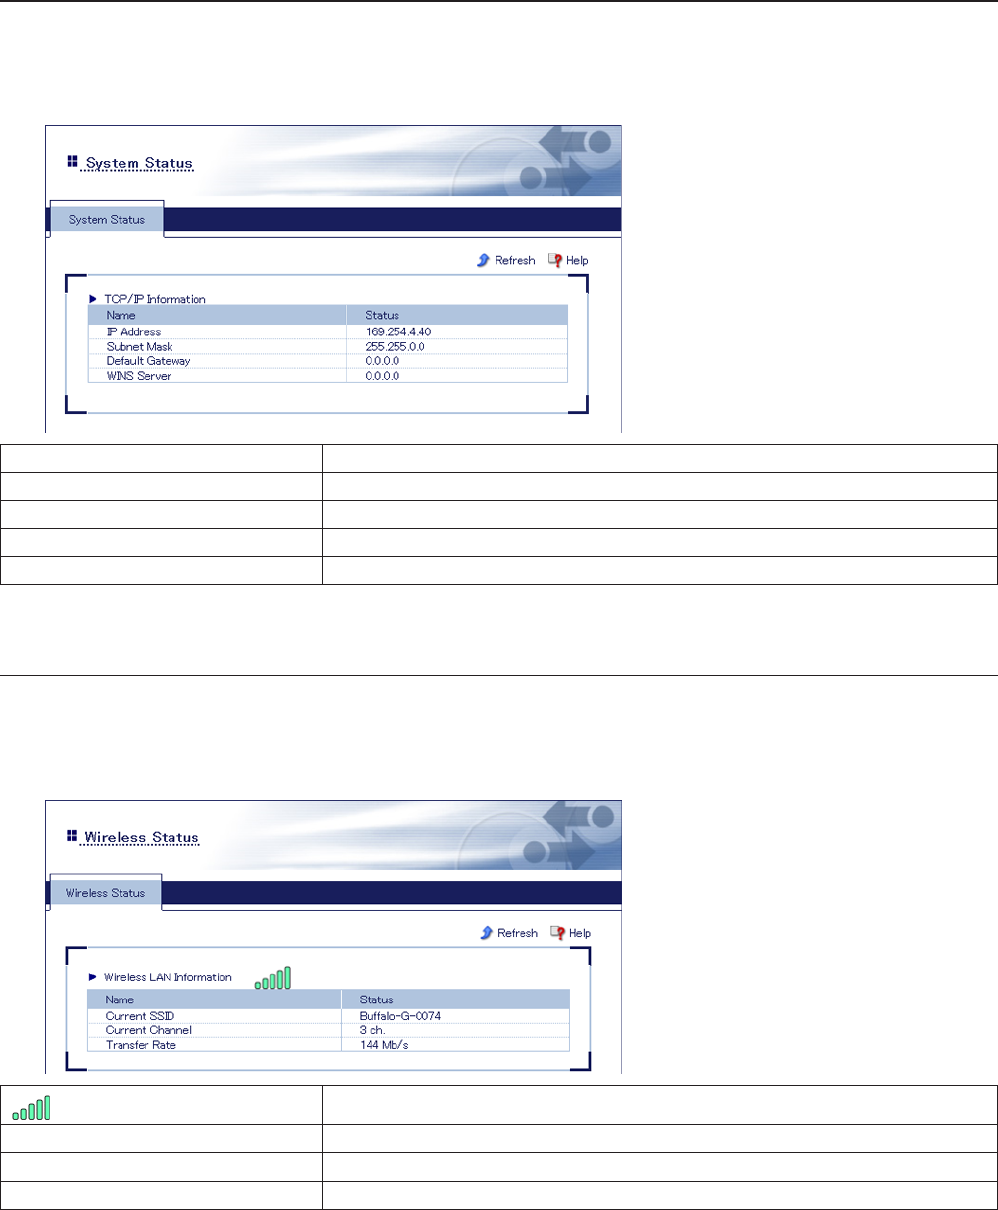
System Status
View system information for the print server.
Status - System
IP Address Displays the assigned IP address.
Subnet Mask Displays the subnet mask.
Default Gateway Displays the default gateway address.
DHCP Server Displays the obtained DHCP server’s IP address.
WINS Server Displays the WINS server’s IP address.
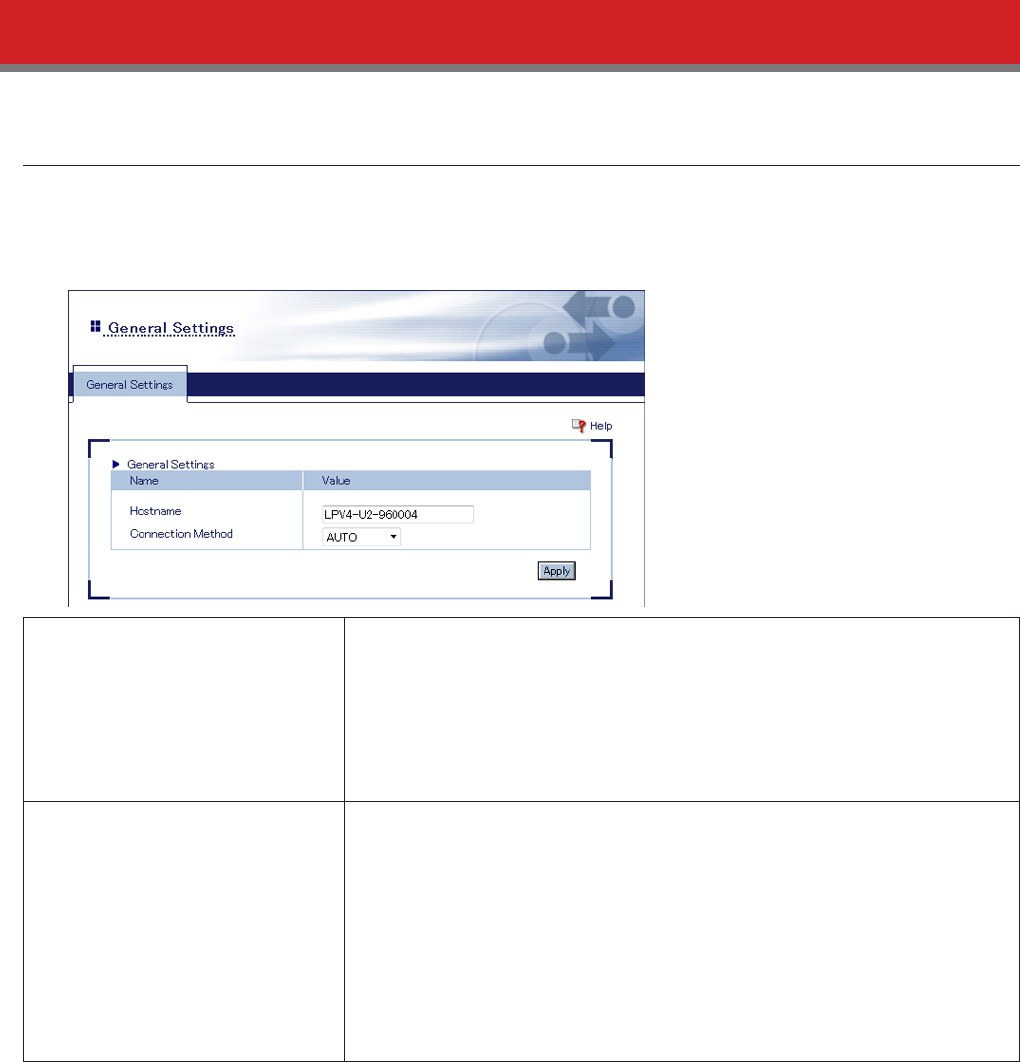
Wireless Status
View wireless LAN interface information for the print server.
Status - Wireless
Displays the signal strength.
Current SSID Displays the current SSID.
Current Channel Displays the current channel.
Transfer Rate Displays the wireless transmission rate.
11
Network
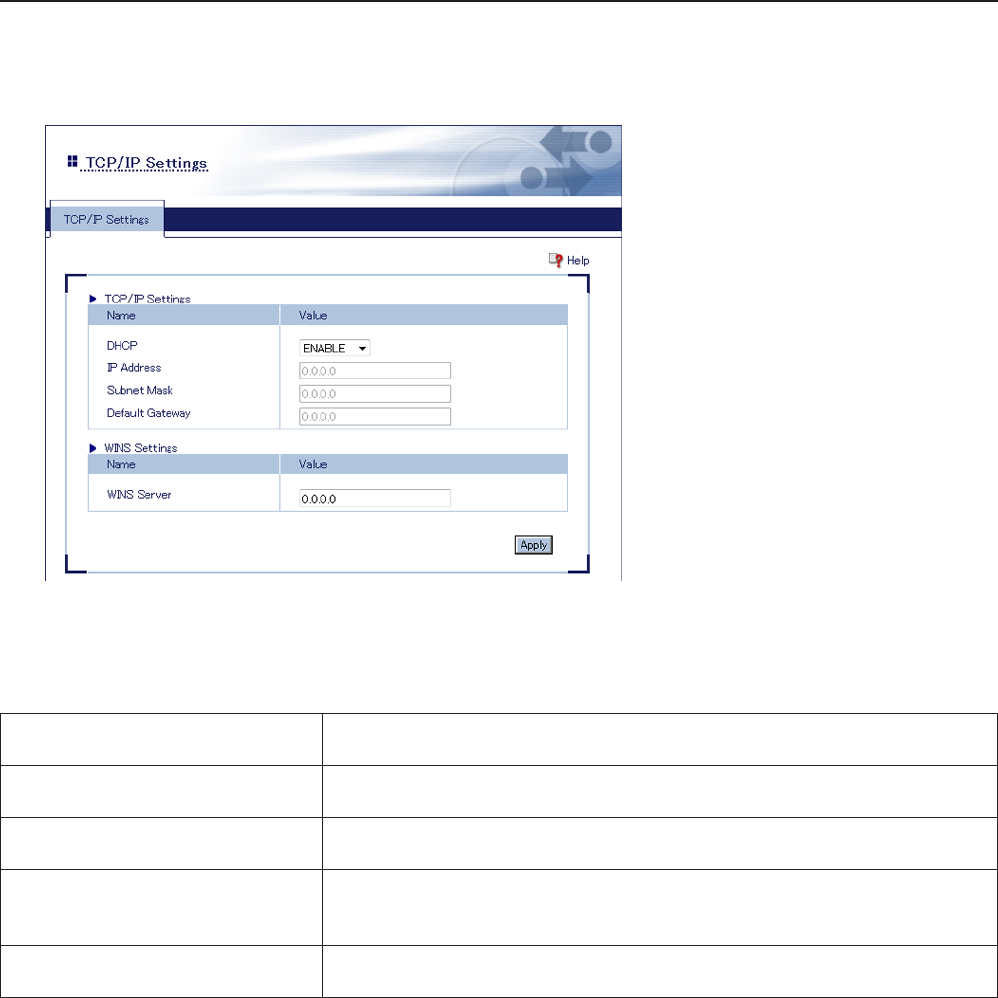
General Settings
Configure the hostname and the connection method here.
Network - General
Hostname
Enter a name for the print server. This will be displayed in Network-USB
Navigator and other software. This name should be unique within your
network.
The hostname may contain up to 15 alphanumeric characters and hyphens (-).
A hyphen cannot be used for the first character.
After changing the hostname, the printer port must be reconfigured. Refer to
Chapter 4 for more details.
Connection Method
Select a connection method.
Auto
Detects the connection method automatically. If a LAN cable is attached to the
print server, it uses a wired connection. Otherwise, the connection is wireless.
Wireless
The print server works as a wireless device.
Wired
The print server works as a wired device.
12
TCP/IP
Configure print server’s network settings here.
Network - TCP/IP
Note: Only assign the print server a valid IP address, otherwise Settings cannot be accessed. If you cannot open
Settings, initialize the print server, which restores all settings to their factory default values.
DHCP If you’re using DHCP on your network, enable it here. If you don’t use DHCP,
you’ll need to configure the print server’s IP address manually.
IP Address If DHCP is not available on your network, you may configure the print server’s
IP address manually here.
Subnet Mask If DHCP is not available on your network, you may configure the print server’s
subnet mask manually here.
Default Gateway
If DHCP is not available on your network, you may configure the print server’s
default gateway address here. If 0.0.0.0 is entered here, no default gateway is
used.
WINS Server You may enter a WINS server address here (optional). If DHCP is in use, the
WINS server assigned by DHCP will override this setting.
13
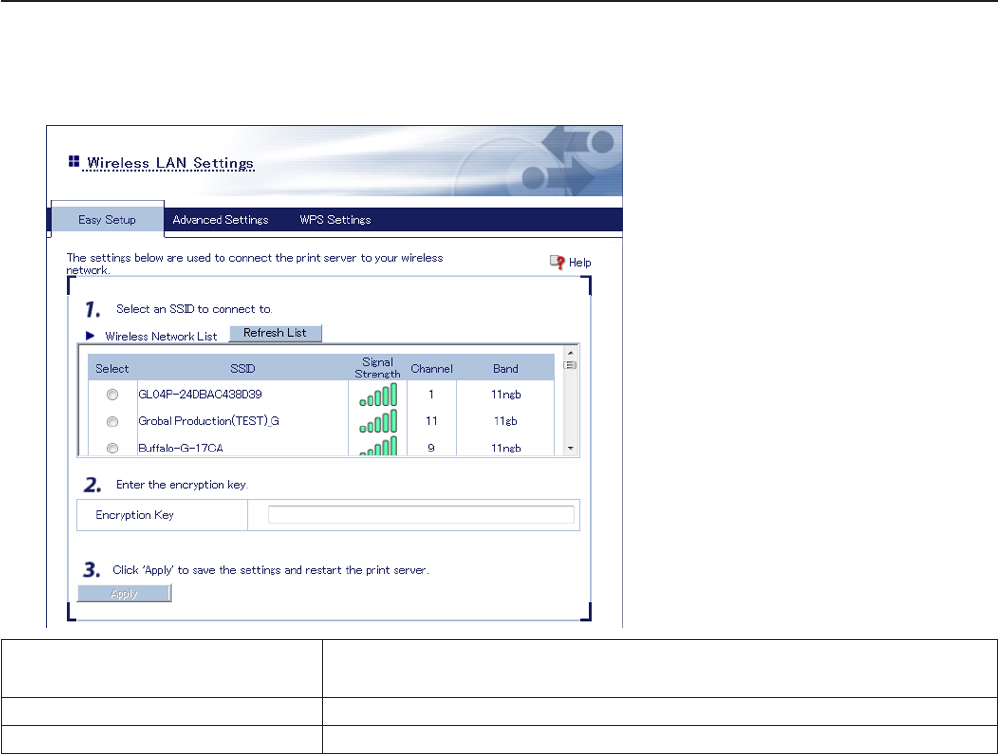
Wireless LAN Settings (Easy Setup)
Configure wireless connection settings here.
Network - Wireless LAN - Easy Setup
Wireless Network List Detected wireless devices are listed. Click Refresh List to search again.
Up to 32 devices are displayed in order of strength of the signal.
Encryption Key Enter the encryption key of the selected wireless device.
Apply Click this button to apply settings and reboot the print server.
14
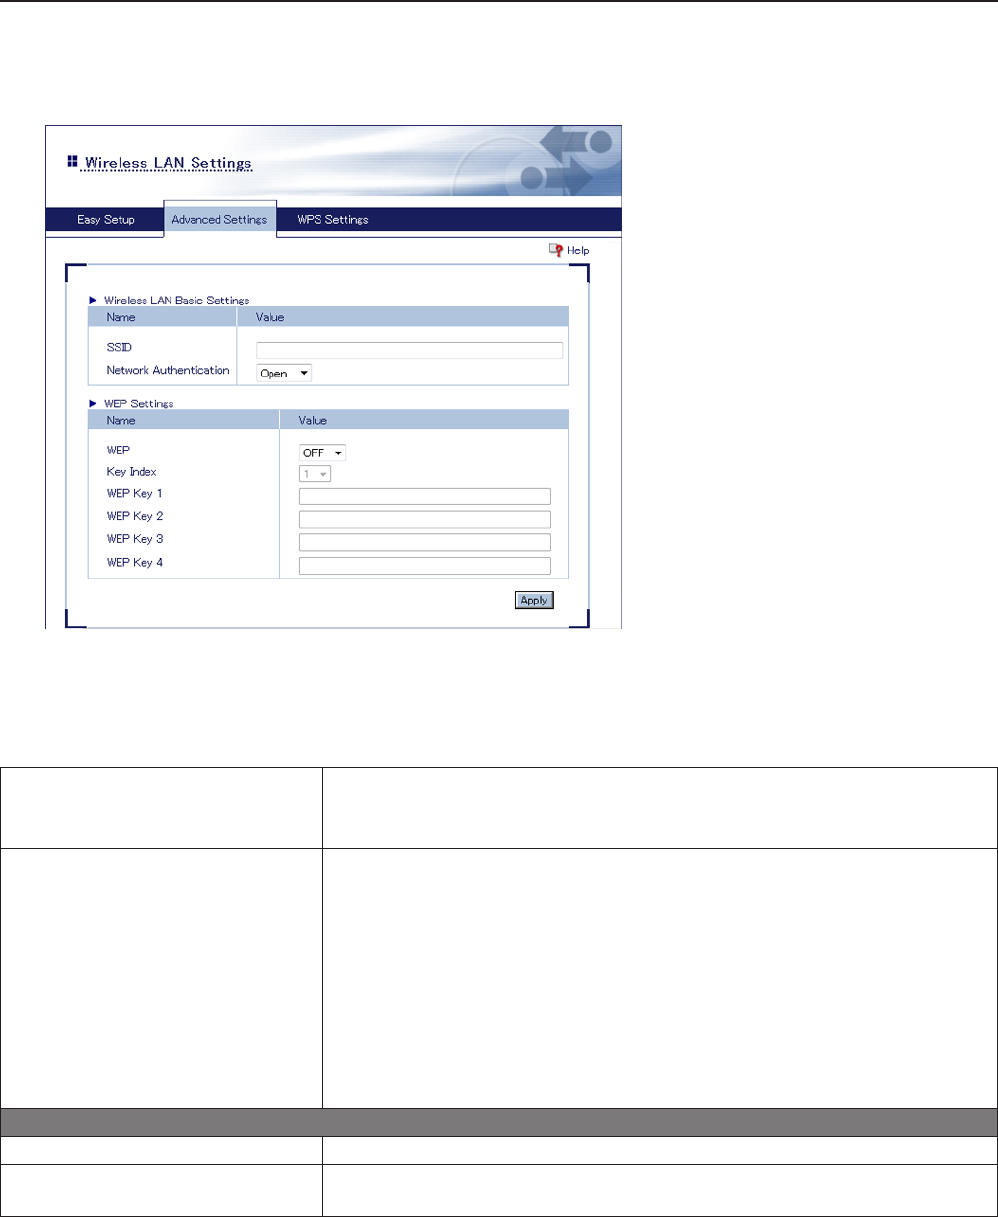
Wireless LAN Settings (Advanced Settings)
Configure advanced wireless settings here.
Network - Wireless LAN - Advanced Settings
SSID
Enter the SSID of the access point that you want to connect to.
SSIDs may contain up to 32 alphanumeric characters, hyphens (-), and
underscores (_).
Network Authentication
Select the same authentication method that your wireless router or access
point uses.
Open (No Authentication)
Choose this if your network uses no authentication or WEP.
WPA
WPA uses PSK authentication, TKIP or AES encryption, and a pre-shared key.
WPA2
WPA2 uses PSK, AES encryption, and a pre-shared key.
WEP Settings
WEP Select whether to enable or disable WEP encryption.
Key Index Select the number of the WEP key you want to use (1 - 4). This WEP key should
be same as the one your access point is configured with.
15
WEP Key 1
WEP Key 2
WEP Key 3
WEP Key 4
Up to 4 WEP keys can be configured. Alphanumeric or hexadecimal WEP keys
of either 64-bit or 128-bit lengths are supported.
WPA/WPA2 Settings
Encryption Method
Select the encryption method for WPA authentication (TKIP or AES). This
setting should match that of the access point.
Note: Usually, AES is safer than TKIP. Always use AES for your wireless network
if it is supported by your devices.
Pre-shared Key
Enter the pre-shared key. This is needed when TKIP or AES is used for
encryption. Use the same key that your access point and other wireless
devices are using. Use 8 - 63 alphanumeric or hexadecimal characters.
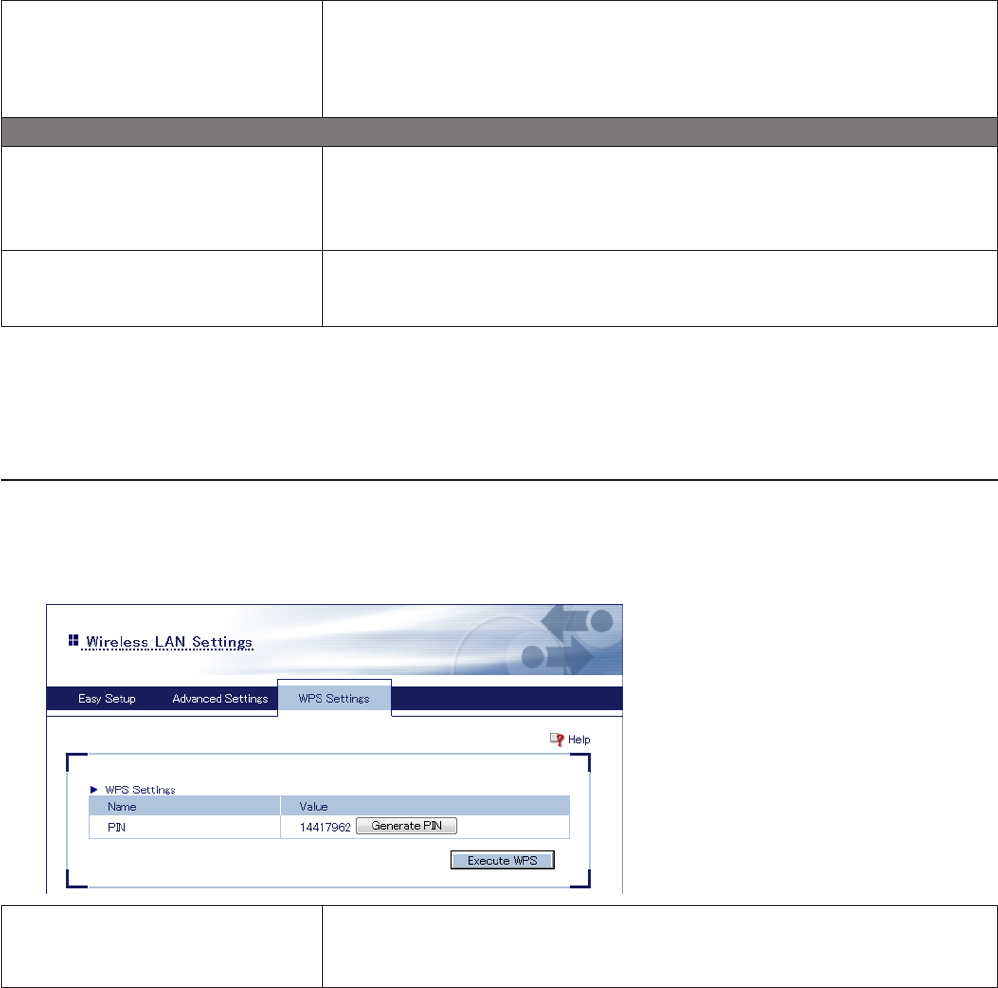
Wireless LAN Settings (WPS Settings)
Configure WPS here.
Network - Wireless LAN - WPS Settings
PIN
Displays PIN for WPS connection. Click Generate PIN to generate new PIN.
To connect to the access point, click Execute WPS and enter the PIN to the
access point within 2 minutes.
16
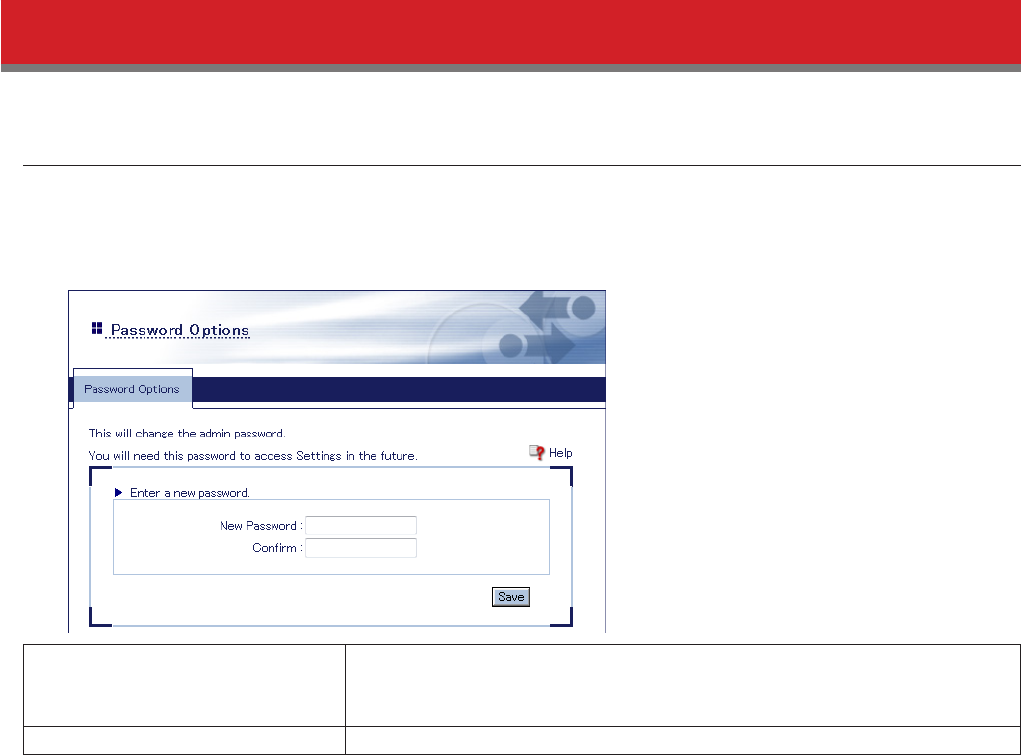
Security
Password Options
Configure print server’s password here.
Security - Password
New Password
The administrator password may contain up to 8 alphanumeric characters and
underscores (_).
This password is used for logging into Settings.
Confirm Enter the password again for confirmation.
17
Maintenance
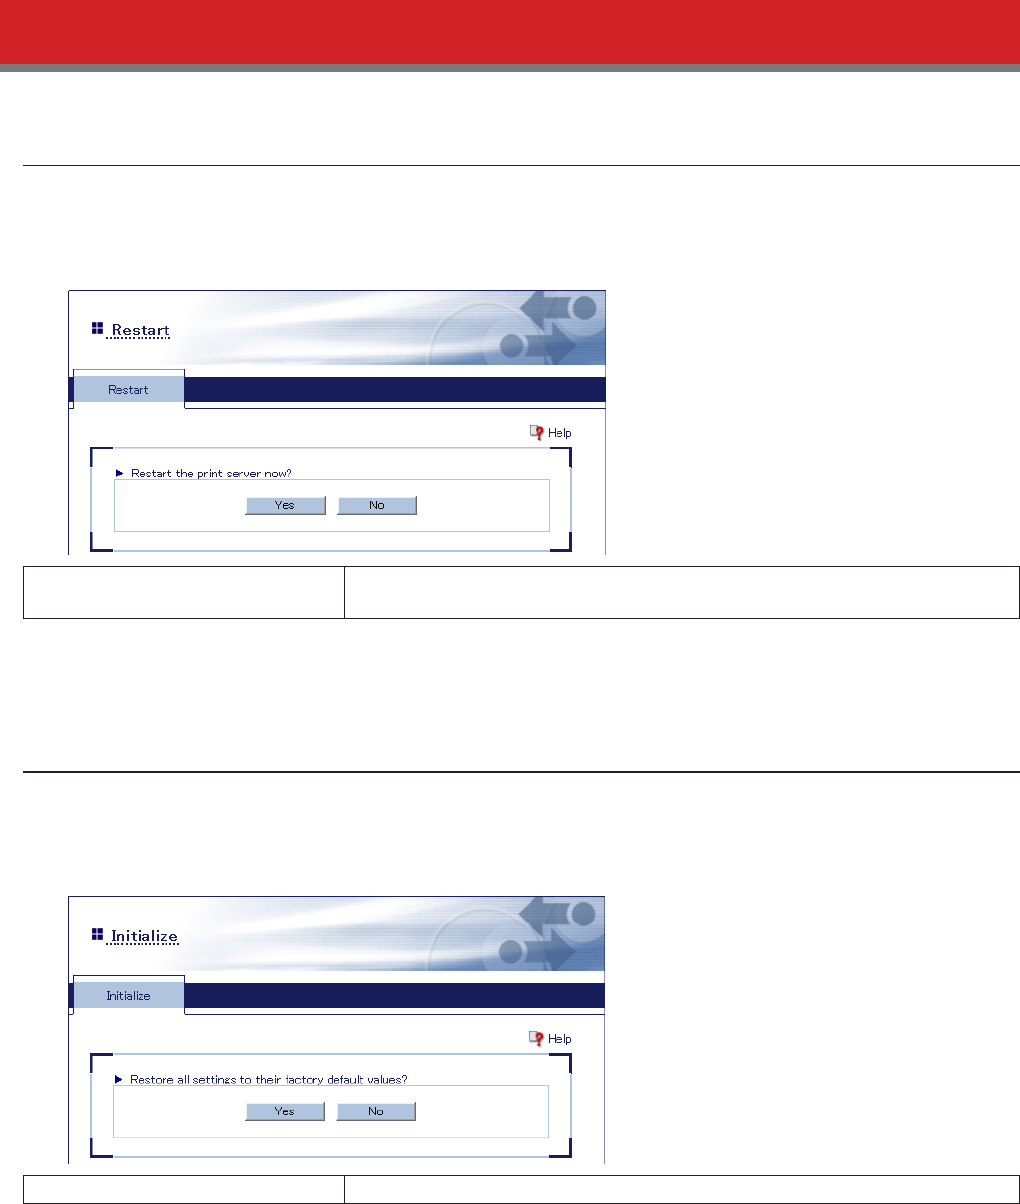
Restart
Restart the print server.
Maintenance - Restart
Restart Click Yes to restart the print server. All current connections to the print server
will be disconnected.
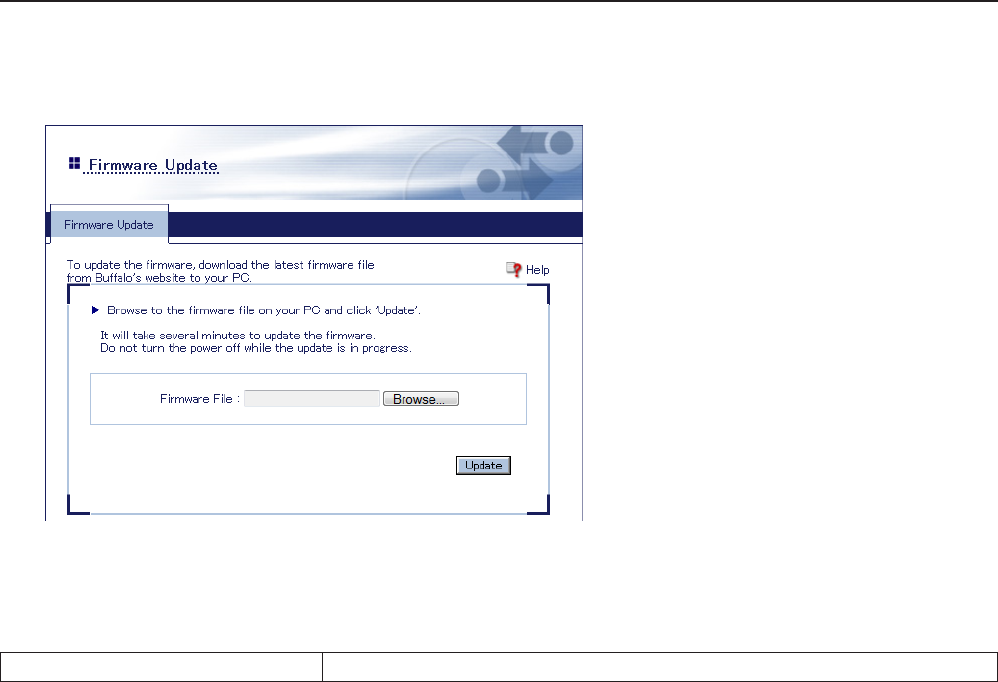
Initialize
Initialize the print server.
Maintenance - Initialize
Initialize Click Yes to restore all settings to their factory default values.
18
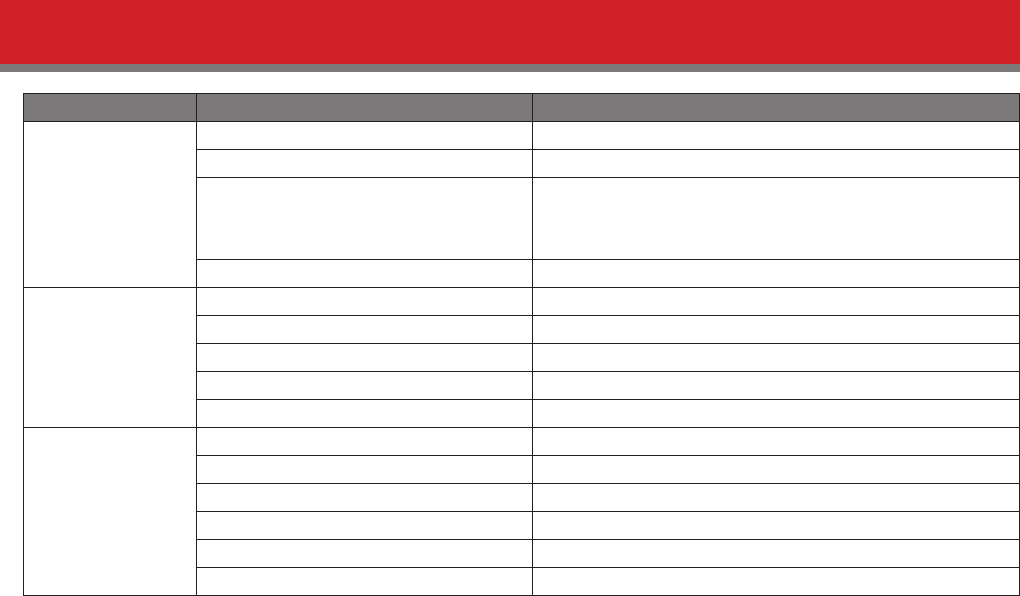
Firmware Update
Update the print server’s firmware.
Maintenance - Firmware Update
Note: Do not turn the power off until update is finished! When the power LED stops blinking and glows steadily, it is
safe to turn off the power.
Firmware File Click Browse and choose the firmware file. Click Update to start updating.
19
Default Configuration Settings
Feature Parameter Default Setting
General Settings
Username admin
Password password
Hostname
LPV4-U2-XXXXXX
(Where “XXXXXX” is the last 6 digits of the print server’s
MAC address)
Connection Method Auto
TCP/IP Settings
DHCP Enabled
IP Address 0.0.0.0
Subnet Mask 0.0.0.0
Default Gateway 0.0.0.0
WINS Server 0.0.0.0
Wireless LAN
Settings
SSID None
Network Authentication Open
WEP Off
Key Index 1
WEP Key None
PIN An 8-digit random value

20
Chapter 2 - Network-USB Navigator
Introduction
Network-USB Navigator lets you connect a multifunctional printer and use functions such as scanning, ink levels, etc.
You can also directly access Settings from the application.
Note: While a printer is accessed through Network-USB Navigator, it cannot be used by anyone else. Disconnect the
printer after using the application.
Install Network-USB Navigator
For Windows Users
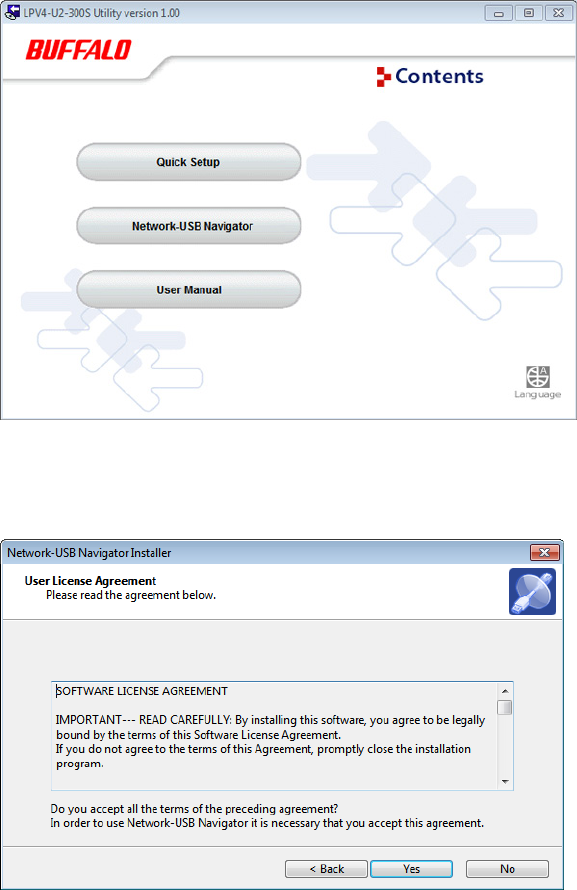
Follow the procedure below to install the application.
1 Access “d.buffalo.jp/lpv4-u2-300s/” and download LPV4-U2-300S Utility.
2 Run the utility.
21
3 Click Network-USB Navigator.
4 If “User Account Control” is displayed, click Yes or Continue.
5 Read the user license agreement and click Yes to agree.
22
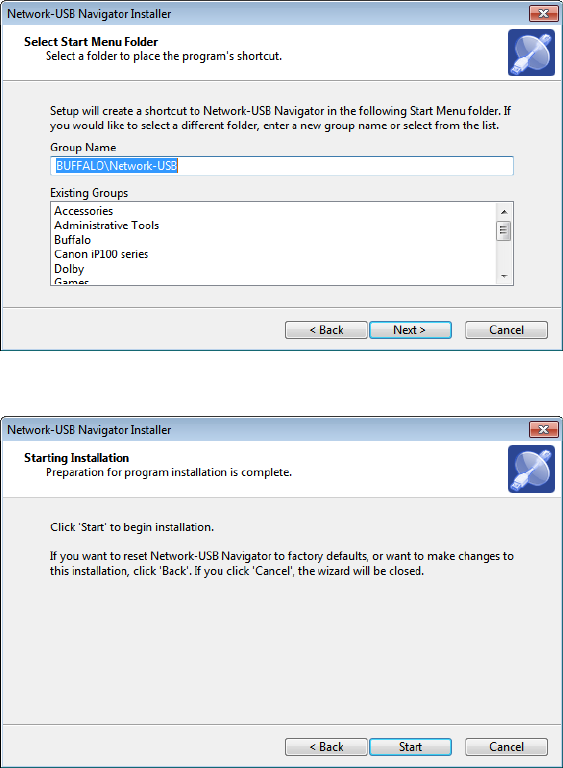
6 Click Next.
7 Click Start.
8 If “Would you like to install this device software?” is displayed, check Always trust software from “BUFFALO INC.”. and
click Install.
23
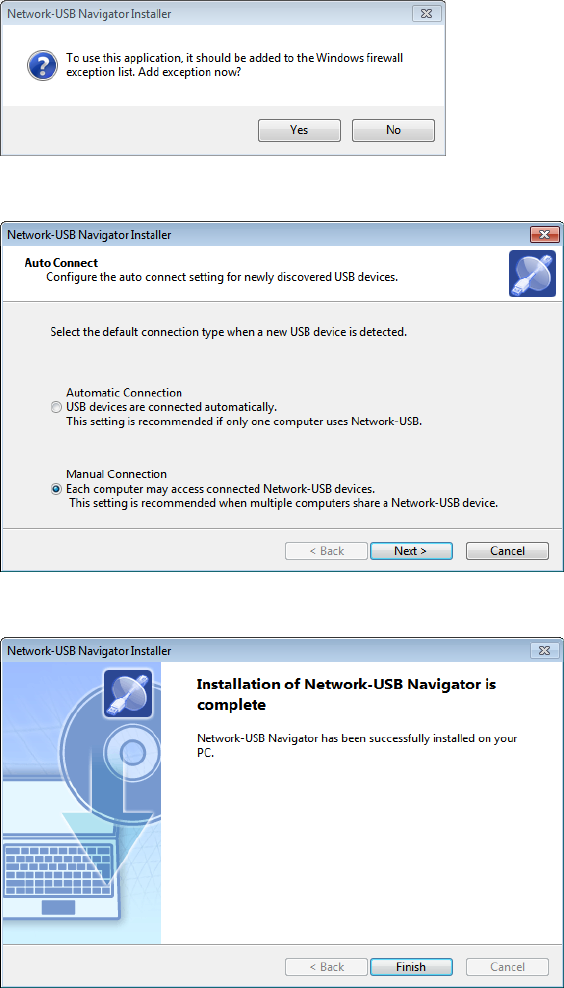
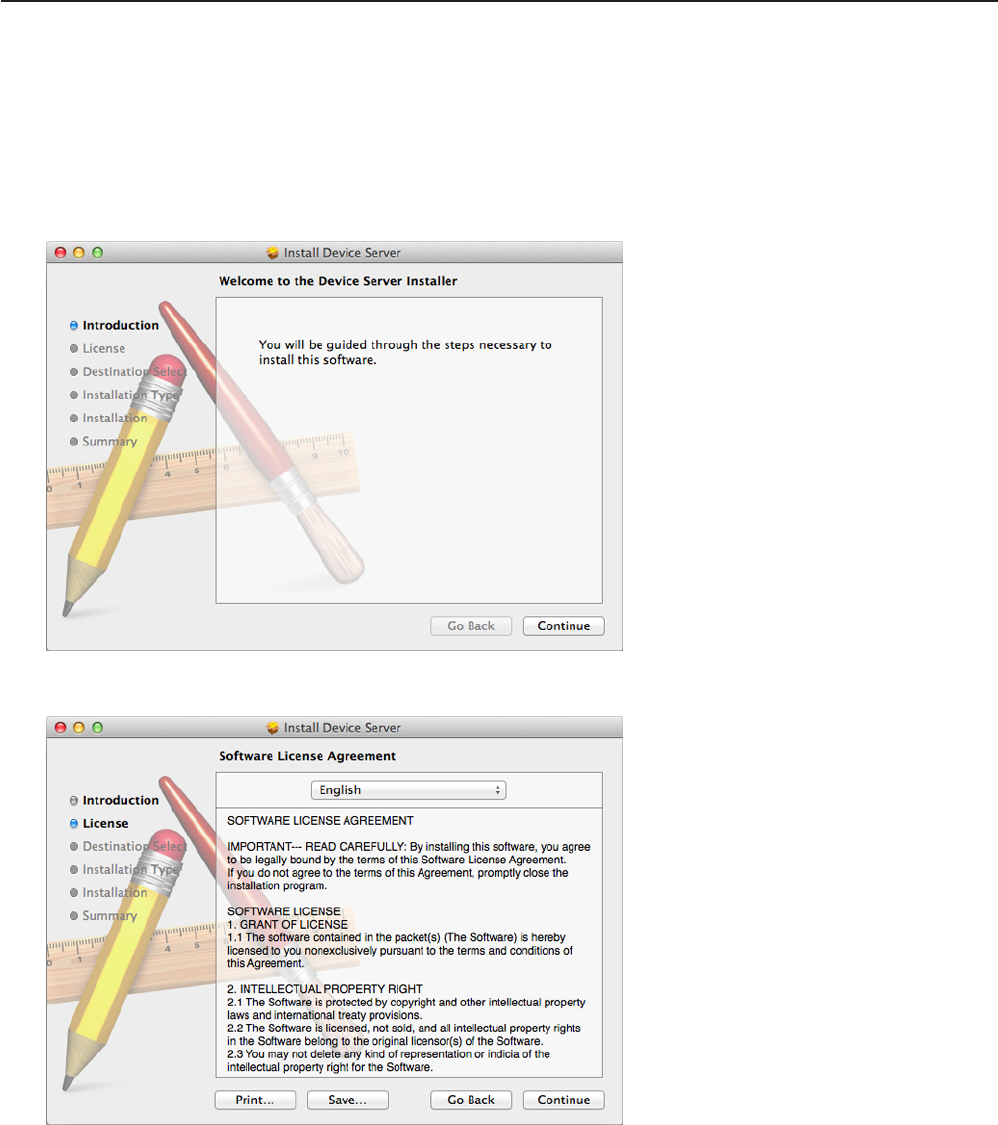
9 Click Yes.
10 Select Manual Connection and click Next.
11 Click Finish.
You have installed Network-USB Navigator. Next, go to “Confirm Settings”.
24
For Mac Users
Follow the procedure below to install the application.
Note: The examples in this chapter show OS X 10.8. Your operating system might be slightly different.
1 Access “d.buffalo.jp/lpv4-u2-300s/” and download the LPV4-U2-300S utility.
2 Run the utility and click Network-USB Navigator.
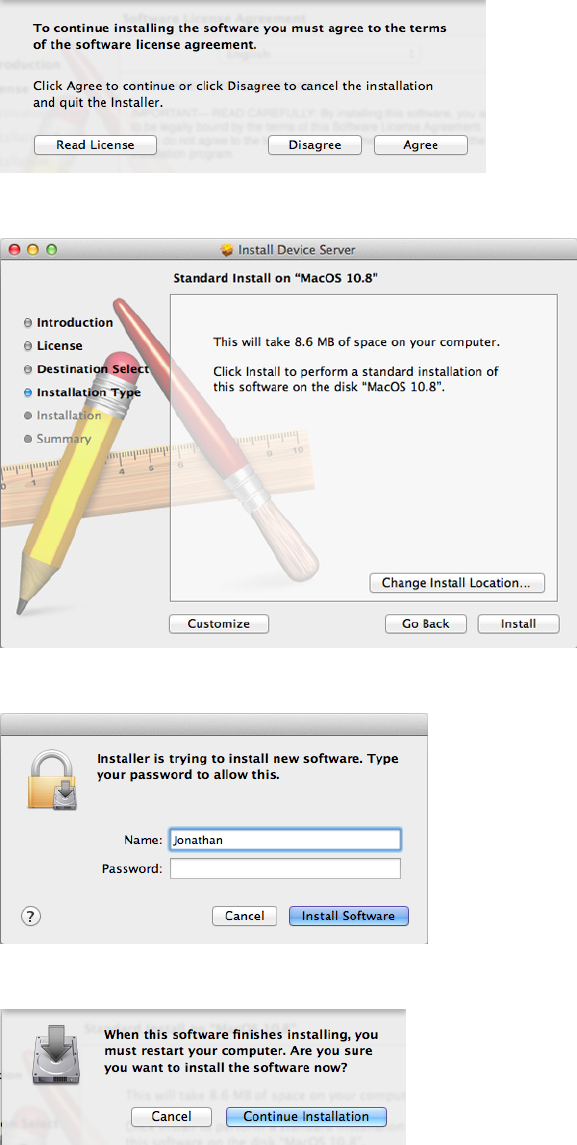
3 Click Continue.
4 Read the software license agreement and click Continue.
25
5 Click Agree to accept the software license agreement.
6 Click Install.
7 Enter your name and password, then click Install Software.
8 Click Continue Installation.
26
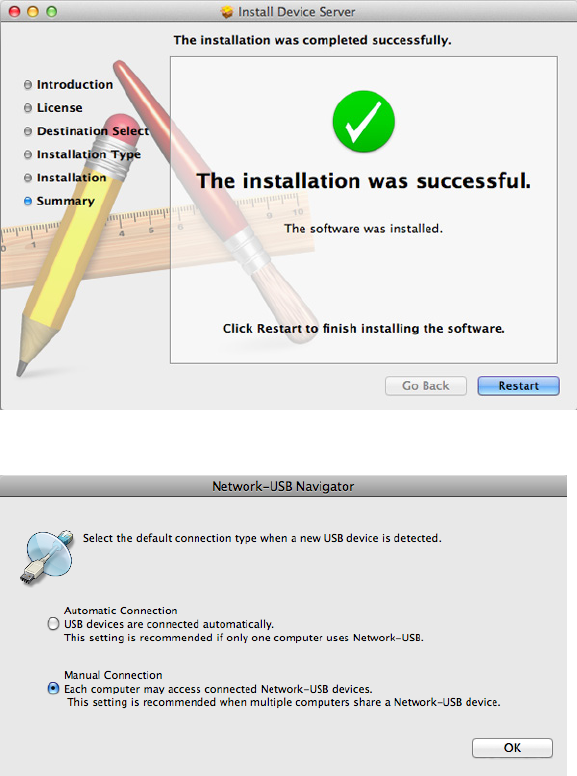
9 Click Restart.
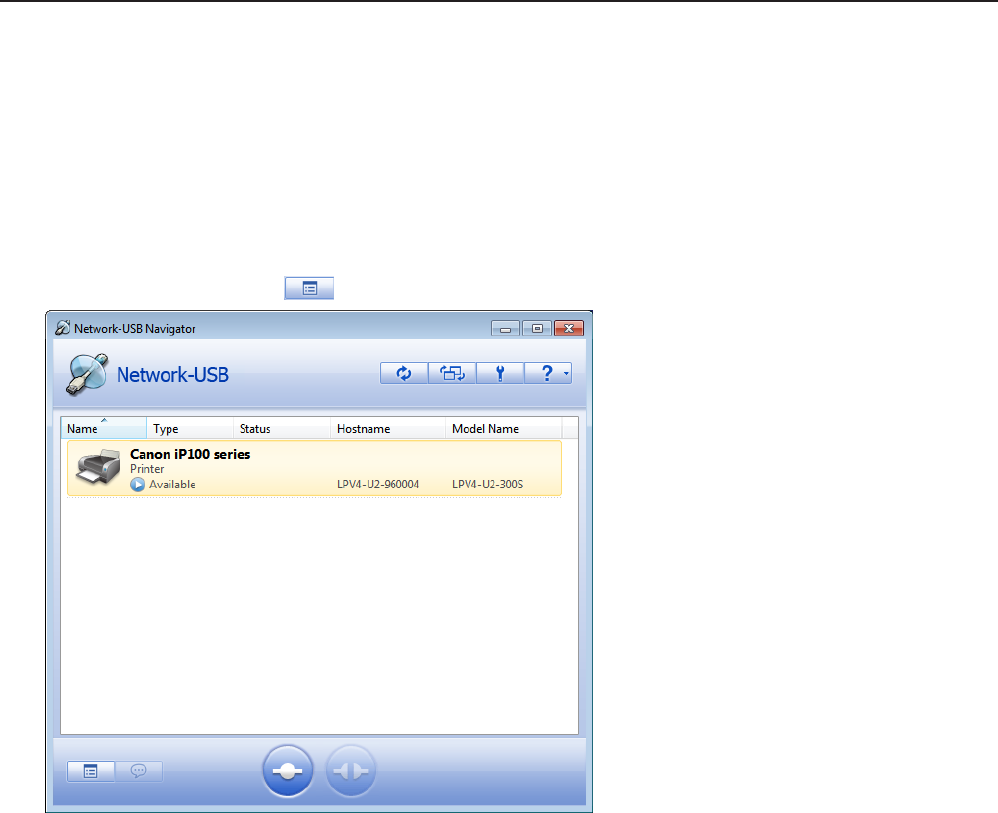
10 After rebooting, select Manual Connection and click OK.
You have installed Network-USB Navigator. Next, go to “Confirm Settings”.
27
Confirm Settings
Use the following procedure to make sure that Network-USB Navigator is configured correctly.
Note: The examples here show Windows screens, but the procedure for Mac OS is the same.
1 Open Network-USB Navigator.
• For Windows 8, select Network-USB Navigator from the Start screen.
• For Windows 7, Windows Vista and Windows XP, navigate to Start - All Programs - BUFFALO - Network-USB - Net-
work-USB Navigator.
• For Mac OS, click the Network-USB Navigator icon in the dock.
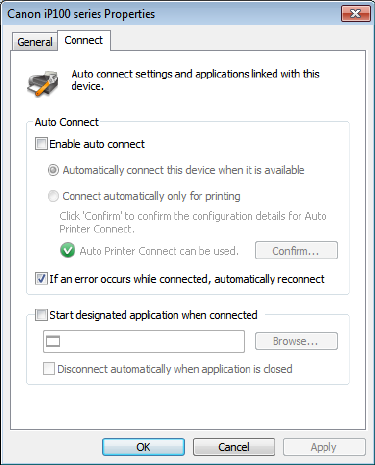
2 Select your printer and click (properties).
Note: If multiple USB devices are displayed, select the LPV4-U2-300S.
28
3 Click Connect tab, confirm that Enable auto connect is not checked, and click Apply.
Note: If Enable auto connect is checked, uncheck it.
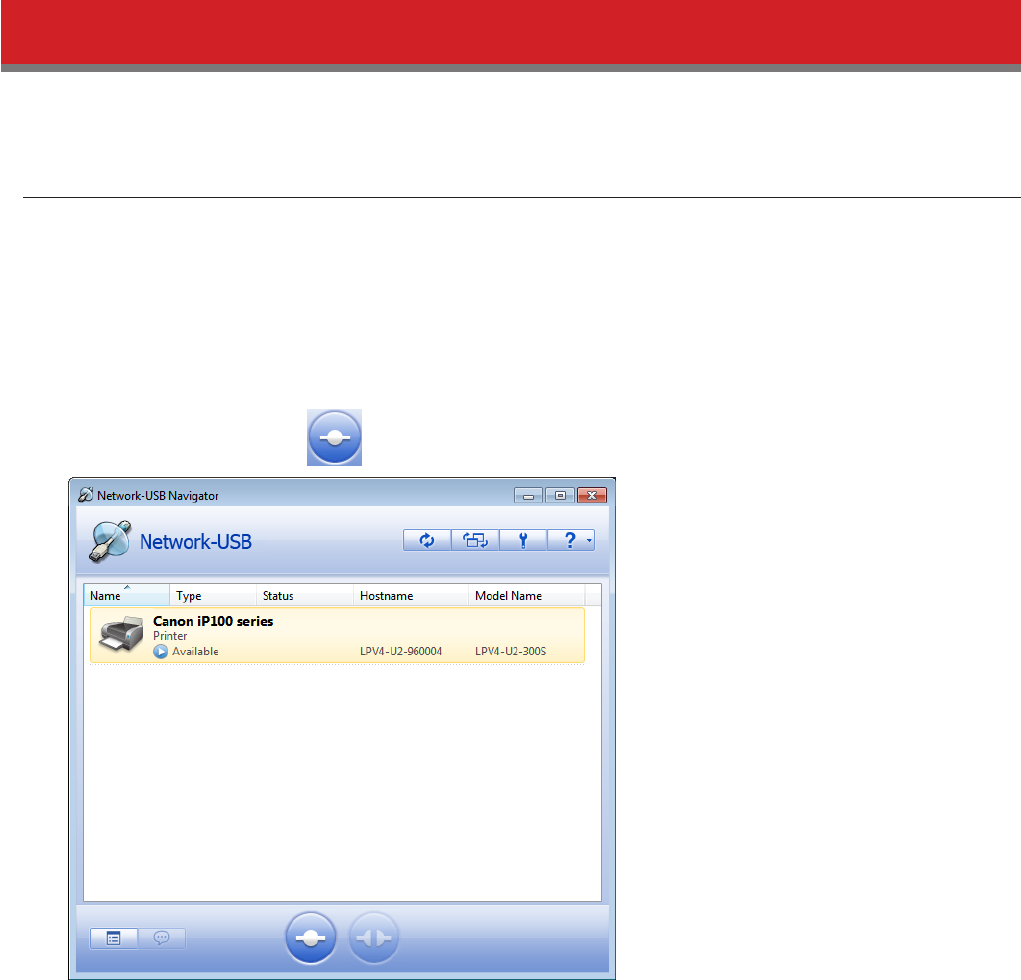
4 Click OK and close the application.
You have finished confirming settings.
29
Connect and Disconnect
Connect to or disconnect your printer with Network-USB Navigator.
How to Connect to Printer
1 Open Network-USB Navigator.
• For Windows 8, select Network-USB Navigator from the Start screen.
• For Windows 7, Windows Vista and Windows XP, navigate to Start - All Programs - BUFFALO - Network-USB - Net-
work-USB Navigator.
• For Mac OS, click the Network-USB Navigator icon in the dock.
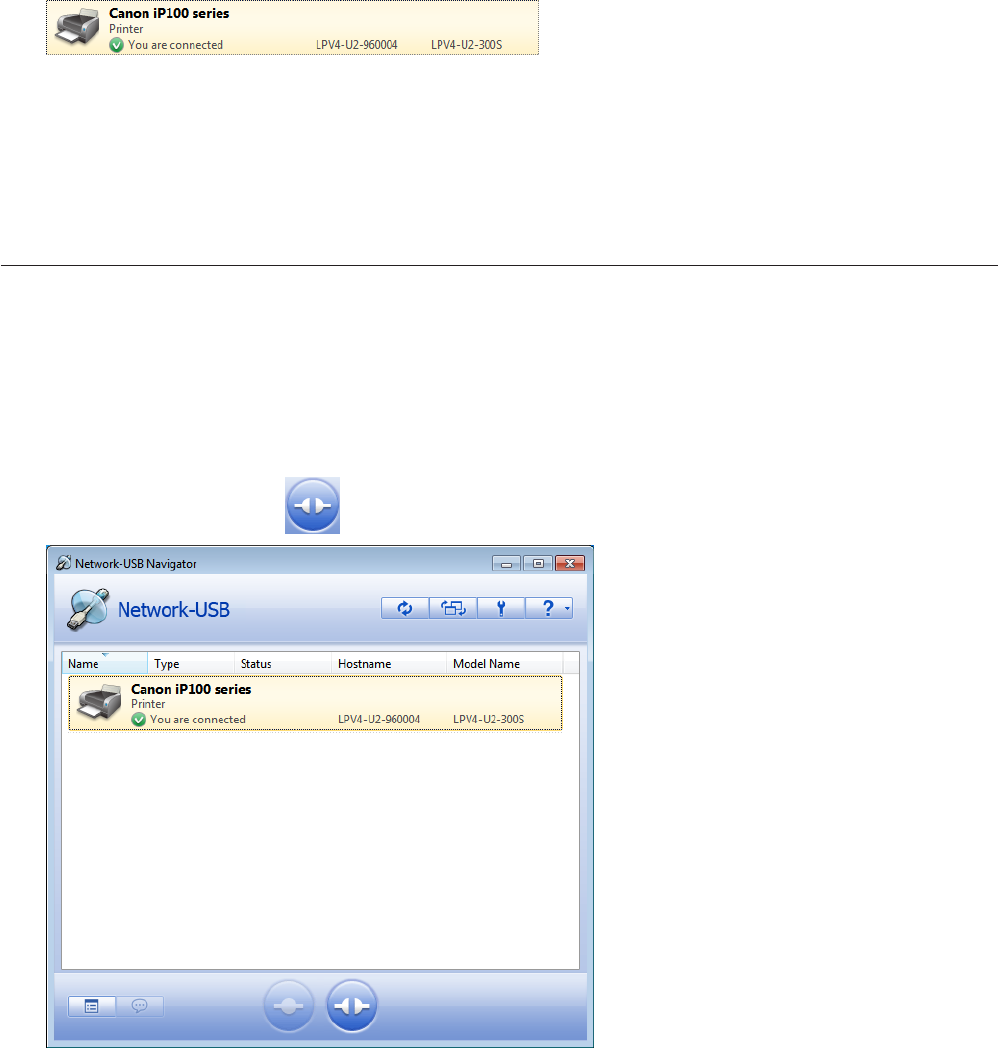
2 Select your printer and click (connect).
Note:
• If multiple USB devices are displayed, select the LPV4-U2-300S.
• If the printer driver installer is displayed, install the driver referring to the manual from your printer.
30
3 Confirm that You are connected is displayed.
How to Disconnect Printer
1 Open Network-USB Navigator.
• For Windows 8, select Network-USB Navigator from the Start screen.
• For Windows 7, Windows Vista and Windows XP, navigate to Start - All Programs - BUFFALO - Network-USB - Net-
work-USB Navigator.
• For Mac OS, click the Network-USB Navigator icon in the dock.
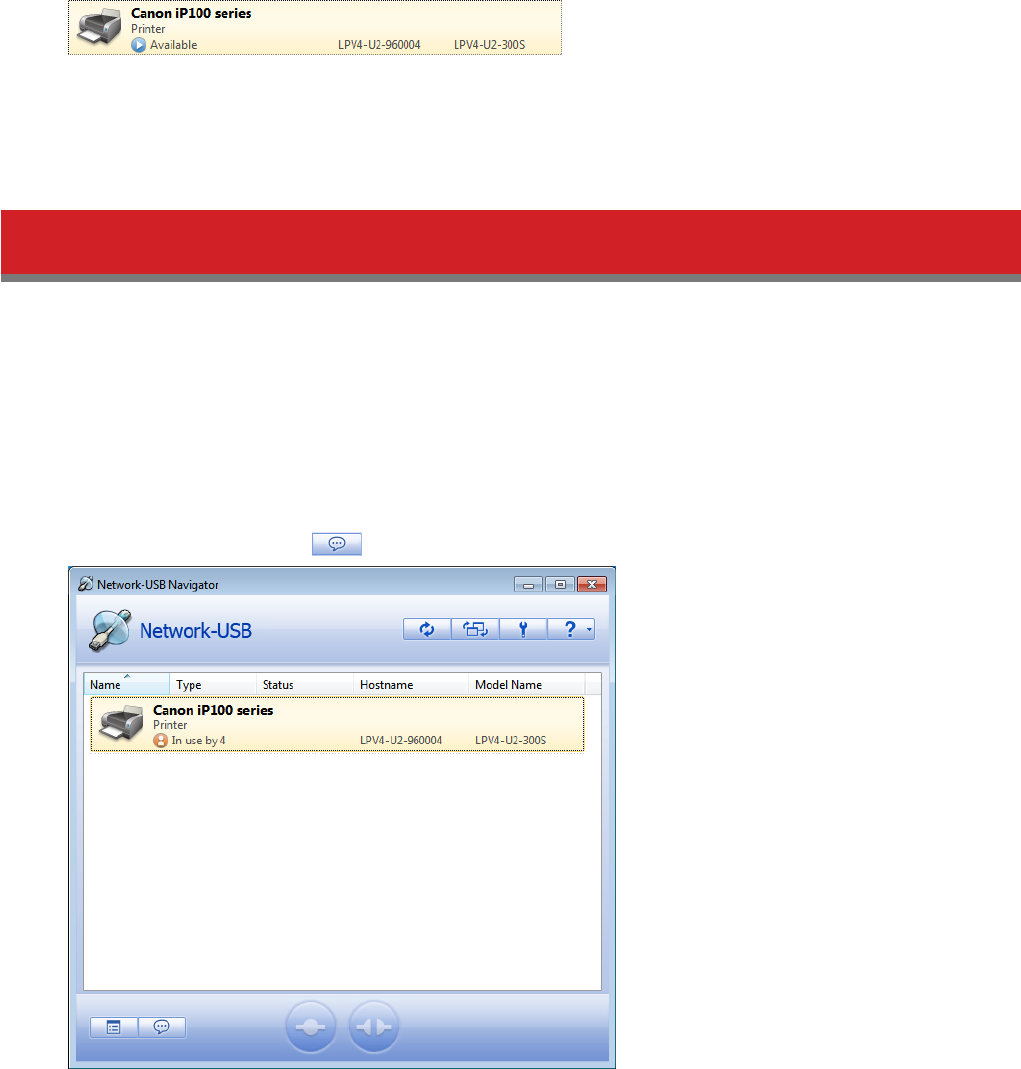
2 Select your printer and click (disconnect).
Note: If multiple USB devices are displayed, select the LPV4-U2-300S.
31
3 Confirm that Available is displayed.
Send Disconnect Request
You can send a disconnection request to the user who is using the printer.
1 Open Network-USB Navigator.
• For Windows 8, select Network-USB Navigator from the Start screen.
• For Windows 7, Windows Vista and Windows XP, navigate to Start - All Programs - BUFFALO - Network-USB - Net-
work-USB Navigator.
• For Mac OS, click the Network-USB Navigator icon in the dock.
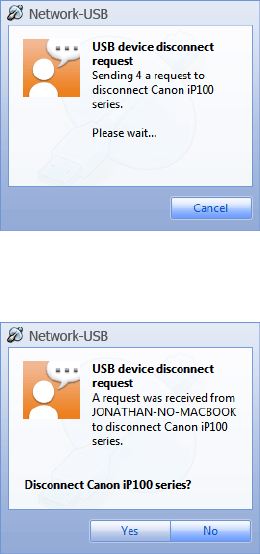
2 Select your printer and click (disconnect request).
Note: If multiple USB devices are displayed, select the LPV4-U2-300S.
32
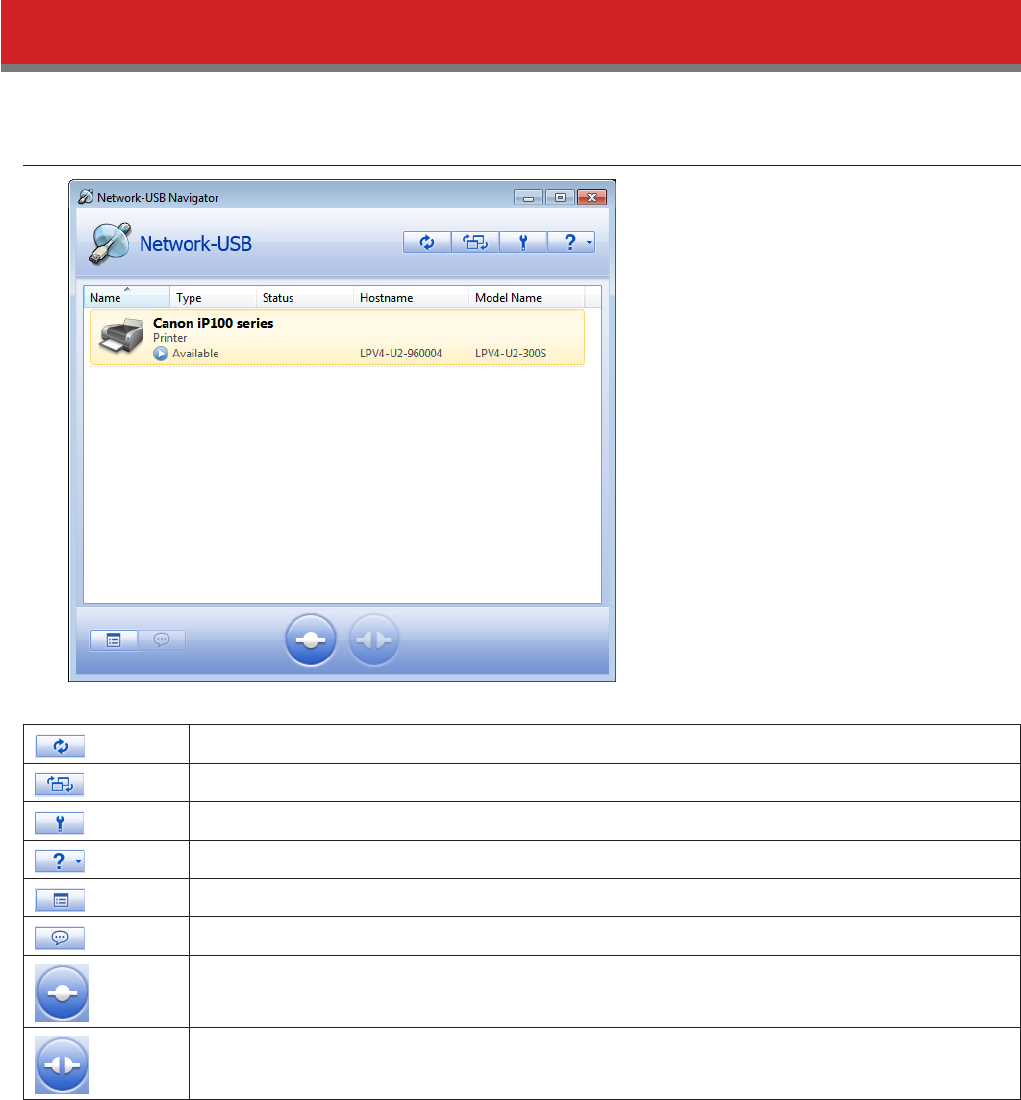
3 The disconnect request is sent to the user who is using the printer.
4 The window below appears on the desktop of the user who received the request. When the user clicks Yes, the
printer will then be available for your use.
33
Main Window
Buttons
Refreshes the screen.
Changes the view of the list.
Opens options.
Opens help menu.
Displays the properties of the selected device.
Sends disconnect request to the user who is using the selected device.
Connects to the selected device.
Disconnects the selected device.
34
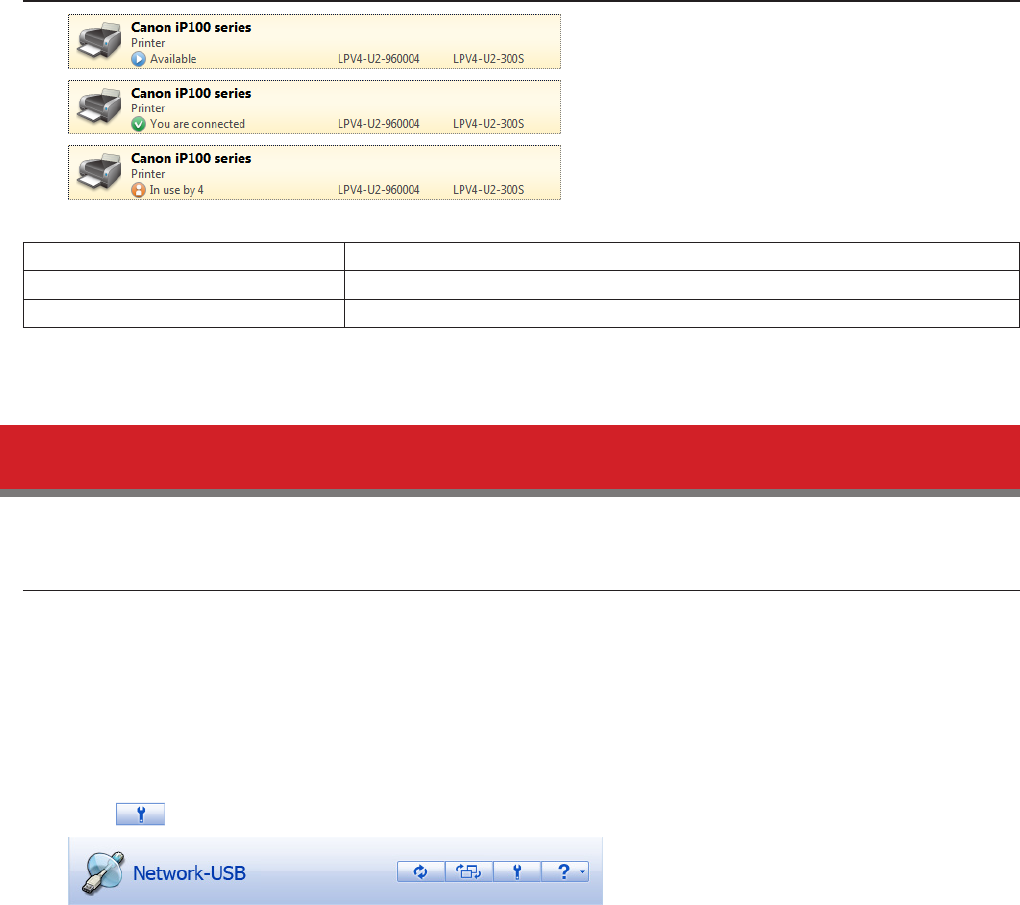
Status
Available You can use the printer.
You are connected You are connected to the printer.
In use Another user is connected to the printer or the printer is printing.
Options
How to Open Options
1 Open Network-USB Navigator.
• For Windows 8, select Network-USB Navigator from the Start screen.
• For Windows 7, Windows Vista and Windows XP, navigate to Start - All Programs - BUFFALO - Network-USB - Net-
work-USB Navigator.
• For Mac OS, click the Network-USB Navigator icon in the dock.
2 Click (options).
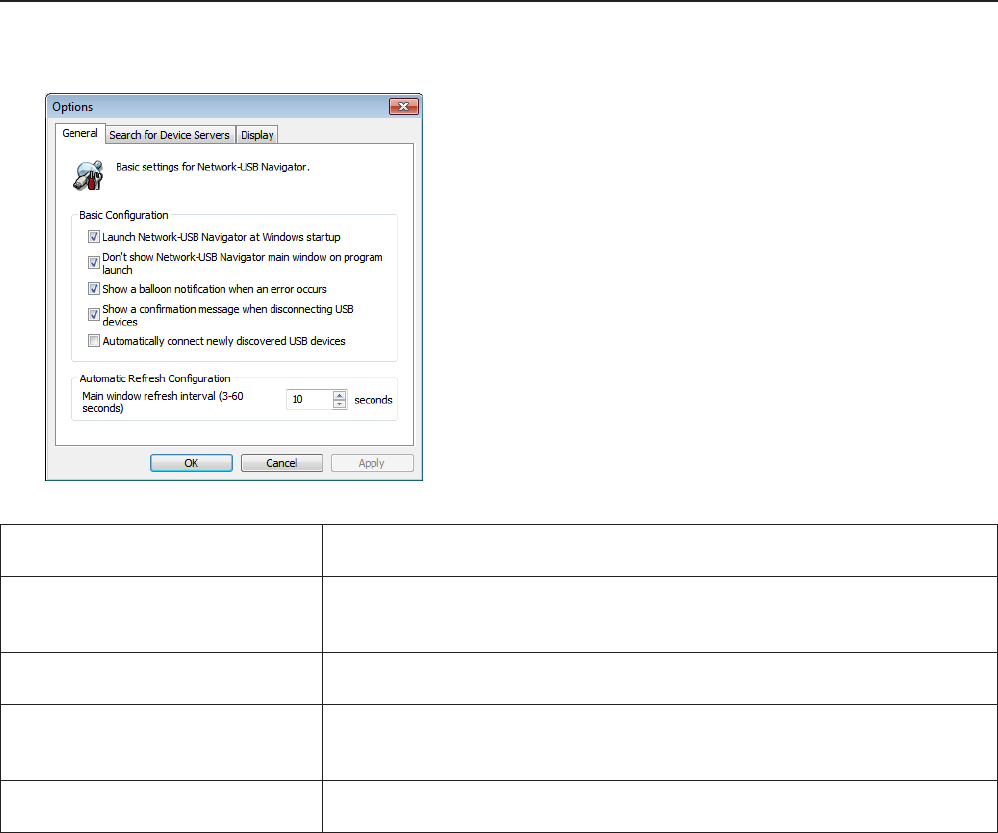
3 Options is displayed.
35
Description
General
Launch Network-USB Navigator
at Windows startup Check to launch Network-USB Navigator at Windows startup.
Don’t show Network-USB
Navigator main window on
program launch
Check to launch Network-USB Navigator minimized.
Show a balloon notification when
an error occurs
Check to show a help balloon when Network-USB experiences a power surge
or a USB device is not correctly disconnected.
Show a confirmation message
when disconnecting USB devices
Check to show a disconnect confirmation prompt before disconnecting a
USB device. A disconnect prompt is not shown when an application or the
automatic printing feature initiates the disconnect.
Automatically connect newly
discovered USB devices. Check to automatically connect USB devices detected for the first time.
36
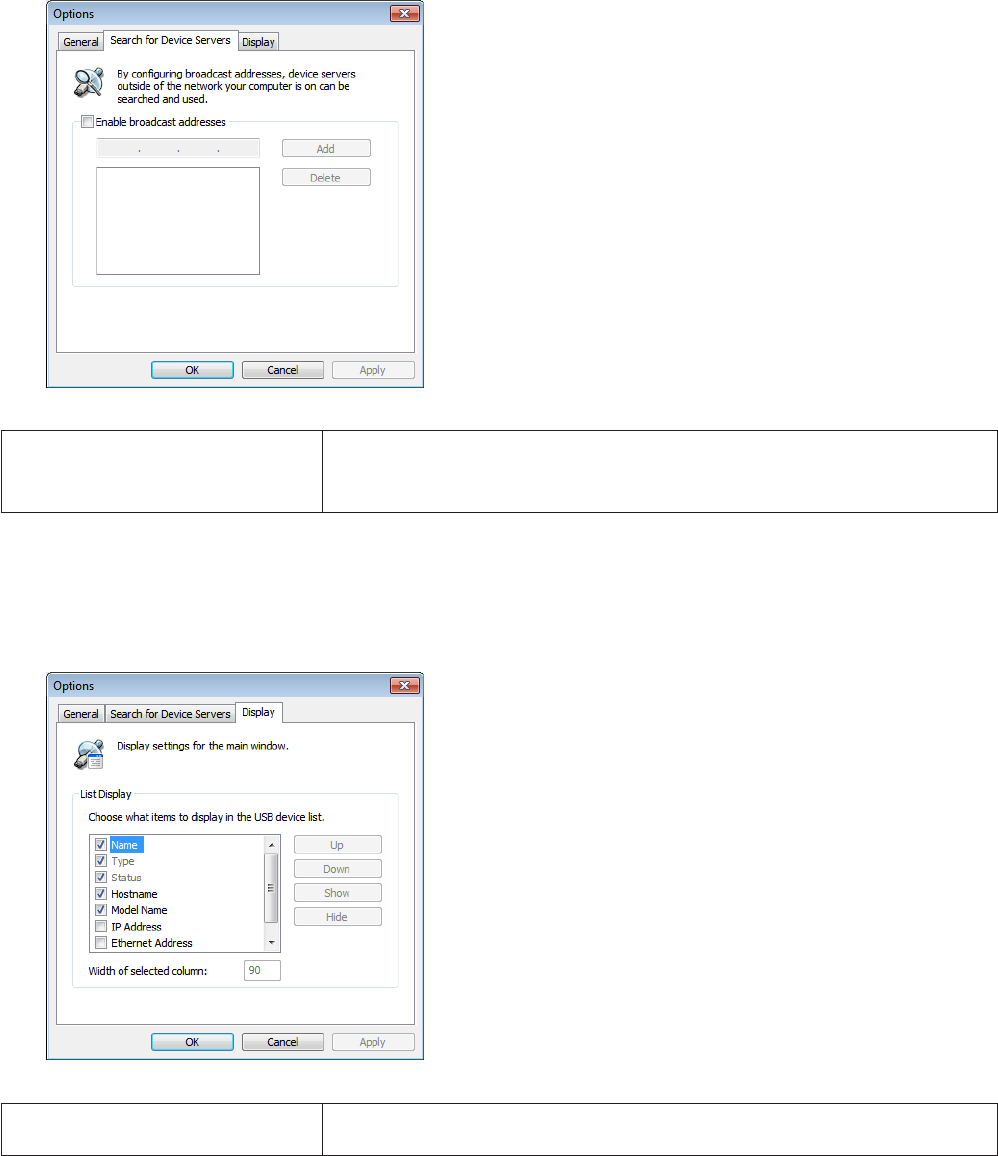
Search for Device Servers
Enable broadcast addresses
You do not need to enable for normal use.
If your PC is connected to multiple networks, enter the broadcast address of
the network which the print server is connected to.
Display
List Display Set the display order and which items to show and hide in the USB device list.
Checked items will be shown. Use Up or Down to change the selection order.

37
Notes
• Do not connect a USB hub to the print server. It may not work correctly.
• Devices are not automatically reconnected when resuming from standby or hibernation. Use Network-USB Navigator
to reconnect them.
• Operation or configuration via Telnet is not supported.
• Do not disconnect or eject USB devices while they are being accessed.
• If your USB device doesn’t automatically connect after detection, connect the device manually.
• If your USB device requires an AC adapter, be sure to connect it.
• For the latest information and updates, go to our website.

38
Chapter 3 - Settings
You can configure various settings of the print server.
Print Data from Your Mobile
You can use the ePrint app, available for iOS and Android, to print pictures or contact files directly from your mobile
device. Refer to the following links for more information on ePrint.
Overview and procedure:
http://www.e-workshop-dev.com/PC_EN/eprint_e.html
Support for ePrint:
http://www.e-workshop-dev.com/PC_EN/inquiry_title_e.html
ePrint for iPad, iPhone, and iPod touch:
https://itunes.apple.com/en/app/eprint-free/id304220730?mt=8
ePrint for Android:
https://play.google.com/store/apps/details?id=jp.co.microtech.android.eprint_free&hl=en
Check Ink Level
Follow the procedure below to check your printer’s ink level.
1 Open Network-USB Navigator and connect to your printer.
2 Use your printer’s included utilities to check the ink level. You may disconnect the printer afterwards.
39
Use Scanning Function
Follow the procedure below to use the printer’s scanning function. The printer’s driver may be required. For more
information, refer to your printer’s manual.
1 Open Network-USB Navigator and connect to your printer.
2 Use the printer’s scanning function. You may disconnect the printer afterwards.
Change Print Server’s IP Address
Follow the procedure below to change the print server’s IP address.
1 Open print server Settings and log in.
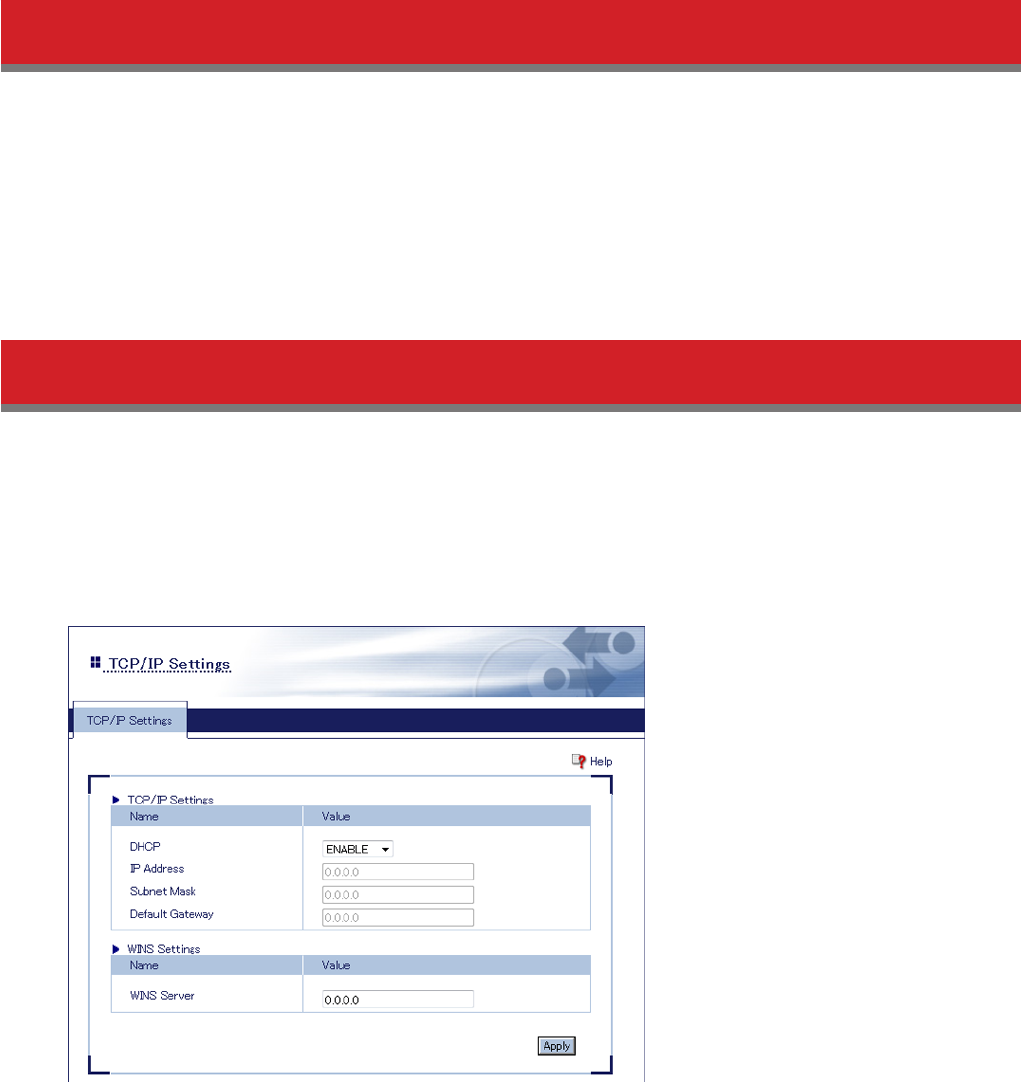
2 Navigate to Network - TCP/IP.
3 Disable DHCP and manually configure the IP address, subnet mask, and default gateway; click Apply when finished.

40
Refer to the example below (if network is on 192.168.11.0).
DHCP - Disabled
IP address - 192.168.11.222
Subnet mask - 255.255.255.0
Default gateway - 192.168.11.1
WINS server - 0.0.0.0
Note: Only assign the print server a valid IP address, otherwise Settings cannot be accessed. If you cannot open
Settings, initialize the print server, which restores all settings to factory default.
4 When “Restart the print server to save the settings. Restart now?” is displayed, click OK.
Switch from Wired to Wireless Connection
Follow the procedure below to switch wired connection to wireless connection.
There are 2 ways to do it: selecting from the wireless network list, or PIN method.
Notes:
• Wired connection and wireless connection cannot be used at the same time.
• WPA2-PSK (TKIP) is not supported.
Select Wireless Access Point from List
Before starting, the print server’s connection method should be set to ‘Auto’. The access point should also have SSID
broadcast enabled and is not using WPA2-PSK (TKIP) encryption. Refer to Chapter 4 for more information.
1 Open print server Settings and log in.
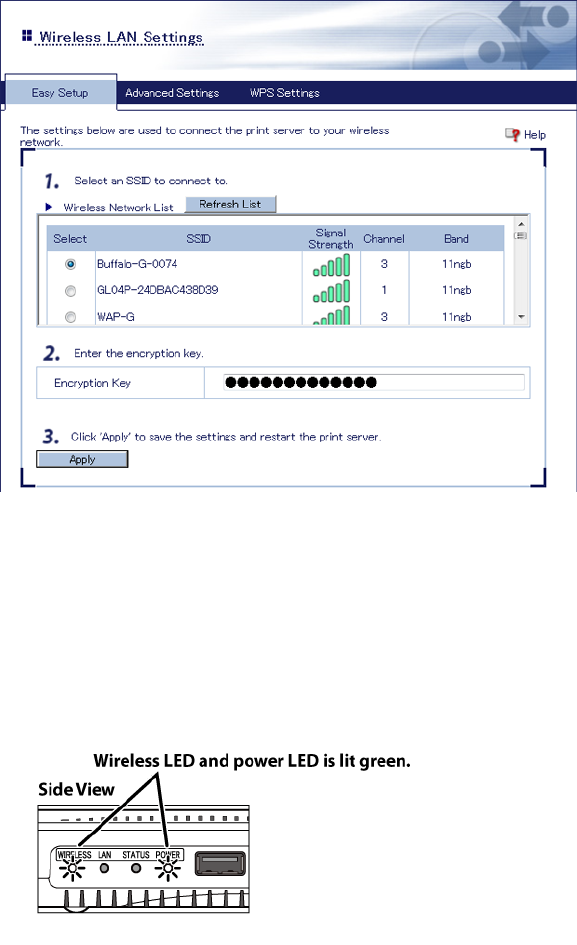
2 Navigate to Network - Wireless LAN.
41
3 Select an access point; enter the encryption key and click Apply.
4 The settings are saved and the print server is rebooted.
5 Disconnect the Ethernet cable from the print server.
6 Disconnect the AC adapter, wait for about 10 seconds, then reconnect the AC adapter.
7 After about 30 seconds, check the LEDs on the side of the print server.
Note: If the wireless LED is blinking, the connection could not be established. Check the access point’s encryption
key and try again.
42
Connect by WPS Pushbutton Method
Before starting, the print server’s connection method should be set to ‘Auto’.
1 Disconnect the Ethernet cable from the print server.
2 Disconnect the AC adapter, wait for about 10 seconds, then reconnect the AC adapter.
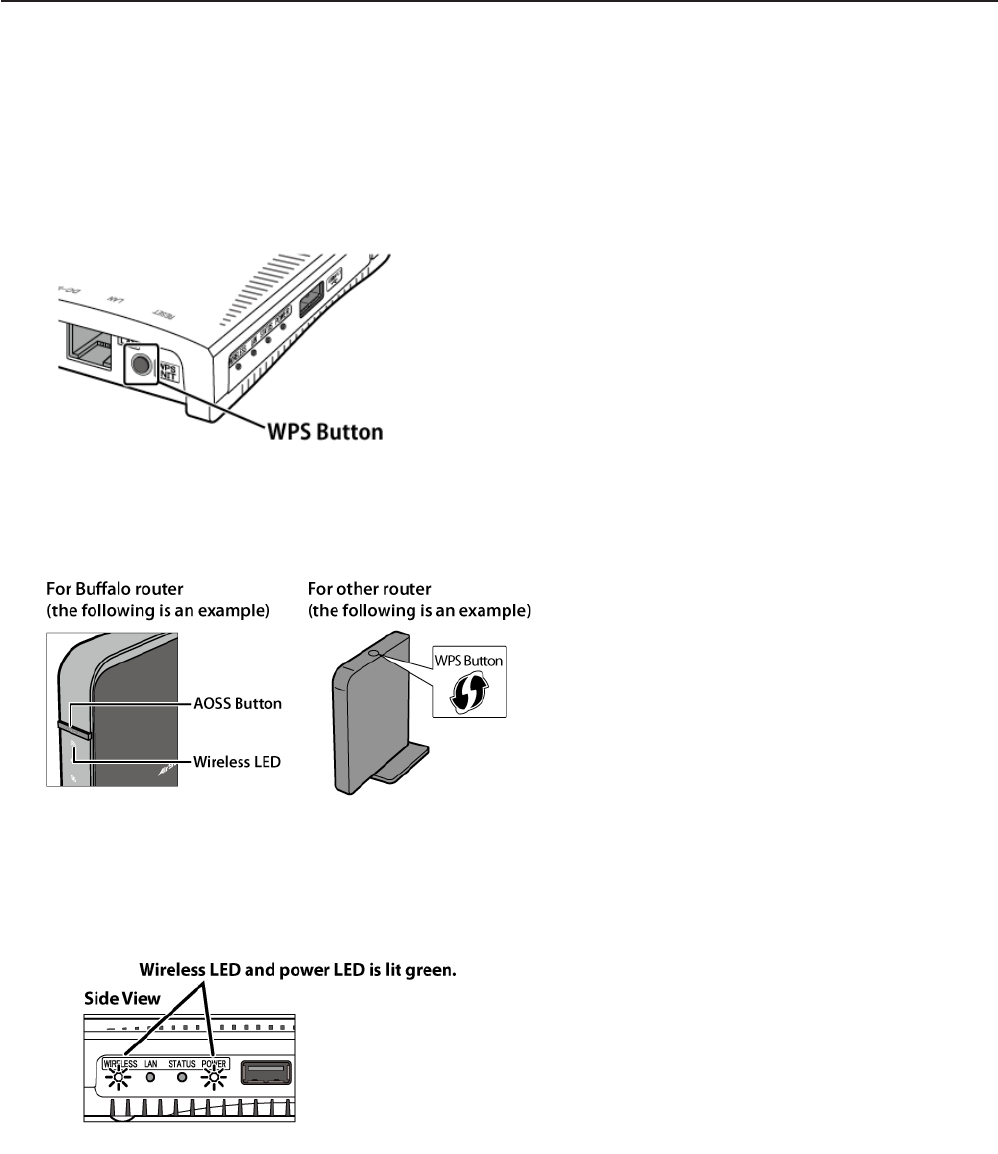
3 Wait for about 30 seconds. Then, press and hold the WPS button for about 5 seconds.
4 Press access point’s AOSS or WPS button to start WPS.
Note: If you are using Buffalo router, press and hold the AOSS button for at least two seconds to start WPS. This may
be different for other routers.
5 Check the LEDs on the side of the print server.
Note: If the wireless LED is blinking, the connection could not be established. Try again from step 3.
43
Connect by WPS PIN
Before starting, check that the connection method is auto.
1 Before starting, the print server’s connection method should be set to ‘Auto’. The target access point should have its
WPS screen open.
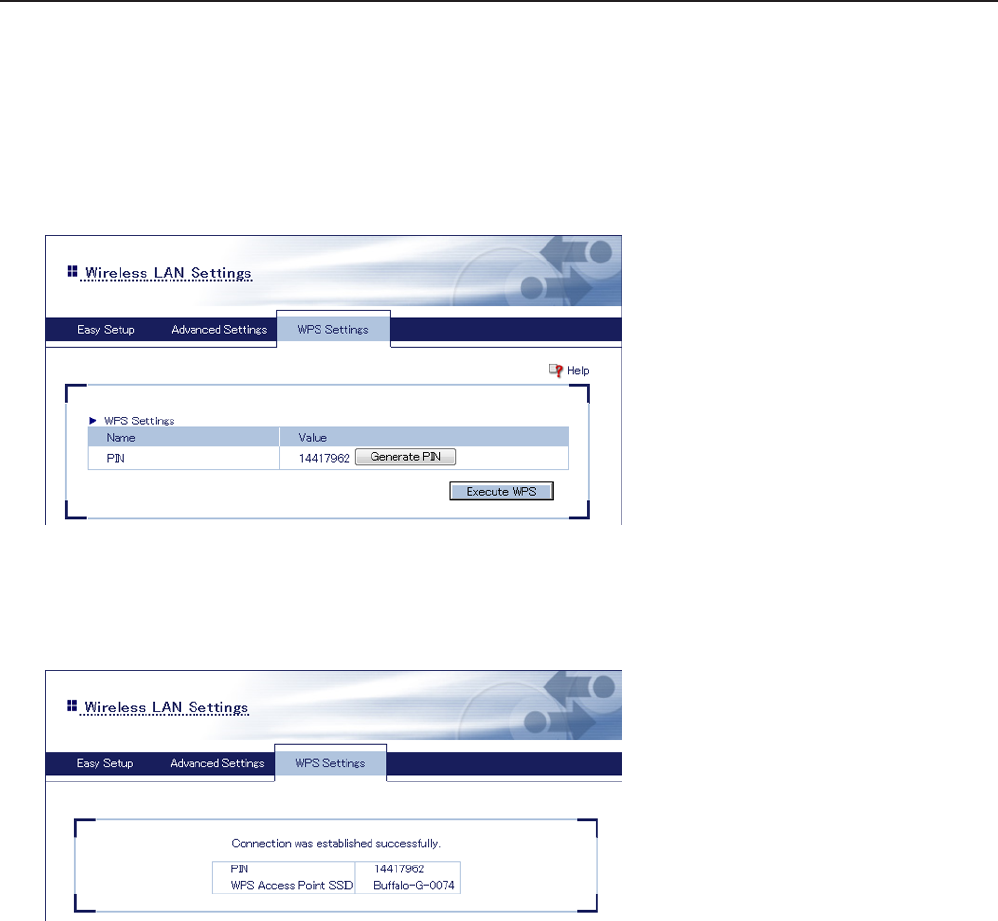
2 Navigate to Network - Wireless LAN - WPS Settings.
3 Note the displayed PIN, then click Execute WPS.
4 Within 2 minutes, register the PIN with the target access point.
5 Confirm that “WPS Success” is displayed. If the following window is not displayed, the connection could not be
established. Try again.
6 Disconnect the Ethernet cable from the print server.
7 Disconnect the AC adapter, wait for about 10 seconds, then reconnect the AC adapter.
44
8 Wait for about 30 seconds, then check the LEDs on the side of the print server.
Switch from Wireless to Wired Connection
Follow the procedure below to switch wireless connection to wired connection. The print server cannot use both wired
and wireless connection at the same time.
Before starting, check that the connection method is ‘Auto’.
1 Disconnect the AC adapter from the print server.
2 Connect the print server to the router or hub with an Ethernet cable.
3 Connect the AC adapter to the print server.
4 Wait for about 30 seconds, then check the LEDs on the side of the print server.
45
Initializing the Print Server
You can initialize the print server by holding down the WPS button, or from within Settings.
Press WPS Button
1 Disconnect the AC adapter from the print server.
2 Reconnect the AC adapter to the print server while holding down the WPS button.
Hold down the WPS button until the power LED blinks green.
Configure in Settings
1 Open print server Settings and log in.
2 Navigate to Maintenance - Initialize.
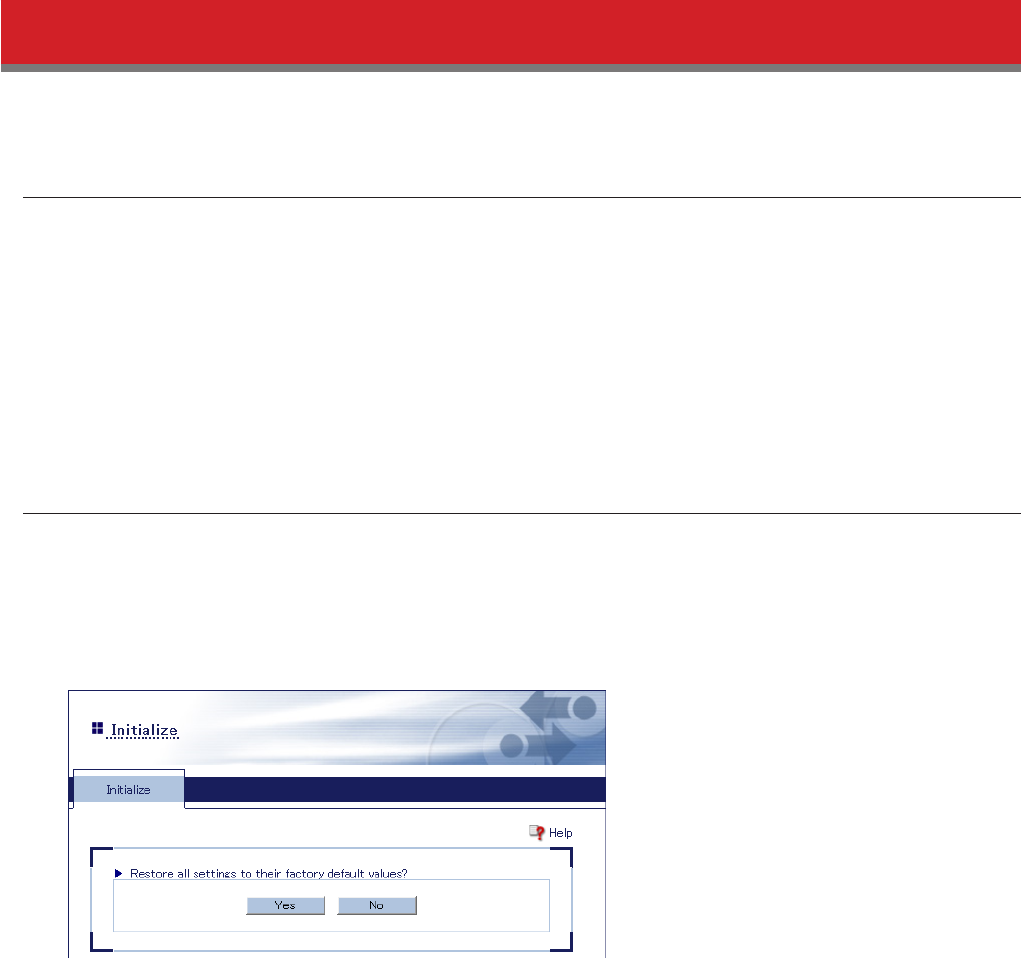
3 Click Yes.
4 When “Restore all settings to their factory default settings?” is displayed, click Yes.
46
Chapter 4 - Troubleshooting
Cannot Print
Case 1: Printer is not ready.
Confirm that the printer’s power is on, and there is enough ink and paper.
Case 2: Print server is not connected correctly.
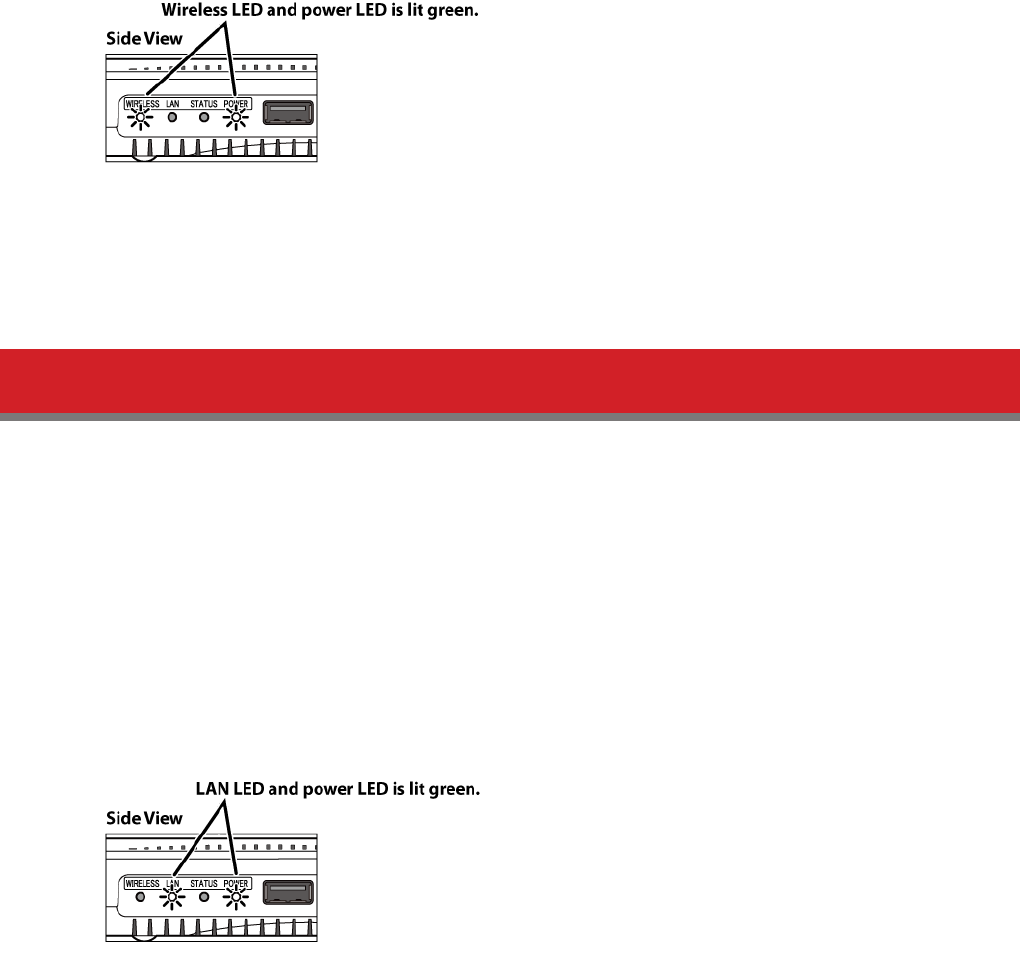
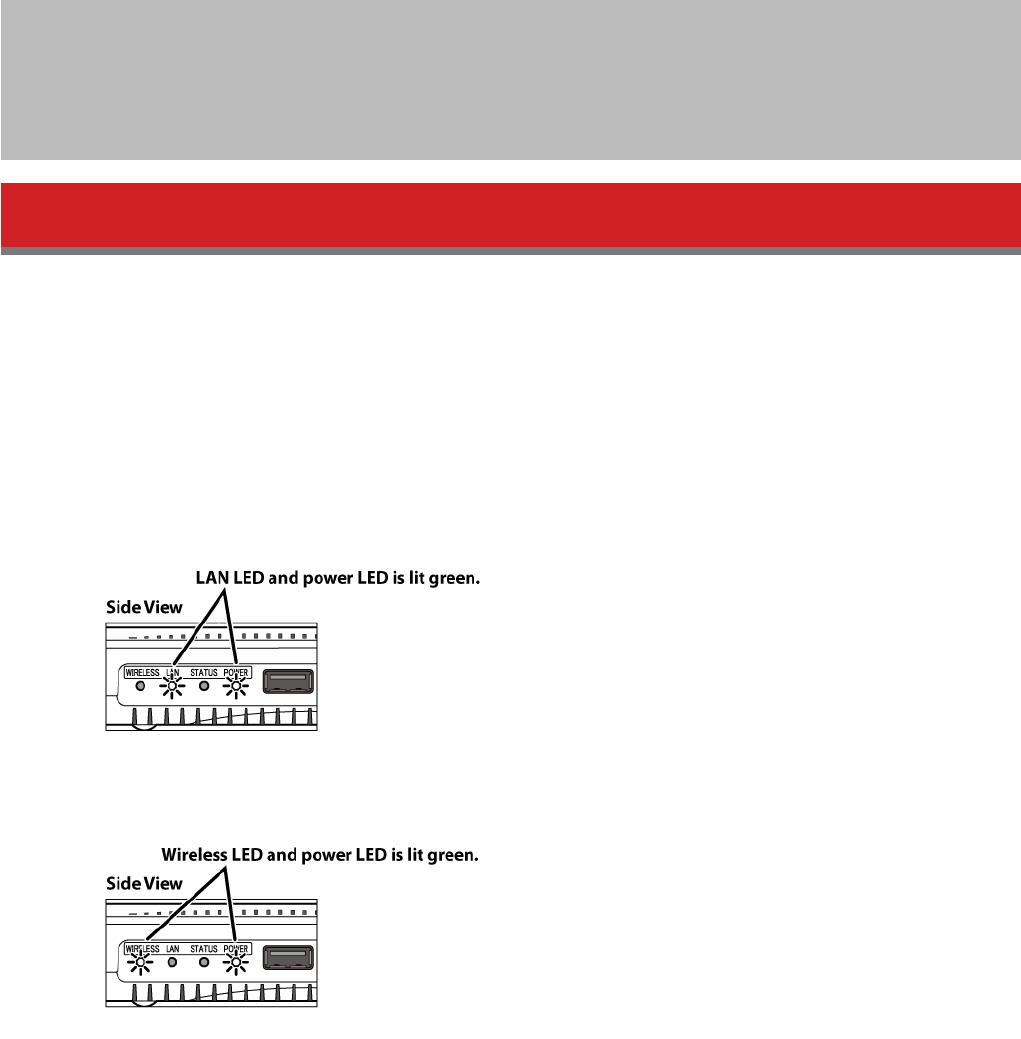
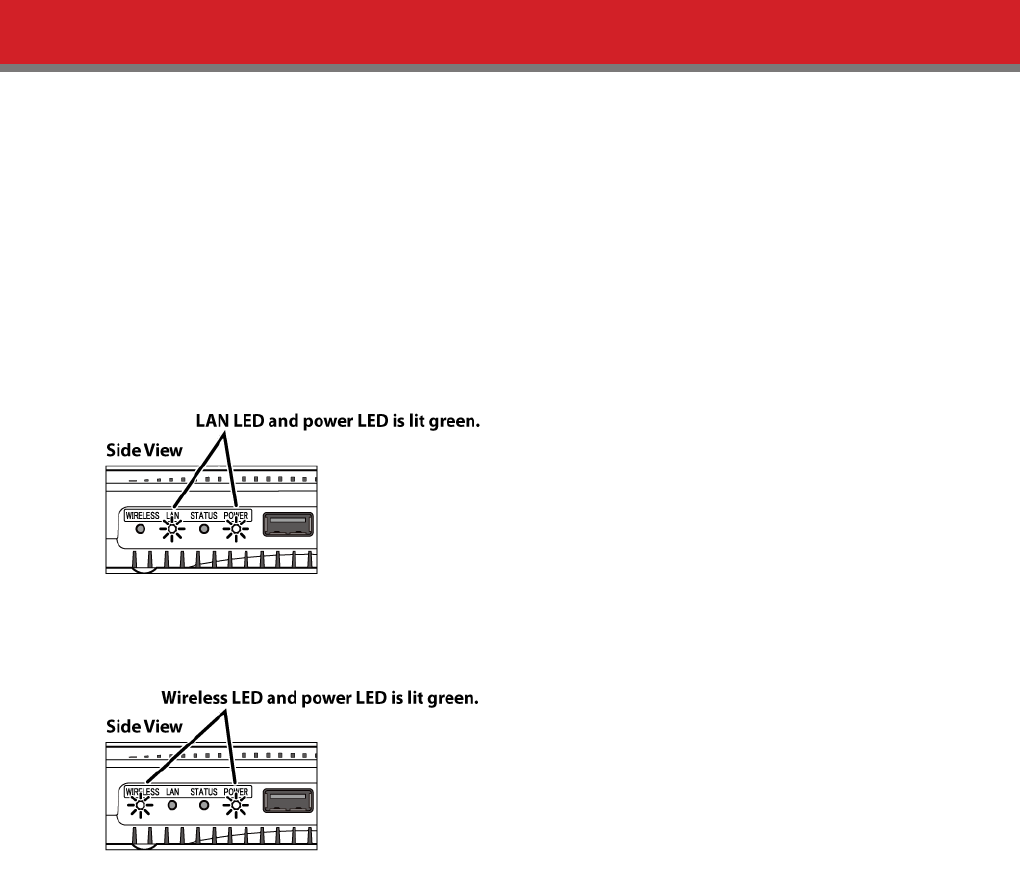
Check the LEDs on the side of the print server. If it is connected correctly, the LEDs will be lit as shown below.
For wired connection:
For wireless connection:
Note: If the LAN LED is not lit while an Ethernet cable is connected, check the router and its connection.
47
Case 3: Connected to the printer using Network-USB Navigator.
If the printer is connected to Network-USB Navigator, you cannot print. Disconnect the printer from Network-USB
Navigator. Also, confirm that automatic connection is disabled.
Case 4: Hostname has been changed.
If you changed the print server’s hostname, you have to reconfigure the printer port. Refer to the “How to Reconfigure
Printer Port” section.
Cannot Access Print Server from PC
Case 1: Print server is not connected correctly.
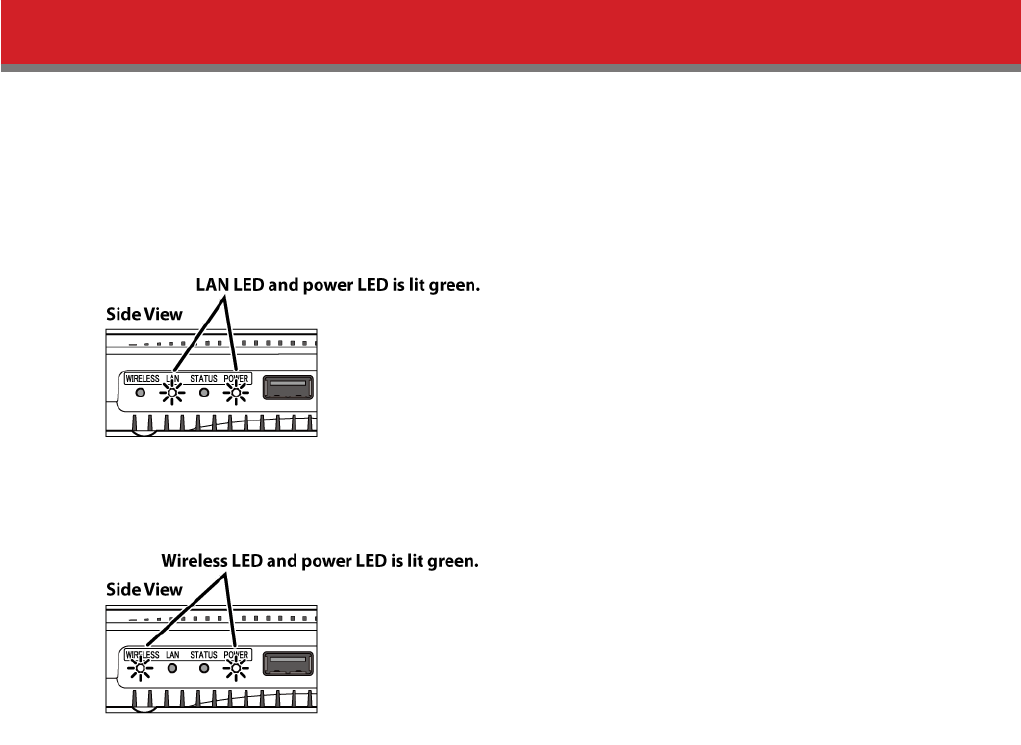
Check the LEDs on the side of the print server. If it is connected correctly, LED is as the following.
For wired connection:
For wireless connection:
Note: If the LAN LED is not lit while an Ethernet cable is connected, check the router and its connection.
48
Case 2: The IP address is invalid.
If print server was assigned an invalid IP address, Settings cannot be accessed. If you cannot open Settings, initialize the
print server, which restores all settings to their factory default values.
Print Server Is Not Displayed on LPV4 Port Setup Wizard
Case 1: The IP address is invalid.
If you set the print server’s IP address improperly (such as broadcast address), you cannot access Settings. If you cannot
access Settings, initialize the print server. Note that initialization will restore all settings of the print server to the factory
default.
Case 2: Print server is not connected correctly.
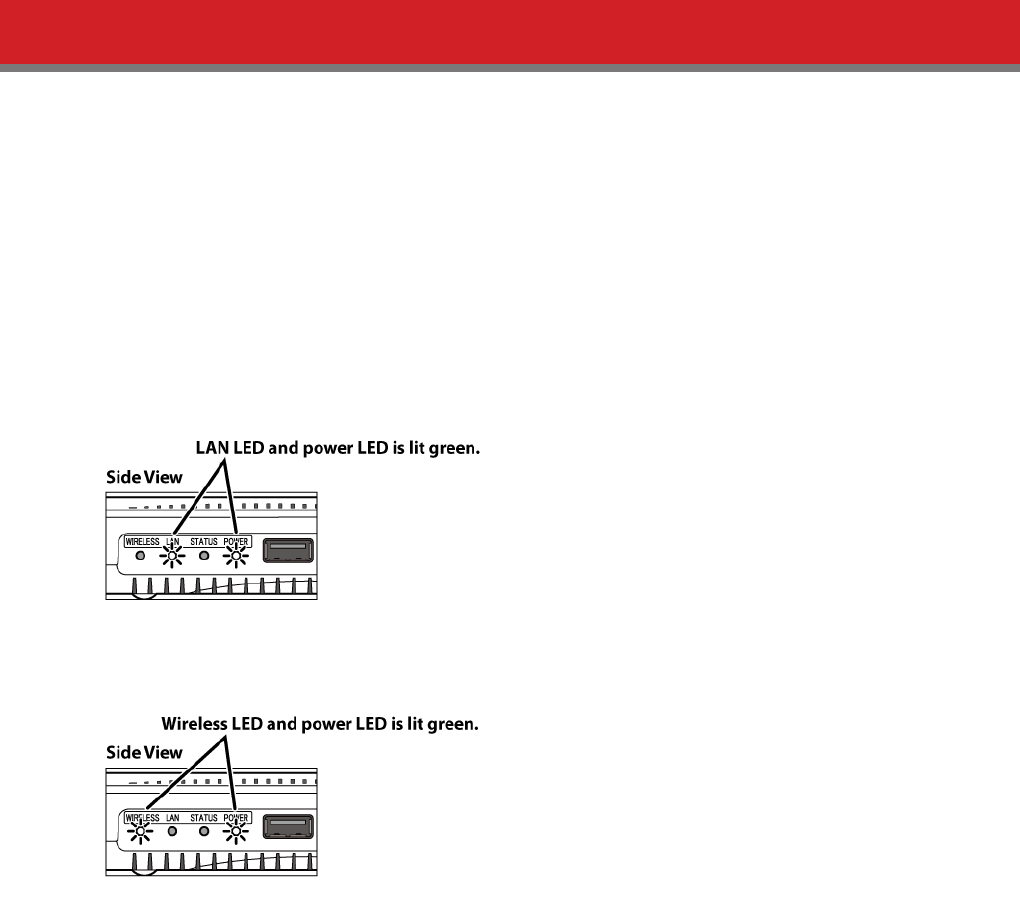
Check the LEDs on the side of the print server. If it is connected correctly, LED is as the following.
For wired connection:
For wireless connection:
Note: If the LAN LED is not lit while an Ethernet cable is connected, check the router and its connection.
49
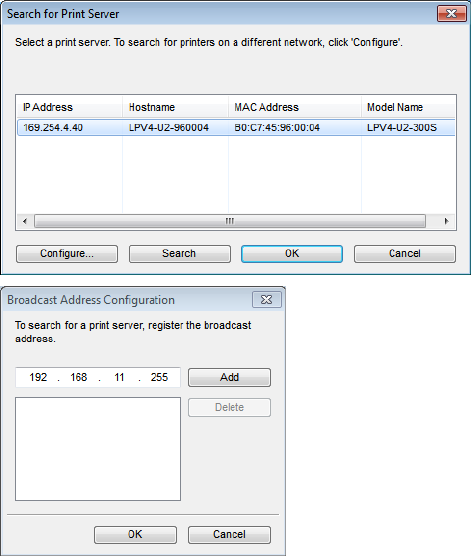
Case 3: Using a PC with multiple network interfaces.
Open LPV4 Port Setup Wizard and navigate to Search for Print Server... - Configure.... Add the broadcast addresses of the
network that the print server is connected to.
50
Print Server Is Not Displayed on Network-USB Navigator
Case 1: The IP address is invalid.
If print server was assigned an invalid IP address, Settings cannot be accessed. If you cannot open Settings, initialize the
print server, which restores all settings to factory default.
Case 2: Print server is not connected correctly.
Check the LEDs on the side of the print server. If it is connected correctly, LED is as the following.
For wired connection:
For wireless connection:
Note: If the LAN LED is not lit while an Ethernet cable is connected, check the router and its connection.
51
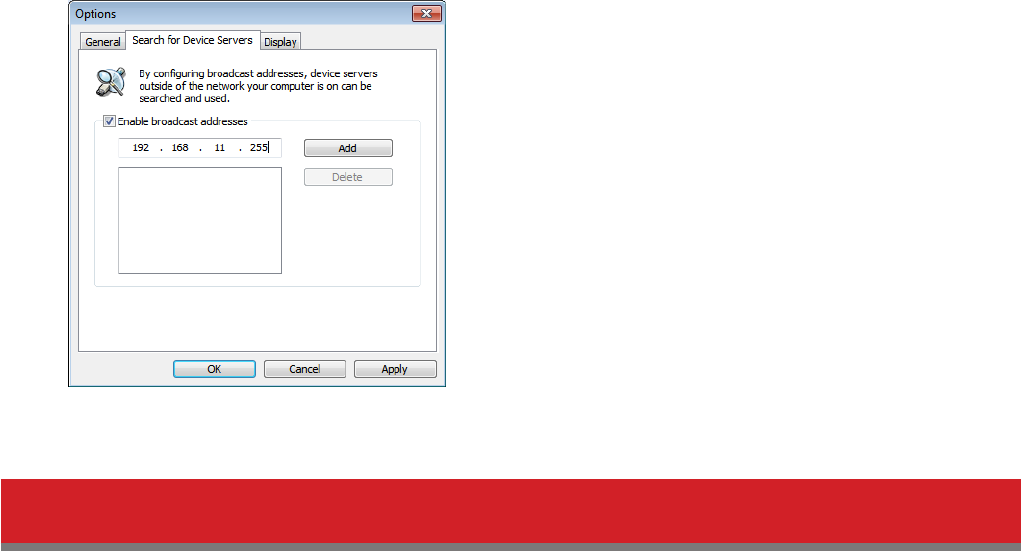
Case 3: Using a PC with multiple network interfaces.
Open Network-USB Navigator and options menu. Click Search for Device Servers tab and check Enable broadcast
addresses, then add broadcast addresses of the network that the print server is connected to.
Cannot Find Access Point from Settings
Case 1: The access point is turned off.
Confirm that the access point is turned on.
Case 2: The access point has SSID broadcasting disabled.
You will never find the access point if it disables broadcasting SSID. Navigate to Network - Wireless LAN - Advanced
Settings and configure manually.
Case 3: The access point sets the authentication method as WPA2-PSK (TKIP).
WPA2-PSK (TKIP) is not supported.

52
Cannot Connect Wirelessly Using WPS
Case 1: The access point is using WEP encryption.
If the encryption method is set to WEP, you cannot use WPS to connect to the access point. Navigate to Network -
Wireless LAN - Advanced Settings and configure manually.
Case 2: The access point has SSID broadcasting disabled.
You will never find the access point if it disables broadcasting SSID. Navigate to Network - Wireless LAN - Advanced
Settings and configure manually.
Case 3: The access point is using WPA2-PSK (TKIP) authentication.
WPA2-PSK (TKIP) is not supported.
53
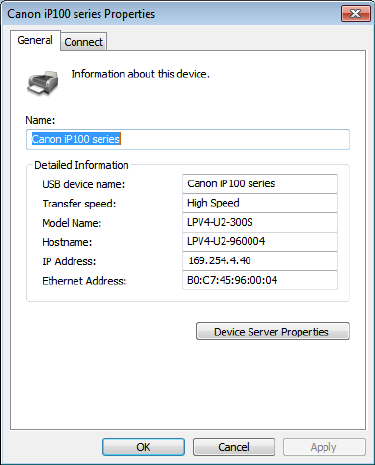
Forgot IP Address
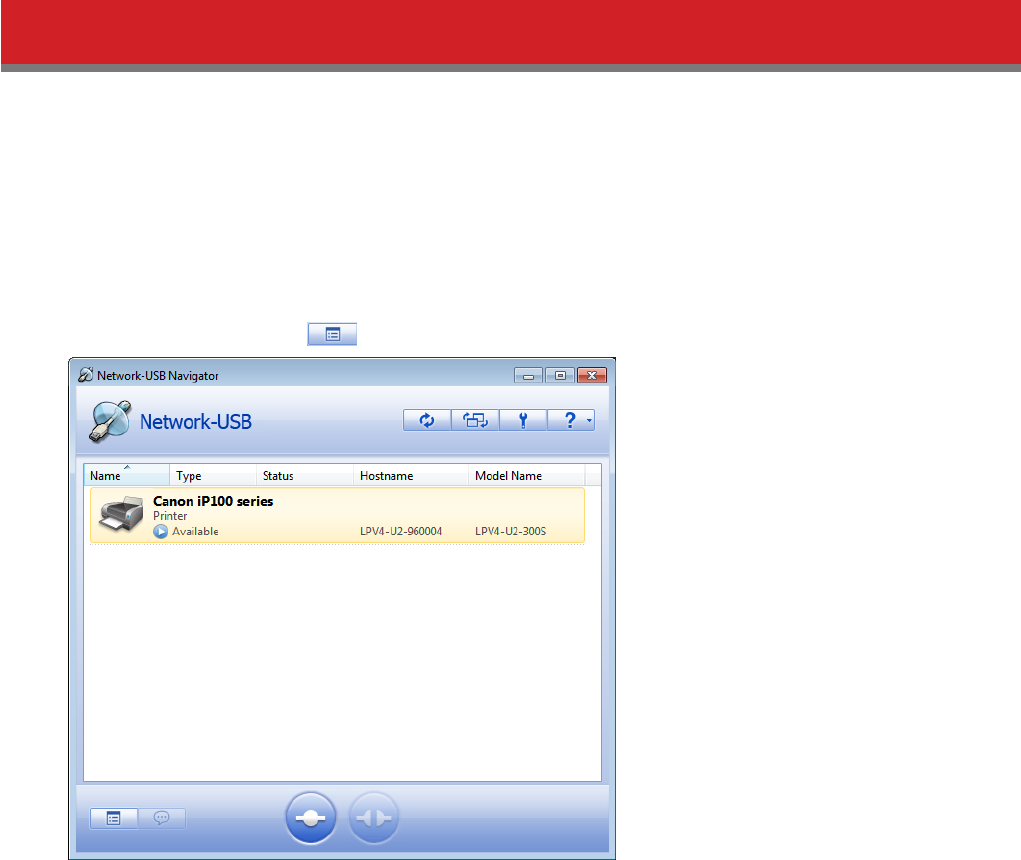
You can check the print server’s IP address by using Network-USB Navigator.
1 Open Network-USB Navigator.
• For Windows 8, select Network-USB Navigator from the Start screen.
• For Windows 7, Windows Vista and Windows XP, navigate to Start - All Programs - BUFFALO - Network-USB - Net-
work-USB Navigator.
• For Mac OS, click the Network-USB Navigator icon in the dock.
2 Select your printer and click (properties).
Note: If multiple USB devices are displayed, select the LPV4-U2-300S.
54
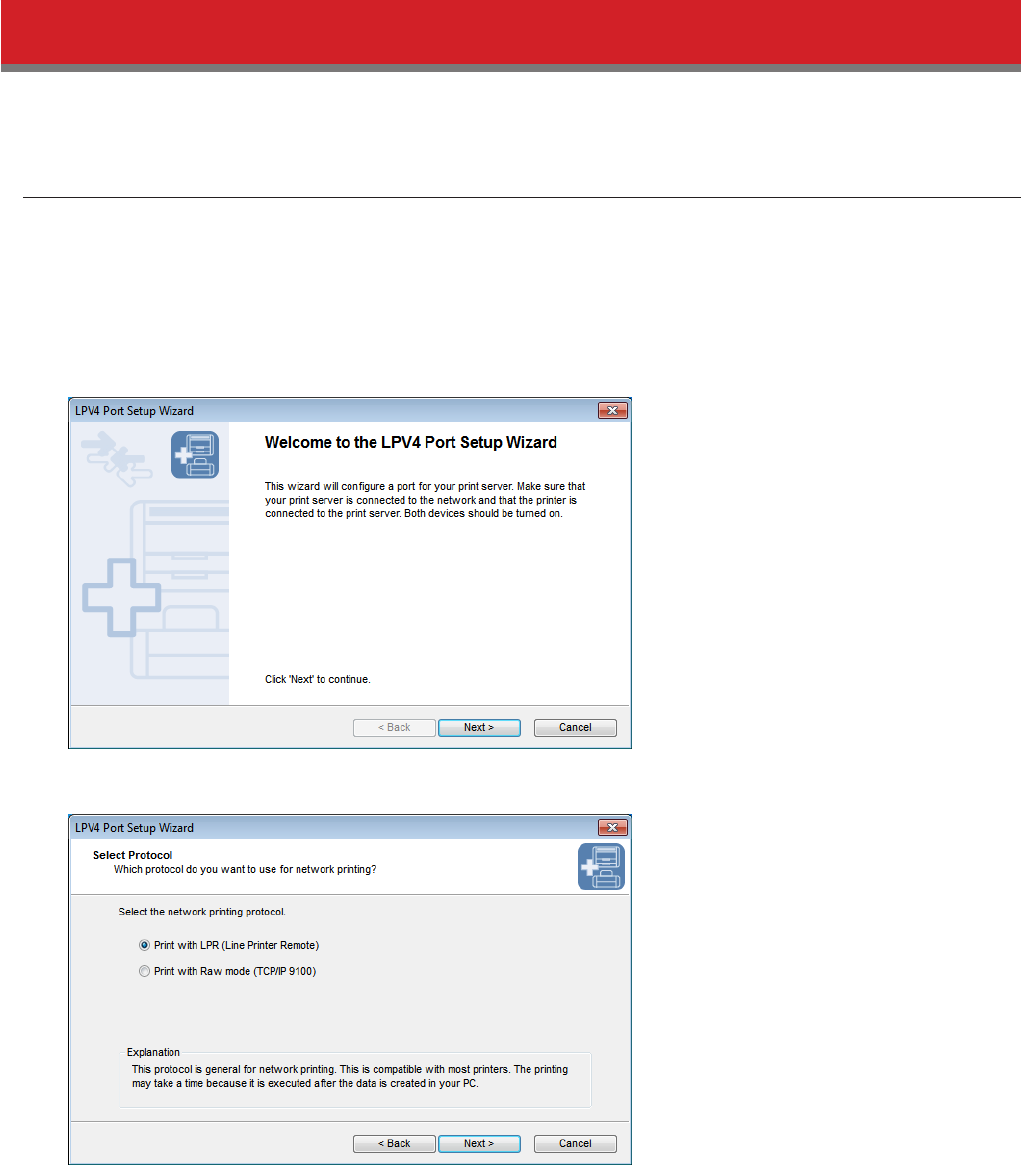
3 The print server’s IP address is displayed in “IP Address”.
55
How to Reconfigure the Printer Port
Follow the procedure below to reconfigure the printer port. The procedure is different between Windows and Mac OS.
For Windows Users
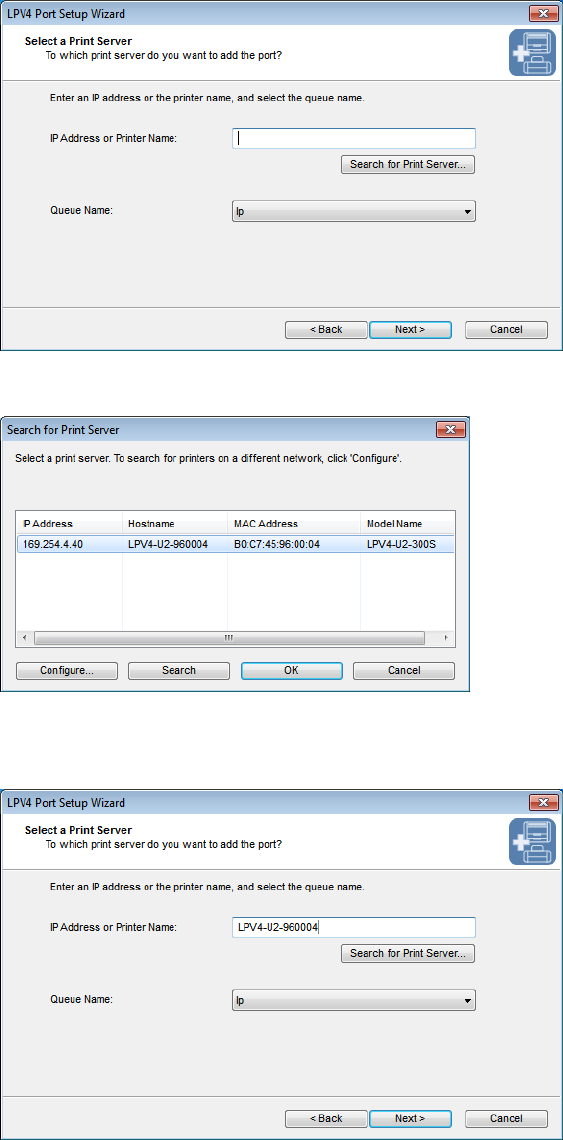
1 Open the LPV4 Port Setup Wizard.
For Windows 8, Select LPV4 Port Setup Wizard in “Start” screen.
For Windows 7, Windows Vista, or Windows XP, Navigate to Start - All Programs - BUFFALO - LPV4 Print - LPV4 Port
Setup Wizard.
2 Click Next.
3 Select Print with LPR (Line Printer Remote) and click Next.
Note: Some printers may not support raw mode.
56
4 Click Search for Print Server....
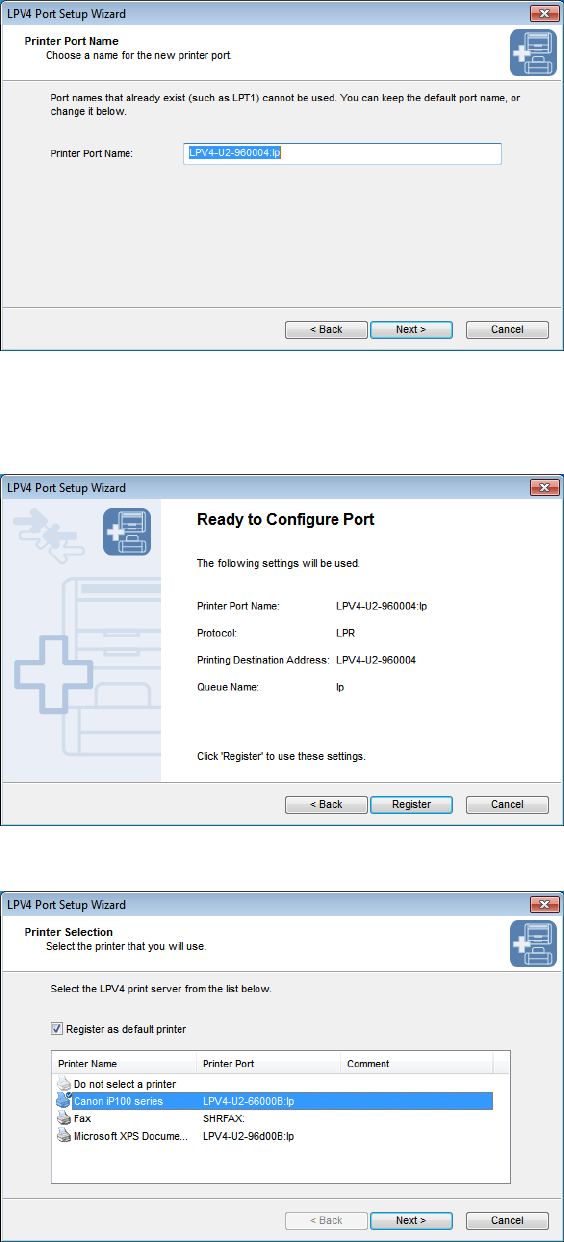
5 Select the print server and click OK.
Note: If multiple print servers are displayed, confirm the MAC address or device name.
6 Click Next.
57
7 Click Next.
Note: If “The printer port xxxxxxxxxxxxxxxxx already exists.” is displayed, cancel the configuration and refer to the
“Cannot Configure Printer Port with LPV4 Port Setup Wizard” section.
8 Click Register.
9 Select the printer connected to the print server, then click Next.
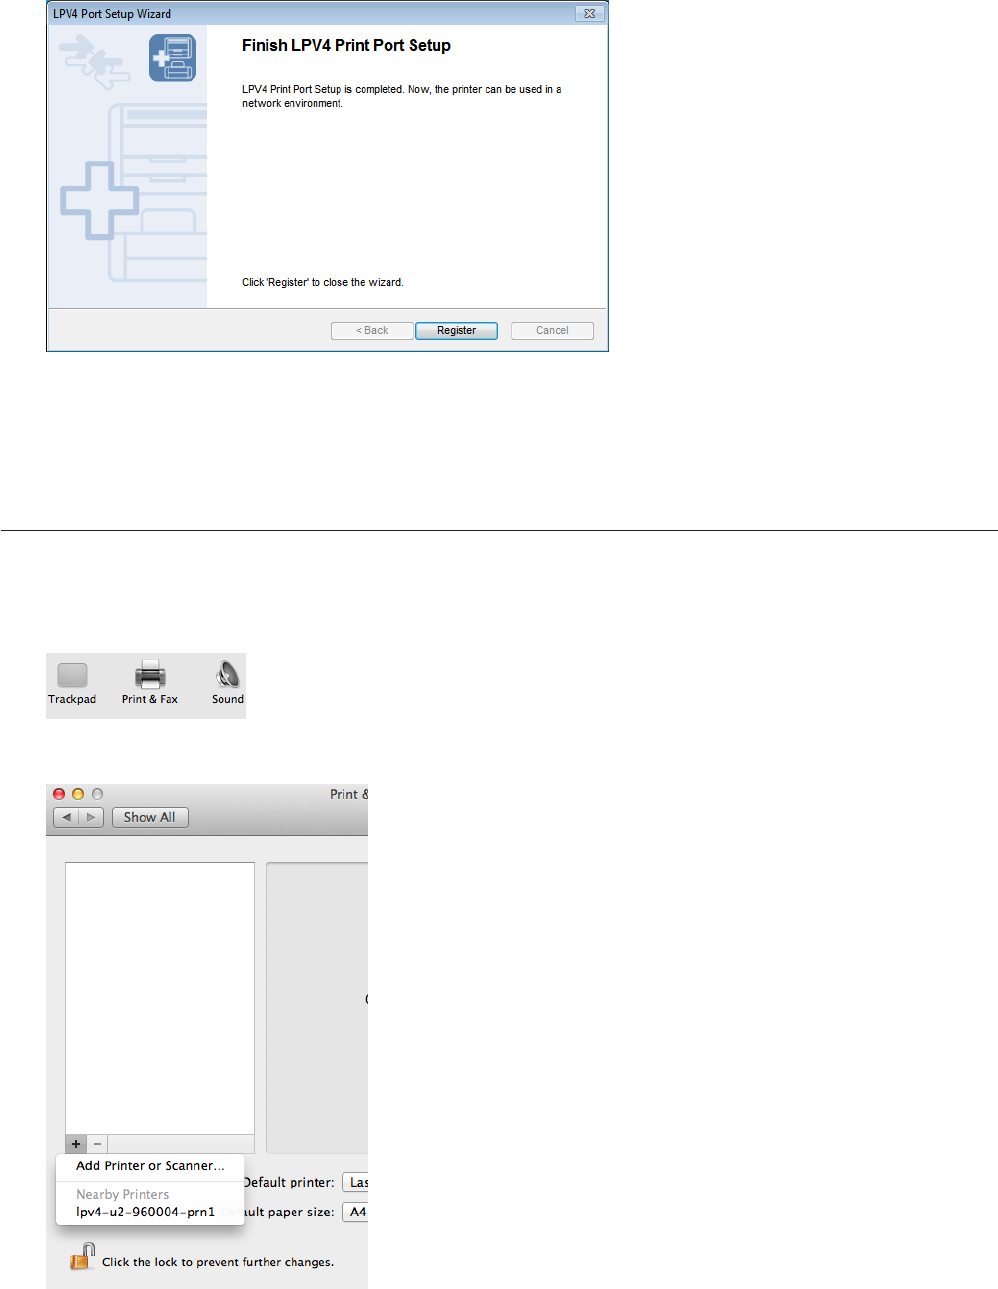
58
10 Click Register.
Now the printer is ready to be used.
For Mac Users
1 Navigate to System Preferences in Apple menu.
2 Click Print & Fax.
3 Click + and select Add Printer or Scanner....
Note: If the screen from step 4 appears when you click + , follow step 4.
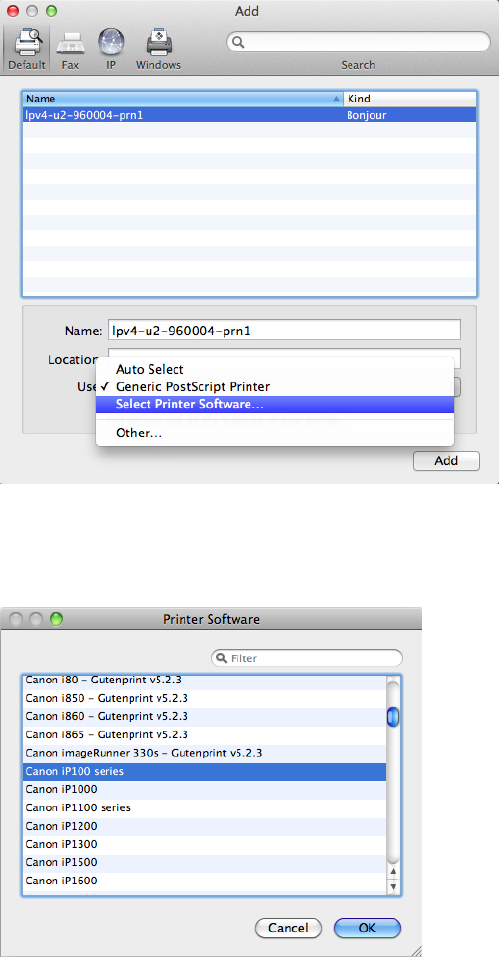
59
4 Select the print server (its suffix is “-prm1”), then select Select Printer Software... from “Use”.
Note: If your print server is not listed, confirm that it is connected correctly and try again. If you find multiple print
servers, check your print server’s MAC address.
5 Select your printer and click OK.
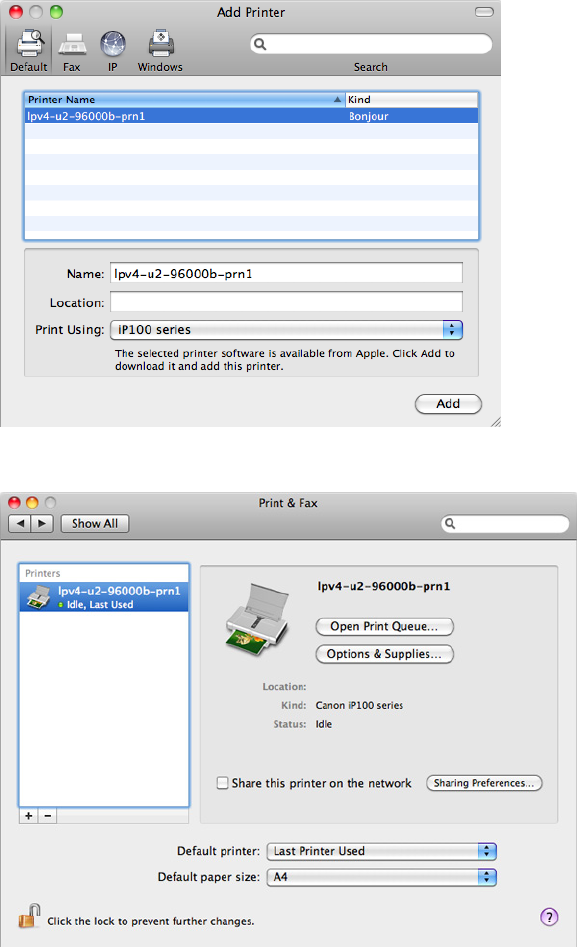
60
6 Click Add.
7 Confirm that your printer is displayed.
Now the printer is ready to be used.
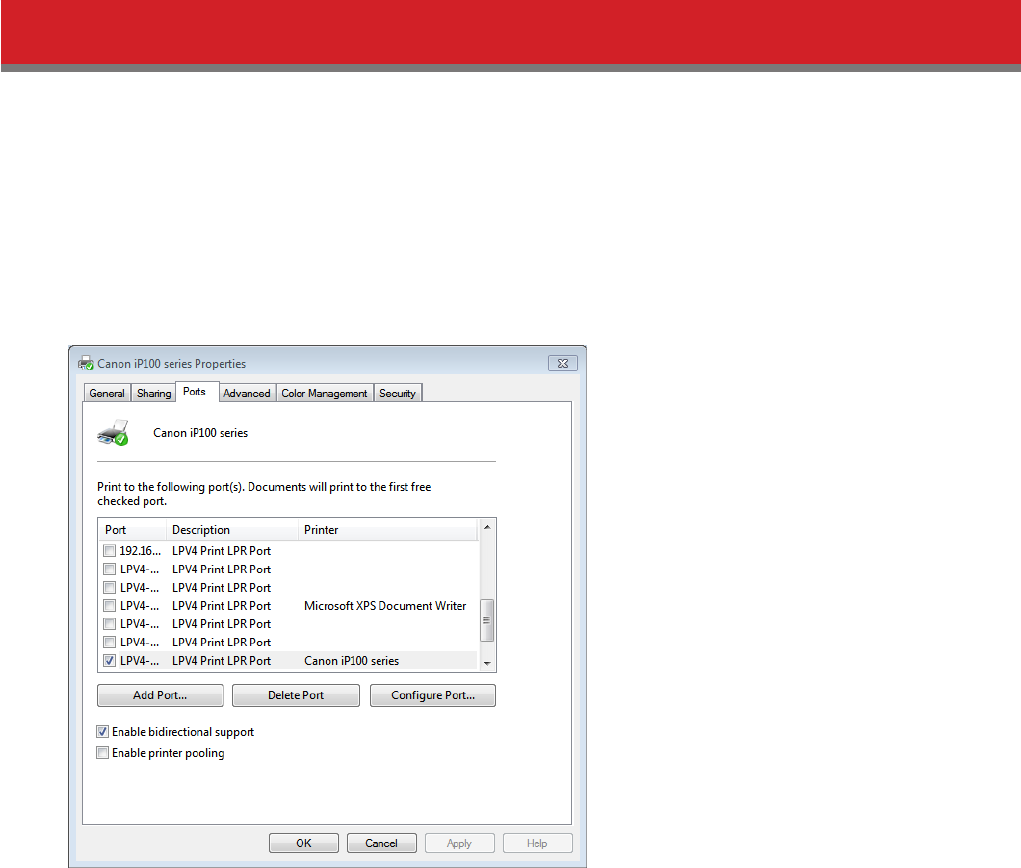
61
Cannot Configure Printer Port with LPV4 Port Setup Wizard
If the same port name is already registered, “The printer port xxxxxxxxxxxxxxxxx already exists.” may be displayed when
registering the printer port.
In this case, follow the procedure below to delete unnecessary printer port settings.
1 Navigate to Control Panel - Devices and Printers, then open properties of your printer.
2 Click Ports tab.
3 Select an unnecessary port and click Delete Port.
Note: The port which is currently used is displayed as “LPV4 Print LPR Port” in “Description” and checked. You can
delete ports that are not checked.
62
Appendix A - Supplemental Information
Technical Specifications
Wireless LAN Interface
Standard Compliance IEEE 802.11n / IEEE 802.11g / IEEE 802.11b
Transmission Method Direct sequence spread spectrum (DSSS), OFDM, MIMO
Frequency Range Available frequencies depend on the country of purchase.
Transmission Rate
IEEE 802.11n: up to 300 Mbps
IEEE 802.11g: up to 54 Mbps
IEEE 802.11b: up to 11 Mbps
Access Mode Infrastructure Mode
Security WPA2-PSK (AES), WPA-PSK (TKIP/AES), 64-bit or 128-bit WEP
Wired LAN Interface
Standard Compliance IEEE 802.3u (100BASE-TX) / IEEE 802.3 (10BASE-T)
Transmission Rate 10 Mbps or 100 Mbps
Transmission Encoding 100BASE-TX 4B5B/MLT-3, 10BASE-T Manchester Coding
Access Method CSMA/CD
Speed and Flow Control 10 Mbps or 100 Mbps, Auto Sensing, Auto MDIX
Other Specifications
Printer Interface 1 USB 2.0/1.1 port
Power Supply External AC 100-240 V Universal, 50/60 Hz
Power Consumption About 2.3 W (Max)
Dimensions 72 x 127 x 25 mm (2.83 x 5 x 0.98 in.)
Weight 100 g (3.53 oz.)
Operating Environment 0 - 40° C (32 - 104° F), 10 - 85% (non-condensing)
Compatible OS
TCP/IP (TCP#9100, LPR)
Windows 8 (64-bit/32-bit), Windows 7 (64-bit/32-bit, SP1 or later), Windows Vista
(64-bit/32-bit, SP2 or later), Windows XP (32-bit, SP3 or later), Mac OS (10.5, 10.6, 10.7,
10.8, Intel CPU only)
Bonjour
Mac OS (10.5, 10.6, 10.7, 10.8, Intel CPU only)
Compatible Printers
USB 2.0 or 1.1 Printers
Only 1 printer can connect to the print server at a time. Interactive communication-
only printers, WPS (Windows Printing System) printers, or GDI printers are not
supported.

63
FCC and IC Notice
FCC Part 15.19
This device complies with Part 15 of the FCC Rules. Operation is subject to the following two conditions:
(1) this device may not cause harmful interference, and
(2) this device must accept any interference received, including interference that may cause undesired operation.
FCC Part.15.105(b)
This equipment has been tested and found to comply with the limits for a Class B digital device, pursuant to Part 15 of
the FCC Rules. These limits are designed to provide reasonable protection against harmful interference in a residential
installation. This equipment generates, uses and can radiate radio frequency energy and, if not installed and used
in accordance with the instructions, may cause harmful interference to radio communications. However, there is no
guarantee that interference will not occur in a particular installation.
If this equipment does cause harmful interference to radio or television reception, which can be determined by turning
the equipment off and on, the user is encouraged to try to correct the interference by one or more of the following
measures:
-- Reorient or relocate the receiving antenna.
-- Increase the separation between the equipment and receiver.
-- Connect the equipment into an outlet on a circuit different
from that to which the receiver is connected.
-- Consult the dealer or an experienced radio/TV technician for help.
FCC Part.15.21
You are cautioned that changes or modifications not expressly approved by the party responsible for compliance could
void your authority to operate the equipment.
64
FCC RF Exposure Warning
This device complies with FCC RF radiation exposure limits set forth for an uncontrolled environment. The antenna used
for this transmitter must be installed to provide a separation distance of at least 20 cm from all persons and must not be
co-located or operating in conjunction with any other antenna or transmitter.
RSS102 2.6 Radiation Exposure Statement
Déclaration d’exposition aux radiations
This equipment complies with IC radiation exposure limits set forth for an uncontrolled environment. This equipment
should be installed and operated with minimum distance 20 cm between the radiator and your body.
Cet équipement est conforme aux limites d’exposition aux rayonnements IC établies pour un environnement non
contrôlé. Cet équipement doit être installé et utilisé avec un minimum de 20 cm de distance entre la source de
rayonnement et votre corps.