Users Manual

Before Operation 1
Installation 2
Windows98/95 Settings 3
WindowsNT4.0 Settings 4
Installing Client Manager 5
Connection to Network 6
Troubleshooting 7
When You Want To... 8
Appendix 9
Thank you for purchasing MELCO INC.’s
wireless LAN card (WLI-PCM). This manual
describes precautions for handling of the wire-
less LAN card. Read this carefully before
using the wireless LAN card to ensure correct
operation.

Precautions for radio wave
●Never use the WLI-PCM near the magnetic field around a microwave oven or
in an area where static electricity and/or radio noise is generated. The radio
waves may not be transmitted in these areas.
* When the WLI-PCM is used near a wireless printer buffer (MELCO INC.’s
RYP-G or similar products by other manufacturers) that use radio waves at
around 2.4 GHz, the processing speed of both devices may be affected.
●As the WLI-PCM has been approved for conformity to the engineering stan-
dards, the following may be regarded unlawful.
• Disassembling/remodeling the WLI-PCM
• Removing the approval label attached to the rear of the WLI-PCM
■All rights for this manual are owned by MELCO INC. No part of this manual may be
transmitted, reproduced, or revised without permission from MELCO INC.
■Product names of other companies used in this manual are trademarks or registered
trademarks of the respective companies. Trademark symbols (,,, etc.) are not indi-
cated in this manual.
■Specifications, design, and other descriptions included in this manual are subject to
change without notice.
■This manual is carefully prepared, however, feel free to contact your nearest sales rep-
resentative if you have any questions or problems.
In addition, note that MELCO INC. shall not be liable for any expenses incurred due to
damage or loss arising from the use of the WLI-PCM, although MELCO INC. has been
advised of the possibility of such damage.
WLI-PCM User’s Manual 1
Be sure to follow the instructions given
below for your safety.
Follow the instructions described here to avoid harming yourself, other people,
and property, and to ensure safety. Be sure to read and understand them thor-
oughly before using this product. This manual contains instructions concerning
general operation of the computer to which this product is connected as well as
those concerning the product.
Please take note that our warranty will not cover any failures and problems of the
computer, any losses and failures of data, or failures and problems of this product
caused by misuse.
■SIGNS AND SYMBOLS USED IN THIS MANUAL
Warning signs;
Symbols;
Specific instructions are given in or around , , and .
WARNING Failure to follow the instructions shown with this
sign may result in a hazard or the serious injury of
the user.
CAUTION Failure to follow the instructions shown with this
sign may result in the injury of the user or property
damage.
This indicates warnings and cautions.
(Ex. , Exercise care to avoid an electric shock.)
This indicates prohibited matters.
(Ex. , Do not disassemble.)
This indicates compulsory rules.
(EX. , Disconnect the plug from the receptacle.)
WLI-PCM User’s Manual2
WARNING
Unplugging
Turn off the power to the computer and peripheral devices
immediately and unplug them if any liquid or foreign sub-
stance gets into the device.
If you continue using them under such circumstances, a short cir-
cuit resulting in a fire or an electric shock may occur.
Keep dry
Never use the this product near water or in humid areas, such
as a bathroom.
Failure to follow this instruction may cause fire, electric shock, and/
or mechanical damage.
Compulsory
Adults knowledgeable about this product must attend and
supervise children using the electrical appliances.
Compulsory
Keep the internal components, cables and connectors of the
electrical appliances out of the reach of children.
Children may be injured if they touch them.
Compulsory
Be sure to observe instructions by manufacturers of personal
computers and peripherals when installing and using this
product.
No
disassembly
Do not disassemble or modify the product.
It may cause a fire or on electric shock.
WLI-PCM User’s Manual 3
Unplugging
Turn off the power to the computer and peripheral devices
immediately and unplug them if smoke or an unpleasant smell
is generated.
If you continue using them under such circumstances, a short cir-
cuit resulting in a fire or an electric shock may occur.
Unplugging
Turn off the power to the computer and peripheral devices
immediately and unplug them if you drop the product or it
receives a severe physical shock.
If you continue using them under such circumstances, a short cir-
cuit resulting in a fire or an electric shock may occur.
CAUTION
Prohibited
Never touch this product with wet hands.
It may cause an electric shock when the power plugs of personal
computers and peripheral devices are connected to the AC outlet.
If the plug is not connected, mechanical failure may occur.
Compulsory
Touch something made of metal (a door knob or aluminum
window frame, for example) and release static electricity
before touching the product to avoid damage caused by static
electricity.
Static electricity generated from the human body may damage the
product.
Compulsory
Back-up any important data on your computer (hard disk, etc.)
onto appropriate media such as an MO disk or floppy disk
before making any environment changes, for example, when
installing/removing this product or installing the required soft-
ware.
Having back-up data files can minimize the loss if the data on the
personal computer is deleted or damaged due to incorrect opera-
tion or mechanical failure. Note that MELCO INC. shall not be lia-
ble for any damages due to loss or damage of digital data.
WLI-PCM User’s Manual4
Compulsory
Be sure to create back-up files on other media (floppy disk,
MO disk, etc.) for your data on the hard disk.
MELCO INC. recommends that you create two back-up copies of
data before and after the original data is updated for any critical
data. Data may be deleted or damaged when:
• Incorrect operation is performed.
• Data is affected by static electricity or electrical noise.
• Hardware is mechanically damaged or repaired.
• Your computer is turned on immediately after being turned off.
• The battery is expired because the device is not used for a long
time.
• Hardware is damaged in a natural disaster.
Note that MELCO INC. shall not be liable for any damages arising
from loss or damage of digital data in any cases.
Prohibited
Never turn off or reset the computer or other devices while
accessing data storage devices such as the hard disk, MO
drive, or floppy disk drive.
Doing so may delete or damage data. Note that MELCO INC. shall
not be liable for any damages arising from loss or damage of digital
data in any cases.
Prohibited
Never turn off or reset the computer or other devices while any
software is running.
Doing so may delete or damage data. Note that MELCO INC. shall
not be liable for any damages arising from loss or damage of digital
data in any cases.

WLI-PCM User’s Manual 5
Prohibited
Do not place the product in the following areas.
Placing the product in the following areas will cause an elec-
tric shock, a fire or a failure.
• Area where strong magnetic
fields are generated: It causes
a failure.
• Area where static electricity is
generated: It causes a failure.
• Unstable area: The unit may
fall or drop and cause an injury
or failure.
• Area where the temperature or
humidity does not conform to
the operation environment
specified in the manual of the
computer, or area where con-
densation occurs: It causes a
failure.
• Area where the product is in
direct sunlight: It causes a fail-
ure or deformation.
• Area in the proximity of fire or
which contains hot air: It
causes a failure or deforma-
tion.
• Area where a short circuit is
likely to occur: It causes a fail-
ure or electric shock.

WLI-PCM User’s Manual6
Table of Contents
1Before Operation 8
Using this manual 8
Product outline 11
Contents of package and section names 13
Setup flow 14
2Installation 15
Before installing the WLI-PCM 16
Installing the WLI-PCM 21
3Windows98/95 Settings 24
Check before installation 24
Driver installation 26
Checking after installation 40
Removing the WLI-PCM 47
Uninstalling the driver 48
Preparing for connection to network 49
4WindowsNT4.0 Settings 60
Driver installation 60
Changing settings 70
Checking after installation 72
Installing the ESS ID Driver 73
Preparing for connection to network 76

WLI-PCM User’s Manual 7
5Installing Client Manager 79
Installation 79
Uninstallation 82
6Connection to Network 83
Connection to network 83
Checking connection to network 91
Connection to other computers 97
7Troubleshooting 99
8When You Want To... 112
Change target access point 112
Check connection using PING command 114
Assign IP address 115
Check MAC address 116
9Appendix 118
Terminology 118
Product specifications 123
WLI-PCM User’s Manual8
1Before Operation
This chapter contains important information you should fully under-
stood before starting operation. Be sure to carefully read the fol-
lowing pages.
This manual is created according to the following editorial points. Please remem-
ber these points when using this manual.
■Editorial points
CAUTION mark
Describes cautions when handling the WLI-PCM. If these instructions
are not observed, injuries or mechanical damage may occur.
NOTE mark
Describes supplementary information or items which should be under-
stood when handling the WLI-PCM.
REFERENCE mark
Indicates page(s) containing related information.
NEXT mark
Indicates page(s) containing the next step is described.
COLUMN mark
Provides convenient tips.
■Terminology
• Descriptions enclosed by double quotation marks " " are software or dialog box
names.
• This product (Wireless LAN Card WLI-PCM) is generally referred to as "the
WLI-PCM".
• A computer equipped with the WLI-PCM is generally referred to as the "wire-
less LAN PC".
Using this manual
Continued on next page
WLI-PCM User’s Manual 9
• All operation procedures are described assuming the following drive configura-
tion.
A: 3.5-inch floppy disk drive
C: Hard disk drive
D: CD-ROM drive
■Handling precautions
The WLI-PCM is a high-precision device. Be sure to read this manual carefully to
ensure correct operation.
MELCO INC. shall not be liable for any failures or problems of the computer, or
any failures and problems of the access point caused by misuse.
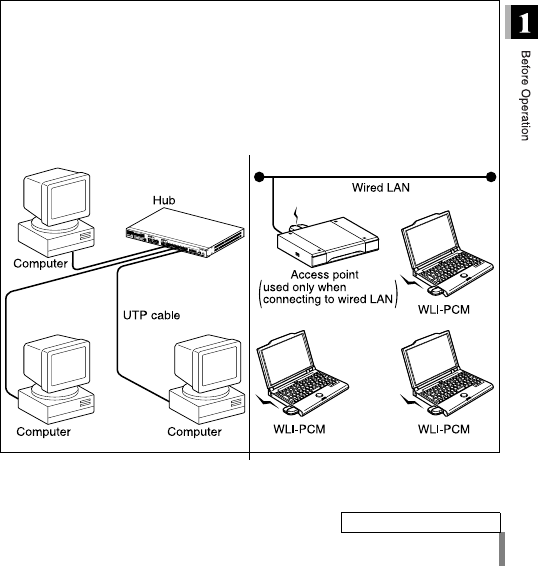
Wired LAN and wireless LAN
The following terms are used in this manual to distinguish between a 10BASE-
T/100BASE-TX LAN connected by cables and a LAN using no cables.
Wired LAN .......... LAN connected by cables
Wireless LAN ...... LAN using wireless communication
Note that these are not general terms and are used only for descriptions in this
manual.
Typical configuration of a wired LAN Typical configuration of a wireless LAN
Continued on next page

WLI-PCM User’s Manual10
ESS-ID
The ESS-ID is an identification code required for communication in a wireless
LAN.
The same ESS-ID must be set to the access point and the wireless LAN PC to
enable communication.
The ESS-ID is upper/lower case sensitive and can consist of up to
32 alphanumeric characters including the under bar (_). The factory default
ESS-ID for the WLI-PCM is "RoamLAN".
The factory default is effective when using the WLI-PCM in a network consist-
ing of only wireless LAN PC’s, however, this may allow unauthorized access
by an external computer equipped with the same model LAN card. We recom-
mend that you change the ESS-ID to your own personal ID.
DS channel
Select the DS channel from channels A, B, or C.
Selecting a channel sets the frequency used to transfer data.
The target access point and the wireless LAN PC must be set to the
same DS channel to enable access.

WLI-PCM User’s Manual 11
Features and operating environment of the WLI-PCM are described below.
■Features
The WLI-PCM is a wireless LAN card for use in computers equipped with a PC
card slot (type II).
The main features are listed below.
• 2.4 GHz low power data communication system (certification not required).
• Direct sequence spread spectrum (DS-SS) technology ensures high noise
resistance.
• Diversity antenna (2 built-in antennas, with data received by the more sensitive
of these).
• IEEE802.11 compliant, with a data rate of 2 Mbps even on a wireless LAN.
• Effective range of 150 ft indoors or 450 ft outdoors (may vary depending on
operating environment).
• ESS ID prevents unauthorized access.
Product outline
Continued on next page
WLI-PCM User’s Manual12
■Operating environment
IBM AT compatible computer equipped with a PC card slot (type II)
Operating system
Windows 98/95, WindowsNT4.0
* The ACPI feature in Windows98 is not supported.
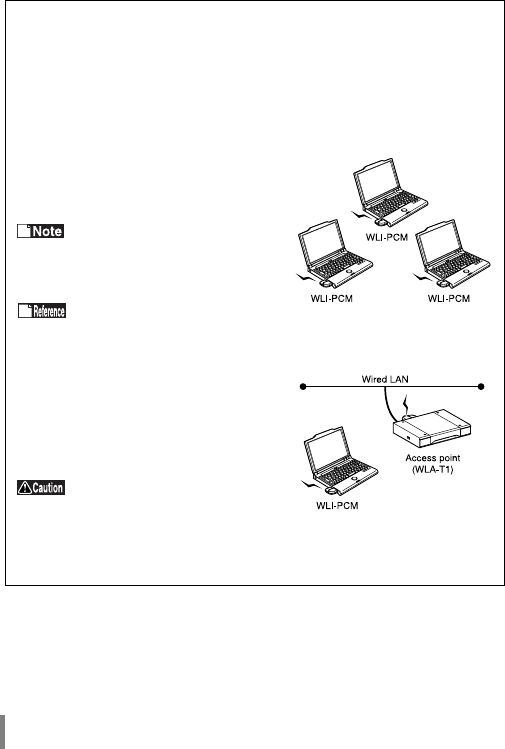
Wireless LAN network configuration
Network configurations for wireless LANs can be classified into two main
groups.
• Wireless LAN only network
• Wired and wireless LAN network
Typical configurations of each type are described below.
■Wireless LAN only network
One wireless LAN card is required for
each computer. All LAN cards must have
the same ESS-ID to enable communica-
tion.
The factory default ESS-ID can
be used, however, we recommend that
you change the default to ensure secu-
rity.
Refer to "ESS-ID" on page 10
for details.
■Wired and wireless LAN network
MELCO INC.’s access point WLA-T1
(provided separately) is required to con-
nect a wireless LAN to a wired LAN.
Computers on the wireless LAN commu-
nicate with those on the wired LAN via
the access point.
Access is only possible when
the wireless LAN is configured using
MELCO INC.’s wireless LAN products
(Access Point WLA-T1, Wireless LAN
ISA Bus Board WLI-ISA, and WLI-
PCM).
WLI-PCM User’s Manual 13
The items listed below are included in the package. Please check the package
and contact your nearest sales representative if any items are missing.
WLI-PCM ....................................................................................................... 1
LAN Card Utility for WLI-PCM disk (3.5" floppy disk)..................................... 1
User’s Manual (this manual) .......................................................................... 1
Be sure to read any additional information sheets provided in the pack-
age.
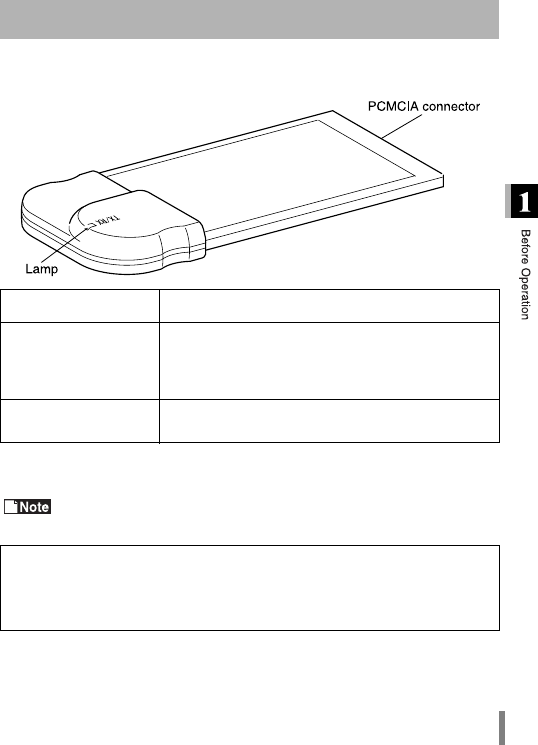
Contents of package and section names
Name Function
PCMCIA connector
Terminal connected to the PCMCIA slot of the com-
puter. Never touch the terminal with your bare
hands. Touching the terminal may cause a malfunc-
tion.
Lamp Lights green or red when sending or receiving data
respectively.
Disk back-up
Be sure to back-up the "LAN Card Utility for WLI-PCM" disk, and use the back-
up disk to install the utility.
WLI-PCM User’s Manual14
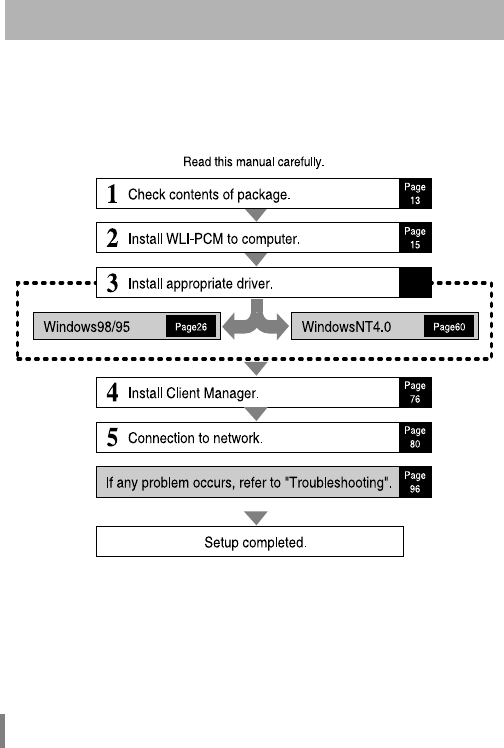
Follow the procedures below to connect the WLI-PCM. Read the entire operation
flow carefully and understand it before starting setup.
Setup flow
WLI-PCM User’s Manual 15
2Installation
This chapter describes the procedure to insert the WLI-PCM into
your computer. If you are using Windows98/95, check that the 32-
bit PC card driver is installed.
Drive configuration
Check the drive configuration of your computer before installing the
driver.
When using Windows98/95, go to "Before installing the WLI-PCM" on page 16.
When using WindowsNT4.0, go to "Installing the WLI-PCM" on page 21.
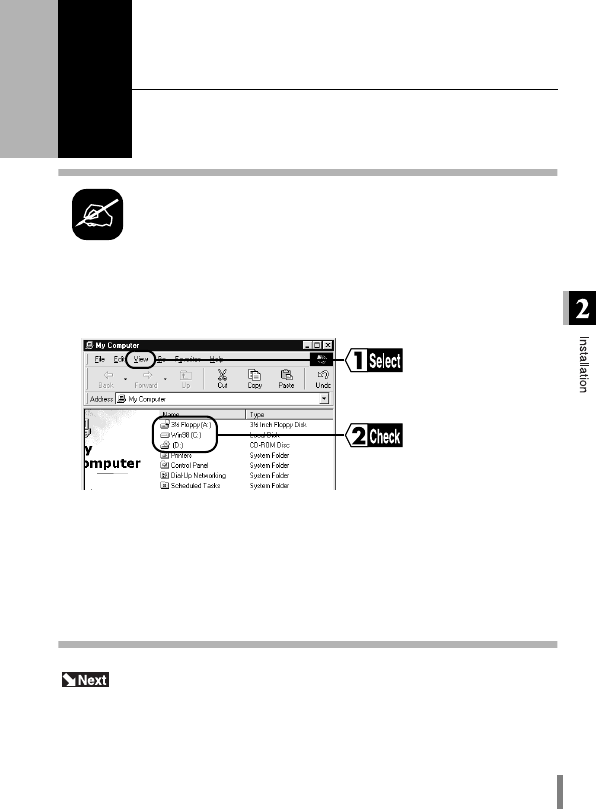
1Double-click the My Computer icon.
2Select View → Details.
Check the drive names listed in the window.
Note the drive names listed here. These will be
required in the following steps.
e.g.The drive configuration for the example screen
shown above
A: Floppy disk drive
C: Hard disk drive
D: CD-ROM drive
WLI-PCM User’s Manual16
When you are using Windows98/95, be sure to check that the 32-bit PC card
driver is correctly installed before inserting the WLI-PCM into the computer.
Checking 32-bit PC card driver
The 32-bit PC card driver must be installed in order to install the WLI-PCM driver.
Follow the procedure below to check that the 32-bit PC card driver is installed.
The procedure described below is for Windows98. Note that different windows
appear for Windows95.
Before installing the WLI-PCM
1Click the Start button and select Settings → Control Panel.
2Double-click the System icon.
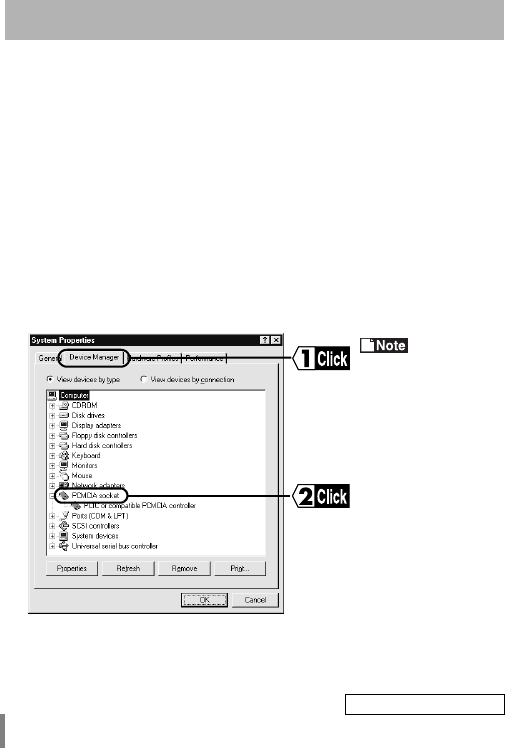
3Click the Device Manager tab and then the + mark on the left of "PCMCIA
socket".
The device
names listed for "PCM-
CIA socket" vary on
some computers.
Continued on next page
WLI-PCM User’s Manual 17
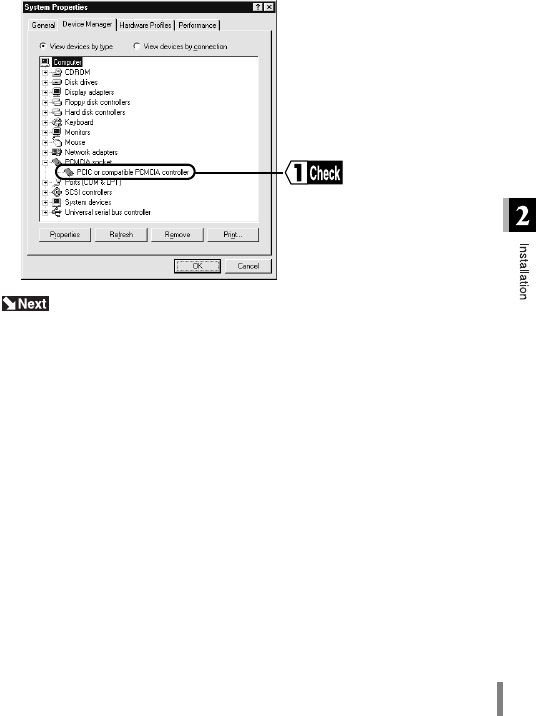
If an error mark is displayed, go to "Troubleshooting for PC card driver" on page
18.
If no error marks are displayed, go to "Installing the WLI-PCM" on page 21.
4Check that no marks indicating a problem ("!" or "X") are displayed for any of
the devices listed for "PCMCIA socket".
WLI-PCM User’s Manual18
Troubleshooting for PC card driver
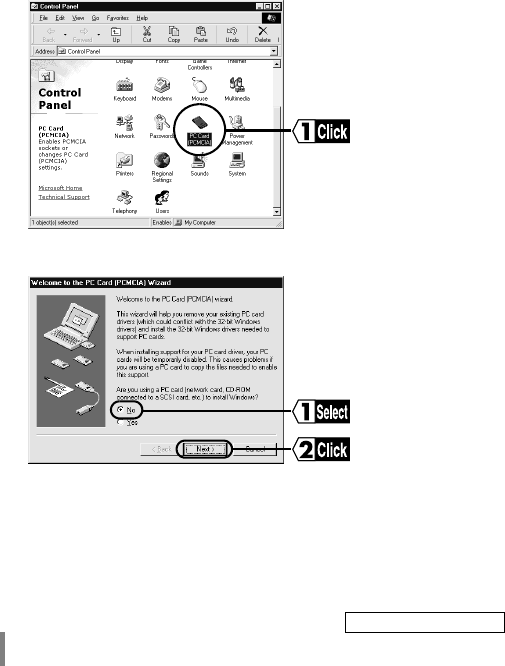
1If an error mark ("!" or "X") is displayed for any of the devices listed for "PCM-
CIA socket" in the "System Properties" dialog box, double-click the PC Card
icon in the Control Panel window.
2Select No and click the Next button.
Continued on next page
WLI-PCM User’s Manual 19
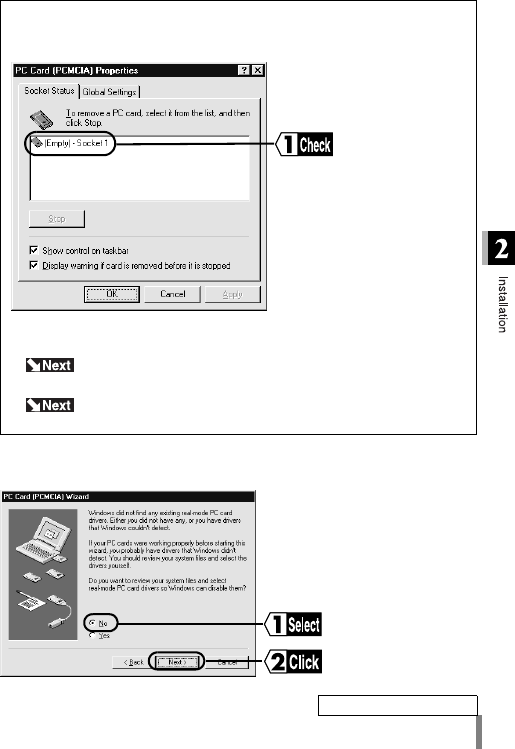
The following screen (PC Card (PCMCIA) Properties window) may
appear instead of the screen shown in step 2 (PC card (PCMCIA) Wiz-
ard). In this case, follow the steps below.
Check the status of the sockets.
• The "Empty" socket is available.
Go to "Installing the WLI-PCM" on page 21.
• Sockets without an "Empty" mark cannot be used.
Refer to the instruction manual for your computer or consult
the manufacturer.
3Select No and click the Next button.
Continued on next page
WLI-PCM User’s Manual20
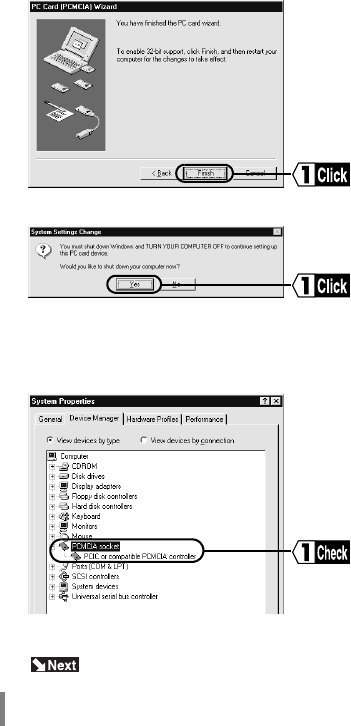
4Click the Finish button.
5Click the Yes button.
The 32-bit card driver can be installed after the com-
puter is restarted.
6Check the PC card driver, following the steps described in "Checking 32-bit
PC card driver" on page 16.
If the PC card driver cannot be installed, refer to the instruction manual for
your computer or consult the manufacturer.
Go to "Installing the WLI-PCM" on page 21.

WLI-PCM User’s Manual 21
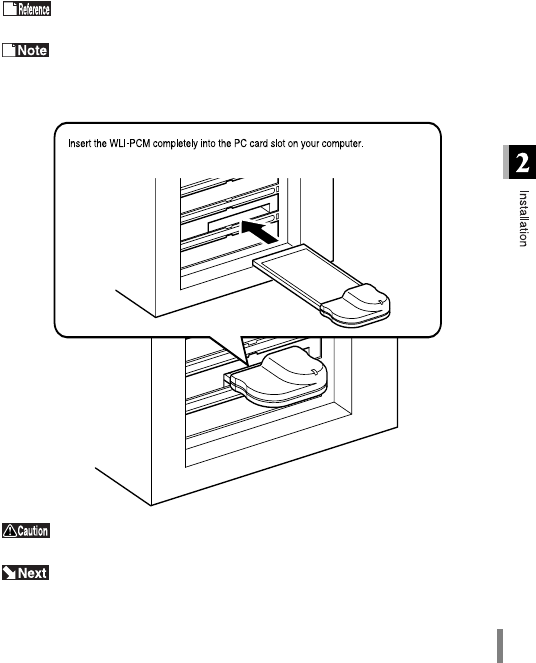
The installation position varies depending on the model of your computer. Be
sure to refer to the manual provided by the manufacturer
■Precautions before installing the LAN card
If your computer is equipped with a power management function that automati-
cally cuts power supply to the computer when it is left idle for a certain period,
turn the function off. The WLI-PCM cannot be used if the power management
function starts.
Refer to the manual provided for the computer for details on the power
management function.
■Precautions when installing the LAN card
• Be sure to follow the handling instructions in the manuals provided with your
computer and peripheral equipment.
• Remove dust from connectors.
• Never touch the connectors of the WLI-PCM.
• Carefully check the direction of the connectors when installing the WLI-PCM to
your computer. The connector may be damaged if it is forced.
■Precautions when removing the LAN card
The LAN card can be inserted and removed with the computer turned on, pro-
vided Windows98/95 is running. Refer to "Removing the WLI-PCM" on page 47.
When installing the WLI-PCM to a notebook computer, go to "Installa-
tion to a notebook computer" on page 22.
Installing the WLI-PCM

WLI-PCM User’s Manual22
Installation to a notebook computer
Follow the steps below when installing the WLI-PCM to a notebook computer.
When using Windows98/95, the WLI-PCM can be installed and
removed with the computer turned on. However, be sure to turn the computer off
when using WindowsNT4.0.
When using Windows98/95, go to "Windows98/95 Settings" on page 24.
When using WindowsNT4.0, go to "WindowsNT4.0 Settings" on page 60.
When your computer is equipped with two card slots
As the WLI-PCM has a protruding section for the built-in antenna, the upper
slot may be blocked when the lower one is occupied with the WLI-PCM. Place
the WLI-PCM in the upper slot.
WLI-PCM User’s Manual 23
Installation to a desktop computer
(when using WLI-ISA)
The PCMCIA/ISA board included with the WLI-ISA must be installed in a desktop
computer before installing the WLI-PCM.
Refer to "WLI-ISA Install Guide" included with the WLI-ISA for installa-
tion procedures for the PCMCIA/ISA board.
When using Windows98/95, the WLI-PCM can be installed and
removed with the computer turned on. However, be sure to turn the computer off
when using WindowsNT4.0.
Refer to the illustration below to install the WLI-PCM to a desktop computer.
Avoid any impact or force on the antenna section. This may affect
operation of the WLI-PCM.
When using Windows98/95, go to "Windows98/95 Settings" on page 24.
When using WindowsNT4.0, go to "WindowsNT4.0 Settings" on page 60.
WLI-PCM User’s Manual24
3
Windows98/95 Settings
This chapter describes the setting procedures for the WLI-PCM
when using Windows98/95.
Be sure to check that the WLI-PCM is inserted correctly before
installing the driver.
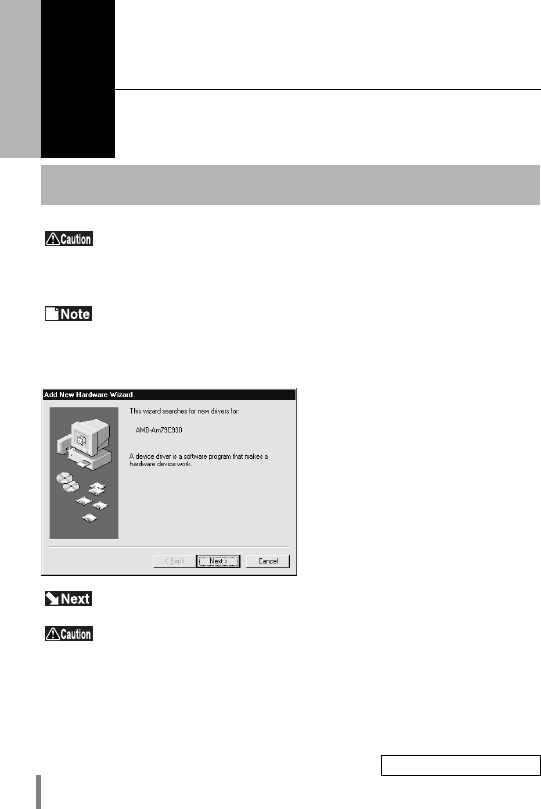
The following window appears when the WLI-PCM is inserted correctly.
Turn the computer on if it is off.
Windows98
The Add New Hardware Wizard appears on the screen.
Go to "Windows98" on page 26.
If the above wizard does not appear, refer to "Add New Hardware
Wizard does not appear when the WLI-PCM is inserted (Windows98/95). Or,
an error mark "!" appears next to "MELCO WLI-PCM 802.11 Network
Adapter"." on page 100.
Check before installation
Continued on next page
WLI-PCM User’s Manual 25
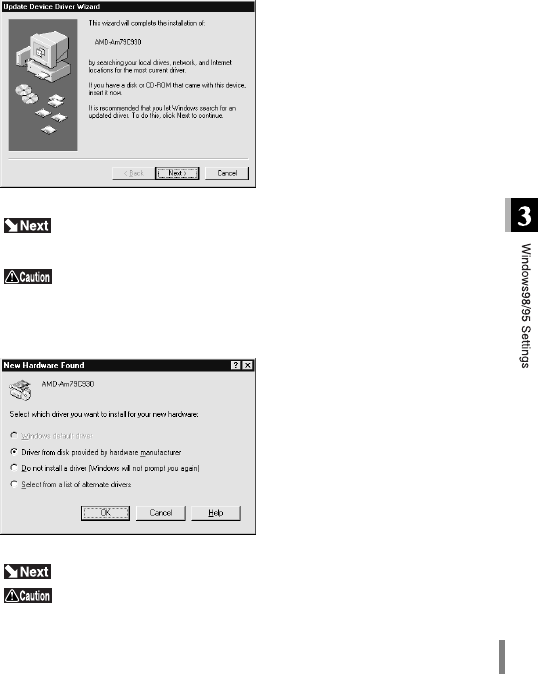
Windows95
Different screens may appear depending on the version of Windows95.
Work through the wizard windows displayed when Windows95 starts.
When Update Device Driver Wizard appears
The above window appears for version "4.00.950 B" or "4.00.950 C".
Go to "When using Windows95 version 4.00.950 B or 4.00.950 C" on
page 31.
If the above wizard does not appear, refer to "Add New Hardware
Wizard does not appear when the WLI-PCM is inserted (Windows98/95). Or,
an error mark "!" appears next to "MELCO WLI-PCM 802.11 Network
Adapter"." on page 100.
When New Hardware Found window appears
The above window appears for version "4.00.950" or "4.00.950a".
Go to "When using Windows95 version 4.00.950 or 4.00.950a" on page 36.
If the above wizard does not appear, refer to "Add New Hardware Wizard
does not appear when the WLI-PCM is inserted (Windows98/95). Or, an error mark
"!" appears next to "MELCO WLI-PCM 802.11 Network Adapter"." on page 100.
WLI-PCM User’s Manual26
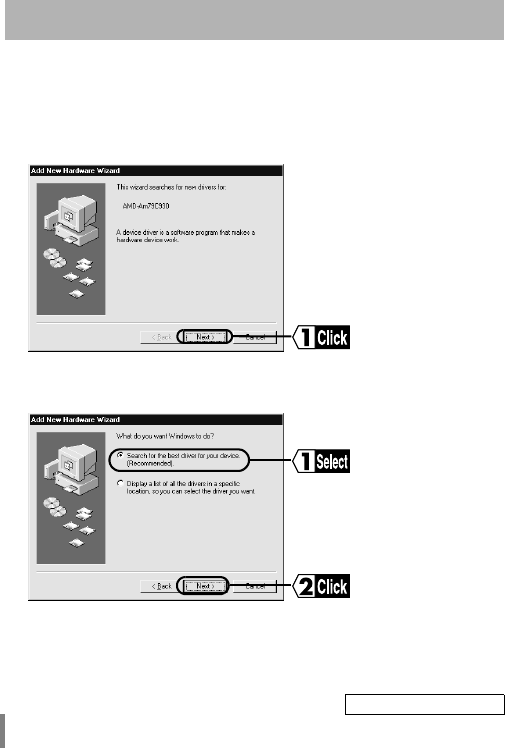
Work through the messages displayed by the Add New Hardware Wizard (page
24) to install the driver.
Windows98
Driver installation
1Click the Next button.
2Select "Search for the best driver for your device. (Recommended)." and click
the Next button.
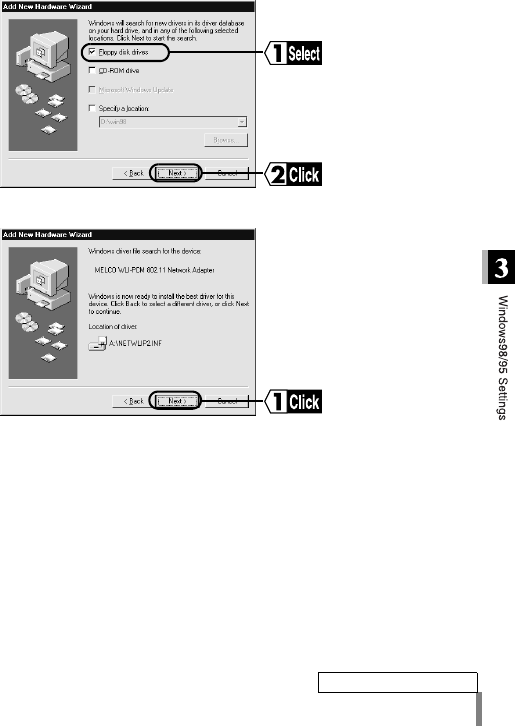
3Insert the “LAN Card Utility for WLI-PCM” disk into the floppy disk drive.
Continued on next page
WLI-PCM User’s Manual 27
4Select "Floppy disk drives" and click the Next button.
5Click the Next button.
Continued on next page
WLI-PCM User’s Manual28
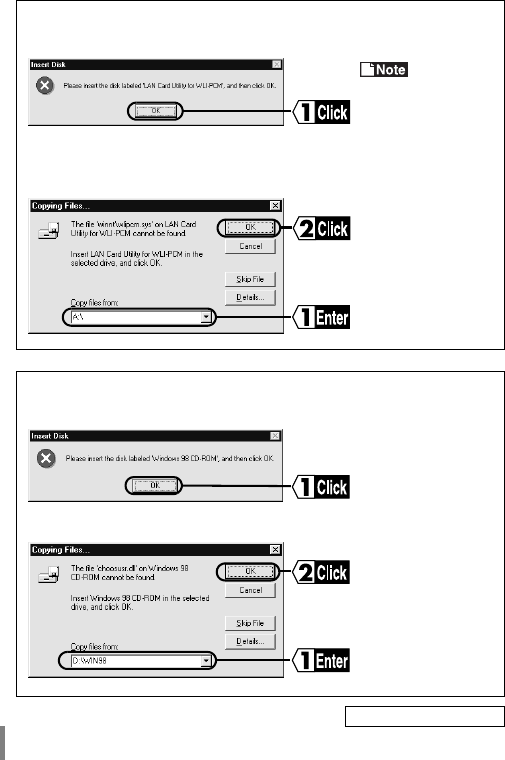
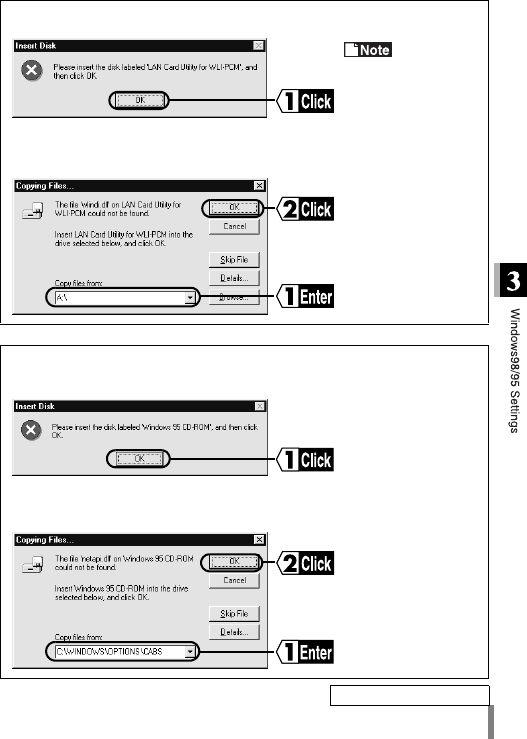
Follow the steps below if requested to insert the “LAN Card Utility for WLI-
PCM” disk.
Click the OK button.
The error
message "The file
winnt\wlipcm.sys’ on
LAN Card Utility for
WLI-PCM cannot be
found" appears.
Change "C:\WINDOWS\CATROOT" shown in the "Copy files from:" field to
"A:\" (when the floppy disk drive is "A") and click the OK button.
A window prompting you to insert the Windows98 CD-ROM may appear.
Follow the steps below before proceeding to step 6.
Set the Windows98 CD-ROM in the CD-ROM drive and click the OK button.
Enter "D:\WIN98" (when CD-ROM drive is "D") and click the OK button.
Continued on next page
WLI-PCM User’s Manual 29
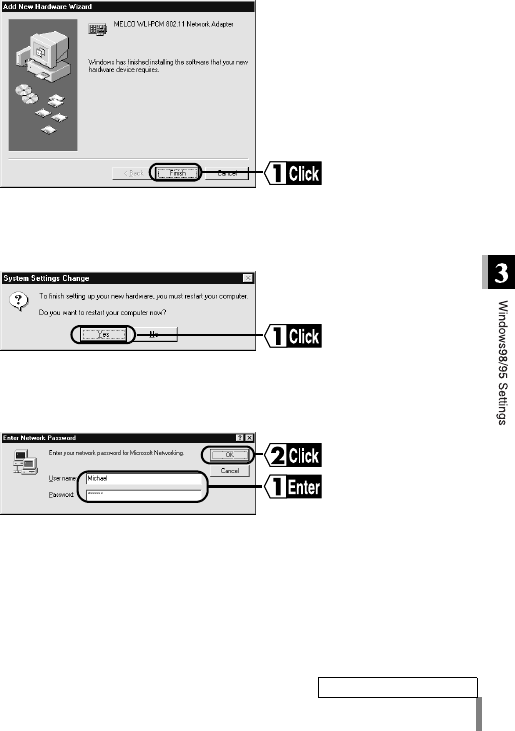
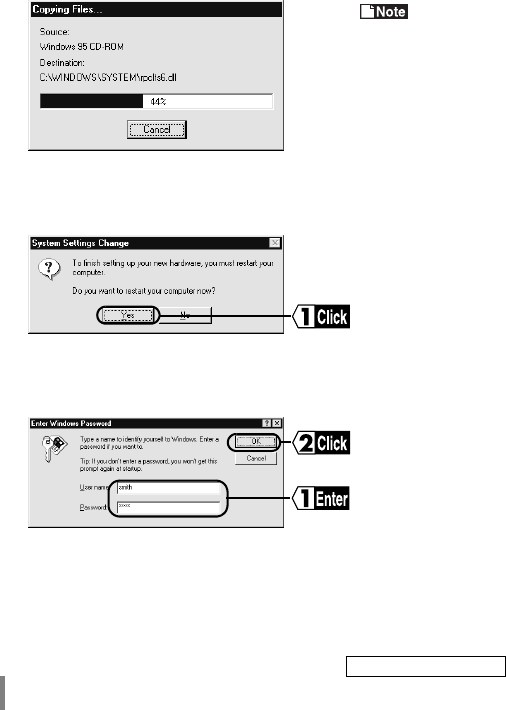
6Click the Finish button.
7Eject the “LAN Card Utility for WLI-PCM” disk from the floppy disk drive.
8Click the Yes button.
9The computer restarts.
10
Enter your user name and password, and click the OK button.
This completes driver installation.
Check that the WLI-PCM is operating correctly.
Continued on next page

WLI-PCM User’s Manual30
If the error message "The DHCP client could not obtain an IP address"
appears, consult the network administrator and set the IP address.
Go to "When using Windows98 or Windows95 version 4.00.950 B /
4.00.950 C" on page 40.
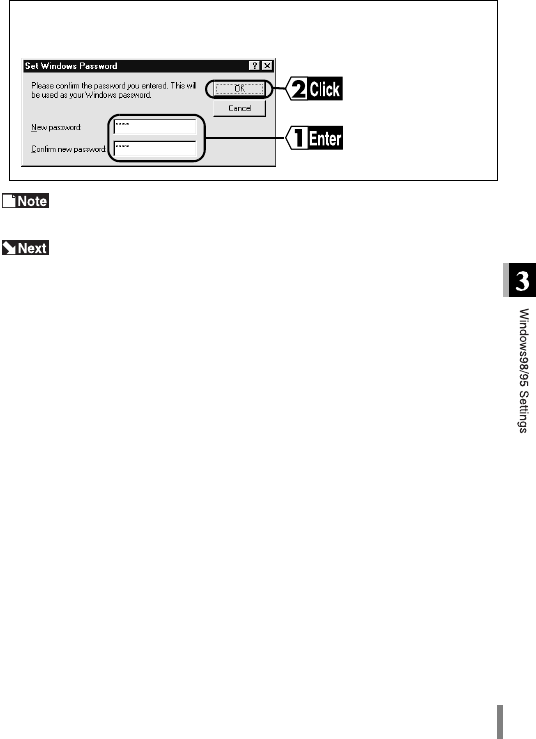
The Set Windows Password window may appear when you click the OK
button on the Enter Windows Password window.
If it does, enter the password again and click the OK button.
WLI-PCM User’s Manual 31
When using Windows95 version
4.00.950 B or 4.00.950 C
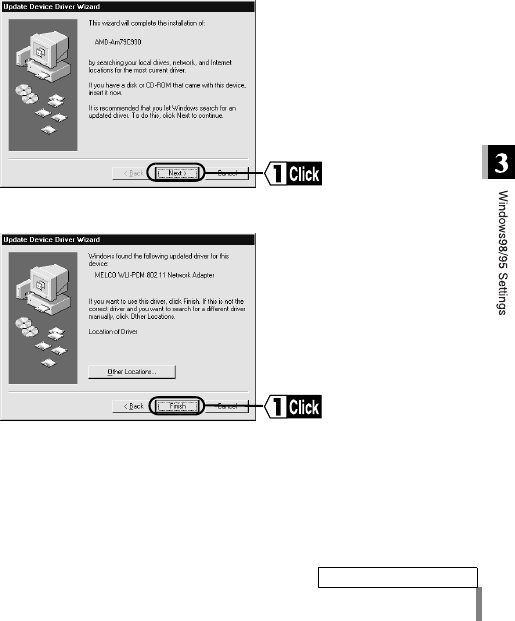
1Insert the “LAN Card Utility for WLI-PCM” disk into the floppy disk drive.
2Click the Next button.
3Click the Finish button.
Continued on next page
WLI-PCM User’s Manual32
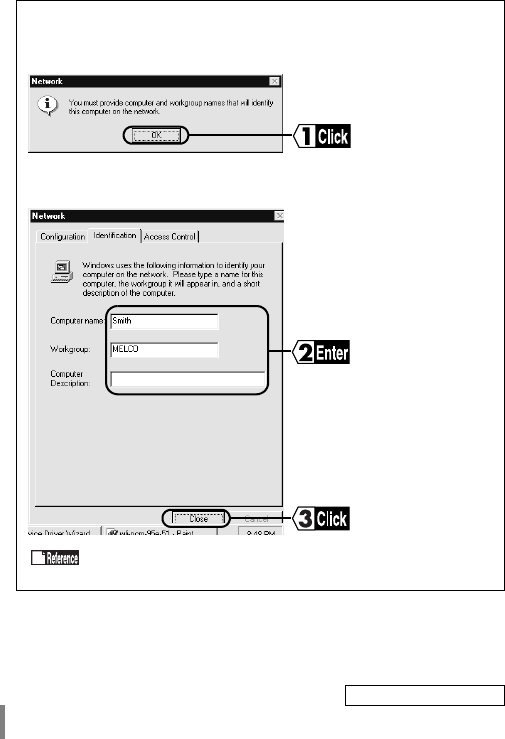
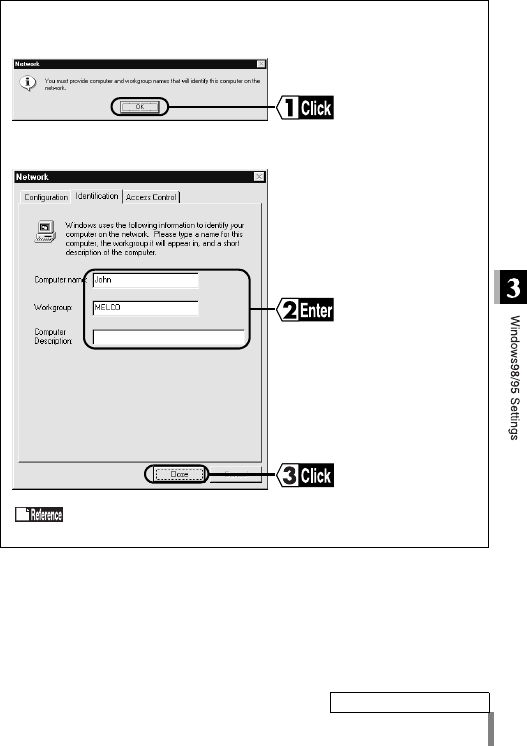
The following Network window may appear when you click the Finish but-
ton.
Follow the steps below before proceeding to step 4.
Click the OK button.
Enter the Computer name, Workgroup, and Computer Description, and
click the Close button.
Refer to "Identification window of Windows98/95" on page 121,
for details of the computer name, workgroup, and computer description
Continued on next page
WLI-PCM User’s Manual 33
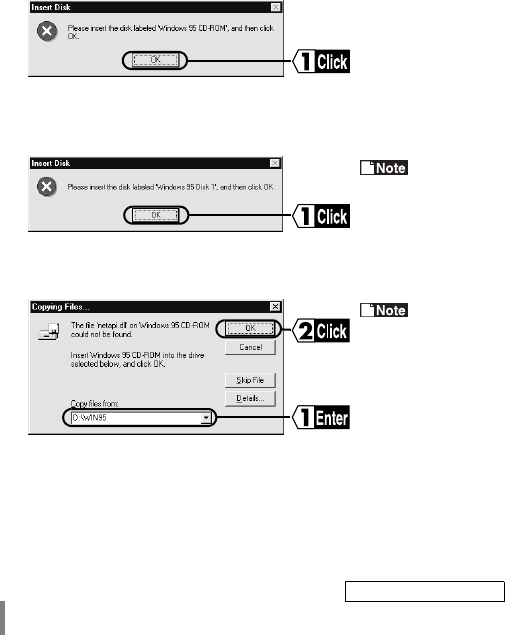
Follow the steps below if requested to insert the “LAN Card Utility for WLI-
PCM” disk.
The error
message "The file
winnt\wlipcm.sys’ on
LAN Card Utility for
WLI-PCM cannot be
found" appears.
Change "C:\WINDOWS\OPTIONS\CABS" shown in the "Copy files from:"
field to "A:\" (when the floppy disk drive is "A") and click the OK button.
A screen prompting you to insert the Windows95 CD-ROM may appear.
Follow the steps below before proceeding to step 4.
Set the Windows95 CD-ROM in the CD-ROM drive and click the OK button.
Change "A:\" shown in the "Copy files from:" field to "C:\WIN-
DOWS\OPTIONS\CABS" (when Windows95 is installed on "C") and click
the OK button.
Continued on next page
WLI-PCM User’s Manual34
4Files are copied.
Dialog boxes
may appear to notify
you of the version of the
files being copied.
Click the Yes button to
use the existing file.
5Eject the “LAN Card Utility for WLI-PCM” disk from the floppy disk drive.
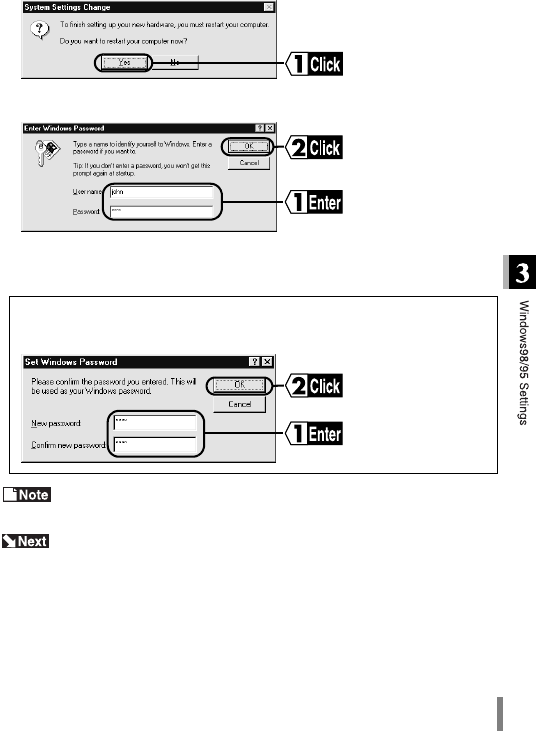
6Click the Yes button.
7Windows95 restarts.
8Enter your user name and password, and click the OK button.
This completes driver installation.
Check that the WLI-PCM is operating correctly.
Continued on next page
WLI-PCM User’s Manual 35
If the error message "The DHCP client could not obtain an IP address"
appears, consult the network administrator and set the IP address.
Go to "When using Windows98 or Windows95 version 4.00.950 B /
4.00.950 C" on page 40.
The Set Windows Password window may appear when you click the OK
button on the Enter Windows Password window.
If it does, enter the password again and click the OK button.
WLI-PCM User’s Manual36
When using Windows95 version
4.00.950 or 4.00.950a
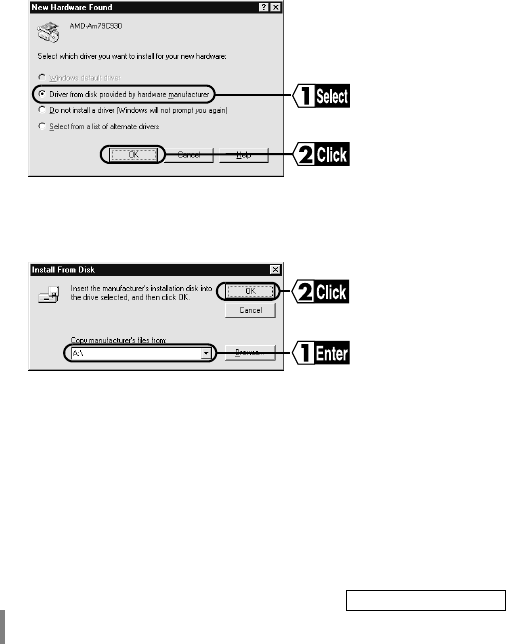
1Select "Driver from disk provided by hardware manufacturer" and click the
OK button.
2Insert the “LAN Card Utility for WLI-PCM” disk into the floppy disk driver.
3Enter "A:\" (when floppy disk drive is "A") and click the OK button.
Continued on next page
WLI-PCM User’s Manual 37
The following Network window may appear when you click the OK button.
Follow the steps below before proceeding to step 4.
Click the OK button.
Enter the Computer name, Workgroup, and Computer Description, and
click the Close button.
Refer to "Identification window of Windows98/95" on page 121,
for details of the computer name, workgroup, and computer description.
Continued on next page
WLI-PCM User’s Manual38
4A message prompting you to insert the Windows95 CD-ROM or floppy disk
appears.
CD-ROM
Insert the Windows95 CD-ROM into the CD-ROM drive and click the OK but-
ton.
Floppy disk
Insert the designated floppy disk into the floppy disk drive and click the OK
button.
Insert the
appropriate floppy disk
as instructed by each
screen.
5Change "A:\" shown in the "Copy files from:" field to "D:\WIN95" (when the
CD-ROM drive is "D") and click the OK button.
If Windows95 is
pre-installed and the com-
puter does not have a CD-
ROM drive, enter "C:\WIN-
DOWS\OPTIONS\CABS"
(when Windows95 is
installed on the C drive).
6Eject the “LAN Card Utility for WLI-PCM” disk from the floppy disk drive.
Continued on next page
WLI-PCM User’s Manual 39
If the error message "The DHCP client could not obtain an IP address"
appears, consult the network administrator and set the IP address.
Go to "When using Windows95 version 4.00.950 or 4.00.950a" on page 36.
7Click the Yes button and restart Windows95.
8Enter your user name and password, and click the OK button.
This completes driver installation.
Check that the WLI-PCM is operating correctly.
The Set Windows Password window may appear when you click the OK
button on the Enter Windows Password window.
If it does, enter the password again and click the OK button.
WLI-PCM User’s Manual40
After installing the driver, follow the steps below to check that the WLI-PCM is
operating correctly.
Different screens may appear after installation depending on the ver-
sion of Windows95.
When using Windows98 or Windows95
version 4.00.950 B / 4.00.950 C
Checking after installation
1Click the Start button and select Settings → Control Panel.
2Double-click the System icon.
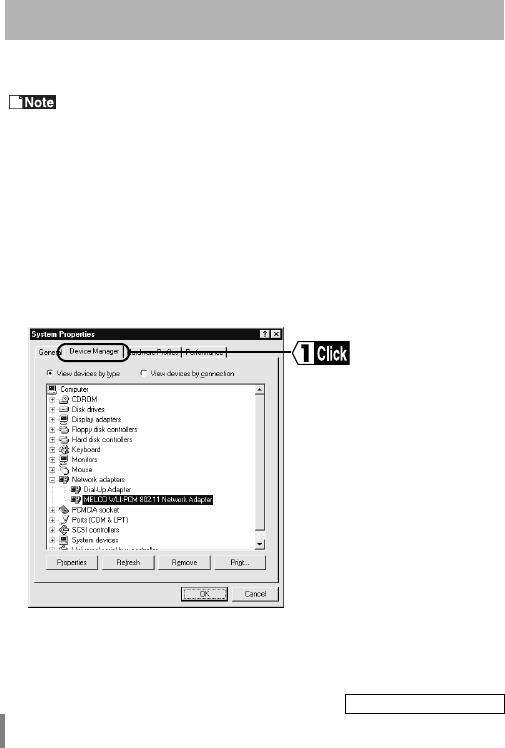
3Click the Device Manager tab.
Continued on next page
WLI-PCM User’s Manual 41
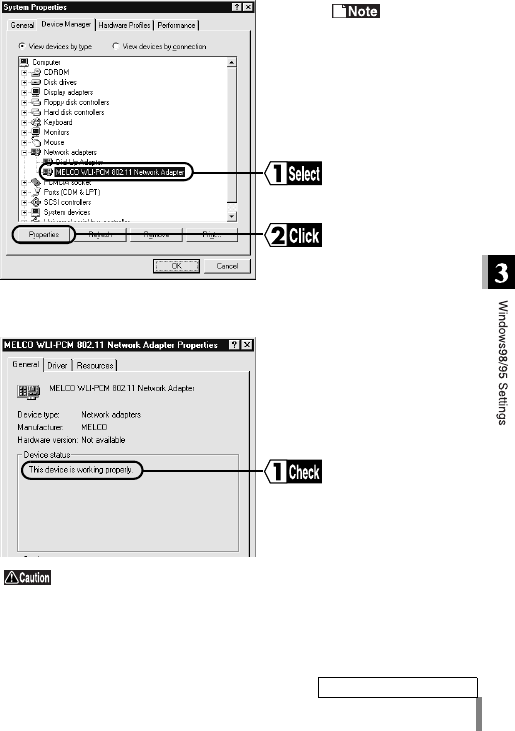
4
Select "MELCO WLI-PCM 802.11 Network Adapter" and click the Properties button.
• If "MELCO WLI-PCM
802.11 Network
Adapter" is not listed,
click the + mark on
the left of "Network
adapters".
• "PCMCIA card ser-
vice" may be included
in "Other devices",
however, this does
not imply any prob-
lem.
5Check that the message "This device is working properly" is displayed for
Device status.
If the above message is not displayed, the WLI-PCM is not
operating correctly. Uninstall and re-install the driver, referring to "Add
New Hardware Wizard does not appear when the WLI-PCM is inserted
(Windows98/95). Or, an error mark "!" appears next to "MELCO WLI-
PCM 802.11 Network Adapter"." on page 100.
Continued on next page
WLI-PCM User’s Manual42
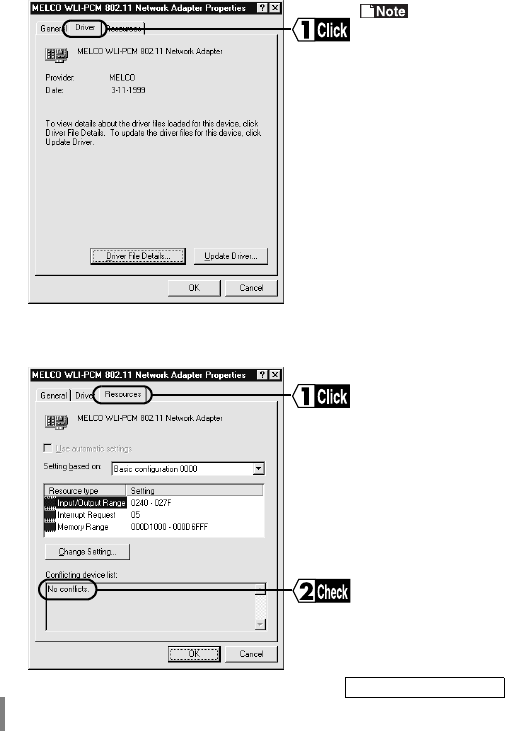
6Click the Driver tab.
When using
Windows95, the mes-
sage "The driver file is
not required or installed
for this device"
appears. However, this
does not imply any
problem.
7Click the Resource tab and check that "No conflicts." is displayed in the Con-
flicting device list.
Continued on next page
WLI-PCM User’s Manual 43
When the WLI-PCM is operating correctly, go to "Preparing for connection to net-
work" on page 49.
When the WLI-PCM is not operating correctly, go to "Add New Hardware Wizard
does not appear when the WLI-PCM is inserted (Windows98/95). Or, an error
mark "!" appears next to "MELCO WLI-PCM 802.11 Network Adapter"." on page
100.
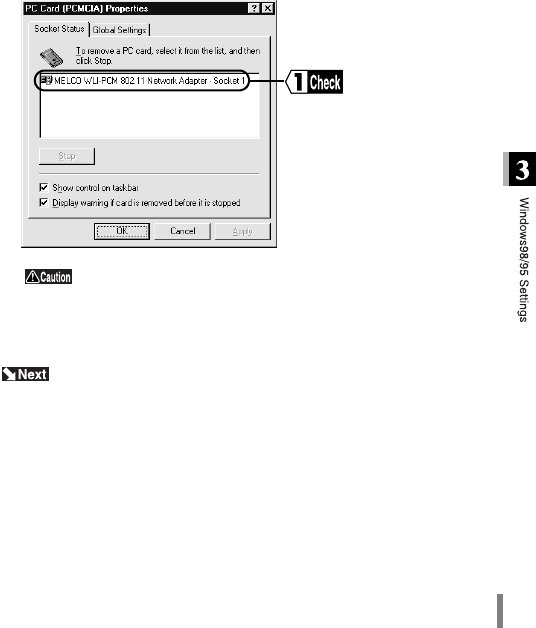
8Click the Start button and select Settings → Control Panel.
9Double-click the PC Card (PCMCIA) icon.
10
Check that "MELCO WLI-PCM 802.11 Network Adapter" is displayed for
Socket Status.
When the above message does not appear, the WLI-PCM is not
operating correctly. Refer to "Add New Hardware Wizard does not
appear when the WLI-PCM is inserted (Windows98/95). Or, an error mark
"!" appears next to "MELCO WLI-PCM 802.11 Network Adapter"." on
page 100.

WLI-PCM User’s Manual44
When using Windows95 version
4.00.950 or 4.00.950a
1Click the Start button and select Settings → Control Panel.
2Double-click the System icon.
3Click the Device Manager tab.
4Select "MELCO WLI-PCM 802.11 Network Adapter" and click the Properties
button.
If "MELCO
WLI-PCM 802.11 Net-
work Adapter" is not
listed, click the + mark
on the left of "Network
adapters".
Continued on next page

WLI-PCM User’s Manual 45
5Check that the message "This device is working properly" is displayed for
Device status.
If the above message is not displayed, the WLI-PCM is not
operating correctly. Uninstall and re-install the driver, referring to "Add
New Hardware Wizard does not appear when the WLI-PCM is inserted
(Windows98/95). Or, an error mark "!" appears next to "MELCO WLI-
PCM 802.11 Network Adapter"." on page 100.
6Click the Resources tab.
Check that "No conflicts." is displayed in the Conflicting device list.
Continued on next page
WLI-PCM User’s Manual46
When the WLI-PCM is operating correctly, go to "Preparing for connection to net-
work" on page 49.
When the WLI-PCM is not operating correctly, go to "Add New Hardware Wizard
does not appear when the WLI-PCM is inserted (Windows98/95). Or, an error
mark "!" appears next to "MELCO WLI-PCM 802.11 Network Adapter"." on page
100.
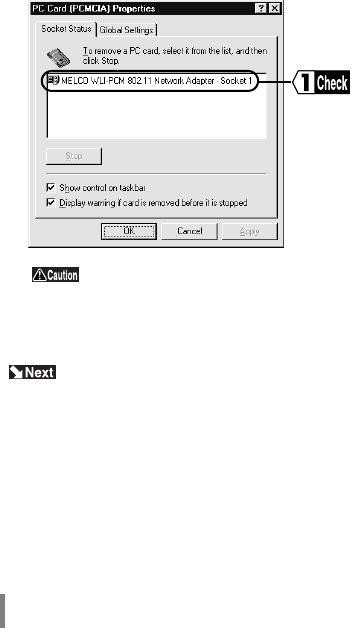
7Click the Start button and select Settings → Control Panel.
8Double-click the PC Card (PCMCIA) icon.
9Check that "MELCO WLI-PCM 802.11 Network Adapter" is displayed for
Socket Status.
When the above message does not appear, the WLI-PCM is not
operating correctly. Uninstall and re-install the driver, referring to "Add
New Hardware Wizard does not appear when the WLI-PCM is inserted
(Windows98/95). Or, an error mark "!" appears next to "MELCO WLI-
PCM 802.11 Network Adapter"." on page 100.
WLI-PCM User’s Manual 47
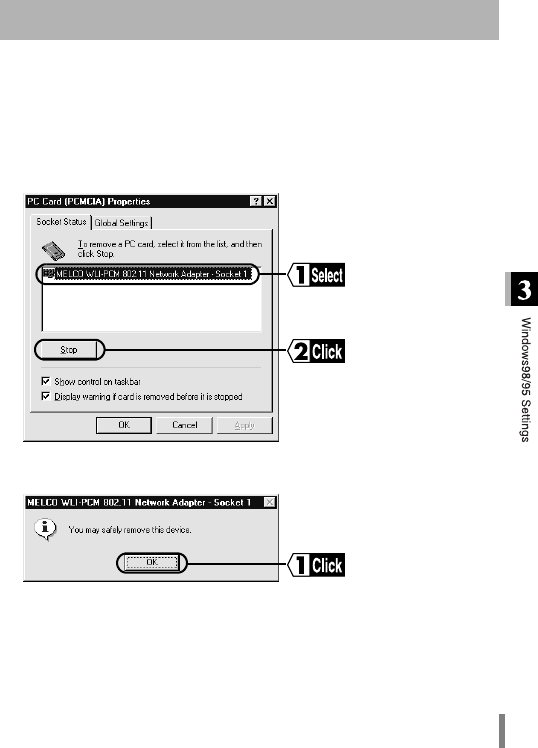
Follow the steps below to remove the WLI-PCM while Windows98/95 is running.
Removing the WLI-PCM
1Click the Start button and select Settings → Control Panel.
2Double-click the PC Card (PCMCIA) icon.
3Select "MELCO WLI-PCM 802.11 Network Adapter" and click the Stop
(Windows98) or Finish (Windows95) button.
4When the following dialog box appears, click the OK button.
5Remove the WLI-PCM.
WLI-PCM User’s Manual48
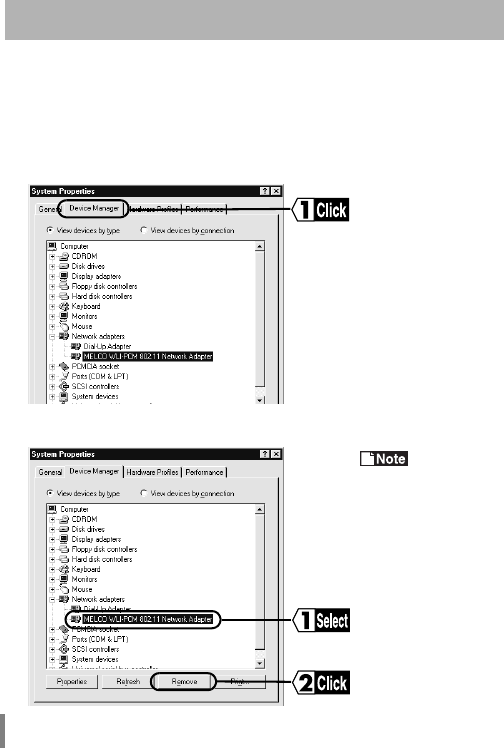
Follow the steps below to uninstall the driver.
Uninstalling the driver
1Click the Start button and select Settings → Control Panel.
2Double-click the System icon.
3Click the Device Manager tab.
4Select "MELCO WLI-PCM 802.11 Network Adapter" and click the Remove
button.
If "MELCO
WLI-PCM 802.11 Net-
work Adapter" is not
listed, click the + mark
on the left of "Network
adapters".
WLI-PCM User’s Manual 49
After checking that the WLI-PCM is operating correctly, you can try connecting to
the network. Refer to the procedure below to make the required settings for the
computer to be connected. Screens from Windows98 are used in this example.
Refer to the manual provided for Windows98/95 for details.
The following is required for all computers.
• Check NetBEUI, TCP/IP, and Microsoft Network Client
• Add File and printer sharing for Microsoft Networks
• Check computer name and workgroup name
• Set sharing
• TCP/IP setting
Checking NetBEUI, TCP/IP, and
Microsoft Network Client
Preparing for connection to network
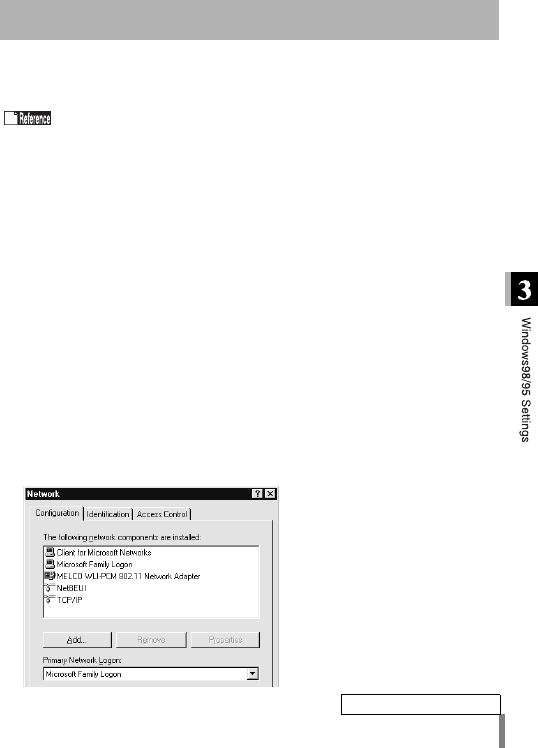
1Click the Start button and select Settings → Control Panel.
2Double-click the Network icon.
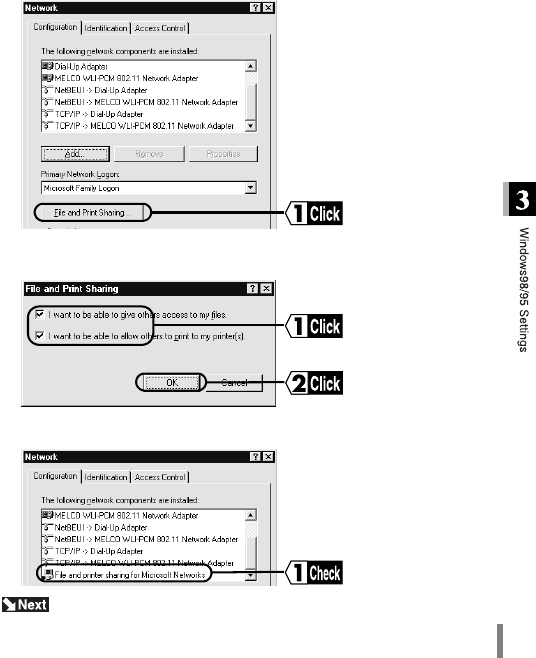
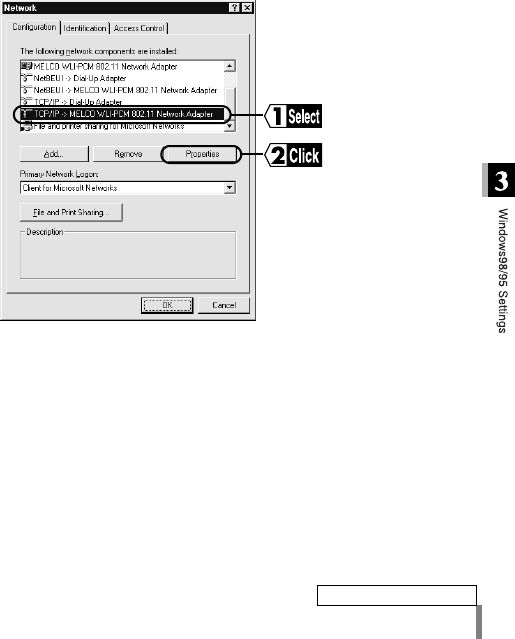
3Check that "NetBEUI", "TCP/IP", and "Microsoft Network Client" are listed in
"The following network components are installed:". When using Windows98,
check that "Microsoft Network Client" is selected for Primary Network Logon.
■If the only network adapter is the WLI-PCM
Continued on next page
WLI-PCM User’s Manual50
When the network adapters are not listed as shown above
add Microsoft Network Client, NetBEUI, and TCP/IP, referring to "Adding
Microsoft Network Client (page 57)", "Adding NetBEUI (page 58), and "Add-
ing TCP/IP (page 59).
Go to "Adding File and printer sharing for Microsoft Networks" on page 51.
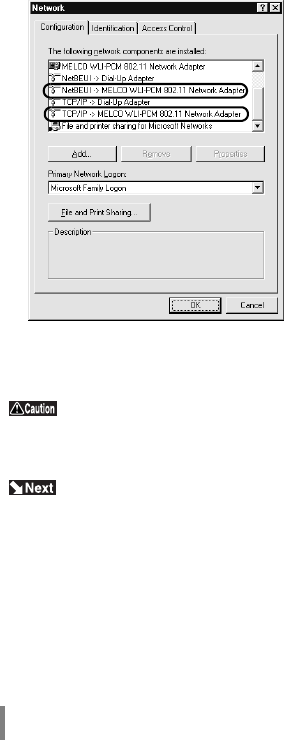
■If multiple network adapters are installed
"NetBEUI -> MELCO WLI-PCM 802.11 Network Adapter" and "TCP/IP ->
MELCO WLI-PCM 802.11 Network Adapter" appear in "The following network
components are installed:". However, this does not imply any problem.
WLI-PCM User’s Manual 51
Adding File and printer sharing for
Microsoft Networks
Go to "Checking computer name and workgroup name" on page 52.
1Click the File and Print Sharing... button.
2Check "I want to be able to give others access to my files" and "I want to be
able to allow others to print to my printer(s)", and click the OK button.
3File and printer sharing for Microsoft Networks is added.
WLI-PCM User’s Manual52
Checking computer name and work-
group name
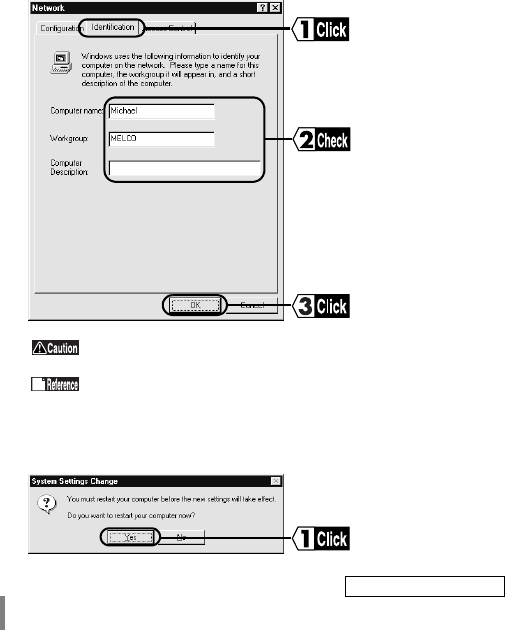
1Click the Identification tab (Windows98) or User Information tab
(Windows95). Check the Computer name, Workgroup, and Computer
Description, and click the OK button.
The same workgroup must be assigned to all the computers
included in the network.
Refer to "Identification window of Windows98/95" on page 121, for
details of the computer name, workgroup, and computer description.
2Click the Yes button to restart Windows98/95. The Enter Network Password
window appears.
Continued on next page
WLI-PCM User’s Manual 53
Go to "Sharing settings" below.
Sharing settings
Make settings for sharing drives and folders. The example here describes the
procedure for sharing the C drive in My Computer.
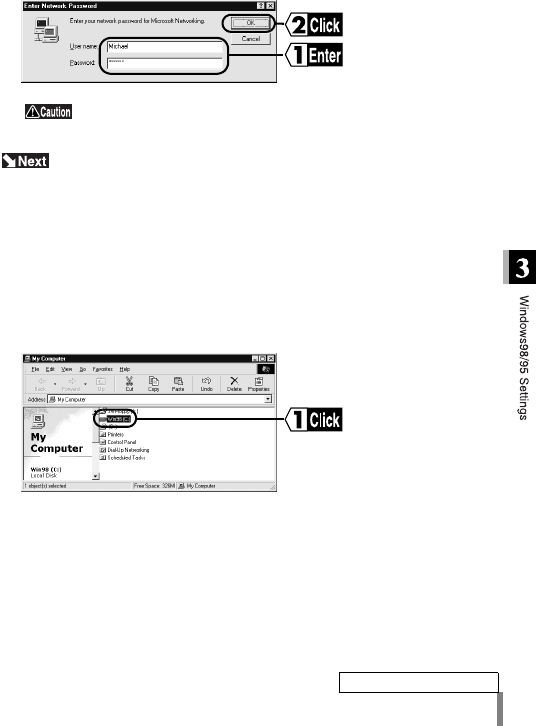
3Enter your user name and password, and click the OK button.
Be sure to enter your user name and password whenever this
window appears, or you will not be able to access the network.
1Double-click the My Computer icon on the desk top.
2Click the icon for the C drive with the right mouse button and select Sharing.
Continued on next page
WLI-PCM User’s Manual54
Go to "Setting TCP/IP" on page 55.
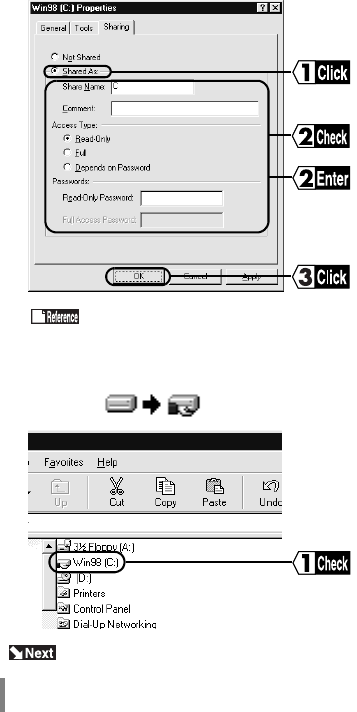
3Select "Shared As:", and check or change Shared Name, Comment, Access
Type, and Password. Click the OK button.
Refer to "Sharing in Windows98/95" on page 120, for details of
Shared Name, Comment, Access Type, and Password.
4The icon for the C drive changes as shown below.
WLI-PCM User’s Manual 55
Setting TCP/IP
1Click the Start button and select Settings → Control Panel.
2Double-click the Network icon.
3Select "TCP/IP" and click the Properties button.
Continued on next page
WLI-PCM User’s Manual56
Go to "Installing Client Manager" on page 79.
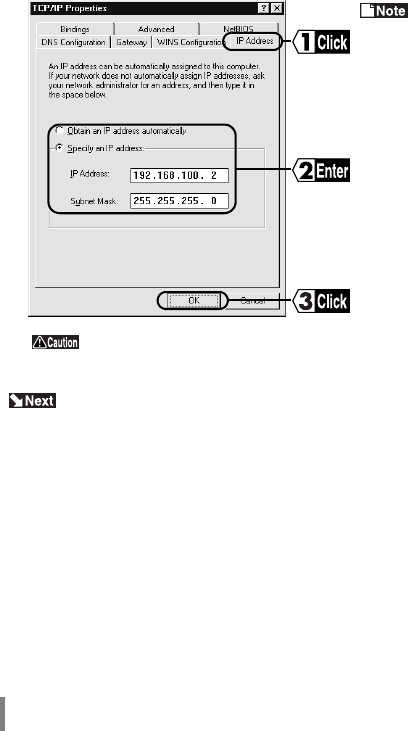
4Click the IP address tab. Set the IP address and click the OK button.
Refer to
"Assign IP address" on
page 115 for IP address
settings.
Contact the network administrator and check the IP address.
Windows98/95 restarts and TCP/IP settings are completed.
WLI-PCM User’s Manual 57
Adding Microsoft Network Client
Go to "Checking NetBEUI, TCP/IP, and Microsoft Network Client" on
page 49.
1Click the Start button and select Settings → Control Panel.
2Double-click the Network icon.
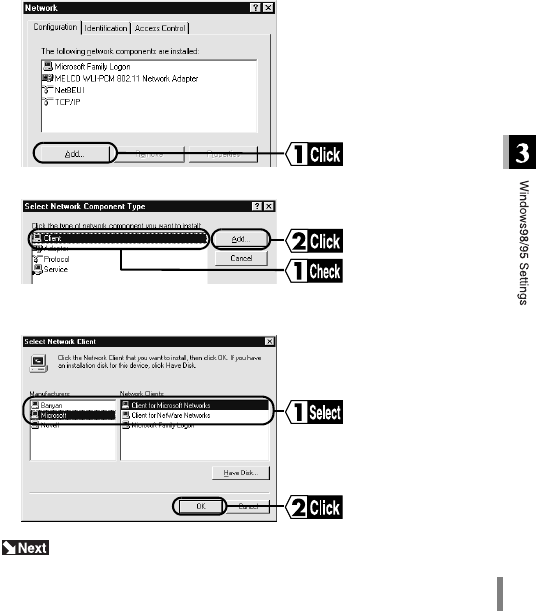
3Click the Add button.
4Select "Client" and click the Add button.
5Select "Microsoft" for Manufacturer and "Microsoft Network Client" for Net-
work Clients, and click the OK button to return to the Network screen (step 3).
WLI-PCM User’s Manual58
Adding NetBEUI
Go to "Checking NetBEUI, TCP/IP, and Microsoft Network Client" on
page 49.
1Click the Start button and select Settings → Control Panel.
2Double-click the Network icon.
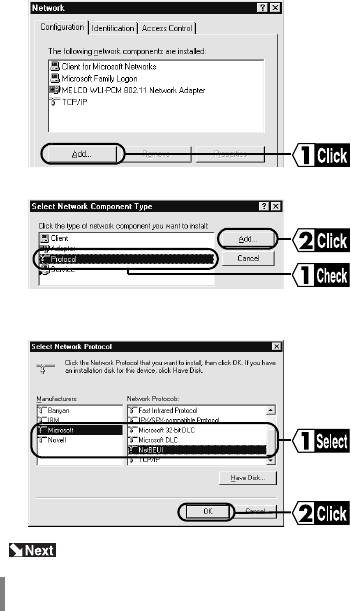
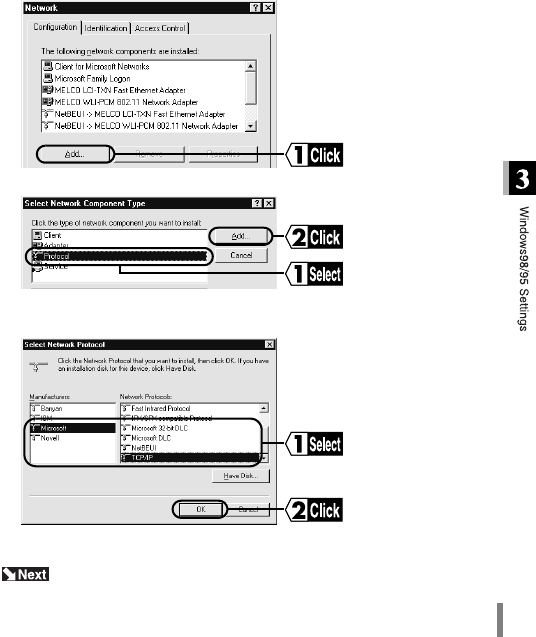
3Click the Add button.
4Select "Protocol" and click the Add button.
5Select "Microsoft" for Manufacturer and "NetBEUI" for Network Clients, and
click the OK button to return to the Network screen (step 3).
WLI-PCM User’s Manual 59
Adding TCP/IP
Follow the steps below when TCP/IP is not already on your computer.
Go to "Checking NetBEUI, TCP/IP, and Microsoft Network Client" on
page 49.
1Click the Start button and select Settings → Control Panel → Network.
2Click the Add button.
3Select "Protocol" and click the Add button.
4Select "Microsoft" for Manufacturer and "TCP/IP" for Network Protocol, and
click the OK button.
5The Network window (step 2) appears.

WLI-PCM User’s Manual60
4
WindowsNT4.0 Settings
This chapter describes the setting procedures for the WLI-PCM
when using WindowsNT4.0.
Before installing driver
• Check that the WLI-PCM is correctly inserted into your computer.
• The PC card driver for WindowsNT4.0 must be operating correctly. Select
Control Panel → Devices and check that the status for "pcmcia" is "start".
• The WLI-PCM cannot be inserted or removed with the computer on.
There is no resume function for WindowsNT4.0.
The installation procedure for the driver differs depending on the operating envi-
ronment of your computer. Select the applicable case.
When installing the driver to a computer with WindowsNT4.0 already set up,
go to "When WindowsNT4.0 is already set up" on page 61.
When installing the driver during WindowsNT4.0 setup,
go to "When WindowsNT4.0 is to be set up" on page 69.
Driver installation
WLI-PCM User’s Manual 61
When WindowsNT4.0 is already set up
Different procedures apply depending on whether the driver has been installed
before, when WindowsNT4.0 is already set up.
When installing the driver for the first time, go to "When installing driver for first
time" below.
* When a LAN card driver has been installed before, go to "When LAN card
driver has been installed before" on page 66.
When installing driver for first time
Follow the steps below when installing the driver for the first time after setting up
WindowsNT4.0.
1Start WindowsNT4.0 and log-on as "administrator".
2Click the Start button and select Settings → Control Panel.
3Double-click the Network icon.
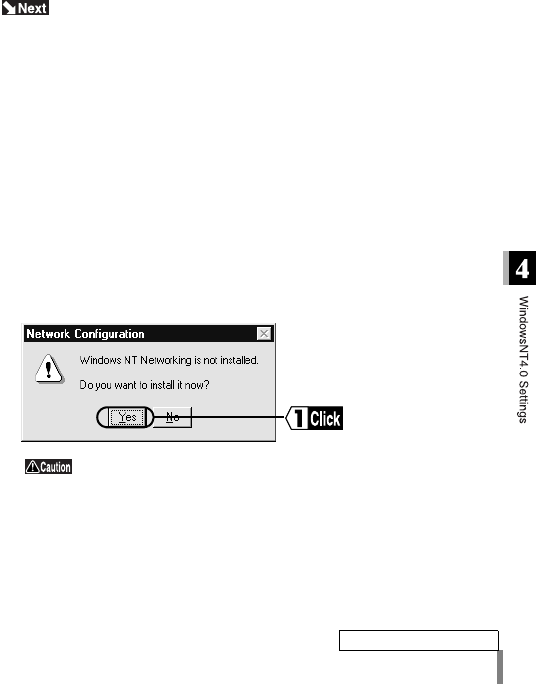
4Click the Yes button. The message "Please wait while WindowsNT prepares
Network Setup..." is displayed.
If the above message does not appear, go to step 4 in "When
LAN card driver has been installed before" on page 66.
Continued on next page
WLI-PCM User’s Manual62
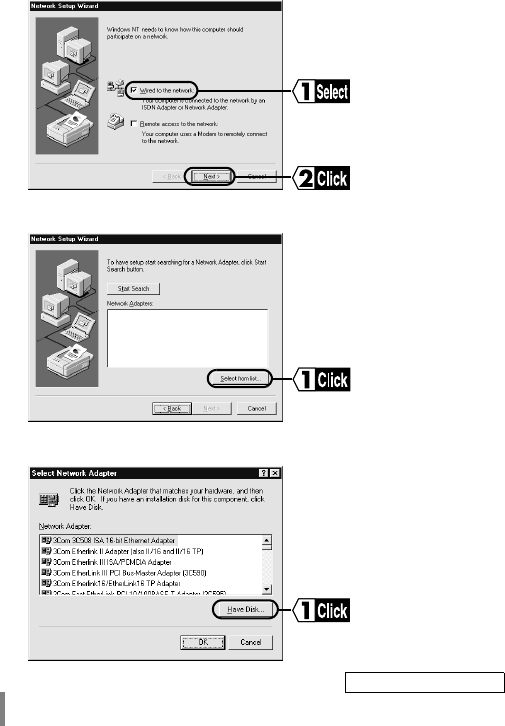
5Select "Wired to the network" and click the Next button.
6Click the Select from list... button.
7Click the Have Disk... button.
Continued on next page
WLI-PCM User’s Manual 63
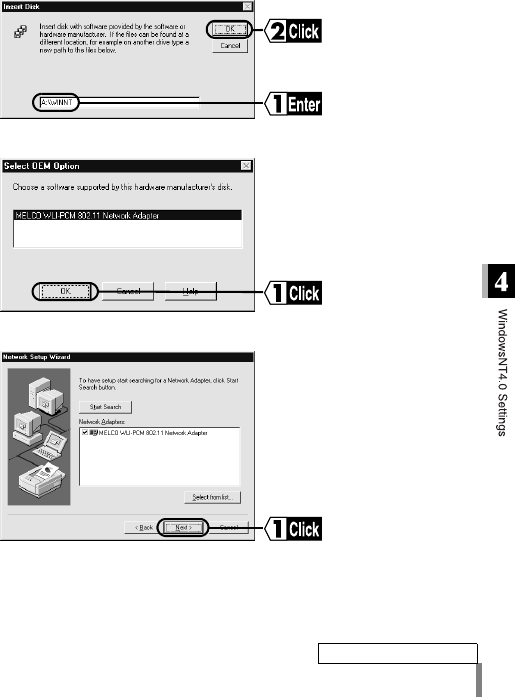
8Insert the “LAN Card Utility for WLI-PCM” disk into the floppy disk drive.
9Enter "A:\WINNT" (when the floppy disk drive is "A") and click the OK button.
10
Click the OK button.
11
Click the Next button.
Continued on next page
WLI-PCM User’s Manual64
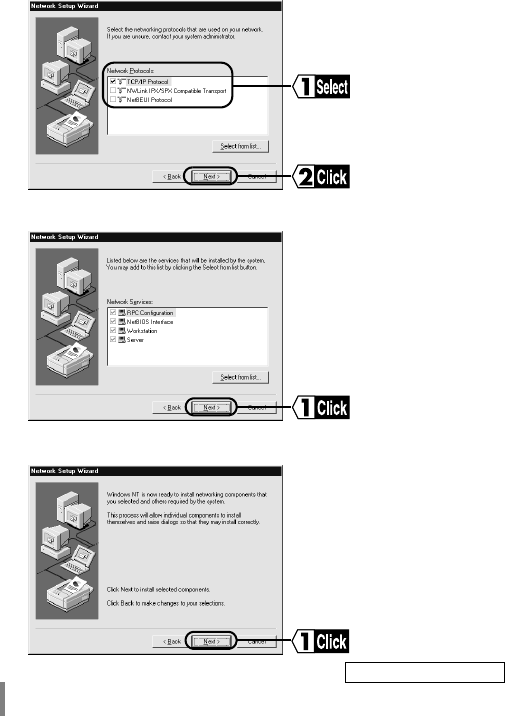
12
Select the network protocol to be used for the network and click the Next but-
ton.
13
Click the Next button.
14
Click the Next button.
Continued on next page
WLI-PCM User’s Manual 65
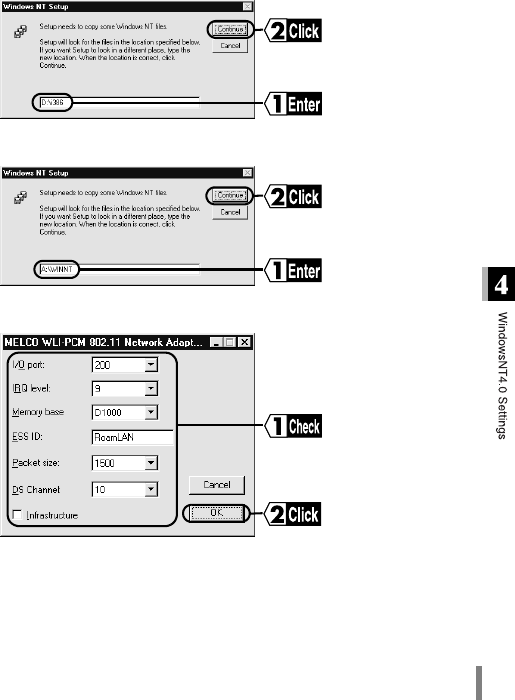
15
Set the WindowsNT CD-ROM in the CD-ROM drive.
16
Enter "D:\I386" (when the CD-ROM drive is "D") and click the Continue button.
17
Enter "A:\WINNT" (when the floppy disk drive is "A") and click the Continue
button.
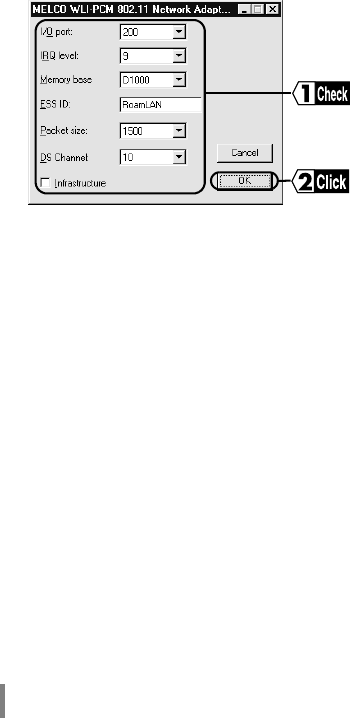
18
The current settings for the WLI-PCM (IRQ level, I/O port address, Memory
base) are displayed. Check the settings and click the OK button.
WLI-PCM User’s Manual66
Go to "Changing settings" on page 70.
When LAN card driver has been
installed before
Follow the steps below when WindowsNT4.0 is already set up and a driver has
been installed before.
When the message "This IRQ level (I/O port address, Memory base) is used
by another board. Please select another value." appears, change the set-
tings.
Setting items
ESS-ID: To be set later from Client Manager
DS channel: Do not change.
Packet size: Maximum packet size (usually set to 1500)
Infrastructure: Delete the check mark if present.
Install the driver as instructed by the wizards.
1Start WindowsNT4.0 and log-on as administrator’.
2Click the Start button and select Settings → Control Panel.
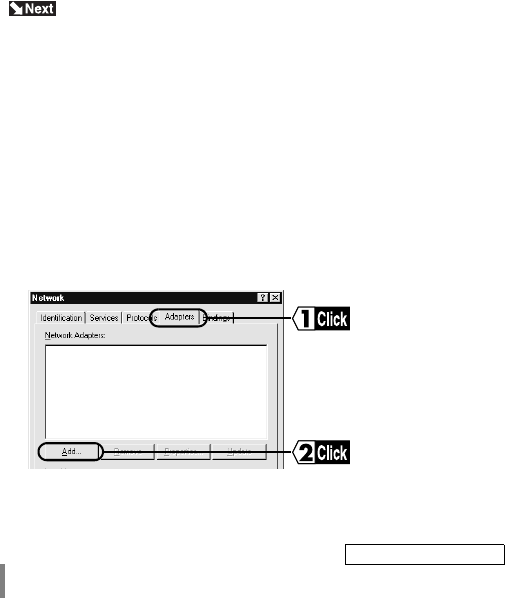
3Double-click the Network icon.
4Click the Adapters tab and the Add button.
Continued on next page
WLI-PCM User’s Manual 67
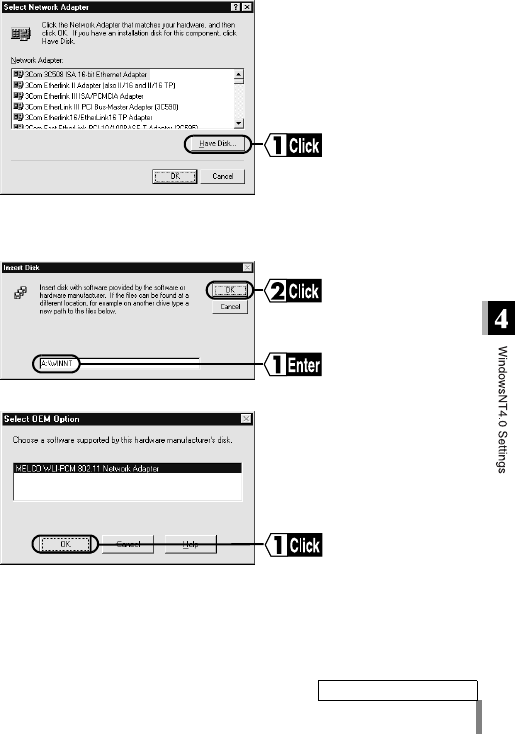
5Click the Have Disk... button.
6Insert the “LAN Card Utility for WLI-PCM” disk into the floppy disk drive.
7Enter "A:\WINNT" (when the floppy disk drive is "A") and click the OK button.
8Click the OK button.
Continued on next page
WLI-PCM User’s Manual68
9The current settings for the WLI-PCM (IRQ level, I/O port address, Memory
base) are displayed. Check the settings and click the OK button.
When the message "This IRQ level (I/O port address, Memory base) is used
by another board. Please select another value." appears, change the set-
tings.
Setting items
ESS-ID: To be set later by Client Manager
DS channel: Do not change.
Packet size: Maximum packet size (usually set to 1500)
Infrastructure: Delete the check mark if present.
WLI-PCM User’s Manual 69
Go to "Changing settings" on page 70.
When WindowsNT4.0 is to be set up
Refer to the following items when installing the driver during WindowsNT4.0
setup. Follow the setup procedures described in the WindowsNT4.0 manual.
Select the driver
Specify the driver name "MELCO WLI-PCM 802.11 Network Adapter". Refer to
steps 6 to 11 in "When installing driver for first time" (page 61)" for details.
WLI-PCM settings
Check the current settings for the WLI-PCM (IRQ level, I/O port address, Memory
base) and click the OK button.
Go to "Changing settings" on page 70.
10
"MELCO WLI-PCM 802.11 Network Adapter" is added. Click the OK button.
Install the driver as instructed by the wizards.
WLI-PCM User’s Manual70
Follow the steps below to change the settings for the WLI-PCM (IRQ level, I/O
port address, Memory base).
Changing settings
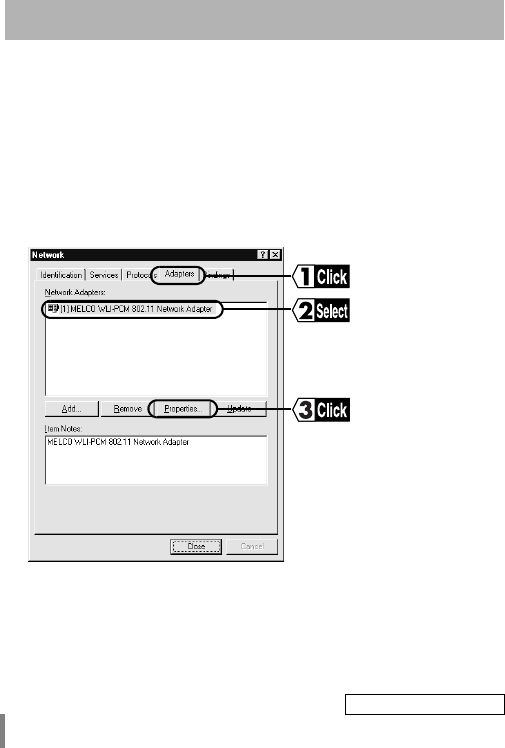
1Start WindowsNT4.0 and log-on as administrator’.
2Click the Start button and select Settings → Control Panel.
3Double-click the Network icon.
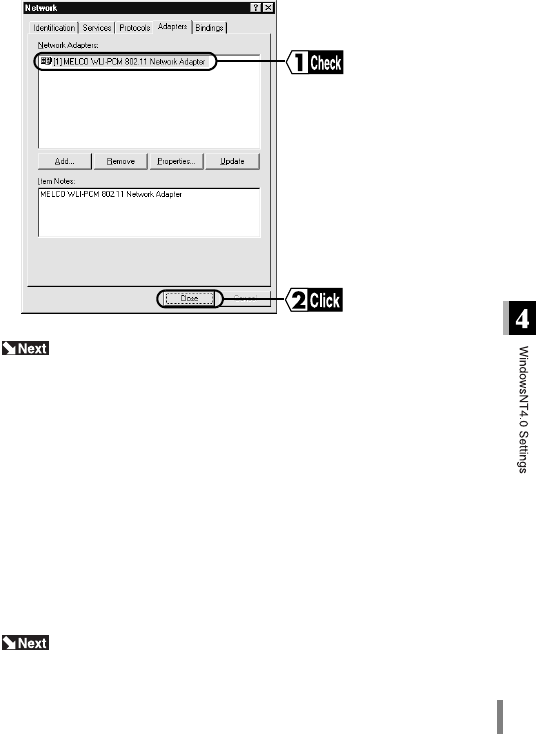
4Click the Adapters tab. Select "MELCO WLI-PCM 802.11 Network Adapter"
and click the Properties button.
Continued on next page
WLI-PCM User’s Manual 71
Go to "Checking after installation" on page 72.
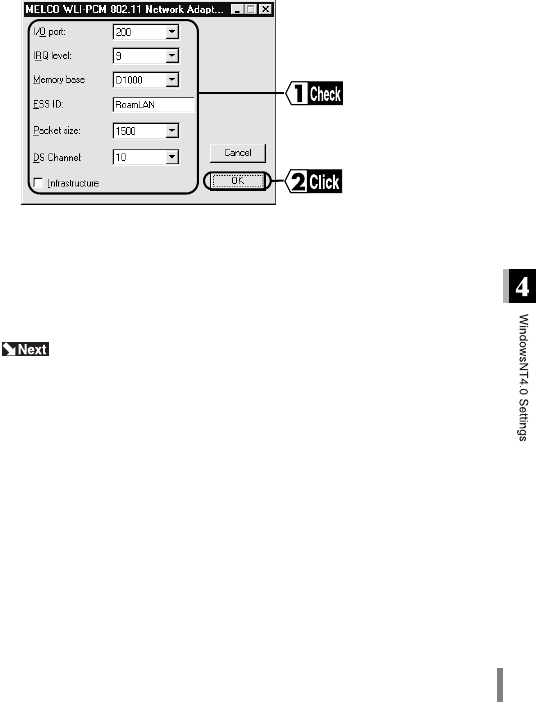
5The current settings for the WLI-PCM (IRQ level, I/O port address, Memory
base) are displayed. Change the settings as required and click the OK but-
ton.
Setting items
ESS-ID: To be set later from Client Manager
DS channel: Do not change.
Packet size: Maximum packet size (usually set to 1500)
Infrastructure: Delete the check mark if present.
6Restart the computer to activate the new settings.
WLI-PCM User’s Manual72
WindowsNT4.0 has a standard diagnosis program that checks whether the WLI-
PCM is set correctly. Follow the steps below to perform this check.
Go to "Installing the ESS ID Driver" on page 73.
Checking after installation
1Click the Start button and select Programs → Administrative Tools (Common)
→ WindowsNT Diagnostics.
2Click the Resources tab.
3Click Devices.
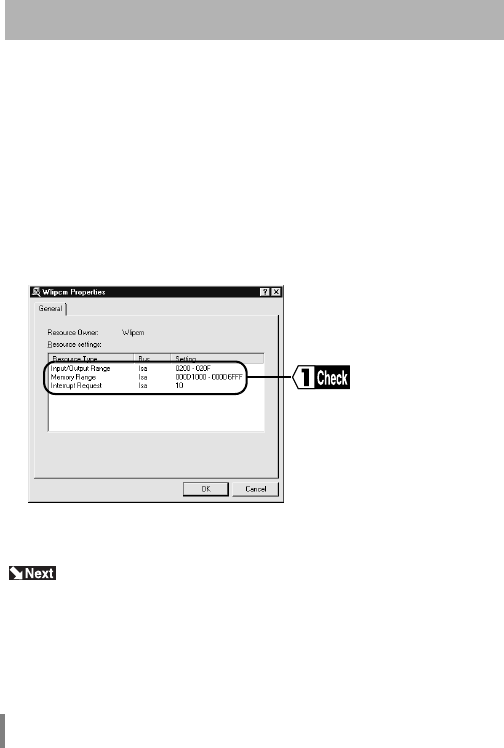
4Select "Wlipcm" from the Device list, and click the Properties button.
5Check that "Input/Output Range", "Memory Range", and "Interrupt Request"
are displayed.
If no settings are displayed or "Wlipcm" is not listed in the Device list, change
the resource settings. Also, check that the WLI-PCM is installed correctly.
WLI-PCM User’s Manual 73
The ESS ID driver must be installed before you can use the WLI-PCM.
Follow the procedure below to install the driver.
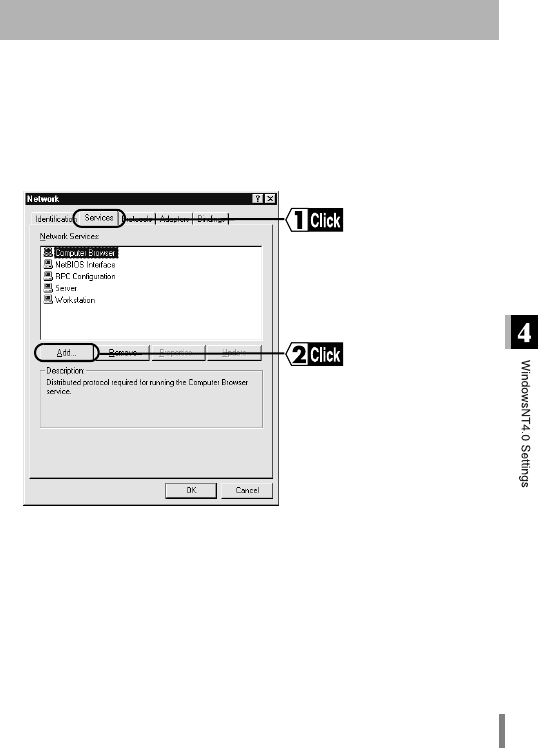
Installing the ESS ID Driver
1Click the Start button and select Settings → Control Panel.
2Double-click the Network icon.
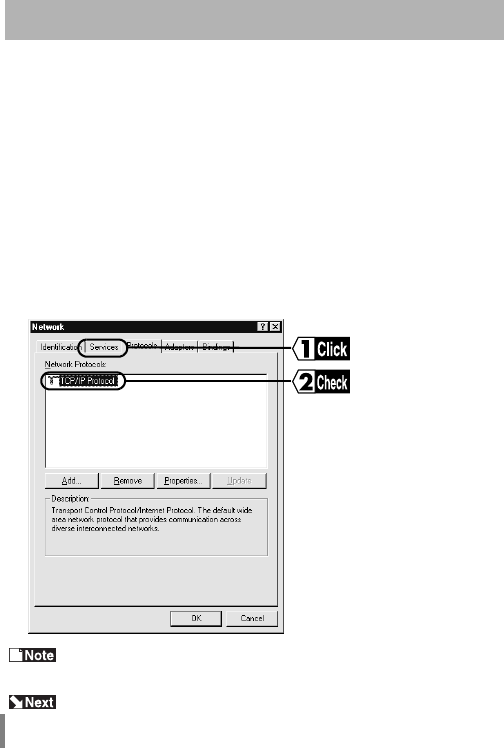
3Click the Services tab and then click the Add... button.
WLI-PCM User’s Manual74
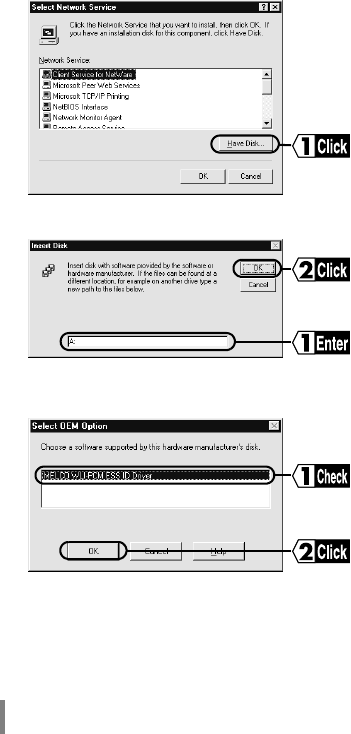
4Click the Have Disk... button.
5Enter "A:" (when the floppy disk drive is "A") and click the OK button.
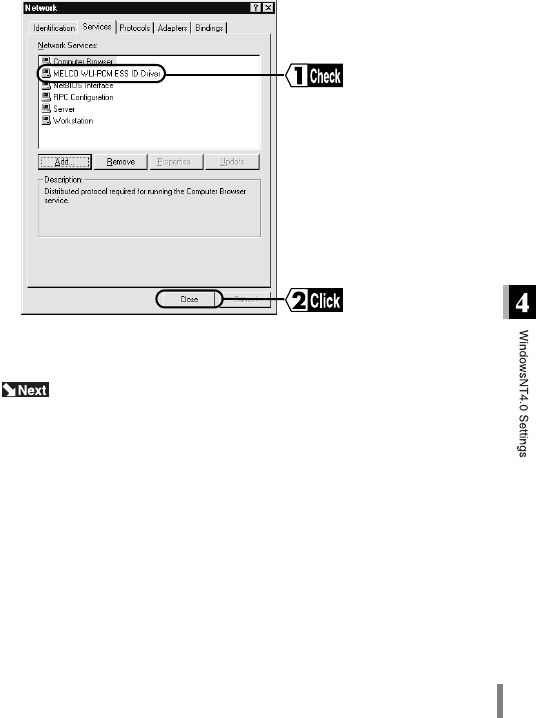
6Check that "MELCO WLI-PCM ESS ID Driver" is displayed and then click the
OK button.
WLI-PCM User’s Manual76
After checking that the WLI-PCM is operating correctly, you can try connecting to
the network.
The following is required for all computers.
• Checking TCP/IP
• Setting TCP/IP
Checking TCP/IP
If "TCP/IP Protocol" is not listed, add it, referring to "Adding TCP/IP" on
page 78.
Go to "Setting TCP/IP" on page 77.
Preparing for connection to network
1Click the Start button and select Settings → Control Panel.
2Double-click the Network icon.
3Click the Protocol tab and check that "TCP/IP Protocol" is listed in the Net-
work Protocols column.
WLI-PCM User’s Manual 77
Setting TCP/IP
Go to "Installing Client Manager" on page 79.
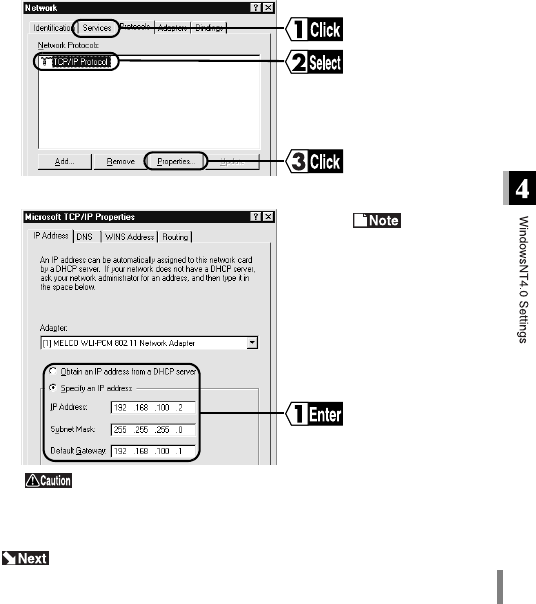
1Click the Start button and select Settings → Control Panel.
2Double-click the Network icon.
3Click the Protocol tab. Select "TCP-IP Protocol" and click the Properties but-
ton.
4Set the IP address and click the OK button.
Refer to
"Assign IP address" on
page 115 for IP address
settings.
Contact the network administrator to check the IP address set-
ting.
5WindowsNT4.0 restarts and TCP/IP settings are completed.

WLI-PCM User’s Manual78
Adding TCP/IP
Follow the steps below when TCP/IP is not already on your computer.
Go to "Checking TCP/IP" on page 76.
1Click the Start button and select Settings → Control Panel → Network.
2Double-click the Network icon.
3Click the Protocol tab and the Add button.
4Select "TCP/IP Protocol" and click the OK button.
5The Network window (step 2) appears.
WLI-PCM User’s Manual 79
5
Installing Client Manager
Client Manager is required to search for the access point and
change settings for the WLI-PCM. This chapter describes the pro-
cedures for installing and uninstalling Client Manager.
Follow the steps below to install Client Manager to all computers using the WLI-
PCM.
Installation
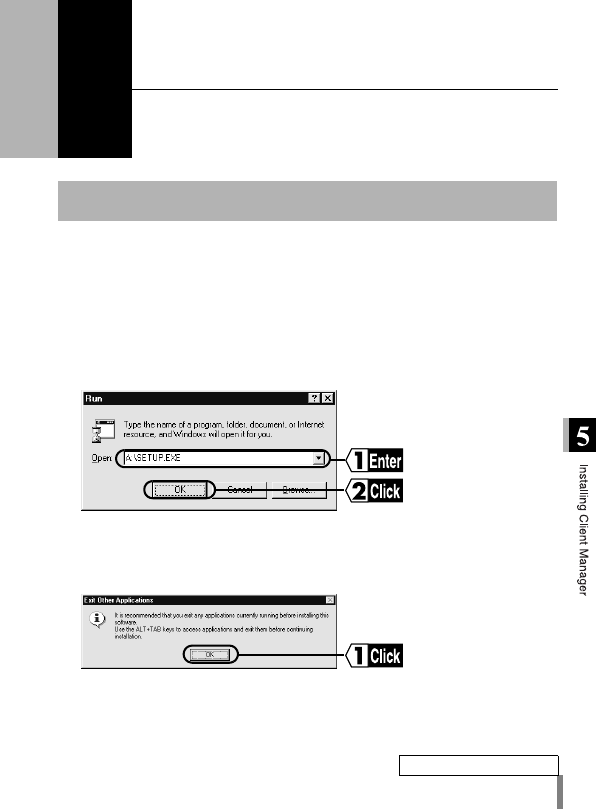
1Insert the “LAN Card Utility for WLI-PCM” disk into the floppy disk drive.
2Click the Start button and select Run....
3Enter the path for "setup.exe" on the “LAN Card Utility for WLI-PCM” disk and
click the OK button.
e.g.: A:\setup.exe (when the floppy disk drive is "A")
4Quit any other applications that are running and click the OK button.
Continued on next page
WLI-PCM User’s Manual80
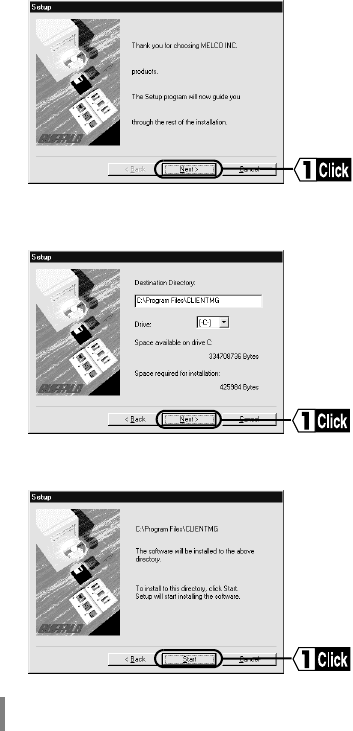
5Click the Next button.
6Check the destination directory for Client Manager and click the Next button.
If you want to change the directory, enter a new path and click the Next but-
ton.
7Check the destination directory again and click the Start button.
Files are copied to the specified directory.
WLI-PCM User’s Manual82
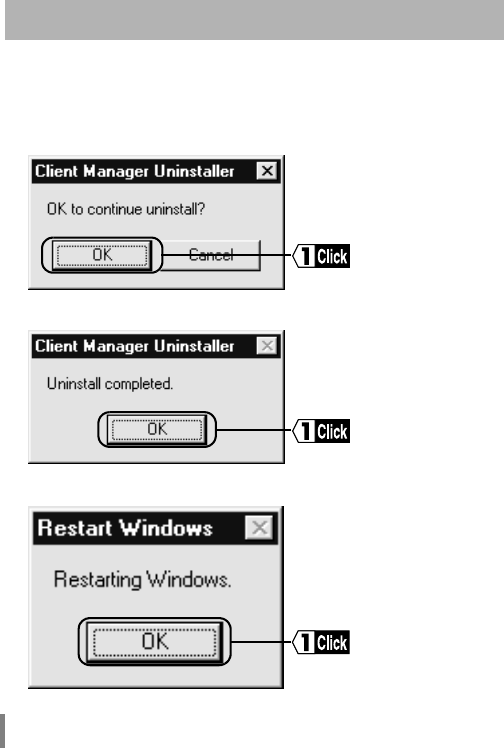
Follow the steps below to uninstall Client Manager.
Uninstallation
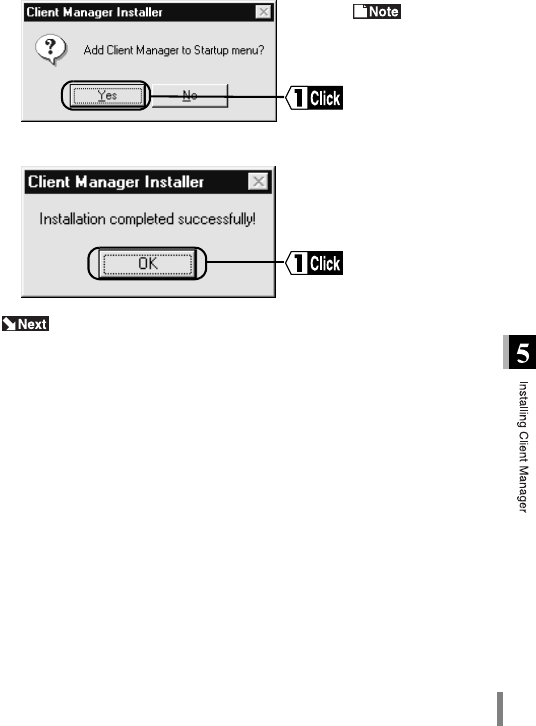
1Click the Start button and select Programs → MELCO WLI-PCM Utility →
Uninstall Client Manager.
2Click the OK button. Client Manager is removed, and related files and icons
are automatically deleted.
3Click the OK button. Uninstallation of Client Manager is completed.
4Click the OK button. The computer restarts.
WLI-PCM User’s Manual 83
6
Connection to Network
After all required settings for the computer are completed, you can
try connecting to the network. This chapter describes how to
access the network, check signal and communication conditions,
and select the target computer on the network.
Follow the steps below to access the network.
There are two types of connection: direct connection between wireless LAN PC’s
and connection to a computer on a wired LAN via an access point (available sep-
arately). The setting procedures vary depending on the connection type. Select
the appropriate procedure for your operating environment.
Connection between wireless LAN PCs
The factory default ESS-ID (RoamLAN) can be used for connection between
wireless LAN PCs, however, we recommend that you change the ESS-ID to
ensure further security.
If you change the ESS-ID, be sure to change that of the destination
computer. Computers with different ESS-IDs cannot be connected. Con-
tact the administrator for the ESS-ID.
Refer to "ESS-ID" on page 10.
Connection to network
When adjacent companies build networks using the same (factory default, for
example) ESS-ID, their networks may be inadvertently connected and confi-
dential information may leak. It is safer to configure the network using an
access point (MELCO INC.’s WLA-T1) with a unique identification code auto-
matically assigned.
Continued on next page
WLI-PCM User’s Manual84
Connection to a wireless LAN PC with the same ESS-ID is completed.
Go to "Checking connection to network" on page 91.
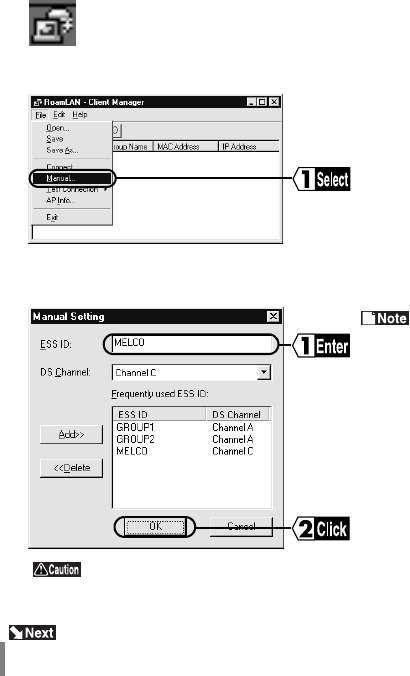
1Click the Start button and select Programs → MELCO WLI-PCM Utility → Cli-
ent Manager.
If the following icon is displayed in the task tray on the screen, you can dou-
ble-click this icon to start Client Manager.
2Select File → Manual....
3Enter the ESS-ID, select the DS channel and click the OK button.
If the desired ESS-ID is registered in the Frequently Used ESS ID list, select it
from there and click the OK button.
Click the Add
button after entering the
ESS-ID to register it as
a frequently used ESS-
ID. Select any unused
ESS-IDS in the list and
click the Delete button
to delete it.
The ESS-ID is upper/lower case sensitive and can consist of
up to 32 alphanumeric characters, including the under bar (_).

WLI-PCM User’s Manual 85
Connection to wired LAN PC using
access point
Access point information files must be obtained from the network administrator
before connecting to the network.
Refer to "When access point information is not available" on page 88 to
acquire the information files.
1Click the Start button and select Programs → MELCO WLI-PCM Utility → Cli-
ent Manager.
If the following icon is displayed in the task tray on the screen, you can dou-
ble-click this icon to start Client Manager.
2Select File → Open.
3Select the access point information file and click the Open button.
Contact the
network administrator
to check the file to be
selected.
Continued on next page
WLI-PCM User’s Manual86
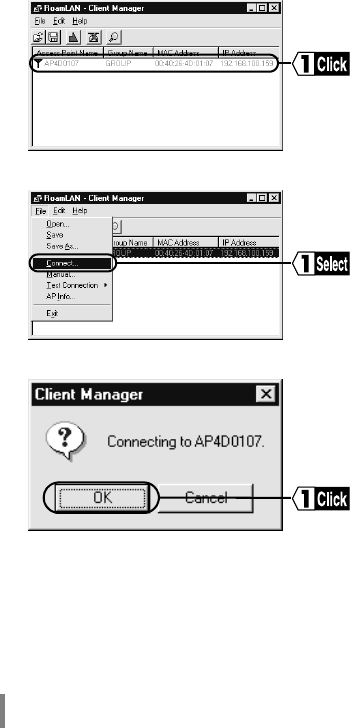
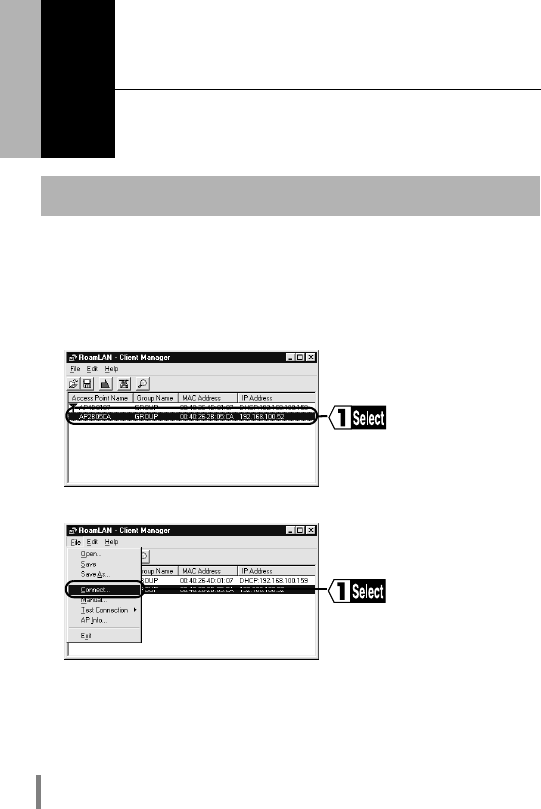
4The access point appears in the list in gray. Select the target access point.
5Select Open → Connect....
6Click the OK button.
WLI-PCM User’s Manual 87
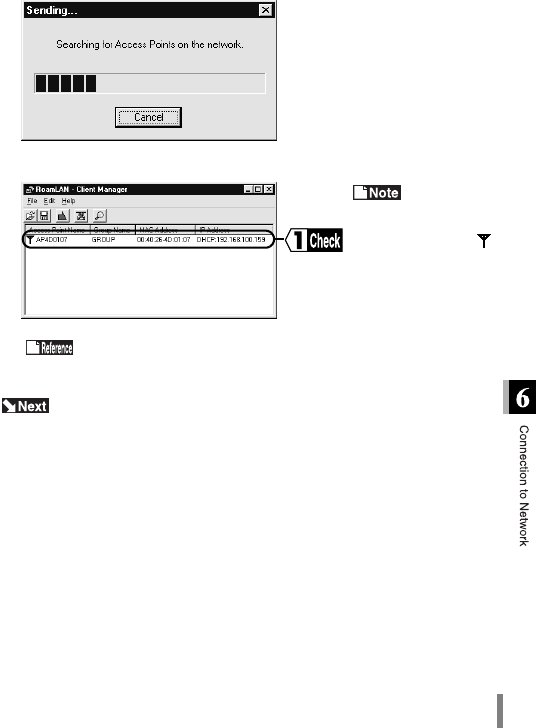
Go to "Checking connection to network" on page 91.
7The ESS-ID is changed and access points are searched automatically.
8Connection to the access point is completed.
The access
point in the list turns
from gray to black and
an antenna mark ( )
appears when your
computer is connected
to the access point.
Refer to "The access point cannot be accessed using Client Man-
ager (access point is displayed in gray even when it is found)." on page 106 if
the access point in the list does not change to black.
WLI-PCM User’s Manual88
When access point information is
not available
You need to enter the ESS-ID if the access point information file is
not available. Contact the network administrator to check the ESS-
ID before connecting to the network.
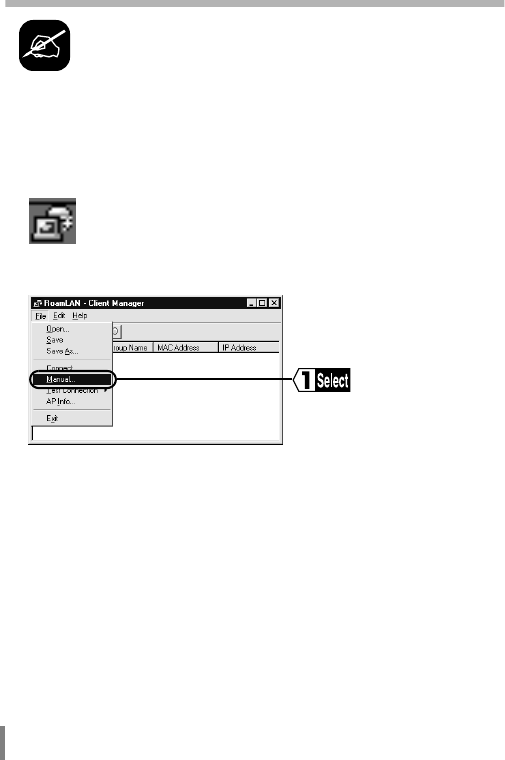
1Click the Start button and select Programs → MELCO WLI-PCM Utility → Cli-
ent Manager.
If the following icon is displayed in the task tray on the screen, you can dou-
ble-click this icon to start Client Manager.
2Select File → Manual....
WLI-PCM User’s Manual 89
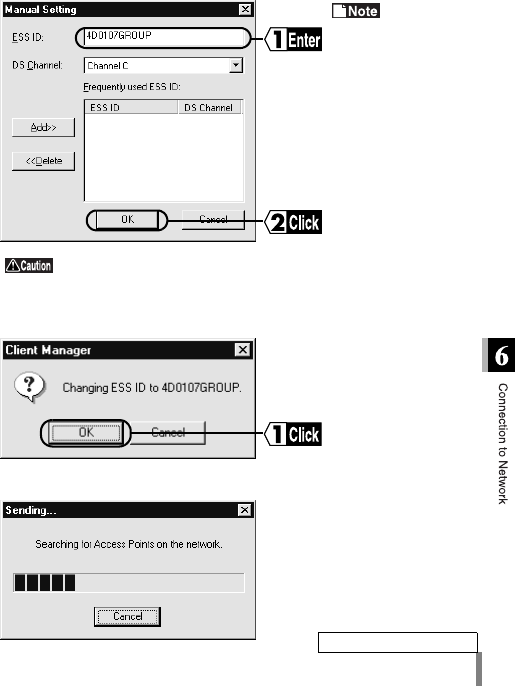
3Enter the ESS-ID, select the DS channel for the target access point and click
the OK button.
If the desired ESS-ID is registered in the Frequently Used ESS ID list, select it
from there and click the OK button.
Contact the
network administrator
to check the ESS-ID.
The ESS-ID is upper/lower case sensitive and can consist of
up to 32 alphanumeric characters, including the under bar (_).
4Click the OK button.
The ESS-ID is changed.
5The ESS-ID is changed and the access point is searched automatically.
Continued on next page
WLI-PCM User’s Manual90
6Connection to the access point is completed.
The access point is displayed.
The access
point in the list turns
from gray to black and
an antenna mark ( )
appears when your
computer is connected
to the access point.
Refer to "The access point cannot be accessed using Client Man-
ager (access point is displayed in gray even when it is found)." on page 106 if
the access point in the list does not change to black.

WLI-PCM User’s Manual 91
This section describes the methods for checking the connection between wire-
less LAN PCs and between the WLI-PCM and an access point.
Connection between wireless LAN PCs
The PING command is used to check the connection between wireless LAN PCs.
Executing the PING command checks that the IP packet reaches the destination
correctly.
The TCP/IP protocol must be installed to execute the PING command.
Go to "Connection to other computers" on page 97.
Checking connection to network
1Click the Start button and select Programs → MS-DOS Prompt.
If you are using WindowsNT4.0, select Programs → Command Prompt.
2Enter the PING command as shown below (when the hard disk drive is "C").
C:\>ping XXX.XXX.XXX.XXX
Where "XXX.XXX.XXX.XXX" is the IP address of the target destination.
e.g. When the IP address of the target destination is "192.168.100.123"
C:\>ping 192.168.100.123
3If the devices are connected correctly, the following is displayed.
Pinging 192.168.100.123 with 32 bytes of data:
Reply from 192.168.100.123:bytes=32 time=1ms TTL=32
Reply from 192.168.100.123:bytes=32 time<10ms TTL=32
Reply from 192.168.100.123:bytes=32 time=4ms TTL=32
Reply from 192.168.100.123:bytes=32 time<10ms TTL=32
If they are not connected correctly, a condition specific error message such
as "Request timed out" or "Destination host unreachable" appears. In this
case, refer to "Communication between wireless LAN PCs is impossible. No
reply is returned when executing the PING command to a wireless LAN PC."
on page 109.
Connection to the access point cannot be checked by executing the
PING command from a wireless LAN PC.
WLI-PCM User’s Manual92
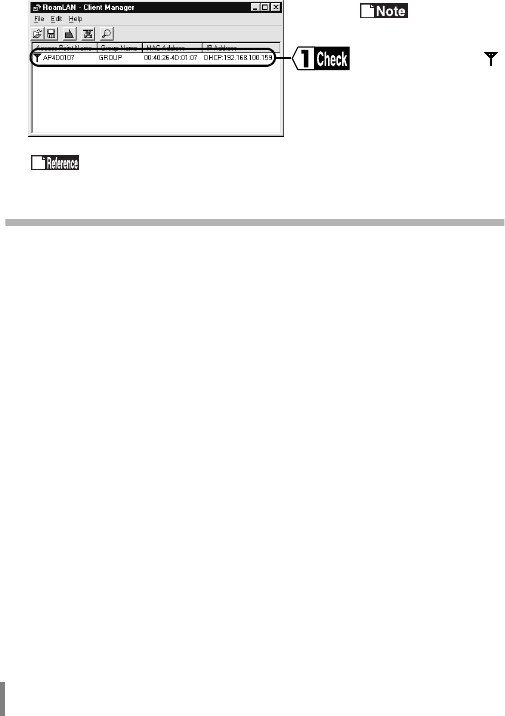
Checking connection between the WLI-
PCM and an access point
Client Manager is used to check connection conditions between the WLI-PCM
and an access point.
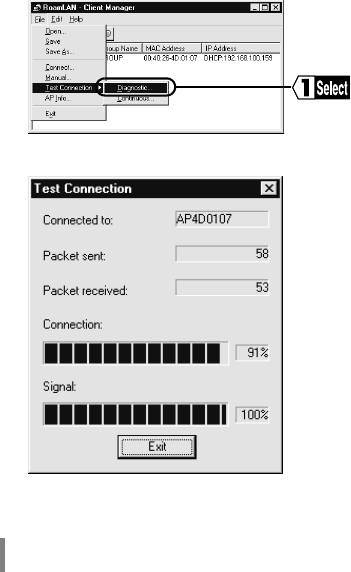
1Click the Start button and select Programs → MELCO WLI-PCM Utility → Cli-
ent Manager.
2Select the access point, and then File → Test Connection → Diagnostic....
3Check the connection.
WLI-PCM User’s Manual94
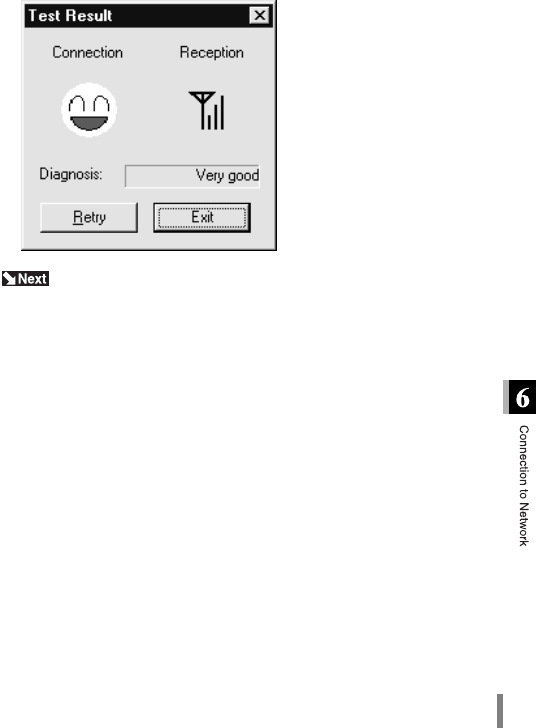
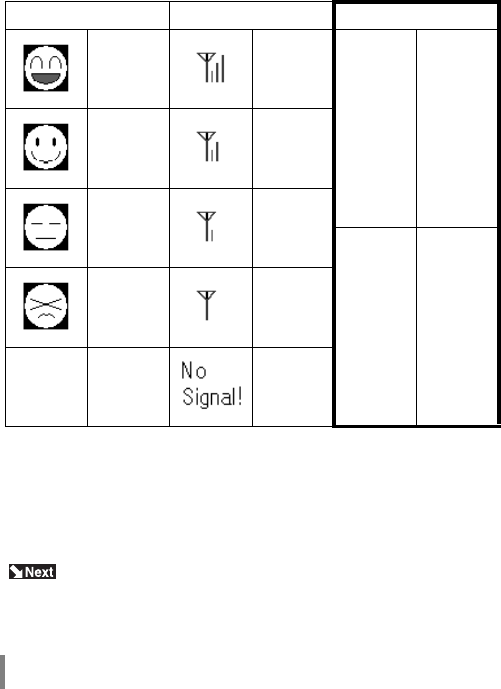
Results of test
The connection and signal conditions are shown as the results of the connection
test. The symbols used and their meanings are shown below.
Take any of the following actions when the diagnosis result is "not acceptable".
1.Move the wireless LAN PC closer to the access point.
2.Request the access point administrator to change the location of the access
point.
3.Eliminate obstacles between the wireless LAN PC and the access point.
4.Check that there is no source of interference such as a microwave oven near
the access point or wireless LAN PC.
Go to "Connection to other computers" on page 97.
Connection Signal Results
Very good Very good
Acceptable
No
communication
problems
Good Good
Bad Poor
Not
acceptable
Communication
conditions are
unstable
Very bad Bad
Communi-
cation
impossible
WLI-PCM User’s Manual 95
When installing the access point for
the first time
Follow the steps below when installing the access point for the first
time.
1Move the access point to the desired location.
2Click the Start button and select Programs → MELCO WLI-PCM Utility → Cli-
ent Manager.
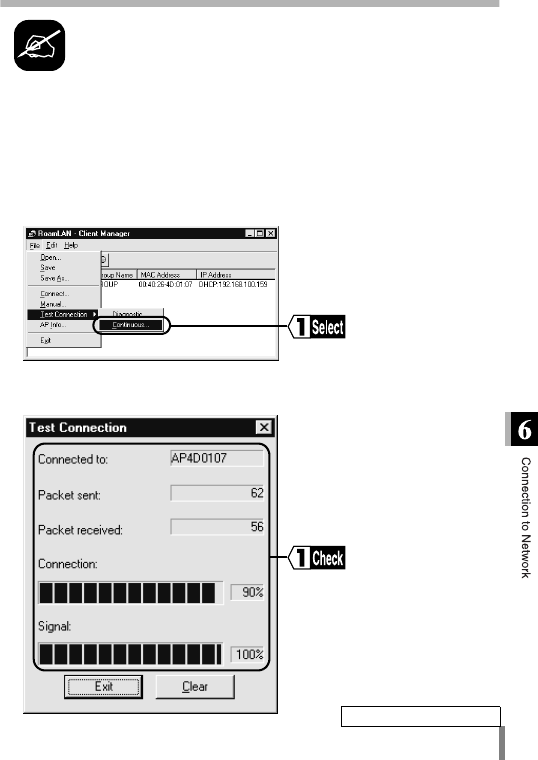
3Select the access point, and then File → Test Connection → Continuous....
4Check the number of sent packets and received packets, and percentage
indicating the connection and signal conditions.
Continued on next page

WLI-PCM User’s Manual96
5Move the client to check the effective communication range.
6Determine the location of the access point where the best communication
conditions are ensured.
WLI-PCM User’s Manual 97
When the computer is connected to the network, try connecting to a wireless LAN
PC or wired LAN PC.
Screens from Windows98 are used in this example.
Connection to other computers
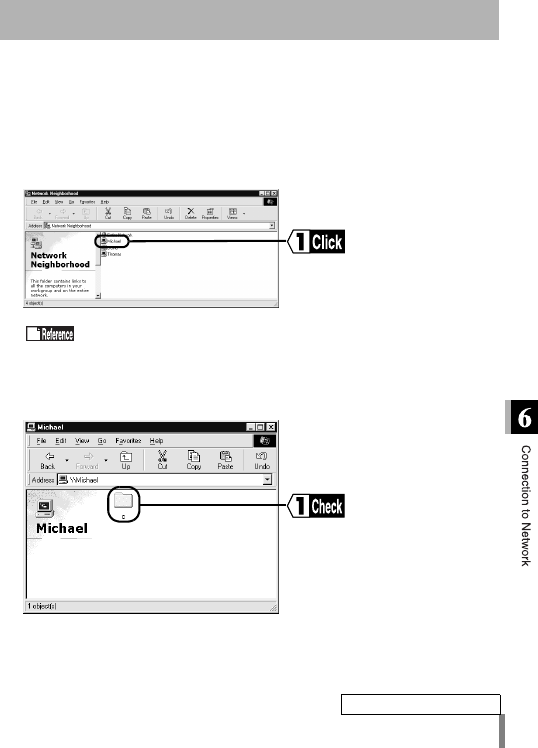
1Double-click the Network Neighborhood icon.
Computers connected Peer to Peer are listed.
2Double-click the icon of the target computer.
Refer to "Computers are not listed after double-clicking the Network
Neighborhood icon" on page 103.
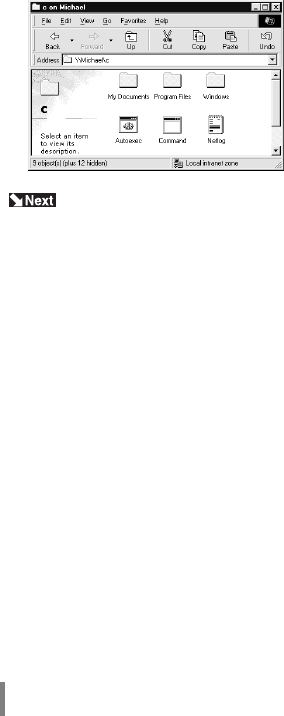
3The drive(s) set to be shared (page 53) are listed.
Double-click the desired drive.
Continued on next page
WLI-PCM User’s Manual98
Computers with a WLI-PCM mounted can be connected to other com-
puters on the same wireless or wired LAN. You can now operate your computers
in a comfortable environment using both the wireless and wired LANs.
4The contents of the selected drive are displayed and you can access the
desired folder.

WLI-PCM User’s Manual 99
7Troubleshooting
This chapter describes problems that may occur during operation,
and possible causes and solutions for these problems.
Possible cause
The WLI-PCM is not inserted into the PC card slot on the computer.
Solution
Check the direction of the WLI-PCM and insert it again.
Possible cause
The PC card slot on the computer is faulty.
Solution
• If your computer has two slots, insert the WLI-PCM to the other slot.
• If you have another computer, insert the WLI-PCM to that computer to locate
the cause of the problem.
Possible cause
The computer’s power management function is activated.
Solution
Turn the power management function off. Refer to the instruction manual pro-
vided with the computer for details.
The computer does not recognize the WLI-PCM.
The WLI-PCM does not operate correctly.
WLI-PCM User’s Manual100
Possible cause
• The driver is not installed correctly.
• "!" mark appears next to "MELCO WLI-PCM 802.11 Network Adapter" in the
"Network Adapters" list on the Device Manager window called by pressing the
Start button and selecting Settings → Control Panel → System → Device Man-
ager.
Solution
Follow the steps below to uninstall and re-install the driver.
Check that the WLI-PCM is inserted to the PC card slot on the
computer.
Add New Hardware Wizard does not appear
when the WLI-PCM is inserted (Windows98/
95). Or, an error mark "!" appears next to
"MELCO WLI-PCM 802.11 Network Adapter".
1Click the Start button and select Settings → Control Panel.
2Double-click the System icon.
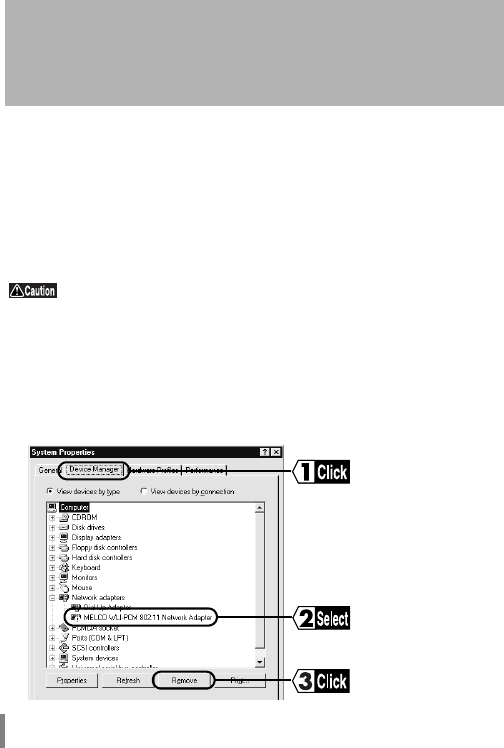
3Click the Device Manager tab.
Select "MELCO WLI-PCM 802.11 Network Adapter" in the "Network Adapt-
ers" list, and click the Remove button.
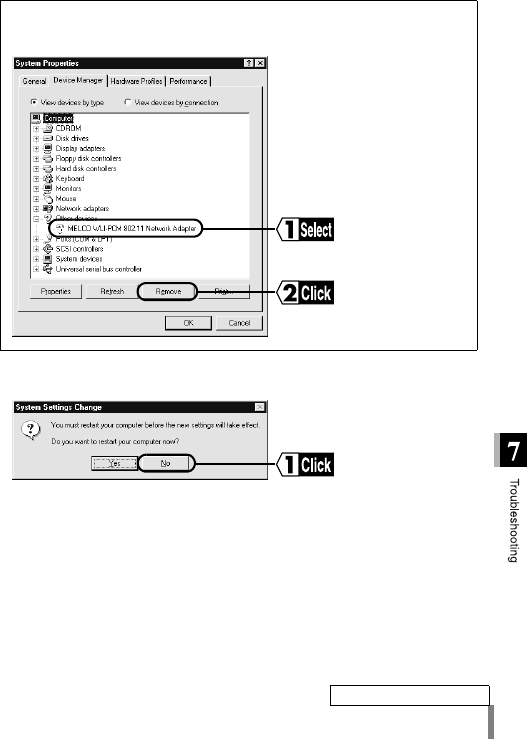
WLI-PCM User’s Manual 101
"MELCO WLI-PCM 802.11 Network Adapter" may be included in "Other
devices". If so, select "MELCO WLI-PCM 802.11 Network Adapter" and
click the Remove button.
4Click the No button.
5Double-click the Network icon.
6If "MELCO WLI-PCM 802.11 Network Adapter" is displayed, remove it.
Continued on next page

WLI-PCM User’s Manual102
Go to "Checking 32-bit PC card driver" on page 16.
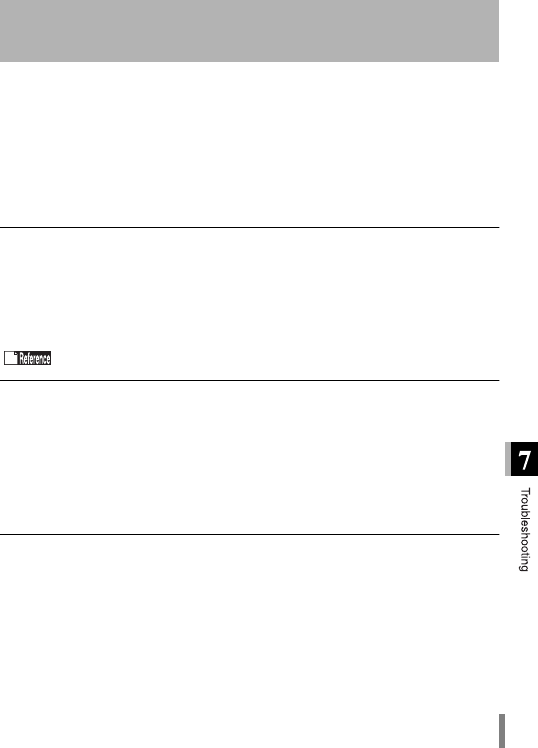
7Click the OK button.
Click the No button if the message "Restart computer now?"
appears.
If you are using Windows98, follow the steps below.
1.Click the Start button and select Programs → Explorer.
2.Select View → Folder Options and click the View tab.
3.Check "Show all files" and click the OK button.
4.Select "C:\Windows\INF\OTHER\MicrosoftNetwlip2.inf" and click the Delete
button.
8Exit Windows98/95 and turn the computer off.
9Remove the WLI-PCM.
Check the PC card driver referring to "Checking 32-bit PC card driver" on
page 16. Then re-install the driver following the steps in "Driver installation"
on page 26.
WLI-PCM User’s Manual 103
Possible cause
The password was not entered when Windows98/95 started.
Solution
Be sure to enter your user name and password when starting Windows98/95. If
you forget your password, enter a different user name. In this case, you do not
have to enter the password. If you enter a new password, the new user name
and password are registered in the computer.
Possible cause
The TCP/IP is configured, but the IP address is not correct.
Solution
Check that the IP address is set correctly.
Refer to "Assign IP address" on page 115.
Possible cause
The driver is not installed correctly.
Solution
Check that the driver is installed correctly.
When using Windows98/95, refer to "Checking after installation" on page 40.
When using WindowsNT4.0, refer to "Checking after installation" on page 72.
Possible cause
The computer cannot communicate with the access point or wireless LAN PC
because the ESS-ID is not correct.
Solution
Check the ESS-ID, referring to "Checking connection to network" on page 91.
Computers are not listed after double-clicking
the Network Neighborhood icon
WLI-PCM User’s Manual104
Possible cause
It takes too long to search the network and list the connected computers.
Solution
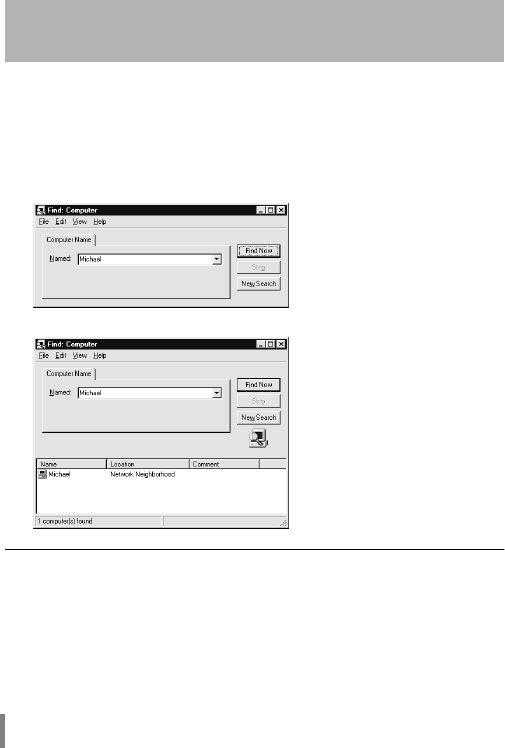
Search for the connected computers as follows.
(1)Click the Start button and select Find → Computer....
(2)Enter the name of the target computer and click the Find Now button.
(3)Double-click the icon of the computer found to access it.
Possible cause
The workgroup is not set correctly.
Solution
Check the settings for the workgroup.
Computers are not listed after double-clicking
the Network Neighborhood icon (continued)
WLI-PCM User’s Manual 105
Possible cause
Network settings are not correct.
Solution
Check the protocol, workgroup name, and sharing settings.
When using Windows98/95, refer to "Preparing for connection to network" on
page 49.
When using WindowsNT4.0, refer to "Preparing for connection to network" on
page 76.
Possible cause
TCP/IP is not installed or configured correctly.
Solution
Check the TCP/IP settings again.
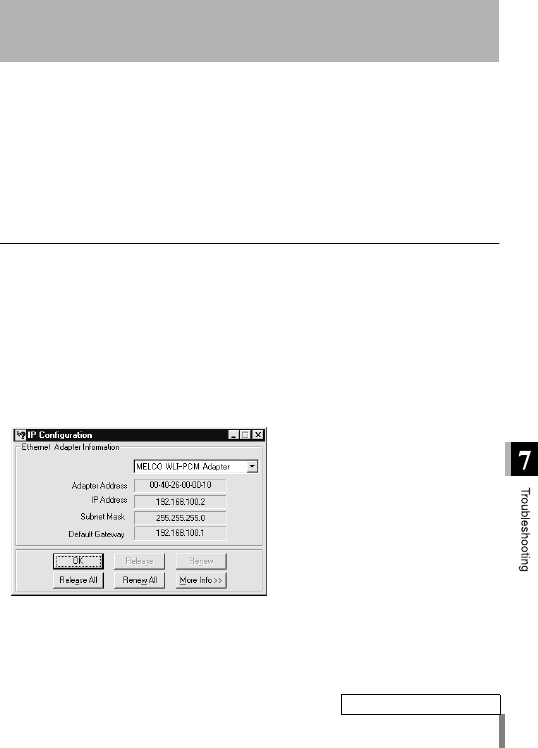
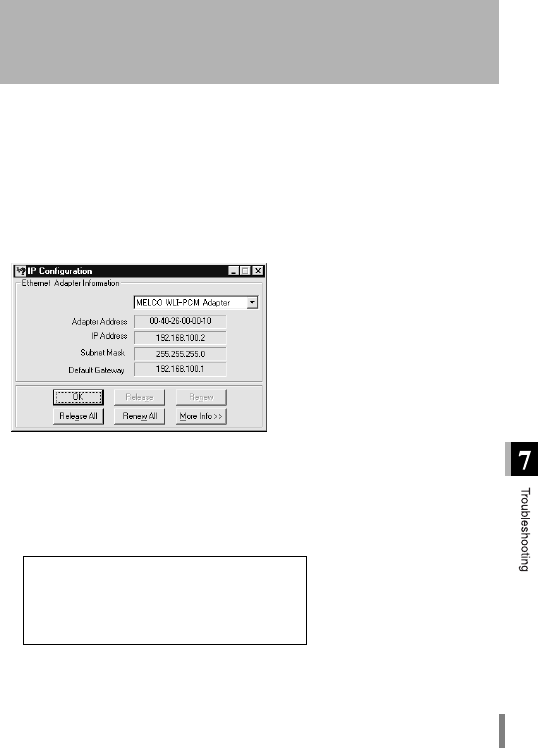
■Windows98/95
1.Click the Start button and select Run....
Enter "WINIPCFG" in the window displayed and click the OK button.
2.Select "MELCO WLI-PCM Adapter" and check the IP address.
If the IP address is not correct, refer to "Setting TCP/IP" on page 55.
Computers are not listed after double-clicking
the Network Neighborhood icon (continued)
Continued on next page

WLI-PCM User’s Manual106
■WindowsNT4.0
1.Click the Start button and select Programs → Command Prompt.
2.Enter "IPCONFIG" and press the RETURN key.
3.Check that the correct IP address is displayed for "IP Address" under "WLIPCM
Adapter".
If the IP address is not correct, refer to "Setting TCP/IP" on page 77.
Possible cause
The drive is not installed correctly.
Solution
Refer to "Add New Hardware Wizard does not appear when the WLI-PCM is
inserted (Windows98/95)" and then re-install the driver.
Possible cause
The driver is not installed correctly.
Solution
Check that the driver is installed correctly. Also, check that the lamp on the WLI-
PCM is lit.
When using Windows98/95, refer to "Checking after installation" on page 40.
When using WindowsNT4.0, refer to "Checking after installation" on page 72.
Ethernet adapter wlipcm1
IP address :192.168.100.188
Subnet Mask :255.255.255.0
Default Gateway :192.168.100.1
The access point cannot be accessed using
Client Manager (access point is displayed in
gray even when it is found).

WLI-PCM User’s Manual 107
Possible cause
TCP/IP is not installed or configured correctly.
Solution
Check the TCP/IP settings again.
■Windows98/95
1.Click the Start button and select Run....
Enter "WINIPCFG" in the window displayed and click the OK button.
2.Select "MELCO WLI-PCM Adapter" and check the IP address.
If the IP address is not correct, refer to "Setting TCP/IP" on page 55.
■WindowsNT4.0
1.Click the Start button and select Programs → Command Prompt.
2.Enter "IPCONFIG" and press the RETURN key.
3.Check that the correct IP address is displayed for "IP Address" under "WLIPCM
Adapter".
If the IP address is not correct, refer to "Setting TCP/IP" on page 77.
The access point cannot be accessed using
Client Manager (access point is displayed in
gray even when it is found). (continued)
Ethernet adapter wlipcm1
IP address :192.168.100.188
Subnet Mask :255.255.255.0
Default Gateway :192.168.100.1

WLI-PCM User’s Manual108
Possible cause
The ESS-ID of the target access point is not entered correctly.
Solution
The ESS-ID is upper/lower case sensitive. Check the ESS-ID of the access point
again, referring to the user’s manual of the WLA-T1 (available separately).
Possible cause
Communication with the access point is not possible due to poor signal reception.
Solution
Shorten the distance between the WLI-PCM and access point, or remove any
obstacles between them, and re-try communication.
Possible cause
The access point has not completed starting.
Solution
It takes 1 ~ 2 minutes for the access point to start after power is supplied. Wait
for 2 minutes or longer before attempting connection after turning the access
point on.
Solution
Refer to "Change target access point" on page 112.
The access point cannot be accessed using
Client Manager (access point is displayed in
gray even when it is found). (continued)
Change target access point
WLI-PCM User’s Manual 109
Possible cause
TCP/IP is not installed or configured correctly.
Solution
Check the TCP/IP settings again.
■Windows98/95
1.Click the Start button and select Run....
Enter "WINIPCFG" in the window displayed and click the OK button.
2.Select "MELCO WLI-PCM Adapter" and check the IP address.
If the IP address is not correct, refer to "Setting TCP/IP" on page 55.
■WindowsNT4.0
1.Click the Start button and select Programs → Command Prompt.
2.Enter "IPCONFIG" and press the RETURN key.
3.Check that the correct IP address is displayed for "IP Address" under "WLIPCM
Adapter".
If the IP address is not correct, refer to "Setting TCP/IP" on page 77.
Communication between wireless LAN PCs is
impossible. No reply is returned when execut-
ing the PING command to a wireless LAN PC.
Ethernet adapter wlipcm1
IP address :192.168.100.188
Subnet Mask :255.255.255.0
Default Gateway :192.168.100.1

WLI-PCM User’s Manual110
Possible cause
TCP/IP is configured, but the IP address is not correct.
Solution
Check that the IP address is set correctly.
Refer to "Assign IP address" on page 115.
Possible cause
The driver is not installed correctly.
Solution
Check that the driver is installed correctly. Also, check that the lamp on the WLI-
PCM is lit.
When using Windows98/95, refer to "Checking after installation" on page 40.
When using WindowsNT4.0, refer to "Checking after installation" on page 72.
Possible cause
The ESS-ID is different from the target computer.
Solution
The ESS-ID is upper/lower case sensitive. Check the ESS-ID for your computer
and the target computer.
Refer to "Connection to Network" on page 83.
Communication between wireless LAN PCs is
impossible. No reply is returned when execut-
ing the PING command to a wireless LAN PC.
(continued)

WLI-PCM User’s Manual 111
Possible cause
Communication with the access point is not possible due to poor signal reception.
Solution
Shorten the distance between the WLI-PCM and access point, or remove any
obstacles between them, and re-try communication.
Possible cause
The access point specifications do not permit a reply to a PING command exe-
cuted from wireless LAN PC. (A reply is only received if the PING command is
executed from a wired LAN PC.)
Solution
Perform connection test using Client Manager to check connection conditions
between the wireless LAN PC and access point.
Refer to "Checking connection between the WLI-PCM and an access
point" on page 92.
Solution
Contact the network administrator to check the TCP/IP settings (IP address,
presence of DHCP server, etc.). Also, refer to "Assign IP address" on page 115.
Communication between wireless LAN PCs is
impossible. No reply is returned when execut-
ing the PING command to a wireless LAN PC.
(continued)
No reply is received when the wireless LAN PC
executes the PING command to the access
point (WLA-T1).
Don’t understand settings in the TCP/IP dialog
box.
WLI-PCM User’s Manual112
8When You Want To...
This chapter describes how to change the target access point and
check the MAC address.
When you move from one cell to another in a wireless network, the target access
point must be changed. Follow the steps below to change the target access
point.
Change target access point
1Click the Start button and select Programs → MELCO WLI-PCM Utility → Cli-
ent Manager.
2Select the target access point at the destination.
3Select File → Connect....
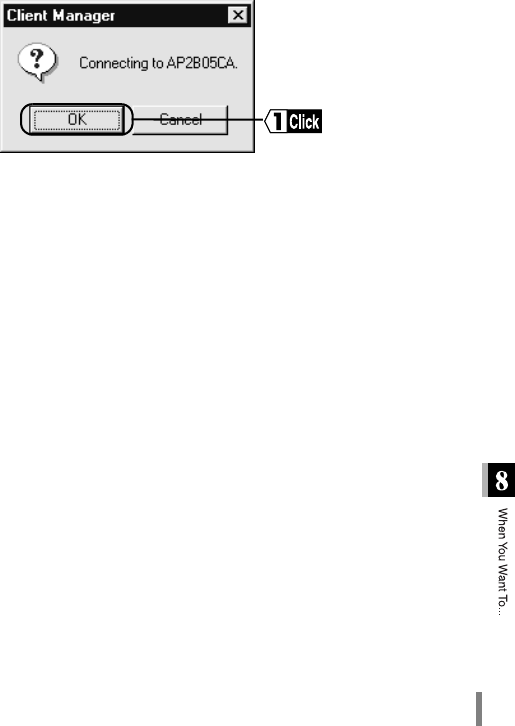
WLI-PCM User’s Manual 113
4Click the OK button.
The target access point is changed.

WLI-PCM User’s Manual114
Follow the steps below to execute the PING command and check that the IP
packet reaches the destination correctly.
The TCP/IP protocol must be installed to execute the PING command.
Check connection using PING command
1Click the Start button and select Programs → MS-DOS Prompt.
If you are using WindowsNT4.0, select Programs → Command Prompt.
2Enter the PING command as shown below (when the hard disk drive is "C").
C:\>ping XXX.XXX.XXX.XXX
Where "XXX.XXX.XXX.XXX" is the IP address of the target destination.
e.g.When the IP address of the target destination is "192.168.100.123"
C:\>ping 192.168.100.123
3If the devices are connected correctly, the following is displayed.
Pinging 192.168.100.123 with 32 bytes of data:
Reply from 192.168.100.123:bytes=32 time=1ms TTL=32
Reply from 192.168.100.123:bytes=32 time<10ms TTL=32
Reply from 192.168.100.123:bytes=32 time=4ms TTL=32
Reply from 192.168.100.123:bytes=32 time<10ms TTL=32
If they are not connected correctly, a condition specific error message such
as "Request timed out" or "Destination host unreachable" appears. In this
case, refer to "Communication between wireless LAN PCs is impossible. No
reply is returned when executing the PING command to a wireless LAN PC."
on page 109.
Connection to the access point cannot be checked by executing the
PING command from a wireless LAN PC.
WLI-PCM User’s Manual 115
An IP address must be set for each computer and other devices on the TCP/IP
network. There are several rules to observe when assigning an IP address to a
computer on the network.
■Rule 1
The same address cannot be assigned to multiple devices on a single network.
The IP address of each device must be unique.
<Example>
Computer A: 192.168.1.1 (255.255.255.0)
Computer B: 192.168.1.2 (255.255.255.0)
Computer C: 192.168.1.3 (255.255.255.0)
:
:
Computer X: 192.168.1.254 (255.255.255.0)
The code in the brackets is the sub net mask. If the IP address is set to
"192.168.x.x", the sub net mask should be "255.255.255.0".
■Rule 2
You cannot assign the network start address (XXX.XXX.XXX.0) or end address
(XXX.XXX.XXX.255) to a device on the network. The network number is
included in the IP address, and communication is impossible if the network num-
ber is different.
<Example>
If the sub net mask is "255.255.255.0", devices are regarded to be on the same
network when the first 3 elements of the IP address are the same. The IP
address represents the network number when the 4th element of the address is
"0".
Network A: 192.168.1.0 (network 192.168.1)
Network B: 192.168.2.0 (network 192.168.2)
Network C: 192.168.15.0 (network 192.168.15)
Network D: 192.168.133.0 (network 192.168.133)
Network E: 192.168.202.0 (network 192.168.202)
Networks A through E are recognized as different networks and intercommunica-
tion is impossible.
Assign IP address
Continued on next page
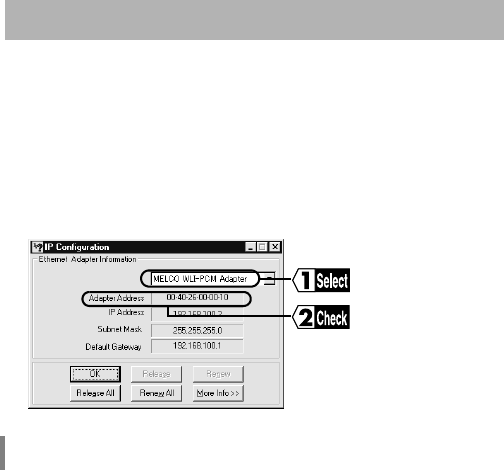
WLI-PCM User’s Manual116
IP addresses in network A are as follows.
192.168.1.0: Not available for use as IP address (used as the network number.)
192.168.1.1 ~ 192.168.1.254: IP address
192.168.1.255: Not available for use as IP address (used as the broadcast
packet)
When the sub net mask of network A is "255.255.255.0", for example,
"192.168.1.1" can communicate with "192.168.1.2", but cannot communicate
with "192.168.2.1".
■Rule 3
The following IP addresses are generally used for a LAN.
192.168.0.0 ~ 192.168.255.255 (255.255.255.0)
There are a large number of detailed books about TCP/IP available that you can
refer to. Be sure to consult your network administrator, if possible, before assign-
ing IP addresses.
Windows98/95
When TCP/IP is installed, follow the steps below to check the MAC address.
Check MAC address
1Click the Start button and select Run....
2Enter "WINIPCFG.EXE" and click the OK button.
The "IP Configuration" dialog box appears.
3Select "MELCO WLI-PCM Adapter". The MAC address is shown in the
Adapter Address field.
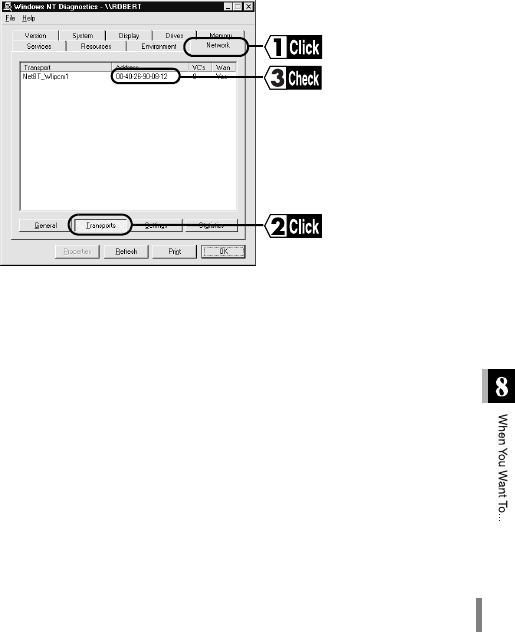
WLI-PCM User’s Manual 117
WindowsNT4.0
Follow the steps below to check the MAC address.
1Click the Start button and select Programs → Administrative Tools (Common)
→ WindowsNT Diagnostics.
2Click the Network tab and then the Transports button.

WLI-PCM User’s Manual118
9Appendix
This chapter contains definitions of special terms and the specifica-
tions of the WLI-PCM.
Networking terms used in this manual are defined below.
■ESS-ID
An identification code to classify computers on the wireless LAN into groups.
Computers can directly communicate with each other on the wireless LAN if they
have the same ESS-ID (i.e. they are in the same group) and are using the same
DS channel. Note that communication is possible only in the same group with
the same ESS-ID assigned. The ESS-ID is upper/lower case sensitive and can
consist of up to 32 alphanumeric characters, including the under bar (_).
■I/O port address (Input/Output)
A port for communicating information between the CPU and peripheral devices.
An I/O port address is assigned to each device in order to determine which port is
used by which device.
■IRQ (Interrupt Request)
Requests from all peripheral devices connected to your computer are processed
by the CPU, however, the CPU cannot estimate when a request is sent from
which device. If the CPU monitors all devices continuously, the monitoring time
becomes longer than the processing time, reducing performance. Therefore,
each device requests an "interruption" via an IRQ number with an urgent task for
the CPU. The CPU recognizes which device is requesting the interruption by its
IRQ number and processes the task. After the task is processed, the CPU
resumes its normal process.
■LAN (Local Area Network)
A network constructed in a relatively small area such as a single building or cam-
pus. Generally based on a data rate of 10 ~100 Mbps.
Terminology

WLI-PCM User’s Manual 119
■MAC address (Media Access Control Address)
Unique physical address assigned to a network card.
The MAC address consists of 6 bytes; the first half is the vendor code and the lat-
ter half is the user code. The vendor code is controlled and assigned by the
IEEE, while network card manufacturers assign a unique number for the user
code. Therefore, the MAC address assigned to your card is not used anywhere
else in the whole world. Frames transmitted using Ethernet are based on this
address.
■Microsoft network client
Client software for using server services, such as Windows98/95/NT4.0. The
protocol used is generally "NetBEUI".
■NetBEUI protocol
Network transport protocol for small- and medium-size LANs. NetBEUI is equiv-
alent to the transport and network protocol of the OSI protocol model. Integrating
NetBEUI and NetBIOS ensures an effective communication system in a work-
group LAN. This protocol is supported by Windows98/95/NT4.0.
■Peer to Peer connection
Communication between computers of the same level, performed via LAN or
WAN. Different from the server-client system, all computers on the network can
allow other users to access and use their resources. In regard to wireless LANs
in particular, this connection refers to the direct communication between wireless
LAN cards without using access points.
■
TCP/IP (Transmission Control Protocol / Internet Protocol)
A protocol corresponding to the network level and transport level of the OSI refer-
ence model. This protocol is defined by RFC. Therefore, different terminals can
communicate with each other using TCP/IP.
• Includes general application protocols such as TELNET and FTP.
• TCP/IP is the standard protocol for the Internet.
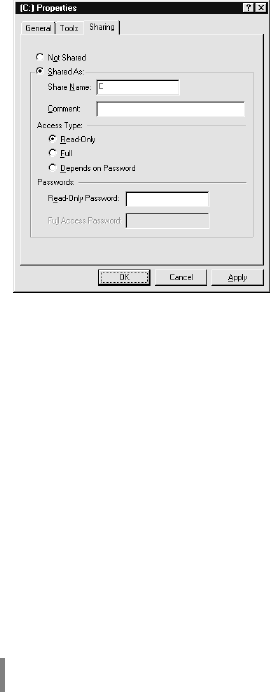
WLI-PCM User’s Manual120
■Sharing in Windows98/95
Click the icon of the drive to be shared with the right mouse button and click the
Sharing tab. The window shown below appears.
Window descriptions
Not shared: Check this option to cancel sharing for the drive.
Shared As: Check this option to share the drive.
Share Name: The shared drive name can be changed.
Access Type: Check an option to determine the operation allowed
to users.
Read Only: Check this option to make the drive a read-only disk.
Full: Check this option to allow users to write and read
data in the drive.
Depends on Password: Check this option to determine operation permission
according to the password.
Password: Password for "Access Type".
Read-Only Password: Sets the password for reading only.
Full Access Password: Sets the password for both reading and writing.
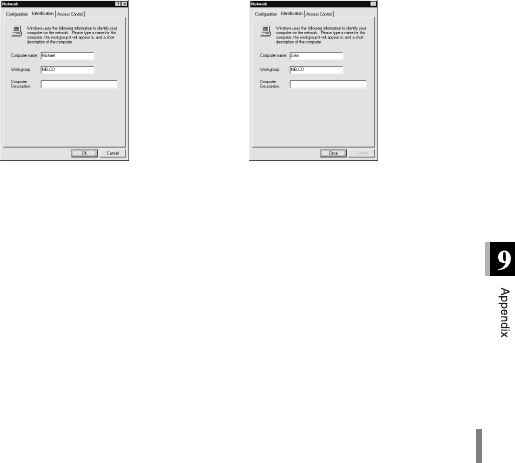
WLI-PCM User’s Manual 121
■User name and password for Windows98/95
When installing the driver and restarting the computer, a dialog box prompting
you to enter the network password appears.
• When using a network, enter the user name and password.
• The user name and password should be set during Windows98/95 setup.
When you log in for the first time, enter the user name and password deter-
mined during the setup. The password does not need to be entered.
• Multiple users can use a single computer by switching the environment. Each
user can log in by entering a new user name and password.
■Identification window of Windows98/95
Window
Window descriptions
Windows98
Double-click the Network icon and
click the Identification tab. The follow-
ing window appears.
Windows95
Double-click the Network icon and
click the Identification tab. The follow-
ing window appears.
Computer name: Name identifying each computer on the network.
A unique name is assigned to each computer.
Workgroup: Name classifying computers on the network.
Assign the same name to all the computers when they
do not need to be separated into groups.
Computer
Description: Supplementary description of the computer.
This field may be left blank.

WLI-PCM User’s Manual122
■Access point
Device required for a wireless LAN PC to access a computer on a wired LAN.
The ESS-ID of the target access point is required when the wireless LAN PC is
connected to the access point.
■Client
Computer that receives services. The client can use the information and services
provided by the server.
■Protocol
Procedures and rules for transmitting data between terminals on a network.
For example, when two computers are communicating with each other, several
requirements for communication must be determined, such as which one sends
what message first, how the other one receives the message and replies to it, the
data format, and measures for communication errors. These requirements
ensure correct data communication.
■Resources (system resource)
Generic term for the IRQ, I/O port address, etc. assigned to peripheral devices
connected to computers (mouse, keyboard, etc.), LAN board, and LAN card.
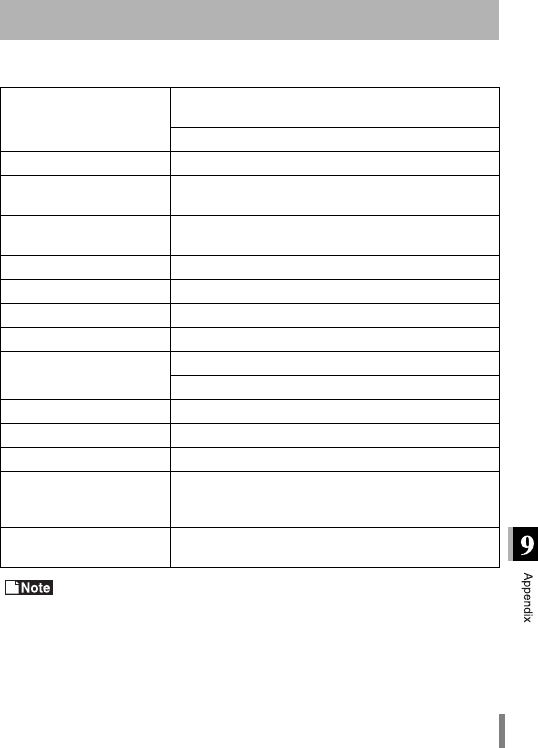
WLI-PCM User’s Manual 123
Refer to the following table for production specifications.
Please refer to the product catalogue or access MELCO INC.’s home
page (http://www.melcoinc.com/) for the latest product information and applicable
models.
Product specifications
Conforming standards
ARIB STD-33A (low power data communication
system standards)
IEEE802.11 (wireless LAN standard protocol)
Transmission method DS-SS (IEEE802.11 compliant), half-duplex
Max. distance
between terminals 450 ft outdoors, 150 ft indoors
(may vary depending on operating environment)
Compatible computers IBM AT compatible equipped with PC card slot
(type II)
Frequency range 2400 ~ 2483.5 MHz
Data transmission rate 2 Mbps / 1 Mbps (automatically switched)
Security ESS-ID
Operating voltage 4.5 ~ 5.5 V
Power consumption Sending 500 mA (Typ)
Receiving 320 mA (Typ)
Operating temperature 32 ~ 104 ºF
Storage temperature 14 ~ 140 ºF
Weight 53 g
Dimensions 123.7 (W) x 54 (L) x 4.9 (H) mm
(2 1/8" (W) x 3 7/8" (L) x 1/8" (H))
*Not including 11.2 mm antenna
Max. number of
wireless terminals 253 (recommended limit of 32)

WLI-PCM User’s Manual124
Notice
The information in this manual is subject to change without notice.
NEITHER TECHWORKS (DELAWARE), INC. (THE DISTRIBUTOR) NOR
MELCO INC. (THE MANUFACTURER)SHALL BE LIABLE FOR TECHNICAL
OR EDITORIAL ERRORS OR OMISSIONS CONTAINED HEREIN: OR FOR
INCIDENTAL OR CONSEQUENTAL DAMAGES RESULTING FROM THE FUR-
NISHING, PERFORMANCE OF USE OF THIS MANUAL.
This manual contains information protected by copyright. No part of this manual
may be photocopied or reproduced in any form without prior written consent from
MELCO INC.
(c) 1998-1999 MELCO INC.
All rights reserved. Printed in Japan.
Windows and Windows NT are trademarks of Microsoft Corporation.
Federal Communications Commission Notice
This equipment has been tested an found to comply with the limits for a Class B
digital device, pursuant to Part 15 of the FCC Rules. These limits are designed
to provide reasonable protection against harmful interference in a residental
instration. This equipment generates, uses, and can radiate radio frequency
energy and, if not installed and used in accordance with the instructions, may
cause harmful interference to radio communications. However, there is no guar-
antee that interference will not occur in a particular installation. If this equipment
does cause harmful interference to radio or television, which can be determined
by turning the equipment off and on, the user is encouraged to try to correct the
interference by one or more of the following measures:
• Reorient or relocate the receiving antenna.
• Increase the separation between the equipment and the receiver.
• Connect the equipment into an outlet on a circuit different from that to which the
receiver is connected.
• Consult the dealer or an experienced radio/TV technician for help.
Modifications
The FCC requires the user to be notified that any changes or modifications made
to this device that are not expressly approved by MELCO INC. (the manufac-
turer) may void the user’s authority to operate the equipment.
WLI-PCM User’s Manual
18 June, 1999 First revision
PY00-25025-DM10-01
Manufactured by:
MELCO INC. (Japan)
http://www.melcoinc.com/