BUFFALO 09101556-0 Wireless-N High Power ADSL2+Modem Router User Manual Manual
BUFFALO INC. Wireless-N High Power ADSL2+Modem Router Manual
UserManual.wiki
>
BUFFALO
>
09101556 0 User Manual
Manual
Navigation menu
Upload a User Manual
Namespaces
Wiki Guide
HTML
PDF
Info
Views
User Manual
Discussion / Help
Navigation

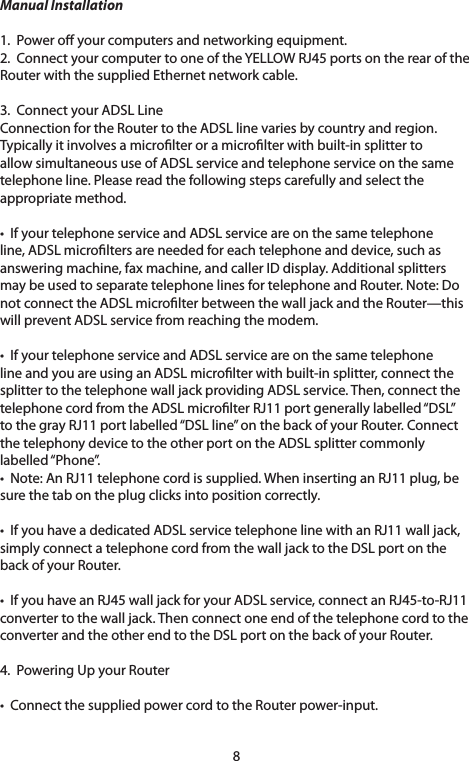
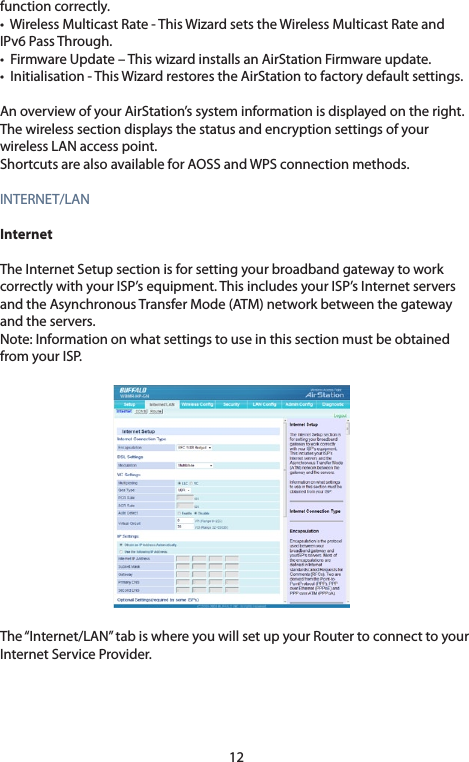

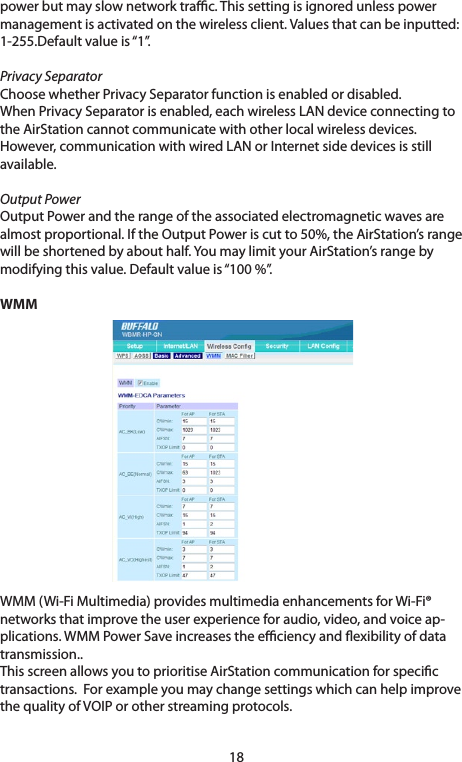
![16300MHz ModeBand WidthYoucanselectwhethertouse20MHzor40MHzmodesforwirelesscom-munication. The20-MHzchannelbandwidthlessensthechanceofinterferencewithotherwireless networks.However,thewide40-MHzchannelbandwidthincreasesthroughputupto300Mbps.Thedefaultsettingis20MHz.Extension ChannelWhen40MHzhasbeenselectedunderBandWidth,twochannelsareused-aControlChannelandanExtensionChannel.The Control Channel is specied by the [Wireless Channel] setting , and the ExtensionChannelisspeciedbythe[ExtensionChannel]setting.Broadcast SSIDFor security purposes, you can choose not to broadcast your network’s SSID (setto“Allow”bydefault).Doingsowillkeepyournetworknamehiddenfromcomputers that are scanning for the presence of wireless networks. To turn o thebroadcastoftheSSID,removethetick.Security/EncryptionThe WBMR-HP-GN modem router includes a security feature which allows eachwirelessclienttoconnectwithadierentlevelofsecurity.Thisfunctionis particularly useful in a situation where a single client can only connect viaWEP(lowestlevelofsecurity).Becauseclientscanconnectatdierentencryptionlevels,itmeansthatthesecurityoftheremainingwirelessdevicesis not compromised.Toidentifyyourwirelessnetwork,anamecalledtheSSID(ServiceSetIdenti¬er)isused.ThedefaultSSIDoftheRouterisprintedonthelabelattached on the back of the Router . You can change this to anything you wanttooryoucanleaveitunchanged.TochangetheSSID,typeintheSSIDthat you want to use in the SSID eld. If you make a change to the SSID, your wireless-equippedcomputersmayalsoneedtobereconguredtoconnectto your new network name.You can also change the Pre-Shared Key or password for each encryption typeandtheRekeyinterval(frequencywiththekeywillberenewed).](https://usermanual.wiki/BUFFALO/09101556-0/User-Guide-1095388-Page-18.png)
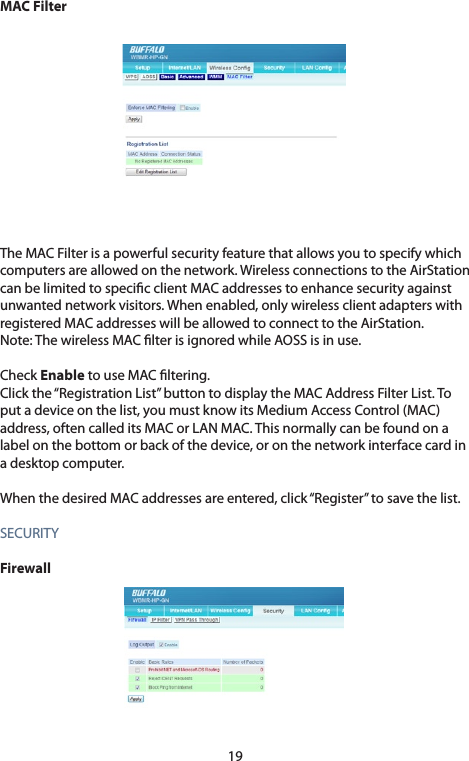
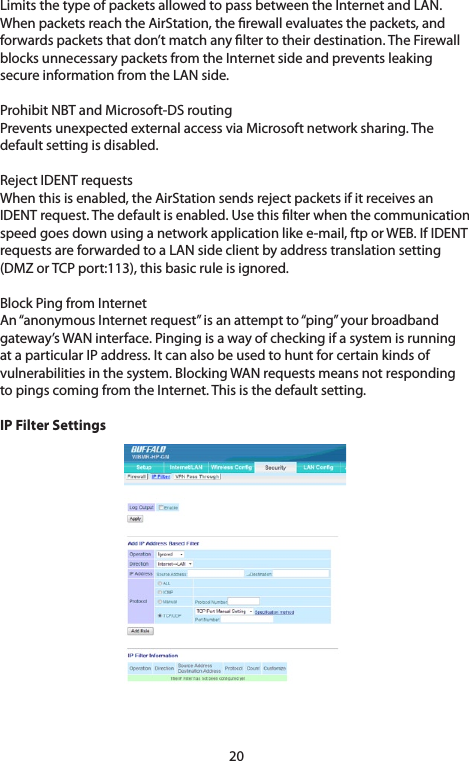
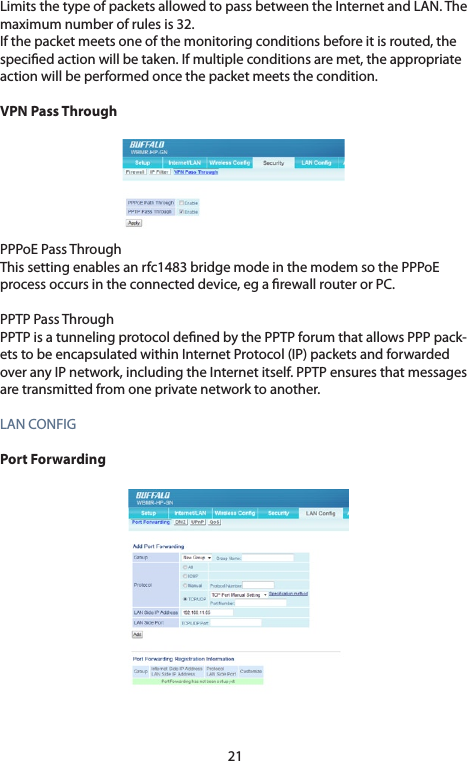
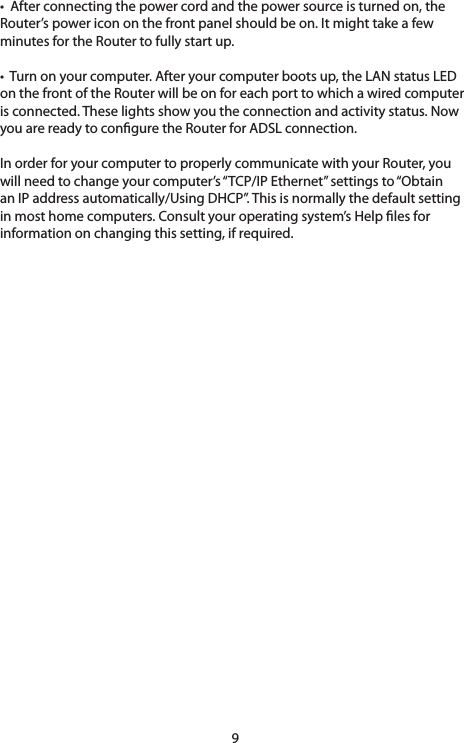
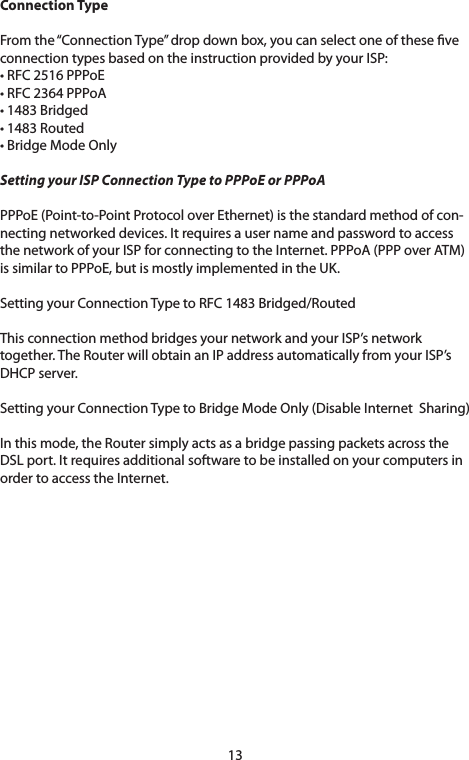
![23QoSQualityofService(QoS)assignsprioritylevelstodierentkindsofpacketstominimizedelaysinthetransferofdata.Thetablelistsfourcommonap-plications and lets you enter the port numbers for up to four more. Click the HighPrioritybuttonfortheapplication(s)whosepacketsyouwishtoreceivepreferential treatment.ADMINCONFIGNameThiscanbeusedtoassignaspecicdescriptivenamefortheAirStation.The AirStation name may be up to 64 alphanumeric characters in length, and ’-’ are allowed, but a ’-’ may not be the rst or last character in the name. By default, the AirStation name is its LAN-side MAC address. This name is used asthehostnamefortheInternetsideDHCPserverwhentheDHCPclientisenabled. Whenloginformationtothesyslogserveristransmitted,itusesitasthehostname. PasswordConguretheAdministratorPasswordtoreviewtheAirStationsettings.Change your root password here. Password may use alphanumeric characters and underscores [_], and may be up to 8 characters long.The default username is the word root and this setting cannot be changed.Time/DateYoumaysettheAirStation’sdateandtimemanuallyoracquirethisinforma-tionfromyourPC(TheTimeZonecannotbeacquiredbythismethod)NTPIfanNTPserveriscongured,theAirStationwillaccessthespeciedNTPserverandadjustit’sinternalclocktoconformwiththeNTPserver’stime.NTP](https://usermanual.wiki/BUFFALO/09101556-0/User-Guide-1095388-Page-25.png)
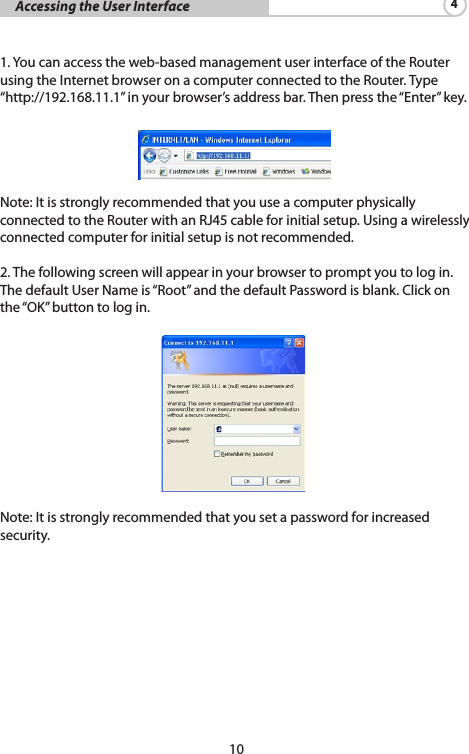
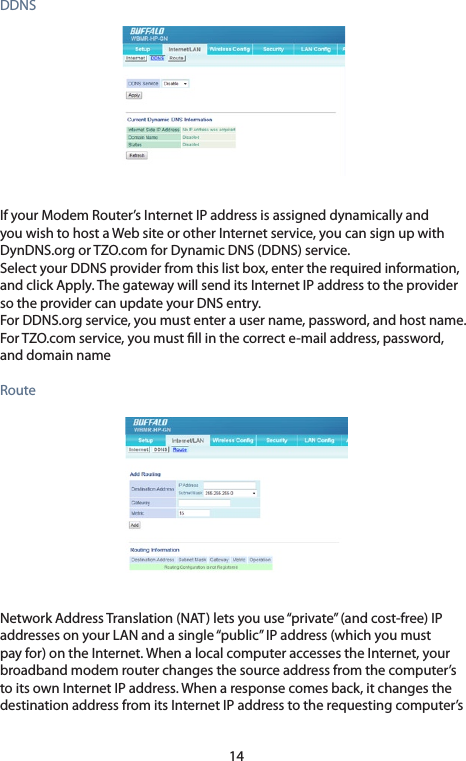
![24isanacronymofNetworkTimeProtocol.AnNTPserverdistributesaccuratetimetonetworkdevices.AccessYou may prohibit management of the AirStation in specic circumstances. EnablinganyoftheselimitationswillpreventchangesbeingmadetotheAirStation’s settings from PCs that meet the listed limitation criteria. Note that checkingalloftheseboxesatoncewillmakeitverydiculttomakefuturechanges to the AirStation’s settings.LogYoucantransfertheAirStation’sloginformationtoaserver.Checking [Enable] will instruct the AirStation to transmit log information to a Syslogserver.Thedefaultsettingisdisabled.Save/Restore Onceyou’vegotyourAirStationsetupthewayyouwantit,youmaysavethe current conguration to a le on the PC. This can then be used to restore settingsasrequired.Note:TheAirStationwillnotbeabletorestorecongurationsfromthesaveleinthe following circumstances:•Ifyoupassword-protectthebackupandthendon’tenterthepasswordcorrectly when restoring. •Congurationlecreatedwithalaterversionofthermwarethanyouarecurrently running. •Congurationlewascreatedbyadierentproduct.Initialize/RestartSometimesitmaybenecessarytorestartorinitializetheRouterifitisnotworkingcorrectly.RestartingtheRouterwillNOTdeleteanyofyourcongu-ration settings.However,ifyouchoosetoinitializeyourAirStationsettingswillberestoredtofactory defaults.UpdateFromtimetotime,BualomayreleasenewversionsoftheRouter’srmware.Firmwareupdatescontainfeatureimprovementsandxestoproblemsthatmayhaveexisted.WhenBualoreleasesnewrmware,youcandownloadthe rmware from the Bualo website and update your Router’s rmware to thelatestversion.](https://usermanual.wiki/BUFFALO/09101556-0/User-Guide-1095388-Page-26.png)
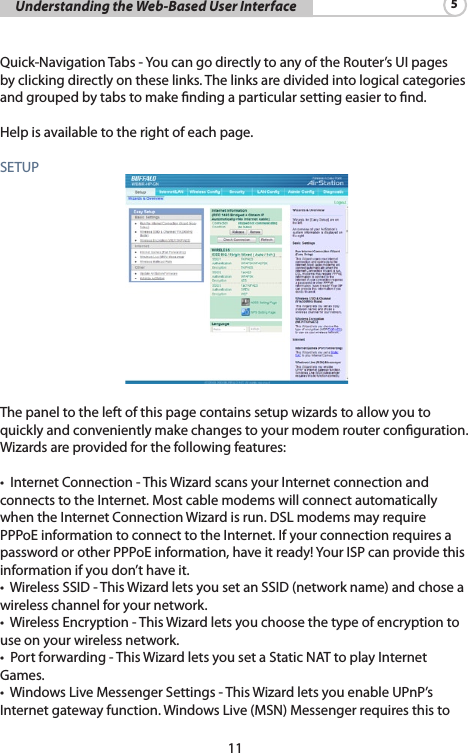
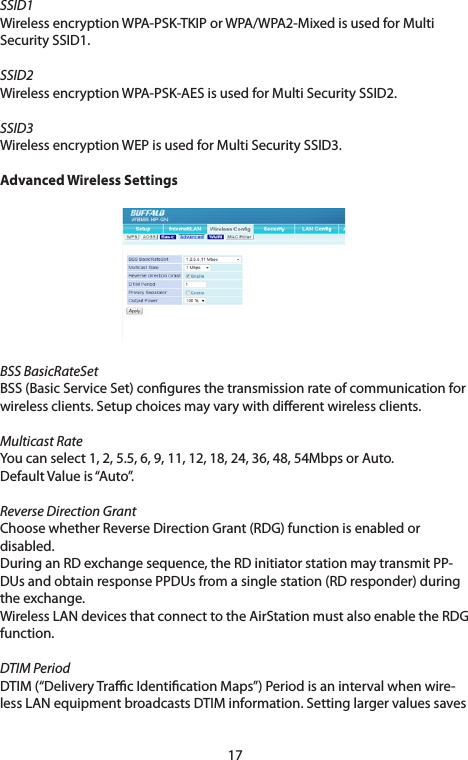
![25Updating the Router’s Firmware 1. In the “Update” screen, click “Browse”. A window will open that allows you to select the location of the rmware update le. 2. Browse to the rmware le you downloaded. Select the le by double- clicking on the le name. 3.Click“UpdateFirmware”toupdatetothelatestrmwareversion.DIAGNOSTICDiagnostic panels show the current status of your modem router, its local network connection, the wireless interface, and the DSL link. The informa-tion displayed is read-only ie. you cannot change any settings through these panels.System InfoDisplay the AirStation’s main settings.LogsDisplays log information recorded by your AirStation. Select the type of information you wish to log and the location.Packet InfoDisplaysthetotalnumbersofpacketssentandreceivedbytheAirStation,and any errors.Client MonitorDisplaystheLANsideclients(PC’s)thatareaccessingtheAirStation.PingA Ping test can be performed from your AirStation. With a ping test, you can establish whether the AirStation can communicate with a specic network device.EnterthenetworkIPaddressthatyouwanttoping;e.g.192.168.11.3orwww.bualotech.com.Click[Execute]andtheresultsofthetestaredisplayed.DSL ConnectionIf a DSL link has been established, technical information about it is shown here.ThePVCConnectionsectionreectssettingsintheInternetConnectionandVCSettingsareasoftheInternet/LANpanel.](https://usermanual.wiki/BUFFALO/09101556-0/User-Guide-1095388-Page-27.png)
![29Austria, Belgium, Germany, Denmark, Spain, Greece, France, Finland, Italy, Ireland,Luxembourg,TheNetherlands,Portugal,Sweden,UnitedKingdom,Cyprus,CzechRepublic,Estonia,Hungry,Latvia,Lithuania,Malta,Poland,SlovakRepublicandSlovenia.ThedeviceisalsoauthorisedforuseinallEFTAmemberstatesIceland,Liechtenstein,NorwayandSwitzerland.EU countries not intended for use:NonePotential restrictive use:Thisdeviceisa2.4GHzwirelessLANtransceiver,intendedforindoorhomeandoceuseinallEUandEFTAmemberstates,exceptinFrance,BelgiumandItalywhererestrictiveuseapplies.In Italy the end-user should apply for a license at the national spectrum authoritiesinordertoobtainanauthorizationtousethedeviceforsettingupoutdoor radio links.InBelgiumthereisarestrictioninoutdooruse.ThefrequencyrangeinwhichoutdooroperationinBelgiumispermittedis2460–2483.5MHz.InFranceonlychannels10,11,12and13areavailable.ThisdevicemaynotbeusedforsettingupoutdoorradiolinksinFrance.Formore information see http://www.anfr.fr/ and/or http://www.art-telecom.frSafetyThisequipmentisdesignedwiththeutmostcareforthesafetyofthosewhoinstallanduseit.However,specialattentionmustbepaidtothedangersofelectricshockandstaticelectricitywhenworkingwithelectricalequipment.All guidelines of this manual and of the computer manufacturer must there-forebeallowedatalltimestoensurethesafeuseoftheequipment.0560 Česky [Czech]Bualo Technology tímto prohlašuje, že tento Modem Router jeveshoděsezákladnímipožadavkyadalšímipříslušnýmiustanovenímisměrnice1999/5/ES. Dansk [Danish]UndertegnedeBualoTechnologyerklærerherved,atføl-gendeudstyrModemRouteroverholderdevæsentligekravogøvrigerelevantekravidirektiv1999/5/EF.](https://usermanual.wiki/BUFFALO/09101556-0/User-Guide-1095388-Page-31.png)
![30 Deutsch [German]Hiermit erklärt Bualo Technology, dass sich das Gerät Modem Router in Übereinstimmung mit den grundlegenden Anforderungen und den übrigen einschlägigen Bestim-mungen der Richtlinie 1999/5/EG bendet. Eesti [Es-tonian]KäesolevagakinnitabBualoTechnologyseadmeModemRoutervastavustdirektiivi1999/5/EÜpõhinõuetelejanimetatuddirektiivisttulenevateleteisteleasjakohastelesätetele. English Hereby, Bualo Technology, declares that this Modem Router isincompliancewiththeessentialrequirementsandotherrelevantprovisionsofDirective1999/5/EC. Español [Spanish]PormediodelapresenteBualoTechnologydeclaraqueelModemRoutercumpleconlosrequisitosesencialesycualesquieraotrasdisposicionesaplicablesoexigiblesdelaDirectiva1999/5/CE. Ελληνική [Greek]ΜΕ ΤΗΝ ΠΑΡΟΥΣΑ Bualo Technology ΔΗΛΩΝΕΙ ΟΤΙ Modem Router ΣΥΜΜΟΡΦΩΝΕΤΑΙ ΠΡΟΣ ΤΙΣ ΟΥΣΙΩΔΕΙΣ ΑΠΑΙΤΗΣΕΙΣ ΚΑΙ ΤΙΣ ΛΟΙΠΕΣ ΣΧΕΤΙΚΕΣ ΔΙΑΤΑΞΕΙΣ ΤΗΣ ΟΔΗΓΙΑΣ 1999/5/ΕΚ. Français [French]ParlaprésenteBualoTechnologydéclarequel’appareilMo-demRouterestconformeauxexigencesessentiellesetauxautresdispositionspertinentesdeladirective1999/5/CE. Italiano [Italian]ConlapresenteBualoTechnologydichiarachequestoModemRouterèconformeairequisitiessenzialiedallealtredisposizionipertinentistabilitedalladirettiva1999/5/CE.Latviski[Latvian]AršoBualoTechnology/izgatavotājanosaukums]deklarē,kaModemRouteratbilstDirektīvas1999/5/EKbūtiskajāmprasībāmuncitiemartosaistītajiemnoteikumiem.Lietuvių[Lithua-nian] Šiuo Bualo Technology deklaruoja, kad šis Modem Router atitinkaesminiusreikalavimusirkitas1999/5/EBDirektyvosnuostatas. Ned-erlands [Dutch]HierbijverklaartBualoTechnologydathettoestelModemRouterinovereenstemmingismetdeessentiëleeisenendeandererelevantebepalingenvanrichtlijn1999/5/EG.](https://usermanual.wiki/BUFFALO/09101556-0/User-Guide-1095388-Page-32.png)
![31 Malti [Maltese]Hawnhekk, Bualo Technology, jiddikjara li dan Modem Routerjikkonformamal-ħtiġijietessenzjaliumaprovvedi-mentioħrajnrelevantilihemmd-Dirrettiva1999/5/EC. Magyar [Hungar-ian]Alulírott,BualoTechnologynyilatkozom,hogyaModemRoutermegfelelavonatkozóalapvetõkövetelményeknekésaz1999/5/ECirányelvegyébelõírásainak. Polski[Polish]NiniejszymBualoTechnologyoświadcza,żeModemRouterjestzgodnyzzasadniczymiwymogamiorazpozostałymistosownymi postanowieniami Dyrektywy 1999/5/EC. Portu-guês [Portu-guese]BualoTechnologydeclaraqueesteModemRouterestáconformecomosrequisitosessenciaiseoutrasdisposiçõesdaDirectiva1999/5/CE.Sloven-sko[Slov-enian]BualoTechnologyizjavlja,dajetaModemRoutervskladuzbistvenimizahtevamiinostalimirelevantnimidoločilidirek-tive1999/5/ES.Slov-ensky [Slovak]BualoTechnologytýmtovyhlasuje,žeModemRouterspĺňazákladnépožiadavkyavšetkypríslušnéustanoveniaSmernice1999/5/ES. Suomi [Finnish]BualoTechnologyvakuuttaatätenettäModemRoutertyyp-pinenlaiteondirektiivin1999/5/EYoleellistenvaatimustenjasitäkoskeviendirektiivinmuidenehtojenmukainen.Svenska[Swedish]Härmed intygar Bualo Technology att denna Modem Router stårIöverensstämmelsemeddeväsentligaegenskapskravochövrigarelevantabestämmelsersomframgåravdirektiv1999/5/EG.](https://usermanual.wiki/BUFFALO/09101556-0/User-Guide-1095388-Page-33.png)
![36Contact Information - Asian Pacic[Taiwan]TEL: 0800-660-886e-mail:support@bualo-tech.com.tw[Republic of Korea]TEL: 02-2057-2095e-mail:support@bualotech.co.kr [India]TEL: 1-8004256210e-mail:csbualo@accelfrontline.in[Singapore]TEL: 65-6297-2085e-mail:bualo@blumm.com [China]TEL: 86-800-820-8262e-mail:support@bualo-china.com[Australia]345 Princes Highway, Rockdale NSW 2216TEL: 1300 761 310[Hong Kong]TEL: 852-2345-0005e-mail:support@hornington.com[Thailand]TEL: 02-716-6669[Malaysia]TEL: 03-5032-0138e-mail:bualo@ecsm.com.my[Indonesia]TEL: 021-6231-2893](https://usermanual.wiki/BUFFALO/09101556-0/User-Guide-1095388-Page-38.png)
![37[Philippines]TEL: 2-688-3999e-mail:digisupport@msi-ecs.com.ph[OtherArea]Please contact the shop or distributor where youpurchased, referring to the attached warranty cardissued by distributor.At Bualo Technology, we constantly update our software and rmware. For the mostrecent software, rmware, driver, and technical whitepaper releases avail-able, please visit the Bualo Technology website: www.bualo-technology.com.](https://usermanual.wiki/BUFFALO/09101556-0/User-Guide-1095388-Page-39.png)