BUFFALO 09101746-0 AirStation Compact Flash 802.11b Adapter User Manual Part 1
BUFFALO INC. AirStation Compact Flash 802.11b Adapter Part 1
BUFFALO >
Contents
- 1. Part 1
- 2. Part 2
Part 1

Wireless LAN Card
WLI2-CF-S11
User's Manual
Before Operation
1
Windows CE Settings
2
Windows Me/98
3
Windows 2000 Settings
4
Troubleshooting
5
Glossary
6
Specifications
7
WLI-CF-S11G.book i ページ 2002年2月27日 水曜日 午後9時10分
■ Precautions for radio signals
● The wireless LAN card WLI2-CF-S11has been approved for conformity
to the engineering standards as the wireless facility for a radio station
with the low power data communication system based on the Wireless
Telegraphy Act. Therefore, use of this LAN card does not require any
radio station license.
● Never use the WLI2-CF-S11 near the magnetic field around a
microwave oven or in an area where static electricity and/or radio noise is
generated. The radio signals may not be normally transmitted in these
areas.
* When the WLI2-CF-S11 is used near a wireless printer buffer
(BUFFALO's RYP-G or similar products by other manufacturers) that
use radio signals around 2.4 GHz, the processing speed of both
devices may be adversely affected.
● As the WLI2-CF-S11 has been approved for conformity to the
engineering standards, the following may be regarded as unlawful.
• Disassembling/remodeling the WLI2-CF-S11
• Removing the approval label from the rear of the WLI2-CF-S11
● When it is necessary to set a radio channel other than the initial setting in
the WLI2-CF-S11, use the same frequency band as the following
equipment or wireless stations
• Industrial, scientific, or medical equipment
• Radio station for mobile identification used such as on a manufacture
line in a factory
①On-premise radio station (requiring a license)
②Specific low power radio station (requiring no license)
● Operating the WLI2-CF-S11 may cause interference with the above
equipment or radio stations. Thus, take precautions for the following
points
1 Before using the WLI2-CF-S11, verify that no on-premise radio
station for mobile identification or no specific low power radio
station is operating near the WLI2-CF-S11.
2 If an event of interference should be taken place by the WLI2-CF
-S11 with an on-premise radio station for mobile identification,
WLI-CF-S11G.book 0 ページ 2002年2月27日 水曜日 午後9時10分

WLI2-CF-S11 User's Manual
1
immediately change the frequency for this product to prevent the
interference.
3 If you notice any trouble such as an event of interference caused by
the WLI2-CF-S11 with a specific radio station for mobile
identification, contact your nearest sales representative.
Operating
frequency band
2.4GHz
Modulation method DS-SS
Assumed
interference
distance
40 m or less
Frequency
changeability
Uses the entire bandwidth, and can avoid the
"on-premise radio station" and "specific lower
power radio station" bands.
WLI-CF-S11G.book 1 ページ 2002年2月27日 水曜日 午後9時10分
WLI2-CF-S11 User's Manual
2
Foreword
Thank you for purchasing BUFFALO's wireless LAN card WLI2-CF-S11.
The WLI2-CF-S11 is installed for wireless LAN communication in
computers equipped with a CompactFlash slot (type II) or PC card slot (type
II).
Read this manual carefully before using the wireless LAN card to ensure
correct operation.
■ For your safety, be sure to follow the instructions
given below.
The following describes the instructions to avoid harming yourself, other
people, and properties, and to ensure safe operation of this product. Be sure
to read and understand them thoroughly before using this product. This
manual also contains instructions concerning general operation of the
computer system to which this product is connected as well as those
concerning the product.
Please take note that our warranty will not cover any failures and problems
of the computer, any losses and failures of data, or failures and problems of
this product caused by misuse.
Meanings of warning signs
Warning Failure to follow the instructions shown with this sign
may result in a hazard or serious injury to the user.
CAUTION Failure to follow the instructions shown with this sign
may result in injury to the user or property damage.
WLI-CF-S11G.book 2 ページ 2002年2月27日 水曜日 午後9時10分
WLI2-CF-S11 User's Manual
3
■Meanings of symbols
This indicates warnings and cautions. Specific instructions are given
in or around △. (E.g., Exercise care to avoid an electric shock.)
This indicates prohibited matters. Specific instructions are given in
or around ○. (E.g., Do not disassemble.)
This indicates compulsory rules. Specific instructions are given in or
around ●. (E.g., Disconnect the plug from the receptacle.)
WARNING
No
disassembly
Do not disassemble or modify the product.
It may cause fire or electric shock.
Unplugging
Turn off the power to the computer and peripheral
devices immediately and unplug them if you drop the
product or it receives a severe physical shock.
If you continue using them under such circumstances, a short
circuit resulting in fire or electric shock may occur. Please
contact your nearest sales representative.
Compulsory
Be sure to observe instructions by manufacturers of
personal computers and peripherals when installing and
using this product.
Unplugging
Turn off the power to the computer and peripheral
devices immediately and unplug them if smoke or heat is
generated.
If you continue using them under such circumstances, a short
circuit resulting in fire or electric shock may occur. Please
contact your nearest sales representative.
WLI-CF-S11G.book 3 ページ 2002年2月27日 水曜日 午後9時10分
WLI2-CF-S11 User's Manual
4
CAUTION
Compulsory
Never touch this product with wet hands when the power
cable of this product is connected to the power outlet.
It will cause electric shock.
Compulsory
Touch something made of metal (a door knob or
aluminum window frame, for example) and release static
electricity before touching the product to avoid damage
caused by static electricity.
Static electricity generated around the human body may
damage this product or delete or damage digital data.
Compulsory
Follow the local rules or regulations when disposing of
this product.
Inquire of your local government about the applicable rules or
regulations.
Compulsory
Be sure to create backup files on other media (floppy
disk, MO disk, etc.) for your data on the hard disk.
We recommends that you create two backup copies of critical
data, one before and one after the original data is updated. Data
may be deleted or damaged when
• Data may be deleted or damaged when:
• Incorrect operation is performed.
• Data is affected by static electricity or electrical noise.
• Hardware is mechanically damaged or under maintenance.
• Your computer is turned on immediately after being turned
off.
• Hardware is damaged in a natural disaster.
Note that We shall not be liable for any damages arising from
loss or damage of digital data in any case.
WLI-CF-S11G.book 4 ページ 2002年2月27日 水曜日 午後9時10分

WLI2-CF-S11G User's Manual
5
Using this manual
The following describes the notational conventions used in this manual.
Please use care for the marks and notations to use this manual effectively.
■Editorial marks and notations
Caution mark
Describes cautions when handling the product. If these instructions
are not observed, injuries or mechanical damage may occur.
Note mark
Describes supplementary information or items which should be
understood when handling the product.
Reference mark
Indicates the page(s) containing related information.
• Descriptions enclosed by square brackets [ ] apply to the name of a menu,
button, textbox, or checkbox to be selected during operation.
• Descriptions enclosed by double quotation marks " " primarily apply to
the software, dialog box, message, or a title of a section to be referenced
during operation.
• As a general rule, this manual primarily refers to the BUFFALO's
wireless LAN card as the WLI-CF-S11G, a packet PC or handheld PC
with Windows CE as a Windows CE device, and a personal computer
with Windows Me/98/2000 as a Windows computer.
• As a general rule, this manual refers to a Windows CE device and a
Windows computer each equipped with the BUFFALO's wireless LAN
card as a wireless LAN computer.
• This manual clearly distinguishes between a cabled 10BASE-T/
100BASE-TX LAN and a non-cabled LAN as follows
Wired LAN……LAN connected by cables
Wireless LAN…LAN using wireless communication
Note that these are not general terms and are used only for descriptions in
this manual.
WLI-CF-S11G.book 5 ページ 2002年2月27日 水曜日 午後9時10分

WLI2-CF-S11 User's Manual
6
■All rights for this manual are owned by BUFFALO. No part of this manual may be
transmitted, reproduced, or revised without permission from BUFFALO.
■Product names of other companies used in this manual are trademarks or registered
trademarks of the respective companies.
Trademark symbols , , are not indicated in this manual.
■Specifications, design, and other descriptions included in this manual are subject to
change without notice.
This manual is carefully prepared, however, feel free to contact your nearest sales
representative if you have any questions or problems.
This product should be used as a general OA device in offices or at home. BUFFALO does
not accept any liability if the product is used other than as a general OA device.
・Do not use this product for any device or system which requires high safety such as a
medical device or any system which is directly or indirectly related to maintaining
human life.
・If this product is used for any device or computing system which requires more
reliability than general OA devices, please make sure that you take any necessary actions
to ensure safety and prevent system malfunctioning.
■Be sure to follow the operation method described in this manual. In particular, never use
this product in such a way as violating the method described as a caution.
WLI-CF-S11G.book 6 ページ 2002年2月27日 水曜日 午後9時10分

WLI2-CF-S11 User's Manual
7
Table of Contents
Chapter 1 Before Operation
1.1 Product Outline .................................................... 10
1.2 Contents of Package and Component Names .... 14
Chapter 2 Windows CE Settings
2.1 Making the Wireless LAN Card Available ............ 18
2.2 Preparing for Connecting to the Network ............ 21
2.3 Connecting to the Network .................................. 23
Chapter 3 Windows Me/98Settings
3.1 Making the Wireless LAN Card Available ............ 34
3.2 Preparing for Connecting to the Network ............. 52
3.3 Connecting to the Network .................................. 66
Chapter 4 Windows 2000 Settings
4.1 Making the Wireless LAN Card Available............ 78
4.2 Preparing for Connecting to the Network ............ 91
4.3 Connecting to the Network 95
Chapter 5 Trouble shooting
5.1 Trouble in the Wireless LAN Card Setting ......... 102
5.2 Trouble in Communication With Wireless LAN
Computers ..........................................................113
Chapter 6 Glossary
6.1 Terms Related to the Network ........................... 126
6.2 Terms in Windows Screens Related to the
Network ............................................................. 133
Chapter 7 Specifications
7.1 Product Specifications ....................................... 138
WLI-CF-S11G.book 7 ページ 2002年2月27日 水曜日 午後9時10分

WLI-CF-S11G ユーザーズマニュアル
8
MEMO
WLI-CF-S11G.book 8 ページ 2002年2月27日 水曜日 午後9時10分

■Overview Chapter1
Chapter 4Before
Operation
This chapter contains the outline of the product
and the contents of the package. Be sure to
read them so that you can smoothly proceed
with the preparatory operations without
trouble.
1.1 Product Outline
■ About wireless LAN card WLI2-CF-S11 ....... 10 Page
■ Wireless LAN network configuration ............. 12 Page
1.2 Contents of Package and Component Names
WLI-CF-S11G.book 9 ページ 2002年2月27日 水曜日 午後9時10分

WLI2-CF-S11 User's Manual
10
1.1 Product Outline
Please be aware of the following points before using the wireless LAN card
WLI2-CF-S11.
■ About the wireless LAN card WLI2-CF-S11
The wireless LAN card WLI2-CF-S11 is installed for use in computers
equipped with a Compact Flash slot (type II) or PC card slot (type II).
Features
• 2.4 GHz low power data communication system (certification not
required).
• Direct sequence spread spectrum (DS-SS) technology ensures high noise
resistance.
• IEEE802.11b compliant, with a data rate of 11 Mbps even on a wireless
LAN.
• Effective range is shown below;
11 Mbps transmission: 160 m outdoors (estimated)
50 m indoors (1) (estimated)
25 m indoors (2) (estimated)
2 Mbps transmission: 400 m outdoors (estimated)
90 m indoors (1) (estimated)
40 m indoors (2) (estimated)
1 Mbps transmission: 550 m outdoors (estimated)
115 m indoors (1) (estimated)
50 m indoors (2) (estimated)
※ Indoors (1): .....Office with few obstacles
Indoors (2): .....Office with many obstacles
※ The effective range is adversely affected by the operating environment.
It may be reduced in the following locations.
• Within a reinforced concrete building such as a condo, or a house with
a metal frame
• Near large metal furniture
WLI-CF-S11G.book 10 ページ 2002年2月27日 水曜日 午後9時10分

1
WLI2-CF-S11 User's Manual
11
• 40-/128-bit WEP compatible. (For more information, see "About
WEP (Wired Equivalent Privacy) - Recommendation of Encryption -"
on page 13.)
※ When using 128-bit WEP, all access points need to be compatible with
the 128-bit WEP. (40-bit WEP and 128-bit WEP cannot be used at the
same time.)
The WLI2-CF-S11 card can be used in computers with the compatible
operating systems listed below.
Applicable Computers
Personal computers equipped with a Compact Flash slot (type II) or PC card
slot (type II) listed below.
• Pocket PC
• Handheld PC
• IBM AT compatible PC (OADG compliant)
※ Installation of the card in a PC card slot (type II) requires the
BUFFALO's card adapter WLI-CF-OP available separately.
• BUFFALO's print server LSP Series and network
diagnostic tool NetSeeker are not supported.
• The Suspend/Resume feature is not supported.
• Dual-processor machine is not supported.
Operating System
※ Windows CE3.0 (Handheld PC 2000, Packet PC), Windows ME/98/
2000
※ The ACPI feature in Windows Me/98/2000 is not supported.
WLI-CF-S11G.book 11 ページ 2002年2月27日 水曜日 午後9時10分
WLI2-CF-S11 User's Manual
12
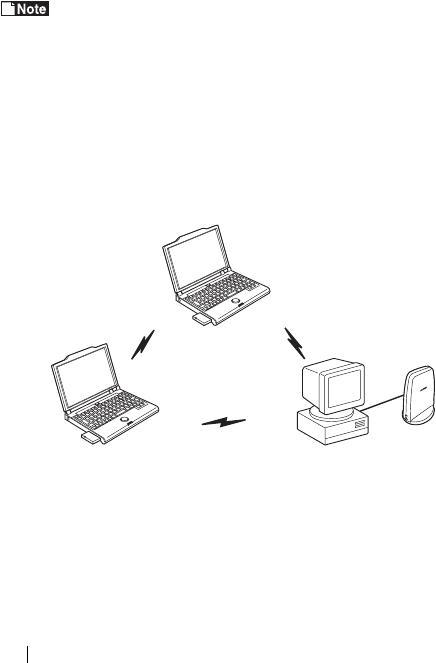
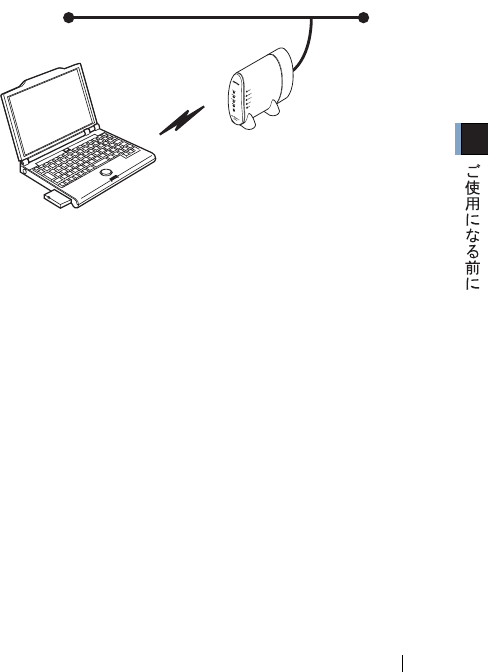
■ Wireless LAN network configuration
The following two methods are available for PC communications with the wireless
LAN card.
This product can communicate with BUFFALO's LAN
products, third-party wireless LAN products with Wi-Fi
certified, and AirPort(*).
※ Communication with AirPort requires BUFFALO's
AirStation.
<<Communicating with wireless LAN computers>>
You can configure the wireless LAN only network of the wireless LAN
computers with BUFFALO's wireless LAN cards/adapters.
Wireless LAN PC
Wireless LAN PC
Wireless LAN PC
WLI-CF-S11G.book 12 ページ 2002年2月27日 水曜日 午後9時10分
1
WLI2-CF-S11 User's Manual
13
≪Communicating via AirStation ≫
You can connect to the Internet or communicate with computers on the
wired LAN via BUFFALO's AirStation.
■ WEP (Wired Equivalent Privacy) - Recommendation
of Encryption
Since the wireless LAN card communicates using radio waves, radio
packets could be intercepted and analyzed outside. To ensure transmission
security, it is recommended to set a password called 'WEP' in the radio
packets during communication.
This card allows two types of WEP; 40-bit WEP and 128-bit WEP. Setting
128-bit WEP (13 alphabetic characters or 26 hex digits) assures higher
security. However, when communicating with a wireless LAN product
compatible only with 40-bit WEP (5 alphabetic characters or 10 hex digits),
it is necessary to set the 40-bit WEP in this product.
※ For the WEP (encryption) setting in the AirStation, refer to the manual
included in the AirStation.
AirStation
Wired LAN
Wireless LAN PC
WLI-CF-S11G.book 13 ページ 2002年2月27日 水曜日 午後9時10分
WLI2-CF-S11 User's Manual
14
1.2 Contents of Package and Component Names
The items listed below are included in the package. Please check the
package and contact your nearest sales representative if any items are
missing.
• Wireless LAN card . . . . . . . . . . . . . . . . . . . . . . . . . . . . . . . . . . . . . . . . . . 1
• AirNavigator CD. . . . . . . . . . . . . . . . . . . . . . . . . . . . . . . . . . . . . . . . . . . 1
• WLI2-CF-S11 User's Manual (this document) . . . . . . . . . . . . . . . . . . . . . 1
• User registration card, warranty. . . . . . . . . . . . . . . . . . . . . . . . . . . . . . . . . 1
•
• Be sure to read any additional information sheets provided in the
package.
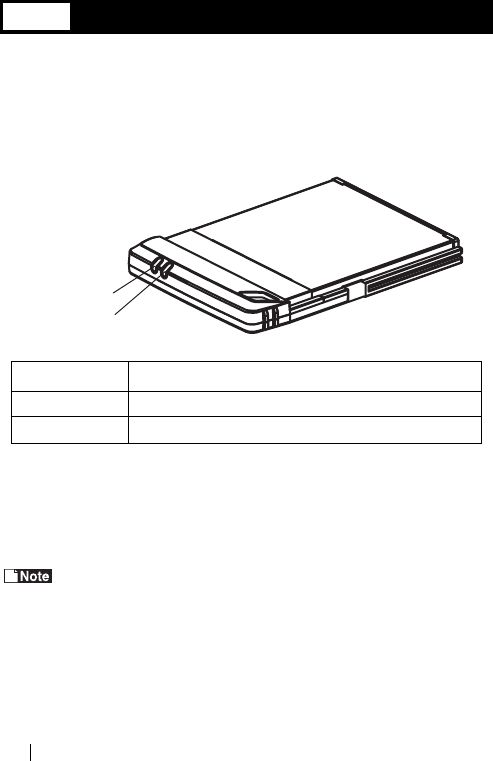
Name Function
POWER lamp ON (green): During operation
ACTIVE lamp
ON (green): During data send/receive
ACTIVE lamp
POWER lamp
WLI-CF-S11G.book 14 ページ 2002年2月27日 水曜日 午後9時10分
■Overview Chapter2
Chapter 2 Windows
CE Settings
This chapter describes how to make the
settings for connecting your Windows CE
device to a wireless LAN.
2.1 Making the Wireless LAN Card Available
Step 1 Before installing the wireless LAN card ......18 page
Step 2 Installing the wireless LAN card drivers ......18 page
Step 3 Installing the wireless LAN card ...................20 page
2.2 Preparing for Connecting to the Network
Step 4 Checking the "IP address" ...........................21 page
2.3 Connecting to the Network
Step 5 -a Communicating via AirStation ....................23 page
Step 5 -b Communicating with wireless LAN
computers ......................................................27 page
WLI-CF-S11G.book 15 ページ 2002年2月27日 水曜日 午後9時10分
WLI2-CF-S11 User's Manual
16
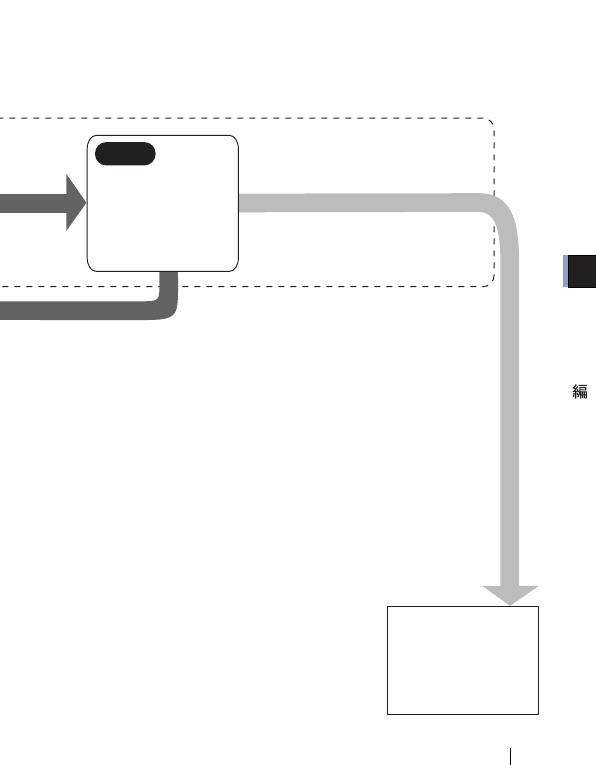
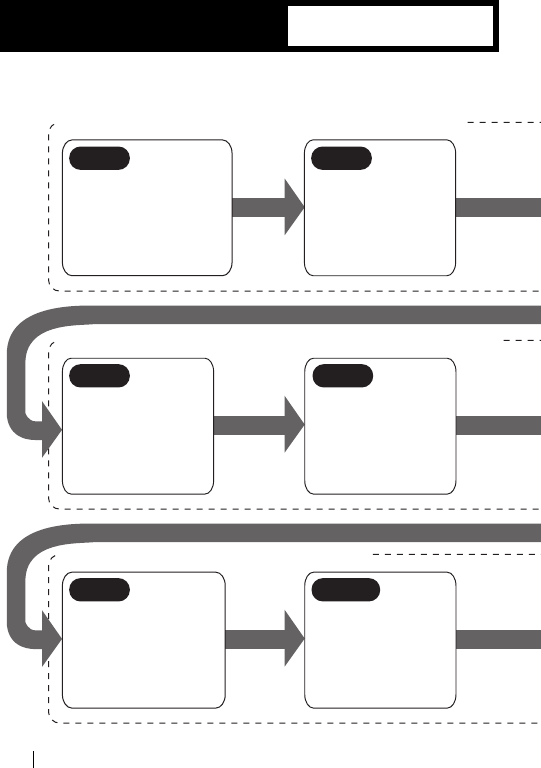
Follow the procedure in the illustration below to connect your Windows CE
device to a wireless LAN.
WindowsCE
Operation Flow
Making the wireless LAN card available
Preparing for connecting to the network
Connecting to the network
Connect a Windows
computer and your
Windows CE device
via Microsoft Active-
Sync.
Install the wireless
LAN card drivers in
the Windows com-
puter.
Make the settings for access
to the network.
a. AirStation
b. Wireless LAN computers
Check the
"IP address."
Step 1 Step 2
Step 5 -a, b
Step 4
(from page 21)
(from page 18)
(from page 23)
WLI-CF-S11G.book 16 ページ 2002年2月27日 水曜日 午後9時10分
2
WindowsCE
WLI2-CF-S11 User's Manual
17
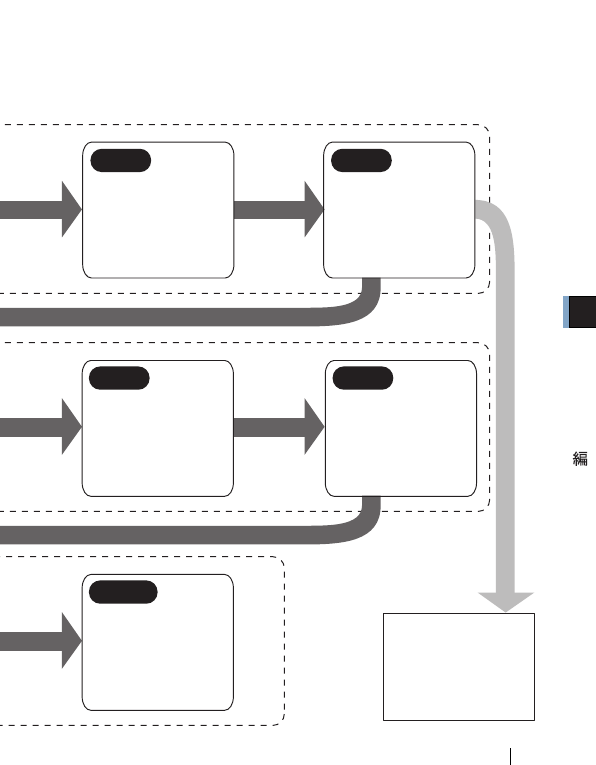
Install the wireless
LAN card in the
Windows CE device.
To make the Air-
Station settings,
refer to the AirSta-
tion manual.
Step 3
WLI-CF-S11G.book 17 ページ 2002年2月27日 水曜日 午後9時10分
WLI2-CF-S11 User's Manual
18
2.1 Making the Wireless LAN Card Available
Install the wireless LAN card to connect your Windows CE device to a
wireless LAN.
Step 1 Before installing the wireless LAN card
Microsoft ActiveSync
Connect the Windows CE device and the Windows computer using
Microsoft ActiveSync so that you can install the wireless LAN card drivers.
For how to use ActiveSync, refer to the manual included in the Windows CE
device.
Step 2 Installing the wireless LAN card drivers
Follow the procedure below to install the wireless LAN card drivers.
1 Insert the "AirNavigator CD" into the CD-ROM drive of the
Windows computer.
Be sure to use the latest AirNavigator CD of version
3.62 or later. Note that the AirStation may include
an AirNavigator CD of earlier version than 3.62.
WLI-CF-S11G.book 18 ページ 2002年2月27日 水曜日 午後9時10分
2
WindowsCE
WLI2-CF-S11 User's Manual
19
When you insert the "AirNavigator CD"
into the CD-ROM drive, the Simple Installation Wizard
window may automatically appear. In this case, click [
Exit ] to close.
2Double-click the [CFS11G] folder in the CD-ROM, and then the
[CESETUP] file.
3
4When the message "Application Downloading Complete"
appears, click [OK].
The message "Please check your mobile device screen to see
if additional steps are necessary to complete this installation."
appears, but you do not need to do so here.
5Turn off the Windows CE device.
Now you have completed the installation of the wireless LAN card drivers.
Click [Yes].
WLI-CF-S11G.book 19 ページ 2002年2月27日 水曜日 午後9時10分
WLI2-CF-S11 User's Manual
20
Step 3 Installing the wireless LAN card
Install the wireless LAN card in the Compact Flash slot (type II) of the
Windows CE device.
Precautions for installation/removal
• Be sure to handle the Windows CE device and its peripherals
in such a way as described in the manual of each unit.
• Make sure that the Windows CE device is turned off before
installing/removing the wireless LAN card in/from that device.
• Completely remove any dust from the connectors.
• Never touch the connector portion of the wireless LAN card.
• Use great care for the connector location of the wireless LAN
card when installing the card in the Windows CE device. The
connector may be damaged if it is forced.
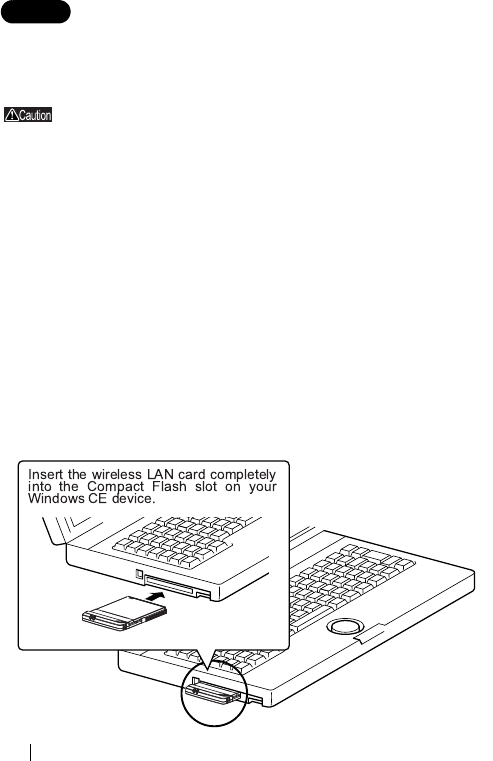
Installing the wireless LAN card in the Windows CE
device
Follow the instructions in the illustration below when installing the wireless
LAN card in the Windows CE device.
WLI-CF-S11G.book 20 ページ 2002年2月27日 水曜日 午後9時10分
2
WindowsCE
WLI2-CF-S11 User's Manual
21
2.2 Preparing for Connecting to the Network
After installing the wireless LAN card in the Windows CE device, prepare
for connecting to the network.
For detailed information, refer to the manual included in the Windows
CE device or open the Windows CE Help.
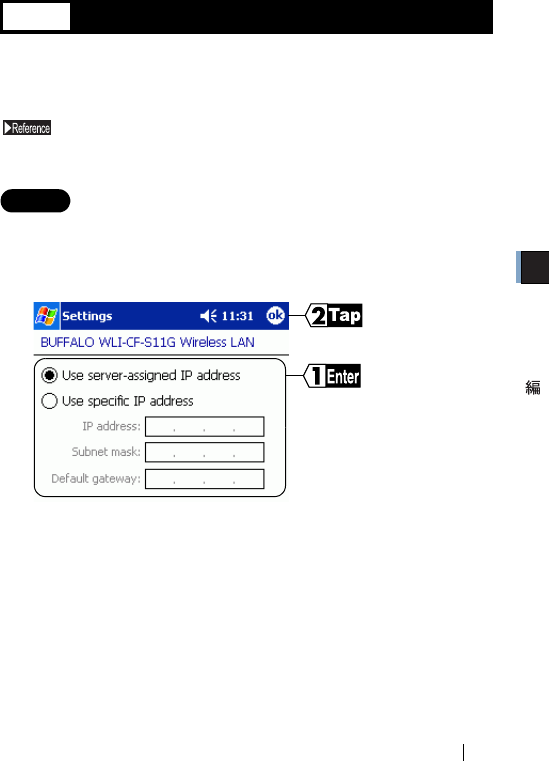
Step 4 Checking the "IP address"
1When the wireless LAN card is successfully installed, the
Windows CE device is automatically turned on to display the
window shown below.
• When a DHCP server exists within the network (e.g., when the
DHCP server function of the AirStation is used), select [Use server-
assigned IP address].
• To manually set the IP address, select [Use specific IP address].
Inquire the IP address, Subnet mask, and Default gateway from
your network administrator.
⇒ Continued on next page
Specify the [IP address].
Ta p [O K] .
WLI-CF-S11G.book 21 ページ 2002年2月27日 水曜日 午後9時10分
WLI2-CF-S11 User's Manual
22
• For the IP address setting, see "I don't know how to assign the IP
address" on page 122 in Chapter 5.
If Wiress LAN Card is not operating normally,the
message of the meaning "Input the device driver name
of this card." is displayed.
Refer to " Installing the wireless LAN card
drivers" and install driver again.
To make the AirStation settings
With the AirStation manual, make the AirStation settings on a wireless
LAN computer excepting a Windows CE machine.
※ When you make the AirStation settings using the "AirNavigator
CD," be sure to use the latest version of 3.62 or later.
To directly connect to the wireless LAN
Make the settings on the Windows CE device according
to on page 23 and subsequent.
Step 1
Step 2
Step 1
Step 5
WLI-CF-S11G.book 22 ページ 2002年2月27日 水曜日 午後9時10分
2
WindowsCE
WLI2-CF-S11 User's Manual
23
2.3
Connecting to the Network
Upon completion of necessary settings, you can connect to the network.
There are two methods for connecting the Windows CE device to the
network as shown below.
•Communicating via AirStation -a
•Communicating with wireless LAN computers -b
Step 5 -a Communicating via AirStation
To make communications using the AirStation, make the settings in the
Window CE device as described below.
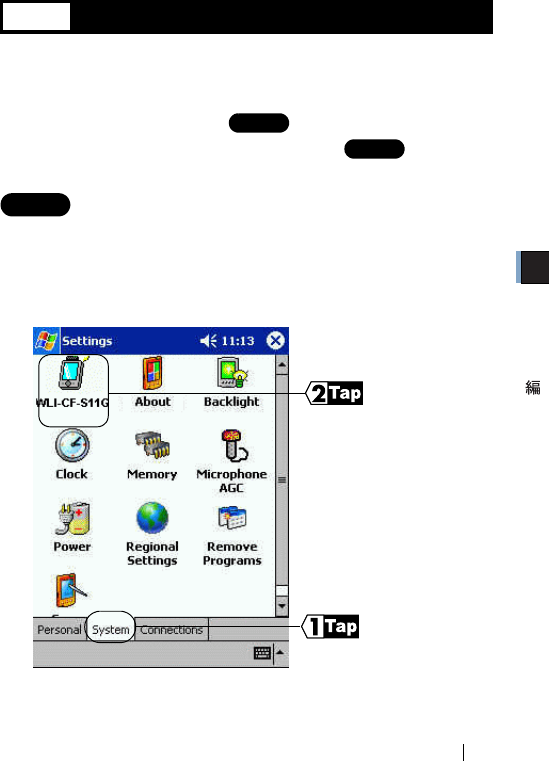
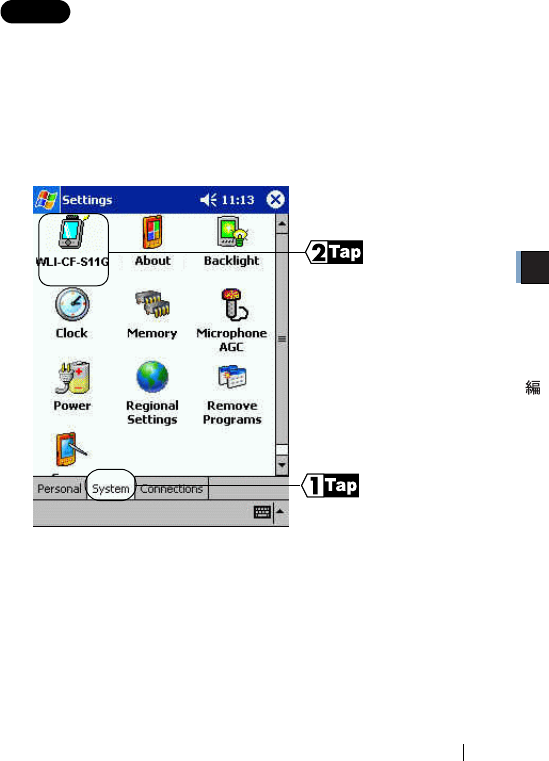
1Select [Start]-[Settings].
2
⇒ Continued on next page
Step 1
Step 5
Step 1
Step 5
Tap [WLI-CF-S11G].
Tap [System].
WLI-CF-S11G.book 23 ページ 2002年2月27日 水曜日 午後9時10分
WLI2-CF-S11 User's Manual
24
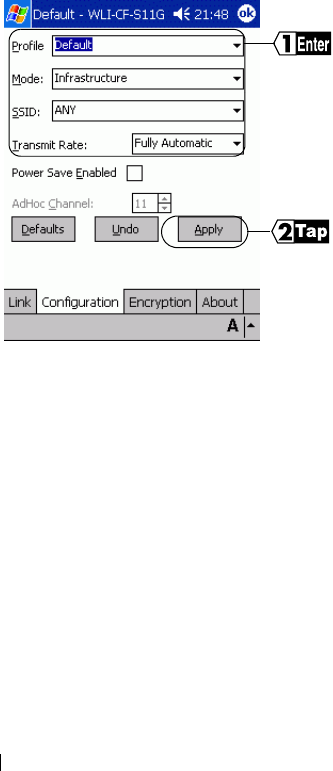
3
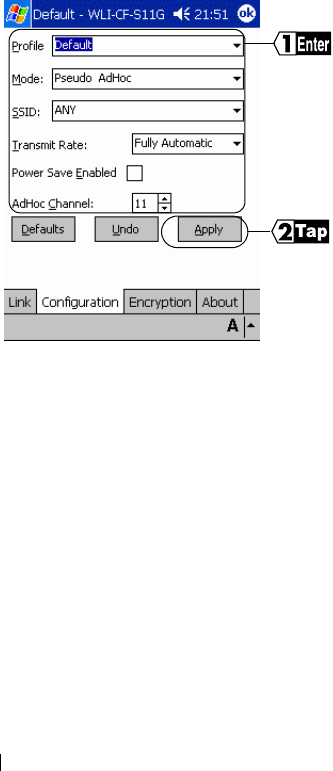
The settings are saved with a text typed in the [Profile] field as a name.
Select Infrastructure for [Mode].
Input the ESS-ID of the target AirStation to [SSID]. The initial setting
of the AirStation ESS-ID shows the last six digits of the MAC address
of the AirStation plus "GROUP" (upper-case).
Select Fully Automatic for [Transmit Rate].
Do not put a checkmark for [Power Save Enabled] as it may disable
normal communication.
Make a configuration if
necessary.
Tap [Apply].
WLI-CF-S11G.book 24 ページ 2002年2月27日 水曜日 午後9時10分
2
WindowsCE
WLI2-CF-S11 User's Manual
25
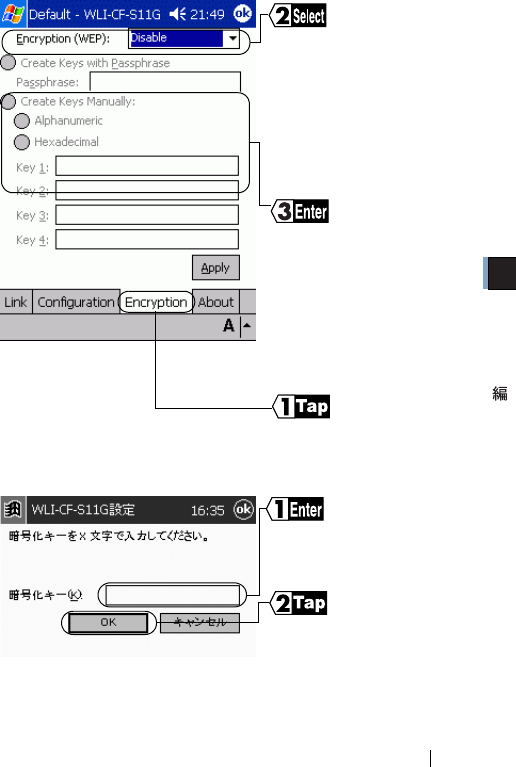
4
《To use a character string for the encryption key》
The window shown below appears.
5Tap [Apply].
⇒ Continued on next page
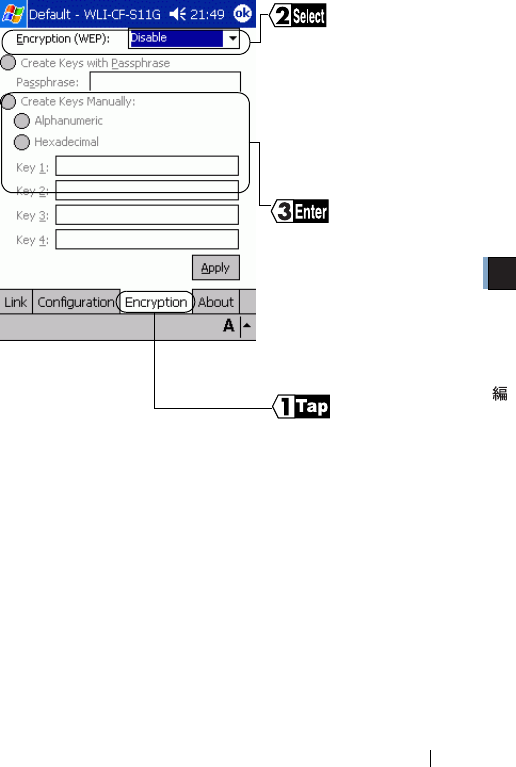
Tap [Encryption].
Select the WEP type (40-bit
or 128-bit) if encryption with
WEP is used in the network.
If the AirStation is still in the
initial state, no encryption is
set. Select Disable in this
case.
Select [Create Keys Manually]
and input an encryption key to
the Key 1 field.
• To use a hexadecimal value,
directly input to the Key 1
field.
• To use a character string, tap
[Alphanumeric] (see below).
Ta p [O K] .
The window in Step 4
Input a character string to
the [ 暗号化キー ] field.
WLI-CF-S11G.book 25 ページ 2002年2月27日 水曜日 午後9時10分
WLI2-CF-S11 User's Manual
26
6
If you cannot communicate with the AirStation, check the ESS-ID and
WEP settings of the AirStation, and then repeat from Step 1.
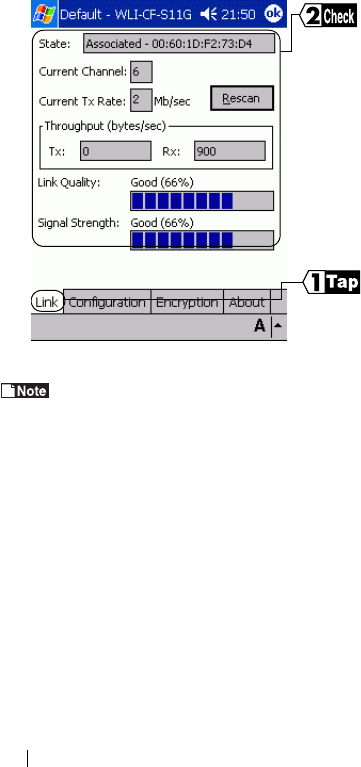
Ta p [L in k] .
You can check the wireless-
side MAC address, current
radio channel, current
transmission rate, data
communication status, link
quality, and signal strength
of the connected AirStation.
When "Associated" appears
for the [State], the
connection to the AirStation
is successfully complete.
WLI-CF-S11G.book 26 ページ 2002年2月27日 水曜日 午後9時10分
2
WindowsCE
WLI2-CF-S11 User's Manual
27
Step 5 -b Communicating with wireless LAN
computers
When communicating with wireless LAN computers using Microsoft
ActiveSync, it is necessary to make the Windows CE device settings shown
below.
1Select [Start]-[Configure].
2
⇒ Continued on next page
Tap [WLI-CF-S11G].
Tap [System].
WLI-CF-S11G.book 27 ページ 2002年2月27日 水曜日 午後9時10分
WLI2-CF-S11 User's Manual
28
3
The settings are saved with a text typed in the [Profile] field as a name.
Select Pseudo AdHoc for [Mode].
You do not have to input data to [SSID].
Select Fully Automatic for [Transmit Rate].
Do not put a checkmark for [Power Save Enabled] as it may disable
normal communication.
Select the same channel as the communicated wireless LAN computers
for [AdHoc Channel].
Make a configuration if
necessary.
Tap [Apply].
WLI-CF-S11G.book 28 ページ 2002年2月27日 水曜日 午後9時10分
2
WindowsCE
WLI2-CF-S11 User's Manual
29
4
《To use a character string for the encryption key》
The window shown below appears.
1. Input a character string to the [encryption key] field.
2. Tap [OK].
3. The window in Step 4 appears.
5Tap [Apply].
⇒ Continued on next page
Tap [Encryption].
Select the WEP type (40-bit
or 128-bit) if encryption with
WEP is used in the network.
If the AirStation is still in the
initial state, no encryption is
set. Select Disable in this
case.
Select [Create Keys Manually]
and input an encryption key to
the Key 1 field.
• To use a hexadecimal value,
directly input to the Key 1
field.
• To use a character string, tap
[Alphanumeric] (see below).
WLI-CF-S11G.book 29 ページ 2002年2月27日 水曜日 午後9時10分

WLI2-CF-S11 User's Manual
30
6
Now you can communicate with the computers set in the same radio
channel.
For the ActiveSync setting, refer to the ActiveSync manual or Help.
Ta p [L in k] .
You can check the connection
mode (AdHoc), current radio
channel, current transmission
rate, and data communication
status.
The link quality and signal
strength will not be displayed.
Ta p [O K] .
WLI-CF-S11G.book 30 ページ 2002年2月27日 水曜日 午後9時10分
■Overview
Chapter 3
Capter 3Windows
Me/98Settings
This chapter describes how to make the
settings for connecting your Windows Me/98
computer to a wireless LAN.
3.1 Making the Wireless LAN Card Available
Step 1
Before installing the wireless LAN card 34page
Step 2
Installing the wireless LAN card ............40page
Step 3 Installing the wireless LAN card
drivers ......................................................43page
Step 4 Confirming that the installed wireless
LAN card is normally operating .............48page
3.2 Preparing for Connecting to the Network
Step 5 Confirming "TCP/IP" and "Client for
Microsoft Networks" ...............................50page
Step 6 Adding "File and printer sharing for
Microsoft Networks" ...............................57page
Step 7 Checking the computer name and
workgroup name .....................................58page
Step 8
Installing Client Manager .......................59page
3.3 Connecting to the Network
Step 9
-a Communicating via AirStation ..............63page
Step 9 -b Communicating with wireless LAN
computers ...............................................65page
Step 10
Making your computer shared ..............67page
Step 11
Starting communication .........................68page
WLI-CF-S11G.book 31 ページ 2002年2月27日 水曜日 午後9時10分
WLI2-CF-S11 User's Manual
32
Follow the procedure in the illustration below to connect your Windows Me/
98 computer to a wireless LAN.
WindowsMe/98
Operation Flow
Making the wireless LAN card available
Preparing for connecting to the network
Connecting to the network
Check the configuration
of the drives on your
Windows computer and
confirm that its PC card
driver operates normally.
Install the wireless
LAN card in the
Windows comput-
er.
Make the settings for
access to the net-
work.
a...AirStation
b...Wireless LAN
computers
Make the wireless
LAN computer
shared.
Confirm that the
"TCP/IP" and
"Client for Micro-
soft Networks" are
installed.
Add "File and print-
er sharing for Mi-
crosoft Networks."
Step 1 Step 2
Step 9 -a, b Step 10
Step 5 Step 6
(from page 66)
(from page 34)
(from page 52)
WLI-CF-S11G.book 32 ページ 2002年2月27日 水曜日 午後9時10分
3
Windows Me/98
WLI-CF-S11G User's Manual
33
Install the wireless
LAN card drivers in
the Windows comput-
er.
Confirm that the in-
stalled wireless LAN
card operates nor-
mally.
Communicate with
other computers on
the network.
Check the computer
name and workgroup
name.
Install Client Manager
for communicating
with other wireless
LAN computers.
To make the AirSta-
tion settings, refer
to the AirStation
manual.
Step 3 Step 4
Step 11
Step 7 Step 8
WLI-CF-S11G.book 33 ページ 2002年2月27日 水曜日 午後9時10分
WLI2-CF-S11 User's Manual
34
3.1 Making the Wireless LAN Card Available
Install the wireless LAN card to connect your Windows Me/98 computer to
a wireless LAN.
Step 1 Before installing the wireless LAN card
Checking the configuration of your drives
Follow the procedure below to check the configuration of the drivers on
your Windows computer in which the wireless LAN card will be installed.
The following procedure uses Windows Me for example.
1Turn on the computer to boot Windows.
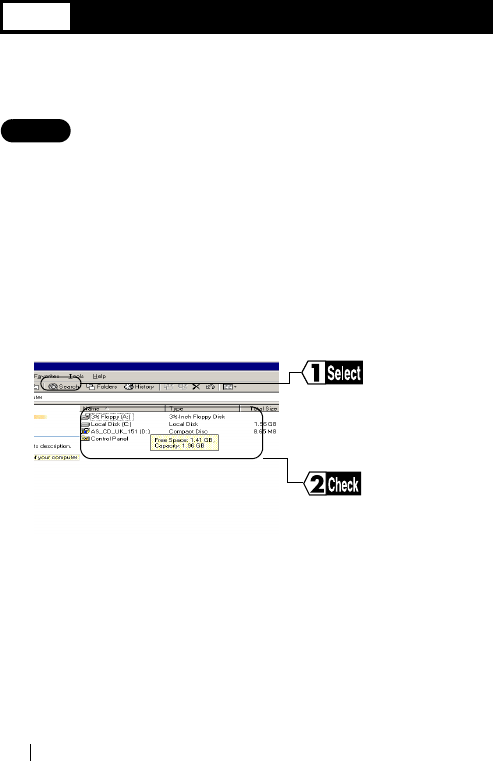
2Double-click [My Computer] on Desktop.
3
These displayed drive names will be necessary in the subse-
quent procedures. Be sure to take note of these drive names in
the table on the upper right of the next page.
Check the drive names
listed in the window.
Select [View]-[Detail].
WLI-CF-S11G.book 34 ページ 2002年2月27日 水曜日 午後9時10分
3
Windows Me/98
WLI2-CF-S11 User's Manual
35
Drive names on your computer
If your computer has only one PC card slot
If the CD-ROM drive is connected via the PC card to a computer with
only one PC card slot, the CD-ROM drive and this wireless LAN card
cannot be used at the same time. Execute the following steps before
installing the PC card driver.
1 Connect the CD-ROM drive to the computer.
2 Insert the "AIRCONNECT Series Driver CD" into the CD-ROM
drive.
3 Create a new folder (directory) on the hard disk, and copy all files
from the CD-ROM to that folder.
When you are prompted for the "AIRCONNECT Series Drier CD"
during installation, specify the folder to which the files were
copied in the above Step 3.
⇒ Continued on next page
Drive Type Icon Drive Name
(e.g.)
3.5" FDD (A:)
HDD (local disk) (C:)
CD-ROM (D:)
WLI-CF-S11G.book 35 ページ 2002年2月27日 水曜日 午後9時10分
WLI2-CF-S11 User's Manual
36
Checking the PC card driver
Follow the procedure below to verify that the PC card driver on the computer in
which the wireless LAN card will be installed is operating normally.
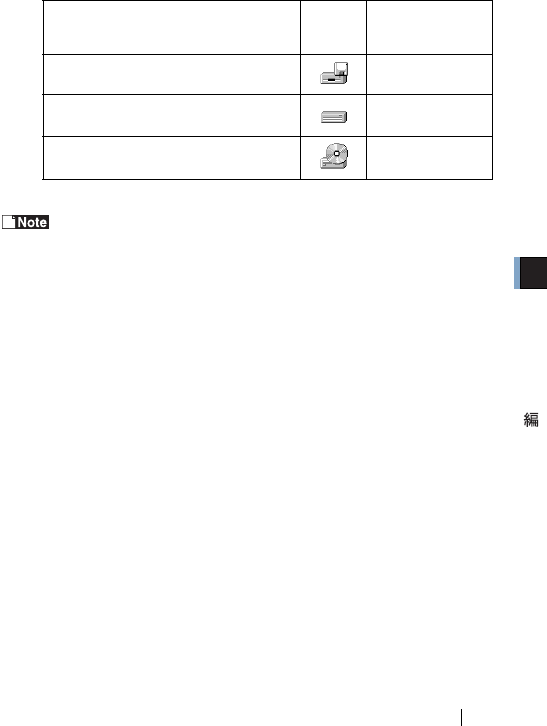
1Right-click [My Computer] on Desktop.
Click [Properties].
2Click the [Device Manager] tab.
3Click the "+" mark on the left of [PCMCIA socket].
4
The displayed PCMCIA socket name varies with the computer
model.
Confirm that the "x" mark is not
indicated for the icon under
[PCMCIA socket].
WLI-CF-S11G.book 36 ページ 2002年2月27日 水曜日 午後9時10分
3
Windows Me/98
WLI2-CF-S11 User's Manual
37
If such an error mark as "!" or "x" is not indicated, the PC card driver is
operating normally.
If the icon displayed under [PCMCIA socket] appears with
the ! or x mark, refer to the manual included in the computer
and activate the PC card driver.
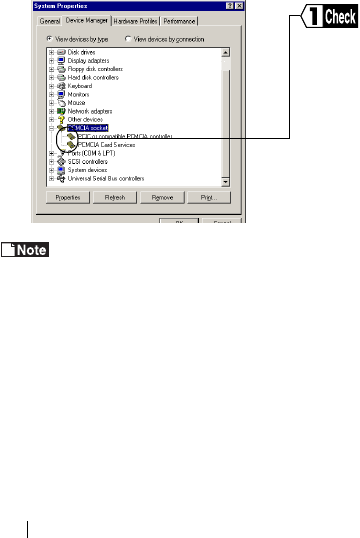
Checking the browser settings (only for using the
AirStation)
When you use the AirStation, invalidate the dial-up settings and proxy
settings under the browser settings.
The following procedure uses Internet Explorer 5.0 or later for example.
1Select [Start]-[Settings]-[Control Panel].
2Double-click [Internet Options].
3Double-click the [Connections] tab.
4
⇒ Continued on next page
When the provider information
is listed in the [Dial-up
settings] area, click the
○
mark on the left side of [Never
dial a connection] below the
area to put a dot mark.
Click [LAN settings] in the
"Local Area Network (LAN)
settings" area.
WLI-CF-S11G.book 37 ページ 2002年2月27日 水曜日 午後9時10分

WLI2-CF-S11 User's Manual
38
5Confirm the items with a checkmark.
For memorandum, put a checkmark for the same items below.
□ Automatically detect settings
□ Use automatic configuration script
□ Use a proxy server
□ Bypass proxy server for local addresses
6Upon completion of confirming the items with the checkmark,
remove the checkmark from all the items.
Checking the network adapter
Confirm the current settings of the network function.
1Select [Start]-[Settings]-[Control Panel].
2Double-click [System].
3
With [View devices by type]
selected, click the "+" mark
on the left side of [Network
adapters]. The current
adapters are listed.
Click [Device Manager].
WLI-CF-S11G.book 38 ページ 2002年2月27日 水曜日 午後9時10分
3
Windows Me/98
WLI2-CF-S11 User's Manual
39
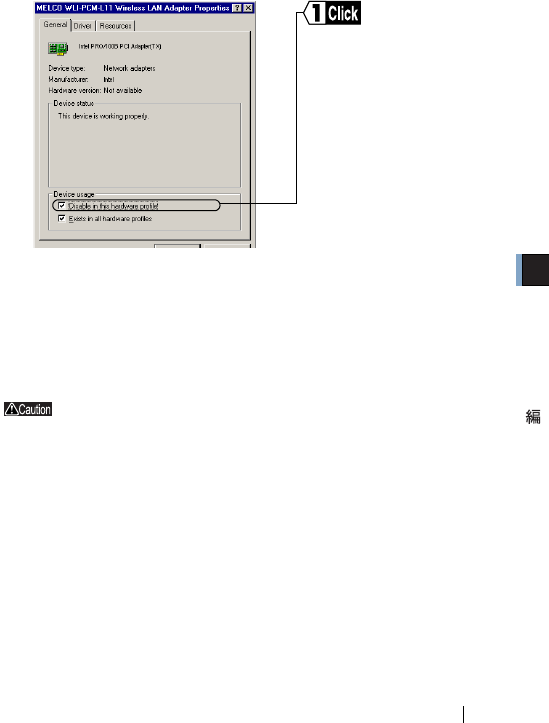
4Disable a LAN board or card if any name.
If there is no LAN board or card name listed, proceed to Step 5.
5If any name beginning with "AOL" is found under [Device
Manager]-[Network adapters], disable it in the same manner as
Step 4.
6Click [OK] to close the [Device Manager].
If you have disabled any driver in Steps 4 and/or 5, restart
the computer.
Put a checkmark for
"Disable in this hardware
profile."
WLI-CF-S11G.book 39 ページ 2002年2月27日 水曜日 午後9時10分

WLI2-CF-S11 User's Manual
40
Step 2 Installing the wireless LAN card
The wireless LAN card can be installed/removed in/from the computer
which is in the ON state.
If your computer is equipped with a power management
function that automatically cuts power supply to the
computer when it is left idle for a certain period, turn the
function off. The wireless LAN card may be disabled if the
power management function starts.
Refer to the manual provided with the computer for details
on the power management function.
Precautions for installation/removal
• Be sure to handle the computer and its peripherals in such a
way as described in the manual of each unit.
• Completely remove any dust from the connectors.
• Never touch the connector portion of the wireless LAN card.
• Use great care for the connector location of the wireless LAN
card when installing the card in the computer. The connector
may be damaged if it is forced.
• The wireless LAN card can be inserted and removed with the
computer turned on (Hot Swap feature). However, you
should set the wireless LAN card in a safely removable state
on Windows before removing it. See "When removing the
wireless LAN card" on page 42.
WLI-CF-S11G.book 40 ページ 2002年2月27日 水曜日 午後9時10分
3
Windows Me/98
WLI2-CF-S11 User's Manual
41
Installing the wireless LAN card in a notebook computer
Follow the instructions in the illustration below when installing the wireless
LAN card in a notebook computer.
When your computer is equipped with two card slots
As this wireless LAN card has a protruding section for the
built-in antenna, the upper slot may be blocked when the
lower one is occupied with this card.
Place this wireless LAN card in the upper slot.
When inserting the wireless LAN card into
the PC card slot on your computer, attach
the BUFFALO's PC card adapter WLI-CF-
OP available separately.
WLI-CF-S11G.book 41 ページ 2002年2月27日 水曜日 午後9時10分
WLI2-CF-S11 User's Manual
42
When removing the wireless LAN card
Follow the procedure below to remove the wireless LAN card when
the computer is running. The following procedure uses Windows ME
for example.
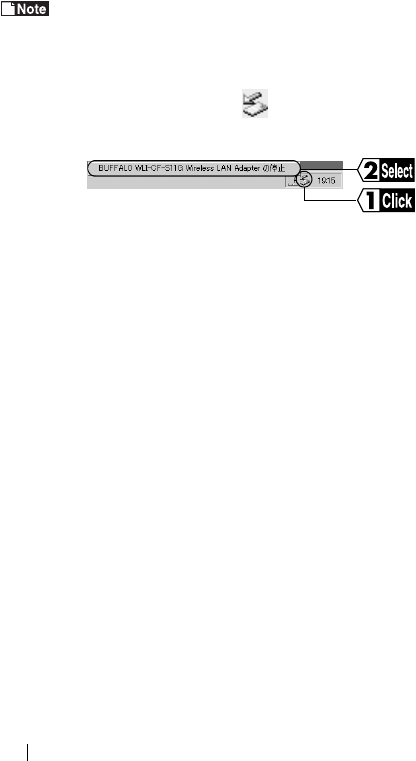
1 Click the removal icon in the task tray, and select "Stop
BUFFALO WLI-CF-S11G Wireless LAN Adapter."
※ The removal icon may be [ ] on Windows 98.
※ The message displayed when you click the icon varies with the
Windows version.
※ If you cannot find the icon, see the Windows Help.
2 When the message "The 'BUFFALO WLI-CF-S11G Wireless LAN
Adapter' device can now be safely removed from the system." is
displayed, click [OK].
※ The message to be displayed varies with the Windows version.
3 Remove the wireless LAN card from the computer.
WLI-CF-S11G.book 42 ページ 2002年2月27日 水曜日 午後9時10分
3
Windows Me/98
WLI2-CF-S11 User's Manual
43
Step 3 Installing the wireless LAN card drivers
Please check the configuration of the drives on your
computer (page 34) before installing the drivers.
In addition, confirm that the PC card driver is normally
operating on your computer (page 36).
The procedure for installing the wireless LAN card drivers varies with
Windows Me/98. Use the procedure applicable to your computer as shown
below.
Windows ME user:
See <<Windows ME>> below.
Windows 98 user:
See <<Windows 98>> on page 46.
Turn on the computer.
《WindowsMe》
1The installed wireless LAN card is recognized and the [Add New
Hardware Wizard] window appears.
If the Wizard window does not appear, see "The
wireless LAN card installation window does not
appear." on page 102 in Chapter 5.
2 Insert the "AirNavigator CD" into the CD-ROM drive.
⇒ Continued on next page
WLI-CF-S11G.book 43 ページ 2002年2月27日 水曜日 午後9時10分

WLI2-CF-S11 User's Manual
44
Be sure to use the latest AirNavigator CD of version
3.62 or later. Note that the AirStation may include
an AirNavigator CD of earlier version than 3.62.
When you insert the "AirNavigator CD" into the CD-ROM
drive, the AirNavigator Menu window may automatically
appear. In this case, click [Exit] to close the window.
31. Select [Automatic Search for a better driver (recommended)].
2. Click [Next].
If the "Copying Files..." window appears, take the
following steps before proceeding to Step 4.
1. "D:\CFS11G" (when the CD-ROM drive is "D:").
2. Click [OK].
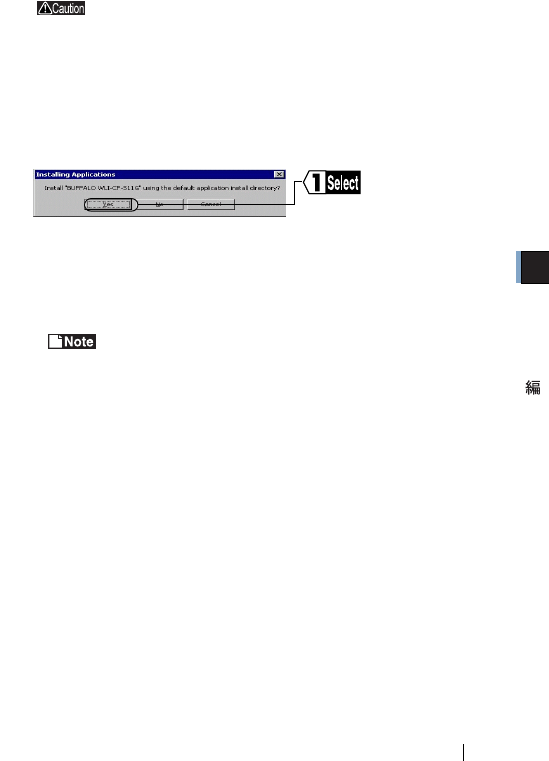
4When the message "Windows has finished installing the new
hardware device." appears, click the [Finish] button.
5 Eject the "AirNavigator CD" from the CD-ROM drive.
6
When the message "Do you want to restart your computer now?"
appears, click [Yes].
The computer restarts.
WLI-CF-S11G.book 44 ページ 2002年2月27日 水曜日 午後9時10分
3
Windows Me/98
WLI2-CF-S11 User's Manual
45
71. Enter your "User name" and "Password."
2. Click [OK].
The above window may not appear, but it is not a problem.
The password field may be left empty.
When you enter a password for the first time, the entered character
string will be registered as your password.
Since the password is case-sensitive, use great care when you enter the
password.
When you click [Cancel], you cannot connect to the network. Be sure
to click [OK].
Now you have completed the installation of the wireless LAN card
drivers.
《Windows98》
1The installed wireless LAN card is recognized and the [Add New
Hardware Wizard] window appears.
Click [Next].
If the Wizard window does not appear, see "The
wireless LAN card installation window does not
appear." on page 102 in Chapter 5.
Proceed to " Confirming that the installed wireless LAN card
is normally operating" on page 50.
Step 1
Step 4
WLI-CF-S11G.book 45 ページ 2002年2月27日 水曜日 午後9時10分

WLI2-CF-S11 User's Manual
46
21.
Select [Search your best driver for your device (recommended)].
2. Click [Next].
3 Insert the "AirNavigator CD" into the CD-ROM drive.
Be sure to use the latest AirNavigator CD of version
3.62 or later. Note that the AirStation may include
an AirNavigator CD of earlier version than 3.62.
When you insert the "AirNavigator CD" into the CD-ROM
drive, the AirNavigator Menu window may automatically
appear. In this case, click [Exit] to close the window.
41. Select "Specify location..."
2. Enter "D:\CFS11G" (when the CD-ROM drive is "D:").
3. Click [Next].
51. Confirm that "BUFFALO WLI-CF-S11G Wireless LAN Adapter"
is displayed.
2. Click [Next].
6When the message " Please insert the disk labeled 'Windows 98
CD-ROM', and then click OK. " appears, take the following steps
before proceeding to Step 6.
1Insert the Windows 98 CD-ROM into the CD-ROM drive.
Click [OK].
WLI-CF-S11G.book 46 ページ 2002年2月27日 水曜日 午後9時10分
3
Windows Me/98
WLI2-CF-S11 User's Manual
47
2Enter "D:\WIN98" to the "Copy files from" field (when the CD-
ROM drive is "D:").
Click [OK].
7Click [Finish]
8When the message "Do you want to restart your computer now?"
appears, click [Yes].
The computer restarts.
9Enter your "User name" and "Password."
Click [OK].
The above window may not appear, but it is not a problem.
The password field may be left empty.
When you enter a password for the first time, the entered character
string will be registered as your password.
Since the password is case-sensitive, use great care when you enter the
password.
When you click [Cancel], you cannot connect to the network. Be sure
to click [OK].
Now you have completed the installation of the wireless LAN card drivers.
Proceed to " Confirming that the installed wireless LAN card
is normally operating" on page 50.
Step 1
Step 4
WLI-CF-S11G.book 47 ページ 2002年2月27日 水曜日 午後9時10分

WLI2-CF-S11 User's Manual
48
Step 4
Confirming that the installed
wireless LAN card is normally operating
Upon completion of the installation of the wireless LAN card drivers,
confirm that the installed wireless LAN card is normally operating by using
the procedure below.
1Right-click [My Computer] on Desktop.
Click [Properties].
2Click the [Device Manager] tab.
3Confirm that "BUFFALO WLI-CF-S11G Wireless LAN Adapter" is
displayed under [Network adapters] without any error mark ("x" or
"!") indicated.
When "BUFFALO WLI-CF-S11G Wireless LAN Adapter" is displayed
without any error mark ("x" or "!"), your wireless LAN card is normally
operating.
If no driver name is listed or an error mark ("x" or "!") is
indicated
Your installed wireless LAN card is not normally operating in this case.
See "I want to uninstall the wireless LAN card" on page 106 in Chapter 5,
and then uninstall and re-install the wireless LAN cad drivers.
To make the AirStation settings
Refer to the AirStation manual to make the AirStation settings.
Step 1
Step 4
WLI-CF-S11G.book 48 ページ 2002年2月27日 水曜日 午後9時10分
3
Windows Me/98
WLI2-CF-S11 User's Manual
49
3.2 Preparing for Connecting to the Network
Upon completion of confirming that the installed wireless LAN card is
normally operating, prepare for connecting to the network.
This section describes how to make the settings in the following operating
environment. Use the settings on the computer to be connected to the
network for reference.
•OS……………… WindowsMe
•Protocol………… TCP/IP
• Client…………… Microsoft Network Client
• Service………… File and printer sharing for Microsoft Networks
For detailed information, refer to the manual provided with Windows Me/
98 and Help file.
Step 5 Confirming "TCP/IP" and "Client for
Microsoft Networks"
For example, the procedure below applies to the Windows Me computer.
1Start your computer.
2Select [Start]-[Settings]-[Control Panel].
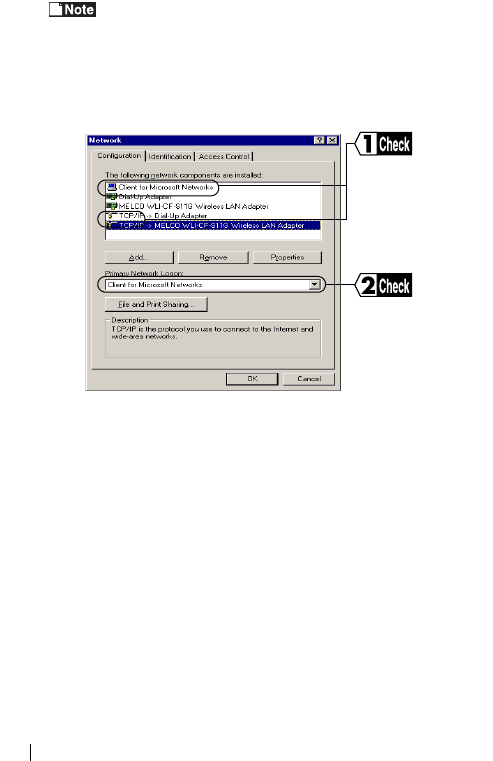
3Double-click [Network].
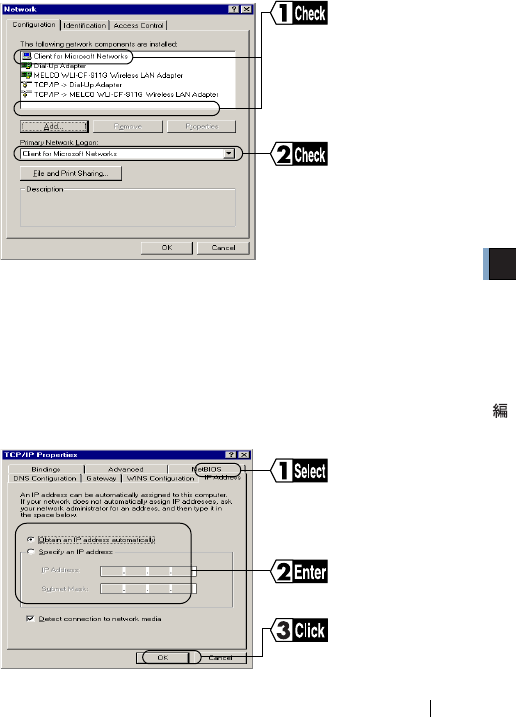
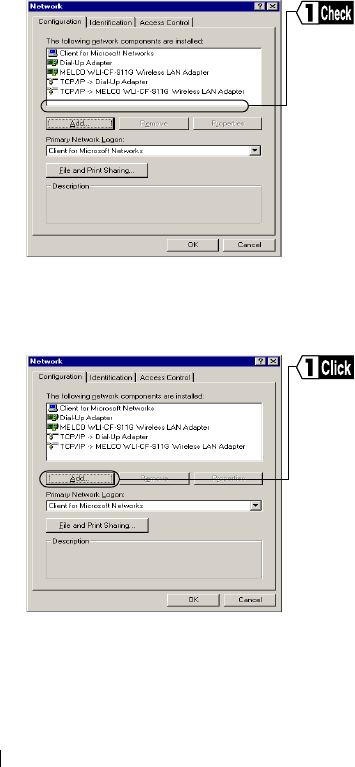
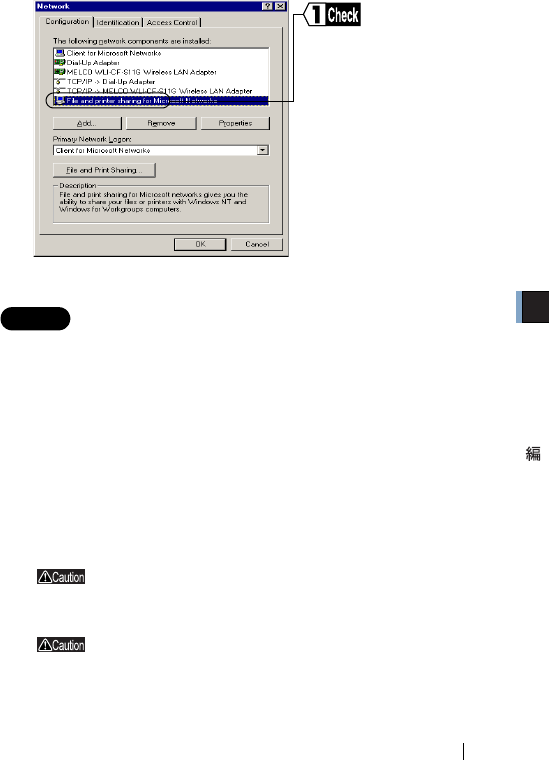
4Confirm that "TCP/IP" and "Client for Microsoft Networks" are
displayed in the [The following network components are
installed:] field of the [Configuration] window.
WLI-CF-S11G.book 49 ページ 2002年2月27日 水曜日 午後9時10分
WLI2-CF-S11 User's Manual
50
When "TCP/IP" is not displayed, see Caution on page 56 to add
the TCP/IP.
When "Client for Microsoft Networks" is not displayed, see
Caution on page 58 to add Microsoft Network Client.
⇒ Continued on next page
《When only the wireless LAN card is installed》
Confirm that
"TCP/IP" and
"Client for Microsoft
Networks" are listed.
Confirm that
"Client for Microsoft
Networks"
is displayed.
WLI-CF-S11G.book 50 ページ 2002年2月27日 水曜日 午後9時10分
3
Windows Me/98
WLI2-CF-S11 User's Manual
51
The following appears in the "The following network components are
installed:" field. However, this does not imply any problem.
"TCP/IP->BUFFALO WLI-CF-S11G Wireless LAN Adapter"
51. Select "TCP/IP."
2. Click [Properties].
6
《When dial-up adapters and/or other LAN boards are installed》
Confirm that "TCP/IP" and
"Client for Microsoft
Networks"are listed.
Confirm that "Client for
Microsoft Networks" is
displayed.
Click the "IP Address" tab.
Enter the IP address.
Click [OK].
WLI-CF-S11G.book 51 ページ 2002年2月27日 水曜日 午後9時10分

WLI2-CF-S11 User's Manual
52
• When a DHCP server exists within the network (e.g., when the
DHCP server function of the AirStation is used), select [Obtain IP
Address Automatically].
• To manually set the IP address, select [Specify an IP address].
Inquire the IP address and Subnet mask from your network
administrator.
• For the IP address setting, see "I don't know how to assign the IP
address" on page 122 in Chapter 5.
7When the window in Step 5 appears again, click [OK] to close the
"Network" window.
8
9Windows Me will restart.
Now you have completed the TCP/IP settings on the computer which will
use a wireless LAN.
Click [Yes].
WLI-CF-S11G.book 52 ページ 2002年2月27日 水曜日 午後9時10分
3
Windows Me/98
WLI2-CF-S11 User's Manual
53
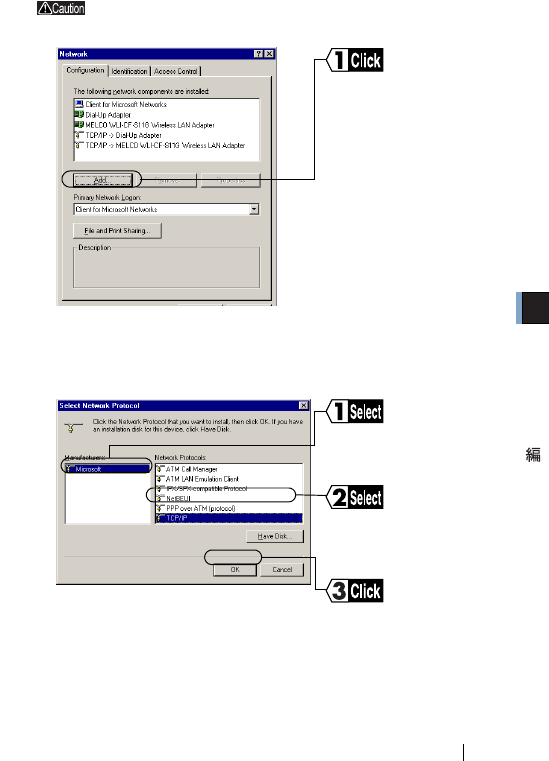
If "TCP/IP" is not displayed, use the procedure below to
add the TCP/IP.
1
21. Select [Protocol].
2. Click [Add].
3
Click [Add].
Select "Microsoft" for
[Manufacturers].
Click [OK].
Select "TCP/IP" for
[Network Protocols].
WLI-CF-S11G.book 53 ページ 2002年2月27日 水曜日 午後9時10分
WLI2-CF-S11 User's Manual
54
4
When "Client for Microsoft Networks" is not displayed,
use the procedure below to add the Microsoft Network
Client.
1
Confirm that the TCP/IP
has been added.
Click [Add].
WLI-CF-S11G.book 54 ページ 2002年2月27日 水曜日 午後9時10分
3
Windows Me/98
WLI2-CF-S11 User's Manual
55
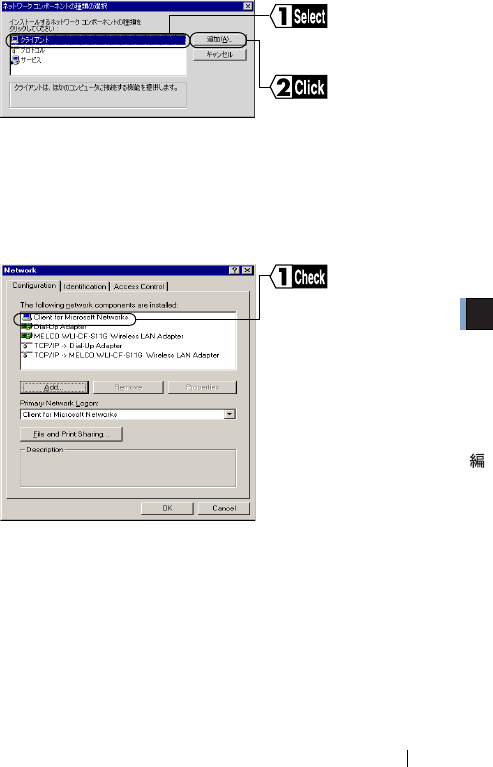
2
31. Select "Microsoft" for [Manufacturers].
2. Select "Client for Microsoft Networks" for [Network Clients].
3. Click [OK].
4
Select [Client].
Click [Add].
Confirm that the
Microsoft Network Client
has been added.
WLI-CF-S11G.book 55 ページ 2002年2月27日 水曜日 午後9時10分

WLI2-CF-S11 User's Manual
56
Step 6 Adding "File and printer sharing for
Microsoft Networks"
1
2
Click [File and Print
Sharing].
Click the checkbox to put a
checkmark for both "I want to
be able to give others access
to my files." and "I want to be
able to allow others to print to
my printer(s)."
Click [OK].
WLI-CF-S11G.book 56 ページ 2002年2月27日 水曜日 午後9時10分
3
Windows Me/98
WLI2-CF-S11 User's Manual
57
3
Step 7 Checking the computer name and
workgroup name
1Click the [Identification] tab.
Check the [Computer name],[Workgroup],and [Computer Description].
Click [OK].
It is recommended to use alphanumeric characters for the [Computer
name] and [Workgroup].
If a specific character such as a period (.) is included, the
computer may fail in connecting to the network.
The same workgroup name must be assigned to all the
computers included in the network.
⇒ Continued on next page
Confirm that "File and printer
sharing for Microsoft
Networks" has been added.
WLI-CF-S11G.book 57 ページ 2002年2月27日 水曜日 午後9時10分

WLI2-CF-S11 User's Manual
58
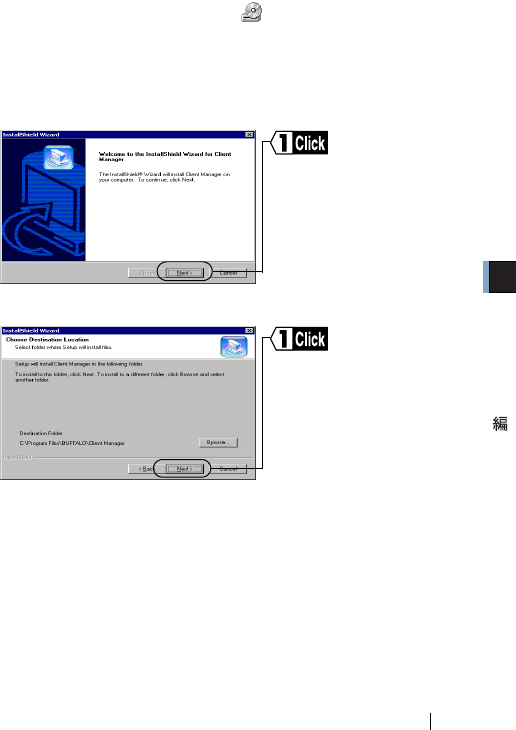
Step 8 Installing Client Manager
"Client Manager" is a tool for communicating with wireless LAN computers
directly or via AirStation. It is necessary to install Client Manager in all
wireless LAN computers.
Use the procedure below to install Client Manager.
1 Insert the "AirNavigato CD" into the CD-ROM drive.
Be sure to use the latest AirNavigato CD of version 3.62 or
later. Note that the AirStation may include an AirNavigator
CD of earlier version than 3.62.
When you insert the "AirNavigato CD" into the CD-ROM
drive, the AirNavigator menu window may automatically
appear. In this case, proceed to Step 4.
WLI-CF-S11G.book 58 ページ 2002年2月27日 水曜日 午後9時10分
3
Windows Me/98
WLI2-CF-S11 User's Manual
59
2Double-click [My Computer] on Desktop.
3Double-click the CD-ROM icon()
41. Select [Install the Client Manager].
2. Click [Next].
5
6
⇒ Continued on next page
Click [Next].
Click [Next].
WLI-CF-S11G.book 59 ページ 2002年2月27日 水曜日 午後9時10分

WLI2-CF-S11 User's Manual
60
7
8
9
Click [No] when you do not wish to add Client Manager to the
Startup menu.
Click [Next].
Select "Client Manager"
Click [Next].
Copying the files required for
the installation will start.
Reconfirm the component to
be installed.
Click [Yes].
Client Manager will be
registered in the Startup
menu.
WLI-CF-S11G.book 60 ページ 2002年2月27日 水曜日 午後9時10分
3
Windows Me/98
WLI2-CF-S11 User's Manual
61
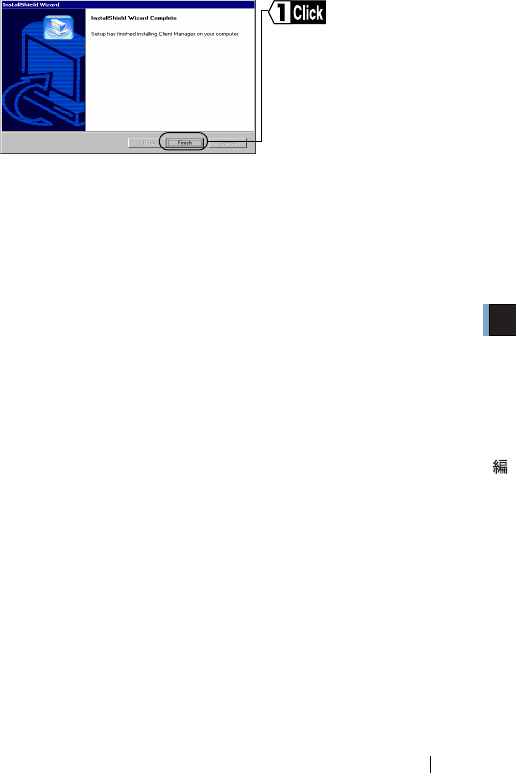
10
Now you have completed the Client Manager installation process.
To uninstall Client Manager
1Select [Start]-[Settings]-[Control Panel].
2Double-click "Add/Remove Programs."
3Select "Client Manager" and click [Add/Remove].
4Select "Remove" and click [Next].
5When the message "Do you want to completely remove the
selected application and all of its components? " appears, click
[OK].
6When the "InstallShield Wizard Complete" window opens, click
[Finish].
Click [Finish].
WLI-CF-S11G.book 61 ページ 2002年2月27日 水曜日 午後9時10分
WLI2-CF-S11 User's Manual
62
3.3 Connecting to the Network
Upon completion of computer settings, you can connect your computer to
the network. There are two methods for connecting the computer to the
network as shown below.
•Communicating via AirStation -a
•Communicating with wireless LAN computers -b
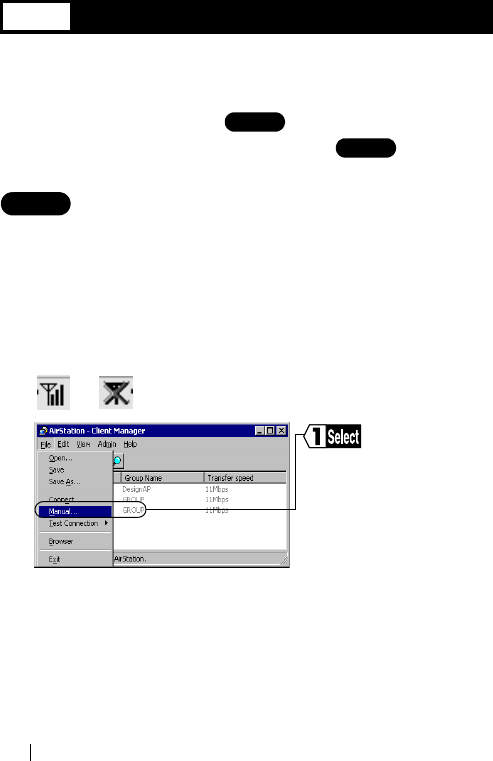
Step 9 -a Communicating via AirStation
To make communications using the AirStation, set the ESS-ID using Client
Manager.
1Select [Start]-[Programs]-[AirStation Utility]-[Client Manager].
If the icon below appears in the task tray in the lower right on the
screen, you can double-click that icon to start Client Manager.
or
2
Step 1
Step 9
Step 1
Step 9
Select [File]-[Manual].
WLI-CF-S11G.book 62 ページ 2002年2月27日 水曜日 午後9時10分
3
Windows Me/98
WLI2-CF-S11 User's Manual
63
31. Select "11Mbps Communication over AirStation" in the
"Network Mode" field.
2. Enter the AirStation ESS-ID to the "ESS-ID" field.
3. Click [OK].
The initial setting of the AirStation ESS-ID shows the last six digits of
the MAC address of the AirStation plus "GROUP" (upper-case).
4
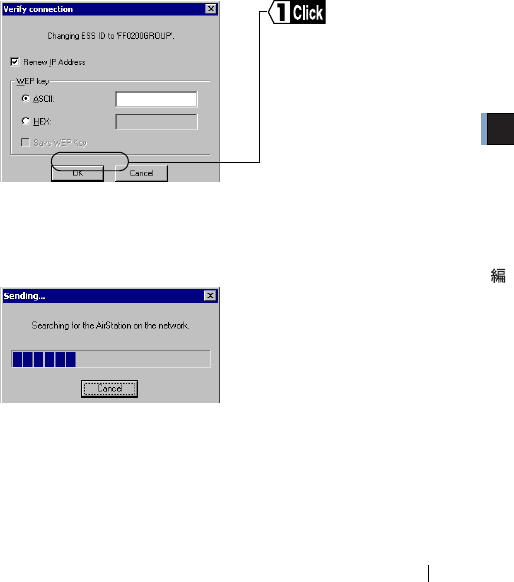
Enter an "WEP Key" if encryption with WEP is used in the network. If
the AirStation is used in the initial state, no encryption is set. Leave the
area empty in this case.
5
⇒ Continued on next page
Click [OK].
Ai
r
St
a
ti
on re
t
r
i
eva
l
w
ill
b
e
started.
WLI-CF-S11G.book 63 ページ 2002年2月27日 水曜日 午後9時10分
WLI2-CF-S11 User's Manual
64
6
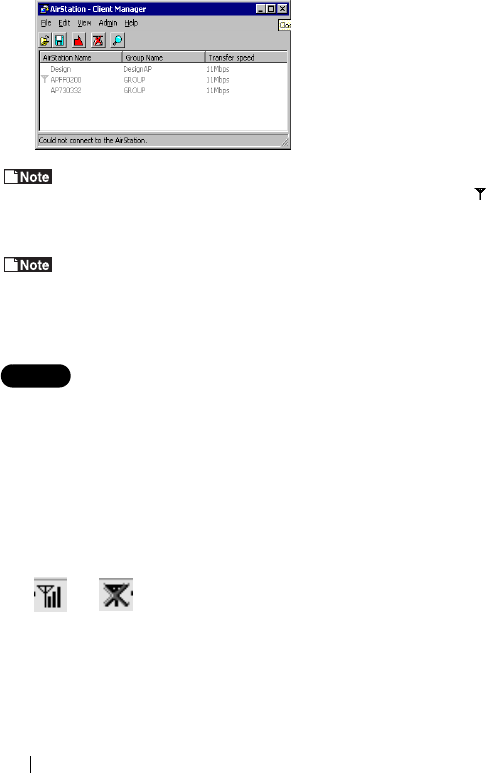
When the access to the AirStation is successful, the AirStation
indication turns from gray to black so that the antenna mark()
appears.
After the computer has succeeded in connecting to the AirStation, a
slower data rate such as "2Mbps" may be displayed in the "Transfer
speed" column. In this case, the correct data rate will appear when
the practical communication starts.
Step 9 -b Communicating with wireless
LAN computers
When communicating with wireless LAN computers, manually set a radio
channel using Client Manager.
1Select [Start]-[Programs]-[AirStation Utility]-[Client Manager].
If the icon below appears in the task tray in the lower right on the
screen, you can double-click that icon to start Client Manager.
or
When this window appears,
the access to the AirStation
is successful.
WLI-CF-S11G.book 64 ページ 2002年2月27日 水曜日 午後9時10分
3
Windows Me/98
WLI2-CF-S11 User's Manual
65
2
3
4
Now you have completed the radio channel configuration procedure.
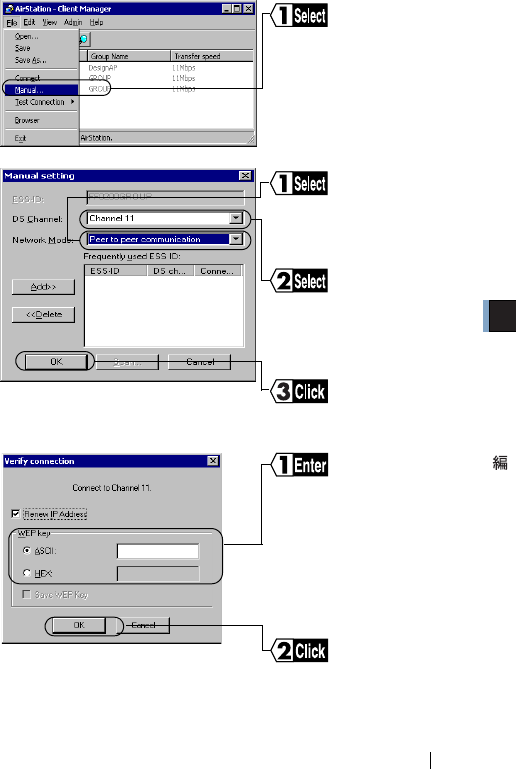
Select [File]-[Manual].
Select the same channel as
the other computers that
you wish to communicate
Click [OK].
Select "Peer to peer
communication" in the
"Network Mode" field.
Click [OK].
Enter an "WEP Key" if
encryption with WEP is used
in the network. If the initial
settings are used, no
encryption is set. Leave the
area empty in this case.
WLI-CF-S11G.book 65 ページ 2002年2月27日 水曜日 午後9時10分
WLI2-CF-S11 User's Manual
66
Step 10 Making your computer shared
Upon completion of wireless LAN channel configuration, make the settings
for sharing the drives and folders in your computer so that any computer on
the network can use them.
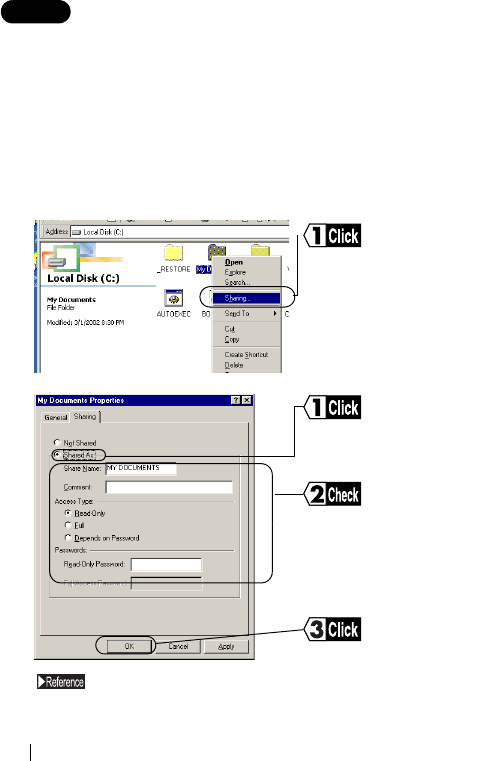
The example here describes the procedure for sharing [My Document] in
Windows Me.
1Double-click [My Computer] on Desktop, and then the C: drive
ion.
2
3
For details on "Share Name," "Comment," "Access Type," and
"Passwords," see "Setting window for sharing in Windows Me/
98" on page 133 in Chapter 6.
Right-click [My Documents],
and select [Sharing] from
the menu.
Click[Shared As].
Click [OK].
Check or change, if
necessary, "Share Name,"
"Comment," "Access Type,"
and "Passwords."
WLI-CF-S11G.book 66 ページ 2002年2月27日 水曜日 午後9時10分
3
Windows Me/98
WLI2-CF-S11 User's Manual
67
4Upon completion of sharing setting, the [My Documents] icon
changes as shown below.
Now you have completed the setting for sharing [My Documents].
Step 11 Starting communication
Upon completion of setting for sharing the drives and folders, you can
access a computer on the network.
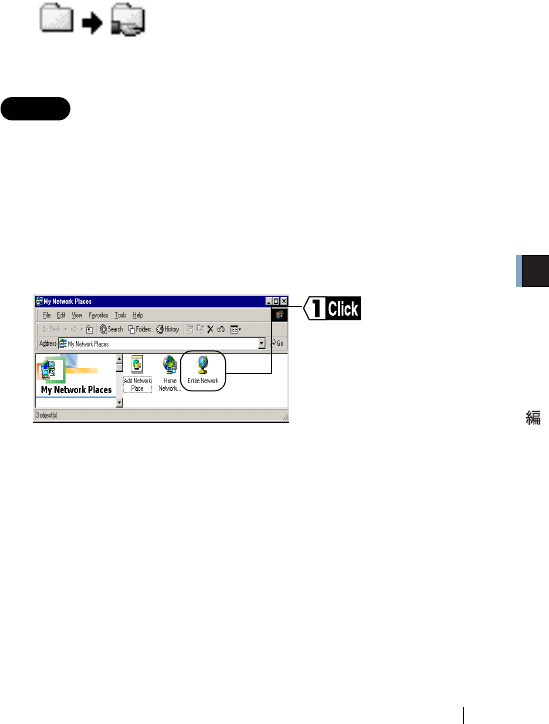
1Double-click [My Network] on Desktop.
In Windows 98, double-click the [Network Computer] icon, and
proceed to Step 4.
2
⇒ Continued on next page
Double-click
[Entire Network].
WLI-CF-S11G.book 67 ページ 2002年2月27日 水曜日 午後9時10分
WLI2-CF-S11 User's Manual
68
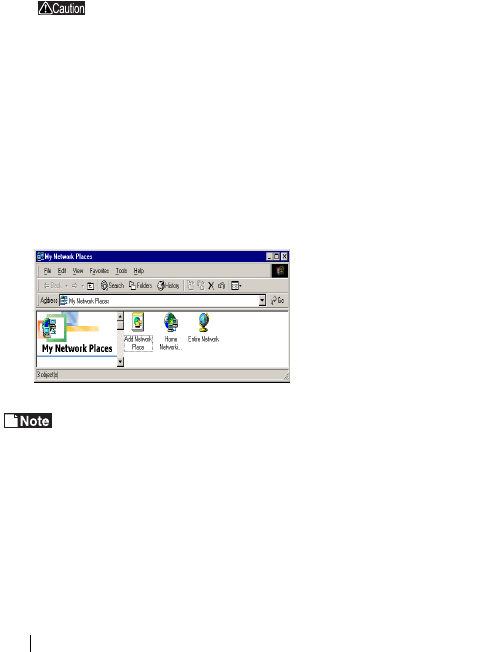
3Double-click the workgroup name icon.
All computers connected on the network are listed.
When your target computer is not listed, see "Other computers
are not listed (during communication without the AirStation)" on
page 114 in Chapter 5.
4Double-click the icon of your target computer.
5Double-click your target folder.
6All available folders and files in the selected folder are listed so
that you can open, create, or update a file in them.
All available folders and files in the selected folder are listed so that
you can open, create, or update a file in them.
WLI-CF-S11G.book 68 ページ 2002年2月27日 水曜日 午後9時10分