Badger Meter BADGERCS Orion Gas Transmitter User Manual Exhibit D Users Manual per 2 1033 b3
Badger Meter Inc Orion Gas Transmitter Exhibit D Users Manual per 2 1033 b3
Exhibit D Users Manual per 2 1033 b3
Installation &
Operation Manual
BadgerMeter,Inc.
®
ORI-IOM-47
P/N 62014 Rev. 1
6-07
Badger® ORION®
Automated Meter
Reading System
ORION Transmitter for
American
Commercial Meters
IMPORTANT: This manual contains important warnings and information.
READ AND KEEP FOR REFERENCE.
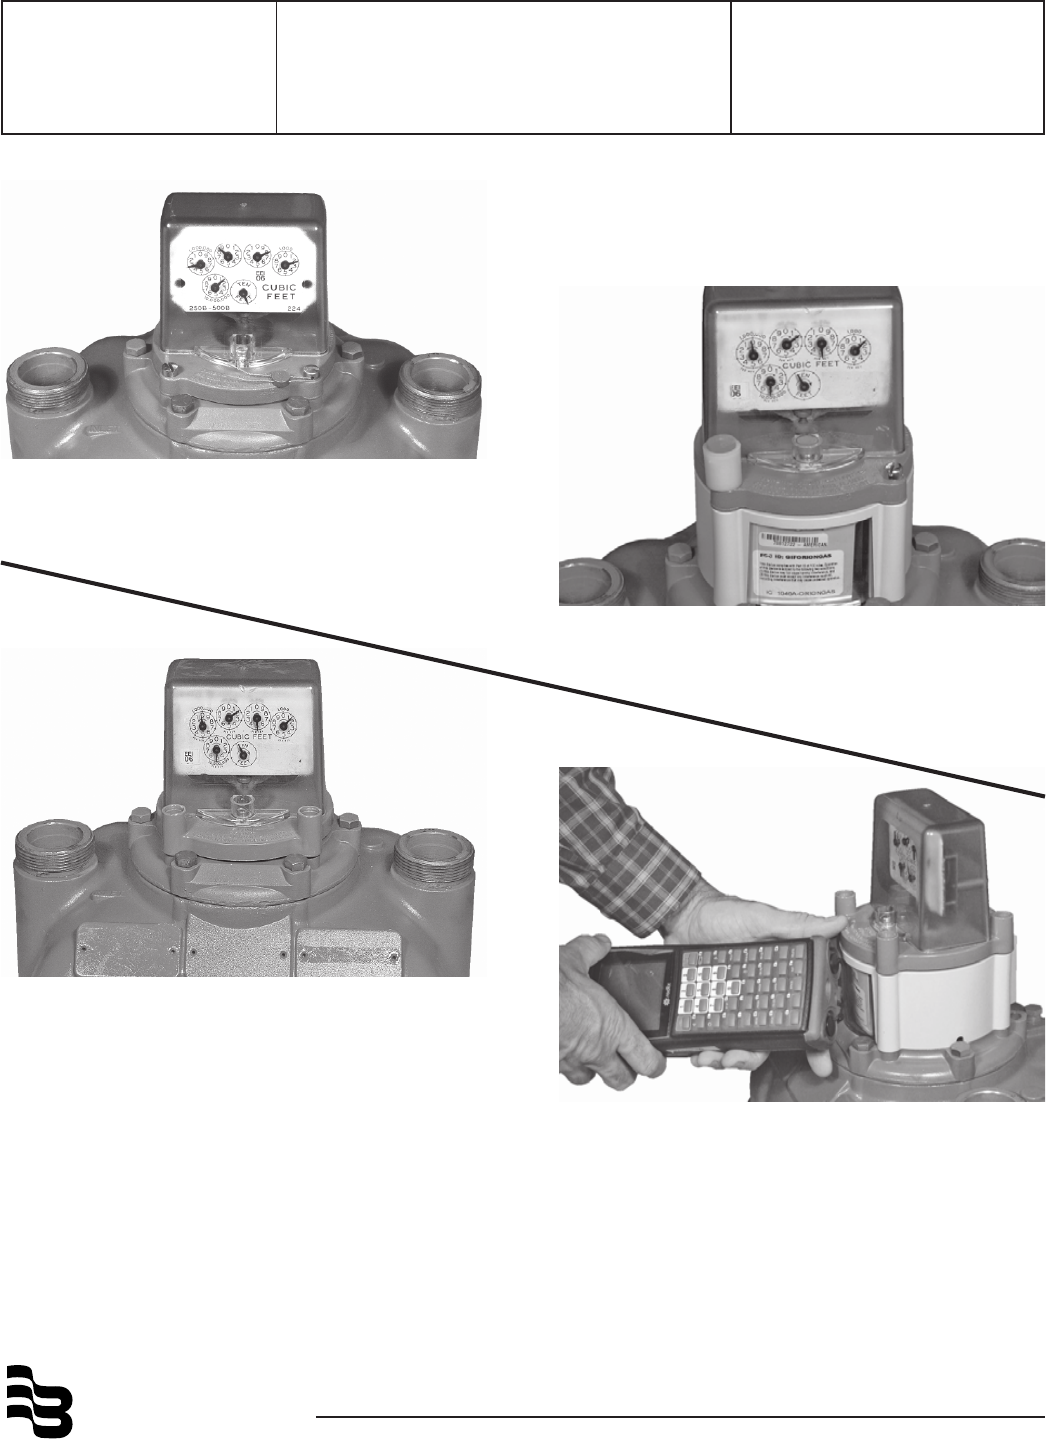
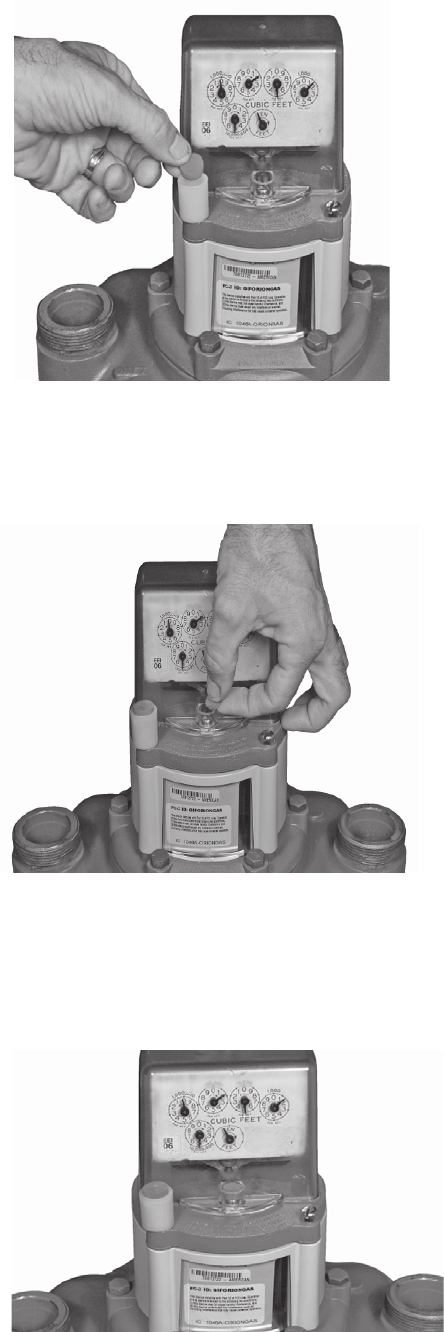
After Installation of
ORION Transmitter
After Installation of
ORION Transmitter
Before Installation
with Red Security Seals
Before Installation
with Wire Seal Security Screw

2
Disclaimer
The user/purchaser is expected to read and understand the information provided in this manual,
follow any listed Safety Precautions and Instructions and keep this manual with the equipment for
future reference.
Misuse, mishandling and/or inadequate maintenance may impair performance and/or compromise
safety.
Questions or Service Assistance
If you have questions regarding the product or this document contact:
Badger Meter, Inc.
P.O. Box 245036
Milwaukee, WI 53224-9536
Telephone: (414) 355-0400, (800) 876-3837
Fax: (888) 371-5982
On the Web: www.badgermeter.com
or call your local Badger Meter representative.
Product Identification Information
Record the product identification numbers from the nameplate.
Transmitter
Model Number _ ______
Serial Number _____________
Tag Number _______________

3
Table of Contents
Disclaimer ................................................................................................................................. 2
Questions or Service Assistance ................................................................................................ 2
Product Identification Information ...............................................................................................2
Note Explanations ...................................................................................................................... 5
Scope of Manual ........................................................................................................................5
Product Unpacking and Inspection............................................................................................. 5
License Requirements ...............................................................................................................5
Badger® ORION® Integral Transmitter/Hardcase Gas Meter Identification .................................. 6
Installation Tools and Materials .................................................................................................. 6
Label Information ........................................................................................................................ 6
Installation of Badger ORION Integral Transmitter...................................................................... 6
American® Commercial Diaphragm with Wire Seal Security Screw and Dial Index..............7
Badger ORION Model 64989-002 ............................................................................................ 7
Index and Index Cover Plate Removal from American Meter ..................................................... 7
Badger ORION Transmitter Label .............................................................................................. 8
Install Badger ORION Transmitter and American Cover Plate ................................................... 8
Program the Badger ORION Transmitter ....................................................................................9
Complete the Installation .......................................................................................................... 10
AMERICAN® Commercial Diaphragm with Red Security Seals and Dial Index .................. 11
Badger ORION Model 64989-002 ...........................................................................................11
Index and Index Cover Plate Removal From American Meter ..................................................11
Badger ORION Transmitter Label ............................................................................................12
Install the Badger ORION Transmitter and American Cover Plate ...........................................12
Program the Badger ORION Transmitter ..................................................................................13
Complete the Installation .......................................................................................................... 14

4
(This page intentionally left blank)
5
License Requirements
This device complies with Part 15 of FCC
Rules. Operation of this device is subject to
the following conditions: (1) This device may
not cause harmful interference, and (2) this
device must accept any interference received,
including interference that may cause
undesired operation.
No FCC license is required by a utility to
operate a Badger ORION meter reading
system.
Any changes made, but not approved by
Badger Meter, can void the user’s authority to
operate the equipment.
Note Explanations
NOTE:
Communicates installation, operation, or
maintenance information that is safety related but
not hazard related.
Scope of Manual
This manual contains installation instructions
for mounting the Badger® ORION® Integral
Transmitter for Gas Meters on two American
Gas Meters.
Proper performance and reliability of the
Badger ORION system depends upon
installation in accordance with these
instructions.
Product Unpacking and Inspection
Upon receipt of the product, perform the
following unpacking and inspection
procedures:
NOTE:
If damage to the shipping container is
evident upon receipt, request the carrier to be
present when the product is unpacked.
Carefully open the shipping package, follow
any instructions that may be marked on the
exterior. Remove all cushioning material
surrounding the product and carefully lift the
product from the package.
Retain the package and all packing material
for possible use in reshipment or storage.
Visually inspect the product and applicable
accessories for any physical damage such as
scratches, loose or broken parts, or any other
sign of damage that may have occurred
during shipment.
NOTE:
If damage is found, request an inspection
by the carrier’s agent within 48 hours of delivery
and file a claim with the carrier. A claim for
equipment damage in transit is the sole
responsibility of the purchaser.
6
Badger® ORION® Integral Transmitter/Hardcase Gas Meter Identification
Badger ORION integral transmitters for gas meters are designed for use with only two major
brands of hardcase gas meters. Please refer to and use the following identification table.
Installation of Badger ORION Integral Transmitter
This manual describes two types of installation of the Badger ORION transmitter and American
index on an American gas meter.
The first section of this manual describes the installation on an American Commercial Diaphragm
and Turbine Meter with Wire Seal Security Screws.
The second section of this manual describes the installation on an American Commercial
Diaphragm and Turbine Meter with Red Security Seals.
Identification Table
American Badger ORION
Gas Meter Manufacturer Gas Meter Models Transmitter Number
American® Meter AL-800, AL-1000, AL-1400, 64989-002
AL-2300, AL-5000 and
GTS/GTX Turbine Meters
Installation Tools and Materials
Use magnetized screwdrivers.
1/4" flat screwdriver
3/16" flat screwdriver
Radix® Handheld
Label Information
Certification markings are noted on the product label.
7
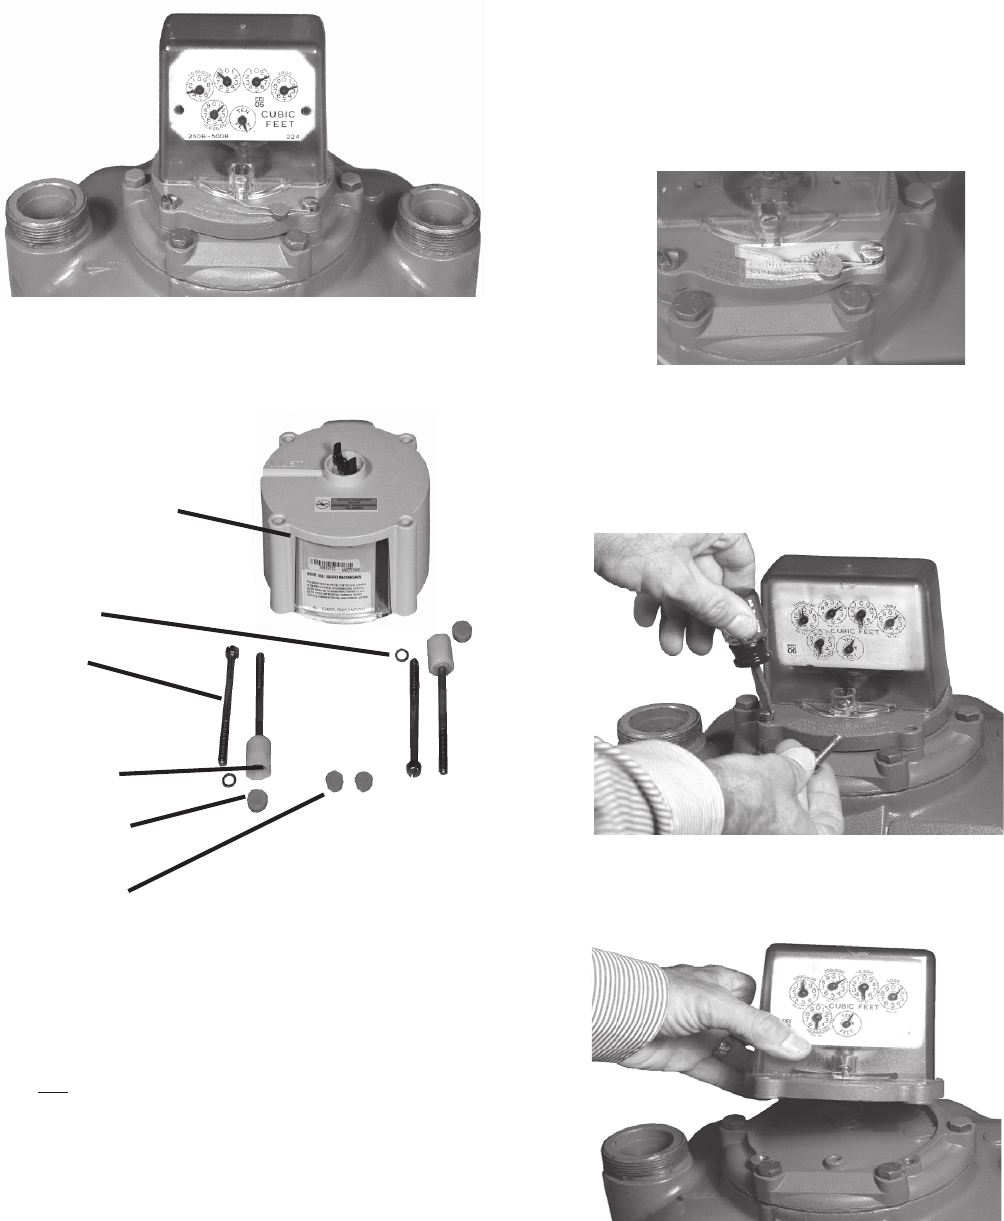
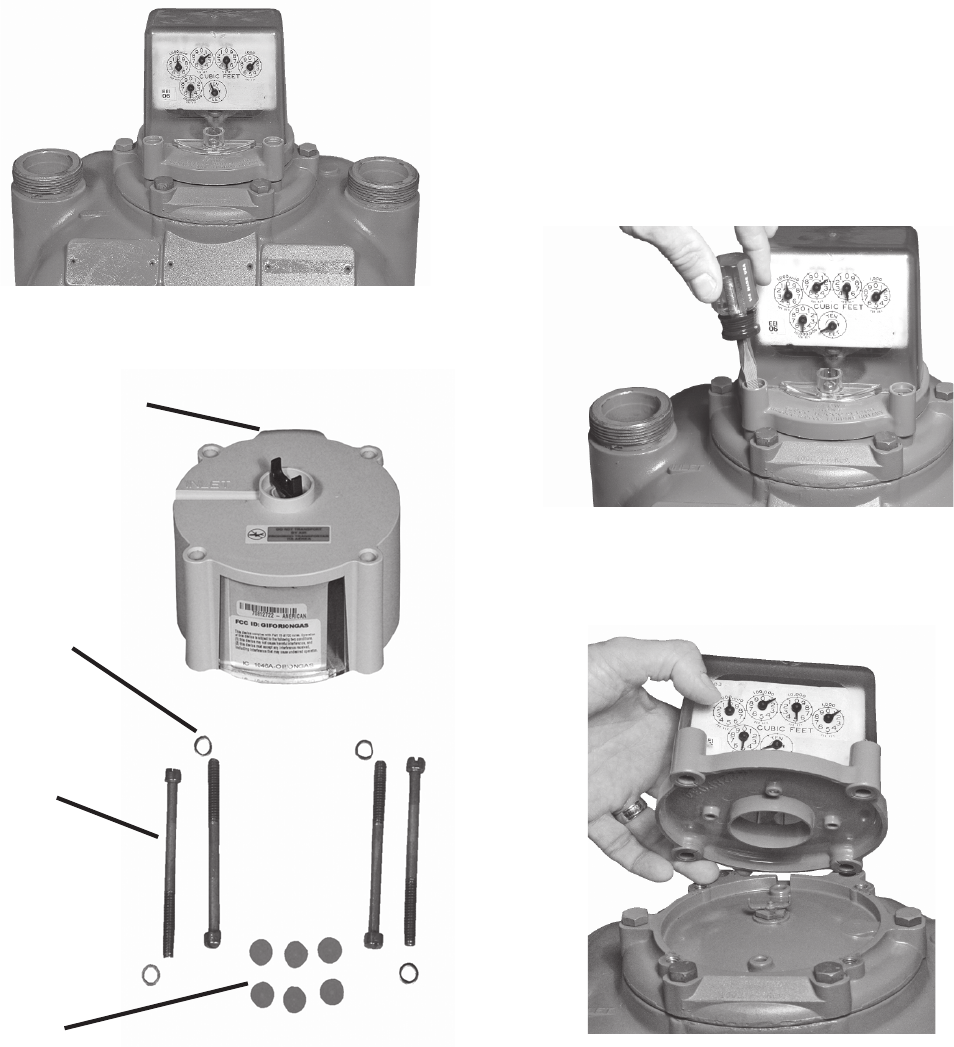
ORION Transmitter
2 Seal Caps
2 Small
Tamper Plugs
2 Large
Tamper Plugs
2 Washers
4 Screws
NOTE: The screws provided in this installation kit
are not drilled for wire seals. Therefore, the wire
seal is replaced with plastic seal cups provided in
the kit.
Index and Index Cover Plate Removal from
American Meter with Seal Security Screw
Step 1: Remove the wire security seal from
the index cover mounting screw.
Step 2: Use a large screwdriver to remove
the four (4) 18-8 index cover mounting plate
screws and American Index. Discard the four
screws.
Step 3: Remove the American index and
mounting plate.
ORION Model 64989-002 Transmitter Kit for
American Commercial Diaphragm and Turbine
Meter with Wire Seal Security Screw
AMERICAN® Commercial Diaphragm and Turbine Meters
with Wire Seal Security Screw
American Commercial Diaphragm and Turbine
Meter with Wire Seal Security Screw
8
When attaching an Badger ORION transmitter
to a gas meter make sure it mounts securely
to the meter.
Install the Badger ORION Transmitter and
American Cover Plate
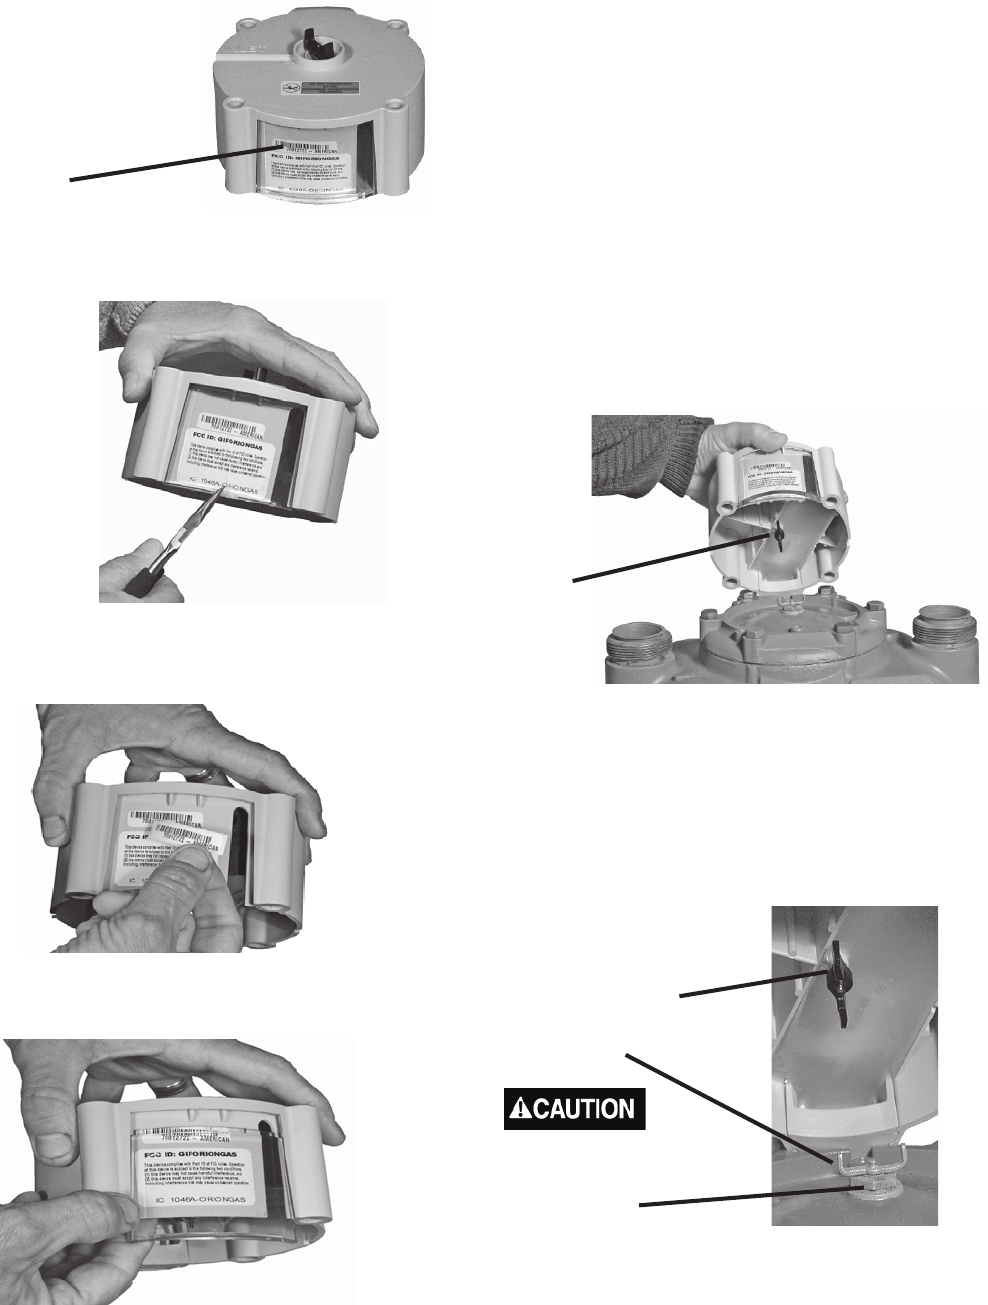
Use care when handling the Badger ORION
transmitter to insure the drive pawl is not
subjected to any physical abuse. Abuse may
cause this spindle to become bent,
misaligned, or otherwise inoperative.
Step 1: Place the Badger ORION transmitter
on top of the gas meter, where the index and
index cover plate were previously removed.
Place the transmitter drive pawl so it is
perpendicular to the meter drive pawl.
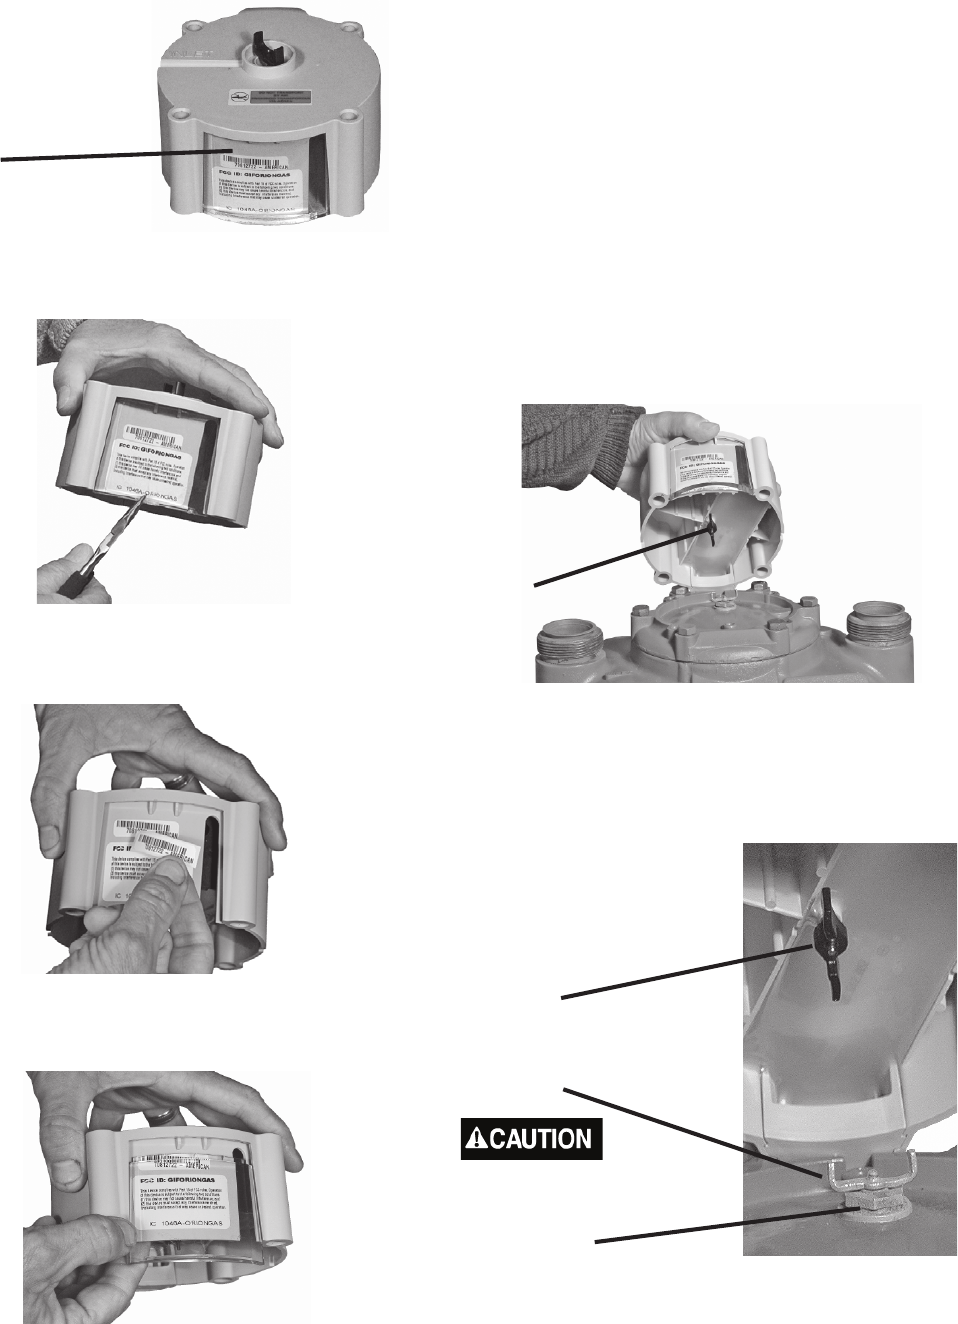
Step B: Place a new serial number tag above
the one that is on the transmitter.
Step C: Place the cover plate back on the
transmitter.
Badger® ORION® Transmitter Label
If the utility chooses to add an additional
label, follow steps A, B, and C below. If not,
go to Install in the next column.
Serial Number
Label
Step A: With a needle nose pliers pull the
plastic cover plate down and off.
Drive Pawl
Spindle
Step 2: When mounting a Badger ORION
transmitter to a gas meter, make sure the
transmitter drive pawl engages the gas meter
drive pawl. These two drive pawls must mate
without causing any binding or potential for
disengagement.
Test to ensure the pawls are engaged and
moving freely.
Meter Drive
Pawl
Transmitter
Drive Pawl
placing transmitter on
meter incorrectly may
damage the output seal of
the gas meter.
9
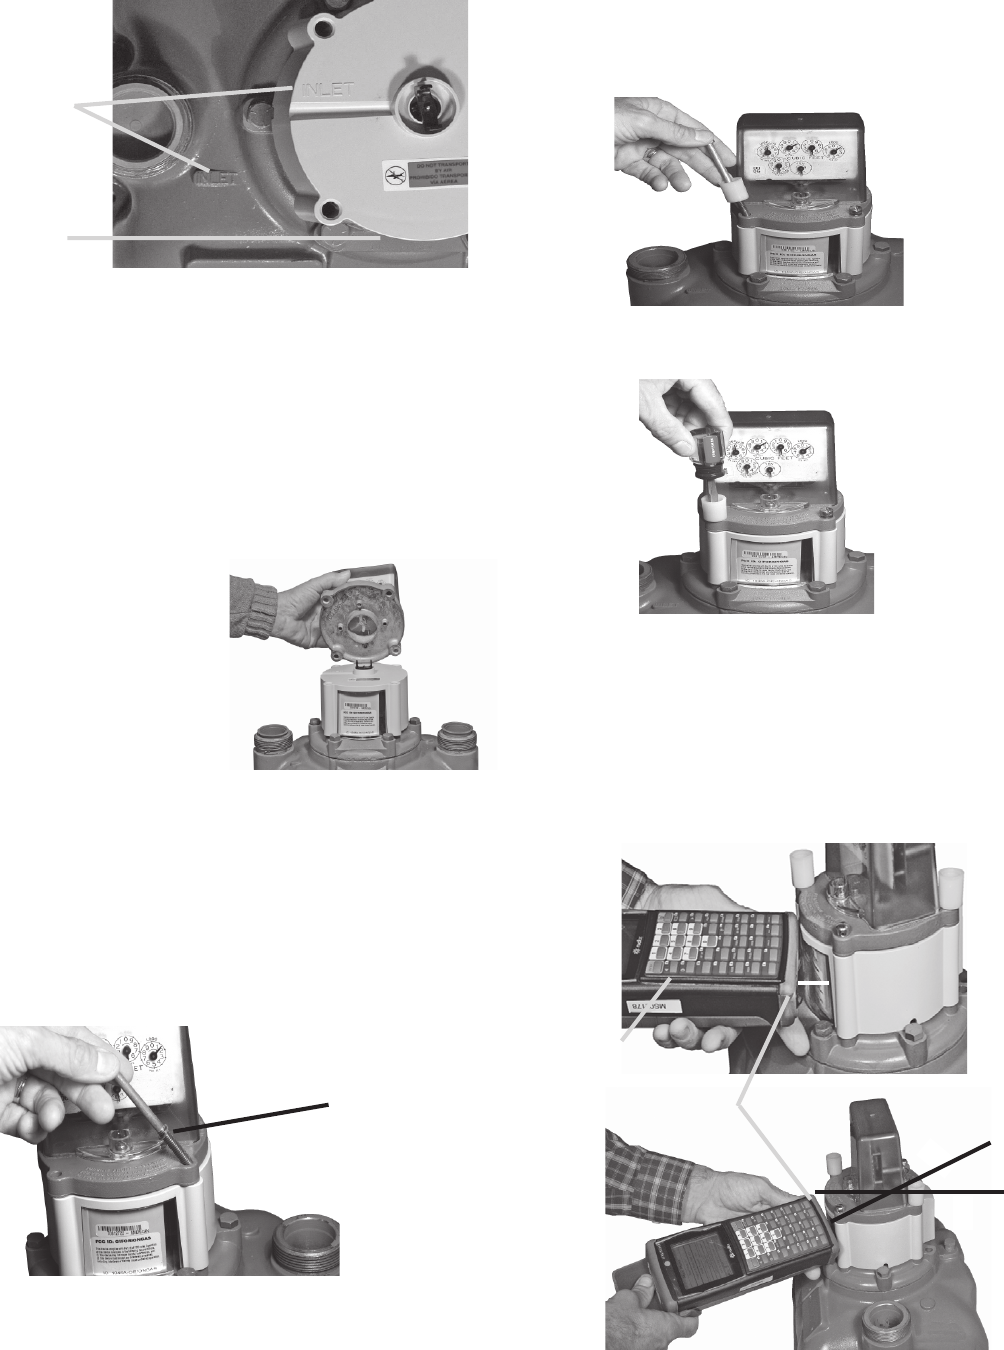
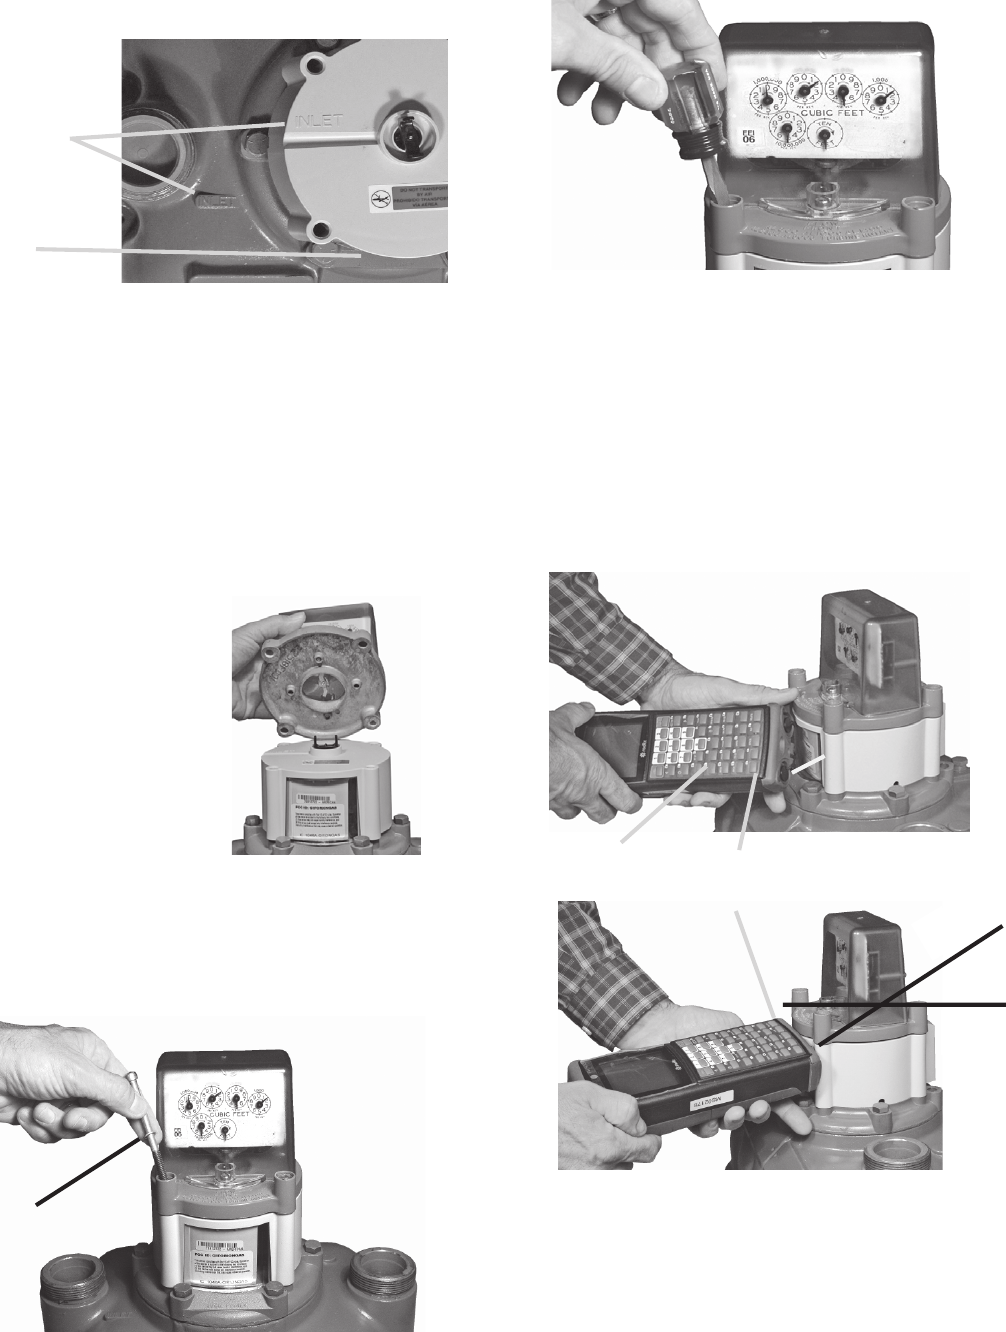
Step 3: Be sure the gas INLET markings are
on the same side of the meter and the lens
faces forward.
Gas INLET
markings
Lens facing
forward
Step 4: Place the American Index and cover
plate (removed earlier) back on the Badger®
ORION® transmitter.
Place it so the text;
TURBINE FRONT FLOW
AL-600, AL-1000, AL-1400, AL-2300, and
AL-5000
(or other such text); faces the front
and the index hole is centered around the
transmitter drive pawl.
Place the index drive
pawl perpendicular to
the transmitter drive
pawl.
Step 5: Place two screws, with a washer on
each, into two corners of the cover mounting
plate.
Use four (4) 18-18x3-1/2 supplied mounting
screws to attach the index, cover plate, and
Badger ORION transmitter to the gas meter.
Washer
Step 7: Tighten all screws evenly with a large
screwdriver to approximately 70 inch lbs.
Step 6: Index and cover has two platic seal
caps that are difficult to maneuver around with
the long bolts. Place two of the screws,
without washers, through the white seal caps.
Place them in the other opposite corners of
the cover mounting plate.
Program the Badger ORION Transmitter
Badger uses the Radix® system to display
and process screens.
Place the Radix so the optic read head aligns
with the LED output port. The angle of
approach should be about 30 degrees.
Rotate Radix unit to
about 30 degrees
Radix
4
3
30°
10
This completes the installation of a Badger®
ORION® transmitter on an American®
Commercial Diaphragm and Turbine Meter
with Wire Seal Security Screw converted to
seal caps.
If the index mounting seal caps were
removed, replace them with the extra caps
provided in the installation kit.
Complete the Installation
After programming, add seal caps to the front
and rear screws of the index cover plate. Only
the front screw is shown below.
11
Index and Index Cover Plate Removal from
American Meter with Red Security Seals
Step 1: Use a large screwdriver to remove
the four (4) 18-8 index cover mounting plate
screws and American Index. Discard the four
screws.
Step 2: Remove the American index and
mounting plate.
AMERICAN® Commercial Diaphragm and Turbine Meters
with Red Security Seals
American Commercial Diaphragm and Turbine
Meter with Red Security Seals
ORION Model 64989-002 Transmitter Kit for
American Commercial Diaphragm and Turbine
Meter with Red Security Seals
4 Screws
6 Small
Tamper Plugs
ORION® Transmitter
4 Washers
12
Step B: Place a new serial number tag
above the one that is on the transmitter.
Step C: Place the cover plate back on the
transmitter.
Badger® ORION® Transmitter Label
Step A: With a needle nose pliers pull the
plastic cover plate down and off.
If the utility chooses to add an additional
label, follow steps A, B, and C below. If
not, go to Install in the next column.
Serial Number
Label
Step 2: When mounting a Badger ORION
transmitter to a gas meter, make sure the
transmitter drive pawl engages the gas meter
drive pawl. These two drive pawls must mate
without causing any binding or potential for
disengagement.
Test to ensure the pawls are engaged and
moving freely.
Install the Badger ORION Transmitter and
American Cover Plate
Use care when handling the Badger ORION
transmitter to insure the drive pawl is not
subjected to any physical abuse. Abuse may
cause this spindle to become bent, misaligned or
otherwise inoperative.
When attaching a Badger ORION transmitter to a
gas meter make sure it mounts securely to the
meter.
Step 1: Place the Badger ORION transmitter on
top of the gas meter, where the index and index
cover plate were previously removed.
Place the transmitter drive pawl so it is
perpendicular to the meter drive pawl.
Drive Pawl
Spindle
Meter
Drive Pawl
Transmitter
Drive Pawl
placing transmitter on
meter incorrectly may
damage the output seal of
the gas meter.
13
Step 6: Tighten all screws evenly with a large
screwdriver to approximately 70 inch-lbs.
Program the Badger ORION Transmitter
Badger® uses the Radix® system to display
and process screens.
Place the Radix so the optic read head aligns
with the LED output port. The angle of
approach should be about 30 degrees.
Radix
Rotate Radix unit to
about a 30 degree
angle
30°
4
3
Step 5: Use four (4) 18-18x3-1/2 supplied
mounting screws and a washer on each to
attach the index, cover plate, and Badger®
ORION transmitter to the gas meter.
Washer
Step 3: Be sure the gas INLET markings are
on the same side of the meter and the lens
faces forward.
Gas INLET
markings
Lens facing
forward
Step 4: Place the American® Index and cover
plate (removed earlier) back on the Badger®
ORION® transmitter.
Place it so the text;
TURBINE FRONT FLOW
AL-600, AL-1000, AL-1400, AL-2300, and
AL-5000
(or other such text); faces the front and
the top hole is centered around the upper
drive pawl.
Place the index drive
pawl perpendicular to
the transmitter drive
pawl.
14
This completes the installation of a Badger
ORION® transmitter on an American®
Commercial Diaphragm and Turbine Meter
with Red Security Seals.
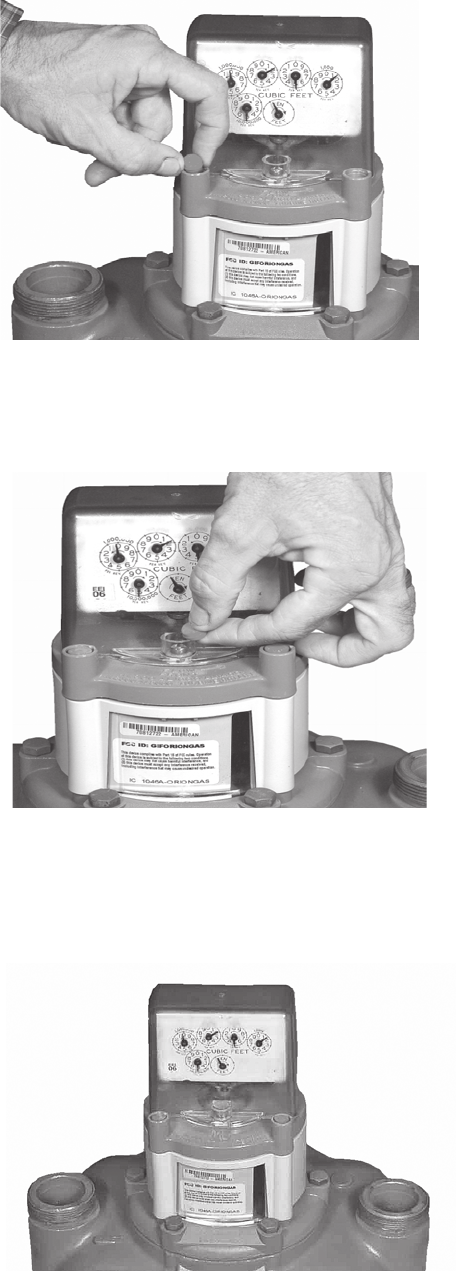
If the index mounting screw seal caps were
removed, replace them with the extra caps
provided in the installation kit.
Complete the Installation
After programming, add seal caps to the front
and rear index cover screws . Only the front
screws are shown below.

15
(This page is intentionally left blank)

®
Due to continuous research, product improvements and enhancements,
Badger Meter reserves the right to change product or system specifications
without notice, except to the extent an outstanding contractual obligation exists.
BadgerMeter,Inc.
P.O. Box 245036, Milwaukee, WI 53224-9536
Telephone: (414) 355-0400 / (877) 243-1010
Fax: (414) 355-7499 / (866) 613-9305
www.badgermeter.com
Copyright © Badger Meter, Inc. 2007. All rights reserved.
Please see our website at
www.badgermeter.com
for specific contacts.
Badger® is a registered trademark of Badger Meter, Inc.