Badger Meter MUSBPWR Orion ME/SE USB Powered Mobile User Manual Exhibit D Users Manual per 2 1033 b3
Badger Meter Inc Orion ME/SE USB Powered Mobile Exhibit D Users Manual per 2 1033 b3
Exhibit D Users Manual per 2 1033 b3
ORION®
Mobile Reading System (ORS) 2.5
ORI-UM-00039-EN (August 2014 FCC Draft) User Manual

Page ii August 2014ORION® Meter Reading System (ORS)

CONTENTS
INTRODUCTION . . . . . . . . . . . . . . . . . . . . . . . . . . . . . . . . . . . . . . . . . . . . . . . . . . . . . . . . . 5
About ORS . . . . . . . . . . . . . . . . . . . . . . . . . . . . . . . . . . . . . . . . . . . . . . . . . . . . . . . . . .5
Compatibility. . . . . . . . . . . . . . . . . . . . . . . . . . . . . . . . . . . . . . . . . . . . . . . . . . . . . . . . .5
Audience and Purpose. . . . . . . . . . . . . . . . . . . . . . . . . . . . . . . . . . . . . . . . . . . . . . . . . . .5
About This Manual . . . . . . . . . . . . . . . . . . . . . . . . . . . . . . . . . . . . . . . . . . . . . . . . . . . . . 6
Product Unpacking and Inspection. . . . . . . . . . . . . . . . . . . . . . . . . . . . . . . . . . . . . . . . . . .6
License Requirements . . . . . . . . . . . . . . . . . . . . . . . . . . . . . . . . . . . . . . . . . . . . . . . . . . . 6
GETTING STARTED . . . . . . . . . . . . . . . . . . . . . . . . . . . . . . . . . . . . . . . . . . . . . . . . . . . . . . . 7
SYSTEM COMPONENTS . . . . . . . . . . . . . . . . . . . . . . . . . . . . . . . . . . . . . . . . . . . . . . . . . . . . 8
Components of the ORION Mobile Reading System . . . . . . . . . . . . . . . . . . . . . . . . . . . . . . . . 8
Vehicle and Laptop Setup with ORION USB-Powered Mobile Transceiver Only . . . . . . . . . . . . . . .9
Vehicle and Laptop Setup with ORION Mobile Receiver Only . . . . . . . . . . . . . . . . . . . . . . . . . .9
Vehicle and Laptop Setup with ORION USB-Powered Mobile Transceiver and ORION Mobile Receiver
. . . . . . . . . . . . . . . . . . . . . . . . . . . . . . . . . . . . . . . . . . . . . . . . . . . . . . . . . . . . . . . . 10
PROGRAM STARTUP / EXIT . . . . . . . . . . . . . . . . . . . . . . . . . . . . . . . . . . . . . . . . . . . . . . . . . 11
Starting the Software . . . . . . . . . . . . . . . . . . . . . . . . . . . . . . . . . . . . . . . . . . . . . . . . . . 11
Exiting the Software . . . . . . . . . . . . . . . . . . . . . . . . . . . . . . . . . . . . . . . . . . . . . . . . . . . 11
Login Screen . . . . . . . . . . . . . . . . . . . . . . . . . . . . . . . . . . . . . . . . . . . . . . . . . . . . . . . . 12
Main Screen . . . . . . . . . . . . . . . . . . . . . . . . . . . . . . . . . . . . . . . . . . . . . . . . . . . . . . . . 14
USER GUIDE
LOADING A ROUTE . . . . . . . . . . . . . . . . . . . . . . . . . . . . . . . . . . . . . . . . . . . . . . . . . . . . . . 18
READING A ROUTE . . . . . . . . . . . . . . . . . . . . . . . . . . . . . . . . . . . . . . . . . . . . . . . . . . . . . . 19
Split View . . . . . . . . . . . . . . . . . . . . . . . . . . . . . . . . . . . . . . . . . . . . . . . . . . . . . . . . . . 20
List View. . . . . . . . . . . . . . . . . . . . . . . . . . . . . . . . . . . . . . . . . . . . . . . . . . . . . . . . . . .21
Map View . . . . . . . . . . . . . . . . . . . . . . . . . . . . . . . . . . . . . . . . . . . . . . . . . . . . . . . . . . 22
Map Control . . . . . . . . . . . . . . . . . . . . . . . . . . . . . . . . . . . . . . . . . . . . . . . . . . . . . . . . 24
Meter Icons . . . . . . . . . . . . . . . . . . . . . . . . . . . . . . . . . . . . . . . . . . . . . . . . . . . . . . . . . 25
Status Icons. . . . . . . . . . . . . . . . . . . . . . . . . . . . . . . . . . . . . . . . . . . . . . . . . . . . . . . . . 26
Page iii August 2014 ORION® Meter Reading System (ORS)

SERVICE DETAILS . . . . . . . . . . . . . . . . . . . . . . . . . . . . . . . . . . . . . . . . . . . . . . . . . . . . . . . 27
Current Reading . . . . . . . . . . . . . . . . . . . . . . . . . . . . . . . . . . . . . . . . . . . . . . . . . . . . . .27
Comment Codes/Messages . . . . . . . . . . . . . . . . . . . . . . . . . . . . . . . . . . . . . . . . . . . . . . 30
UNLOADING A ROUTE . . . . . . . . . . . . . . . . . . . . . . . . . . . . . . . . . . . . . . . . . . . . . . . . . . . . 35
CLEARING A ROUTE. . . . . . . . . . . . . . . . . . . . . . . . . . . . . . . . . . . . . . . . . . . . . . . . . . . . . .35
QUICK READ . . . . . . . . . . . . . . . . . . . . . . . . . . . . . . . . . . . . . . . . . . . . . . . . . . . . . . . . . . 36
Performing a Quick Read . . . . . . . . . . . . . . . . . . . . . . . . . . . . . . . . . . . . . . . . . . . . . . . . 36
SETTINGS . . . . . . . . . . . . . . . . . . . . . . . . . . . . . . . . . . . . . . . . . . . . . . . . . . . . . . . . . . . . 38
General Tab. . . . . . . . . . . . . . . . . . . . . . . . . . . . . . . . . . . . . . . . . . . . . . . . . . . . . . . . .39
Alerts Tab . . . . . . . . . . . . . . . . . . . . . . . . . . . . . . . . . . . . . . . . . . . . . . . . . . . . . . . . . . 40
Map Tab . . . . . . . . . . . . . . . . . . . . . . . . . . . . . . . . . . . . . . . . . . . . . . . . . . . . . . . . . . . 42
Communications Tab. . . . . . . . . . . . . . . . . . . . . . . . . . . . . . . . . . . . . . . . . . . . . . . . . . . 44
User Interface Tab . . . . . . . . . . . . . . . . . . . . . . . . . . . . . . . . . . . . . . . . . . . . . . . . . . . . . 46
OUTOFROUTE READS . . . . . . . . . . . . . . . . . . . . . . . . . . . . . . . . . . . . . . . . . . . . . . . . . . . 47
GEOCODING METER LOCATIONS . . . . . . . . . . . . . . . . . . . . . . . . . . . . . . . . . . . . . . . . . . . . . 48
TWOWAY COMMUNICATIONS . . . . . . . . . . . . . . . . . . . . . . . . . . . . . . . . . . . . . . . . . . . . . . 57
Signal Strength Indicator . . . . . . . . . . . . . . . . . . . . . . . . . . . . . . . . . . . . . . . . . . . . . . . . 57
Work Items . . . . . . . . . . . . . . . . . . . . . . . . . . . . . . . . . . . . . . . . . . . . . . . . . . . . . . . . . 58
Requesting Extended Status Manually. . . . . . . . . . . . . . . . . . . . . . . . . . . . . . . . . . . . . . . . 59
Interval History . . . . . . . . . . . . . . . . . . . . . . . . . . . . . . . . . . . . . . . . . . . . . . . . . . . . . . 60
Requesting Interval History Manually . . . . . . . . . . . . . . . . . . . . . . . . . . . . . . . . . . . . . . . .61
Requesting Firmware Manually . . . . . . . . . . . . . . . . . . . . . . . . . . . . . . . . . . . . . . . . . . . . 62
FIND . . . . . . . . . . . . . . . . . . . . . . . . . . . . . . . . . . . . . . . . . . . . . . . . . . . . . . . . . . . . . . . 63
UNARCHIVE . . . . . . . . . . . . . . . . . . . . . . . . . . . . . . . . . . . . . . . . . . . . . . . . . . . . . . . . . . 65
APPENDIX
GLOSSARY. . . . . . . . . . . . . . . . . . . . . . . . . . . . . . . . . . . . . . . . . . . . . . . . . . . . . . . . . . . .68
TROUBLESHOOTING . . . . . . . . . . . . . . . . . . . . . . . . . . . . . . . . . . . . . . . . . . . . . . . . . . . . . 70
TECHNICAL SUPPORT . . . . . . . . . . . . . . . . . . . . . . . . . . . . . . . . . . . . . . . . . . . . . . . . . . . . 71
Page iv August 2014ORION® Meter Reading System (ORS)

INTRODUCTION
The ORION® Mobile Reading System (ORS) 2.5.x is a software application designed for utility meter route reading using the
Panasonic® Toughbook® laptop computer. This manual is the guide for using the software application.
About ORS
ORS is an automated route meter reading system that incorporates a global positioning system (GPS) to display the
location of the reading vehicle on a map while reading meters. ORS is also a geographic information system (GIS) that displays
meter reading information. The laptop connects to a radio frequency-controlled ORION FHSS mobile transceiver and/or
mobile receiver.
Endpoint Solutions
• The ORION Fixed Network (SE ) endpoint is a full functioning two-way water endpoint for use in either mobile
or fixed network mode of operation. Once installed, ORION Fixed Network endpoints operate in mobile mode
and automatically transition to fixed network mode of operation once ORION network gateway transceivers and
ReadCenter® software are deployed. ORION Fixed Network endpoints automatically transition to a backup mobile
mode of operation if the network is disrupted for a period of time.
• The ORION Migratable (ME) endpoint is a full functioning two-way water endpoint for mobile applications with the
capability of migrating to fixed network mode to support future utility growth. In addition to providing the current
reading, the ORION Migratable endpoint’s two-way functionality allows users to capture data profile information
wirelessly, without having to access the endpoint during the normal reading process. See "Two-Way Communications"
on page 57 for additional information.
• The ORION Classic (CE) endpoint is a one-way endpoint designed for mobile meter reading. ORION Classic endpoints
support data profile and can be transitioned to fixed network application through approved electric connectivity
partner solutions, or with strategic deployment of ORION gateway 4.0 and 2.0 receivers.
The FHSS mobile transceiver and receiver capture meter readings from endpoints installed on each meter. Meter information
is then captured by the laptop system and displayed on the laptop screen.
Examples of displayed information are:
• Meter serial number • Meter and reading vehicle location
• Unread uncaptured meter information • Water meter leakage and tampering
Compatibility
This manual is written for ORS 2.5.x, and is compatible with Badger Meter reading data management software which acts as
an interface between the utility's billing software and the meter reading devices. ORS will load route information from the
reading data management software and unload meter information to the reading data management software.
Audience and Purpose
This manual is intended to be used by field technicians for collecting accurate utility meter readings from homes and
businesses using ORS from the convenience of their vehicles.
The contents of this manual are accessible through the interactive ORS Help. Click the Help button on the ORS
main tool bar to access the manual.
OTE:N Instructions for installing ORS software can be found in the ORION Mobile Reading System Software Installation
Manual, available at www.badgermeter.com.
INTRODUCTION
Page 5 August 2014 ORION® Meter Reading System (ORS)

About This Manual
The ORION Mobile Reading System (ORS) user manual has three main parts:
• Getting Started
The first part of the manual covers basic information including equipment set up, how to start and exit the software
application, and how to set the COM ports for the equipment connected to the computer.
• User Guide
The User Guide is the main part of the manual that includes process details and step-by-step procedures for using
the software to read meters.
• Appendix
Refer to the Appendix to find a glossary of terms used in this manual, as well as troubleshooting and technical
support information.
OTE:N To provide the best solution for our customers, Badger Meter continually improves software programs and
periodically updates this manual to reflect upgrades. Therefore, some discrepancies may be detected between the
installed software and this manual.
Typographic Conventions
• Items on the software screens that you will be asked to select or choose by clicking a button, highlighting, checking
a box or another similar means are in bold text and capitalized in the manual.
Example: Click once on the View Report button.
• Names of options, boxes, columns and fields are italicized. In most cases, first letters will be capitalized.
Example: The value displays in the Status Information field.
• Messages and special markings are shown in quotation marks.
Example: “Service Stopped” is shown on the display.
OTE:N Names, addresses and other customer-related information displayed in screen examples were created for
demonstration purposes in this manual. No actual customer information is included.
Product Unpacking and Inspection
Upon opening the shipping container, visually inspect the product and applicable accessories for any physical damage such
as scratches, loose or broken parts, or any other sign of damage that may have occurred during shipment.
OTE:N If damage is found, request an inspection by the carrier’s agent within 48 hours of delivery and file a claim with the
carrier. A claim for equipment damage in transit is the sole responsibility of the purchaser.
License Requirements
ORION meter reading systems comply with Part 15 of FCC Rules. Operation of the ORS is subject to the following conditions:
(1) The ORION meter reading systems may not cause harmful interference, and (2) the ORION meter reading systems must
accept any interference received, including interference that may cause undesired operation.
In accordance with FCC Regulations, “Code of Federal Regulations” Title 47, Part 2, Subpart J, Section 1091, transmitters
(endpoints) pass the requirements pertaining to RF radiation exposure. However, to avoid public exposure in excess of limits
for general population (uncontrolled exposure), a 20 centimeter distance between the endpoint and the body of the user
must be maintained during testing.
No FCC license is required by a utility to operate an ORION meter reading system.
ORION meter reading systems comply with Industry Canada license-exempt RSS standard(s). Operation is subject to the
following two conditions: (1) they may not cause interference, and (2) they must accept any interference, including
interference that may cause undesired operation of the device. Le présent appareil est conforme aux CNR d'Industrie Canada
applicables aux appareils radio exempts de licence. L'exploitation est autorisée aux deux conditions suivantes:
(1) l'appareil ne doit pas produire de brouillage, et (2) l'utilisateur de l'appareil doit accepter tout brouillage radioélectrique
subi, même si le brouillage est susceptible d'en compromettre le fonctionnement.
Any changes made, but not approved by Badger Meter, can void the user's authority to operate the equipment.
INTRODUCTION
Page 6 August 2014ORION® Meter Reading System (ORS)

GETTING STARTED
GETTING STARTED
Page 7 August 2014 ORION® Meter Reading System (ORS)
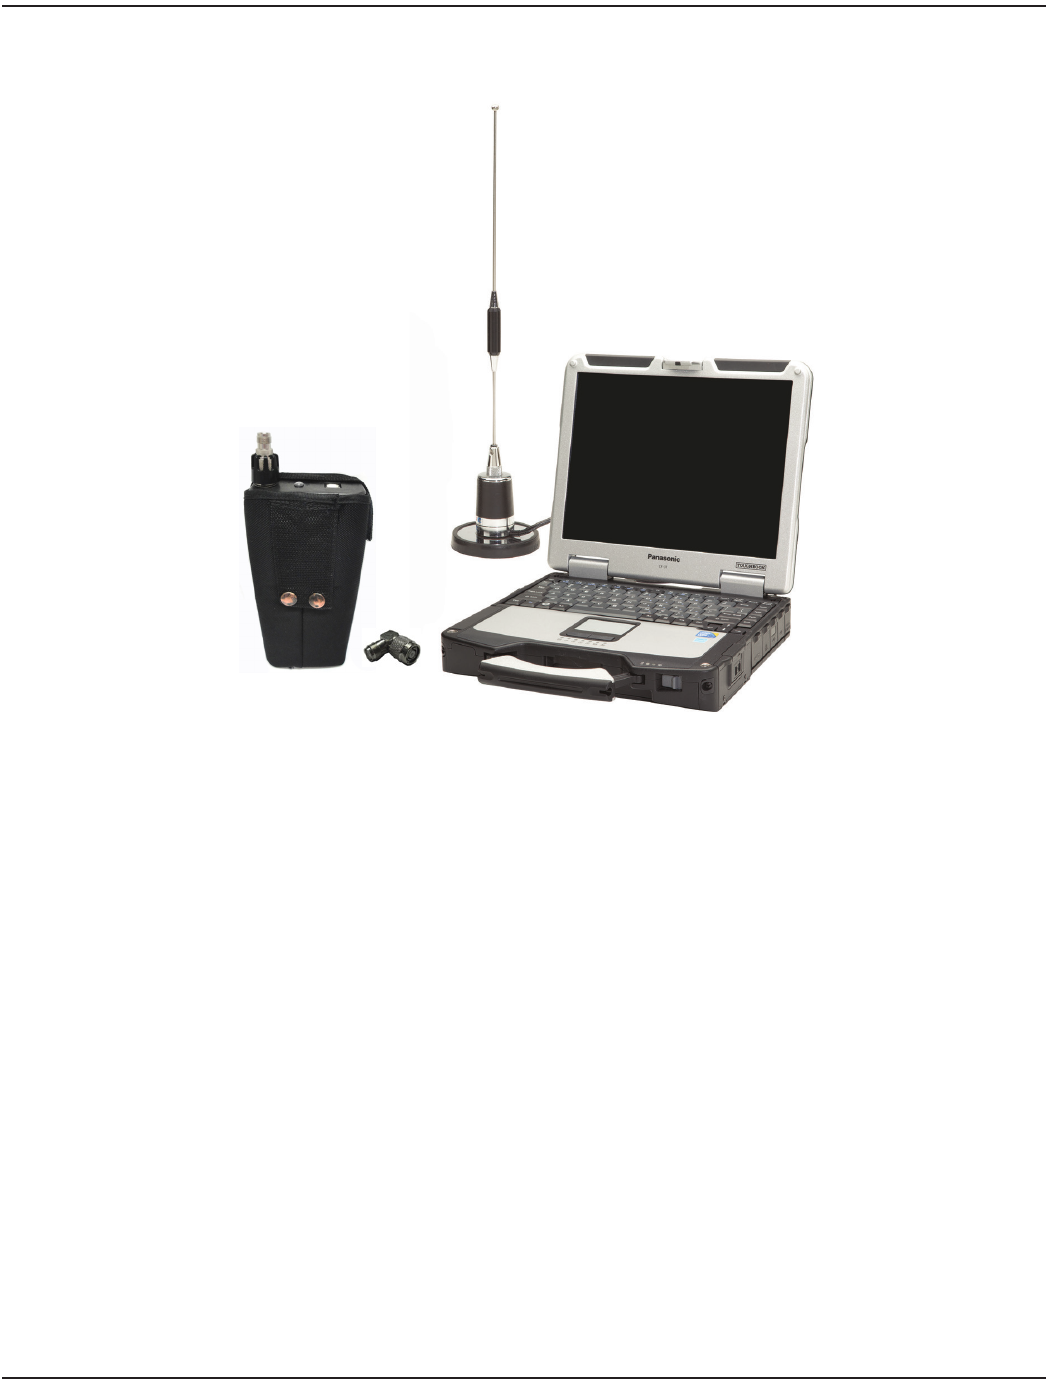
SYSTEM COMPONENTS
Figure 1: USB-powered mobile transceiver, magnetic mount antenna and Panasonic Toughbook
Components of the ORION Mobile Reading System
• Panasonic Toughbook laptop computer with touch screen, DVD multi-drive and built-in GPS receiver
• Laptop AC power supply and DC power supply (not shown)
• ORS 2.5.x software, pre-installed on the Panasonic Toughbook
OTE:N ORS 2.5.x is compatible with Panasonic CF-31 and CF-30 Toughbook laptop computers.
• ORION USB-powered mobile transceiver (pictured) and/or ORION mobile receiver with DC power supply (not shown)
• ORION mobile transceiver-to-laptop USB communication cable, or ORION mobile receiver-to-laptop nine-pin serial
communication cable (not shown)
• 90 degree antenna connector
• Magnetic mount antenna
• Dual-socket adapter (not shown)
• Optical programming cable (not shown)
• Shipping and carrying case (not shown)
Toughbook Touch Screen
In addition to using a standard mouse or keyboard commands, the Panasonic Toughbook is also equipped with a touch
screen. If you are using the software on a Toughbook computer, touch the screen using the stylus tool contained in the handle
of the laptop to make a selection, or simply tap the screen with your finger. The laptop screen is sensitive enough to allow
selecting with a tap even if you are wearing gloves. Throughout this manual, the term “click” is interchangeable with “tap.”
SYSTEM COMPONENTS
Page 8 August 2014ORION® Meter Reading System (ORS)

Vehicle and Laptop Setup with ORION USB-Powered Mobile Transceiver Only
To set up the vehicle for meter reading using an ORION USB-powered mobile transceiver, follow these steps.
1. Place the magnetic mount antenna on the vehicle roof. Ensure that the free area around the base of the antenna
equals the antenna height.
OTE:N The antenna must be at least two feet away from other antennas and the cable must be in good condition.
2. Connect the antenna cable to the top of the mobile transceiver and tighten until snug.
3. Power on the laptop.
4. Plug the small end of the communication cable into the top of the mobile transceiver and the larger end into an
available USB port on the laptop. Always connect it to the same USB port if possible.
5. Start the ORS software.
OTE:N Go to Device Manager on the laptop to verify that the mobile transceiver USB connection is recognized.
If Windows does not recognize the mobile transceiver USB connection, disconnect the mobile transceiver from
the USB port and contact Badger Meter Technical Support. Have your ORS 2.5.x DVD available when you call.
Vehicle and Laptop Setup with ORION Mobile Receiver Only
To set up the vehicle for meter reading using an ORION FHSS mobile receiver, follow these steps.
1. Place the magnetic mount antenna on the vehicle roof. Ensure that the free area around the base of the antenna
equals the antenna height.
OTE:N The antenna must be at least two feet away from other antennas and the cable must be in good condition.
2. Connect the antenna cable to the top of the mobile receiver and tighten until snug.
3. Power on the laptop.
4. The mobile receiver requires a DC power source to operate. Plug the mobile receiver DC power supply into the
bottom of the mobile receiver and plug the other end into the vehicle's interior DC power source (utility or
cigarette lighter).
5. Plug the communication cable into the top of the mobile receiver and the nine-pin serial end into the serial port on
the laptop.
6. Switch ON the mobile receiver.
7. Start the ORS software.
MPORTANTI
Best practice recommends you always power on the laptop and connect the mobile transceiver (and/or mobile receiver)
before you start the software. If you need to reboot the laptop, disconnect the mobile transceiver (and/or receiver) and
then reboot the laptop. After the laptop reboots, reconnect the mobile transceiver (and/or receiver) power before you
start the software.
OTE:N Refer to the ORION USB-Powered Migratable (ME) Mobile Transceiver and ORION Mobile Receiver product data
sheets, available at www.badgermeter.com, for status indicators and replacement parts.
SYSTEM COMPONENTS
Page 9 August 2014 ORION® Meter Reading System (ORS)
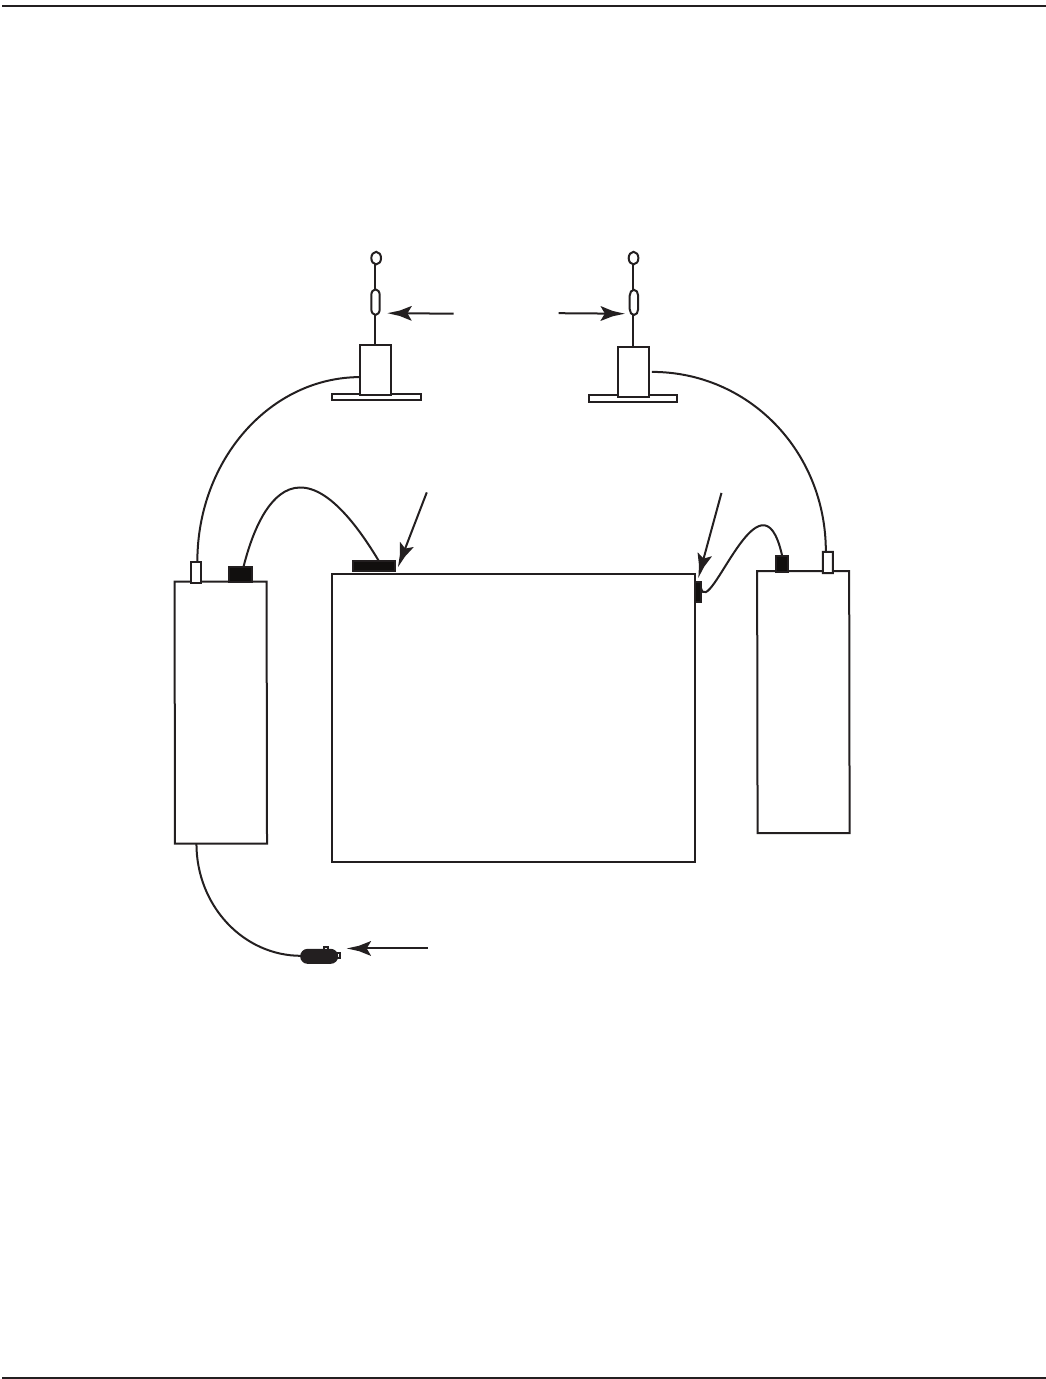
Vehicle and Laptop Setup with ORION USB-Powered Mobile Transceiver and ORION
Mobile Receiver
Follow the steps on the previous page to set up the vehicle to use both an ORION USB-powered mobile transceiver and an
ORION mobile receiver for mobile reading. Setup with both a transceiver and receiver should resemble Figure 2 below.
OTE:N To ensure the communication (COM) ports are set up correctly for the mobile transceiver and receiver, refer to
"Communications Tab" on page 44.
ORION ME
ORION CE
Serial Port USB Port
Two Feet +
LAPTOP
Connect to
DC power source
Figure 2: Set up with ORION USB-powered mobile transceiver and ORION mobile receiver
SYSTEM COMPONENTS
Page 10 August 2014ORION® Meter Reading System (ORS)
PROGRAM STARTUP / EXIT
OTE:N Close any other open ORION software application before starting up the ORS software application.
Starting the Software
1. Power on the laptop.
2. Switch on the mobile transceiver and/or receiver.
3. Type orion in the log in window.
Result: The Windows® desktop is displayed.
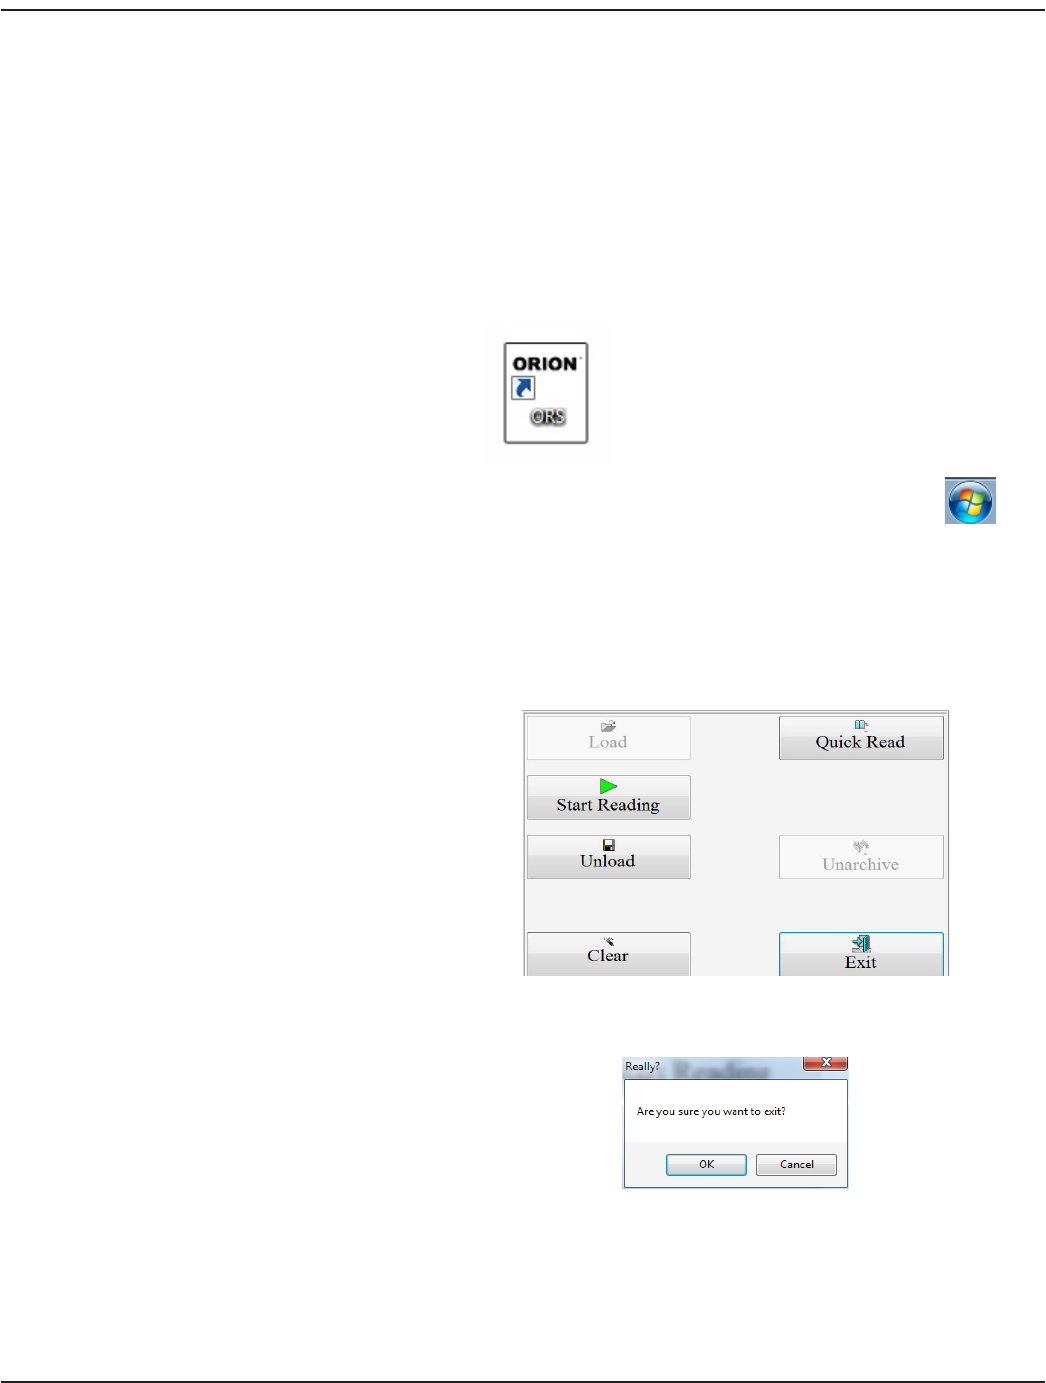
4. Double-click the ORION ORS desktop icon shortcut (Figure 3).
Figure 3: Software desktop icon
Alternatively, you can initialize the software and start the program by clicking the Windows Start button
in the lower left corner of the main task bar on the Windows desktop and selecting All Programs> Badger Meter
Inc> ORS.
Result: The initial software Login screen opens. See Figure 6 on the next page.
Exiting the Software
1. To close and exit the software application,
click Exit on the main menu.
Figure 4: Main menu
2. Click OK when you see the message
asking you to conrm you want to exit.
Figure 5: Confirm exit
PROGRAM STARTUP / EXIT
Page 11 August 2014 ORION® Meter Reading System (ORS)

Login Screen
The Login screen (Figure 6) is the initial screen that opens when you launch the ORS software application. Below the software
copyright date, you will see the state for which maps are loaded. A warning message alerting the meter reader to the dangers
of watching the ORS screens while driving is displayed prominently on the screen.
Figure 6: Login screen
1. In the User Name/Initials eld, enter your three-character initials or another three-character, alphanumeric code
as designated by your utility. For example, JAS, 123, TR1. The User Name/Initials must be entered by an authorized
representative of the customer/licensee.
A warning message in red on the Login screen alerts the meter reader to the dangers of watching the ORS
screens while driving. By entering your User Name/Initials and selecting Accept, you are acknowledging the
warning message.
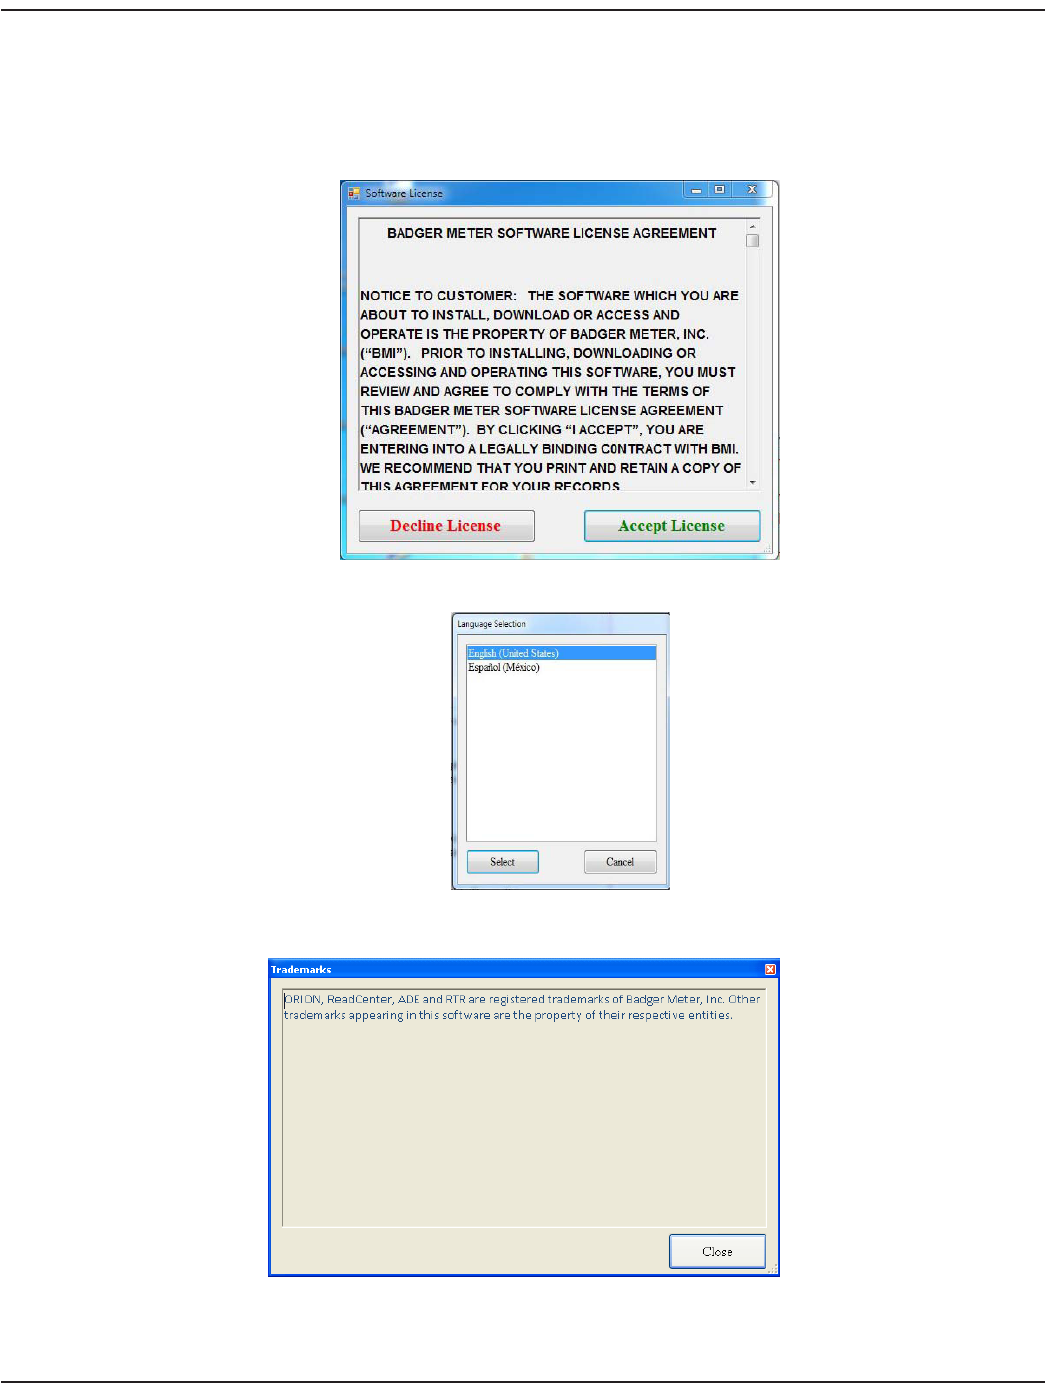
• Click View License to read the software license agreement (Figure 7).
OTE:N The first time you access the software, the License screen opens automatically on top of the Login screen.
Read the software license agreement and click Accept License.
The License Agreement must be accepted by an authorized representative of the customer/licensee. The
License screen closes automatically and the Login screen is shown.
• Click Language Idioma to choose the appropriate language if other than English (Figure 8).
• Click View Trademarks to see the Badger Meter trademark language (Figure 9).
PROGRAM STARTUP / EXIT
Page 12 August 2014ORION® Meter Reading System (ORS)
2. Click Accept to acknowledge the warning message (see step 1) and start the software or click Cancel to close and
exit the program.
If the system detects that the communication (COM) ports are not properly set, a warning message will display. You
must set the COM ports to proceed. See "Communications Tab" on page 44.
Figure 7: Software License Agreement
Figure 8: Language Selection screen
Figure 9: Trademarks screen
PROGRAM STARTUP / EXIT
Page 13 August 2014 ORION® Meter Reading System (ORS)
Main Screen
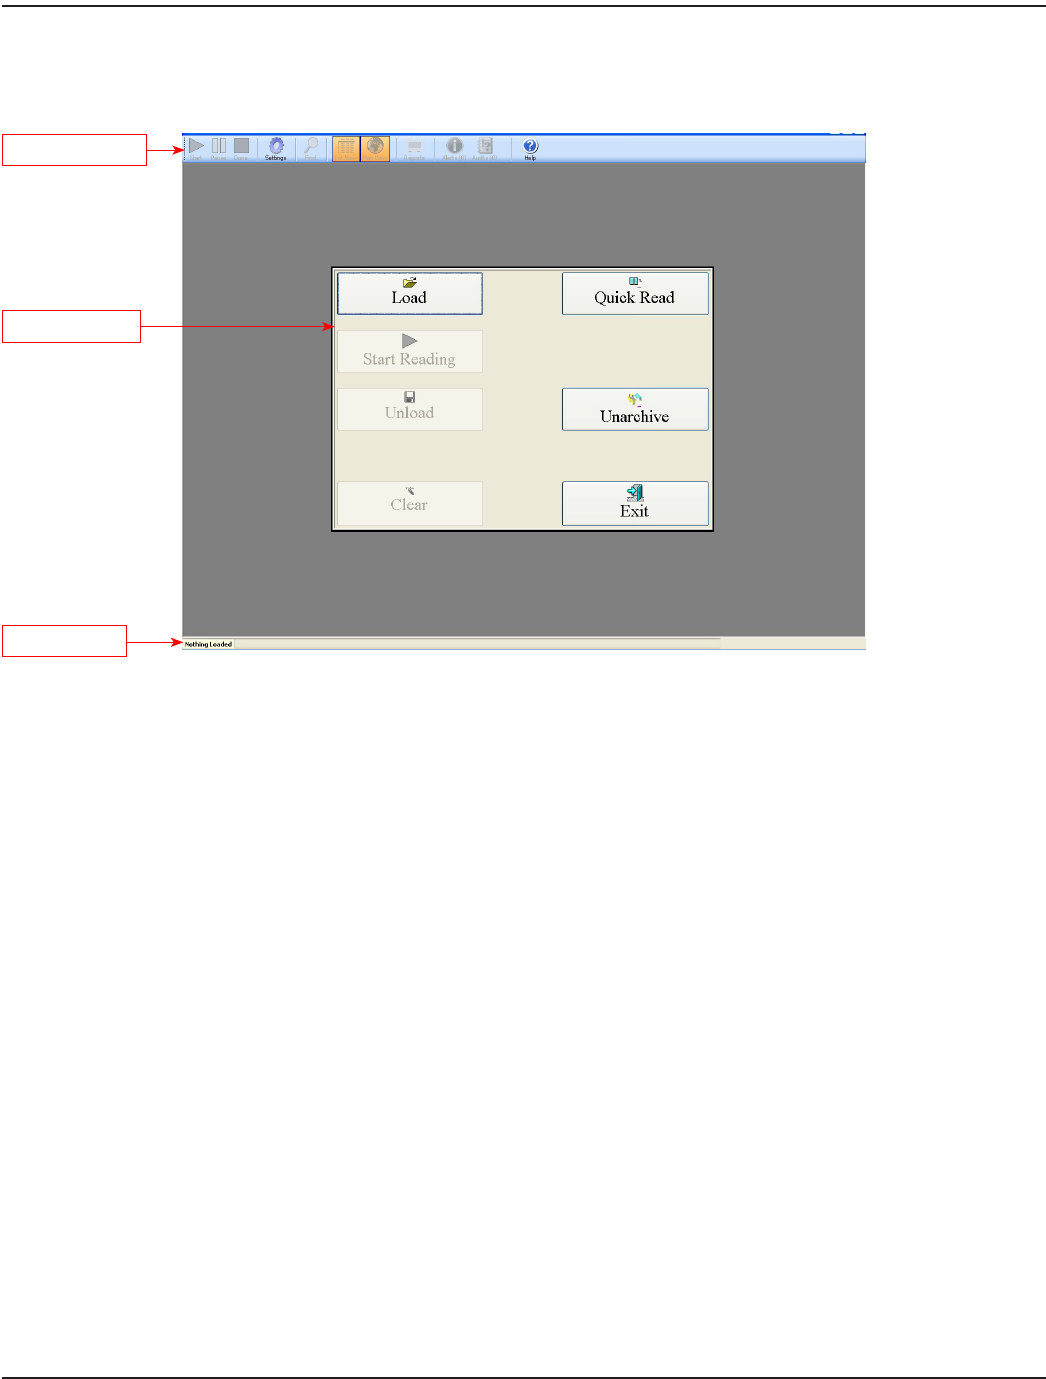
After the Login screen, the main ORS screen appears, displaying the main menu, tool bar and status bar.
Figure 10: Main screen with main menu, tool bar and status bar
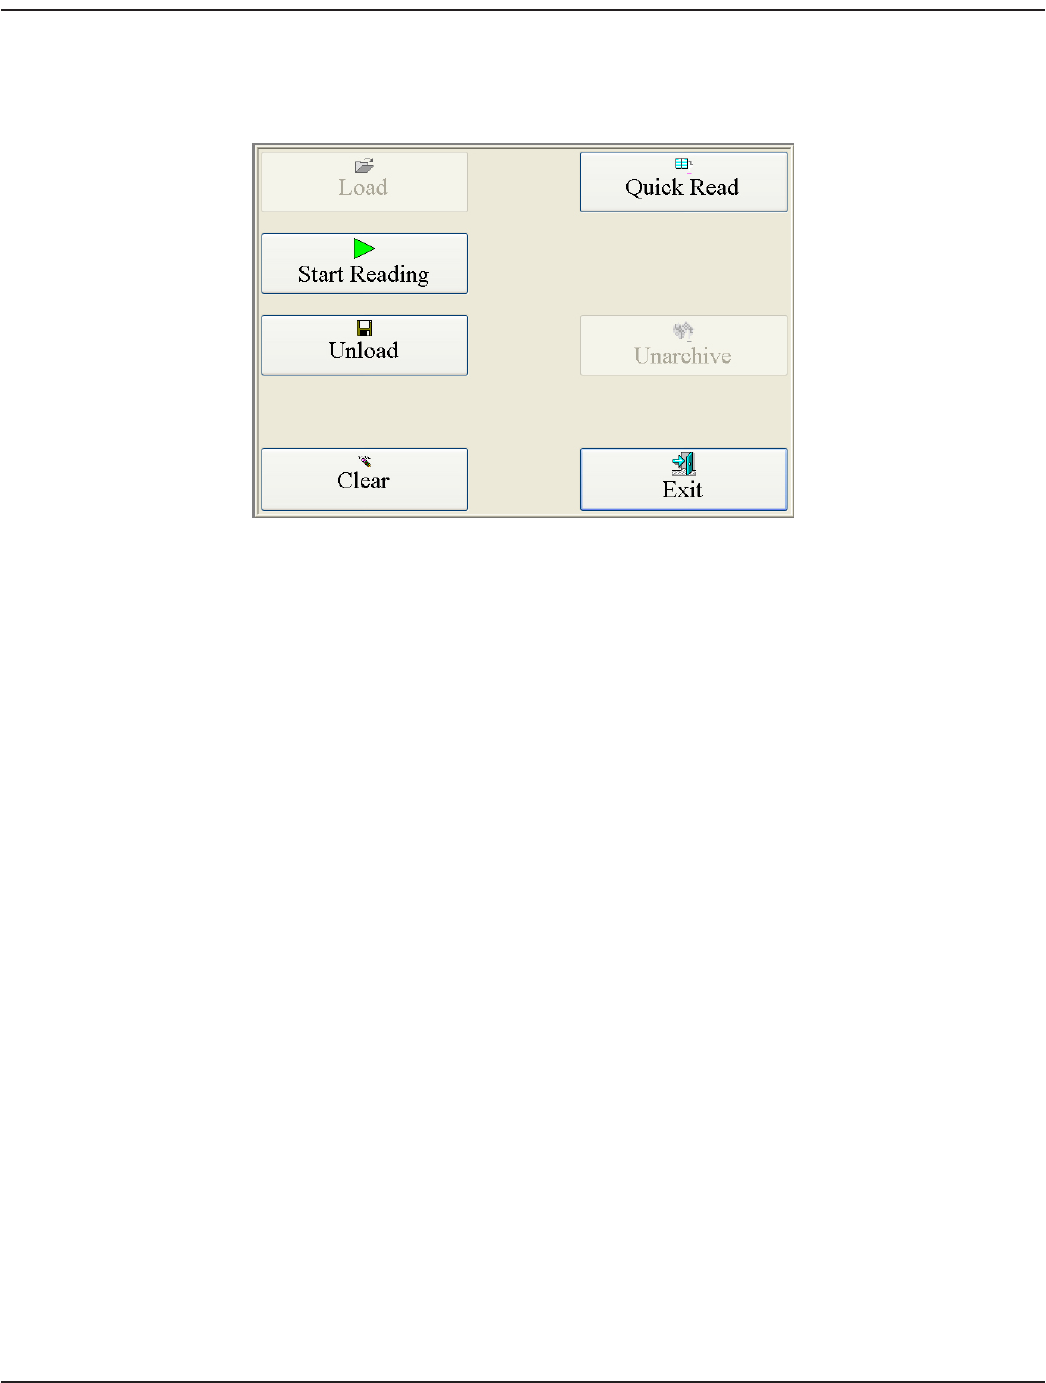
Main Menu
The main menu includes all the general functions for collecting meter readings.
Load Loads the route from a specified location.
OTE:N If the Load button is inaccessible, the route was already loaded.
Start Reading Activates the GPS and the ORION mobile transceiver and/or ORION mobile receiver. Updates the status
bar and displays the List View and Map View screens.
Unload Prepares the meter reading data for transfer to the reading data management software. When you have
completed the meter readings, click the Unload button to transfer the meter reading data to a storage
device, such as a memory stick. These readings will then be uploaded into the reading data management
software. Unload also archives the data in case the memory stick is misplaced or destroyed before
uploading to the reading data management software.
Clear Deletes all meter reading information currently being processed.
Quick Read Reads an ORION endpoint without the need to load a route. This is helpful for final reads and to verify an
endpoint is operating correctly.
Unarchive Reloads a prior route so the user can save the data (unload) again. All previously unloaded routes
are stored.
Exit Closes the application and returns you to the Windows desktop. Exit can be selected without having to
unload a route. If you click Exit, a window opens to verify you want to exit without unloading.
Main tool bar
Status bar
Main menu
PROGRAM STARTUP / EXIT
Page 14 August 2014ORION® Meter Reading System (ORS)

Tool Bar
The tool bar at the top of the main screen contains the different commands and configuration options that make up ORS.
Except for Settings, the buttons on the tool bar become active when you load a route.
Figure 11: Main tool bar
Start Begins or resumes the meter reading process. Click Start to navigate to the next screens including List View
or Map View.
Pause Temporarily stops the meter reading process. To resume the application, click Start. If you are finished
reading meters, click Done.
Done Completes the meter reading process and prepares the readings for transfer to the reading data
management software. Click Done to return to the main menu.
Settings Allows you to change the settings that control the behavior of ORS. It holds the information that controls all
of the subsystems including the ORION transceiver and/or receiver and GPS connection information, and
the map display options.
OTE:N A password is needed to access Settings. The password is set up during training. The Utility has the
ability to change the password and is encouraged to record the new password for future reference
as Badger Meter Technical Support does not have access to Utility-specific passwords.
Find Allows you to search for meter records using a number of different search criteria.
List View An active list of unread meters displayed in reading sequence order. It allows you to display the detailed
information about each meter by selecting the Details button.
Map View Displays the location of the meter reading vehicle and all meters with their current status on the area map.
It allows you to display the detailed information about each meter by selecting the meter's icon. In Map
View, the map control buttons for map zooming and other functions are also displayed. See "Map Tab" on
page 42 for more information.
Reports Displays the different reports available. Select the report name to bring up a specific report.
Alerts Allows users to set appropriate alerts for potential issues that can occur when meter reading is in progress.
The system allows the user to add warnings such as alarms, leak cautions or error signals. Each alert can be
set to a desired sound option that a user can select from a "Sound Played" list. If Alerts appears grayed out
on the tool bar it is accessible from the Settings option.
Audits Displays exception conditions in the ORS system. Examples: GPS is not seeing enough satellites to produce
a location, or a receiver is not communicating. The Audits button will only be accessible if those types of
exception conditions exist.
Help Displays this User Manual in a separate window to allow users to look up information about the software
functionality from the laptop.
PROGRAM STARTUP / EXIT
Page 15 August 2014 ORION® Meter Reading System (ORS)
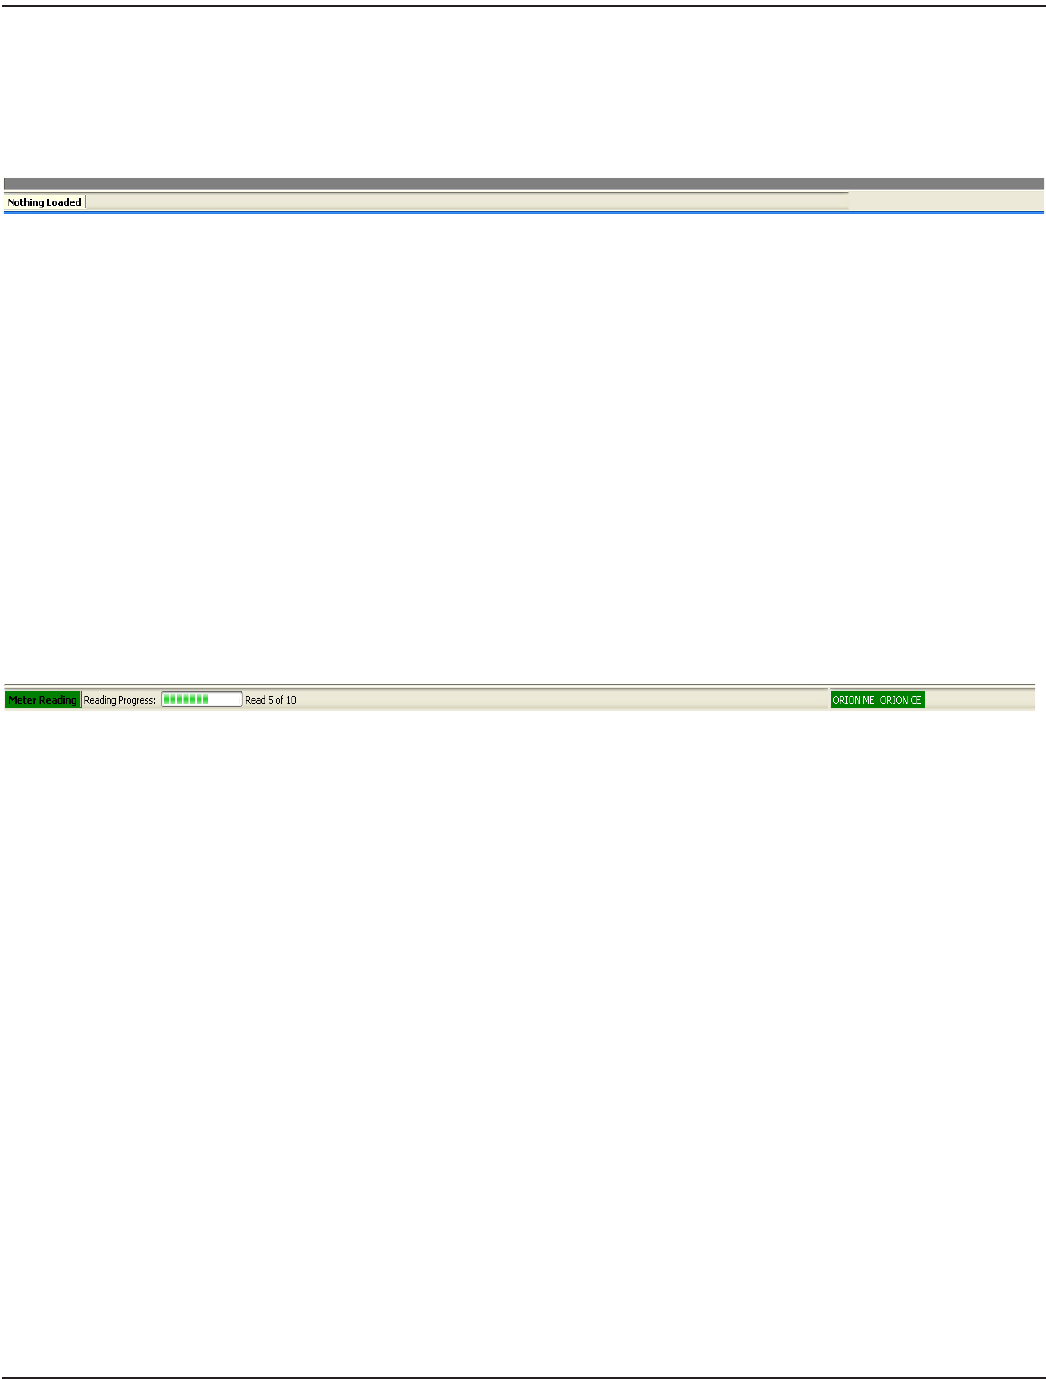
Status Bar
The status bar, located at the bottom of the Main screen, displays the number of meters left to read in the route, the percent
complete and the number of routes and meters loaded. The colors displayed on the bar indicate the reading and
communication status for the types of meters being read.
Figure 12: Status bar prior to loading route
Before the route is loaded, the status bar is gray and reads "Nothing Loaded" as shown in Figure 12. When the reading cycle
starts, the status bar is activated.
The following information is available on the status bar during a reading cycle.
Meter Reading Status Yellow indicates the reading is paused. Green indicates the reading is in progress.
Reading Progress Indicates the progress of the reading application. As meters are read, the progress bar will
increase. The ratio of read meters to unread meters is shown in numbers next to the progress bar.
Read X of Y Provides the meter reader with the number of endpoints loaded in the software and the
total number of endpoints that have been read. In Figure 13, 5 of 10 meter endpoints have
been read.
ORION ME/ORION CE Either ORION ME (when an ORION ME FHSS mobile transceiver is connected) and/or ORION CE
(when an ORION CE FHSS mobile receiver is connected) will display in the lower right status bar
to indicate communication status between the ORS software and the mobile transceiver and/
or receiver. Green indicates good communication. Red indicates no communication. In Figure 13,
both the ORION ME and ORION CE show good communications status.
Figure 13: Status bar after loading route
GPS OK Displays when the GPS is operational. No message shows on the status bar if GPS is off.
PROGRAM STARTUP / EXIT
Page 16 August 2014ORION® Meter Reading System (ORS)

USER GUIDE
USER GUIDE
Page 17 August 2014 ORION® Meter Reading System (ORS)
LOADING A ROUTE
This section describes the procedure for loading a route. Before loading a route, make sure the ORS software is running and
the main menu is displayed on the laptop desktop. If you need help, refer to "Program Startup / Exit" on page 11.
OTE:N For instructions on creating a route load file using the reading data management software, please refer to
the reading data management manual.
1. Obtain a memory stick that contains route information les from the reading data management software operator
for the route you intend to read.
2. Insert the memory stick into an available USB port on the Toughbook laptop computer.
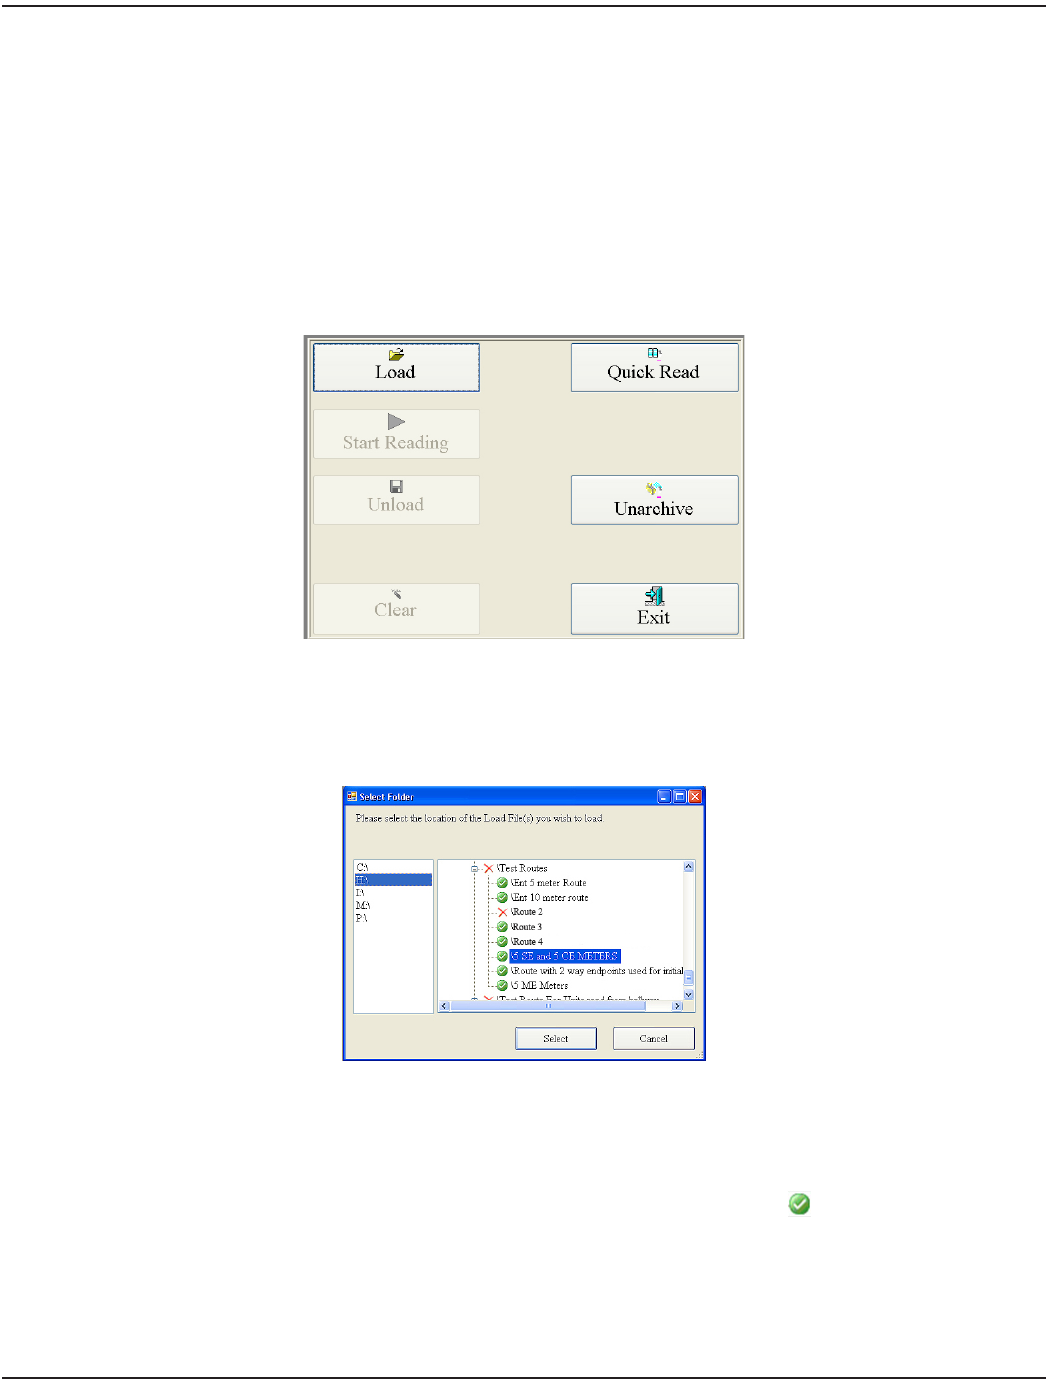
3. Click the Load button on the main menu.
Figure 14: ORS main menu with active Load button
Result: The Select Folder screen opens.
OTE:N The Select Folder window will default to the location the last route files were retrieved.
Figure 15: Select folder window
4. Click the drive letter for the memory stick. In Figure 15, the memory stick is using drive H.
5. Click the small plus sign (+) to open a folder and display the contents.
6. From the folder options, click the folder containing the route data.
OTE:N A green check mark indicates ORS has identified the item as a valid route file.
7. Click Select to begin loading the route le.
OTE:N When the route is successfully loaded, the Load button is grayed out (no longer available).
8. Safely remove the memory stick from the USB port. The route is ready to read.
LOADING A ROUTE
Page 18 August 2014ORION® Meter Reading System (ORS)
READING A ROUTE
When the route files have been loaded, the Start Reading button on the main menu becomes accessible.
Figure 16: ORS main menu with active Start Reading button
MPORTANTI
When there is one operator, the recommended practice for meter reading is to drive through an area without observing
the screen. Then stop when convenient to view progress.
Click the Start Reading button to begin. This activates the following functions:
• Reading cycle
• Split view (List View and Map View)
• Main (top) tool bar
• Status bar
- Progress
- GPS
- Transceiver and/or receiver status
OTE:N If geocoding mode has been turned OFF, a message displays briefly at the start of the reading cycle to notify the user
that GPS is not active. See "General Tab" on page 39 for more information regarding geocoding options.
OTE:N If the software does not detect the route starting location, a message displays to notify the user that ORS is using the
last known good address as the starting location. This ensures the route maps will display appropriately.
When you start the reading cycle, the screen defaults to the Split View which displays the List View (top) and Map View
(bottom) in a split-screen format. It is described in more detail in the next section.
READING A ROUTE
Page 19 August 2014 ORION® Meter Reading System (ORS)
Split View
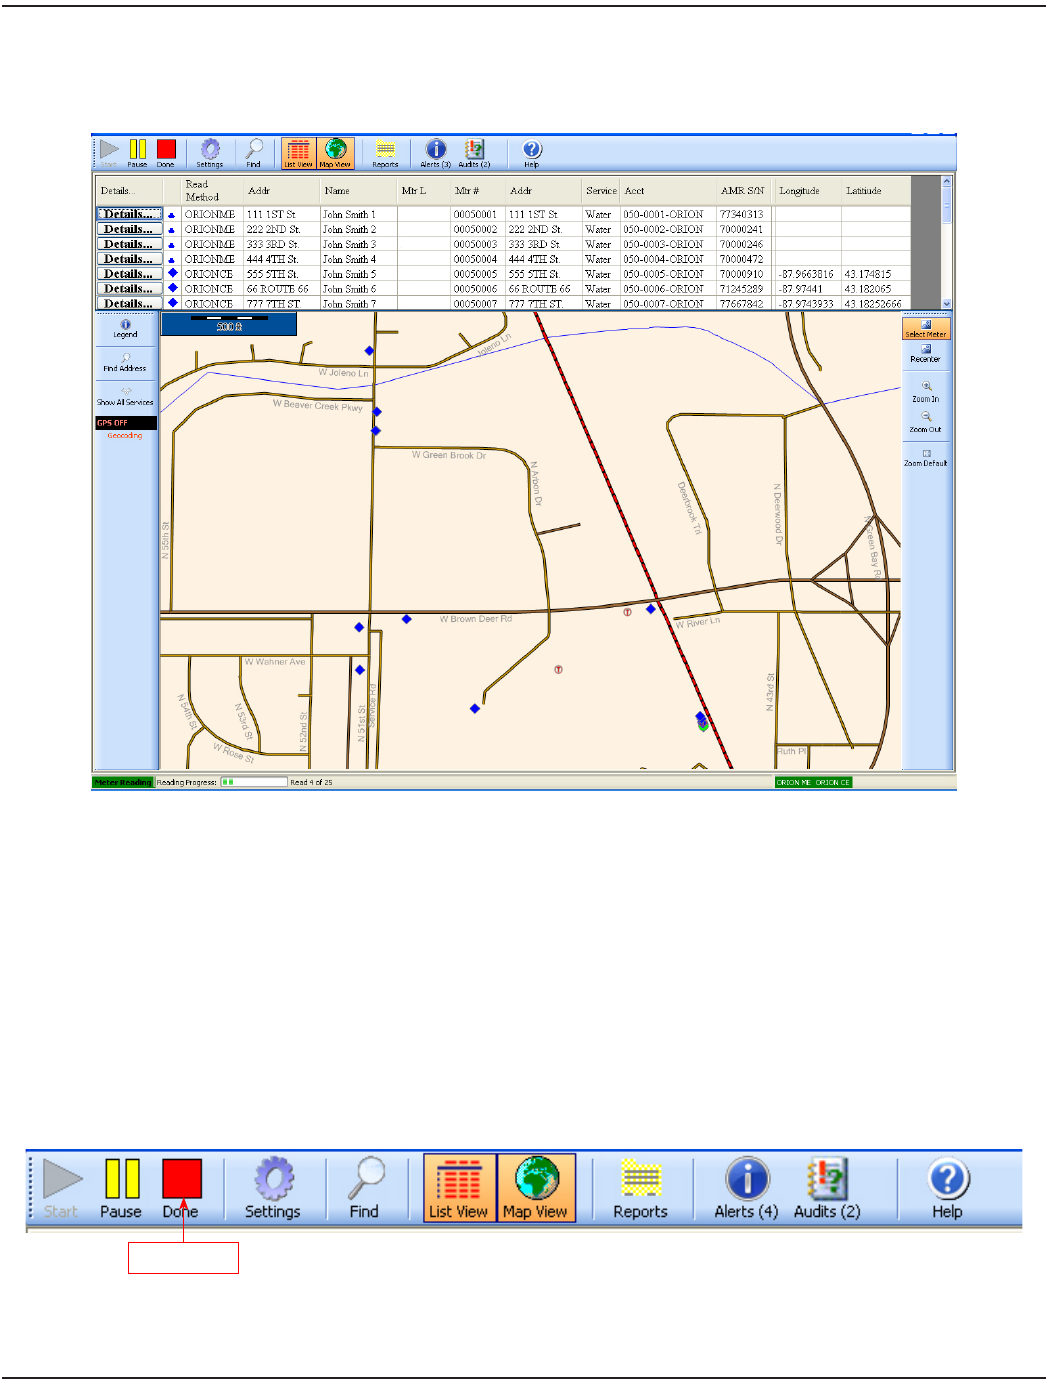
In Split View, the current route is shown in a list at the top of the screen and on a map below the route list.
Figure 17: Split View screen
The status of Geocoding is shown in the bar on the left side of the map. In Figure 17, the status shows “GPS OFF” indicating
that Geocoding is not active.
The status bar at the bottom of the screen gives the current status of the ORION ME mobile transceiver and ORION CE mobile
receiver. In Figure 17, the status bar shows meter readings are in progress (green), the progress field (green dots) visually
indicates the reading is about one-fifth completed and the number of meters read (“Read 4 of 25”) displays next to the
progress field.
In Split View, both the List View and Map View buttons are active on the main tool bar. The Split View display is static. The
number of lines listed and the map size depend on the laptop monitor display and/or resolution settings.
To view the list or the map in full screen, click the button for the view you wish to close.
Figure 18: Status bar
To exit from this screen, click Done (red square icon) on the main tool bar as shown in Figure 18.
Exit screen
READING A ROUTE
Page 20 August 2014ORION® Meter Reading System (ORS)

List View
In List View, unread meters are displayed as a list in the order loaded from the reading data management software.
Figure 19: List View screen
Adjusting Columns
When information is displayed in columns on any screen in ORS, column order can be changed by selecting a column heading
and dragging it, right or left, to a new position. ORS retains the new column format until it is changed again. Adjust the size of
any column by clicking between the column headings and dragging to expand or condense the column width.
Account information is displayed in the order of the route as loaded from the reading data management software.
Column Headings
The column headings in List View are based on user selections available in the reading data management software and may
vary from those shown here. AMR S/N is selected automatically so it always displays in List View.
Details The Details button is used to access the Service Details screen for a specific listing. The Service Details
screen provides account details stored for that customer and allows you to enter codes and messages or
enter manual meter readings. For more information, refer to "Service Details" on page 27.
Meter Icon An icon/symbol representing the meter type appears in the second column. Meter icons and
descriptions can be found in the Legend. For descriptions of the meter icons, refer to "Meter Icons" on
page 25.
Read Method The type of meter endpoint being read. For example, ORION ME, ORION CE, etc.
Name The customer/account name.
Addr The street address of the meter location. Addr always displays in List View.
Meter L The physical location of the meter. This is a free text field used to describe the location of the meter
in the best way determined by the utility. For example, west side of house, pit in northwest corner of
property, etc.
Mtr # The number engraved on the meter body.
Service The type of meter service such as water or gas.
Acct Account number.
AMR S/N The endpoint serial number as loaded in the reading data management software. AMR S/N always
displays in List View.
Longitude The numerical longitude of the meter location.
Latitude The numerical latitude of the meter location.
Sequence # The sequential order of the meter in the route as it is set up in the reading data management software.
Completed Readings
As meter readings are received from the ORION mobile transceiver and/or receiver, the line for that meter drops off List
View so as to monitor the reading status and missed reads in real time. When all meters are read, List View disappears and a
message displays briefly, confirming that readings have been completed.
READING A ROUTE
Page 21 August 2014 ORION® Meter Reading System (ORS)
Map View
In Map View, meters are marked by icons on a map of the area, with the reading location as the focal point. An example of
a screen displaying unread meters in Map View is shown in Figure 20. Control buttons to the left and right of the map are
available in this view. See "Meter Icons" on page 25 for a detailed description of the meter icons.
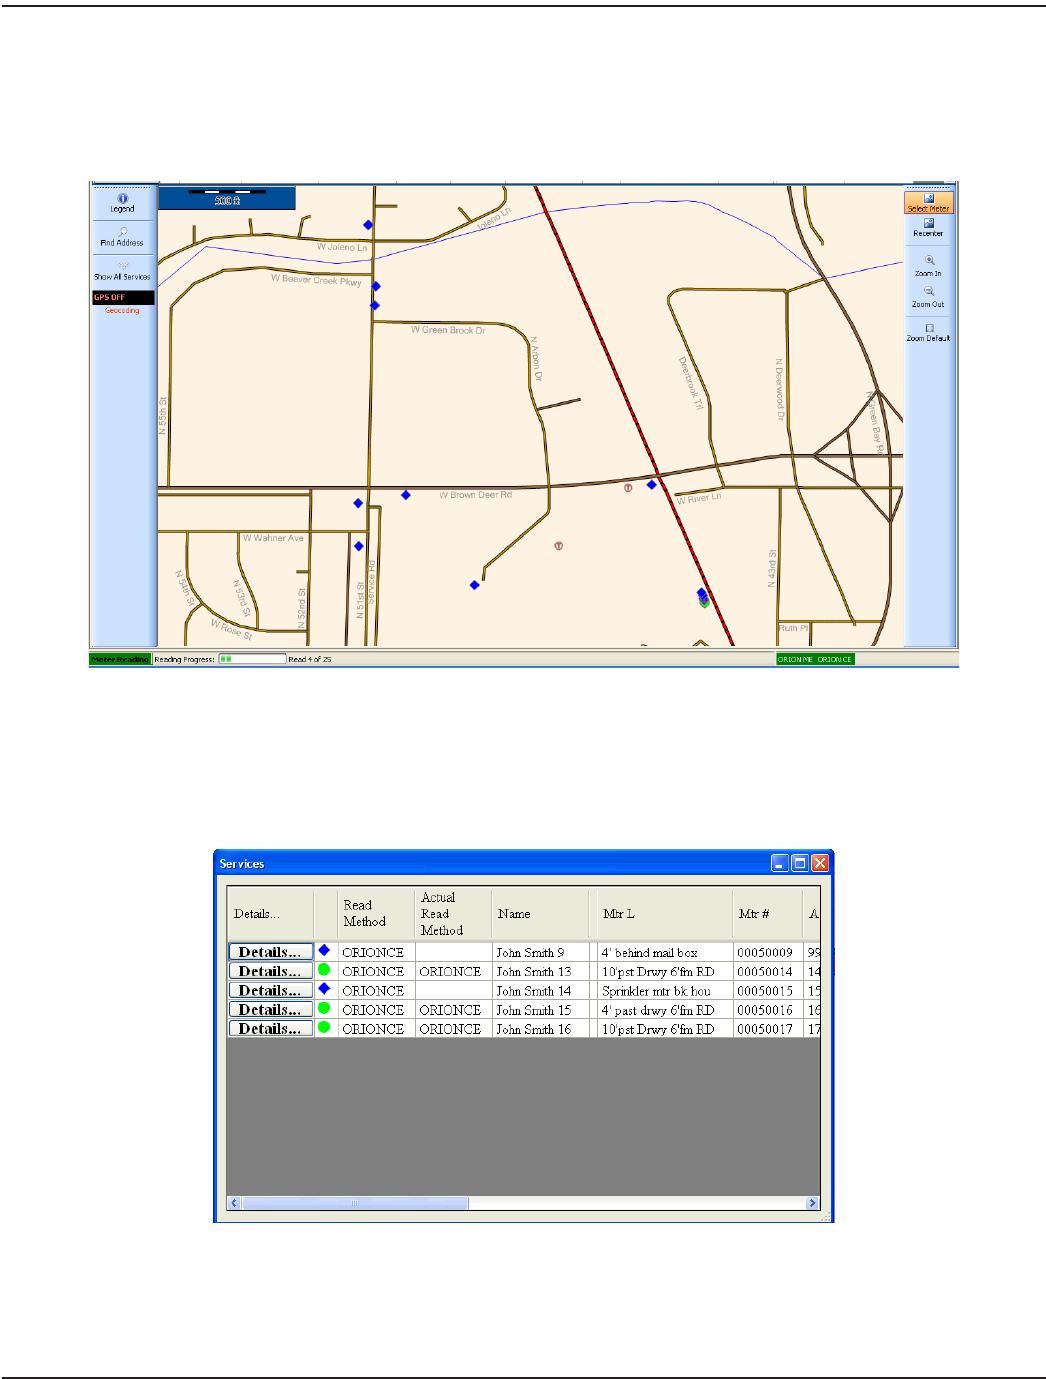
Figure 20: Map View
To view the service details for a specific meter, click the Select Meter button on the right side of the map, then click the meter
icon on the map you wish to view.
OTE:N If more than one meter is present in the reading area, ORS displays a list of related meters from which to select
(Figure 21). Click the Details button for the meter you wish to view.
Figure 21: Meters in the same reading area
READING A ROUTE
Page 22 August 2014ORION® Meter Reading System (ORS)
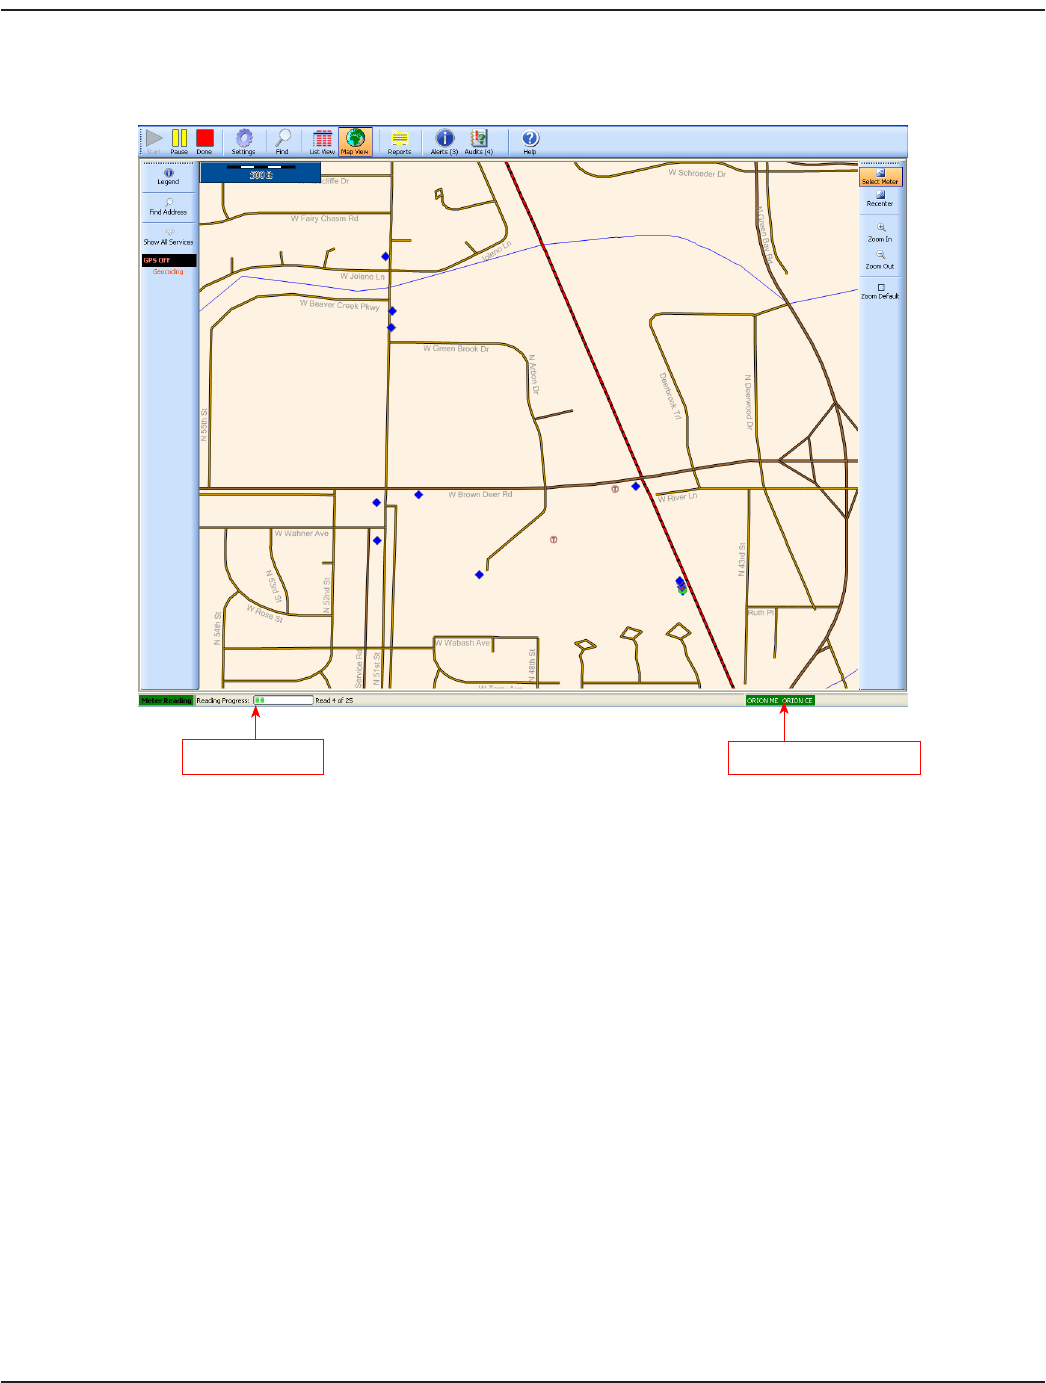
The meter icon changes to reflect the status of the meter throughout the reading cycle. For example, a successfully read
meter changes to a green circle as shown in the lower right portion of the screen in Figure 22.
Figure 22: Route map with meter icons after reading
For a list of all the icons and what they represent, refer to "Meter Icons" on page 25.
The status bar in Figure 22 shows meter readings have been captured for 4 of 25 endpoints loaded in the route file and the
ORION mobile transceiver and ORION mobile receiver are in communication with ORS as indicated by the green background
color where “ORION ME ORION CE” is displayed on the status bar.
Communication with ORS
Reading progress
READING A ROUTE
Page 23 August 2014 ORION® Meter Reading System (ORS)
Map Control
The Map control buttons are located on the right and left sides of the display when Map View is selected from the main
tool bar.
Figure 23: Map buttons left side Figure 24: Map buttons right side
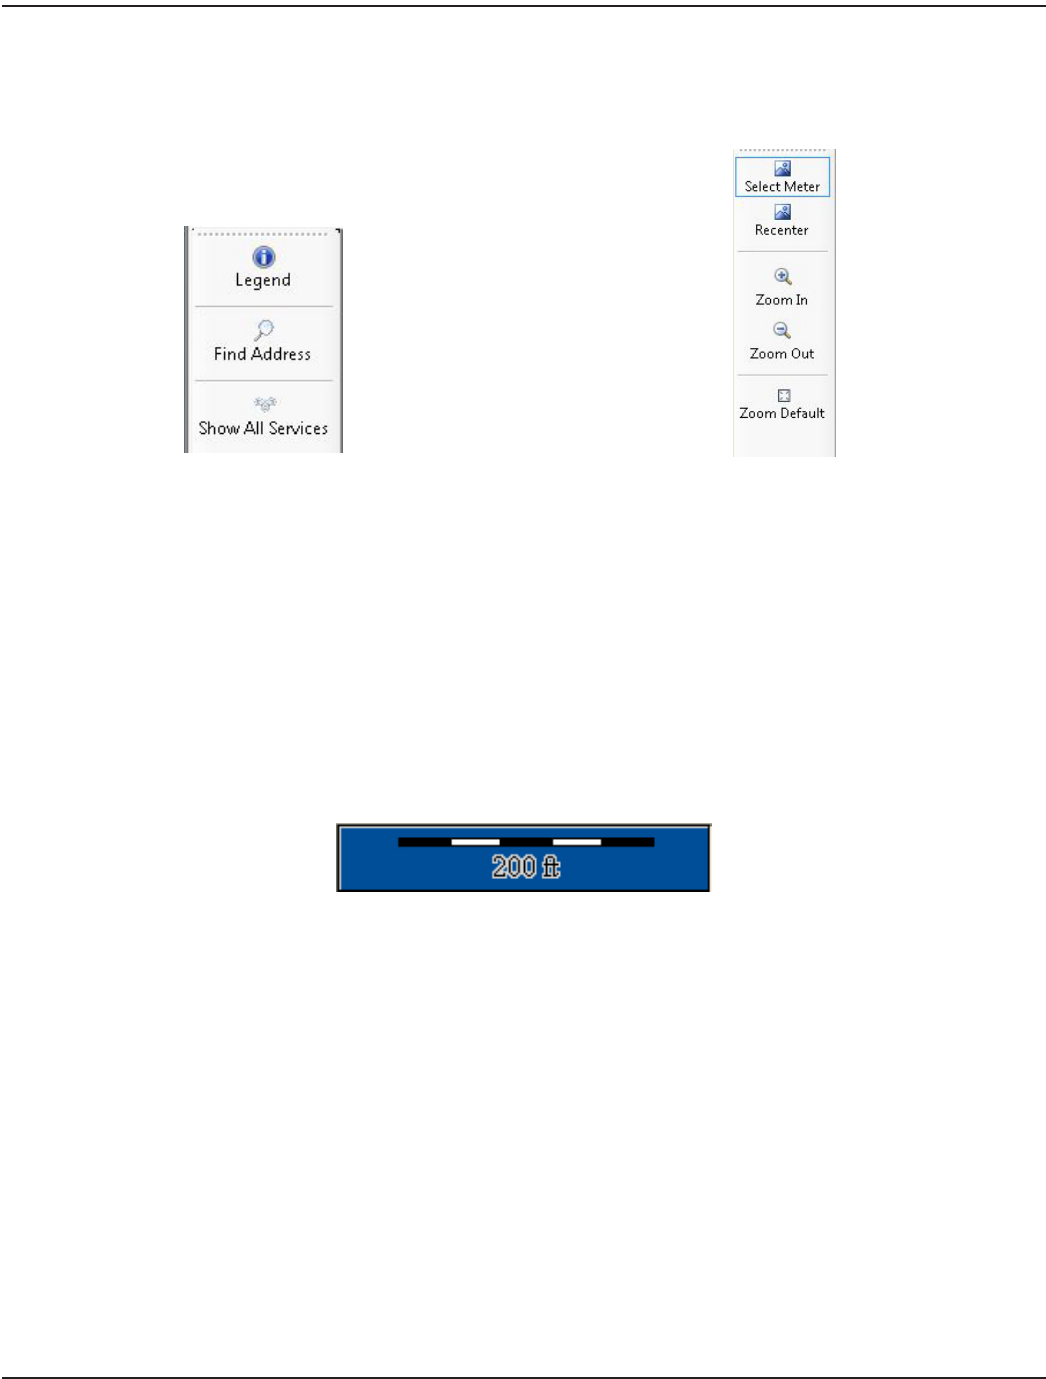
Left Side Buttons
Legend Toggles between the distance legend and the icon legend. The distance legend displays on the map
and defines the distance to which the map is scaled, inches per foot (Figure 25). The icon legend gives
a description for the meter icons that display on the map. The icon legend has a dynamic display that
changes based on the meter type(s) loaded in the route file. To see the icons and their descriptions, refer to
"Meter Icons" on page 25.
Find Address Click this button to enter a specific address in the window that appears. Click OK when finished and the
map centers itself to the address entered.
Show All
Services
To display the location information of all available meters, click the Show All Services button. This button
centers all the meters and displays location information on the map.
Figure 25: Distance legend
Right Side Buttons
Select Meter Allows you to click a meter icon to display the meter details. If two or more meters are in the same place, a
list with all the available meters in that location is displayed.
Recenter Pauses reading and allows you to move the map in any direction. Click, hold and drag the map to the
location you desire. Then click the Start icon in the main tool bar to resume meter reading.
Zoom In Allows you to draw a box around an area and zoom into it. If you click this button, you can zoom into the
map by centering the map on the spot that you selected.
Zoom Out Allows you to zoom out of the current map area using the selected point as the center of the map.
Zoom Default Returns to the default map view. To adjust the default setting, refer to "Map Tab" on page 42.
READING A ROUTE
Page 24 August 2014ORION® Meter Reading System (ORS)
Meter Icons
Meter icons display on the map as visual indicators of the route status. Icons alert the meter reader to potential problems,
show when the route reading has been completed and provide the status of any work items that have been assigned.
Work items are requests for ORION endpoint data which are included as part of the route file. See "Two-Way Communications"
on page 57 for additional information about work items.
Meter icons and their descriptions are listed below.
OTE:N To see the icon legend, click the Legend button on the left side of screen when Map View is selected. The icon
Legend is a dynamic display of icons with brief descriptions. The Legend changes based on the meter type(s) loaded
in the route file.
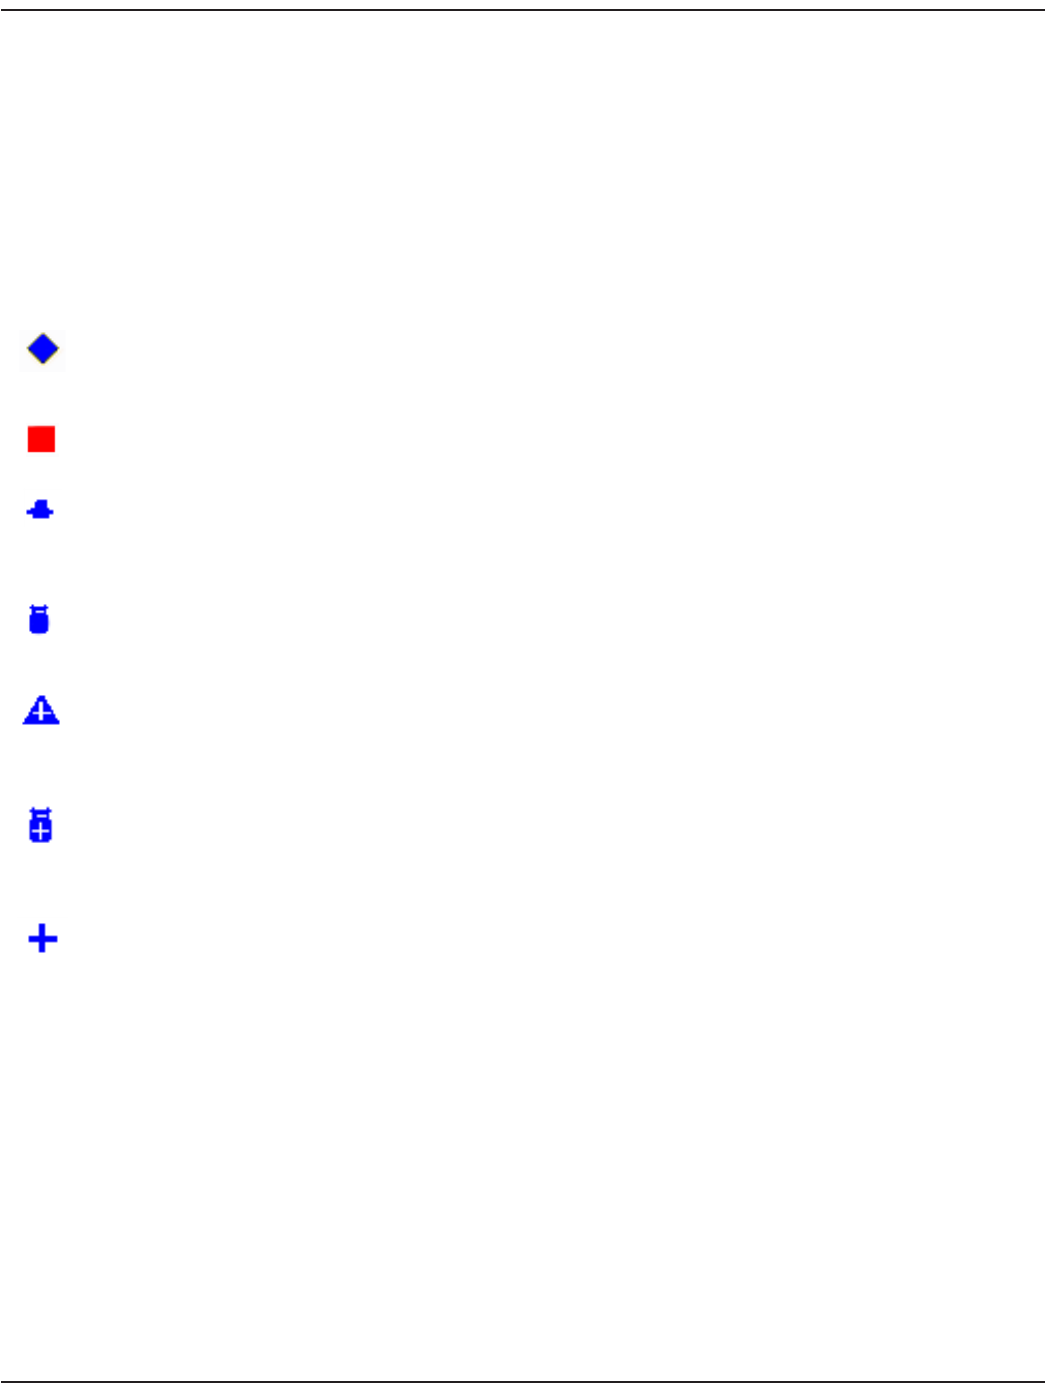
Unread ORION
Classic water or gas
endpoint
A blue diamond denotes a meter equipped with an ORION Classic water or gas endpoint
that does not have a current reading stored. If the vehicle does not drive close enough to
get a reading, the icon does not change.
Missed ORION
endpoint
A red square indicates the reading vehicle has passed through the entry/exit zones
without communication from the ORION endpoint.
Unread ORION
Migratable water
endpoint
A blue meter symbol denotes a water meter equipped with an ORION Migratable
or Fixed Network (in mobile mode) water endpoint that does not have a current
reading stored. If the vehicle does not drive close enough to get a reading, the icon does
not change.
Unread ORION gas
endpoint
A blue gas meter icon denotes an ORION gas endpoint that does not have a current
reading stored. If the vehicle does not drive close enough to get a reading, the icon does
not change.
Unread ORION
Migratable water
endpoints with work
items pending
A blue triangle with a white plus (+) sign denotes a water meter equipped with an ORION
Migratable or Fixed Network (in mobile mode) water endpoint that does not have a
current reading stored and has additional work items assigned but not completed.
Unread ORION
Migratable gas
endpoint with work
items pending
A blue gas meter icon with a white plus (+) sign denotes an ORION Migratable or Fixed
Network (in mobile mode) gas endpoint that does not have a current reading stored and
has additional work items assigned but not completed.
ORION Migratable
water or gas
endpoint with
reading – work items
pending
A blue plus (+) sign denotes an ORION Migratable or Fixed Network (in mobile mode)
water or gas endpoint with a current reading but work items that were assigned are
missing or incomplete. To see the progress of the work items, click Details next to the
account line item in List View.
READING A ROUTE
Page 25 August 2014 ORION® Meter Reading System (ORS)
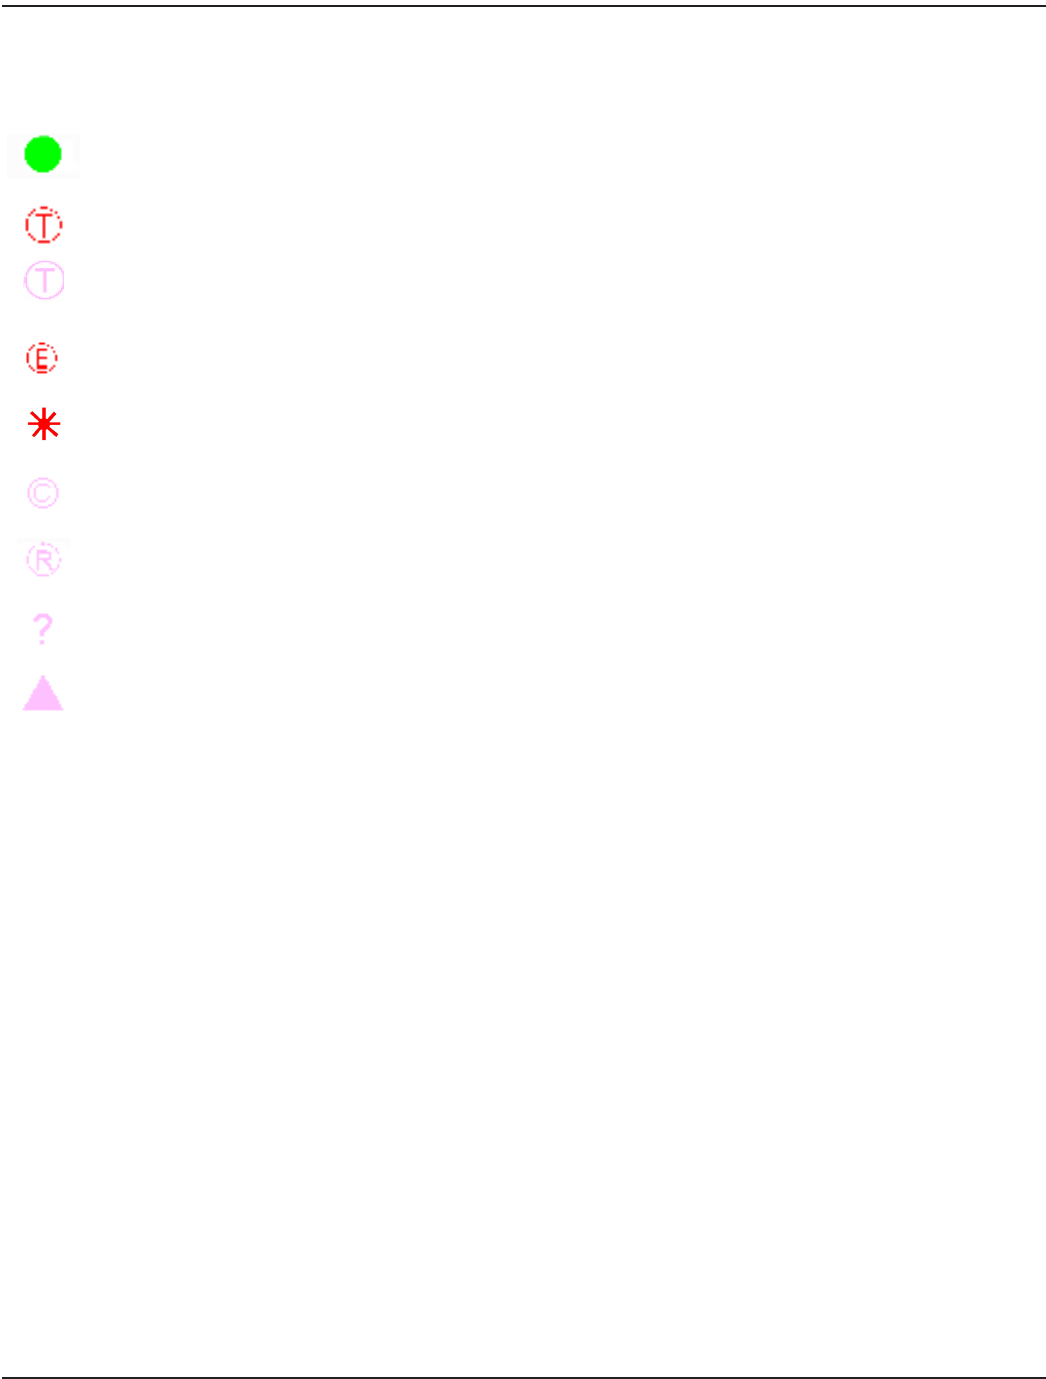
Status Icons
The following icons denote the status of a meter. They are used for all ORION water and gas endpoints.
Read A green circle displays when the meter reading, and work items, if applicable, are received
and no problems were reported.
Tamper A red letter “T” inside a red circle indicates a potential tamper situation where the meter is
not working. For example, a cut wire.
A pink letter “T” inside a pink circle also indicates a potential tamper situation where the
meter is still working. For example, the meter cover is removed or low battery.
Encoder Error A red letter "E" inside a red circle is used for meters equipped with encoders to indicate a
reading cannot be obtained.
Potential Leak A red starburst indicates a meter has shown continuous usage over the past 24-hour period,
which indicates a potential leak.
No Usage A pink letter "C" inside a pink circle displays when the meter has not registered water usage
for 30 days.
Reverse Flow A pink letter "R" inside a pink circle is used for meters equipped with an encoder when the
current reading is lower than the previous reading.
Out of Route A pink question mark indicates a reading has been received from an endpoint that was not
part of the route file loaded to the laptop.
Unread Manual A pink triangle denotes an unread meter equipped with technologies other than ORION
that must be read manually.
Automatically Removing Meters After Reading
To remove successfully read meters from the screen automatically, change the map settings by following these steps.
1. Click Settings on the main tool bar.
2. Click the Map tab.
3. Check the box labeled Remove Normal Read Services from Map.
Result: The meter icon will disappear from the map as it is read instead of displaying a green circle.
OTE:N For additional settings that control the map functions and display, refer to "Map Tab" on page 42.
READING A ROUTE
Page 26 August 2014ORION® Meter Reading System (ORS)
SERVICE DETAILS
The Service Details screen displays all of the information stored in ORS for each account. You can view the details for the
customer, enter codes, messages and manual meter readings. You can also access the two-way communication functionality
for ORION Migratable and Fixed Network (in mobile mode) endpoints.
Access the Service Details screen by clicking the Details button next to the account line item in List View.
OTE:N The Service Details screen is also available when performing a Quick Read.
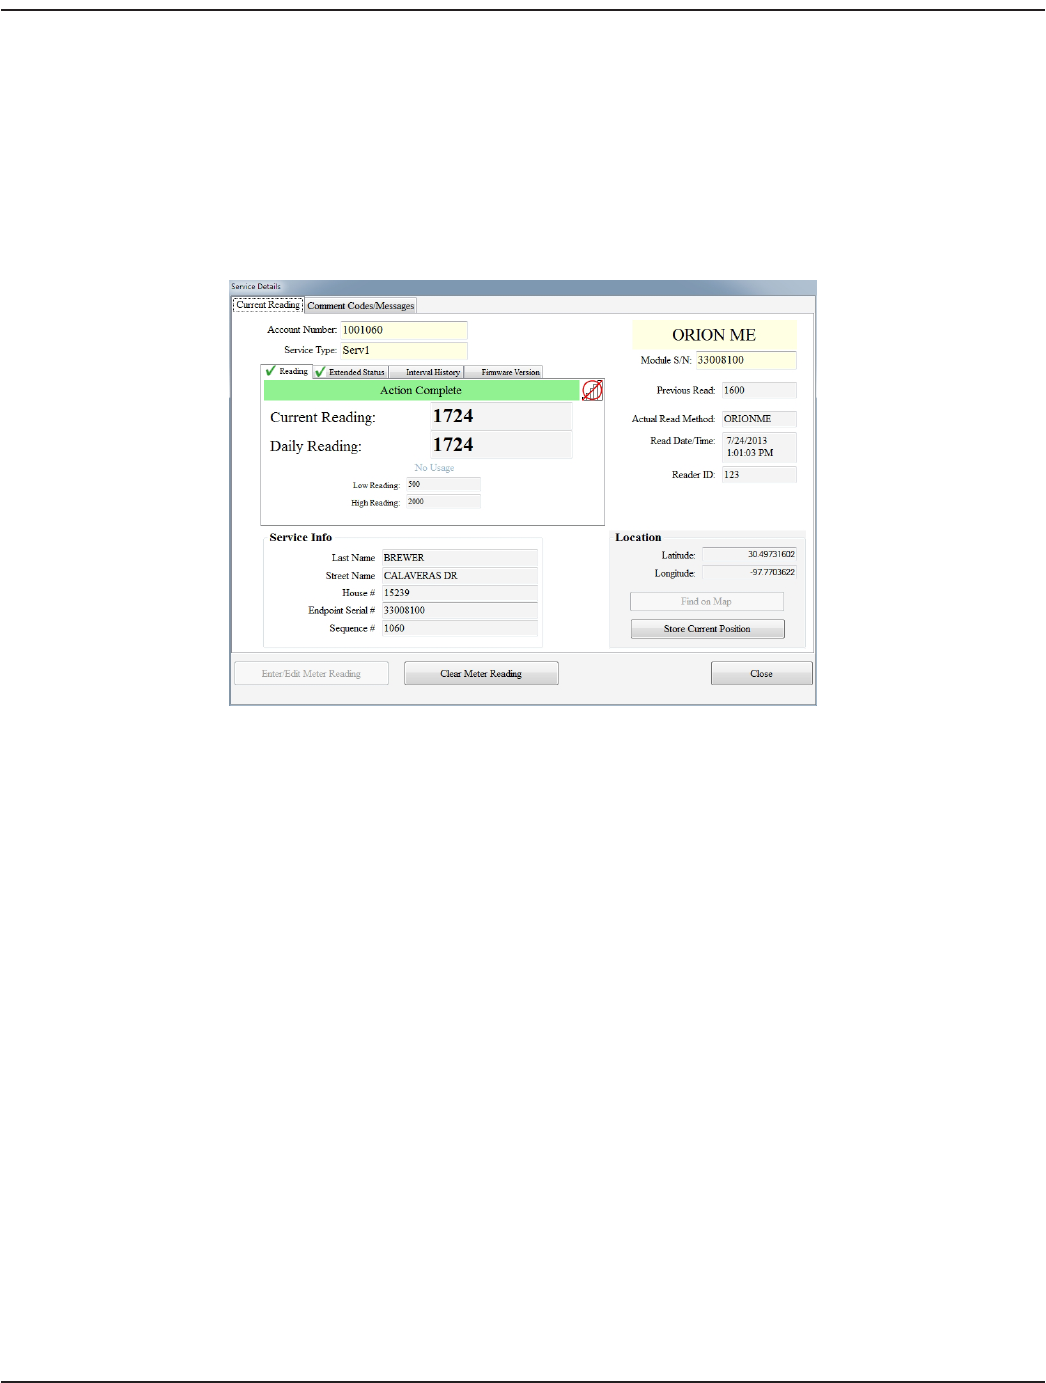
The Service Details screen has two tabs: Current Reading and Comment Codes/Messages.
Figure 26: Service Details screen – Reading from ORION ME endpoint
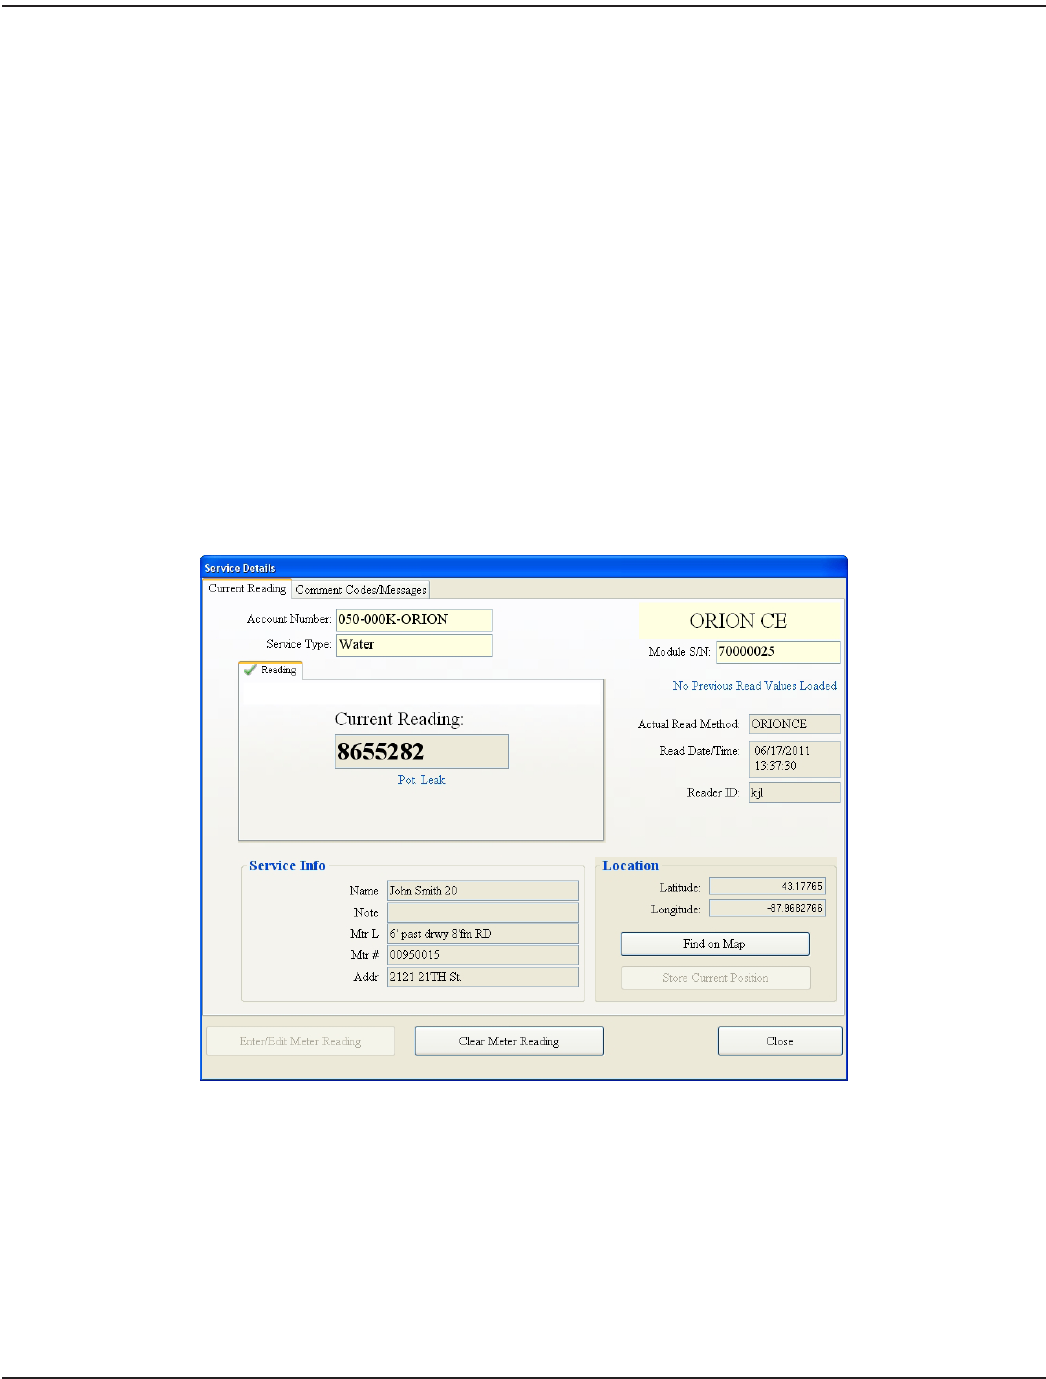
Current Reading
The Current Reading tab of the Service Details screen displays the current meter reading, date and time along with meter
information from the reading data management software. The type of endpoint technology is displayed in the upper right
corner of the screen.
Account Number Indicates the account number from the reading data management software.
Service Type Describes the service type being measured by the meter, such as water, electric, gas, etc.
Module S/N The serial number of the ORION endpoint assigned to the meter. The serial number allows ORS
to uniquely identify each meter. The serial number is sent from the reading data management
software and is cannot be changed.
The Actual Read Method, Read Date/Time and Reader ID are displayed below the Module S/N.
Current Reading The current reading value is displayed in this field. If the meter is a gas meter, the index value
displays instead of the subcount.
• Unread If the meter is not read, the word “Unread” appears in the reading field.
• Low Reading If the current reading is lower than this value, it will be considered low.
“Low Read” displays below the reading.
• High Reading If the current reading is higher than this value, it will be considered high.
“High Read” displays below the reading.
• Potential Leak If the ORION endpoint detects a potential water leak, “Pot. Leak” displays
below the reading. See Figure 27 on the next page.
SERVICE DETAILS
Page 27 August 2014 ORION® Meter Reading System (ORS)
Daily Reading The time-synchronized daily read that displays below the Current Reading for ORION
Migratable endpoints.
Service Info Includes customer name, address and the meter serial number downloaded to ORS from the
reading data management software. During Quick Read, these fields are blank unless the account
is part of the route load file.
Location Latitude displays the GPS latitude as a decimal number. Longitude displays the GPS longitude as a
decimal number.
Find on Map Finds the location of the endpoint on the map if the account has a lat/long.
Store Current Position Stores the current vehicle location as the location for the meter. Click the button to store the
lat/long manually for that account.
Enter/Edit Meter
Reading
Enter or change meter readings manually. This button does not display when the Clear Meter
Reading button is active.
Clear Meter Reading Erases the current meter reading. This button does not display when the Enter/Edit Meter
Reading button is active.
Close Exit the Service Details screen.
Figure 27: ORION endpoint reporting leak
The screen in Figure 27 shows an example of a meter reporting a potential leak. If the meter were to report a tamper, the
words “Pot. Leak” (below the Current Reading field) would be replaced with the word “TAMPER.” The Current Reading field
would also show TAMPER with no reading but could be manually overwritten using the Enter/Edit Meter Reading button
which is grayed out in Figure 27.
ORION ME Service Details
The ORION Migratable or Fixed Network (in mobile mode) endpoints provide advanced functionality. In addition to the
Current Reading information described above, the Service Details screen displays three more tabs with features that
are available when reading meters with ORION Migratable or Fixed Network (in mobile mode) endpoints. See "Two-Way
Communications" on page 57 for more information.
SERVICE DETAILS
Page 28 August 2014ORION® Meter Reading System (ORS)
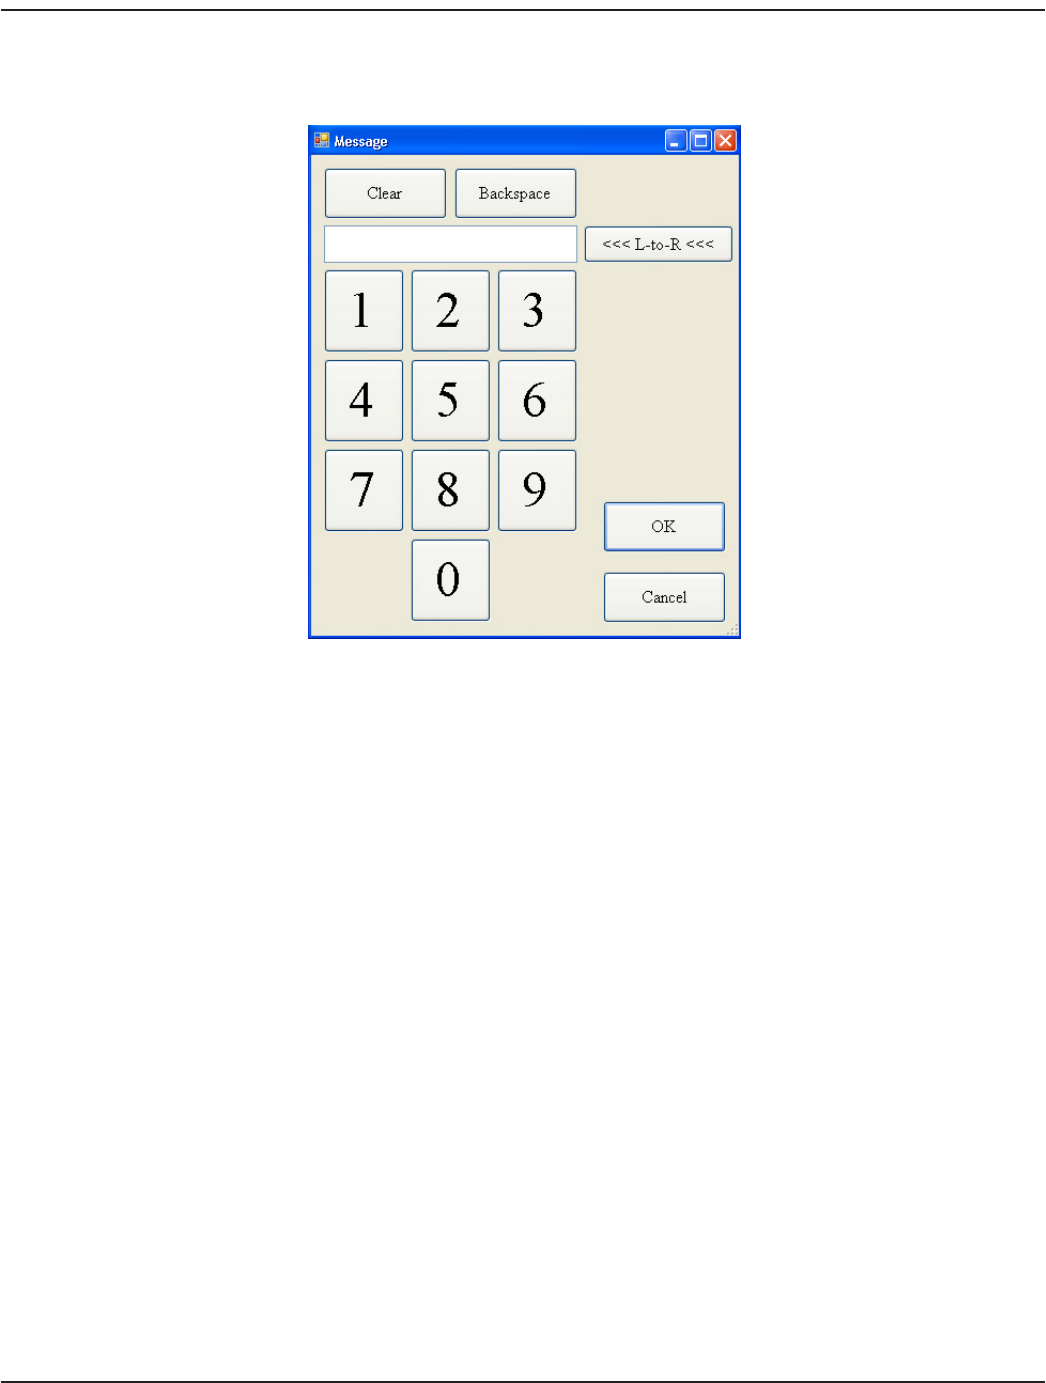
Enter/Edit Meter Reading
Use the Enter/Edit Meter Reading button on the Service Details screen to manually overwrite a meter reading.
Figure 28: Keypad for meter reading entry
To enter a reading manually, follow these steps.
1. Click the Enter/Edit Meter Reading button on the Service Details screen.
2. Manually enter a meter reading using the touch screen keypad or type the reading on the laptop keyboard.
3. If the meter reading dials are set from right to left, click the <<<L-to-R>>> button. Clicking the button resets the
option to R-to-L.
4. Click OK to enter the reading or Cancel to exit the touch screen keypad.
OTE:N If a tamper report is received from a meter and a manual reading for that meter is entered, the reading
information relayed to the reading data management software will include both the manual reading and the
reported tamper condition.
SERVICE DETAILS
Page 29 August 2014 ORION® Meter Reading System (ORS)
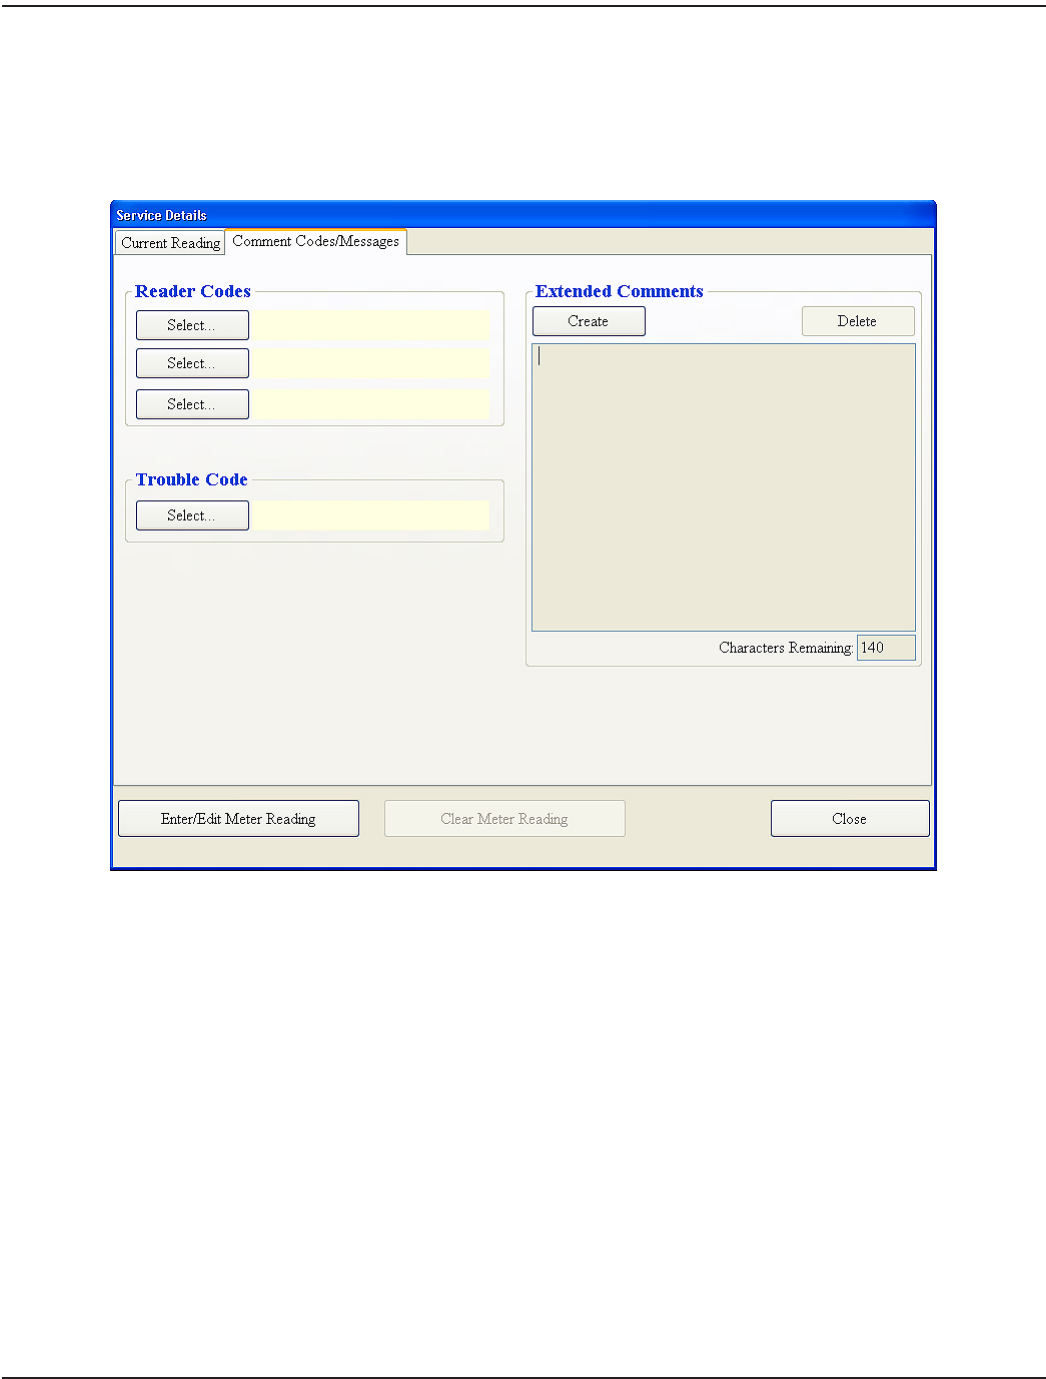
Comment Codes/Messages
The second tab of the Service Details screen is Comment Codes/Messages. This tab displays any codes or messages relating
to a meter. The codes are pre-defined by the reading data management software operator. Reader Codes, Trouble Codes and
Comments recorded by the meter reader are sent to the reading data management software operator and cleared at the
process of the next billing cycle.
Figure 29: Service Details screen - Comment Codes/Messages
Reader Codes Values the meter reader can choose about a specific meter. See "Choosing Reader Codes" on page
31 for more information.
Trouble Codes Values the meter reader can choose for problems related to a specific meter. See "Choosing a
Trouble Code" on page 32 for more information.
Extended
Comments
Field in which the meter reader can create a free-form message for the account. The limit to the
number of characters in this field is displayed by an automated Characters Remaining monitor.
See "Create/Edit/Delete Extended Comments" on page 33 for more information.
SERVICE DETAILS
Page 30 August 2014ORION® Meter Reading System (ORS)
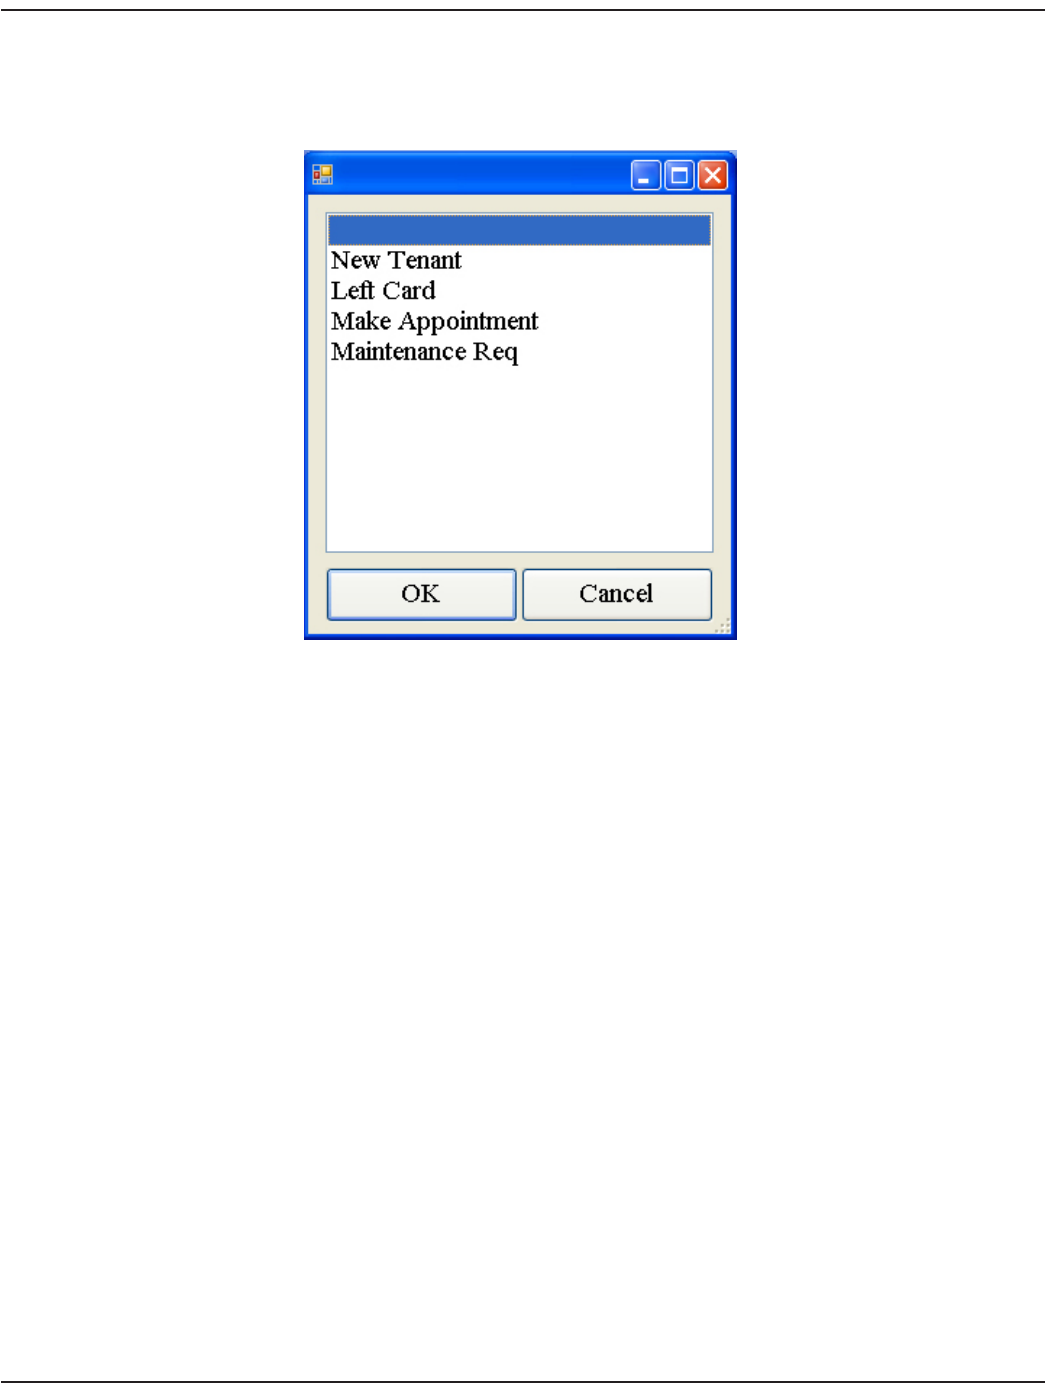
Choosing Reader Codes
Reader Codes are used to report non-trouble information about a meter, such as a name change or appointment. Reader
Codes are defined in the reading data management software and downloaded to ORS.
Figure 30: Reader Codes
1. With the Comment Codes/Messages tab selected on the Service Details screen, click one of the Select buttons
under Reader Codes.
2. Click the appropriate code and then click OK.
Result: The code becomes part of the information ORS collects from the Service Details screen for the account.
3. If you want to select another Reader Code, repeat steps 1 and 2. Up to three Reader Codes can be selected for each
customer record.
4. To remove a Reader Code, click Cancel.
OTE:N When readings are sent back to the reading data management software, reports of meters with these codes can
be generated.
SERVICE DETAILS
Page 31 August 2014 ORION® Meter Reading System (ORS)
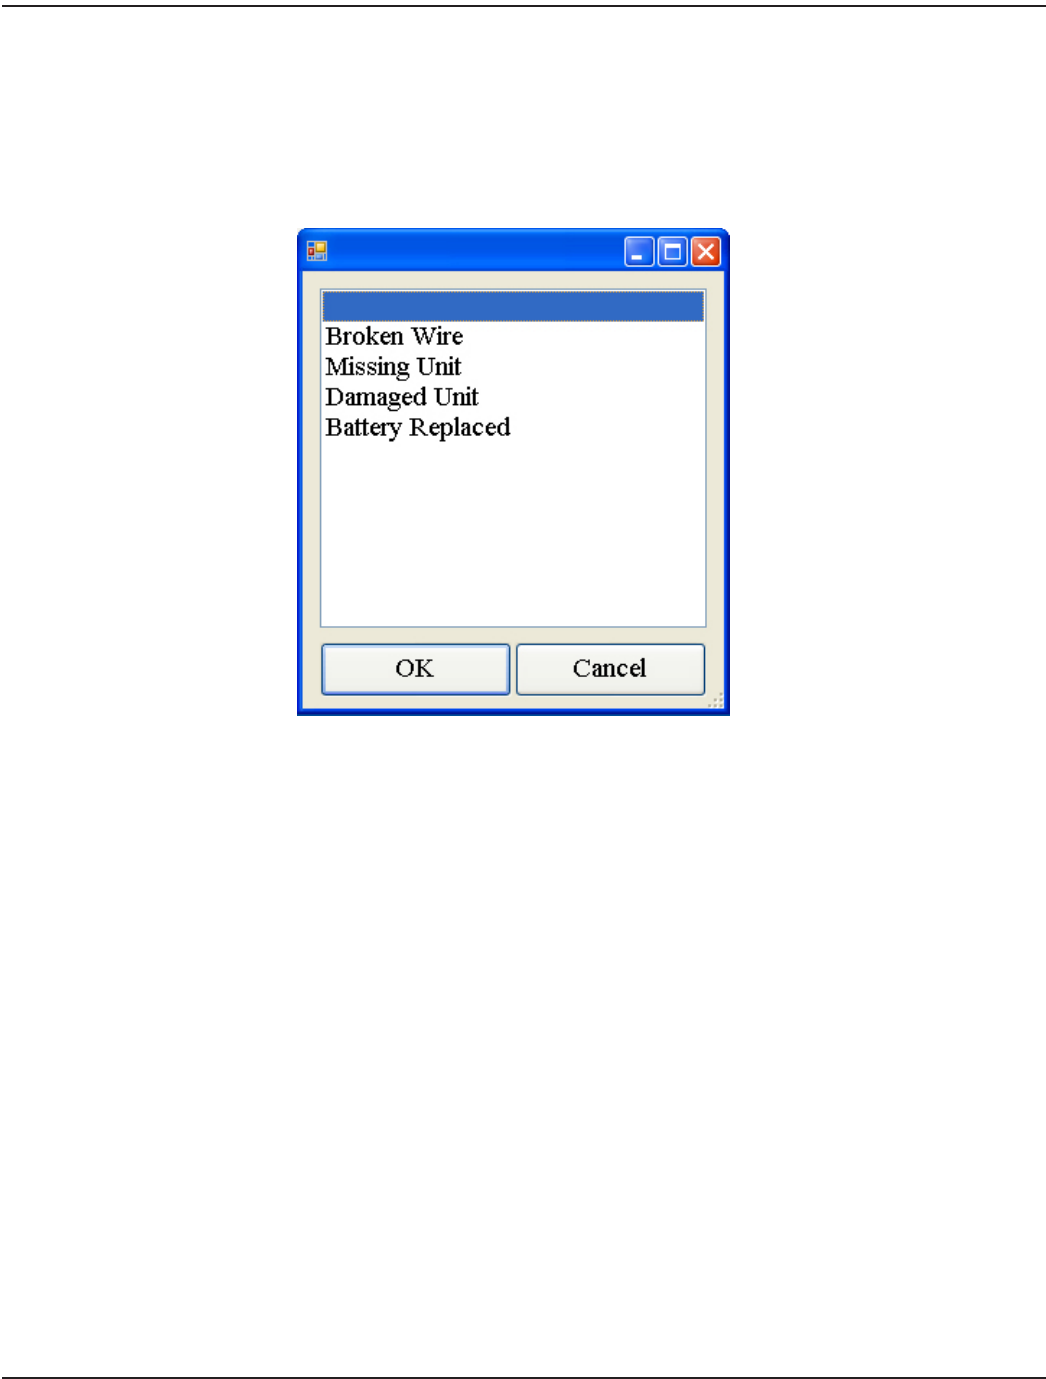
Choosing a Trouble Code
A Trouble Code is used to report a meter problem to the utility office. Trouble Codes are defined in the reading data
management software and downloaded to ORS.
1. With the Comment Codes/Messages tab selected on the Service Details screen, click the Select button under
Trouble Code.
2. Click the appropriate Trouble Code and click OK.
Figure 31: Trouble Codes
Result: The code becomes part of the information ORS collects from the Service Details screen for the account.
3. If a Trouble Code is entered and you wish to change it, select another code or click Cancel to remove the code.
SERVICE DETAILS
Page 32 August 2014ORION® Meter Reading System (ORS)
Create/Edit/Delete Extended Comments
The Extended Comments option allows users to create text messages for the utility or notes that can be used later when
reporting issues to Technical Support.
Figure 32: Extended Comments field
Create Comments
1. With the Comment Codes/Messages tab selected on the Service Details screen, select Create to activate the Extended
Comments text box.
2. Use the laptop keyboard to type your message.
OTE:N Text messages up to a maximum of 140 characters can be sent back to the utility.
3. Select Close to save your message when it is complete.
Result: The message becomes part of the information ORS collects from the Service Details screen for the account.
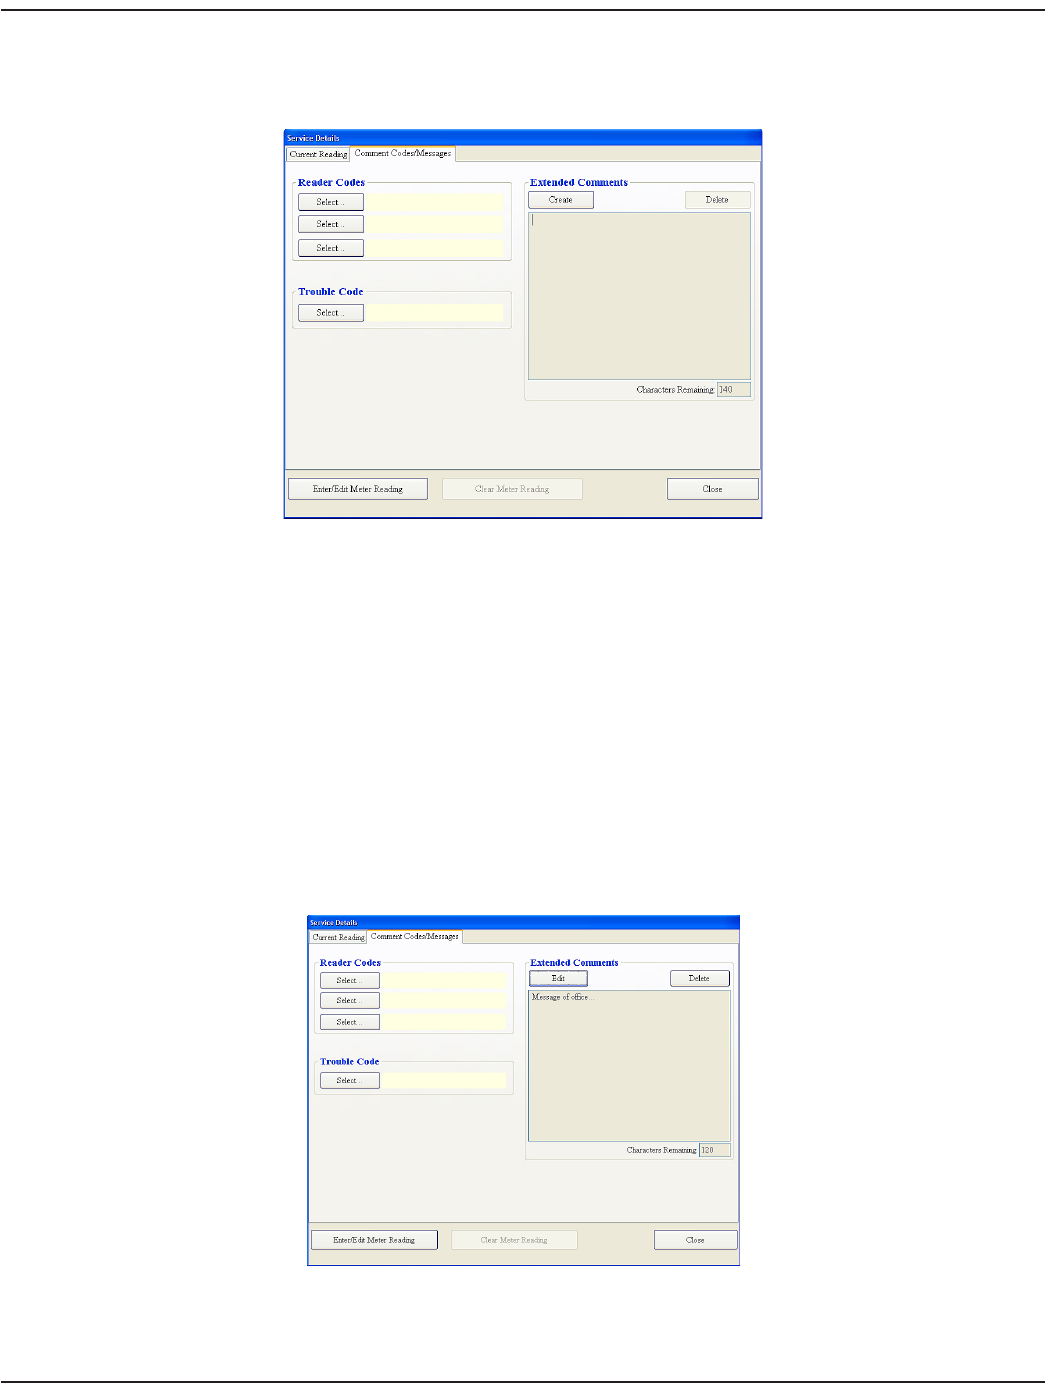
Edit Comments
1. In List View, select the Details button to display the Service Details screen for the account with the comment you
wish to edit.
2. Select the Comment Codes/Messages tab.
Result: The previously created message displays in the Extended Comments field.
Figure 33: Extended Comments eld with comment
3. Click the Edit button to activate the text box and type any changes using the laptop keyboard.
SERVICE DETAILS
Page 33 August 2014 ORION® Meter Reading System (ORS)
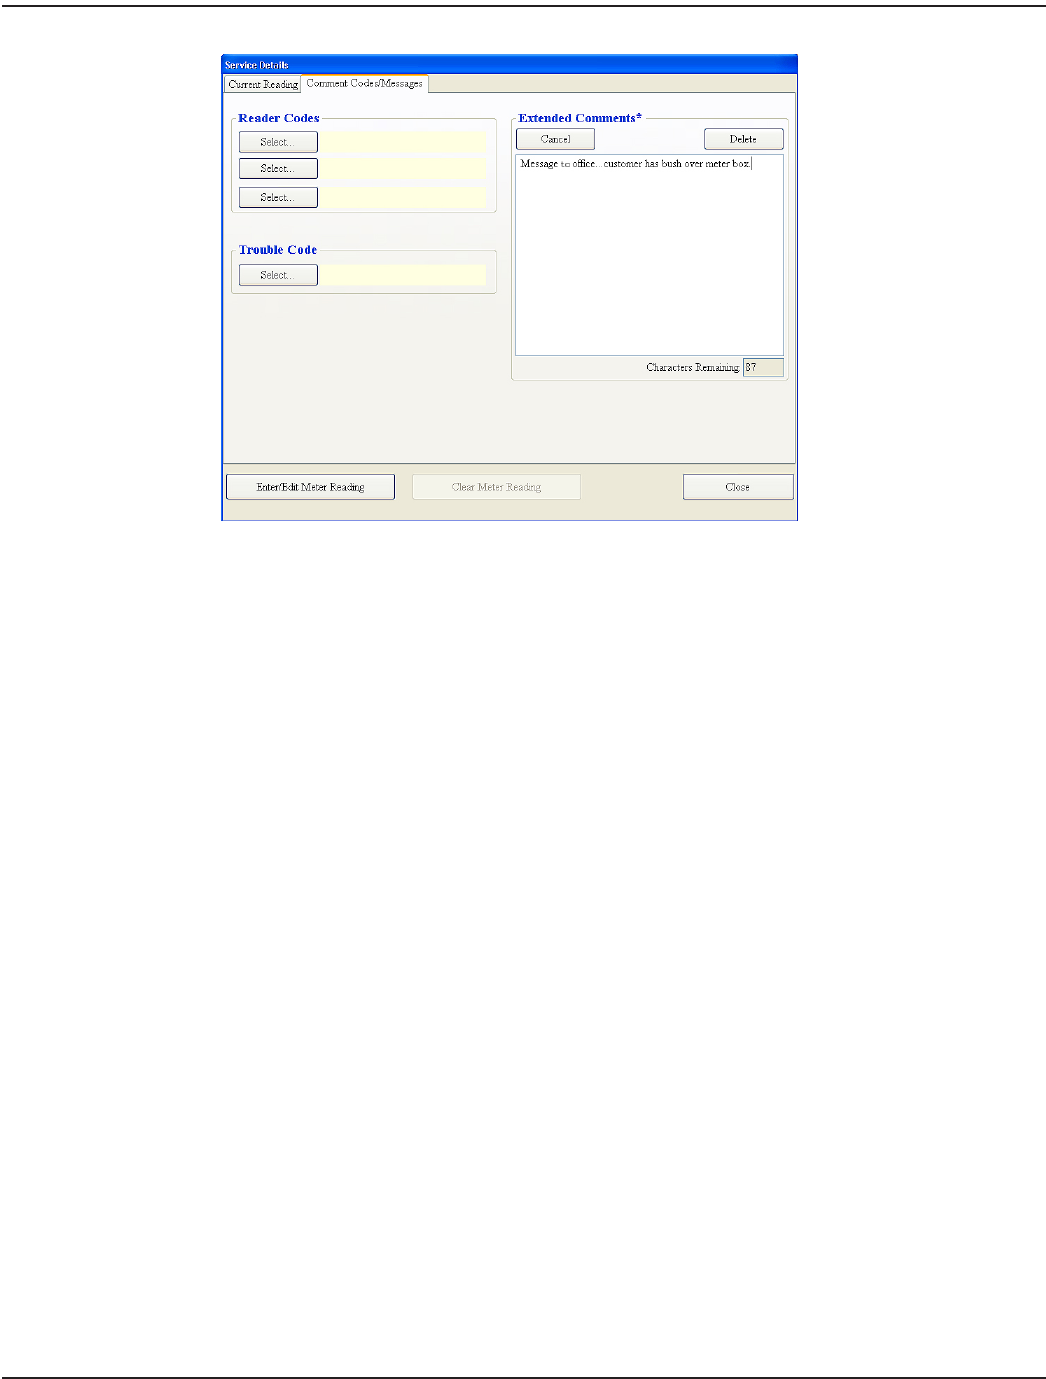
Figure 34: Extended Comments Field with Edited Message
4. Select Close to save the message when you are nished editing. The message stays with the account. If you want to
remove the entire message without saving, select Cancel.
OTE:N If you select Create or Edit and start typing a message, an asterisk (*) appears after the Extended Comments field
heading to indicate the message has not yet been saved (Figure 34).
Delete Comments
1. In List View, select the Details button to display the Service Details for the account with the comment you wish
to delete.
2. Select the Comment Codes/Messages tab.
Result: The previously created message displays in the Extended Comments field.
3. Click the Delete button to remove the previously saved message from the account.
SERVICE DETAILS
Page 34 August 2014ORION® Meter Reading System (ORS)

UNLOADING A ROUTE
After the route is read, the Unload option is used to write the meter data to a memory stick for transfer to the reading data
management software, and to archive the data in ORS in case the memory stick is misplaced or destroyed before the billing
cycle is complete.
1. Insert the memory stick into an available USB port on the Toughbook laptop computer.
2. Click the Unload button on the main menu.
Figure 35: Main menu - Unload
Result: The Select Folder screen opens.
OTE:N If you are using the memory stick from which the route was loaded, the Select Folder location window
defaults to the location from which the last route files were retrieved.
3. Select the folder where the meter readings should be stored.
4. Click the Select button.
Result: The route data automatically unloads to the le location you selected and the Main screen reappears.
5. Safely remove the memory stick after the route unload is complete.
6. Return the memory stick to the reading data management software operator.
OTE:N If you do not want to unload the route, select Exit on the main menu.
CLEARING A ROUTE
The Clear option on the main menu deletes all meter account data that was collected for the route. If you select Clear, ORS
prompts you to confirm: “Are you sure you want to clear the currently loaded route--any and all reads will be lost.” Select OK to
clear the reading information. Select Cancel if you do not want to clear the route.
OTE:N Cleared routes CANNOT be recovered.
Figure 36: Clear confirmation
UNLOADING A ROUTE
Page 35 August 2014 ORION® Meter Reading System (ORS)

QUICK READ
The Quick Read option on the main menu allows you to read an ORION unit without having a route loaded. This option is
handy when you want to verify that a unit is operating correctly or if you want to collect a reading and status of a unit without
loading a route.
OTE:N Readings from the Quick Read option are not stored and cannot be transferred to the reading data
management software.
Enter an endpoint serial number to get a quick read of one endpoint. If a serial number is not entered, readings are displayed
for all active ORION meters in range. This screen also verifies proper ORION endpoint installation and can be used to obtain
final meter reads.
Total Read Count Displays the total number of reads. One endpoint may read multiple times during Quick Read.
Distinct Read Count Displays the total number of endpoints read during Quick Read.
Performing a Quick Read
1. Verify the ORION mobile transceiver and/or receiver are connected and turned on, and the antenna is in place. See
"Vehicle and Laptop Setup with ORION FHSS Mobile Transceiver Only" on page 9 if you need help.
2. Select the Quick Read button on the main menu. See Figure 35 on the previous page.
Result: The Quick Read screen opens. (Figure 37).
Figure 37: Quick Read screen
3. To begin a Quick Read, click one or more buttons for the desired AMR To Listen For. In this example, the ORION ME
button is selected.
Result: Quick Reads from meters with the selected AMR To Listen For within range of the mobile transceiver and/or receiver
are displayed (Figure 38).
QUICK READ
Page 36 August 2014ORION® Meter Reading System (ORS)
4. Readings will auto scroll as additional readings are received. To stop the auto scroll and pause the screen, click the
AMR To Listen For button again. Then move the scroll bar up or down to view the readings.
Figure 38: Quick Read results
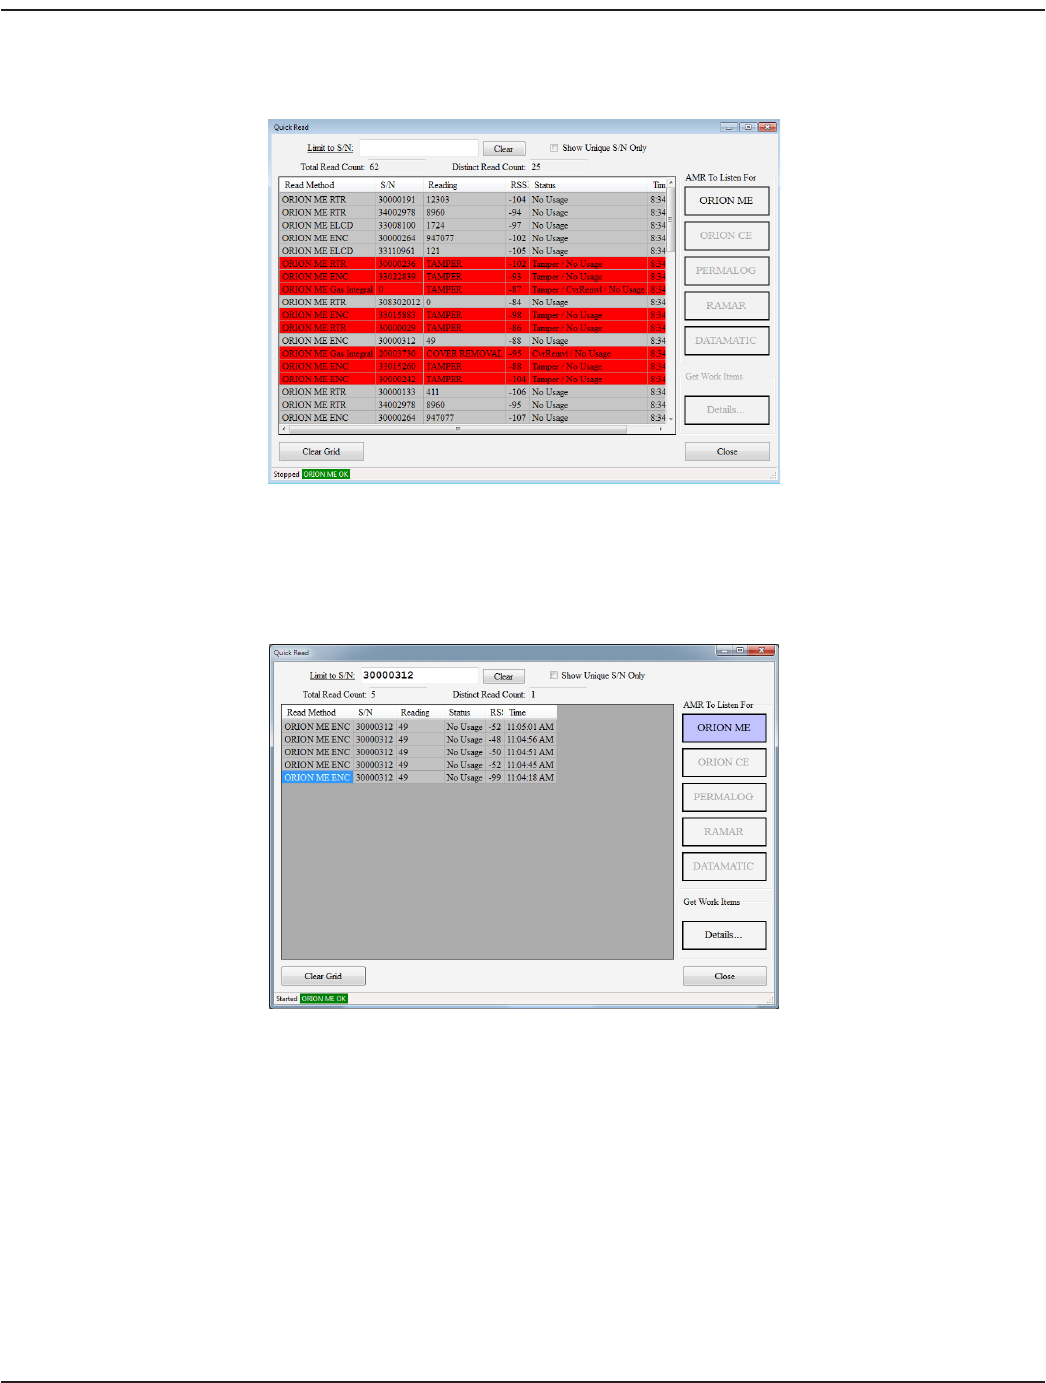
5. Click the ORION ME button again to continue the Quick Read or click the Clear Grid button to clear the list.
6. To read a specic meter, key the endpoint serial number in the Limit to S/N eld and click the appropriate AMR To
Listen For button for that endpoint.
Figure 39: Single endpoint Quick Read
7. When a single ORION ME endpoint is selected, work items become available.
Click the Details... button under Get Work Items to see the Service Details screen for selecting work items. For
complete information on work items, refer to "Two-Way Communications" on page 57.
OTE:N Interval profile data collected as part of a Quick Read is saved as either an .xml or .csv file. The file is sent back
to the reading data management software operator with the route unload file. See "Historical Interval File
Type" on page 60 for complete information.
8. To end Quick Read, click Close.
QUICK READ
Page 37 August 2014 ORION® Meter Reading System (ORS)

SETTINGS
The Settings option on the main tool bar allows you to change the settings used by the software in its operations.
Figure 40: Main tool bar with Settings option
OTE:N A password is required to access and change the information on the Settings screen. See the Settings description at
"Tool Bar" on page 15 for more information.
When you click the Settings option on the main tool bar and enter the password, the Settings screen opens. The Settings
screen has the following five tabs.
• General
• Alerts
• Map
• Communications
• User Interface
MPORTANTI
When using an ORION mobile transceiver, always perform the steps below, in order, before you access settings:
1. Connect the mobile transceiver to the USB port on the laptop. Connect it to the same USB port each time, if possible.
2. Power on the mobile transceiver.
If you access Settings without having the mobile transceiver attached and powered on, or you perform the steps in reverse
order, the COM port setting may be lost and would need to be reset. Refer to "Communications Tab" on page 44.
SETTINGS
Page 38 August 2014ORION® Meter Reading System (ORS)
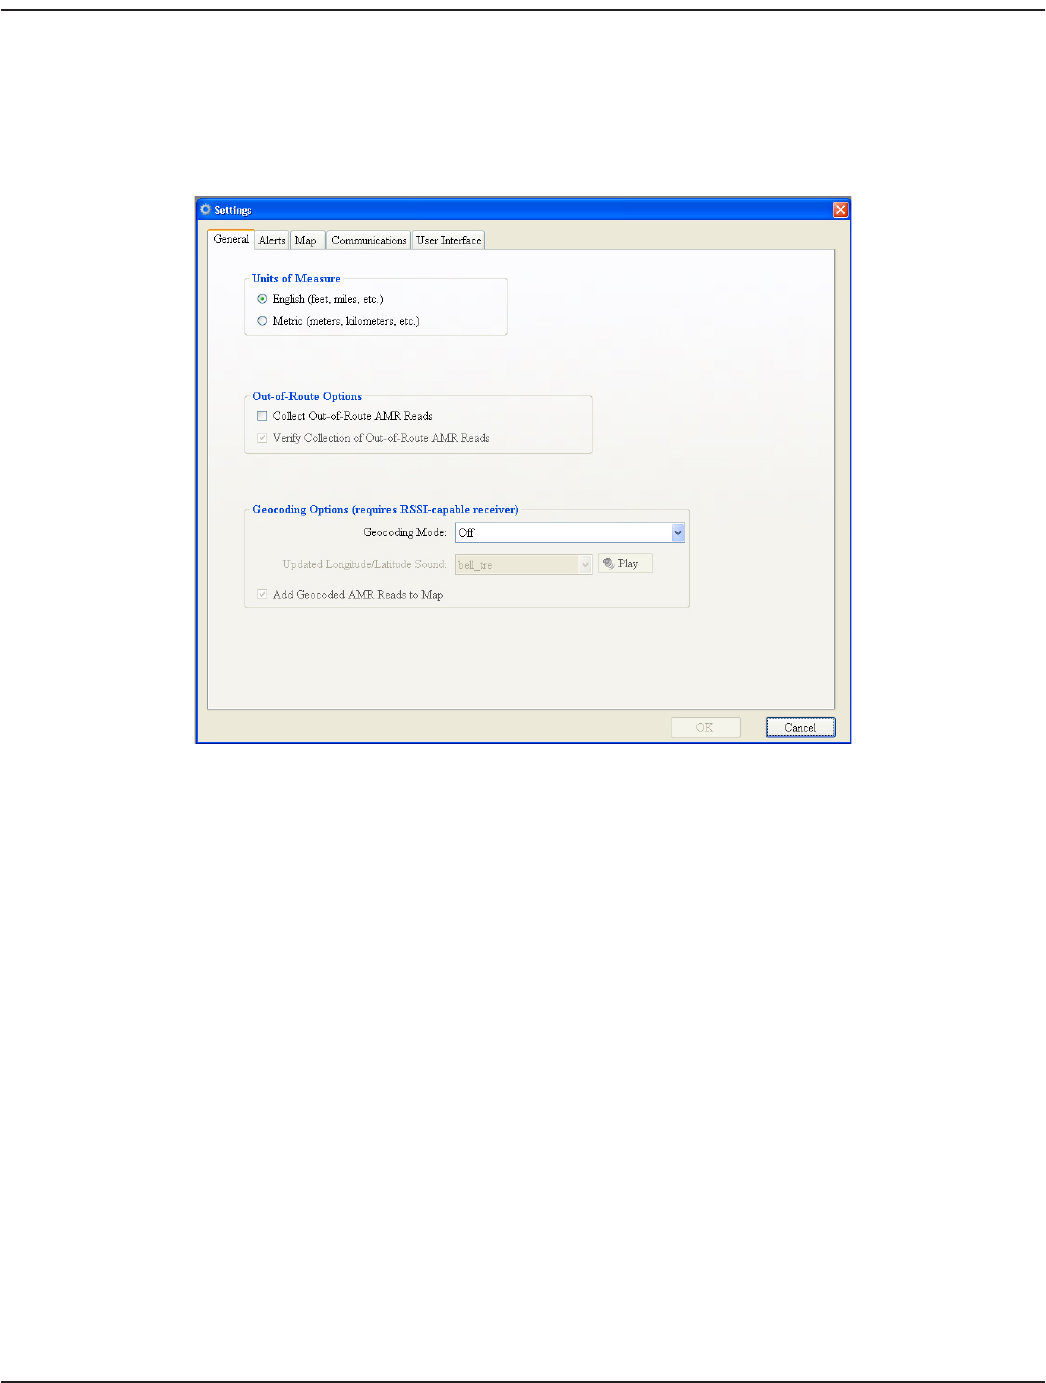
General Tab
The General tab displays the Units of Measure, Out-of-Route Options and Geocoding Options.
When finished making changes to the settings on this screen, select OK and return to the reading cycle. Select Cancel to
disregard any changes and return to the main menu.
Figure 41: Settings screen - General tab
Units of Measure Select English or Metric units for entry and exit zone values.
Out-of-Route
Options
• Collect Out-of-Route AMR Reads: Check this box to read meters not loaded into the current
route. See "Out-Of-Route Reads" on page 47 for details.
• Verify Collection of Out-of-Route AMR Reads: Check this box to send out-of-route readings
back to reading data management.
OTE:N When collecting out-of-route readings, the unload file can become large and may slow
down the performance of the laptop. Badger Meter does not recommend collecting
out-of-route readings during regular meter reading.
Geocoding
Options
• Geocoding Mode: Select from the drop-down menu to turn geocoding On or Off.
If Geocoding Mode is On (and you have an RSSI transceiver/receiver), the software stores the
vehicle latitude and longitude coordinates for the meter's location where the strongest signal is
received. See "Geocoding Meter Locations" on page 48 for additional information.
• Update Latitude/Longitude Sound: An alert may be added so you can recognize when
geocoding is active. Choose a sound from the drop-down menu in this field. Click Play to
preview the sound.
• Add Geocoded AMR Reads to Map: Check this box so geocoded endpoints display as icons on
the map. This check box is not accessible if Geocoding Mode is Off.
SETTINGS
Page 39 August 2014 ORION® Meter Reading System (ORS)
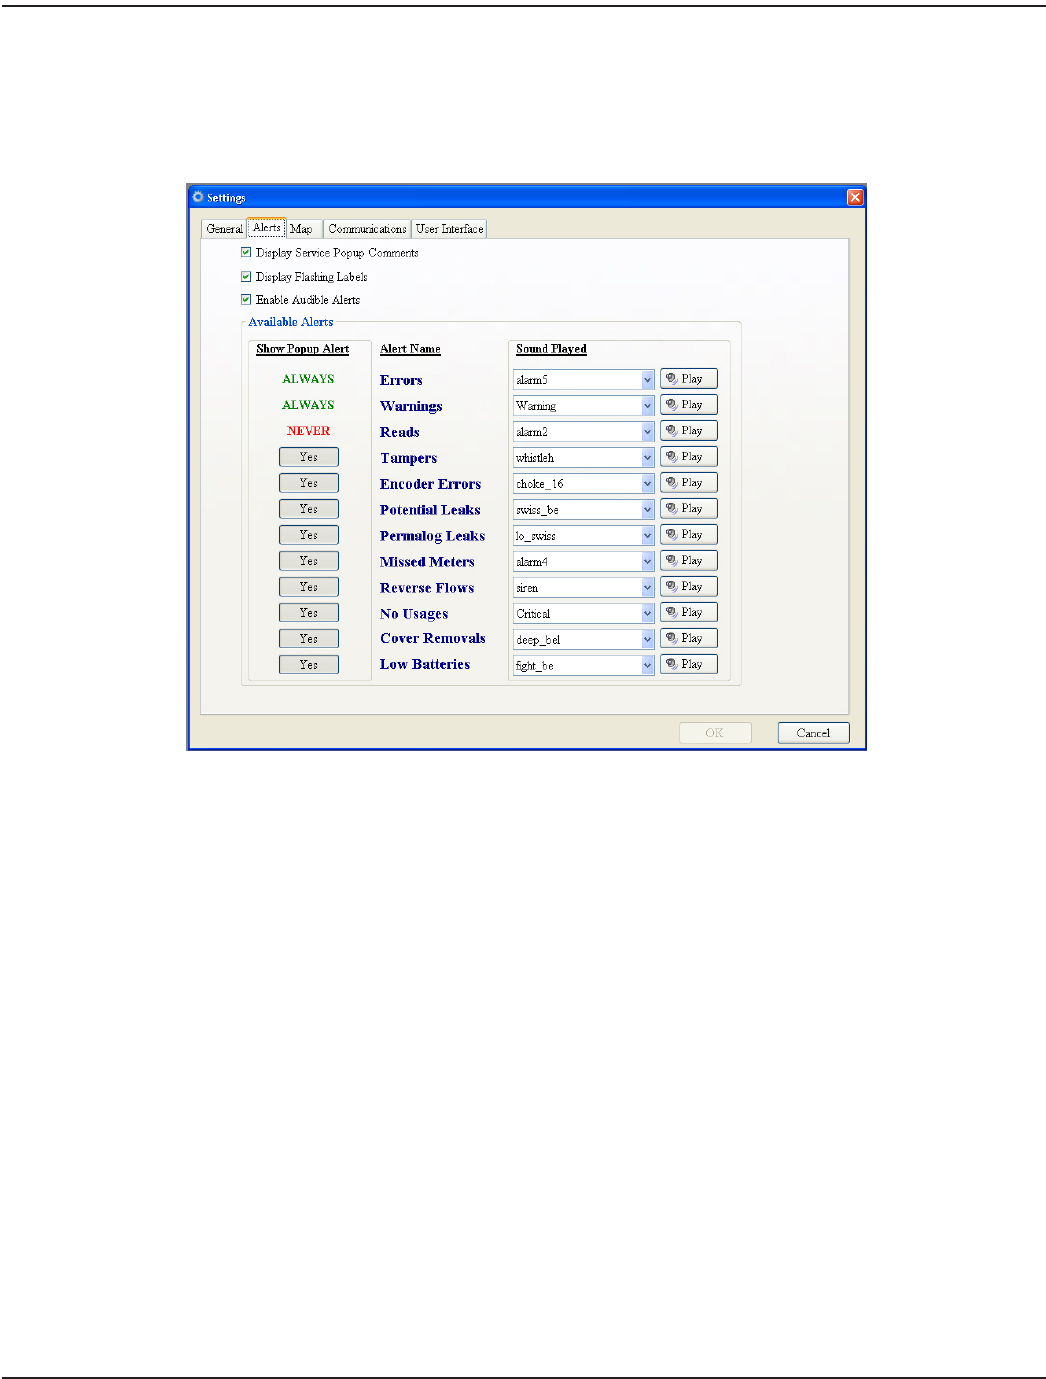
Alerts Tab
The Alerts tab is used to set sounds and popups as audible and visual alerts for issues that occur during a route reading.
When finished making changes to the settings on this screen, select OK and return to the reading cycle. Select Cancel to
disregard any changes and return to the main menu.
Figure 42: Settings screen - Alerts tab
OTE:N The sounds and popup alerts are pre-set. Badger Meter recommends keeping the pre-set alerts until the user
determines the best set up for an individual route.
Display Service Popup
Comments
Comments display when the vehicle is within reading range of a meter. Comments are
created by the reading data management software operator and passed to the meter reader.
Examples: seasonal, bad dog or shut off water
Display Flashing Labels GPS and/or ORION endpoint labels flash on the main reading screen in map view and on the
Quick Read screen when their radio signals are not functioning.
Enable Audible Alerts Alert sounds are heard as meter readings are received.
OTE:N If the Enable Audible Alerts box is not checked, NO sounds are heard for ANY alerts.
Show Popup Alert Popup alerts display based on the setting. ORS controls the settings for Errors, Warnings and
Reads. Popup alerts ALWAYS display for Errors and Warnings and NEVER display for Reads.
To choose the setting for all other alerts, click the button to select Yes or No.
Sound Played A unique sound plays for each alert. Choose from a drop-down menu of available sounds.
To hear the sound, click Play. If you do not want a sound to play for an alert, select the blank
space on the drop-down menu.
SETTINGS
Page 40 August 2014ORION® Meter Reading System (ORS)

Types of Alerts
Errors A reading error such as, ”Not Receiving GPS“ or ”Not Receiving ORION Signal.“
Warnings A software warning such as ”Invalid Com Port“ or ”GPS is not Active.“
Missed Meters When the latitudes and longitudes are set, an alert is triggered when the vehicle passes through the
entry and exit zones set for the meter without receiving a reading.
Reads An endpoint reading has been recorded.
Tampers Potential tamper situation.
Encoder Errors Reading cannot be obtained because the encoder is reporting an error.
Potential Leaks Continuous water usage for 24 hours, indicating a potential leak.
Permalog Leaks A potential water main leak when optional Permalog AMR/AMI acoustic leak loggers are installed.
Reverse Flows Endpoints connected to encoders have a current reading lower than the previous reading.
No Usages The meter has not registered water usage for 30 days.
Cover Removals Gas only: Alert is triggered when a cover is removed from an ORION Migratable or ORION Fixed
Network (in mobile mode) endpoint.
Low Batteries ORION Migratable or ORION Fixed Network (in mobile mode) gas or water endpoint battery life is low.
SETTINGS
Page 41 August 2014 ORION® Meter Reading System (ORS)
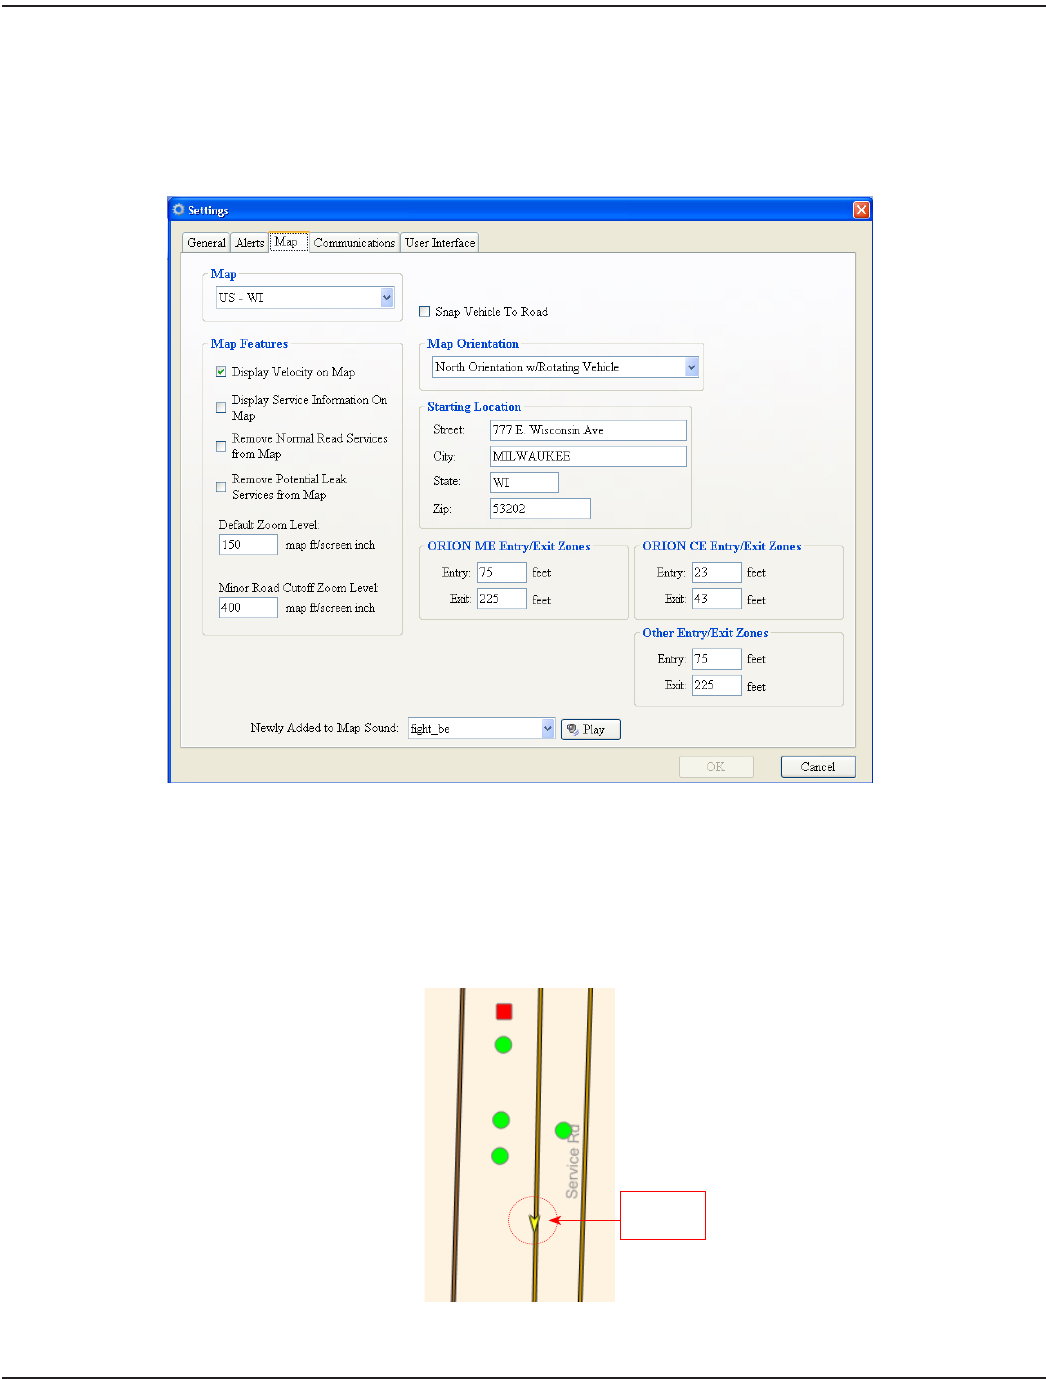
Map Tab
The Map tab primarily displays the settings for map location, features, orientation and entry/exit zones. Settings can be
customized based on user preferences.
When finished making changes to the settings on this screen, select OK and return to the reading cycle. Select Cancel to
disregard any changes and return to the main menu.
Figure 43: Settings screen - Map tab
Map The state name for the map loaded in ORS is displayed in the drop-down field at the top of the
screen. Click the drop-down menu to see any other state maps that may be available.
Snap Vehicle To Road The approximate location of the meter reading vehicle is displayed as a bright yellow icon on
the map (Figure 44) when geocoding is on. Checking this box “snaps” or moves the vehicle icon
to the most precise location, placing it on the road nearest its location.
Figure 44: Vehicle icon “snapped” to road
Vehicle on
the road
SETTINGS
Page 42 August 2014ORION® Meter Reading System (ORS)

Map Features
• Display Velocity On Map When Geocoding Mode is on, this feature displays the current vehicle speed. The
maximum speed for setting lat/longs is 15 mph. See "Geocoding Meter Locations" on page
48 for more information.
• Display Service
Information On Map
Displays an identifier for the account, such as the location or name, as determined by the
reading data management operator.
• Remove Normal Read
Services from Map
When a normal read is received, unread meter icons disappear from the screen rather
than changing to a green circle. This includes manual reads.
• Remove Potential Leak
Services from Map
Icons for potential leak situations will not display on the map.
• Default Zoom Level The number entered is used to set the zooming feature in Map View. The setting returns
to this zoom level when Zoom Default is selected using the Map Control buttons in Map
View. For additional information, refer to "Map Control" on page 24.
• Minor Road Cutoff
Zoom Level
The number entered is used to set the zooming level when major highways are shown
and minor road names drop off the map when Zoom Out is selected in Map View.
Map Orientation Choose how the map is displayed while reading meters by selecting from the drop-down menu.
Starting Location The address shown on the map until the GPS antenna reports the current location of the vehicle.
From then on, the map centers at the vehicle location. Location may also be displayed as latitude/
longitude (lat/long). The location can be manually changed by typing in new information.
OTE:N If ORS does not detect a starting location, it uses the last known valid address to ensure the
route maps display appropriately. An alert message displays when you start to read
the route.
Entry/Exit Zones These distances specify the entry and exit zone distances for determining when there is a missed
read. If the mobile transceiver/receiver passes through the entry/exit zone for an endpoint without
receiving a reading, ORS records a “MISSED” alert for the endpoint.
SETTINGS
Page 43 August 2014 ORION® Meter Reading System (ORS)